Spetz Specs No. 9775: step-by-step build guide
6x10 Lean-To Backyard Storage Shed
The complete step-by-step guide made from Everyday Shed's YouTube video, free on Spetz. For the video, a step-by-step player and answers to your questions, see the 6x10 Lean-To Backyard Storage Shed project page.
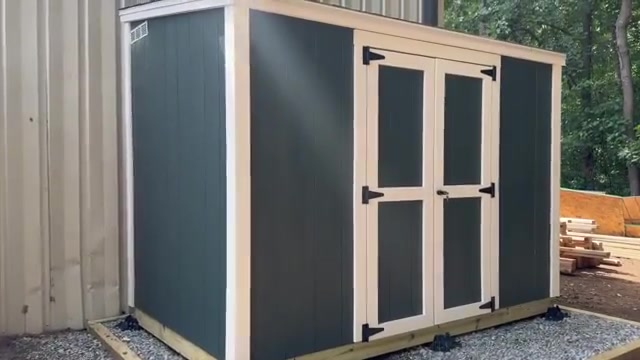
12 steps, 34 parts, 25 tools, 29 materials
Overview
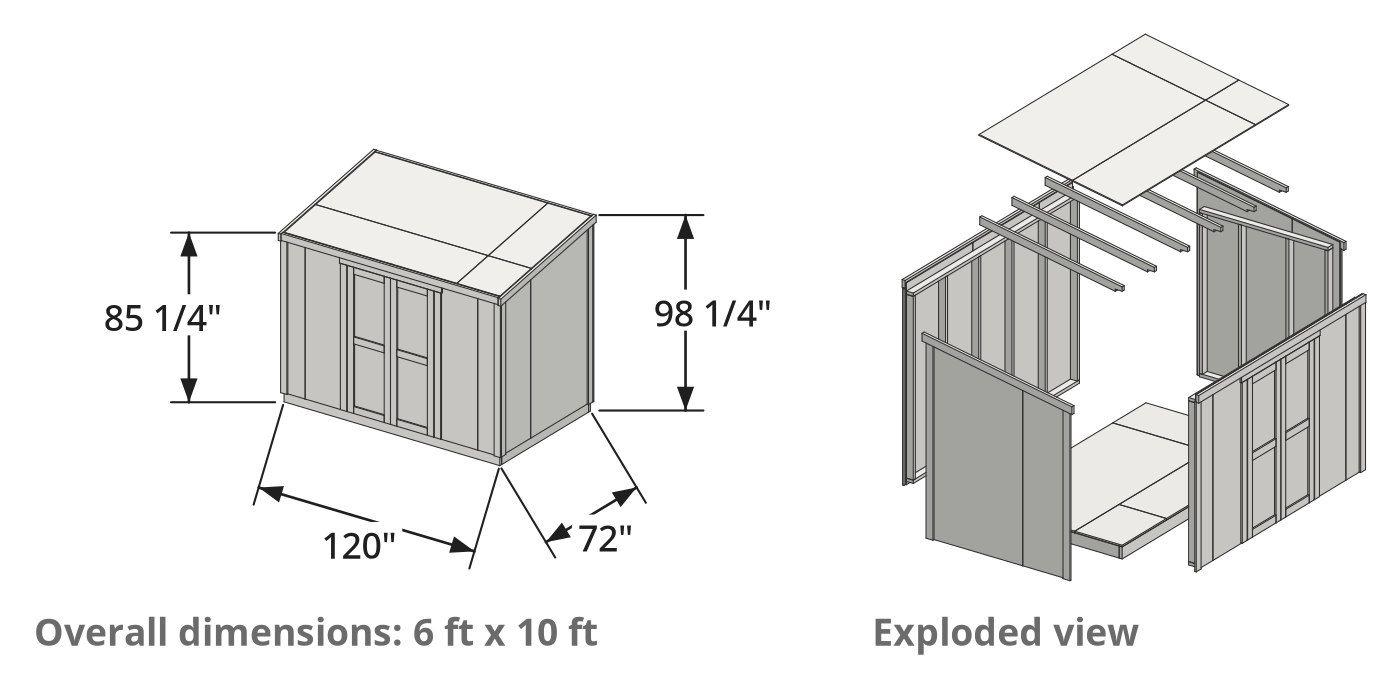
Finished size: 120 in W x 72 in D (10 ft x 6 ft)
What You're Building
- A 6 x 10 ft lean-to shed on concrete blocks.
- 2x4 walls 24 in on center: the back wall has 84 in studs (87 in tall with its plates), the front wall 73-1/2 in studs (76-1/2 in tall).
- LP SmartSide siding with a trimmed double door cut from the front panels.
- A 10° shingled roof on six rafters, with two wall vents.
Why This Design Works
- Each wall is sided and painted flat on the floor, then stood up.
- The doors are cut from the front siding, so they line up with the wall.
- Overhangs 1/2 in above the rafters leave a pocket for the roof decking.
What It Takes
- Framing, panel siding and roofing with a circular saw, a reciprocating saw and a drill.
- A helper to raise the 10 ft walls.
- Ladder work for the rafters, the roof and the vents.
What Decides Success
- A 140 in diagonal on the floor frame before the OSB goes down.
- 3-3/4 in of siding above the back wall's top plate for the rafters.
Health and safety
Power Saws and Nailers
- Support OSB and siding panels securely when cutting with the circular saw so the blade never binds.
- Hold the reciprocating saw firmly when trimming the side siding, and let the blade stop before setting it down.
- Keep fingers clear of the pneumatic roofing nailer nose, and disconnect the air supply before clearing jams or climbing.
- Brace the cordless drill firmly when using the hole saw bit for gable vent openings in case the bit catches.
Wood Dust and Treated Lumber
- Wear protective equipment including safety glasses and a dust mask when sawing engineered wood siding, which throws heavy dust.
- Wear gloves and a dust mask when sawing pressure-treated floor framing lumber, and wash your hands thoroughly after handling the boards.
- Keep eye and respiratory protection on when clearing sawdust with the cordless blower so airborne debris does not enter your eyes.
Heavy Walls and Framing Hazards
- Raise the heavy 10-foot front and back walls with a helper to maintain control on the narrow shed floor.
- Secure standing walls immediately with temporary framing braces so wind or bumps cannot tip them before the rafters go up.
- Cut the double doors open before installing the side walls so you do not get trapped inside the shed.
Ladder and Roof Safety
- Set the A-frame step ladder on firm, level ground and maintain stable footing while fastening top plates, rafters, and vents.
- Keep firm footing when working on the sloped shed roof, and never step on loose synthetic underlayment or unfastened shingles.
Tools
- Cordless drill/driver (DeWalt)
- Cordless impact driver (DeWalt)
- Spirit level (box beam level, Kobalt)
- Vertical panel saw (stationary panel saw) (optional)
- Tape measure (pocket tape measure)
- Cordless circular saw (DeWalt)
- Caulking gun (manual caulk gun)
- Broom (angle broom) (optional)
- Step ladder (A-frame step ladder, Werner)
- Cordless blower (cordless jobsite blower, DeWalt) (optional)
- Paint roller and tray (paint roller frame with extension pole and tray, Wooster, 3/4 in nap roller cover)
- Claw hammer
- One-handed bar clamps (trigger clamps, Irwin, Quick-Grip) (optional)
- Speed square (rafter square)
- Cordless palm router (cordless compact router with flush-trim bit, DeWalt) (optional)
- Eye protection (safety glasses)
- Utility knife
- Pneumatic roofing nailer (pneumatic coil roofing nailer, DeWalt) (optional)
- Hole saw bit (hole saw drill attachment)
- Ratchet and socket (socket wrench)
- Reciprocating saw
- Spade bit (spade drill bit, 5/8 in)
- Square drive bits (driver bits, #1 and #2)
- Staple gun (optional)
- Shovel
Materials
- 2x4 framing lumber, 8 ft (38 boards, framing lumber, 2x4 x 8 ft)
- 2x4 framing lumber, 10 ft (4 boards, framing lumber, 2x4 x 10 ft)
- 2x4 framing lumber, 12 ft (2 boards, framing lumber, 2x4 x 12 ft)
- Pressure-treated 2x6 lumber, 8 ft (9 boards, pressure-treated lumber, 2x6 x 8 ft)
- Pressure-treated 2x6 lumber, 10 ft (2 boards, pressure-treated lumber, 2x6 x 10 ft)
- Floor OSB sheets (2 sheets, OSB floor sheathing, 3/4 in, 4 ft x 8 ft)
- LP SmartSide panel siding (9 sheets, engineered wood panel siding, LP SmartSide, 4 ft x 8 ft)
- OSB roof sheathing (2 sheets, OSB sheathing, 7/16 in, 4 ft x 8 ft)
- Concrete blocks, 2x8x16 (3 blocks, concrete block, 2 x 8 x 16 in)
- Concrete blocks, 4x8x16 (9 blocks, concrete block, 4 x 8 x 16 in)
- Asphalt shingles (3 bundles, asphalt roof shingles)
- Royal PVC trim boards (15 boards, PVC trim, Royal, 1x4 x 8 ft)
- White aluminum drip edge (4 pieces, drip edge, 2 to 3 in, white aluminum, 10 ft)
- Synthetic roof underlayment (roof underlayment)
- Plastic cap nails (cap nails)
- Roofing nails
- Double shed door kit (1 kit, door hardware kit, 6 x 6 in heavy-duty T-hinges, 1 x 4-1/2 in T-handle lock set, 2 spring latch barrel bolt sets, 32 #8 x 2 in and 38 #8 x 1-1/4 in black wood screws)
- Wall vents (2 vents, louvered wall vent)
- #10 x 3-1/2 in exterior screws (exterior screws, #10 x 3-1/2 in)
- #9 x 2-1/2 in exterior screws (exterior screws, #9 x 2-1/2 in)
- #9 x 3 in exterior screws (exterior screws, #9 x 3 in)
- #9 x 2 in exterior screws (exterior screws, #9 x 2 in)
- #7 x 2-1/4 in stainless steel trim screws (stainless steel trim screws, #7 x 2-1/4 in)
- #7 x 1-1/4 in stainless steel trim screws (stainless steel trim screws, #7 x 1-1/4 in)
- #8 x 1-1/8 in exterior screws (exterior screws, #8 x 1-1/8 in)
- Exterior paint (exterior acrylic latex paint, Sherwin-Williams SuperPaint)
- White caulk (caulk, DAP)
- Roofing tar
- Chalk (1 bottle, chalk line refill: a tall plastic squeeze bottle of blue marking chalk powder with a long pointed nozzle cap)
Hardware
| Hardware | Size | Count | Used in steps |
|---|---|---|---|
| #10 x 3-1/2 in exterior screws | ~66 | 1, 3, 6, 9 | |
| #9 x 2-1/2 in exterior screws | 1, 8 | ||
| #9 x 3 in exterior screws | ~60 | 2, 4, 7, 8, 9, 10 | |
| #9 x 2 in exterior screws | 2, 5, 9, 10, 11 | ||
| White caulk | 2 | ||
| #7 x 1-1/4 in stainless steel trim screws | 4 | ||
| #8 x 1-1/8 in exterior screws | 5, 12 | ||
| #8 x 1-1/4 in black hinge screws | 6 | ||
| #8 x 2 in black hinge screws | 6 | ||
| Door kit screws | 8 | ||
| #7 x 2-1/4 in stainless steel trim screws | 10 | ||
| Roofing nails | 11 | ||
| Plastic cap nails | 11 |
Cut list
| Part | Name | Qty | Size | Notes |
|---|---|---|---|---|
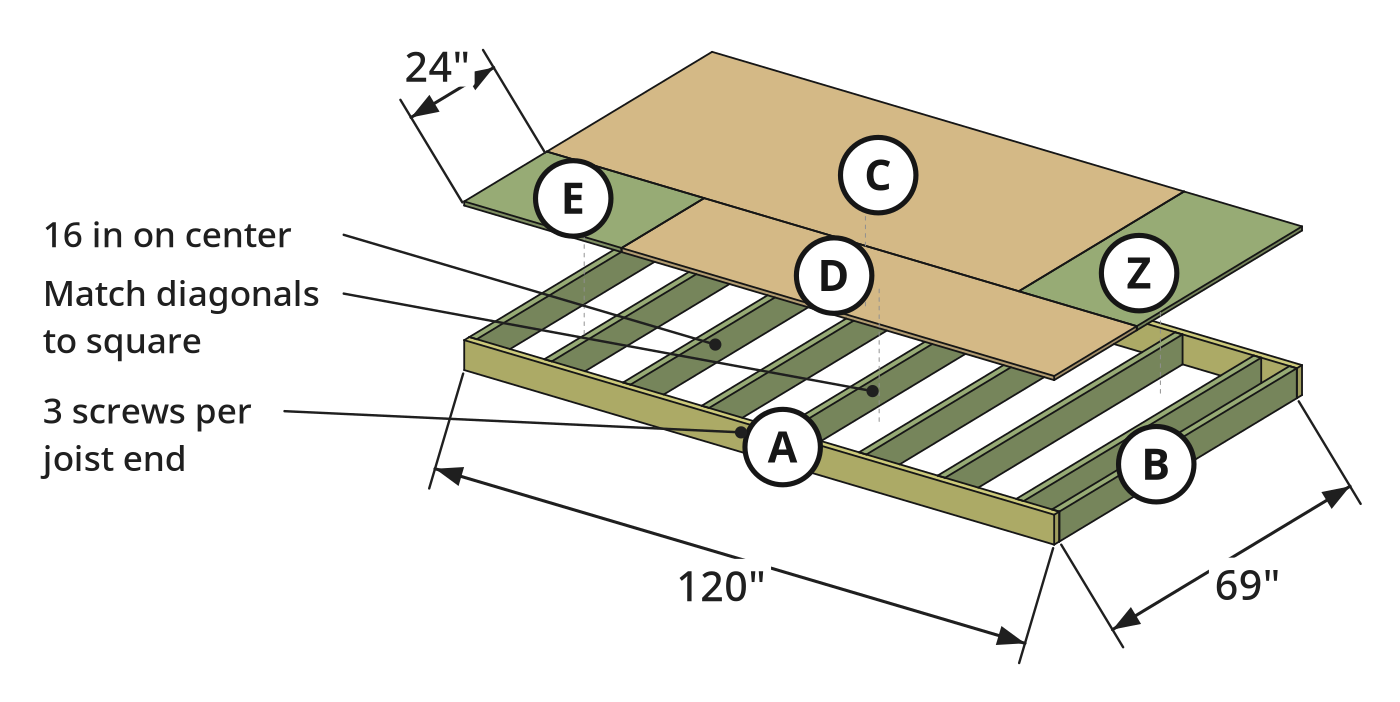
| A | Floor rim board | x2 | 2x6 (1 1/2" × 5 1/2") × 120" | Front and back of the 72 x 120 in floor frame. |
| B | Floor joist | x9 | 2x6 (1 1/2" × 5 1/2") × 69" | Between the rim boards, 16 in on center from one end; the last space is 7-1/4 in. |
| C | Floor OSB, full sheet | x1 | 3/4" (T) × 48" (W) × 96" (L) | Sheet 1 of the plywood layout. |
| D | Floor OSB strip | x1 | 3/4" (T) × 24" (W) × 88" (L) | Piece 3, cut from sheet 2. |
| E | Floor OSB piece | x1 | 3/4" (T) × 24" (W) × 32" (L) | Piece 2, cut from sheet 2. |
| F | Back wall top and bottom plate | x2 | 2x4 (1 1/2" × 3 1/2") × 120" | |
| G | Back wall stud | x6 | 2x4 (1 1/2" × 3 1/2") × 84" | Full 84 in studs: the plates go on their ends, so the back wall frame stands 87 in. Marks at 23-1/4, 47-1/4, 71-1/4, 95-1/4 and 118-1/2 in. |
| H | Back wall siding panel | x2 | 3/8" (T) × 48" (W) × 92 1/4" (H) | |
| I | Back wall siding panel, narrow | x1 | 3/8" (T) × 24" (W) × 92 1/4" (H) | |
| J | Front wall top and bottom plate | x2 | 2x4 (1 1/2" × 3 1/2") × 120" | The bottom plate is cut out across the doorway after the wall stands. |
| K | Front wall stud | x6 | 2x4 (1 1/2" × 3 1/2") × 73 1/2" | Full 73-1/2 in studs: the plates go on their ends, so the front wall frame stands 76-1/2 in. Marks at 11-1/4, 33-3/4, 84-3/4, 107-1/4 and 118-1/2 in. The two by the door are king studs. |
| L | Door jack stud | x2 | 2x4 (1 1/2" × 3 1/2") × 70" | |
| M | Door header | x2 | 2x4 (1 1/2" × 3 1/2") × 49 1/2" | Two 2x4s sandwiched between the king studs. |
| N | Front siding panel with door | x2 | 3/8" (T) × 48" (W) × 80 1/2" (H) | One full sheet per door. |
| O | Front siding strip | x2 | 3/8" (T) × 12" (W) × 80 1/2" (H) | The left strip can be cut 12-1/2 in to line up with the framing; the corner trim covers it. |
| P | Door brace | x2 | 2x4 (1 1/2" × 3 1/2") × 70 1/2" | One on the inside of each door, 1/2 in from the panel edge and 3/4 in above the floor. |
| Q | Side wall plate | x4 | 2x4 (1 1/2" × 3 1/2") × 65" | |
| R | Side wall stud | x8 | 2x4 (1 1/2" × 3 1/2") × 73 1/2" | Full 73-1/2 in studs: the plates go on their ends, so each side wall frame stands 76-1/2 in. Marks at 19-3/4, 43-3/4 and 63-1/2 in. |
| S | Side wall siding panel | x2 | 3/8" (T) × 48" (W) × 96" (H) | Full sheet, cut along the roofline flush with the top of the rafters. |
| T | Side wall siding panel, narrow | x2 | 3/8" (T) × 24" (W) × 96" (H) | Cut along the roofline flush with the top of the rafters. |
| U | Rafter | x6 | 2x4 (1 1/2" × 3 1/2") × 73 1/8" | 10° plumb cut at both ends; 2-7/8 in seat cut at one end. |
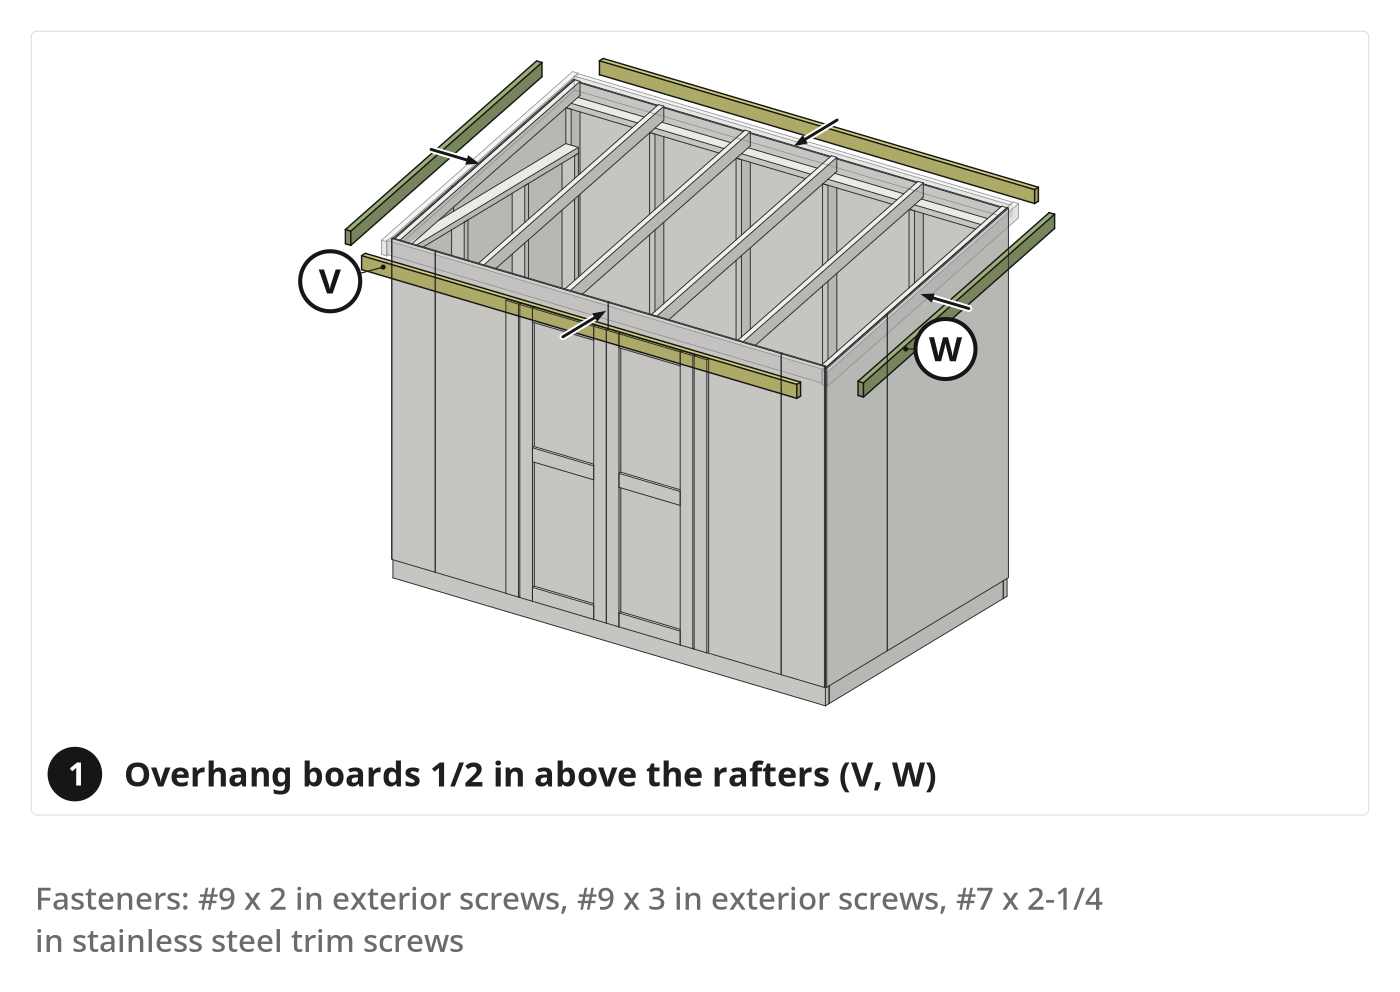
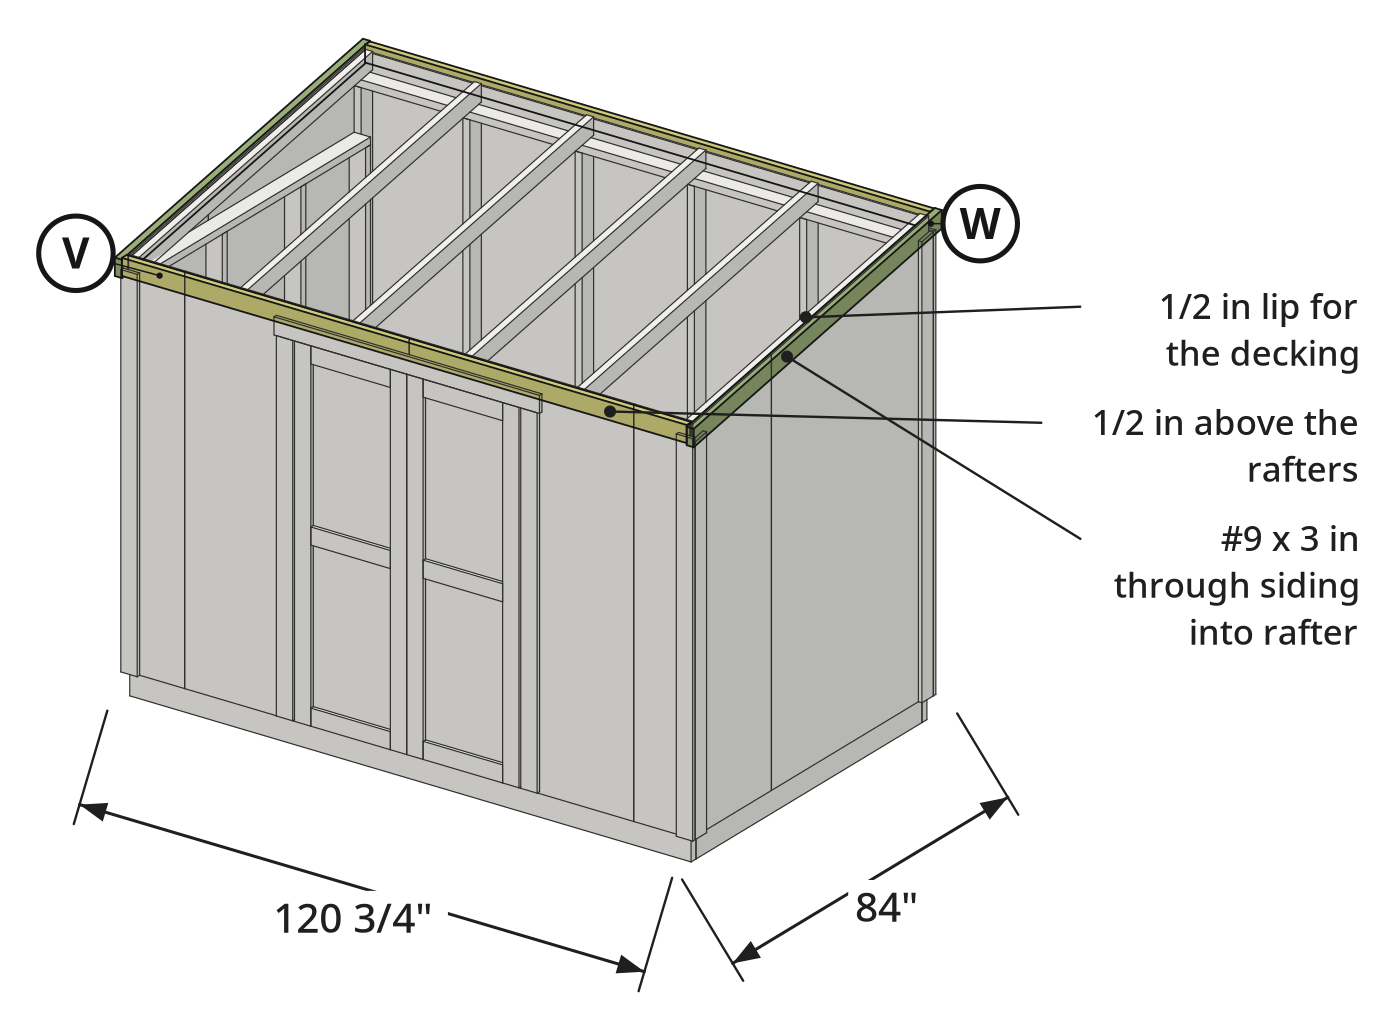
| V | Eave overhang | x2 | 2x4 (1 1/2" × 3 1/2") × 120 3/4" | Front and back; 1/2 in above the rafters. |
| W | Rake overhang | x2 | 2x4 (1 1/2" × 3 1/2") × 84" | Cut a little long (about 84 in), then marked flush with the eave overhangs. |
| X | Roof sheathing, full sheet | x1 | 7/16" (T) × 48" (W) × 96" (L) | Pushed to the back, flush with the back wall siding. |
| Y | Door trim side | x4 | 3/4" (T) × 3 1/2" (W) × 73 1/2" (H) | Two per door, on its outer edges; the hinges go on these. |
| Z | Floor OSB piece, end | x1 | 3/4" (T) × 24" (W) × 48" (L) | Piece 1, cut from sheet 2. |
| AA | Roof sheathing, end piece | x1 | 7/16" (T) × 24" (W) × 48" (L) | |
| AB | Roof sheathing strip | x1 | 7/16" (T) × 25 5/8" (W) × 96" (L) | |
| AC | Roof sheathing, small end piece | x1 | 7/16" (T) × 24" (W) × 25 5/8" (L) | |
| AD | Door trim rail | x6 | 3/4" (T) × 3 1/2" (W) × 17" (L) | Three per door: bottom, middle and top, with 31-1/2 in openings between them. Cut them from the offcuts of the longer trim boards. |
| AE | Vertical trim beside the doors | x2 | 3/4" (T) × 3 1/2" (W) × 73 1/2" (H) | One on each side of the doors, 3/8 in from the door trim. |
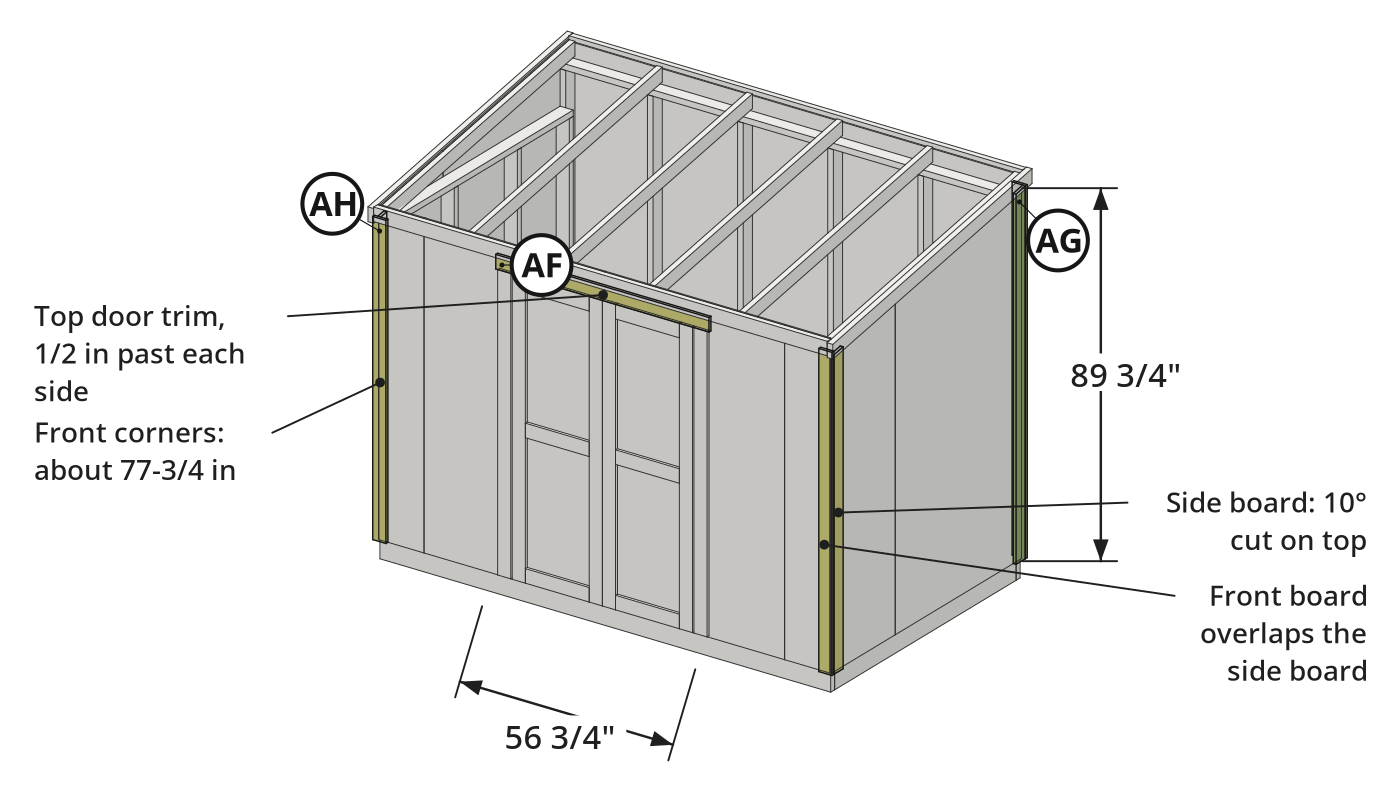
| AF | Top door trim | x1 | 3/4" (T) × 3 1/2" (W) × 56 3/4" (L) | Runs past the vertical trim on both sides. |
| AG | Corner trim, back (high) corners | x4 | 3/4" (T) × 3 1/2" (W) × 89 3/4" (H) | Two per corner. Measure each corner first; cut the side-wall board with a 10° angle across the top, the back-wall board square. |
| AH | Corner trim, front (low) corners | x4 | 3/4" (T) × 3 1/2" (W) × 77 3/4" (H) | Two per corner. Measure each corner first; cut the side-wall board with a 10° angle across the top, the front-wall board square. |
What to buy
- Buy 15 × 1x4 8 ft (Royal PVC trim boards)
- Buy 4 × 2x4 10 ft (2x4 framing lumber, 10 ft)
- Buy 38 × 2x4 8 ft (2x4 framing lumber, 8 ft)
- Buy 2 × 2x4 12 ft (2x4 framing lumber, 12 ft)
- Buy 2 × 2x6 10 ft (Pressure-treated 2x6 lumber, 10 ft)
- Buy 9 × 2x6 8 ft (Pressure-treated 2x6 lumber, 8 ft)
- Buy 2 × Floor OSB sheets 4x8 sheet (Floor OSB sheets)
- Buy 9 × LP SmartSide panel siding 4x8 sheet (LP SmartSide panel siding)
- Buy 3 × OSB roof sheathing 4x8 sheet (OSB roof sheathing)

Before you start
Lumber and Sheet Goods
- Pick up 3 to 5 extra 2x4s in case one has a big knot or a split.
- Buy extra 4x8x16 blocks for leveling.
- Caulk and paint the siding and overhangs before assembling; PVC trim can't be painted.
Layout and Labeling
- Start the blocks at the highest corner of your spot.
- Label cut studs, plates and siding by wall.
- Keep the screws sorted by size: each step names the one it uses.
Step by step
Step 1: Frame, Level, and Deck the Shed Floor
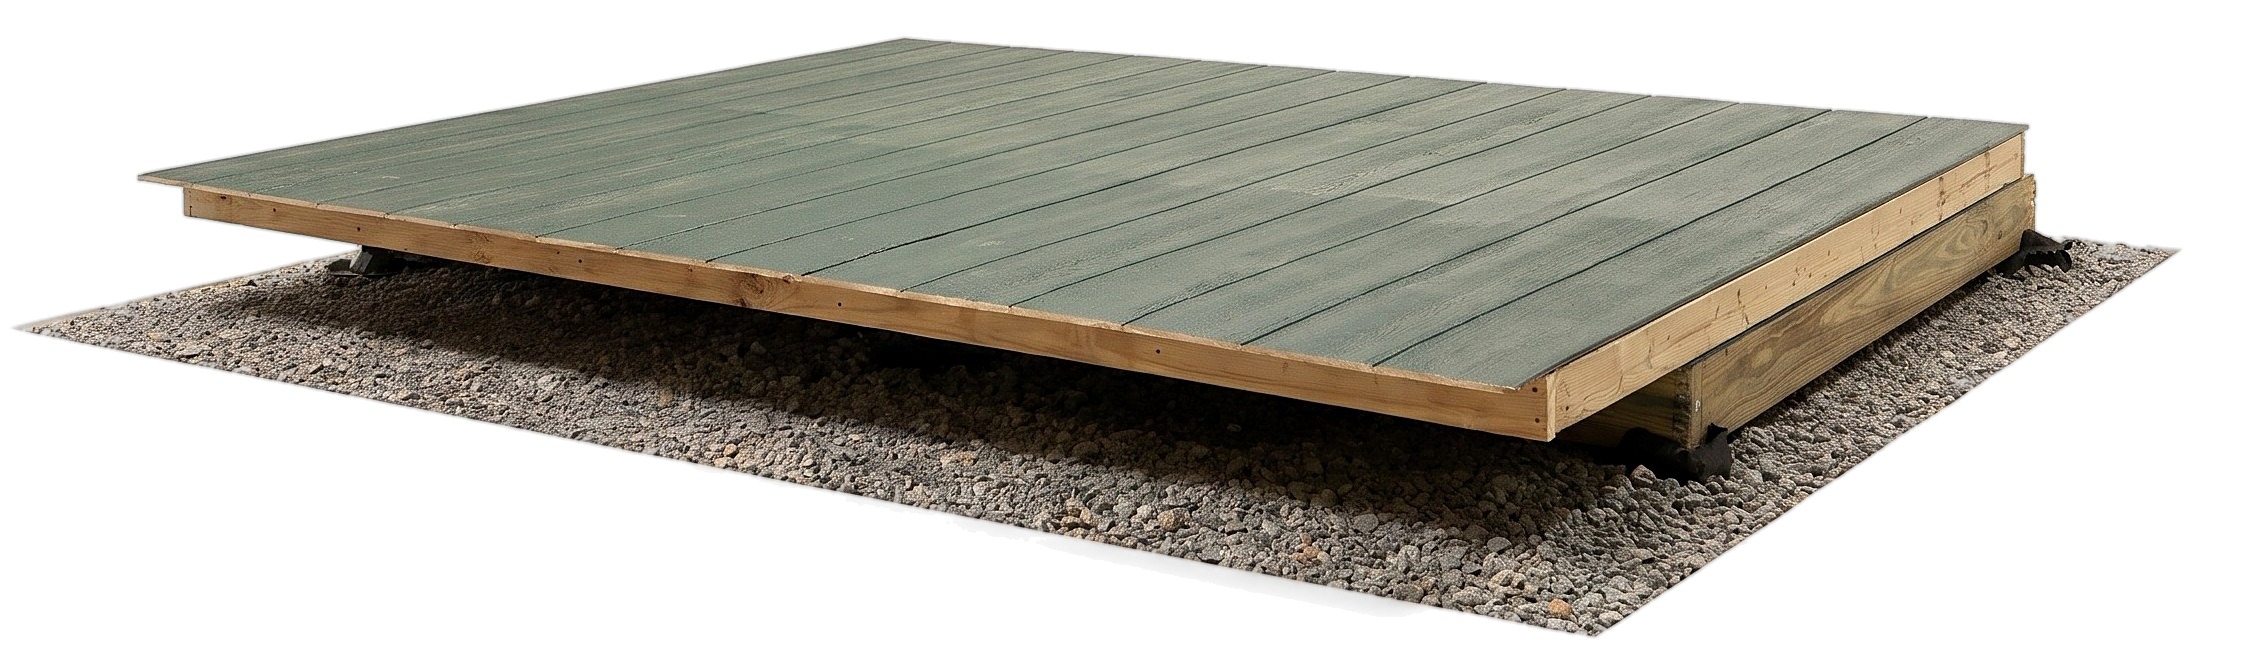
Build a level, square 72 x 120 in pressure-treated floor on concrete blocks and deck it with 3/4 in OSB.
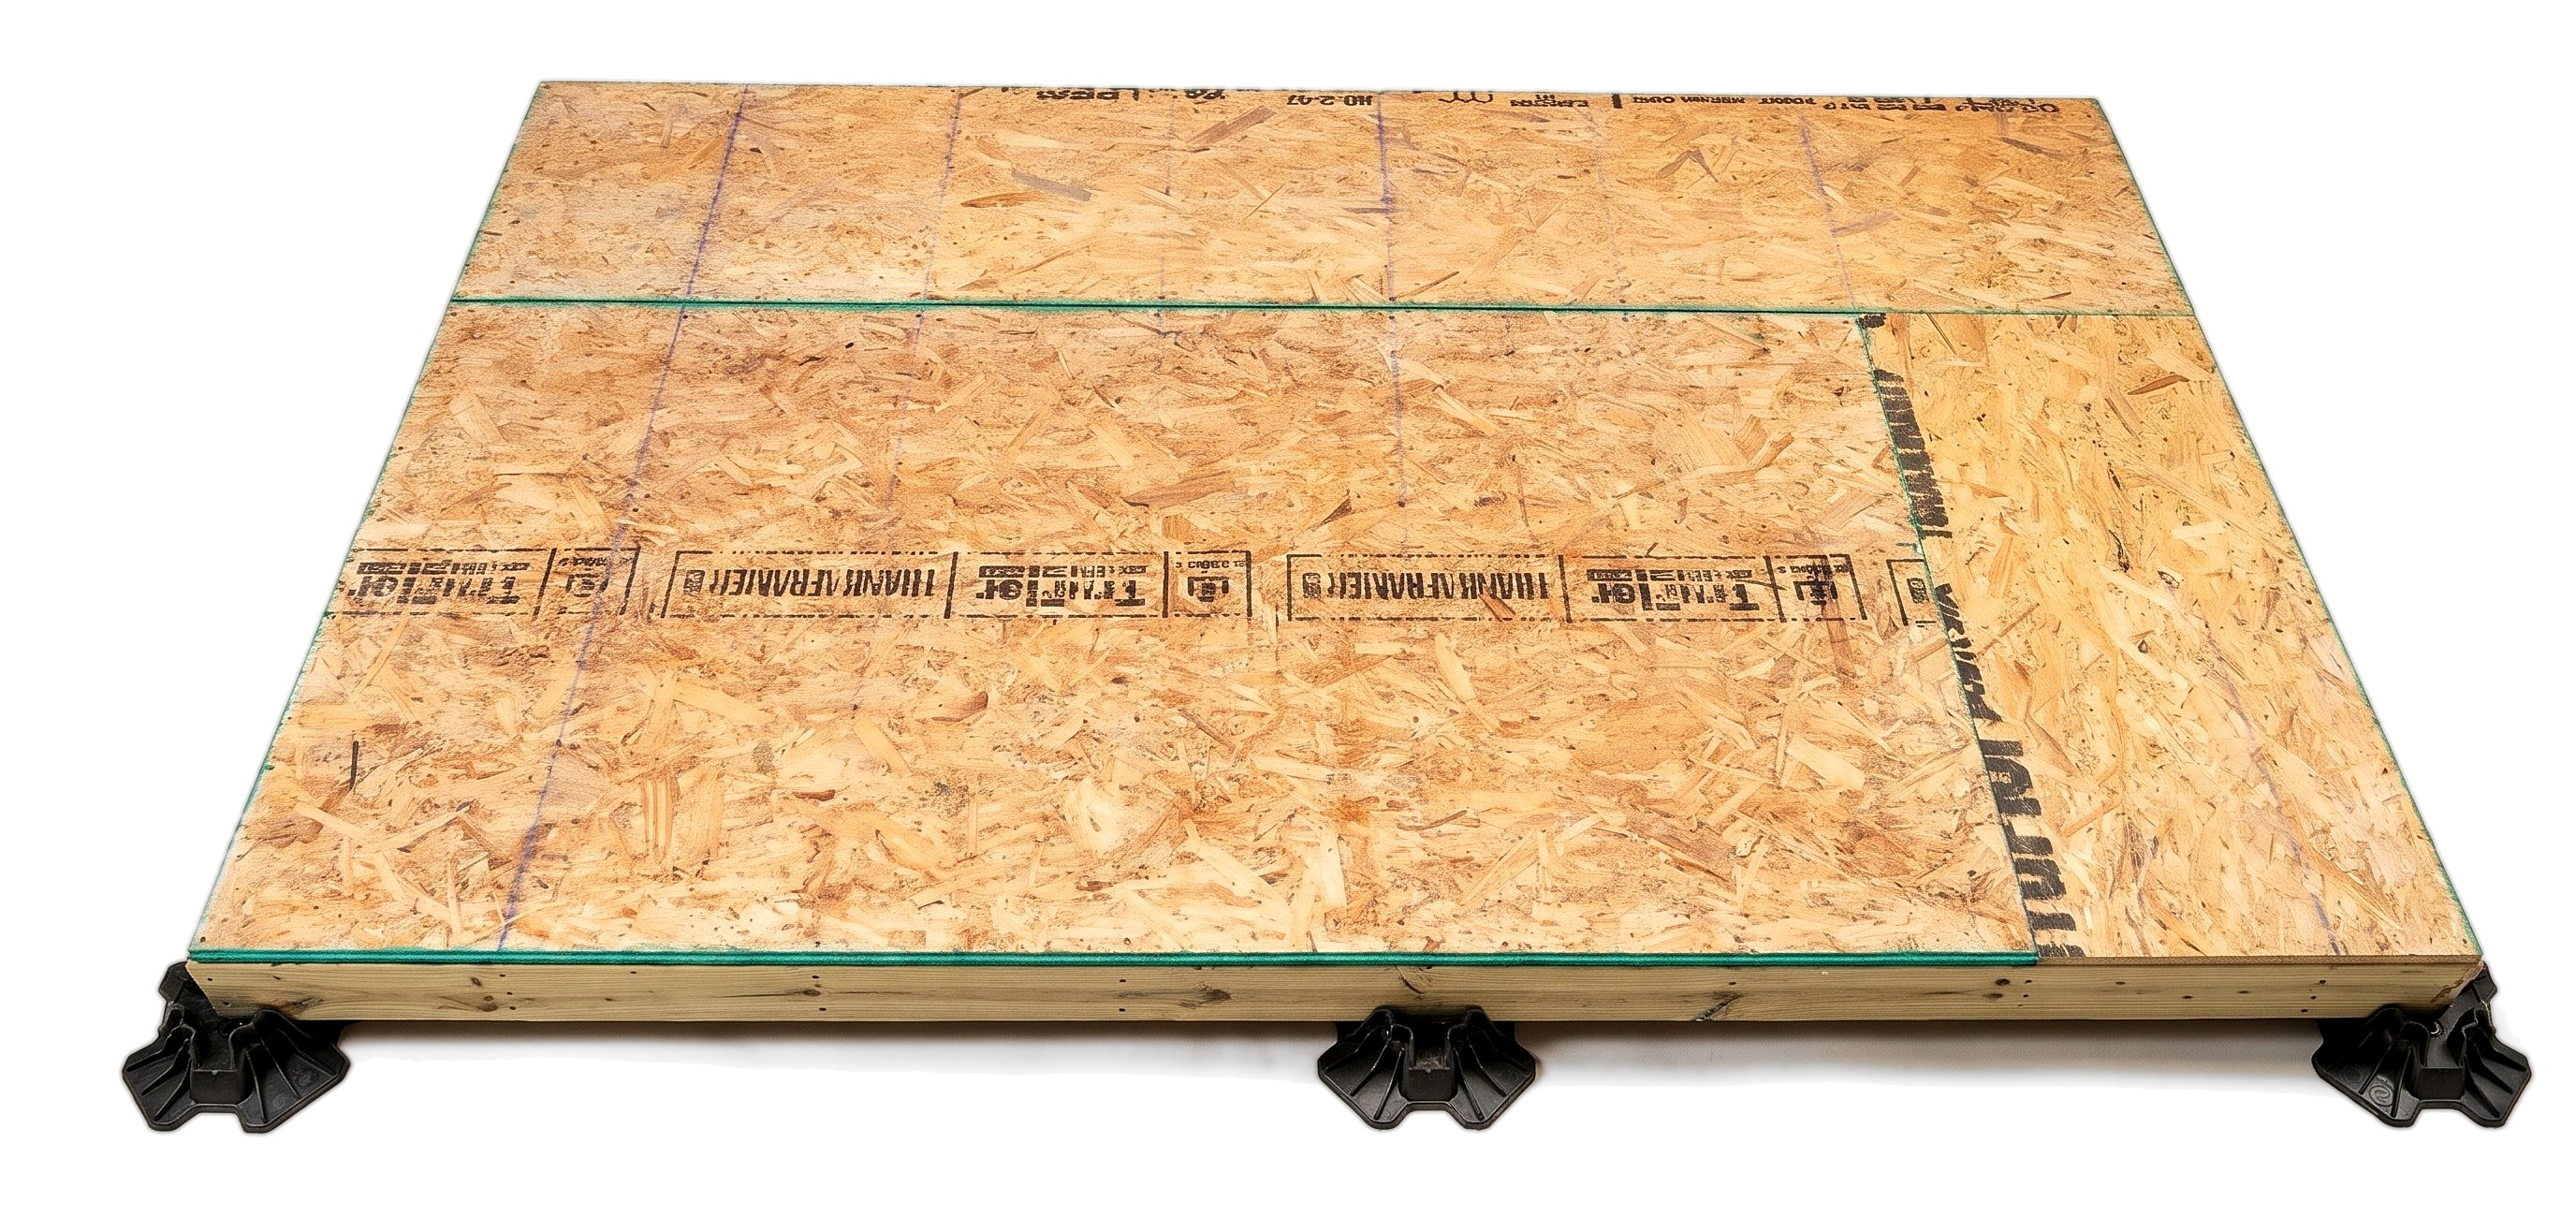
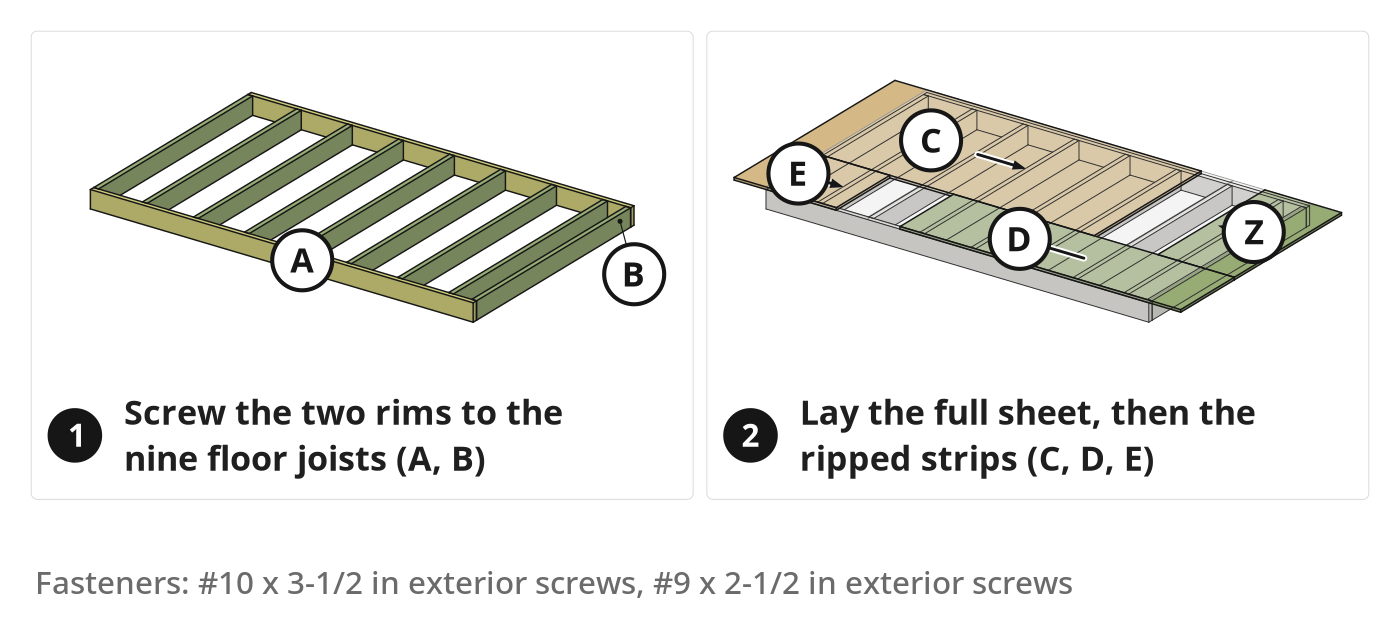
Parts in this step: (A) Floor rim board, (B) Floor joist, (C) Floor OSB, full sheet, (D) Floor OSB strip, (E) Floor OSB piece, (Z) Floor OSB piece, end
You'll need: Cordless impact driver, Shovel, Spirit level, Tape measure, Cordless circular saw, Square drive bits, Pressure-treated 2x6 lumber, 8 ft, Pressure-treated 2x6 lumber, 10 ft, Concrete blocks, 4x8x16, Concrete blocks, 2x8x16, Floor OSB sheets, #10 x 3-1/2 in exterior screws, #9 x 2-1/2 in exterior screws
- 1.1 Lay out and assemble the floor frame
- Cut two 2x6 rim boards (A) to 120 in and nine joists (B) to 69 in.
- Screw the two end joists (B) between the rims (A) with three #10 x 3-1/2 in screws at each corner.
- Mark the inner joists (B) 16 in on center from one end; the last space is 7-1/4 in.
- Fasten each inner joist (B) with three #10 x 3-1/2 in screws at each end.
- 1.2 Set and level the frame on concrete blocks
- Start at the highest corner: dig an area 4 to 6 in wider than the block and clear out the roots.
- Dig only deep enough for the block to sit close to level with the ground.
- Level the blocks along the 10 ft rim (A), then add the center blocks for support.
- Check for square: the diagonal measures 140 in.
- 1.3 Cut and fit the OSB floor
- Lay the full OSB sheet (C) on the frame.
- Cut the second sheet into a 48 x 24 in piece (Z), a 32 x 24 in piece (E) and an 88 x 24 in strip (D).
- Fit the pieces as in the plywood layout: (Z) beside (C), then (E) and (D) along the 24 in row.
- 1.4 Square the frame and screw down the OSB
- Use the OSB sheet to square the floor frame.
- Drive #9 x 2-1/2 in screws every 6 in along all sheet edges.
- Drive them every 12 in across the field of each sheet.
Key measurements
- Floor frame: 72 x 120 in, with 69 in joists between 120 in rims.
- Joist layout: 16 in on center from one end; last space 7-1/4 in.
- Square check: 140 in diagonal.
- OSB screws: 6 in on edges, 12 in in the field.
- Tip: Use the perimeter boards as a guide for where each block goes.
Before you move on: The diagonal reads 140 in and the frame is level along the 10 ft side.
Step 2: Frame, Sheet, Paint, and Trim the Back Wall
Frame the back wall (84 in studs, 87 in tall with the plates) flat on the floor, side it, and leave 3-3/4 in of siding above the top plate.
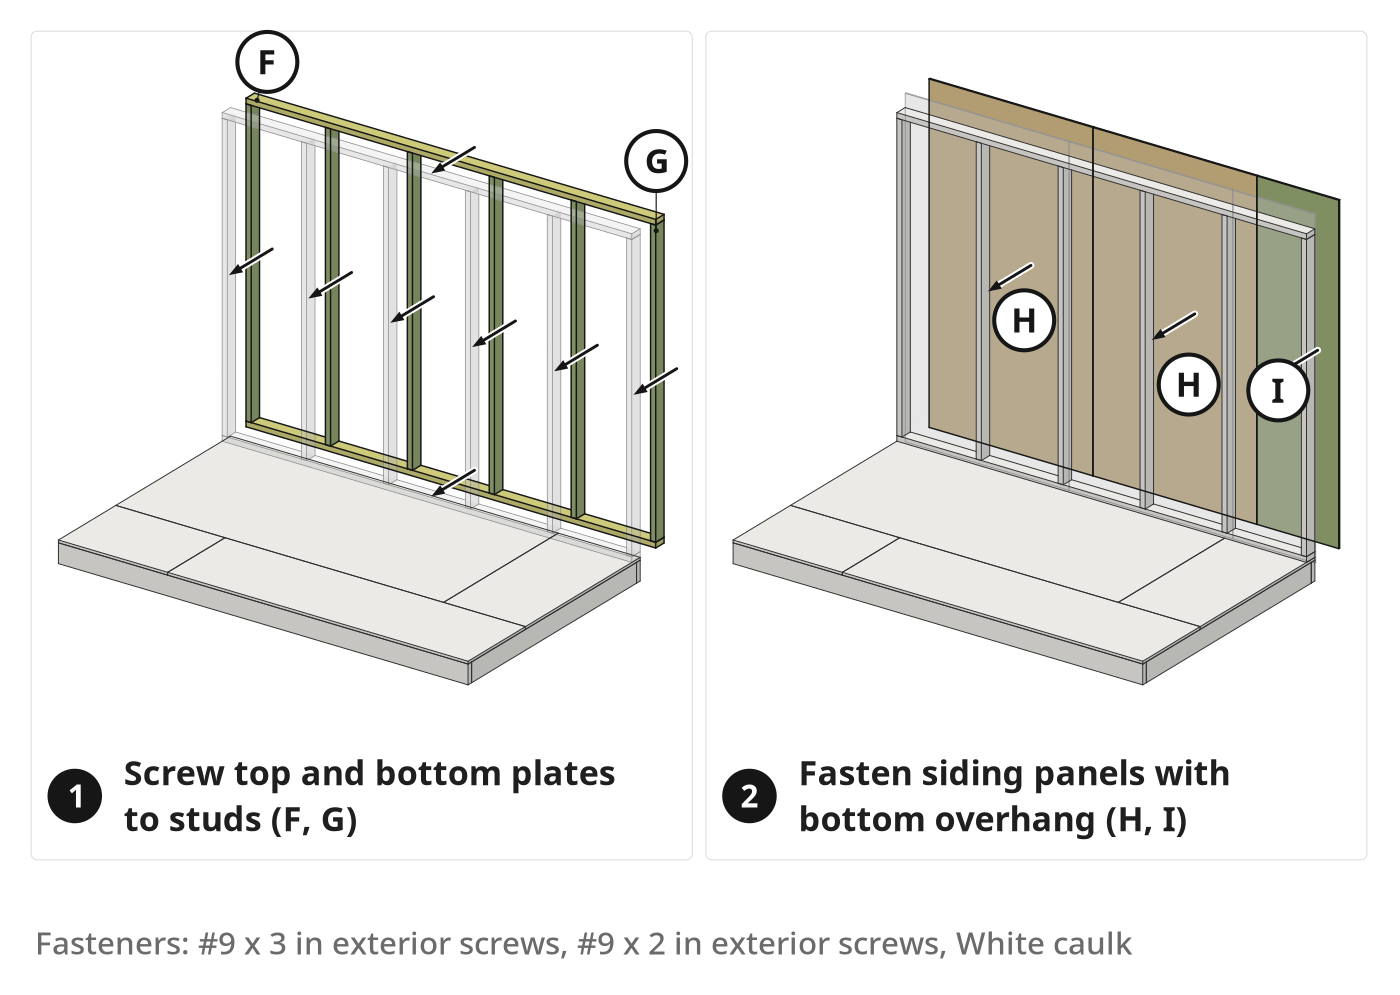
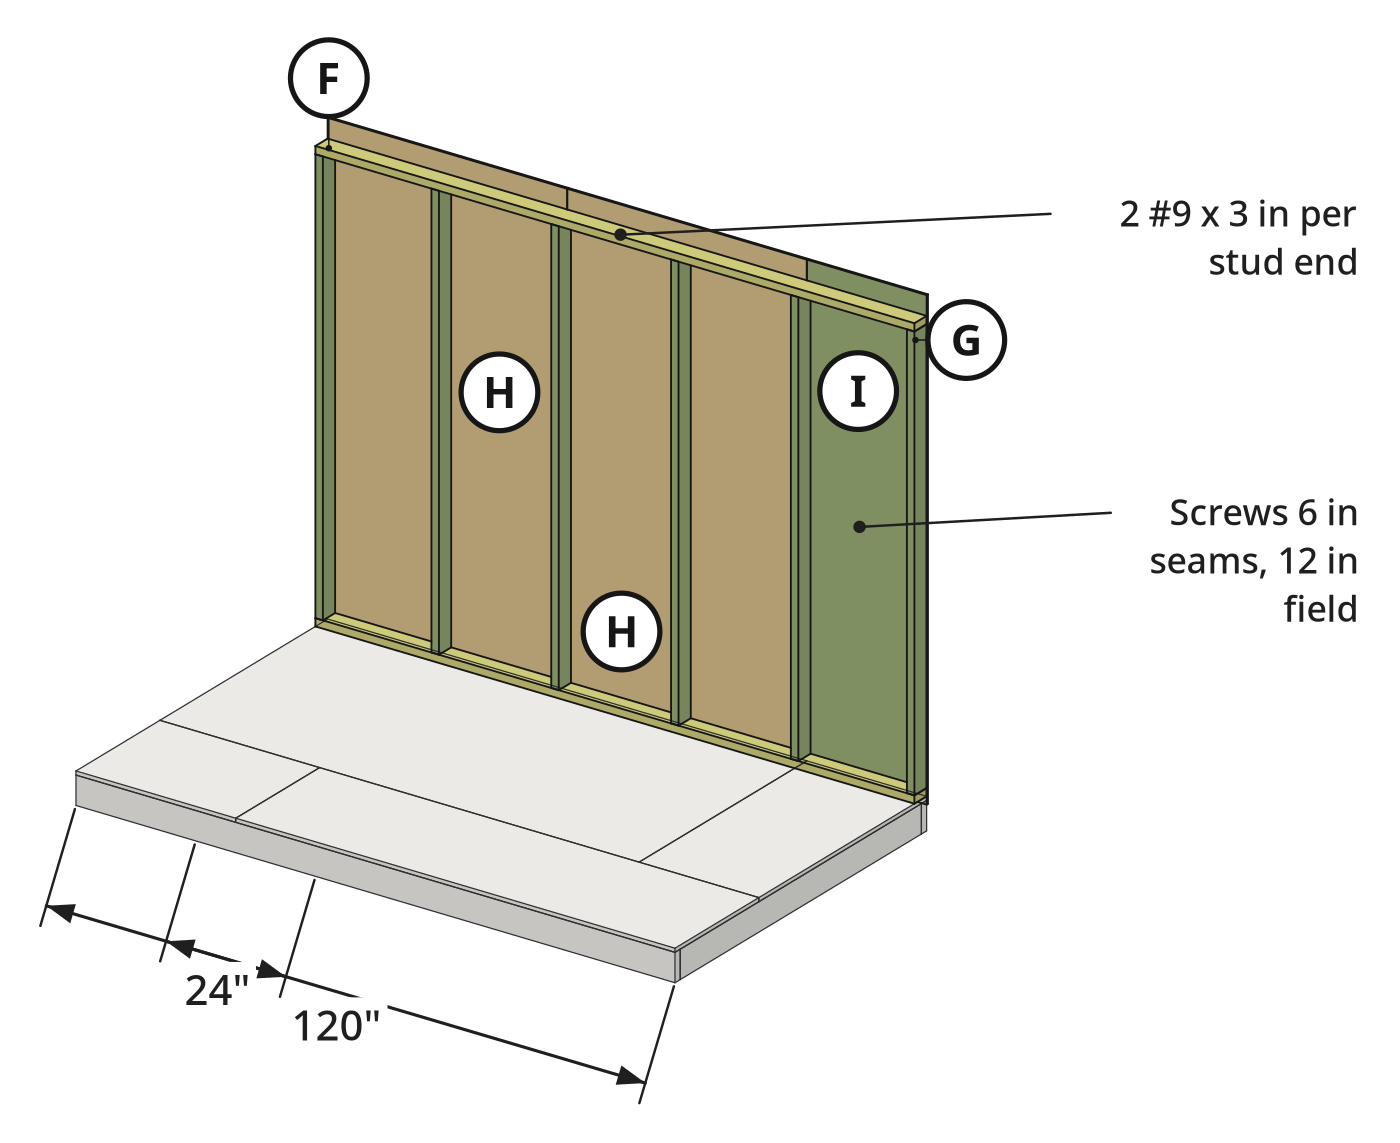
Parts in this step: (F) Back wall top and bottom plate, (G) Back wall stud, (H) Back wall siding panel, (I) Back wall siding panel, narrow
You'll need: Cordless impact driver, Tape measure, Cordless circular saw, Caulking gun, Broom, Paint roller and tray, 2x4 framing lumber, 8 ft, 2x4 framing lumber, 10 ft, LP SmartSide panel siding, #9 x 3 in exterior screws, #9 x 2 in exterior screws, White caulk, Exterior paint
- 2.1 Frame the back wall with studs 24 inches on center
- Cut two plates (F) to 120 in and six studs (G) to 84 in; the plates go on the ends of the studs.
- Mark the studs from one end at 23-1/4, 47-1/4, 71-1/4, 95-1/4 and 118-1/2 in.
- Drive two #9 x 3 in screws through the plates (F) into each stud end.
- Keep the wall flat; use the floor as a guide to square the frame.
- 2.2 Cut and align the siding with a 1-1/2 inch bottom overlap
- Cut two siding panels (H) to 48 in and one (I) to 24 in, all 92-1/4 in tall.
- Start with a sheet at one end and use it to square the wall.
- Let the siding overlap the floor sheathing and joists by 1-1/2 in.
- Butt each new sheet against the last one's alignment bead for a 1/8 in gap.
- 2.3 Fasten the siding and caulk the screw holes
- Drive #9 x 2 in screws every 12 in along studs (G) away from the seams.
- Drive them every 6 in along each seam.
- Trim any siding past the end studs (G) so it sits flush.
- Caulk the screw holes while the wall is flat.
- 2.4 Trim the siding to 3-3/4 inches above the top plate
- Cut the tops of all panels (H, I) so 3-3/4 in of siding stands above the top plate (F).
- That 3-3/4 in is the room the rafters sit in.
- Sweep off the sawdust, then paint the siding before standing the wall.
Key measurements
- Back wall frame: 120 in wide, 87 in tall (84 in studs plus the two plates).
- Back wall studs: 84 in, 24 in on center.
- Siding height: 92-1/4 in.
- Bottom overlap: 1-1/2 in over the floor sheathing and joists.
- Siding above the top plate: 3-3/4 in.
- Siding screws: 12 in on studs, 6 in on seams.
- Tip: Gauge the 1-1/2 in bottom overlap with a scrap 2x4.
- Tip: Painting the siding before it is fully fastened saves over an hour.
- Heads up: Wear eye protection when cutting siding panels with a circular saw.
Before you move on: 3-3/4 in of siding stands above the top plate and 1-1/2 in hangs below the floor line.
Step 3: Stand, Plumb, and Anchor the Back Wall
Stand the back wall at the back edge of the floor, plumb it and screw it down.
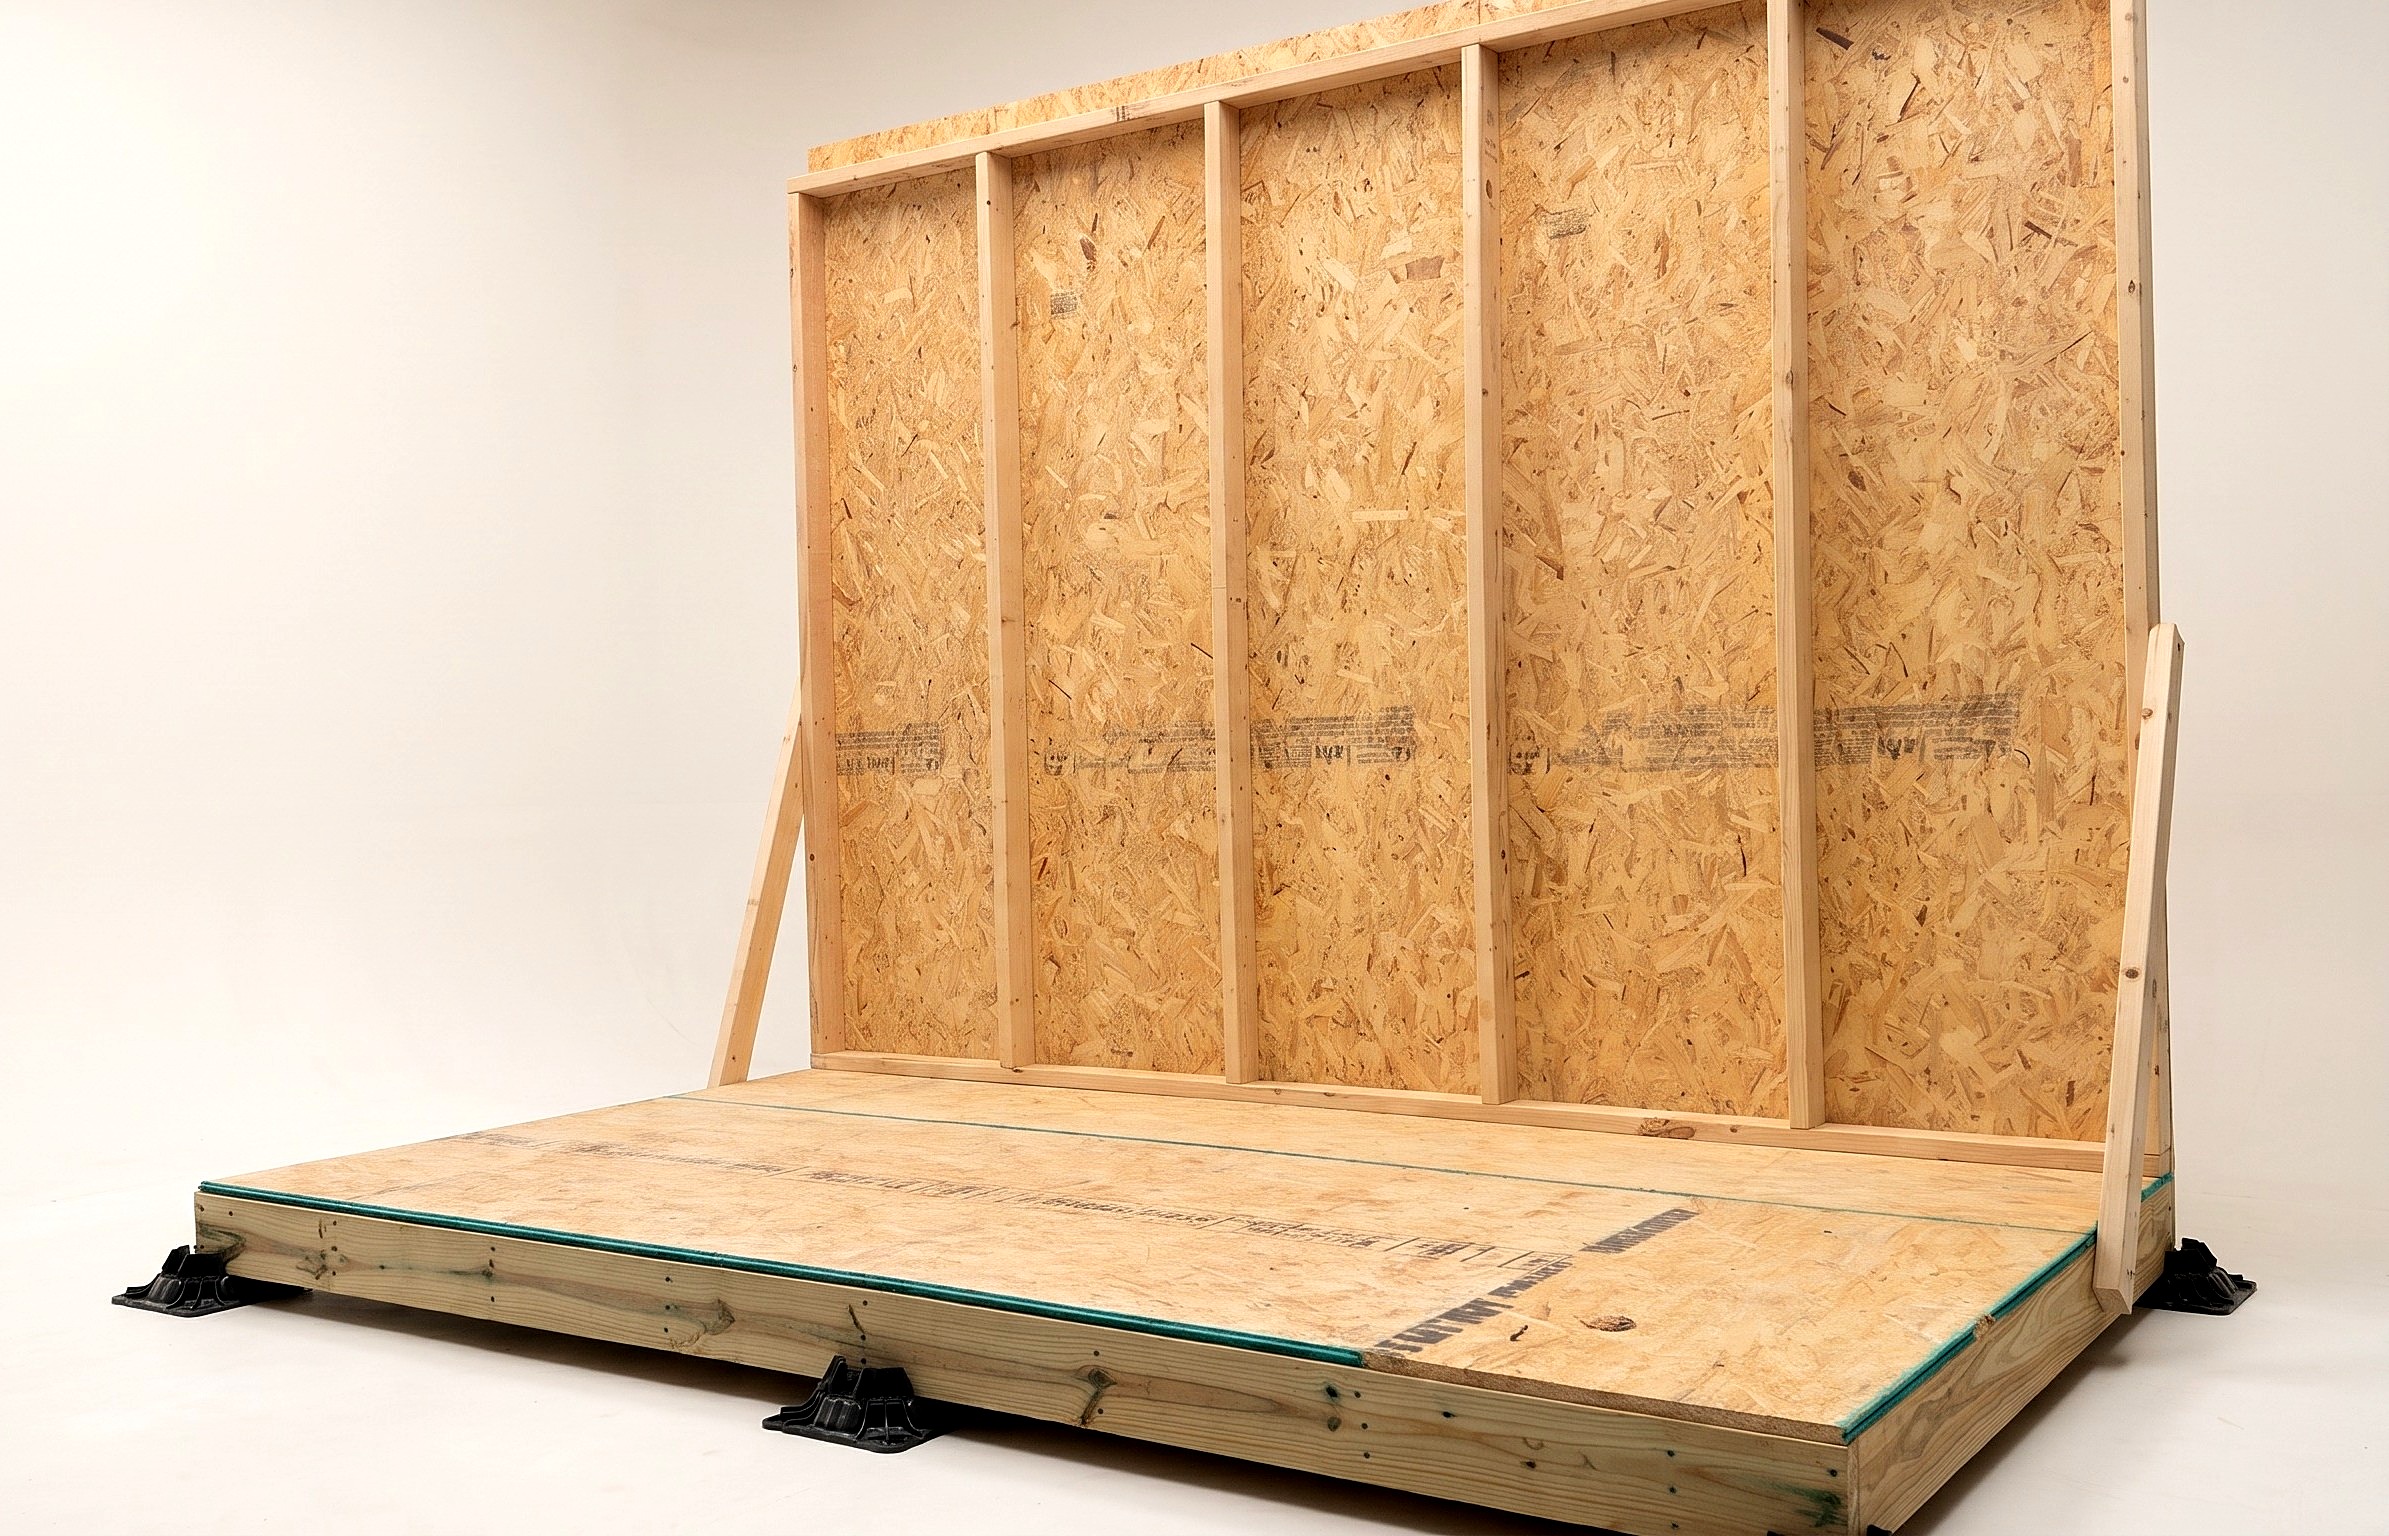
Parts in this step: (F) Back wall top and bottom plate, (G) Back wall stud, (H) Back wall siding panel, (I) Back wall siding panel, narrow
You'll need: Cordless impact driver, Spirit level, #10 x 3-1/2 in exterior screws
- 3.1 Brace and raise the back wall
- Grab a friend: the 10 ft wall is heavy.
- Screw a temporary 2x4 brace to an end stud (G) while the wall is flat.
- Lift the wall upright along the back edge with the siding over the rim (A).
- Screw the brace to the floor.
- 3.2 Plumb the wall and screw it to the floor
- Check both ends with a level and adjust the brace until the wall is plumb.
- Drive two #10 x 3-1/2 in screws through the bottom plate (F) at each stud location.
Key measurements
- Wall to floor: two screws at each stud location.
- Tip: Attach the temporary brace before lifting so you can secure the wall right away.
- Heads up: Raise the 10 ft wall with a helper.
Before you move on: Both ends of the back wall are plumb.
Step 4: Frame the Front Wall and Assemble the Door Panels
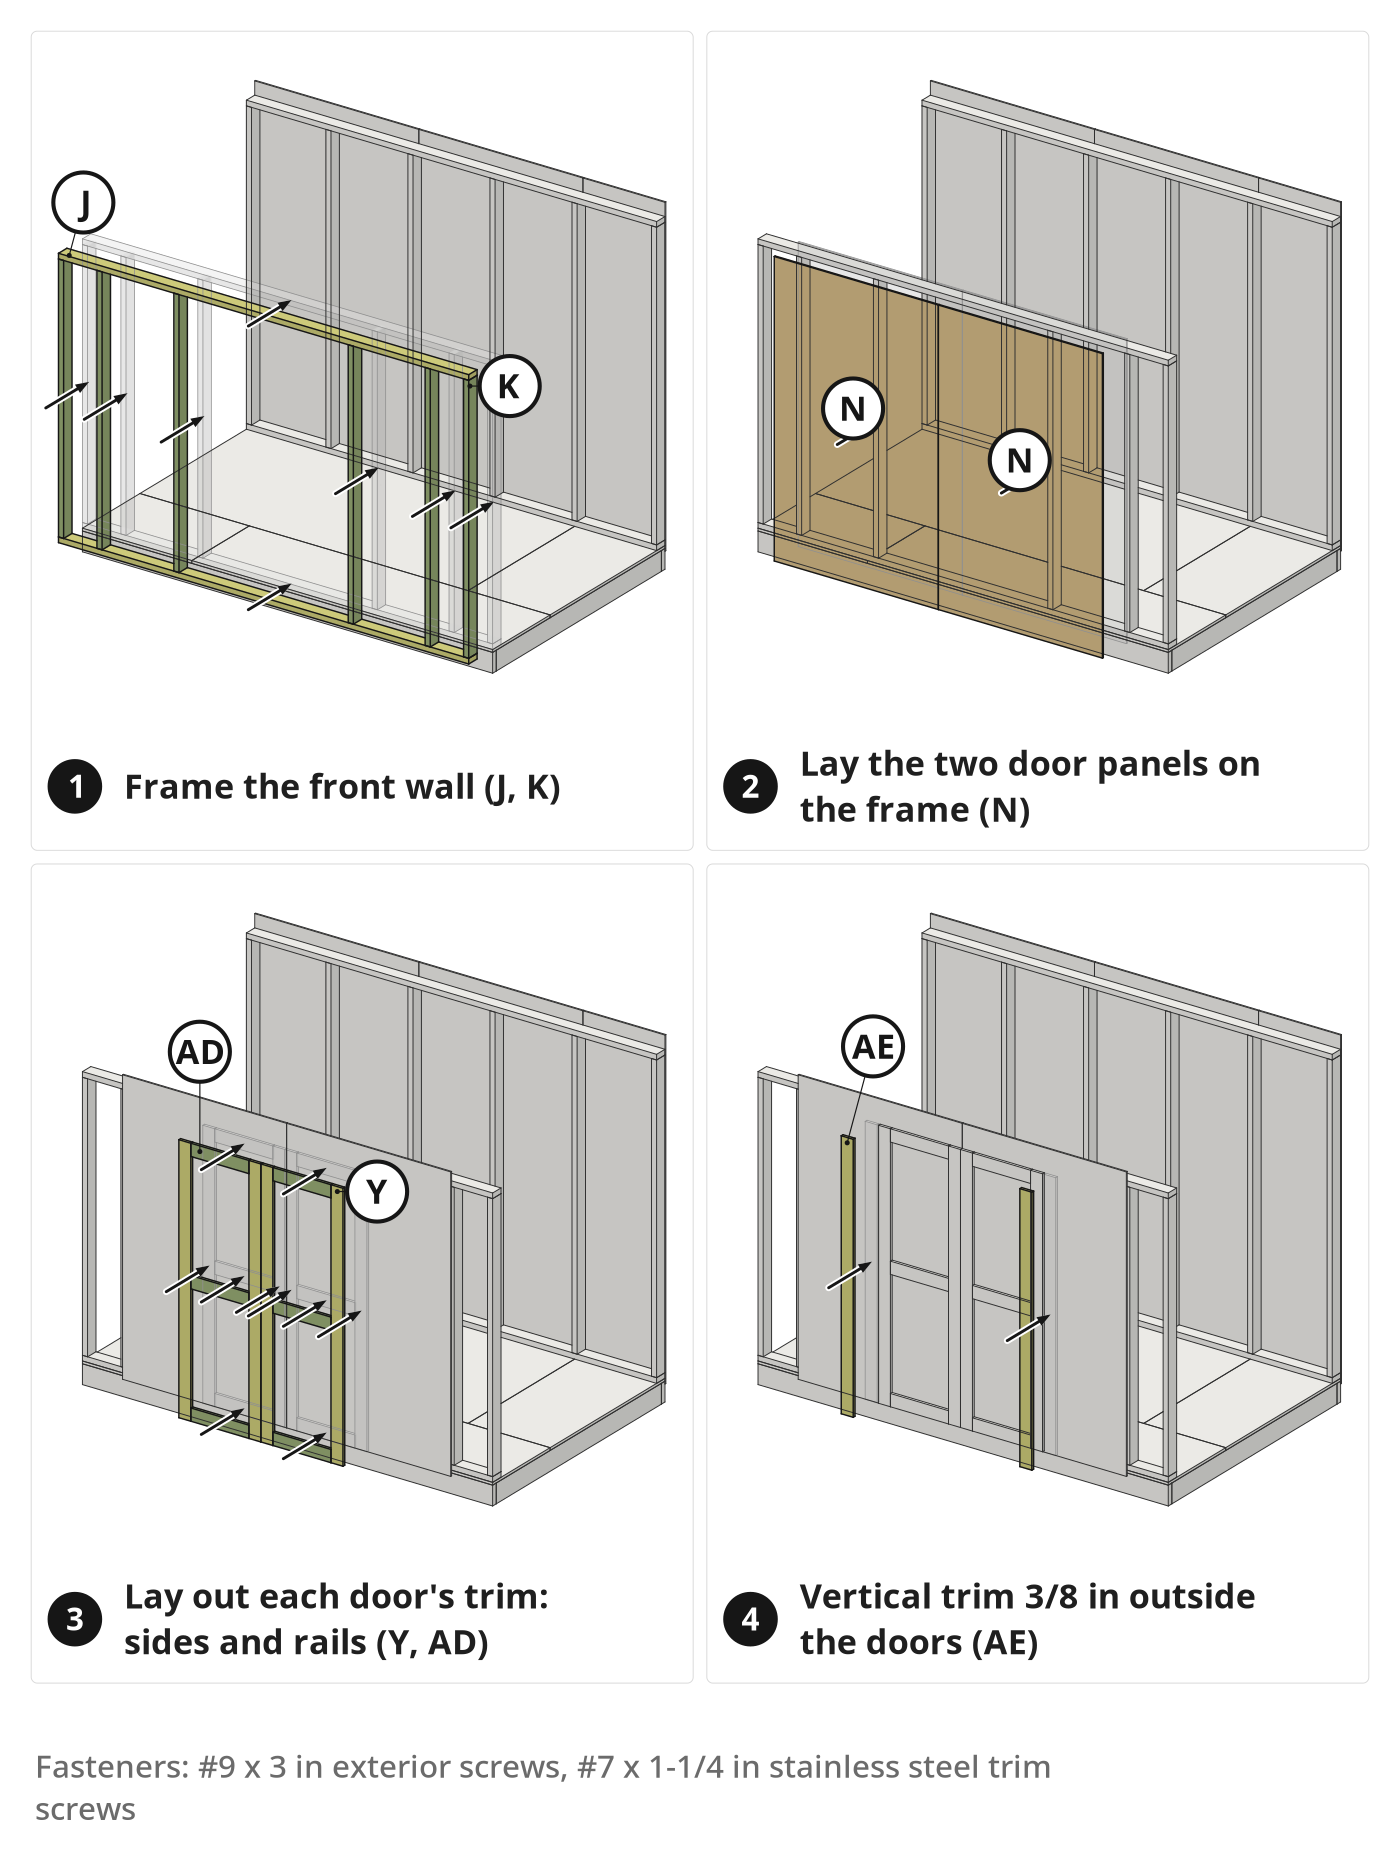
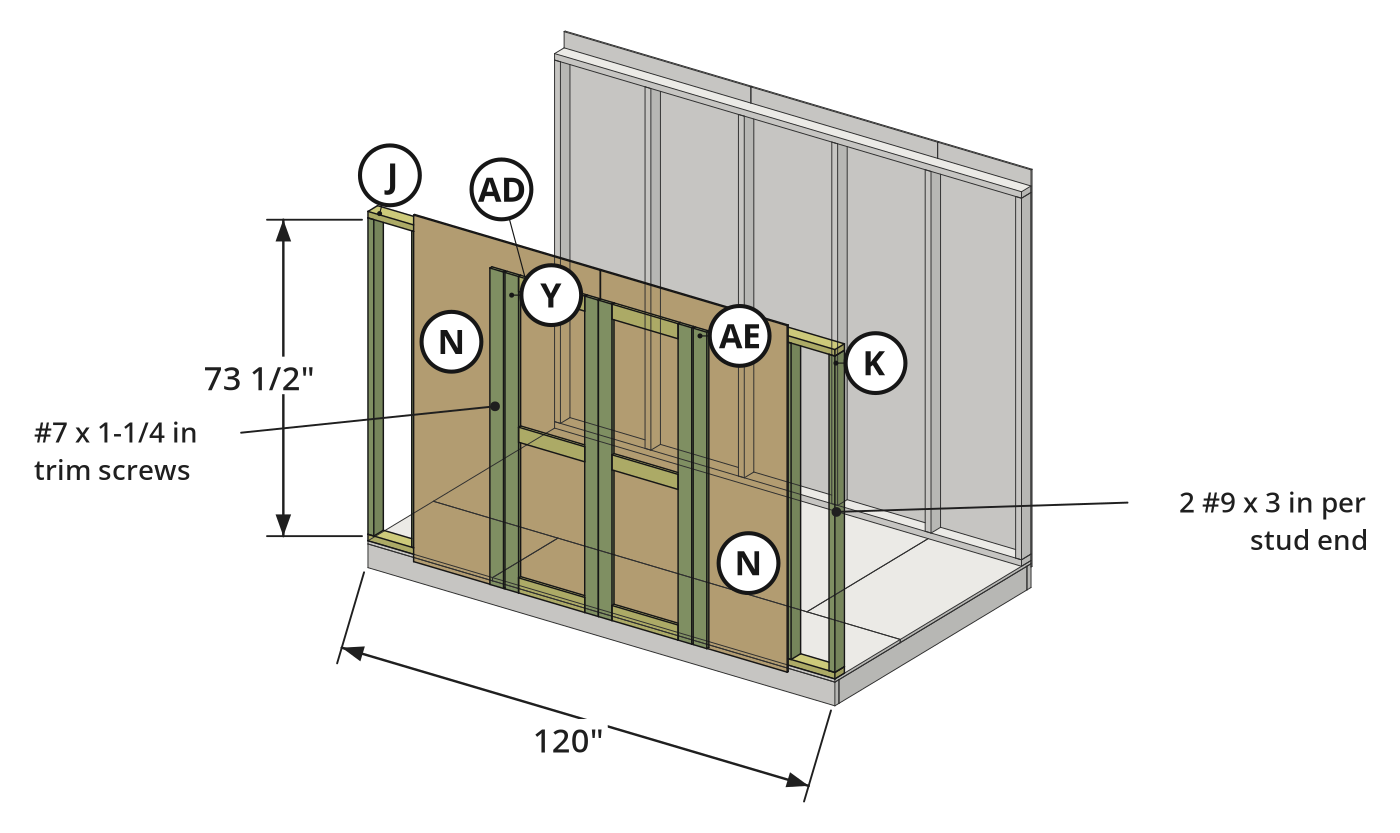
Frame the front wall (73-1/2 in studs, 76-1/2 in tall with the plates) and lay out the door trim on the front siding.
Parts in this step: (J) Front wall top and bottom plate, (K) Front wall stud, (N) Front siding panel with door, (O) Front siding strip, (Y) Door trim side, (AD) Door trim rail, (AE) Vertical trim beside the doors
You'll need: Cordless impact driver, Cordless drill/driver, Tape measure, Paint roller and tray, 2x4 framing lumber, 8 ft, 2x4 framing lumber, 10 ft, LP SmartSide panel siding, Royal PVC trim boards, #9 x 3 in exterior screws, #7 x 1-1/4 in stainless steel trim screws, Exterior paint
- 4.1 Frame the front wall studs to the top plate
- Cut two plates (J) to 120 in and six studs (K) to 73-1/2 in; the plates go on the ends of the studs.
- Mark the studs from one end at 11-1/4, 33-3/4, 84-3/4, 107-1/4 and 118-1/2 in.
- The studs at 33-3/4 and 84-3/4 in are the king studs; the jack studs and header come later.
- Drive two #9 x 3 in screws through the top plate (J) into each stud (K).
- 4.2 Fasten the bottom plate to the front wall studs
- Slide the frame forward so the stud ends overhang the front floor edge.
- Set the bottom plate (J) on the stud ends and drive two #9 x 3 in screws into each stud (K).
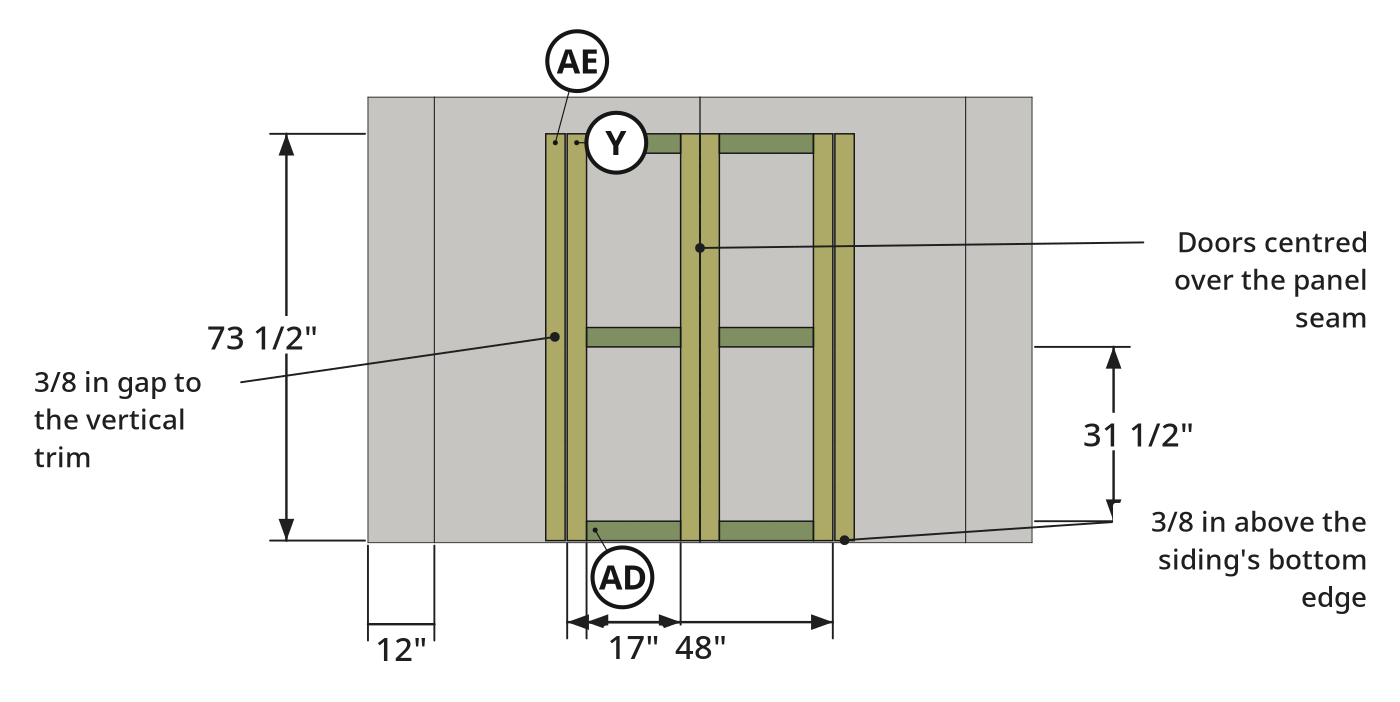
- 4.3 Lay out and attach the door trim
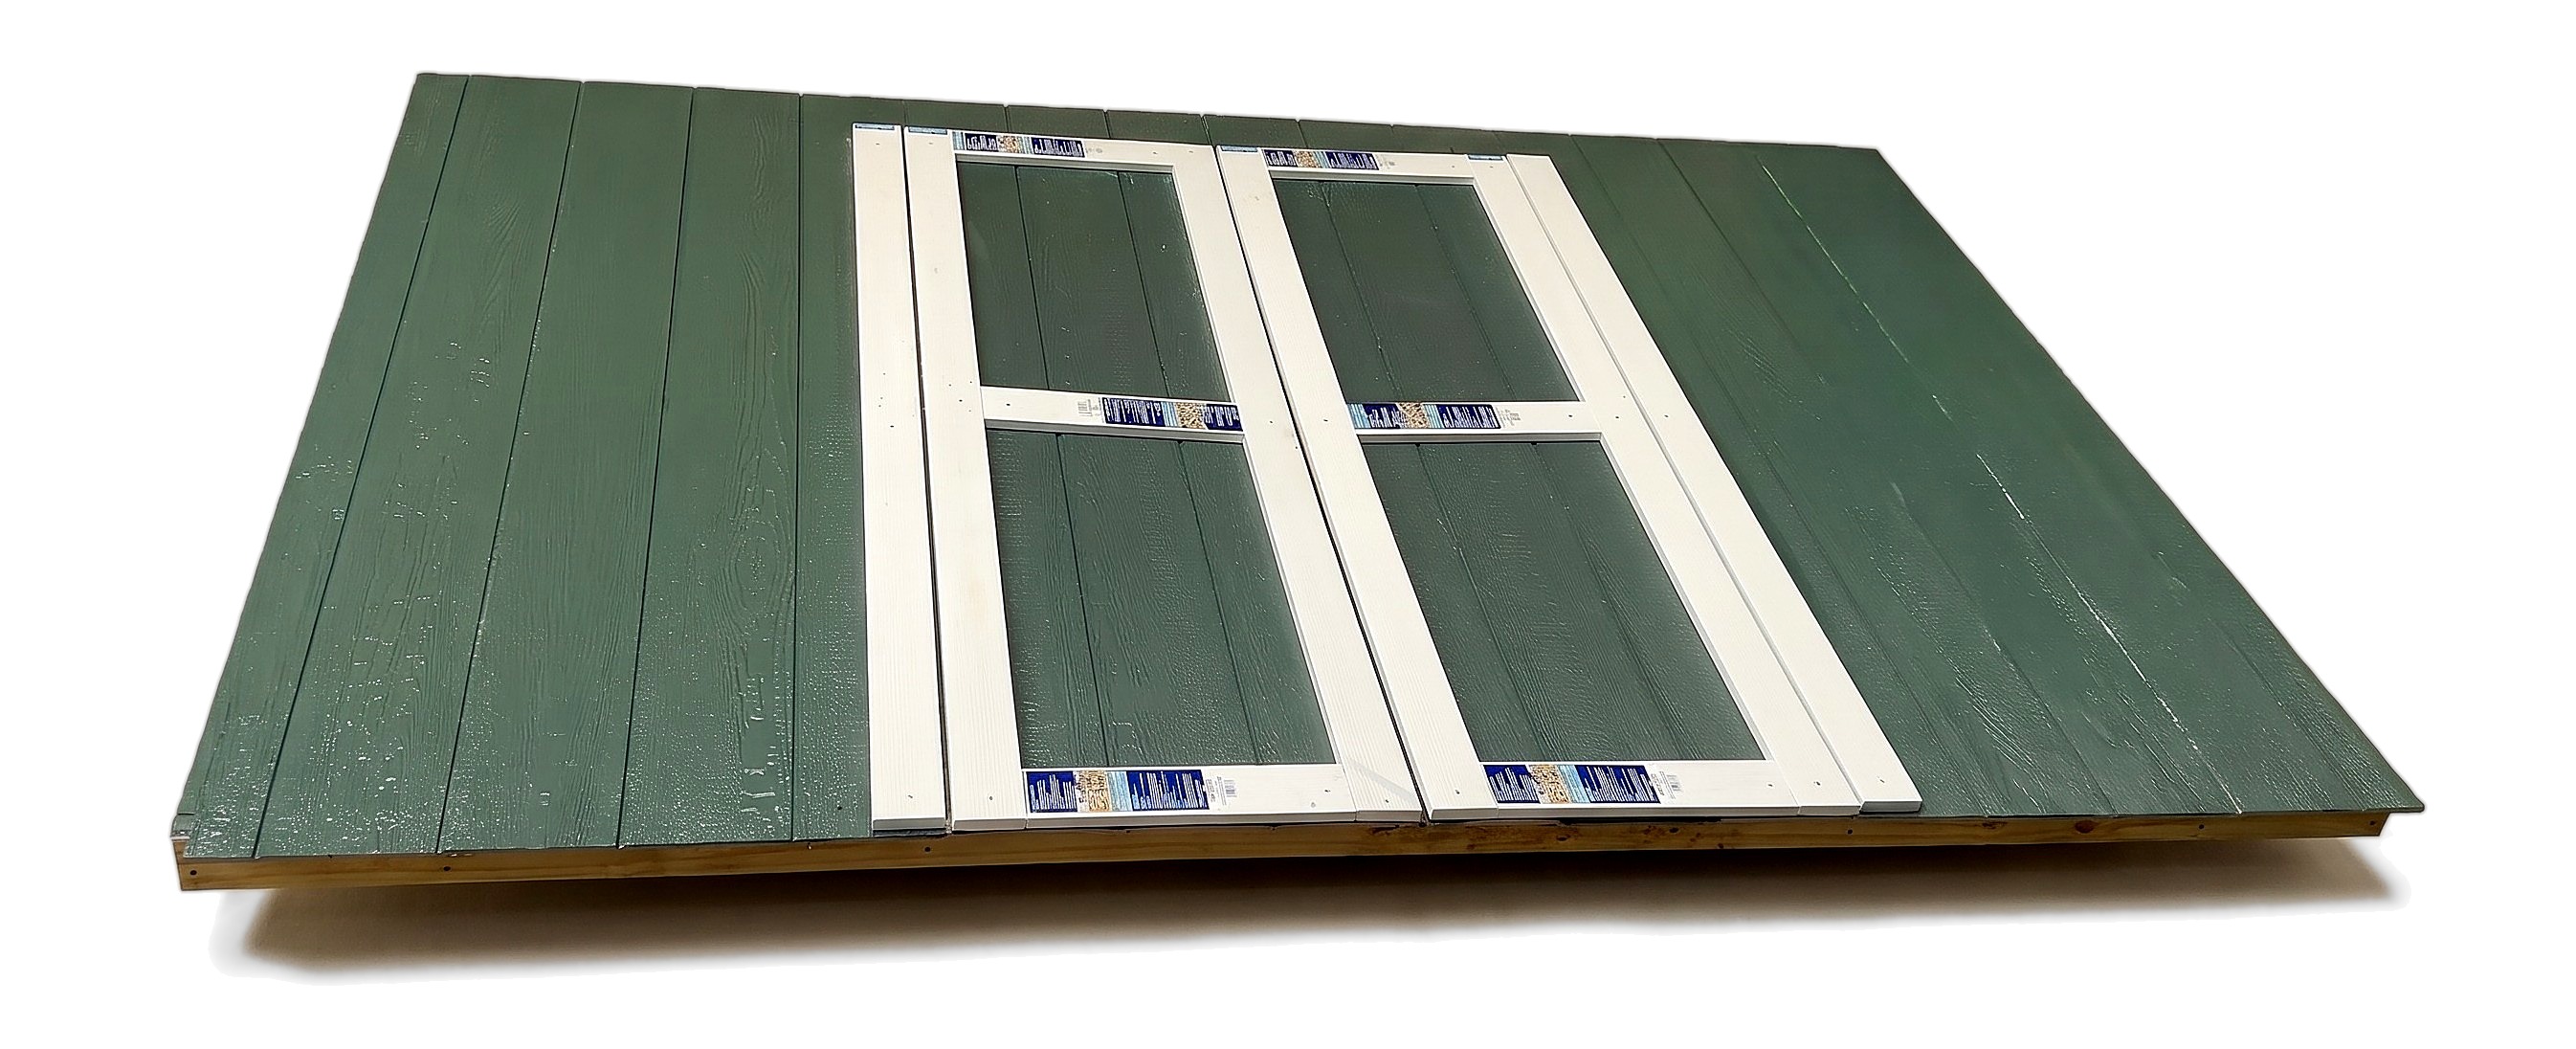
- Cut two 48 in panels (N) and two 12 in strips (O), all 80-1/2 in tall, and paint them lying on the wall frame, unfastened; the frame keeps paint off the floor.
- Each door is 24 in wide: two 73-1/2 in sides (Y) with three 17 in rails (AD) between them, at the bottom, the middle and the top, leaving two 31-1/2 in openings.
- Lay the two doors side by side over the seam of the two panels (N), 36 in in from each end of the wall and 3/8 in above the siding's bottom edge. Line up the left door's trim with the panel edge whose tongue is on the back, the right door's with the edge whose tongue is on the front.
- Add a 73-1/2 in vertical trim (AE) on each side, 3/8 in from the door trim and 3/8 in above the siding's bottom edge; a scrap of the 3/8 in siding makes a good spacer.
- Fasten all the trim lightly with #7 x 1-1/4 in trim screws every 12 in, without overdriving; the final screws go in from the back in step 5.
Key measurements
- Front wall frame: 120 in wide, 76-1/2 in tall (73-1/2 in studs plus the two plates).
- Front wall studs: 73-1/2 in.
- Front siding: 80-1/2 in tall; 12, 48, 48 and 12 in wide.
- Door trim: 73-1/2 in sides, 17 in rails, 31-1/2 in openings; each door 24 in wide.
- Trim gaps: 3/8 in to the vertical trim and above the siding's bottom edge.
- Tip: A scrap of LP SmartSide is exactly 3/8 in thick: use it as the gap spacer.
- Tip: The left 12 in strip can be cut 12-1/2 in to line up with the framing; the corner trim covers it either way.
Before you move on: The trim gaps are an even 3/8 in on both doors.
Step 5: Attach and Trim the Front Wall Siding and Doors
Score the doors out of the siding, fasten the trim from the back and fasten the front siding to the frame.
Parts in this step: (N) Front siding panel with door, (Y) Door trim side, (AD) Door trim rail, (AE) Vertical trim beside the doors, (J) Front wall top and bottom plate, (K) Front wall stud, (O) Front siding strip
You'll need: Cordless drill/driver, Cordless circular saw, Cordless impact driver, Cordless blower, LP SmartSide panel siding, #8 x 1-1/8 in exterior screws, #9 x 2 in exterior screws, Chalk
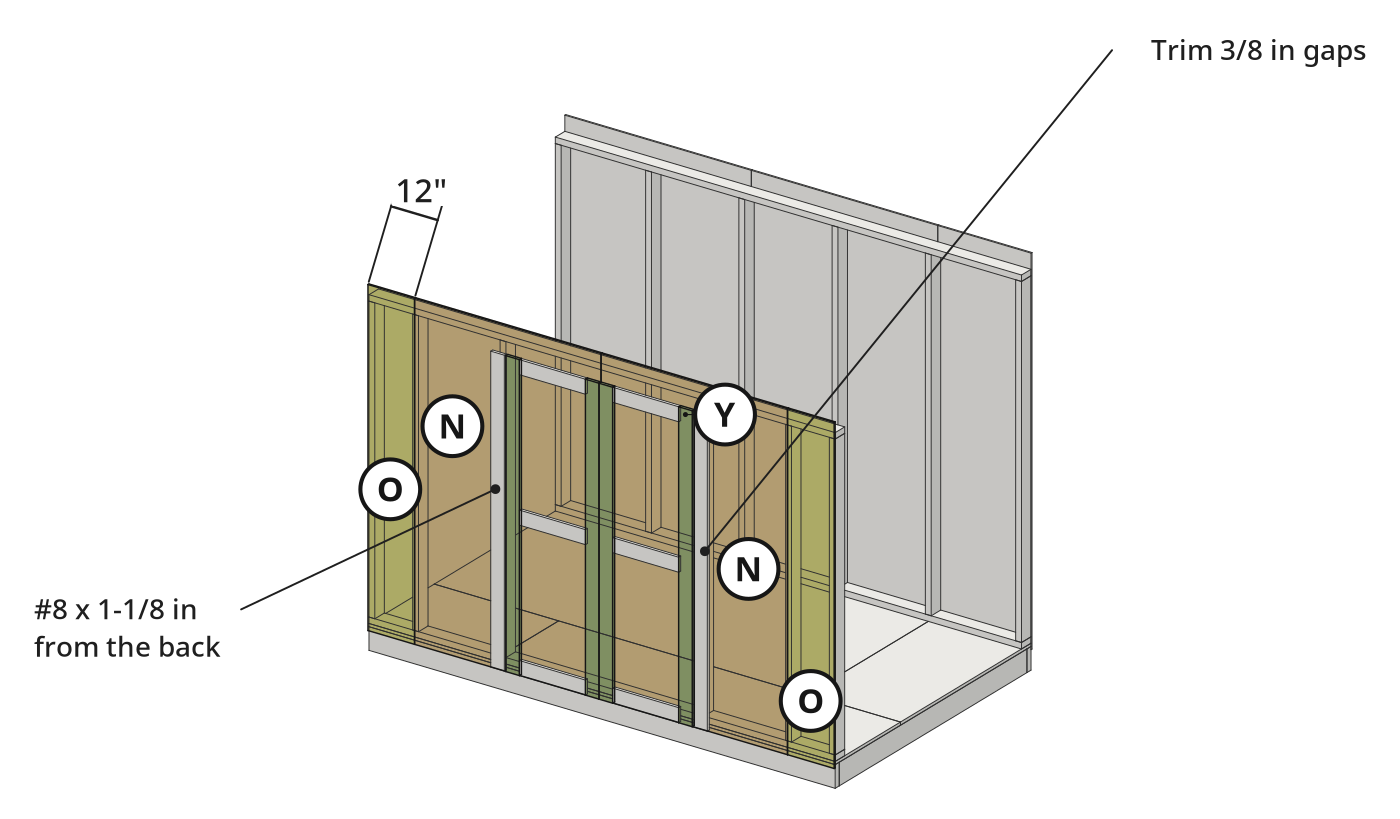
- 5.1 Score the doors and screw into the trim from the back
- Drill pilot holes from the front along each door's cut line, in the 3/8 in gap just outside the door trim.
- Flip the panels (N) and draw lines connecting the pilot holes.
- Make perforation cuts with a circular saw, leaving 2 to 3 uncut chunks on the side and 1 to 2 on top.
- Mark the trim outlines with a scrap of trim, then drive #8 x 1-1/8 in screws through the back into the trim (Y, AD, AE) every 12 in.
- 5.2 Fasten the front siding to the framing
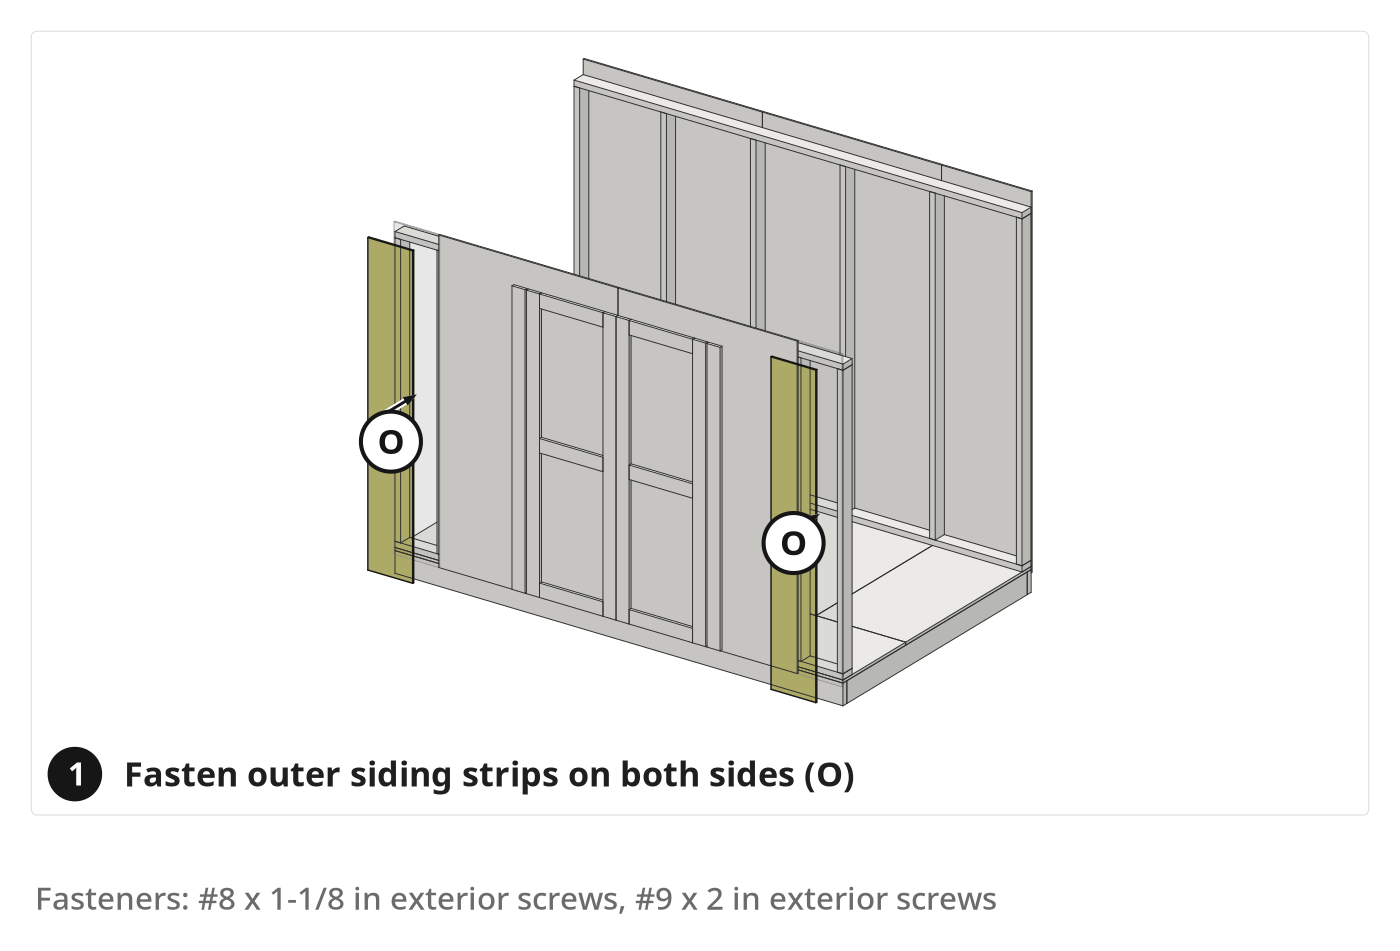
- Set the two door panels (N) and the 12 in strips (O) on the front wall frame.
- Keep the 1-1/2 in bottom overlap, as on the back wall.
- Drive #9 x 2 in screws through the siding into the frame (J, K).
- Never screw through the doors themselves: they must swing free.
- 5.3 Snap a chalk line and trim the top edge
- Snap a chalk line across the top of the panels (N, O).
- Trim any siding above the line with a circular saw and blow off the sawdust.
Key measurements
- Door trim screws from the back: every 12 in.
- Perforation cuts: 2 to 3 uncut chunks on the side, 1 to 2 on top.
- Tip: The uncut chunks keep the doors attached to the panel until the wall is up.
- Tip: Screws driven from the back hold the trim tight over time.
- Heads up: Wear eye protection when cutting siding with a circular saw.
Before you move on: The doors are scored but still attached, and no screws go into the doors.
Step 6: Paint the Front Wall, Install Hinges, and Stand the Wall
Caulk and paint the front siding, mount the six T-hinges and stand the front wall.
Parts in this step: (N) Front siding panel with door, (O) Front siding strip, (K) Front wall stud, (Y) Door trim side, (AE) Vertical trim beside the doors, (J) Front wall top and bottom plate
You'll need: Caulking gun, Paint roller and tray, Cordless drill/driver, Cordless impact driver, Spirit level, White caulk, Exterior paint, Double shed door kit, #10 x 3-1/2 in exterior screws, #8 x 1-1/4 in black hinge screws, #8 x 2 in black hinge screws
- 6.1 Caulk and paint the front wall
- Caulk all screw holes.
- Roll exterior paint on the siding with a 3/4 in nap roller.
- 6.2 Install the six door hinges
- Set three 6 in T-hinges on each door while the wall is flat.
- Drive #8 x 1-1/4 in black hinge screws into the door trim.
- Drive #8 x 2 in black hinge screws where the hinge sits over the framing, so they reach the 2x4s behind the trim.
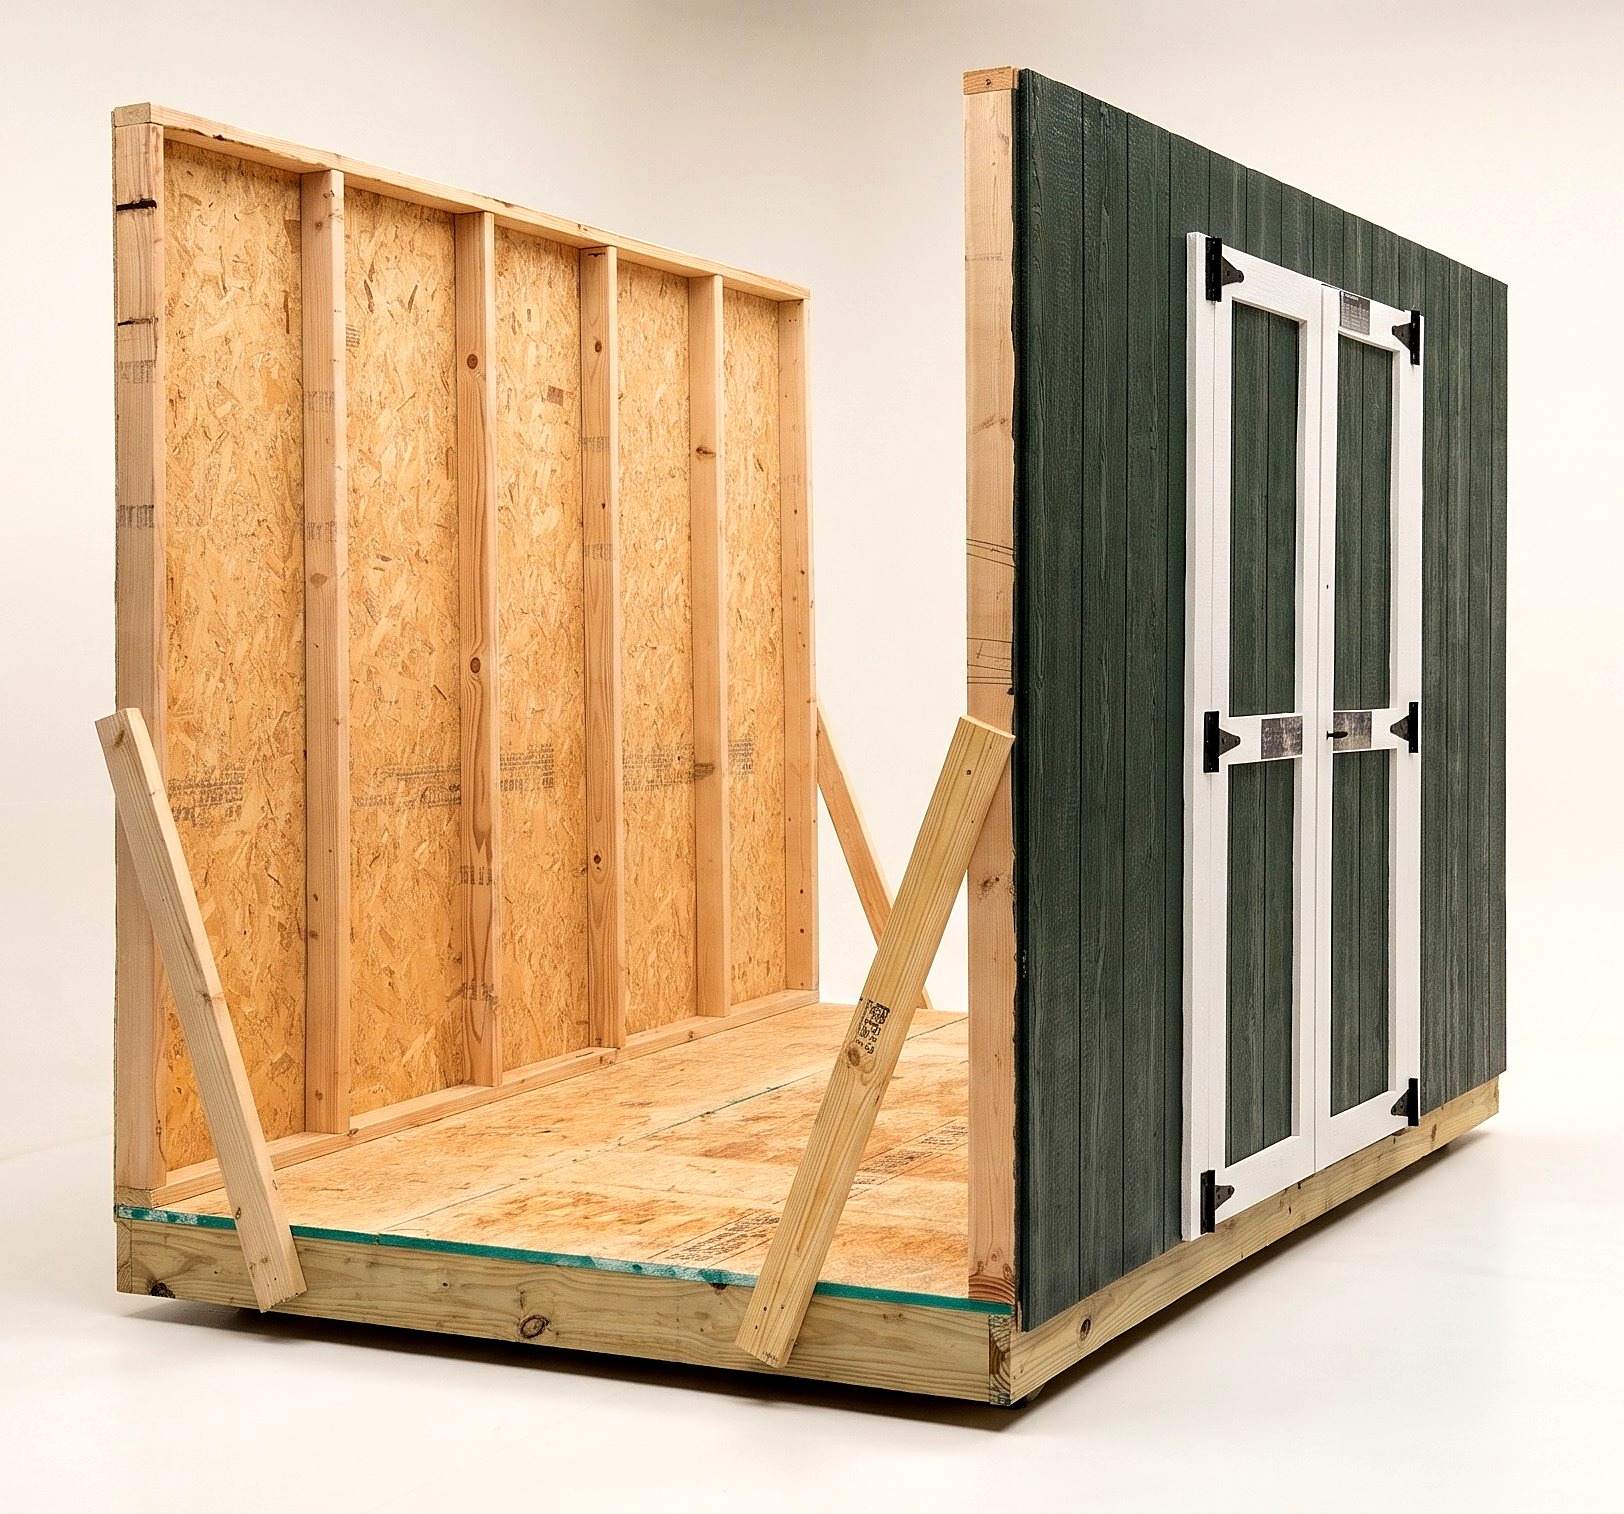
- 6.3 Raise, brace, plumb, and anchor the front wall
- Stand the front wall with a helper and brace it.
- Plumb it, then drive two #10 x 3-1/2 in screws through the bottom plate (J) at each stud location.
Key measurements
- Hinges: six 6 in T-hinges, three per door.
- Paint roller: 3/4 in nap.
- Tip: Mount the hinges with the wall flat, so the doors are ready to cut free once it stands.
- Heads up: Lift the front wall with a helper.
Before you move on: The front wall is plumb and screwed down at every stud.
Step 7: Install the Roof Rafters
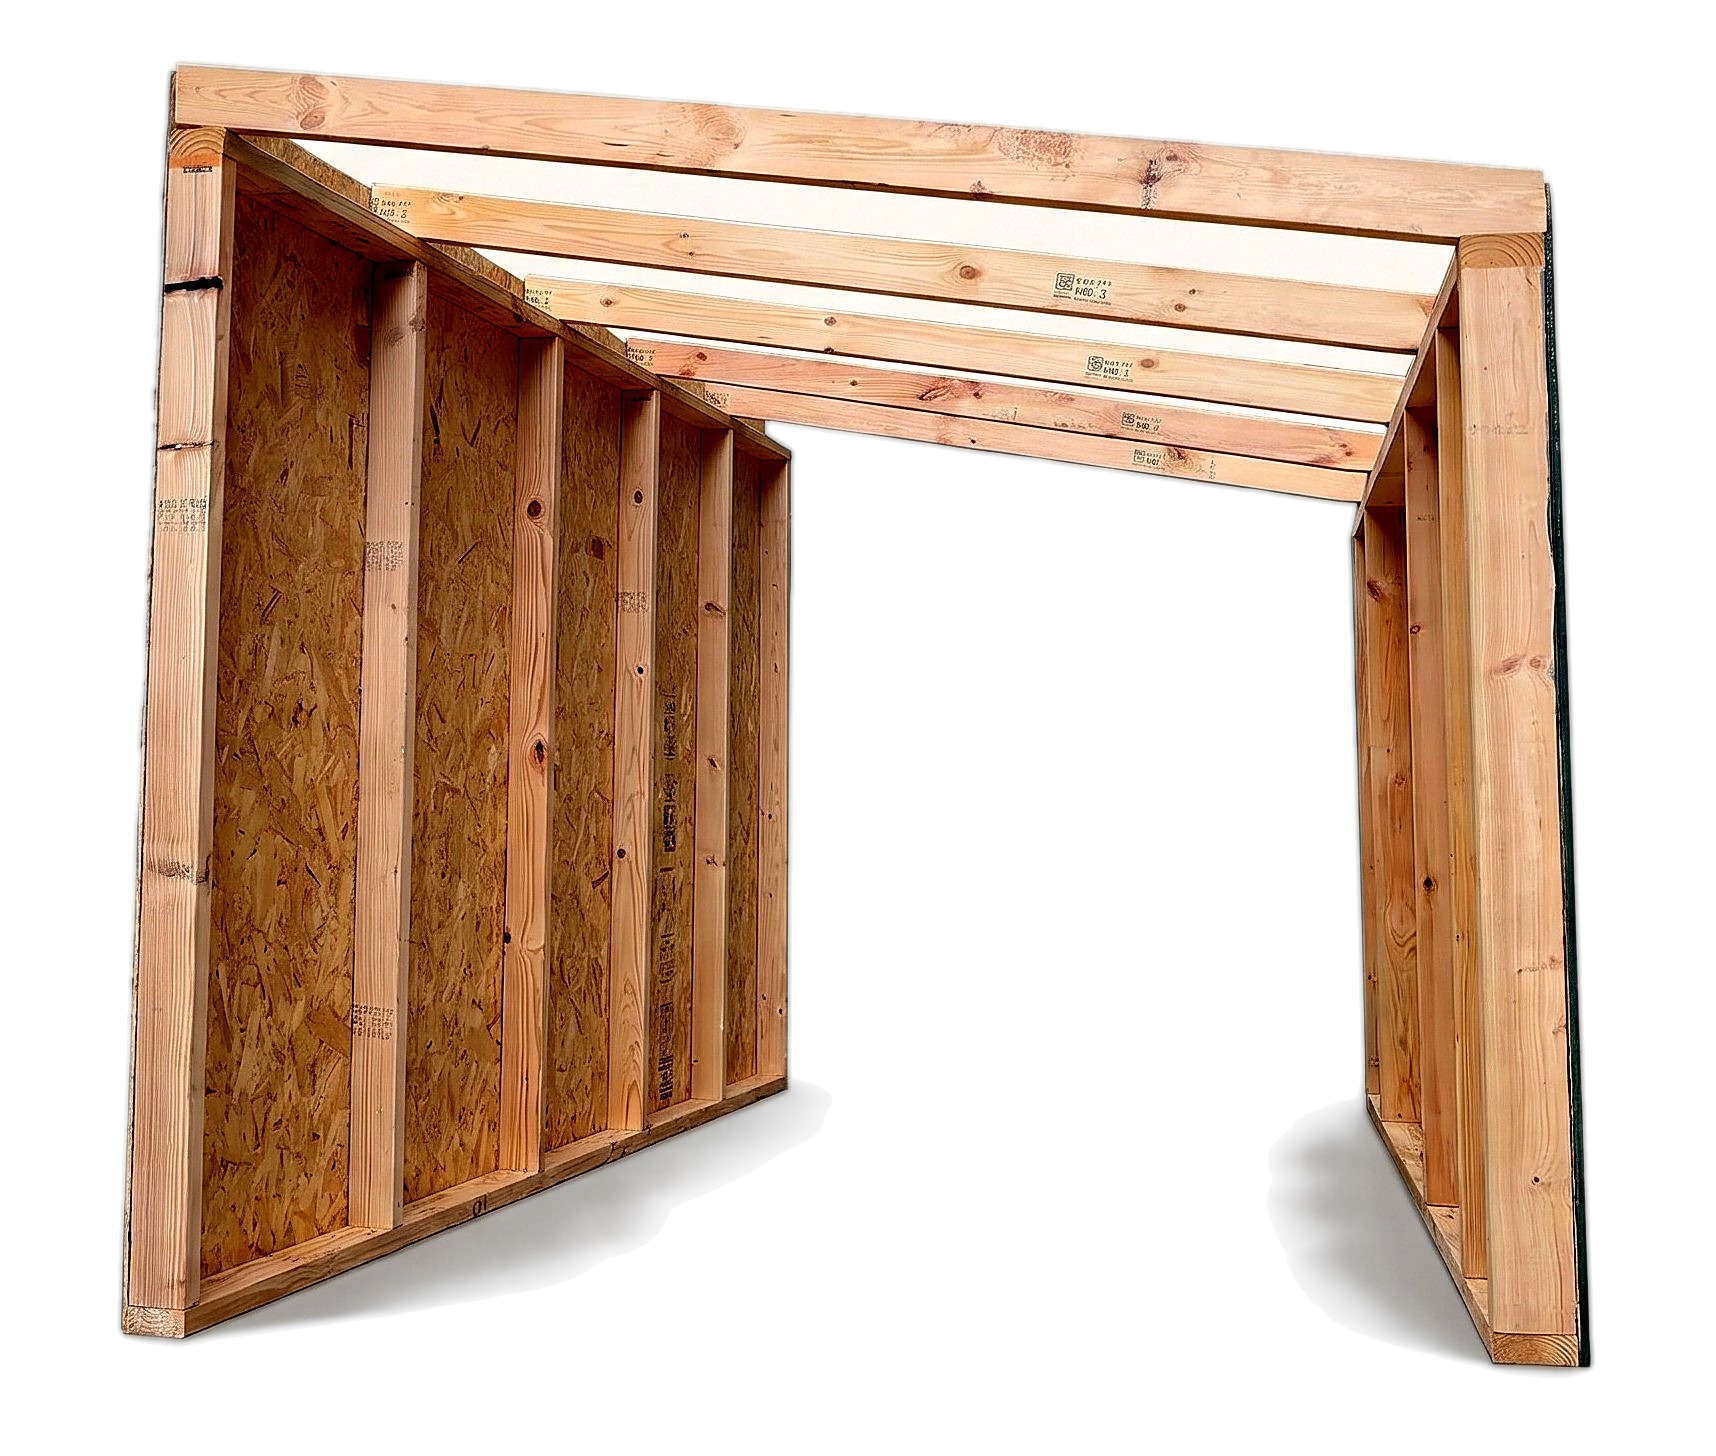
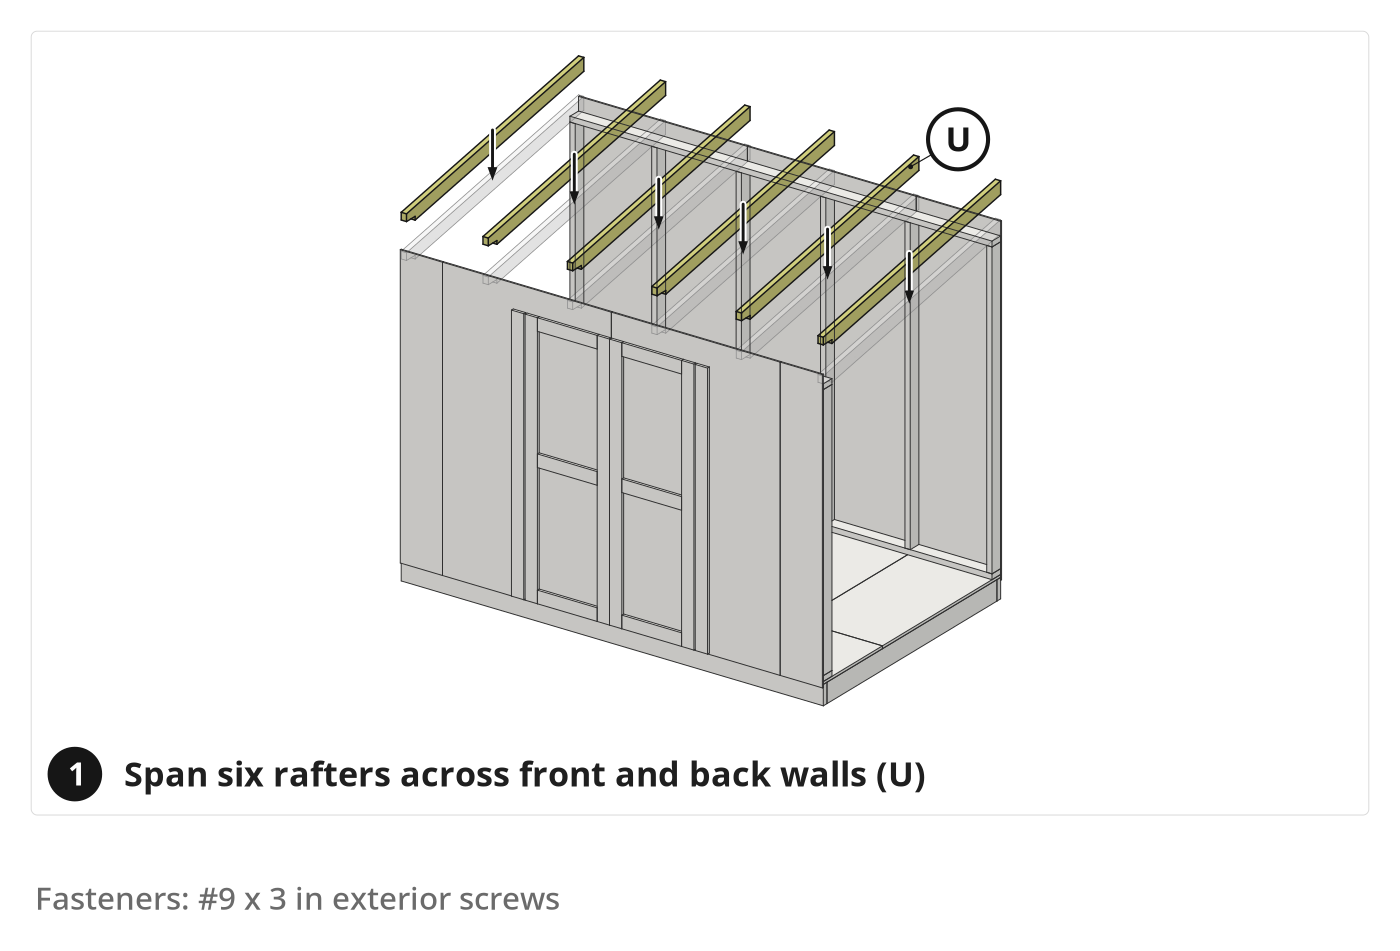
Cut six 73-1/8 in rafters and fasten them 24 in on center across the front and back walls.
Parts in this step: (U) Rafter
You'll need: Speed square, Cordless circular saw, Cordless impact driver, Step ladder, Tape measure, 2x4 framing lumber, 8 ft, #9 x 3 in exterior screws
- 7.1 Cut the rafters and set them 24 inches on center
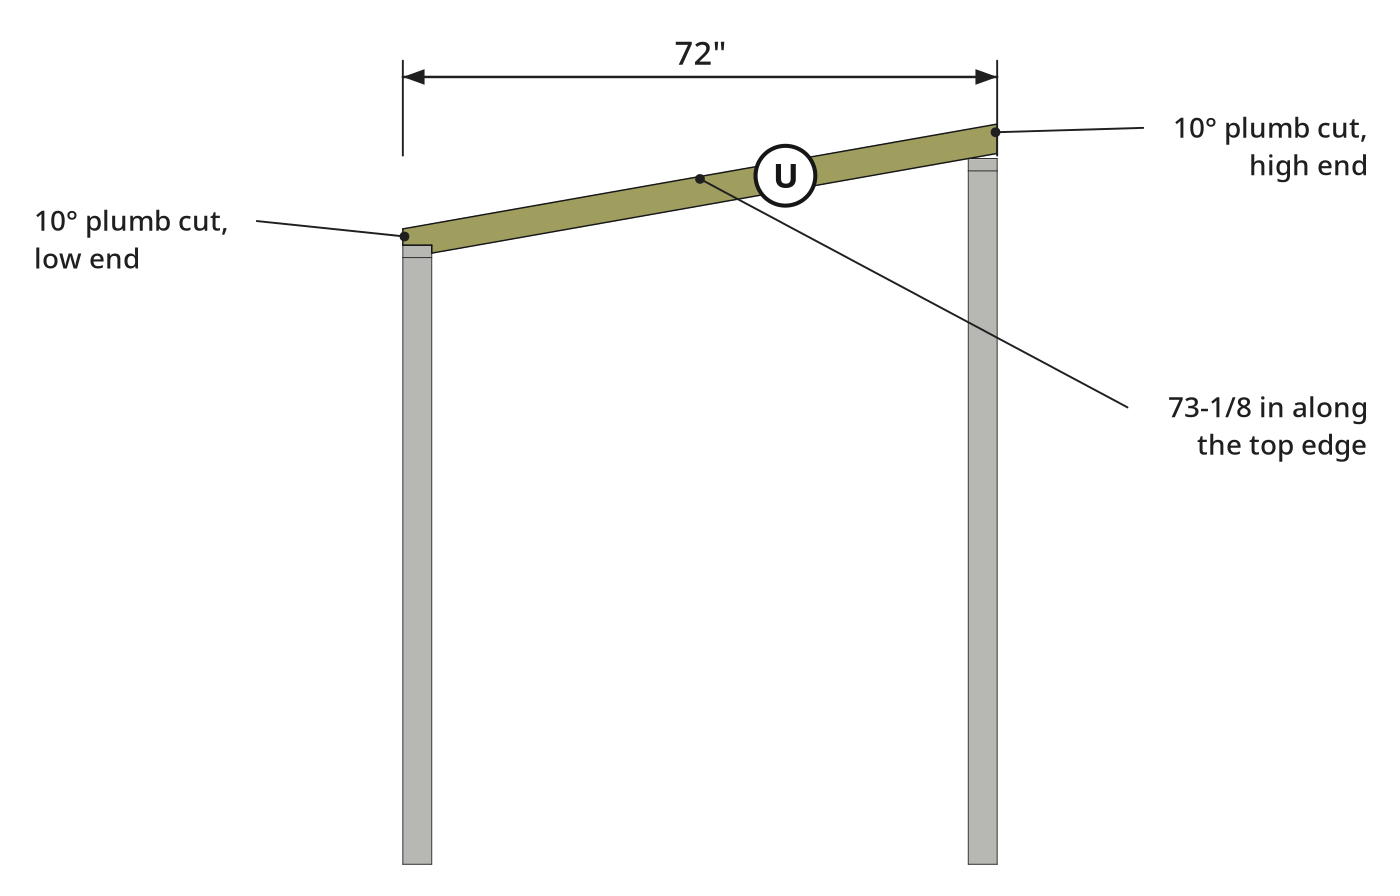
- Cut six 2x4 rafters (U) to 73-1/8 in with a 10° plumb cut at each end.
- Mark the 10° cuts with a speed square: line up the 2 (about 10°) with the top edge of the board.
- Make a seat cut 2-7/8 in down from the short edge at one end so the rafter rests on the top plate.
- Set the outer rafters first, then space the rest 24 in on center; the end spaces are 23-1/4 in.
- 7.2 Screw each rafter through the siding and toe-screw both sides
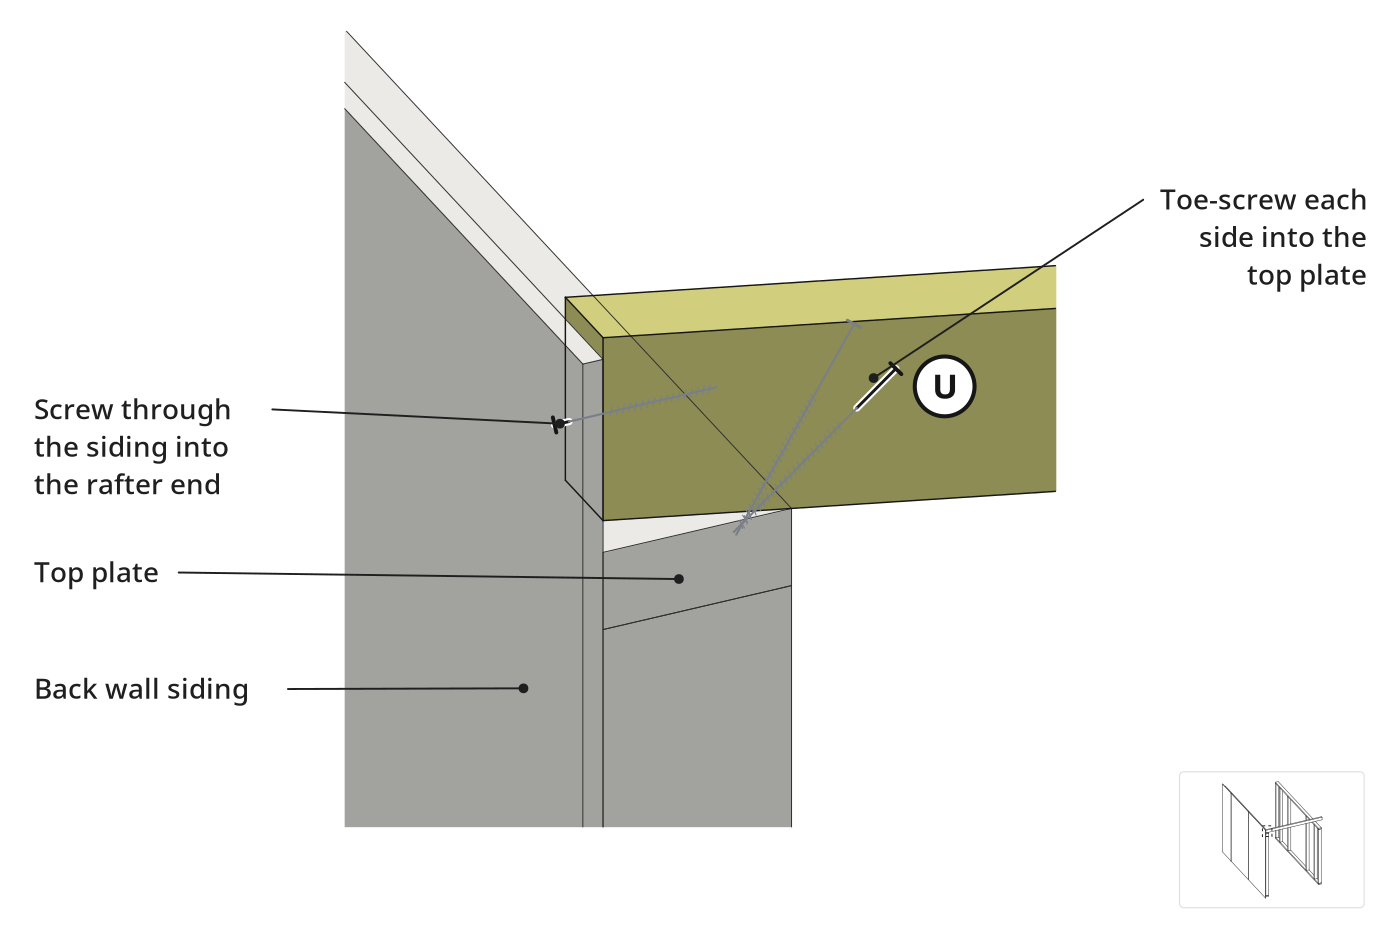
- Drive one #9 x 3 in screw through the siding into the end of each rafter (U).
- Toe-screw one #9 x 3 in screw on each side of every rafter (U), angled down through the rafter into the top plates (F, J).
Key measurements
- Rafter length: 73-1/8 in, 10° plumb cut at both ends.
- Seat cut: 2-7/8 in.
- Rafter spacing: 24 in on center; 23-1/4 in at the ends.
- Tip: Set the two outer rafters first and measure the inner ones from them.
- Heads up: Keep stable footing on the step ladder.
Before you move on: All six rafters sit on both top plates with a toe screw on each side.
Step 8: Cut Open the Doors, Frame the Doorway, and Install Hardware
Cut the doors free, frame the doorway, brace the doors and fit the latch and barrel bolts.
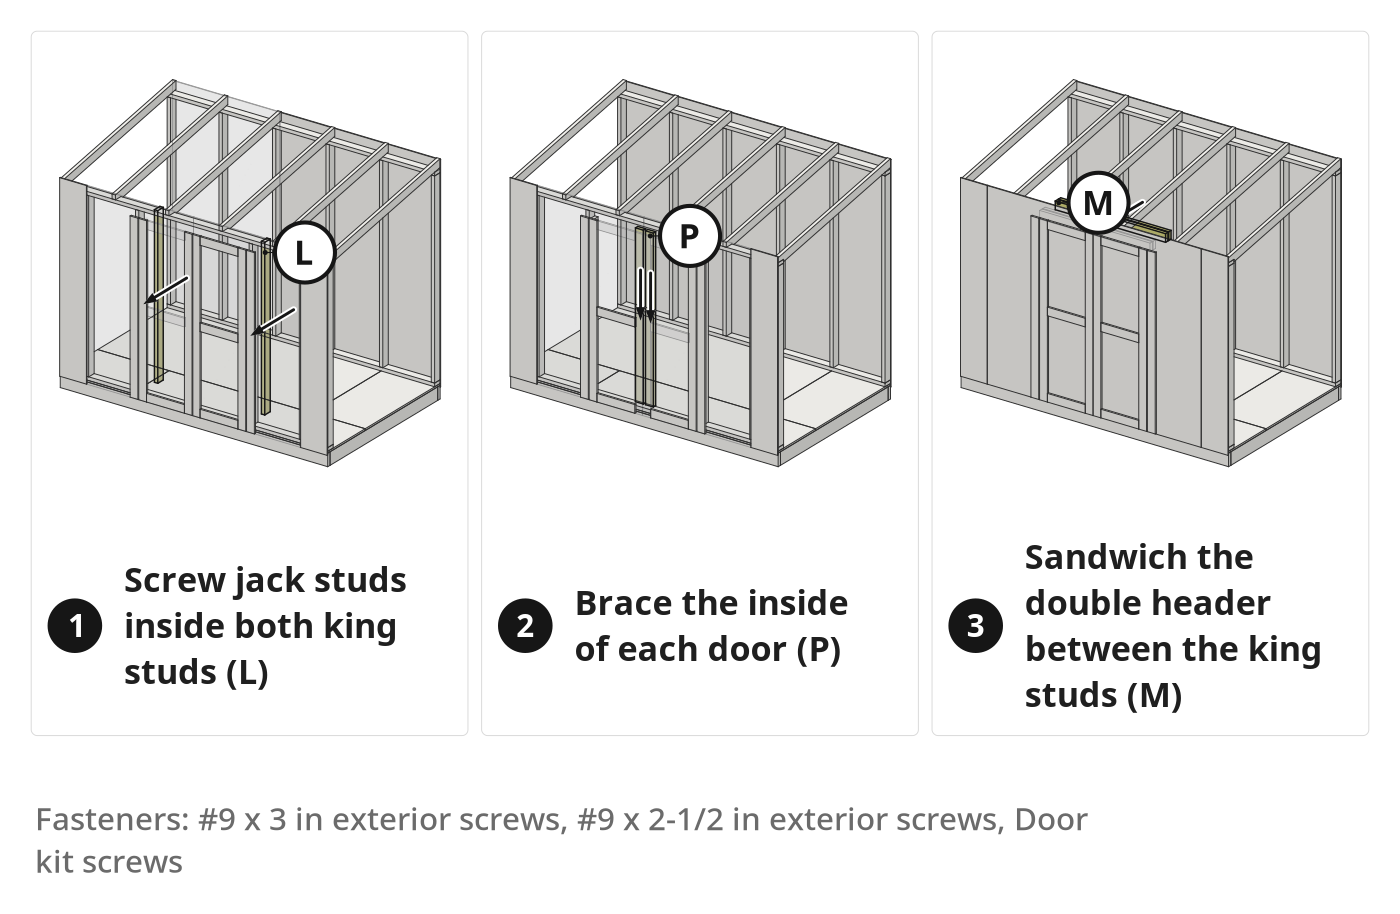
Parts in this step: (J) Front wall top and bottom plate, (K) Front wall stud, (L) Door jack stud, (M) Door header, (N) Front siding panel with door, (P) Door brace
You'll need: Cordless circular saw, Reciprocating saw, Cordless impact driver, Cordless drill/driver, Spade bit, One-handed bar clamps, 2x4 framing lumber, 8 ft, Double shed door kit, #9 x 3 in exterior screws, #9 x 2-1/2 in exterior screws, Door kit screws
- 8.1 Cut the double doors free
- Finish the perforation cuts with a circular saw to free both doors.
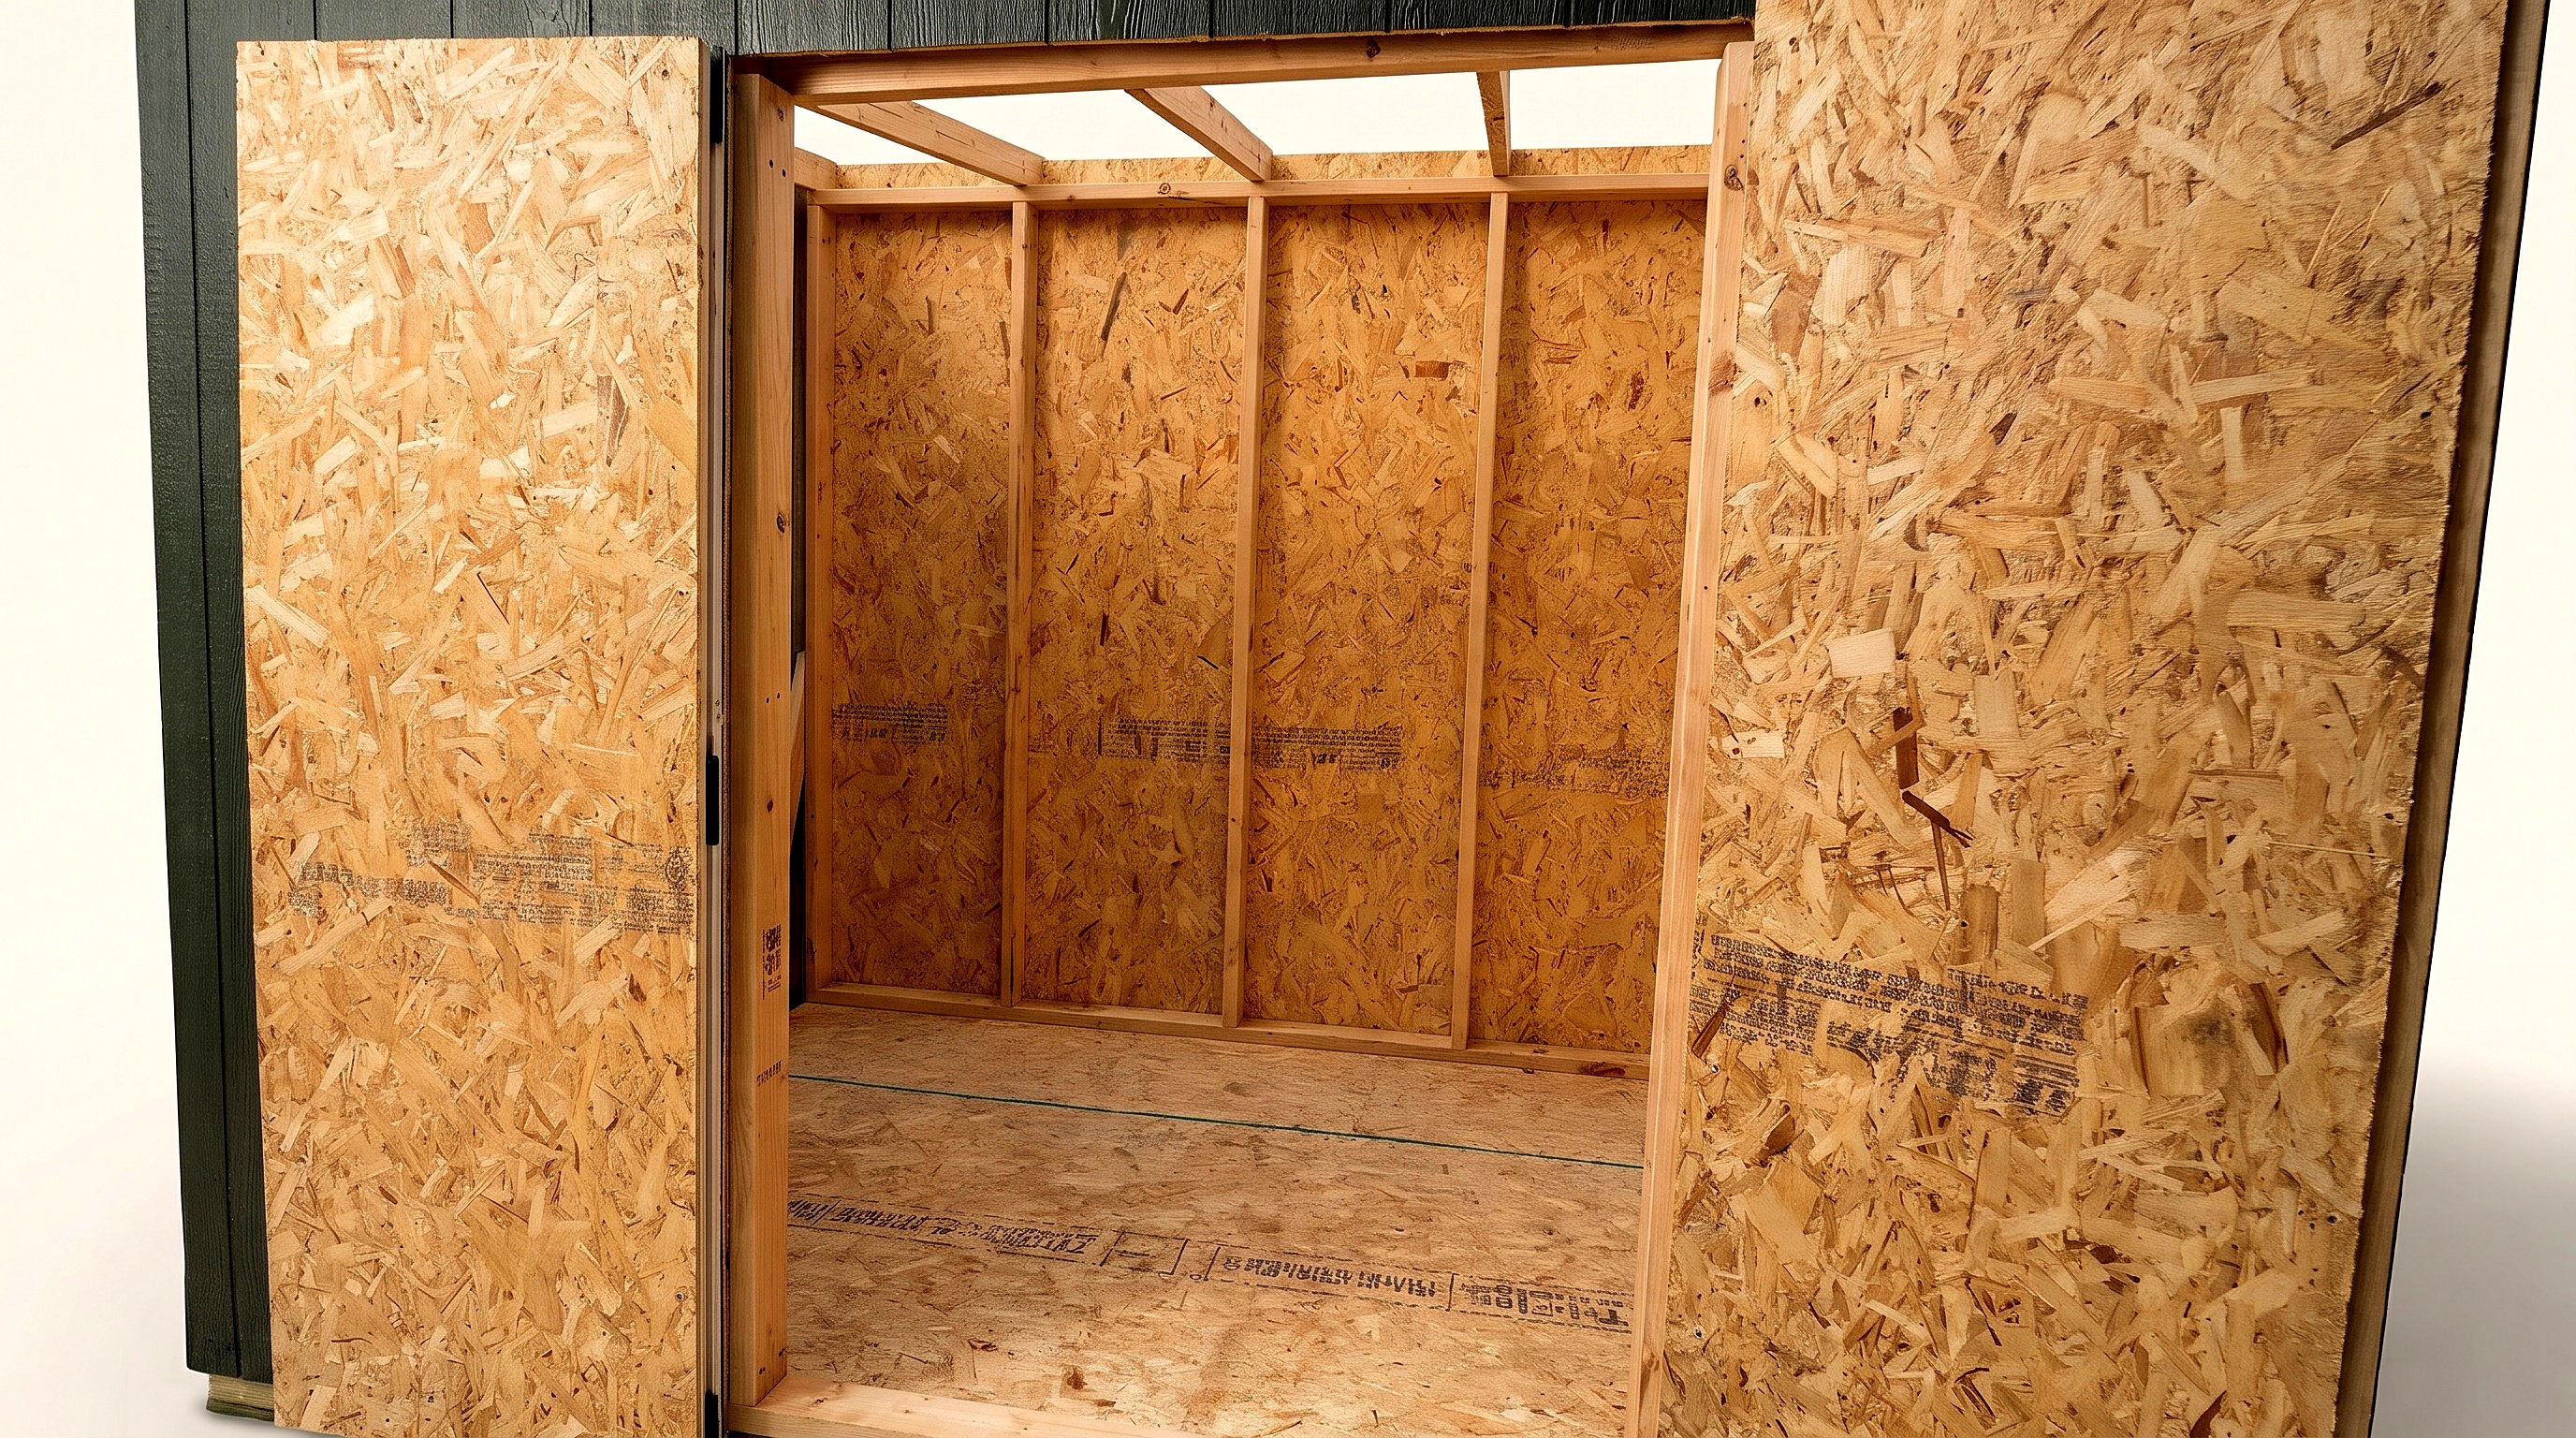
- Cut the doors free before the side walls go up, so you're not trapped inside.
- 8.2 Install the jack studs and header, and cut out the threshold
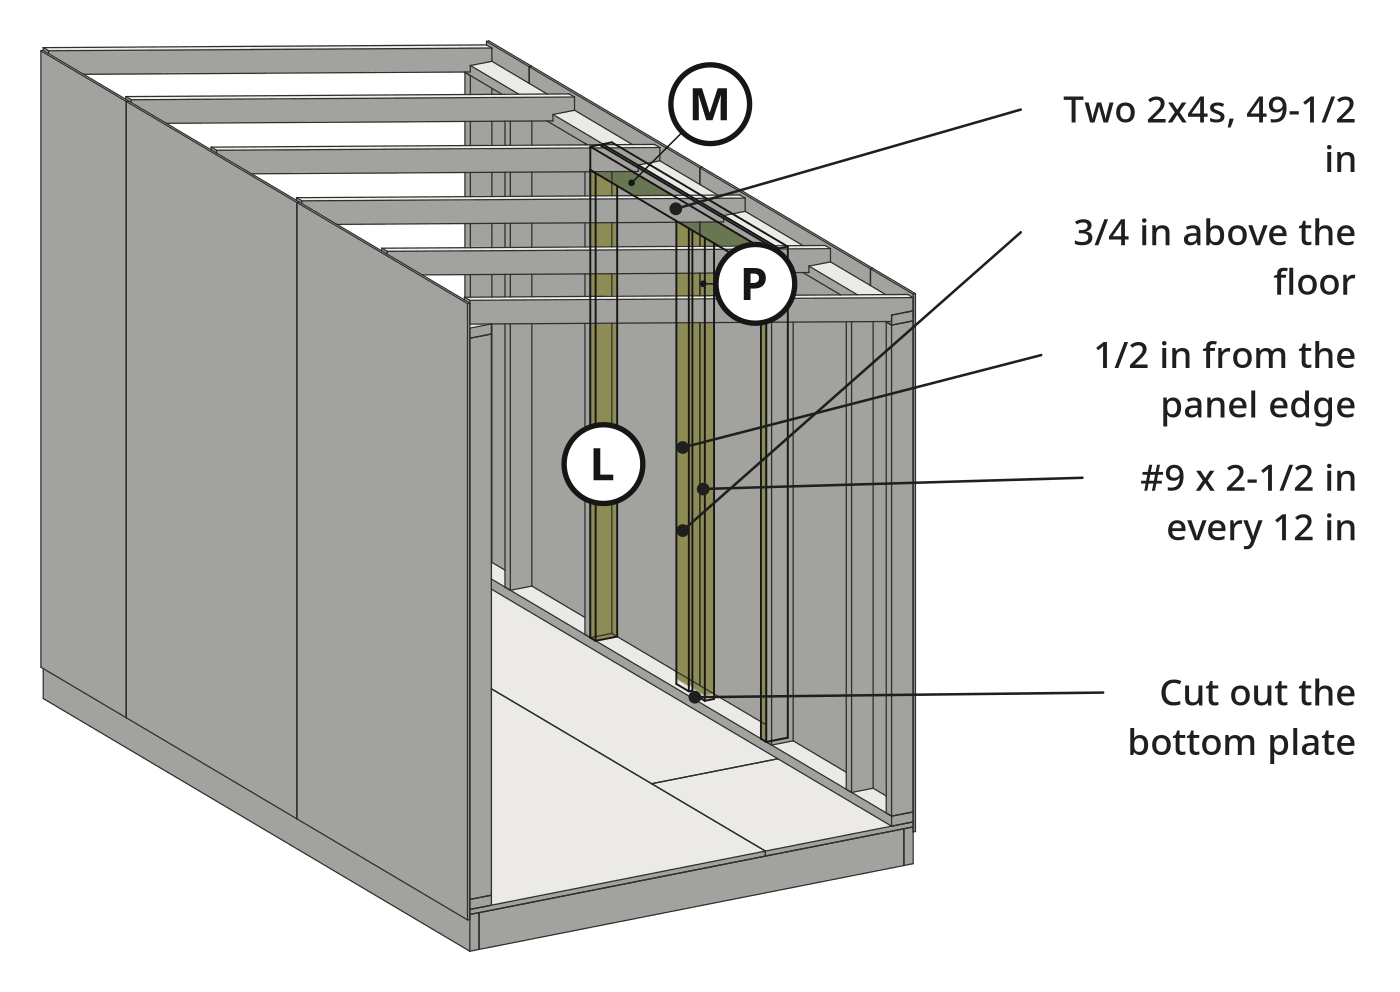
- Cut two jack studs (L) to 70 in and two header 2x4s (M) to 49-1/2 in.
- Sandwich the two header 2x4s (M) between the king studs (K).
- Drive two #9 x 3 in screws through each king stud into the header, and four down each jack stud (L) into its king stud.
- Cut out the bottom plate (J) across the doorway with a reciprocating saw.
- 8.3 Brace the inside of each door
- Cut two 2x4 door braces (P) to 70-1/2 in, one per door.
- Keep about 1/2 in between each brace and the panel edge, so the right door's tongue rests on the left door's.
- Leave a 3/4 in gap between the bottom of each brace and the OSB floor.
- Drive #9 x 2-1/2 in screws every 12 in.
- 8.4 Install the barrel bolts and the T-handle latch
- Screw the barrel bolts to the top and bottom of the left door's brace (P).
- Drill a 5/8 in hole through the right door with a spade bit.
- Slide the latch through, screw it in through every mounting hole, then fit the D-handle inside and tighten its set screw.
Key measurements
- Door header: two 2x4s, 49-1/2 in.
- Jack studs: 70 in.
- Door braces: 70-1/2 in; 1/2 in from the panel edge, 3/4 in above the floor.
- Latch hole: 5/8 in.
- Tip: Clamp the braces and test the swing before screwing them on.
- Heads up: Cut the doors open before installing the side walls, or you'll be trapped inside.
Before you move on: Both doors open, close and latch without rubbing.
Step 9: Frame, Sheet, Trim, and Paint the Side Walls
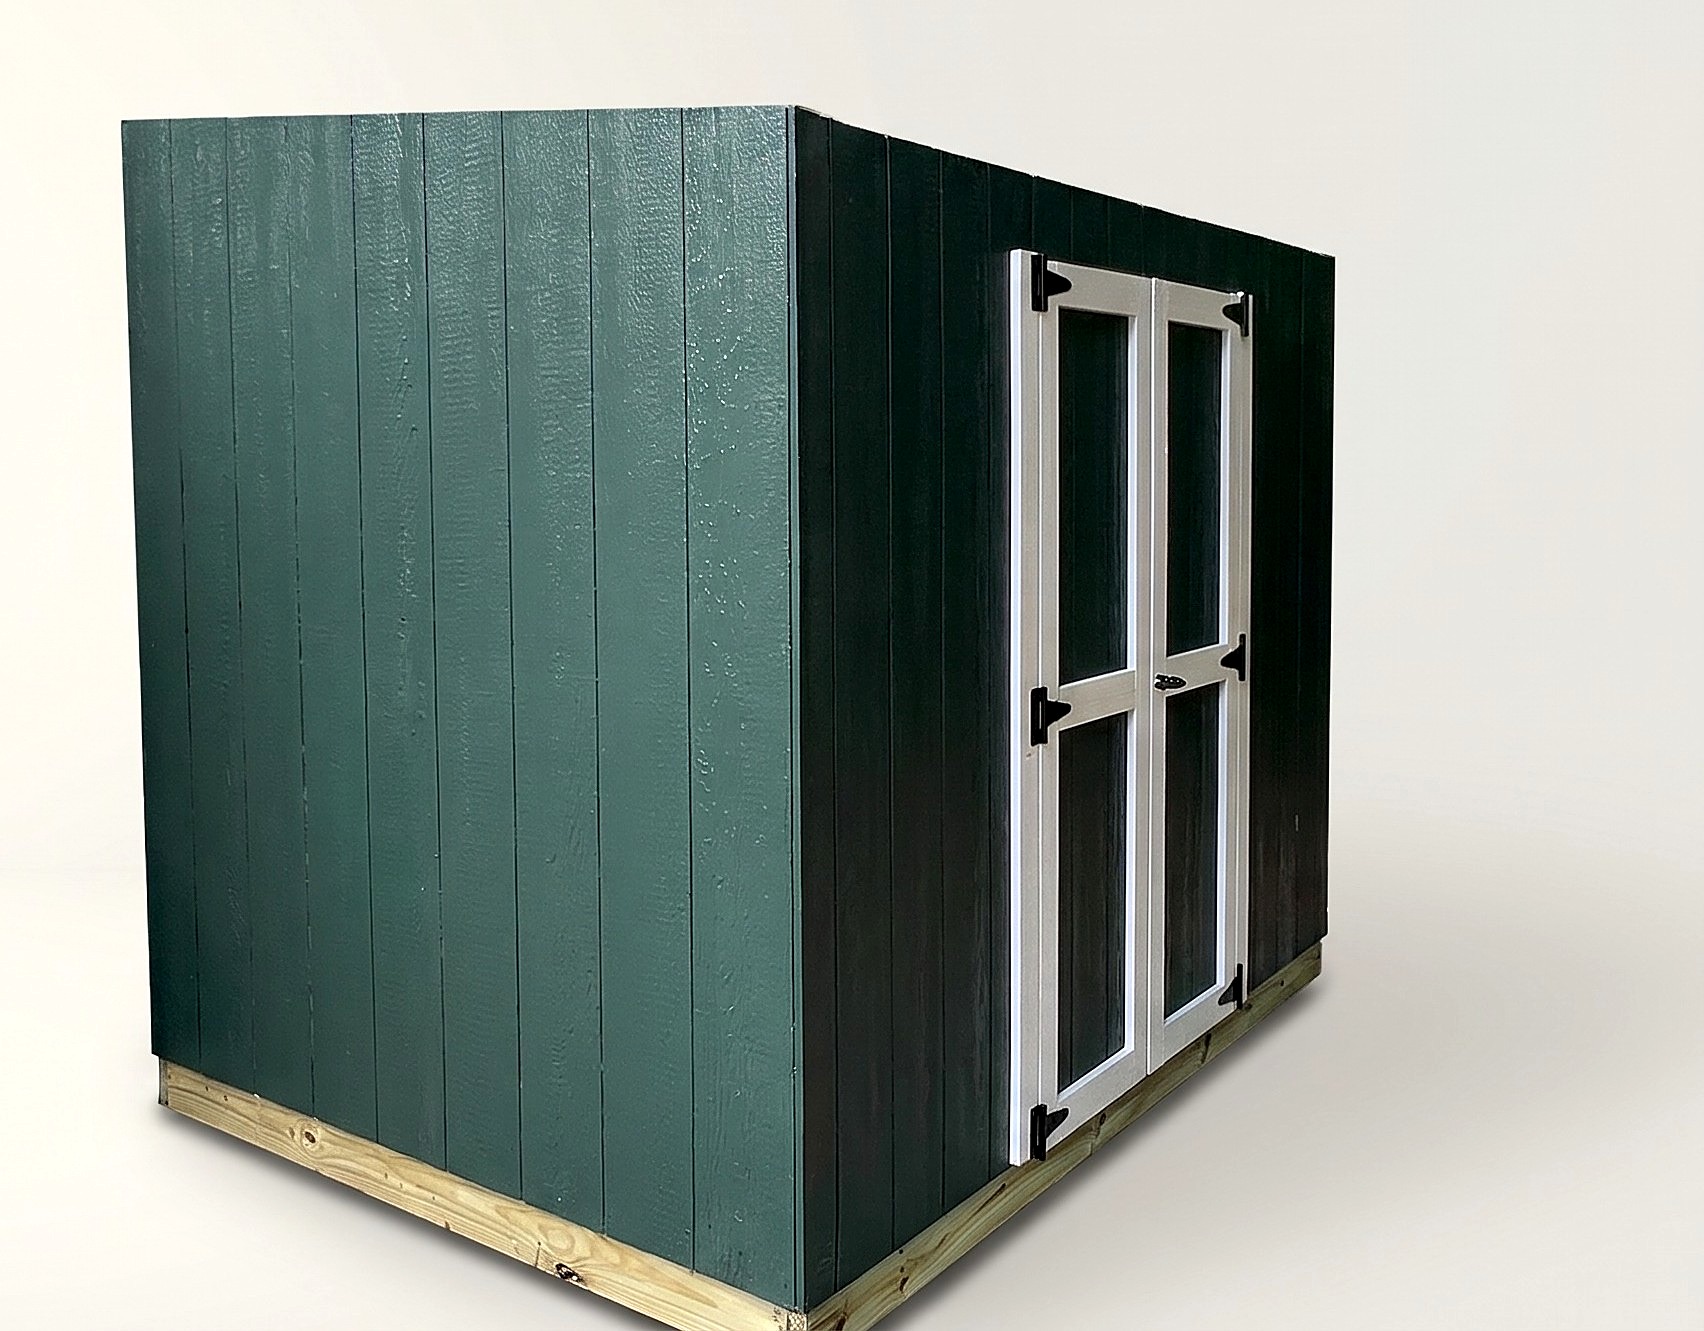
Frame and stand both side walls, side them and cut the siding along the roofline.
Parts in this step: (Q) Side wall plate, (R) Side wall stud, (S) Side wall siding panel, (T) Side wall siding panel, narrow, (U) Rafter
You'll need: Speed square, Cordless impact driver, Spirit level, Reciprocating saw, Eye protection, Paint roller and tray, 2x4 framing lumber, 8 ft, LP SmartSide panel siding, #9 x 3 in exterior screws, #10 x 3-1/2 in exterior screws, #9 x 2 in exterior screws, White caulk, Exterior paint
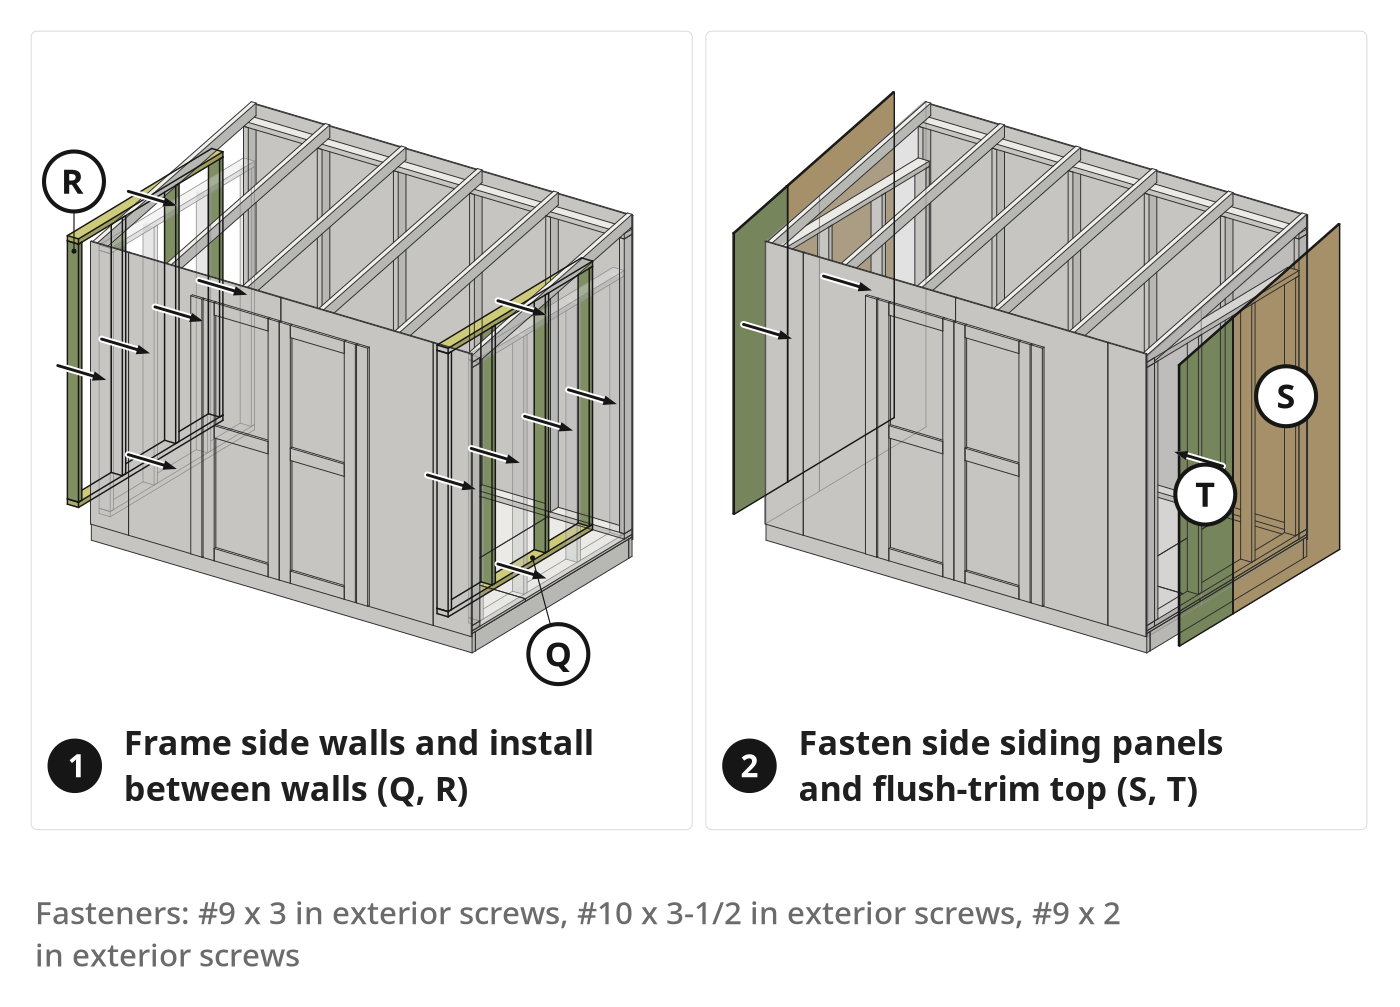
- 9.1 Frame and install the side walls
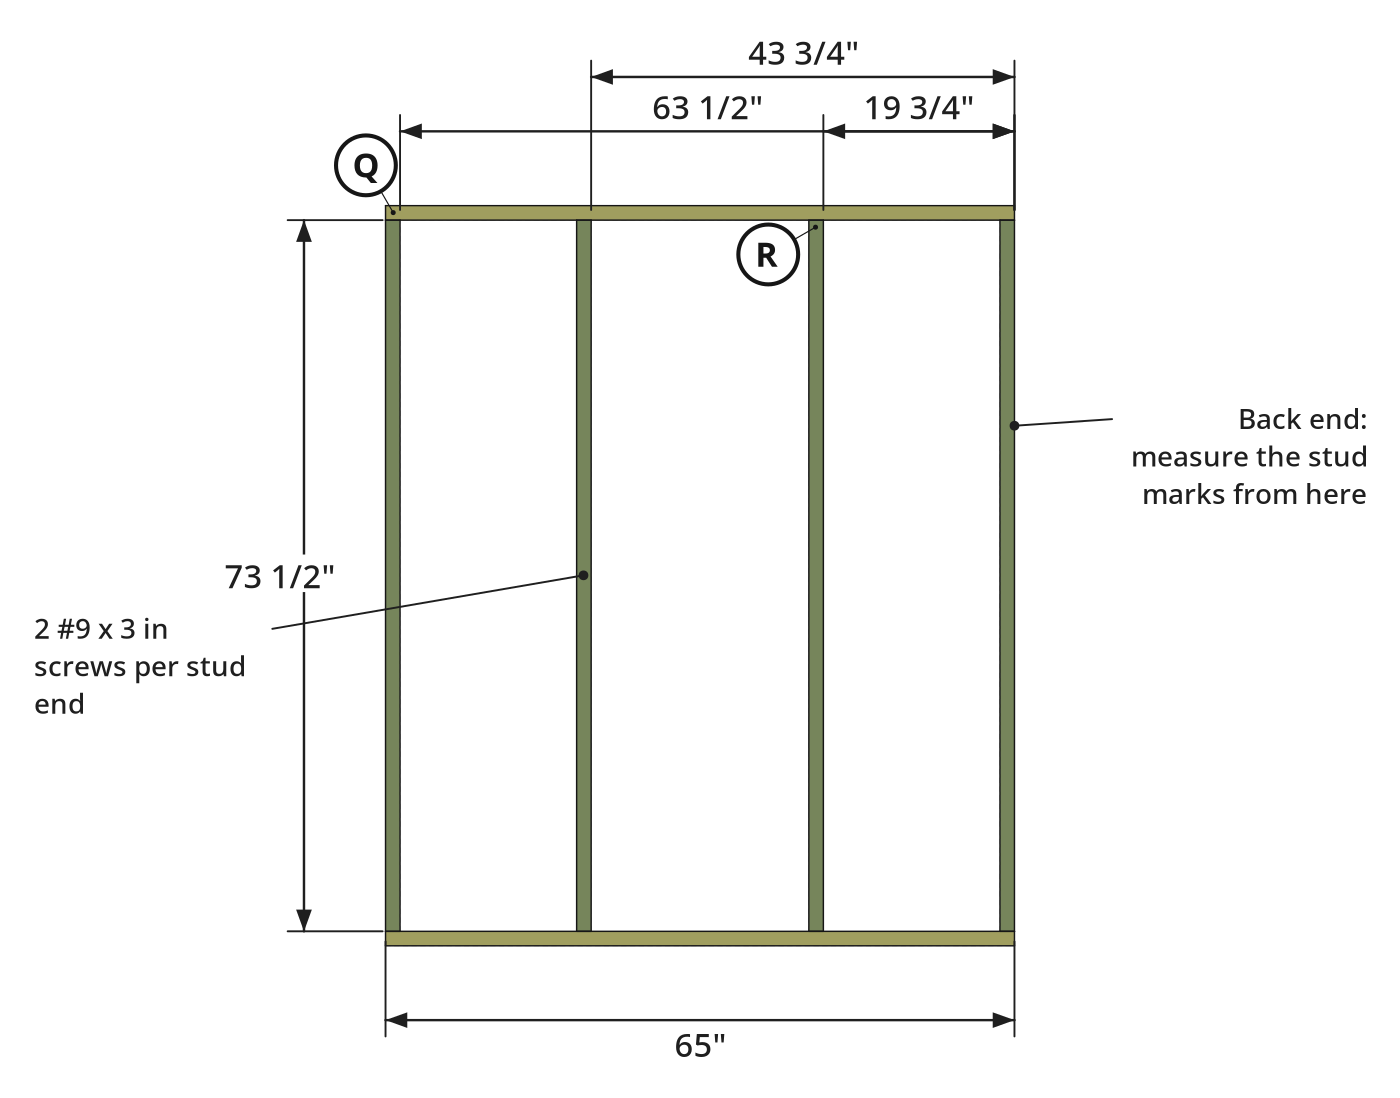
- Cut four plates (Q) to 65 in and eight studs (R) to 73-1/2 in for two frames, 76-1/2 in tall with the plates.
- Mark the studs from one end at 19-3/4, 43-3/4 and 63-1/2 in and screw them to the plates (Q) with #9 x 3 in screws.
- Set each frame between the front and back walls; screw the bottom plate (Q) to the floor with #10 x 3-1/2 in screws.
- Drive three #9 x 3 in screws down the side of each frame into the wall next to it.
- 9.2 Hang the side wall siding on a temporary ledger
- Screw a temporary 2x4 ledger to the floor frame to hold the siding.
- Hang a full 48 in sheet (S) and a 24 in sheet (T) on each side wall.
- Drive #9 x 2 in screws as on the back wall: 12 in on studs, 6 in on seams.
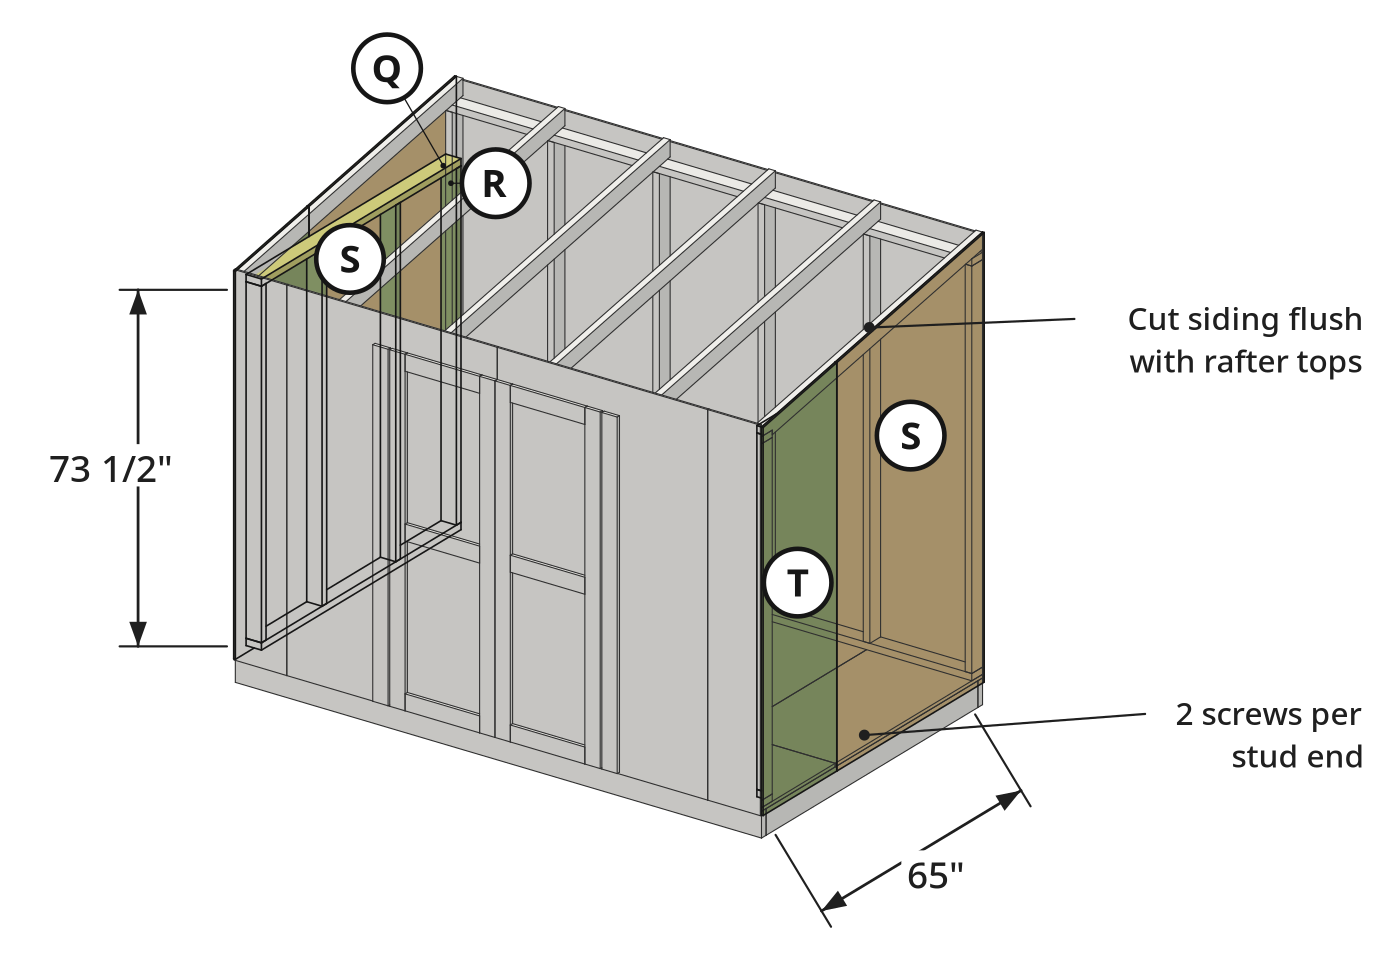
- 9.3 Cut the side wall siding along the roofline
- Cut the siding (S, T) along the roofline so its top is flush with the top of the rafters (U).
- Trim with a reciprocating saw or a similar tool; a palm router with a flush-trim bit also works.
- Wear eye protection: cutting siding throws dust.
- 9.4 Caulk and paint the side wall siding
- Caulk the screw holes and roll exterior paint on the side wall siding (S, T).
Key measurements
- Side wall frames: 65 in wide, 76-1/2 in tall (73-1/2 in studs plus the two plates).
- Side wall studs: 73-1/2 in.
- Side siding: one 48 in and one 24 in sheet per wall, cut flush with the rafter tops.
- Tip: The temporary ledger holds the heavy siding sheets in line while you fasten them alone.
- Heads up: Wear eye protection when cutting siding.
Before you move on: The side siding's top edge is flush with the top of the end rafters.
Step 10: Install Roof Overhangs and Exterior Corner Trim
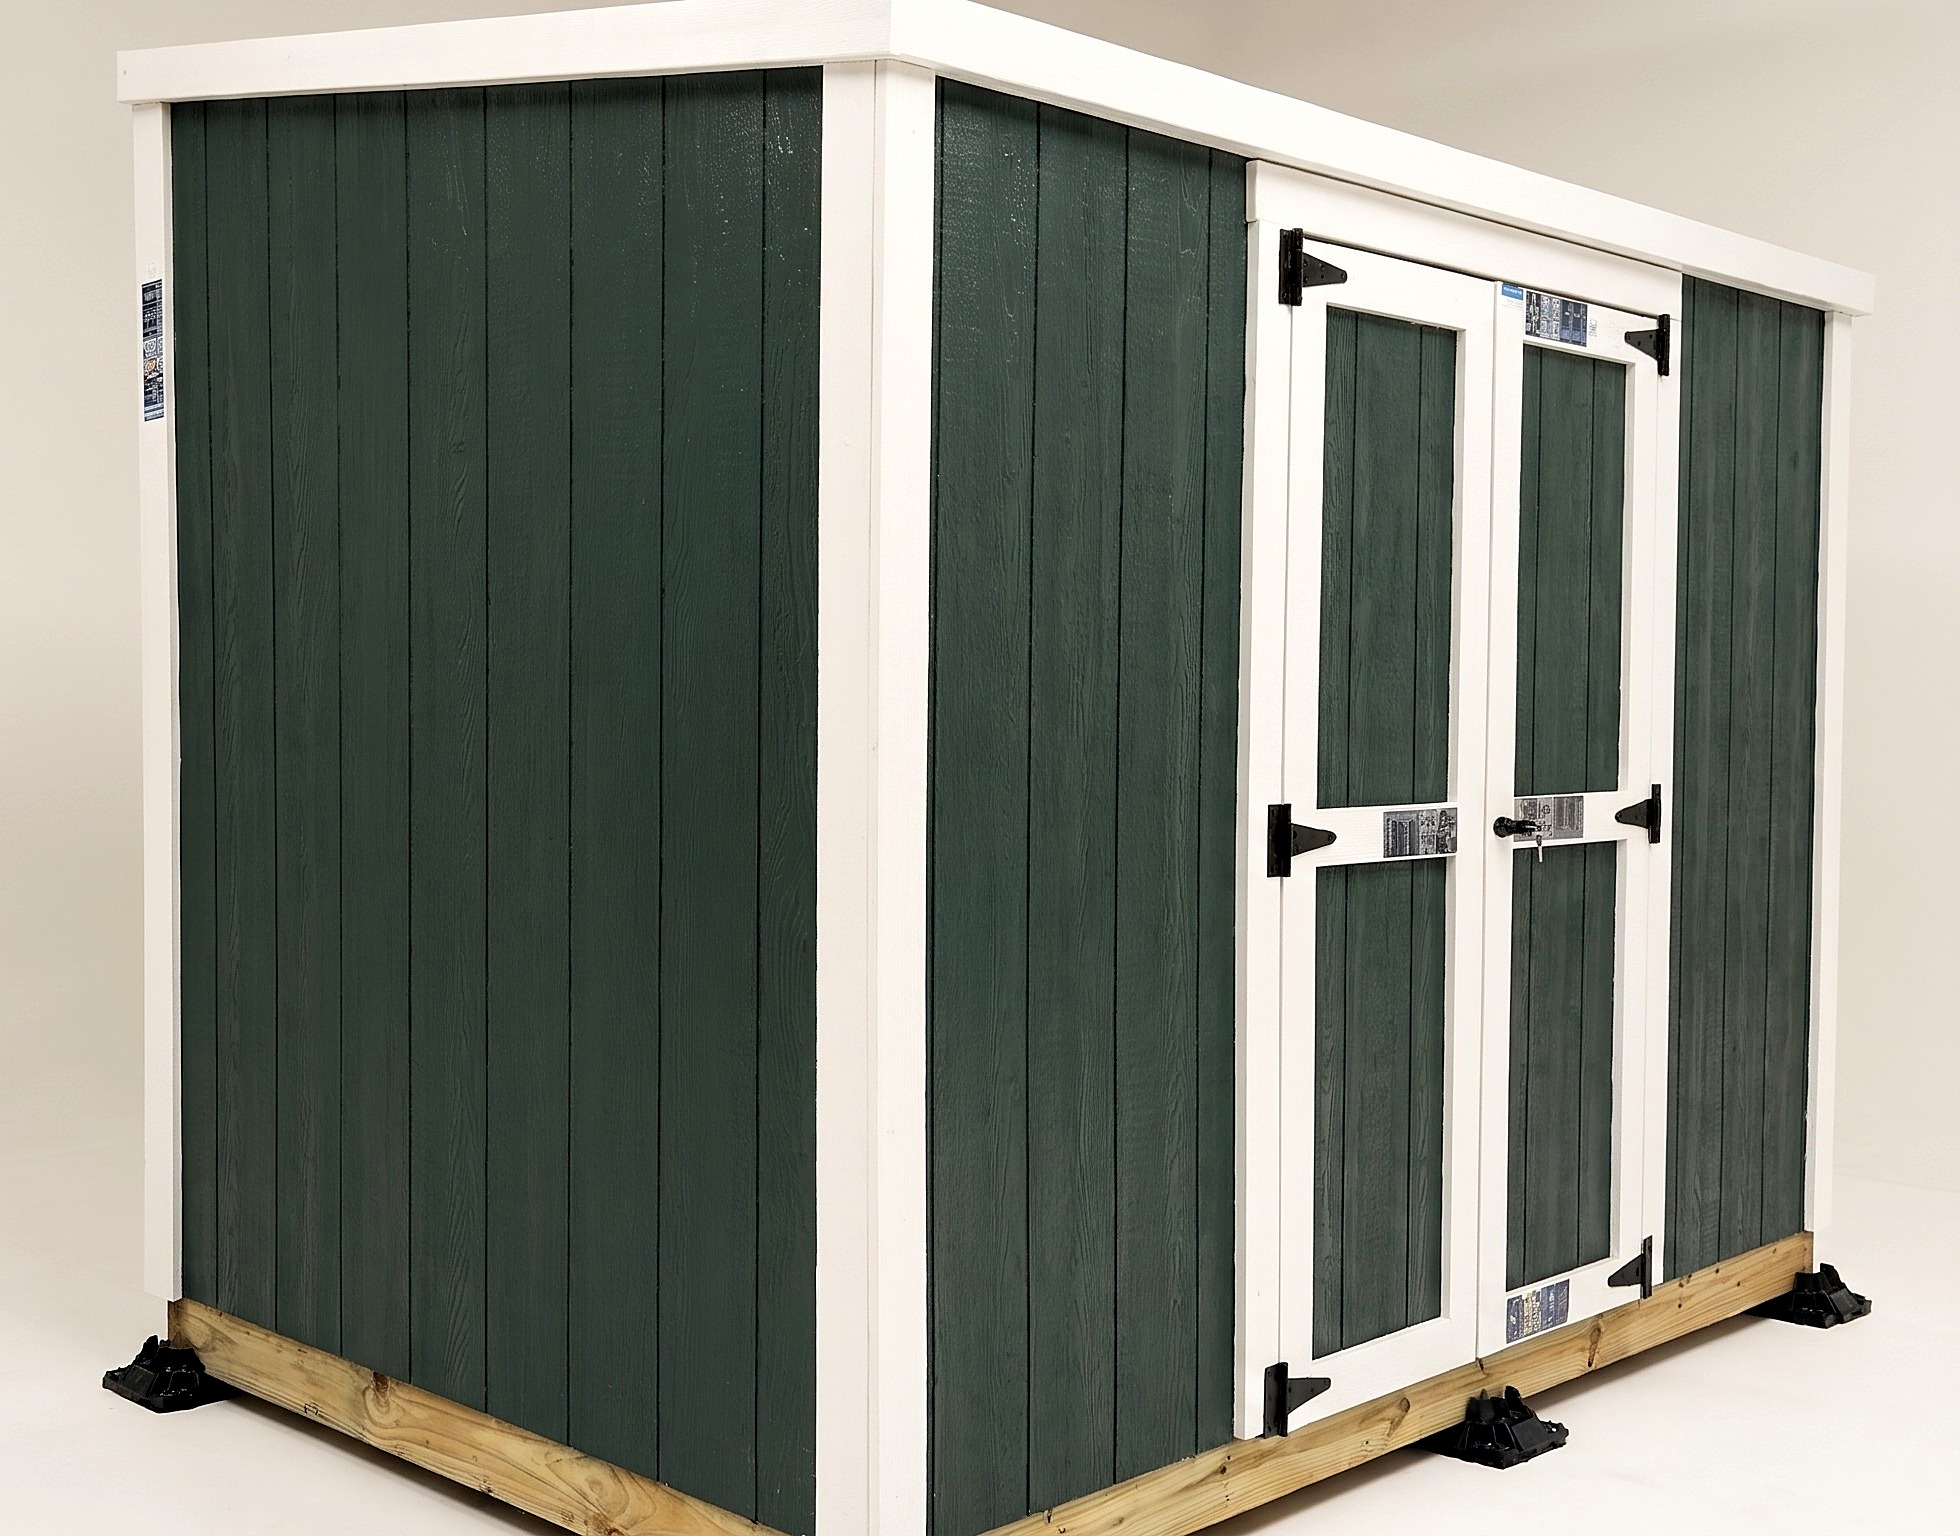
Fit the 2x4 overhangs 1/2 in above the rafters, then the corner trim and the top door trim.
Parts in this step: (U) Rafter, (V) Eave overhang, (W) Rake overhang, (AF) Top door trim, (AG) Corner trim, back (high) corners, (AH) Corner trim, front (low) corners
You'll need: One-handed bar clamps, Cordless impact driver, Cordless circular saw, Tape measure, Step ladder, 2x4 framing lumber, 12 ft, 2x4 framing lumber, 8 ft, Royal PVC trim boards, #9 x 2 in exterior screws, #9 x 3 in exterior screws, #7 x 2-1/4 in stainless steel trim screws
- 10.1 Install the 2x4 roof overhangs
- Cut the front and back eave overhangs (V) to 120-3/4 in; measure carefully, a short board leaves gaps.
- Set them, and the siding, 1/2 in taller than the rafters (U) for the roof decking.
- Screw them on with #9 x 2 in screws every 12 in.
- Cut the rake overhangs (W) a little long (about 84 in), mark them flush with the eaves and cut.
- Screw the rakes on with #9 x 3 in screws through the siding and the rafter.
- 10.2 Install the corner trim and the top door trim
- Each corner gets two 1x4 boards, both flush with the bottom of the siding: one on the side wall (rake side) and one on the front or back wall (eave side), overlapping the edge of the side board.
- Measure each corner from the bottom of the siding to the underside of the overhang: about 89-3/4 in at the two back (high) corners (AG) and 77-3/4 in at the two front (low) corners (AH).
- Cut the side-wall boards with a 10° angle across the top so they sit tight under the sloped rake overhang; cut the front and back boards square.
- Fasten the corner trim with #7 x 2-1/4 in stainless steel trim screws.
- Center the 56-3/4 in top door trim (AF) over the doors, on top of the door and vertical trim and just under the front overhang; it runs 1/2 in past the vertical trim on each side.
Key measurements
- Eave overhangs: 120-3/4 in.
- Overhang height: 1/2 in above the rafters.
- Rake overhangs: about 84 in.
- Corner trim: about 89-3/4 in (back corners) and 77-3/4 in (front corners); measure yours.
- Top door trim: 56-3/4 in, 1/2 in past the vertical trim each side.
- Tip: Measure each corner yourself: the trim length varies from shed to shed.
- Tip: Install the corner trim from the ground before climbing onto the roof.
Before you move on: The overhangs stand an even 1/2 in above the rafters all the way round.
Step 11: Install Roof Decking, Drip Edge, Underlayment, and Shingles
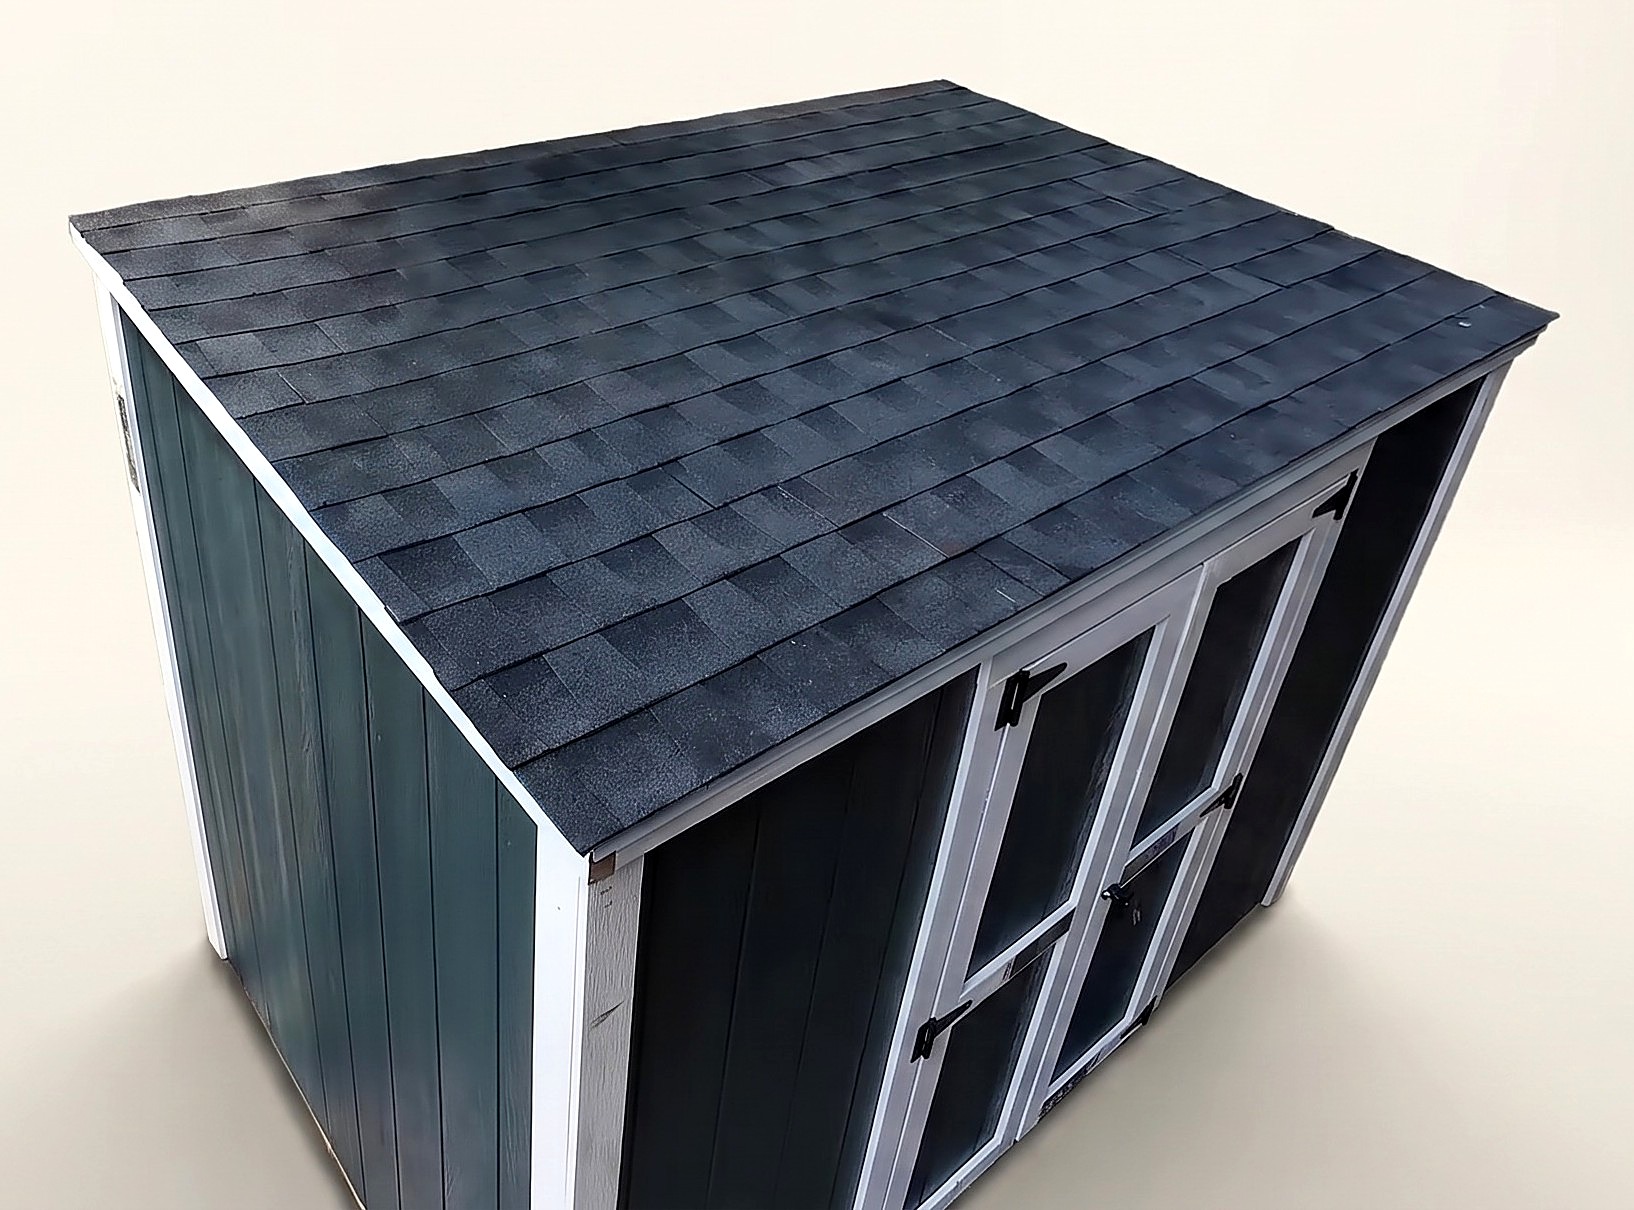
Deck the roof with 7/16 in OSB, add the drip edge and underlayment, and shingle it.
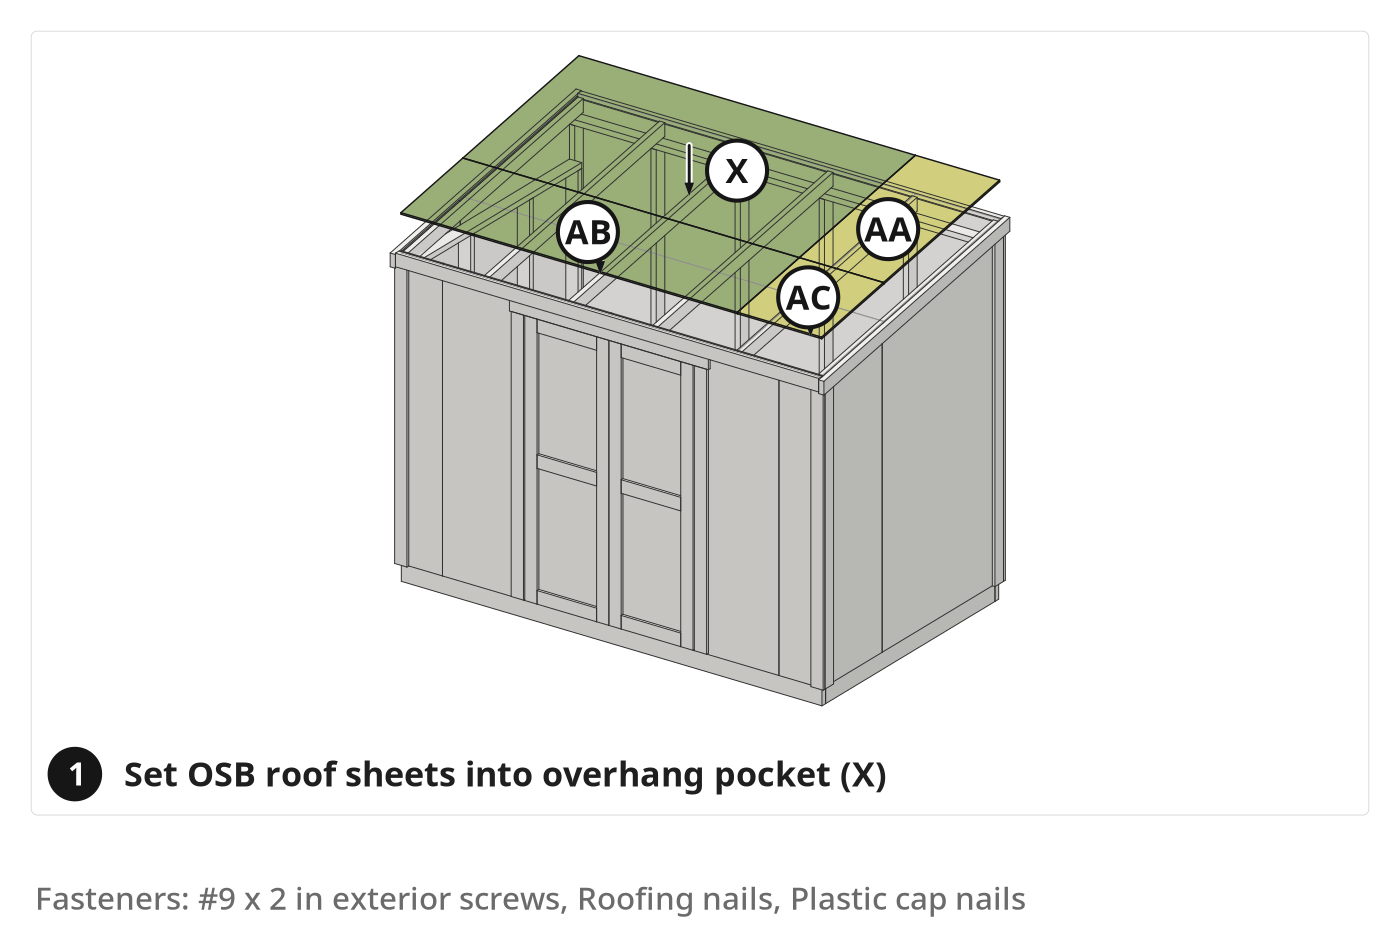
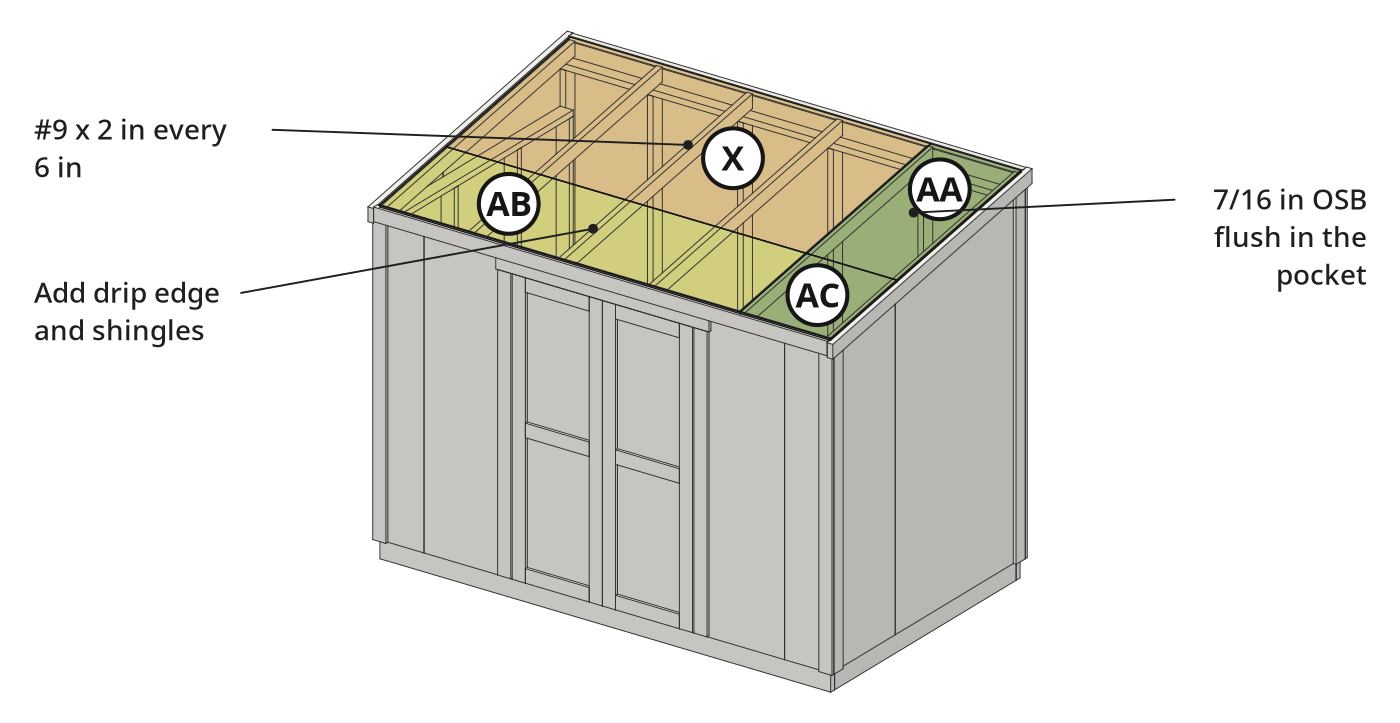
Parts in this step: (U) Rafter, (V) Eave overhang, (W) Rake overhang, (X) Roof sheathing, full sheet, (AA) Roof sheathing, end piece, (AB) Roof sheathing strip, (AC) Roof sheathing, small end piece
You'll need: Cordless impact driver, Claw hammer, Staple gun, Utility knife, Pneumatic roofing nailer, Step ladder, OSB roof sheathing, #9 x 2 in exterior screws, White aluminum drip edge, Roofing nails, Synthetic roof underlayment, Plastic cap nails, Asphalt shingles, Roofing tar
- 11.1 Place and screw down the OSB roof decking
- Push the full OSB sheet (X) to the back, flush with the back wall siding.
- Fill in with the 24 in end piece (AA), the 25-5/8 in strip (AB) and the small end piece (AC).
- Leave 3/8 in between the decking's side edges and the siding.
- Lay the OSB textured side up and drive #9 x 2 in screws every 6 in along the edges and rafters.
- 11.2 Install the drip edge
- Nail one full drip edge strip on the front eave overhang only, trimmed flush with the side walls.
- Lay the rake drip edges over it and staple them into the 2x4 overhangs.
- 11.3 Roll out and nail down the synthetic roof underlayment
- Roll out the synthetic underlayment and fasten it with plastic cap nails.
- 11.4 Install the asphalt shingles
- Start with a shingle flipped upside down, lighter half along the drip edge.
- For each new layer, cut 5 in off the shingle, nail it over the last layer and let it hang about 1/2 in past the overhang.
- For the last row, cut the shingles in half along the nailing strip and use the darker three-tab half, 1/4 in past the front edge.
- Seal the exposed nails on the last row with roofing tar.
Key measurements
- Roof decking: 7/16 in OSB.
- Side gap: 3/8 in.
- Decking screws: every 6 in.
- Shingle overhang: about 1/2 in; 1/4 in at the front edge on the last row.
- Tip: Check the shingle maker's instructions before you start.
- Heads up: Keep firm footing on the ladder and the roof.
Before you move on: Every shingle row overlaps the one below and the last row's nails are sealed.
Step 12: Drill Vent Openings and Install the Wall Vents
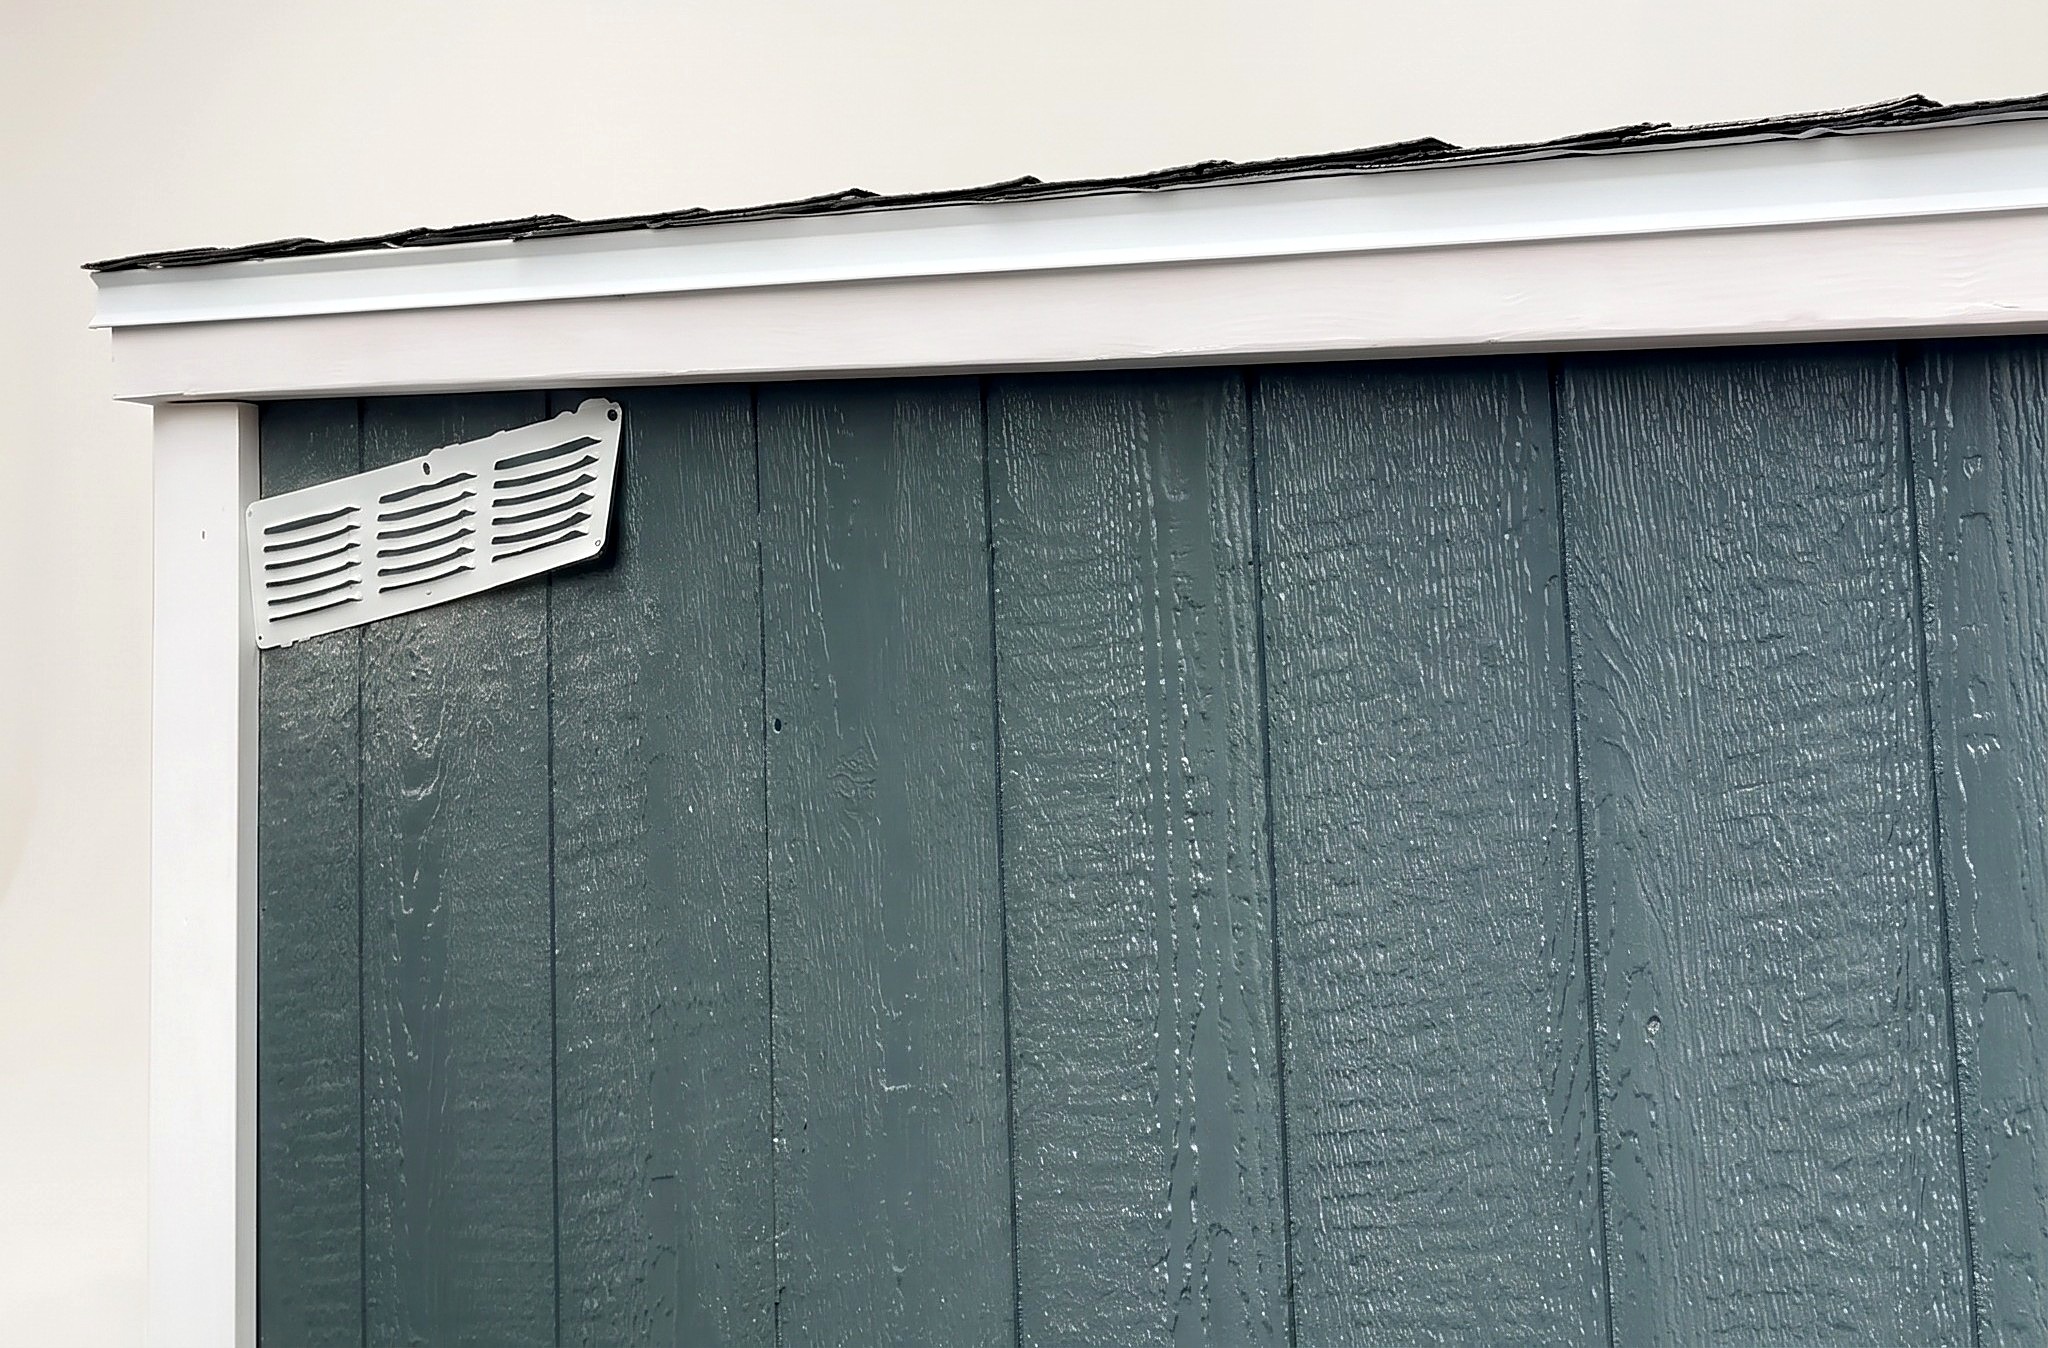
Cut the vent holes in both side walls and screw on the two vents, louvres down.
Parts in this step: (S) Side wall siding panel, (T) Side wall siding panel, narrow
You'll need: Cordless drill/driver, Hole saw bit, Step ladder, Wall vents, #8 x 1-1/8 in exterior screws
- 12.1 Drill the vent holes in each side wall
- Mark each vent on the side wall, just above the top plate and below the rafters.
- Drill one hole-saw hole for each set of louvre blades.
- 12.2 Screw on the vents, louvres down
- Hold the vent over the holes with the louvre blades pointing down, so rain can't get in.
- Drive a #8 x 1-1/8 in screw in each mounting hole.
- Fit the second vent the same way on the other side wall.
Key measurements
- Vents: two, one per side wall, above the top plate and below the rafters.
- Tip: Blades pointing up let rain in and can cause major water damage.
Before you move on: Both vents' louvre blades point down.
Finishing
Caulking and Touch-Up
- Caulk all screw and staple holes with white caulk.
- Touch up cut edges and screw heads with exterior paint.
Paint Application
- Roll exterior paint with a 3/4 in nap roller.
- Let paint and caulk dry as the maker says before closing the doors.
Alternatives
- Use LP SmartSide trim instead of PVC if you want painted trim.
- Drive the roofing nails with a hammer if you don't have a roofing nailer.
These Specs are built from Everyday Shed's video “6x10 Lean-To Backyard Storage Shed”. Open the 6x10 Lean-To Backyard Storage Shed project page.
