Spetz Specs No. 6387: step-by-step surface & covering guide
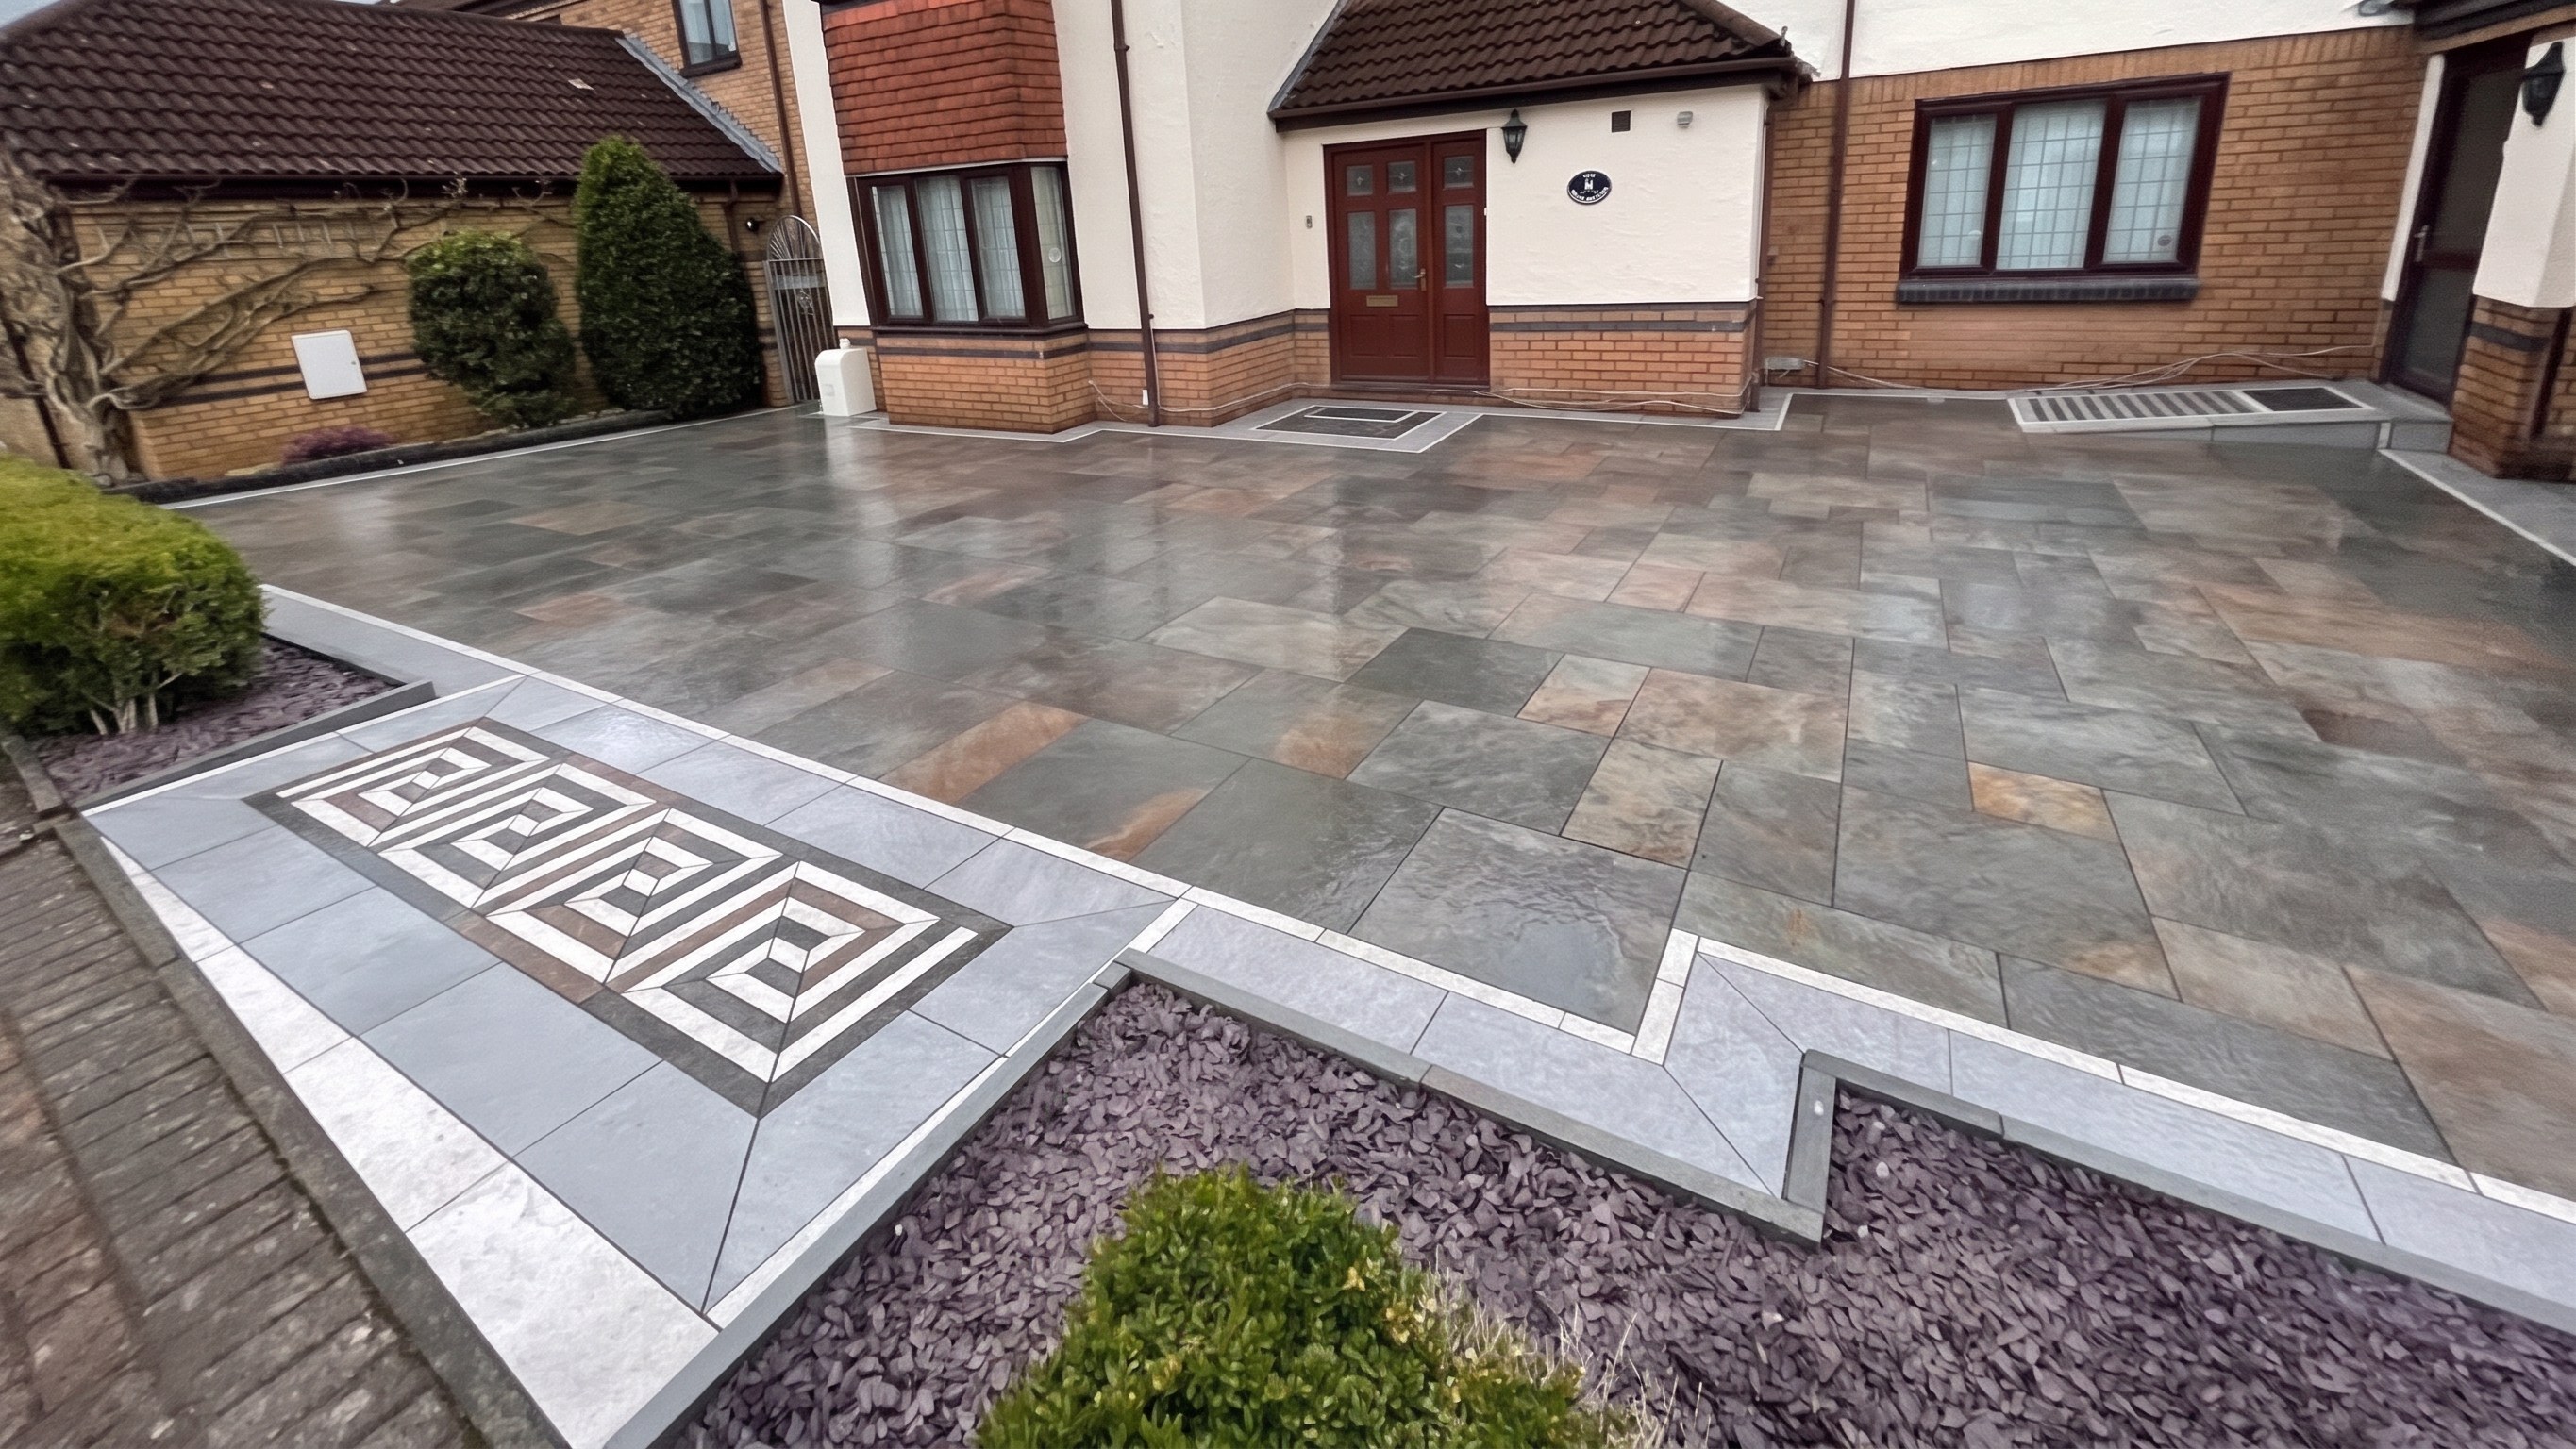
Porcelain Tile Driveway, Pathway, and Circular Lawn Border with Greek Key Entrance
The complete step-by-step guide made from Tidybricks patio restore's YouTube video, free on Spetz. For the video, a step-by-step player and answers to your questions, see the Porcelain Tile Driveway, Pathway, and Circular Lawn Border with Greek Key Entrance project page.
21 steps, 8 parts, 21 tools, 21 materials
Overview
Finished size: ~135 sq m total area; 1.2 m side pathway width; 400 to 500 mm total base depth
The Surface and Covering
- Cover a 135 sq m concrete driveway and pathway with 20 mm vitrified porcelain.
- Frame copper field slabs with 250 linear meters of mitered grey and ivory borders.
- Add a radial circular lawn border, ribbed doorway ramp, and Greek key entrance inlay.
What It Takes
- Excavate 48 tons of spoil; pour a 150 to 200 mm reinforced concrete slab.
- Let the concrete slab cure six weeks before bedding porcelain tiles.
- Cut strips, miters, and radial wedges face up on a wet bridge saw.
What Decides Success
- Set multi-directional drainage falls to channel drains; vitrified porcelain is non-porous.
- Coat slab undersides with slurry primer before bedding on 4:1 wet mortar.
- Blend tiles from all three color batches before laying for even tones.
Layout at a glance
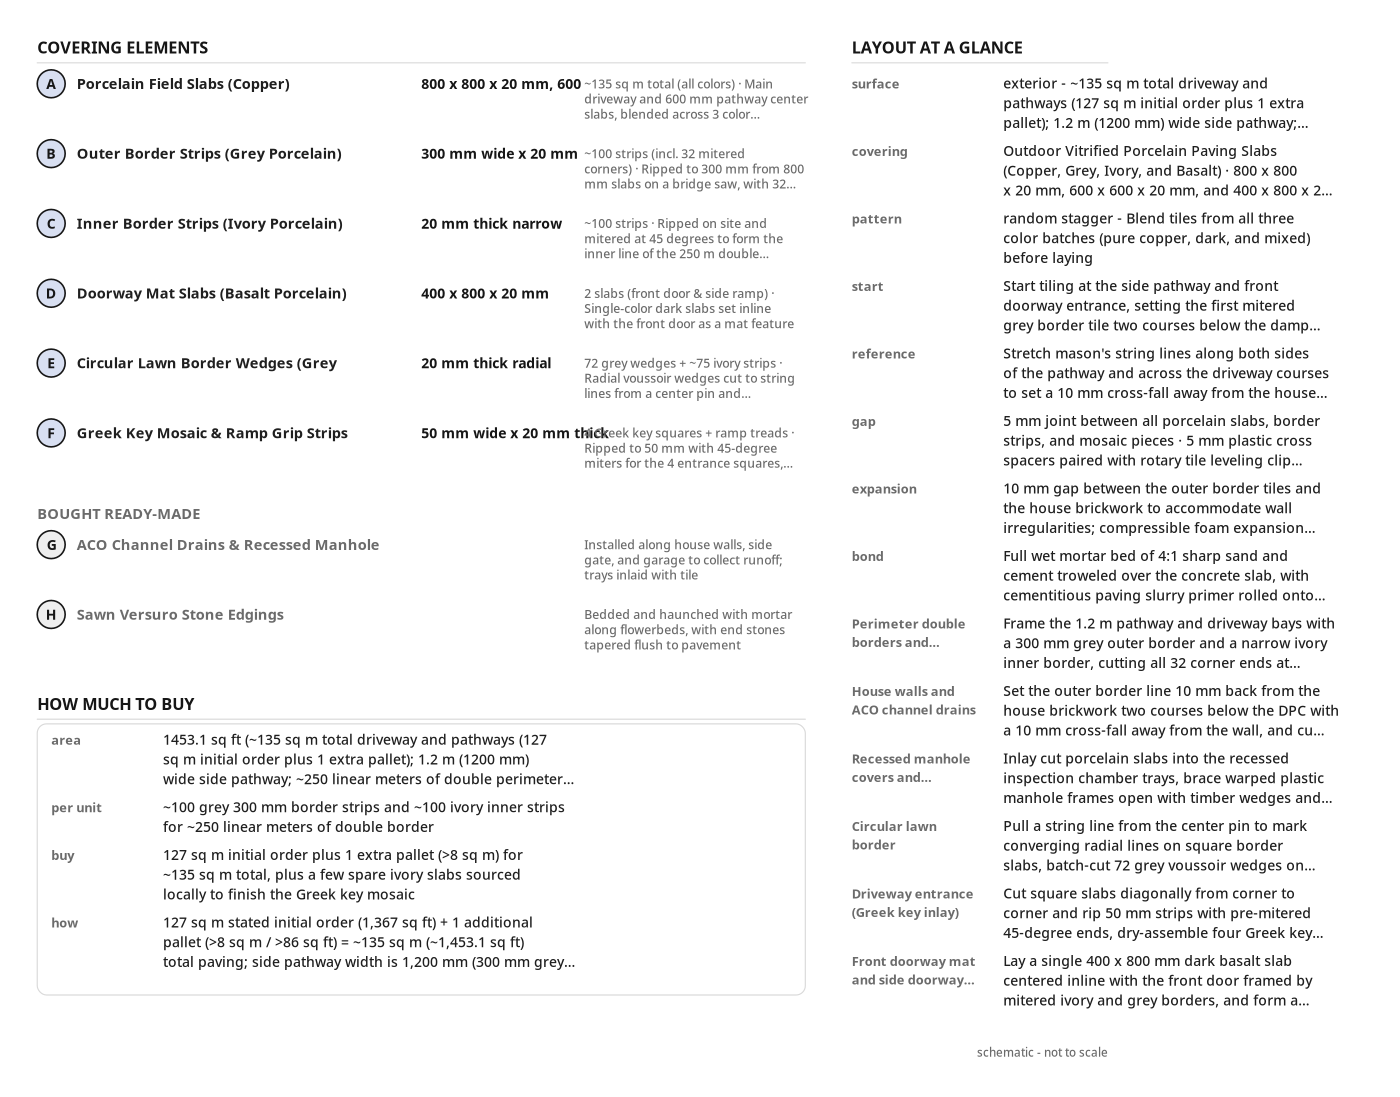
- Covering: Outdoor Vitrified Porcelain Paving Slabs (Copper, Grey, Ivory, and Basalt) 800 x 800 x 20 mm, 600 x 600 x 20 mm, and 400 x 800 x 20 mm
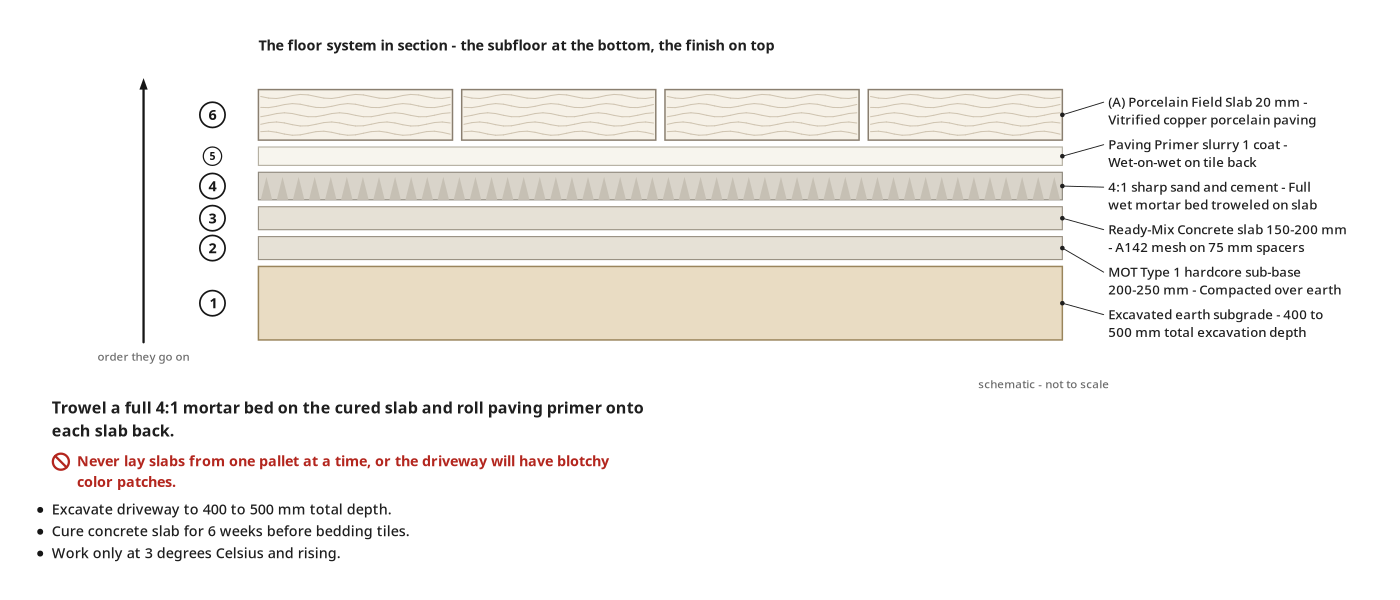
- Laid on: 150 to 200 mm (6 to 8 in) A142 steel mesh-reinforced concrete slab (elevated on 75 mm brick spacers) over 200 to 250 mm compacted MOT Type 1 hardcore sub-base
- Pattern: random stagger
- Offset: Blend tiles from all three color batches (pure copper, dark, and mixed) before laying
- Start: Start tiling at the side pathway and front doorway entrance, setting the first mitered grey border tile two courses below the damp proof course (DPC) and 10 mm off the house brickwork, then work along the pathway and from the upper driveway bay and central drainage valley toward the perimeter borders.
- Reference line: Stretch mason's string lines along both sides of the pathway and across the driveway courses to set a 10 mm cross-fall away from the house and multi-directional falls down the central valley to the ACO slot drains.
- Gap: 5 mm joint between all porcelain slabs, border strips, and mosaic pieces
- Expansion gap: 10 mm gap between the outer border tiles and the house brickwork to accommodate wall irregularities; compressible foam expansion joint strips installed against the house walls and between concrete slab bays.
- Bond: Full wet mortar bed of 4:1 sharp sand and cement troweled over the concrete slab, with cementitious paving slurry primer rolled onto the underside of every porcelain tile and stone edging before tapping into level with a rubber mallet and locking edges flush with rotary leveling clips.
- Perimeter double borders and corners: Frame the 1.2 m pathway and driveway bays with a 300 mm grey outer border and a narrow ivory inner border, cutting all 32 corner ends at 45-degree miters on a wet bridge saw using a clamped angle jig positioned on alternating sides of the saw table so tiles are always cut face up.
- House walls and ACO channel drains: Set the outer border line 10 mm back from the house brickwork two courses below the DPC with a 10 mm cross-fall away from the wall, and cut field and border slabs flush against the ACO slot drains along the house perimeter, side gate, and garage threshold.
- Recessed manhole covers and downpipes: Inlay cut porcelain slabs into the recessed inspection chamber trays, brace warped plastic manhole frames open with timber wedges and pour boiling water over them to hold a uniform 5 mm joint, and replace adjacent slabs that form accidental four-way cross joints with a 600 x 600 mm or L-cut slab.
- Circular lawn border: Pull a string line from the center pin to mark converging radial lines on square border slabs, batch-cut 72 grey voussoir wedges on the bridge saw, dry-lay the entire ring to equalize joint spacing, bed them one by one, and individually cut ~75 inner ivory border strips to keep the radial joints aligned.
- Driveway entrance (Greek key inlay) and flowerbed kerbs: Cut square slabs diagonally from corner to corner and rip 50 mm strips with pre-mitered 45-degree ends, dry-assemble four Greek key squares on a DPM-protected MDF template board using a 5 mm lipped speed square before bedding
- Front doorway mat and side doorway ramp: Lay a single 400 x 800 mm dark basalt slab centered inline with the front door framed by mitered ivory and grey borders, and form a sloped mortar ramp outside the side door inlaid with alternating raised grey and recessed copper porcelain strips for a high-grip tread.
Health and safety
Excavation and Heavy Machinery
- Locate and mark all underground electric cables, gas lines, and water pipes before digging the driveway with the mini excavator.
- Keep bystanders clear of the mini excavator swing radius and never overload or turn the power barrow sharply on slopes.
- Wear hearing and eye protective equipment and sturdy boots when operating the petrol plate compactor over the hardcore sub-base.
- Keep hands, shovels, and loose clothing out of the rotating electric cement mixer drum while blending sharp sand and cement.
Cutting Porcelain and Stone
- Wear eye and hearing protective equipment when cutting porcelain slabs and Versuro stone edgings with the wet bridge saw or angle grinder.
- Wear a particulate respirator when dry-cutting with the diamond angle grinder to avoid inhaling hazardous silica dust from porcelain and stone.
- Clamp workpieces securely with a G-clamp on the wet bridge saw jig and keep hands clear of the overhead diamond blade.
- Route 110V wet bridge saw and electric pressure washer cords away from standing water and connect them through residual current protection.
Cement, Primers, and Acid Cleaners
- Wear waterproof protective gloves when handling wet cement mortar, Postcrete, slurry primer, and exterior grout to prevent severe alkaline skin burns.
- Wear tall waterproof boots and eye protective equipment when raking and screeding pumped ready-mix concrete across the driveway bays.
- Use chemical-resistant protective gloves and eye protection when scrubbing tiles with acidic KF cement residue remover, and rinse splashes immediately.
- Avoid breathing airborne dust when pouring dry cement or Postcrete into trenches, and apply aerosol line marking paint outdoors only.
Sharp Edges, Mesh, and Lifting
- Use a cushioned kneeling pad when bedding porcelain slabs, setting leveling clips, and scrubbing grout residue to prevent knee injuries.
- Wear cut-resistant gloves when tying A142 steel reinforcing mesh and handling freshly cut porcelain strips with sharp vitrified edges.
- Step carefully across the elevated A142 steel mesh and brick spacers during the concrete pour to avoid tripping or impalement.
- Lift heavy Versuro stone edgings, full porcelain slabs, and recessed manhole trays with your legs, or share the load.
The surface & its prep
- Excavate the front driveway to 400 to 500 mm depth below finished level.
- Compact 200 to 250 mm of MOT Type 1 hardcore over the subgrade.
- Pour a 150 to 200 mm concrete slab with A142 steel mesh on 75 mm brick spacers.
- Fit compressible foam expansion strips at house walls and between concrete slab bays.
- Cure the reinforced concrete slab for 6 weeks before bedding porcelain tiles.
- Work only when air and ground temperatures are 3 degrees Celsius and rising.
- Run string lines two courses below the damp proof course with a 10 mm cross-fall from walls.
- Unpack and blend porcelain slabs from pure copper, dark, and mixed color batches before laying.
Tools
- Mini Excavator (tracked micro digger, JCB, 8008 CTS)
- Power Barrow / Mini Dumper (4-wheel drive pedestrian dumper, Belle)
- Plate Compactor (Wacker Plate) (petrol vibrating plate compactor, Belle, PCX 13/40)
- String Line (mason's string line)
- Tape Measure (retractable pocket tape measure)
- Cordless Drill (cordless drill/driver, Makita)
- Angle Grinder (corded angle grinder with diamond blade, Makita)
- Hand Saw (woodworking hand saw)
- Garden Hose (water hose with spray nozzle)
- Concrete Rake / Screed (long-handled concrete placer and leveler)
- Wet Bridge Tile Saw (electric overhead rail wet tile cutter with side roller table and angle jig, Raimondi, Zoe 130, 110V)
- G-Clamp (screw clamp) (optional)
- Mini Paint Roller (short-handled roller)
- Bricklaying Trowel (pointing / bricklayer's trowel)
- Rubber Mallet (non-marking mallet)
- Spirit Levels (box-beam spirit levels and boat level, Stabila)
- Wheelbarrow (builder's wheelbarrow)
- Cement Mixer (portable electric drum mixer, Belle)
- Kneeling Pad (cushioned kneeling mat) (optional)
- Speed Square and Steel Rule (metal layout square and ruler)
- Pressure Washer (electric pressure washer, Mac Allister)
Materials
- MOT Type 1 Hardcore (crushed aggregate sub-base, Type 1, 200-250 mm depth)
- Line Marking Spray Paint (1 can, aerosol marking paint, red)
- Expansion Joint Strip (compressible foam expansion joint roll)
- Channel Drain (slot drain / channel drainage system, ACO)
- Steel Reinforcing Mesh (welded steel wire mesh sheets, A142)
- Bricks (spacer bricks, 75 mm height)
- Timber Shuttering Boards and Pegs (formwork timber)
- Ready-Mix Concrete (pumped ready-mix concrete, Tarmac, 150-200 mm (6-8 in) depth)
- Porcelain Paving Tiles (~135 sq m (127 sq m initial order + 1 extra pallet), outdoor vitrified porcelain paving slabs, Marshalls, Symphony series (Copper, Grey, Ivory) and Basalt, 80 x 80 x 2 cm, 60 x 60 x 2 cm, 40 x 80 x 2 cm)
- Paving Primer (cementitious slurry primer, Marshalls)
- Sharp Sand and Cement (mortar bedding mix, Travis Perkins, 4:1 sharp sand to cement ratio)
- Tile Leveling Clips and Caps (rotary screw cap and base clip leveling system, Tilers Tools)
- Tile Spacers (plastic cross spacers, 5 mm)
- Recessed Manhole Covers (infill tray inspection chamber covers)
- Damp Proof Membrane (DPM) (polythene sheet)
- Enclosure Posts (cylindrical screen posts, grey)
- Postcrete (fast-setting post concrete, Blue Circle)
- Sawn Versuro Edging Stones (sawn natural stone kerbs/edgings, Marshalls, Versuro)
- Exterior Jointing Grout (exterior paving jointing grout, Marshalls)
- KF Cement Residue Remover (3 bottles, acidic tile cleaner concentrate, Lithofin, KF)
- Artificial Grass (synthetic turf roll)
Finishes & supplies, in the order they go on
| Product | What it does | Mix & coats | Dry time | Applied with |
|---|---|---|---|---|
| Ready-Mix Concrete | 150 to 200 mm reinforced structural slab over compacted hardcore sub-base | 1 coats | Walkable next day; 6 weeks cure before tiling | Concrete pump and Concrete Rake / Screed |
| Paving Primer | Cementitious slurry primer rolled onto the back of every porcelain slab and stone edging | Pre-mixed slurry (or homemade SBR and cement mix), 1 coats | Apply wet-on-wet immediately before placing tile onto mortar | Mini Paint Roller |
| Sharp Sand and Cement | Full wet mortar bed under porcelain tiles, channel drains, and stone edgings | 4 parts sharp sand to 1 part cement mixed with water, 1 coats | 24 hours before removing leveling clips; apply at 3 degrees Celsius and rising | Bricklaying Trowel |
| Postcrete | Fast-setting concrete: anchor rear vertical screen posts in trench | Pour dry mix into water-filled trench, 1 coats | Sets rapidly while held plumb in timber jig | Poured directly from bag |
| Exterior Jointing Grout | Fill 5 mm joints in porcelain driveway, pathways, and borders | 1 coats | Apply above 3 degrees Celsius; scrub residue once cured | Grout float or trowel and sponge |
| KF Cement Residue Remover | Acidic cleaner: remove cloudy cement and grout haze over ~135 sq m (3 bottles) | 1 coats | Scrub immediately with abrasive pad and rinse clean | Abrasive pad and Pressure Washer |
Covering elements
| Part | Name | Qty | Size | Notes |
|---|---|---|---|---|
| A | Porcelain Field Slabs (Copper) | x135 | 31 1/2" (T) × 31 1/2" (W) × 31 1/2" (L) | ~135 sq m total (all colors) · Main driveway and 600 mm pathway center slabs, blended across 3 color batches before laying |
| B | Outer Border Strips (Grey Porcelain) | x100 | 3/4" (T) × 13/16" (W) × 11 13/16" (L) | ~100 strips (incl. 32 mitered corners) · Ripped to 300 mm from 800 mm slabs on a bridge saw, with 32 mitered 45-degree corner ends |
| C | Inner Border Strips (Ivory Porcelain) | x100 | 20 mm thick narrow strips | ~100 strips · Ripped on site and mitered at 45 degrees to form the inner line of the 250 m double border |
| D | Doorway Mat Slabs (Basalt Porcelain) | x2 | 13/16" (T) × 15 3/4" (W) × 31 1/2" (L) | 2 slabs (front door & side ramp) · Single-color dark slabs set inline with the front door as a mat feature and at the ramp landing |
| E | Circular Lawn Border Wedges (Grey & Ivory) | x72 | 20 mm thick radial voussoir wedges | 72 grey wedges + ~75 ivory strips · Radial voussoir wedges cut to string lines from a center pin and dry-fitted before bedding |
| F | Greek Key Mosaic & Ramp Grip Strips | x4 | 50 mm wide x 20 mm thick | 4 Greek key squares + ramp treads · Ripped to 50 mm with 45-degree miters for the 4 entrance squares, plus raised ramp grip strips |
| G | ACO Channel Drains & Recessed Manhole Covers | count yours | Installed along house walls, side gate, and garage to collect runoff; trays inlaid with tile | |
| H | Sawn Versuro Stone Edgings | count yours | Bedded and haunched with mortar along flowerbeds, with end stones tapered flush to pavement |
Before you start
Protect and Clear
- Clear a front driveway bay first to stockpile rear garden soil for grab lorry pickup.
- Keep a strip of block paving as a temporary house walkway.
- Lay damp proof membrane under and over the MDF template board to stop warping.
Cut Station Set-Up
- Fit the wet bridge saw's side roller table to support 800 mm slabs.
- Fix a rear-fence stop block for repeatable 300 mm and 50 mm rip cuts.
- Bolt the 45-degree miter jig to alternate saw table sides to cut face up.
Step by step
Step 1: Excavate Driveway and Rear Garden
Excavate the front driveway staging area and rear lawn to depth; haul away the first 26 tons of spoil.

You'll need: Mini Excavator, Power Barrow / Mini Dumper, Tape Measure
- 1.1 Break Up Front Block Paving
- Pry up interlocking brick pavers along the front hedge with the mini excavator.
- Save clean hardcore from under the old bricks to reuse in the rear garden.
- Clear a flat front staging area to stockpile back garden soil.
- 1.2 Excavate Rear Lawn into Power Barrow
- Dig turf and topsoil from the rear lawn to a 6 in depth.
- Load excavated soil into the pedestrian power barrow.
- Haul spoil to the front driveway staging pile.
- 1.3 Load Spoil with Grab Lorry and Continue Digging
- Clear the first 26-ton earth and rubble stockpile with a grab lorry.
- Dig the next driveway section into the cleared staging space.
Key measurements
- Rear excavation depth: 6 in (150 mm) below turf
- First spoil load: 26 tons of earth and rubble
- Tip: Clear a front driveway bay first so the grab lorry collects rear garden spoil in one load.
Step 2: Compact the Rear Garden Subgrade
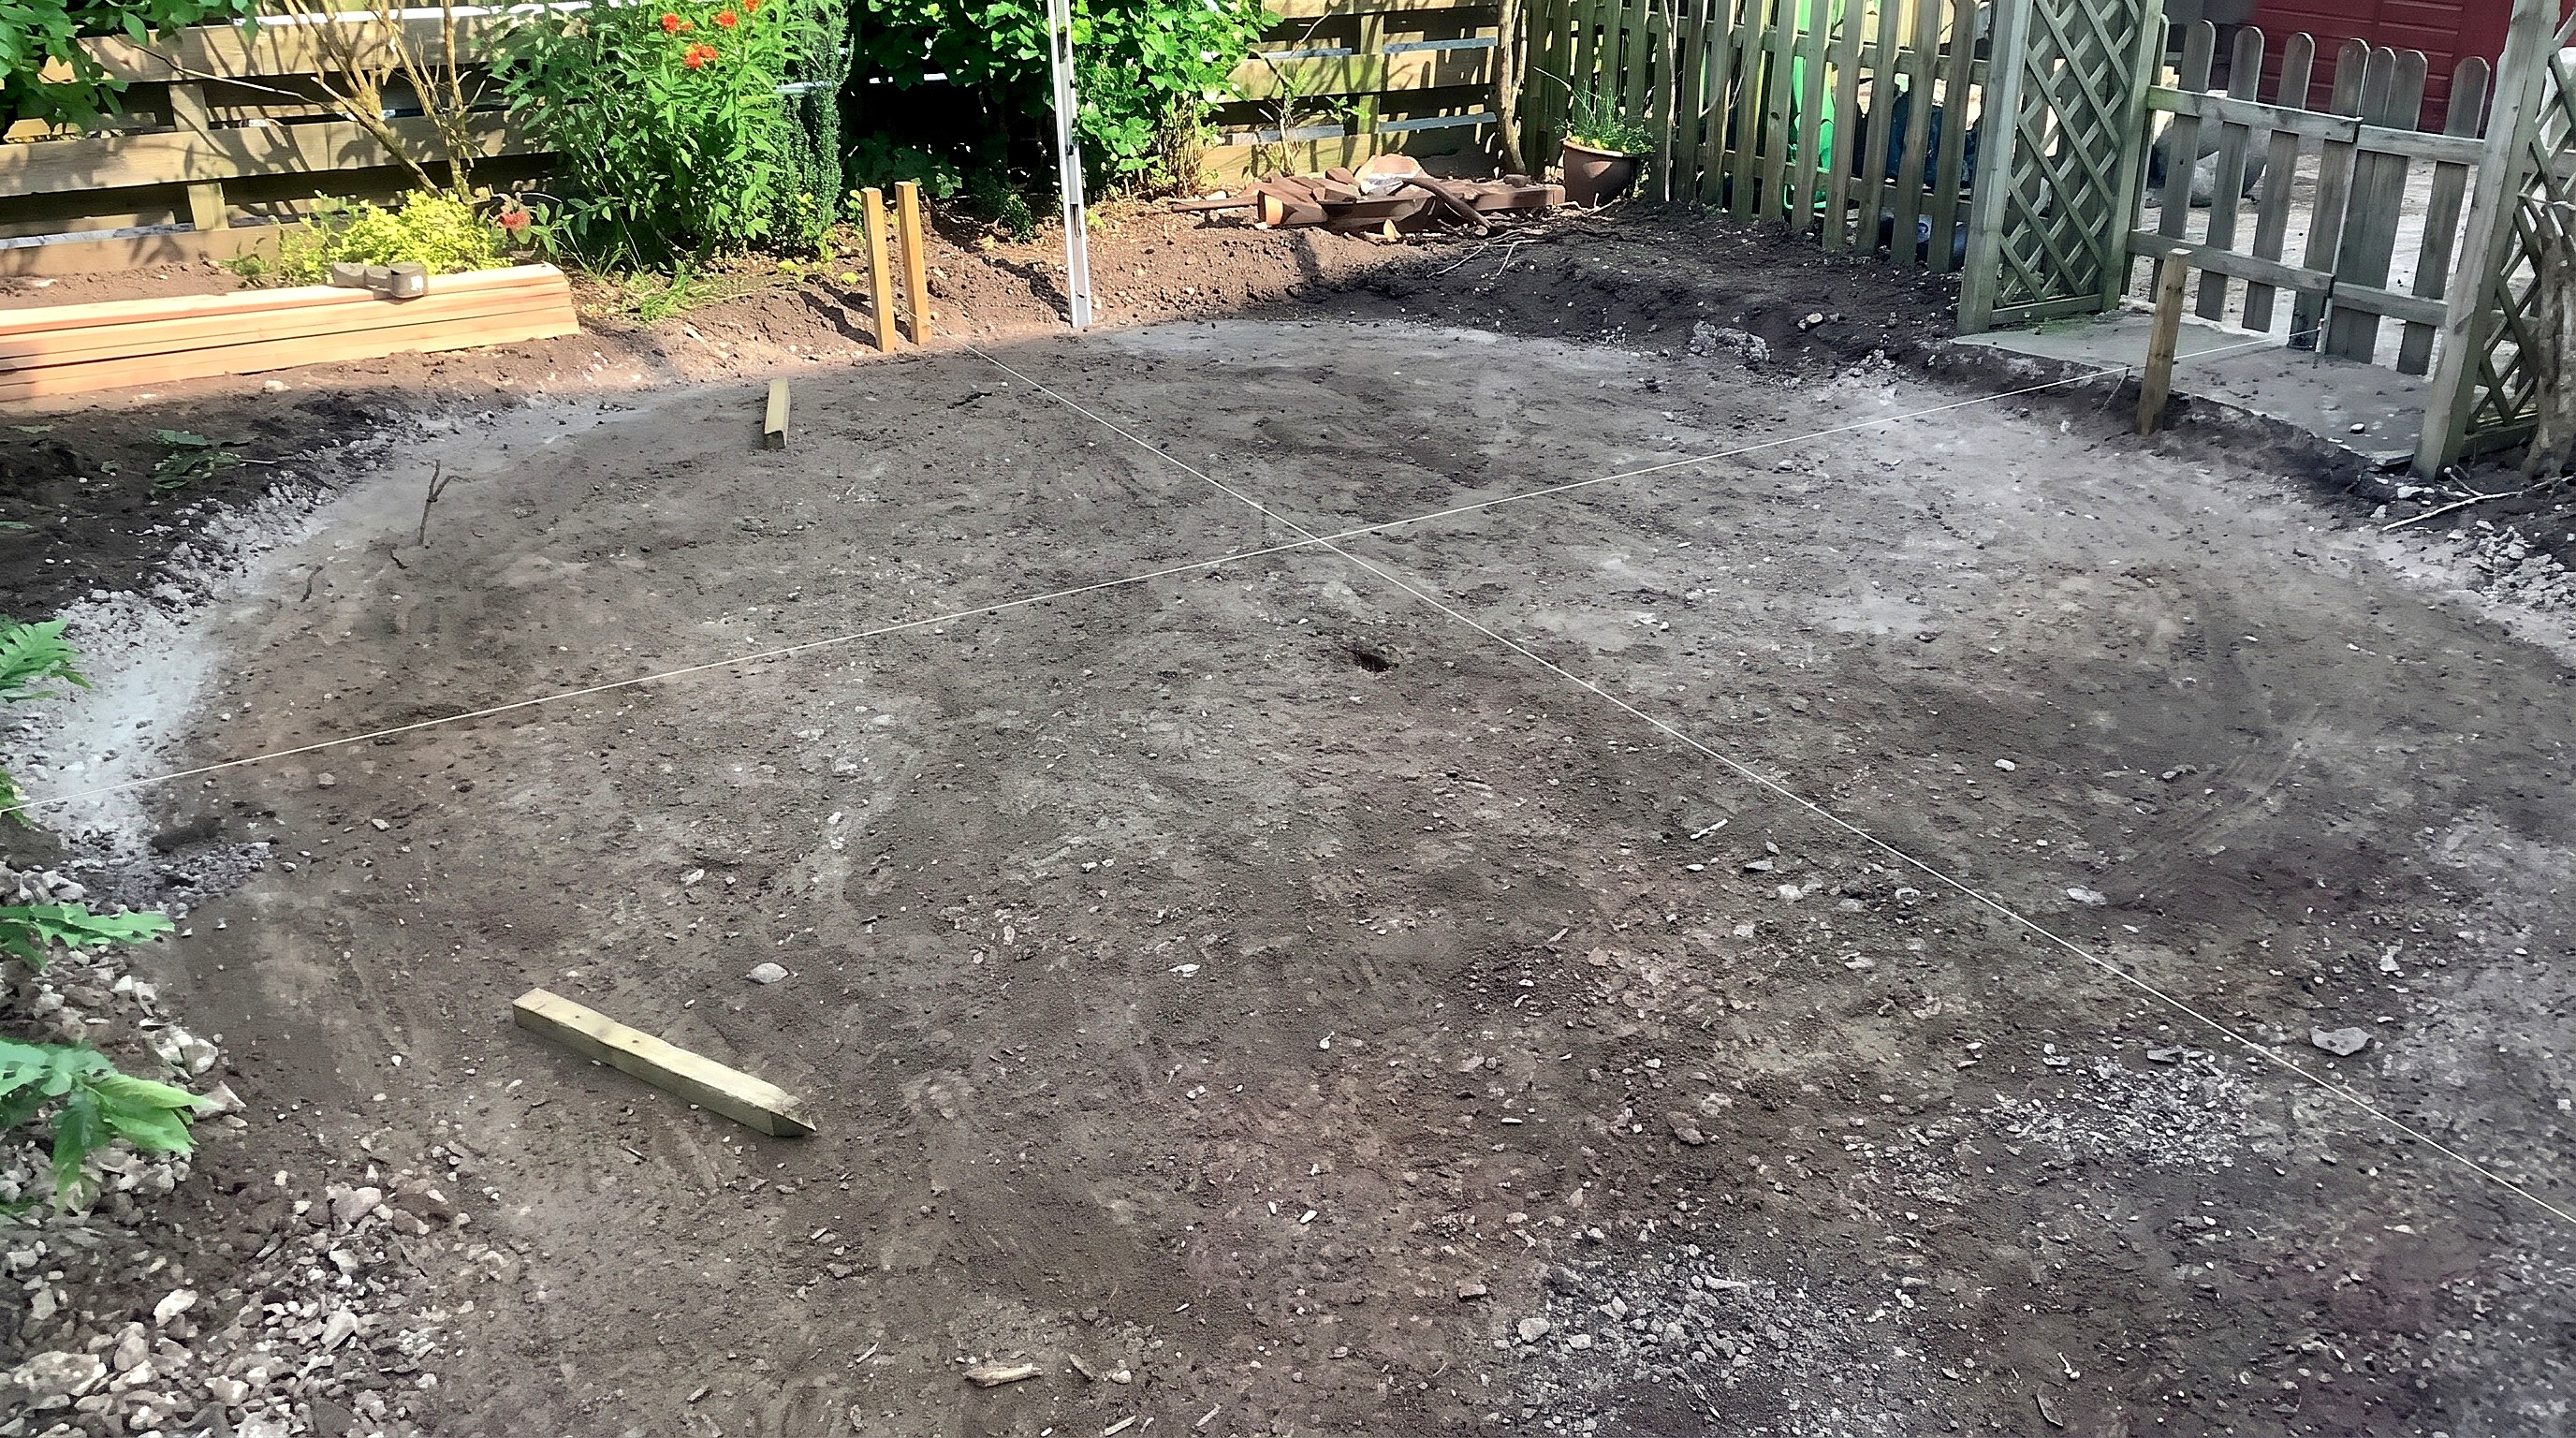
Rear garden bare earth subgrade dug to an even 6 in depth and compacted flat.
You'll need: Plate Compactor (Wacker Plate), Tape Measure
- 2.1 Prepare Excavated Subgrade
- Measure the rear garden excavation for an even 6 in depth.
- Place the vibrating plate compactor at the dug perimeter.
- 2.2 Compact Bare Earth Subgrade
- Run the plate compactor in overlapping circles from perimeter to center.
- Do one full pass over bare earth to flatten the soil before hardcore.
Key measurements
- Rear subgrade depth: 6 in below finished level
- Tip: Do only one compactor pass on bare earth to flatten it before aggregate.
Step 3: Set Out Rear Alignment and Compact Hardcore
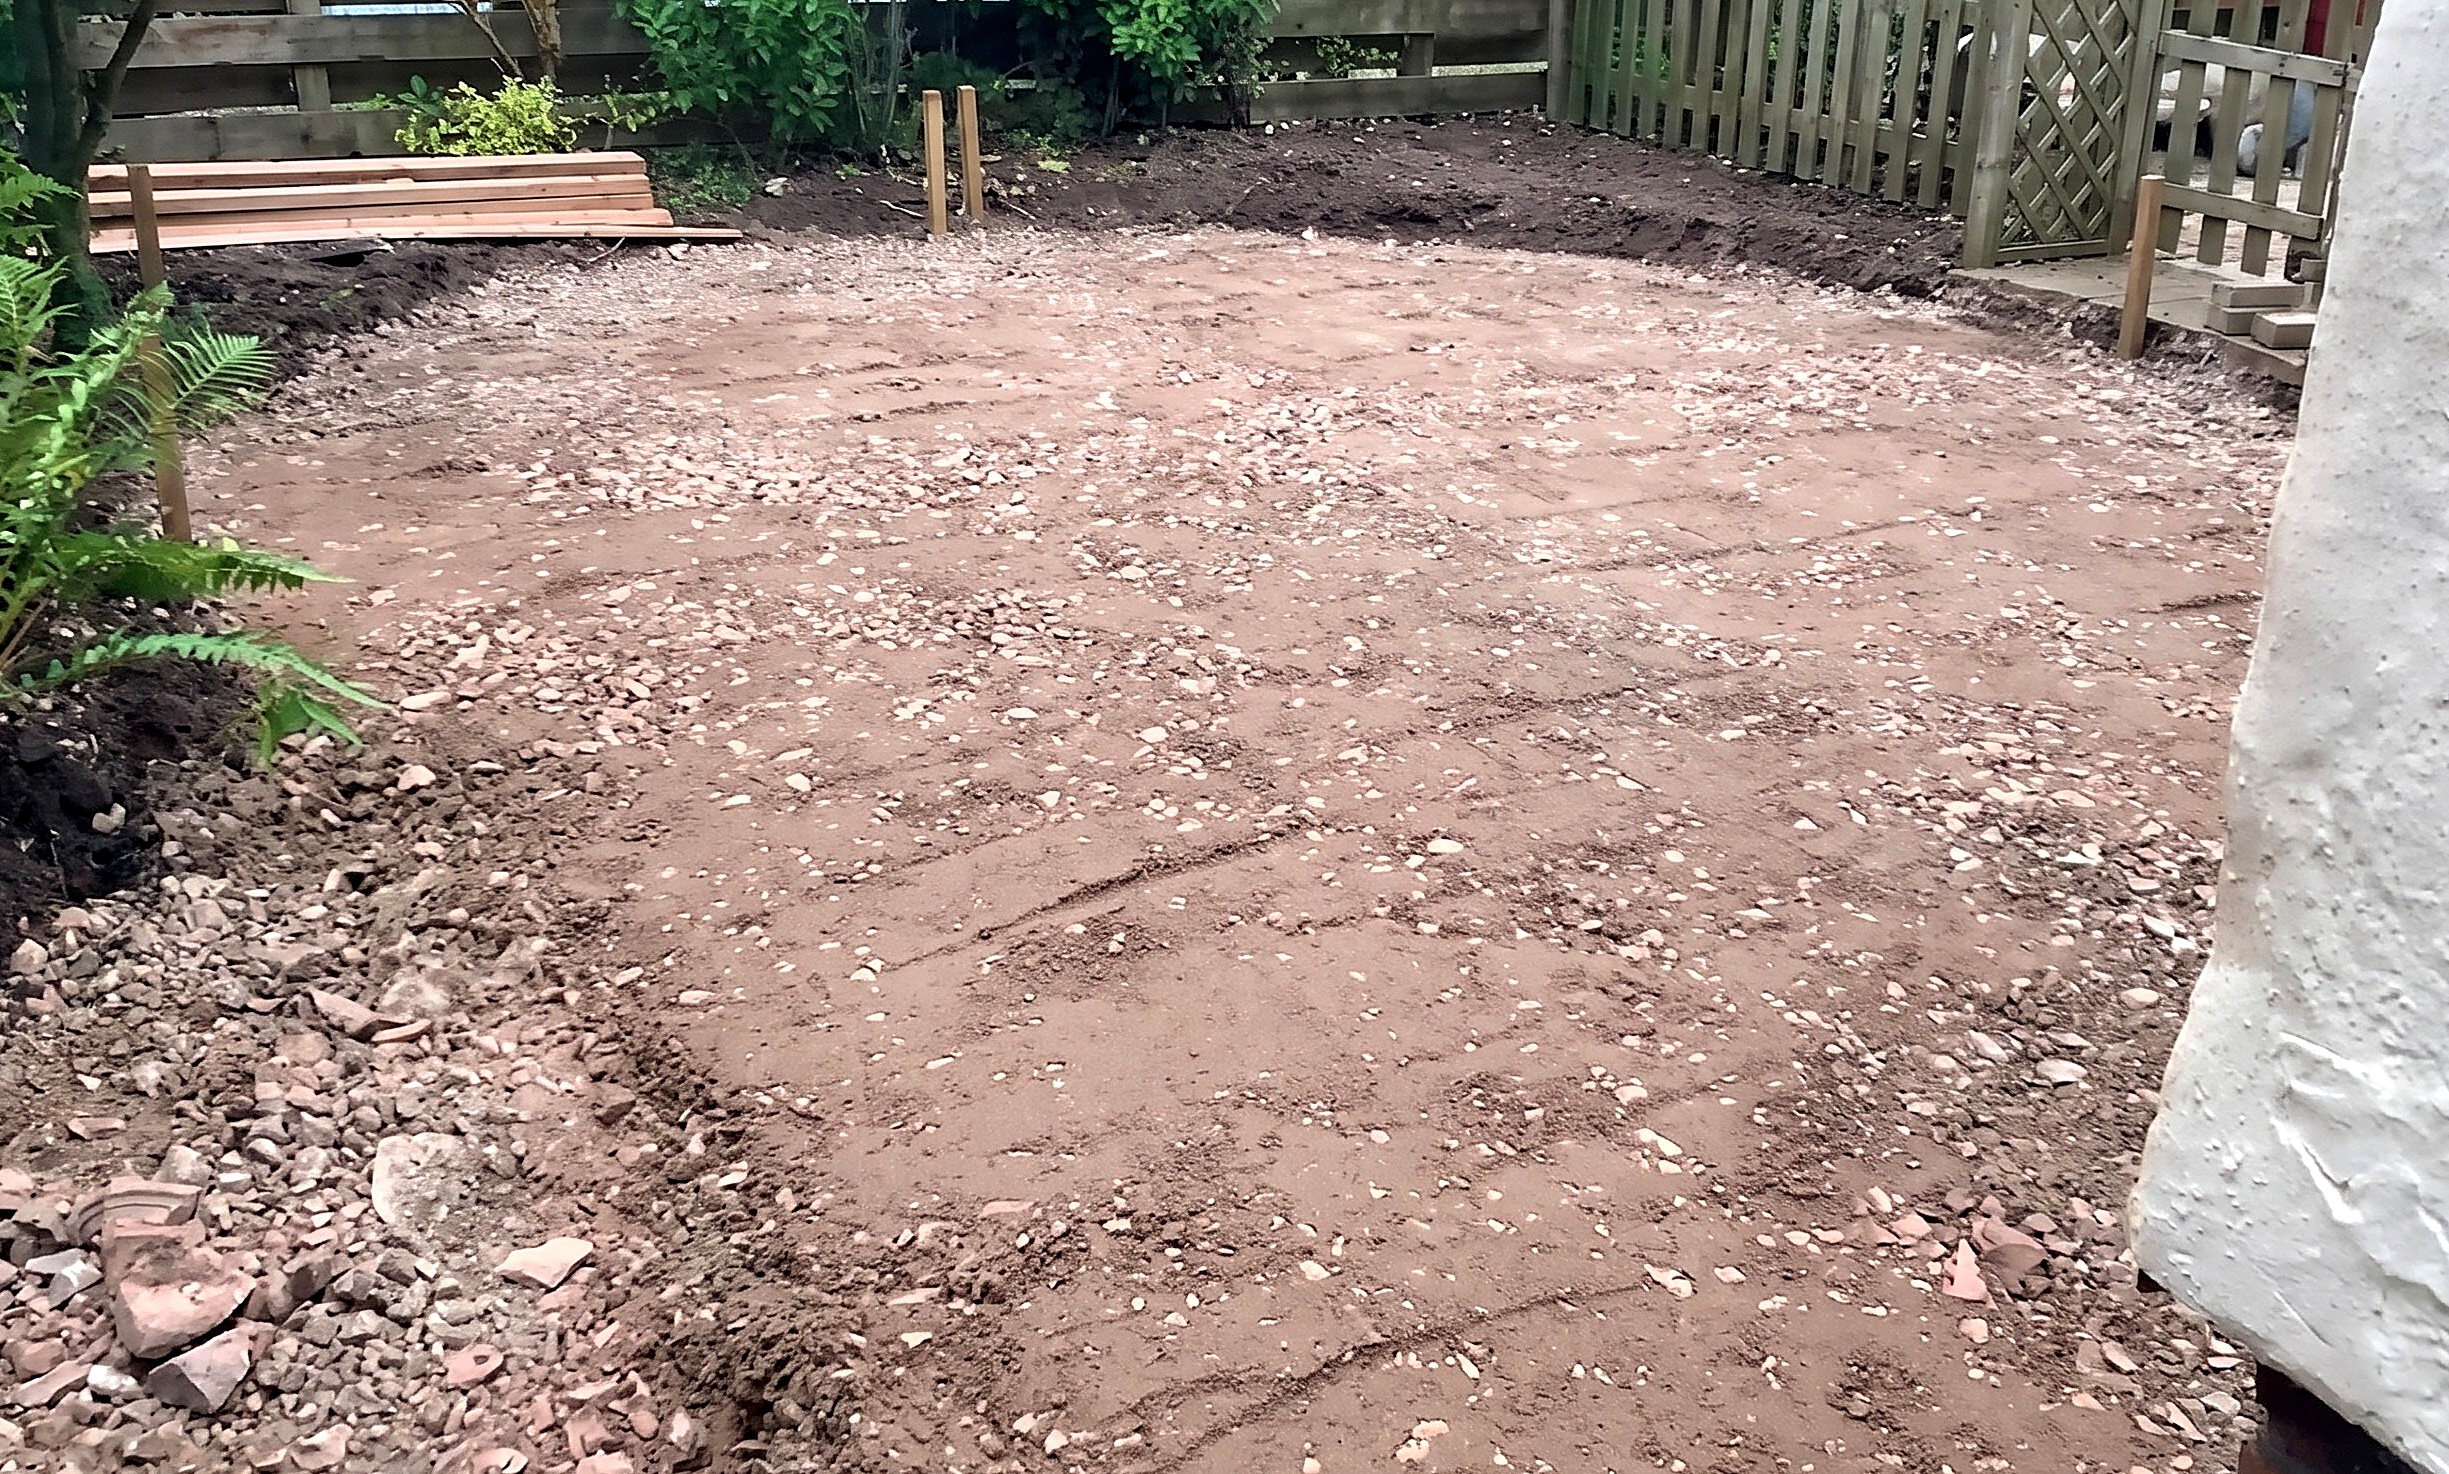
Perpendicular centerlines aligned with the rear house window; reclaimed hardcore sub-base compacted level.
You'll need: Power Barrow / Mini Dumper, Plate Compactor (Wacker Plate), String Line, MOT Type 1 Hardcore, Timber Shuttering Boards and Pegs
- 3.1 Set Intersecting Center String Lines
- Drive wooden pegs at the rear garden edges and stretch two perpendicular string lines.
- Center the main string axis on the overlooking house window for symmetry.
- 3.2 Spread Reclaimed Hardcore in Rear Garden
- Haul clean reclaimed hardcore from front driveway to rear garden.
- Spread MOT Type 1 hardcore in 2 in layers over the compacted soil.
- 3.3 Compact Hardcore Sub-Base
- Run the plate compactor in spirals over each 2 in hardcore layer.
- Add and compact layers until the sub-base is solid and level.
Key measurements
- Hardcore lift: 2 in (50 mm) per compacted layer
- Tip: Reuse clean hardcore from under the old driveway to avoid haul-away costs.
Before you move on: Check the main string line is dead-center with the rear house window.
Step 4: Mark the Circular Lawn Area
True circular perimeter scribed in red paint on the compacted rear hardcore sub-base.
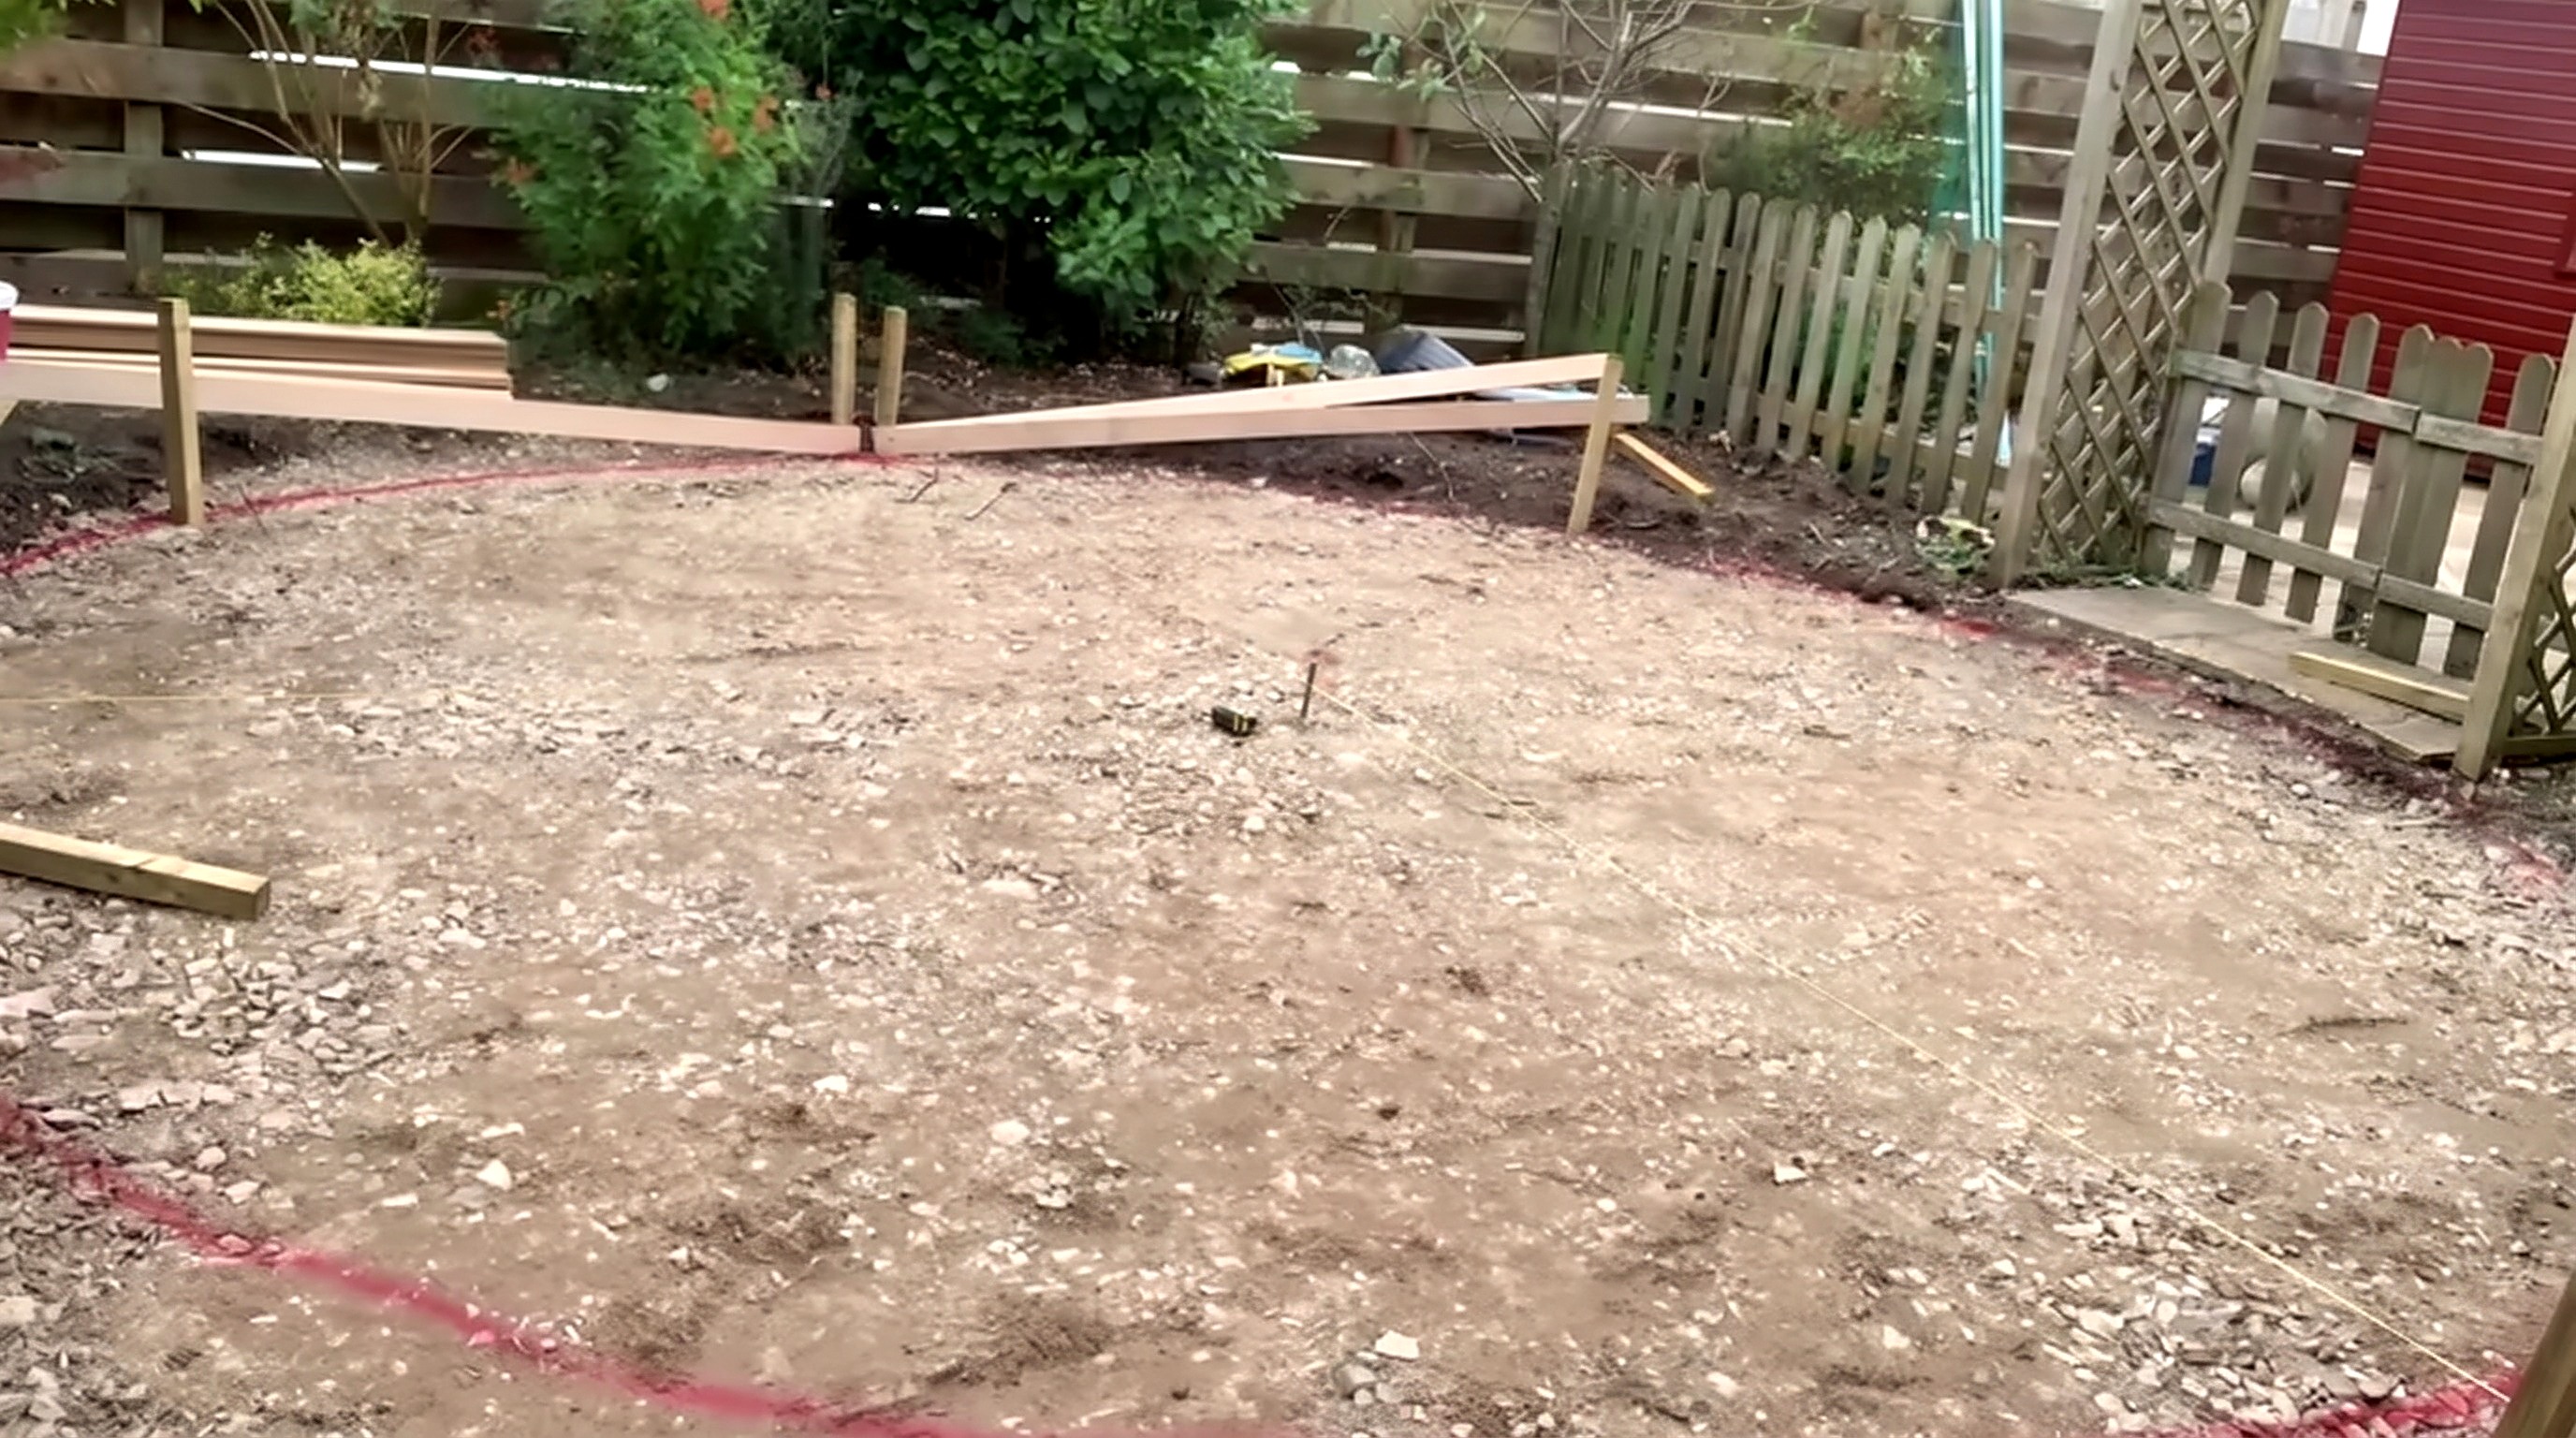
You'll need: String Line, Tape Measure, Line Marking Spray Paint
- 4.1 Rig Non-Binding String Compass to Spray Can
- Drive a steel pin where the two center string lines cross.
- Tie one end of a string line to a can of red line-marking spray paint.
- Tie a plastic bottle-top ring to the other end and slip it on the center pin.
- 4.2 Spray Circular Perimeter Line
- Pull the radius string taut from the bottle-top pivot.
- Walk the perimeter, spraying a continuous red circle on the hardcore.
- Tip: Use a true circle, not an oval, so every radial border tile shares one wedge angle.
- Tip: A bottle-top ring on the center pin lets the string spin without coiling and shortening the radius.
Step 5: Excavate Front Driveway to Depth and Lay Sub-Base
Front driveway dug 400 to 500 mm deep and compacted with 200 to 250 mm of hardcore, leaving 350 mm below finished level.
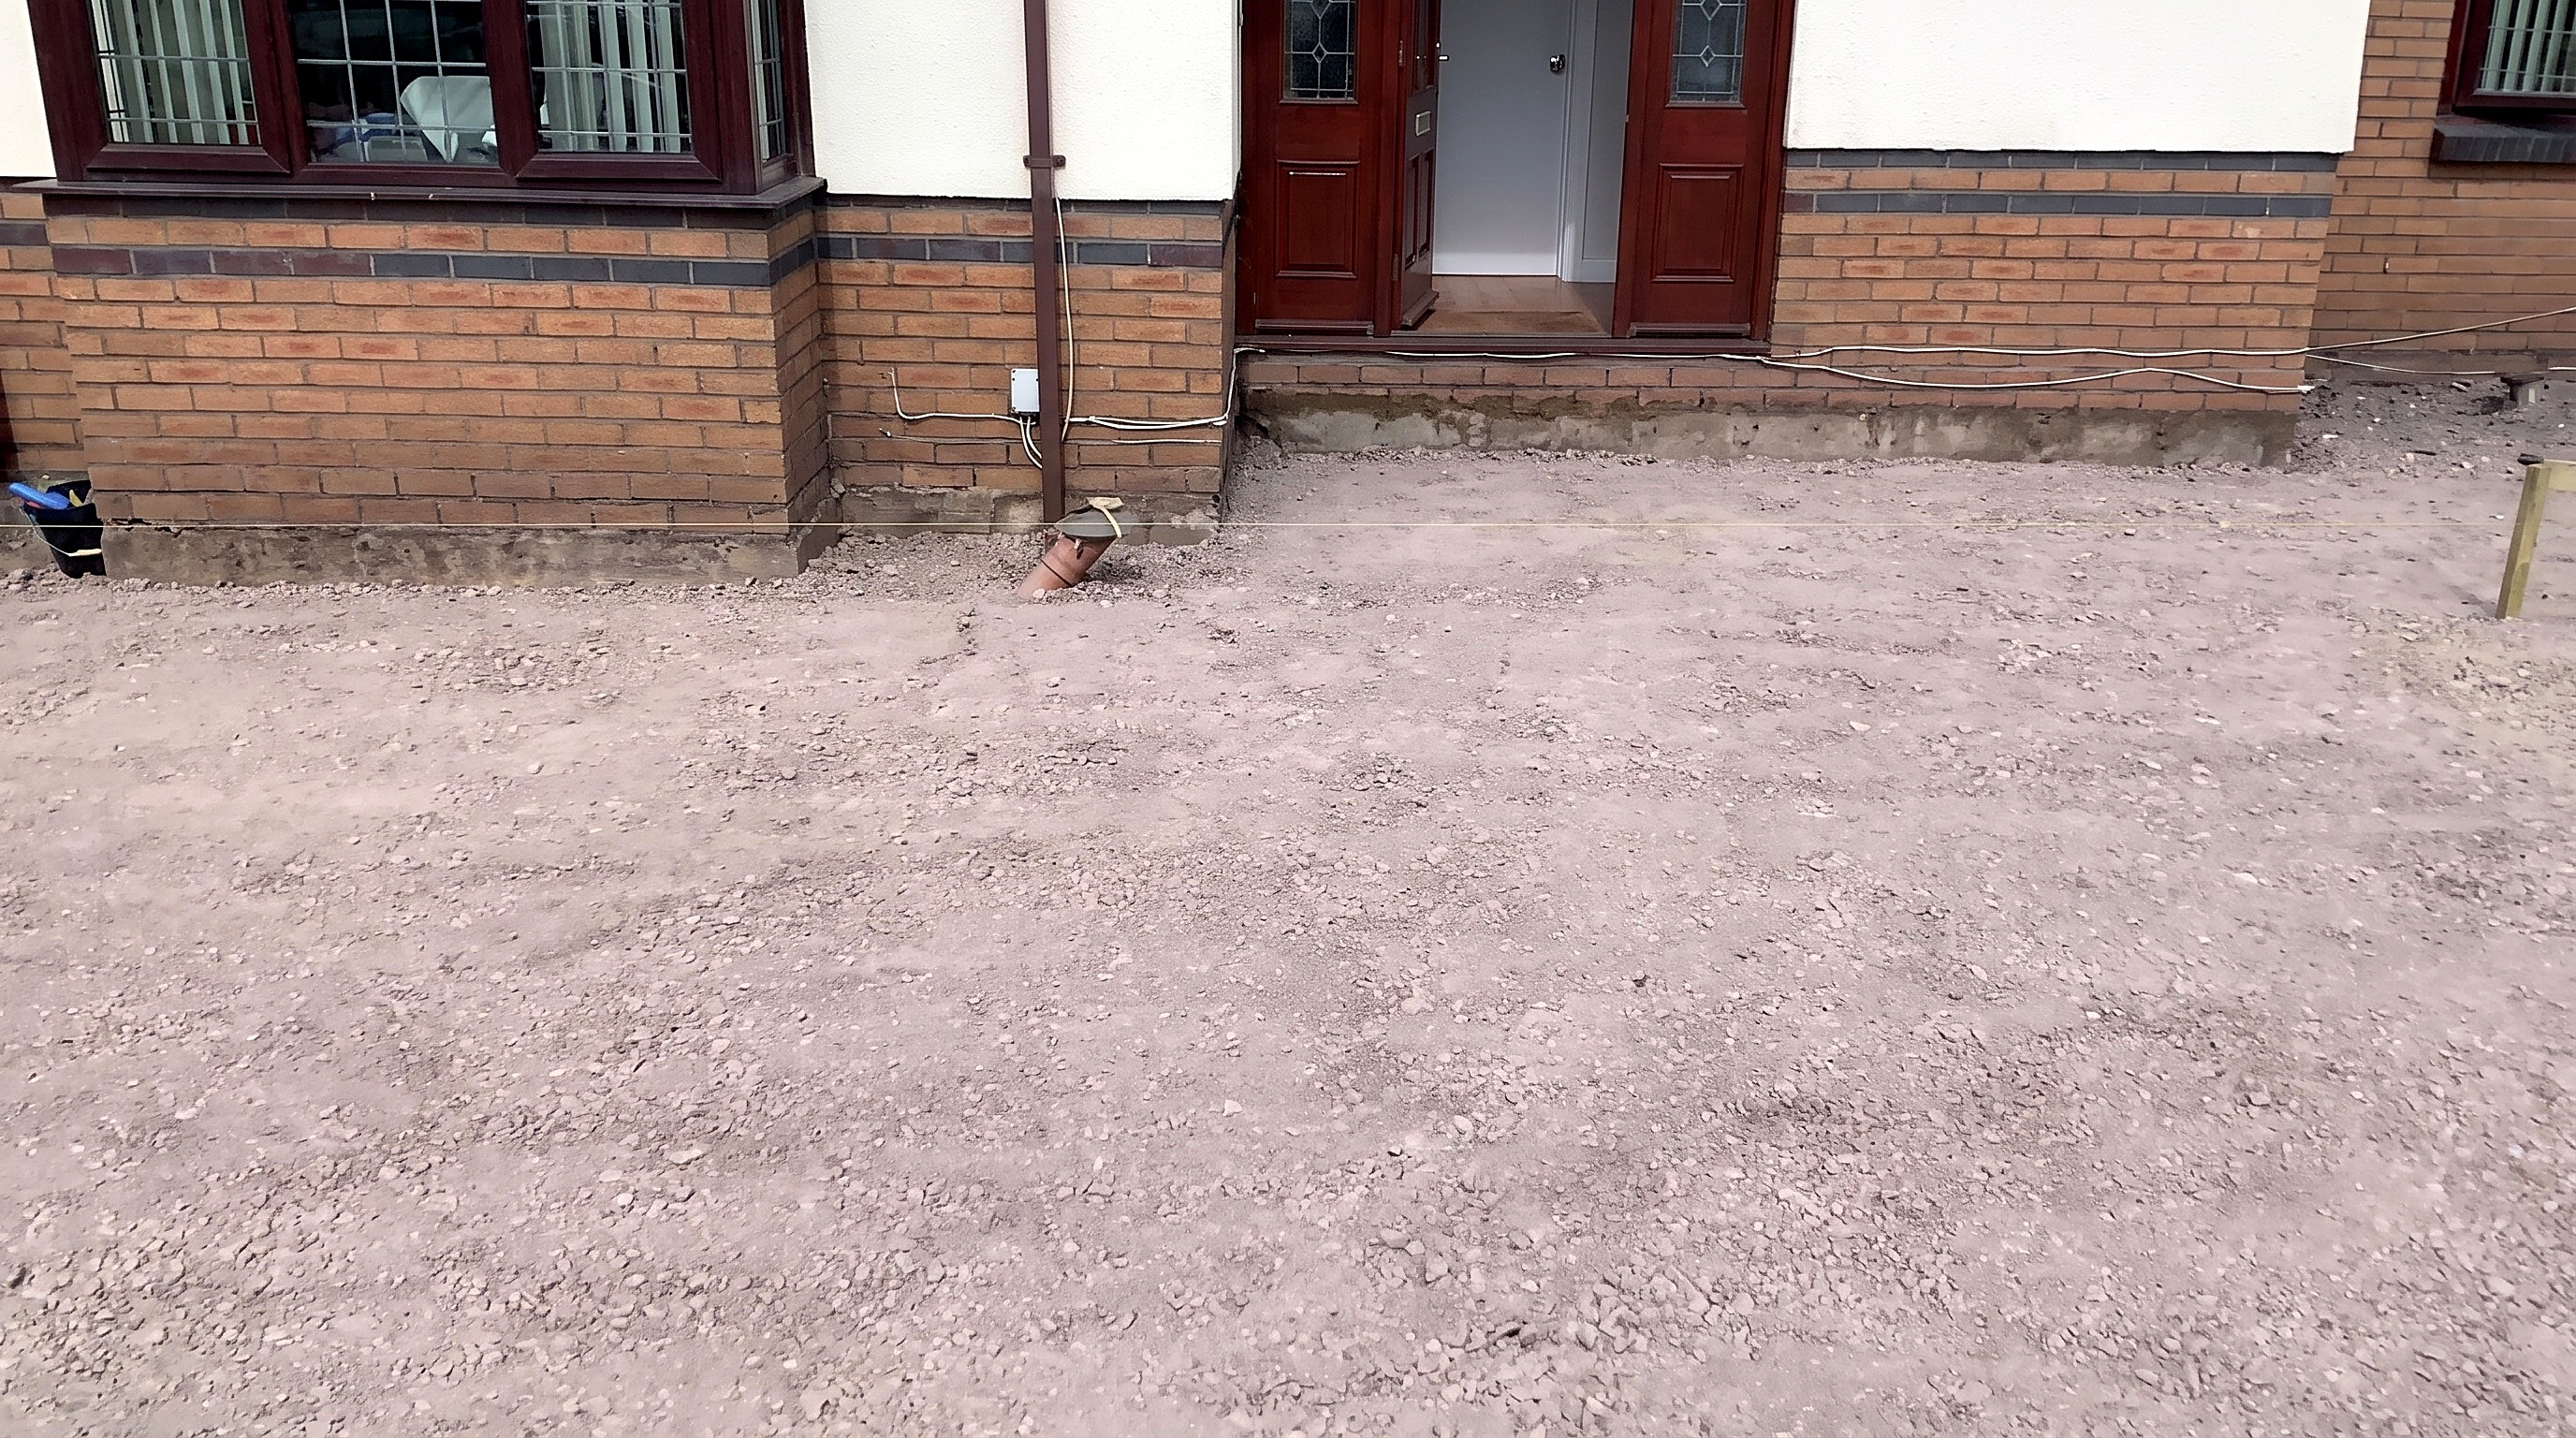
You'll need: Mini Excavator, Plate Compactor (Wacker Plate), String Line, Tape Measure, MOT Type 1 Hardcore
- 5.1 Excavate Driveway and Leave Temporary Access Path
- Dig the main front driveway 400 to 500 mm deep with the mini excavator.
- Leave a strip of existing block pavers as a temporary front-door walkway.
- 5.2 Verify 350 mm Depth Below String Line
- Spread and compact 100 mm of MOT Type 1 hardcore first.
- Measure from compacted hardcore to the finished-level string line to check 350 mm depth remains.
- 5.3 Remove Final Spoil and Deliver MOT Type 1 Hardcore
- Remove the temporary walkway and load final spoil on the grab lorry for 48 tons total.
- Spread and compact fresh MOT Type 1 hardcore to the full 200 to 250 mm sub-base depth.
Key measurements
- Total driveway depth: 400 to 500 mm below finished level
- Hardcore sub-base depth: 200 to 250 mm compacted MOT Type 1
- Remaining depth above first 100 mm hardcore layer: 350 mm to string line
- Spoil removed: 48 tons of earth and old paving
- Tip: Keep the temporary old paving strip until the final grab lorry arrives so residents can enter the house.
Before you move on: Check depth from the finished-level string line to the hardcore for a 150 to 200 mm concrete slab, mortar, and tile.
Step 6: Install Formwork, Expansion Foam, and Reinforcing Mesh
Divide the driveway into shuttered bays with expansion foam and A142 steel mesh on 75 mm brick spacers.
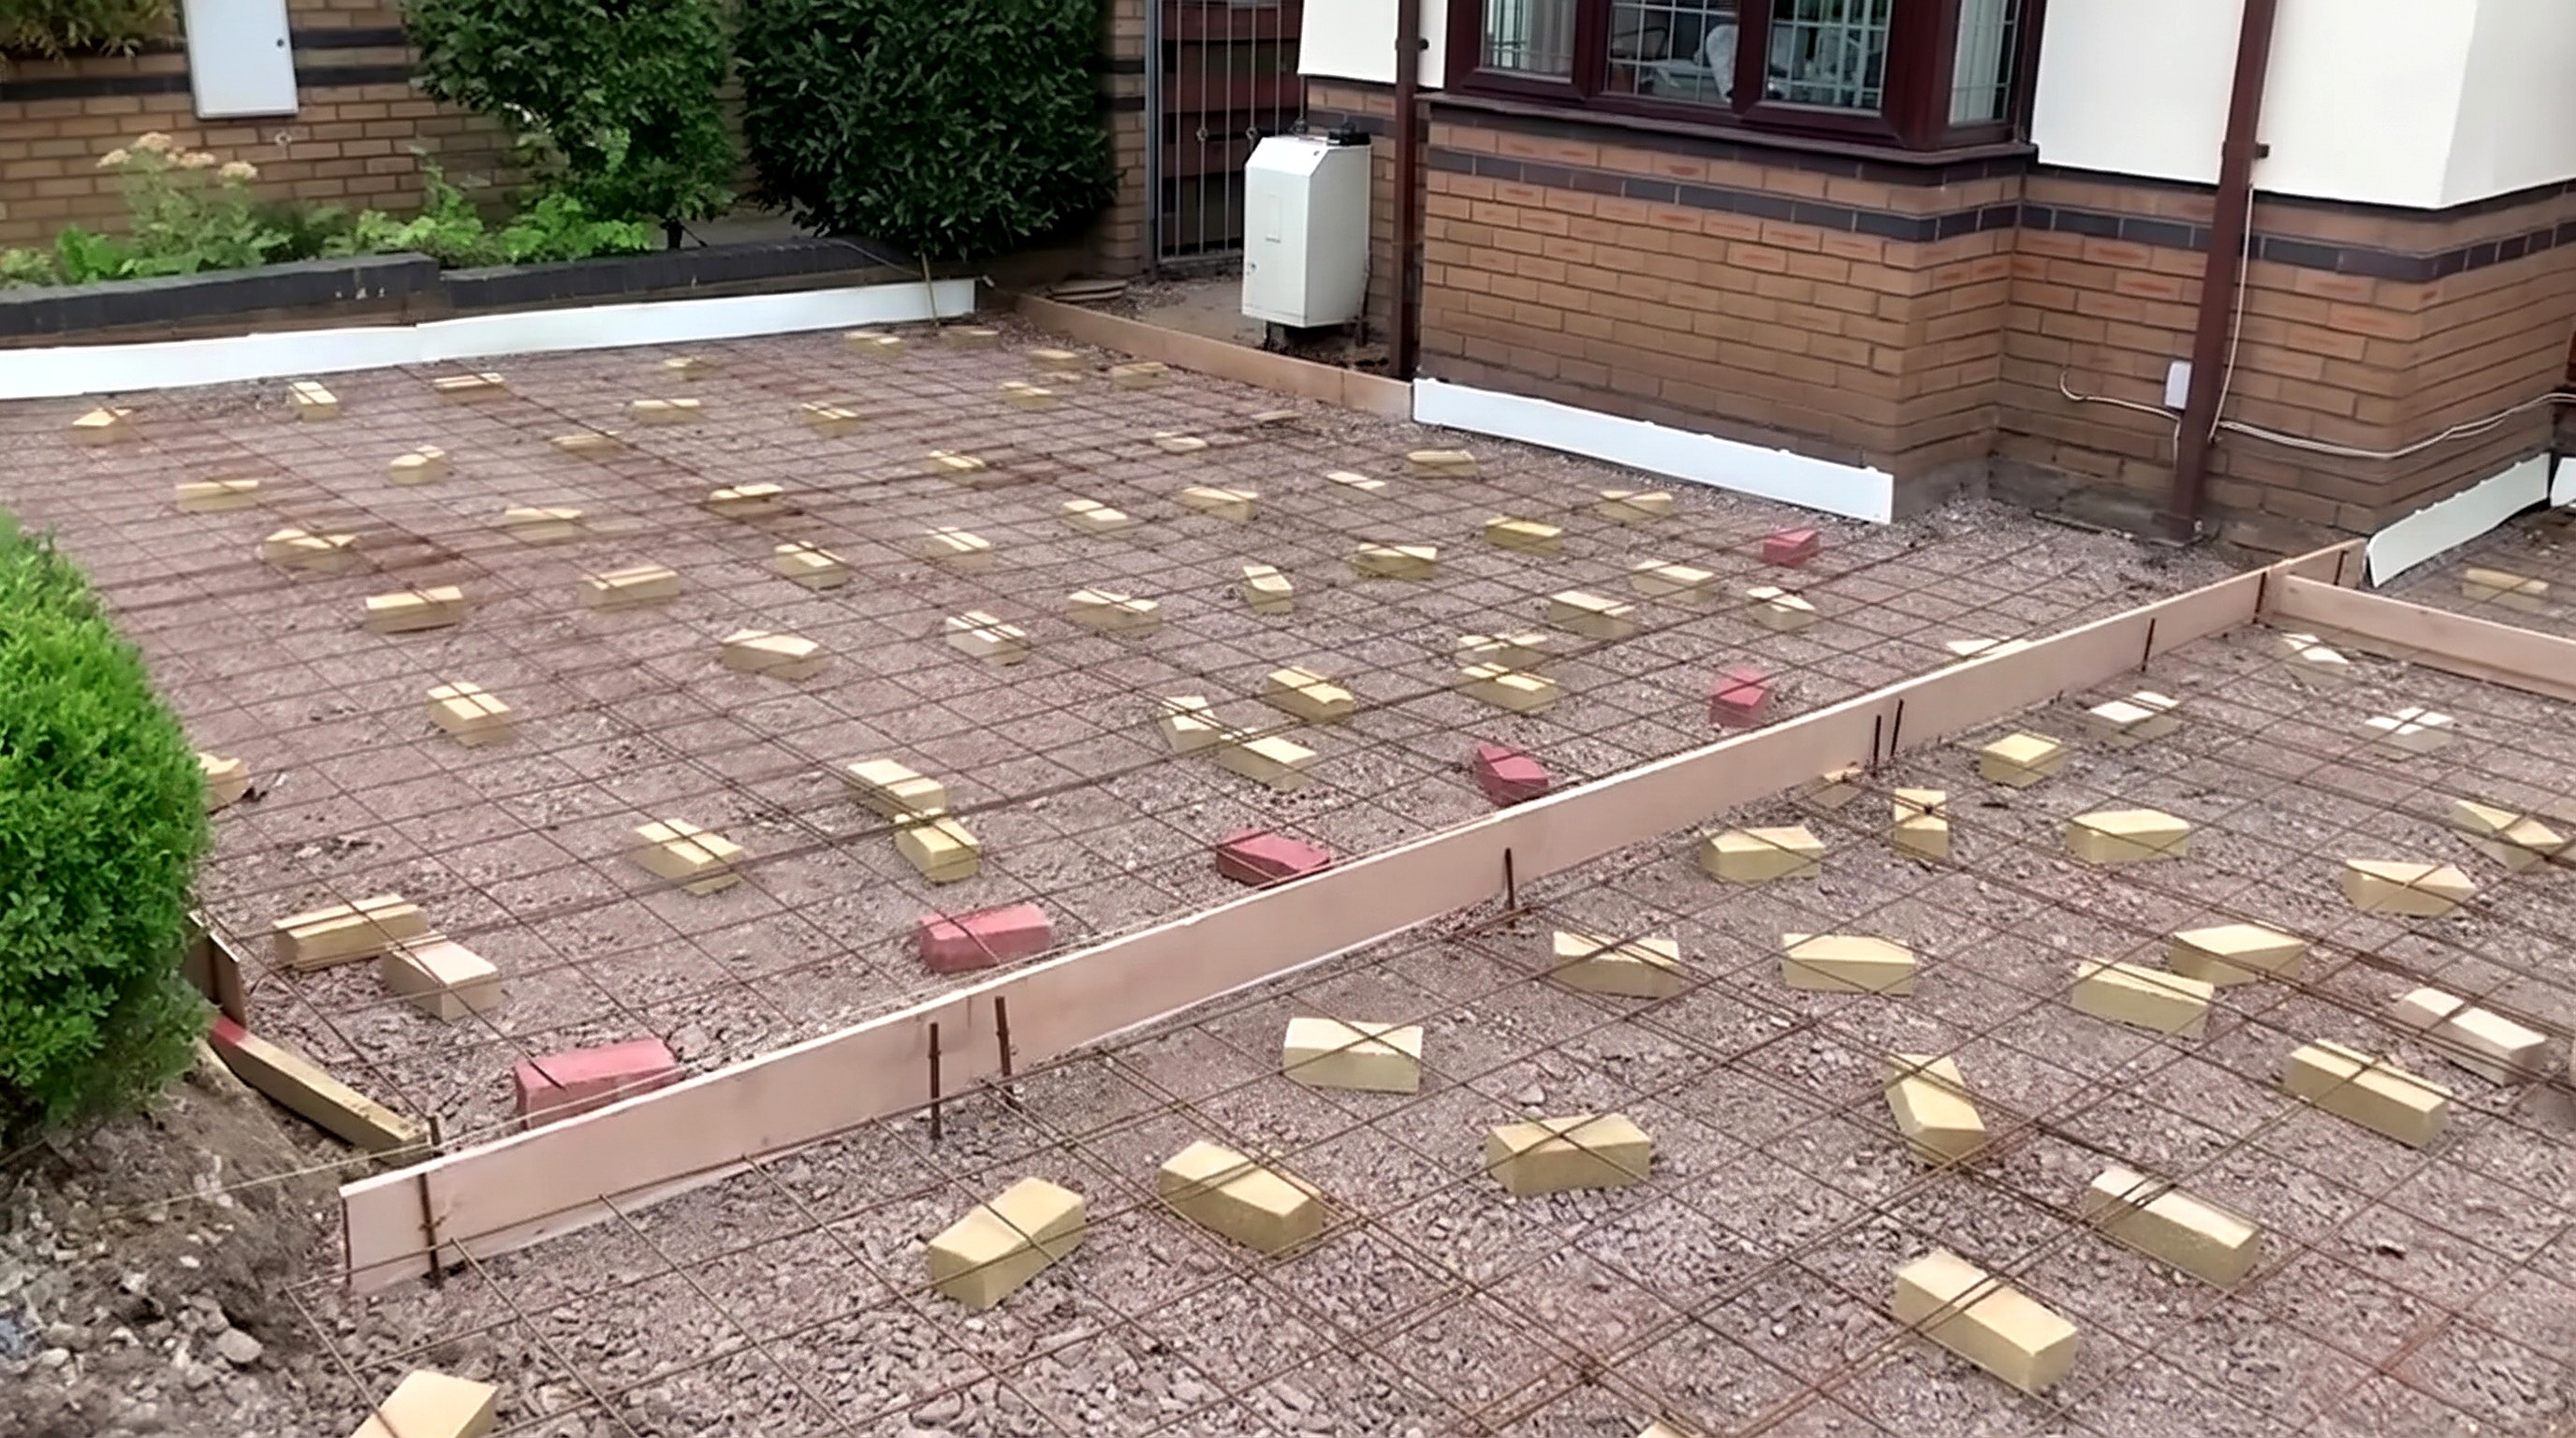
You'll need: Cordless Drill, Angle Grinder, Hand Saw, Expansion Joint Strip, Steel Reinforcing Mesh, Bricks, Timber Shuttering Boards and Pegs
- 6.1 Set Timber Shuttering and Tie A142 Mesh on Brick Spacers
- Stake timber shuttering boards on the bay lines with pegs and a cordless drill.
- Set 75 mm high bricks on the hardcore to hold the mesh at mid-depth.
- Lay A142 steel reinforcing mesh sheets on the bricks and tie overlaps.
- 6.2 Fit Perimeter Expansion Foam and Complete Mesh Layout
- Fit compressible white expansion joint strips against the house brickwork and bay shuttering.
- Cut the remaining A142 steel mesh with an angle grinder and lay across the bays.
Key measurements
- Mesh spacer height: 75 mm bricks to center mesh in a 150 mm concrete slab
- Tip: Rest A142 mesh on 75 mm bricks for 75 mm of concrete above and below.
Step 7: Dampen Sub-Base and Pour Concrete Slab
Pour a 150 to 200 mm reinforced concrete slab, screed to the drainage falls, and cure for 6 weeks.
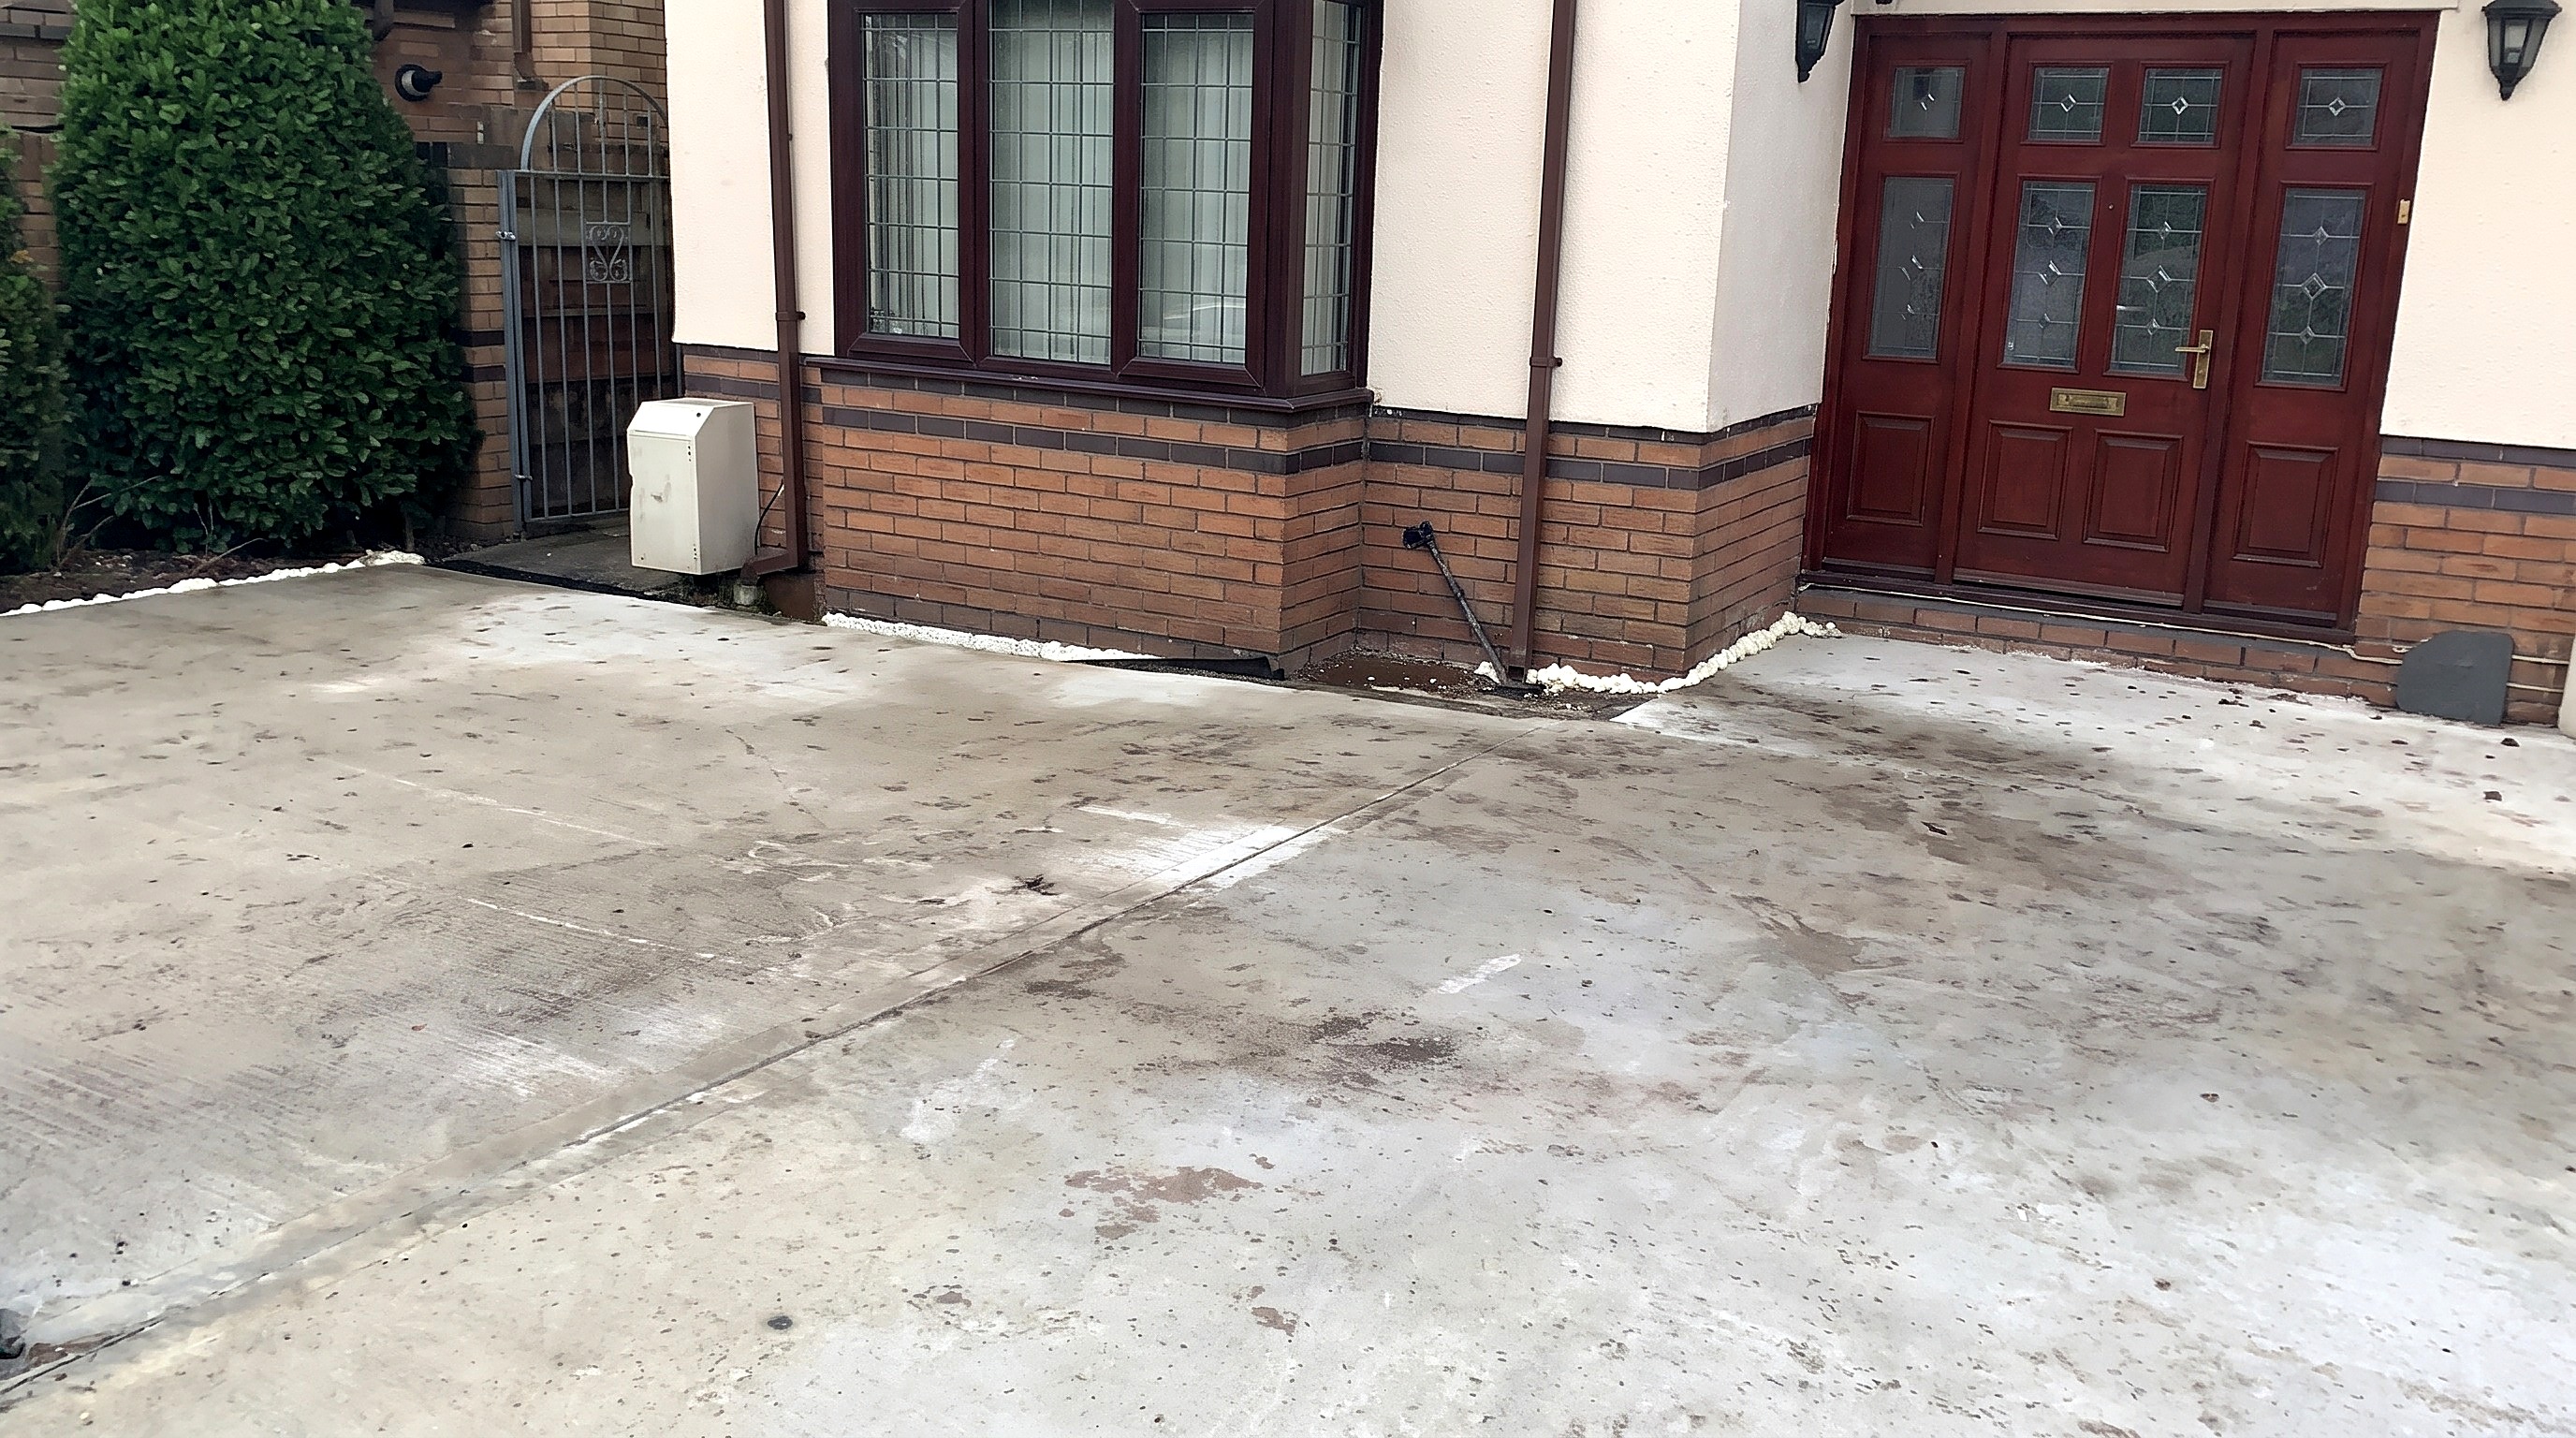
You'll need: Garden Hose, Concrete Rake / Screed, Spirit Levels, Ready-Mix Concrete
- 7.1 Soak the Hardcore Sub-Base with Water
- Spray the compacted hardcore sub-base and steel mesh with a garden hose.
- Dampen the area so dry hardcore cannot pull moisture from the fresh concrete.
- 7.2 Pump and Screed Upper Driveway Concrete Bay
- Pump ready-mix concrete into the upper bay over the A142 reinforcing mesh.
- Rake concrete 150 to 200 mm thick and screed to the shuttering boards and drainage falls.
- 7.3 Pump and Screed Lower Driveway Concrete Bay
- Pump concrete into the lower bay and tamp to slope toward the corner drain.
- Let the slab set overnight for foot traffic, then cure 6 weeks before tiling.
Key measurements
- Concrete slab thickness: 150 to 200 mm (6 to 8 in)
- Concrete cure time before tiling: 6 weeks
- Tip: Soak the hardcore before pumping concrete to stop rapid moisture loss and surface cracking.
- Heads up: Do not lay porcelain tiles until the concrete slab cures for about 6 weeks.
Before you move on: Verify the screeded concrete slopes toward the planned channel drain positions with no high spots.
Step 8: Cut Border Strips and Mitered Corners
Cut the 300 mm grey outer border strips, narrow ivory inner strips, and 32 45-degree corner miters face up.
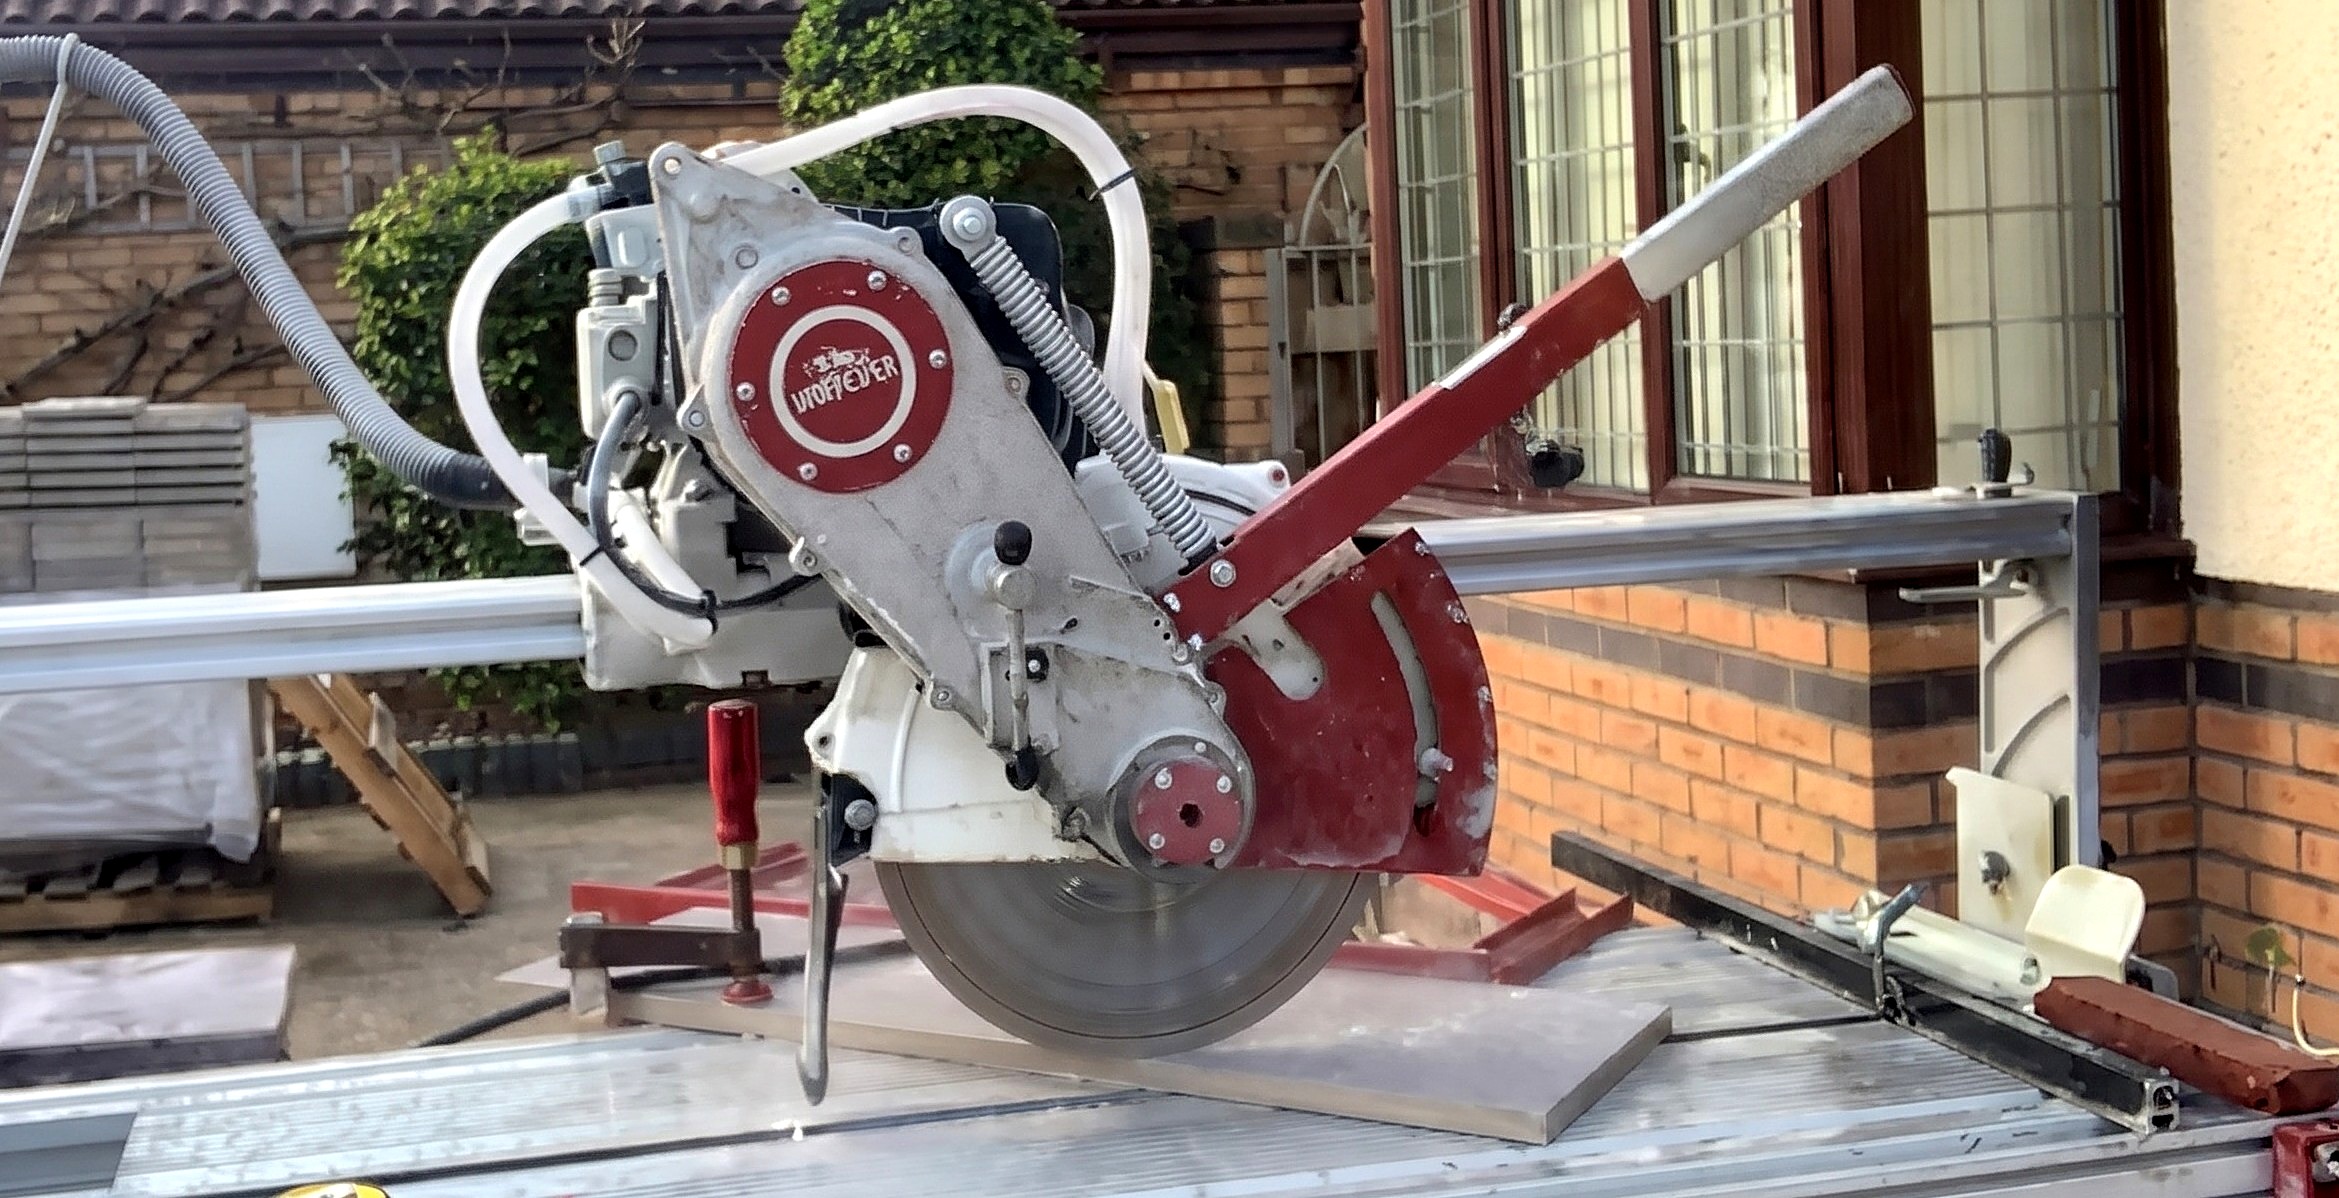
Parts in this step: (B) Outer Border Strips (Grey Porcelain), (C) Inner Border Strips (Ivory Porcelain), (D) Doorway Mat Slabs (Basalt Porcelain)
You'll need: Wet Bridge Tile Saw, G-Clamp, Tape Measure, Porcelain Paving Tiles, Bricks
- 8.1 Rip Porcelain Border Strips Using a Stop Block
- Clamp a stop block to the wet bridge saw back fence.
- Butt an 800 mm grey slab against the stop, overhanging the side roller table.
- Rip ~100 300 mm Outer Border Strips (Grey Porcelain) (B) and ~100 Inner Border Strips (Ivory Porcelain) (C).
- 8.2 Dry-Fit Front Doorway Mat and Configure Miter Jig
- Dry-lay one 400 x 800 mm Doorway Mat Slab (Basalt Porcelain) (D) centered at the front door.
- Frame the basalt slab dry with ivory inner strips (C) and grey outer border strips (B).
- Bolt the adjustable 45-degree angle jig to the wet saw table.
- 8.3 Batch-Cut 45-Degree Mitered Border Corners
- G-clamp each border strip to the angle jig with a brick counterweight.
- Cut 16 corner miters face up, then move the jig to the opposite side of the saw table.
- Cut 16 opposing 45-degree miters face up (32 corner pieces total), saving triangular offcuts.
Key measurements
- Grey outer border width: 300 mm ripped from 800 mm slabs
- Basalt doorway mat size: 400 x 800 x 20 mm
- Corner miter angle: 45 degrees across 32 corner pieces (16 corners)
- Double border length: ~250 linear meters (~100 grey and ~100 ivory strips)
- Tip: Move the angle jig to the opposite side of the saw table to cut opposing miters face up.
- Tip: Save triangular miter offcuts for decorative entrance features.
- Heads up: Never cut porcelain slabs upside down on the wet bridge saw; cutting face down chips the top glaze.
Step 9: Tile the Side Pathway and Front Entrance
Tile the 1.2 m side pathway and front entrance two courses below the damp proof course (10 mm cross-fall, 5 mm joints).
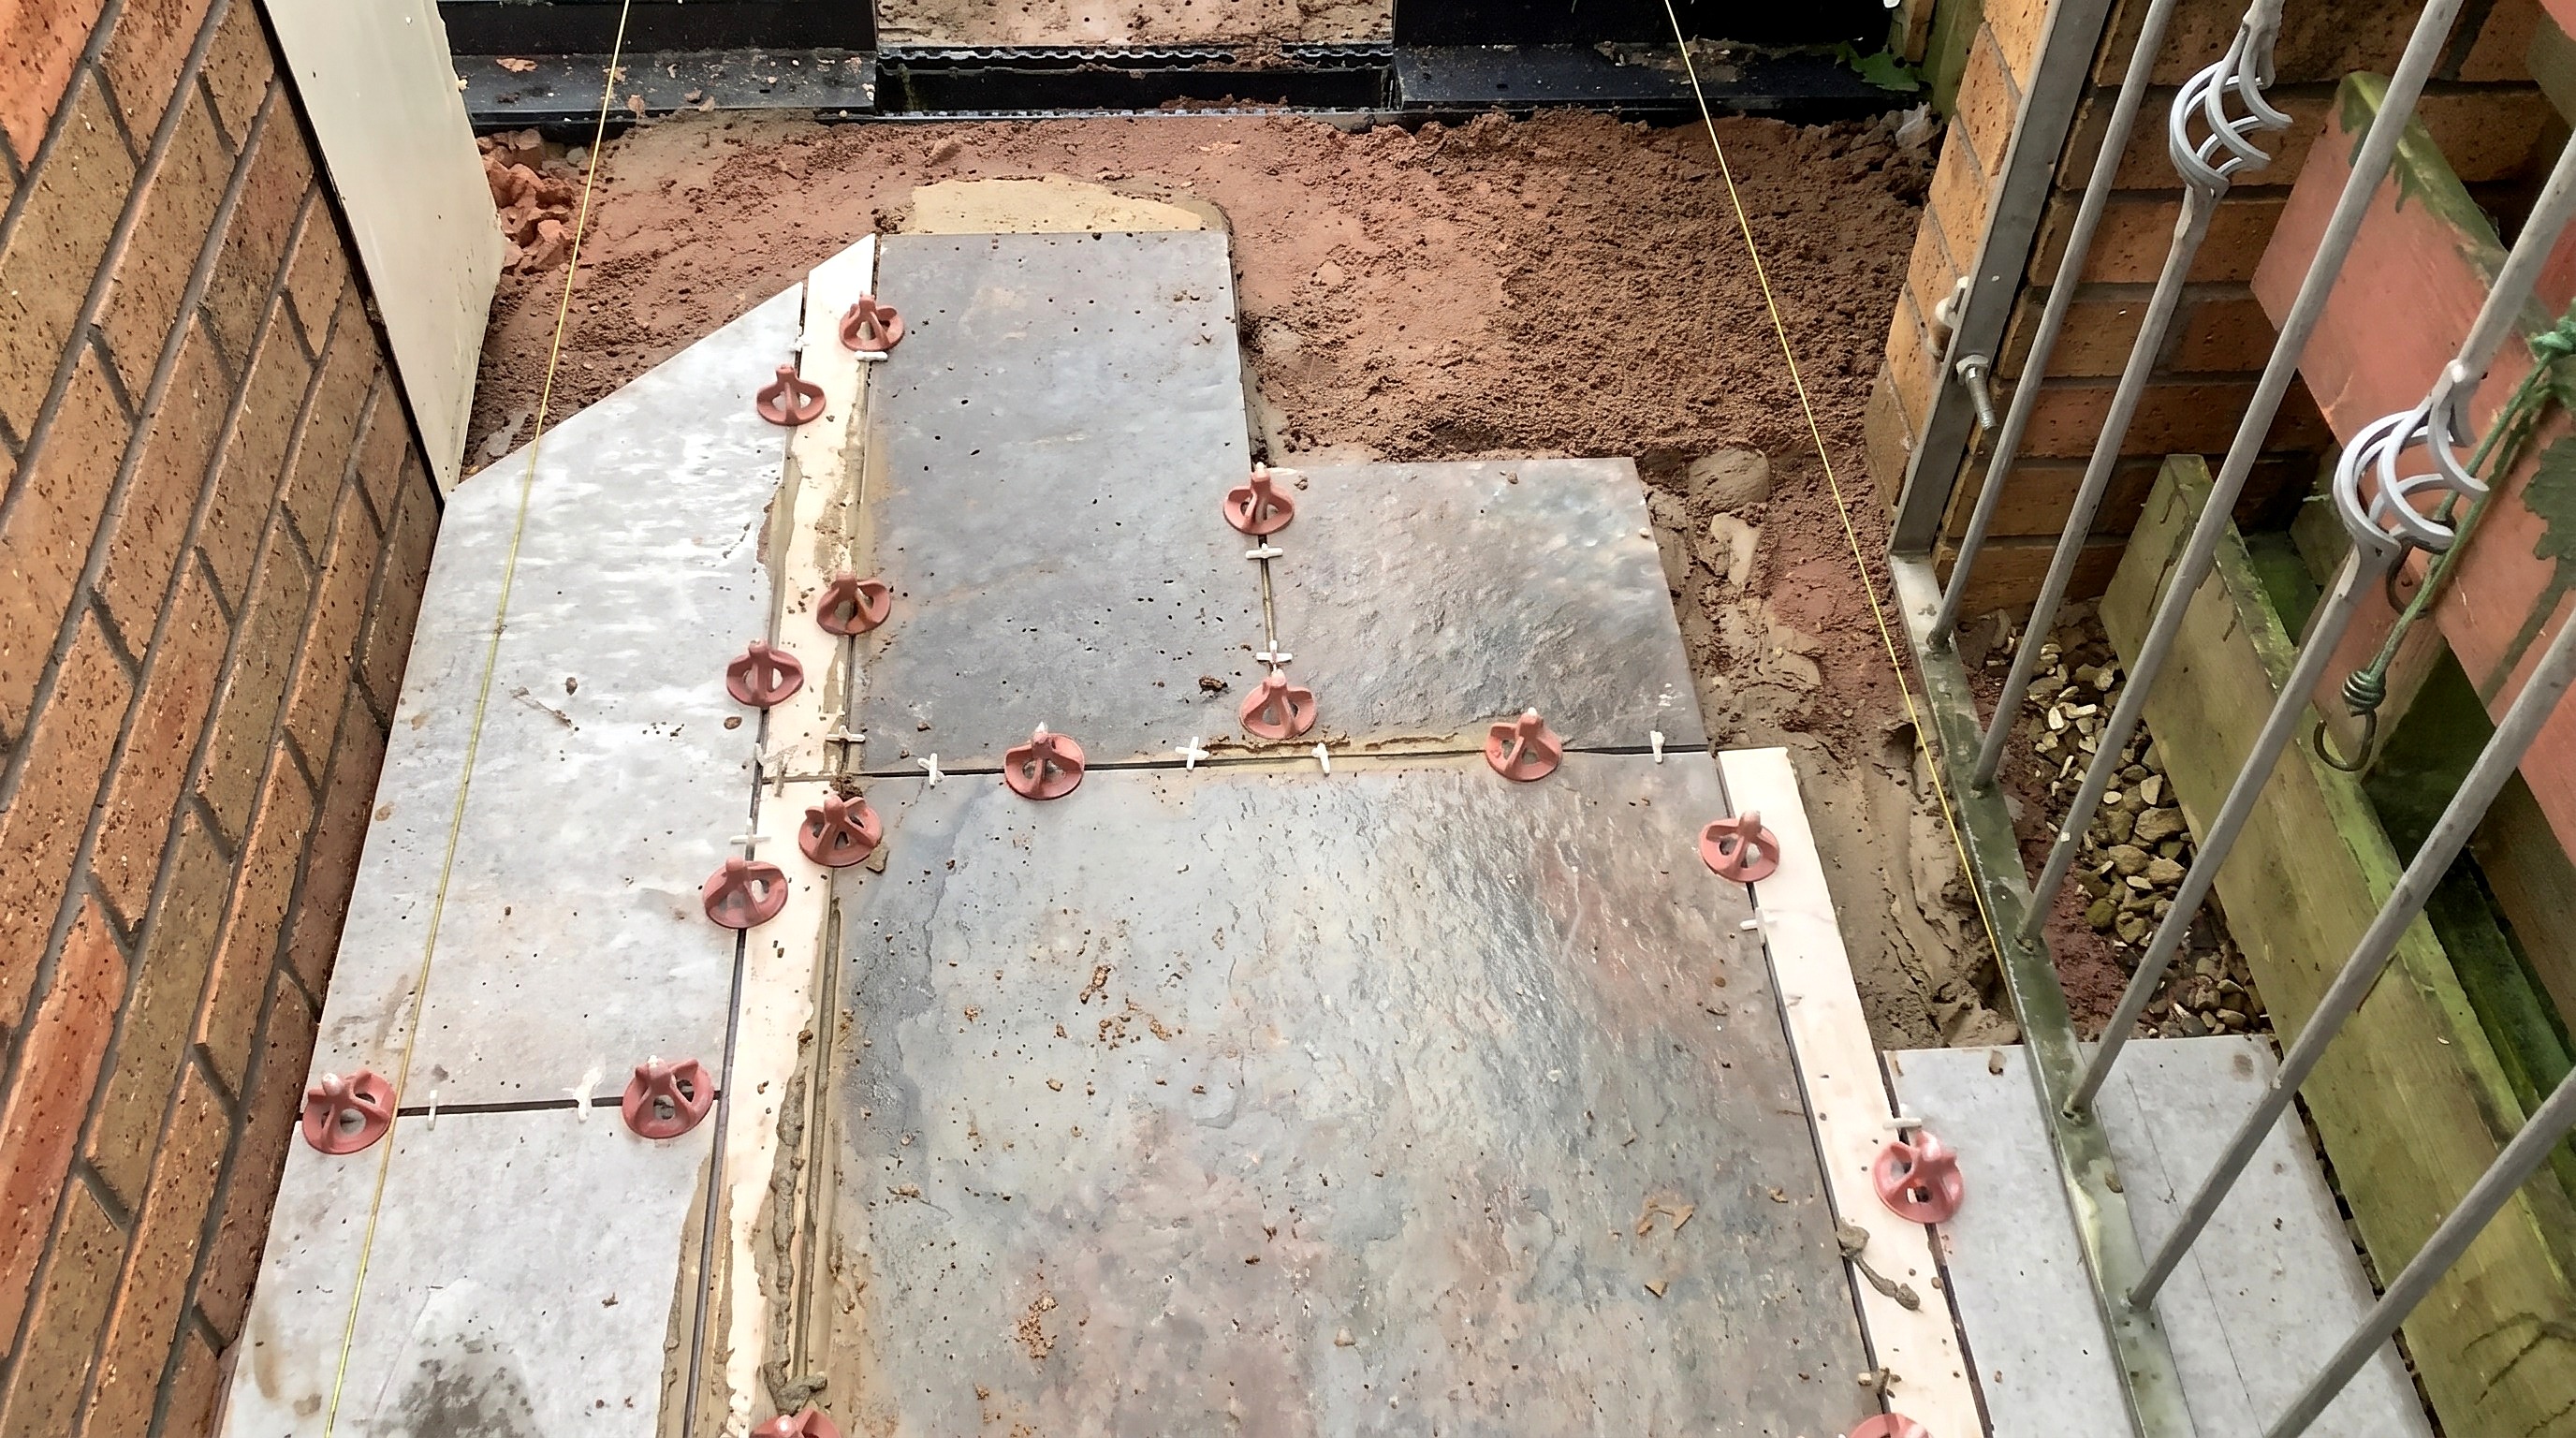
Parts in this step: (A) Porcelain Field Slabs (Copper), (B) Outer Border Strips (Grey Porcelain), (C) Inner Border Strips (Ivory Porcelain), (D) Doorway Mat Slabs (Basalt Porcelain)
You'll need: String Line, Mini Paint Roller, Bricklaying Trowel, Rubber Mallet, Spirit Levels, Wheelbarrow, Cement Mixer, Kneeling Pad, Porcelain Paving Tiles, Paving Primer, Sharp Sand and Cement, Tile Leveling Clips and Caps, Tile Spacers
- 9.1 Prime and Bed First Mitered Pathway Border Tile
- Run string lines on both sides of the 1.2 m pathway, two courses below the damp proof course.
- Trowel a full 4:1 sharp sand and cement mortar bed on the concrete base.
- Roll paving primer onto the first mitered Outer Border Strip (Grey Porcelain) (B) back.
- Set the tile 10 mm off the house brickwork, edge aligned with the string line.
- 9.2 Level Border Tile with 10 mm Cross-Fall
- Tap grey border strip (B) down with a rubber mallet.
- Check both axes with a spirit level; set a 10 mm cross-fall away from the house wall.
- 9.3 Lay Pathway Center Slabs and Borders with Leveling Clips
- Prime and bed Inner Border Strips (Ivory Porcelain) (C), 600 mm Porcelain Field Slabs (Copper) (A), and Doorway Mat Slab (Basalt Porcelain) (D).
- Place 5 mm cross spacers and rotary leveling clips under every joint across the 1.2 m width.
- Tighten leveling caps to lock the narrow ivory strips flush with adjacent slabs.
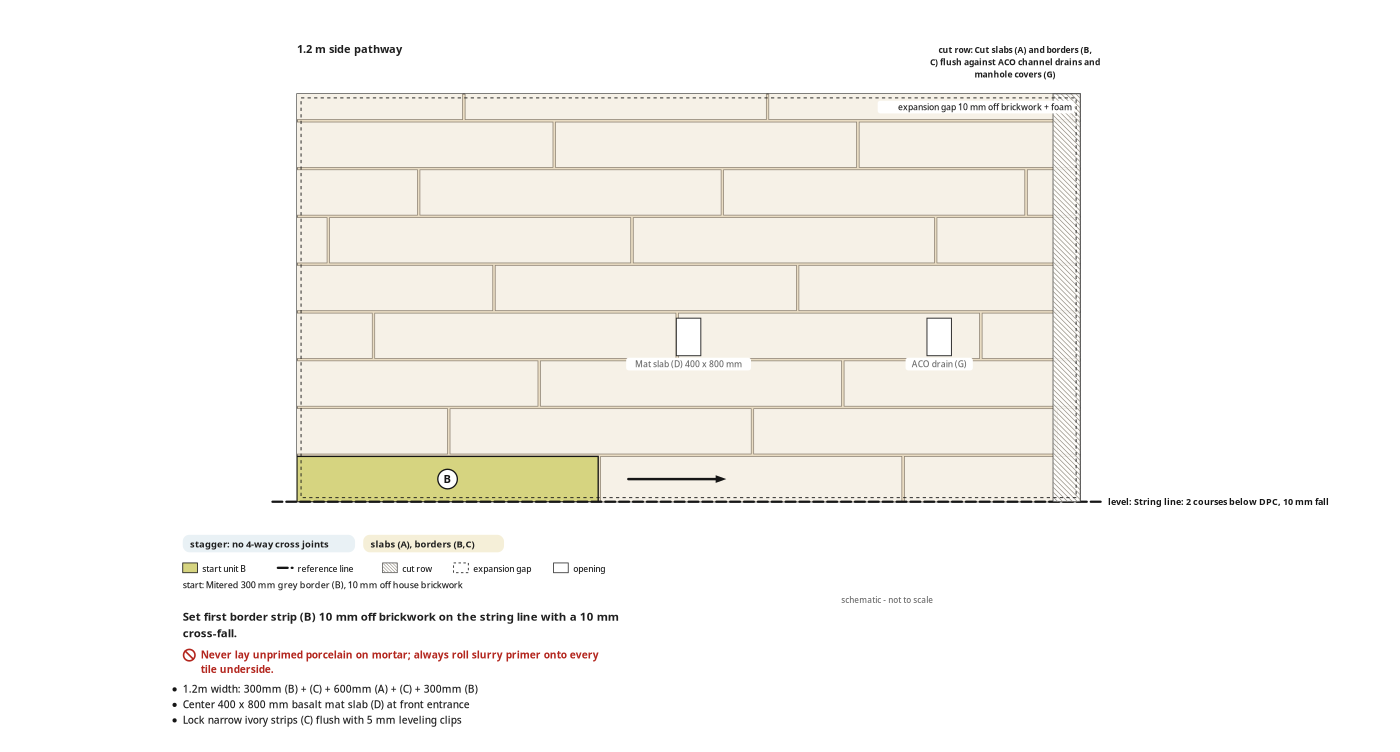
Key measurements
- Pathway width: 1.2 m (300 mm grey border + ivory strip + 600 mm copper slab + ivory strip + 300 mm grey border).
- Paving height: 2 brick courses below damp proof course (DPC).
- Wall clearance gap: 10 mm off house brickwork
- Pathway cross-fall: 10 mm slope away from house wall.
- Tile joint width: 5 mm with plastic cross spacers.
- Mortar mix: 4 parts sharp sand to 1 part cement.
- Tip: Keep the outer border 10 mm off the house wall so uneven brickwork cannot skew the straight tile line.
- Tip: Clip narrow ivory strips with rotary leveling clips to prevent tipping or shifting in wet mortar.
- Heads up: Coat every porcelain underside with slurry primer; unprimed porcelain will not bond to mortar.
Before you move on: Check the first border course with a spirit level and string line: true line, 10 mm cross-fall away from the house.
Step 10: Mark, Cut, and Dry-Fit Circular Border Tiles
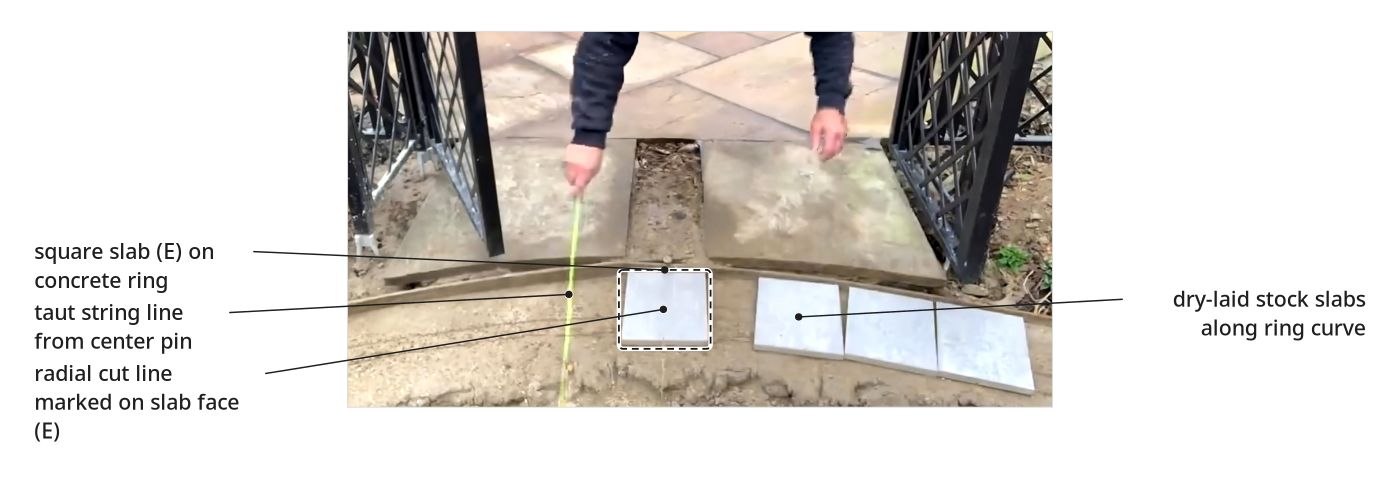
All 72 radial grey voussoir wedges cut and dry-fitted on the scribed concrete foundation ring: even joints, no small closing cut.
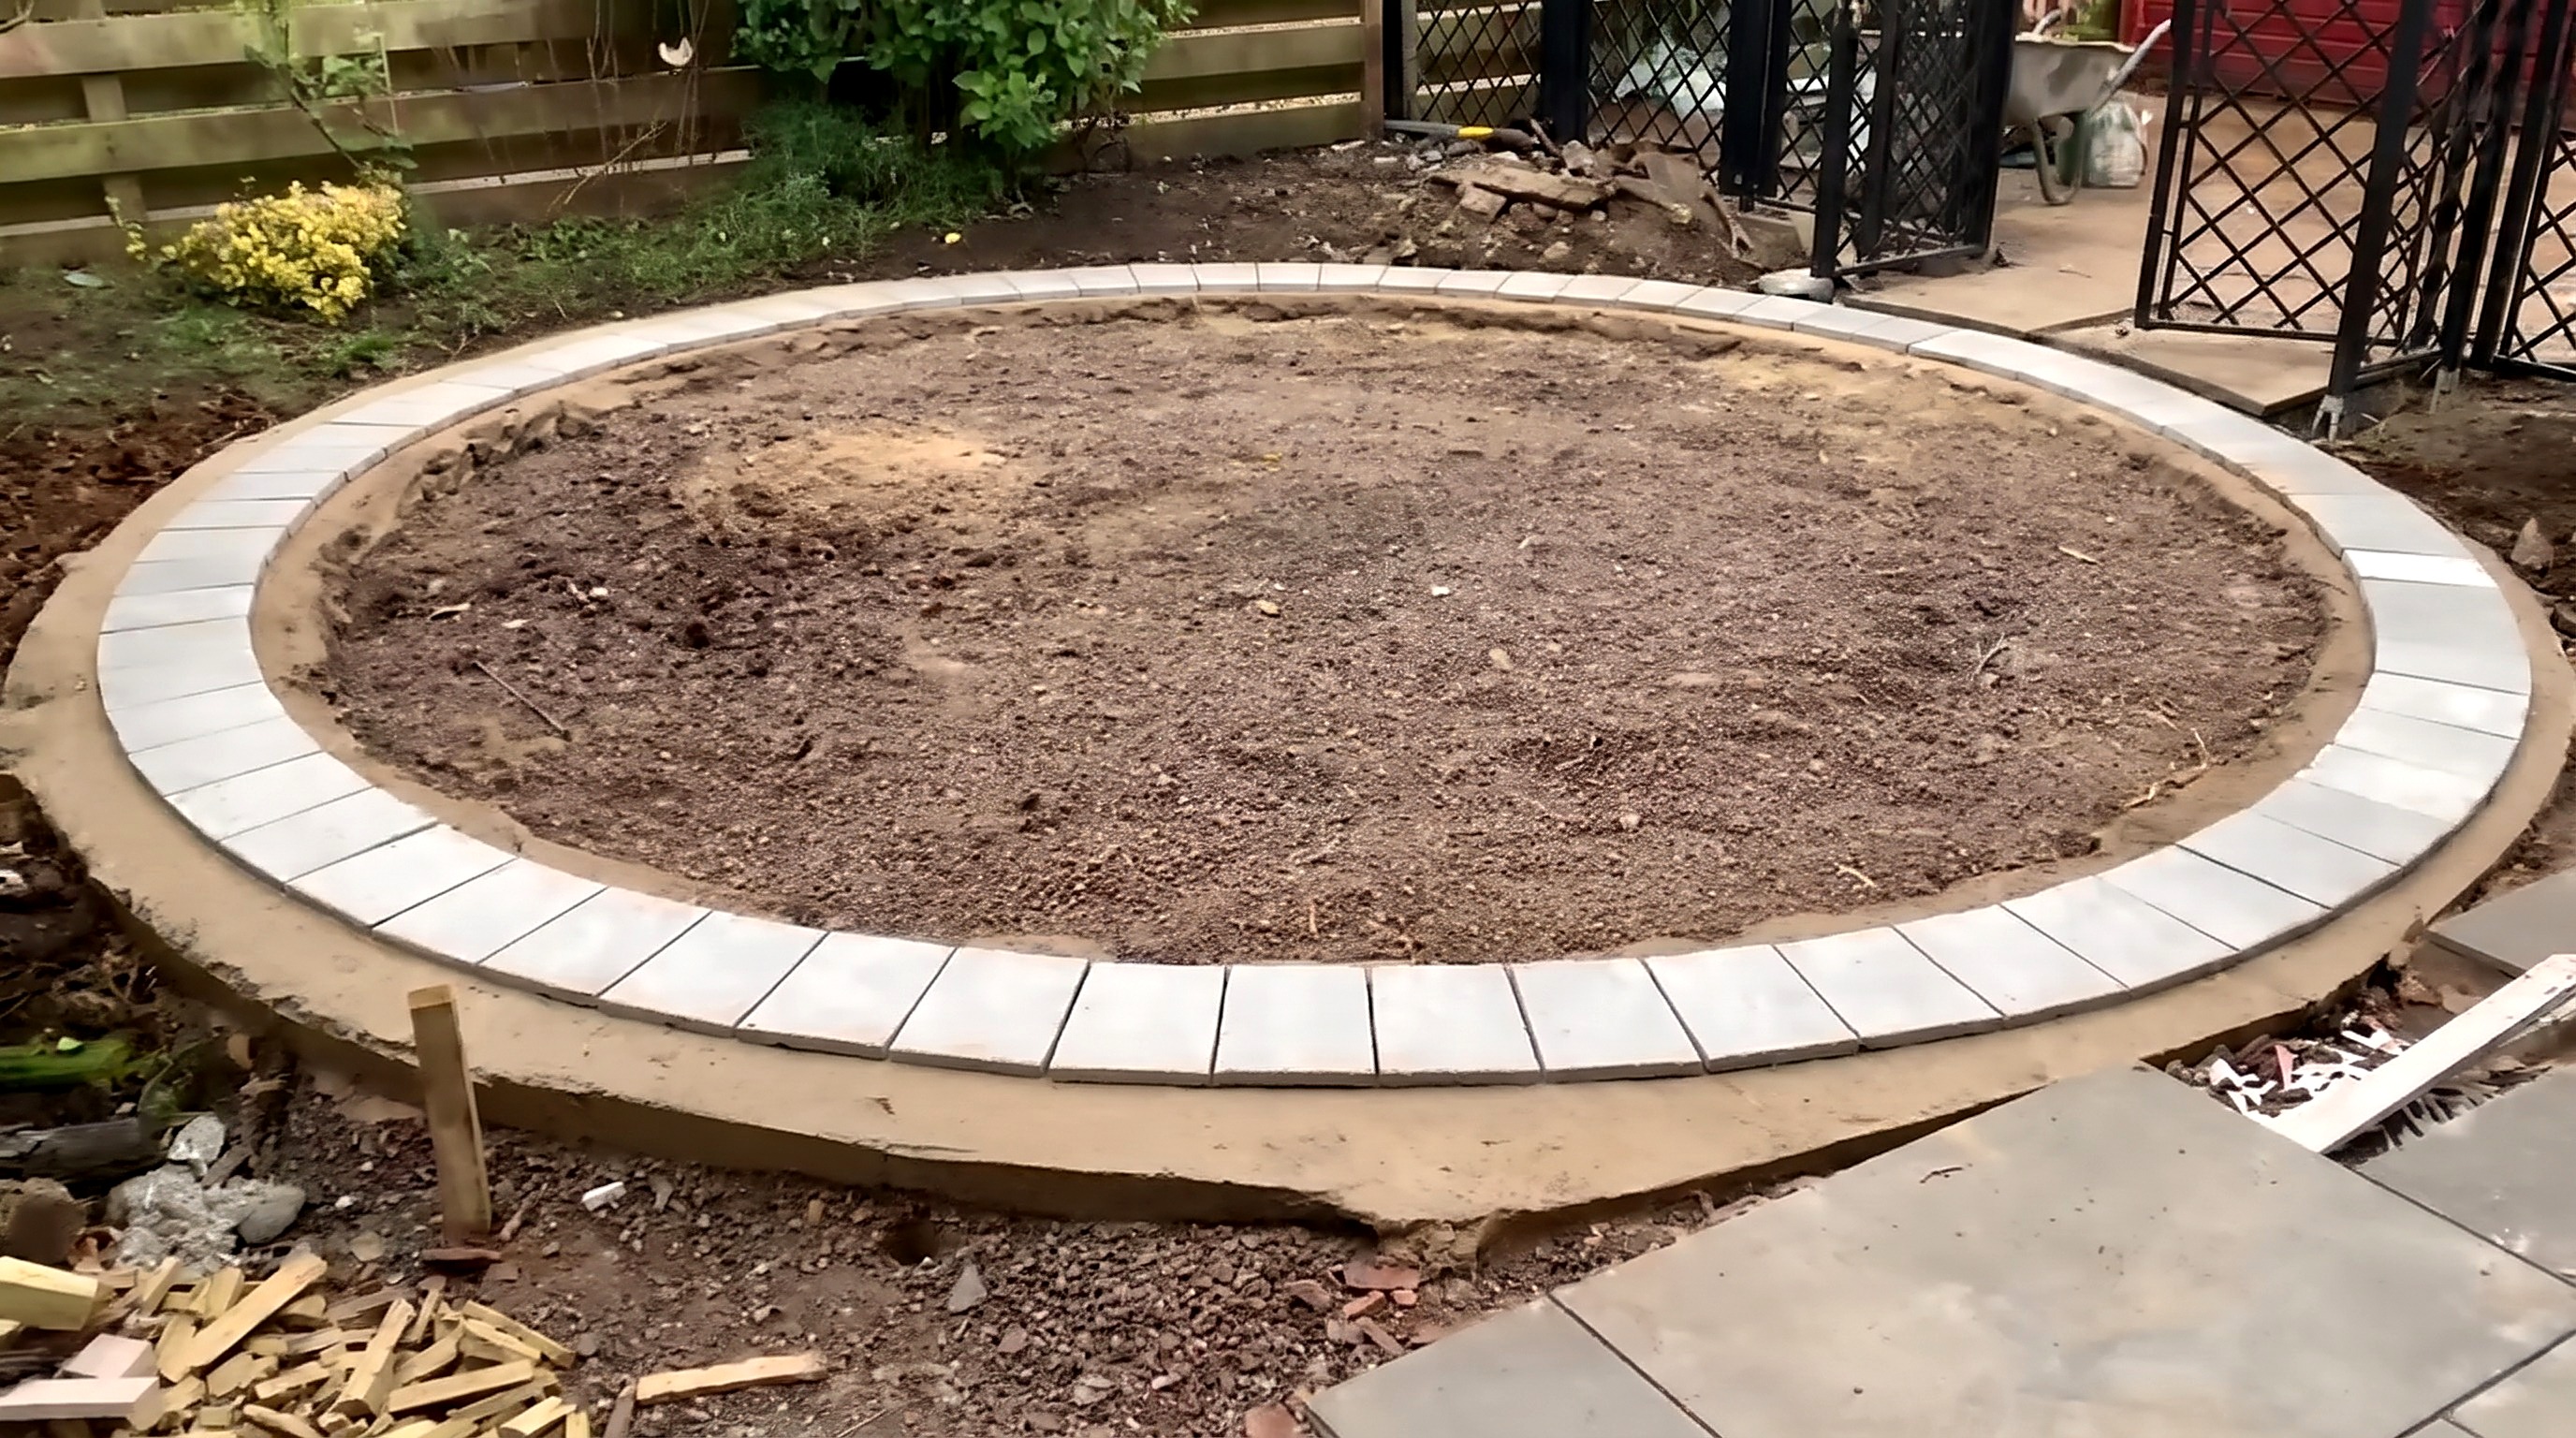
Parts in this step: (E) Circular Lawn Border Wedges (Grey & Ivory)
You'll need: String Line, Wet Bridge Tile Saw, Tape Measure, Porcelain Paving Tiles
- 10.1 Mark Radial Wedge Angles from Center Pin
- Place a square border slab on the circular lawn's dry concrete foundation ring.
- Pull a string line taut from the center pin to both outer slab corners.
- Mark the two converging radial lines on the tile face in pen.
- 10.2 Set Saw Jig and Cut Voussoir Wedge Tiles
- Align the marked slab on the wet bridge saw; lock the angle jig to the radial line.
- Batch-cut 72 grey wedge-shaped Circular Lawn Border Wedges (Grey & Ivory) (E) face up.
- 10.3 Scribe Circle on Foundation Ring and Dry-Fit All Wedges
- Tie two strings to a screw's top and bottom; fit a bottle-top pivot on the center pin.
- With the two-string bridle taut to hold the screw upright, scribe the circle onto the concrete ring.
- Dry-lay all 72 grey wedges (E) on the scribed line; adjust joint widths over two loops so the circle closes without a sliver cut.
Key measurements
- Outer circular border: 72 radial grey voussoir wedges.
- Tip: A two-string bridle on the scribing screw keeps its tip vertical at a constant radius.
- Tip: First dry-lay the full ring on the concrete foundation to spread gap adjustments evenly across all 72 joints.
Before you move on: Check all 72 dry-fitted wedges close the full circle with even joints and no small offcut.
Step 11: Bed and Level the Circular Lawn Border
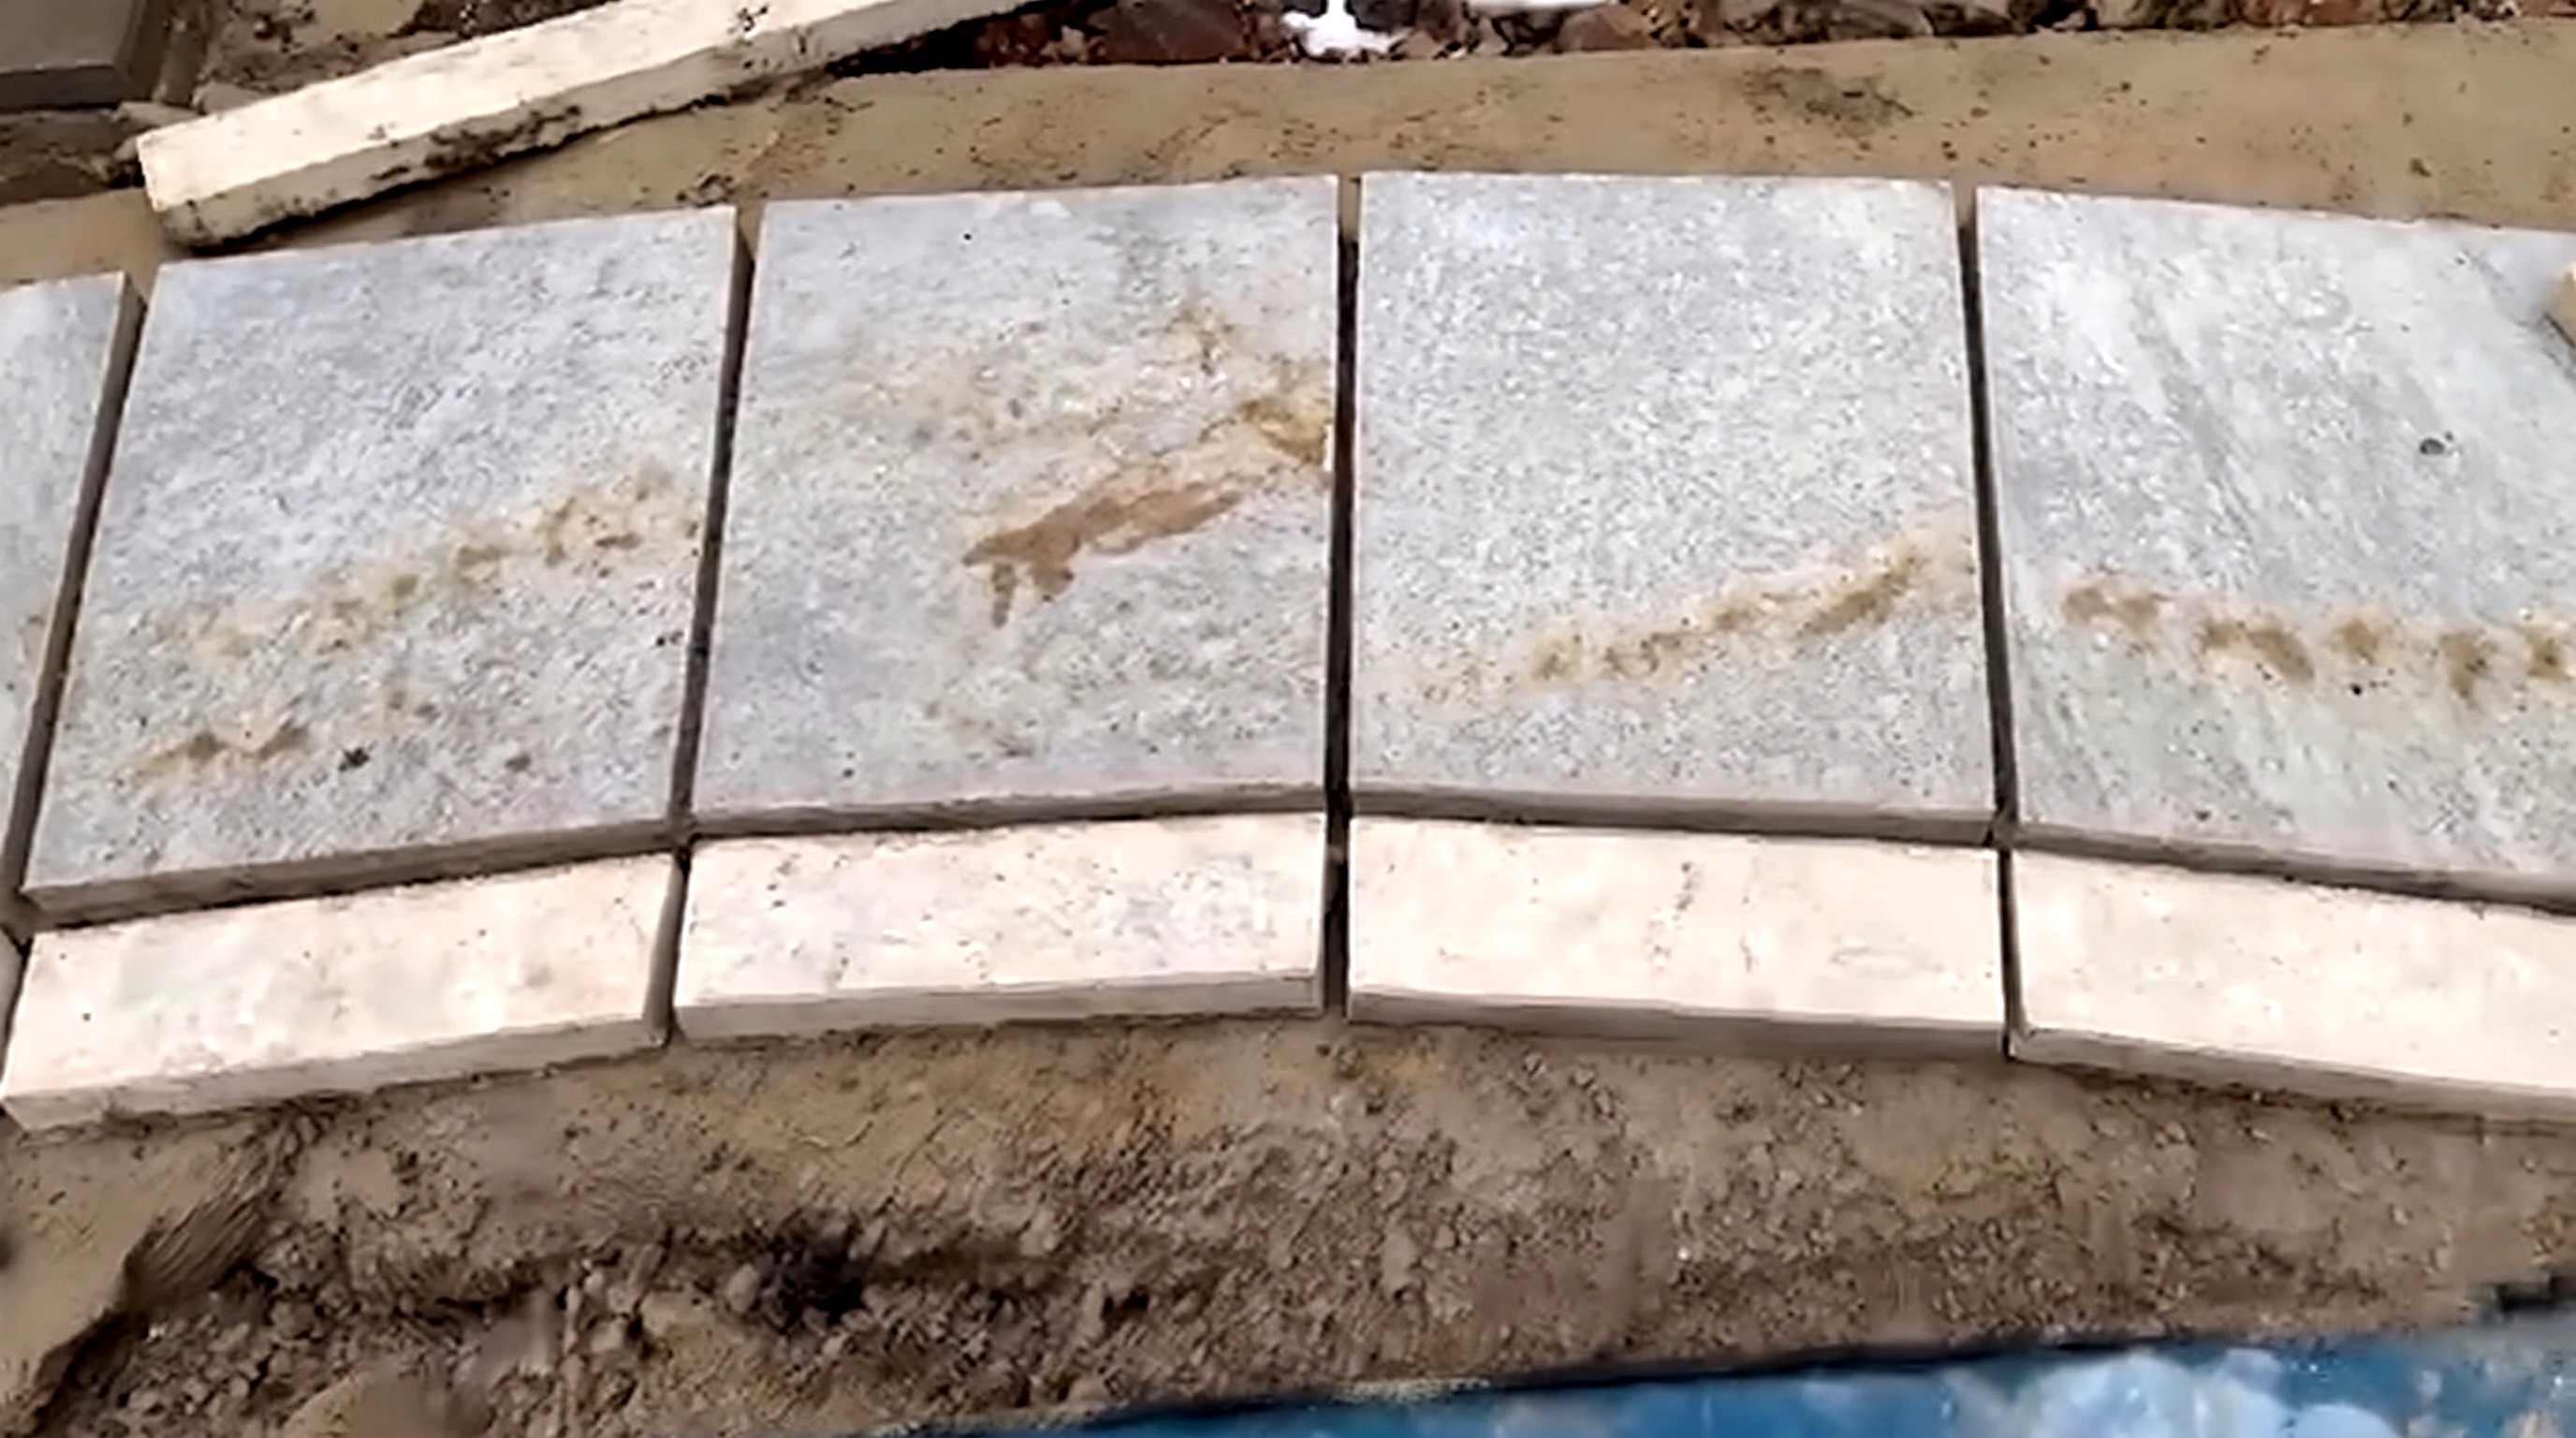
All 72 grey circular border wedges and ~75 inner ivory veneer strips primed, bedded level, and closed flush around the lawn.
Parts in this step: (E) Circular Lawn Border Wedges (Grey & Ivory)
You'll need: Angle Grinder, Wet Bridge Tile Saw, Mini Paint Roller, Bricklaying Trowel, Rubber Mallet, Spirit Levels, Cement Mixer, Kneeling Pad, Porcelain Paving Tiles, Paving Primer, Sharp Sand and Cement
- 11.1 Lift, Prime, and Bed Grey Circular Border Wedges One by One
- Lift one dry-fitted grey wedge from Circular Lawn Border Wedges (Grey & Ivory) (E) at a time.
- Trowel 4:1 wet mortar on the concrete ring; roll paving primer on the tile back.
- Tap the wedge down with a rubber mallet; check both axes with a boat level.
- 11.2 Check Level Closure Around the Full Circle
- Lift, prime, and bed one wedge at a time around the full circle.
- Span a long spirit level from the final wedges to the first; tap down 1 to 2 mm until flush.
- 11.3 Trim and Fit Inner Ivory Border Veneers
- Cut ~75 inner ivory border strips (E) individually by wet saw to match each outer grey wedge.
- Shave 1 mm off tight edges with an angle grinder so radial joints align, then prime and bed in mortar.
Key measurements
- Inner ring count: ~75 cut ivory border strips
- Tip: Lift only one dry-fitted wedge at a time so you do not lose the pre-adjusted joint positions.
- Tip: Cut each inner ivory strip individually to match its outer wedge, never batch-cutting with a jig.
Before you move on: Bridge closing and starting wedges with a long spirit level to check for zero joint step.
Step 12: Lay the Upper Driveway Porcelain Tiles
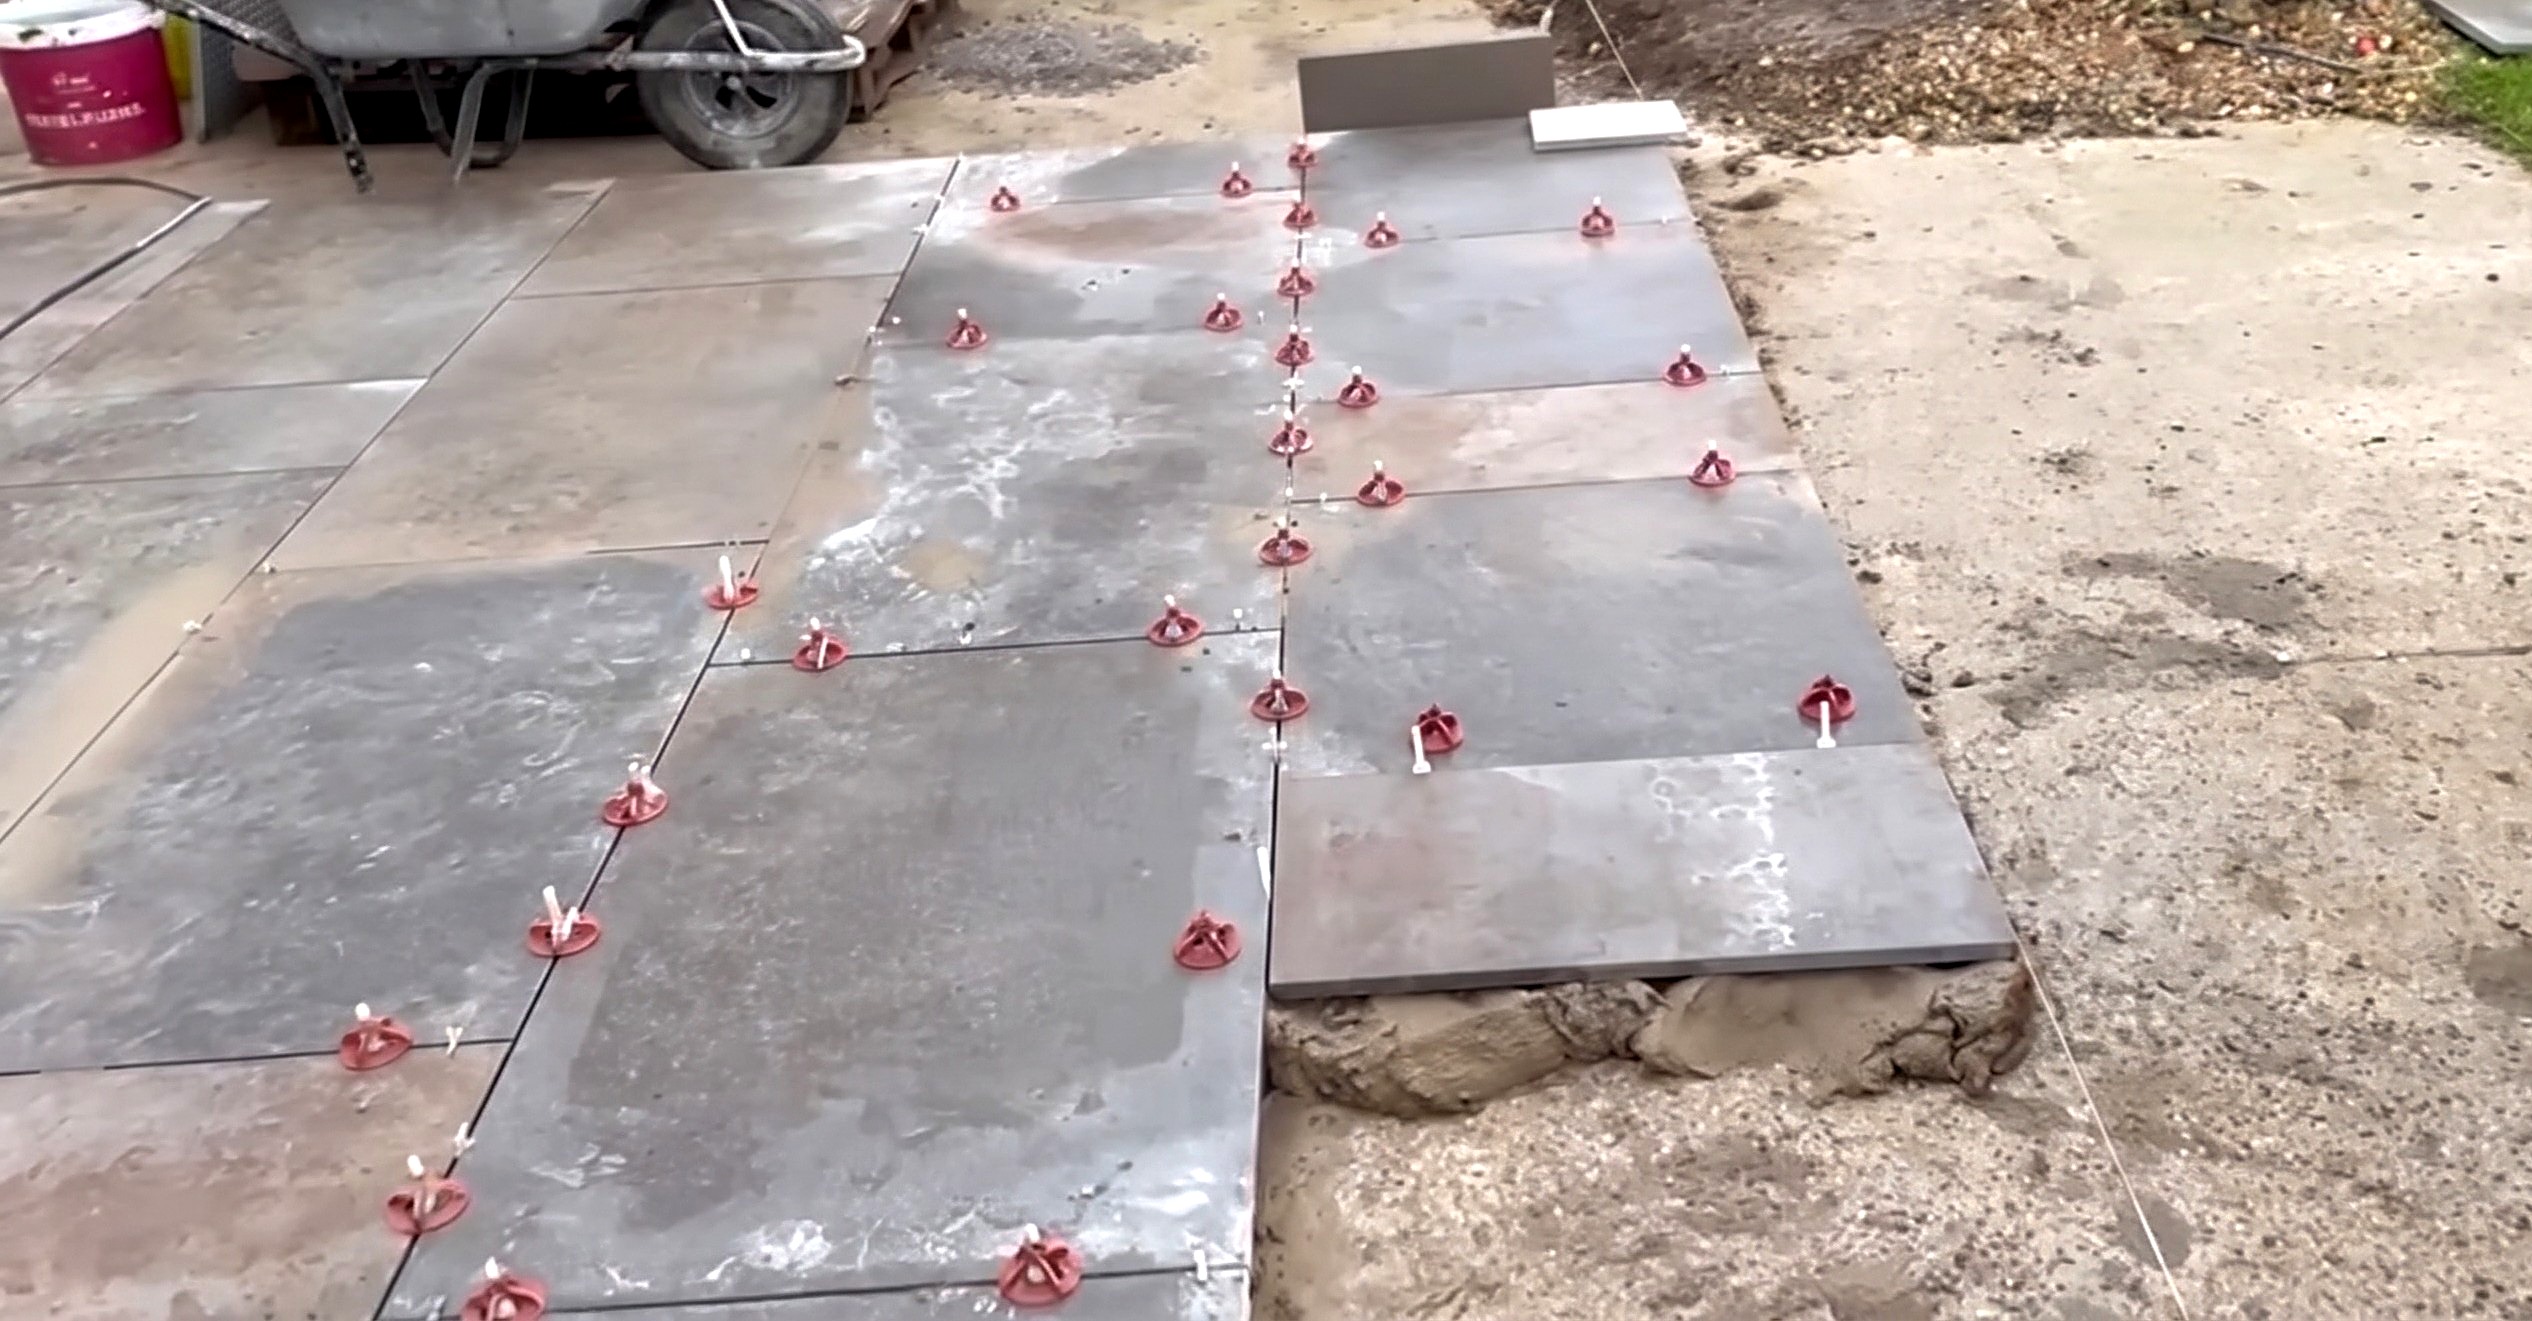
Bed upper driveway field slabs on primed wet mortar, falling multi-directionally to the central drainage valley.
Parts in this step: (A) Porcelain Field Slabs (Copper)
You'll need: String Line, Mini Paint Roller, Bricklaying Trowel, Rubber Mallet, Spirit Levels, Wheelbarrow, Cement Mixer, Kneeling Pad, Porcelain Paving Tiles, Paving Primer, Sharp Sand and Cement, Tile Leveling Clips and Caps, Tile Spacers
- 12.1 Insert Leveling Clips and Prime Porcelain Slab
- Sort Porcelain Field Slabs (Copper) (A) into pure copper, dark, and mixed color batches before laying.
- Trowel a full 4:1 mortar bed on the concrete; slide leveling clip bases under adjacent laid tiles.
- Generously roll paving primer under the next copper slab (A).
- 12.2 Bed Slab, Lock Corner Clip, and Tap to String Line
- Set primed slab (A) on the mortar; spin on one leveling cap to anchor the back edge.
- Insert 5 mm cross spacers into the joints.
- Tap the outer corner inward and down to the string line with a rubber mallet, then tighten all leveling caps.
Key measurements
- Field slabs: 800 x 800 x 20 mm, 600 x 600 x 20 mm, 400 x 800 x 20 mm
- Joint spacing: 5 mm between all slabs
- Tip: Lock one leveling cap first, then mallet the opposite corner in to close the 5 mm joints.
- Tip: Leave leveling caps on until mortar cures so nobody steps on fresh slabs.
- Heads up: Blend all three color batches as you lay; using one pallet at a time leaves blotchy patches.
Step 13: True the Manhole Frame and Test Driveway Runoff
True the warped recessed manhole frame to an even 5 mm joint and check central valley runoff.
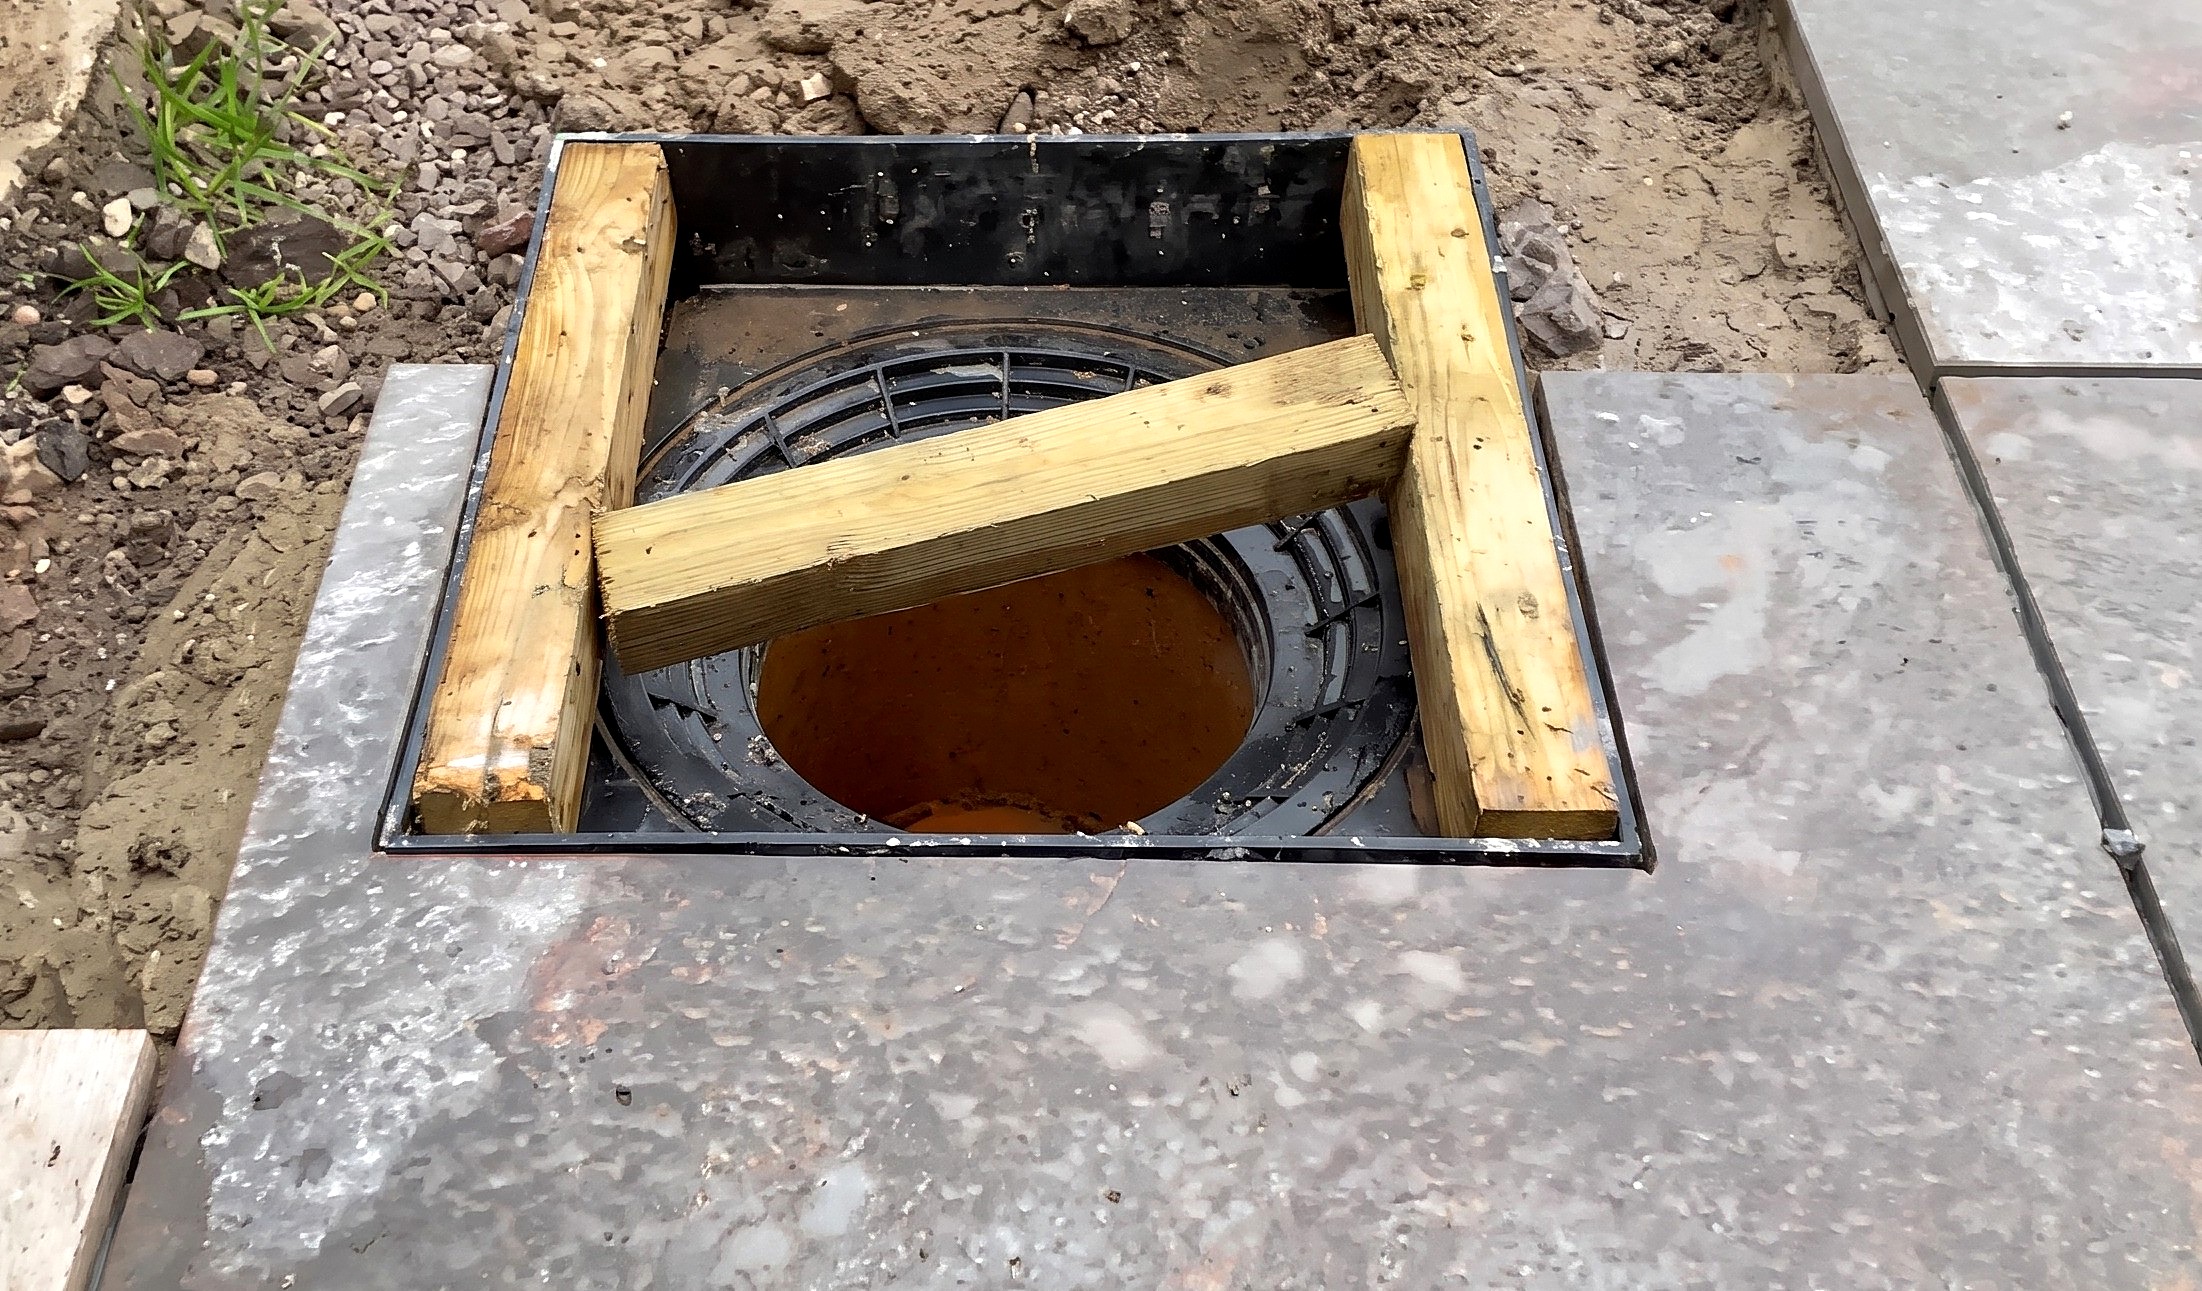
Parts in this step: (A) Porcelain Field Slabs (Copper), (G) ACO Channel Drains & Recessed Manhole Covers
You'll need: Hand Saw, Tape Measure, Recessed Manhole Covers, Timber Shuttering Boards and Pegs
- 13.1 Wedge Warped Manhole Frame Square and Pour Boiling Water
- Wedge timber battens in the bowed plastic frame of ACO Channel Drains & Recessed Manhole Covers (G).
- Push bowed sides out for an even 5 mm joint against Porcelain Field Slabs (Copper) (A).
- Pour boiling water on the wedged plastic frame to relax the warp and hold it square.
- 13.2 Inspect Upper Driveway Valley and Pour Water to Test Runoff
- Pour buckets of water over the cured upper driveway slabs (A).
- Check water runs off both side slopes into the central valley and to garage drain (G).
Key measurements
- Manhole perimeter joint: 5 mm even gap to porcelain slabs
- Tip: True warped plastic manhole frames in situ with timber struts and boiling water (or a heat gun).
Before you move on: Check poured water runs down the valley to the garage channel drain without puddling.
Step 14: Rip Replacement Rectangular Tiles on the Bridge Saw
Rip replacement 400 x 800 mm slabs from square slabs and set string lines across the lower driveway.
Parts in this step: (A) Porcelain Field Slabs (Copper)
You'll need: Wet Bridge Tile Saw, String Line, Tape Measure, Porcelain Paving Tiles
- 14.1 Set Stop Jig on Bridge Saw and Rip Rectangular Slabs
- Clamp the stop block on the wet bridge saw table.
- Rip square Porcelain Field Slabs (Copper) (A) face up into rectangles to replenish the random pattern.
- 14.2 Set String Lines for Remaining Driveway Courses
- Stretch string lines from the laid upper slabs (A) to the lower border line.
- Set string lines to blend the sloped valley smoothly into the flat garage threshold drain.
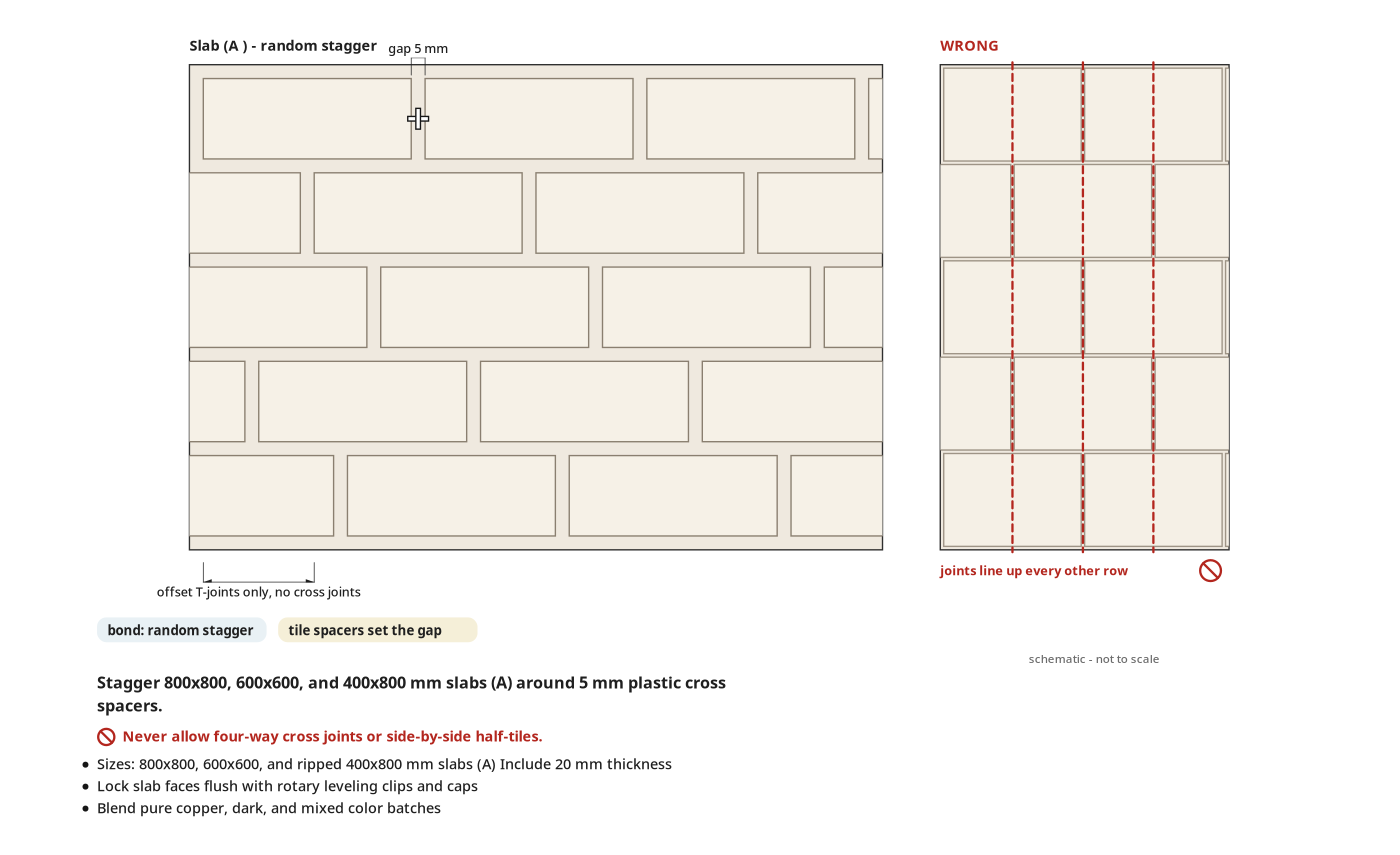
- Tip: Use a paving pattern planner for the three-size random stagger so courses transition cleanly.
Step 15: Lay Lower Driveway Field Tiles
Prime and bed lower field slabs on 4:1 mortar, leveled across the transition to the garage drain.
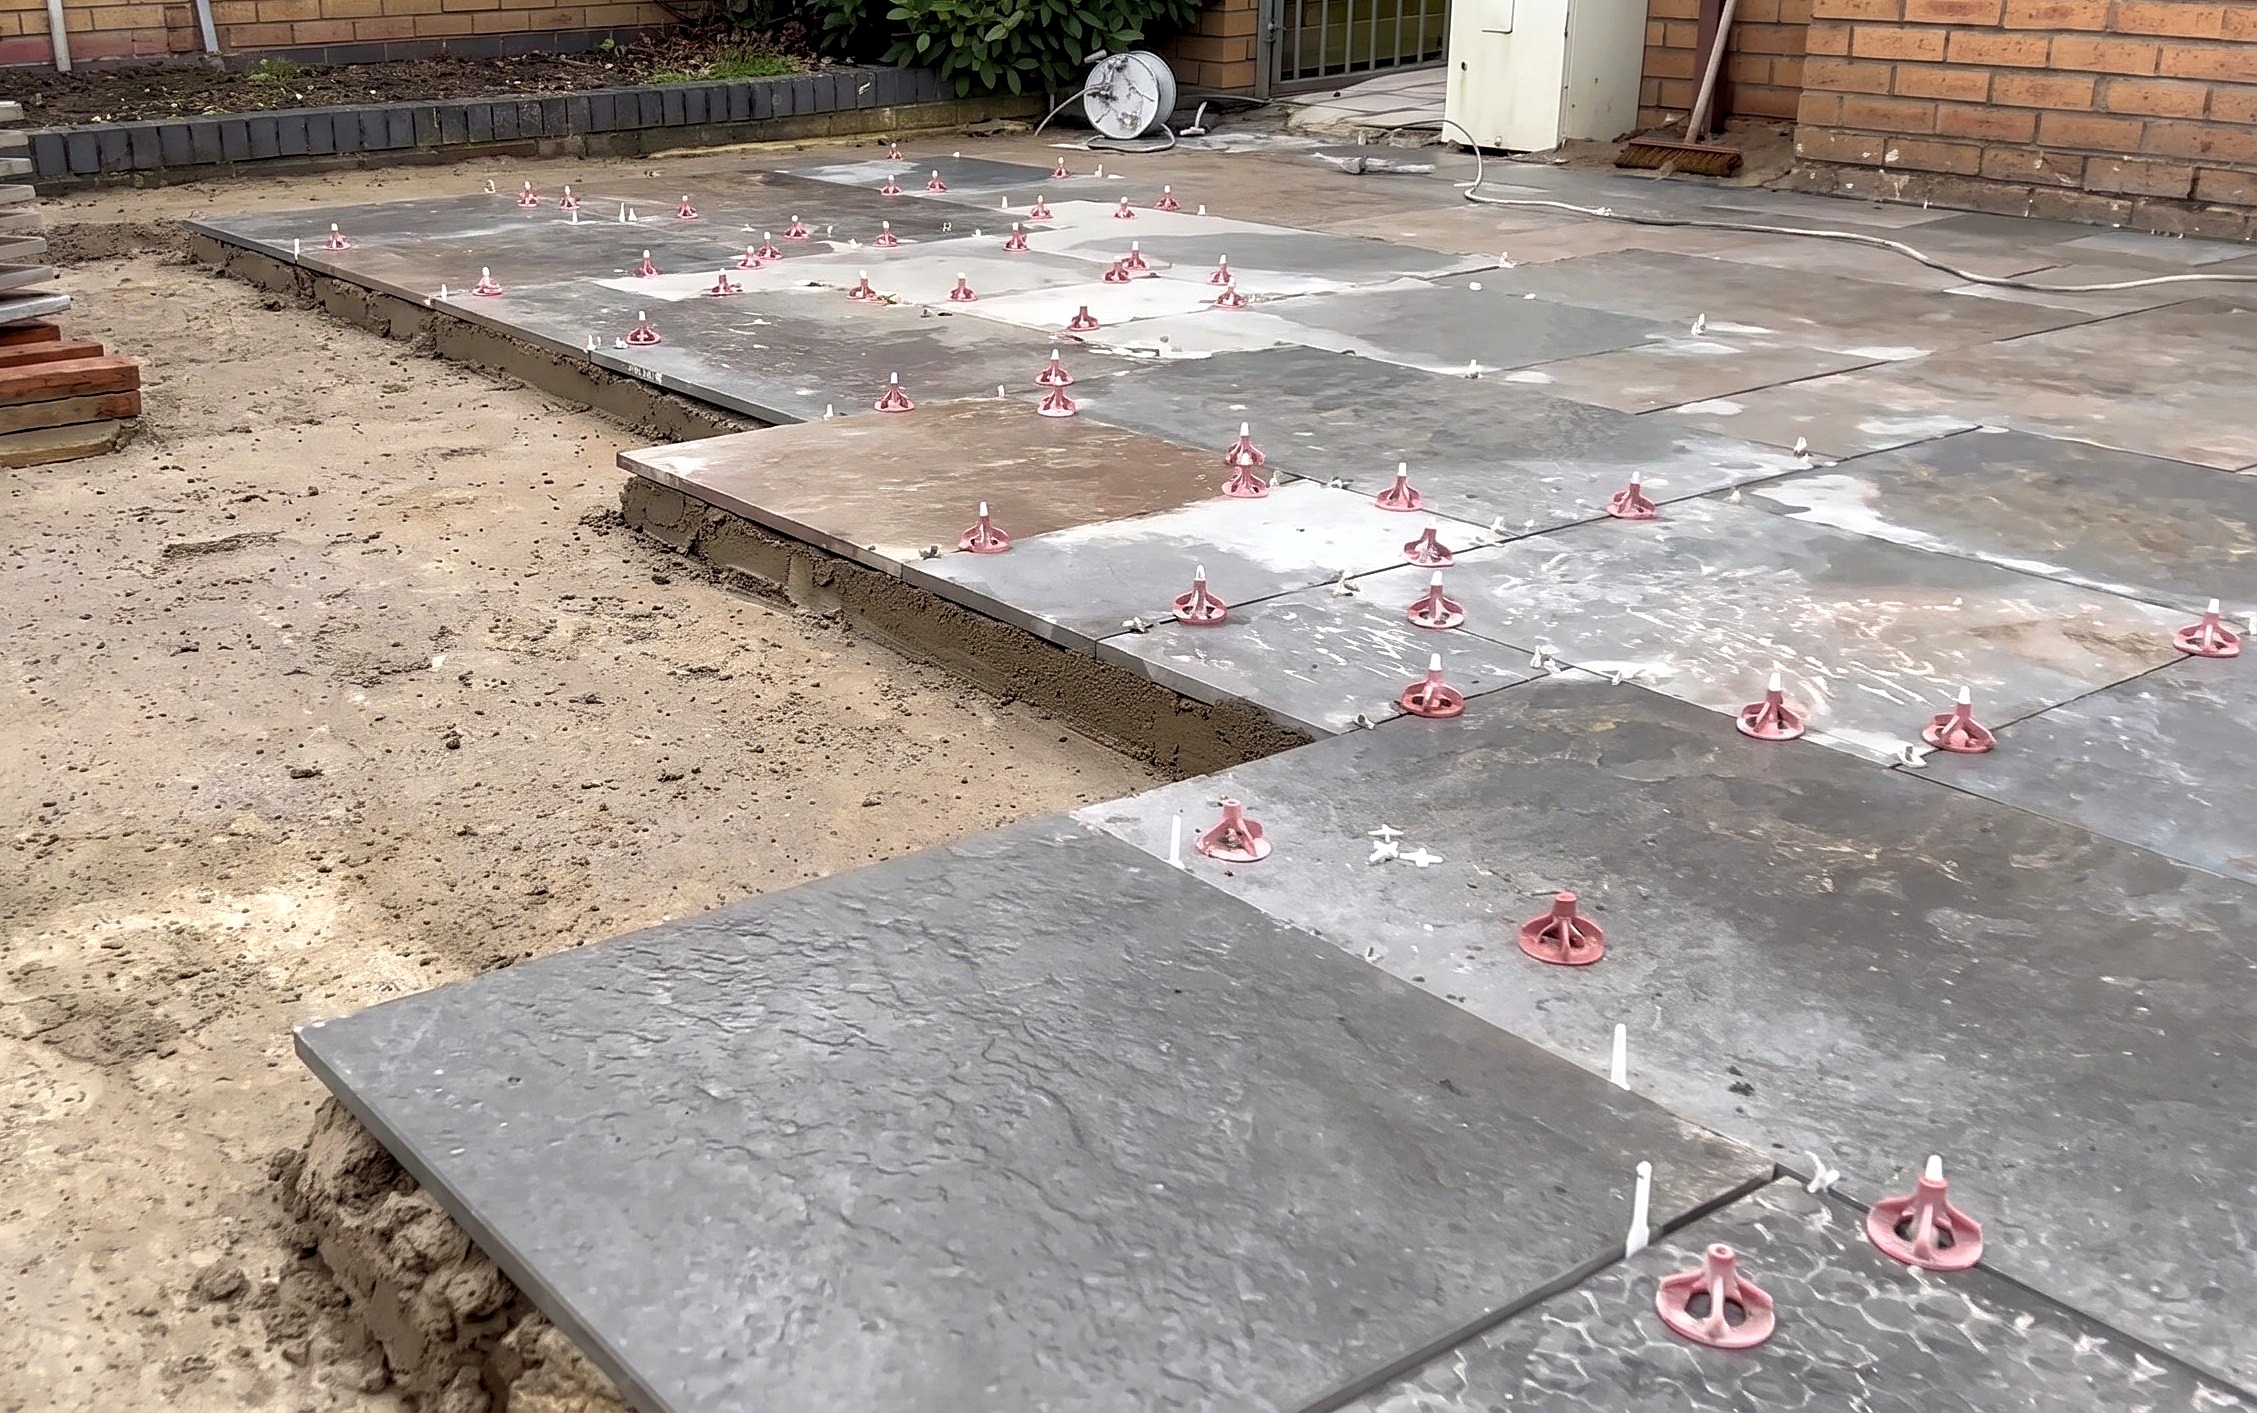
Parts in this step: (A) Porcelain Field Slabs (Copper)
You'll need: String Line, Mini Paint Roller, Bricklaying Trowel, Rubber Mallet, Spirit Levels, Wheelbarrow, Cement Mixer, Kneeling Pad, Porcelain Paving Tiles, Paving Primer, Sharp Sand and Cement, Tile Leveling Clips and Caps, Tile Spacers
- 15.1 Place Leveling Clips and Prime Underside of Slab
- Trowel a 4:1 sharp sand and cement mortar bed across the lower bay.
- Slide four leveling clip bases under adjacent tile edges.
- Roll paving primer under each Porcelain Field Slab (Copper) (A) and set it on the bed.
- 15.2 Attach Caps, Insert Spacers, and Level Slab
- Spin red leveling caps loosely onto the four clip posts and insert 5 mm cross spacers.
- Tap the outer corner inward and down with a rubber mallet while checking flatness with a spirit level.
- Tighten the caps, tap the corner against the spacers, and kick the clips off the next day.
Key measurements
- Mortar mix: 4 parts sharp sand, 1 part cement
- Minimum working temperature: 3 degrees Celsius and rising
- Tip: Kick off leveling caps the next day and save the reusable caps for the next section.
- Heads up: Never lay mortar below 3 degrees Celsius or on a falling temperature; freezing stops cement curing.
Step 16: Install Slot Drains, Manhole Covers, and Border Corners
Install channel drains, inlaid manhole trays, and mitered border corners, eliminating accidental cross joints.
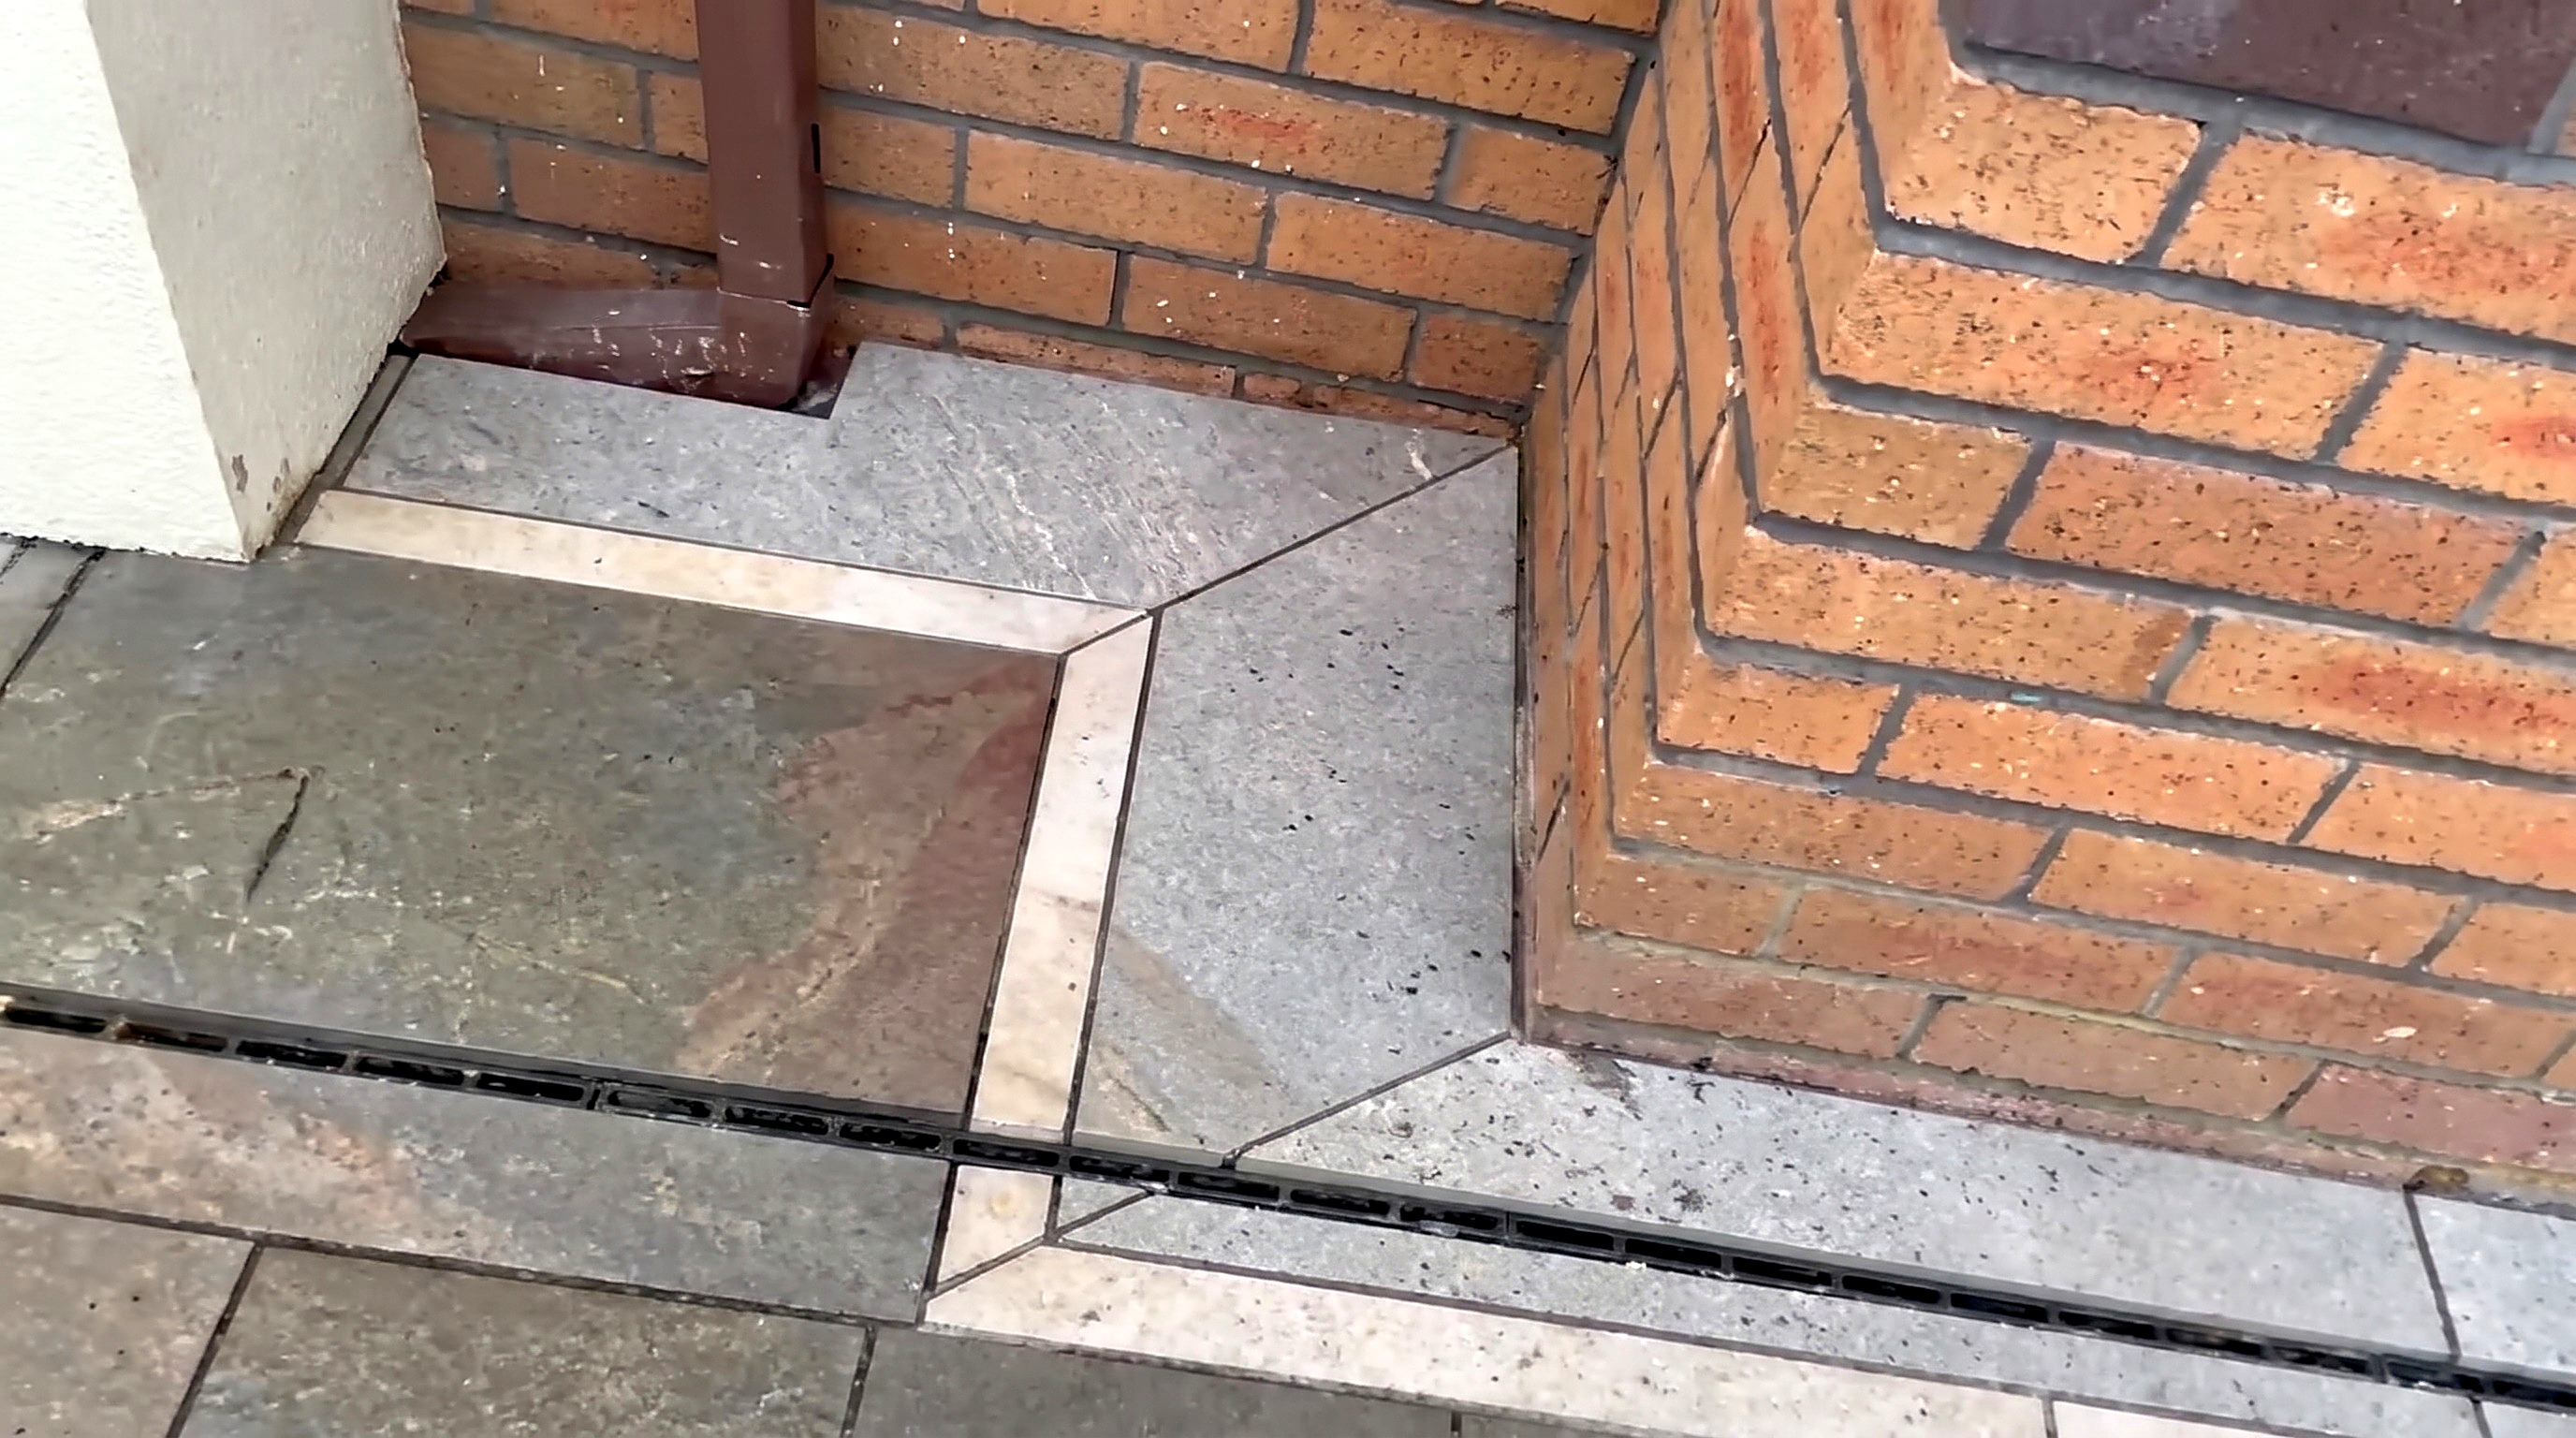
Parts in this step: (A) Porcelain Field Slabs (Copper), (B) Outer Border Strips (Grey Porcelain), (C) Inner Border Strips (Ivory Porcelain), (G) ACO Channel Drains & Recessed Manhole Covers
You'll need: Angle Grinder, Wet Bridge Tile Saw, Mini Paint Roller, Bricklaying Trowel, Rubber Mallet, Spirit Levels, Channel Drain, Porcelain Paving Tiles, Paving Primer, Sharp Sand and Cement, Tile Leveling Clips and Caps, Tile Spacers, Recessed Manhole Covers
- 16.1 Fit ACO Slot Drains, Corner Miters, and Recessed Manhole Cover
- Mortar-bed ACO Channel Drains & Recessed Manhole Covers (G) along the house walls, side gate, and garage.
- Notch and bed Outer Border Strips (Grey Porcelain) (B) and Inner Border Strips (Ivory Porcelain) (C) around downpipes and utility boxes.
- Cut and bed Porcelain Field Slabs (Copper) (A) flush in the recessed manhole trays (G).
- 16.2 Remove and Replace Cross-Jointed Slabs and Adjacent Half-Tiles
- With an angle grinder, slice joints of cured slabs (A) forming a four-way cross joint by the rear manhole.
- Pry out the cross-jointed tiles and side-by-side pathway half-tiles.
- Cut, prime and bed one 600 x 600 mm L-cut slab and staggered full slabs (A) in their place.
- 16.3 Bed Pre-Cut Mitered Perimeter Border Corners
- Prime and bed pre-cut 45-degree mitered grey (B) and ivory (C) border corners along the front hedge and flowerbeds.
- Tip: Cut an L-slab from a 600 x 600 mm tile around manhole corners to avoid four-way cross joints.
- Heads up: Never leave four-way cross joints or adjacent half-tiles in a linear running bond.
Step 17: Build and Tile the Textured Doorway Ramp
Tile the side doorway ramp: flat basalt landing, mitered double borders, and alternating raised grey and recessed copper grip strips.
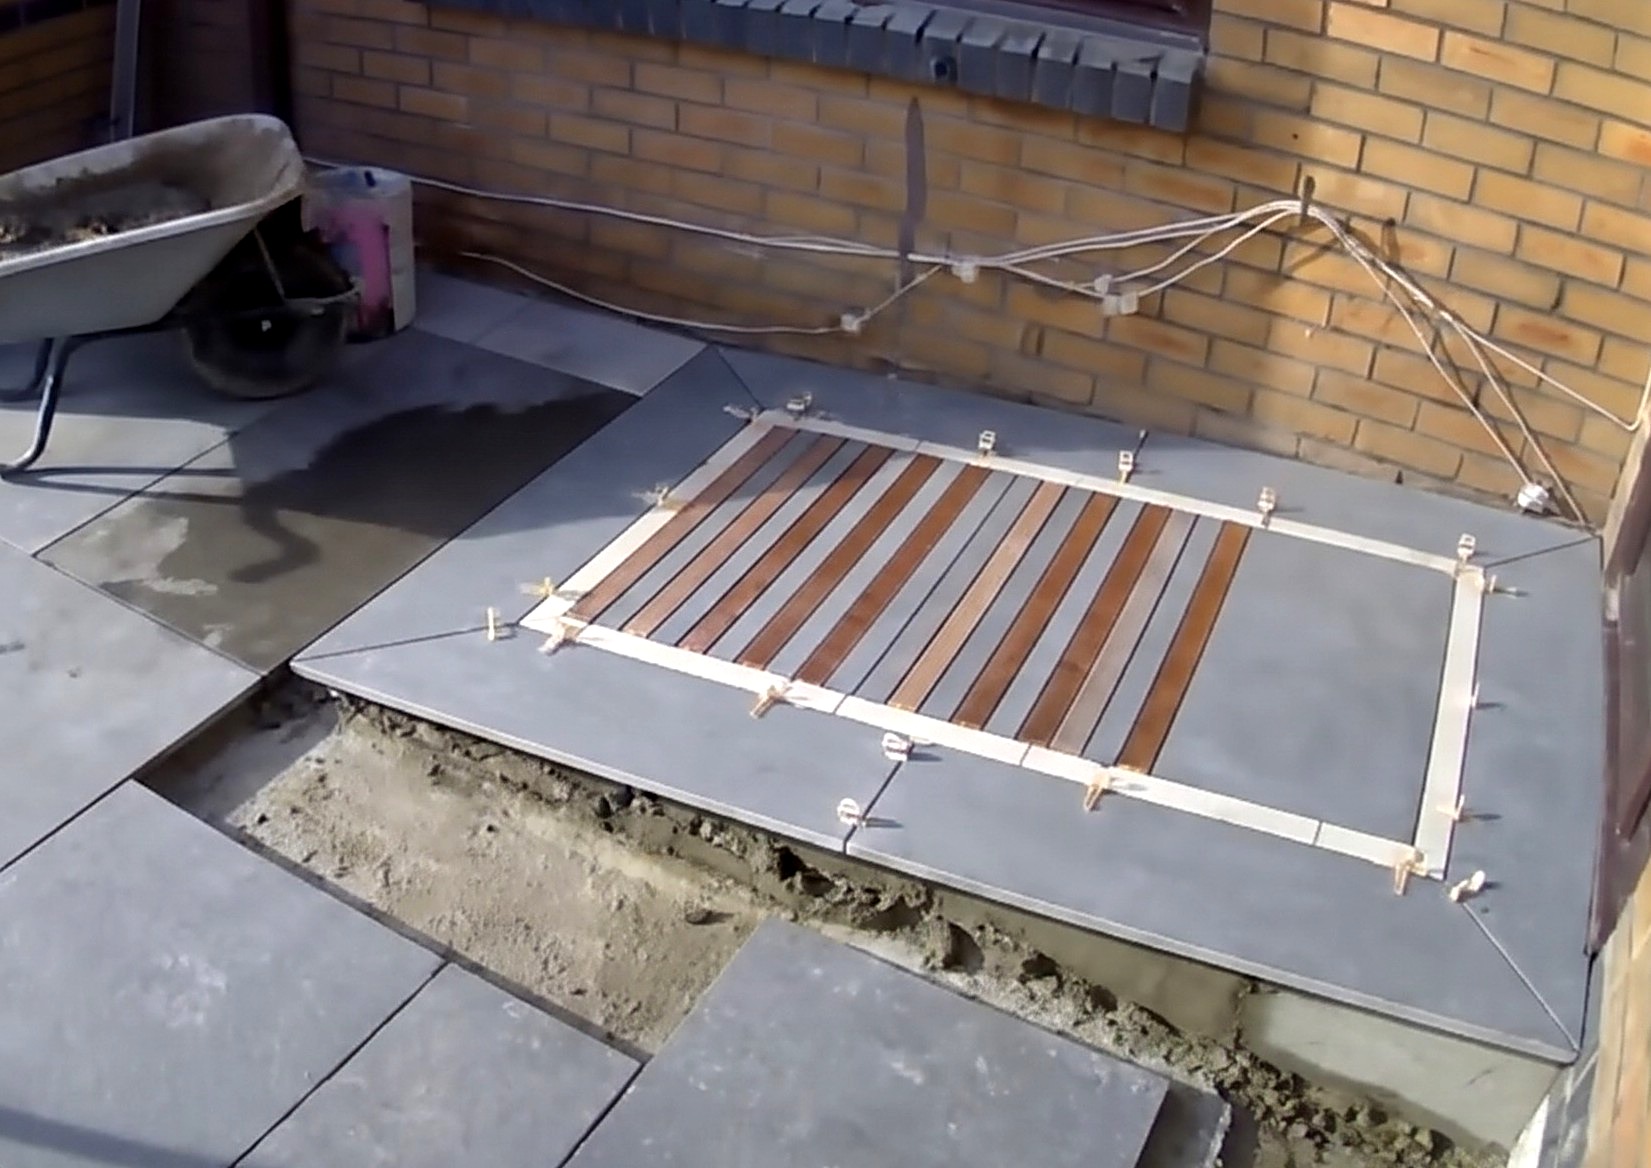
Parts in this step: (A) Porcelain Field Slabs (Copper), (B) Outer Border Strips (Grey Porcelain), (C) Inner Border Strips (Ivory Porcelain), (D) Doorway Mat Slabs (Basalt Porcelain), (F) Greek Key Mosaic & Ramp Grip Strips
You'll need: Wet Bridge Tile Saw, Mini Paint Roller, Bricklaying Trowel, Rubber Mallet, Spirit Levels, Kneeling Pad, Porcelain Paving Tiles, Paving Primer, Sharp Sand and Cement, Tile Leveling Clips and Caps, Tile Spacers
- 17.1 Form Ramp Base and Lay Mitered Border and Basalt Landing
- Build a sloped 4:1 mortar bed between the doorway ramp retaining kerbs.
- Prime and bed mitered Outer Border Strips (Grey Porcelain) (B) and Inner Border Strips (Ivory Porcelain) (C) around the ramp.
- Prime and bed the second 400 x 800 mm Doorway Mat Slab (Basalt Porcelain) (D) flat at the top landing.
- 17.2 Inlay Alternating Raised Grey and Recessed Copper Grip Strips
- Prime and bed alternating narrow grey and copper Greek Key Mosaic & Ramp Grip Strips (F) across the ramp slope.
- Set grey strips slightly proud of copper strips for a ribbed, slip-resistant tread.
- Prime and bed surrounding Porcelain Field Slabs (Copper) (A) flush with the ramp outer border.
Key measurements
- Landing slab dimensions: 400 x 800 x 20 mm basalt porcelain
- Tip: Set alternating ramp strips slightly proud for mechanical grip on sloped porcelain.
Step 18: Cut and Assemble the Greek Key Mosaic on a Template
Cut and dry-assemble 50 mm mitered strips for the four Greek key squares and inner borders on a protected MDF template.
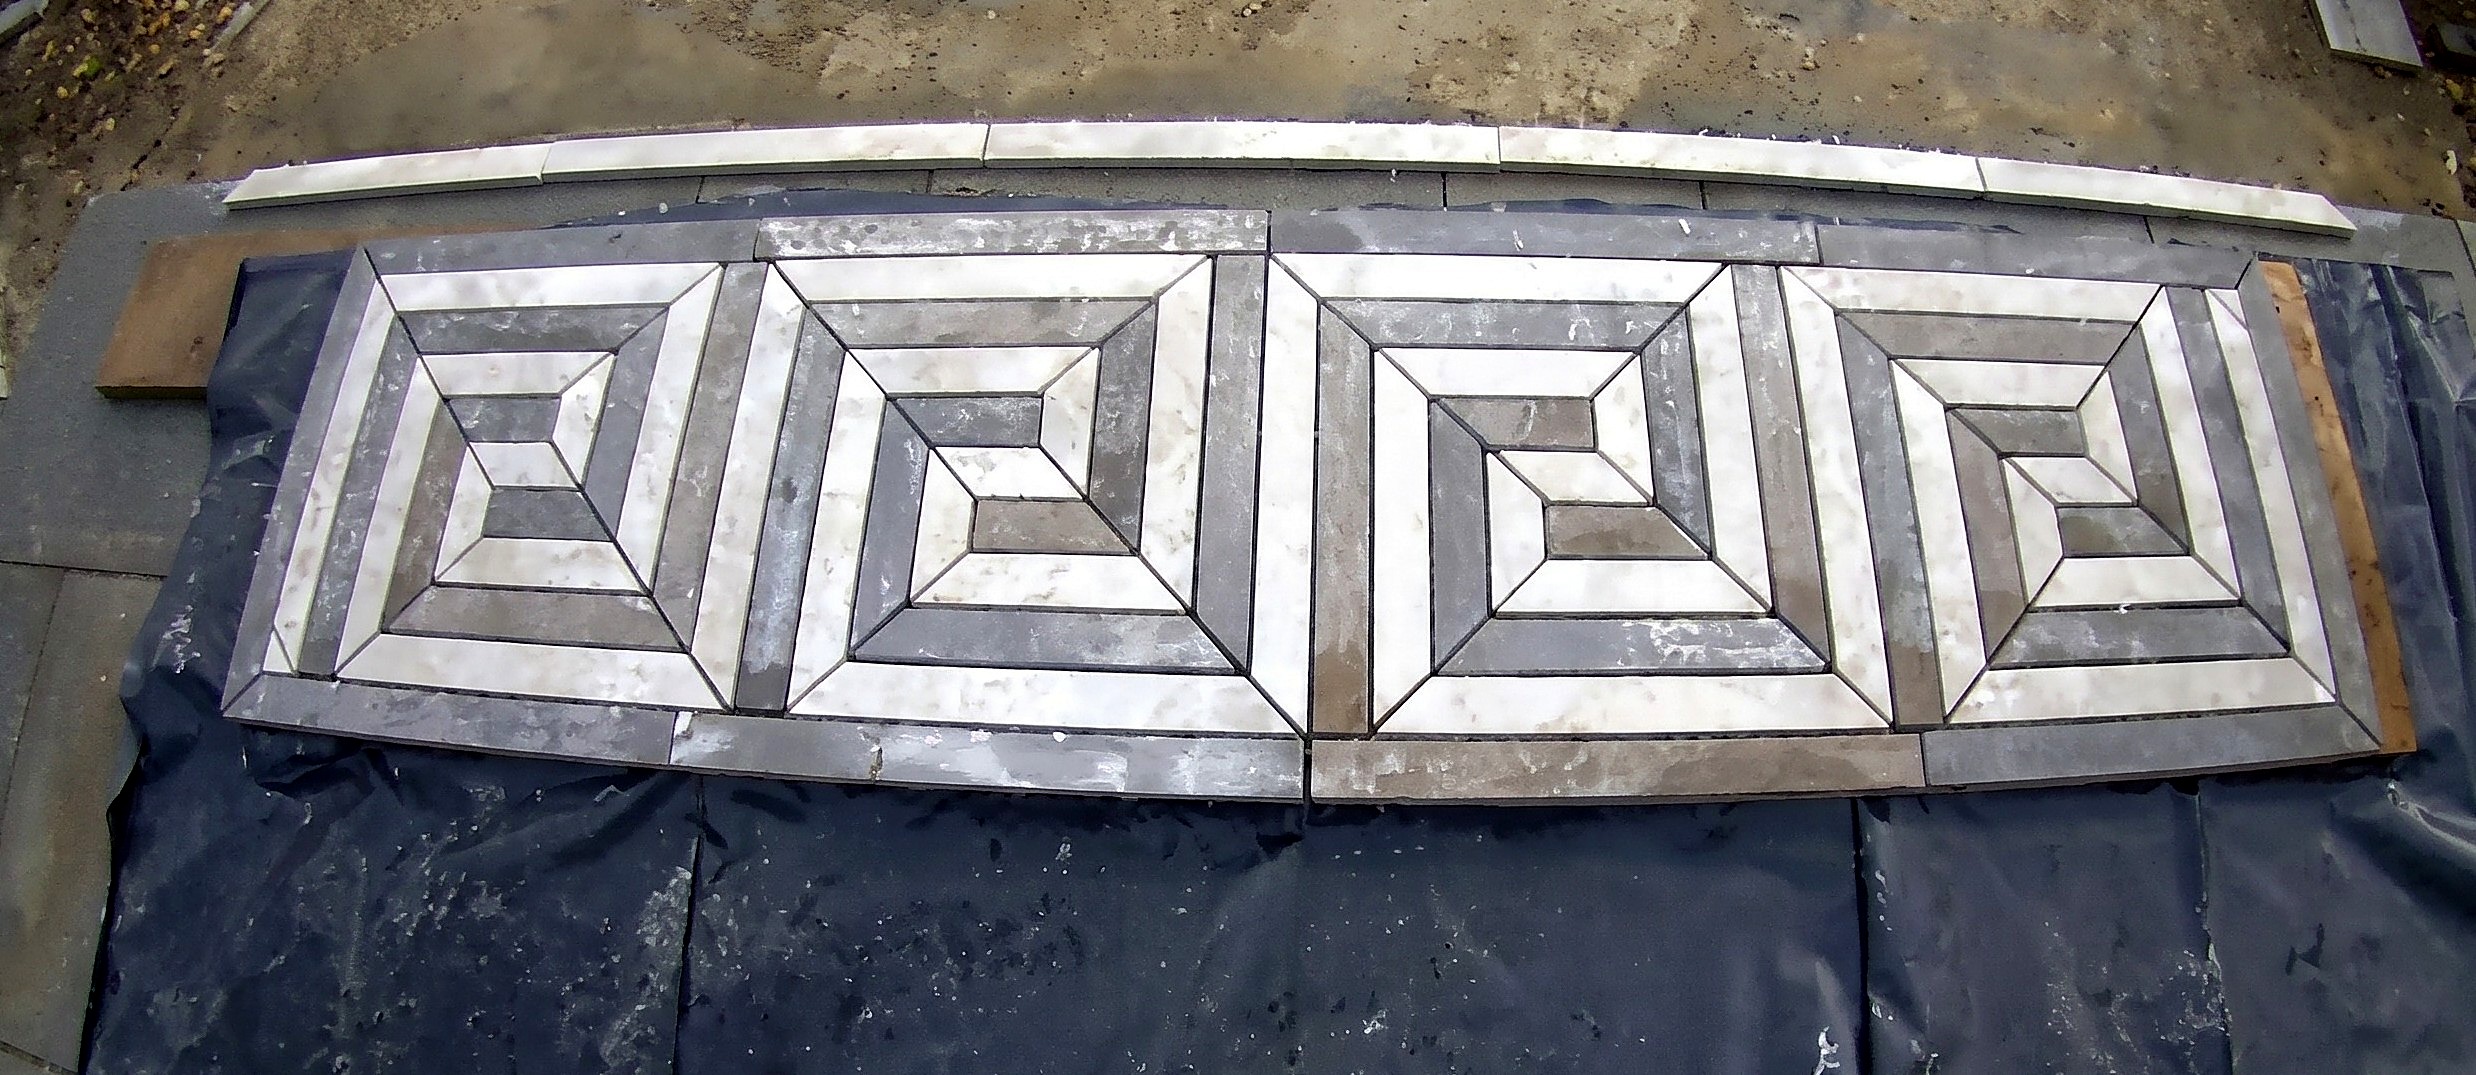
Parts in this step: (B) Outer Border Strips (Grey Porcelain), (C) Inner Border Strips (Ivory Porcelain), (F) Greek Key Mosaic & Ramp Grip Strips
You'll need: Wet Bridge Tile Saw, Speed Square and Steel Rule, Tape Measure, Porcelain Paving Tiles, Damp Proof Membrane (DPM), Tile Spacers
- 18.1 Cut Diagonal Miter and Rip 50 mm Strips on Bridge Saw
- Set a square porcelain slab diagonally on the wet bridge saw table and cut corner-to-corner at 45 degrees.
- Set the rear stop block to 50 mm and rip the triangular halves parallel to their factory edges.
- This yields 50 mm Greek Key Mosaic & Ramp Grip Strips (F) with a factory-accurate 45-degree miter on one end.
- 18.2 Set Up MDF Template Board on Damp Proof Membrane
- Lay scaffold planks flat by the driveway entrance and cover with a Damp Proof Membrane (DPM).
- Set the full-size drawn MDF Greek key template on the membrane; keep extra plastic ready for rain.
- 18.3 Cut and Dry-Assemble the Four Greek Key Squares
- Lay cut 50 mm ivory, copper and grey strips (F) on the template lines with 5 mm joints.
- Hook a speed square with a 5 mm recessed lip into each joint to mark the opposing 45-degree miter.
- Cut each segment on the wet saw and dry-assemble all four Greek key squares on the template.
- 18.4 Cut and Dry-Fit Perimeter Border Strips Around Template
- Cut 50 mm copper border strips (F), Inner Border Strips (Ivory Porcelain) (C) and Outer Border Strips (Grey Porcelain) (B).
- Dry-fit straight border strips around the four Greek key squares; leave outer mitered corners uncut until bedded.
Key measurements
- Greek key strip width: 50 mm with 45-degree mitered ends
- Mosaic joint width: 5 mm hooked with a 5 mm recessed speed square
- Mosaic layout: 4 interlocking Greek key squares
- Tip: Cut a square slab corner-to-corner, then rip 50 mm strips so each starts with one 45-degree miter.
- Tip: Hook a speed square with a 5 mm lip into the joint to mark miter lengths on the template.
- Tip: Leave outer border corners uncut until the central mosaic is bedded in mortar to measure final lengths.
- Heads up: Keep the MDF template wrapped in polythene membrane; moisture warps MDF and ruins layout tolerances.
Before you move on: Check all four dry-assembled Greek key squares align on the MDF template with tight 45-degree miter corners.
Step 19: Bed and Level the Greek Key Entrance Feature
Prime and bed the four Greek key mosaic squares and mitered double border frame level at the entrance threshold with leveling clips.
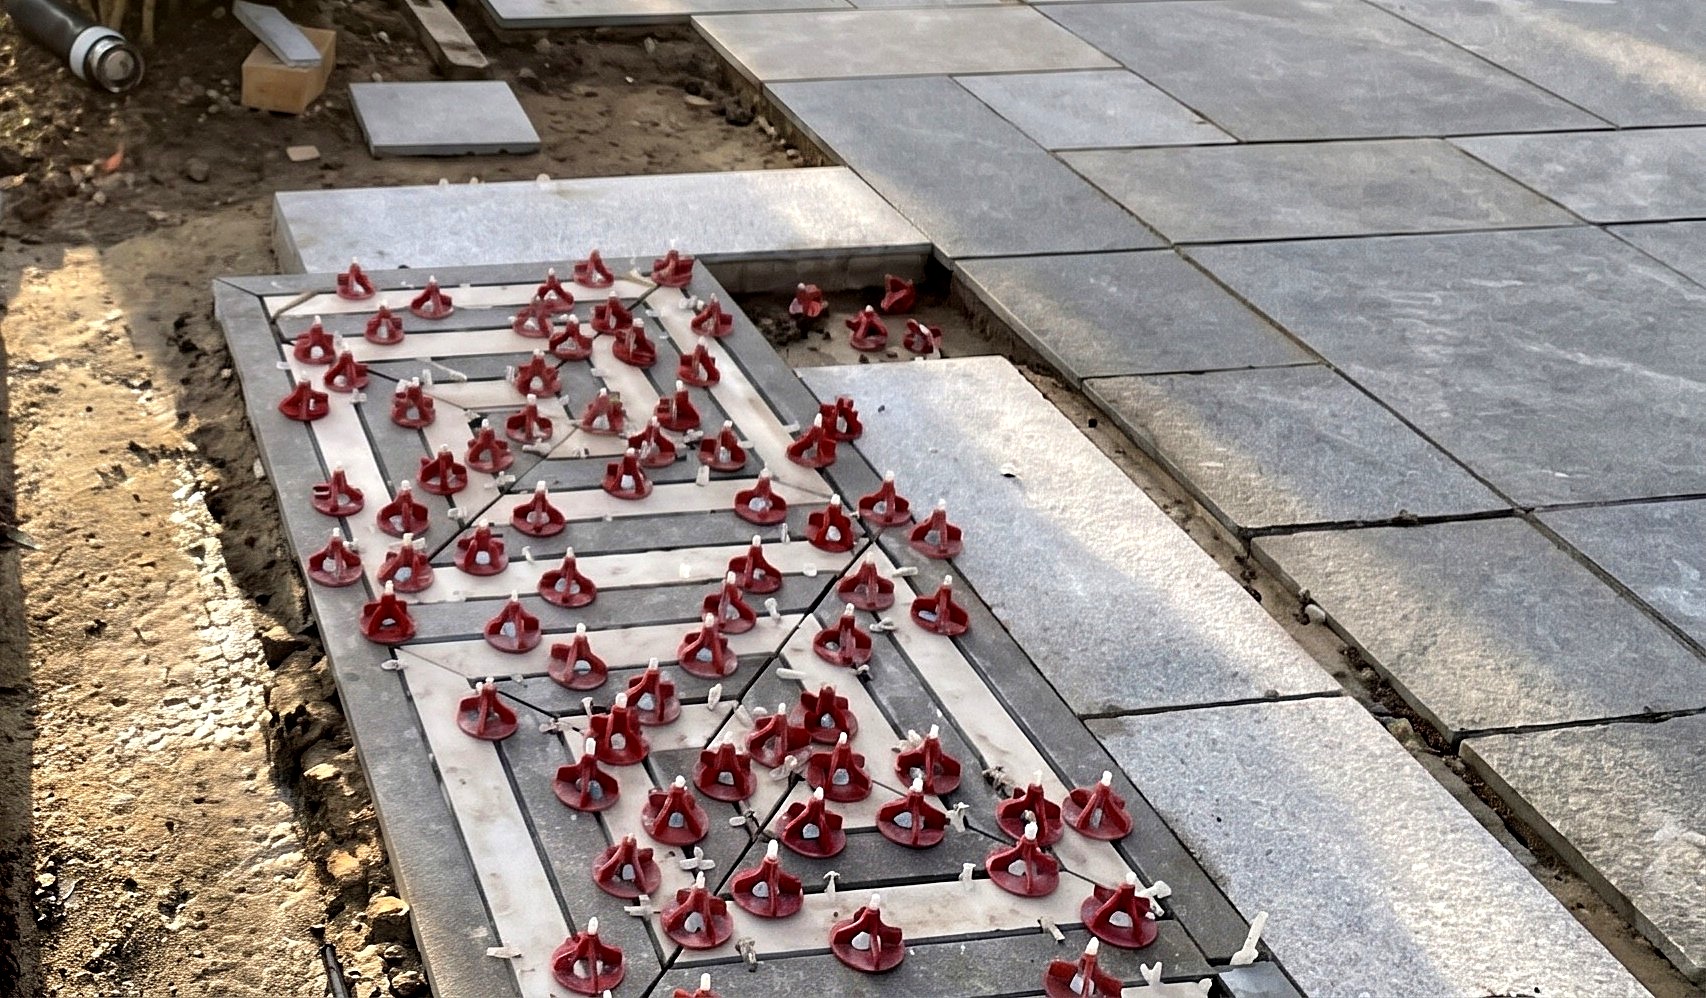
Parts in this step: (B) Outer Border Strips (Grey Porcelain), (C) Inner Border Strips (Ivory Porcelain), (F) Greek Key Mosaic & Ramp Grip Strips
You'll need: Wet Bridge Tile Saw, Mini Paint Roller, Bricklaying Trowel, Rubber Mallet, Spirit Levels, Speed Square and Steel Rule, Kneeling Pad, Porcelain Paving Tiles, Paving Primer, Sharp Sand and Cement, Tile Leveling Clips and Caps, Tile Spacers
- 19.1 Bed First Greek Key Square with Spacers and Leveling Clips
- Trowel a flat 4:1 mortar bed across the entrance bay.
- Roll paving primer on the back of each first-square 50 mm strip of Greek Key Mosaic & Ramp Grip Strips (F).
- Bed strips outward from the corner with 5 mm spacers and rotary leveling clips at every miter and straight joint.
- 19.2 Bed Remaining Three Greek Key Squares
- Transfer, prime, and bed the remaining three Greek key squares (F) onto the mortar.
- Check squareness with a speed square; loosen rotary caps to slide miters into corner alignment, then re-tighten.
- 19.3 Cut and Bed Mitered Border Frame Around Greek Key Inlay
- Kick off leveling clips the next day once the mosaic mortar cures.
- Measure, miter-cut, prime, and bed framing Inner Border Strips (Ivory Porcelain) (C) and Outer Border Strips (Grey Porcelain) (B) flush with the street pavement.
Key measurements
- Mosaic strip width: 50 mm with 5 mm joints
- Tip: Loosen rotary leveling caps to nudge 50 mm strips into sharp miter alignment, then tighten.
Before you move on: Check all four Greek key squares with a spirit level and speed square before mortar sets.
Step 20: Install Bin Screen Posts and Driveway Stone Edgings
Concrete vertical rear screen posts plumb in a trench; bed and haunch sawn stone edgings along front flowerbeds.
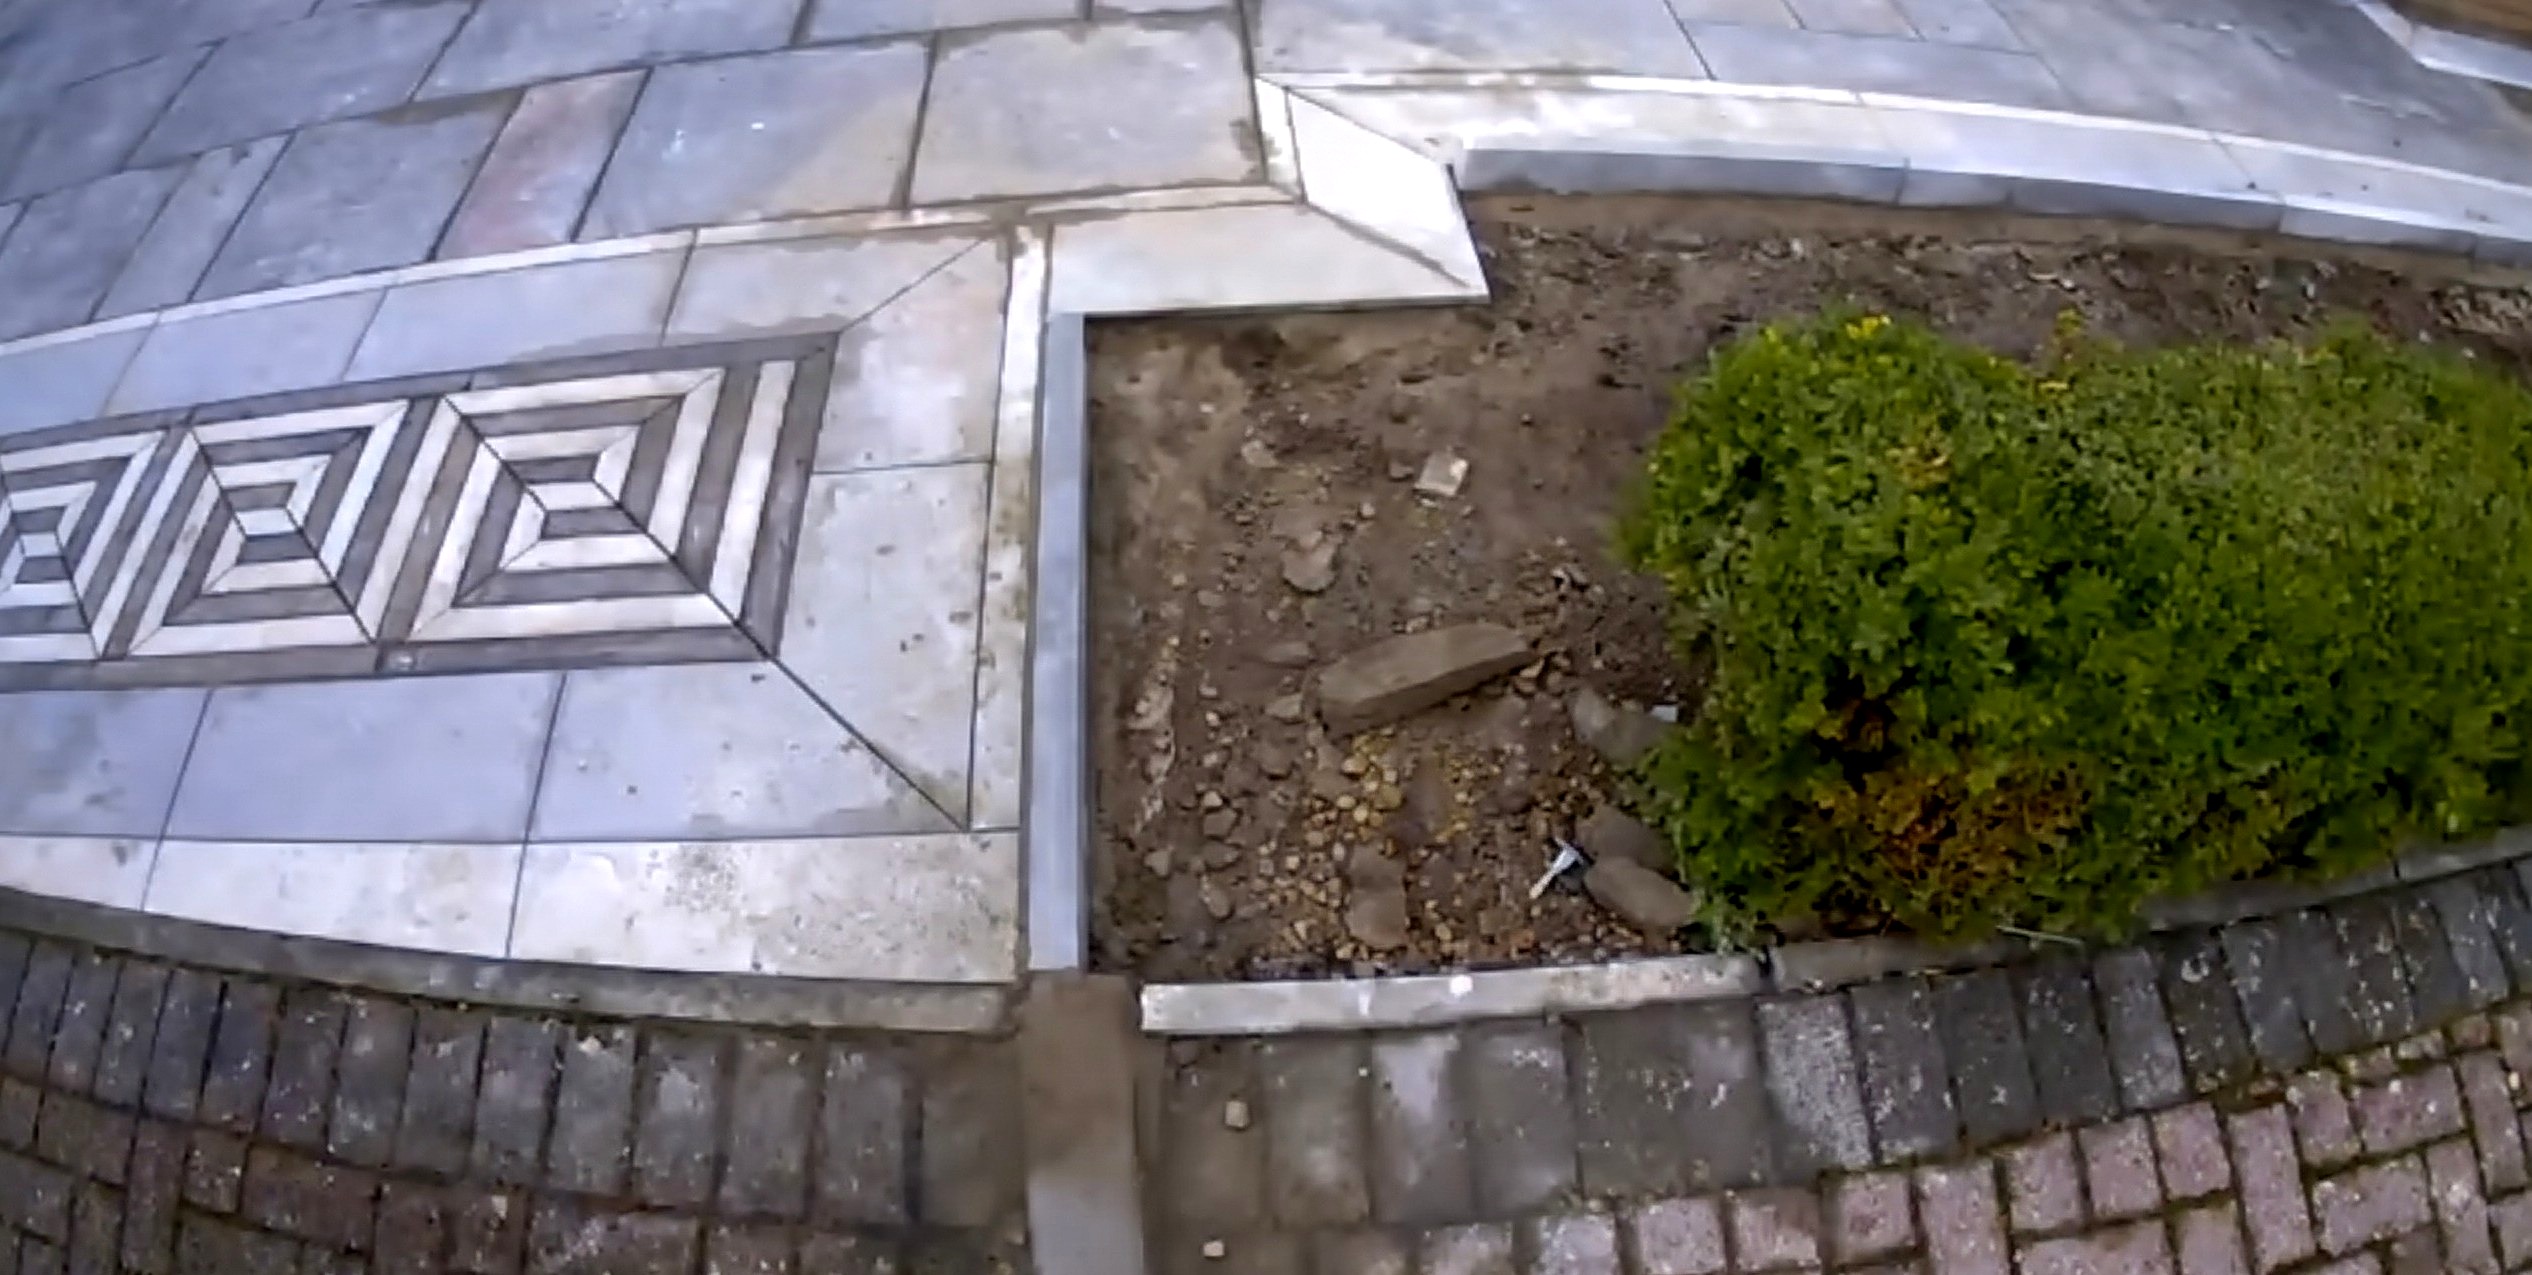
Parts in this step: (H) Sawn Versuro Stone Edgings
You'll need: String Line, Angle Grinder, G-Clamp, Mini Paint Roller, Bricklaying Trowel, Rubber Mallet, Spirit Levels, Garden Hose, Timber Shuttering Boards and Pegs, Enclosure Posts, Postcrete, Sawn Versuro Edging Stones, Paving Primer, Sharp Sand and Cement
- 20.1 Set Rear Bin Screen Posts Using a Trestle Jig and Postcrete
- Clamp four long timber boards across two trestles over the rear post trench as a plumb alignment channel.
- Stand cylindrical grey enclosure posts in the excavated channel; wrap string line between adjacent posts as a spacer.
- Pour water and Postcrete into the trench, let set, and cut away spacer strings.
- 20.2 Bed and Haunch Sawn Stone Edgings Along Driveway Flowerbeds
- Trowel a 4:1 mortar bed along the front driveway flowerbeds and hedge line.
- Prime the Sawn Versuro Stone Edgings (H) backs, tap level with a rubber mallet, and haunch the backs with mortar.
- Taper-cut the end stone edging (H) to meet the street pavement flush with no trip edge.
- Tip: Clamp four boards across two trestles as a guide jig to hold multiple cylindrical posts plumb at once.
- Tip: Taper the final kerb stone to pavement height to prevent a sidewalk trip hazard.
Step 21: Clean Grout Haze with Cement Residue Remover
Grout all 5 mm joints and scrub cured cement haze off the porcelain with acidic residue remover.
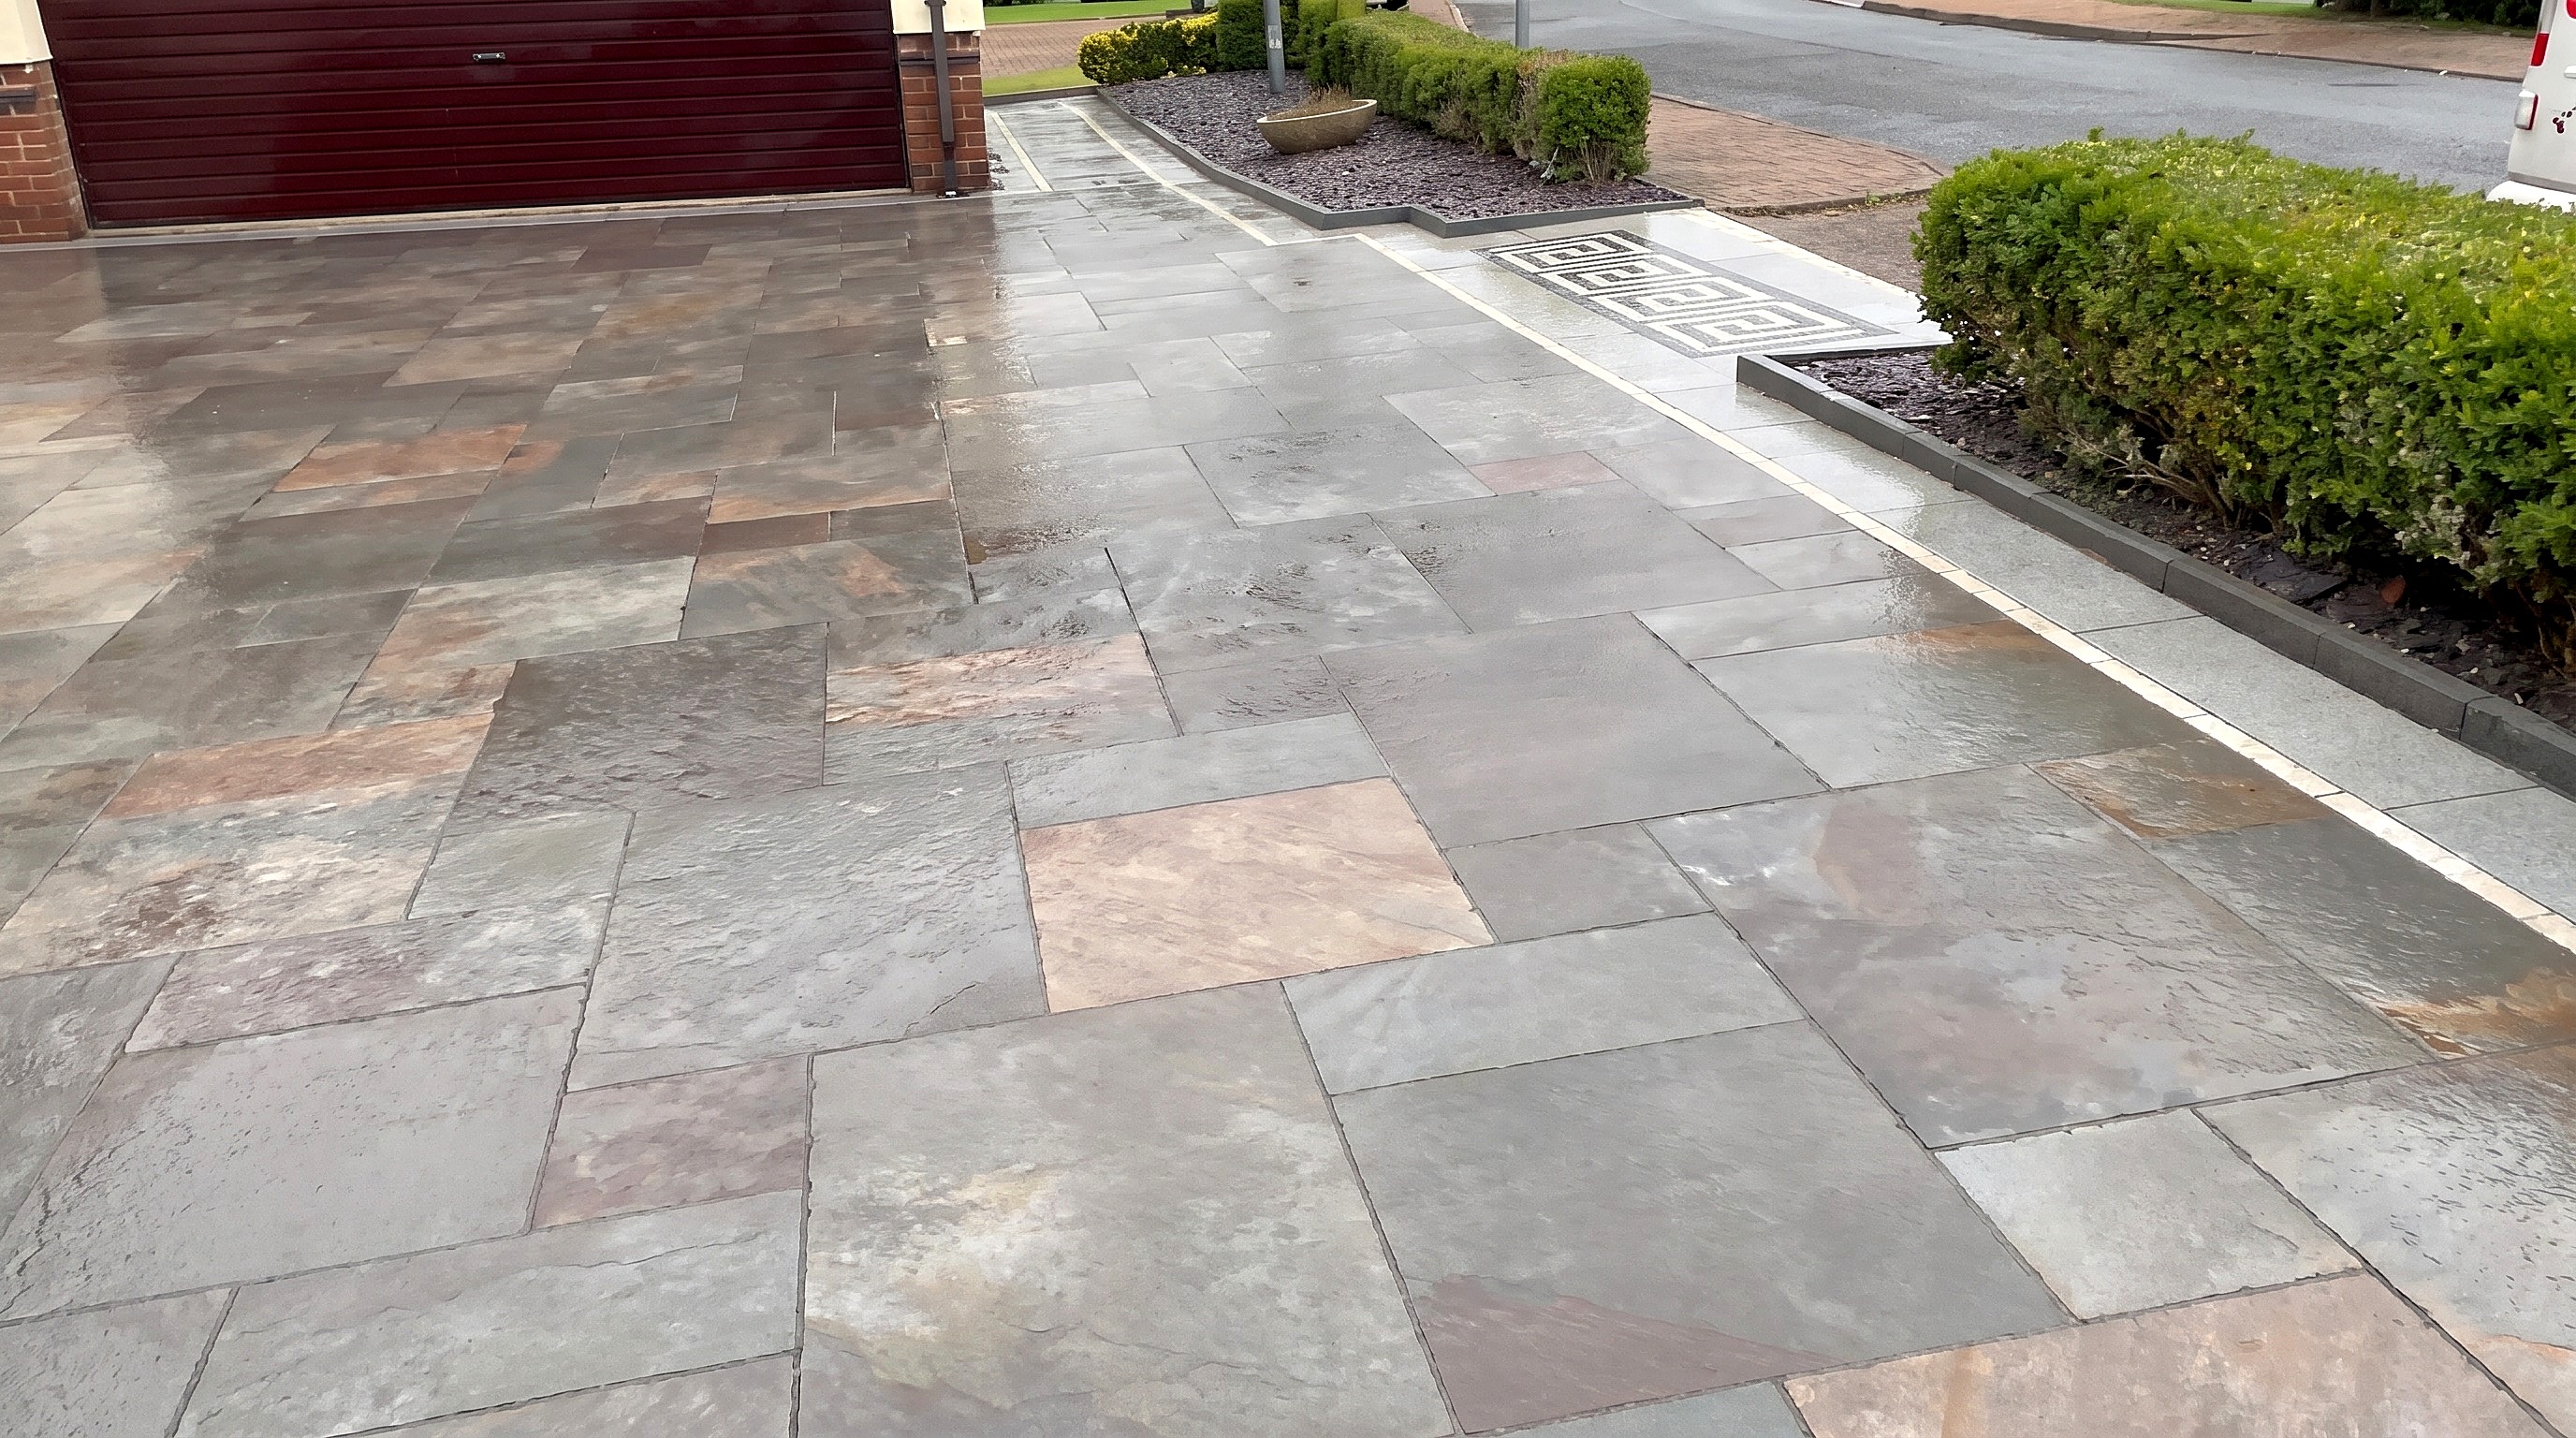
Parts in this step: (A) Porcelain Field Slabs (Copper), (B) Outer Border Strips (Grey Porcelain), (C) Inner Border Strips (Ivory Porcelain), (D) Doorway Mat Slabs (Basalt Porcelain), (E) Circular Lawn Border Wedges (Grey & Ivory), (F) Greek Key Mosaic & Ramp Grip Strips
You'll need: Kneeling Pad, Pressure Washer, Exterior Jointing Grout, KF Cement Residue Remover
- 21.1 Scrub Tiles with Lithofin KF Cement Residue Remover and Rinse
- Pressure wash all 5 mm joints clean and fill with exterior jointing grout across parts (A), (B), (C), (D), (E), and (F).
- Apply Lithofin KF Cement Residue Remover to the grouted porcelain slabs once the grout cures.
- Scrub every tile on hands and knees with an abrasive pad to dissolve cloudy grout haze.
- Rinse the driveway and pathway with a pressure washer.
Key measurements
- Cleaner quantity: 3 bottles of Lithofin KF Cement Residue Remover for ~135 sq m
- Tip: Pressure wash open tile joints before grouting so dirt and debris do not contaminate the grout.
- Heads up: Never judge tile cleanliness while wet; wet porcelain hides cloudy grout haze that reappears once dry.
Before you move on: Let a test section dry completely to check zero white cement or grout film remains on the porcelain face.
Finishing
Turf and Paving Details
- Lay artificial grass inside the rear garden's circular porcelain border.
- Re-joint rear Indian sandstone patio slabs with the same exterior jointing grout.
Cure and Traffic
- Keep traffic off freshly bedded porcelain slabs for 24 hours before kicking off leveling clips.
- Protect mortar and grout from freezing below 3 degrees Celsius.
Care and Alternatives
- Wash vitrified outdoor porcelain with a garden hose or pressure washer; no sealer needed.
- Use a homemade SBR bonding agent and cement slurry if pre-mixed paving primer is unavailable.
Check before you call it done
| Check | What you should see | If not |
|---|---|---|
| Pour buckets of water across the upper and lower driveway slopes. | Water channels down the central valley into the ACO slot drains without pooling. | |
| Lay a long spirit level across the circular lawn border's closing and starting wedges. | Adjacent wedges meet flush with uniform radial joints and no sliver cut. | Before mortar cures, tap high wedges down 1 to 2 mm with a rubber mallet, or shave tight inner veneers 1 mm with an angle grinder. |
| Check the linear running bond around manhole covers and along the side pathway. | Courses stagger cleanly with 5 mm joints, no four-way cross joints, and no adjacent half-tiles. | Cut out offending slabs with an angle grinder and bed a 600 x 600 mm L-cut slab or full staggered slabs. |
| Check recessed plastic manhole frame edges against surrounding tiles. | A uniform 5 mm joint runs along all four sides without inward bowing. | Brace timber struts in the plastic frame and pour boiling water over the bowed side to relax the warp. |
| Check the grouted porcelain surface once completely dry. | Rich copper, grey, ivory, and basalt tones with zero cloudy white film. | Scrub dry haze on hands and knees with Lithofin KF Cement Residue Remover and rinse with a pressure washer. |
These Specs are built from Tidybricks patio restore's video “Porcelain Tile Driveway, Pathway, and Circular Lawn Border with Greek Key Entrance”. Open the Porcelain Tile Driveway, Pathway, and Circular Lawn Border with Greek Key Entrance project page.
