Spetz Specs No. 4082: step-by-step build guide
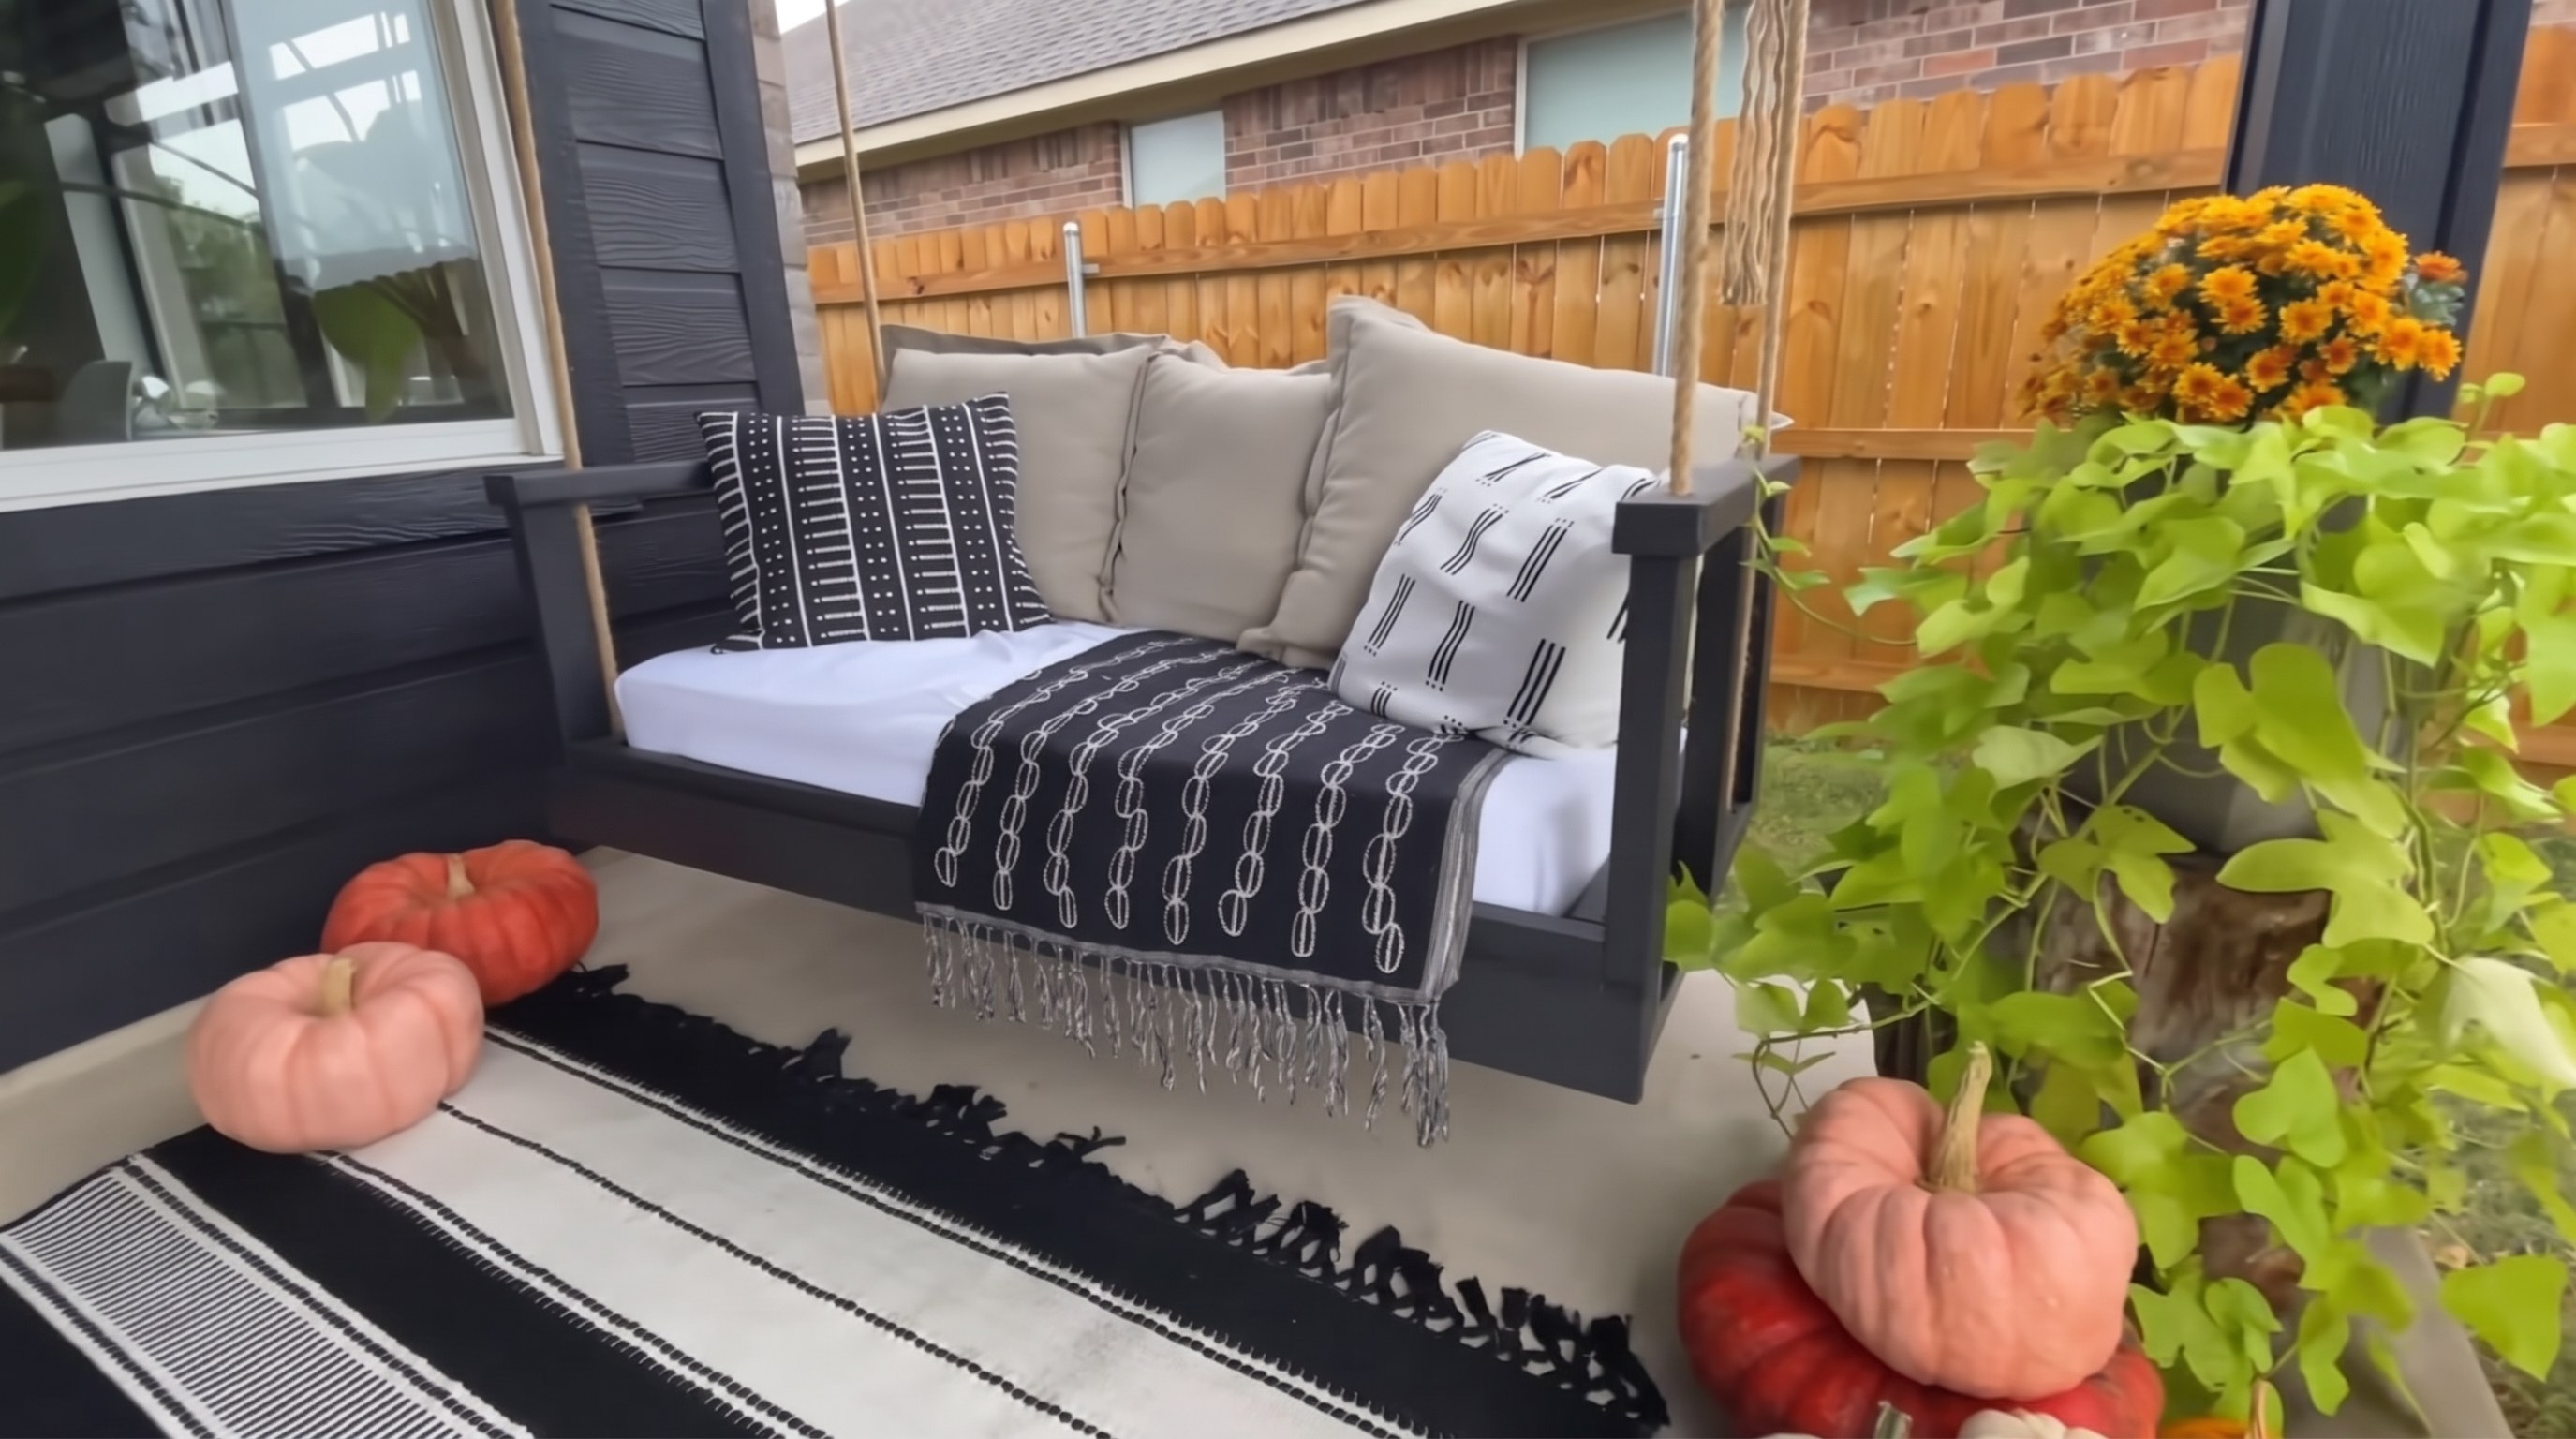
Crib Mattress Porch Swing
The complete step-by-step guide made from EmyLuDesigns's YouTube video, free on Spetz. For the video, a step-by-step player and answers to your questions, see the Crib Mattress Porch Swing project page.
7 steps, 10 parts, 13 tools, 10 materials
Overview
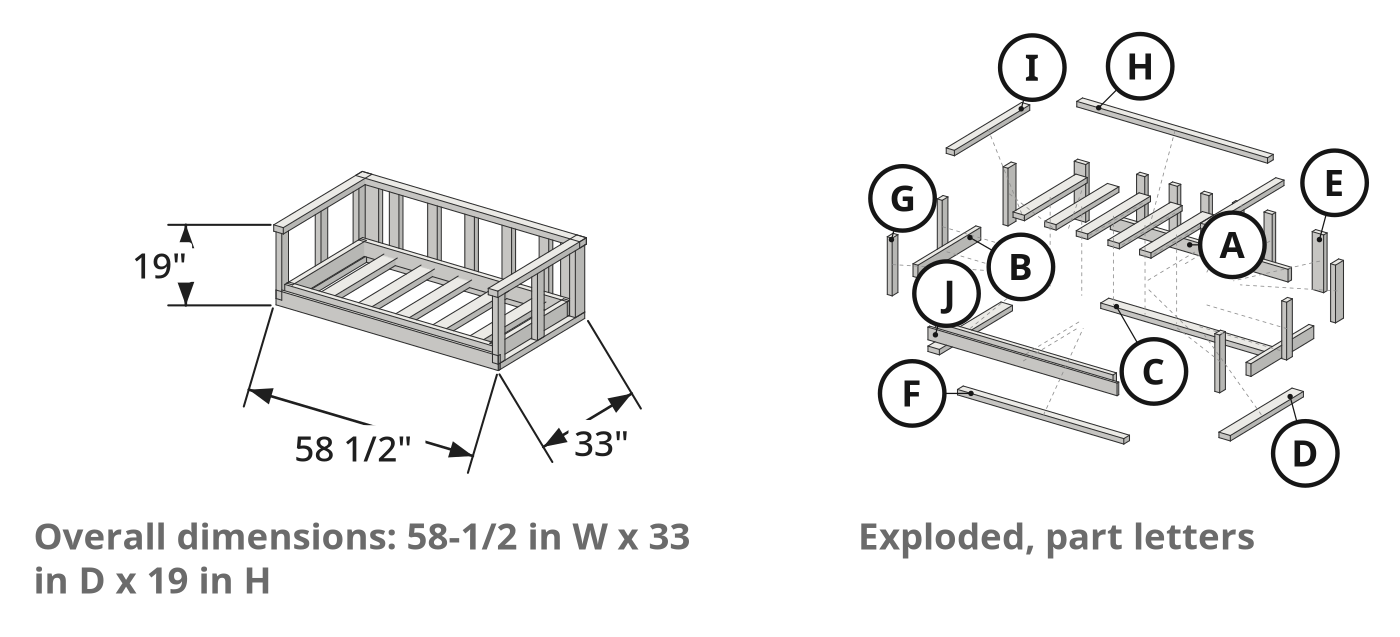
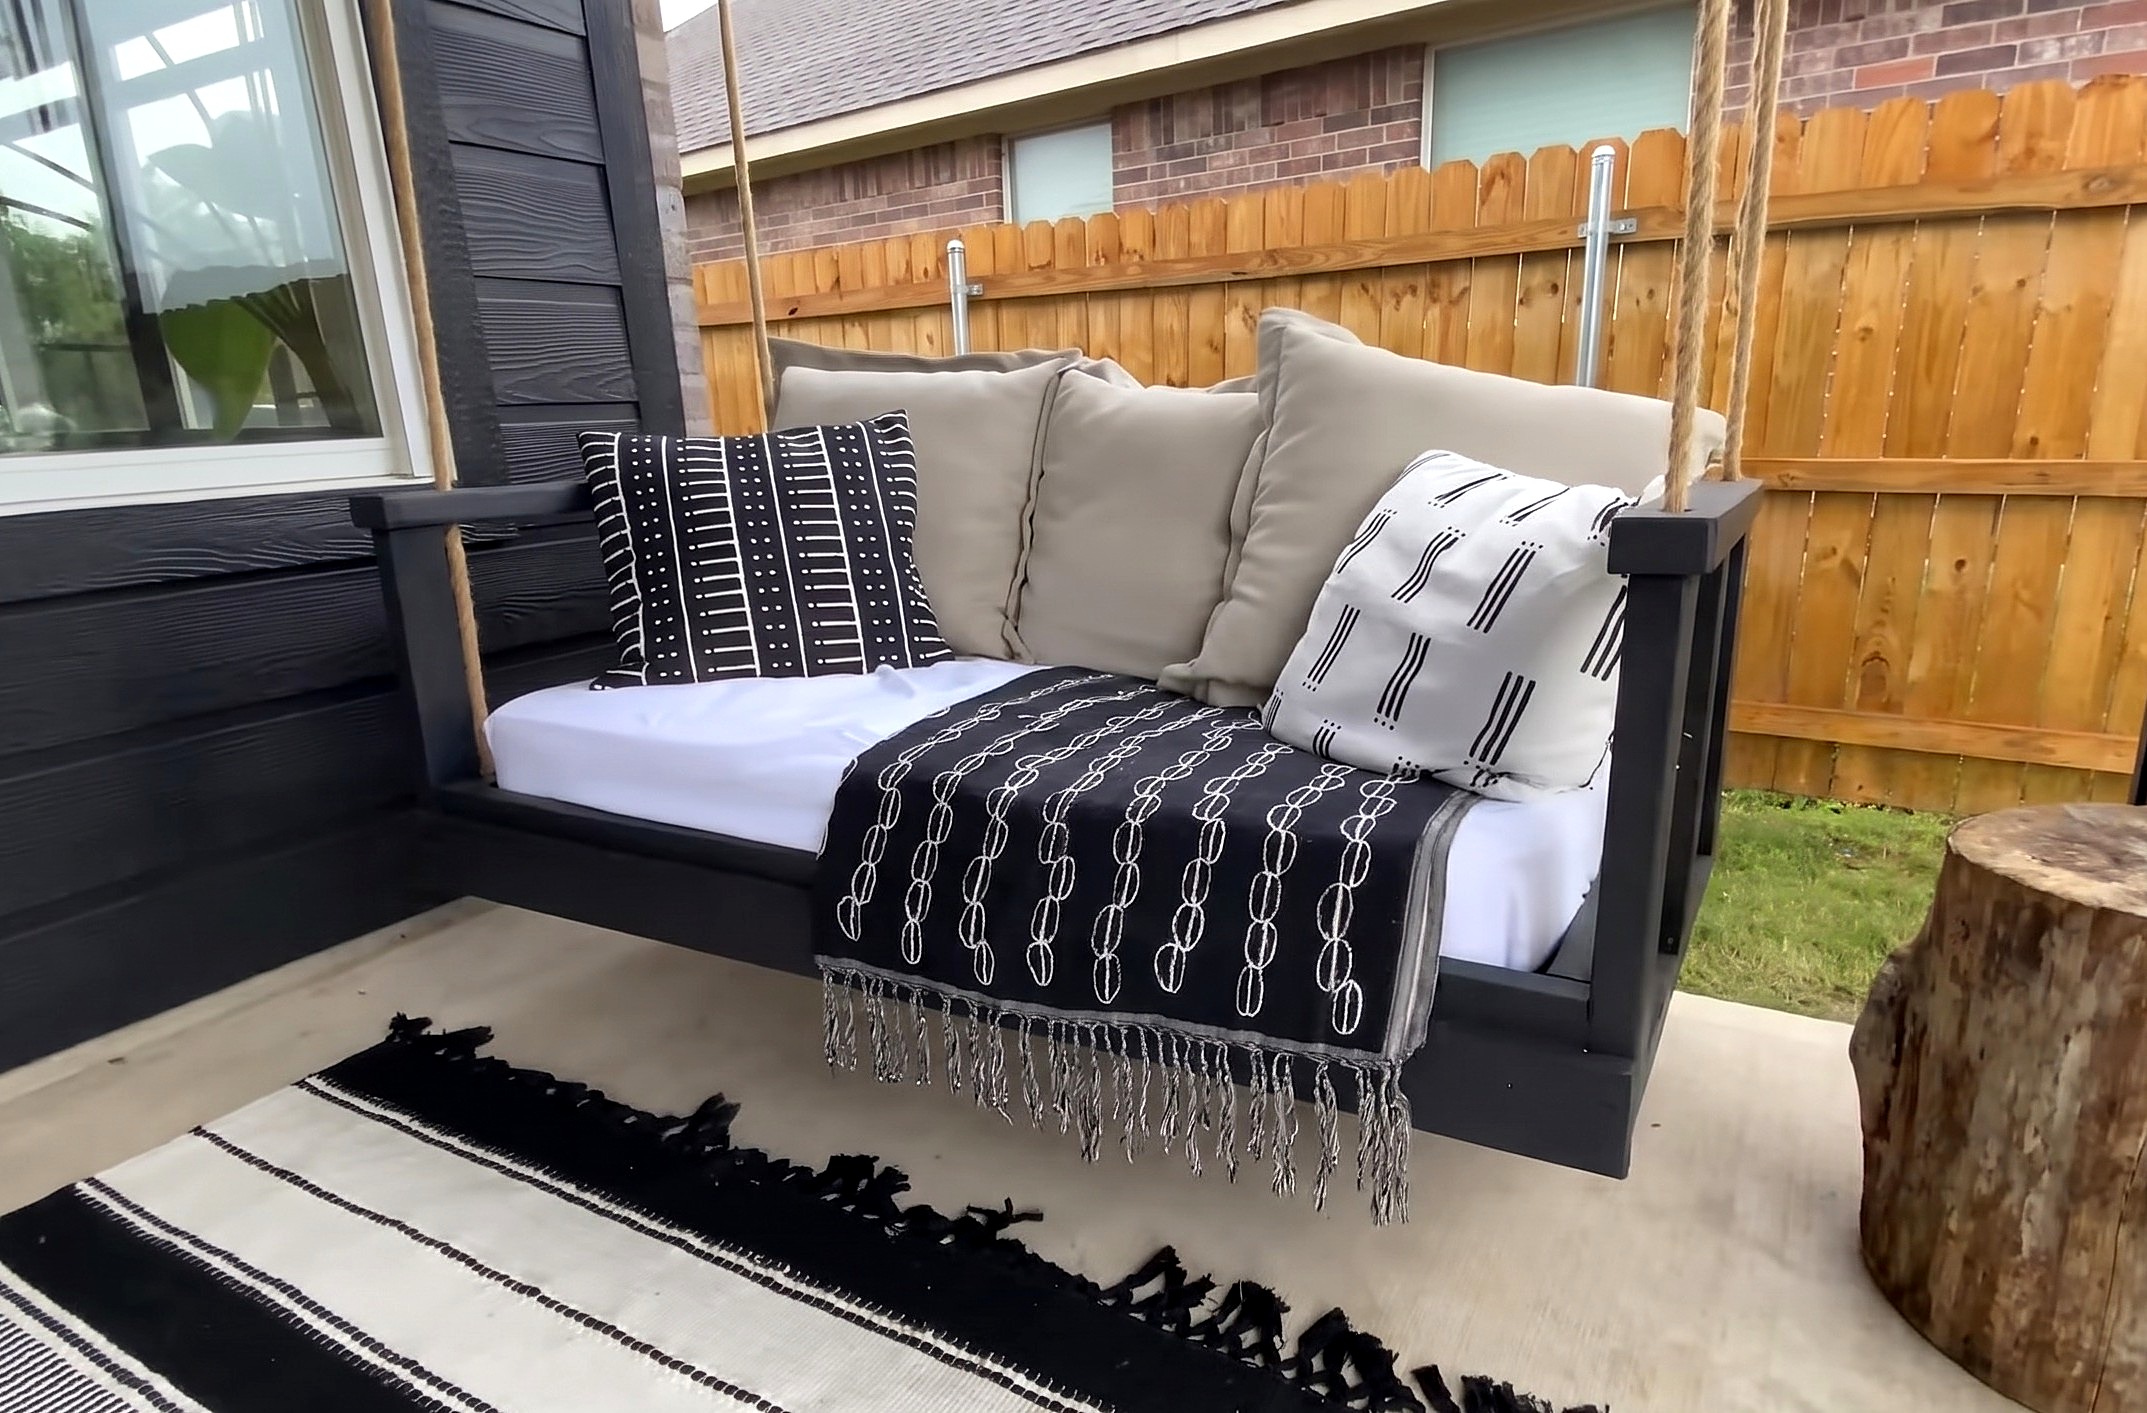
Finished size: 58-1/2 in W x 33 in D x 19 in H
What You're Building
- Build a hanging wood swing for a standard crib mattress.
- Fit a compact lounging swing onto small porches where a twin bed frame will not fit.
Why This Design Works
- Set the mattress in a 2-inch deep outer 2x4 base box pocket.
- Support interior slats below with an overhanging 2x4 and 2x3 sub-base ledge.
- Pass two continuous ropes under the base slats for quick leveling.
What It Takes
- Cut 2x4, 2x3, and 1x4 boards with a circular saw or miter saw.
- Make 90-degree square crosscuts on all parts except four 45-degree top-rail miters.
- Pre-drill joints and drive 3-inch exterior screws before painting and hanging from ceiling joists.
What Decides Success
- Pre-drill centered pilot holes at joints so 3-inch screws do not split wood.
- Anchor four heavy-duty eye screws in the center of overhead structural joists.
Health and safety
Circular and Miter Saws
- Support 2x4, 2x3, and 1x4 boards on rigid foam sheets during circular saw cuts to prevent blade binding and kickback.
- Keep hands clear of the miter saw blade path and let the blade stop completely before lifting the saw head.
- Wear protective equipment, including safety glasses and hearing protection, whenever cutting lumber with the circular saw or miter saw.
Drilling and Driving Screws
- Brace the drill firmly when boring 7/8-inch rope holes, as wide Forstner bits can catch in the wood and twist suddenly.
- Watch the placement of 3-inch screws on the base and corner posts so your drill bit never strikes buried metal.
- Wear safety glasses when pre-drilling with the 5/32-inch bit and driving screws with the impact driver to block flying debris.
Sanding, Paint, and Finishes
- Wear a dust mask and safety glasses when sanding dried exterior wood filler to keep fine dust out of your lungs.
- Apply exterior paint or stain in an open, ventilated area and wear gloves to avoid skin contact and fume inhalation.
- Lay stain-soaked rags flat outdoors to dry or submerge them in water inside a sealed metal can to prevent self-ignition.
Ceiling Joists and Suspension
- Check the porch ceiling for hidden electrical wires before drilling overhead pilot holes for the eye screws.
- Drive all four 325-pound capacity eye screws directly into the center of structural ceiling joists before loading the swing.
- Enlist a helper to lift the assembled wooden swing when connecting the 3/4-inch Manila ropes and heavy-duty S-hooks overhead.
- Confirm that all Manila rope knots and S-hooks are tight and fully seated before anyone sits on the swing.
Tools
- Speed square (rafter / speed square, Milwaukee)
- Circular saw (cordless circular saw, Ryobi, brushless)
- Miter saw (power miter saw, Ryobi) (optional)
- Drill driver (cordless drill/driver, Ryobi)
- Impact driver (cordless impact driver, Ryobi, brushless) (optional)
- Drill bit (twist drill bit, 5/32 in)
- Forstner bit (Forstner drill bit, 7/8 in)
- Tape measure (retractable tape measure, Stanley, FatMax, 25 ft)
- Stud finder (electronic stud finder, HART)
- Sanding sponge (hand sanding block) (optional)
- Adjustable wrench (adjustable crescent wrench) (optional)
- Pencil (marking pencil)
- Paintbrush (angled sash paintbrush)
Materials
- Crib mattress and cover (1, crib mattress)
- 2x4 boards (6 boards, dimensional lumber, 2x4x8 ft)
- 2x3 boards (4 boards, dimensional lumber, 2x3x8 ft)
- 1x4 board (1 board, dimensional trim board, 1x4x6 ft)
- Exterior wood screws (2 boxes, coated exterior wood screw, 3 in)
- Heavy-duty eye screws (4, screw eye, Everbilt, 325 lb capacity per screw, 3/8 in x 4-7/8 in)
- Heavy-duty S-hooks (4, S-hook)
- Manila rope (1 roll, natural fiber rope, 3/4 in diameter, 50 ft)
- Exterior wood filler (1 tub, wood filler, exterior grade)
- Exterior paint or stain (1 gallon, exterior paint, Clare, exterior)
Hardware
| Hardware | Size | Count | Used in steps |
|---|---|---|---|
| 3 in Exterior wood screws | ~58 | 2, 3, 4, 5 | |
| 3/8 in x 4-7/8 in Heavy-duty eye screws | 4 | 7 | |
| Heavy-duty S-hooks | 4 | 7 |
Cut list
| Part | Name | Qty | Size | Notes |
|---|---|---|---|---|
| A | Base front and back rail | x2 | 1 1/2" (T) × 3 1/2" (W) × 54 1/2" (L) | 90° crosscut both ends; installed on edge (3-1/2 in face vertical) at the front and back of the mattress box. |
| B | Base end rail and interior slat | x7 | 1 1/2" (T) × 3 1/2" (W) × 27 1/2" (L) | 90° crosscut both ends; 2 installed on edge between the ends of the 54-1/2 in rails to close the box, and 5 laid flat inside the box spaced 6-1/4 in apart flush with the bottom edge. |
| C | Sub-base back rail | x1 | 1 1/2" (T) × 3 1/2" (W) × 51" (L) | 90° crosscut both ends; fits flat underneath the base between the back ends of the two 32 in side sub-base rails, creating a 1-1/2 in exterior ledge and a 1/2 in interior ledge. |
| D | Sub-base side rail | x2 | 1 1/2" (T) × 3 1/2" (W) × 32" (L) | 90° crosscut both ends; attached flat underneath the left and right sides of the base, flush at the front and overhanging 1-1/2 in at the sides and back. Drill two 7/8 in rope holes through the overhang (4 in from front and 6-1/2 in from back). |
| E | Back corner post | x4 | 1 1/2" (T) × 3 1/2" (W) × 16" (H) | 90° crosscut both ends; two posts join in an L-shape on the sub-base ledge at each back corner. |
| F | Sub-base front rail | x1 | 1 1/2" (T) × 2 1/2" (W) × 51" (L) | 90° crosscut both ends; centered flat underneath the front base rail flush with the front face, leaving 1-3/4 in at each end for the side sub-base rails. |
| G | Vertical rail support | x9 | 1 1/2" (T) × 2 1/2" (W) × 16" (H) | 90° crosscut both ends; 2 mounted along each side ledge (front and middle) and 5 spaced ~7-1/2 in apart along the back ledge aligned with the interior slats. |
| H | Back top rail | x1 | 1 1/2" (T) × 2 1/2" (W) × 58 1/2" (L) | 45° miter at both ends (long point to long point) so the inside corners intersect the back corner posts and meet the mitered armrests. |
| I | Armrest | x2 | 1 1/2" (T) × 2 1/2" (W) × 33" (L) | 45° miter on the back end only (opposing hands for left and right sides) and 90° crosscut on the front end; drill two 7/8 in rope holes (4 in from front and 6-1/2 in from back). |
| J | Front fascia trim | x1 | 3/4" (T) × 3 1/2" (W) × 58" (L) | 90° crosscut; scribed in place across the front face of the assembled swing and cut flush with the outer edges to cover exposed screw heads. |
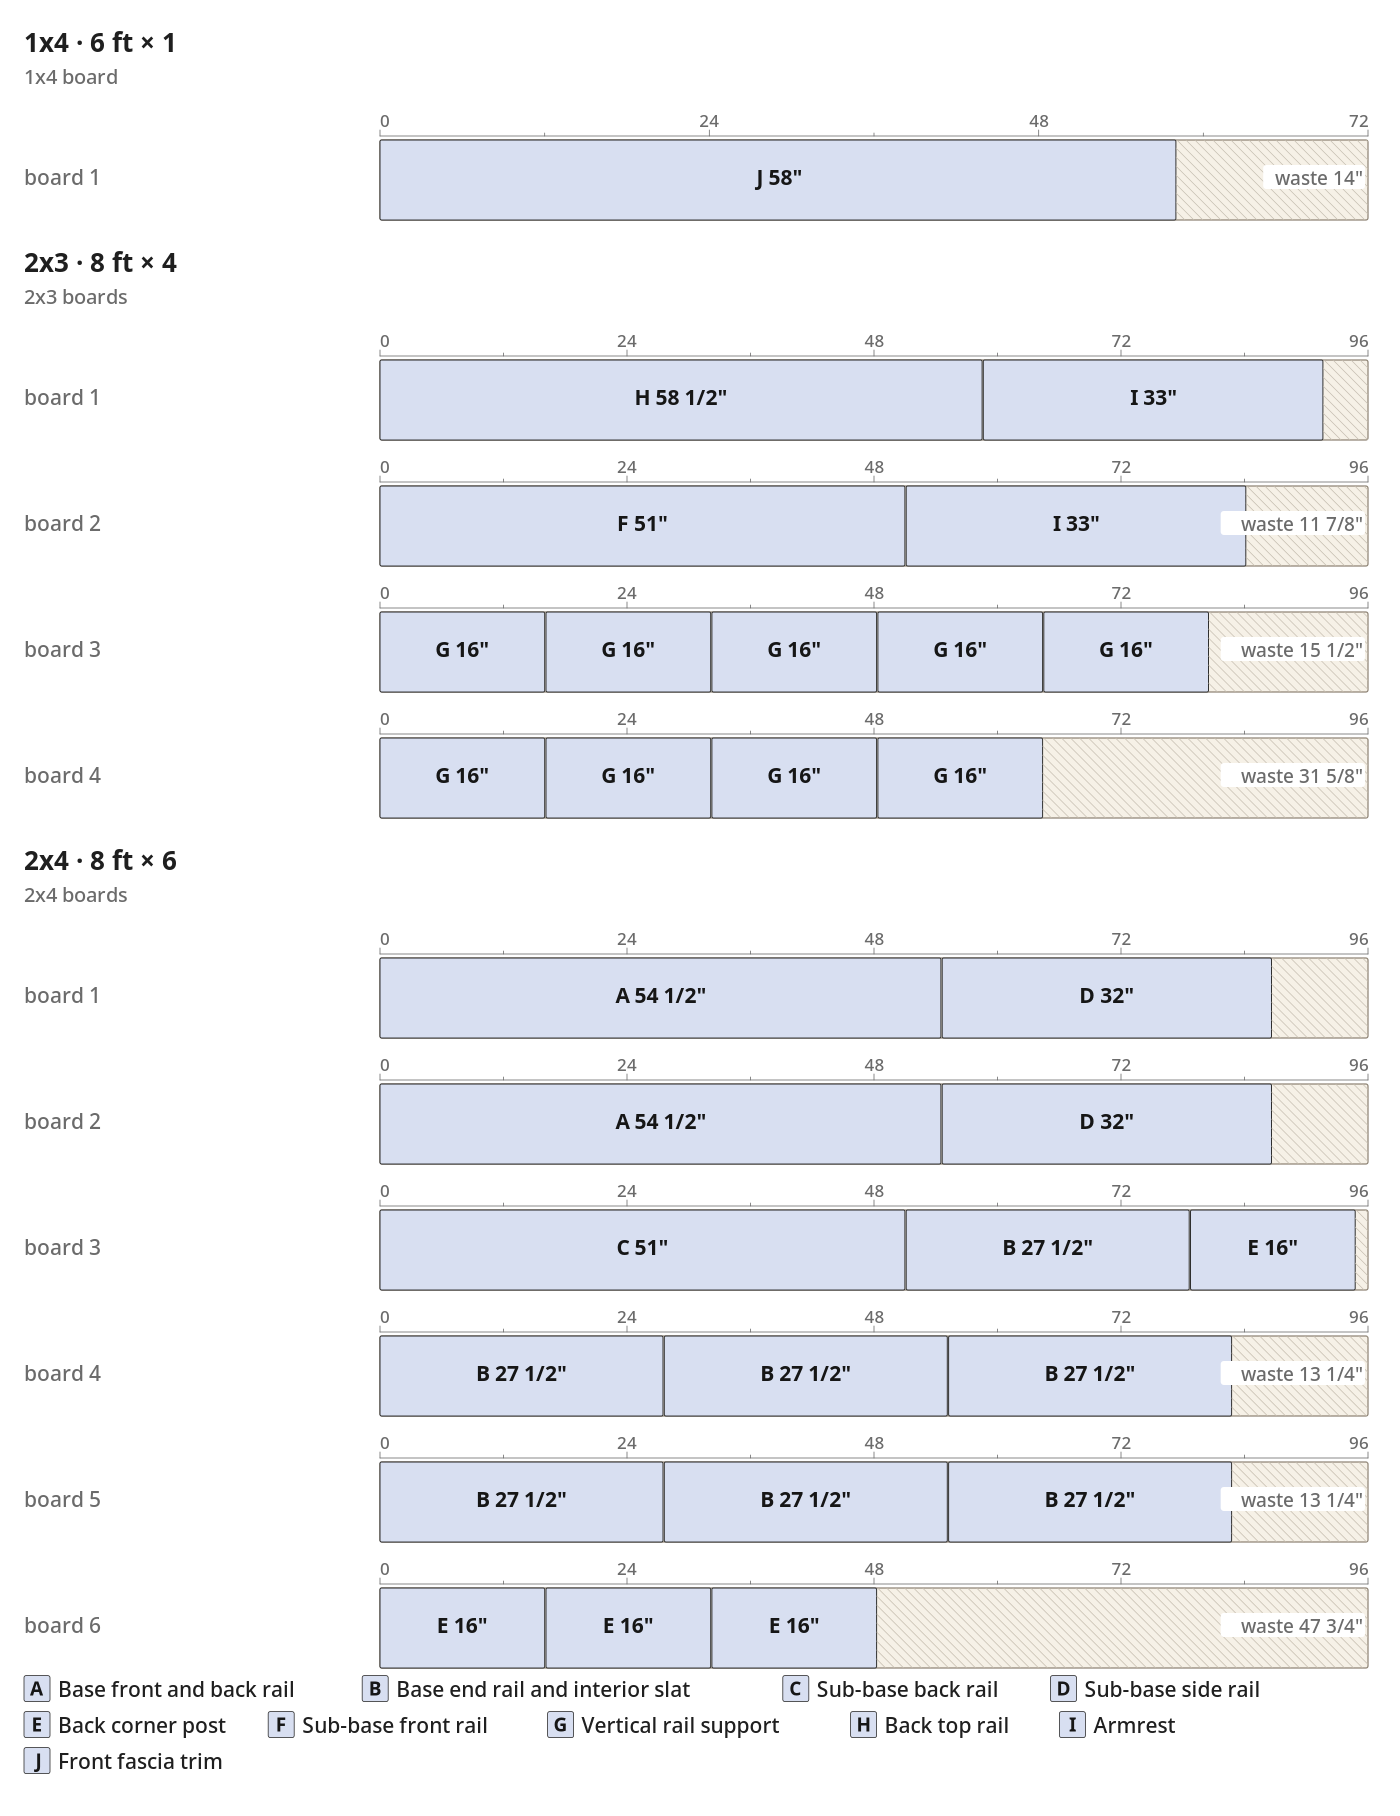
What to buy
- Buy 1 × 1x4 6 ft (1x4 board)
- Buy 4 × 2x3 8 ft (2x3 boards)
- Buy 6 × 2x4 8 ft (2x4 boards)
Before you start
Lumber Selection
- Pick straight, dry 2x4, 2x3, and 1x4 boards with few knots or splits.
- Reject twisted or bowed lumber so the sub-base and mitered top rails sit flat.
Layout and Labeling
- Check each board off the cut list after cutting to track parts.
- Label cut pieces by letter and stage boards in assembly order.
Step by step
Step 1: Measure and Cut the Boards
Cut 2x4 and 2x3 frame boards to length with square ends or 45-degree miters.
Parts in this step: (A) Base front and back rail, (B) Base end rail and interior slat, (C) Sub-base back rail, (D) Sub-base side rail, (E) Back corner post, (F) Sub-base front rail, (G) Vertical rail support, (H) Back top rail, (I) Armrest, (J) Front fascia trim
You'll need: Speed square, Circular saw, Miter saw, Tape measure, Pencil, 2x4 boards, 2x3 boards, 1x4 board
- 1.1 Stage lumber and mark cut lines
- Mark 2x4s for base rails (A, C, D), slats (B), and corner posts (E).
- Mark 2x3s for rail (F), supports (G), top rail (H), and armrests (I).
- Draw square cut lines across boards with a tape measure and speed square.
- Leave 1x4 front fascia trim (J) uncut for scribing in Step 5.
- 1.2 Make the 90-degree crosscuts
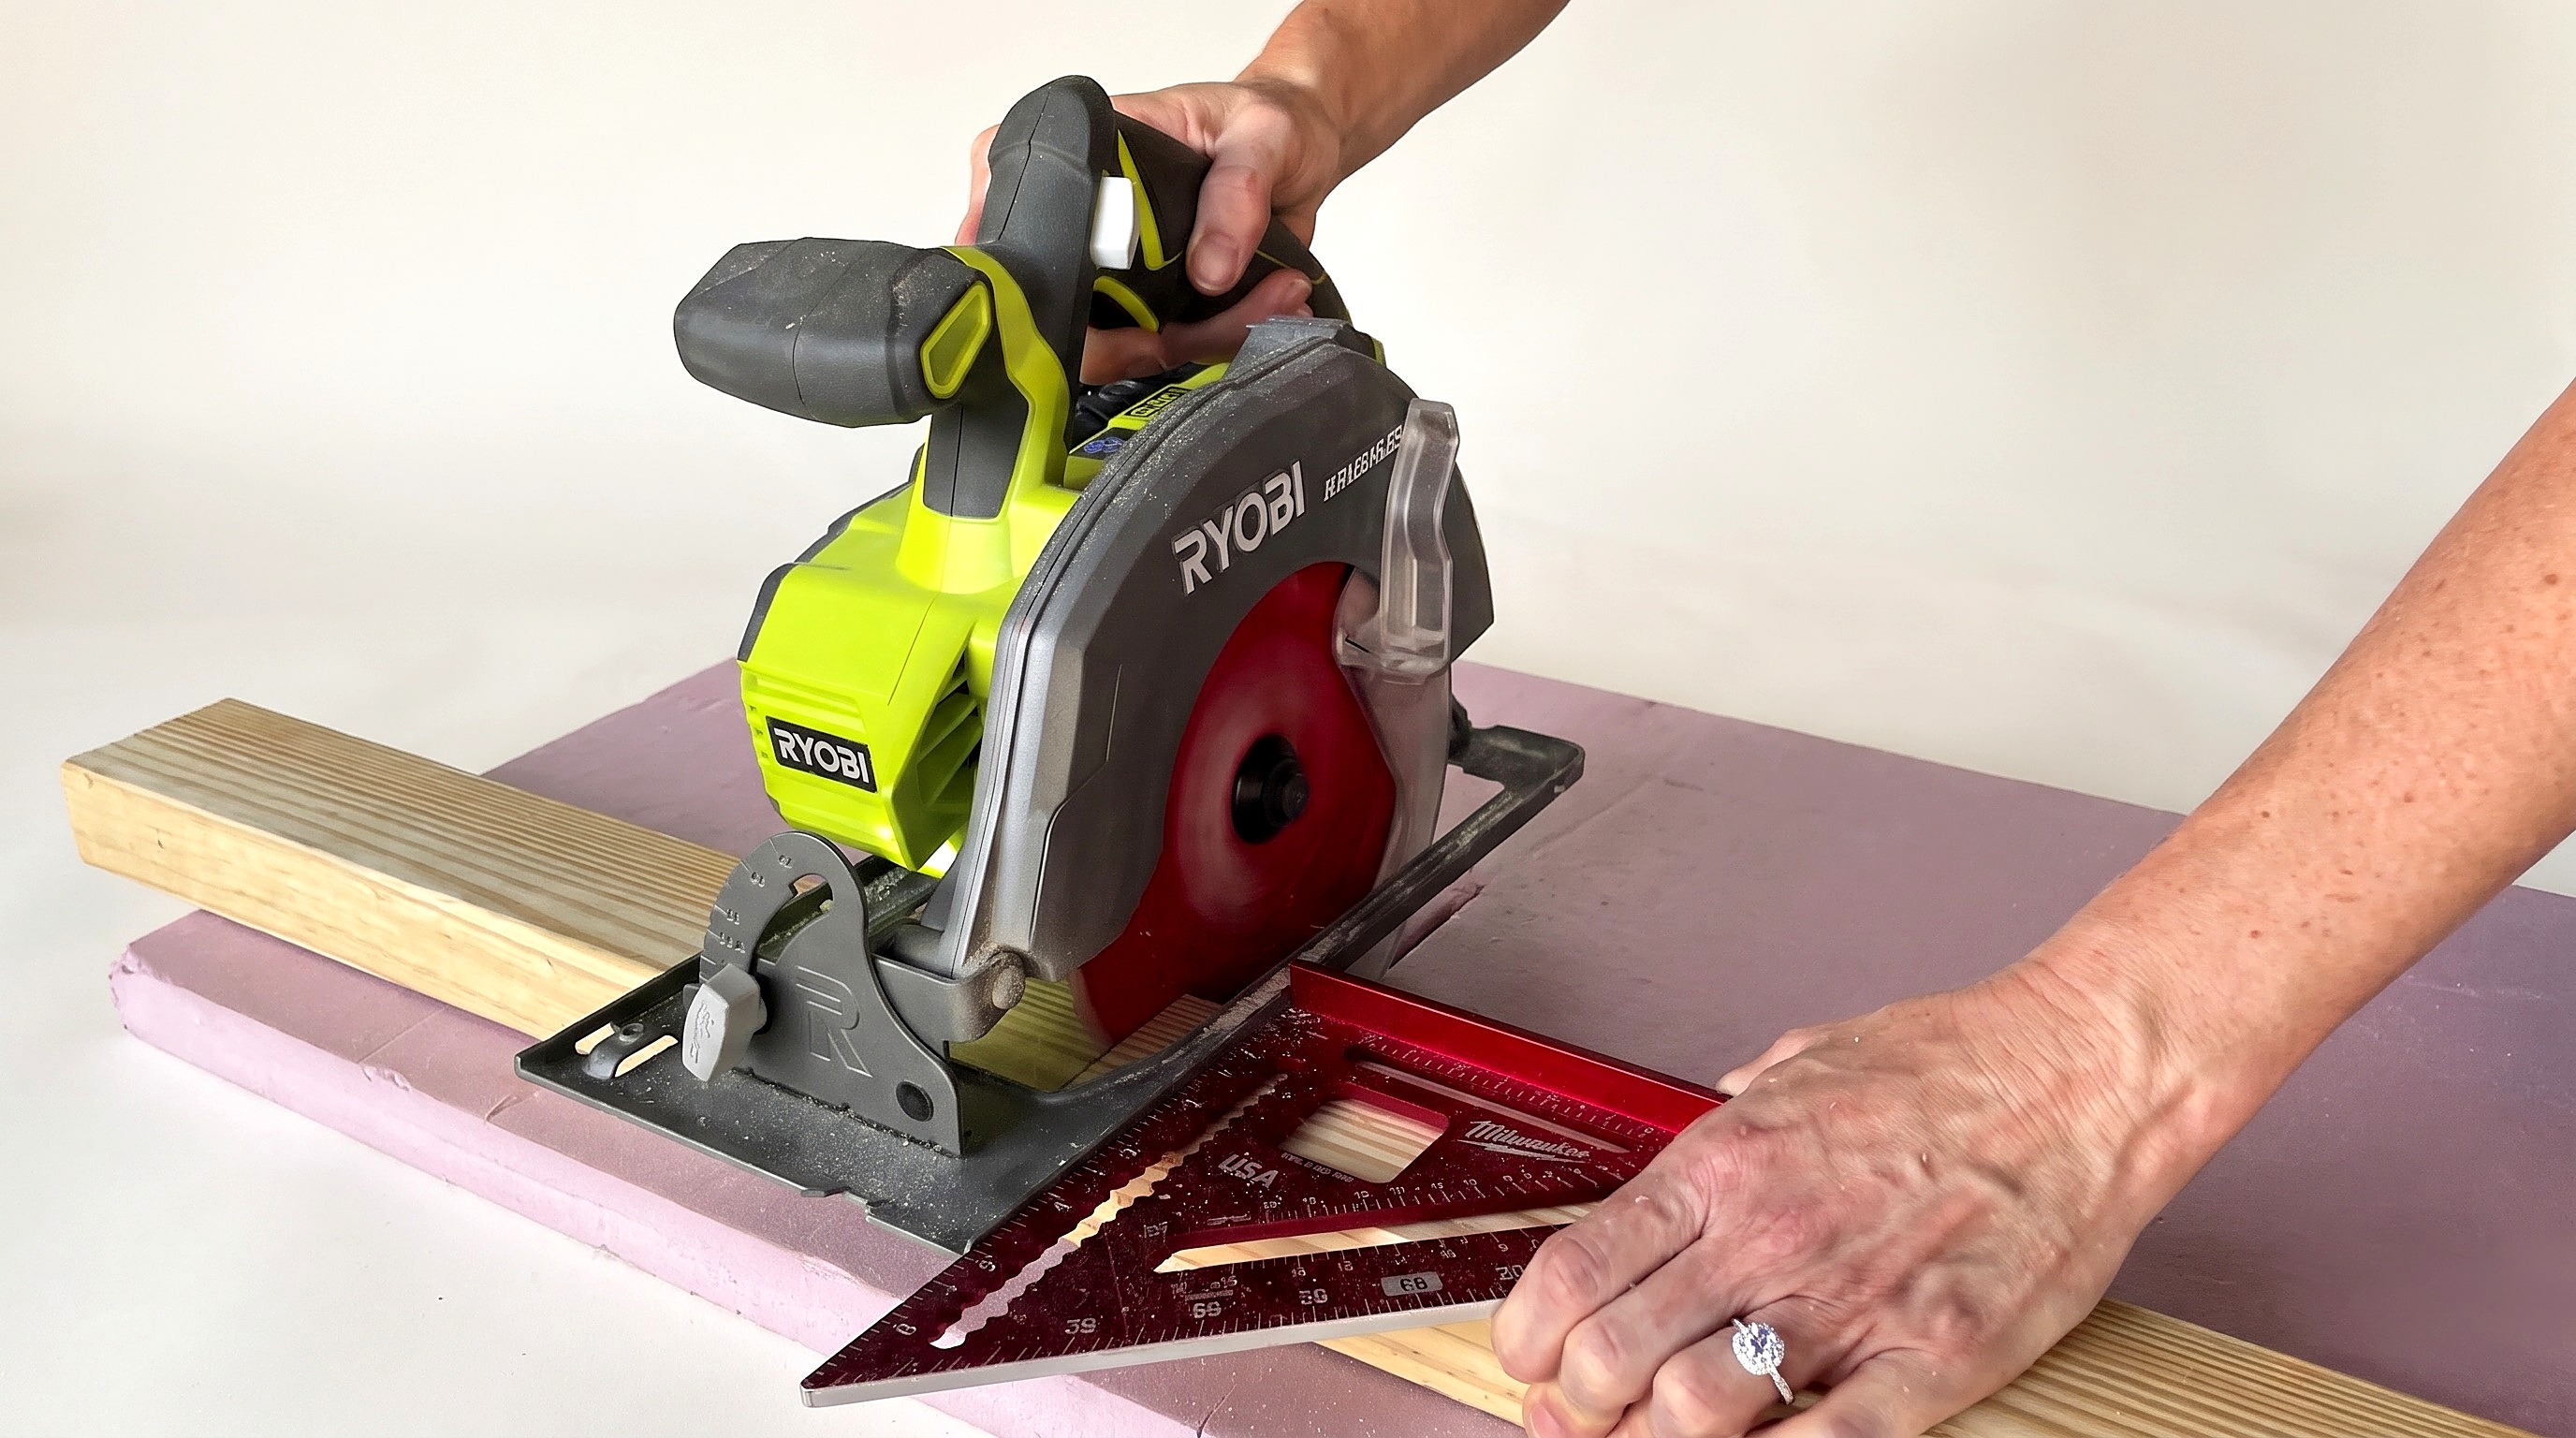
- Lay marked 2x4 and 2x3 boards flat on rigid foam insulation sheets.
- Hold the speed square on the board edge to guide the circular saw shoe.
- Crosscut 90-degree parts: rails (A, C, D, F), slats (B), posts (E), and supports (G).
- Check each piece off the cut list as you cut.
- 1.3 Cut the 45-degree miters on the top rails
- Set a miter saw to 45 degrees or guide the circular saw along the speed square.
- Cut 45-degree miters on both ends of 58-1/2 in back top rail (H).
- Cut a 45-degree miter on the back end only of each 33 in armrest (I).
- Cut the front end of each armrest (I) square at 90 degrees as a left-and-right pair.
Key measurements
- Base front and back rails (A): two 54-1/2 in 2x4 boards
- Base end rails and interior slats (B): seven 27-1/2 in 2x4 boards
- Sub-base rails (C, D, F): one 51 in 2x4, two 32 in 2x4s, one 51 in 2x3
- Vertical posts and supports (E, G): four 2x4s, nine 2x3s cut to 16 in
- Mitered top rails (H, I): one 58-1/2 in 2x3 back rail, two 33 in 2x3 armrests
- Tip: Rest boards on foam insulation sheets so the circular saw blade cuts cleanly without hitting the bench.
- Tip: Only four cuts are 45-degree angles; all others are 90 degrees.
- Heads up: Wear safety glasses when using the circular saw or miter saw.
Before you move on: Check the two 33 in armrests (I) have opposing 45-degree miters for a left-right pair.
Step 2: Assemble the Swing Base
Fasten the outer 2x4 mattress frame and five flat interior slats.
Parts in this step: (A) Base front and back rail, (B) Base end rail and interior slat
You'll need: Drill driver, Impact driver, Drill bit, Tape measure, Pencil, 2x4 boards, Exterior wood screws
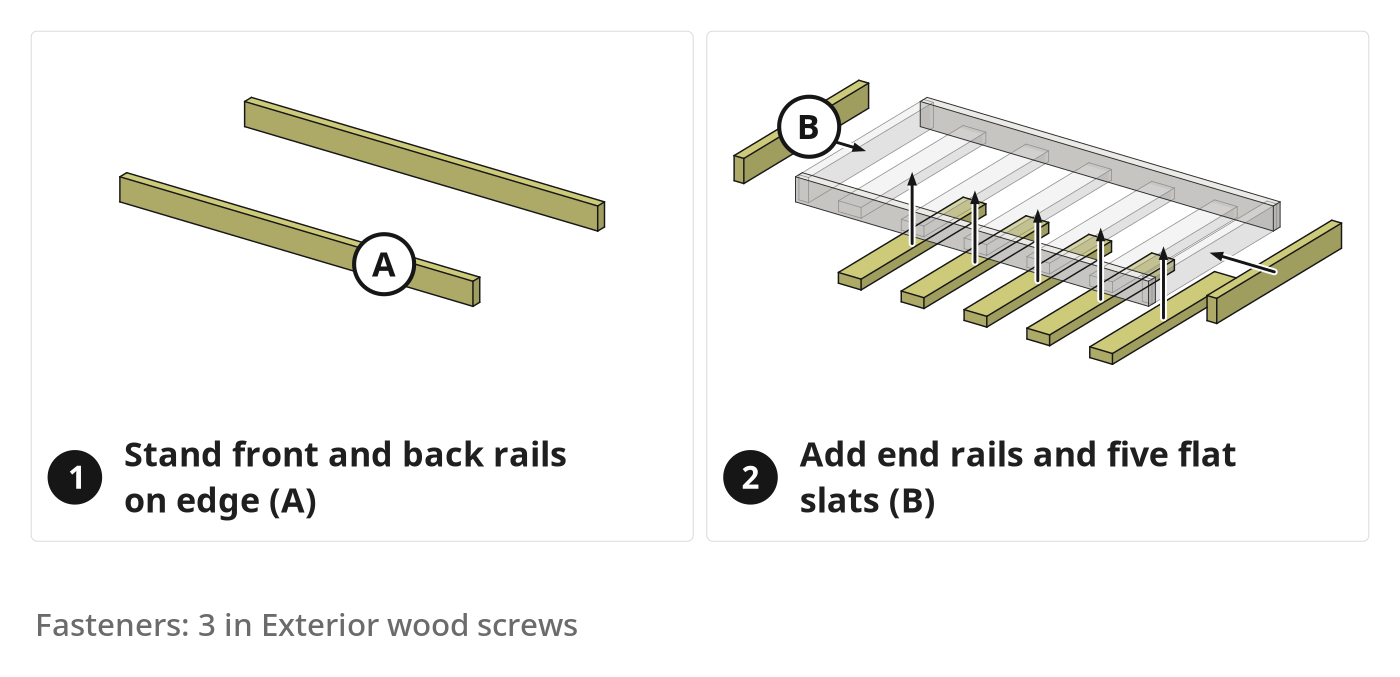
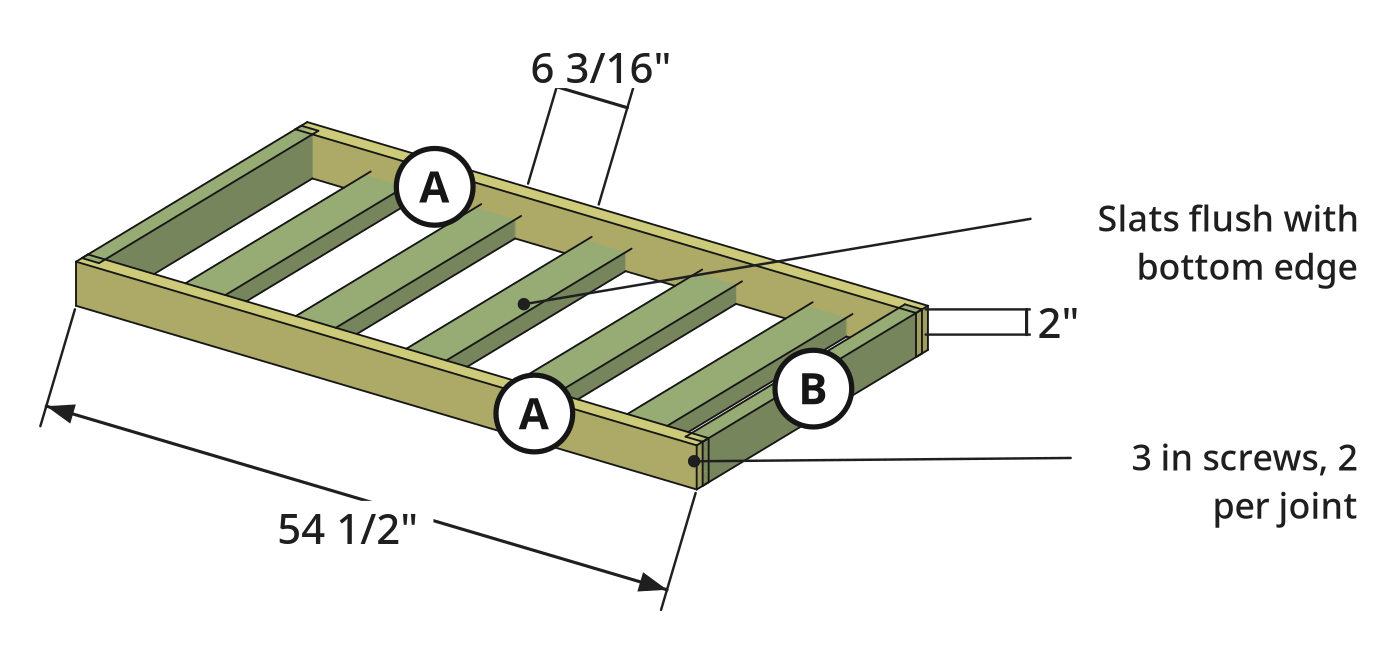
- 2.1 Assemble the outer base box
- Stand the two 54-1/2 in base front and back rails (A) on 1-1/2 in edges.
- Set two 27-1/2 in base end rails (B) on edge between rails (A) ends.
- Flush all four boards top and bottom for a 3-1/2 in tall box.
- Pre-drill two 5/32 in pilot holes and drive two 3 in screws per corner.
- 2.2 Space and secure the interior base slats
- Lay the five remaining 27-1/2 in interior slats (B) flat inside, 6-1/4 in apart.
- Flush each flat slat bottom with the bottom edge of rails (A).
- Stand the frame on edge; trace a scrap 2x4 on the outer rail over each slat.
- Pre-drill two centered pilot holes per slat end, drive 3 in screws, flip and repeat.
Key measurements
- Interior slat spacing: 6-1/4 in between 27-1/2 in slats (B).
- Mattress recess depth: 2 in lip above flat interior slats.
- Pilot hole bit size: 5/32 in twist drill bit for 3 in wood screws
- Tip: Trace a scrap 2x4 on the outer rail to center screws in the slat edge.
- Tip: Stand the base on its side to drill and drive screws straight down.
- Heads up: Do not drive screws near 2x4 slat edges without marking the slat outline first.
Before you move on: Check all five slats sit flush with the box bottom, leaving a 2 in top lip.
Step 3: Attach the Sub-Base Support Frame
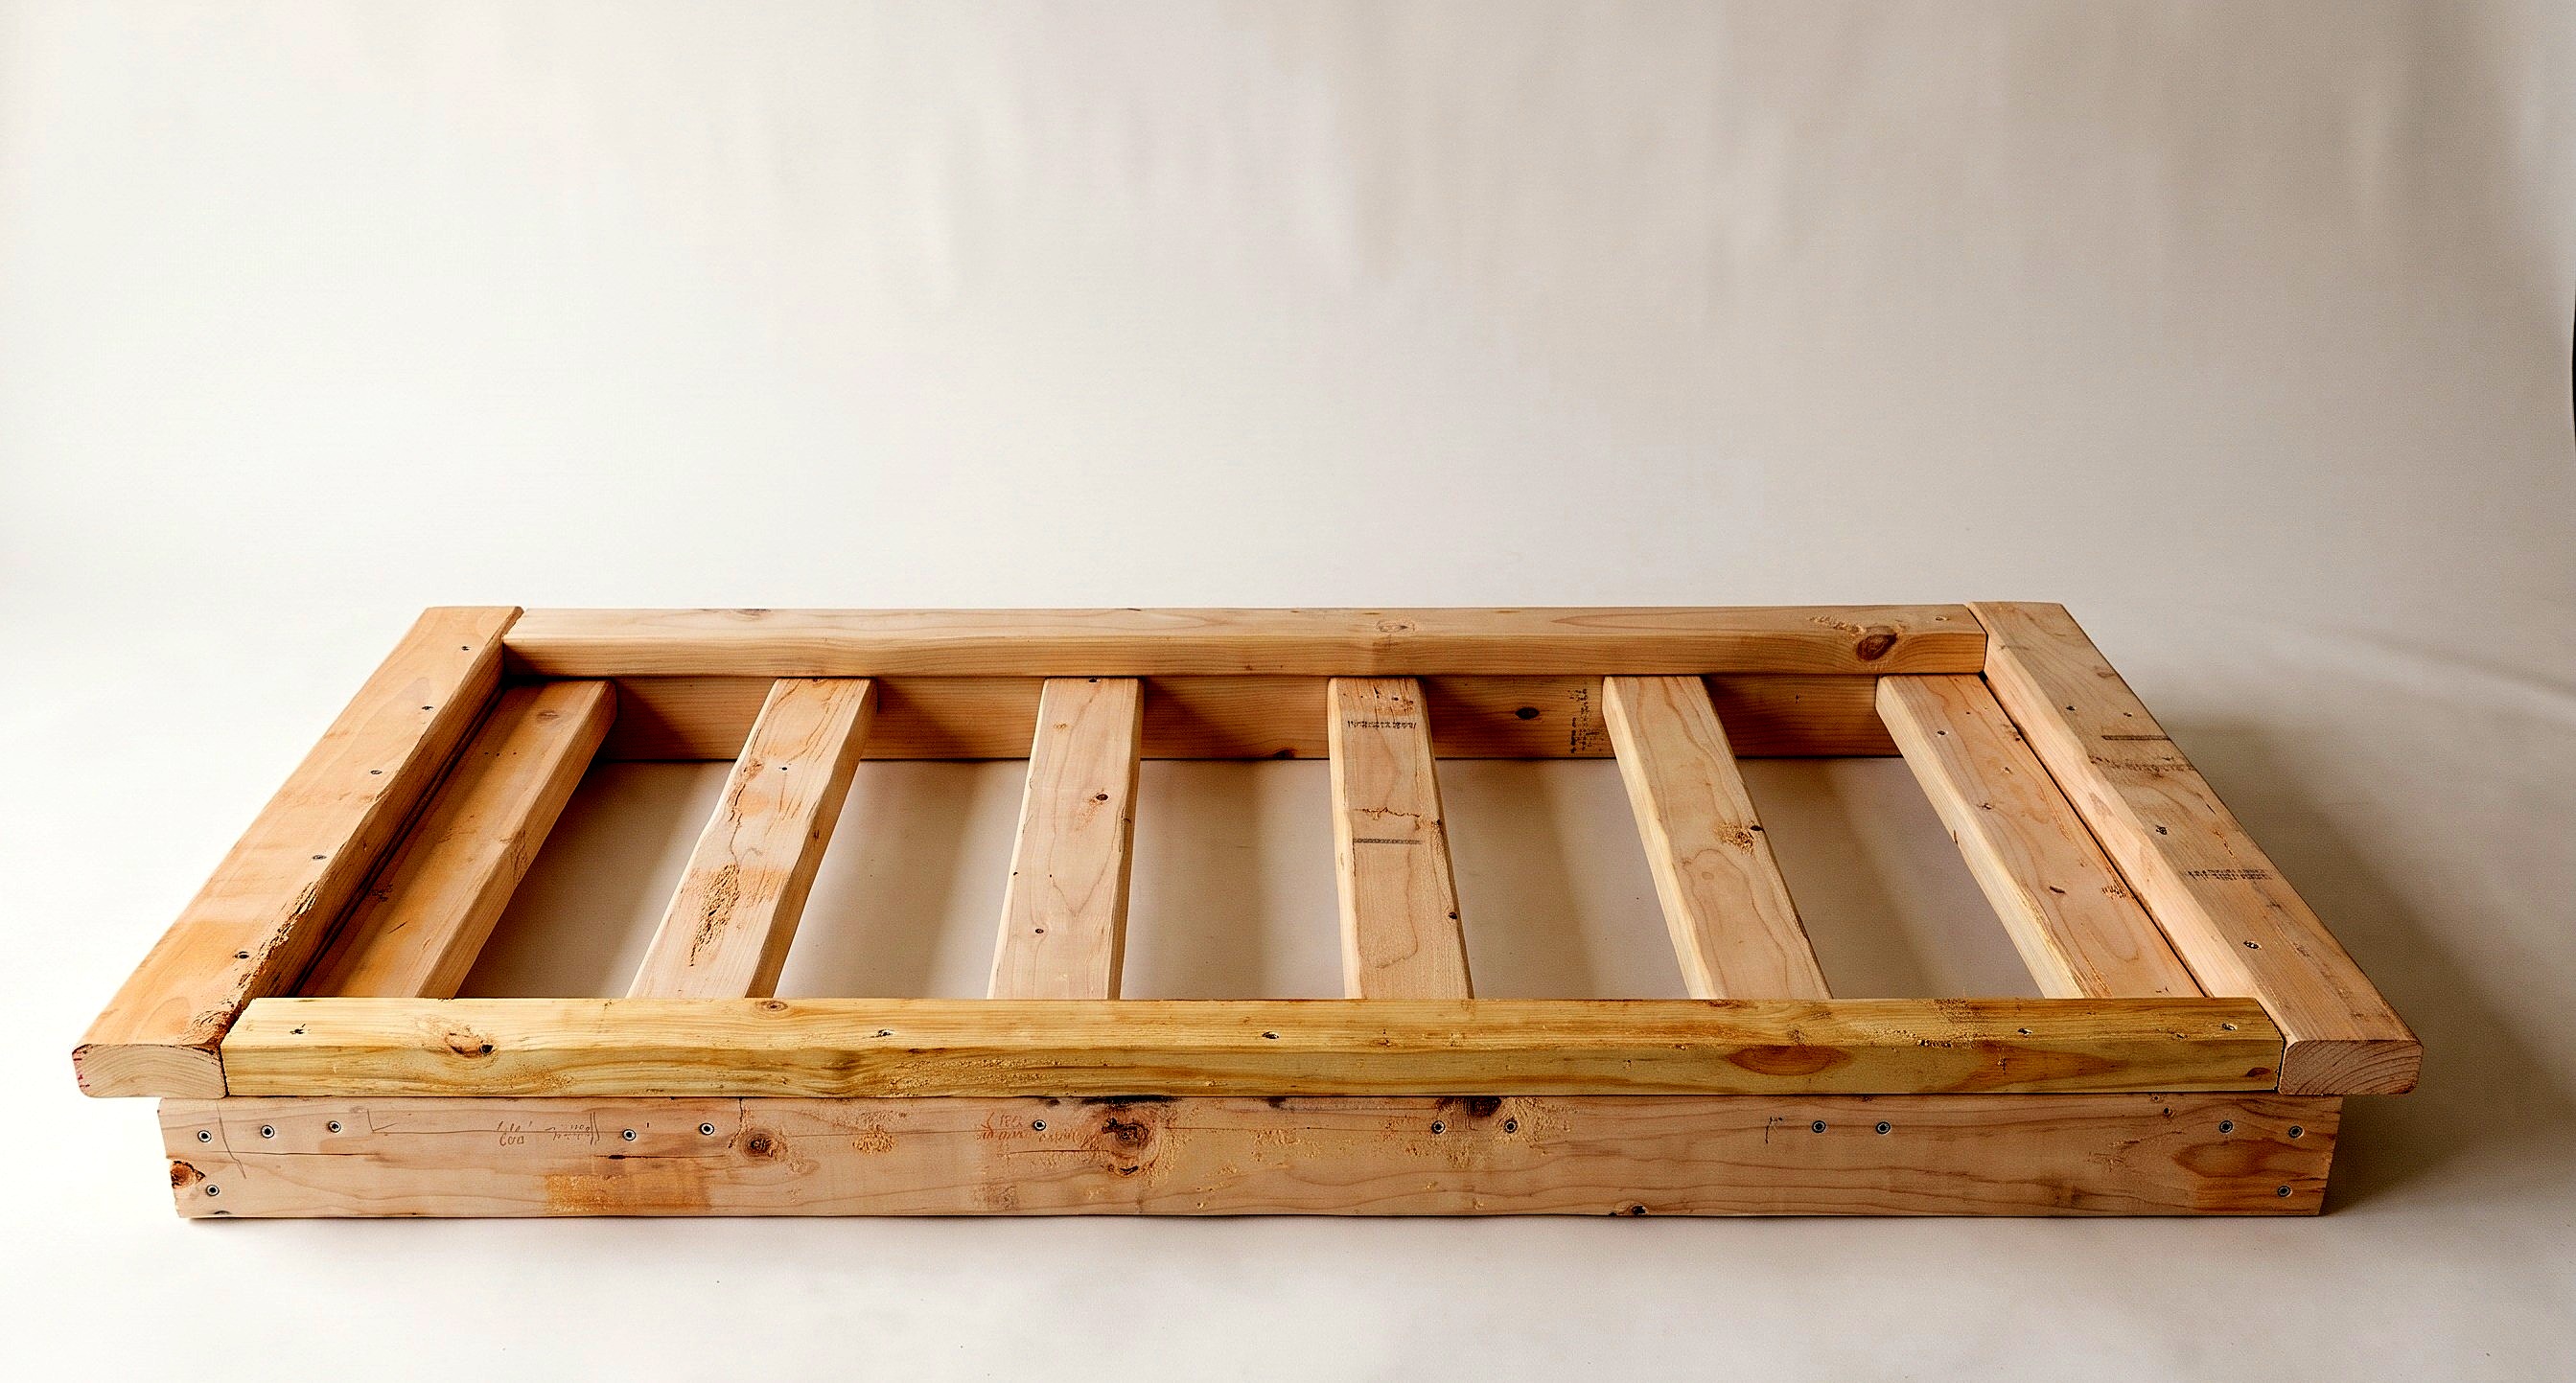
Screw the sub-base frame under the base box for an exterior ledge and interior slat support.
Parts in this step: (C) Sub-base back rail, (D) Sub-base side rail, (F) Sub-base front rail
You'll need: Drill driver, Impact driver, Drill bit, Tape measure, Pencil, 2x4 boards, 2x3 boards, Exterior wood screws
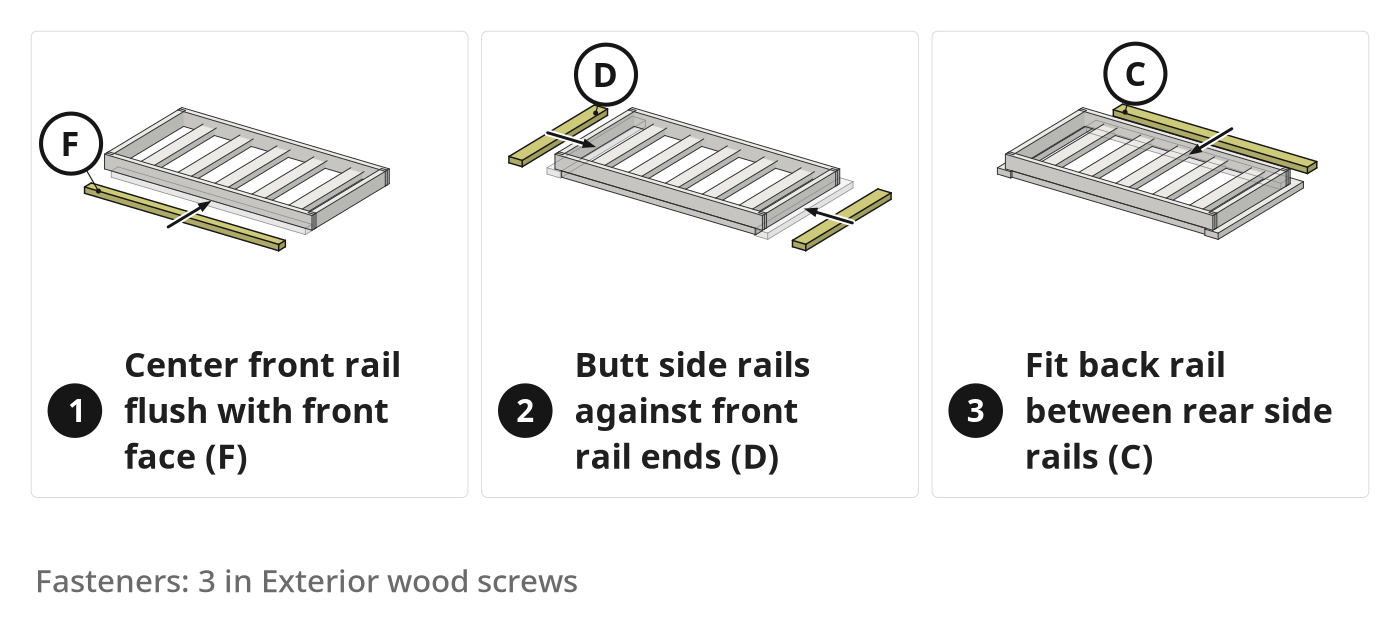
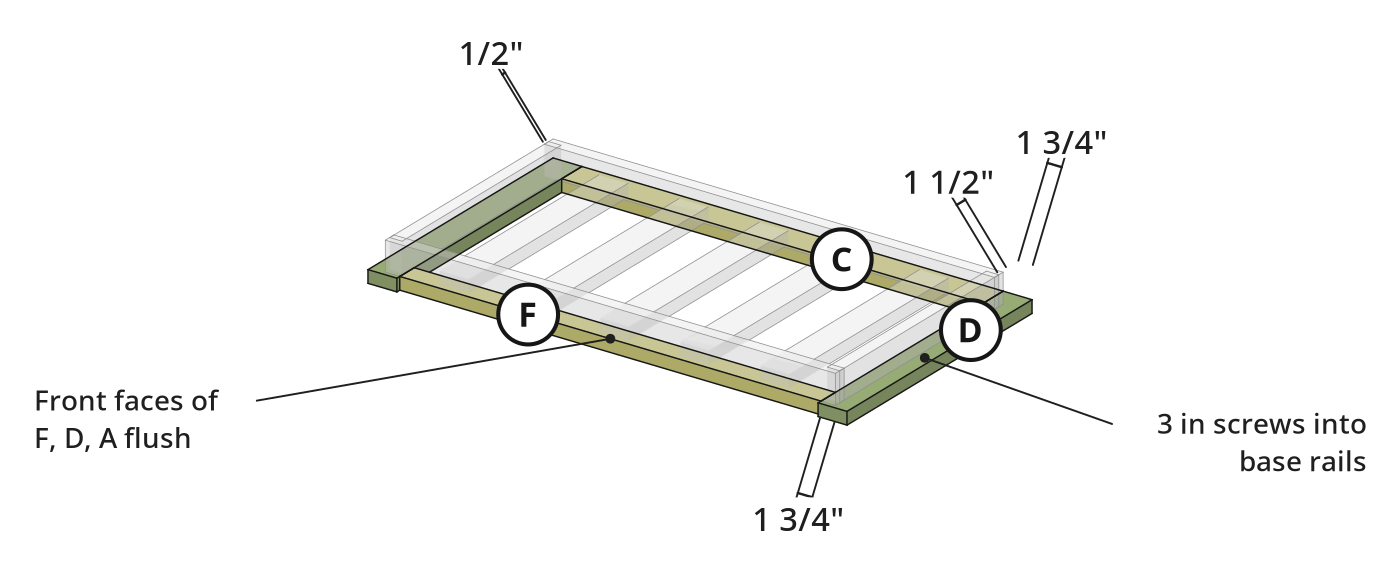
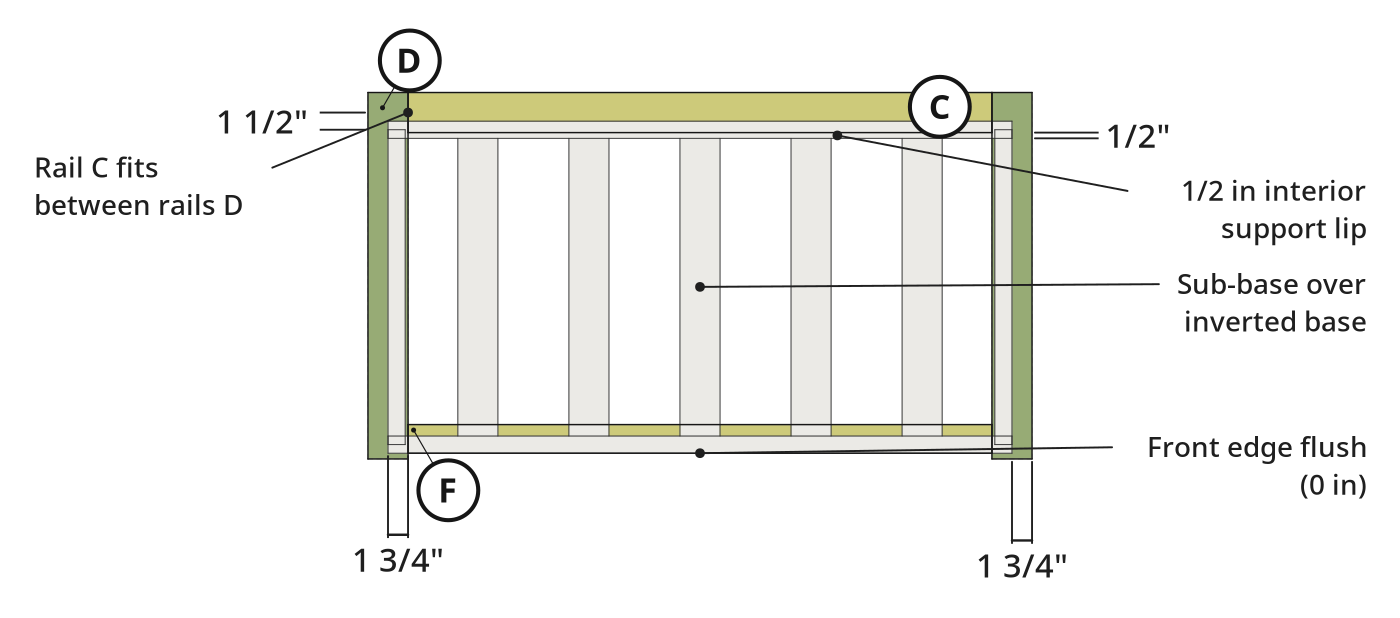
- 3.1 Attach the centered 51-inch front 2x3
- Flip the base box upside down, flat slats facing up.
- Center the 51 in sub-base front rail (F) flat on front base rail (A).
- Flush the front of rail (F) with rail (A), leaving 1-3/4 in per end.
- Pre-drill 3/4 in from the front face and drive 3 in screws into rail (A).
- 3.2 Attach the two 32-inch side 2x4s
- Lay a 32 in sub-base side rail (D) flat on each side, tight to rail (F) ends.
- Flush the front ends, leaving about a 1-3/4 in overhang outside each side and 1-1/2 in past the back.
- Prop a 16 in board under the side overhang to hold rail (D) flat while drilling.
- Pre-drill and drive 3 in screws into the base end rail, avoiding corner screws.
- 3.3 Mark and attach the 51-inch back 2x4
- Fit the 51 in sub-base back rail (C) flat between the two side rails (D) rear ends.
- Overhang rail (C) past back rail (A) by 1-1/2 in outside and 1/2 in inside.
- Hold a scrap 2x4 inside the base rail below to mark the screw line.
- Pre-drill the marked centerline and fasten rail (C) with 3 in exterior screws.
Key measurements
- Front rail end gap: 1-3/4 in per end of 51 in front rail (F).
- Exterior sub-base ledge: about 1-3/4 in on the left and right, 1-1/2 in at the back.
- Interior sub-base lip: 1/2 in overhang under slats to distribute weight.
- Tip: Prop one 16 in board under the side overhang as a flat support block while drilling.
- Tip: Transfer the hidden base rail edges onto the back sub-base board top with a spare 2x4.
- Heads up: Watch existing screw heads on the base side so you do not drill into metal.
Before you move on: Check the front sub-base rail sits flush, the sides overhang about 1-3/4 in and the back 1-1/2 in.
Step 4: Install the Vertical Rail Supports
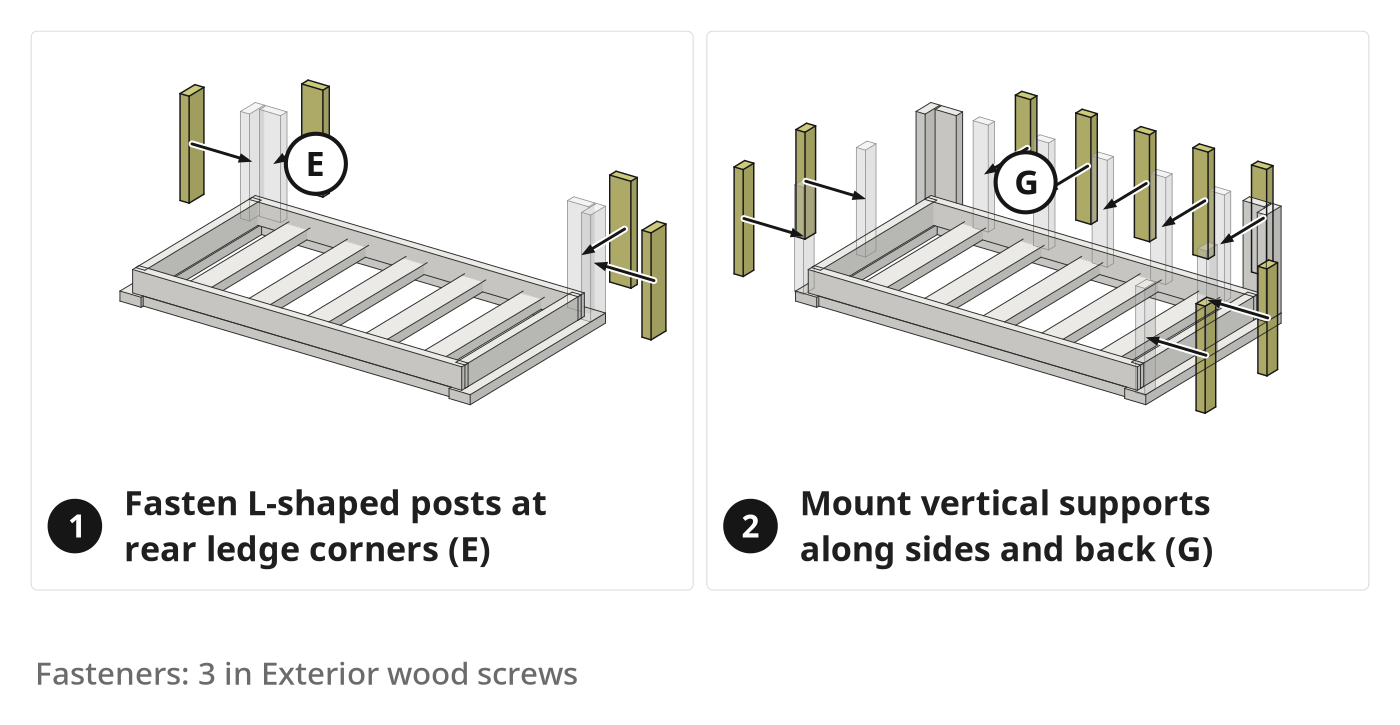
Fasten four L-shaped corner posts and nine vertical rail supports around the sub-base ledge.
Parts in this step: (E) Back corner post, (G) Vertical rail support
You'll need: Drill driver, Impact driver, Drill bit, Tape measure, Pencil, 2x4 boards, 2x3 boards, Exterior wood screws
- 4.1 Flip base right-side up and inspect ledge
- Flip the base right-side up, sub-base flat on the floor.
- Check the exterior ledge on the left, right, and back (about 1-3/4 in at the sides, 1-1/2 in at the back).
- Check the interior sub-base overhang sits under mattress slats (B).
- 4.2 Attach the back corner 2x4 posts and side 2x3 supports
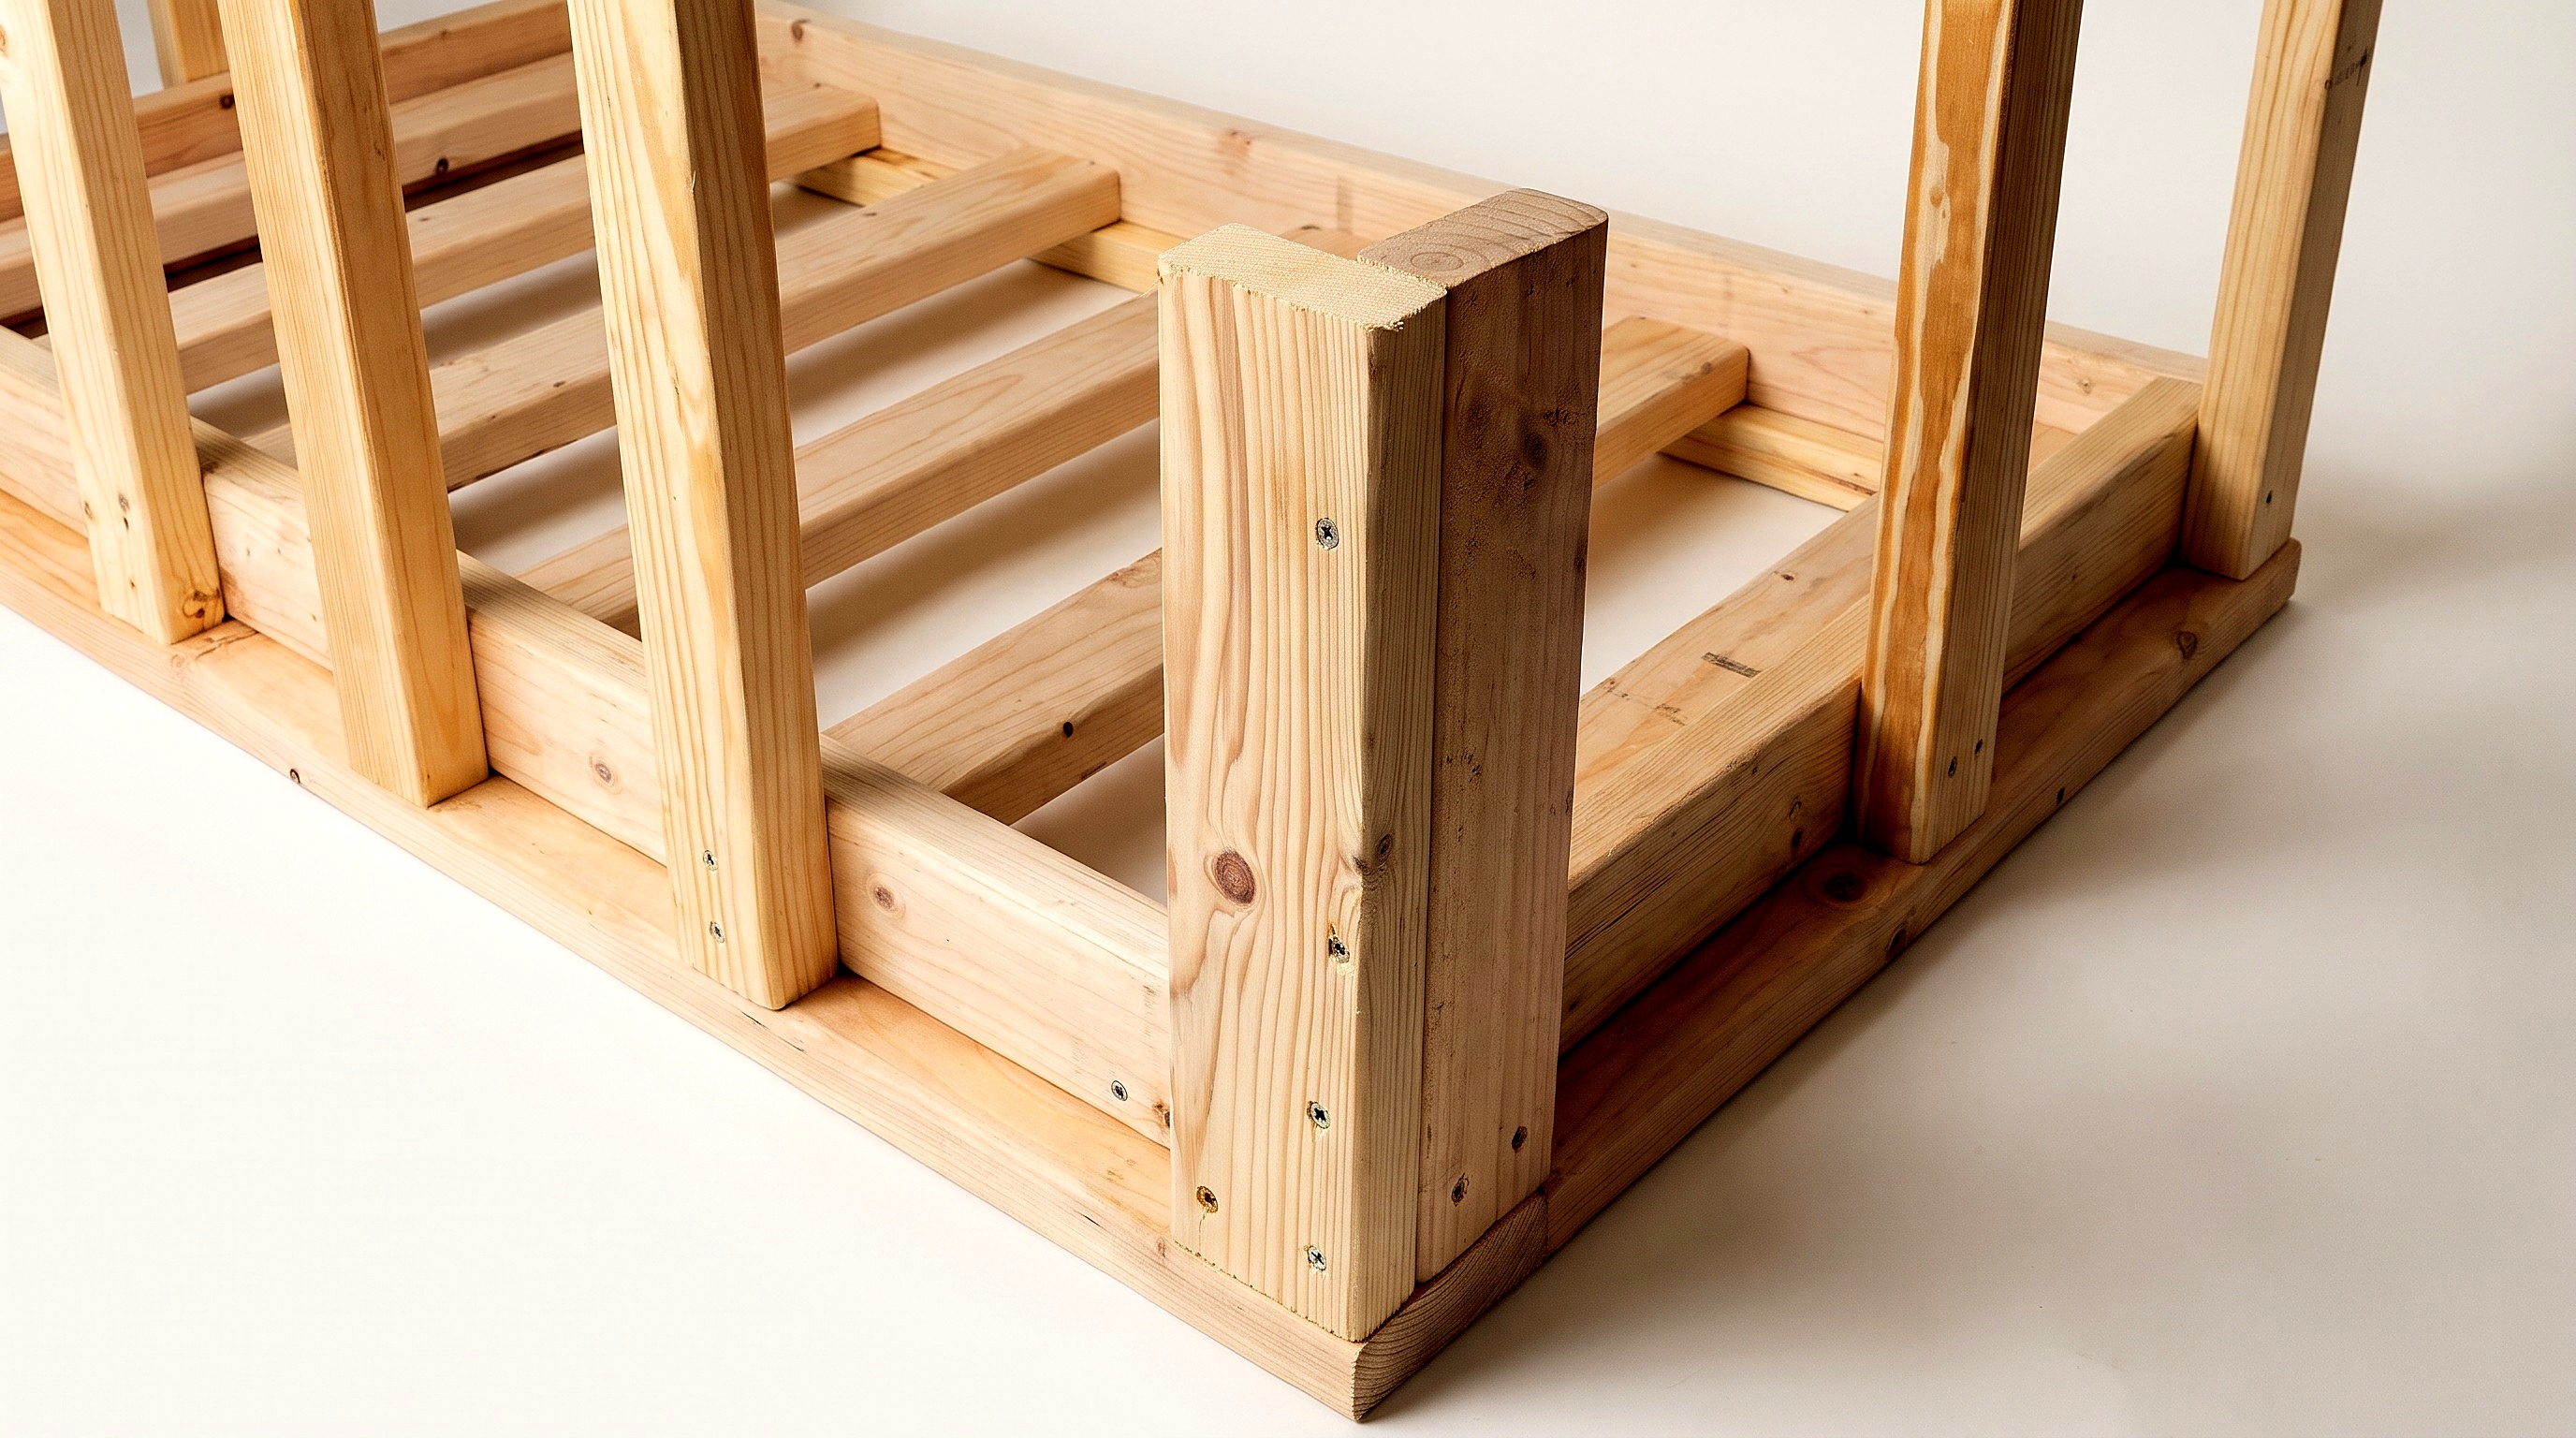
- Set one 16 in back corner post (E) flush on each rear ledge corner.
- Butt a second post (E) against the first's front in an L-shape.
- Drive two 3 in screws at each base and two joining the posts.
- Mount two 16 in vertical rail supports (G) per side: front-flush and centered.
- 4.3 Attach the five back 2x3 vertical rail supports
- Align five 16 in supports (G) with slats (B) along the back ledge.
- Pre-drill the top base hole; drive one 3 in screw to lock alignment.
- Pre-drill below the first hole and drive a second 3 in screw.
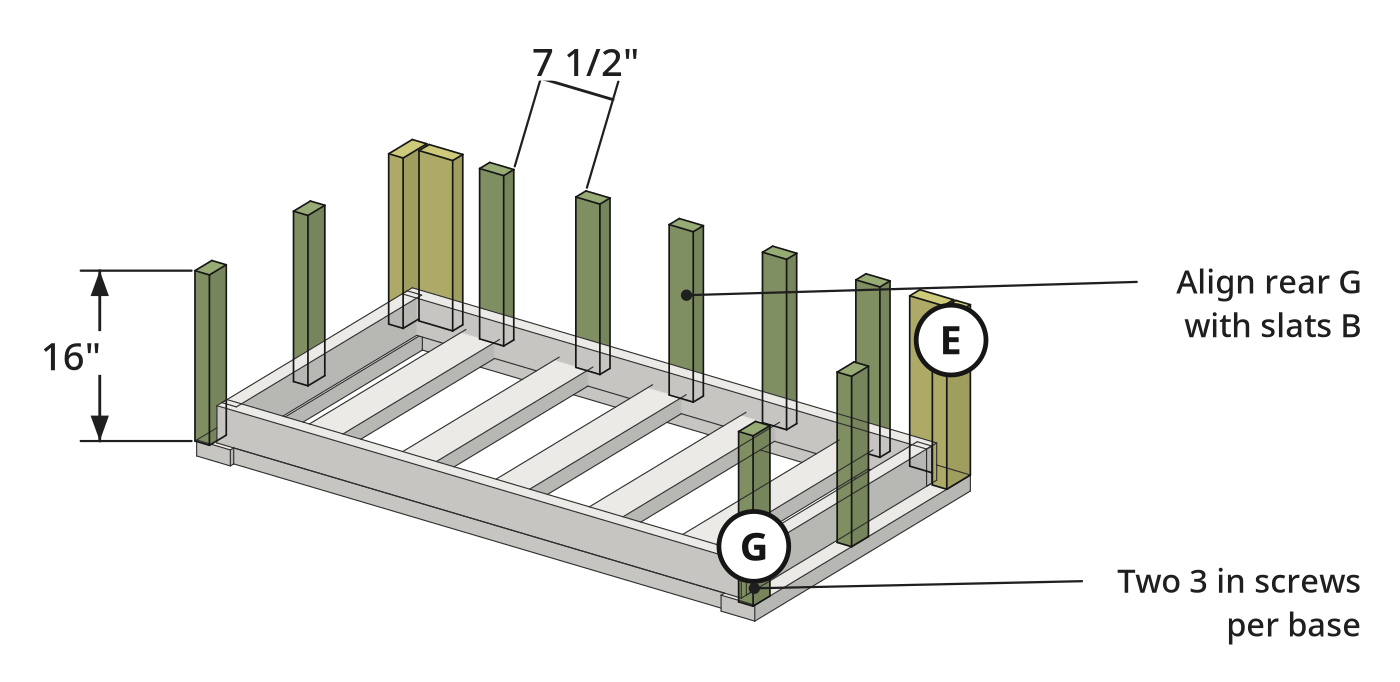
Key measurements
- Vertical rail support height: 16 in for four 2x4 posts (E) and nine 2x3 supports (G).
- Back vertical support spacing: about 7-1/2 in, aligned with interior slats.
- Tip: Pre-drill and drive each back support's top base screw first so it stays vertical for the second.
- Tip: Align the five back supports and five interior slats for even spacing.
- Heads up: Keep the upper screw joining the corner posts (E) down from the top end so top rail screws do not hit it.
Before you move on: Check all 13 vertical posts and supports stand plumb and flush at 16 in.
Step 5: Attach the Top Rails, Armrests, and Front Trim
Mitered back rail and armrests cap the vertical supports; 1x4 fascia covers the front screws.
Parts in this step: (H) Back top rail, (I) Armrest, (J) Front fascia trim
You'll need: Speed square, Circular saw, Drill driver, Impact driver, Drill bit, Pencil, 2x3 boards, 1x4 board, Exterior wood screws
- 5.1 Attach the mitered 58-1/2 inch back top rail
- Set the 58-1/2 in back top rail (H) flat on the rear supports.
- Align each miter's inside corner with the back post (E) inside corner.
- Drive two 3 in screws per corner post and one per back support.
- 5.2 Attach the left and right 33-inch armrests
- Set 33 in armrests (I) flat on the side supports and corner posts.
- Flush the rear miter against rail (H) and flush the front end.
- Drive two 3 in screws at the rear corner, one per side support.
- 5.3 Measure, cut, and install the 1x4 front trim
- Tip the swing on its back; lay the 1x4 front fascia trim (J) across the front.
- Set one end side-flush and mark the other end flush.
- Cut trim (J) square with a speed square and circular saw.
- Pre-drill and screw trim (J) across the front with 3 in exterior screws.
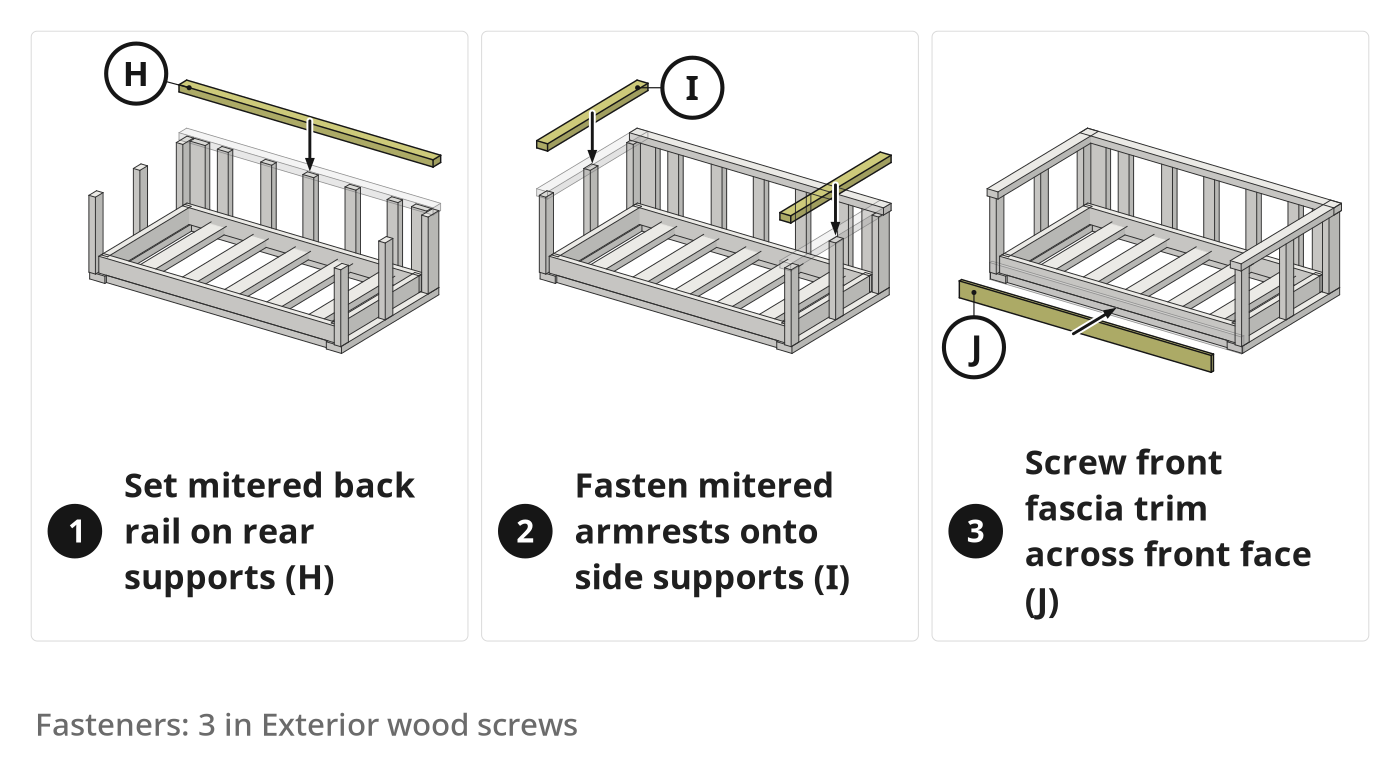
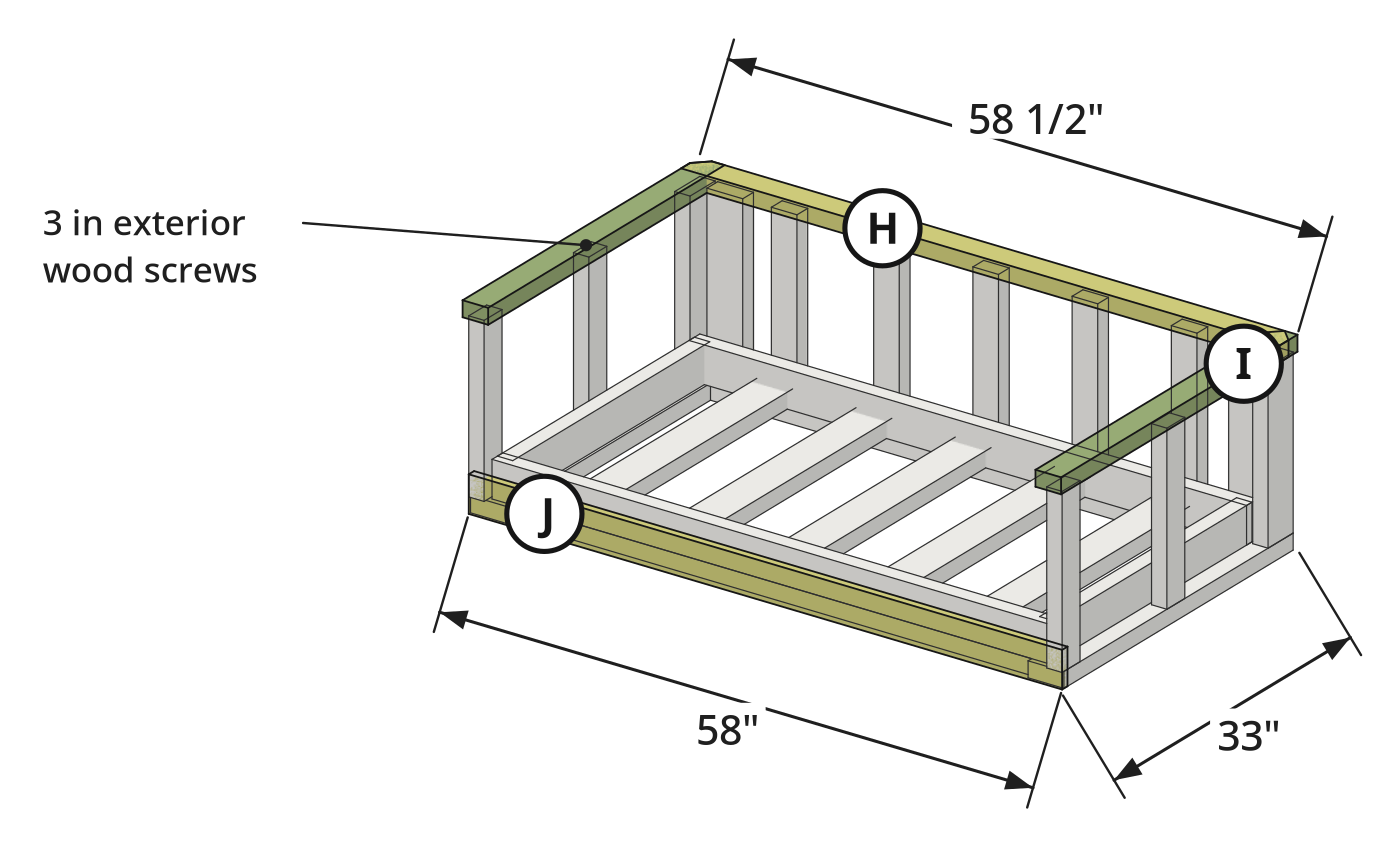
Key measurements
- Back top rail length: 58-1/2 in, mitered 45 degrees both ends.
- Armrest length: 33 in, mitered 45 degrees at the rear.
- Front fascia trim length: about 58 in, scribed flush across the front.
- Tip: Overhang the outer edge of top rail (H) slightly so the 45-degree miter meets the corner post cleanly.
- Tip: Mark the 1x4 front trim against the swing before cutting for a flush fit.
Before you move on: Check both rear 45-degree miters close tight and the 1x4 front trim covers all front screw heads.
Step 6: Drill Rope Holes, Fill, and Paint
Bore eight 7/8-inch rope holes through the armrests and sub-base, then fill, sand, and paint the frame.
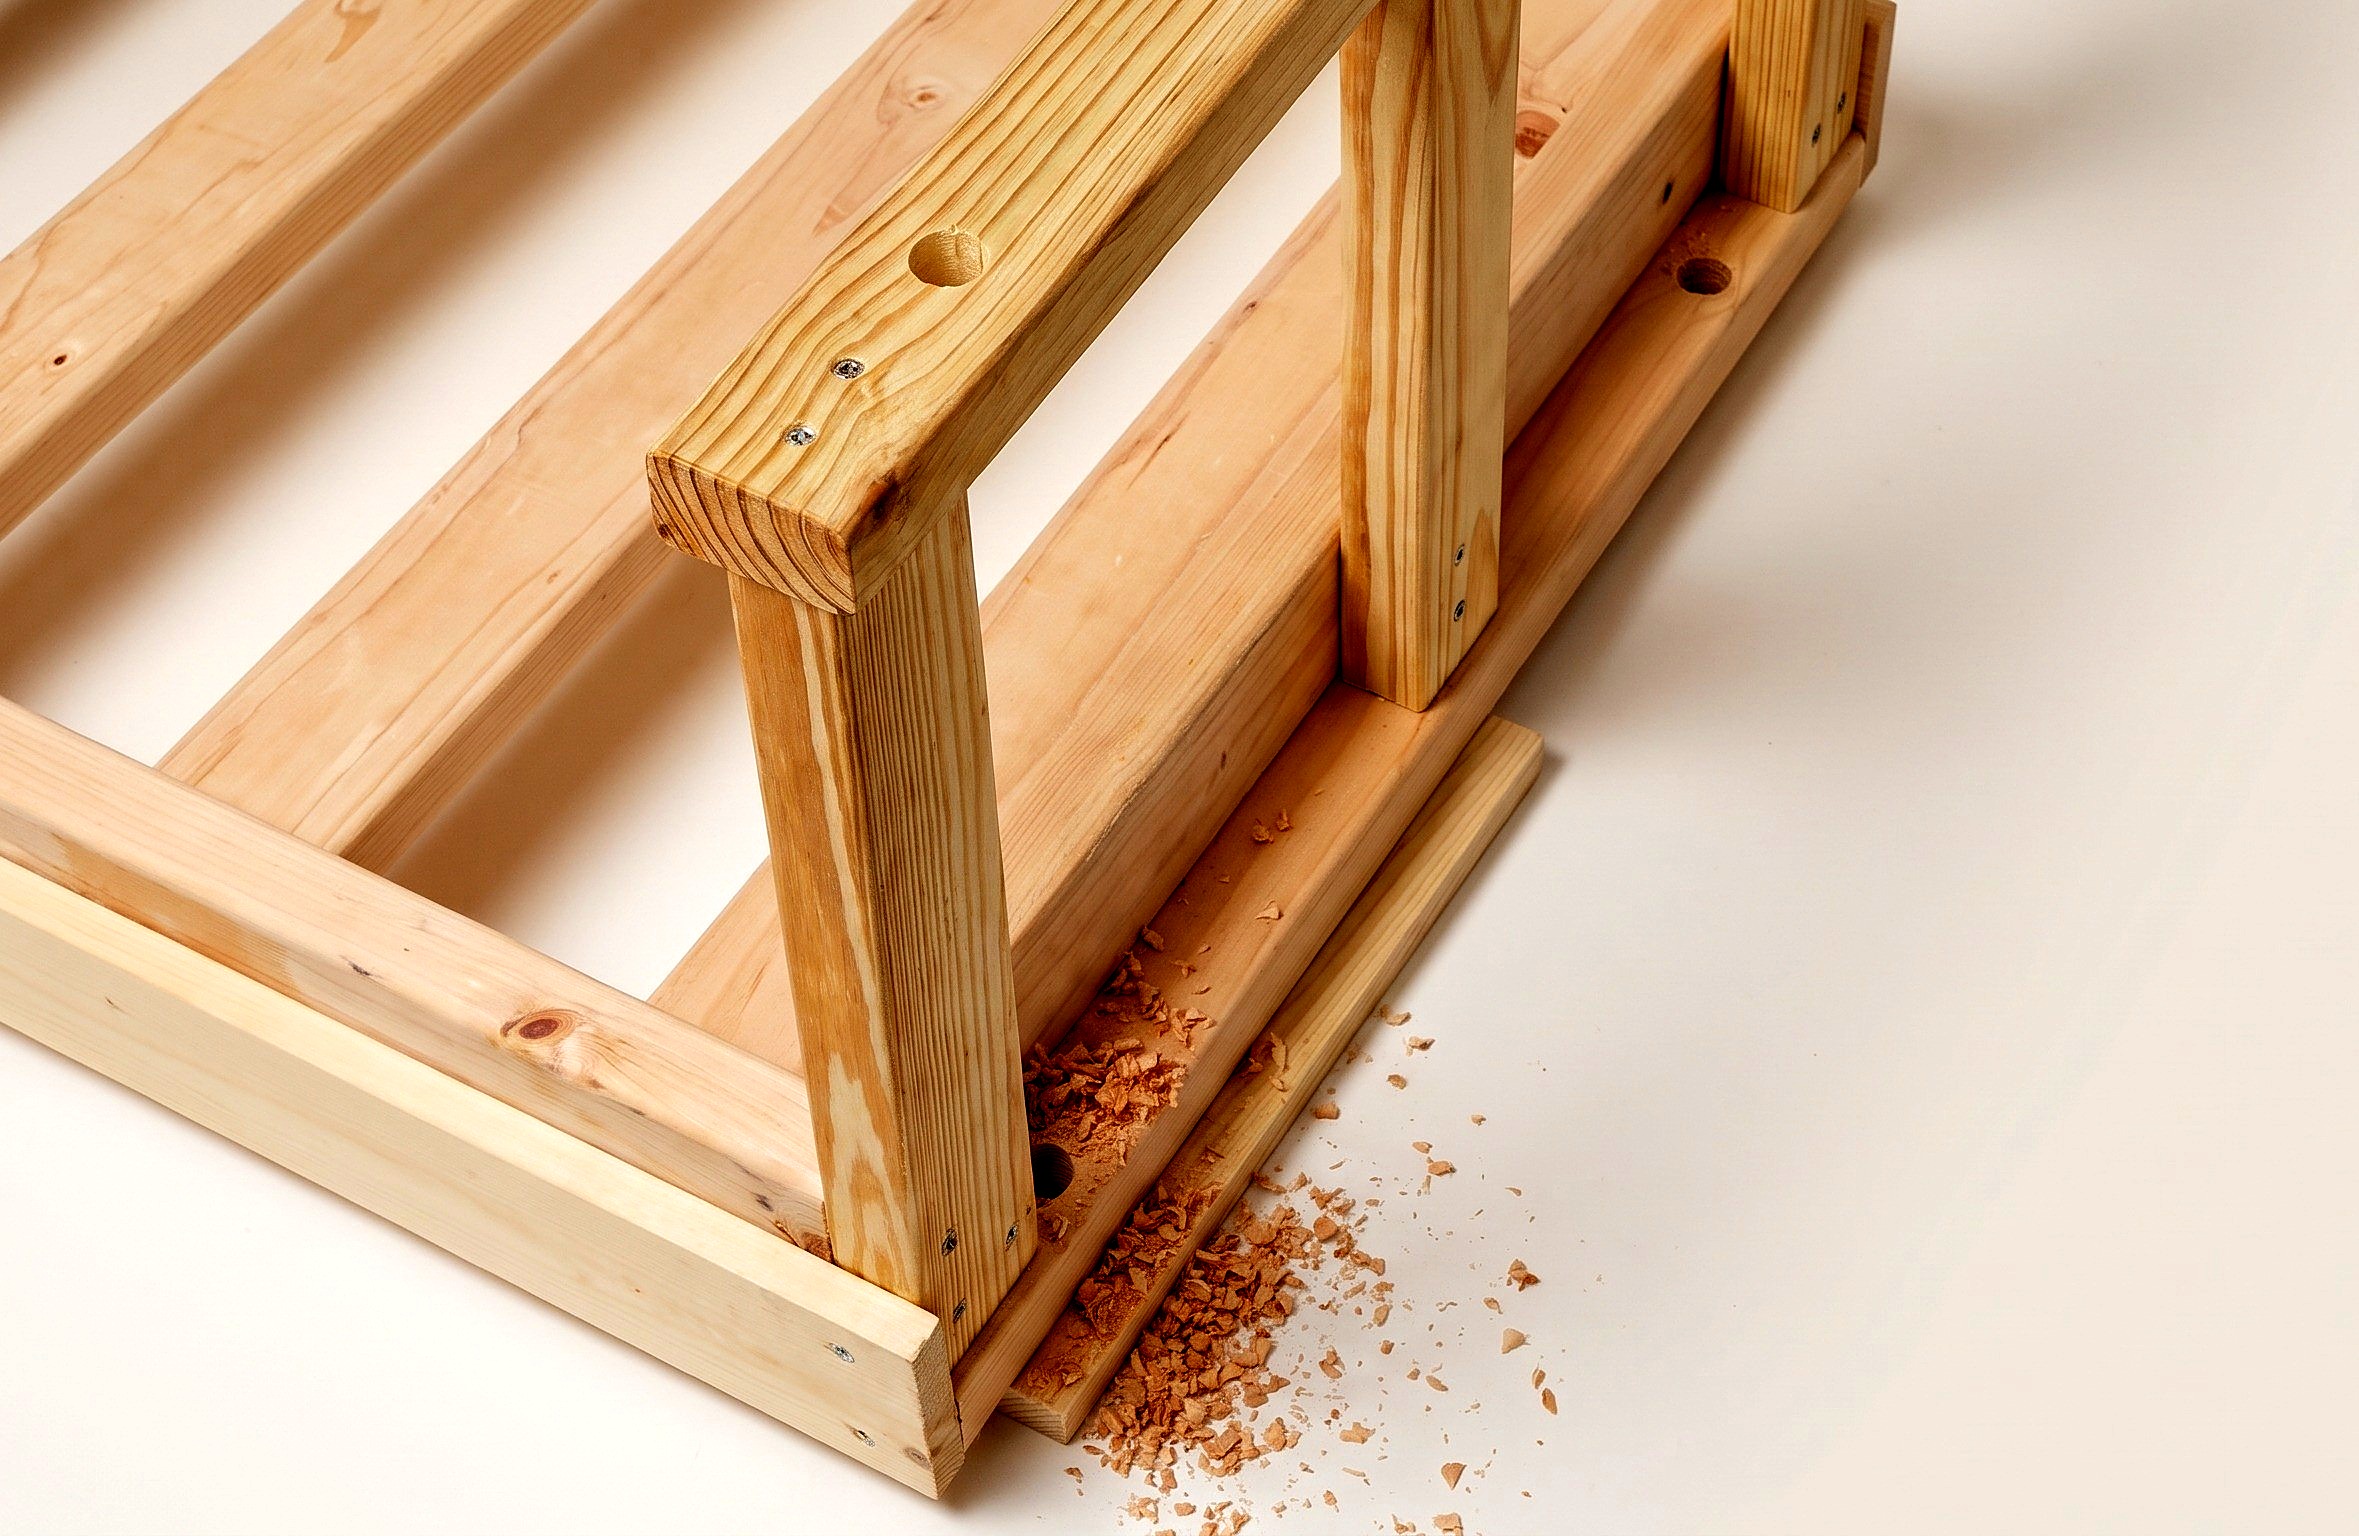
Parts in this step: (D) Sub-base side rail, (I) Armrest
You'll need: Drill driver, Forstner bit, Tape measure, Sanding sponge, Pencil, Paintbrush, Exterior wood filler, Exterior paint or stain
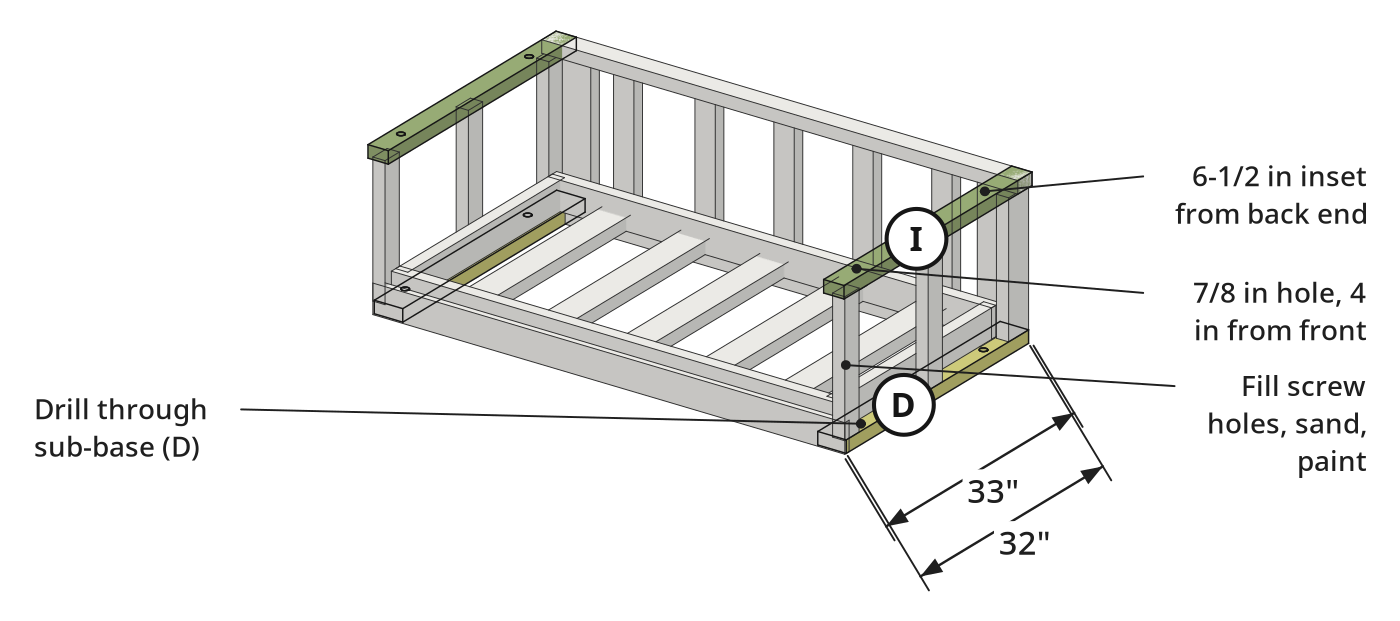
- 6.1 Bore 7/8-inch rope holes through armrests and sub-base
- Mark armrests (I) 4 in from front and 6-1/2 in from back.
- Mark sub-base side rails (D) directly below the armrest marks.
- Set a scrap board under each sub-base side rail (D) to prevent exit tear-out.
- Bore straight through the eight marks with a drill and 7/8 in Forstner bit.
- 6.2 Fill screw holes, sand, and apply exterior finish
- Fill exposed screw holes and seams with exterior wood filler.
- Sand dry wood filler smooth with a sanding sponge.
- Coat the frame in exterior paint or stain with a paintbrush.
Key measurements
- Rope hole diameter: 7/8 in bored with a Forstner bit
- Front rope hole inset: 4 in back from armrest and sub-base front edges
- Rear rope hole inset: 6-1/2 in forward from armrest and sub-base back edges
- Tip: Back the sub-base ledge bottom with a scrap board when drilling with the Forstner bit to protect the floor.
- Heads up: Wear safety glasses when boring 7/8 in rope holes and sanding wood filler.
Before you move on: Before hanging, check all eight 7/8 in holes are clean through-holes and the exterior paint is dry.
Step 7: Mount Eye Screws and Hang the Swing
Four heavy-duty eye screws in the ceiling joists hang the swing level on Manila ropes.
Parts in this step: (B) Base end rail and interior slat, (D) Sub-base side rail, (I) Armrest
You'll need: Drill driver, Drill bit, Stud finder, Adjustable wrench, Pencil, Crib mattress and cover, Heavy-duty eye screws, Heavy-duty S-hooks, Manila rope
- 7.1 Locate ceiling joists and install four heavy-duty eye screws
- Find and mark the ceiling joist centers for the four hanging points.
- Pre-drill pilot holes straight up into the marked joist centers.
- Thread 3/8 in x 4-7/8 in heavy-duty eye screws into the pilot holes.
- Turn each screw fully home with an adjustable wrench through the eye loop.
- 7.2 Thread the Manila rope under the swing and hang from S-hooks
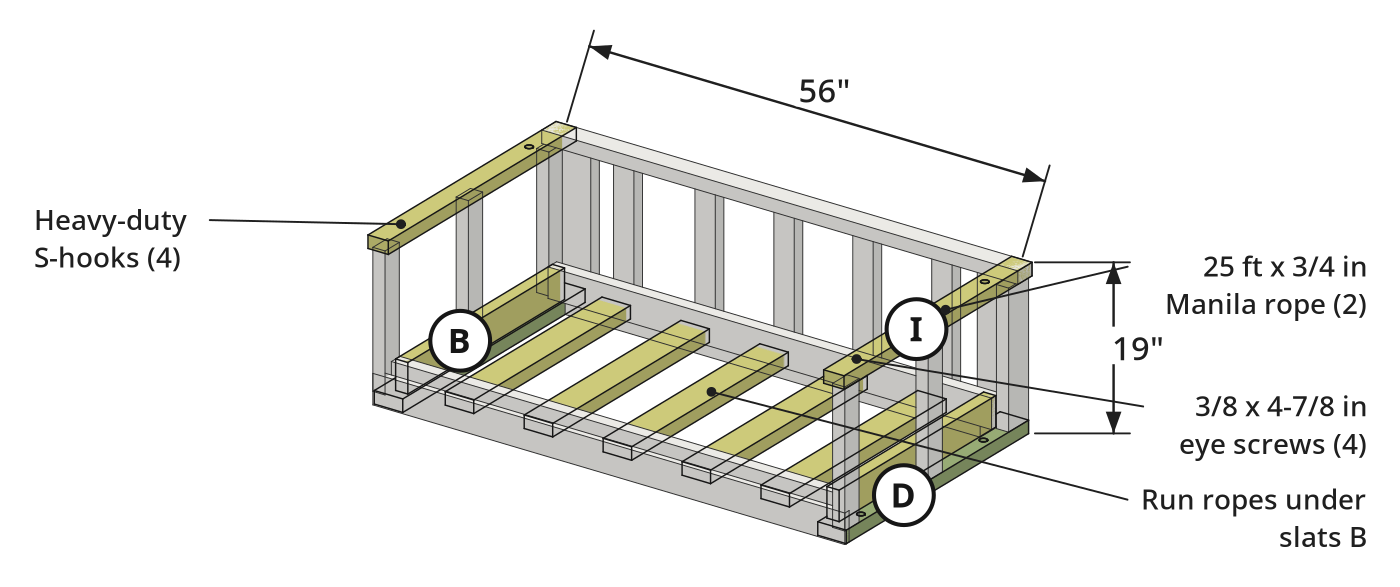
- Cut the 50 ft Manila rope into two 25 ft lengths.
- Run one rope down the front-left holes, under slats (B), up the front-right.
- Run the second rope down the back-left, under the slats, up the back-right.
- Knot all four ends to S-hooks, level the swing, and put the mattress inside.
Key measurements
- Eye screw specs: 3/8 in x 4-7/8 in, rated 325 lb per screw in solid joists
- Rope lengths: two 25 ft pieces cut from a 50 ft roll of 3/4 in Manila rope
- Tip: Run each rope continuously under the swing slats from left to right for easy leveling.
- Tip: Tie the two parallel ropes together at the center under the slats to prevent spreading.
- Heads up: Anchor all four eye screws into structural ceiling joist centers before sitting on the swing.
Before you move on: Verify all four eye screws are fully threaded into solid joists and the swing hangs level before use.
Finishing
Filling and Sanding
- Pack exterior wood filler into countersunk screw holes and miter joints.
- Once dry, sand filled spots and board edges smooth with a sanding sponge.
Exterior Finish
- Brush exterior paint evenly on the frame, including underside slats and sub-base.
- Let the coating dry before threading the 3/4 in Manila rope.
Alternatives
- Use exterior wood stain instead of exterior paint for a natural wood look.
- Substitute heavy-duty hanging chains for 3/4 in Manila rope if preferred.
These Specs are built from EmyLuDesigns's video “Crib Mattress Porch Swing”. Open the Crib Mattress Porch Swing project page.
