Spetz Specs No. 6325: step-by-step surface & covering guide
Porcelain Tile Patio with Contrasting Border and Recessed Drain Covers
The complete step-by-step guide made from Tidybricks patio restore's YouTube video, free on Spetz. For the video, a step-by-step player and answers to your questions, see the Porcelain Tile Patio with Contrasting Border and Recessed Drain Covers project page.
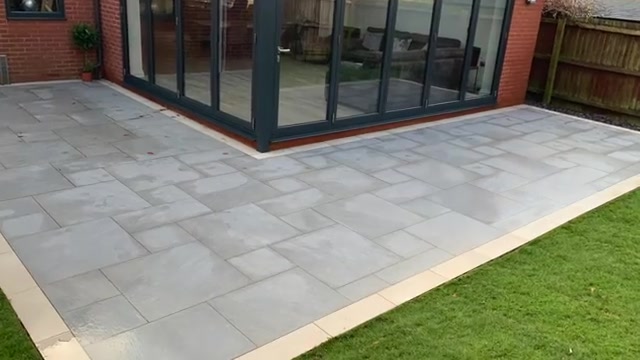
8 steps, 3 parts, 15 tools, 10 materials
Overview
Finished size: Patio spanning approximately 2.7m out from the house wall
Surface and covering
- Cover an excavated footprint 2.7m out from the house wall.
- Frame multi-size grey porcelain patio tiles (A) in 200mm ivory porcelain border tiles (B).
- Inset recessed manhole covers (C) flush with the slabs to hide drain chambers.
Why do it yourself
- Build a 100mm compacted sub-base and full mortar bed to stop winter frost heave.
- Prime non-porous slab undersides so tiles lock to the semi-dry bed.
- Inlay porcelain cutouts over inspection chambers instead of exposed cast-iron lids.
What it takes
- Use a plate compactor, wet tile rail saw, angle grinder, paddle mixer and pressure washer.
- Cure drain-frame mortar overnight before standing on slabs to cut inlays.
- Grouting continuously, clear excess slurry before the 30-minute set.
What decides success
- Set taut string lines two bricks below the damp-proof course at a 10mm-per-meter fall.
- Coat slab backs with slurry primer and wash grout off within 20 minutes.
Layout at a glance
- Covering: Grey porcelain patio tiles (Marshalls Symphony Classic Grey) 800mm x 800mm, 800mm x 400mm, and 400mm x 400mm
- Laid on: Excavated sub-grade built up with a 100mm MOT Type 1 hardcore sub-base (compacted in two 50mm layers) and blinded with compacted stone dust
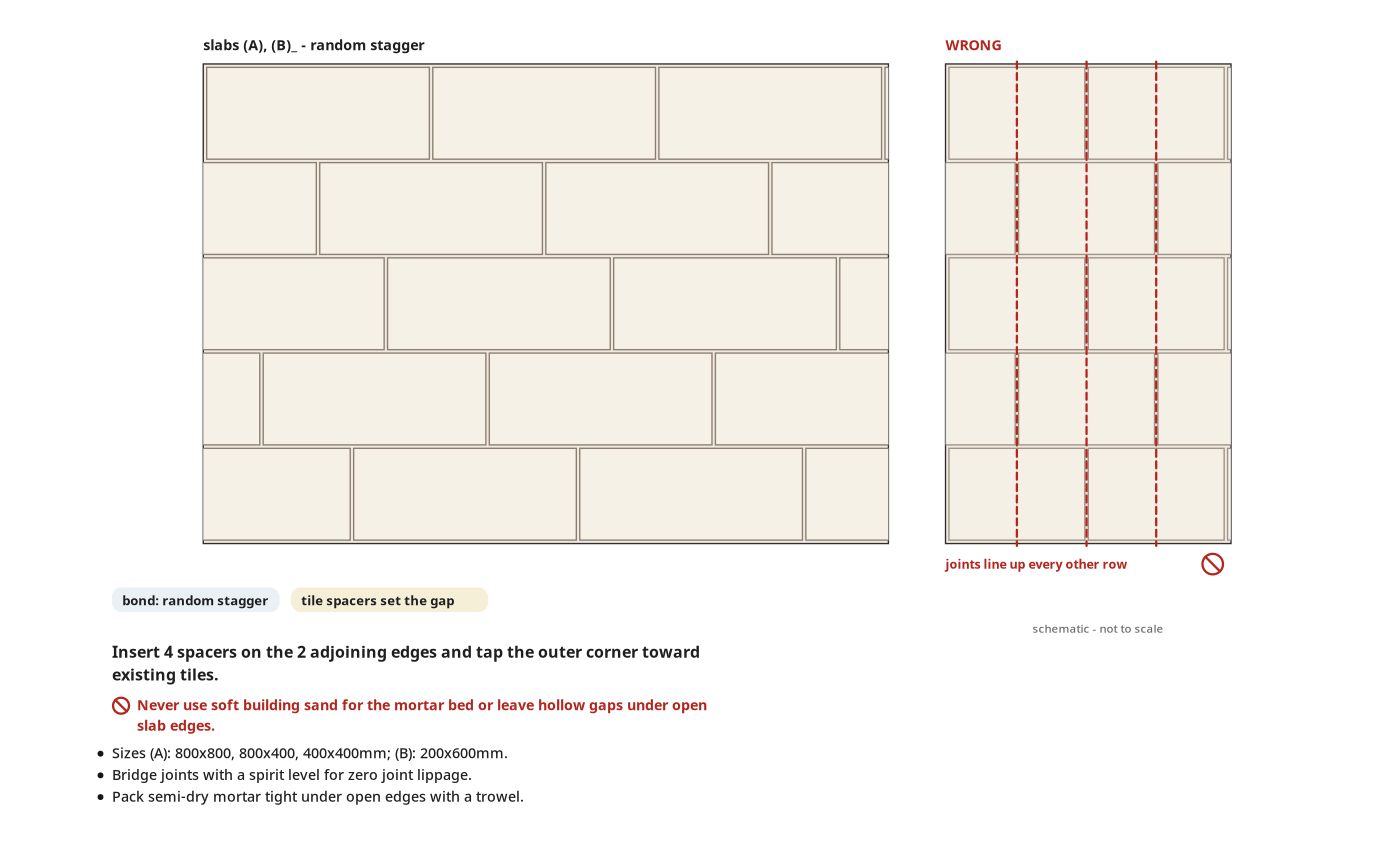
- Pattern: random stagger
- Offset: Three-size modular field pattern (800x800mm, 800x400mm, 400x400mm) enclosed inside a continuous 200mm-wide ivory picture-frame border
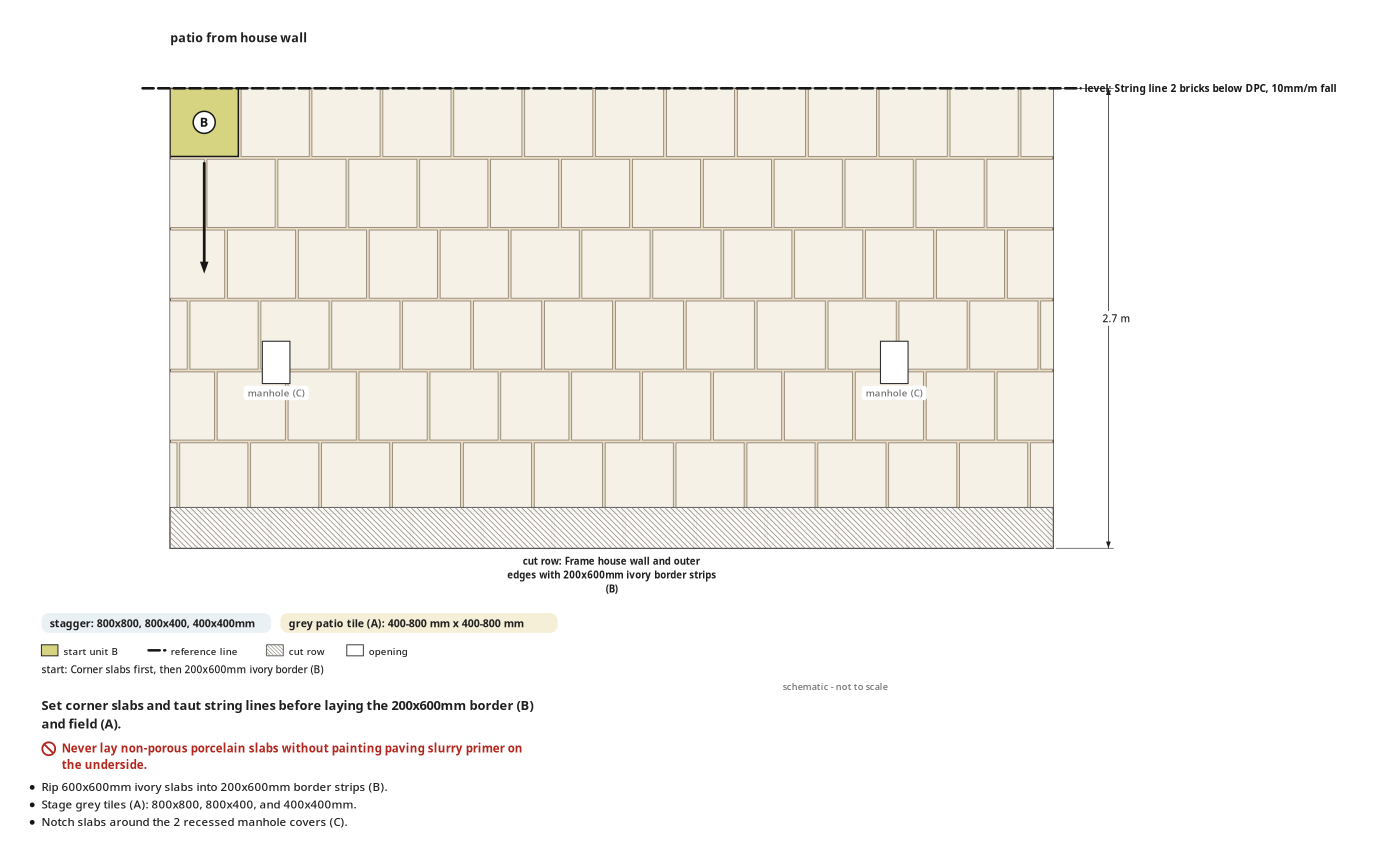
- Start: Set reference corner slabs ('dead men') at the corners, run taut string lines between them, and lay the 200mm x 600mm perimeter border strips before filling in the multi-size field tiles
- Reference line: Perimeter string lines on steel pins set two bricks below the house damp-proof course (DPC) with a 10mm-per-meter drainage fall away from the house (27mm drop over 2.7m), checked across joints with a long spirit level
- Bond: Paving slurry primer painted onto the underside of each porcelain slab, bedded onto an approximately 1-inch (25mm) semi-dry sharp sand and cement mortar mix, tapped flush with a rubber mallet, and jointed with flowable exterior cementitious grout
- House wall and outer patio perimeter: Frame the inside house wall and outer edges with 200mm x 600mm ivory porcelain strips cut down from 600mm x 600mm slabs.
- Exposed slab edges: Push and pack excess semi-dry mortar tightly underneath the open edges of each laid slab with a brick trowel to lock the edge in place.
- Inspection chambers and drain covers: Cut off the old circular cast-iron rim with an angle grinder, bed square recessed manhole trays flush with the patio slope, cut surrounding porcelain slabs with a wet rail saw, and wait until the surrounding tiles cure overnight before standing on them to cut and fit the internal tray inlays.
- Open perimeter grout joints: Dam the open outer ends of corner and perimeter joints before pouring flowable grout so the liquid slurry cannot run out.
Health and safety
Excavation and Heavy Plant
- Scan the ground for buried electrical cables, gas pipes, and drain lines before digging with the mini excavator or driving steel pins.
- Keep bystanders clear of the mini excavator swing radius and the tracked power barrow path while moving soil and hardcore.
- Wear steel-toe boots and hearing protection when operating the petrol plate compactor over the MOT Type 1 and stone dust sub-base.
- Refuel the petrol plate compactor outdoors only after shutting off the engine and letting the hot exhaust cool completely.
Cutting Saws and Power Tools
- Support 600mm porcelain slabs firmly on the wet tile rail saw, and keep both hands clear of the spinning blade path.
- Keep the guard fitted on the corded angle grinder and wait for the cutting disc to stop before setting it down.
- Keep hands, loose clothing, and power cords away from the rotating paddles of the twin-paddle electric mixer when blending grout.
- Never point the electric pressure washer nozzle at anyone, and wear eye protection against flying grit and grout spray.
Cement, Grout, and Dust Control
- Wear a dust mask and eye protection when pouring dry cementitious grout powder, Portland cement, or fine stone dust.
- Wear a dust mask and eye protection when cutting porcelain slabs or cast-iron drain covers with power saws and grinders.
- Wear waterproof gloves and knee pads when handling, testing, or kneeling near wet cement mortar to prevent alkali skin burns.
- Wash skin immediately with clean water if wet cement mortar, paving primer, or flowable grout splashes onto bare skin.
Water and Electrical Safety
- Keep 240V extension leads and corded power tools clear of pooled water when pressure-washing and wet-grouting the patio.
- Inspect cords on the wet tile rail saw, paddle mixer, and pressure washer for damage before working around water.
- Route extension leads behind your cutting area so the angle grinder and wet rail saw never nick a live cable.
The surface & its prep
- Turf and topsoil stripped across the patio and 200mm border footprint.
- Underground rainwater pipe extensions fitted before laying sub-base aggregate.
- String lines stretched on steel stakes two bricks below the damp-proof course.
- String-line drainage fall set at 10mm per meter from the house (27mm drop over 2.7m).
- MOT Type 1 hardcore compacted to 100mm depth in two 50mm layers.
- Two tons of stone dust spread and compacted over hardcore to fine-tune the base level.
- Porcelain tiles ordered from one batch so shades match.
Tools
- Mini excavator (tracked micro digger, JCB, 8008 CTS) (optional)
- Tracked power barrow (motorized tracked dumper) (optional)
- Shovel (hand shovel)
- String line and stakes (mason's string line with steel pins)
- Spirit level (long box-section spirit level, Stabila)
- Plate compactor (petrol vibratory plate compactor (wacker plate), Belle)
- Wheelbarrow (builder's wheelbarrow)
- Brick trowel (pointed masonry trowel)
- Rubber mallet (white-headed rubber paving mallet)
- Angle grinder (corded angle grinder with cutting disc, DeWalt)
- Wet tile rail saw (corded wet plunge/rail saw, Flex)
- Paddle mixer (corded twin-paddle electric mixer)
- Flexible mixing tub (heavy-duty flexible plastic tub)
- Pressure washer (electric pressure washer, Nilfisk)
- Rubber floor squeegee (long-handled rubber blade squeegee)
Materials
- Grey porcelain patio tiles (porcelain paving slabs, Marshalls, Symphony Classic Grey, 800mm x 800mm, 800mm x 400mm, 400mm x 400mm)
- Ivory porcelain border tiles (porcelain paving slabs, Marshalls, ivory, 600mm x 600mm (cut to 200mm x 600mm))
- MOT Type 1 hardcore (crushed aggregate sub-base, Type 1 MOT, 100mm total depth (two 50mm layers))
- Sharp sand (sharp grit sand)
- Cement (Portland cement)
- Stone dust (2 tons, fine aggregate blinding)
- Paving primer (slurry bond primer, Marshalls, 20 kg tub)
- Tile spacers (4 per tile, plastic paving spacers)
- Recessed manhole covers (2, recessed square inspection chamber trays, one circular-base square tray and one smaller corner square tray)
- Exterior jointing grout (flowable cementitious paving grout, Marshalls, mixed with 4.25 litres of water per tub)
Finishes & supplies, in the order they go on
| Product | What it does | Mix & coats | Dry time | Applied with |
|---|---|---|---|---|
| Paving primer | Slurry bond coat painted under each porcelain slab so it adheres to the mortar bed | 1 coats | Bed slab immediately onto fresh mortar while primer is wet | Brush or roller onto slab underside |
| Sharp sand | About 1-inch (20mm to 25mm) full mortar bed under slabs and haunching under open edges | Sharp sand, cement, and water mixed to a semi-dry consistency that holds shape when squeezed (exact ratio not stated in sources), 1 coats | Cure overnight before standing on newly laid slabs around drain covers | Shovel and brick trowel |
| Exterior jointing grout | Flowable cementitious jointing slurry that fills tile joints and cures to about 53 Newtons | 4.25 liters of clean water per tub of dry grout powder, 1 coats | Sets rock-solid within 20 to 30 minutes; firms in joints within a few minutes for final pressure-wash rinse | Flexible mixing tub, rubber floor squeegee, and pressure washer |
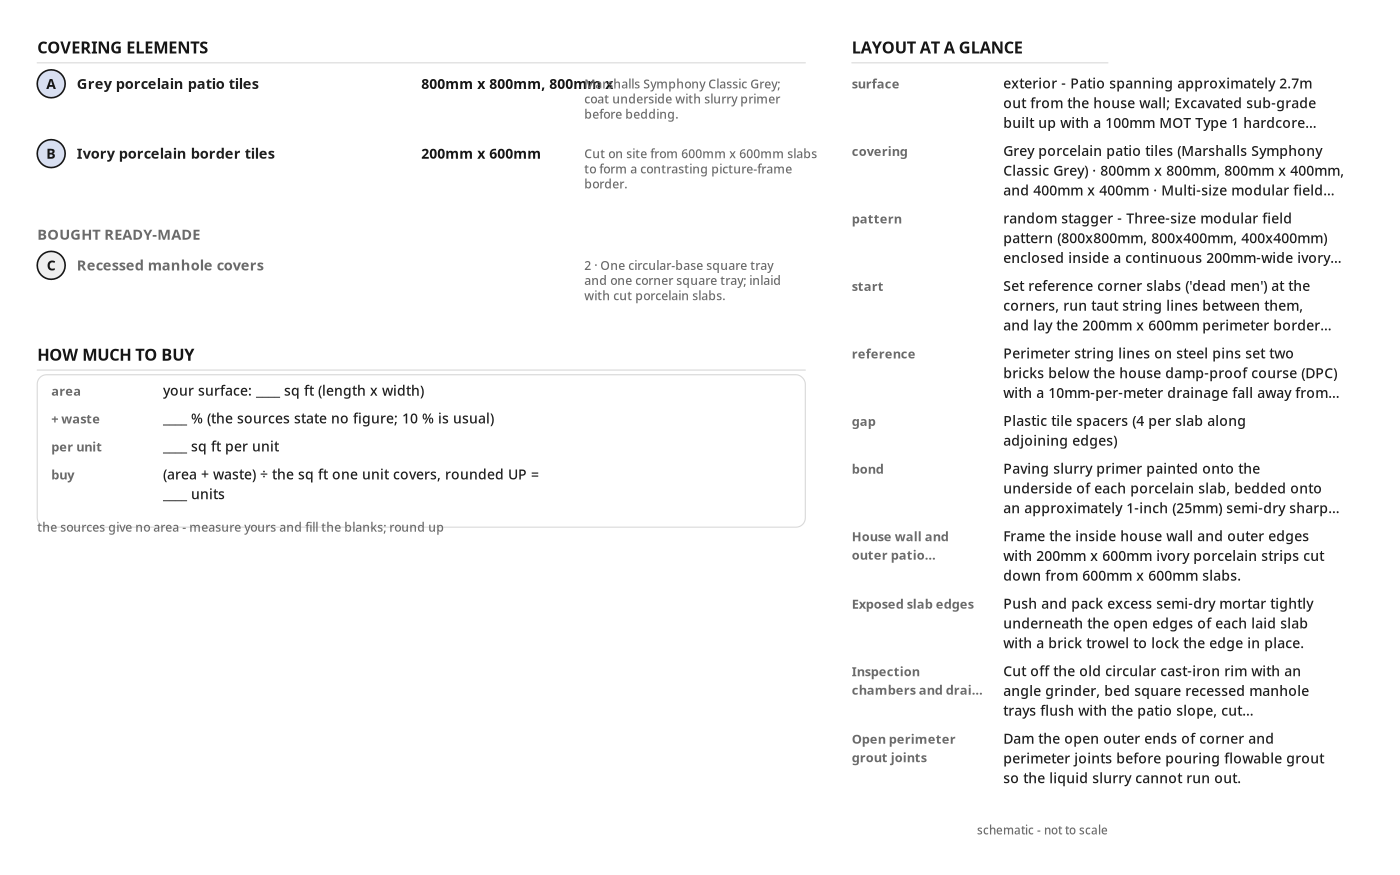
Covering elements
| Part | Name | Qty | Size | Notes |
|---|---|---|---|---|
| A | Grey porcelain patio tiles | count yours | 31 1/2" (T) × 31 1/2" (W) × 31 1/2" (L) | Marshalls Symphony Classic Grey; coat underside with slurry primer before bedding. |
| B | Ivory porcelain border tiles | count yours | 3/4" (T) × 7 7/8" (W) × 23 5/8" (L) | Cut on site from 600mm x 600mm slabs to form a contrasting picture-frame border. |
| C | Recessed manhole covers | x2 | 2 · One circular-base square tray and one corner square tray; inlaid with cut porcelain slabs. |
Before you start
Protect and clear
- Clear turf, topsoil and obstacles across the patio and border footprint.
- Fit underground rainwater pipe access extensions before covering the sub-grade.
- Keep 240V power leads clear of standing water while cutting and washing.
Cut and mix station
- Set the wet tile rail saw on stable ground to rip 200mm border strips.
- Stage the wheelbarrow, sharp sand, cement and paving primer tub by the sub-base.
- Clear hoses and tools off slabs before mixing and pouring jointing grout.
Step by step
Step 1: Excavate the patio area and set level string lines
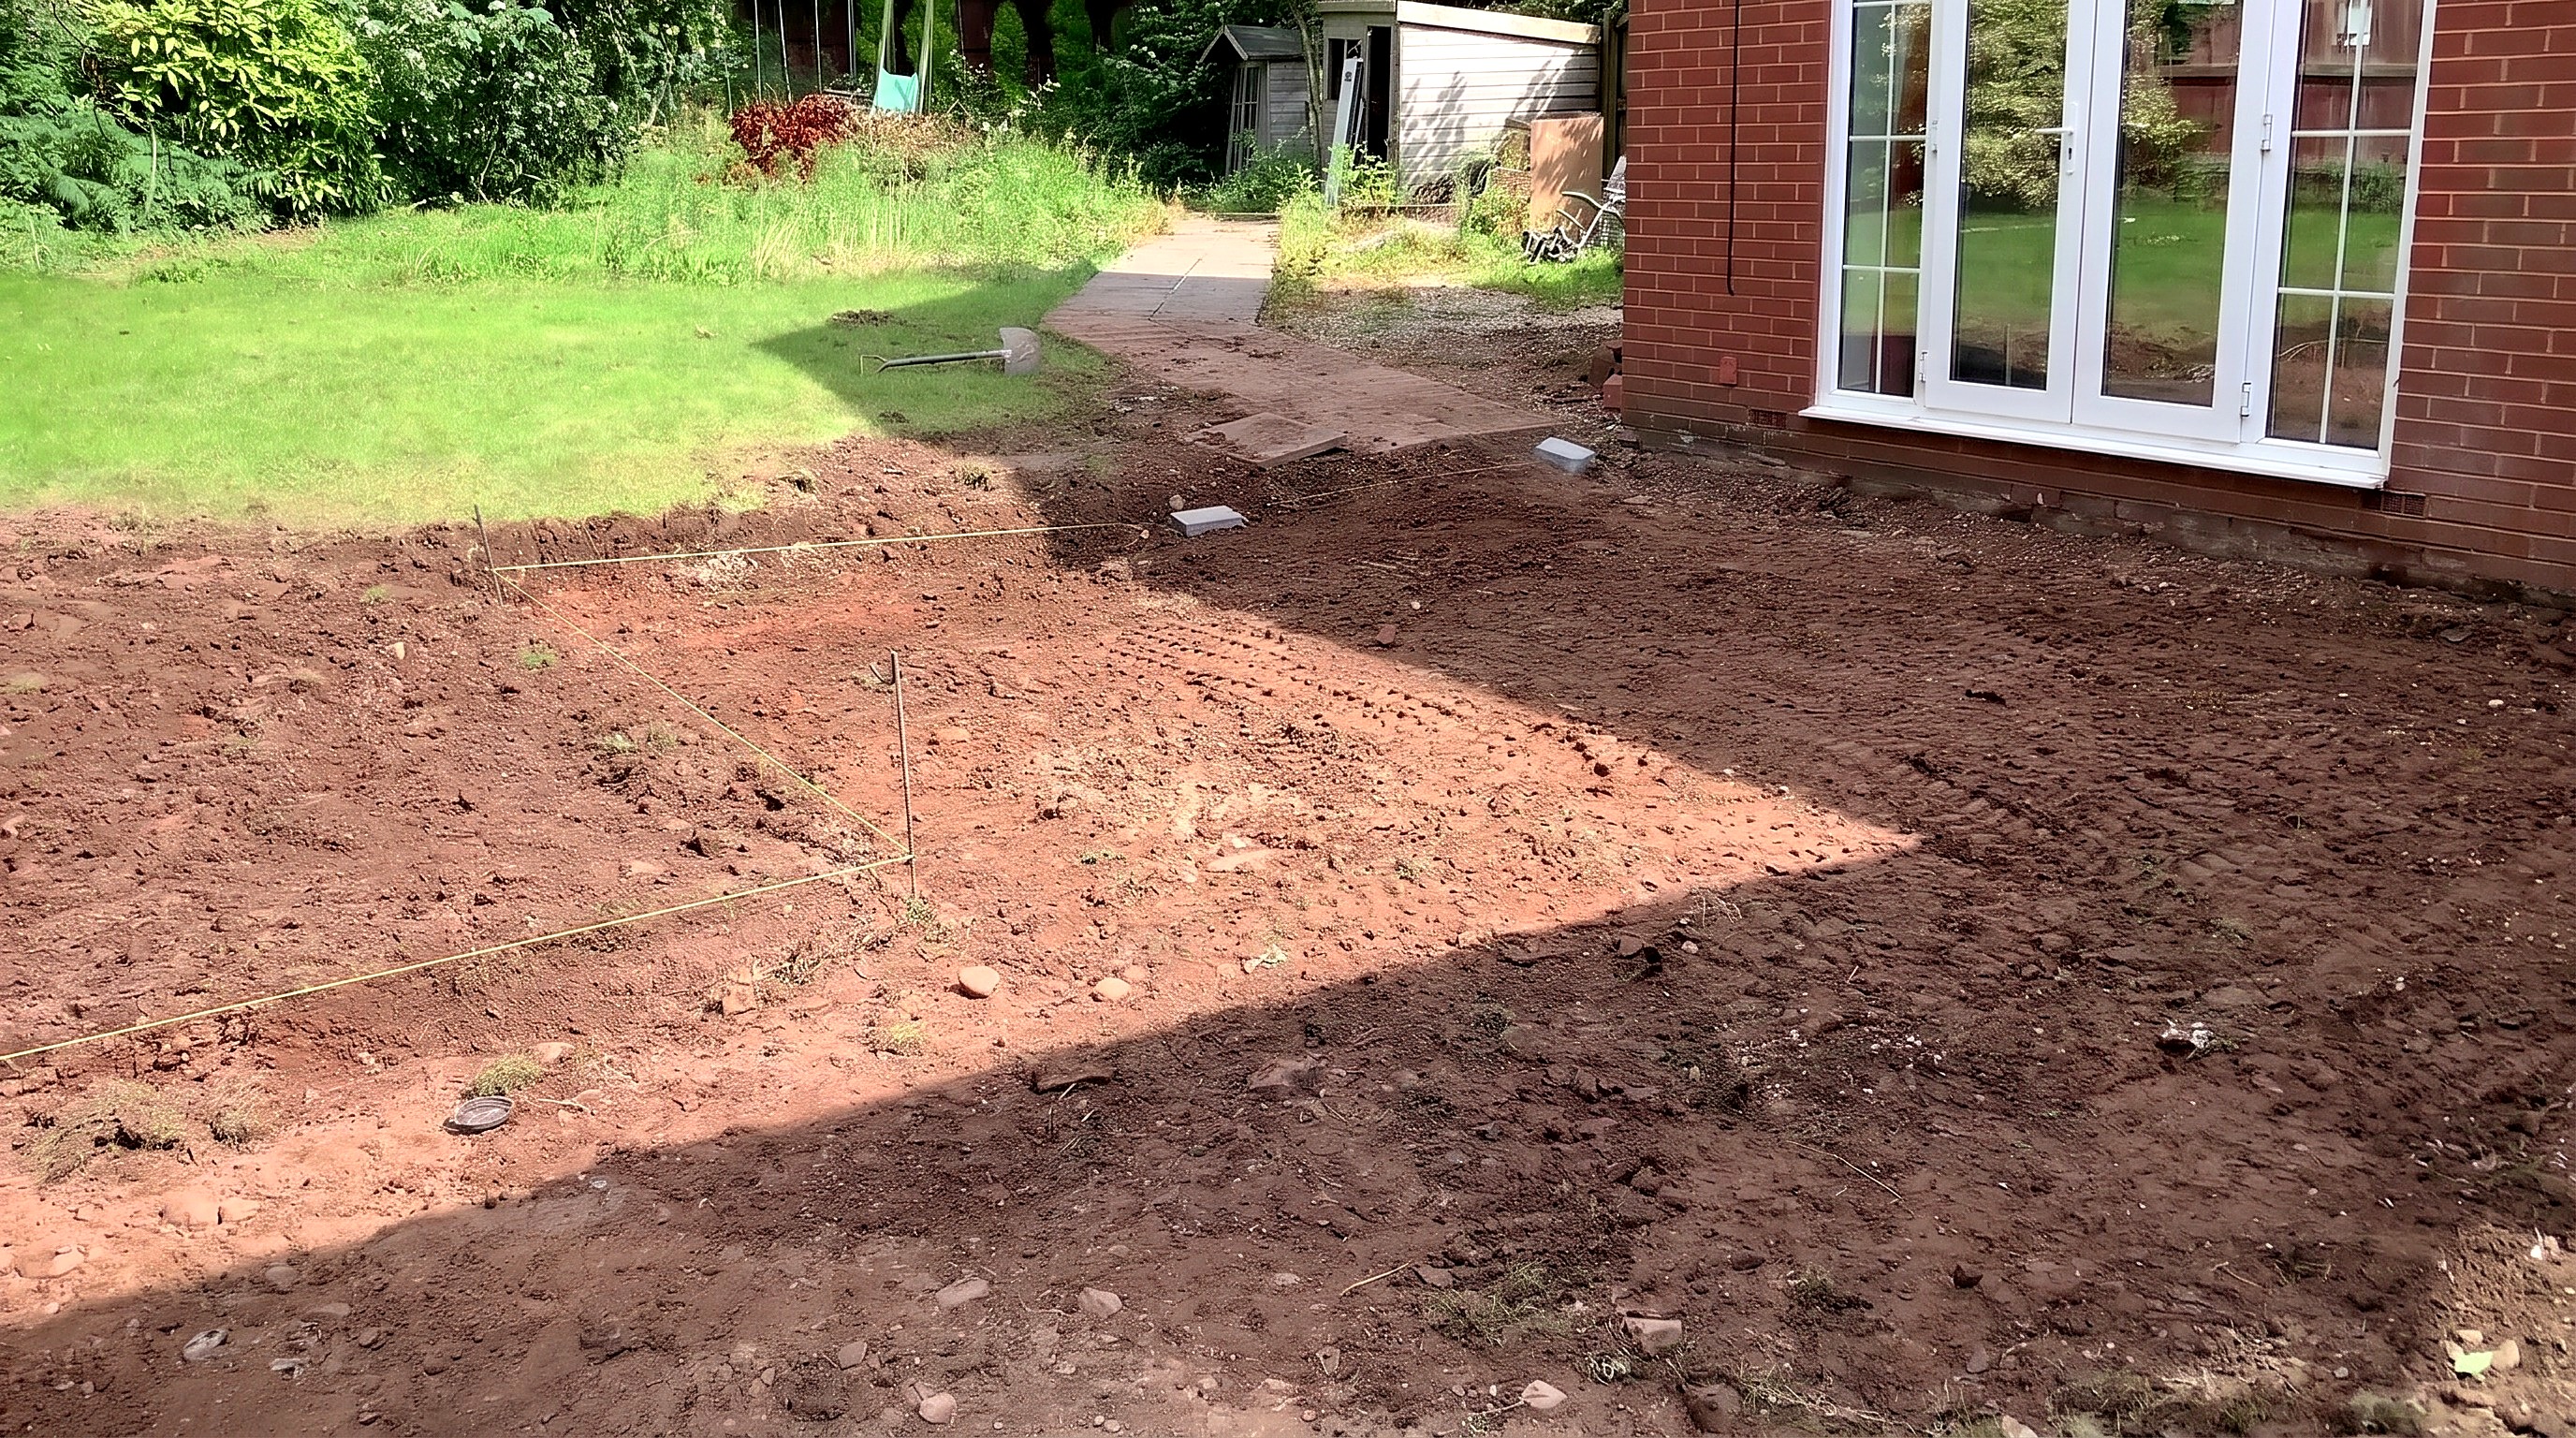
Footprint excavated to sub-grade; perimeter string lines set a 10mm-per-meter drainage fall two bricks below the damp-proof course.
You'll need: Mini excavator, Tracked power barrow, Shovel, String line and stakes, Spirit level
- 1.1 Strip the turf and excavate the patio footprint
- Mark the patio and 200mm border perimeter along the house wall and outer edges.
- Cut the perimeter turf line with a shovel.
- Strip turf and topsoil with a mini excavator and tracked power barrow.
- Extend underground rainwater access pipes before backfilling the sub-base.
- 1.2 Set perimeter string lines with a 10mm-per-meter drainage fall
- Drive perimeter steel stakes to hold the mason's string lines.
- Set the house-side string line two bricks below the damp-proof course.
- Slope string lines from the house at 10mm of fall per meter.
- Check the 2.7m span drops 27mm from house wall to outer edge.
Key measurements
- House wall starting height: 2 bricks below damp-proof course.
- Drainage fall: 10mm drop per 1m from the house.
- Total patio fall: 27mm drop over the 2.7m width.
- Tip: Include the 200mm border width when marking the trench.
- Heads up: Never set paving closer than two bricks below the damp-proof course, or water bridges the wall.
Before you move on: Measure from string line to ground across the span for 100mm hardcore, mortar, and slab clearance.
Step 2: Lay and compact the MOT Type 1 hardcore sub-base
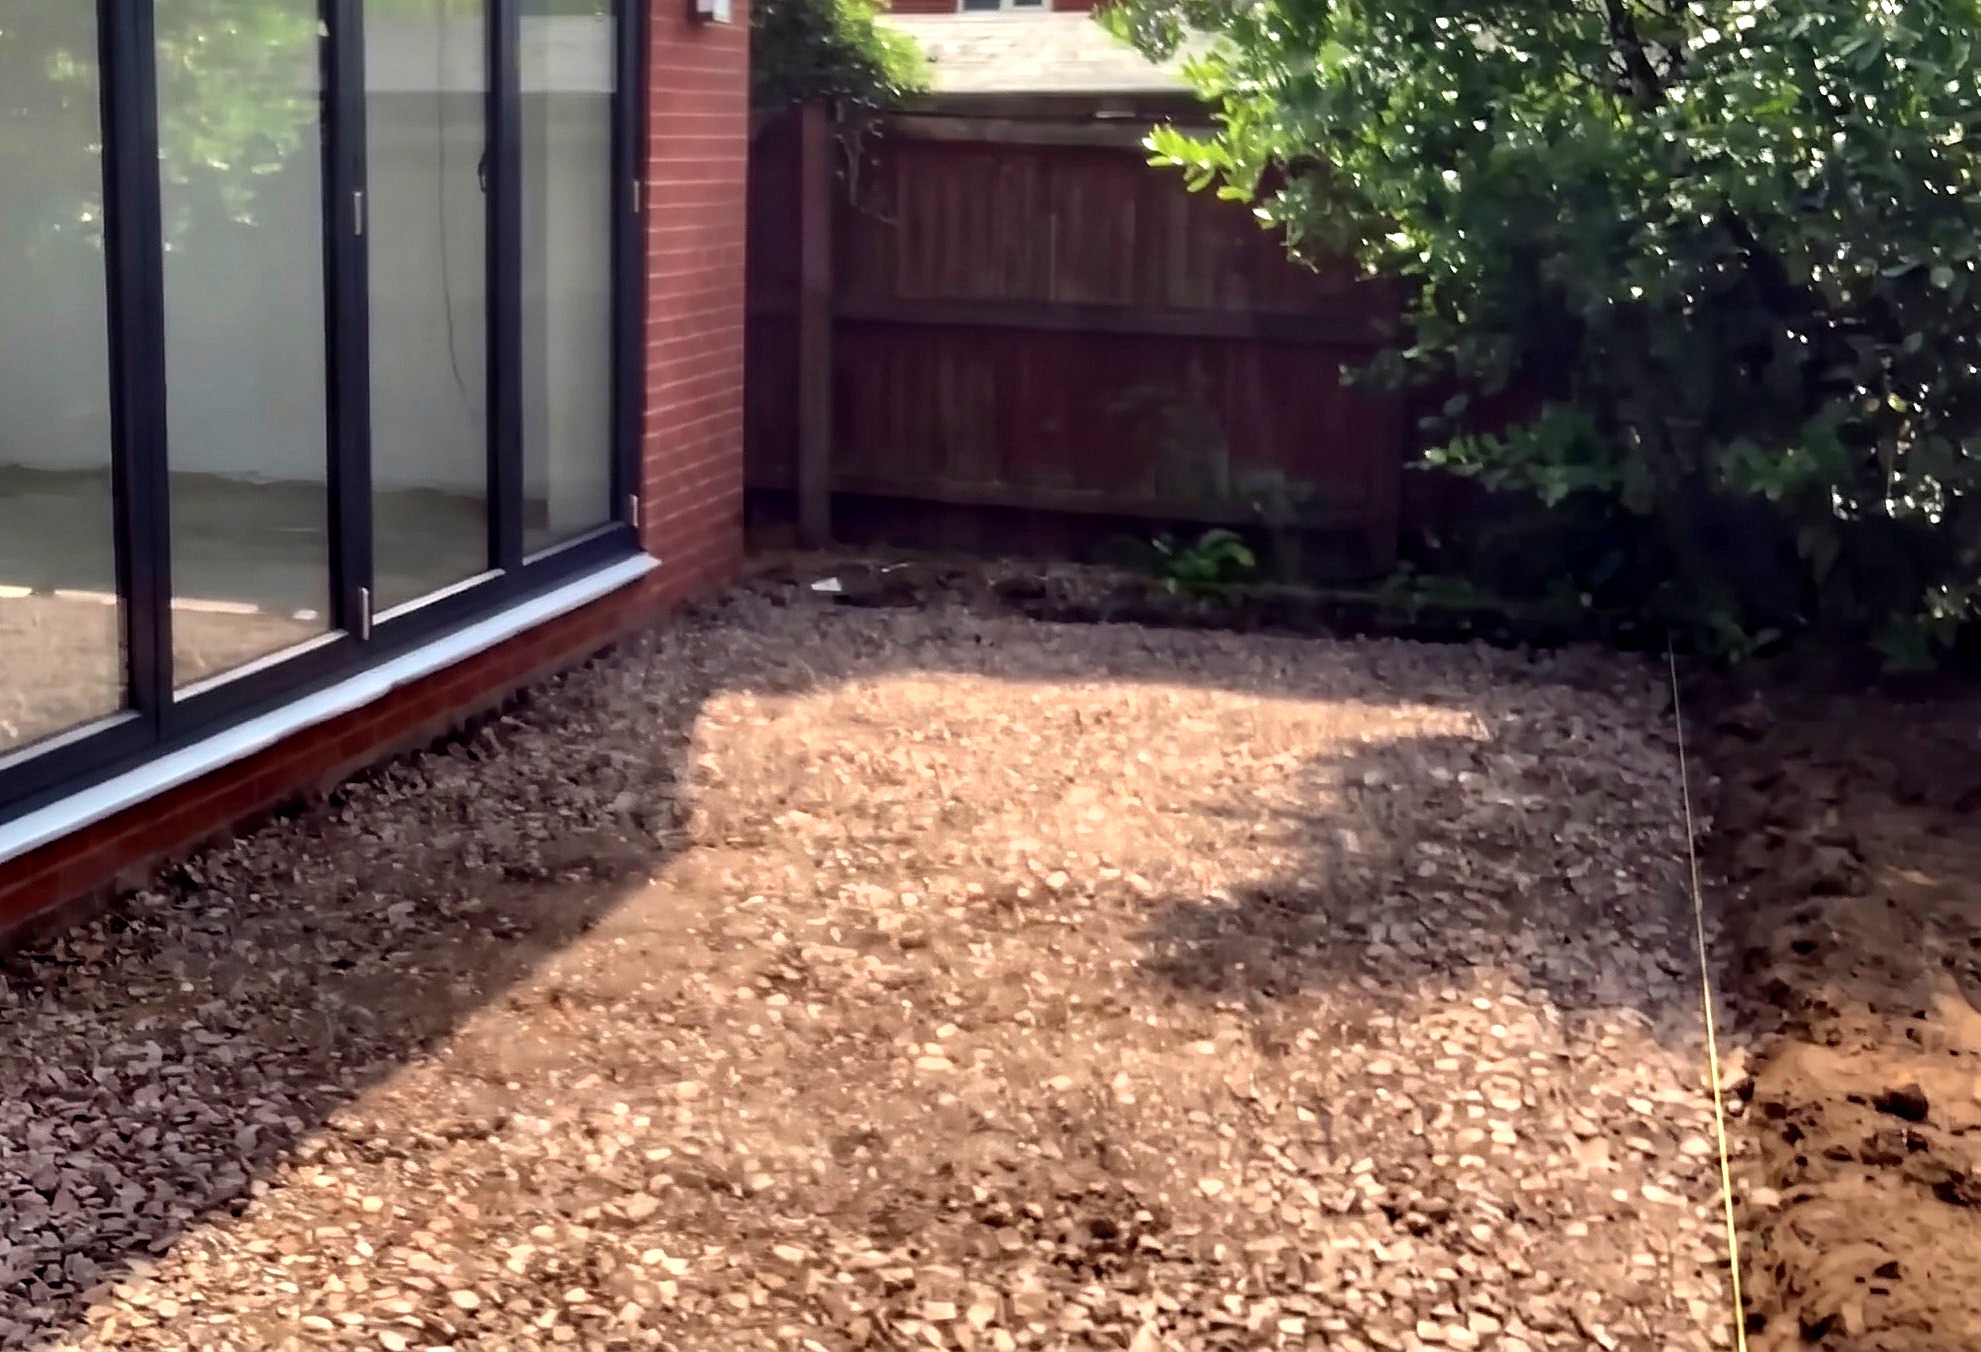
Compact a 100mm MOT Type 1 sub-base in two 50mm lifts; blind flat with compacted stone dust.
You'll need: Tracked power barrow, Shovel, Plate compactor, Spirit level, MOT Type 1 hardcore, Stone dust
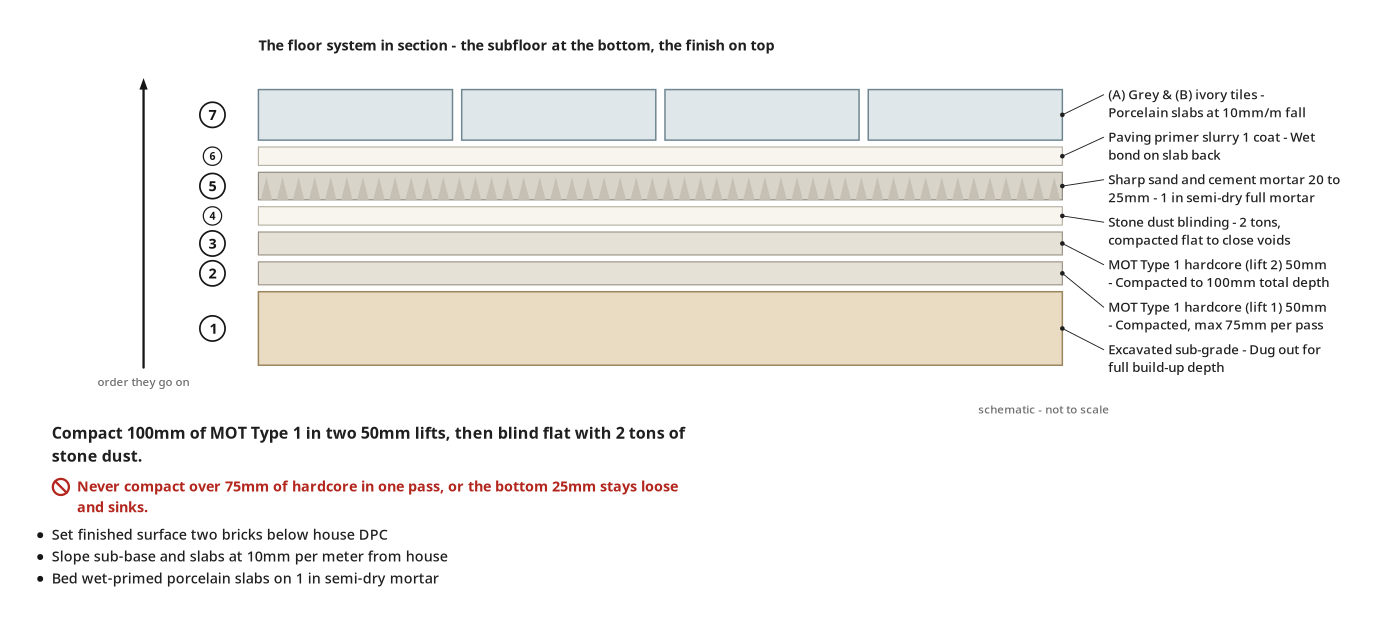
- 2.1 Spread and compact the first 50mm layer of MOT Type 1
- Haul MOT Type 1 hardcore in with the tracked power barrow.
- Raker and shovel an even 50mm first hardcore layer across the sub-grade.
- Run a heavy plate compactor over the 50mm layer until consolidated.
- 2.2 Spread and compact the second 50mm layer of MOT Type 1
- Spread a second 50mm MOT Type 1 hardcore layer to 100mm total depth.
- Compact the second hardcore layer across the footprint with the plate compactor.
- Spread 2 tons of stone dust over the hardcore to fine-tune levels.
- Compact the stone dust blinding flat, parallel to the string line fall.
Key measurements
- First lift depth: 50mm MOT Type 1 hardcore.
- Second lift depth: 50mm MOT Type 1 hardcore (100mm total).
- Max compaction depth: 75mm hardcore per pass.
- Blinding quantity: 2 tons of stone dust over hardcore.
- Tip: Blind the hardcore with stone dust to close voids and fine-tune levels before tiling.
- Heads up: Never compact over 75mm of hardcore in one pass, or the bottom 25mm stays loose and sinks.
Before you move on: Check the stone dust with a spirit level: firm and parallel to the sloped string lines.
Step 3: Cut border tiles and stage materials on the blinded base
Rip ivory border strips to 200mm x 600mm, stage grey field tiles by size, and plan corner reference slabs.
Parts in this step: (A) Grey porcelain patio tiles, (B) Ivory porcelain border tiles
You'll need: Wet tile rail saw, String line and stakes, Grey porcelain patio tiles, Ivory porcelain border tiles, Paving primer
- 3.1 Cut 600x600mm ivory tiles into 200x600mm border strips
- Set a 600mm x 600mm slab of ivory porcelain border tiles (B) under the wet tile rail saw.
- Rip the 600mm x 600mm slabs into 200mm x 600mm border strips.
- Dry-stage the 200mm x 600mm strips along the house wall and outer edges.
- 3.2 Stage the multi-size grey tiles and prepare the paving primer
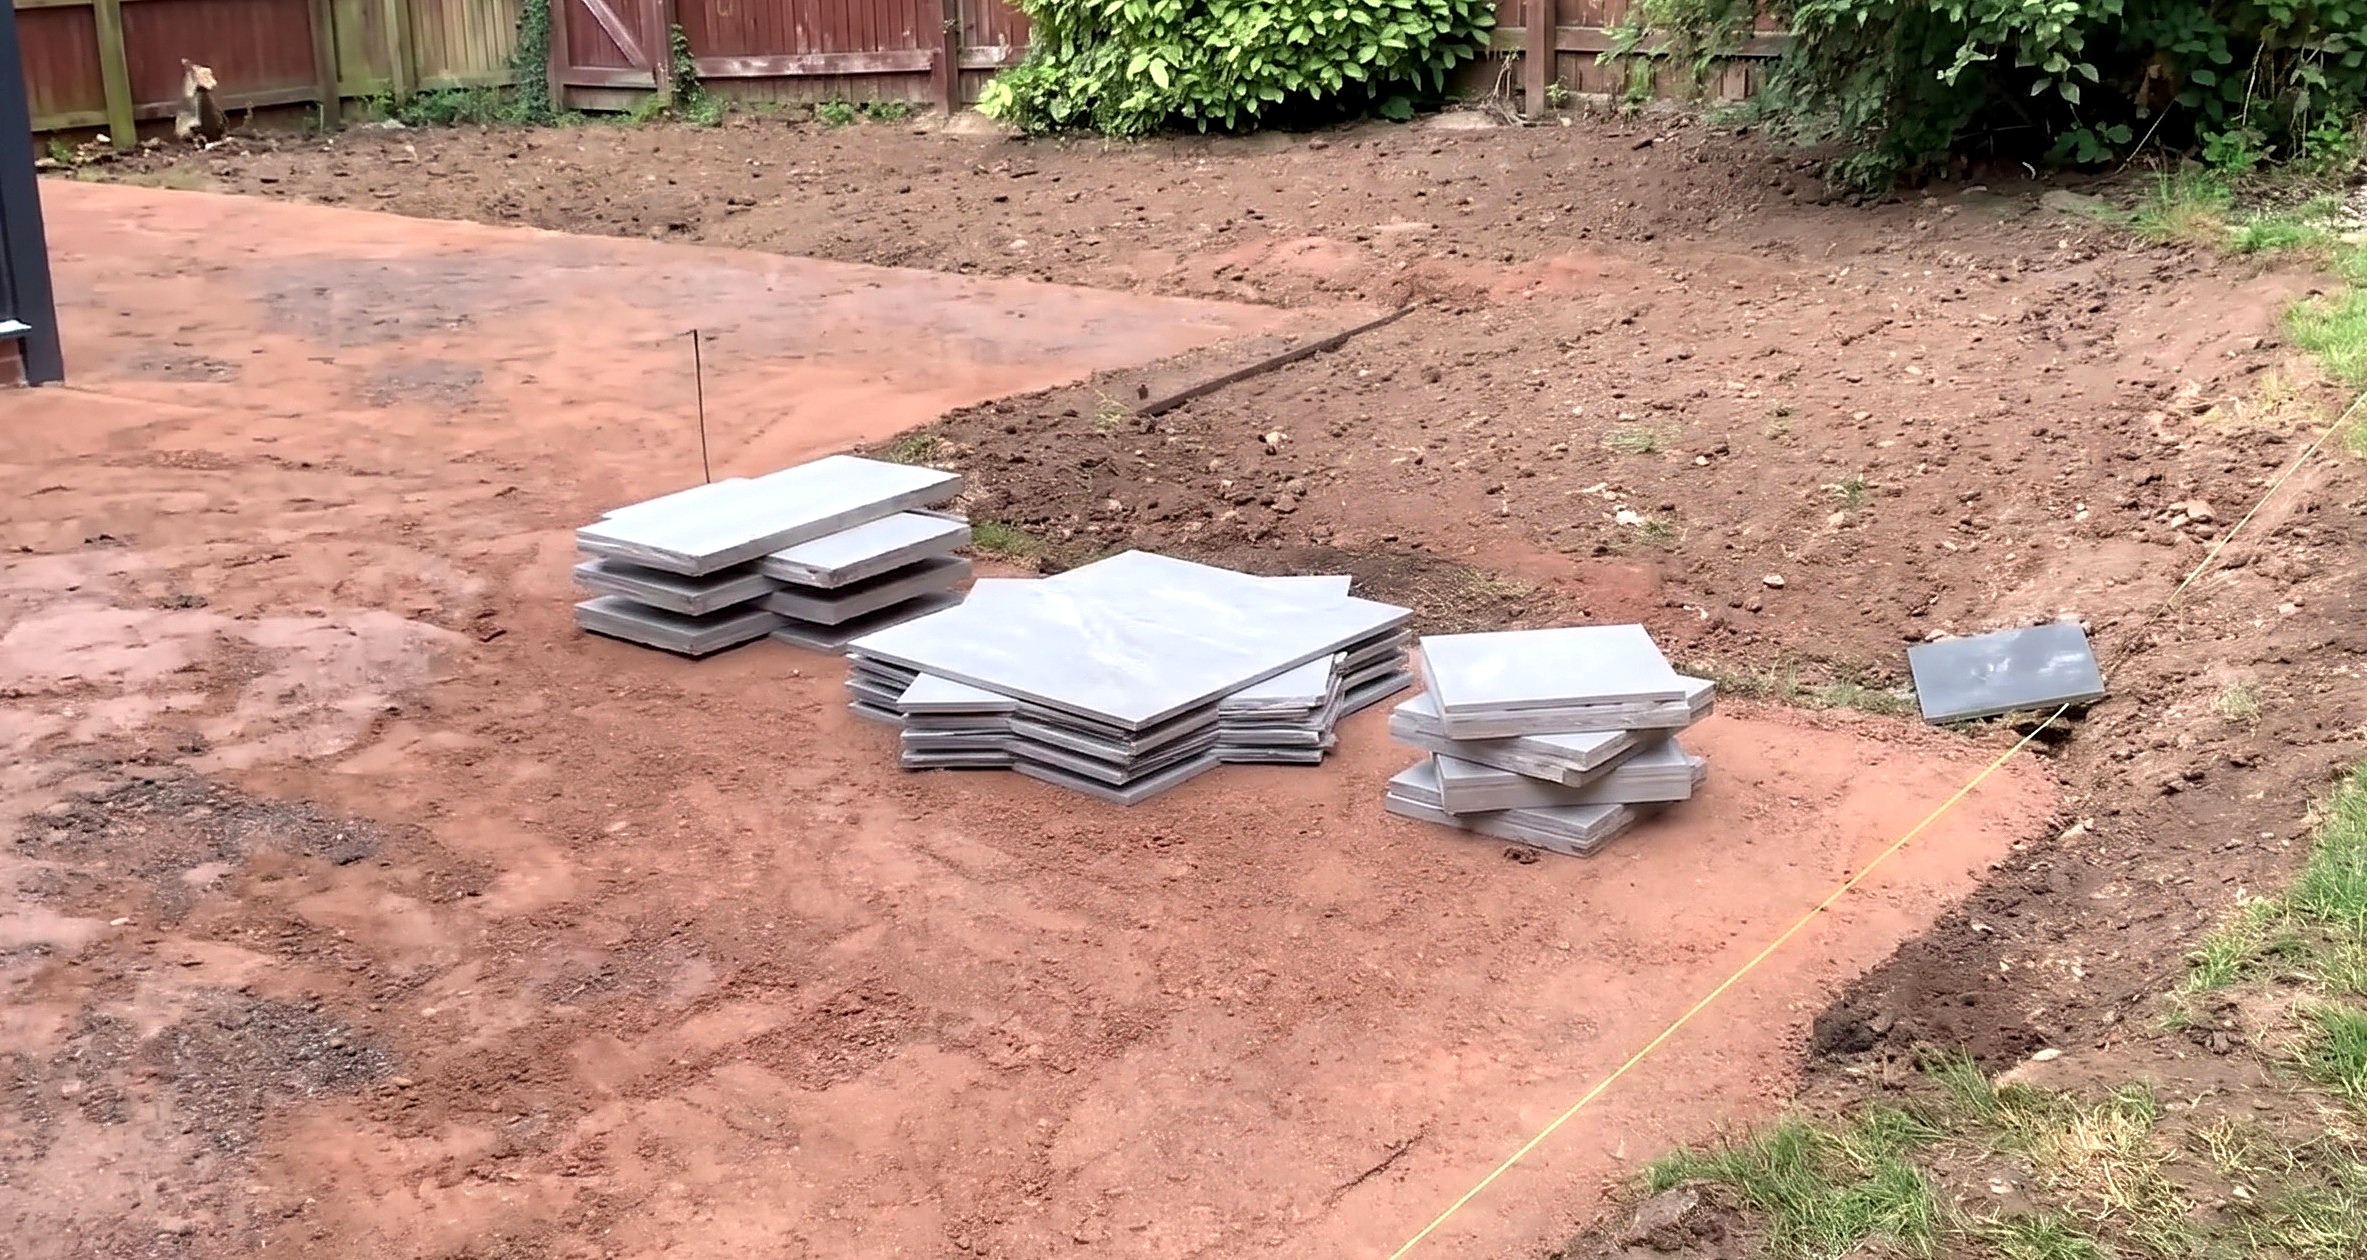
- Stack grey porcelain patio tiles (A) by size: 800mm x 800mm, 800mm x 400mm, 400mm x 400mm.
- Set a reference slab at each border corner and pull a taut string line between them.
- Open the 20 kg paving primer tub by the laying area to coat slab undersides.
Key measurements
- Border strips: 200mm x 600mm, cut from 600mm x 600mm slabs.
- Field tiles: 800mm x 800mm, 800mm x 400mm, 400mm x 400mm.
- Tip: Pre-cut a batch of 200mm border strips so laying goes on without stopping.
- Heads up: Never lay non-porous porcelain slabs without painting paving slurry primer on the underside.
Before you move on: Check all tile packs match in batch shade and the string line between corner slabs is taut and clear.
Step 4: Lay primed porcelain tiles on a semi-dry mortar bed
Bed primed border and field tiles flush on a 1-inch semi-dry sharp sand and cement bed with spacer joints and haunched edges.
Parts in this step: (A) Grey porcelain patio tiles, (B) Ivory porcelain border tiles
You'll need: Shovel, Wheelbarrow, Brick trowel, Spirit level, Rubber mallet, Grey porcelain patio tiles, Ivory porcelain border tiles, Sharp sand, Cement, Paving primer, Tile spacers
- 4.1 Test the semi-dry mortar consistency and spread the bed
- Mix sharp sand, cement, and water into semi-dry mortar.
- Squeeze a gloved handful: mortar must hold shape without crumbling or oozing water.
- Shovel two mortar scoops onto the base; spread flat over the tile footprint with a brick trowel.
- 4.2 Gauge the mortar bed height using a spirit level
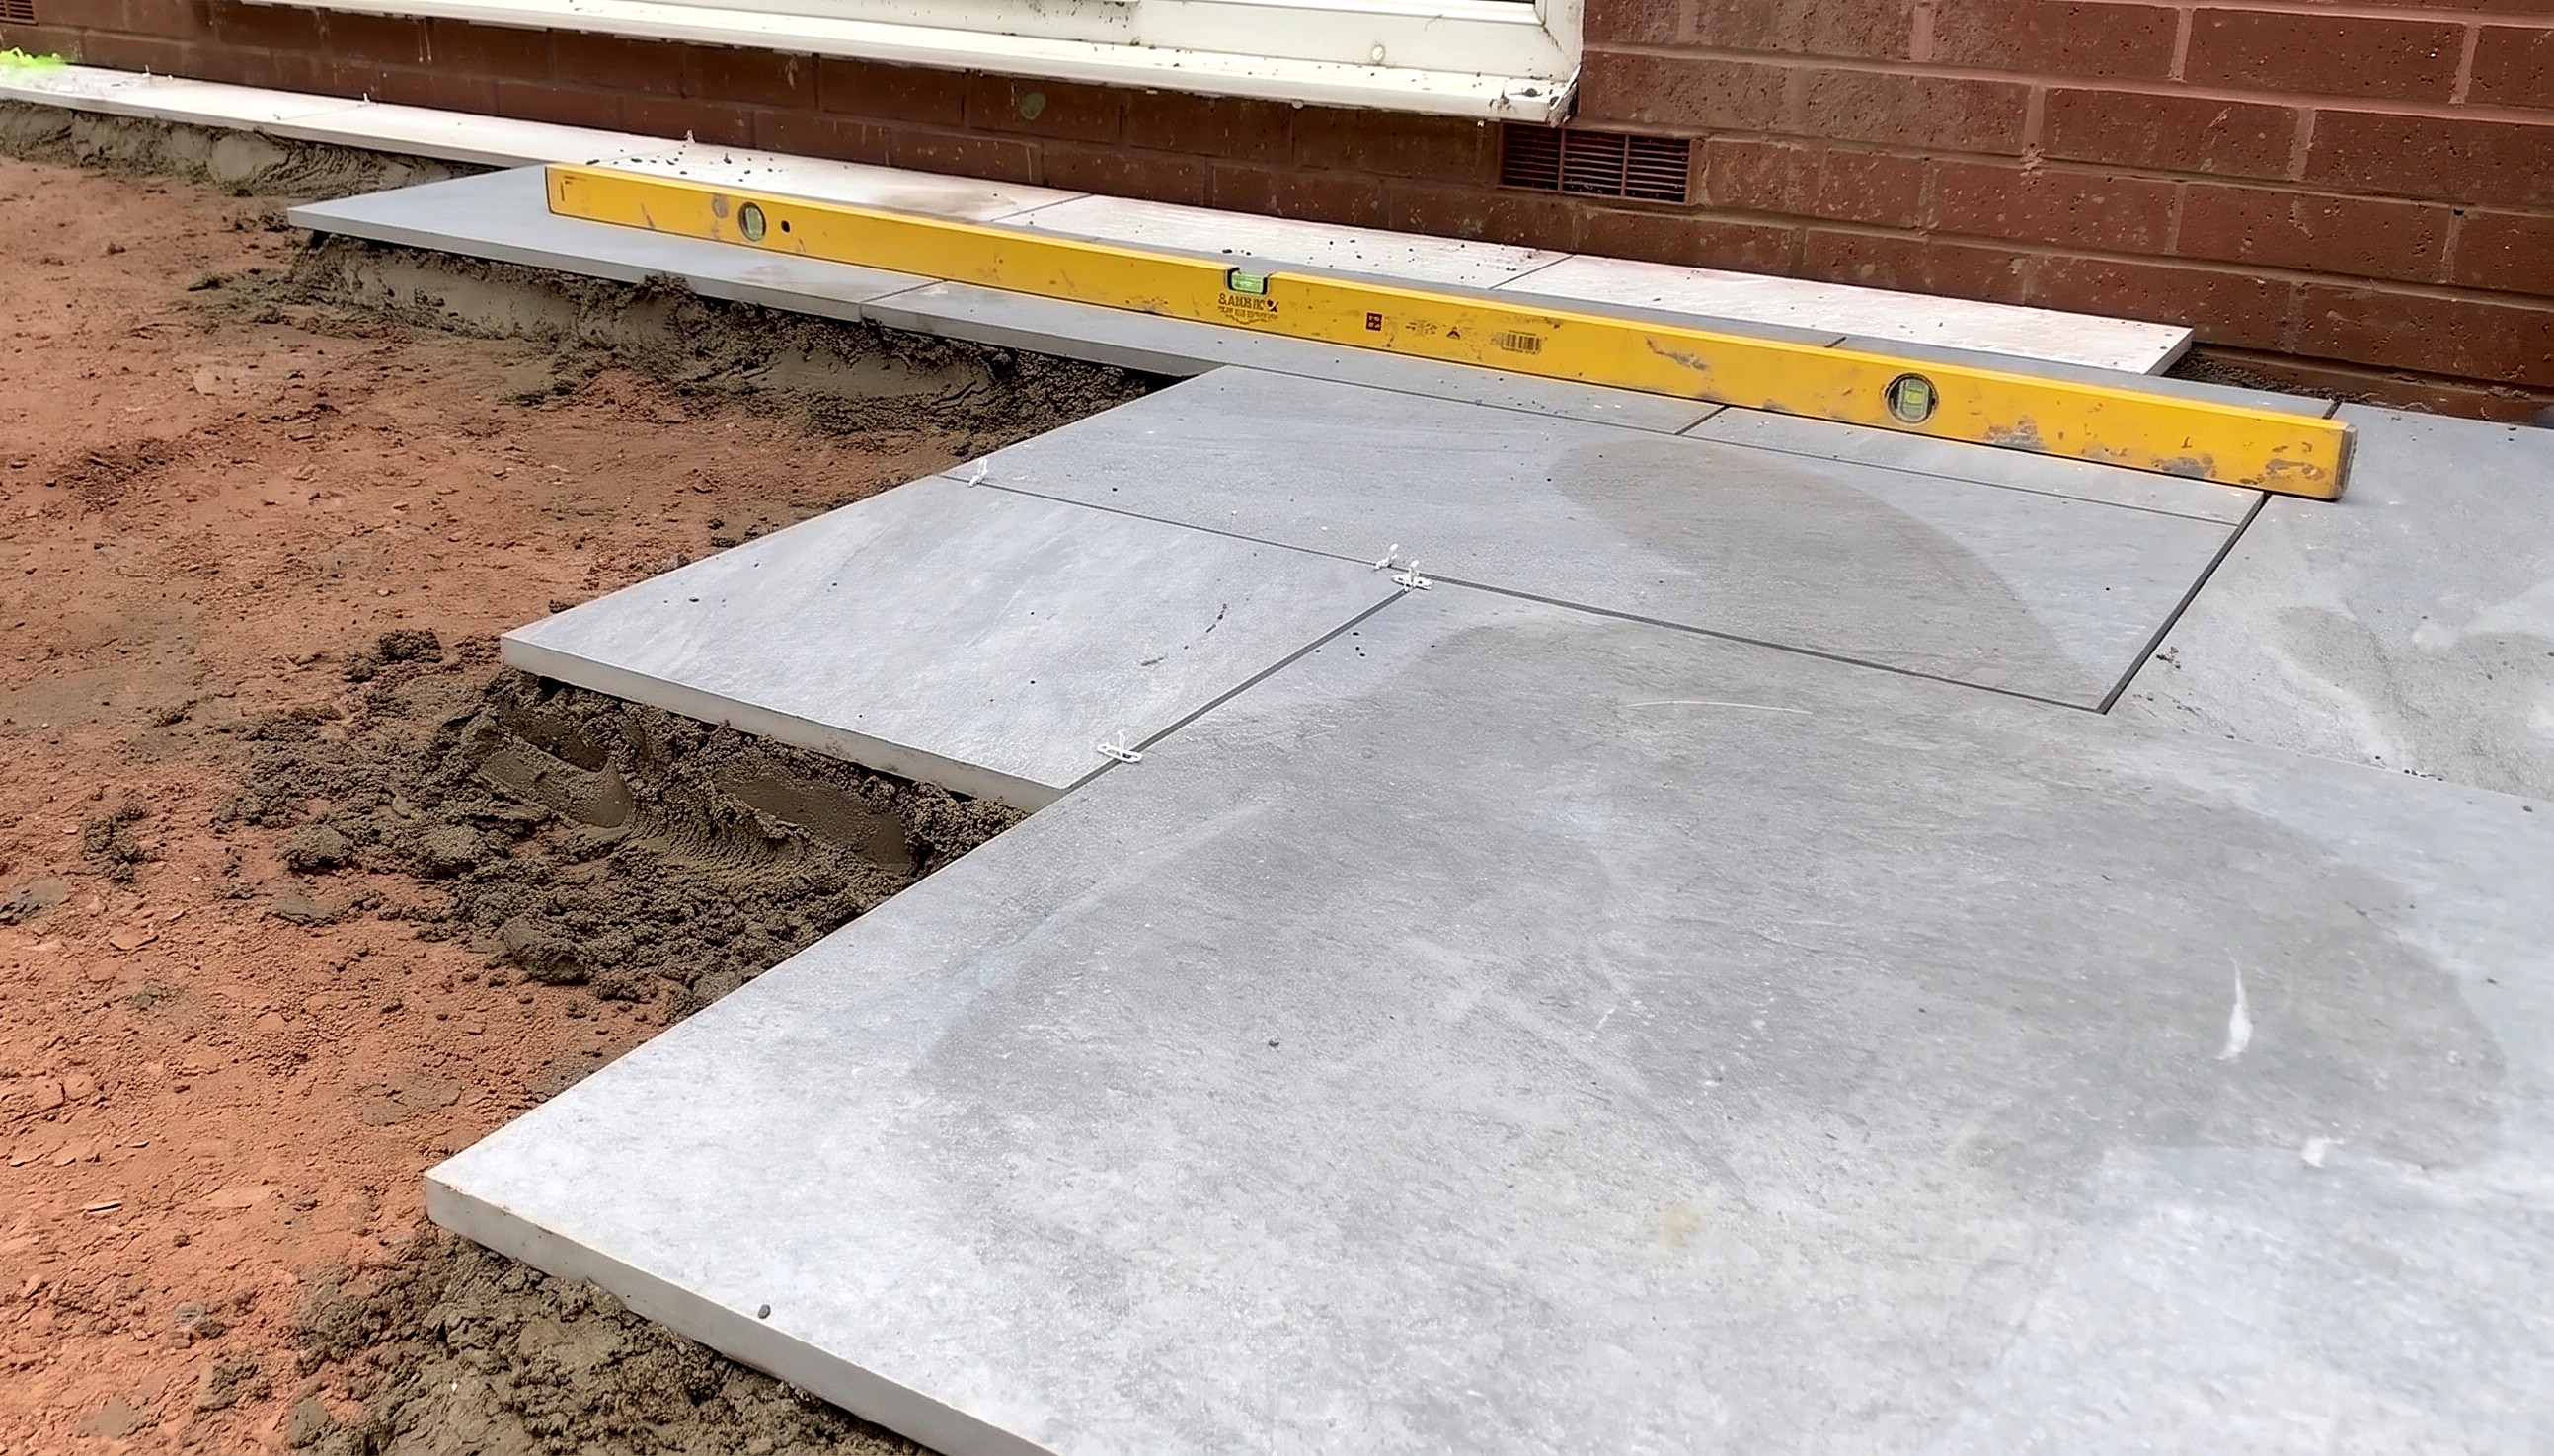
- Lay a long spirit level across adjoining tiles to bridge the fresh mortar bed.
- Trowel the mortar until an even gap under 1 inch (about 20mm) sits below the level.
- 4.3 Set the pre-primed tile, insert spacers, and tap flush
- Paint a full coat of paving primer under the ivory porcelain border tiles (B) or grey porcelain patio tiles (A).
- Lay the primed slab on the mortar bed and tap to height with a white rubber mallet.
- Insert four plastic tile spacers along the two adjoining edges.
- Tap the outer corner toward existing tiles with the rubber mallet to tighten joints against the spacers.
- 4.4 Verify the drainage fall and haunch the mortar edges
- Check across the new tile and neighbouring slabs with the spirit level for zero joint lippage.
- Check the bubble for a ~1cm drainage fall away from the house.
- Pack exposed mortar under open slab edges with the brick trowel to lock the tile.
Key measurements
- Mortar bed thickness: about 1 inch (20mm to 25mm) per tile.
- Joint spacing: 4 plastic tile spacers along the two adjoining edges per slab.
- Surface slope: about 1cm fall away from the house.
- Tip: Mix cement with sharp sand, not soft building sand, for a strong, free-draining mortar bed.
- Tip: Strike each new tile's outer corner with the rubber mallet to tighten both adjoining joints at once.
- Heads up: Wear waterproof gloves when testing or troweling cement mortar to prevent alkali skin burns.
Before you move on: Bridge every joint with the spirit level for zero lippage, and check open edges are haunched with mortar.
Step 5: Install recessed drain covers and cut surrounding tiles
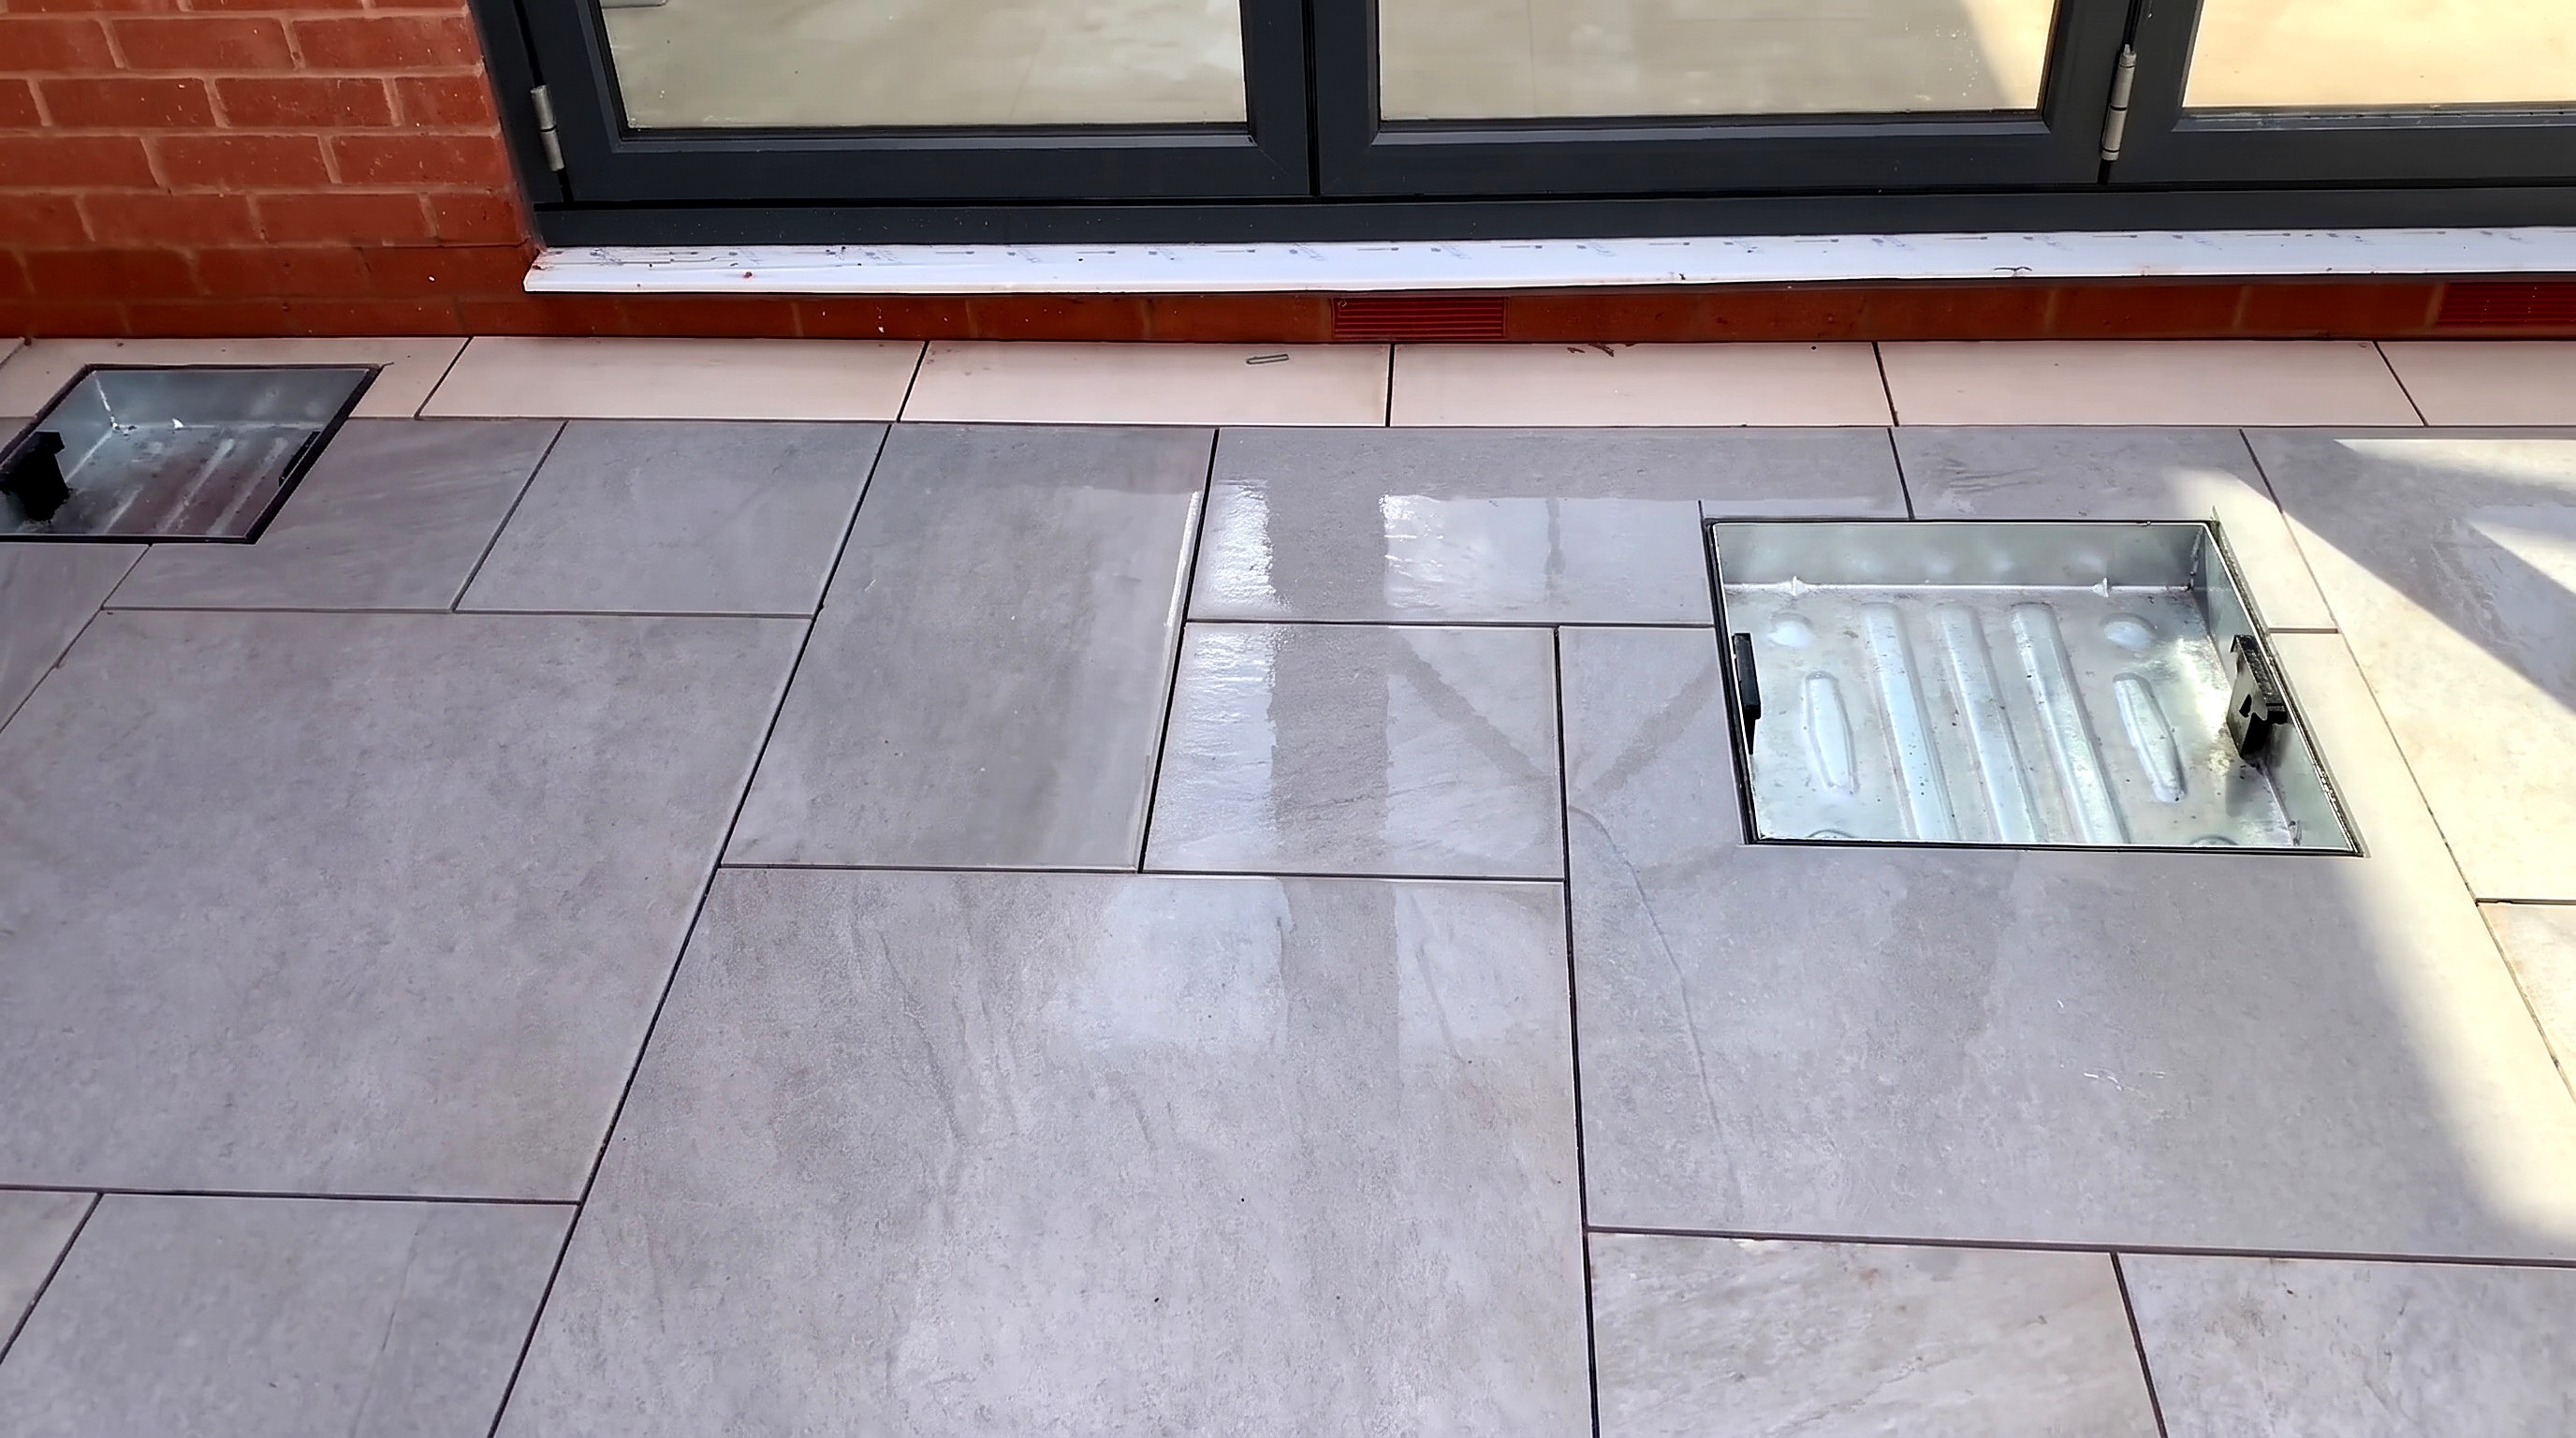
Both recessed square drain covers sit flush with the patio fall inside custom-cut porcelain slabs.
Parts in this step: (A) Grey porcelain patio tiles, (B) Ivory porcelain border tiles, (C) Recessed manhole covers
You'll need: Angle grinder, Wet tile rail saw, Brick trowel, Rubber mallet, Spirit level, Grey porcelain patio tiles, Ivory porcelain border tiles, Recessed manhole covers, Sharp sand, Cement, Paving primer, Tile spacers
- 5.1 Stage the recessed drain trays and cutting tools
- Stage the two recessed manhole covers (C): main chamber circular-base square tray and smaller corner square tray.
- Set the angle grinder and wet tile rail saw near the inspection chambers.
- 5.2 Cut out the old manhole rim and set the new recessed frame
- Remove the cast-iron cover and cut off the circular rim with the angle grinder to lower the chamber.
- Fit the circular-base square tray of the recessed manhole covers (C) into the chamber.
- Bed both recessed trays on mortar, flush with the tile height and 10mm-per-meter drainage slope.
- 5.3 Cut and lay porcelain tiles around both recessed drain frames
- Measure and mark the grey porcelain patio tiles (A) and ivory porcelain border tiles (B) to notch around both square frames.
- Cut the marked porcelain slabs on the wet tile rail saw without overshooting internal corners.
- Prime and mortar-bed the cut surround slabs flush against both recessed frames.
- Cure the surround tiles overnight before kneeling on them to cut and lay the tray inlays.
Key measurements
- Curing wait before tray inlays: overnight before standing on surrounding slabs.
- Tip: A square recessed tray with a circular bottom spigot converts a round drain pipe into a square tile-in cover.
- Heads up: Stop the circular rail saw blade at internal L-cut corners around the manhole frame to avoid overshooting the visible face.
- Heads up: Do not stand or kneel on surround tiles the same day, or they shift out of level.
Before you move on: Check the recessed metal tray rims and surrounding tiles with the spirit level for flushness with the patio plane.
Step 6: Mix the exterior jointing grout slurry
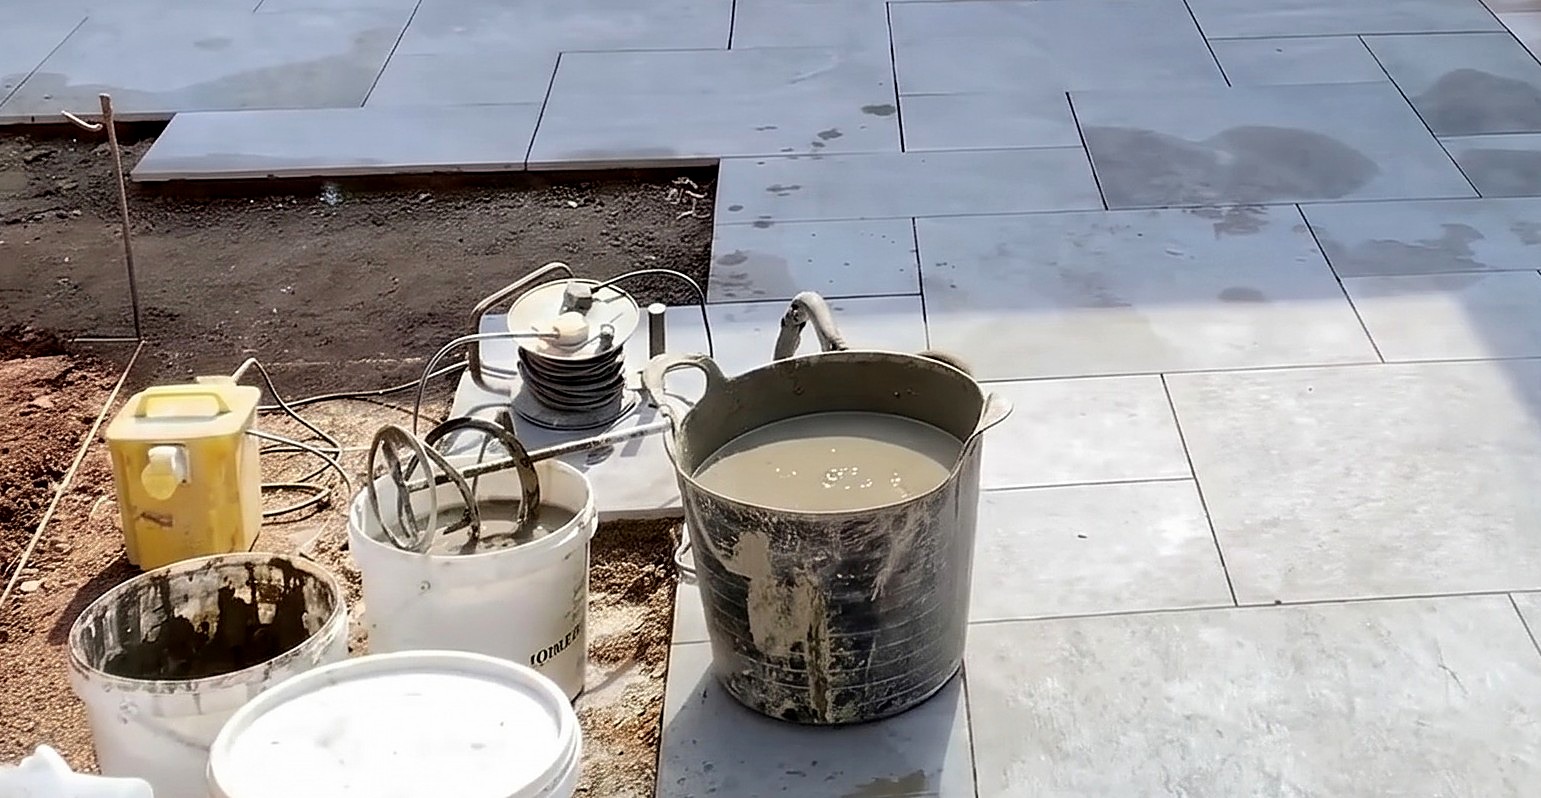
Mix exterior jointing grout with 4.25 liters of water into a smooth, lump-free pourable slurry.
You'll need: Flexible mixing tub, Paddle mixer, Rubber floor squeegee, Exterior jointing grout
- 6.1 Pour the jointing grout powder into 4.25L of water
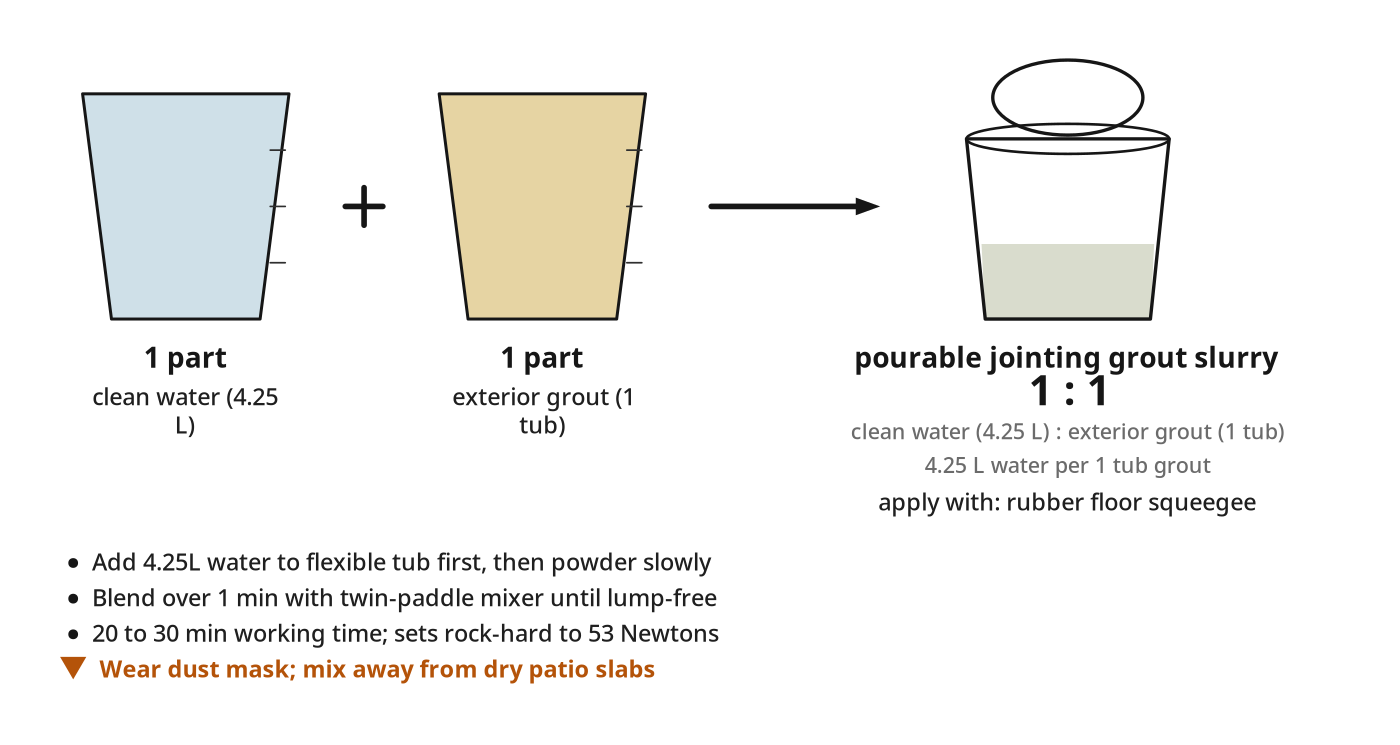
- Measure 4.25 liters of clean water into a flexible mixing tub.
- Wear a dust mask and slowly pour in one full tub of dry exterior jointing grout powder.
- 6.2 Blend the grout with a twin-paddle mixer and stage the squeegee
- Mix with a corded paddle mixer for over a minute until smooth and lump-free.
- Place the long-handled rubber floor squeegee by the patio before pouring.
Key measurements
- Grout water ratio: 4.25 liters of water per tub of exterior jointing grout
- Mixing duration: over 1 minute with a twin-paddle electric mixer
- Tip: Mix grout in a flexible plastic tub to pinch the rim into a pouring spout.
- Heads up: Mix away from dry un-wetted patio slabs so powder or splashes do not bond to dry porcelain.
Before you move on: Check the slurry pours smoothly without dry lumps and the patio is clear of hoses and tools.
Step 7: Pre-wet the patio and squeegee grout into the joints
Fill tile joints flush with flowable grout and squeegee excess slurry off wet slabs before the 20-to-30-minute set.
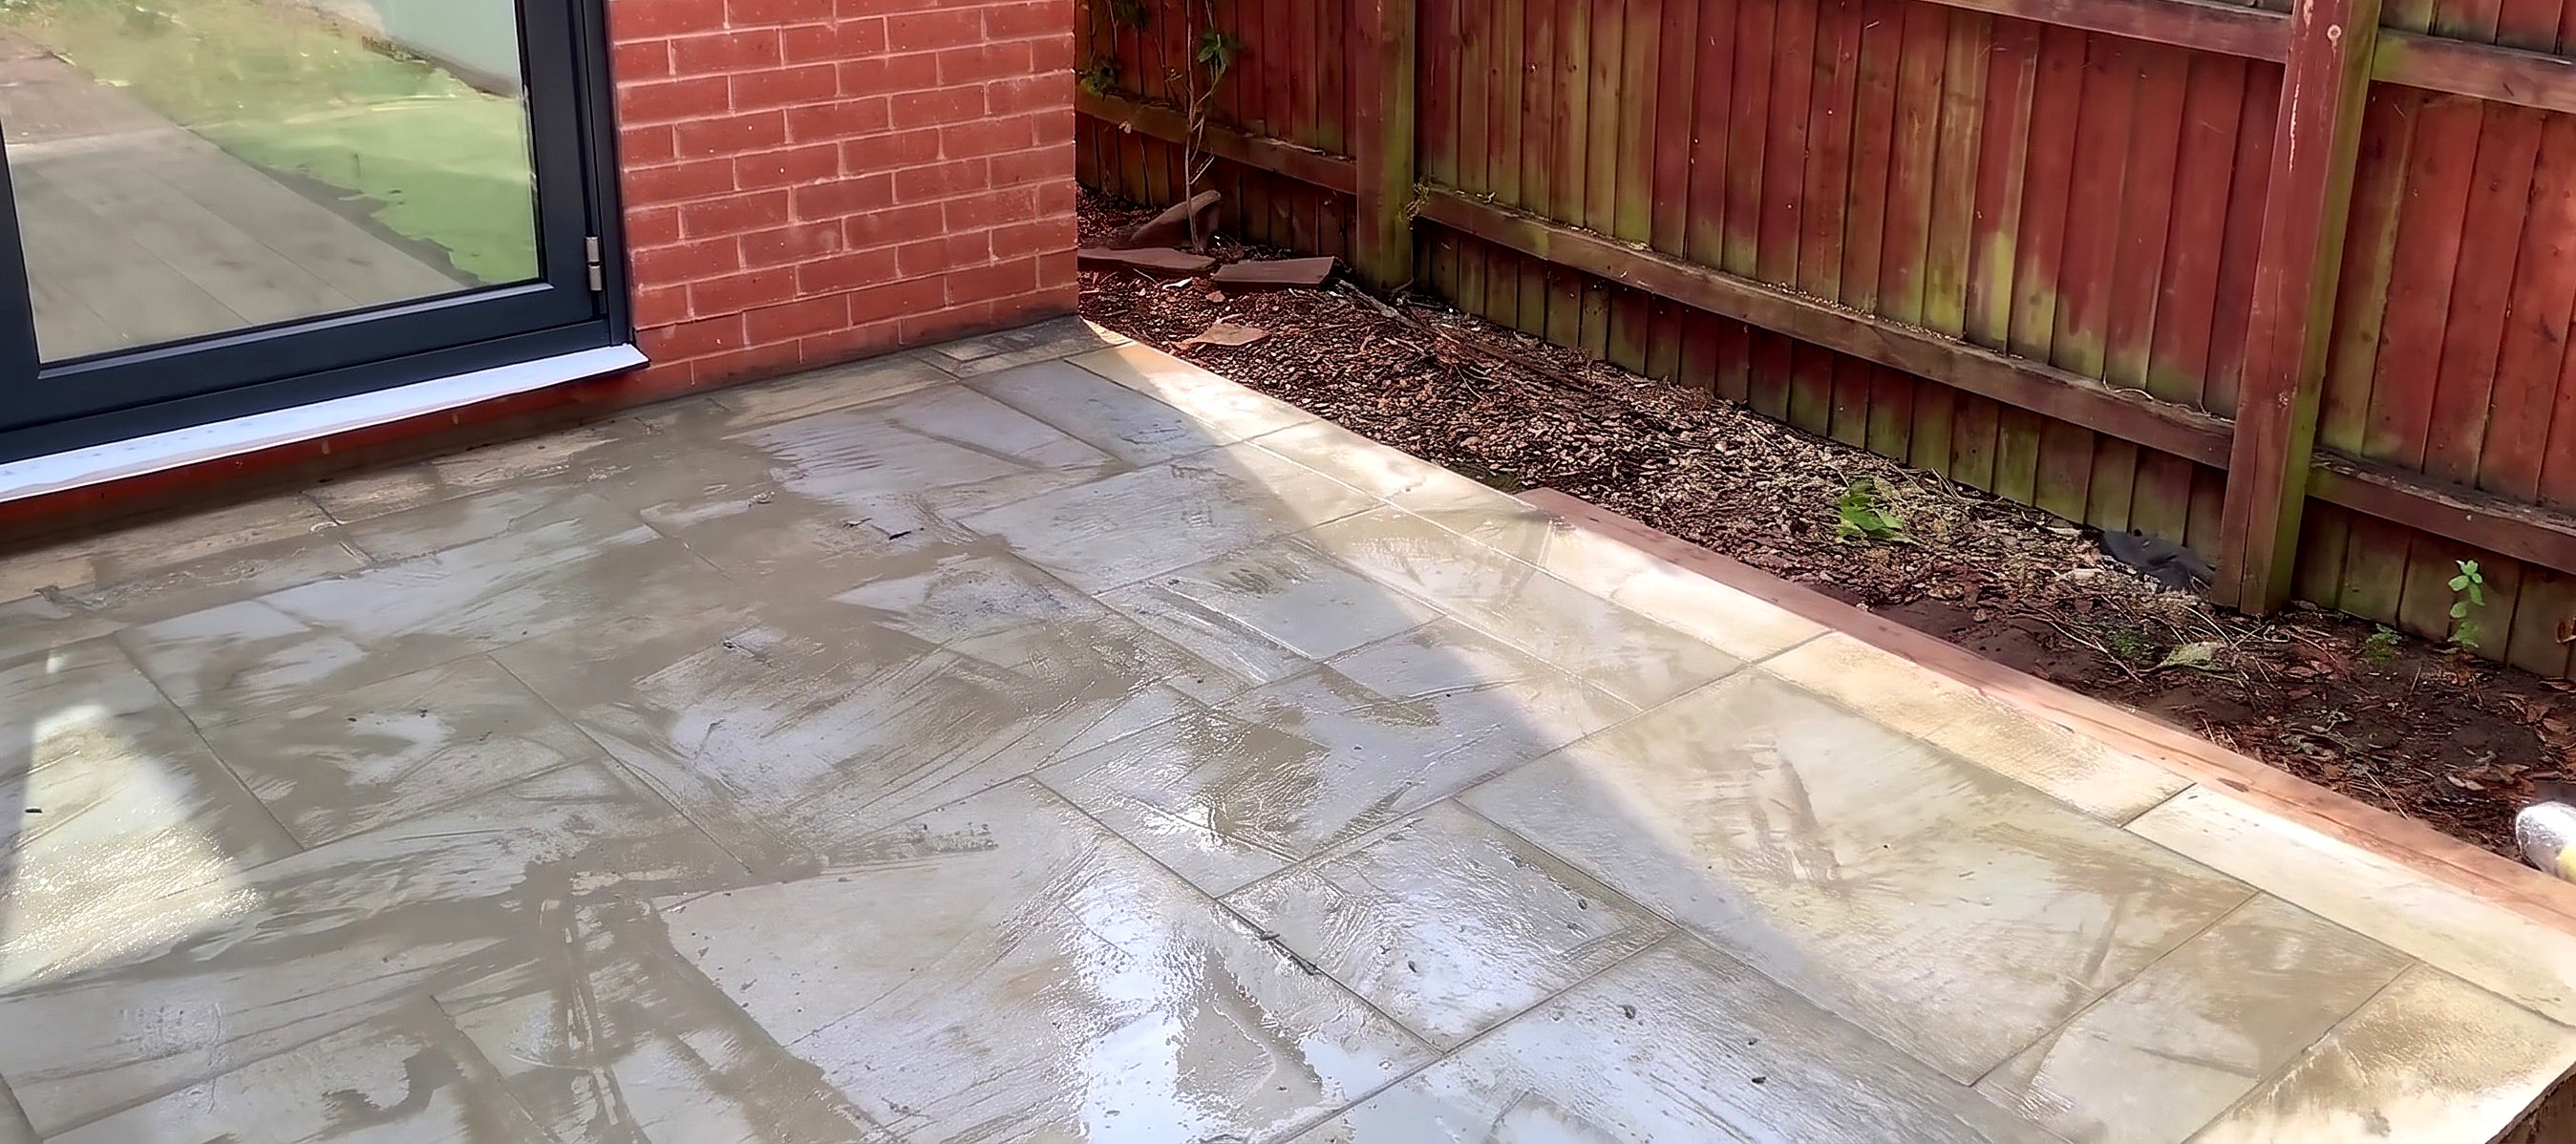
Parts in this step: (A) Grey porcelain patio tiles, (B) Ivory porcelain border tiles
You'll need: Pressure washer, Flexible mixing tub, Rubber floor squeegee, Grey porcelain patio tiles, Ivory porcelain border tiles, Exterior jointing grout
- 7.1 Pre-wet the porcelain tiles with a pressure washer
- With a pressure washer, fan water across the grey porcelain patio tiles (A) and ivory porcelain border tiles (B).
- Soak the slab faces so cementitious grout flows easily and cannot grab dry porcelain.
- 7.2 Pour ribbons of grout slurry and squeegee into the joints
- Block open perimeter and corner joint ends with mortar or timber dams so liquid grout cannot run out.
- Pinch the flexible mixing tub into a spout and pour grout slurry ribbons across the wet tiles.
- Push the slurry back and forth across the joints with the rubber floor squeegee until every joint is full to the top.
- 7.3 Mist the surface and squeegee off excess grout before it sets
- Fan a light water mist over the grouted slabs with the pressure washer.
- Sweep the rubber floor squeegee diagonally across the tiles to clear excess slurry from the slab faces.
- Remove all surface slurry within 20 to 30 minutes before the grout sets rock-hard.
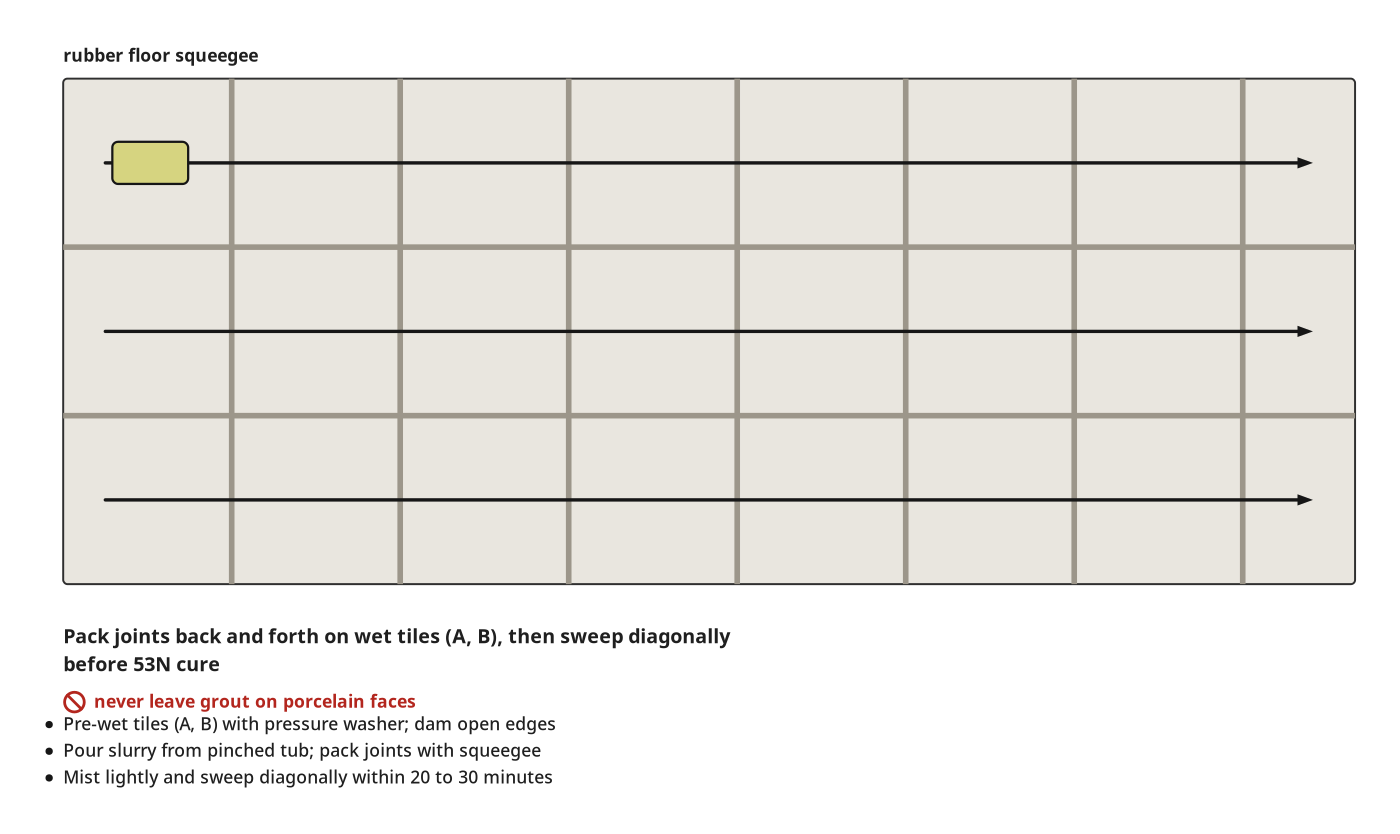
Key measurements
- Grout working and setting window: 20 to 30 minutes before curing rock-solid
- Cured grout compressive strength: about 53 Newtons
- Tip: Dam open perimeter joint ends before pouring so liquid grout stays at full height in edge joints.
- Heads up: Never leave exterior jointing grout on porcelain faces; it sets to 53 Newtons in 30 minutes and permanently ruins the tiles.
Before you move on: Inspect every joint to confirm no sunken voids remain and verify that only a thin damp film remains on the tile faces.
Step 8: Wash off remaining grout residue with a pressure washer
Remaining grout residue is pressure-washed off the grey field tiles and ivory border strips, leaving clean slabs and hard, flush joints.
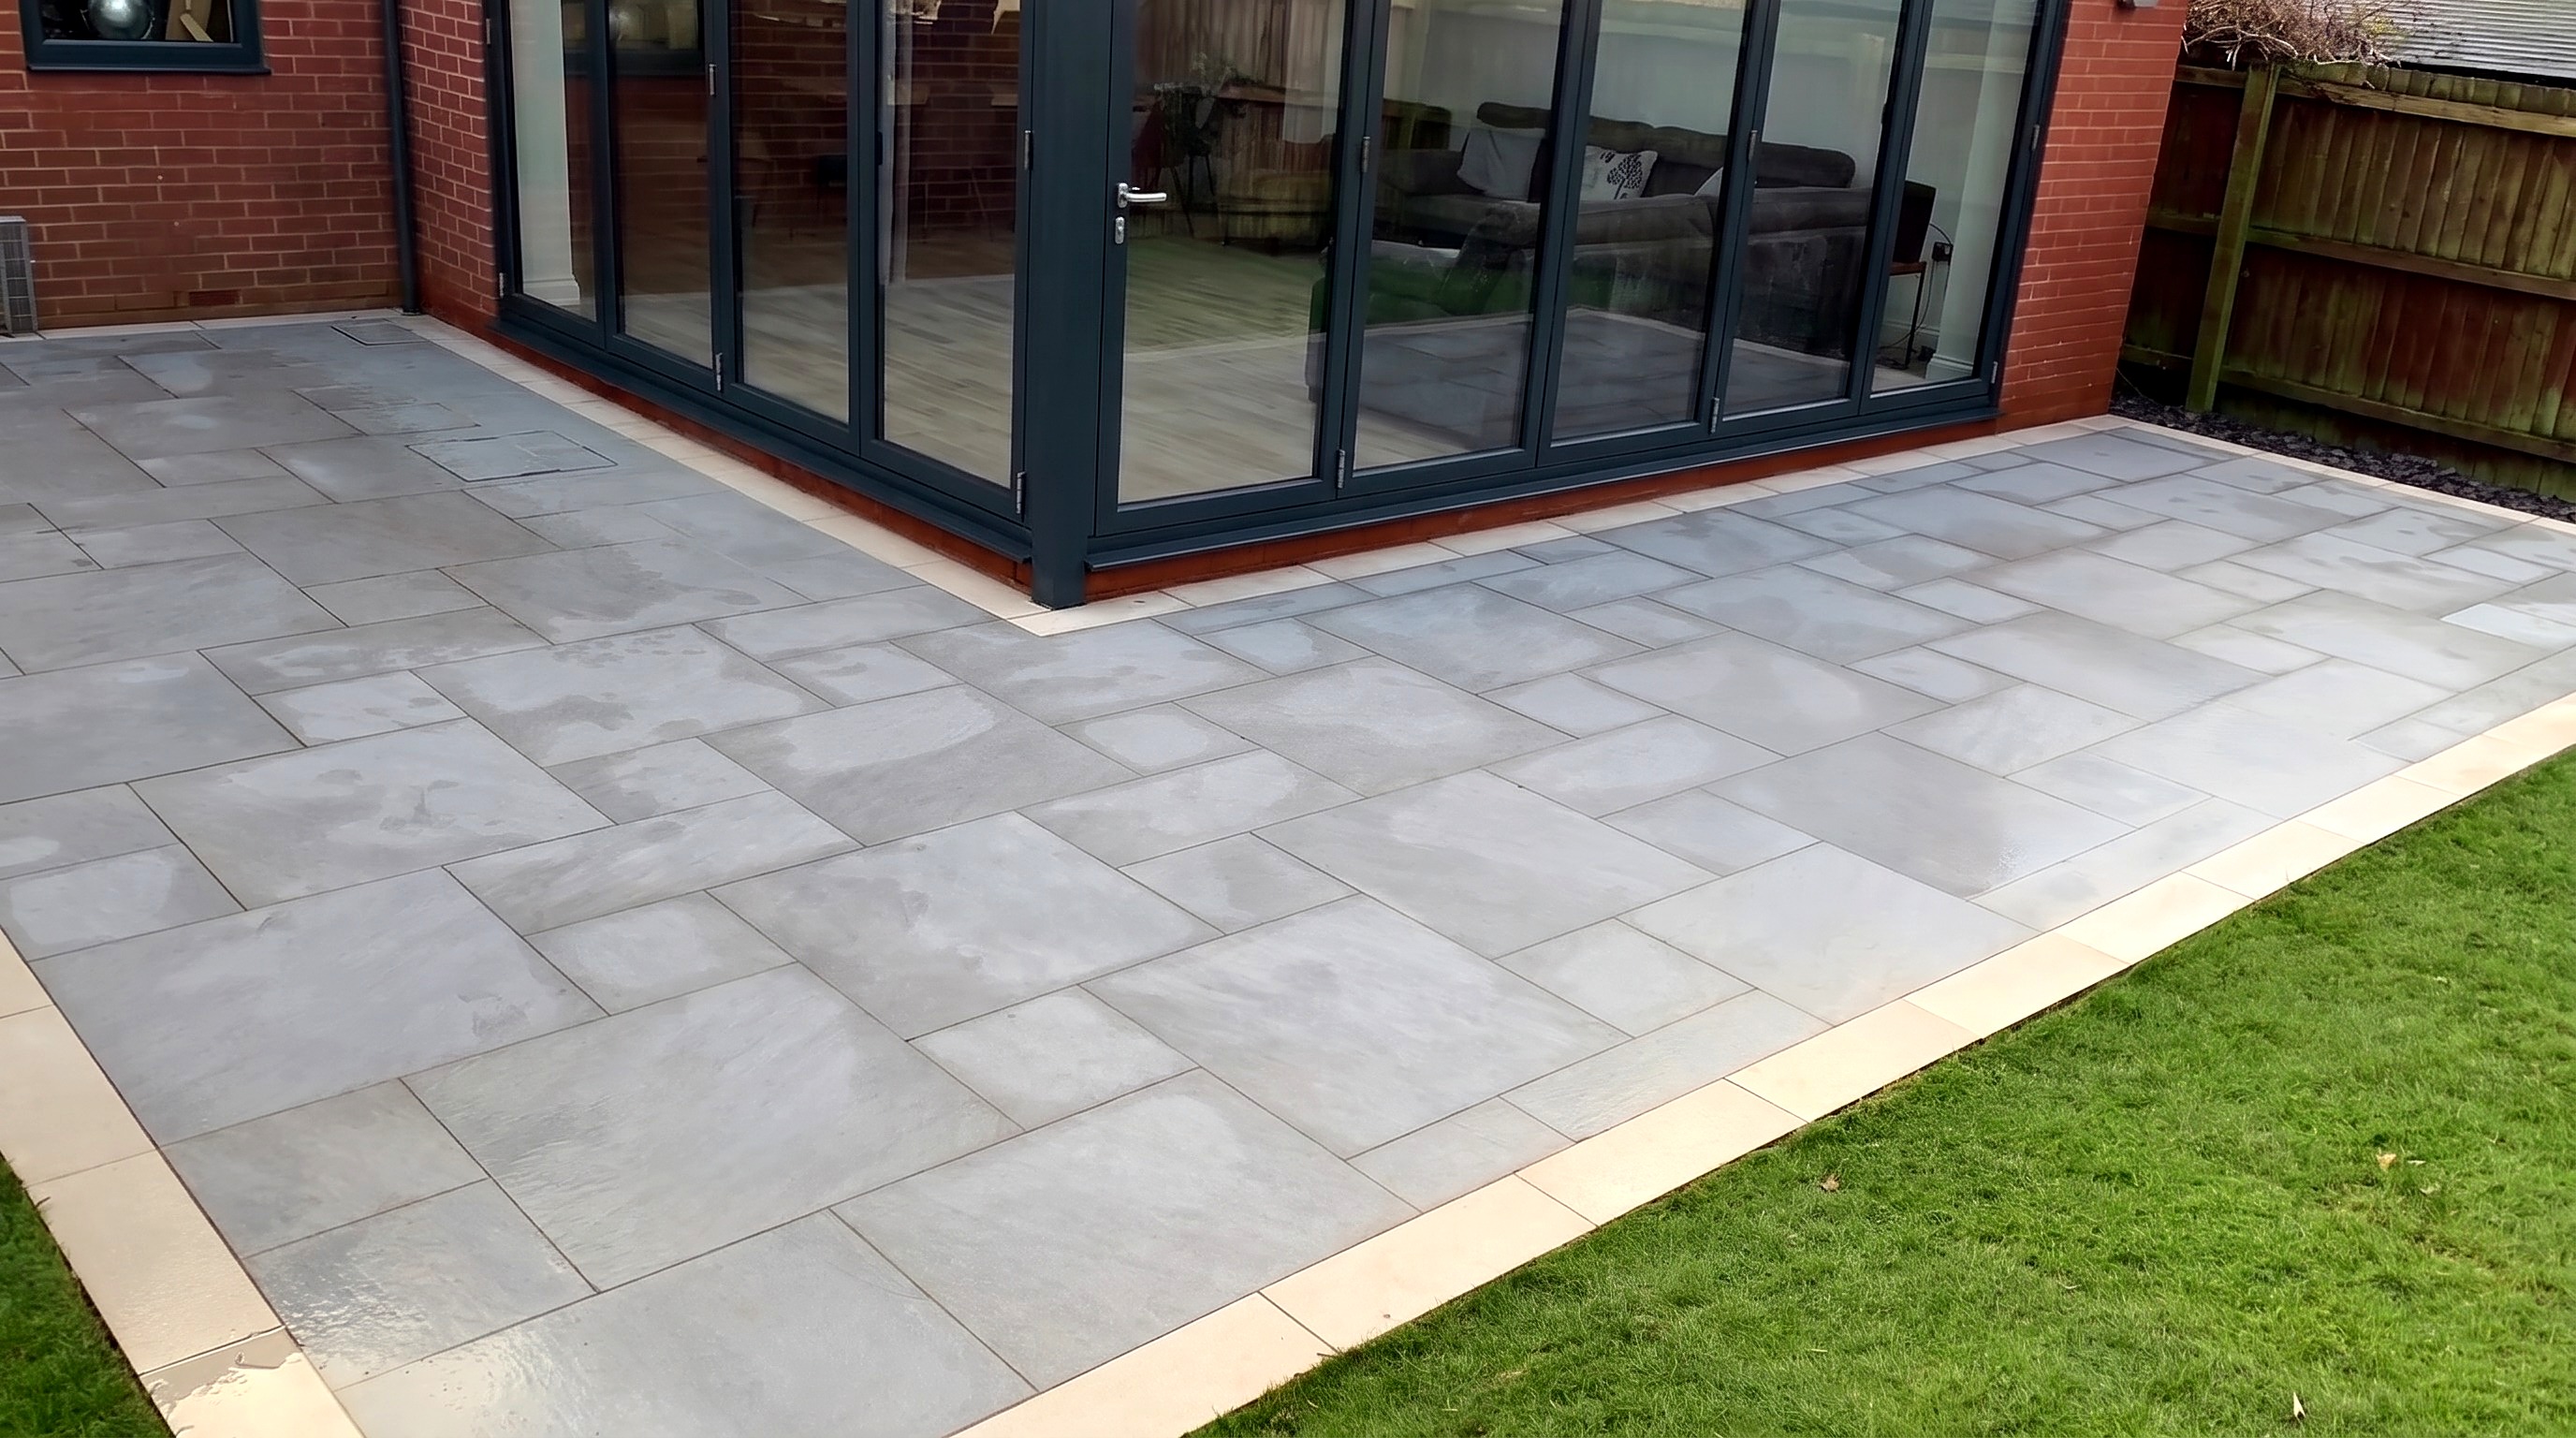
Parts in this step: (A) Grey porcelain patio tiles, (B) Ivory porcelain border tiles
You'll need: Pressure washer, Grey porcelain patio tiles, Ivory porcelain border tiles, Exterior jointing grout
- 8.1 Pressure-wash the grey field tiles toward the outer edge
- Let the joint grout firm up for a few minutes after squeegeeing.
- Sweep a pressure washer fan spray across the grey porcelain patio tiles (A) from the house wall to the outer edge.
- 8.2 Rinse the ivory border tiles clean
- Rinse the 200mm ivory porcelain border tiles (B) with the pressure washer fan spray to remove grey grout haze.
- Wash remaining residue off the outer patio edge.
Key measurements
- Final wash wait time: a few minutes after squeegeeing, until joints firm up
- Tip: Wash from the house wall toward the outer border so rinse water follows the 10mm-per-meter drainage fall.
- Heads up: Angle the pressure washer fan across the tile surface instead of blasting straight down into fresh joints.
Before you move on: Sight across the wet grey and ivory porcelain surfaces to check zero grout haze remains on the slab faces.
Finishing
Drain inlays and edges
- Once outer surround slabs cure overnight, cut and bed porcelain inlays in both recessed manhole covers (C).
- Remove temporary perimeter joint dams once exterior jointing grout cures hard.
Cure and traffic
- Let bedded porcelain slabs cure overnight before standing on them for detail cutting.
- Wait until cementitious jointing grout hardens before placing garden furniture on the patio.
Alternatives
- Use a wetter mortar mix instead of semi-dry if you prefer wetter suction when tapping slabs level.
- Lay geotextile membrane under the first 50mm MOT Type 1 layer to stop subsoil migration.
Check before you call it done
| Check | What you should see | If not |
|---|---|---|
| Bridge a long spirit level across adjoining tile joints. | Zero lippage between adjacent slabs and a continuous ~10mm-per-meter fall from the house. | Tap high edges down with the rubber mallet or lift the slab and adjust the semi-dry mortar bed before it cures. |
| Check the exposed outer edges of laid border and field slabs before grouting. | Mortar is packed tight under every slab edge with no hollow gaps. | Pack fresh semi-dry mortar under the open slab edge with a brick trowel. |
| Check the porcelain slab faces and ivory border within 20 minutes of pouring grout. | Surface grout film is squeegeed and washed clean while joints stay full and firm. | Mist at once with the pressure washer and squeegee off residue before the 30-minute cure locks it onto the tile. |
| Check perimeter and corner grout joints along the outer border. | Joints are filled flush to the tile surface without slurry leaking from open ends. | Block open joint ends with mortar or timber and top up with fresh grout slurry. |
These Specs are built from Tidybricks patio restore's video “Porcelain Tile Patio with Contrasting Border and Recessed Drain Covers”. Open the Porcelain Tile Patio with Contrasting Border and Recessed Drain Covers project page.
