Spetz Specs No. 5613: step-by-step build guide
Brick Dome Pizza Oven and Outdoor BBQ Kitchen
The complete step-by-step guide made from Tidybricks patio restore's YouTube video, free on Spetz. For the video, a step-by-step player and answers to your questions, see the Brick Dome Pizza Oven and Outdoor BBQ Kitchen project page.
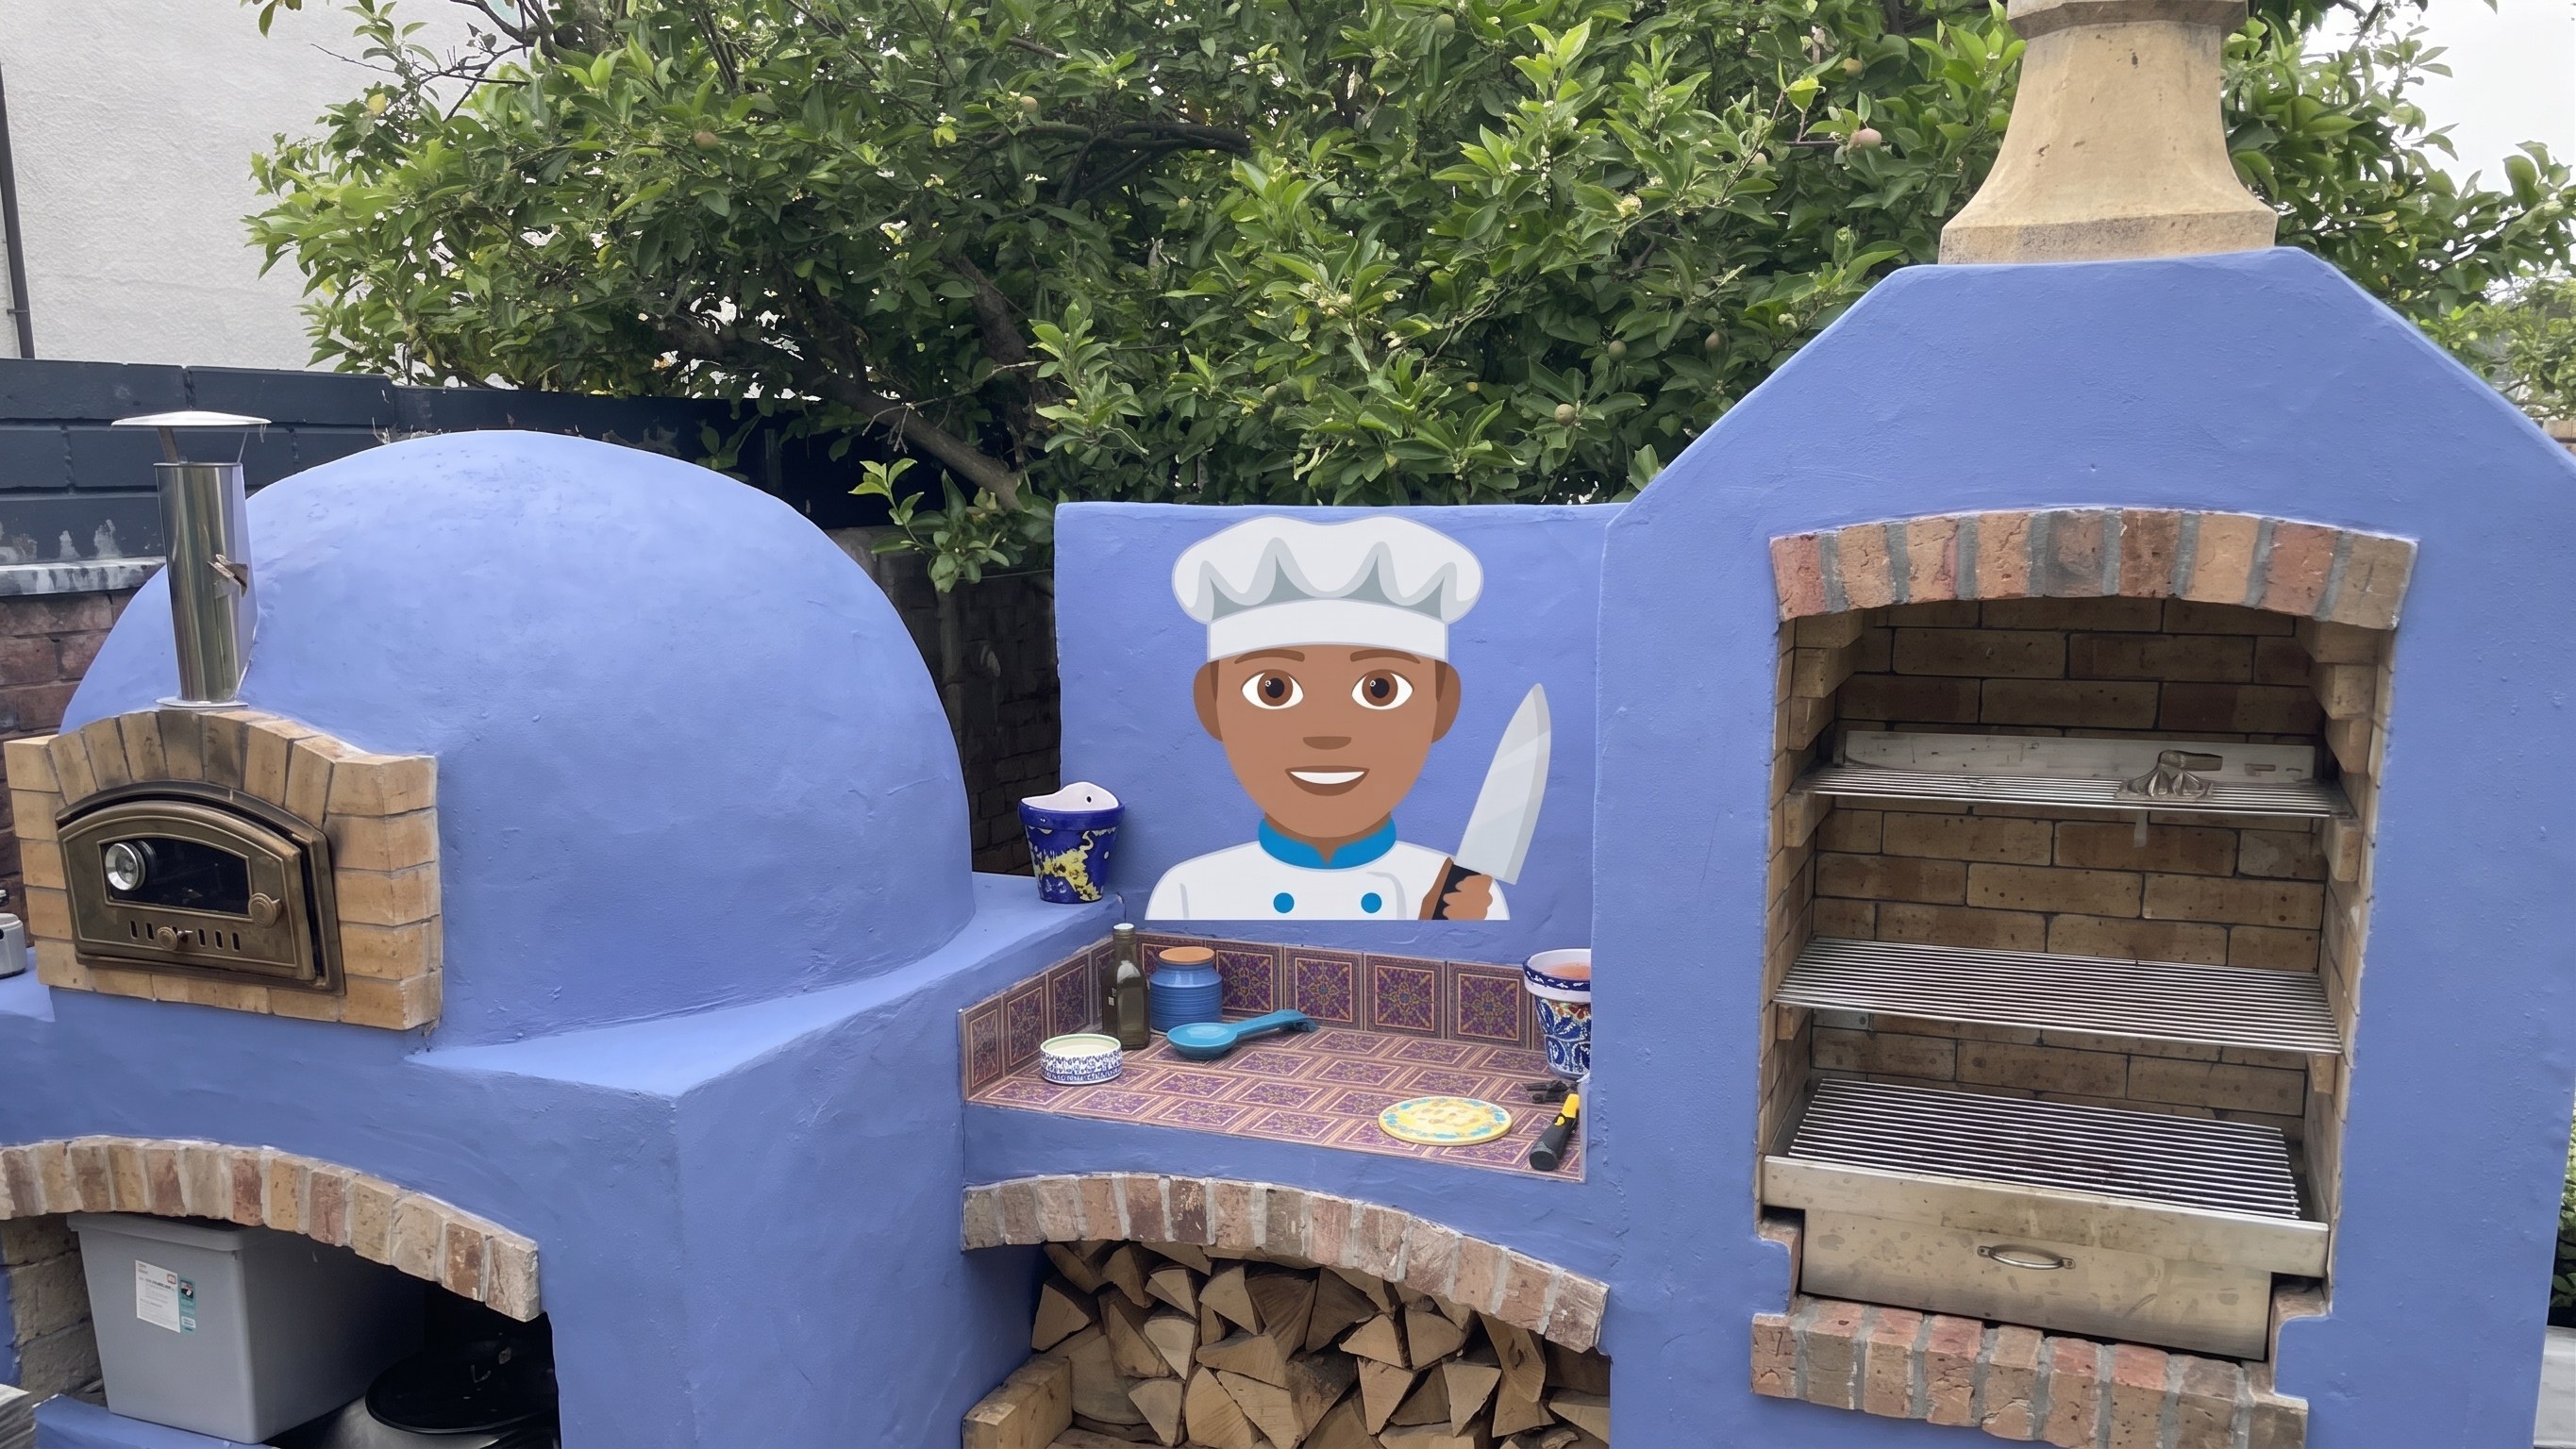
24 steps, 25 parts, 18 tools, 23 materials
Overview
What You Are Building
- Build a masonry outdoor kitchen: wood-fired brick dome pizza oven, central prep counter, and charcoal barbecue.
- Build the base on a reinforced concrete footing: arched log storage bays and a ventilated lintel wood rack.
Why This Design Works
- Lay 9 in concrete blocks flat for wide bearing walls under the 4 in suspended concrete countertop slabs.
- Ceramic fiber board, ceramic blanket, and heatproof screed trap high heat in the fire-brick dome.
What It Takes
- Plan multi-day pauses for the concrete footing, suspended slabs, corbeled brickwork, and dome crown to cure.
- Cut angled fire bricks with a wet brick saw; guide dome courses with a rotating trammel arm.
What Decides Success
- Measure grill insert, arch templates, and slab heights before laying blocks to avoid cutting cured masonry.
- Extend the under-floor insulation board under the outer soldier course so heat cannot drain into the concrete slab.
Health and safety
Angle Grinder and Masonry Saws
- Verify the 9-inch diamond blade matches the angle grinder rotation arrow before mounting, and grip both handles firmly against kickback.
- Wear long trousers, eye protection, and protective equipment when cutting steel rebar mesh so hot grinder sparks miss bare skin.
- Keep hands clear of the wet brick saw blade, feed fire bricks steadily, and keep corded tool plugs out of standing water.
- Grip the corded SDS rotary hammer drill with both hands in case the bit binds in cured concrete or masonry.
Silica Dust and Ceramic Fibers
- Wear a respirator mask, safety glasses, and hearing protection when dry-cutting solid concrete blocks, thermal blocks, or bricks with the angle grinder.
- Wear a respirator mask, gloves, and long sleeves when cutting and wrapping ceramic fiber blanket or board to avoid inhaling refractory fibers.
- Rinse exposed skin with cool water after handling ceramic fiber insulation, and never rub your face or eyes with dusty gloves.
Wet Concrete and Refractory Cements
- Wear waterproof gloves and eye protection when mixing or troweling concrete, mortar, outdoor oven cement, and heatproof screed to prevent alkaline burns.
- Wash wet mortar, concrete, or refractory fire cement off bare skin right away, as prolonged contact causes severe chemical irritation.
Sharp Wire, Rebar, and Screws
- Wear thick work gloves and safety glasses when cutting steel rebar mesh, chicken wire mesh, and tie wire with nippers or pliers.
- Fold cut tie wire and chicken wire ends flat against the dome so sharp points do not puncture hands while troweling screed.
- Watch your hands and knees around the wood screws driven partially into the plywood shuttering before pouring the concrete slabs.
Tools
- Wheelbarrow (builder's wheelbarrow)
- Bricklayer's trowel (pointing and masonry trowels)
- Spirit level (box-beam spirit levels)
- Tape measure (retractable pocket tape measure)
- String line (bricklayer's line and pins)
- Club hammer (lump hammer)
- Framing square (metal L-square)
- Angle grinder (corded 9-inch angle grinder, Makita, 9 in diamond blade)
- Hand saw (wood crosscut hand saw)
- Cordless impact driver (Makita, 18V)
- Wet brick saw (benchtop masonry table saw)
- Soft brush (handheld masonry brush / broom head) (optional)
- Shovel (square-mouth builder's shovel)
- Rotary hammer drill (corded SDS rotary hammer drill) (optional)
- Rubber mallet (optional)
- Sponge (masonry cellulose sponge) (optional)
- End nippers (pincer wire cutters)
- Diagonal pliers (side-cutting pliers)
Materials
- Concrete (site-mixed concrete, 6 in thick footing, 4 in thick countertop slabs)
- Steel rebar mesh (welded steel reinforcement mesh)
- Concrete blocks (solid dense concrete blocks, 9 in and 4 in)
- Mortar (sand and cement masonry mortar)
- Concrete lintels (6, precast reinforced concrete lintels)
- Stainless steel BBQ grill insert (1, drop-in charcoal BBQ grill grate with ash pan drawer)
- Plywood (structural plywood sheet)
- Timber (treated softwood framing lumber)
- Wood screws (countersunk screws)
- Rustic red bricks (reclaimed-style facing bricks)
- Outdoor oven cement (refractory fire cement, VITCAS, VITCAS OC, 20kg tubs)
- Fire bricks (refractory fire bricks, VITCAS)
- Ceramic fiber insulation board (rigid high-temperature insulation board)
- Swivel caster wheel (1, plate-mount swivel caster)
- Pizza oven door (1, arched metal oven door with thermometer and viewing window)
- Stainless steel chimney flue (1, flue pipe with rain cap and base plate)
- Clay chimney pot (1, flared terracotta/clay chimney pot)
- Thermal blocks (lightweight aerated concrete blocks)
- Building sand (wet building sand)
- Ceramic fiber blanket (1 roll, high-temperature refractory insulation blanket, 2300 mm cut length)
- Chicken wire mesh (2 rolls, galvanized hexagonal wire netting)
- Tie wire (galvanized binding wire)
- Heatproof screed (5 tubs, ready-mixed refractory screed, VITCAS, VITCAS HPS, 20kg tubs, rated to 1400°C / 2550°F)
Hardware
| Hardware | Size | Count | Used in steps |
|---|---|---|---|
| Mortar | 1, 2, 3, 4, 5 | ||
| Wood screws | ~1 | 4, 8, 11 | |
| 20 kg tubs Outdoor oven cement | 9, 12, 13, 14, 15, 16, 17, 18, 19, 20, 22 | ||
| Tie wire | 23 |
Cut list
| Part | Name | Qty | Size | Notes |
|---|---|---|---|---|
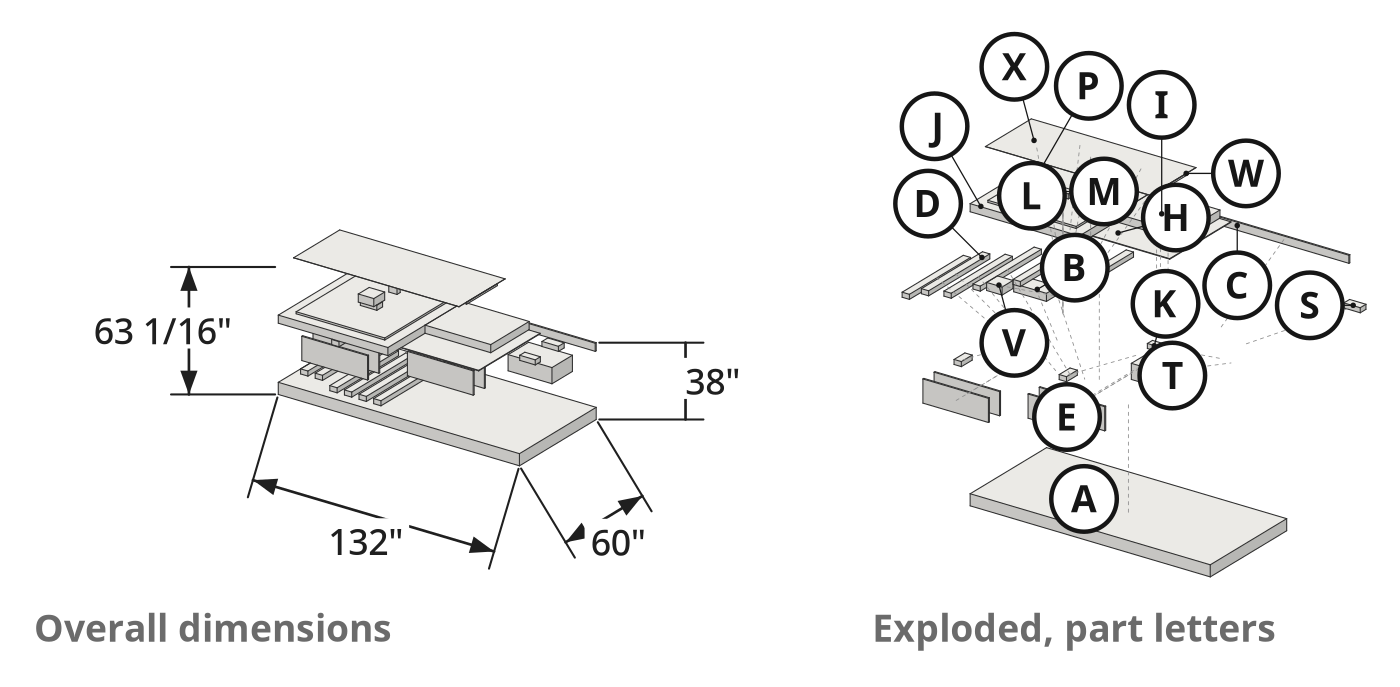
| A | Reinforced foundation footing | x1 | 6" (T) × 60" (W) × 132" (L) | Poured in place with steel rebar reinforcement to support the entire outdoor kitchen footprint |
| B | Main structural base wall blocks | x1 | 4" (T) × 9" (W) × 18" (L) | Laid flat on their 9 in face to provide wide bearing walls for the concrete slabs; four inner blocks cut in half lengthwise to form a ledge for the firewood lintels, and rear prep wall blocks trimmed in height with a 9 in angle grinder |
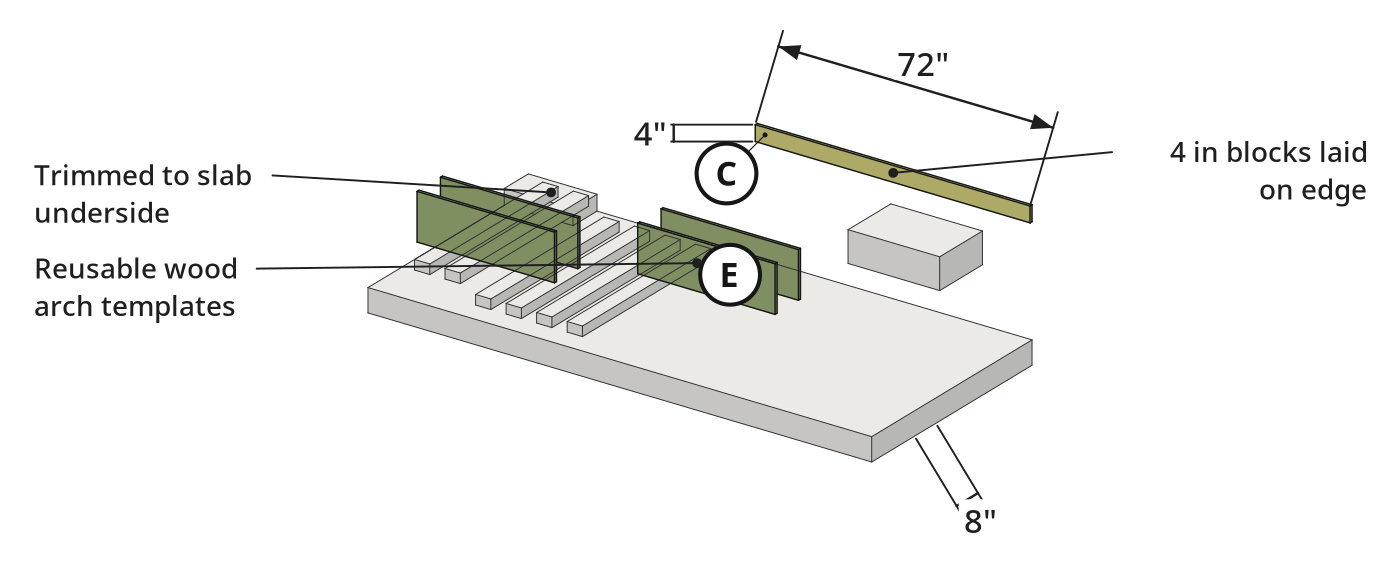
| C | Rear backing wall blocks | x1 | 3/4" (T) × 4" (W) × 72" (L) | Laid on edge behind the prep counter and corbeled BBQ hood to raise the rear wall (~6 ft across) |
| D | Firewood storage rack lintels | x6 | 2 1/2" (T) × 4" (W) × 48" (L) | Bridged front-to-back across the lower pizza oven base walls with air gaps between them for ventilated log storage |
| E | Arch template curved side panels | x4 | 3/4" (T) × 12" (W) × 36" (L) | Cut to the arch curve to make two reusable two-sided arch templates (later trimmed down to fit the BBQ hood arch) |
| F | Arch template timber spacers | x1 | 2x4 (1 1/2" × 3 1/2") × 8" | Crosscut with a hand saw and screwed between the curved plywood side panels to set the arch template width |
| G | Under-slab shuttering panels | x2 | 3/4" (T) × 42" (W) × 42" (L) | One removable sheet propped inside the prep bay and one permanent sheet left inside the pizza oven bay with wood screws driven partially into the top surface to key into the poured concrete |
| H | Countertop and oven slab reinforcement grids | x3 | 1/4" (T) × 48" (W) × 48" (L) | Sliced to bay dimensions with a 9 in angle grinder: 1 grid for the prep countertop slab and 2 stacked grids for the pizza oven base slab |
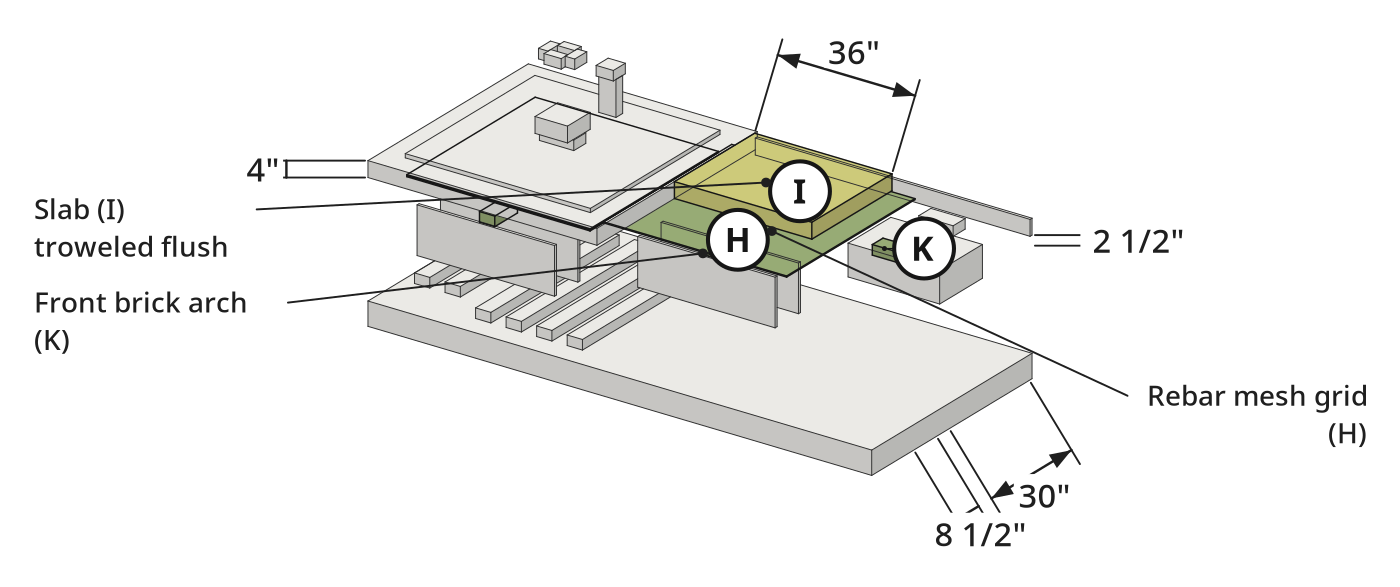
| I | Prep countertop concrete slab | x1 | 4" (T) × 30" (W) × 36" (L) | Poured over the removable plywood shuttering and single rebar mesh grid, troweled flush with the surrounding blockwork |
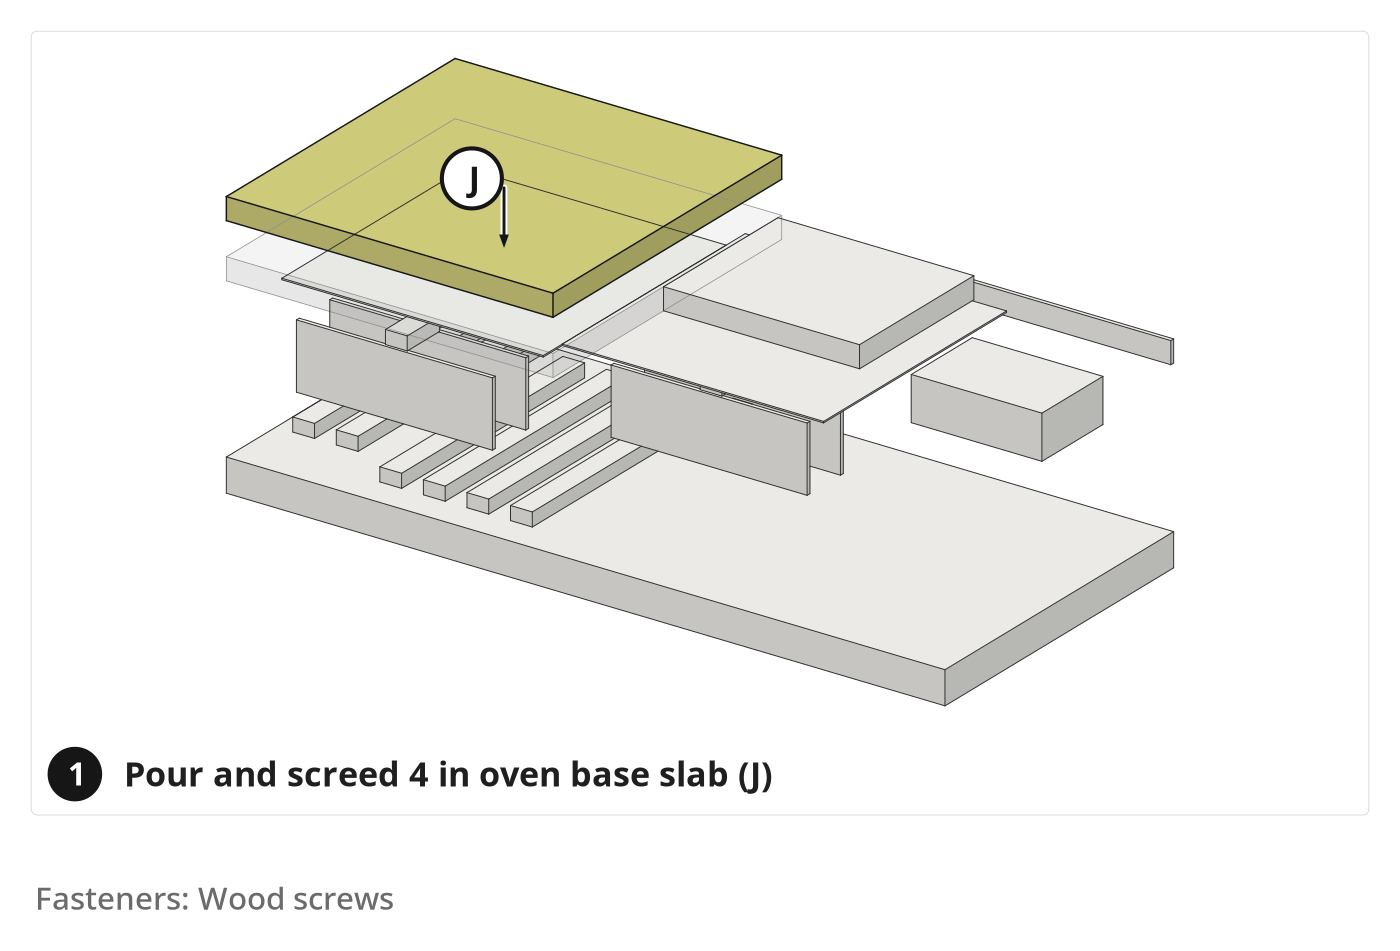
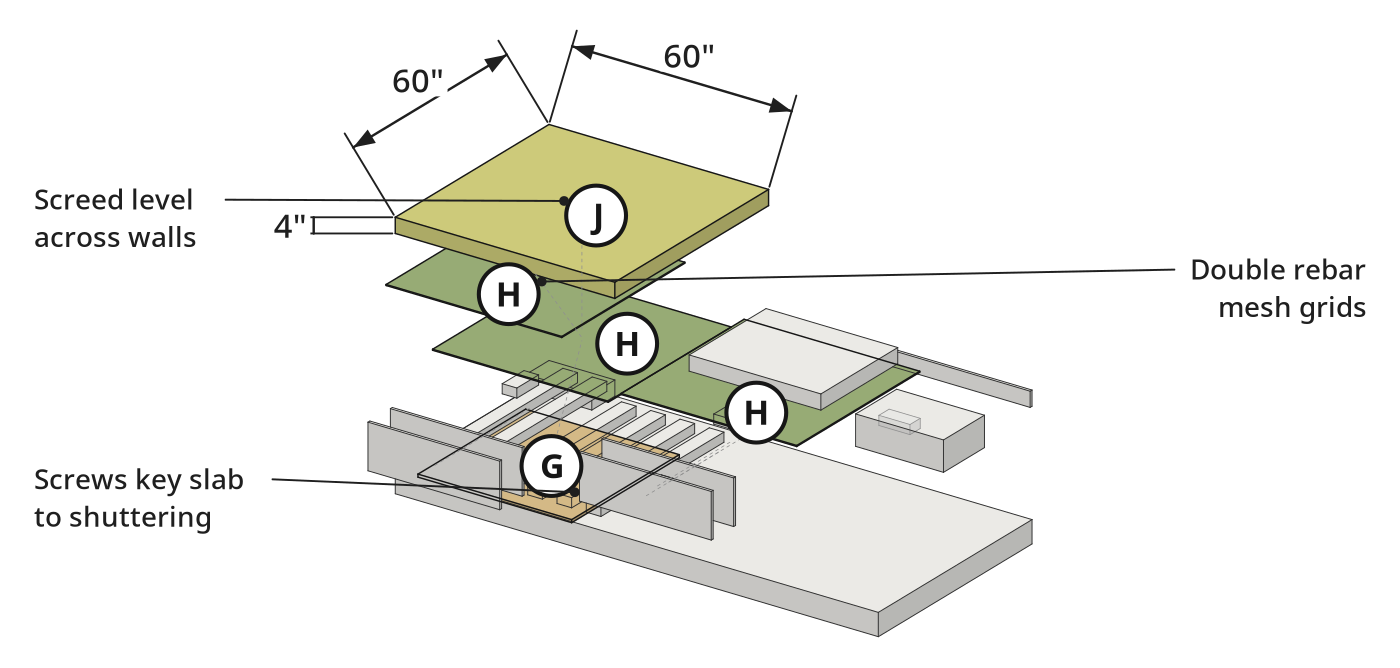
| J | Pizza oven base concrete slab | x1 | 4" (T) × 60" (W) × 60" (L) | Poured over the permanent plywood shuttering and double rebar mesh grids, vibrated with a rotary hammer drill, and screeded flat |
| K | Storage bay and BBQ hood front brick arches | x3 | 2 1/2" (T) × 4" (W) × 8 1/2" (L) | Mortared over the wooden arch templates across the prep bay opening, the pizza oven log store opening, and the upper BBQ hood opening (set proud to allow for exterior render) |
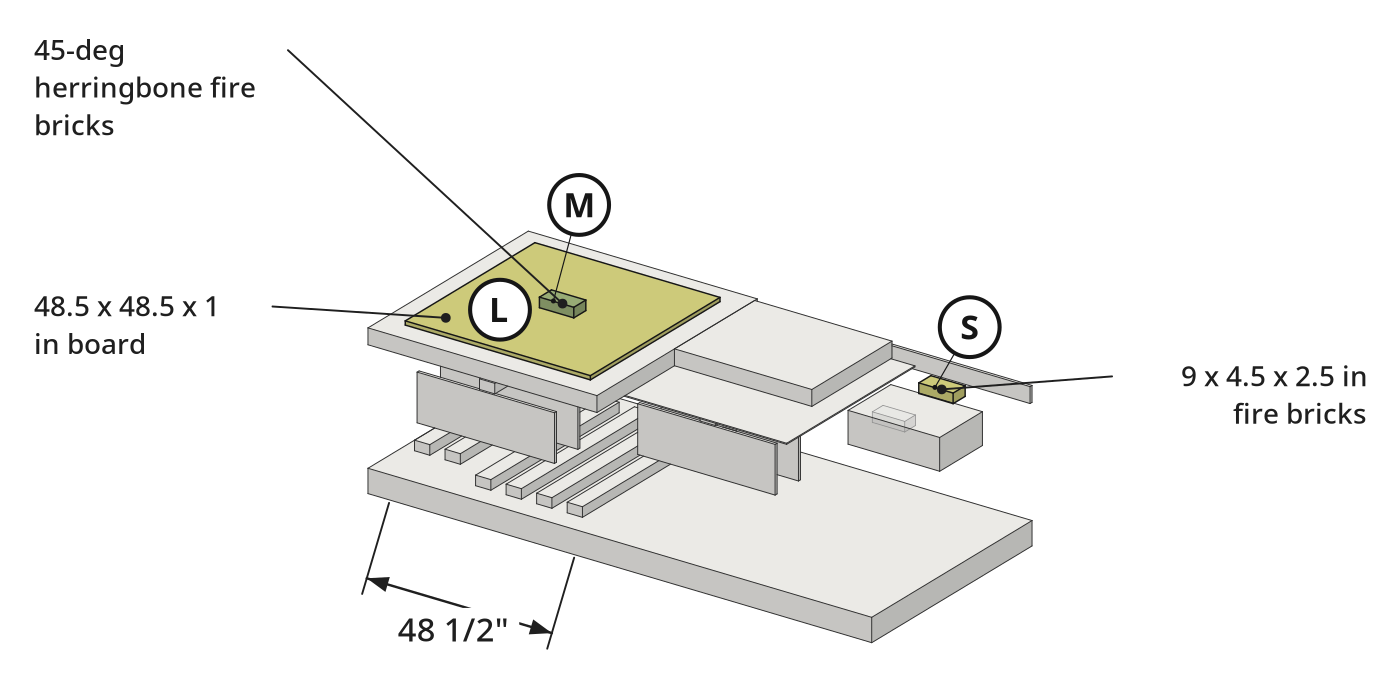
| L | Under-floor oven insulation board | x1 | 1" (T) × 48 1/2" (W) × 48 1/2" (L) | Laid over the cured 4 in pizza oven concrete slab and trimmed with an angle grinder to match the circular oven floor perimeter |
| M | Herringbone oven floor bricks | x1 | 2 1/2" (T) × 4 1/2" (W) × 9" (L) | Whole fire bricks dry-laid in a 45° herringbone pattern over the insulation board, scribed to a circle using a center screw and string compass, and cut along the perimeter curve on a wet brick saw |
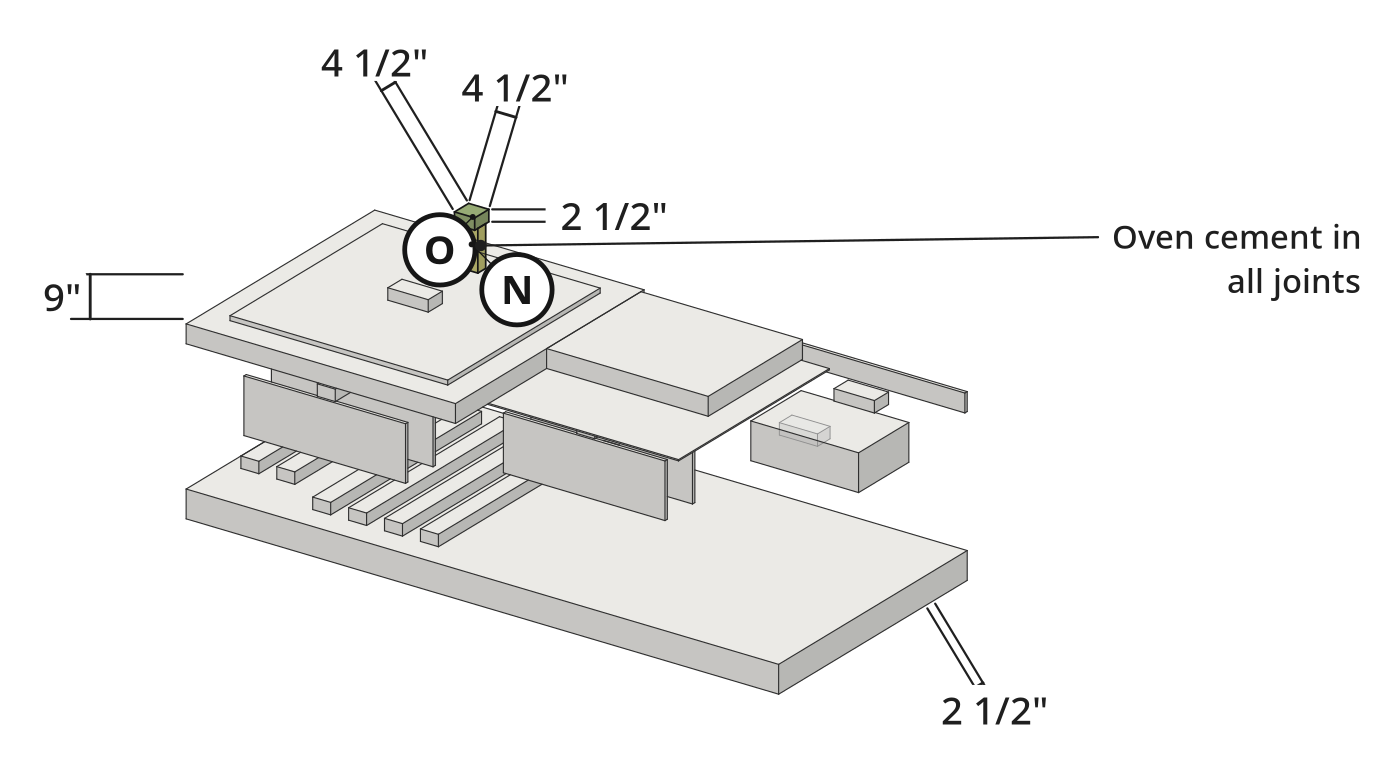
| N | Oven perimeter soldier course bricks | x1 | 2 1/2" (T) × 4 1/2" (W) × 9" (H) | Whole soaked fire bricks mortared vertically around the perimeter of the circular herringbone floor |
| O | Oven dome half-bricks | x1 | 2 1/2" (T) × 4 1/2" (W) × 4 1/2" (L) | Whole fire bricks cut in half crosswise on the wet masonry saw and laid in staggered rings using a rotating trammel arm; upper crown courses side-mitered for tight wedge joints |
| P | Oven crown center brick wedges | x4 | 2 1/2" (T) × 2 1/2" (W) × 4 1/2" (L) | Cut into triangular wedges on the wet saw and packed with oven cement into the final crown gaps between four upright center bricks |
| Q | Pizza oven entry door and arch assembly | x1 | Arched metal oven door framed with mortared fire-brick side pillars and a custom-cut fire-brick entry arch | |
| R | Pizza oven chimney flue | x1 | Set atop the vent opening in the front entry arch and mortared in place with cut fire bricks around the base collar | |
| S | BBQ firebox and corbeled hood bricks | x1 | 2 1/2" (T) × 4 1/2" (W) × 9" (L) | Whole fire bricks mortared around the BBQ bay walls (with two courses offset inward to form shelf ledges), corbeled inward at the top to form the hood, and cut to fit the top ring around the chimney pot |
| T | BBQ grill insert | x1 | 8" (T) × 16" (W) × 24" (L) | Drop-in stainless steel charcoal grill and ash drawer unit fitted into the lower BBQ masonry opening |
| U | BBQ hood chimney pot | x1 | Bedded in outdoor oven cement onto the top opening of the corbeled fire-brick BBQ hood | |
| V | Temporary dome crown support blocks | x1 | 4" (T) × 8 1/2" (W) × 8 1/2" (L) | Aerated thermal blocks cut in half, stacked inside the oven under plastic bags and sculpted wet sand to support the crown courses, then removed through the doorway |
| W | Dome insulation blanket wrap | x1 | 1" (T) × 24" (W) × 90 1/2" (L) | Cut to 2300 mm (2 m 300) to span over the brick dome, tucked tight into the front arch corners with a trowel handle, trimmed, and stitched at the seams with tie wire |
| X | Dome reinforcement wire mesh wrap | x1 | 1/16" (T) × 36" (W) × 90 1/2" (L) | Cut into strips from 2 rolls, draped over the ceramic fiber blanket, and wired tightly together with tie wire |
| Y | Heatproof screed outer dome shell | x5 | ~1 in thick (5 x 20 kg tubs) | Troweled over the chicken wire mesh around the entire pizza oven dome and smoothed with a wet sponge |
What to buy
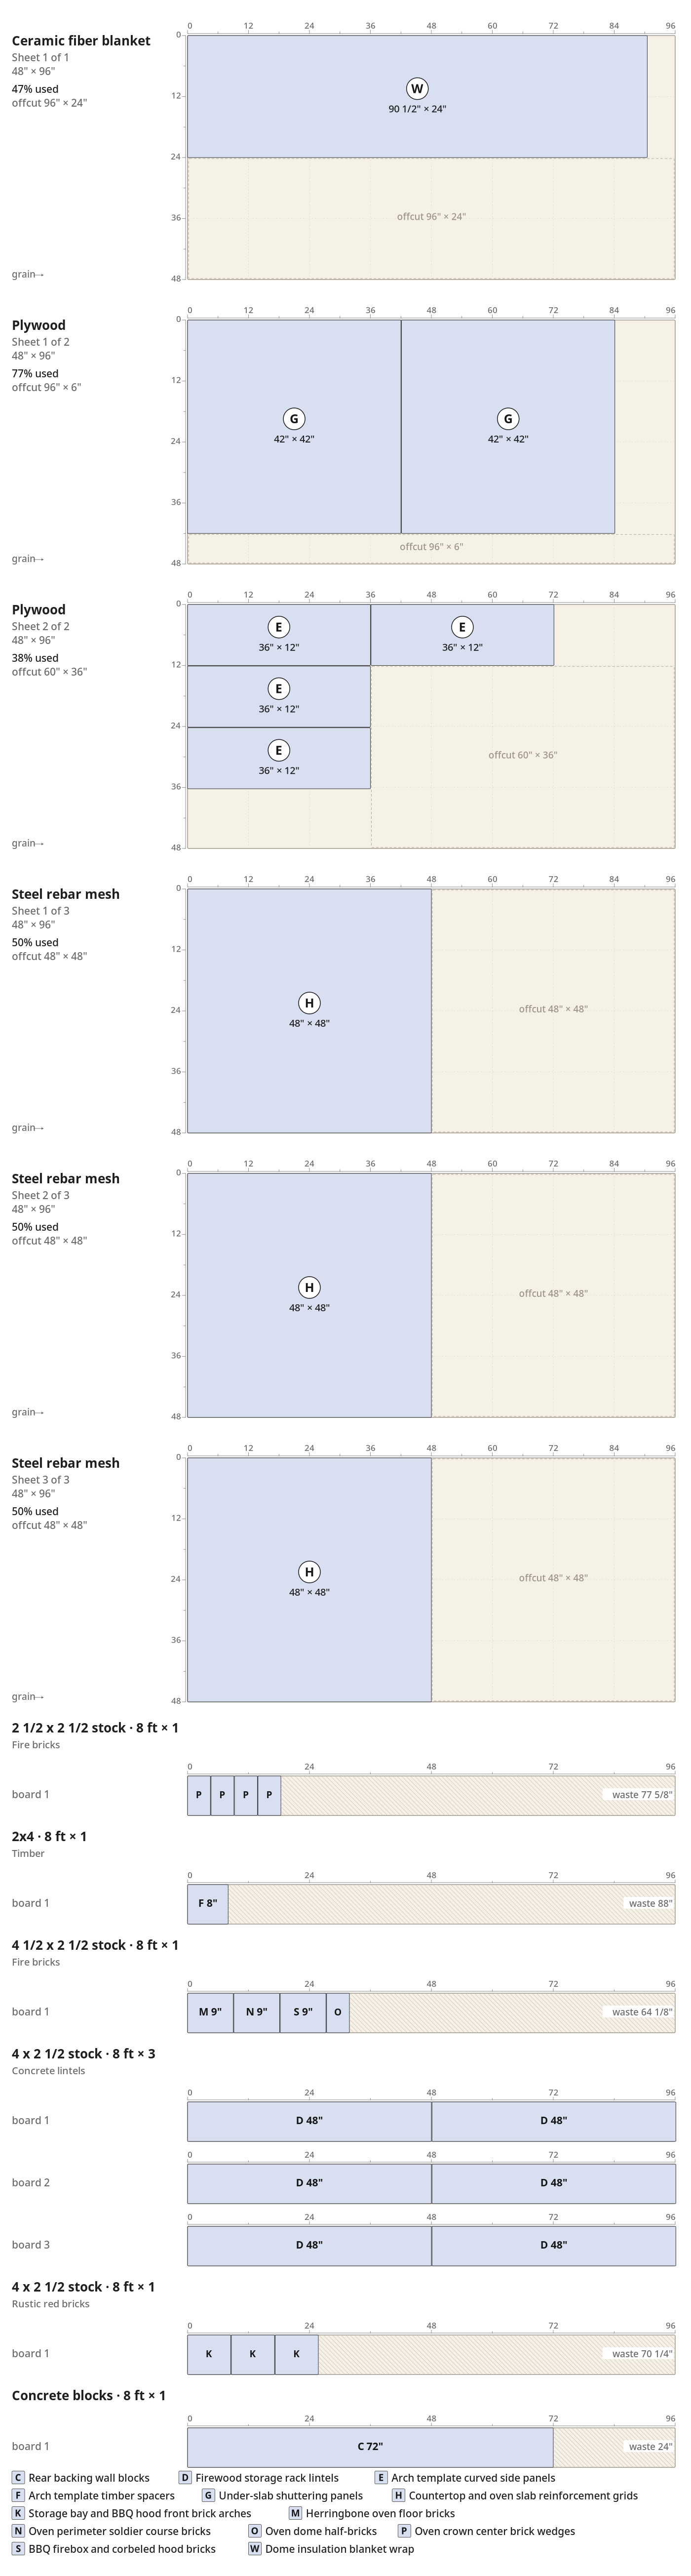
- Buy 1 × 2 1/2 x 2 1/2 stock 8 ft (Fire bricks)
- Buy 1 × 2x4 8 ft (Timber)
- Buy 1 × 4 1/2 x 2 1/2 stock 8 ft (Fire bricks)
- Buy 3 × 4 x 2 1/2 stock 8 ft (Concrete lintels)
- Buy 1 × 4 x 2 1/2 stock 8 ft (Rustic red bricks)
- Buy 1 × Concrete blocks 8 ft (Concrete blocks)
- Buy 1 × Ceramic fiber blanket 4x8 sheet (Ceramic fiber blanket)
- Buy 1 × Ceramic fiber insulation board 4x8 sheet (Ceramic fiber insulation board)
- Buy 1 × Chicken wire mesh 8 ft in all (Chicken wire mesh)
- Buy 1 × Clay chimney pot, (Clay chimney pot)
- Buy 3 × Concrete each (Concrete)
- Buy 1 × Concrete blocks each (Concrete blocks)
- Buy 5 × Heatproof screed, (Heatproof screed)
- Buy 1 × Pizza oven door, (Pizza oven door)
- Buy 2 × Plywood 4x8 sheet (Plywood)
- Buy 1 × Stainless steel BBQ grill insert each (Stainless steel BBQ grill insert)
- Buy 1 × Stainless steel chimney flue, (Stainless steel chimney flue)
- Buy 3 × Steel rebar mesh 4x8 sheet (Steel rebar mesh)
- Buy 1 × Thermal blocks each (Thermal blocks)
Before you start
Footing and Layout
- Pour and cure the 6 in reinforced foundation footing (A) (footprint is not stated; 132 x 60 in is estimated).
- Measure BBQ grill insert (T) and pizza oven door (Q) on site before marking block bay openings.
Materials and Soaking
- Soak fire bricks in a wheelbarrow of water first so dry bricks do not rob cement moisture.
- Stage five 20 kg tubs of ready-mixed heatproof screed to coat the insulated dome in one session.
Step by step
Step 1: Lay the First Concrete Block Courses
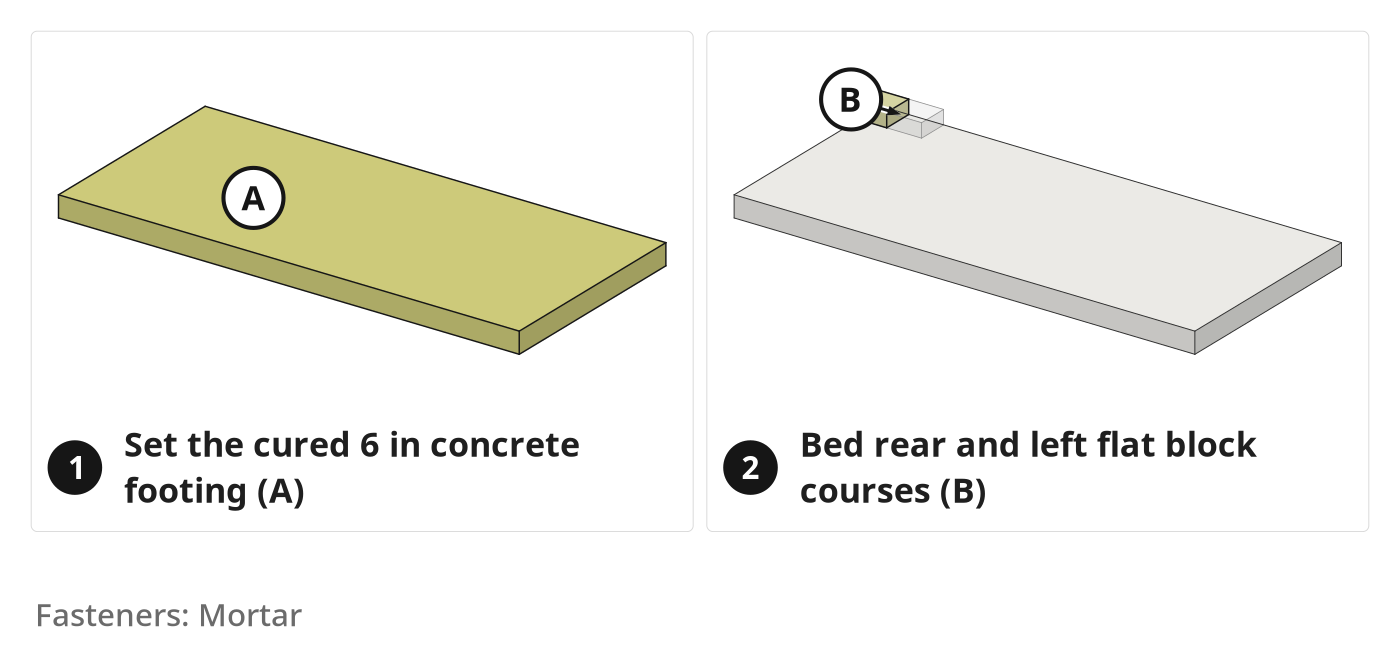
Lay the first flat concrete block courses on the rear and left perimeter of the reinforced concrete footing.
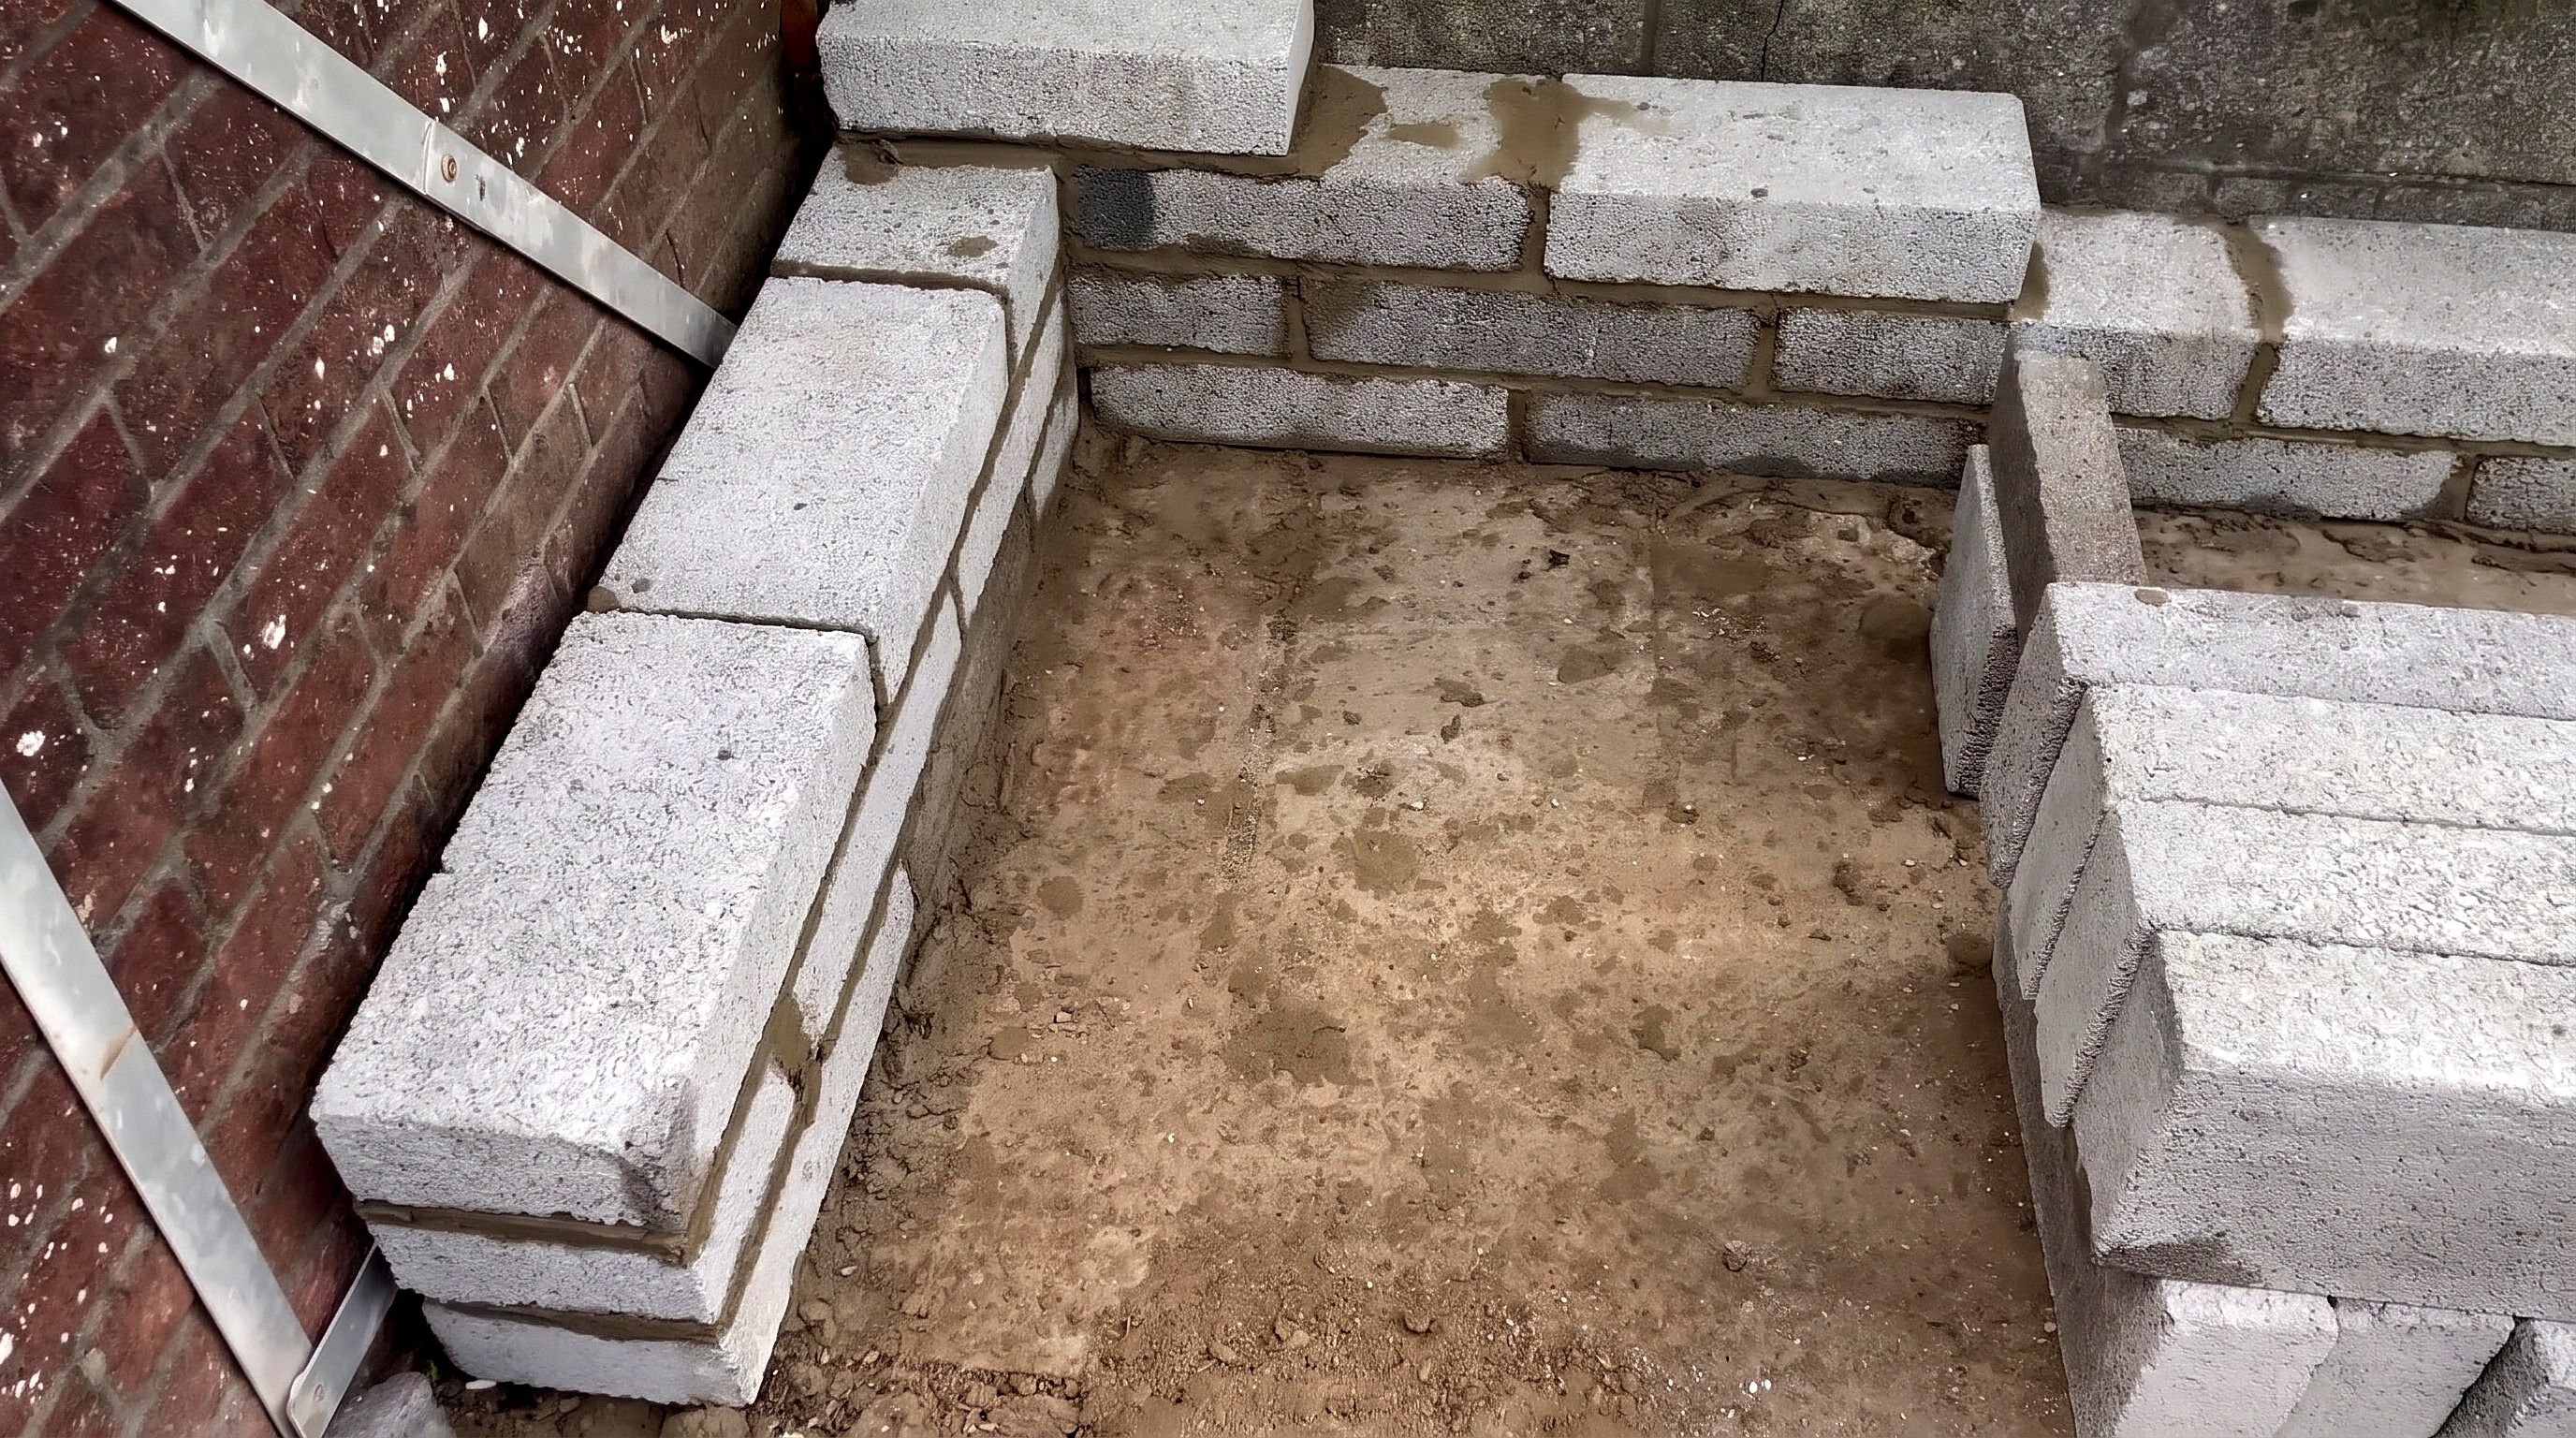
Parts in this step: (A) Reinforced foundation footing, (B) Main structural base wall blocks
You'll need: Wheelbarrow, Bricklayer's trowel, Spirit level, Tape measure, String line, Club hammer, Framing square, Concrete, Concrete blocks, Mortar
- 1.1 Set the Rear Line and Lay the First Flat Block Course
- Stretch a taut string line along the rear edge of the cured 6 in reinforced foundation footing (A).
- Trowel a sand-and-cement mortar bed along the footing line.
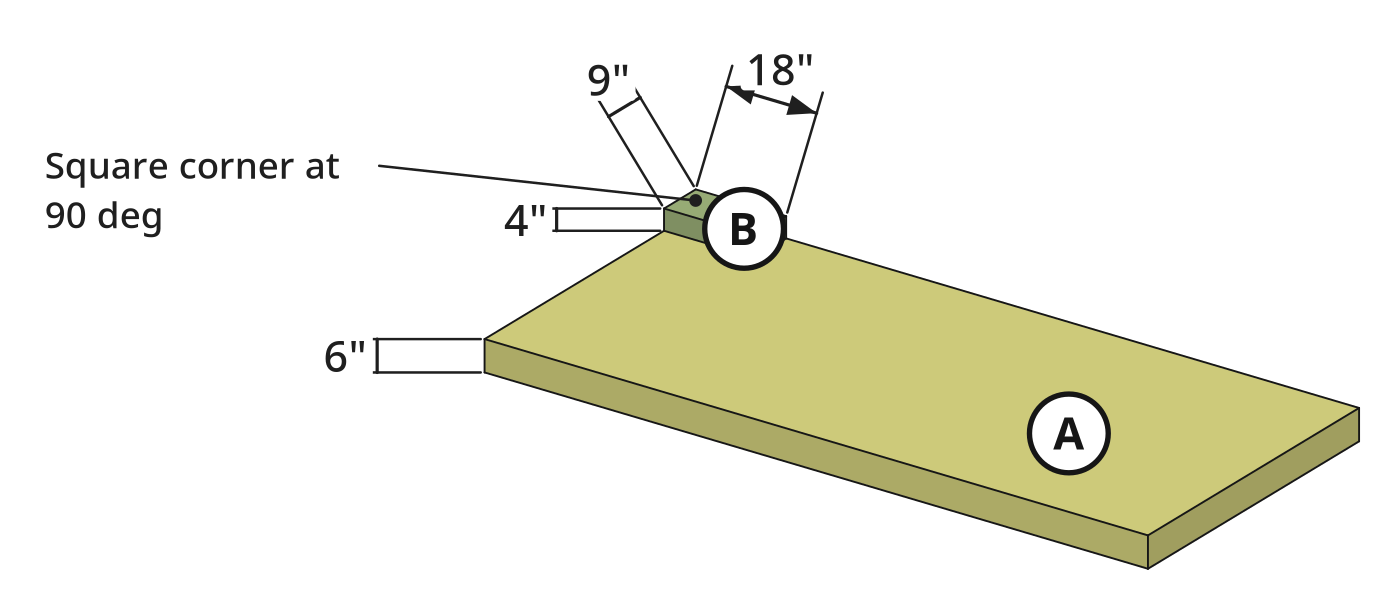
- Lay the main structural base wall blocks (B) flat on their 9 in face (block size is not stated; 18 x 9 x 4 in is estimated).
- Tap each block down with a club hammer to the string line and spirit level.
- 1.2 Build Up the Left Side Wall Courses
- Lay three staggered courses of main structural base wall blocks (B) flat on the left pizza oven wall.
- Keep the side wall at 90 degrees to the rear wall with a framing square.
- Plumb and level each course with a spirit level.
Key measurements
- Foundation footing thickness: 6 in of steel-reinforced concrete
- Main structural wall width: 9 in (concrete blocks laid flat
- Tip: Lay 9 in concrete blocks flat for the main base walls to form a wide bearing ledge for the concrete slabs.
Before you move on: Check the left corner is 90 degrees and the top block course is level.
Step 2: Build the Base Walls and BBQ Pillars
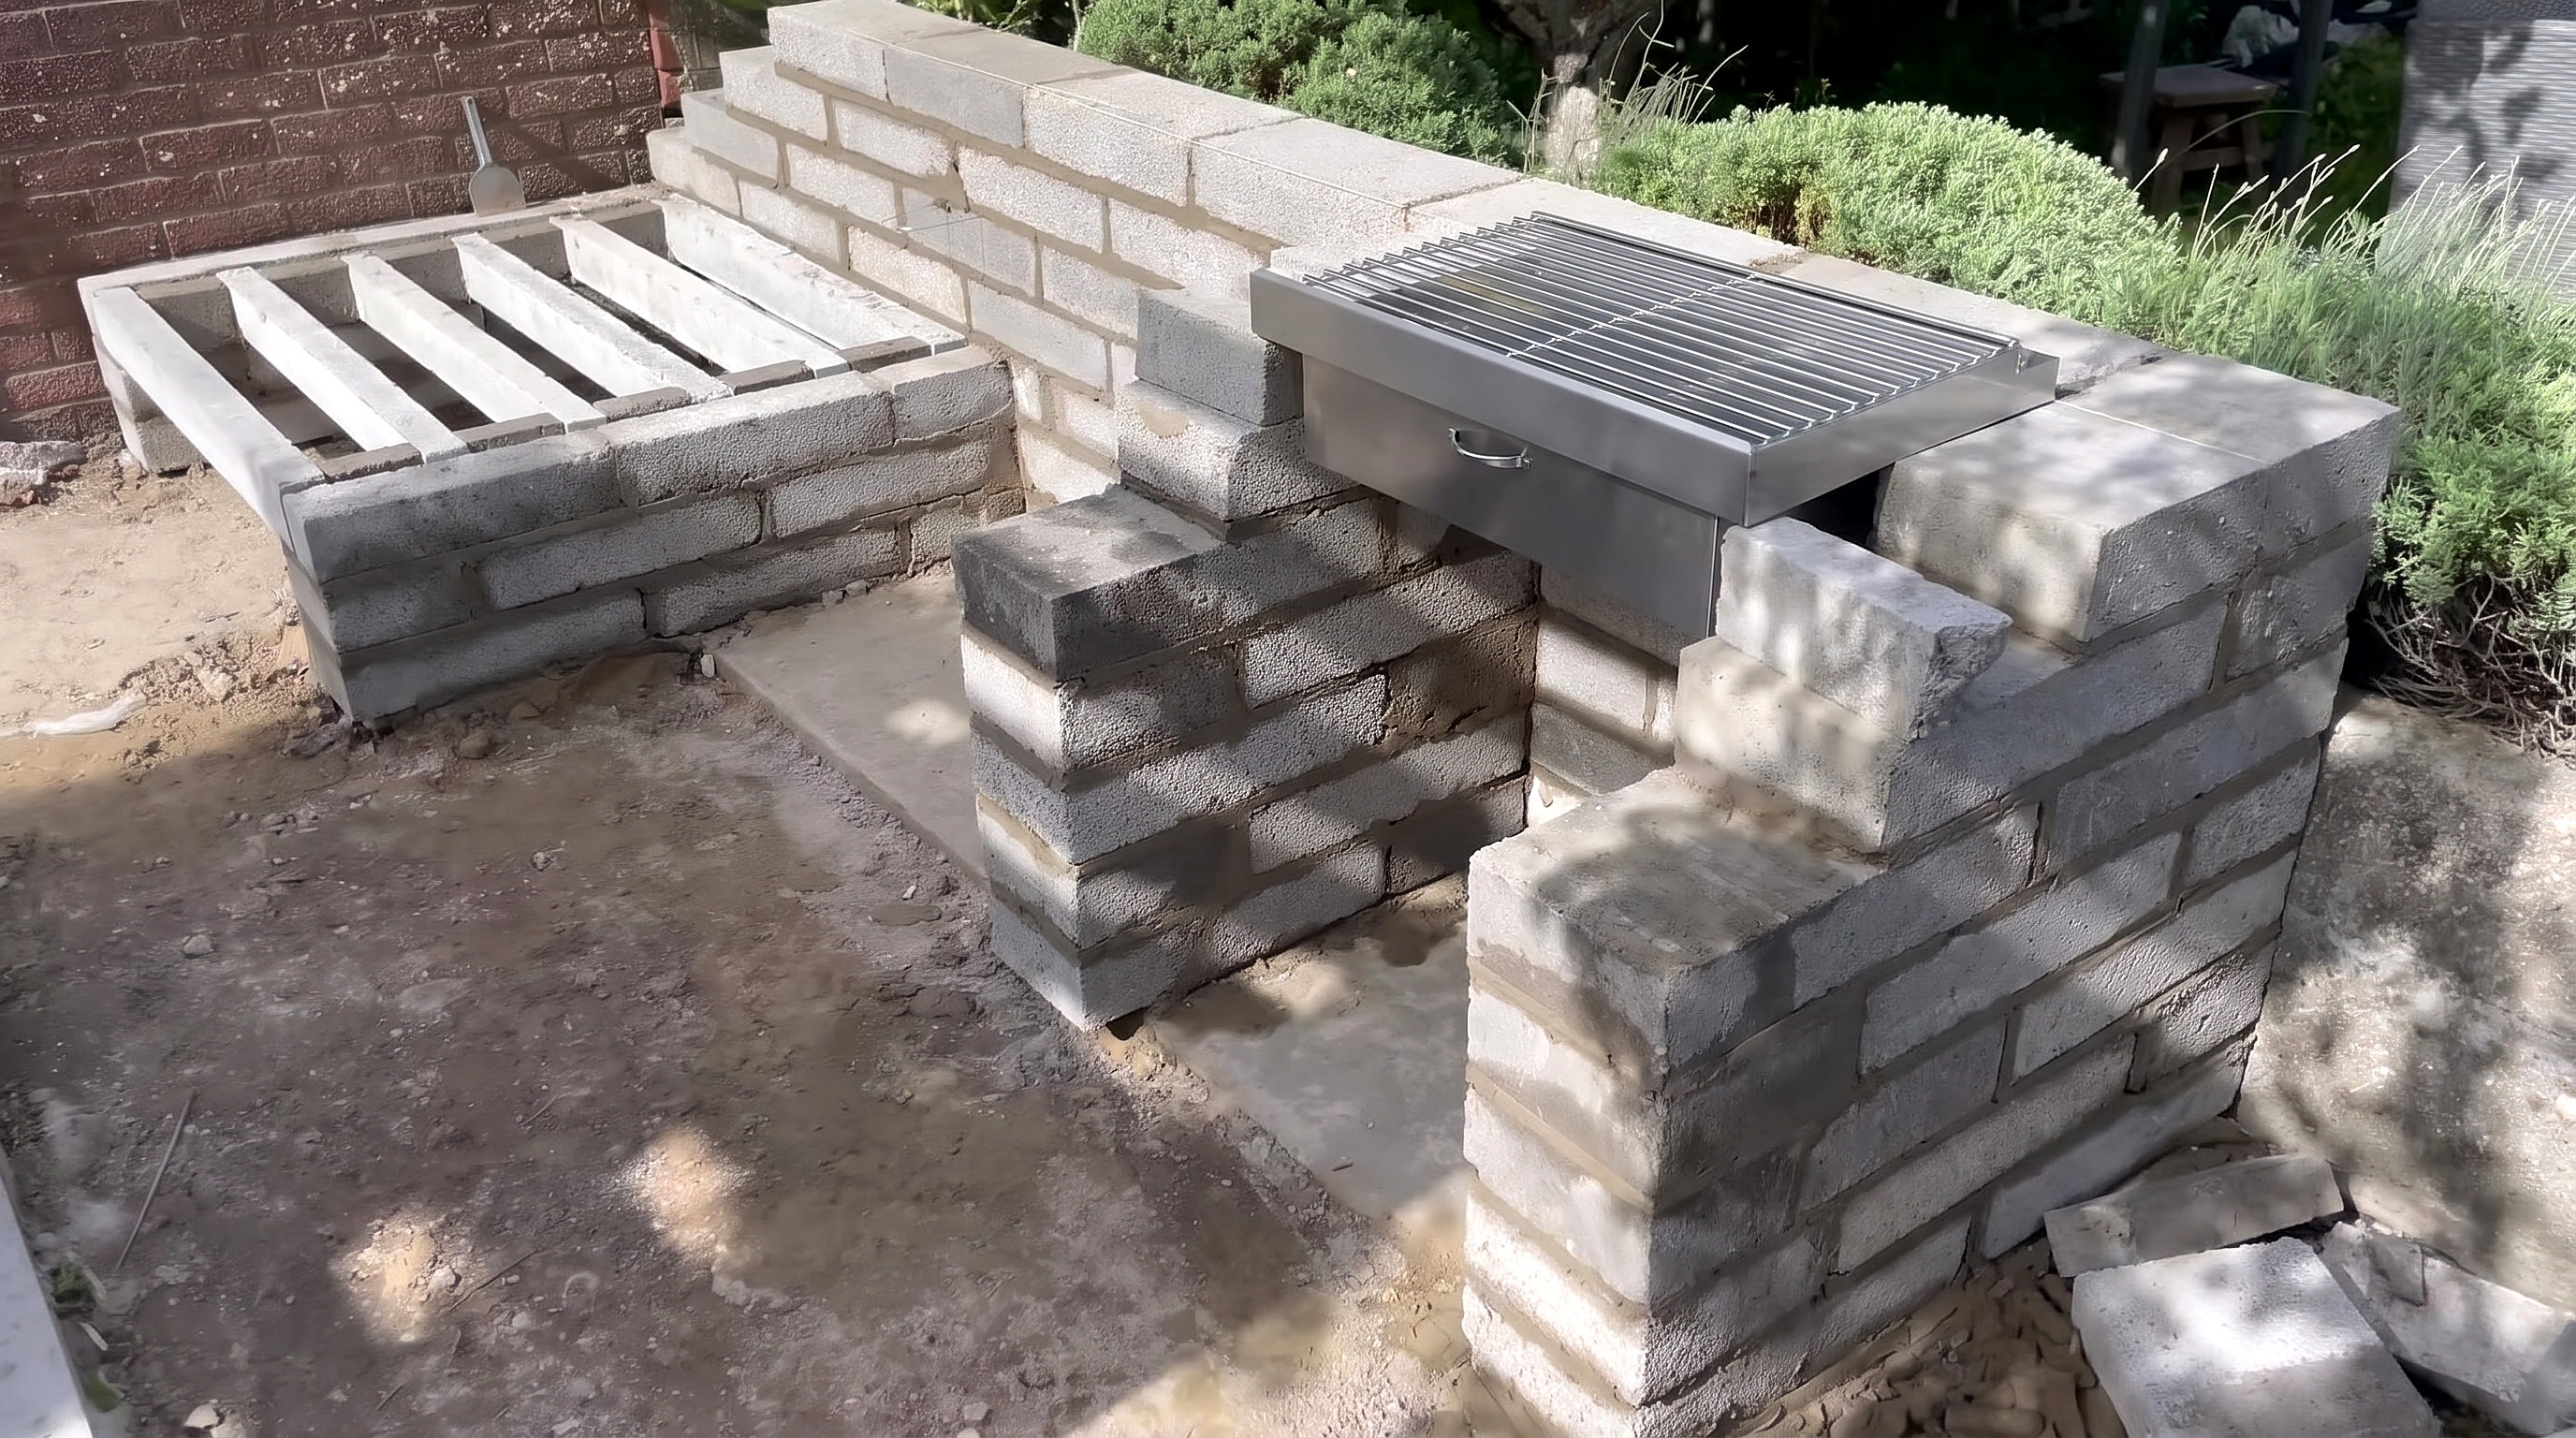
Build the rear wall, internal bay dividers, ventilated firewood lintel rack, and barbecue side piers.
Parts in this step: (B) Main structural base wall blocks, (D) Firewood storage rack lintels, (T) BBQ grill insert
You'll need: Bricklayer's trowel, Spirit level, Framing square, Club hammer, Concrete blocks, Mortar, Concrete lintels, Stainless steel BBQ grill insert
- 2.1 Lay the Rear Wall and Right-Hand BBQ Pier
- Mortar staggered courses of main structural base wall blocks (B) along the rear wall.
- Build the right barbecue-bay return pier with flat blocks.
- Plumb and level every course with a spirit level.
- 2.2 Build the Central Dividing Walls
- Lay the internal dividing wall of main structural base wall blocks (B) between the pizza oven and central prep bays.
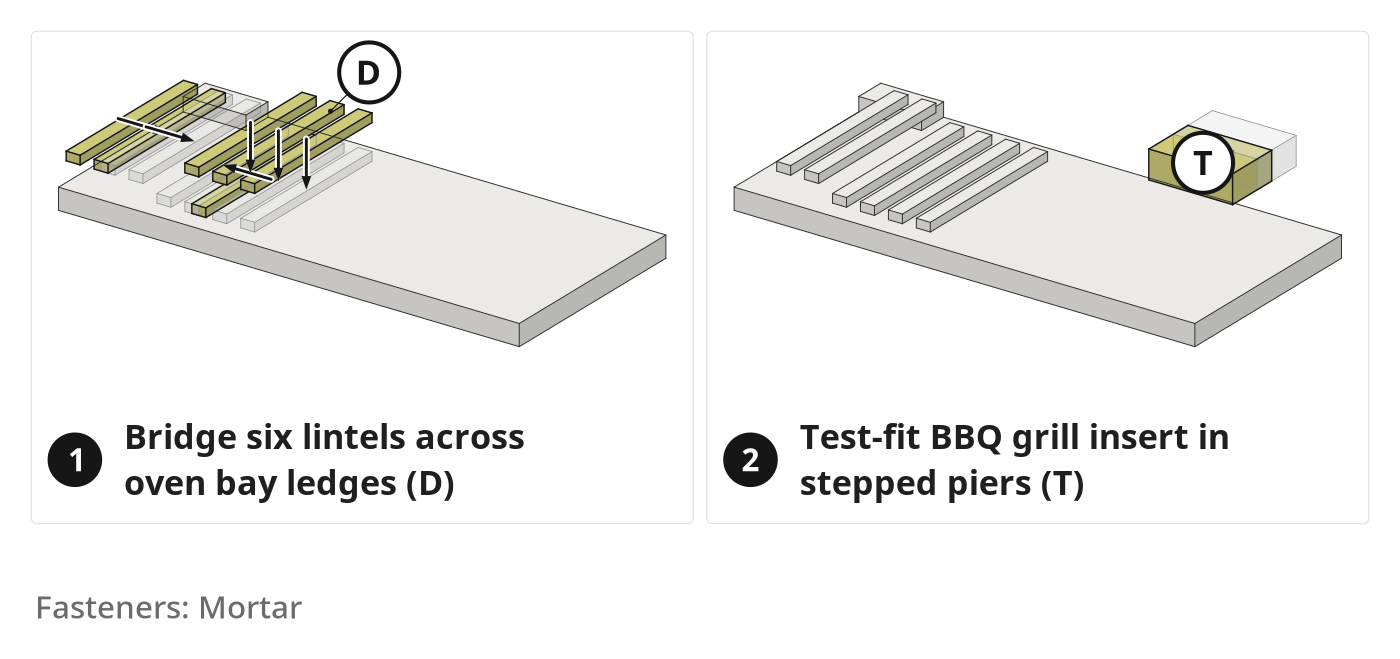
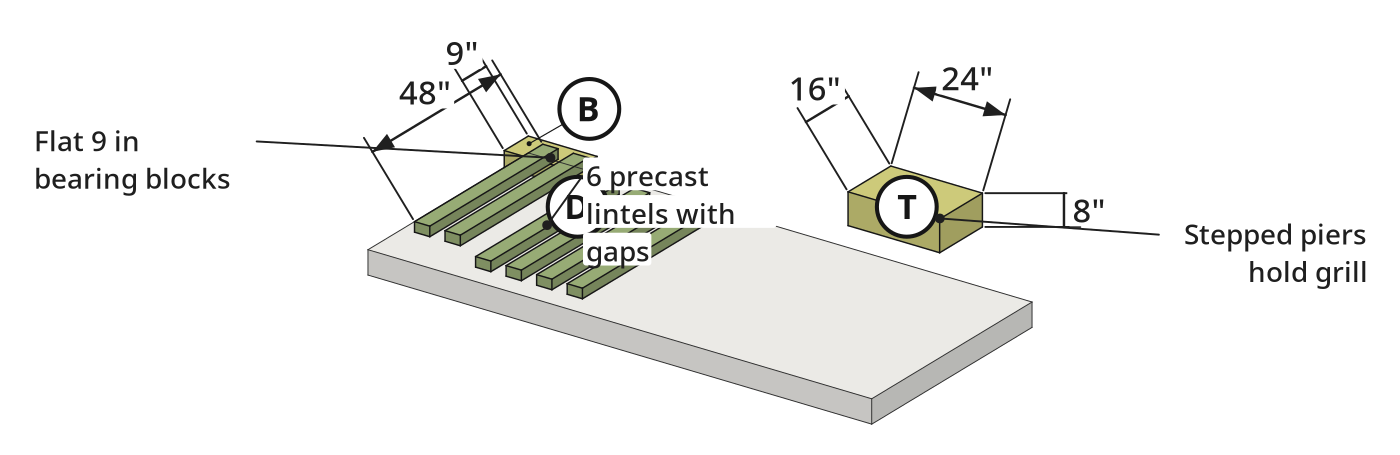
- Cut four inner oven-bay blocks in half lengthwise; mortar them to the back edge to leave a front bearing ledge.
- Bridge six firewood storage rack lintels (D) (exact size is not stated; 48 x 4 x 2 1/2 in is estimated) across the ledges with air gaps between them.
- 2.3 Square and Build the Left BBQ Pier
- Check inner barbecue bay corners with a framing square.
- Mortar the left barbecue pier with main structural base wall blocks (B), spaced for the BBQ grill insert (T) (24 x 16 x 8 in estimated).
- Step the left pier front blocks to match the right and test-fit the grill insert.
Key measurements
- Firewood rack support: 6 precast concrete lintels with air gaps
- Tip: Check barbecue pier corners with a framing square and test-fit the stainless steel grill insert before mortar sets.
Before you move on: Slide the stainless steel BBQ grill insert into the barbecue bay to confirm a square, bind-free fit.
Step 3: Build the Pizza Oven Base Walls
Raise the concrete block enclosure walls around the pizza oven base.
Parts in this step: (B) Main structural base wall blocks, (D) Firewood storage rack lintels
You'll need: Bricklayer's trowel, Spirit level, Club hammer, Concrete blocks, Mortar, Concrete lintels
- 3.1 Mortar Concrete Blocks Around the Lintel Perimeter
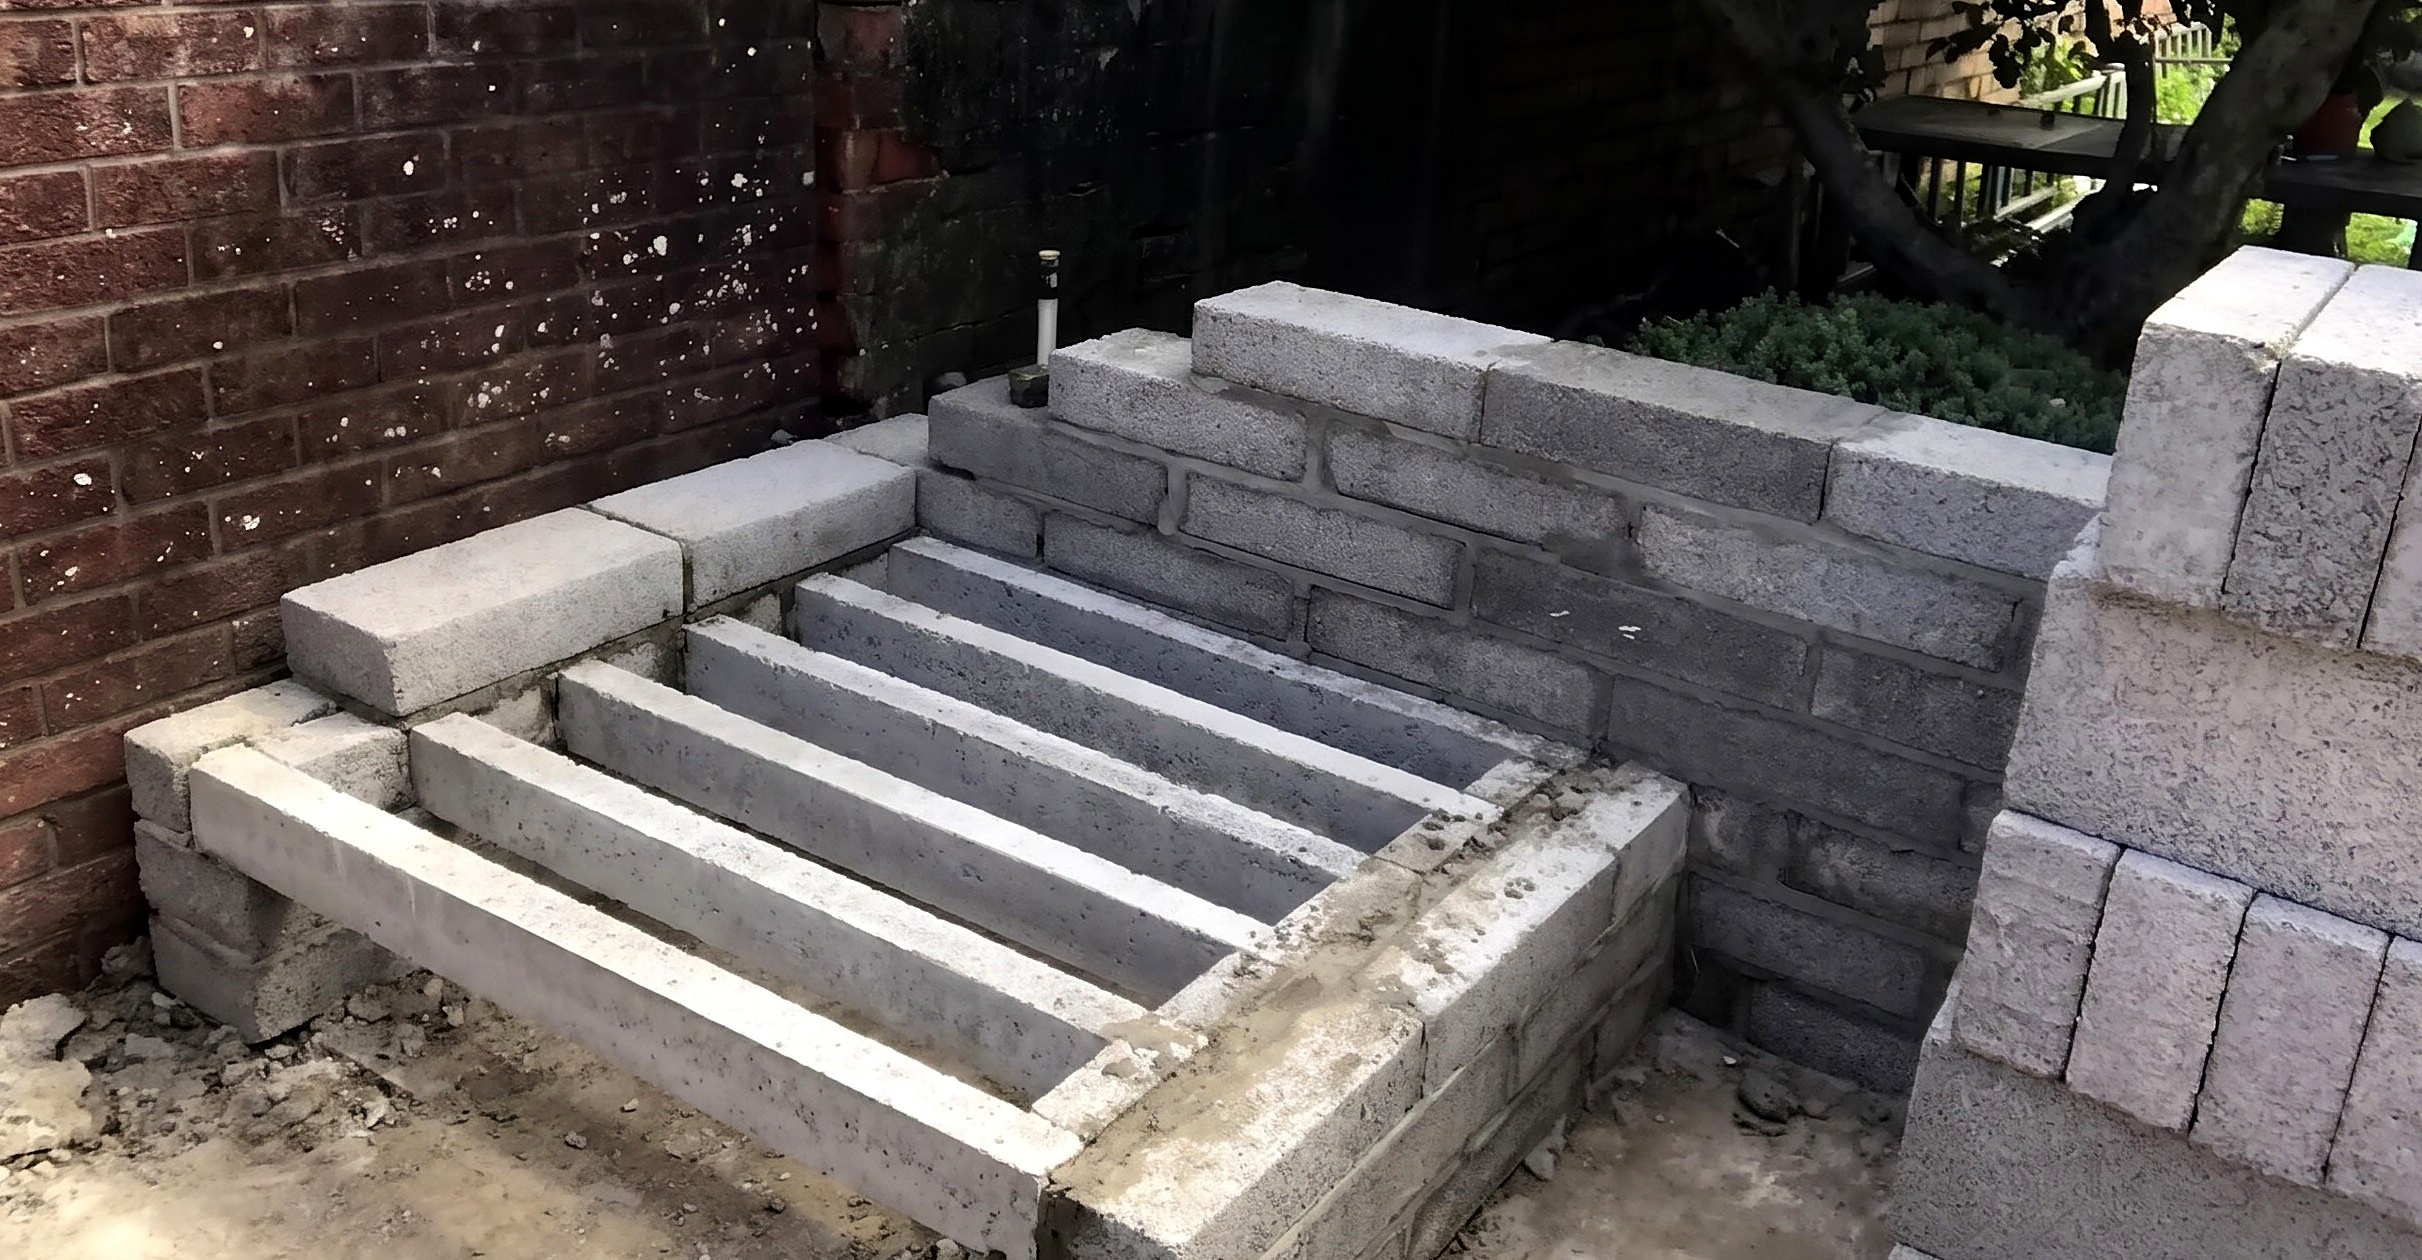
- Lay a temporary wooden board across the firewood storage rack lintels (D) to stand on.
- Mortar courses of main structural base wall blocks (B) along the left, rear, and right oven base walls.
- Block the lower front gap under the lintels to keep animals out while keeping airflow under the firewood.
- Tip: Leave air gaps between the concrete lintels in the log bay so air circulates under stored firewood.
Before you move on: Check the left, rear, and right oven base walls sit level across the bay.
Step 4: Trim the Rear Wall and Build Arch Templates
Trim the rear prep wall to slab bearing height, build two wooden arch templates, and raise the 4 in rear backing wall.
Parts in this step: (B) Main structural base wall blocks, (C) Rear backing wall blocks, (E) Arch template curved side panels, (F) Arch template timber spacers
You'll need: Angle grinder, Hand saw, Cordless impact driver, Bricklayer's trowel, Spirit level, Soft brush, Club hammer, Concrete blocks, Mortar, Plywood, Timber, Wood screws
- 4.1 Cut Down the Rear Prep Bay Wall with an Angle Grinder
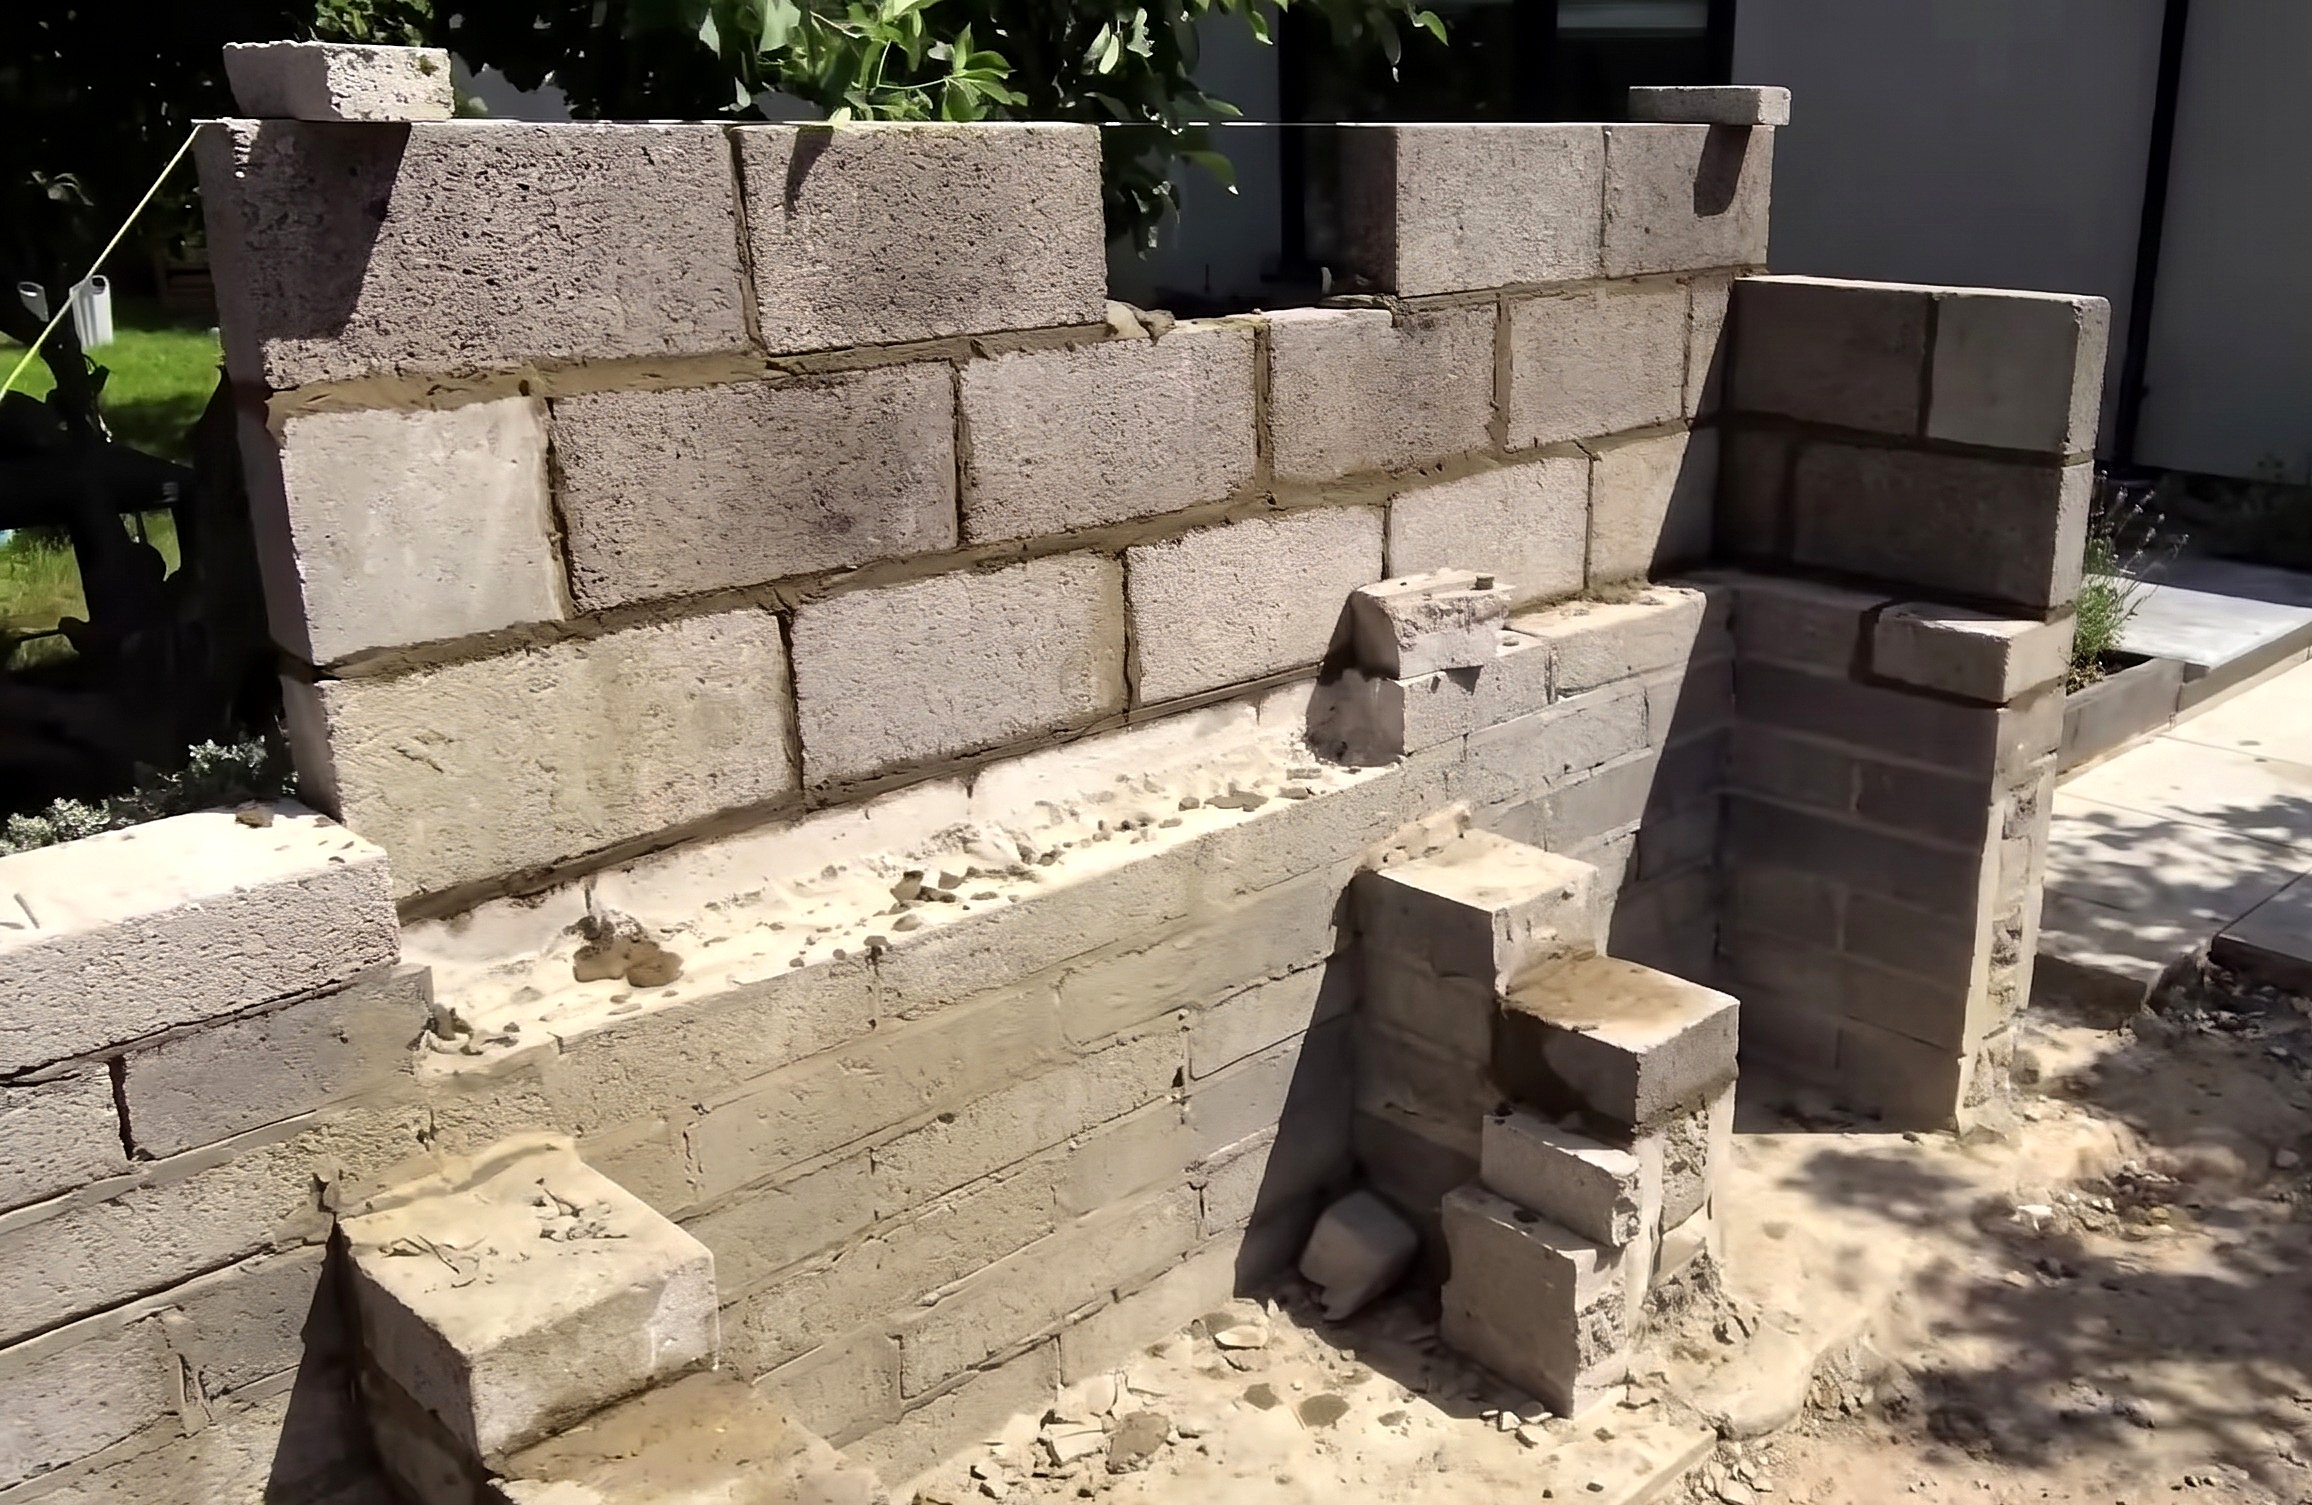
- Pencil a horizontal line along the rear prep bay's top main structural base wall blocks (B) at the countertop slab underside height.
- Wear protective equipment and score deep along the line with a 9 in angle grinder.
- Knock off the waste block top with a club hammer and brush off dust with a soft brush.
- 4.2 Cut and Screw Together the Wooden Arch Template
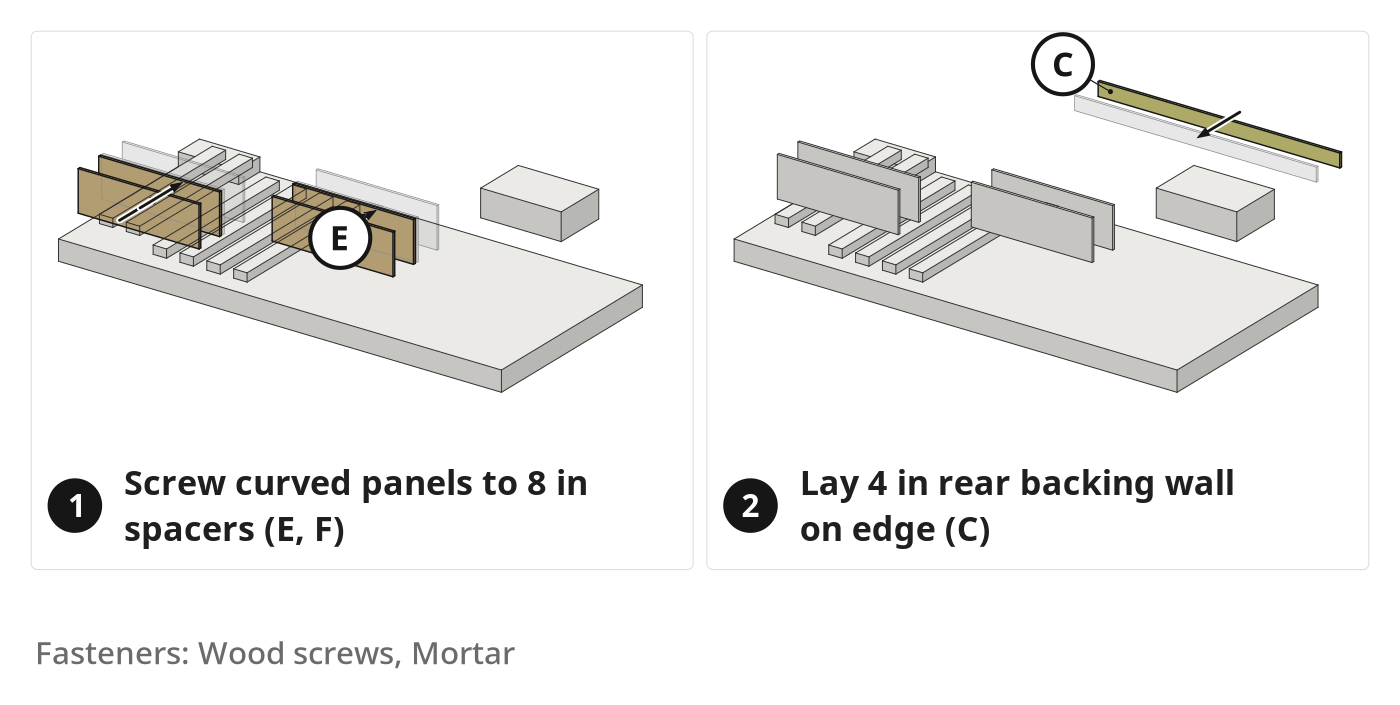
- Cut arch template timber spacers (F) (exact length is not stated; 8 in 2x4 blocks are estimated) using a hand saw.
- Align pairs of arch template curved side panels (E) (exact size is not stated; 36 x 12 x 3/4 in is estimated) against the timber spacers.
- Drive wood screws through the plywood panels into the spacers with a cordless impact driver to build two curved arch templates.
- 4.3 Test-Fit the Arch Templates and Raise the Rear Block Wall
- Mortar the front pier main structural base wall blocks (B) and test-fit both arch templates in the bay openings.
- Lay rear backing wall blocks (C) on their 4 in edge behind the prep and barbecue bays (~72 in span).
- Check the 4 in rear backing wall is plumb and level while building above countertop height.
Key measurements
- Rear backing wall thickness: 4 in concrete blocks on edge
- Rear backing wall span: ~72 in (~6 ft) across prep and BBQ bays
- Heads up: Wear protective equipment (respirator mask, safety glasses, hearing protection) when dry-cutting concrete blocks with an angle grinder.
Before you move on: Check both wooden arch templates sit level and flush with the front piers at the slab underside height.
Step 5: Lay the Brick Storage Arches
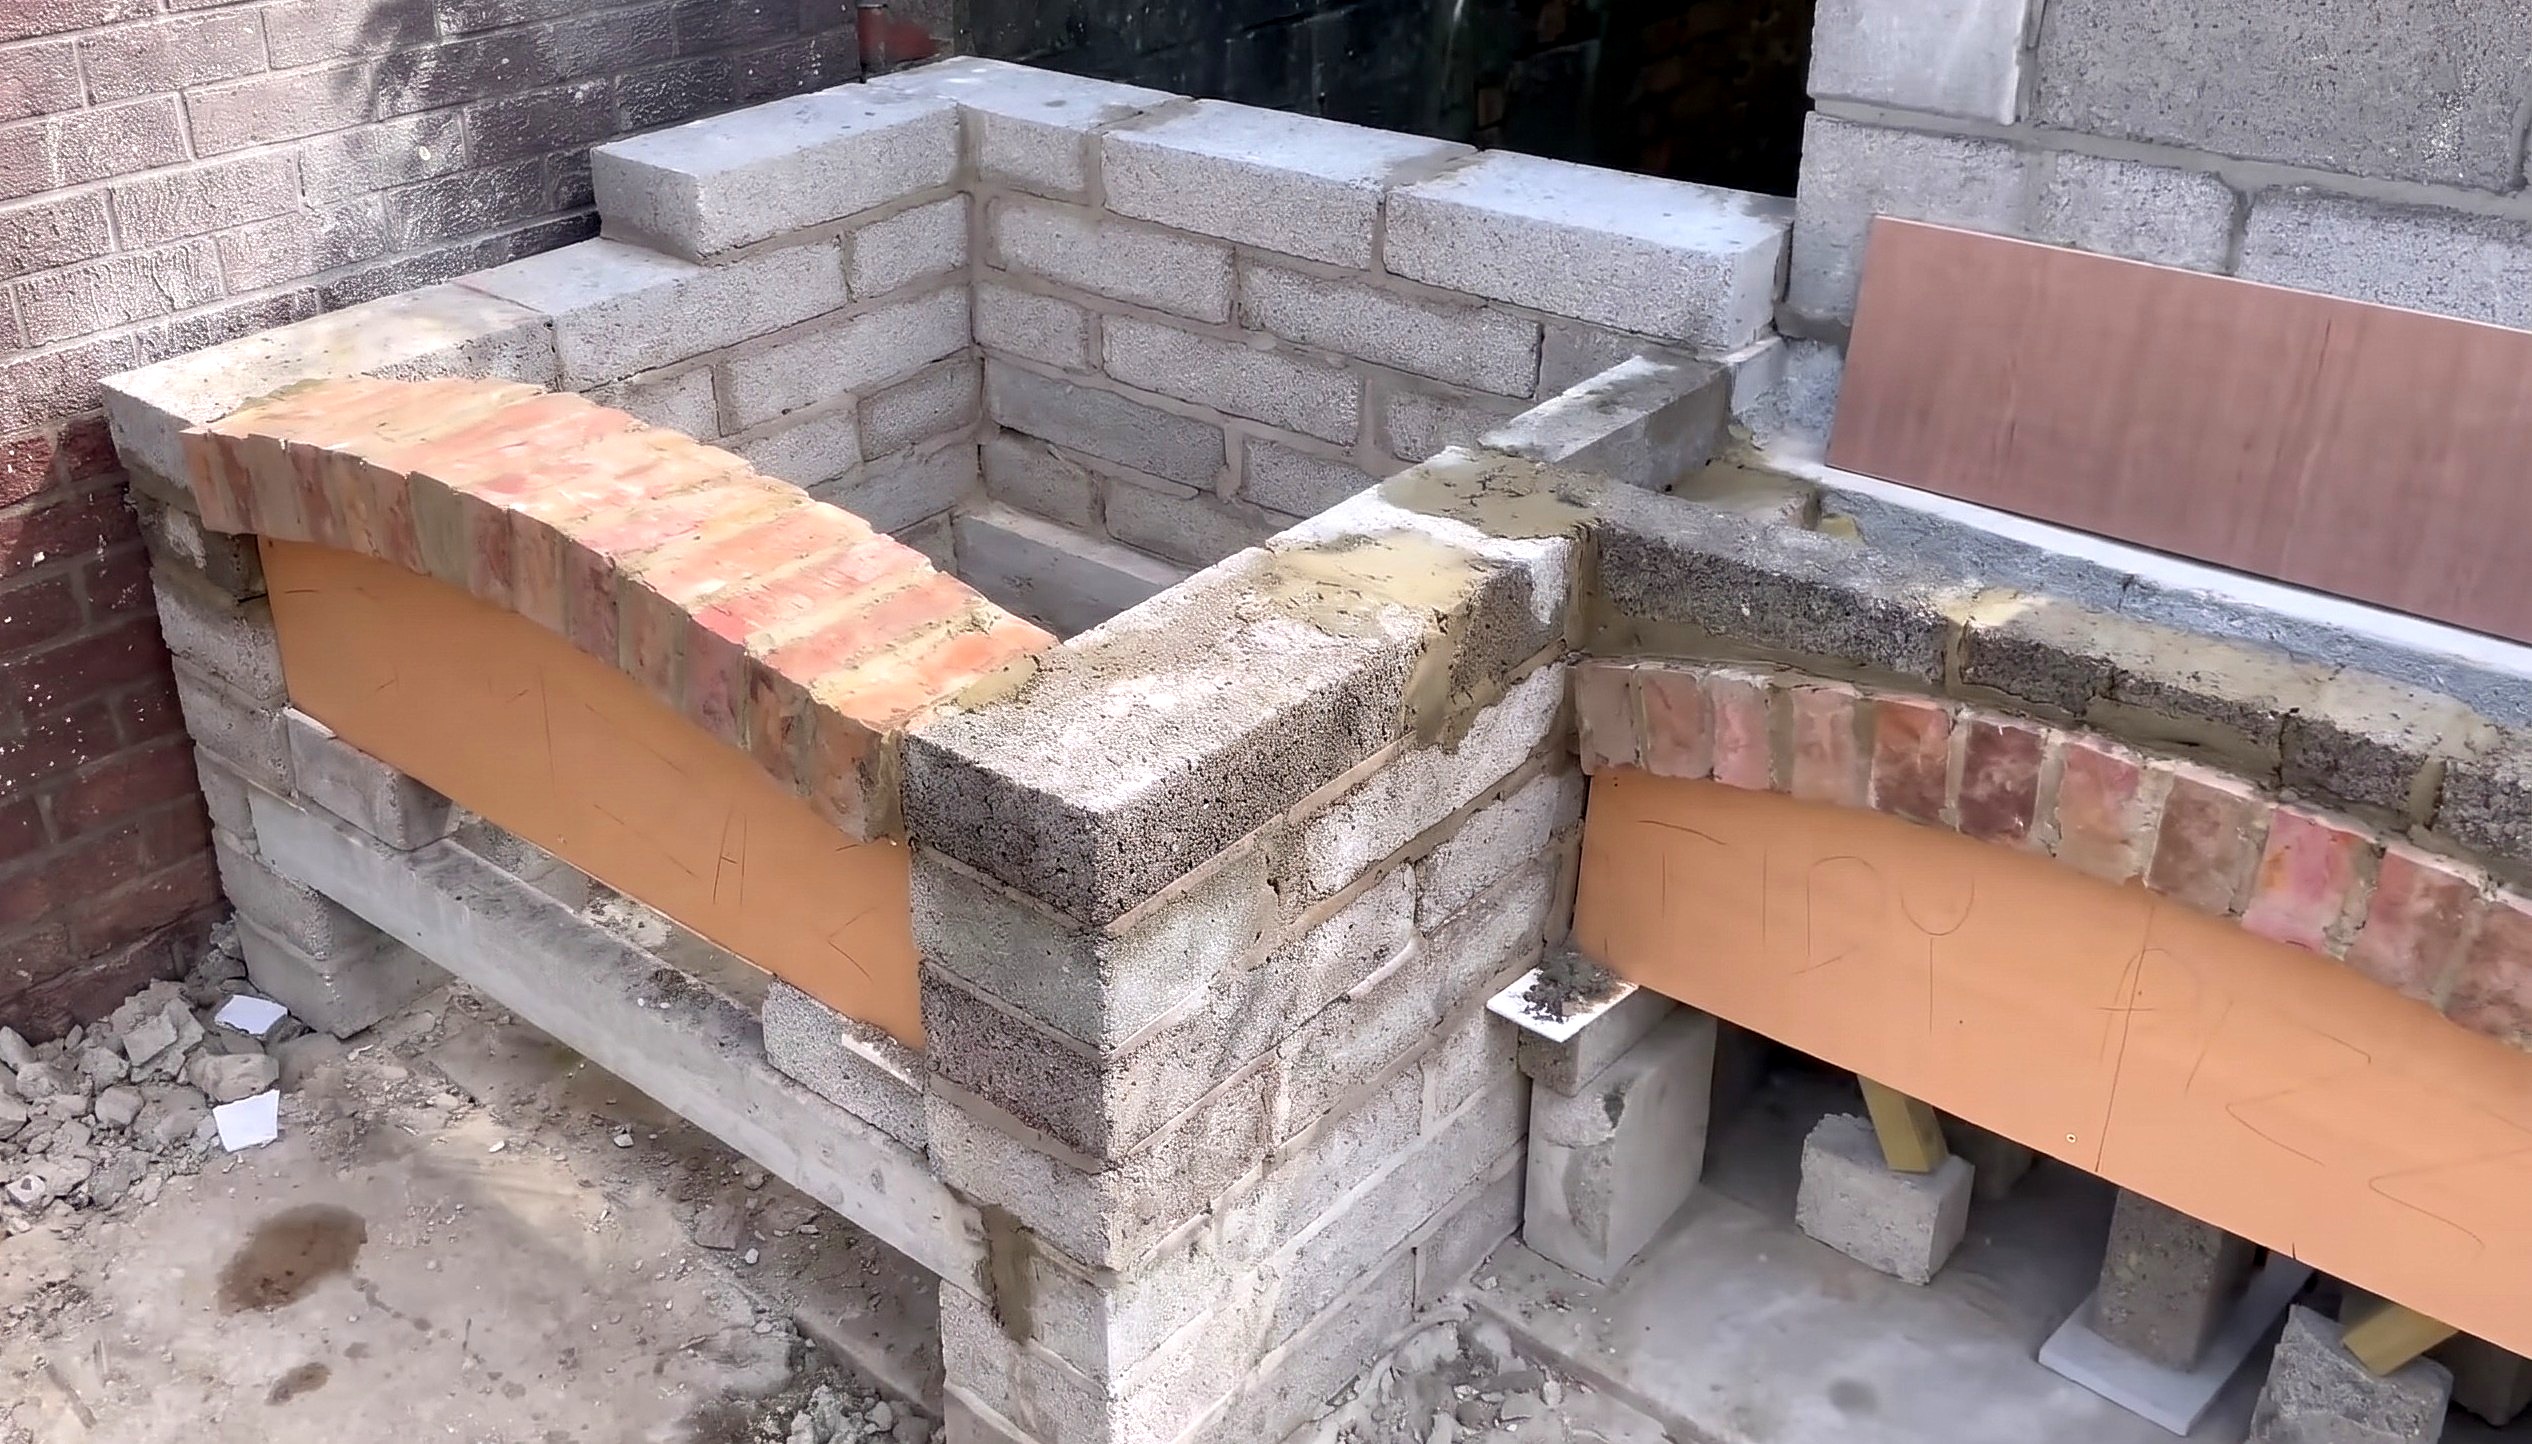
Mortar curved rustic red brick arches over the prep and pizza oven storage bays.
Parts in this step: (K) Storage bay and BBQ hood front brick arches
You'll need: Bricklayer's trowel, String line, Spirit level, Rustic red bricks, Mortar
- 5.1 Mortar the Prep Bay Brick Arch
- Dry-fit the storage bay and BBQ hood front brick arches (K) (brick size is not stated; 8.5 x 4 x 2 1/2 in is estimated) across the prep bay arch template and pencil the layout marks onto the plywood.
- Stretch a taut string line across the front piers to keep brick faces flush.
- Mortar the rustic red bricks from both ends to the top center, centering the middle joint.
- 5.2 Mortar the Pizza Oven Bay Brick Arch
- Support the second wooden arch template in the pizza oven storage bay.
- Mortar the storage bay and BBQ hood front brick arches (K) up both sides to meet at the crown.
- Pack every wedge joint with mortar, strike joints neat, and remove the wooden templates once cured.
- Tip: Pencil dry-fitted brick marks on the wooden template and run a front string line to keep the arch uniform.
Before you move on: Check crown wedge joints on both arches are packed solid with mortar before pouring the concrete slabs above.
Step 6: Pour the Prep Countertop Concrete Slab
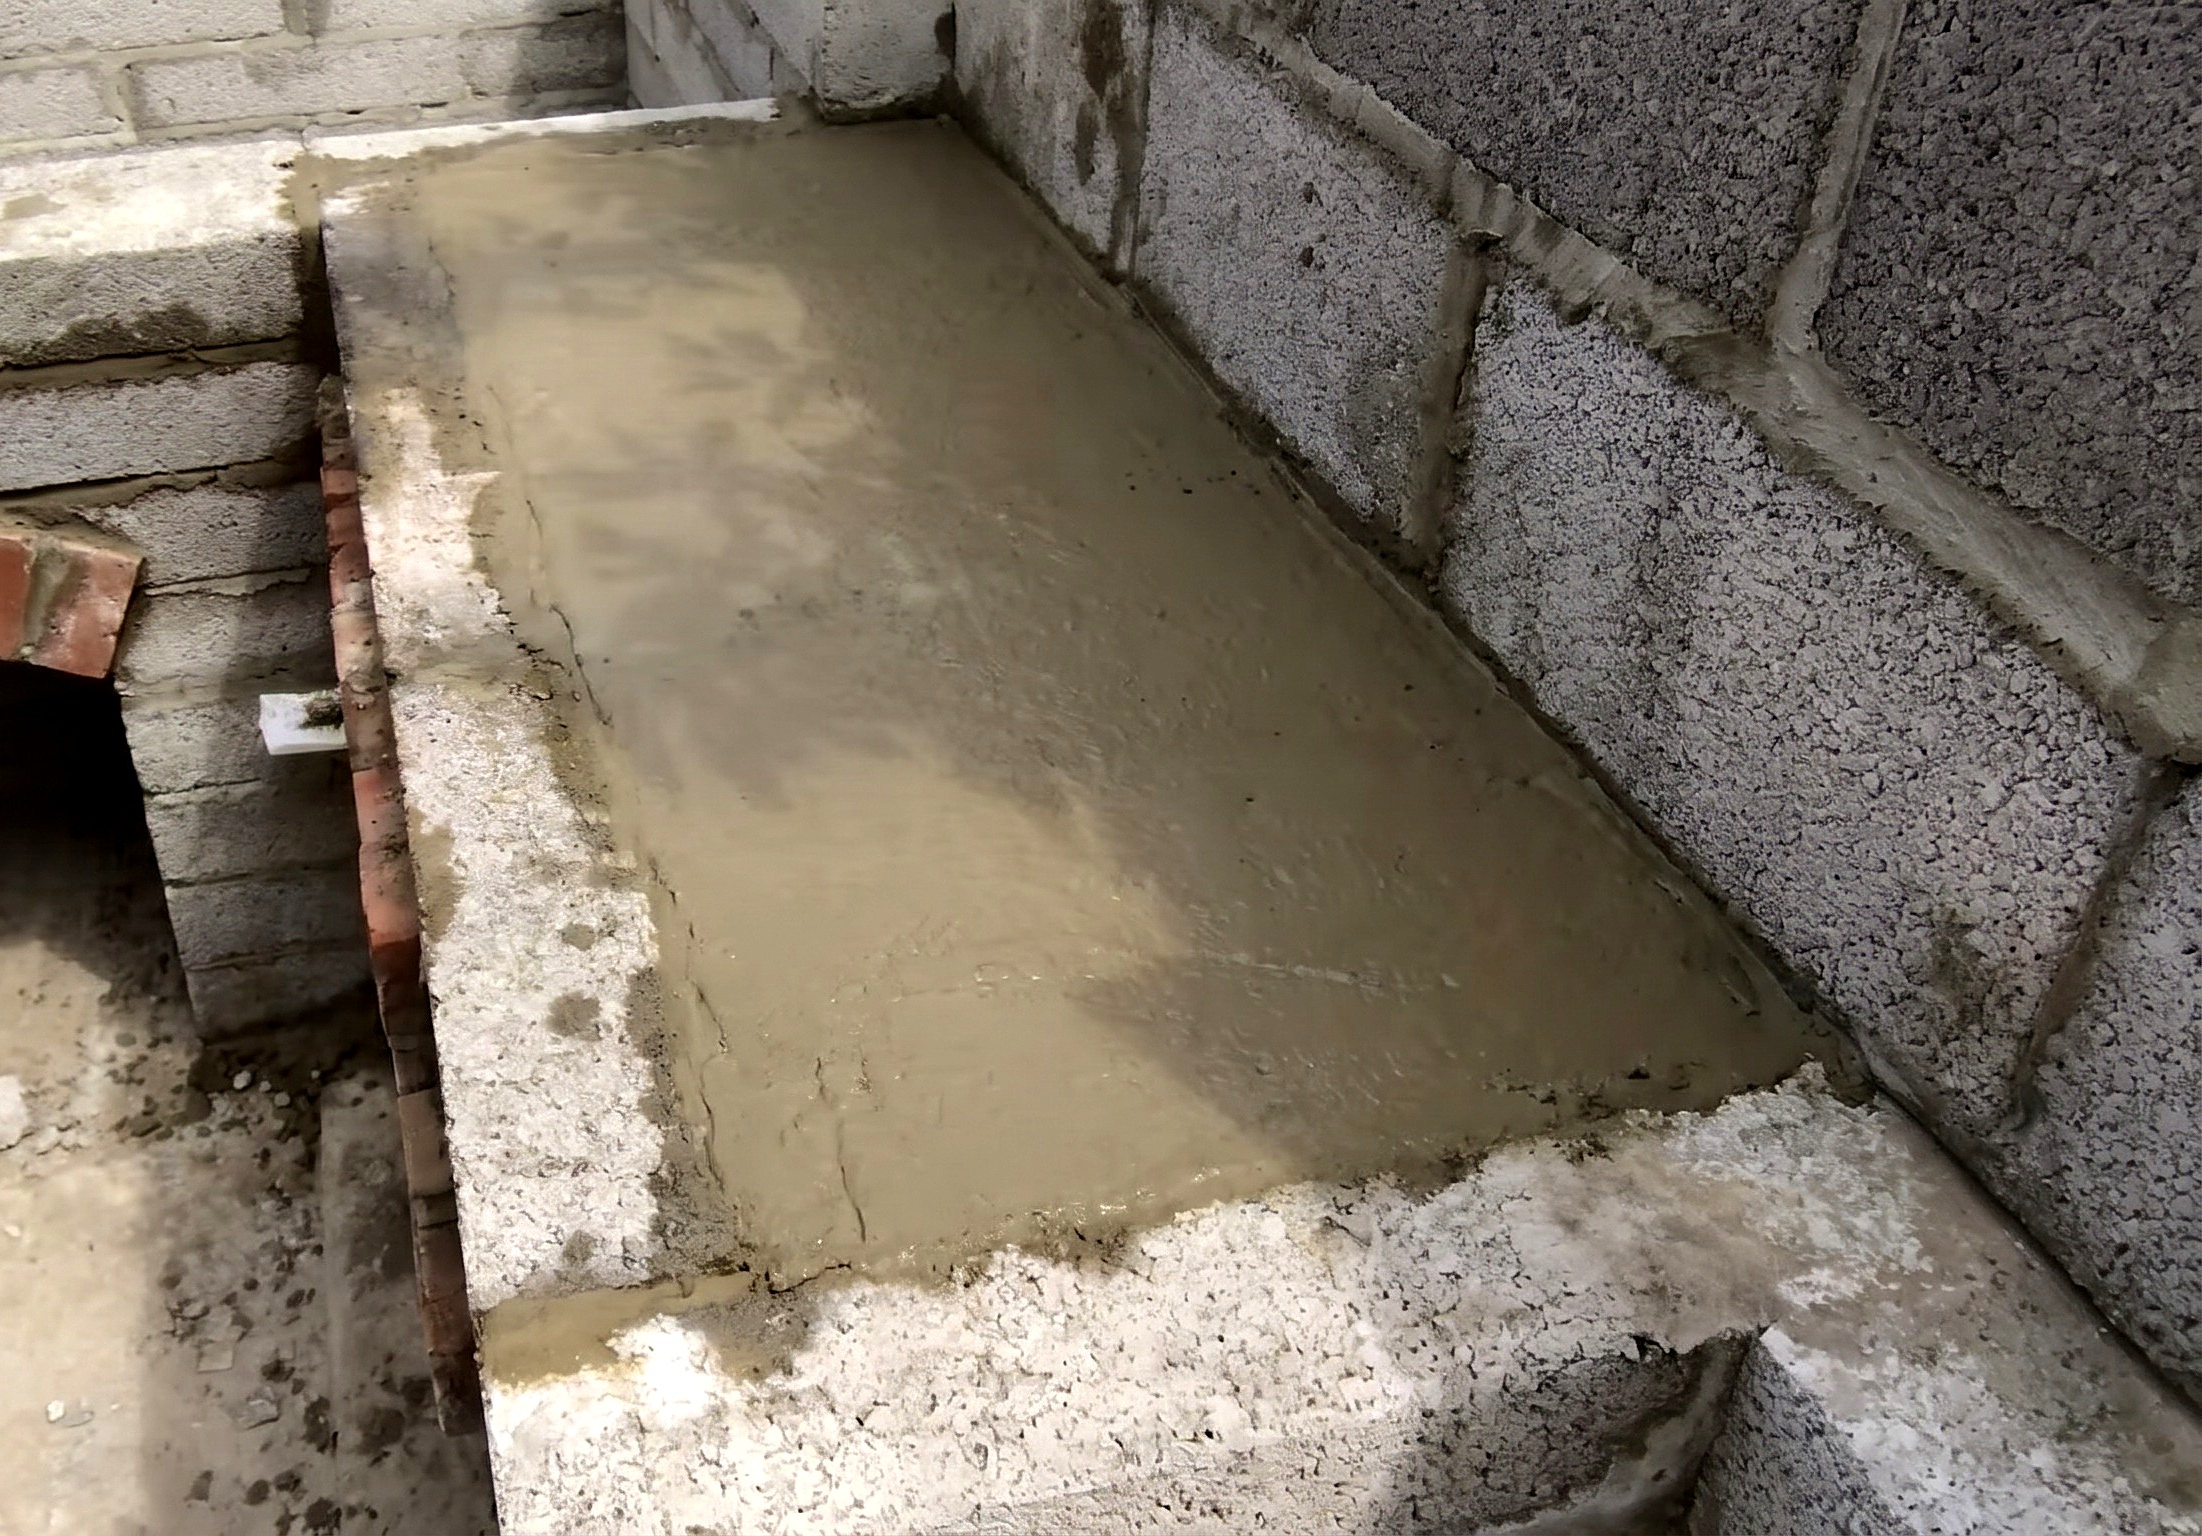
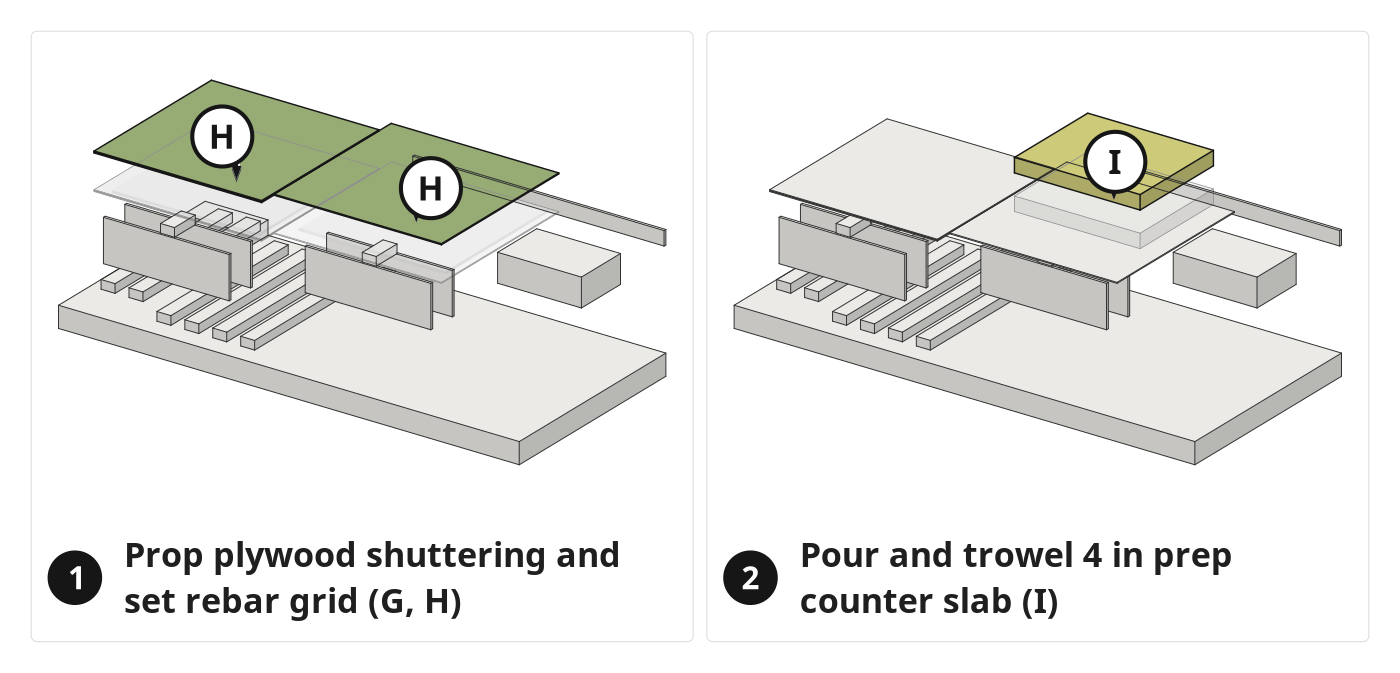
Form, reinforce, and pour the 4 in suspended concrete countertop slab over the prep bay.
Parts in this step: (B) Main structural base wall blocks, (G) Under-slab shuttering panels, (H) Countertop and oven slab reinforcement grids, (I) Prep countertop concrete slab, (K) Storage bay and BBQ hood front brick arches
You'll need: Soft brush, Shovel, Bricklayer's trowel, Spirit level, Plywood, Timber, Steel rebar mesh, Concrete
- 6.1 Position the Plywood Shuttering and Rebar Mesh
- Prop temporary timber supports and a removable knock-out block in the prep bay, then set one under-slab shuttering panel (G) (42 x 42 x 3/4 in estimated) flush with the inner walls.
- Set one cut countertop and oven slab reinforcement grid (H) (48 x 48 x 1/4 in estimated) on the shuttering within the 4 in slab depth.
- 6.2 Wet the Formwork and Surrounding Block Edges
- Wet the under-slab shuttering panel (G) with a wet soft brush.
- Brush water over the top edges of the main structural base wall blocks (B) and storage bay and BBQ hood front brick arches (K).
- 6.3 Shovel and Trowel the Prep Counter Concrete
- Shovel wet concrete into the form to cast the 4 in prep countertop concrete slab (I) (footprint is not stated; 36 x 30 x 4 in is estimated).
- Work concrete through reinforcement grid (H) with a bricklayer's trowel to remove air pockets.
- Trowel flat and flush with the block walls; remove props and shuttering once cured.
Key measurements
- Prep countertop thickness: 4 in steel-reinforced concrete
- Tip: Wet down the plywood shuttering and surrounding masonry before pouring concrete in warm weather so the edges do not dry too rapidly.
Before you move on: With a spirit level, check the countertop is flush with the walls and void-free.
Step 7: Cut Steel Rebar Mesh for the Oven Slab
Size the steel reinforcement mesh grids for the oven slab.
Parts in this step: (H) Countertop and oven slab reinforcement grids
You'll need: Wheelbarrow, Angle grinder, Tape measure, Steel rebar mesh
- 7.1 Cut the Steel Mesh Grid Over a Wheelbarrow
- Rest the remaining reinforcement grids (H) (estimated 48 x 48 x 1/4 in) across a wheelbarrow.
- Wear protective equipment and long trousers, directing angle grinder sparks away from you.
- Cut the steel crossbars with the angle grinder to size two mesh grids for the oven cavity.
- Heads up: Wear long trousers and eye protection when cutting steel rebar mesh with an angle grinder to prevent burns from hot sparks.
Before you move on: Test-fit both cut steel mesh sheets in the oven bay to check they clear the block walls.
Step 8: Pour and Vibrate the Pizza Oven Concrete Slab
Lay double rebar mesh, pour the 4 in concrete oven slab, and vibrate out air pockets.
Parts in this step: (B) Main structural base wall blocks, (G) Under-slab shuttering panels, (H) Countertop and oven slab reinforcement grids, (J) Pizza oven base concrete slab
You'll need: Cordless impact driver, Soft brush, Shovel, Bricklayer's trowel, Spirit level, Rotary hammer drill, Plywood, Wood screws, Steel rebar mesh, Concrete
- 8.1 Lay Double Rebar Mesh on Masonry Spacers and Wet the Form
- Prop under-slab shuttering panel (G) in the bay, set a stop board behind the front brick arch, and drive wood screws partway into the plywood top to key the concrete.
- Prop the first reinforcement grid (H) on masonry offcuts and lay the second grid on top.
- Wet the shuttering and blockwork edges with a soft brush.
- 8.2 Pour and Screed the Pizza Oven Concrete Slab
- Shovel wet concrete into the bay to cast the 4 in pizza oven base concrete slab (J) (footprint is not stated; 60 x 60 x 4 in is estimated).
- Compact concrete through both reinforcement grids (H) with a bricklayer's trowel.
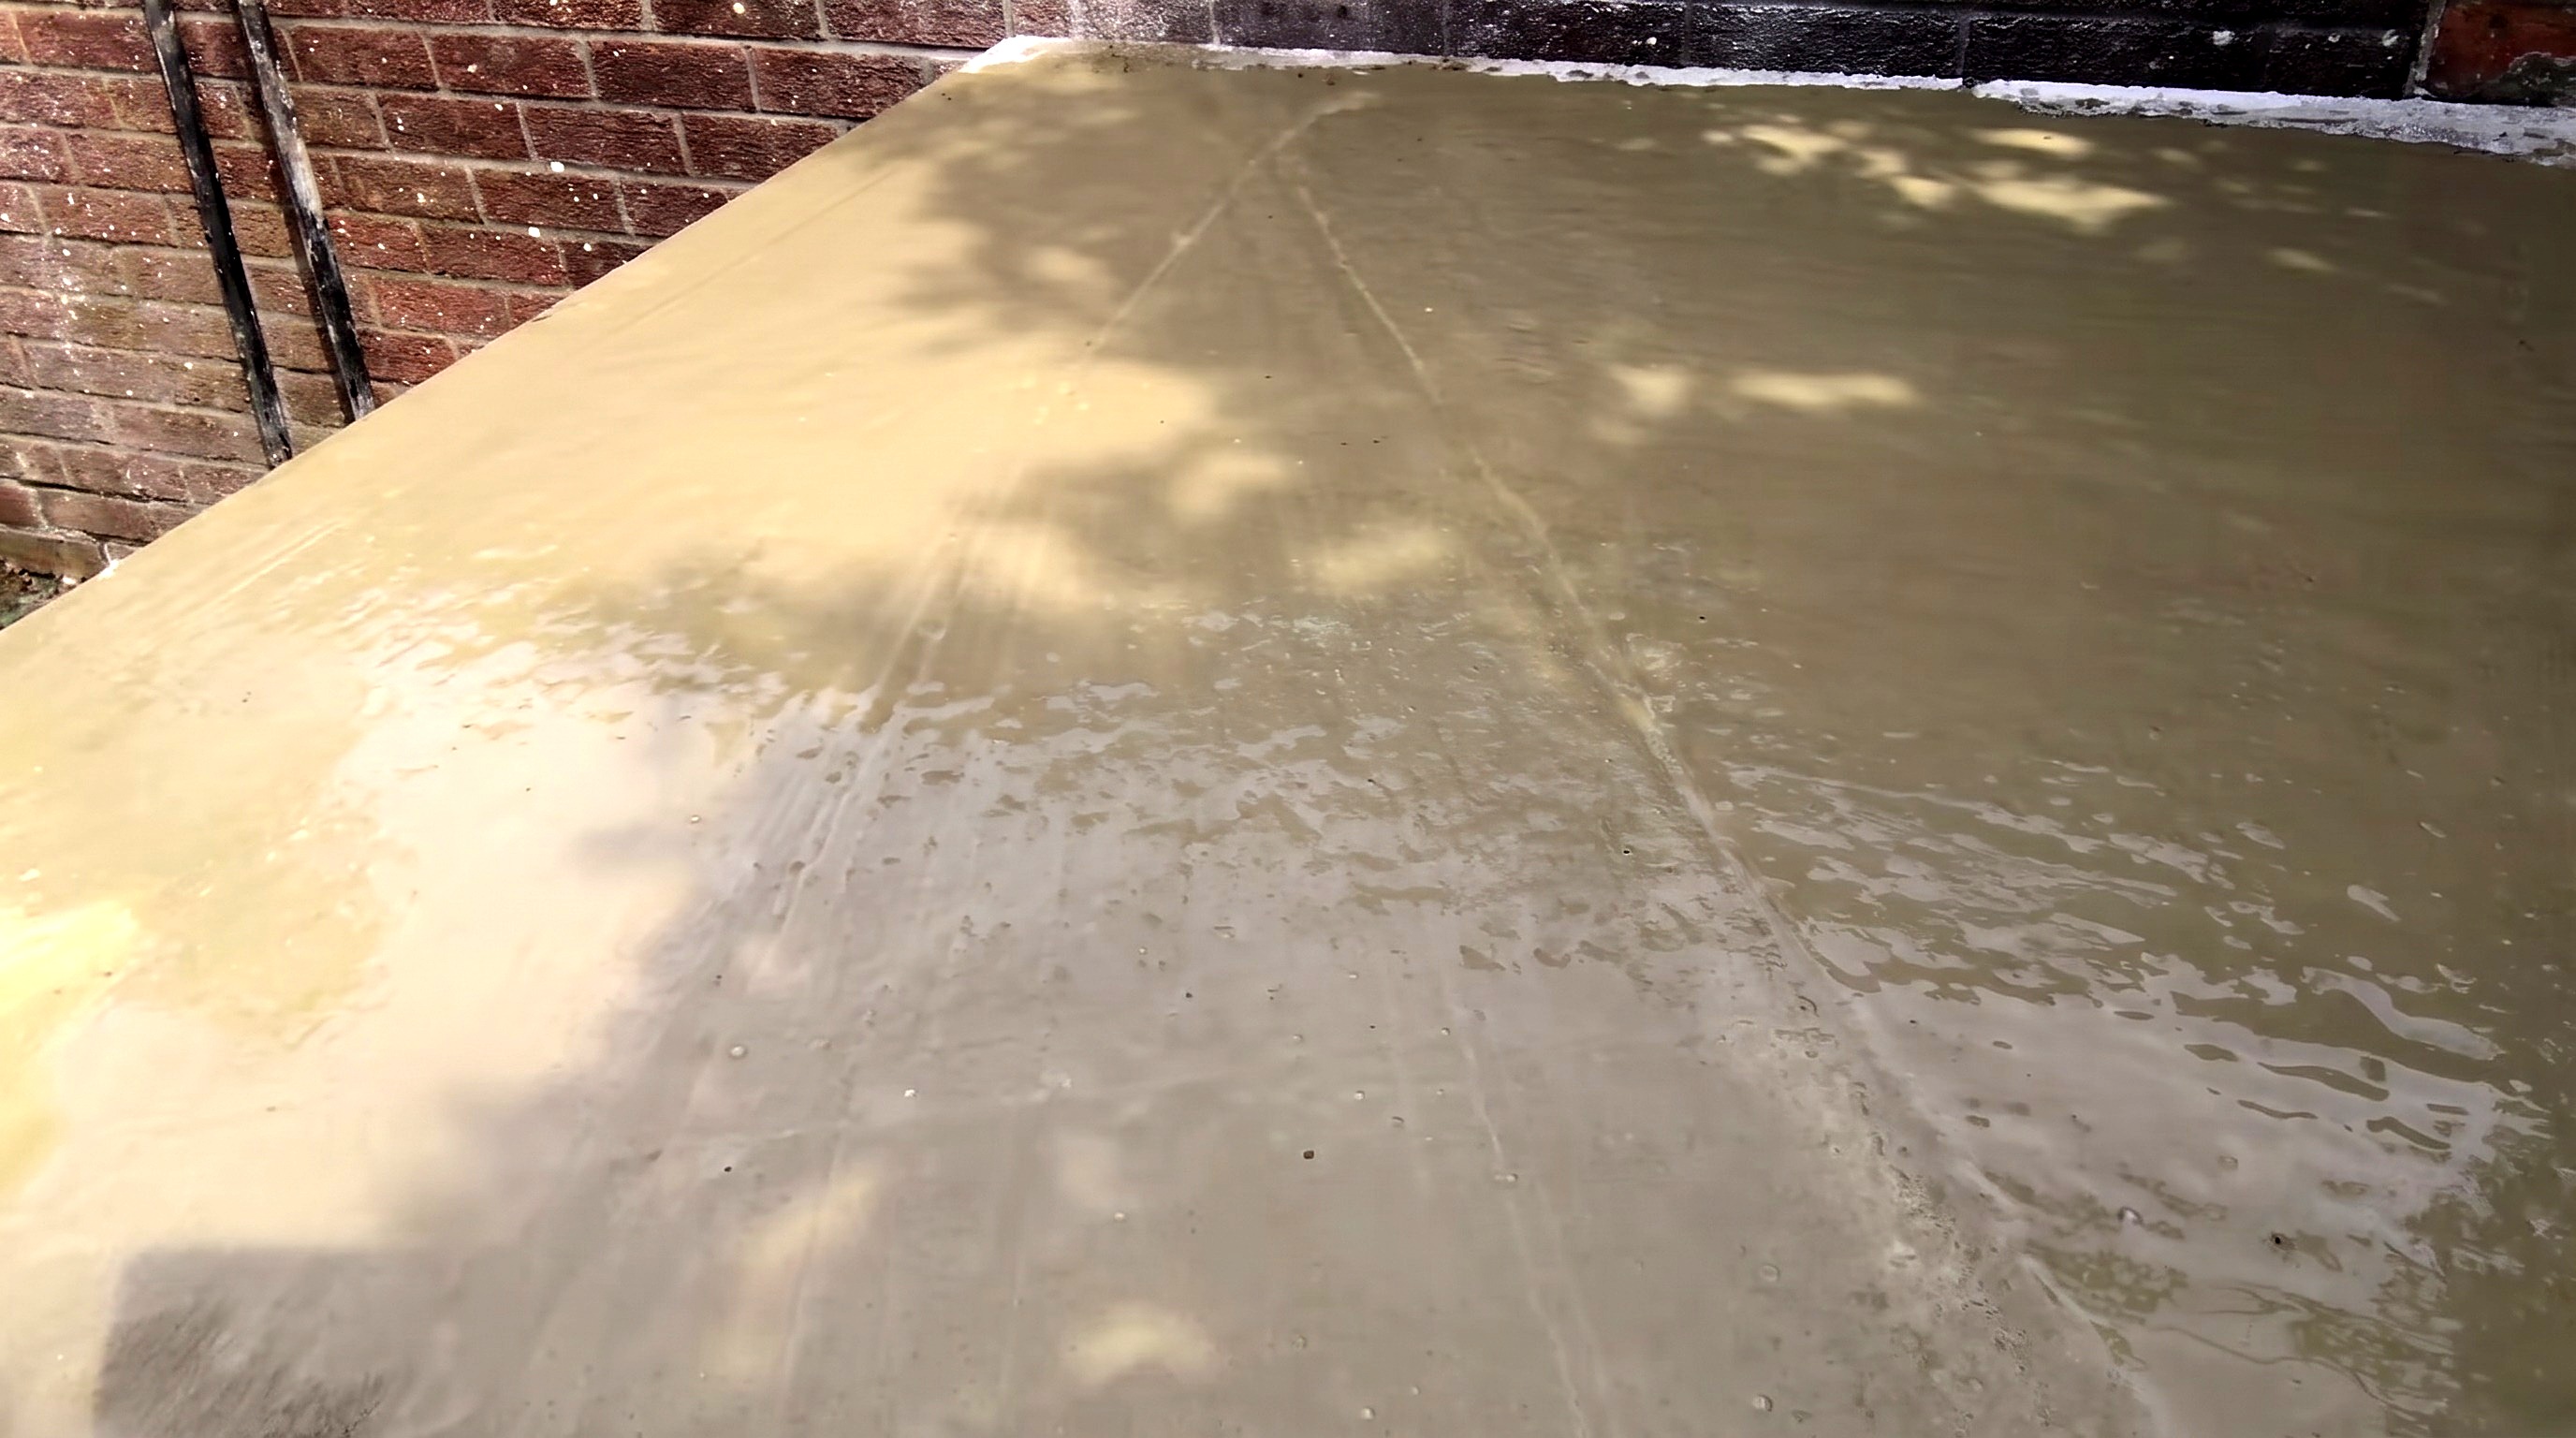
- Screed the slab flat across the block walls with a long spirit level.
- 8.3 Vibrate the Slab with a Hammer Drill and Re-Screed
- Hold a rotary hammer drill against the outer base wall blocks (B) to vibrate air bubbles from concrete slab (J).
- Top up settled low spots with fresh concrete.
- Screed flat and smooth again with the spirit level; let the slab cure.
Key measurements
- Oven base slab thickness: 4 in double-mesh reinforced concrete
- Tip: Rest the bottom steel rebar mesh on small masonry offcuts so concrete completely surrounds the steel.
- Tip: Use cement backer board, not untreated plywood, for permanent shuttering under a moisture-exposed outdoor slab.
Before you move on: Let the 4 in oven slab cure hard before loading bricks or standing on it.
Step 9: Lay Fire Bricks for the BBQ Firebox
Line the barbecue bay walls with soaked fire bricks and heat-resistant oven cement.
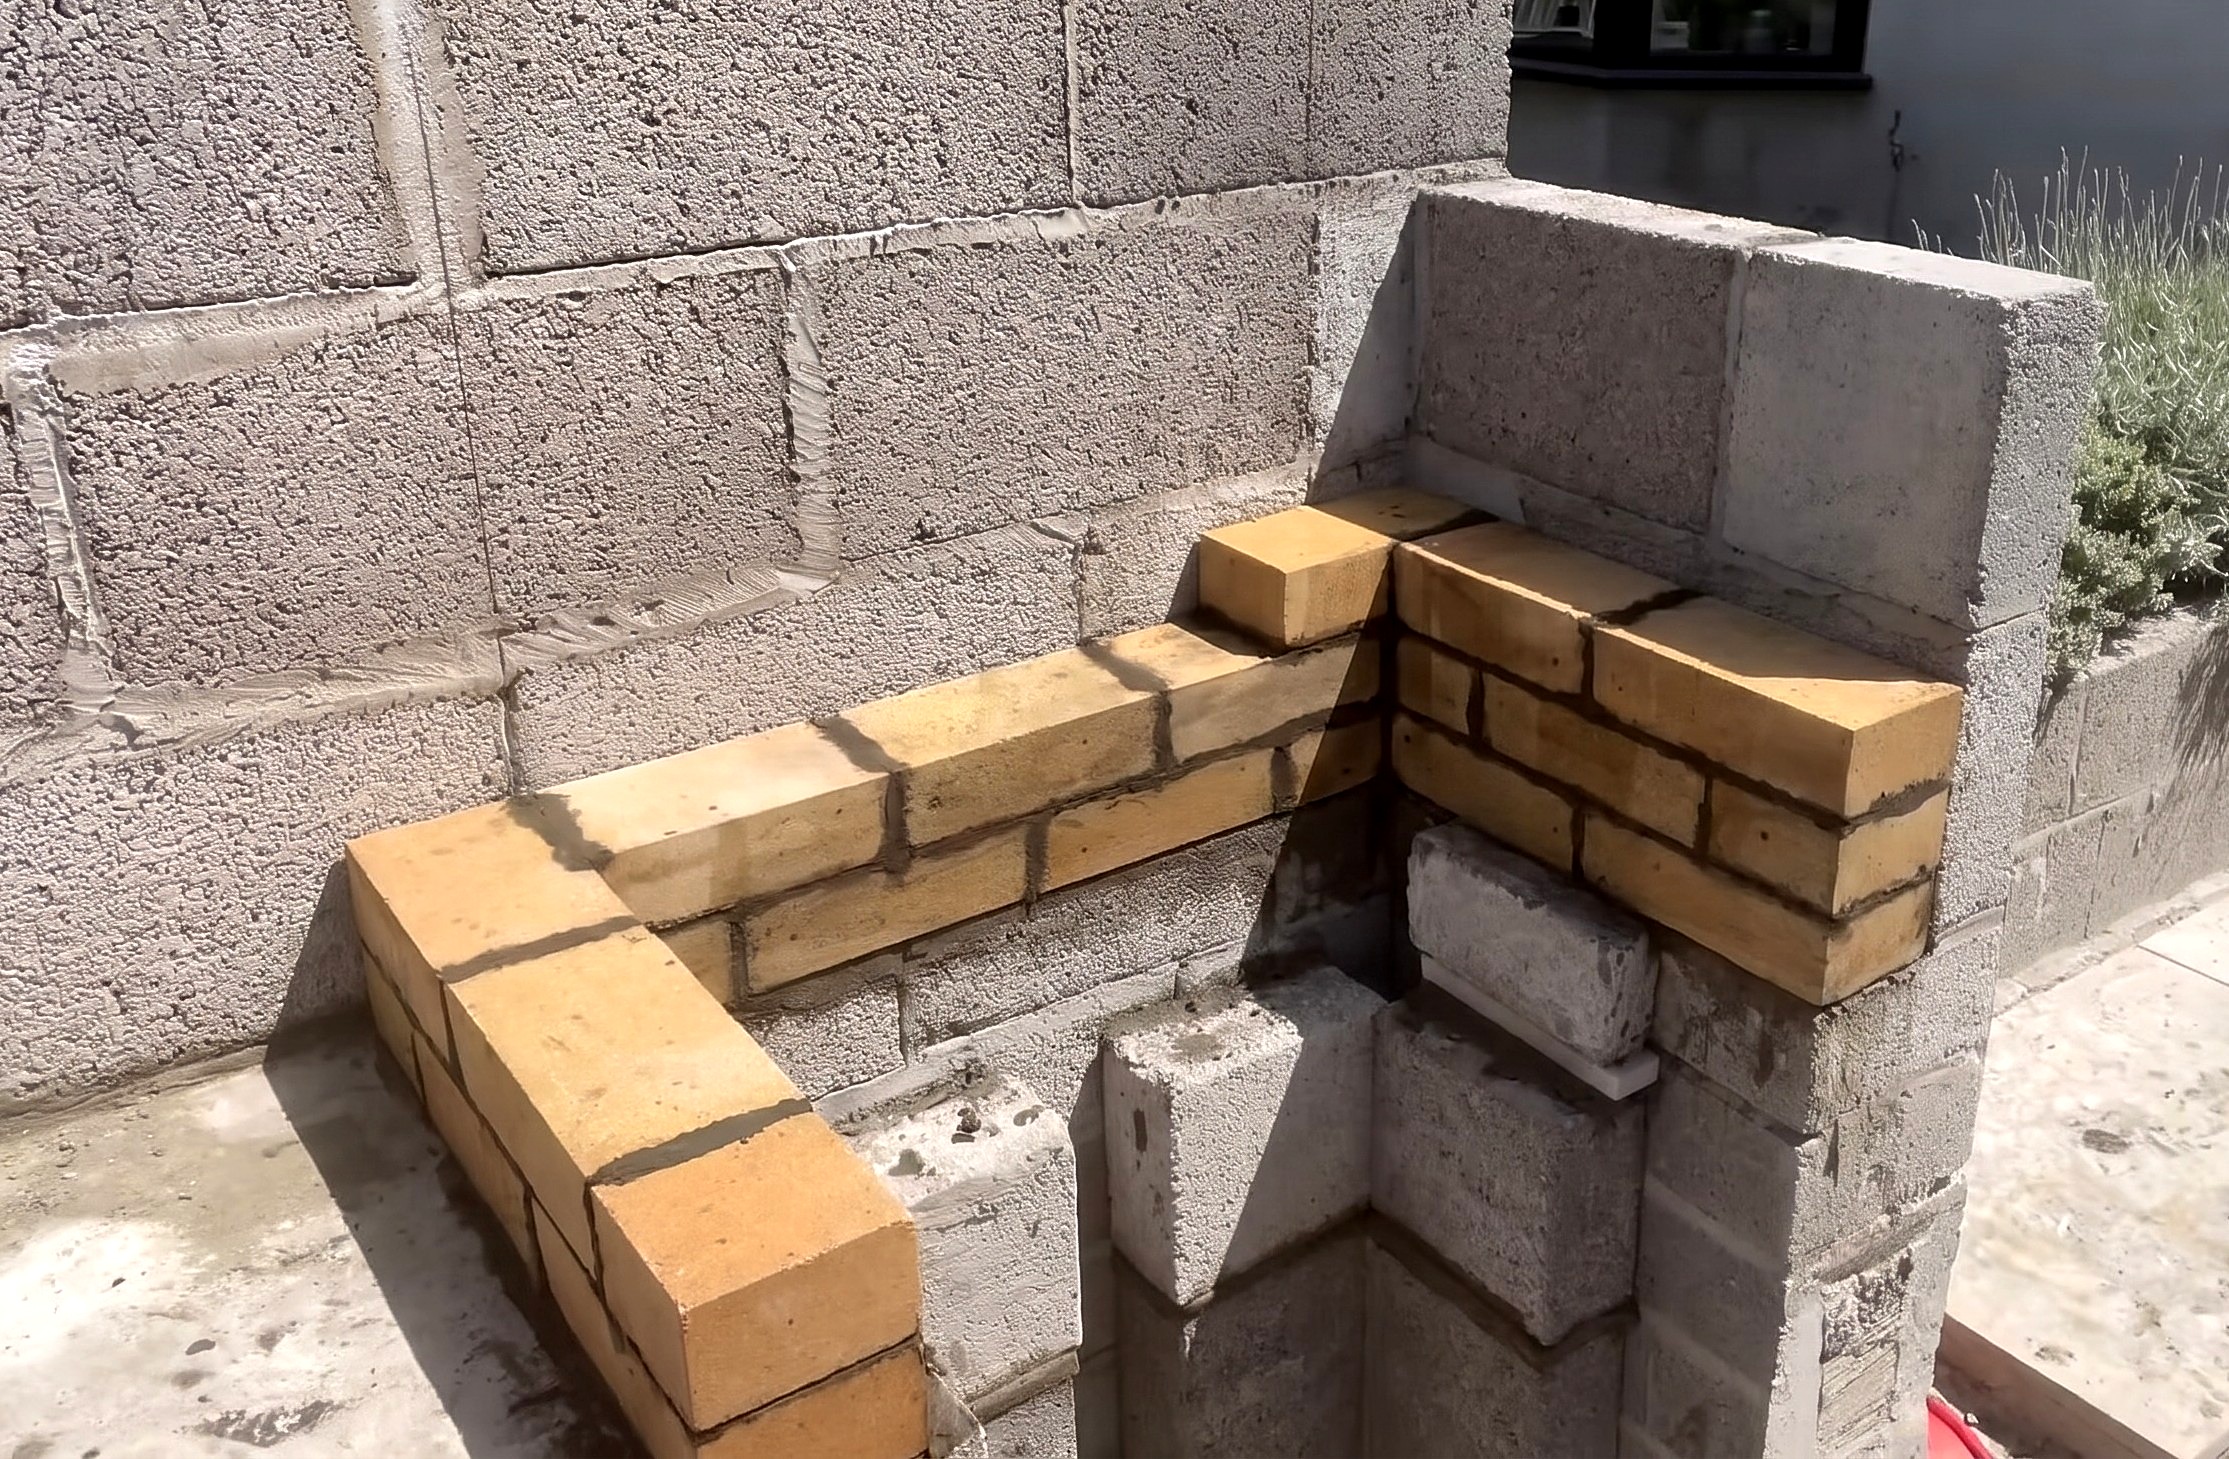
Parts in this step: (S) BBQ firebox and corbeled hood bricks
You'll need: Wheelbarrow, Bricklayer's trowel, Spirit level, Club hammer, Fire bricks, Outdoor oven cement
- 9.1 Lay Staggered Courses of Fire Bricks in the BBQ Bay
- Submerge the BBQ firebox and corbeled hood bricks (S) (brick size is not stated; 9 x 4.5 x 2 1/2 in is estimated) in a wheelbarrow of water before laying.
- Butter each soaked brick with Vitcas outdoor oven cement using a bricklayer's trowel.
- Lay staggered courses on the left, rear, and right firebox walls, checking plumb and level with a spirit level.
- Tip: Soak fire bricks before buttering so dry bricks do not draw moisture from the outdoor oven cement early.
Before you move on: Check the fire-brick walls are plumb and keep the clearance width for the grill insert.
Step 10: Dry-Lay the Herringbone Fire Brick Floor
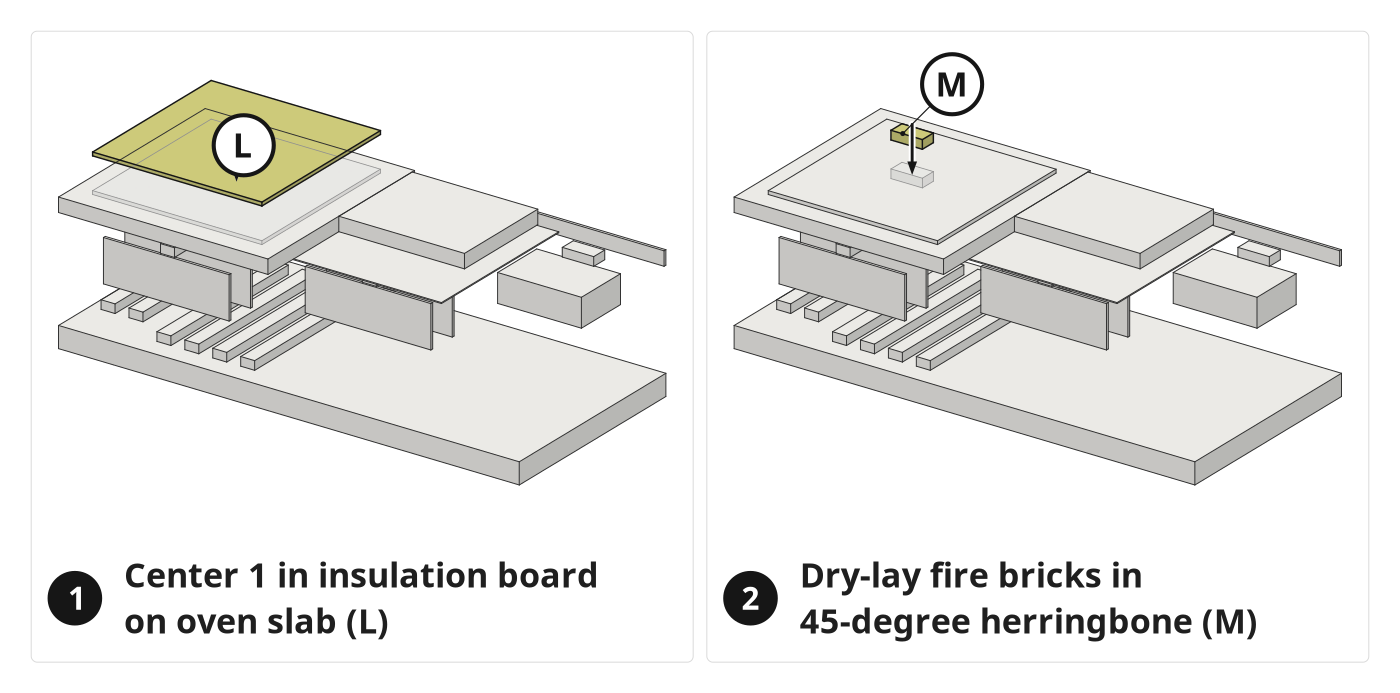
Set the rigid insulation board on the slab and dry-lay the herringbone fire-brick floor.
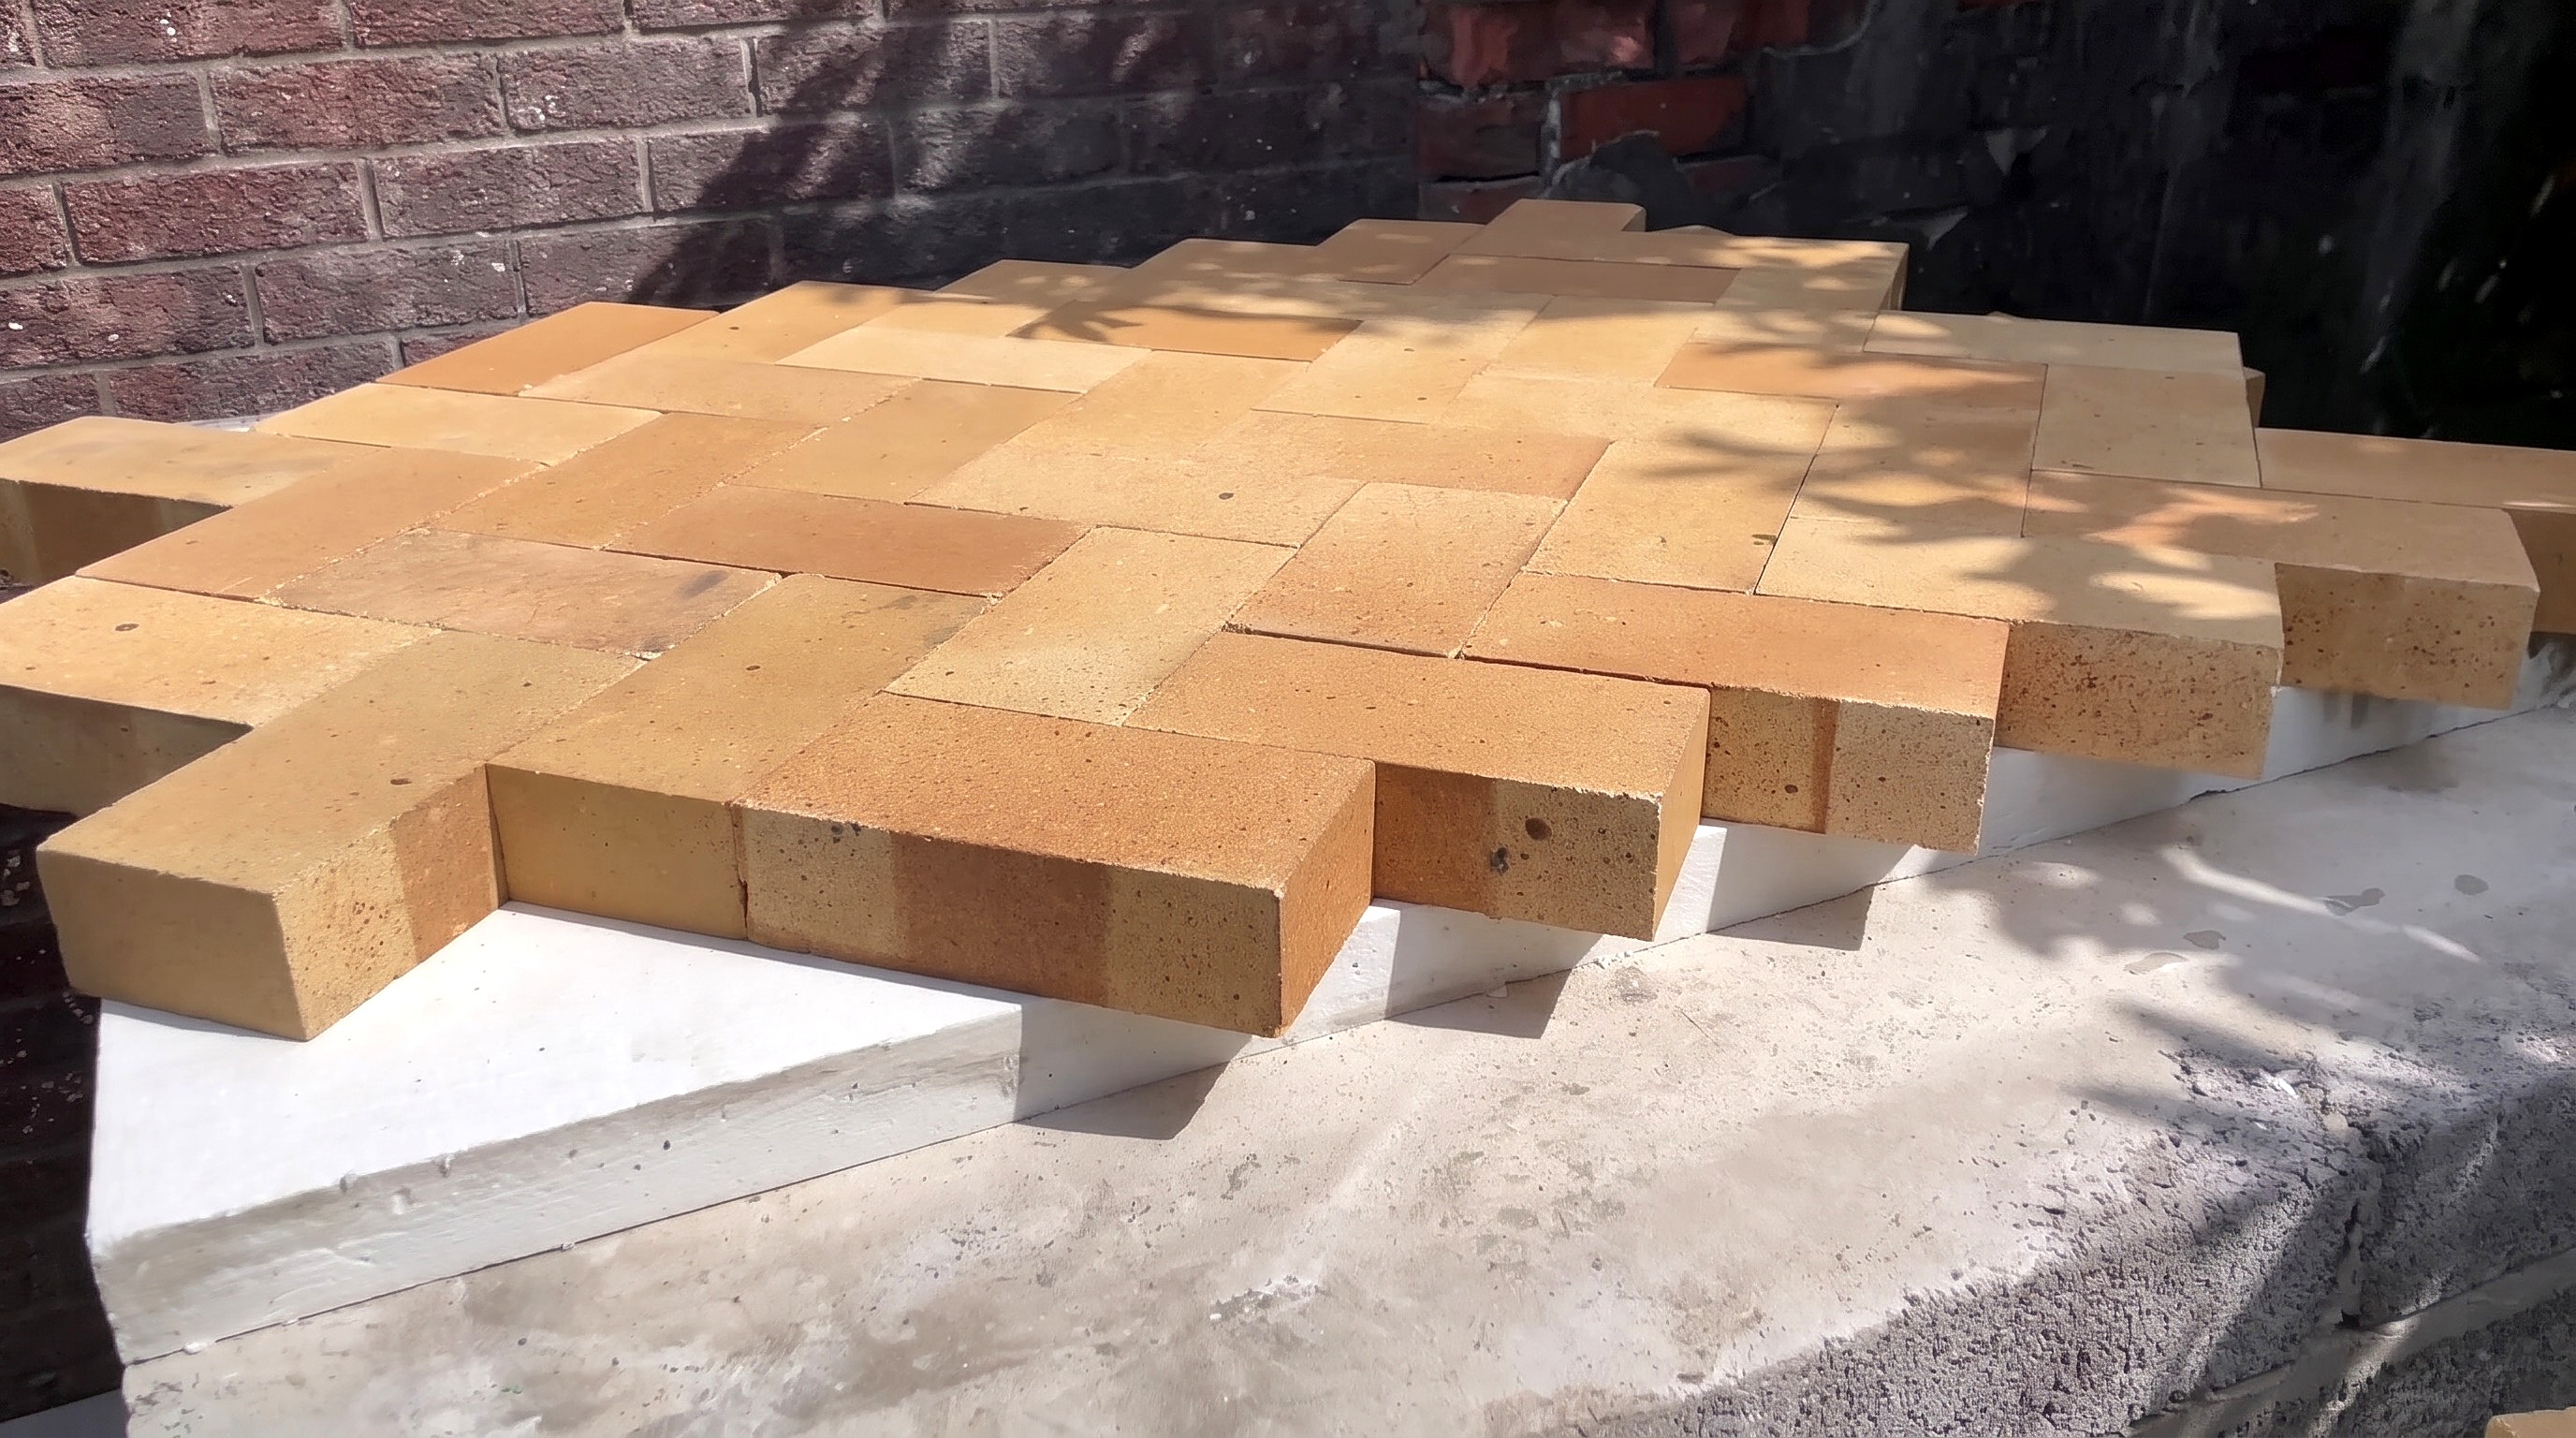
Parts in this step: (J) Pizza oven base concrete slab, (L) Under-floor oven insulation board, (M) Herringbone oven floor bricks
You'll need: Tape measure, Spirit level, Ceramic fiber insulation board, Fire bricks
- 10.1 Dry-Fit Fire Bricks in a Herringbone Pattern
- Center the under-floor oven insulation board (L) (size is not stated; 48.5 x 48.5 x 1 in is estimated) on top of the cured pizza oven base concrete slab (J).
- Extend the insulation board under both the cooking floor and the outer vertical soldier course.
- Dry-fit whole oven floor bricks (M) (estimated 9 x 4.5 x 2 1/2 in) tightly in a 45-degree herringbone pattern across the board.
Key measurements
- Herringbone floor angle: 45 degrees across the insulation board
- Tip: Do not stop the ceramic fiber insulation board short of the outer soldier course, or dome heat conducts into the concrete slab.
Before you move on: Check herringbone bricks sit tight with no gaps across the dome footprint.
Step 11: Mark and Cut the Circular Oven Floor
Level the floor bricks, scribe the circular dome perimeter, and cut the bricks and insulation board to shape.
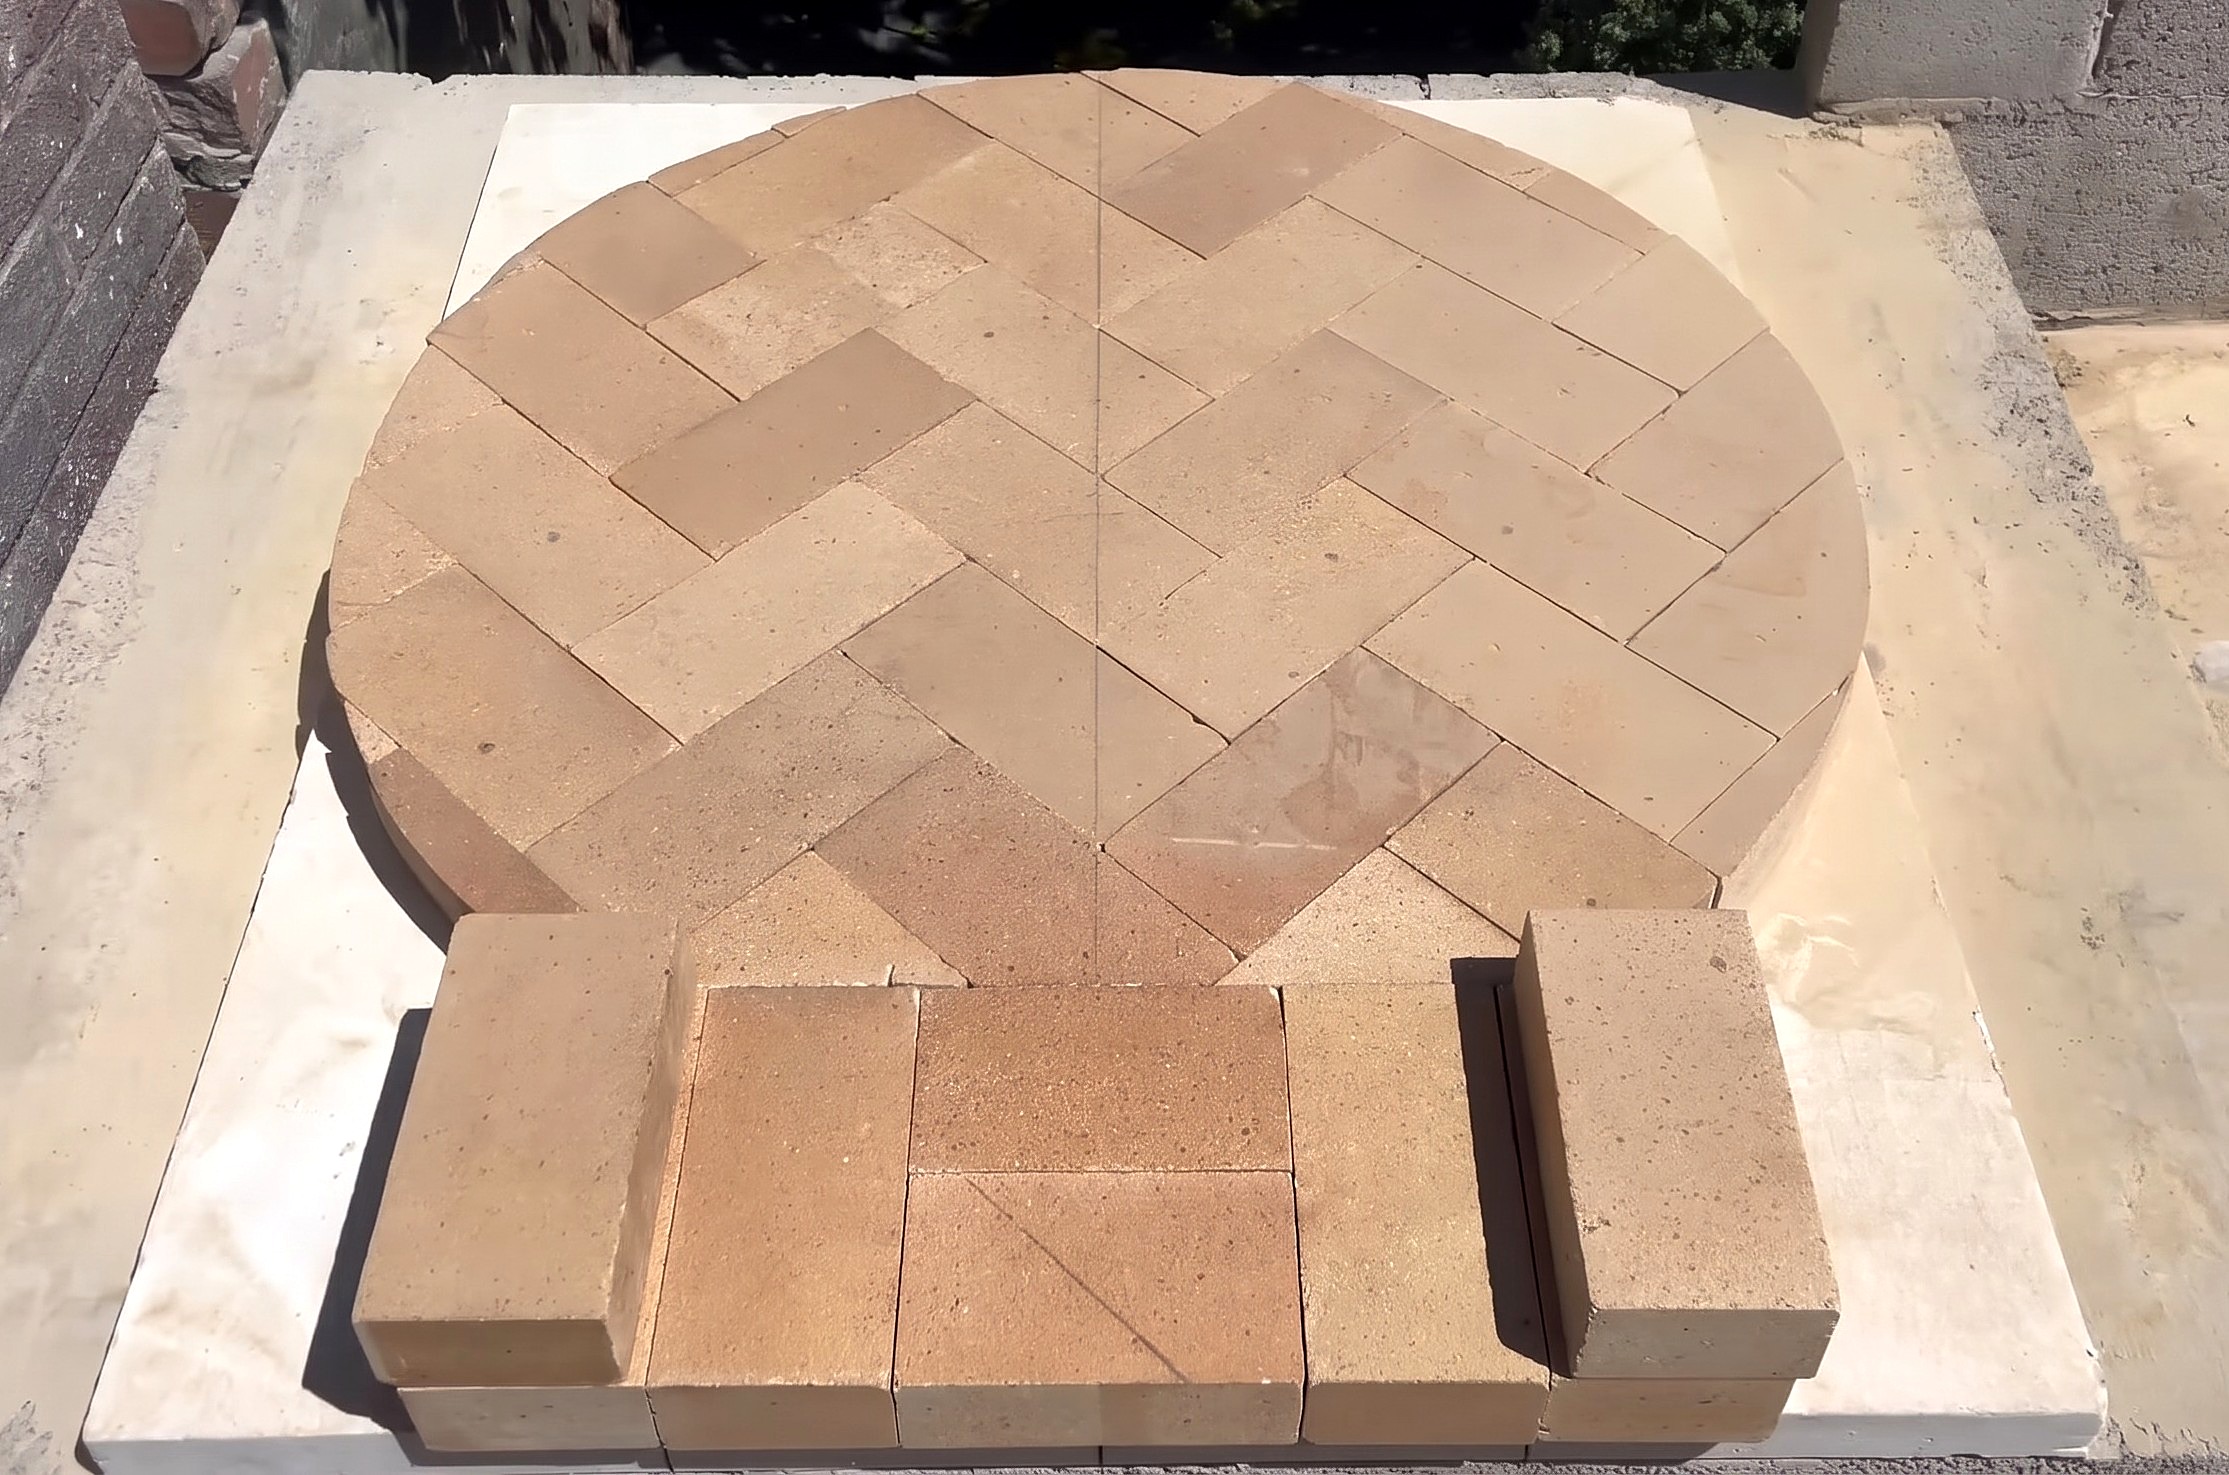
Parts in this step: (L) Under-floor oven insulation board, (M) Herringbone oven floor bricks
You'll need: Spirit level, Tape measure, String line, Cordless impact driver, Wet brick saw, Angle grinder, Fire bricks, Ceramic fiber insulation board, Wood screws
- 11.1 Swap Lipped Bricks and Mark the Front Tunnel Edge
- Run a hand over dry-laid floor bricks (M); flip or swap raised edges so a pizza peel will not catch.
- Set two whole fire bricks at the entry tunnel, one pencil width back from the front slab edge to leave room for render bead over the under-floor oven insulation board (L).
- Hold a spirit level across the front tunnel bricks and pencil the straight front threshold line.
- 11.2 Mark the Centerline and Pivot Point
- Align a spirit level with the center joints of the herringbone oven floor bricks (M) and draw the front-to-back centerline.
- Mark the dome center 500 mm back from the front threshold line along the centerline.
- Drive a wood screw into the center-mark brick joint.
- 11.3 Scribe the Dome Circle with a String Compass
- Tie a string line to the center screw, wrap a pencil at the outer dome radius, and swing the taut string across the herringbone oven floor bricks (M) to scribe the circle.
- Cut the marked perimeter bricks along the curve on a wet brick saw and refit them into the floor.
- Trim the exposed perimeter of the under-floor oven insulation board (L) with an angle grinder.
Key measurements
- Front threshold setback: 1 pencil width from the front concrete edge for render bead
- Dome center pivot: 500 mm back from the front tunnel line on the centerline
- Tip: Use whole fire bricks instead of small cut triangles at the front threshold for a clean, durable doorway edge.
Before you move on: Run your palm over the circular floor to confirm zero lipped edges before laying the perimeter walls.
Step 12: Lay the Soldier Course and Cut Half Bricks
Mortar the vertical soldier course around the circular floor and cut half-bricks for the dome rings.
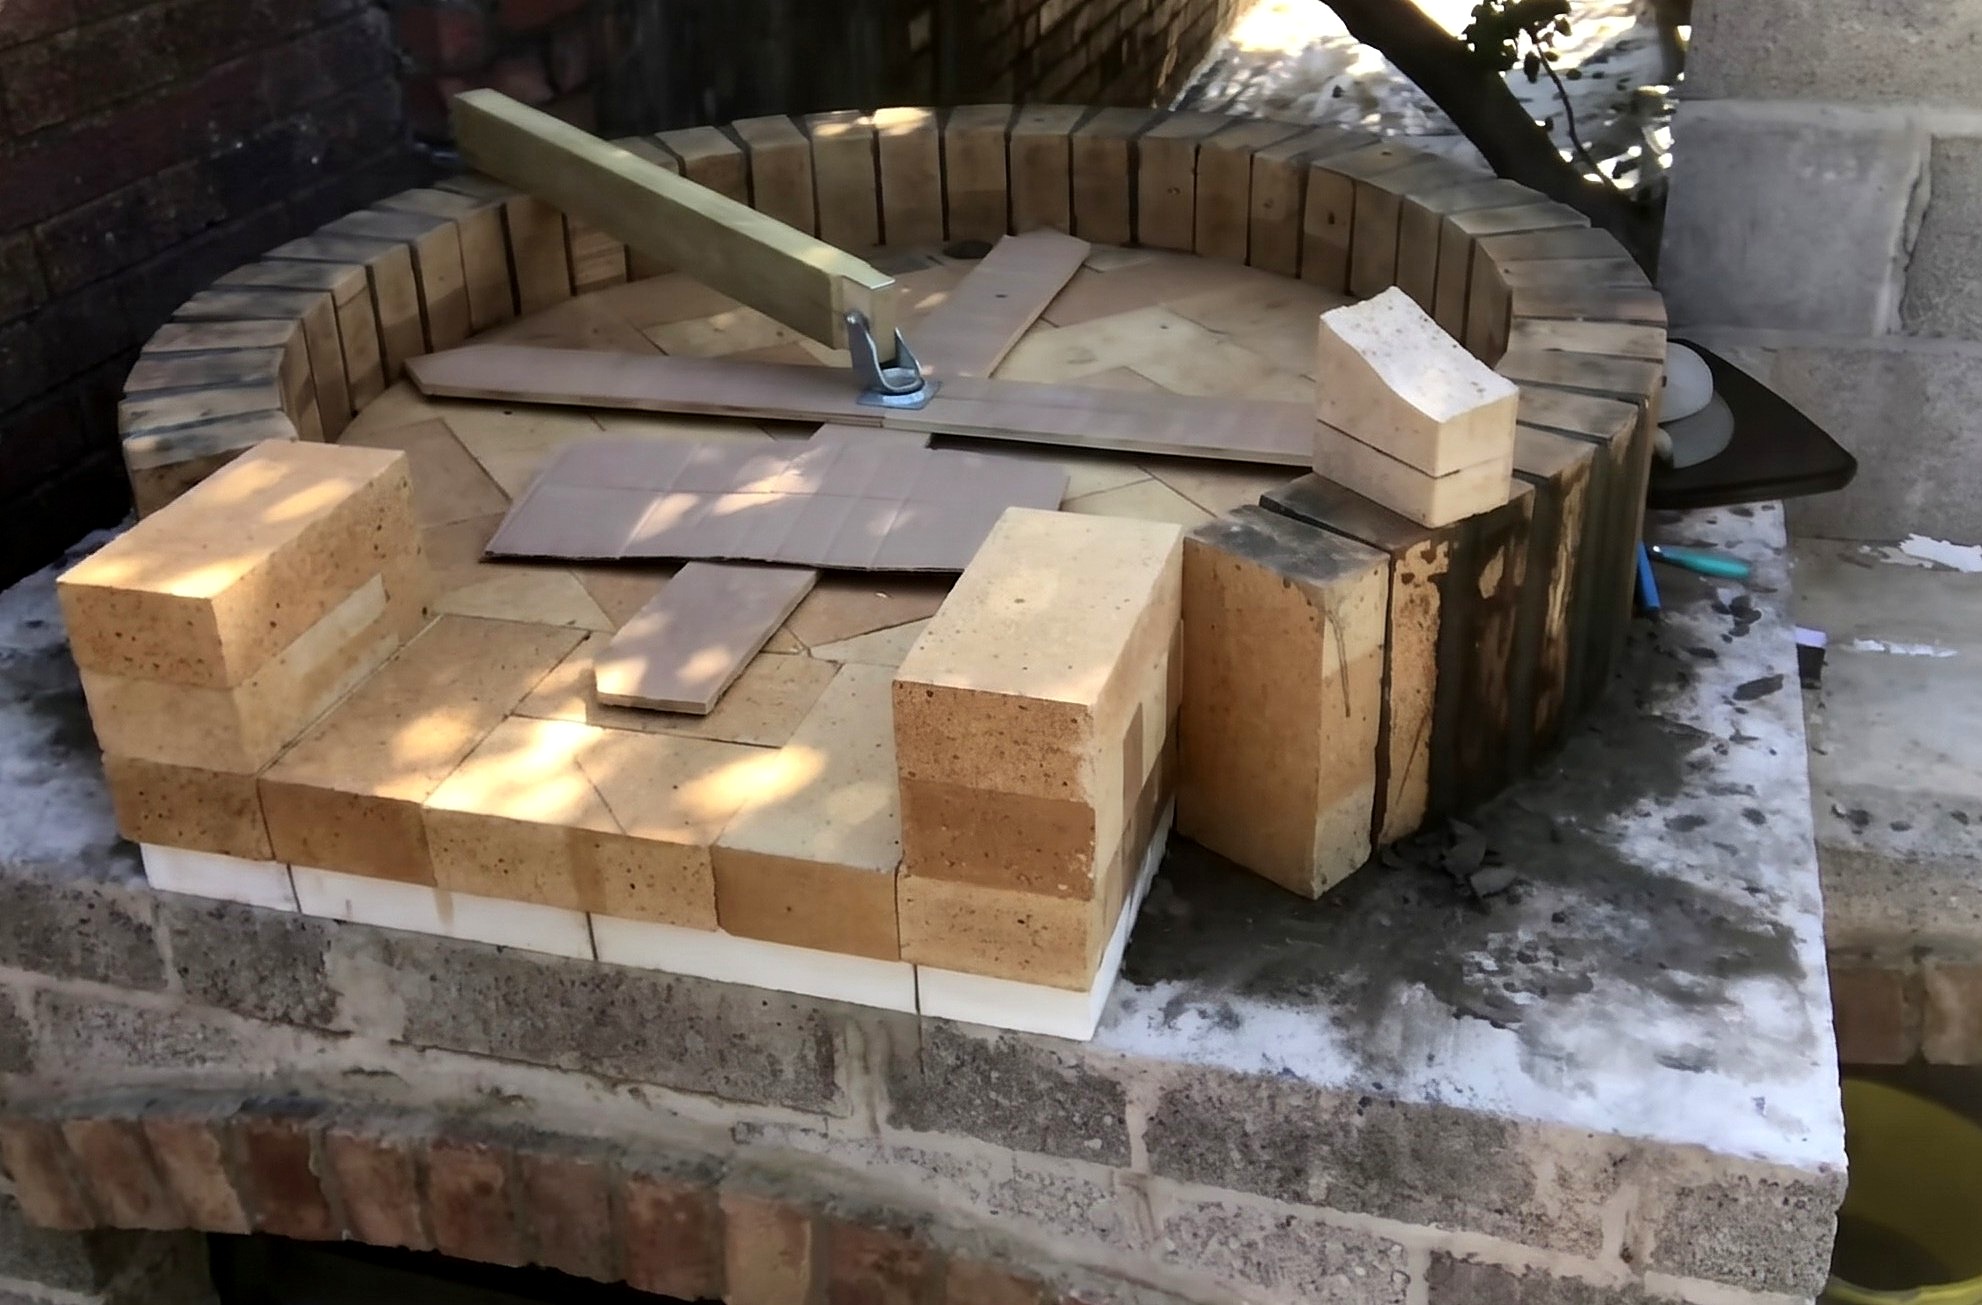
Parts in this step: (L) Under-floor oven insulation board, (M) Herringbone oven floor bricks, (N) Oven perimeter soldier course bricks, (O) Oven dome half-bricks
You'll need: Cordless impact driver, Bricklayer's trowel, Rubber mallet, Wet brick saw, Sponge, Swivel caster wheel, Timber, Wood screws, Fire bricks, Outdoor oven cement, Ceramic fiber insulation board
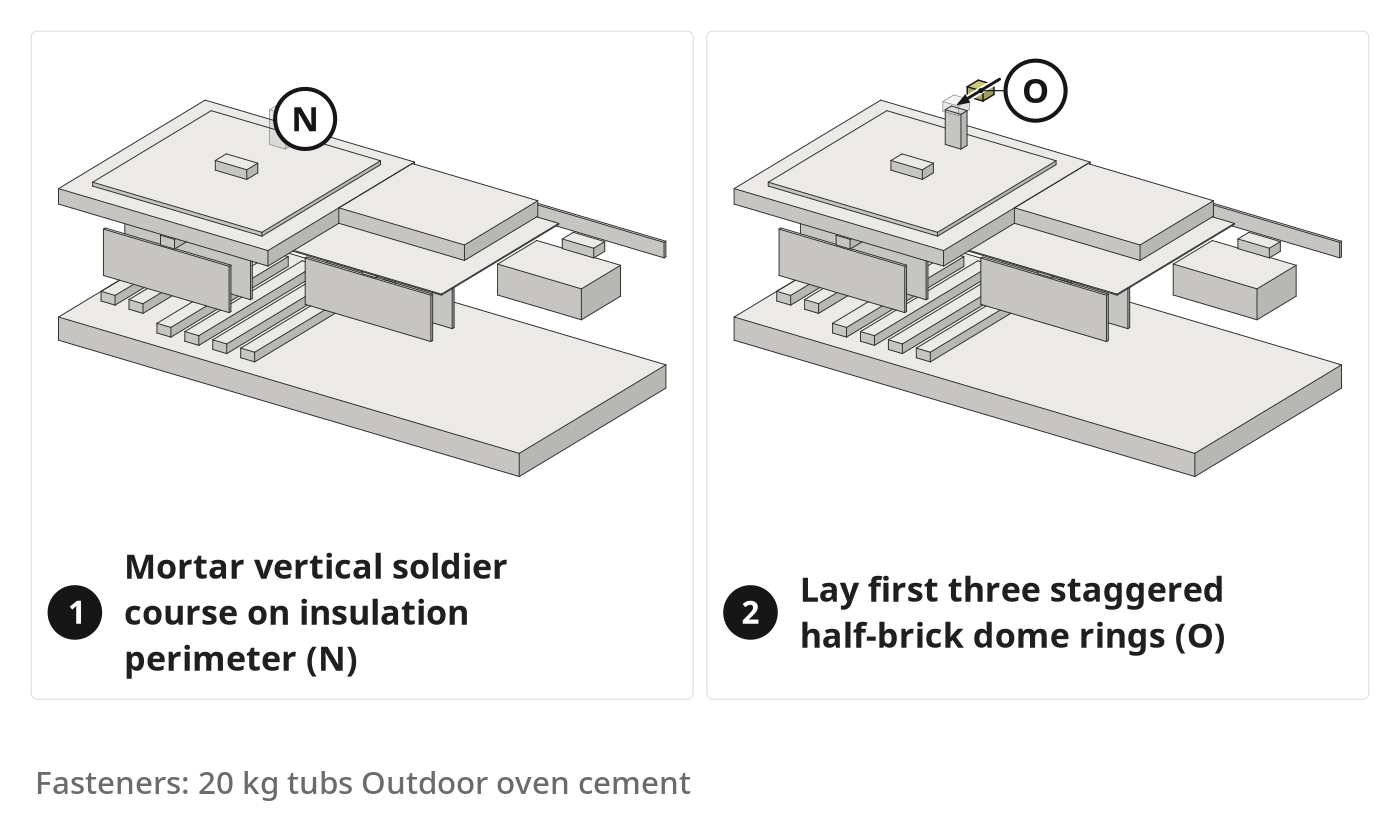
- 12.1 Mortar the Vertical Soldier Course Around the Floor
- Center and screw the split wooden trammel base and swivel caster wheel to the herringbone oven floor bricks (M) so it unscrews in halves to come out the door later.
- Dip whole oven perimeter soldier course bricks (N) (9 x 4.5 x 2 1/2 in is estimated) in a bucket of water and apply Vitcas outdoor oven cement.
- Stand the soldier bricks around the perimeter on the under-floor oven insulation board (L), resting each against the notched trammel arm and tapping it level with a rubber mallet.
- 12.2 Cut Fire Bricks in Half on the Wet Masonry Saw
- Set whole fire bricks on the wet brick saw sliding table.
- Cut the bricks in half crosswise into oven dome half-bricks (O) (4.5 x 4.5 x 2 1/2 in is estimated) for the curved dome courses.
- Tip: Dip each fire brick in a bucket of water right before buttering with oven cement.
Before you move on: Rotate the trammel arm 360 degrees to check every soldier brick meets the guide notch at the same height and radius.
Step 13: Build the Pizza Oven Entry Arch
Frame the metal pizza oven door with mortared fire-brick pillars and a custom-cut entry arch.
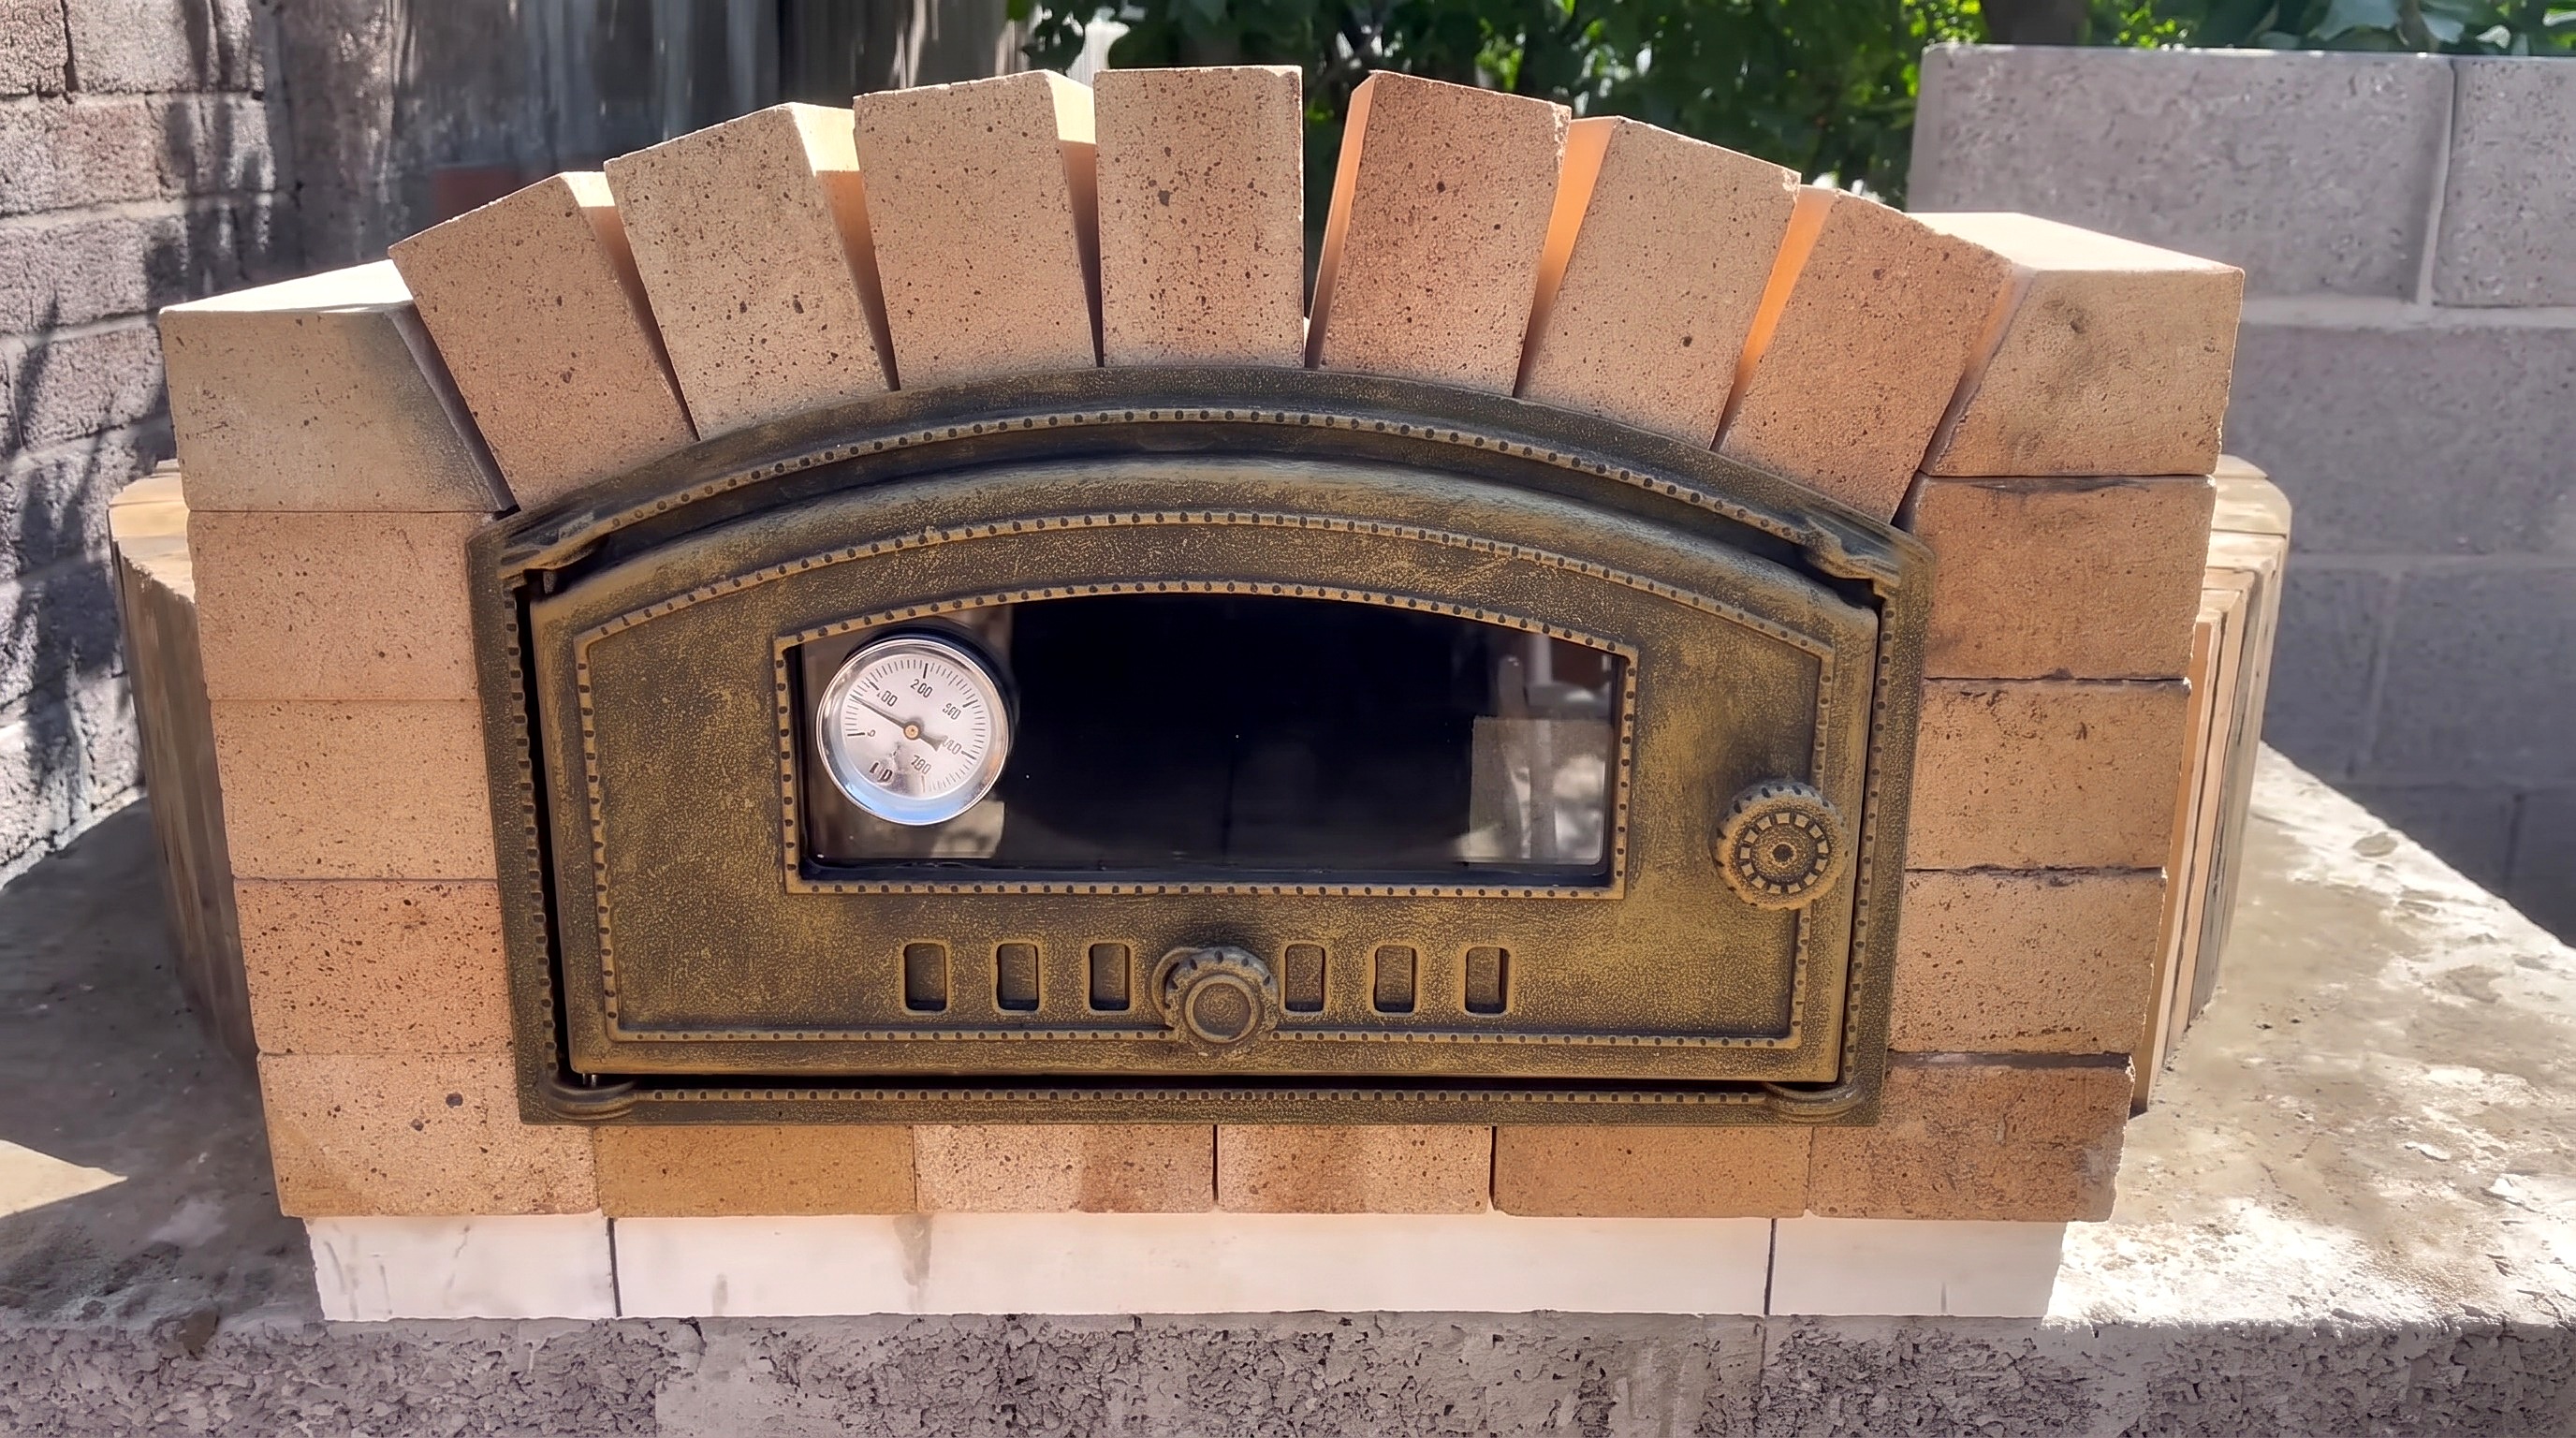
Parts in this step: (Q) Pizza oven entry door and arch assembly
You'll need: Bricklayer's trowel, Spirit level, Wet brick saw, Rubber mallet, Pizza oven door, Fire bricks, Outdoor oven cement
- 13.1 Mortar the Side Pillars Around the Oven Door
- Set the arched metal frame of the pizza oven entry door and arch assembly (Q) at the front threshold and check the trammel arm clears it.
- Dip fire bricks in water, butter with outdoor oven cement, and mortar vertical pillars up both sides of the door frame.
- Check the side pillars for plumb and level with a spirit level.
- 13.2 Dry-Fit and Mark the Entry Arch Bricks
- Cut angled skewback bricks on the wet brick saw and bed them on the side pillars of the pizza oven entry door and arch assembly (Q).
- Dry-fit fire bricks over a curved wooden template atop the door frame and pencil the radial cuts.
- Cut the arch bricks on the wet brick saw and mortar the inner entry arch over the door.
- Tip: Build the inner entry arch and lower dome courses before the outer chimney flue arch so you can align the flue.
Before you move on: Check the metal pizza oven door sits plumb and opens smoothly without binding on the brickwork.
Step 14: Lay the Lower Courses of the Brick Dome
Lay the first three angled courses of half fire bricks around the dome using the rotating trammel arm.
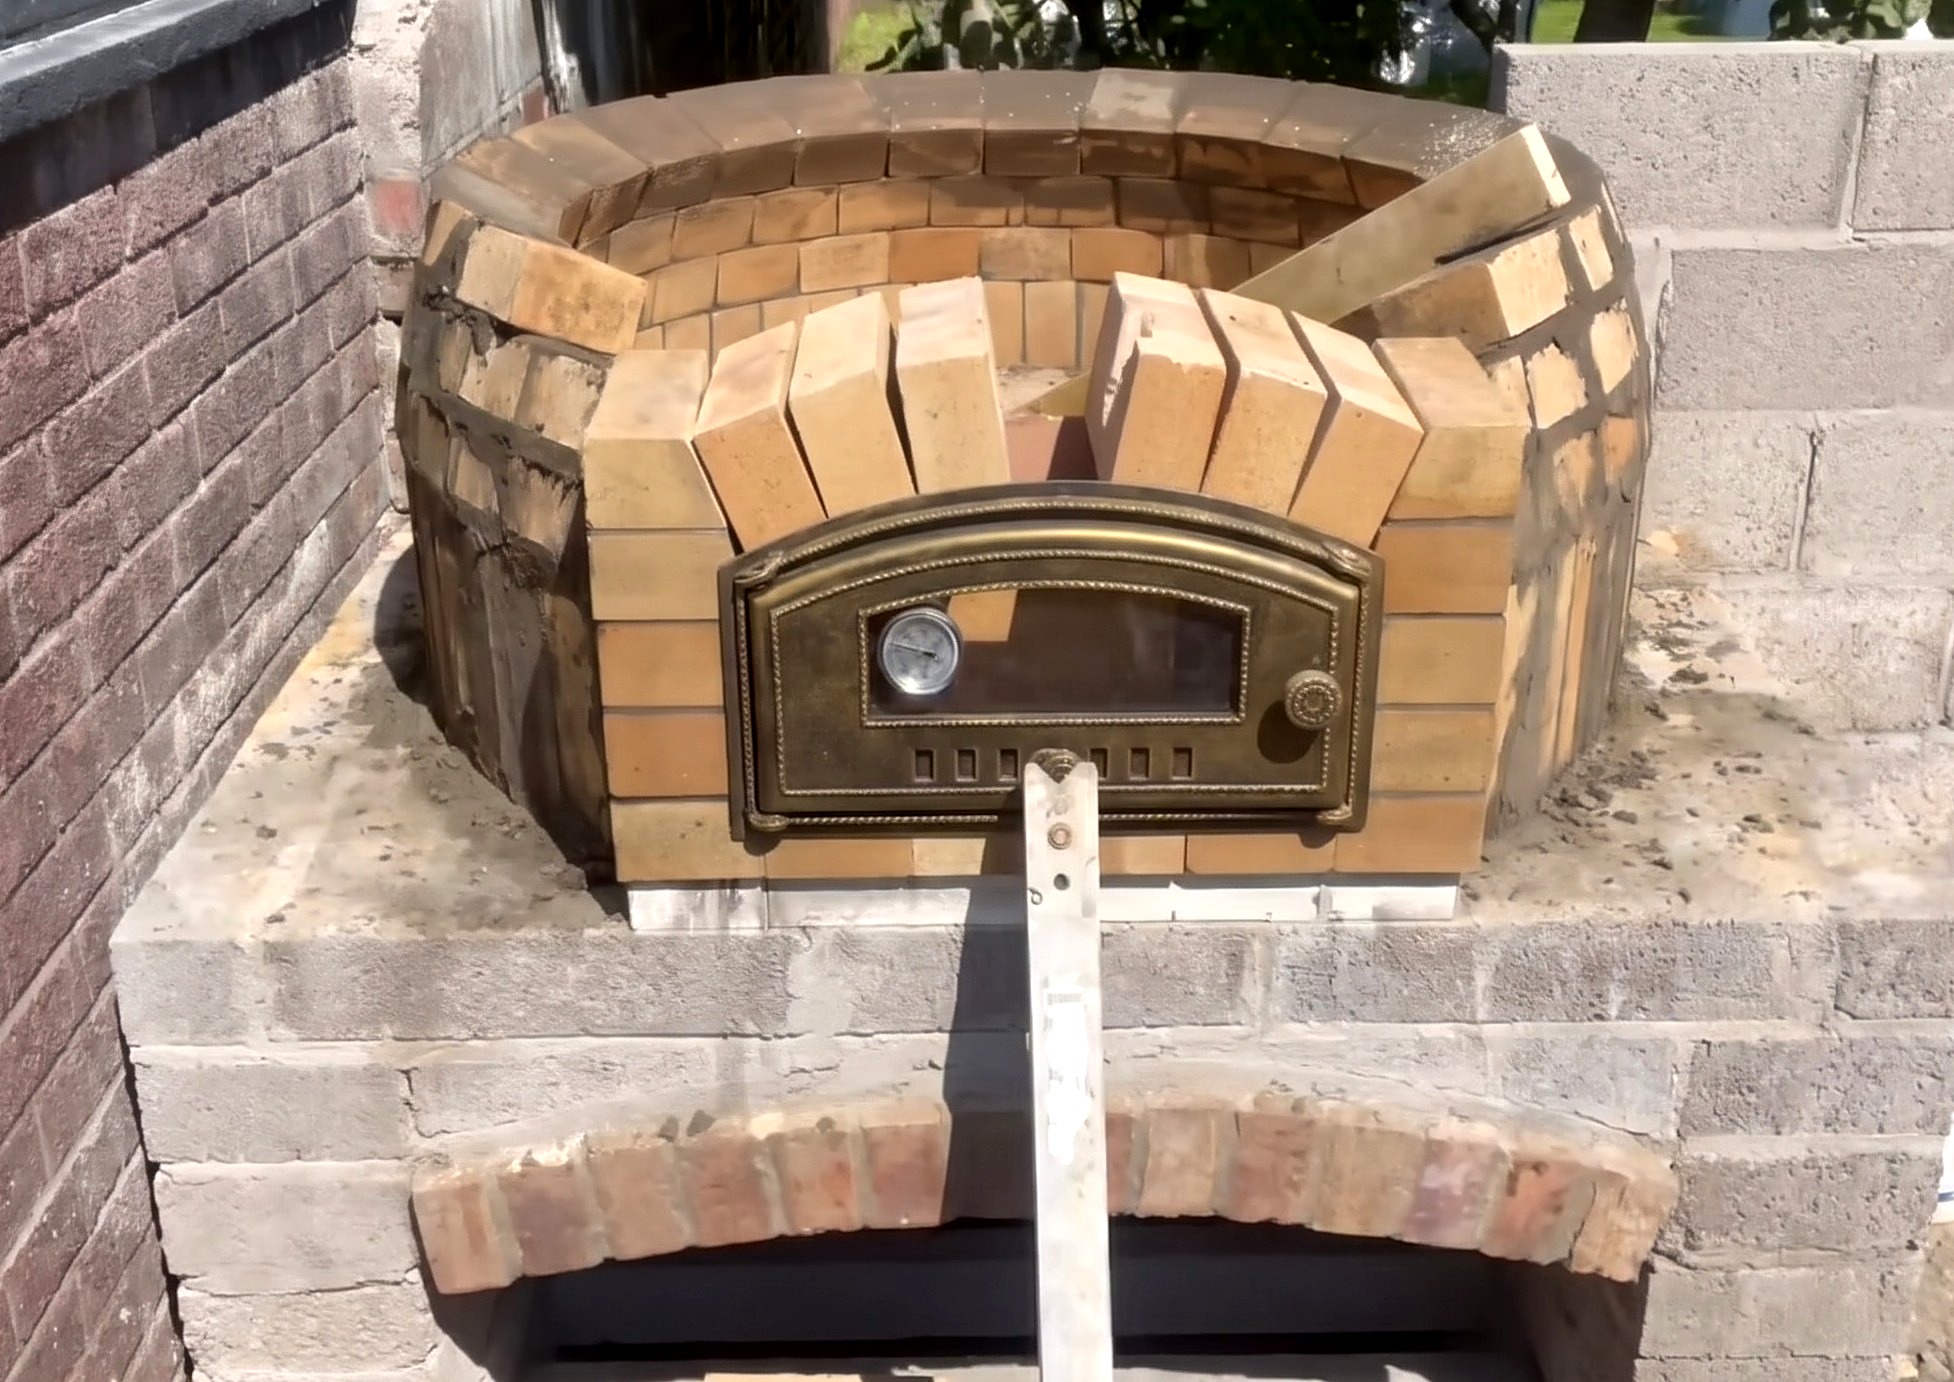
Parts in this step: (N) Oven perimeter soldier course bricks, (O) Oven dome half-bricks
You'll need: Bricklayer's trowel, Rubber mallet, Sponge, Fire bricks, Outdoor oven cement
- 14.1 Lay the First Angled Course of Half Bricks
- Start at the rear center of the oven perimeter soldier course bricks (N), opposite the doorway, so the joints visible through the tunnel stay evenly staggered.
- Dip each oven dome half-brick (O) in water and butter its bottom and sides with outdoor oven cement.
- Rest each half-brick's inner bottom edge against the notched trammel arm and lay bricks outward both ways toward the front arch.
- 14.2 Lay the Second and Third Staggered Dome Courses
- Start the second and third courses at the rear center for a half-brick stagger over the course below.
- Dip each oven dome half-brick (O) in water, apply outdoor oven cement, and set the inward slope with the rotating trammel arm.
- Wipe excess cement off the inner dome wall with a wet sponge after each course while you can still reach over the top.
- Tip: Start every dome ring at the back wall opposite the door and work outward both ways so irregular closing joints hide near the front corners.
Before you move on: Sponge interior mortar joints clean before the mortar hardens and the dome opening closes in.
Step 15: Mortar the Chimney Flue Base
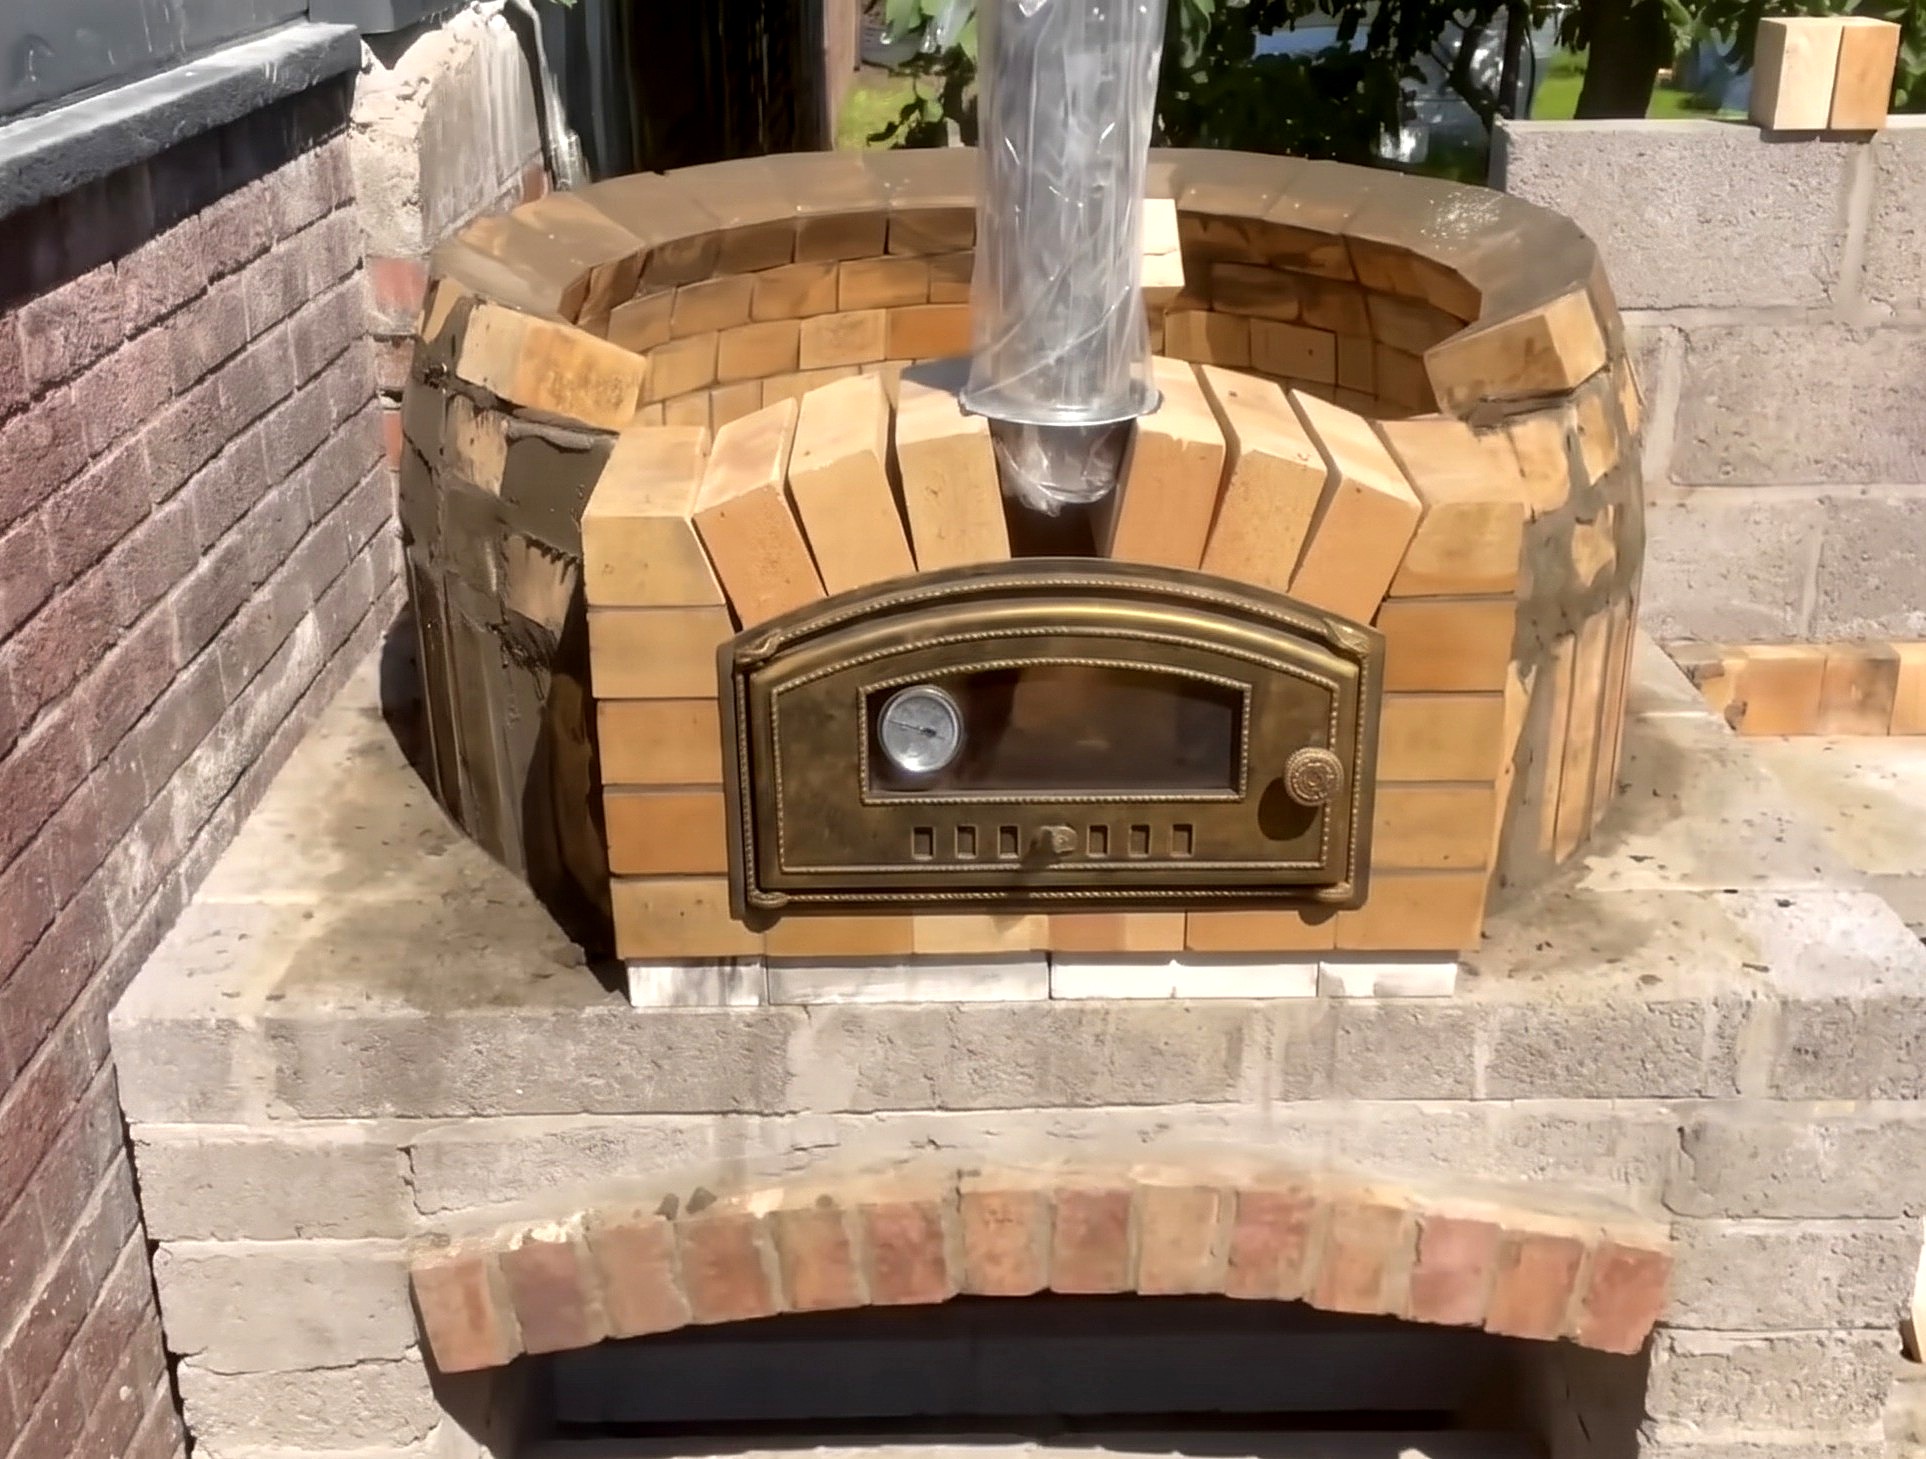
Mount the stainless steel chimney flue over the front entry arch and mortar fire bricks around its base collar.
Parts in this step: (Q) Pizza oven entry door and arch assembly, (R) Pizza oven chimney flue
You'll need: Bricklayer's trowel, Spirit level, Wet brick saw, Stainless steel chimney flue, Fire bricks, Outdoor oven cement
- 15.1 Set the Chimney Flue and Mortar the Front Arch
- Keep the protective plastic film on the pizza oven chimney flue (R) to protect the stainless steel from mortar.
- Set the flue base over the front tunnel vent on the pizza oven entry door and arch assembly (Q), forward enough to clear the outer dome screed.
- Cut and mortar fire bricks with outdoor oven cement around the flue base plate to lock the chimney vertically.
- Tip: Leave the plastic wrap on the stainless steel chimney flue until brickwork and exterior screeding finish.
Before you move on: Check two adjacent sides of the chimney flue pipe for plumb with a spirit level.
Step 16: Build the Middle Courses of the Brick Dome
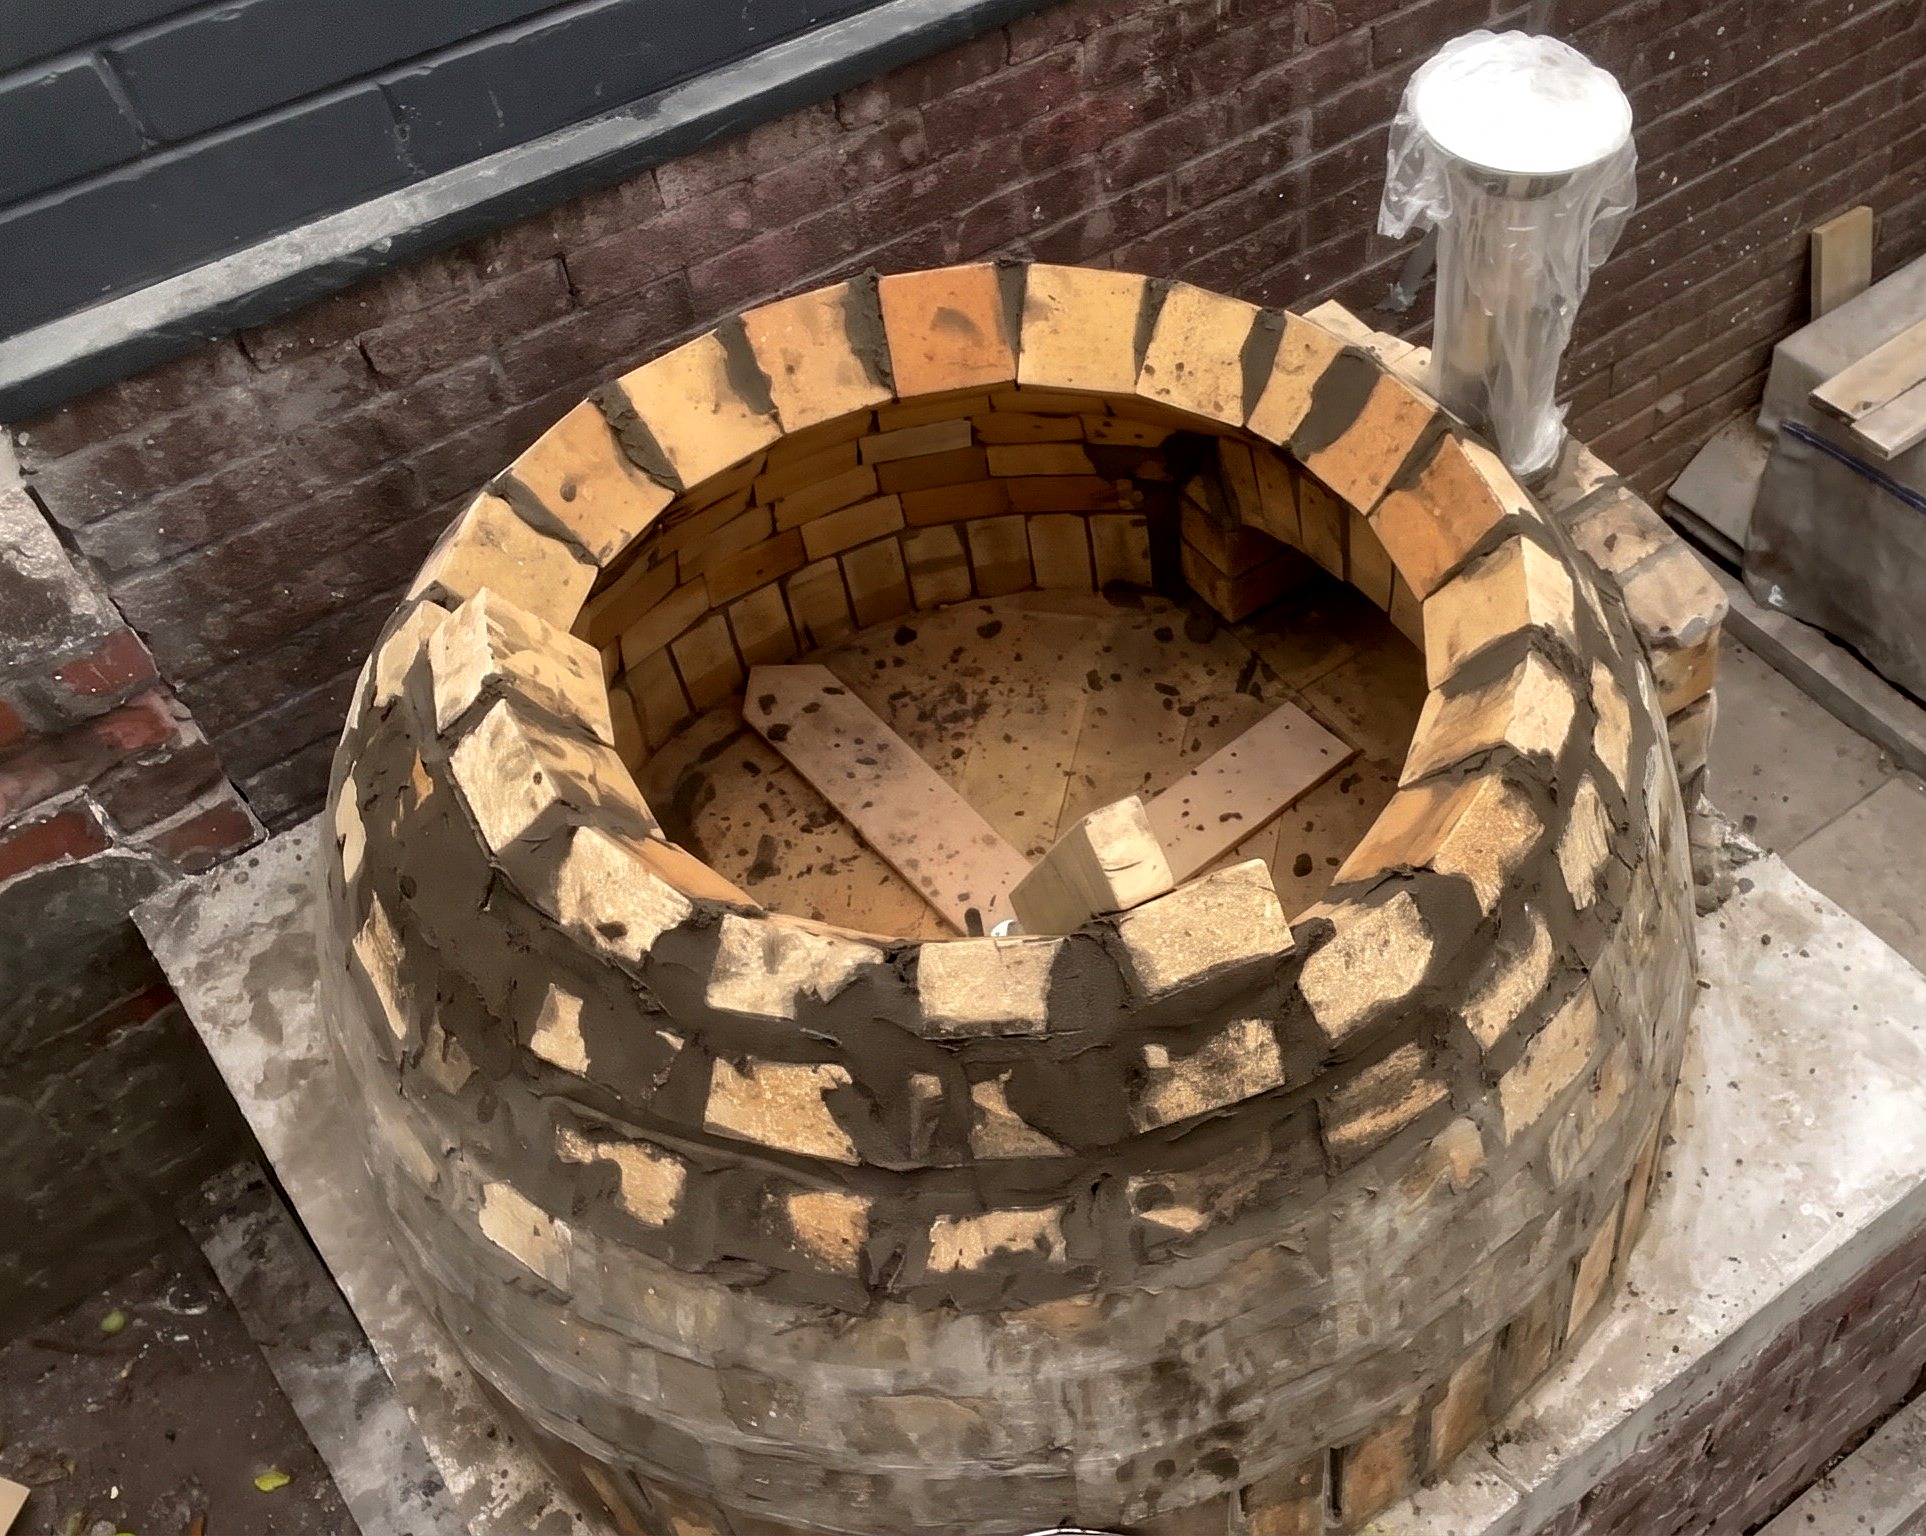
Lay the middle fire-brick dome courses, tying the rings into the front arch and chimney collar.
Parts in this step: (O) Oven dome half-bricks, (Q) Pizza oven entry door and arch assembly, (R) Pizza oven chimney flue
You'll need: Bricklayer's trowel, Wet brick saw, Rubber mallet, Sponge, Fire bricks, Outdoor oven cement
- 16.1 Lay the Fourth and Fifth Dome Courses and Tie Into the Arch
- Dip oven dome half-bricks (O) in water and mortar the fourth and fifth staggered courses with the rotating trammel arm.
- Angle-cut tie-in bricks on the wet brick saw where dome rings meet the pizza oven entry door and arch assembly (Q) and pizza oven chimney flue (R).
- Pack outdoor oven cement tightly into joints behind the chimney base.
- 16.2 Lay the Upper-Middle Dome Courses
- Lay staggered courses of dipped oven dome half-bricks (O) up the upper-middle dome with the trammel arm.
- Wipe inner joints clean with a damp sponge after each ring.
- Stop laying when the inward tilt is steep enough that buttered bricks slide off the mortar bed.
Before you move on: Let upper-middle dome courses cure firm before building the internal crown support form.
Step 17: Lay the Corbeled BBQ Hood Courses
Raise the upper barbecue firebox walls with shelf ledges and corbel the hood inward.
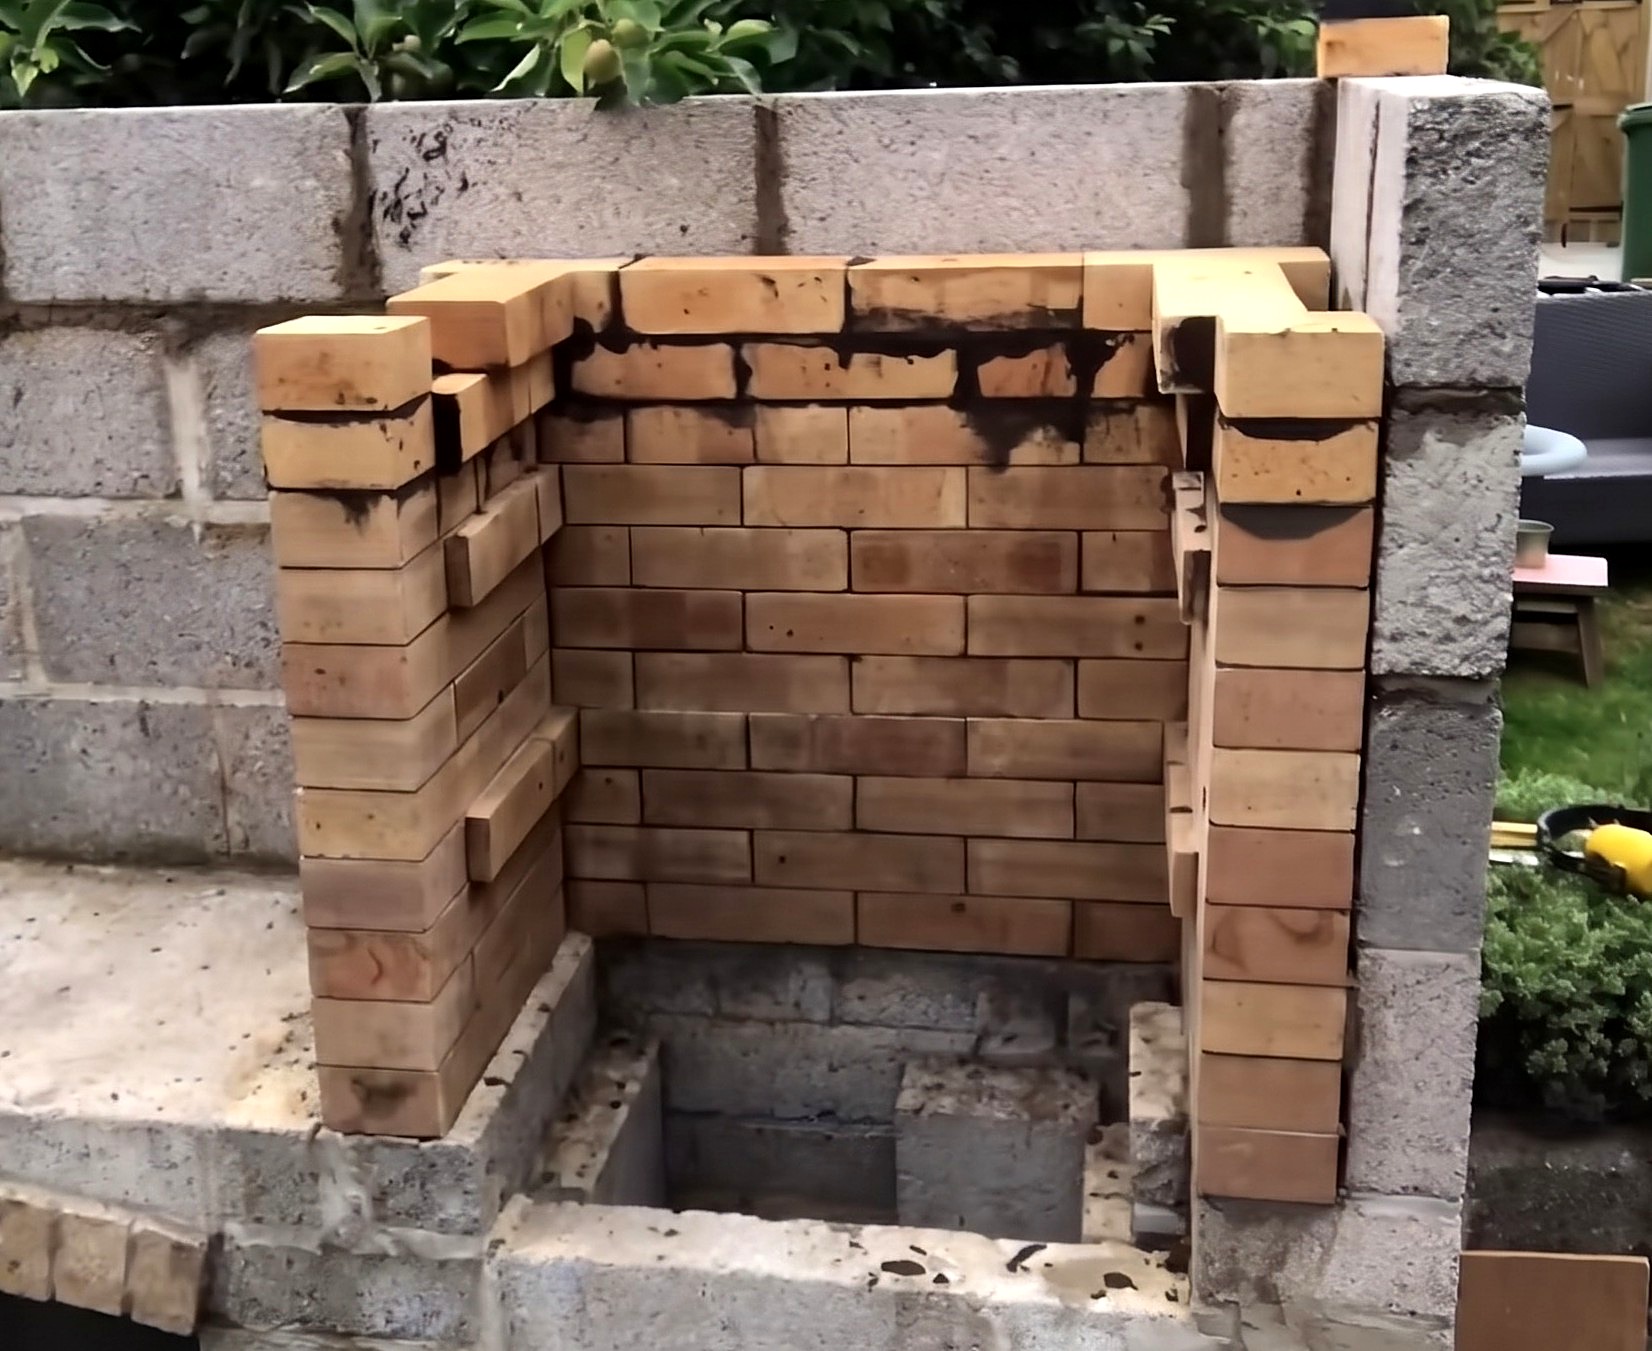
Parts in this step: (S) BBQ firebox and corbeled hood bricks
You'll need: Bricklayer's trowel, Spirit level, Club hammer, Fire bricks, Outdoor oven cement
- 17.1 Lay the Upper BBQ Firebox Walls and Shelf Ledges
- Dip whole BBQ firebox and corbeled hood bricks (S) in water; mortar upper courses on the left, rear, and right walls with outdoor oven cement.
- Offset two courses inward on the left and right inner walls to form ledges for grill grates or warming shelves.
- Level across both side ledges with a spirit level so shelves sit flat.
- 17.2 Begin Corbeling the BBQ Hood Inward
- Mortar the first inward-stepping corbel courses of BBQ firebox and corbeled hood bricks (S) on the left and right walls.
- Step each course inward evenly to narrow the hood toward the center chimney opening.
- Check each brick for level and plumb with a spirit level.
- Tip: Offsetting fire bricks proud on both inner side walls creates durable warming-shelf ledges without metal brackets.
Before you move on: Check that left and right corbel steps match in height and inward projection.
Step 18: Continue Corbeling the BBQ Hood
Lay the upper hood corbel courses and counterbalance them against the rear wall.
Parts in this step: (C) Rear backing wall blocks, (S) BBQ firebox and corbeled hood bricks
You'll need: Bricklayer's trowel, Spirit level, Fire bricks, Outdoor oven cement, Concrete, Concrete blocks
- 18.1 Lay Upper Corbel Courses on the BBQ Hood
- Mortar three more inward-stepping courses of soaked BBQ firebox and corbeled hood bricks (S) on the left, right, and rear hood walls with outdoor oven cement.
- If overhanging courses feel top-heavy, stop and let the mortar cure.
- Pack concrete between the rear corbeled bricks and 4 in rear backing wall blocks (C) to counterbalance and anchor the overhang.
- Tip: Never lay uncured corbeled bricks past their balance point; let the cement set overnight and backfill behind them with concrete.
Before you move on: Make sure corbeled walls are cured and stable before capping the top ring and adding the heavy clay chimney pot.
Step 19: Cap the BBQ Hood and Install the Chimney Pot
Mortar the top fire-brick hood ring and bed the clay chimney pot.
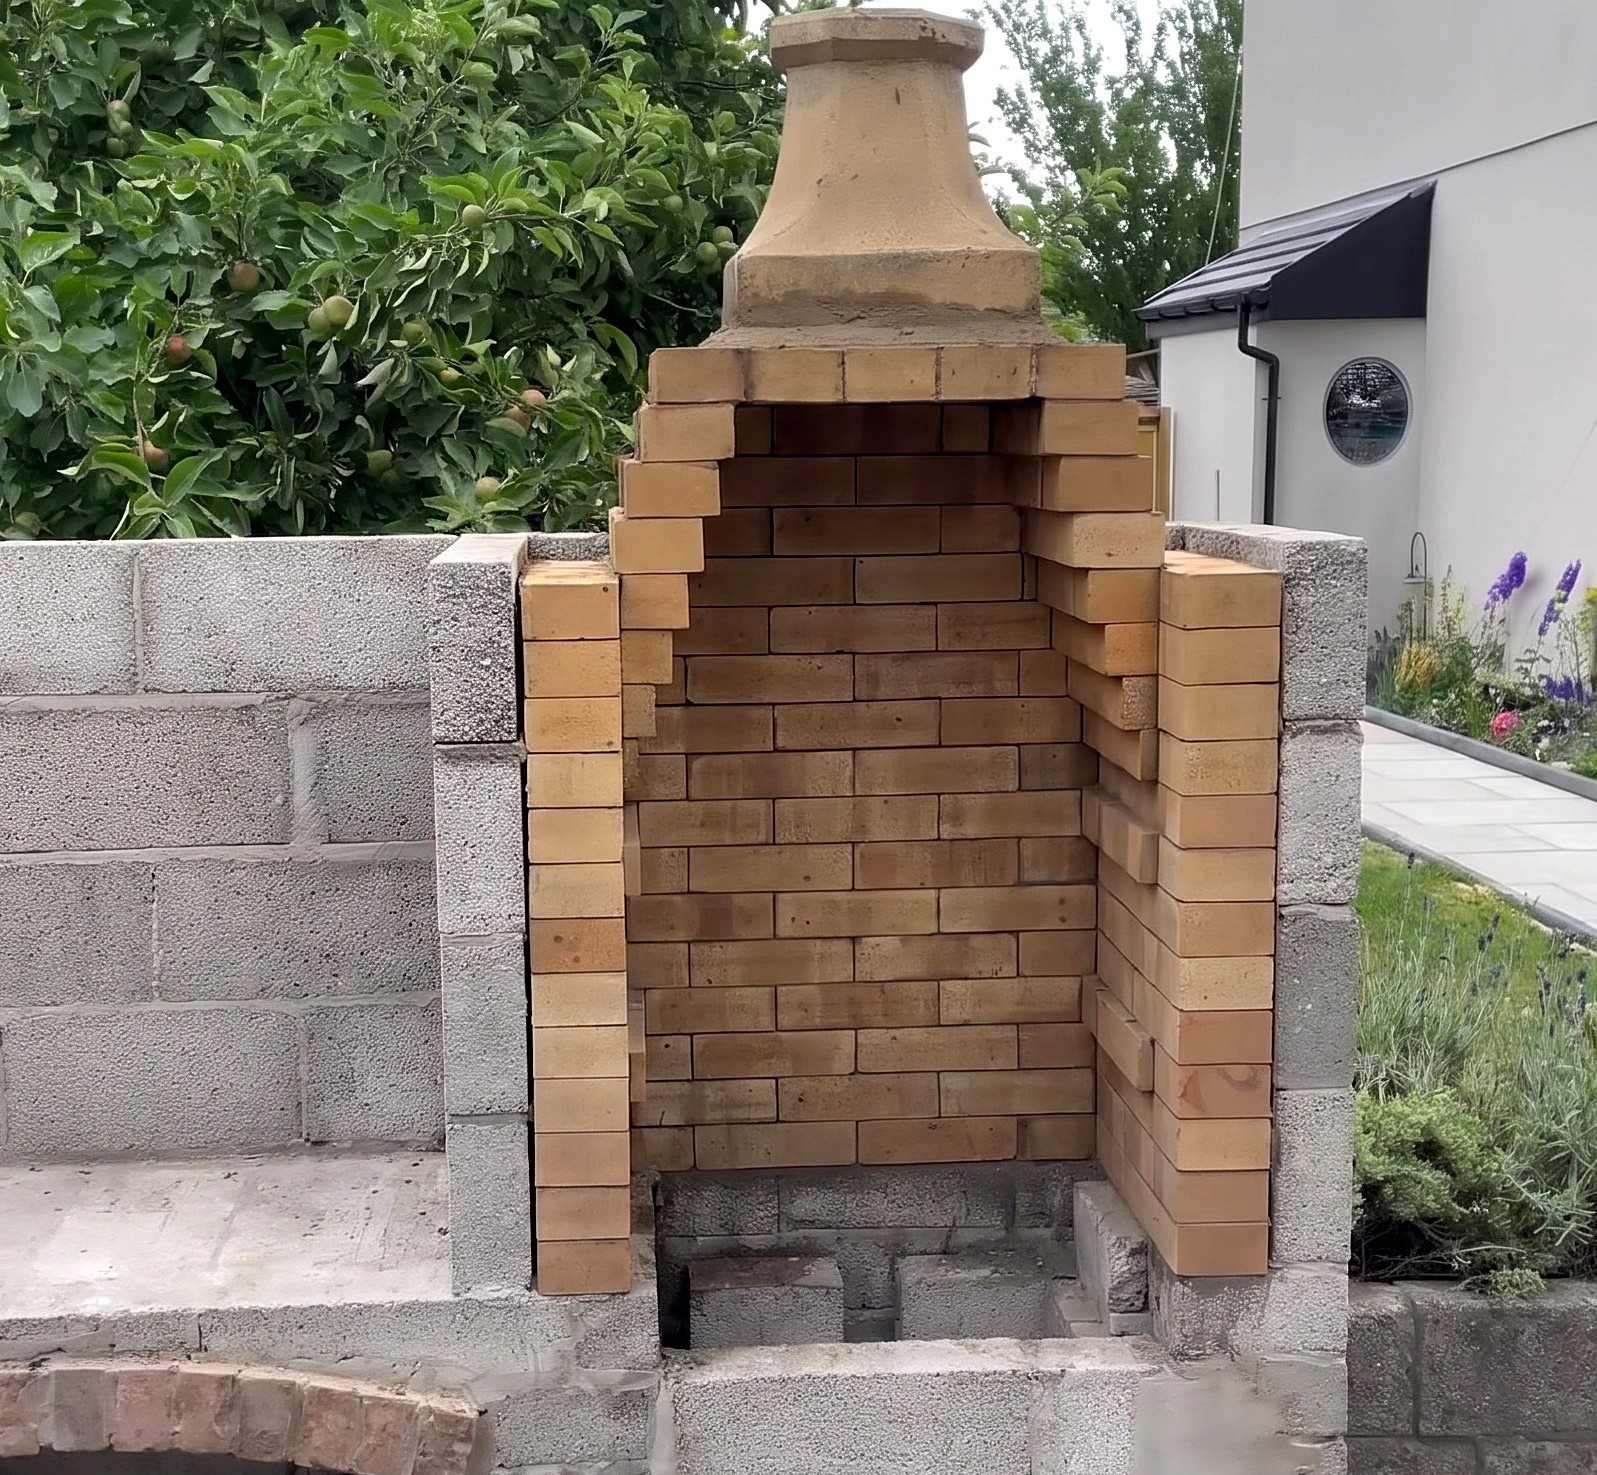
Parts in this step: (S) BBQ firebox and corbeled hood bricks, (U) BBQ hood chimney pot
You'll need: Tape measure, Wet brick saw, Bricklayer's trowel, Spirit level, Sponge, Fire bricks, Outdoor oven cement, Clay chimney pot
- 19.1 Cut and Mortar the Top Corbel Course
- Measure the narrowed top hood opening with a tape measure.
- Cut BBQ firebox and corbeled hood bricks (S) to fit on the wet brick saw; mortar the top ring with outdoor oven cement.
- Wipe stepped inner and outer joints clean with a wet sponge.
- 19.2 Bed the Clay Chimney Pot on the BBQ Hood
- Spread a thick collar of outdoor oven cement on the top ring of BBQ firebox and corbeled hood bricks (S).
- Press the BBQ hood chimney pot (U) into the cement bed over the top flue opening.
- Check the chimney pot for plumb with a spirit level and sponge the base mortar fillet smooth.
Before you move on: Check that the clay chimney pot stands plumb with its base joint sealed around the top ring.
Step 20: Sculpt the Sand Form and Close the Dome Crown
Build an internal block-and-sand mound; lay the final mitered fire-brick courses and crown wedges.
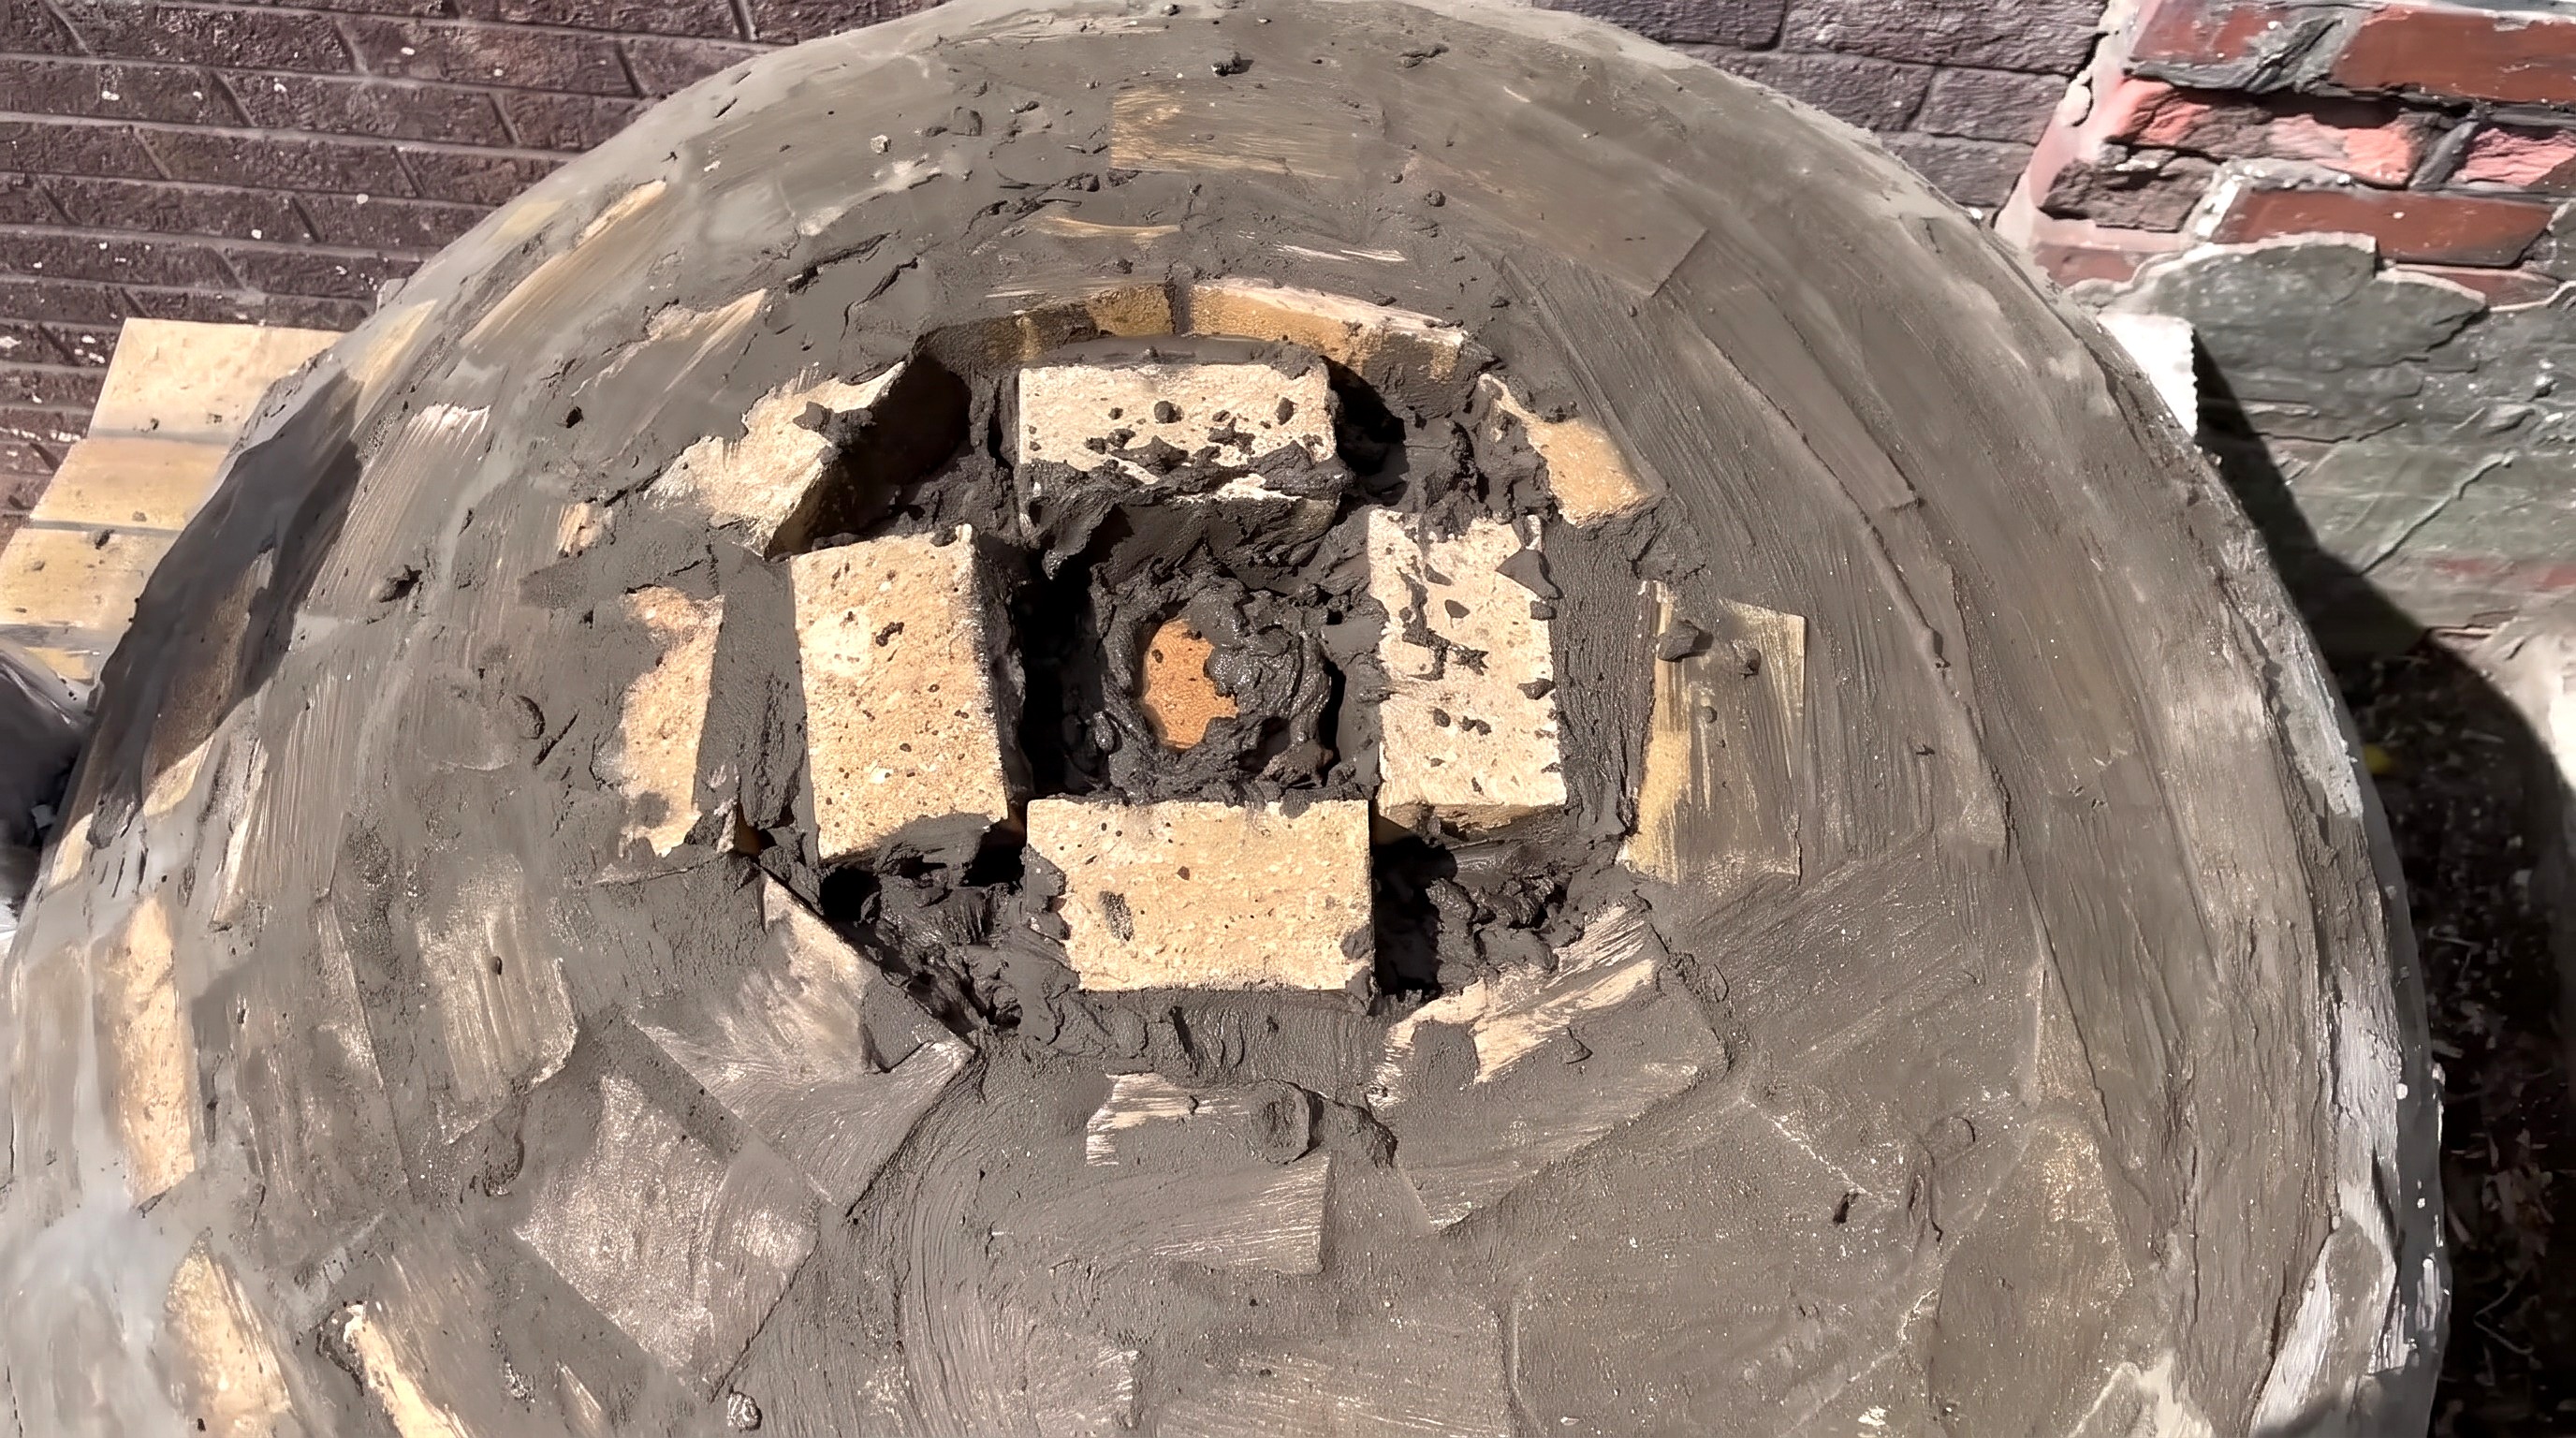
Parts in this step: (O) Oven dome half-bricks, (P) Oven crown center brick wedges, (V) Temporary dome crown support blocks
You'll need: Wet brick saw, Bricklayer's trowel, Rubber mallet, Thermal blocks, Building sand, Fire bricks, Outdoor oven cement
- 20.1 Sculpt the Wet Sand Mound and Lay Two Mitered Courses
- Unscrew the trammel arm and stack halved temporary dome crown support blocks (V) (8.5 x 8.5 x 4 in is estimated) inside the oven.
- Cover the blocks with plastic bags to keep sand out of the gaps, then sculpt wet building sand on top to match the inner dome curve.
- Miter the sides of oven dome half-bricks (O) on the wet brick saw; mortar two tight rings on the sand form with outdoor oven cement.
- 20.2 Pack the Center Crown with Brick Wedges and Oven Cement
- Cut four triangular oven crown center brick wedges (P) (4.5 x 2.5 x 2 1/2 in is estimated) on the wet brick saw.
- Push four upright oven dome half-bricks (O) and four triangular brick wedges into the center crown.
- Poke and pack outdoor oven cement to the bottom of the narrow crown gaps with a pencil, then cap flush.
Key measurements
- Center crown closure: 4 upright half-bricks with 4 cut triangular brick wedges
- Tip: Cut the aerated thermal blocks in half before stacking inside so they pull out through the narrow doorway later.
- Tip: Ram outdoor oven cement deep into the tight crown wedge joints with a pencil.
Before you move on: Let the crown outdoor oven cement cure before moving the internal support blocks.
Step 21: Remove the Support Blocks and Sand from the Oven
Empty the temporary support blocks, plastic bags, and sand from the cured brick dome.
Parts in this step: (M) Herringbone oven floor bricks, (Q) Pizza oven entry door and arch assembly, (V) Temporary dome crown support blocks
You'll need: Soft brush, Bricklayer's trowel, Thermal blocks, Building sand
- 21.1 Pull Out the Lower Thermal Blocks
- Open the pizza oven entry door and arch assembly (Q) once the crown mortar cures.
- Pull out the lower tiers of halved temporary dome crown support blocks (V).
- 21.2 Clear Out the Remaining Blocks, Plastic Bags, and Sand
- Pull out the upper temporary dome crown support blocks (V) and plastic bags as the sand drops.
- Scoop out the building sand and clean the herringbone oven floor bricks (M) with a soft brush.
- Light a small curing fire inside and close the door to dry the refractory mortar before insulating the exterior.
- Tip: Burn a small curing fire in the bare dome to dry the refractory mortar before adding insulation and screed.
Before you move on: Check under the crown that all wedge bricks are locked in and the floor is swept free of sand.
Step 22: Lay the Front Brick Arch on the BBQ
Mortar the decorative rustic red brick arch across the barbecue hood upper front opening.
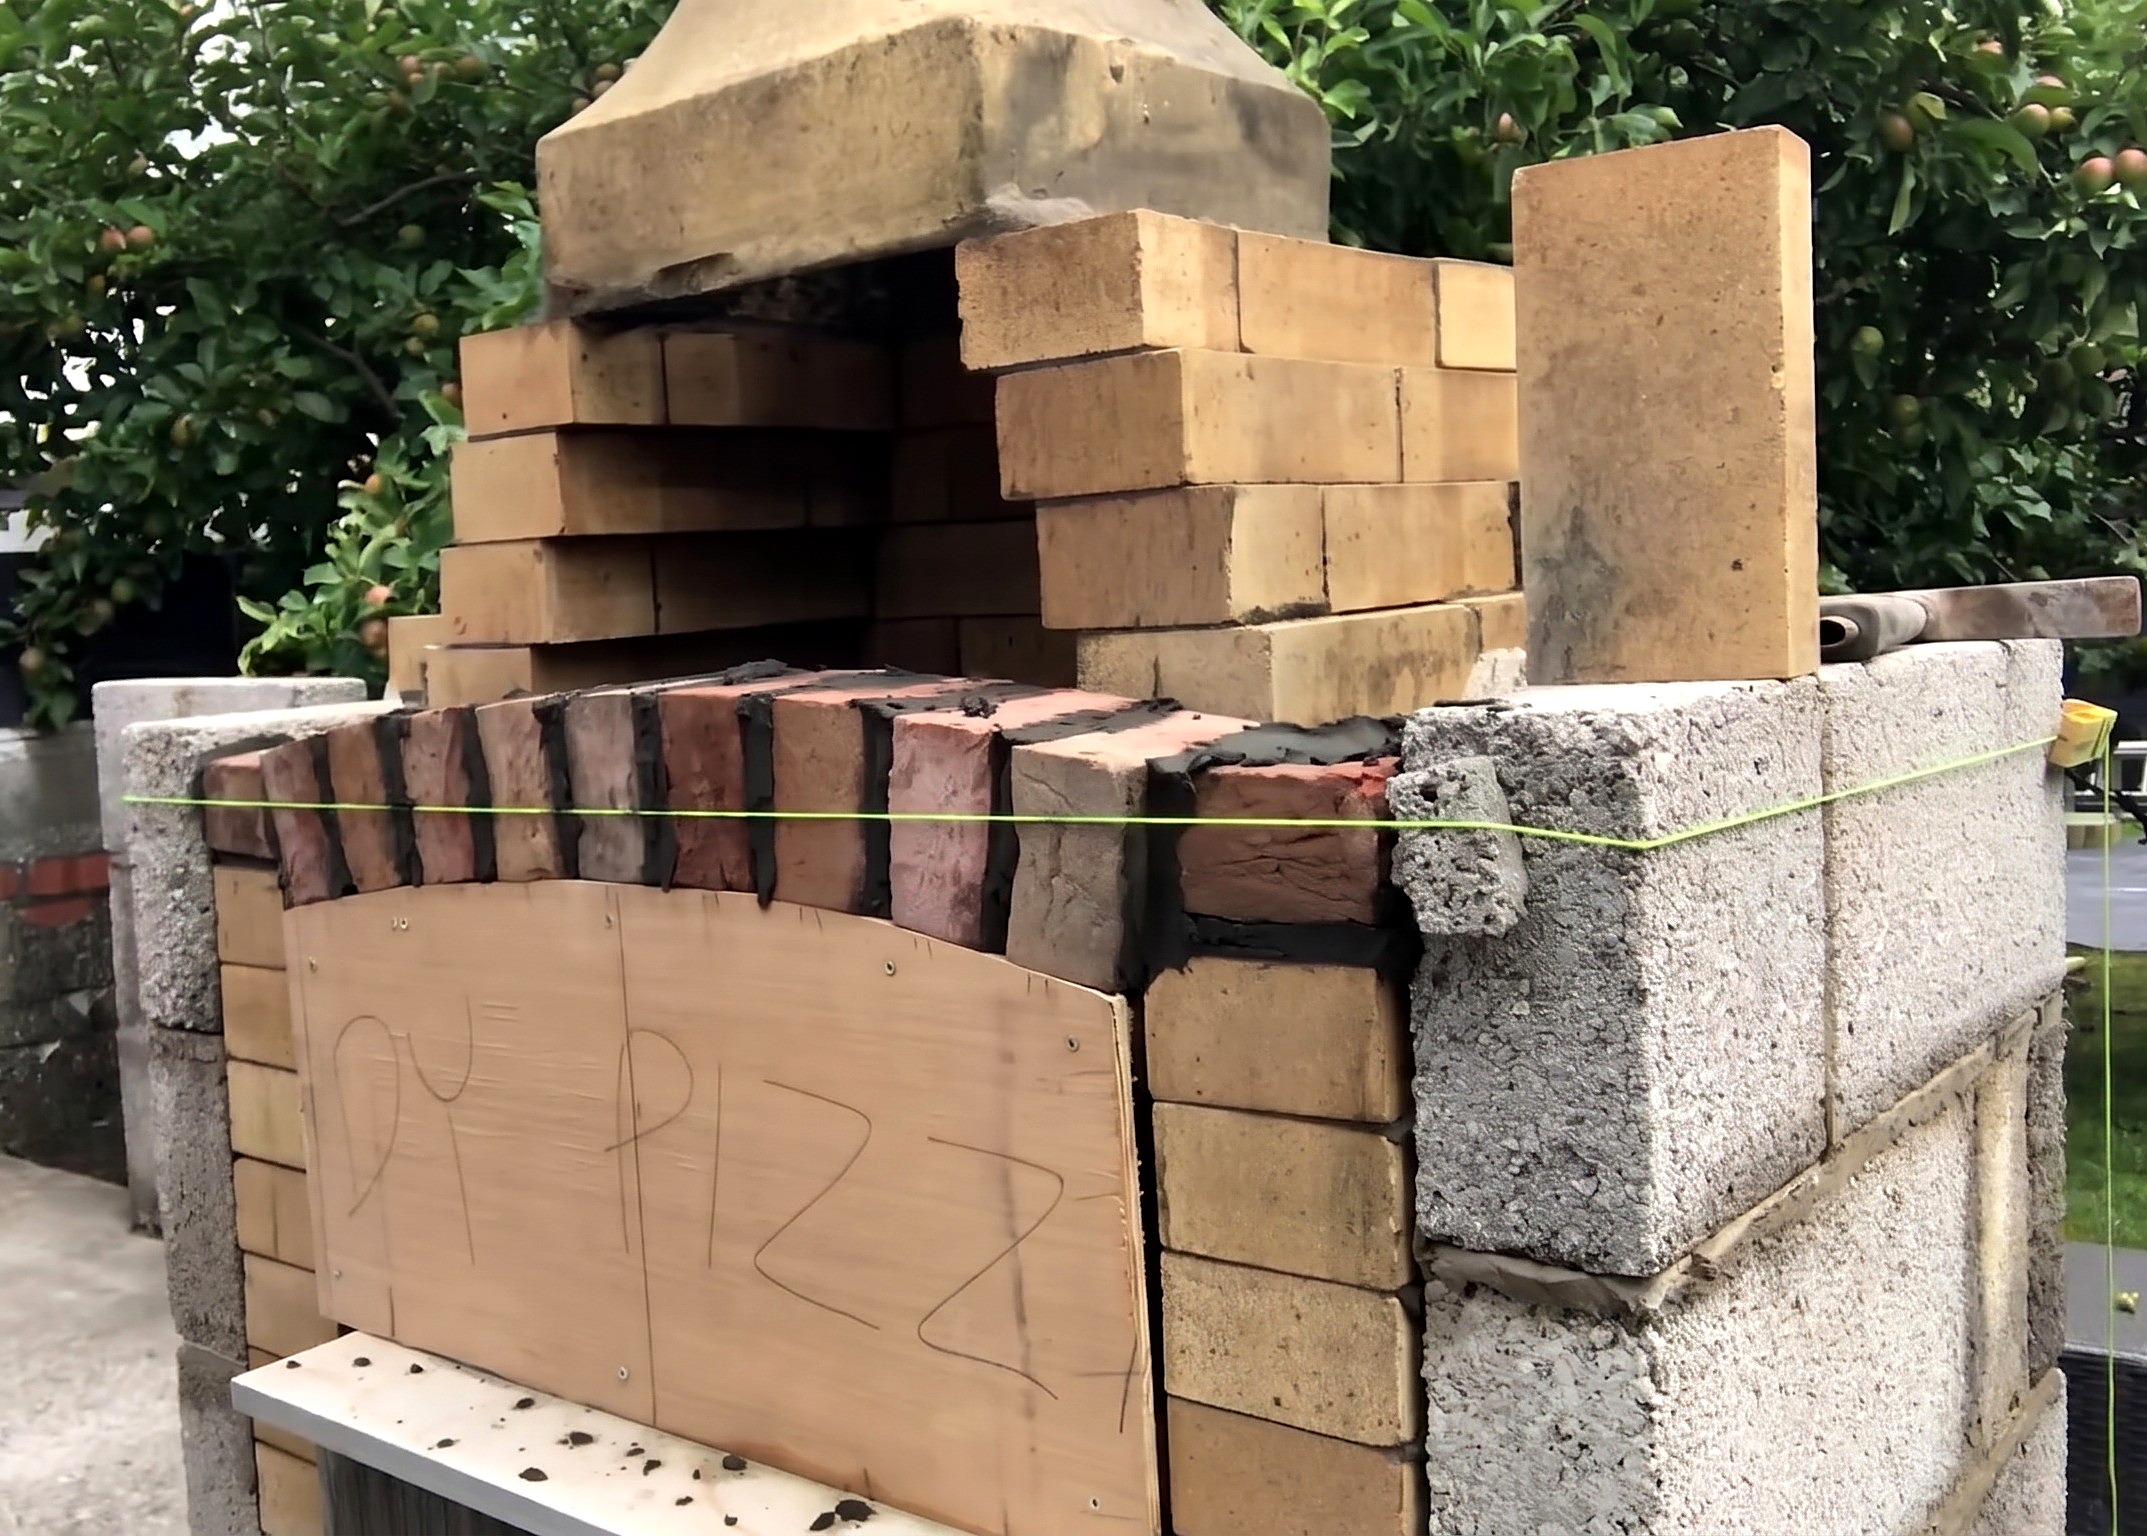
Parts in this step: (E) Arch template curved side panels, (K) Storage bay and BBQ hood front brick arches, (S) BBQ firebox and corbeled hood bricks
You'll need: Hand saw, Bricklayer's trowel, String line, Spirit level, Plywood, Rustic red bricks, Outdoor oven cement, Fire bricks
- 22.1 Mortar Rustic Bricks Across the BBQ Arch Template
- Trim a wooden arch template of arch template curved side panels (E) to fit the barbecue hood upper front opening.
- Stretch a front string line and mortar the storage bay and BBQ hood front brick arches (K) over the template with outdoor oven cement, set proud so exterior render finishes flush.
- Fill the stepped pockets above the arch against the BBQ firebox and corbeled hood bricks (S) with cut brick offcuts and mortar.
- Tip: Set the decorative red brick arch proud of the masonry face so the exterior render coat finishes flush.
Before you move on: Remove the wooden arch template once the mortar cures and check all front arch joints are full.
Step 23: Wrap the Dome in Ceramic Blanket and Wire Mesh
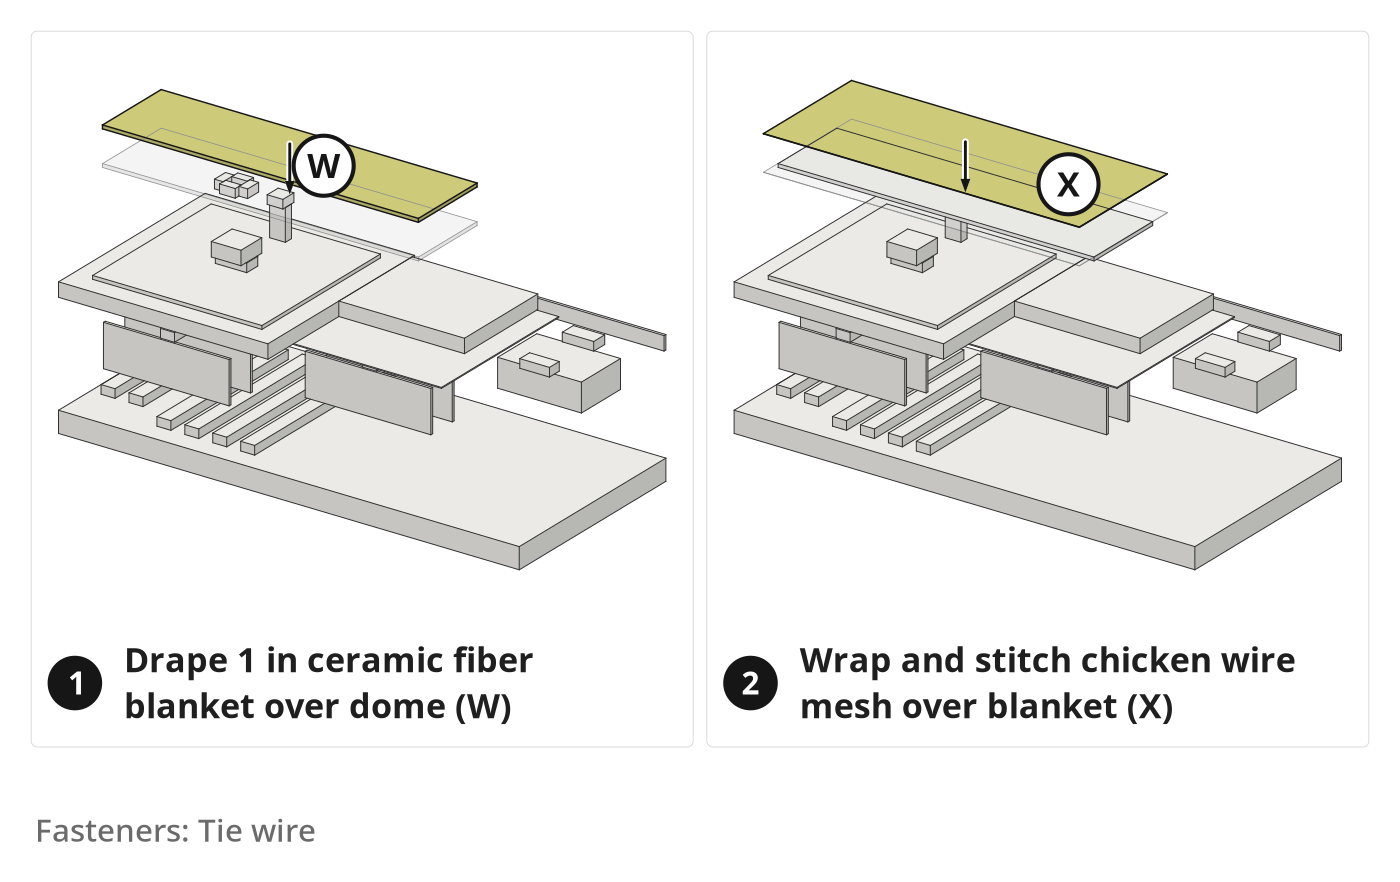
Wrap the cured brick dome in ceramic fiber blanket and stitched galvanized chicken wire mesh.
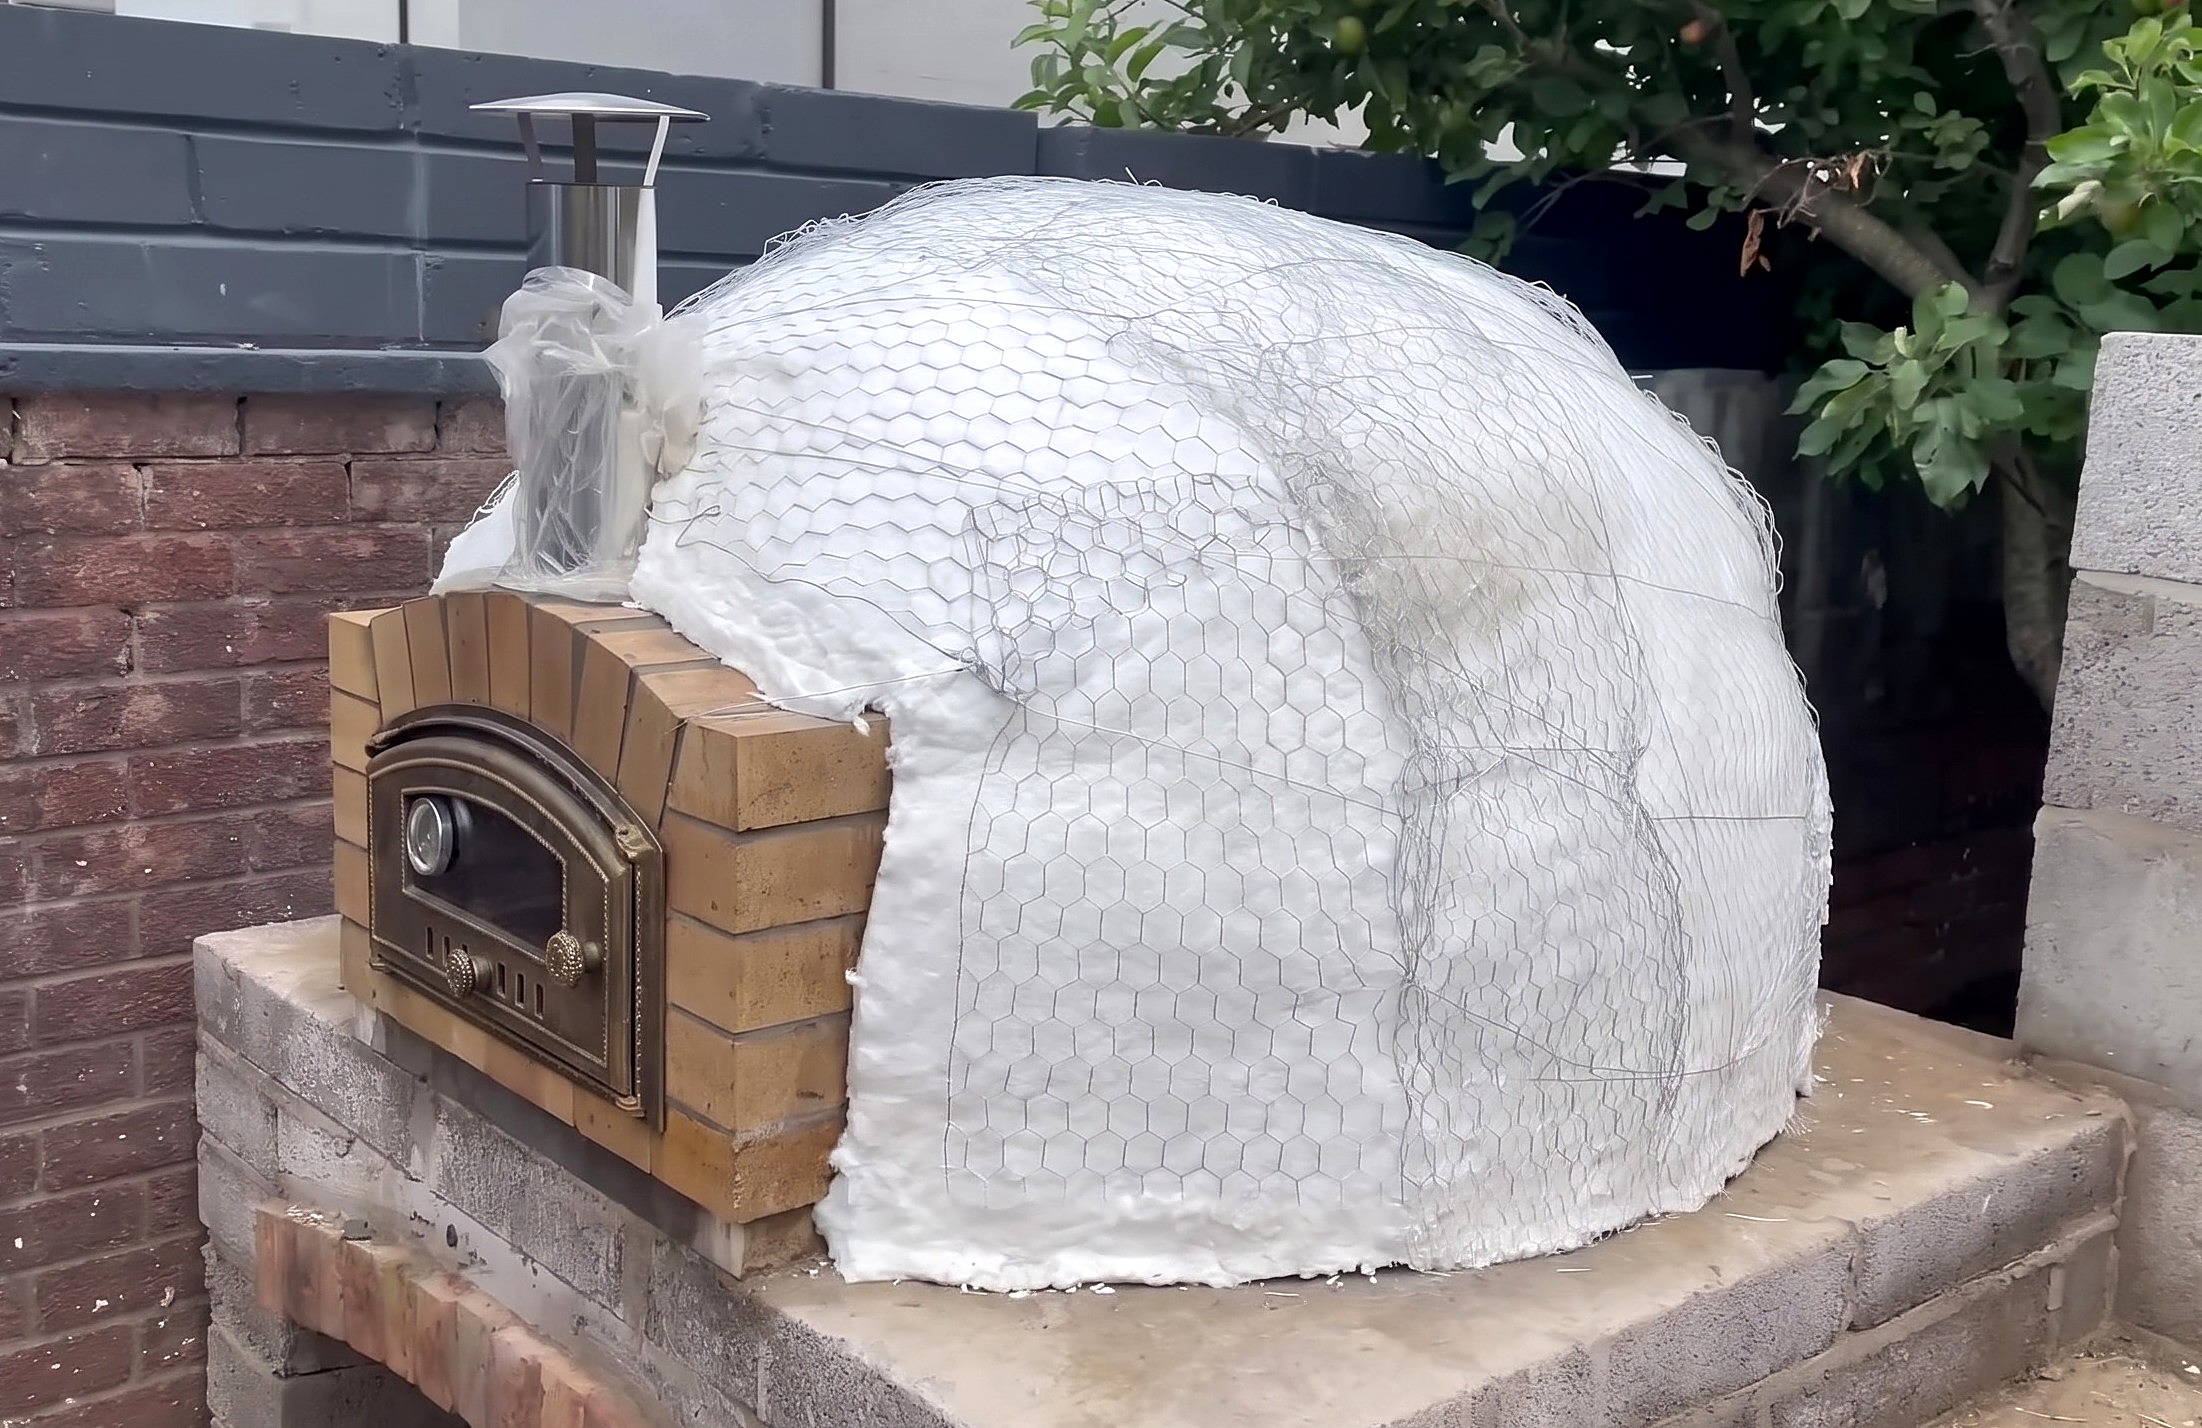
Parts in this step: (Q) Pizza oven entry door and arch assembly, (R) Pizza oven chimney flue, (W) Dome insulation blanket wrap, (X) Dome reinforcement wire mesh wrap
You'll need: Tape measure, Bricklayer's trowel, End nippers, Diagonal pliers, Ceramic fiber blanket, Chicken wire mesh, Tie wire
- 23.1 Measure and Roll Out the Ceramic Fiber Blanket
- Wear protective equipment, including a respirator mask and gloves, before unrolling the ceramic fiber blanket.
- Measure the brick dome over-the-top span (2300 mm) with a tape measure.
- Roll out the dome insulation blanket wrap (W) (90.5 x 24 x 1 in, estimated from the 2300 mm cut length) and cut strips.
- 23.2 Tuck the Blanket Into Corners and Stitch Seams with Tie Wire
- Drape the dome insulation blanket wrap (W) over the dome and cut around the pizza oven chimney flue (R).
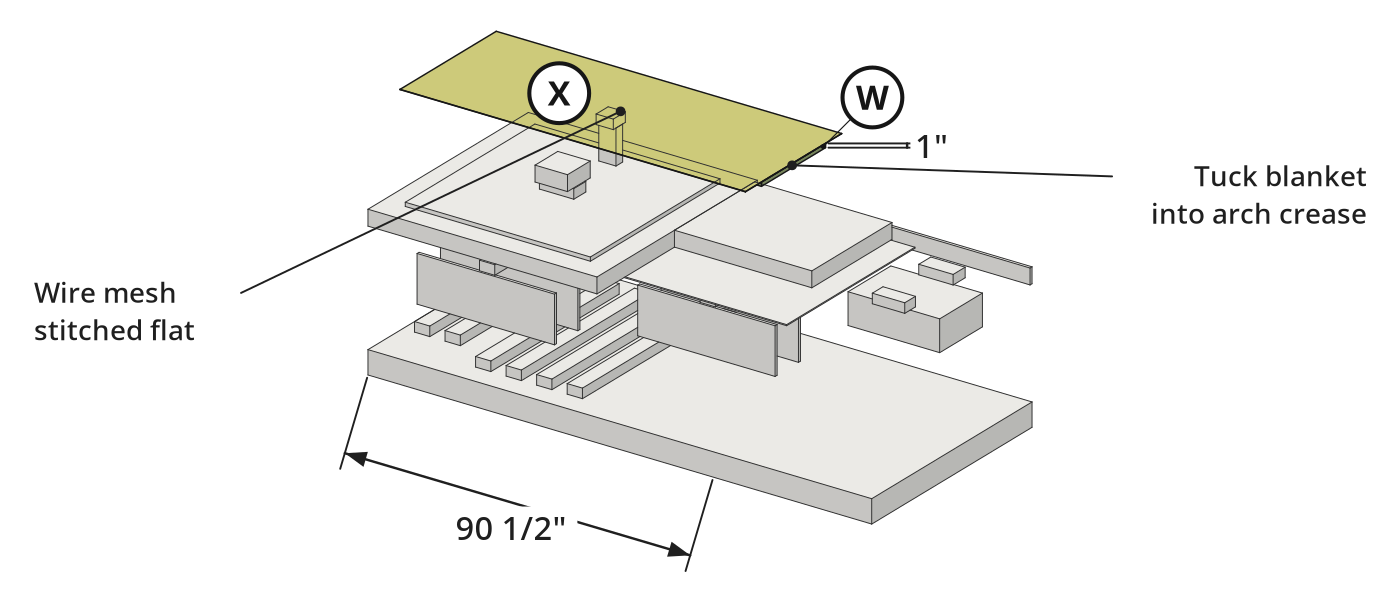
- Push the blanket into the front crease behind the pizza oven entry door and arch assembly (Q) with a rounded bricklayer's trowel handle, then trim excess.
- Thread tie wire across the blanket seams and twist tight with end nippers so the insulation cannot shift.
- 23.3 Wrap and Stitch Chicken Wire Mesh Over the Blanket
- Cut panels of dome reinforcement wire mesh wrap (X) (90.5 x 36 x 1/16 in estimated, 2 rolls) with diagonal pliers.
- Drape the chicken wire mesh over the dome insulation blanket wrap (W) and mold to the curve.
- Stitch overlapping mesh edges with tie wire and end nippers until the wire hugs the blanket without springy bulges.
Key measurements
- Ceramic fiber blanket cut length: 2300 mm (90 1/2 in) over the dome top
- Tip: Push the ceramic blanket into the front arch corners with a trowel handle and wire the seams before trimming so it stays snug.
- Tip: Buy two rolls of chicken wire mesh to wrap and tie the dome and front tunnel.
- Heads up: Wear a respirator mask and gloves when cutting and handling ceramic fiber blanket; airborne refractory fibers are hazardous to inhale.
Before you move on: Press around the mesh-wrapped dome to check all wire overlaps are tied flat and cannot spring through the screed.
Step 24: Apply Heatproof Screed Over the Dome
Trowel five tubs of heatproof screed over the wire mesh and sponge the outer shell smooth.
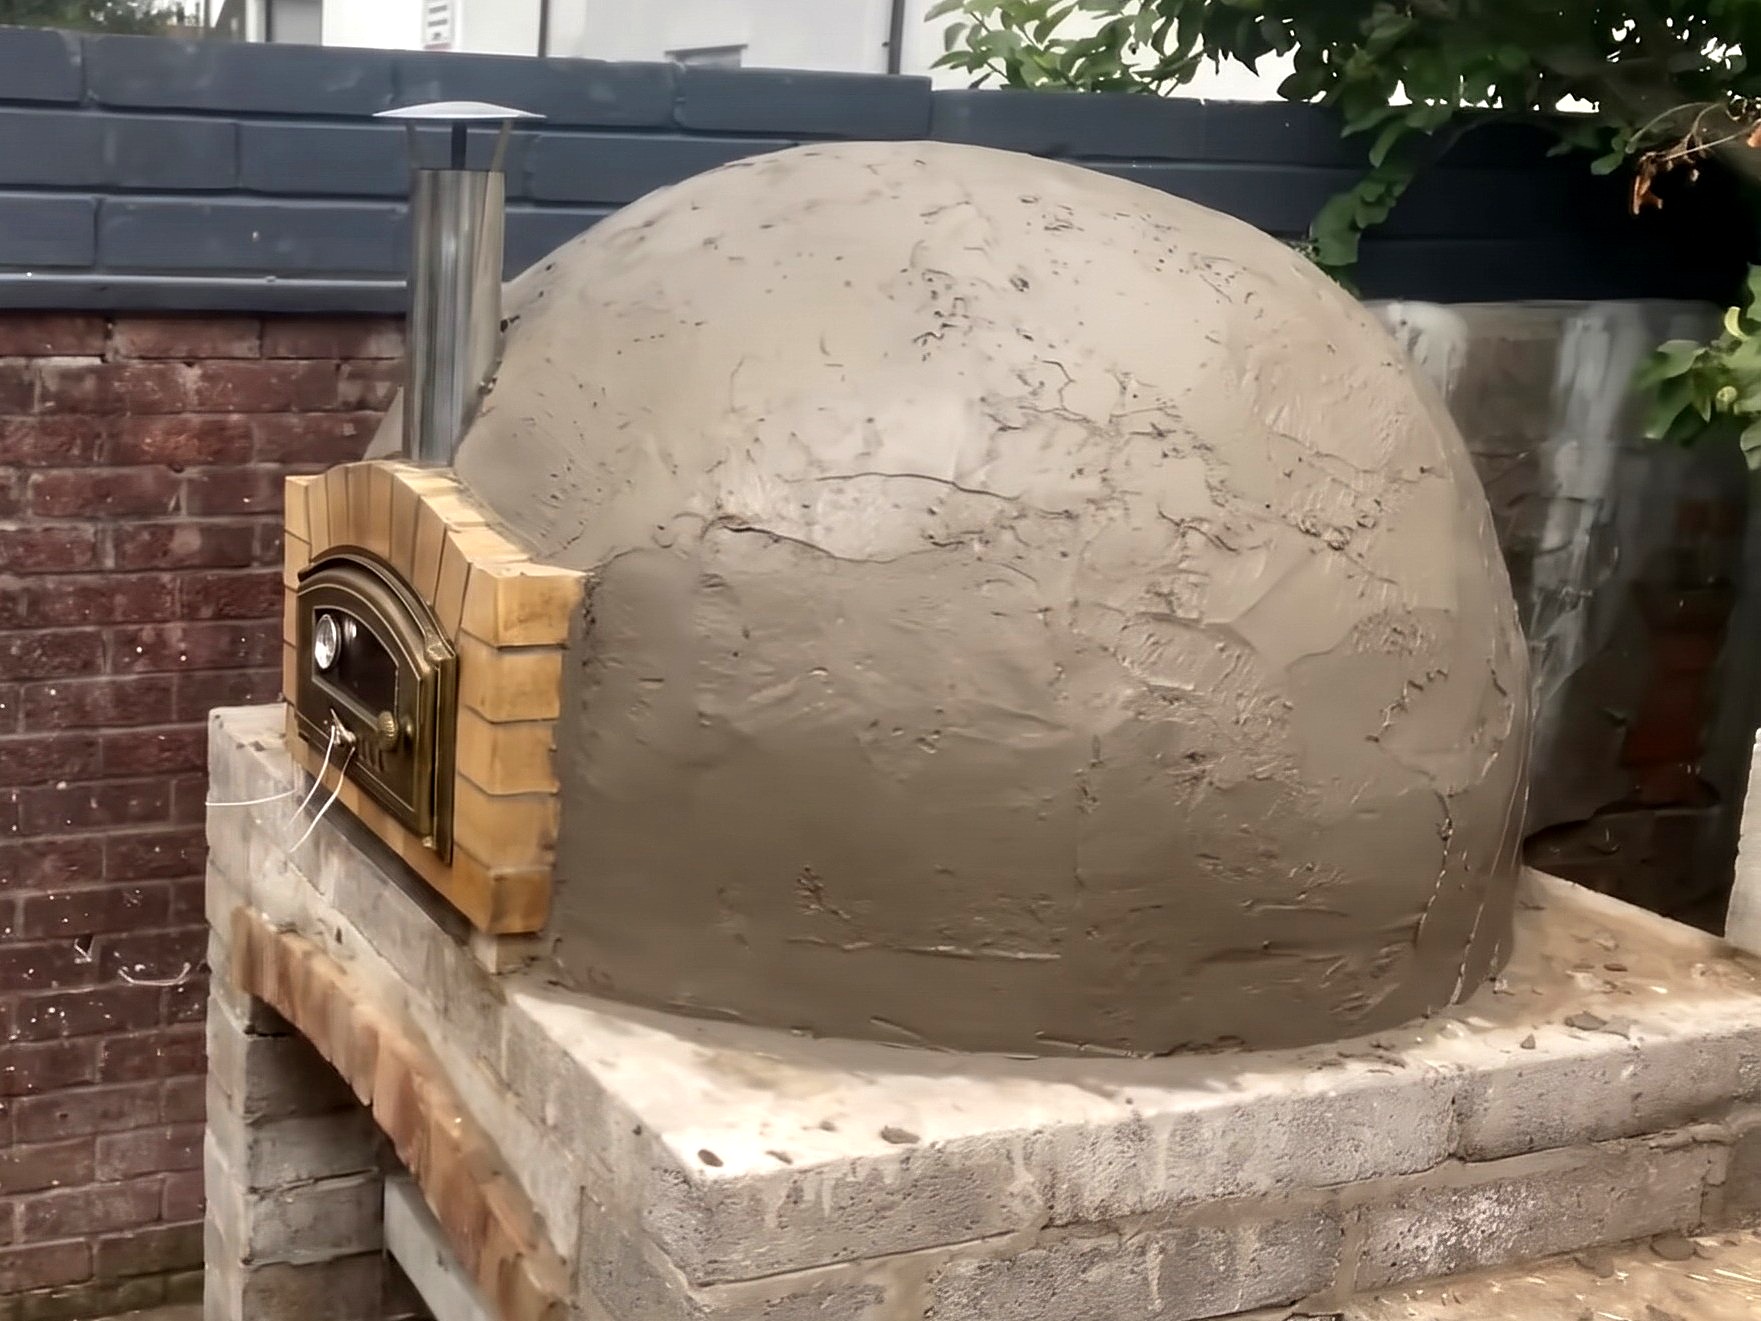
Parts in this step: (R) Pizza oven chimney flue, (X) Dome reinforcement wire mesh wrap, (Y) Heatproof screed outer dome shell
You'll need: Bricklayer's trowel, Sponge, Heatproof screed, Chicken wire mesh, Stainless steel chimney flue
- 24.1 Trowel Heatproof Screed Around the Lower Dome
- Scoop ready-mixed screed from the five 20 kg tubs of heatproof screed outer dome shell (Y) onto a bricklayer's trowel.
- Press an about 1 in coat through the dome reinforcement wire mesh wrap (X) around the dome base and front arch.
- 24.2 Screed the Top Crown of the Dome Smooth
- Trowel the remaining tubs of heatproof screed outer dome shell (Y) over the crown and around the pizza oven chimney flue (R) collar.
- Smooth the hemisphere with the flat bricklayer's trowel blade.
- Let screed firm slightly, then wipe with a damp sponge for an even shell ready for cement-lime rendering.
Key measurements
- Heatproof screed thickness: ~1 in on insulated dome (five 20 kg tubs).
- Tip: Divide the five 20 kg heatproof screed tubs evenly around the dome for even crown thickness.
Before you move on: Check no bare chicken wire or ceramic blanket shows on the dome.
Finishing
Sponge Smoothing
- Let the outer Vitcas heatproof screed coat firm up slightly on the dome.
- Rub a damp masonry sponge in circles over the dome to smooth trowel ridges.
Exterior Render
- Fix corner render beads to the exposed front pizza-oven slab edge to cover and weatherproof the ceramic fiber insulation board.
- Coat the heatproof screed dome and concrete block walls with cement-lime render or K-render, flush against the proud rustic red brick arches.
Cure and Care
- Cure the heatproof screed and final exterior render completely in dry weather before firing the pizza oven to full cooking temperature.
- Peel the protective plastic wrap off the stainless steel chimney flue before lighting the oven.
These Specs are built from Tidybricks patio restore's video “Brick Dome Pizza Oven and Outdoor BBQ Kitchen”. Open the Brick Dome Pizza Oven and Outdoor BBQ Kitchen project page.
