Spetz Specs No. 7526: step-by-step build guide
Framed Drop-Down Tray Ceiling
The complete step-by-step guide made from Indy Farm Life's YouTube video, free on Spetz. For the video, a step-by-step player and answers to your questions, see the Framed Drop-Down Tray Ceiling project page.
5 steps, 8 parts, 4 tools, 3 materials
Overview
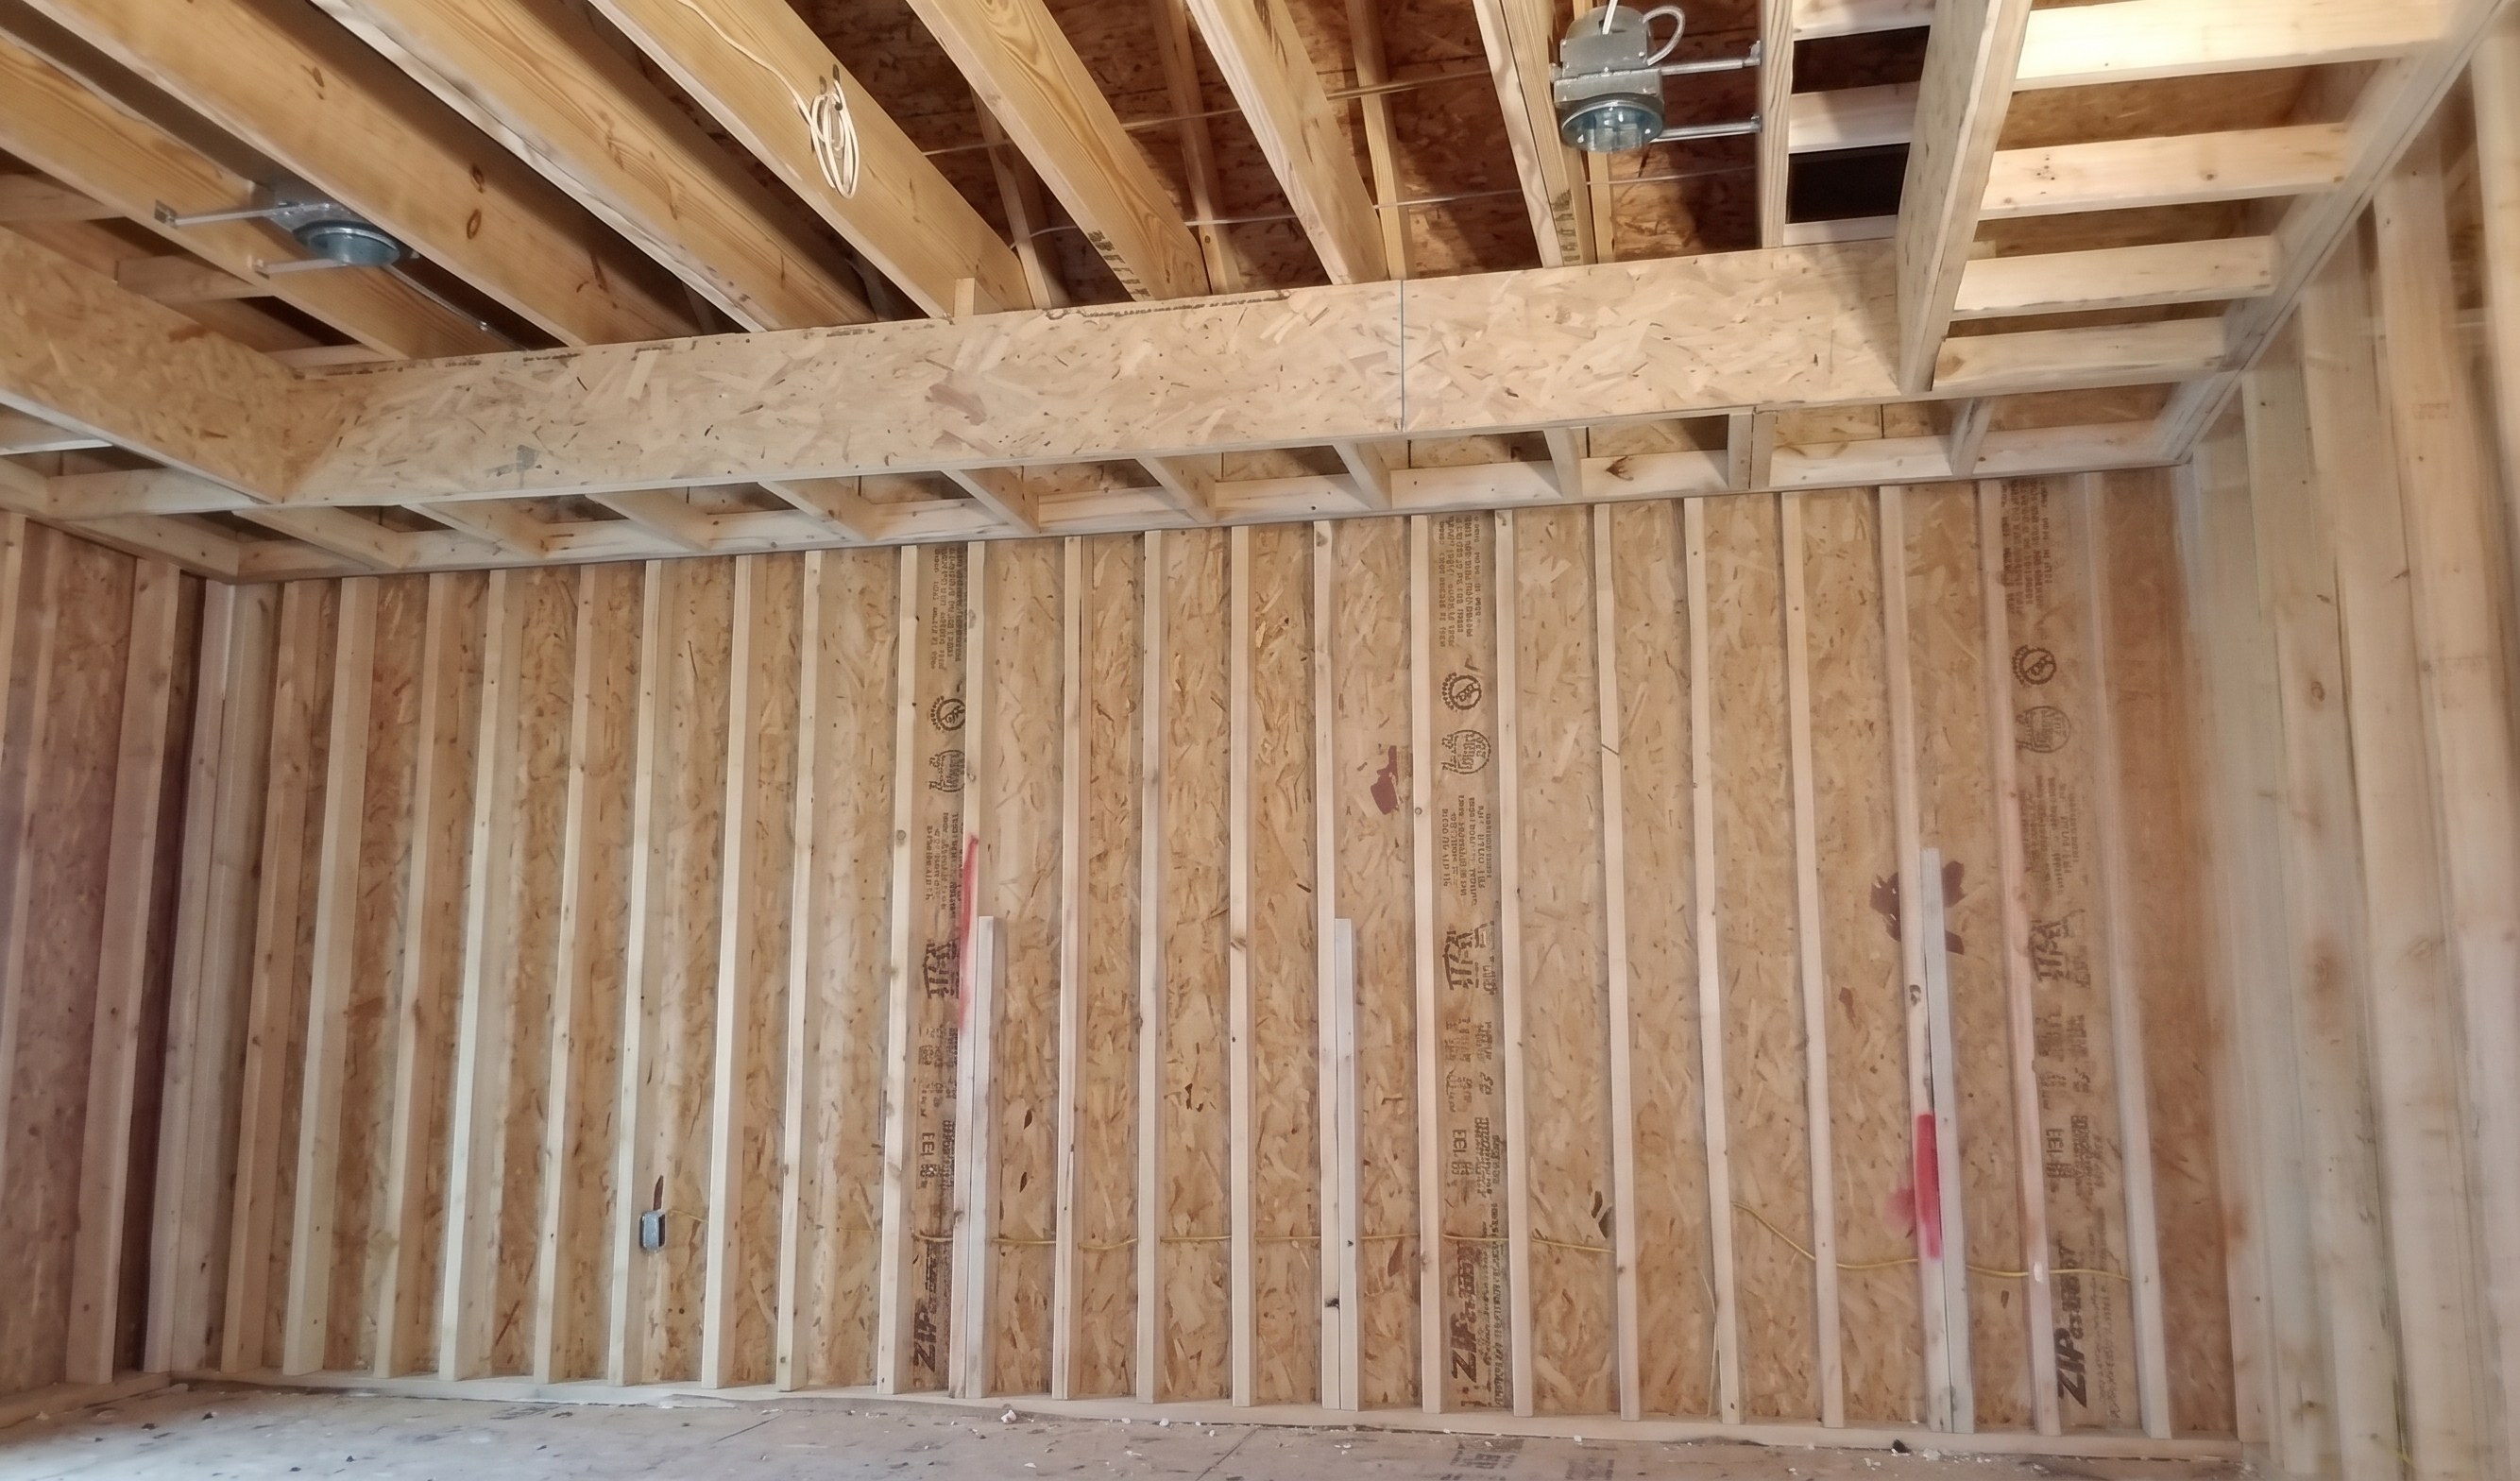
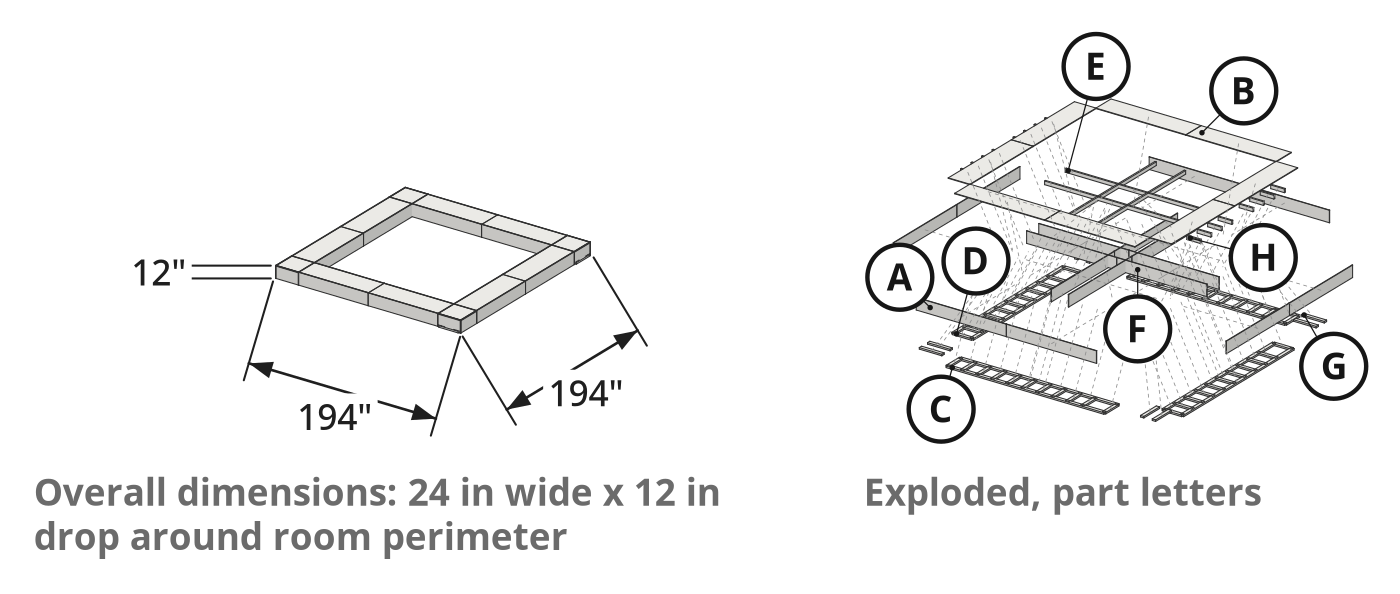
Finished size: 24 in wide x 12 in drop around room perimeter
What you're building
- Frame a room's perimeter drop-down tray ceiling box.
- Make a 12 in vertical drop and 24 in wide perimeter soffit.
- Form a hidden hollow cavity for speaker wire and lighting cables.
Why this design works
- Frame below the ceiling joists, not up inside them.
- Two 1/2 in OSB thicknesses plus a 23 in frame make a 24 in box.
- Seal upper wall and ceiling cavities with OSB for fire-blocking code.
What it takes
- Rip full 1/2 in OSB sheets on a table saw; cut 2x4s with a circular saw.
- On a step ladder with a helper, lift and fasten 12 ft to 14 ft frames overhead.
- Total build time is not stated.
What decides success
- Rip straight, clean 12 in and 23 in OSB strips.
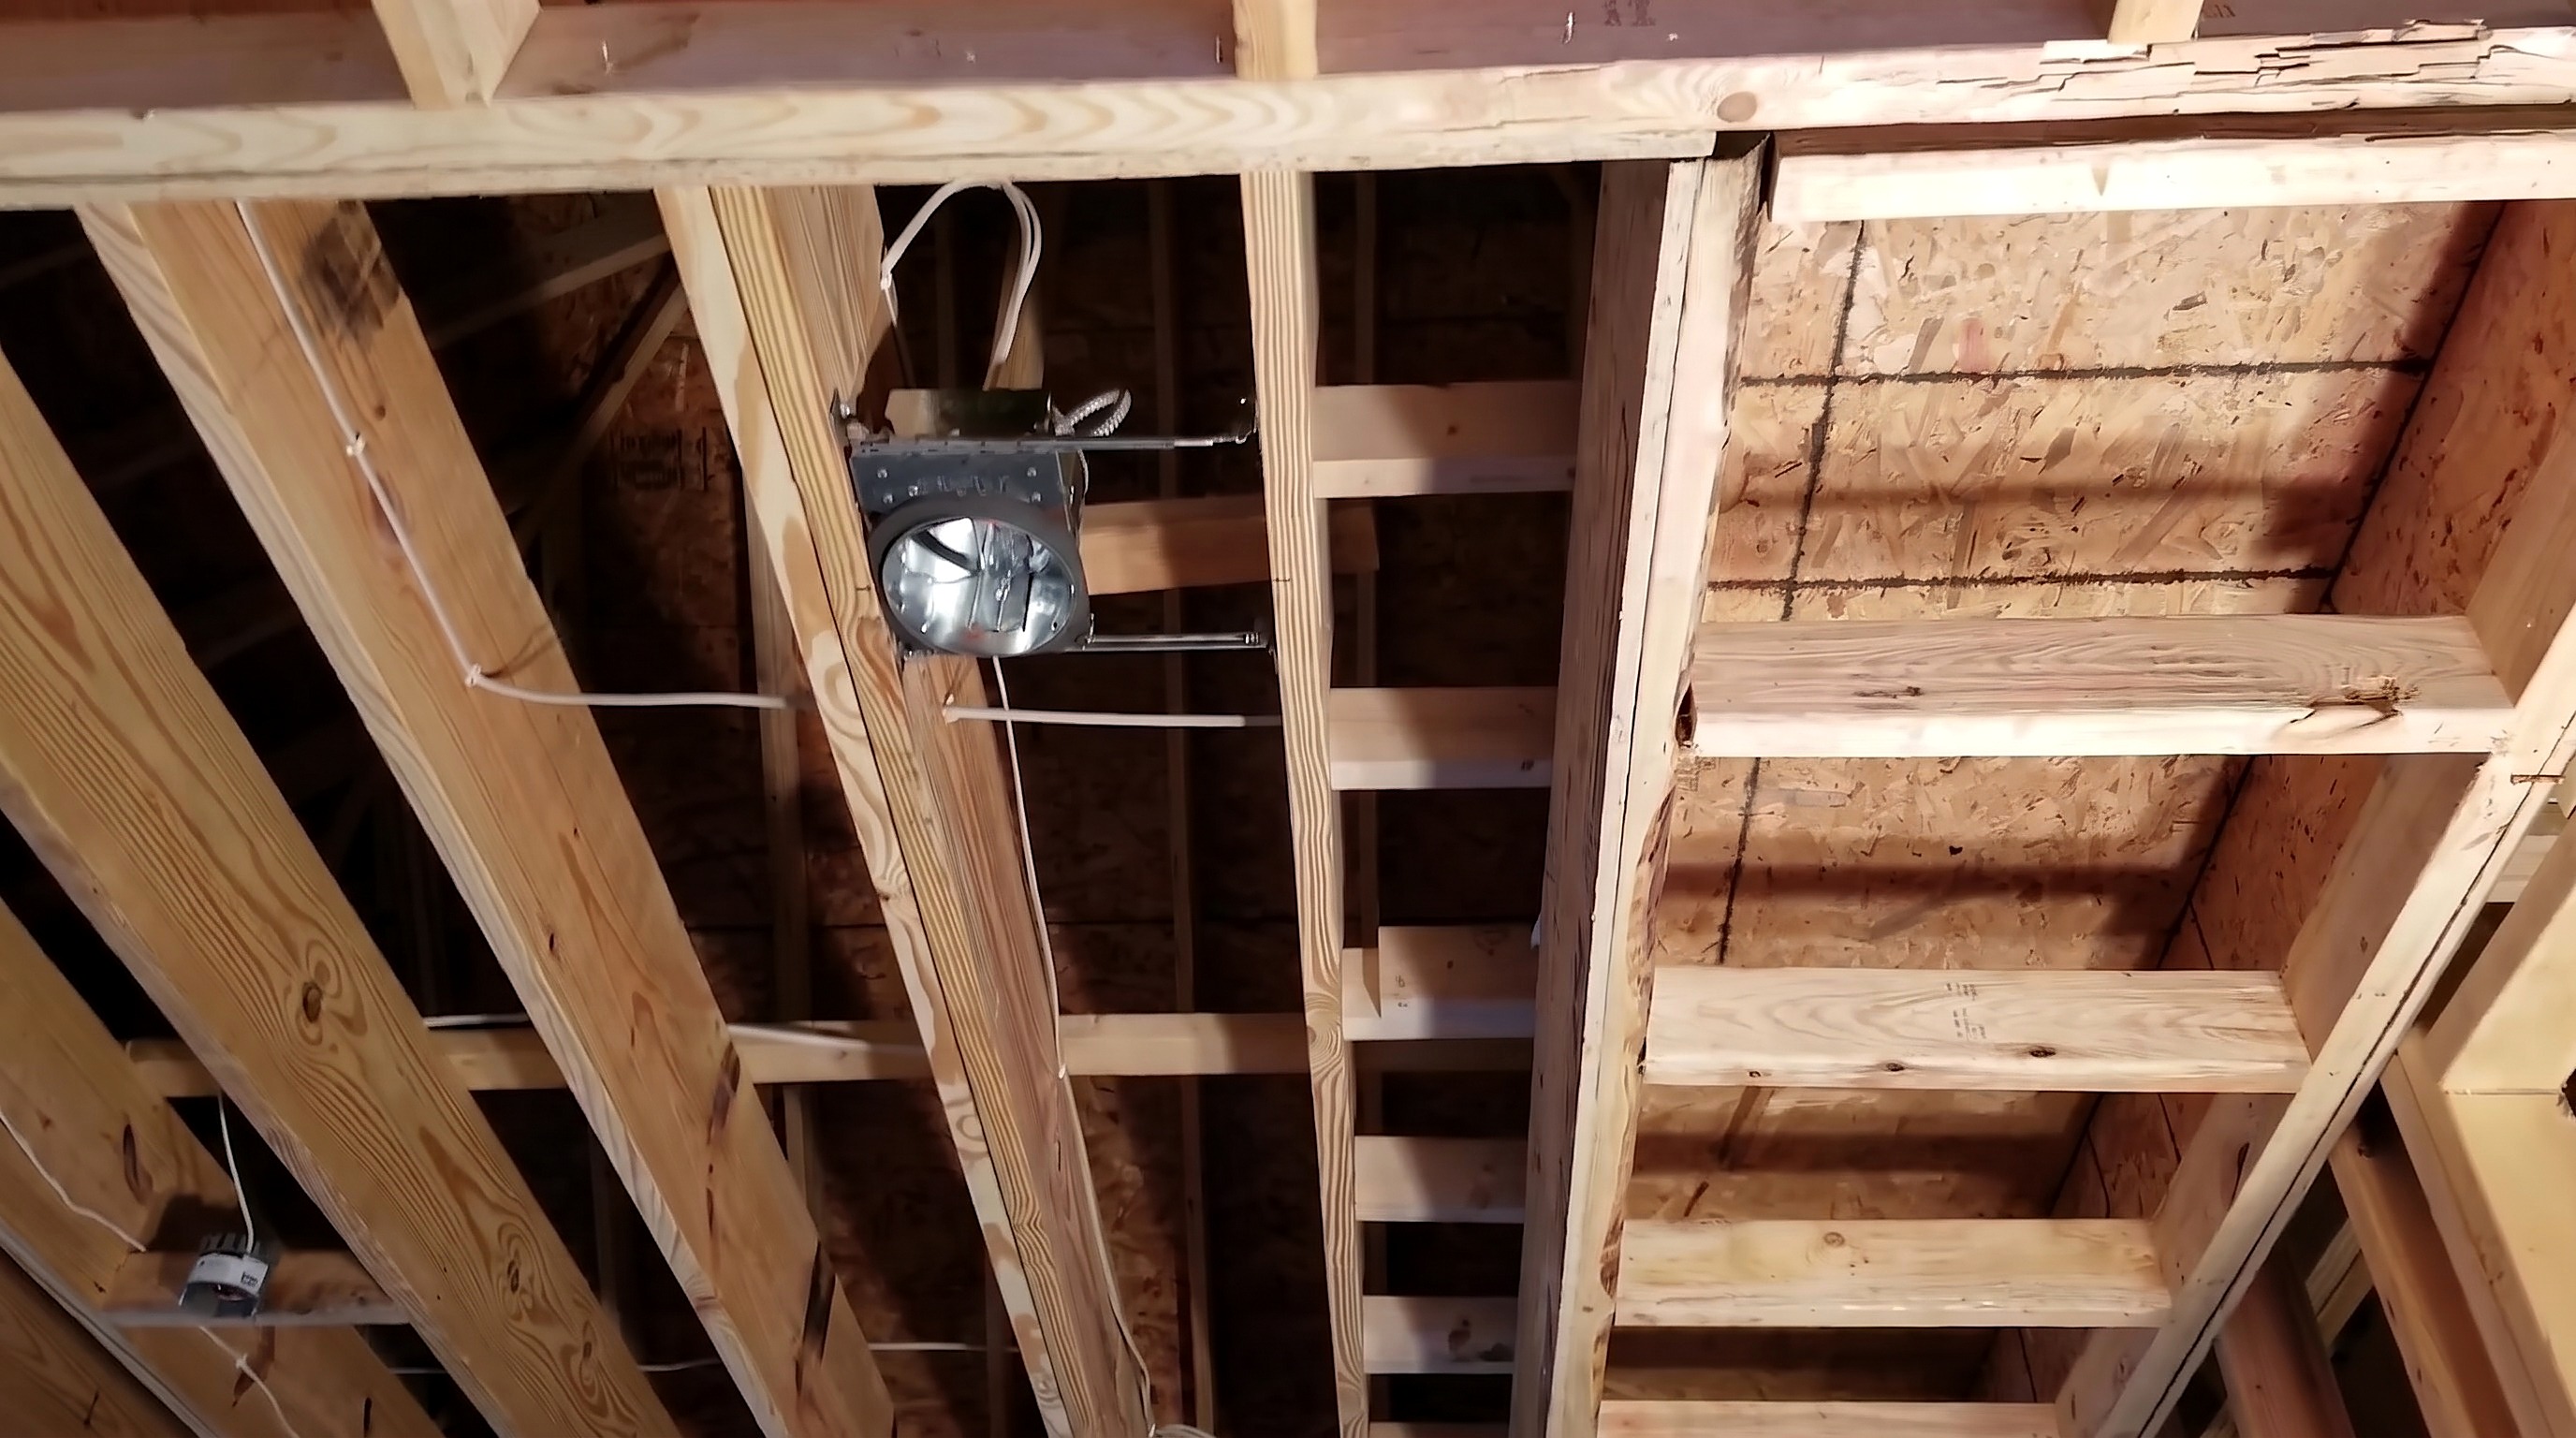
- Install perpendicular 2x4 blocking between parallel ceiling joists before hanging ceiling strips.
Health and safety
Table and Circular Saw Safety
- Keep the table saw blade guard and riving knife installed when ripping full sheets of 1/2-inch OSB sheathing.
- Use a push stick and support wide OSB panels on the table saw to prevent blade binding and kickback.
- Keep both hands on the circular saw when cutting 2x4 framing lumber, and let the blade stop before setting it down.
Ladders and Overhead Framing
- Set the A-frame step ladder on a level floor with its spreaders fully locked, and never step on the top cap.
- Have a helper on a second step ladder lift and hold the 12 ft to 14 ft 2x4 soffit frames overhead.
- Reposition the step ladder often rather than overreaching while holding OSB panels or driving construction screws into the ceiling.
Structural and Fire Code Safety
- Install perpendicular 2x4 joist blocking before hanging parallel soffit runs so every ceiling screw anchors into solid framing.
- Install and seal all 1/2-inch OSB fire blocking to local building codes so wall or wire fires cannot reach the attic.
- Check walls and ceilings for hidden electrical wiring or plumbing before driving construction screws into studs and joists.
Protective Equipment and Handling
- Wear protective equipment, including eye protection, hearing protection, and a dust mask, when sawing 2x4 lumber and OSB sheathing.
- Wear work gloves when carrying and positioning 1/2-inch OSB strips and 2x4 boards to guard against rough edges and splinters.
- Grip the cordless drill or impact driver firmly when driving construction screws overhead so the bit does not slip.
Tools
- Step ladder (A-frame step ladder)
- Cordless drill or impact driver (cordless drill/driver)
- Table saw (jobsite or stationary table saw) (optional)
- Circular saw (handheld circular saw)
Materials
- Construction screws (1 bucket, wood screws)
- 1/2-inch OSB sheathing (oriented strand board (OSB), 1/2 in, 1/2 in thick, ripped into 12 in and 23 in wide strips)
- 2x4 framing lumber (dimensional lumber, 2x4, 2x4 (12 ft or 14 ft runs, plus 20 in cross studs))
Hardware
| Hardware | Size | Count | Used in steps |
|---|---|---|---|
| Construction screws | 1, 2, 3, 4, 5 |
Cut list
| Part | Name | Qty | Size | Notes |
|---|---|---|---|---|
| A | Wall fire-blocking strip | x8 | 1/2" (T) × 12" (W) × 96" (L) | Rip 1/2-in OSB sheets into 12-in wide strips and cut to length to span all four walls at the top of the wall studs. |
| B | Ceiling fire-blocking strip | x8 | 1/2" (T) × 23" (W) × 96" (L) | Rip 1/2-in OSB sheets into 23-in wide strips and fasten to the ceiling joists around the room perimeter, butting the back edge tight against the 1/2-in wall OSB. |
| C | Soffit frame top and bottom plate | x8 | 1 1/2" (T) × 3 1/2" (W) × 168" (L) | Used in pairs (inner and outer plate) to assemble manageable 12-ft or 14-ft horizontal ladder frames on the floor before lifting into place. |
| D | Soffit frame cross stud | x44 | 1 1/2" (T) × 3 1/2" (W) × 20" (L) | Sandwiched between the two 1-1/2-in thick 2x4 plates at 16 inches on center (plus corner blocks) for a total ladder frame width of 23 inches (3 in + 20 in = 23 in). Total count varies by room perimeter. |
| E | Ceiling ledger strip | x4 | 1 1/2" (T) × 3 1/2" (W) × 144" (L) | Fastened flat along the outer perimeter edge of the 23-in ceiling OSB across all four sides of the room to provide a nailing flange for the outer vertical OSB face. |
| F | Outer vertical soffit face strip | x8 | 1/2" (T) × 12" (W) × 96" (L) | Rip 1/2-in OSB sheets into 12-in wide strips and screw vertically to the outer edge of the ceiling 2x4 ledger and the front edge of the 23-in soffit frame, bringing the total box width to 24 inches (1/2 in + 23 in + 1/2 in). |
| G | Corner plate filler block | x8 | 1 1/2" (T) × 3 1/2" (W) × 24" (L) | Cut to fit in place overhead to complete the inner and outer frame plates at the room corners where the pre-built 12-ft or 14-ft ladder frames stop short. |
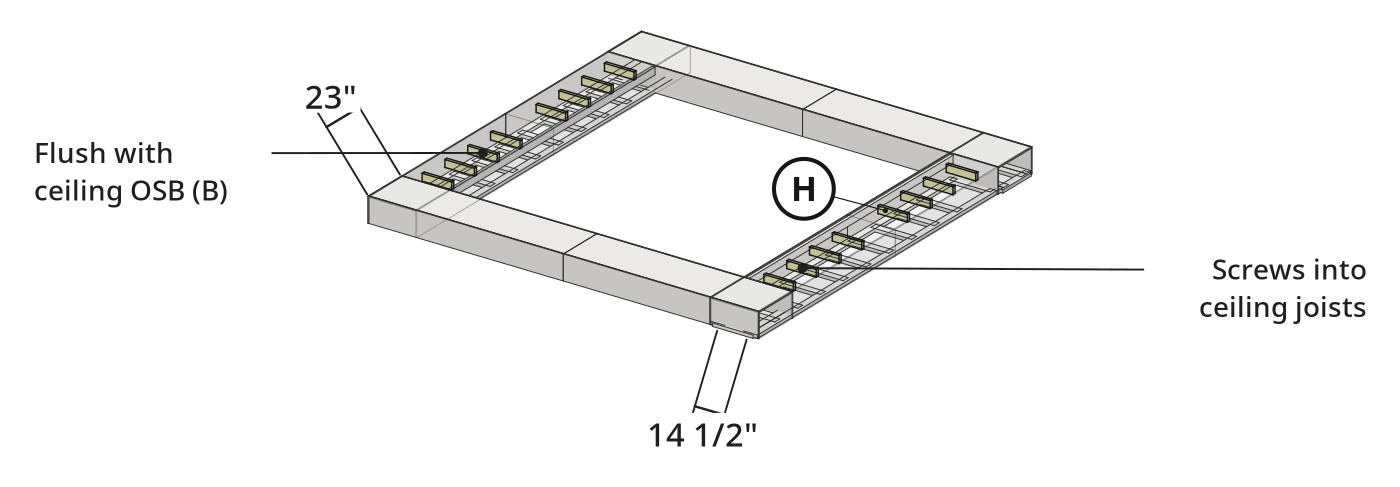
| H | Ceiling joist blocking | x16 | 1 1/2" (T) × 3 1/2" (W) × 14 1/2" (L) | Cut to fit perpendicular between ceiling joists on the two walls running parallel to the joists to provide solid fastening points for the ceiling OSB and 2x4 ledger. |
What to buy
- Buy 20 × 2x4 14 ft (2x4 framing lumber)
- Buy 10 × 1/2-inch OSB sheathing 4x8 sheet (1/2-inch OSB sheathing)

Before you start
Lumber and sheathing
- Pick straight, dry 2x4 framing lumber without heavy twists or crowns.
- Check 1/2 in OSB sheathing sheets for flat, undamaged edges.
Layout and labeling
- Check ceiling joist direction to find the two parallel walls.
- Rip 12 in and 23 in OSB strips and cut 20 in cross studs before assembly.
- Label cut parts A through H before climbing the ladder.
Step by step
Step 1: Install Wall and Ceiling Fire Blocking
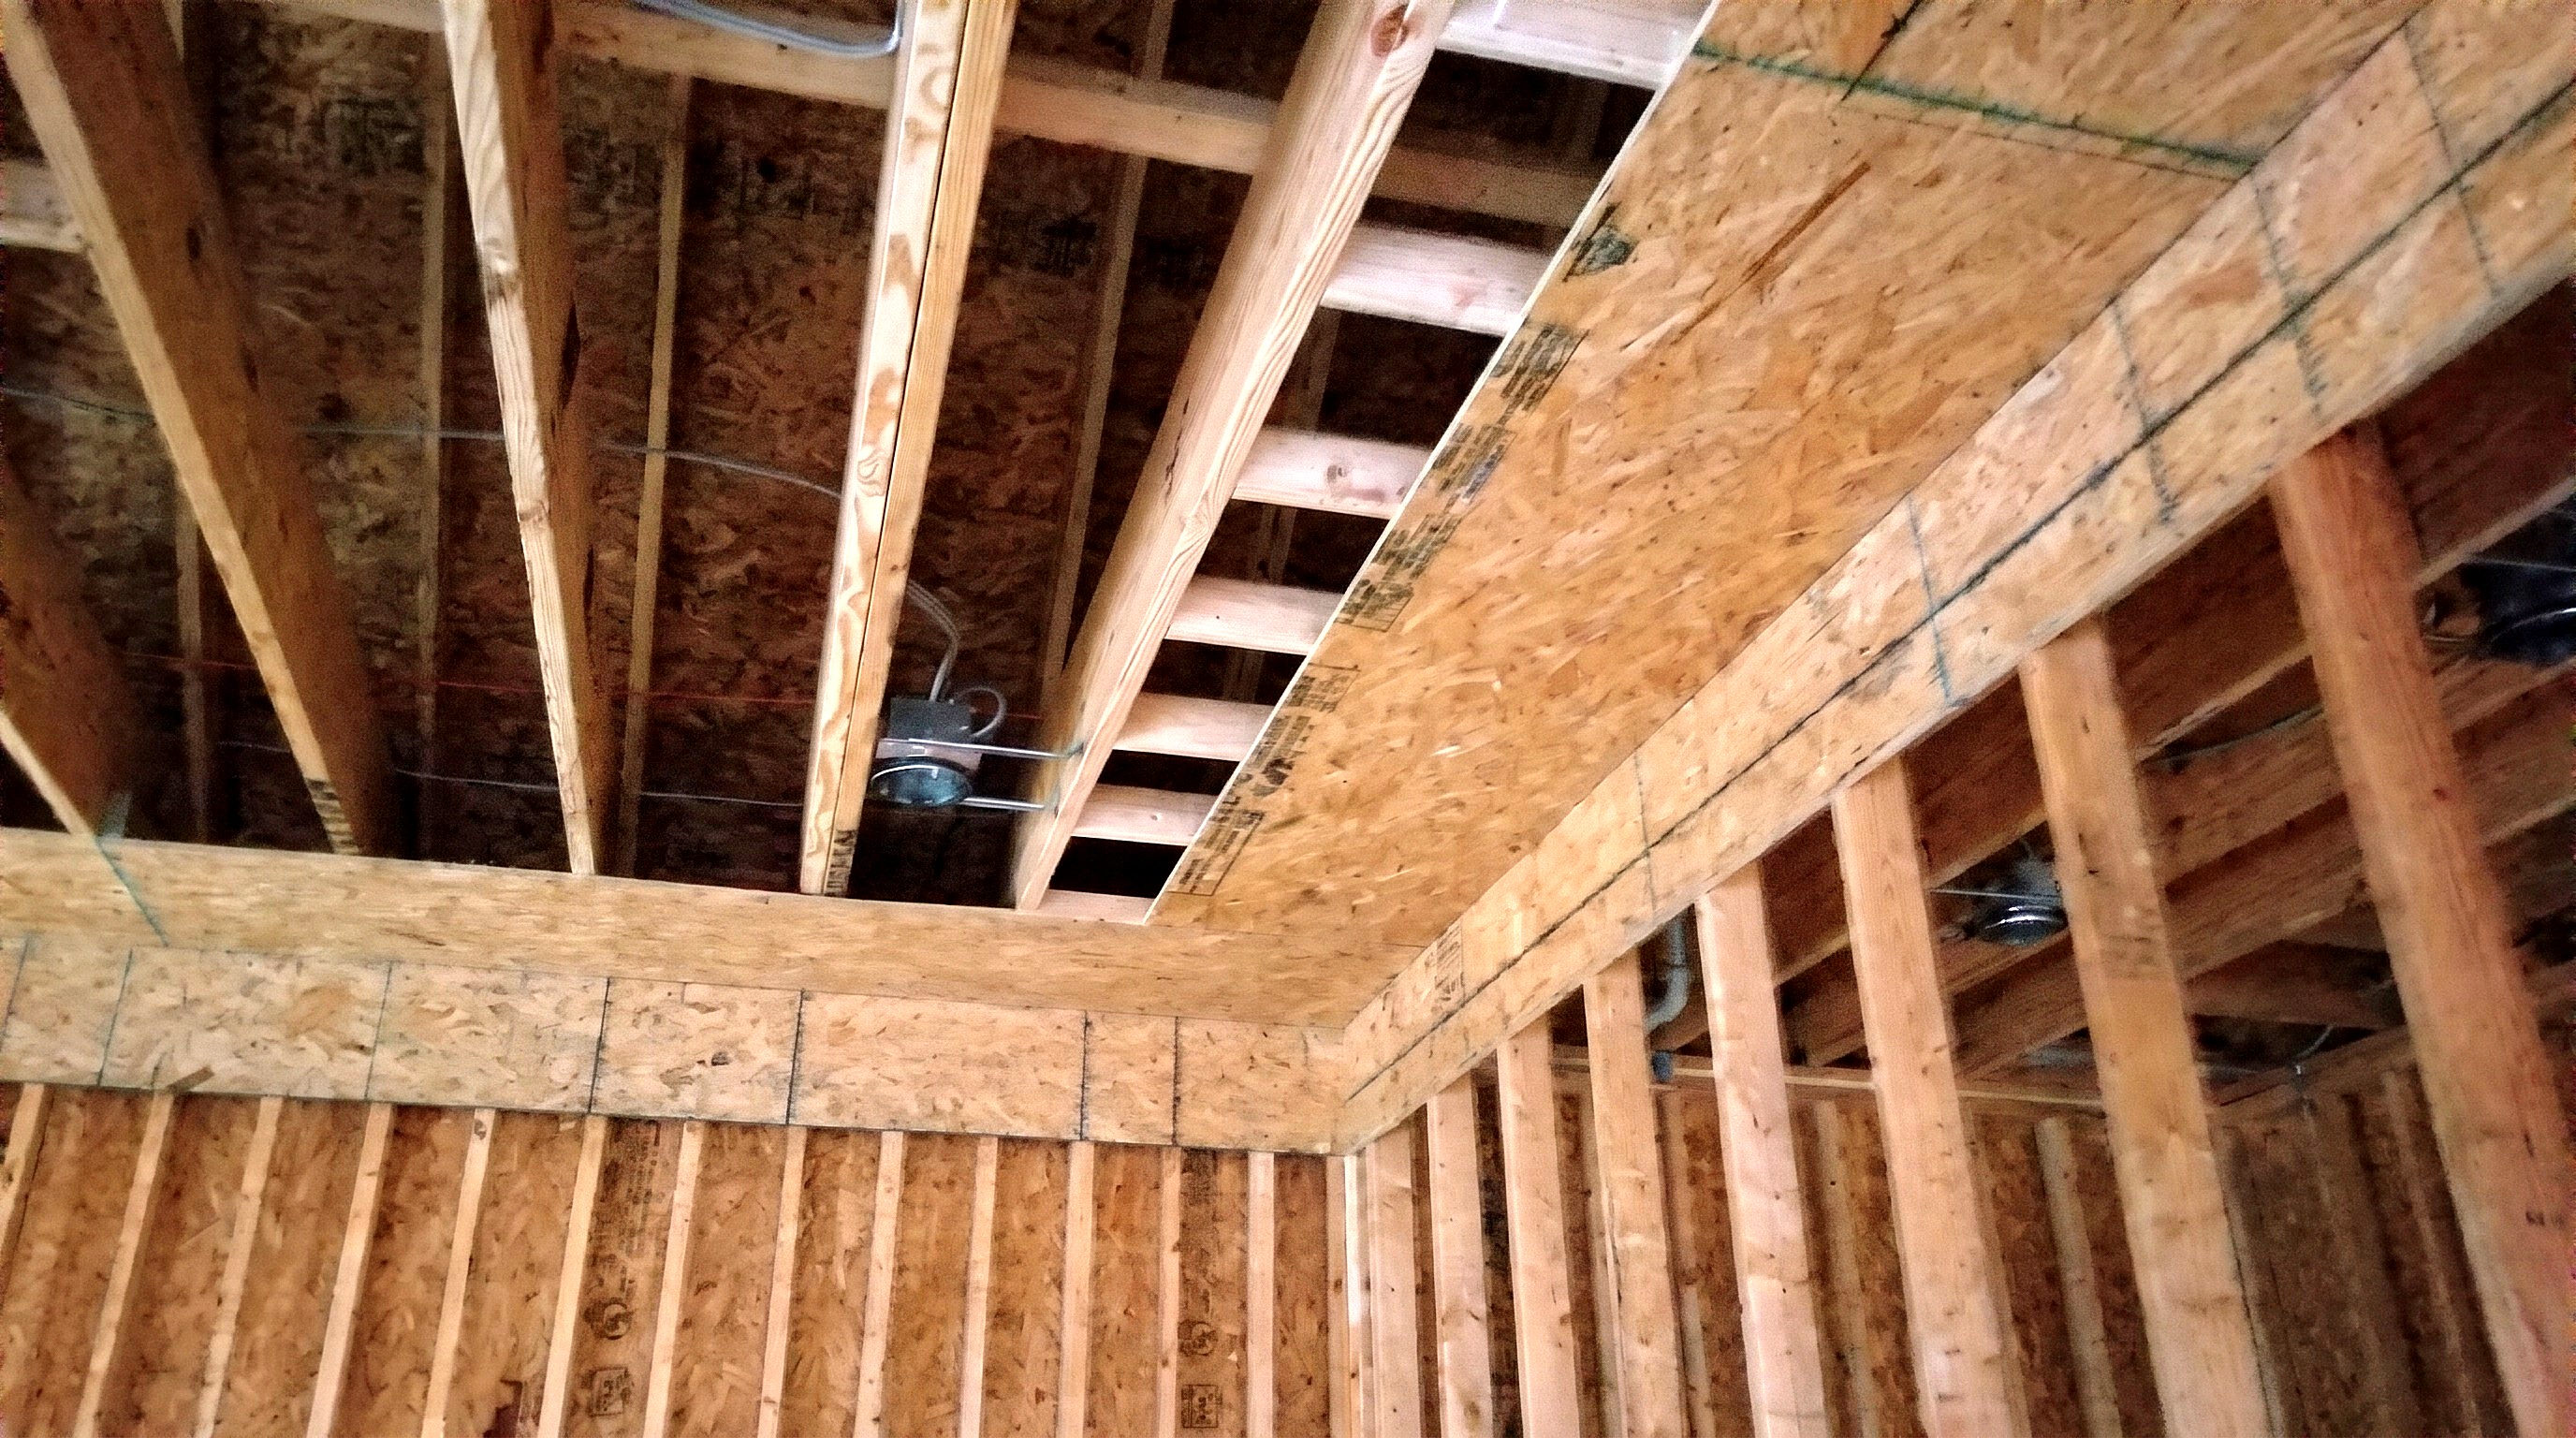
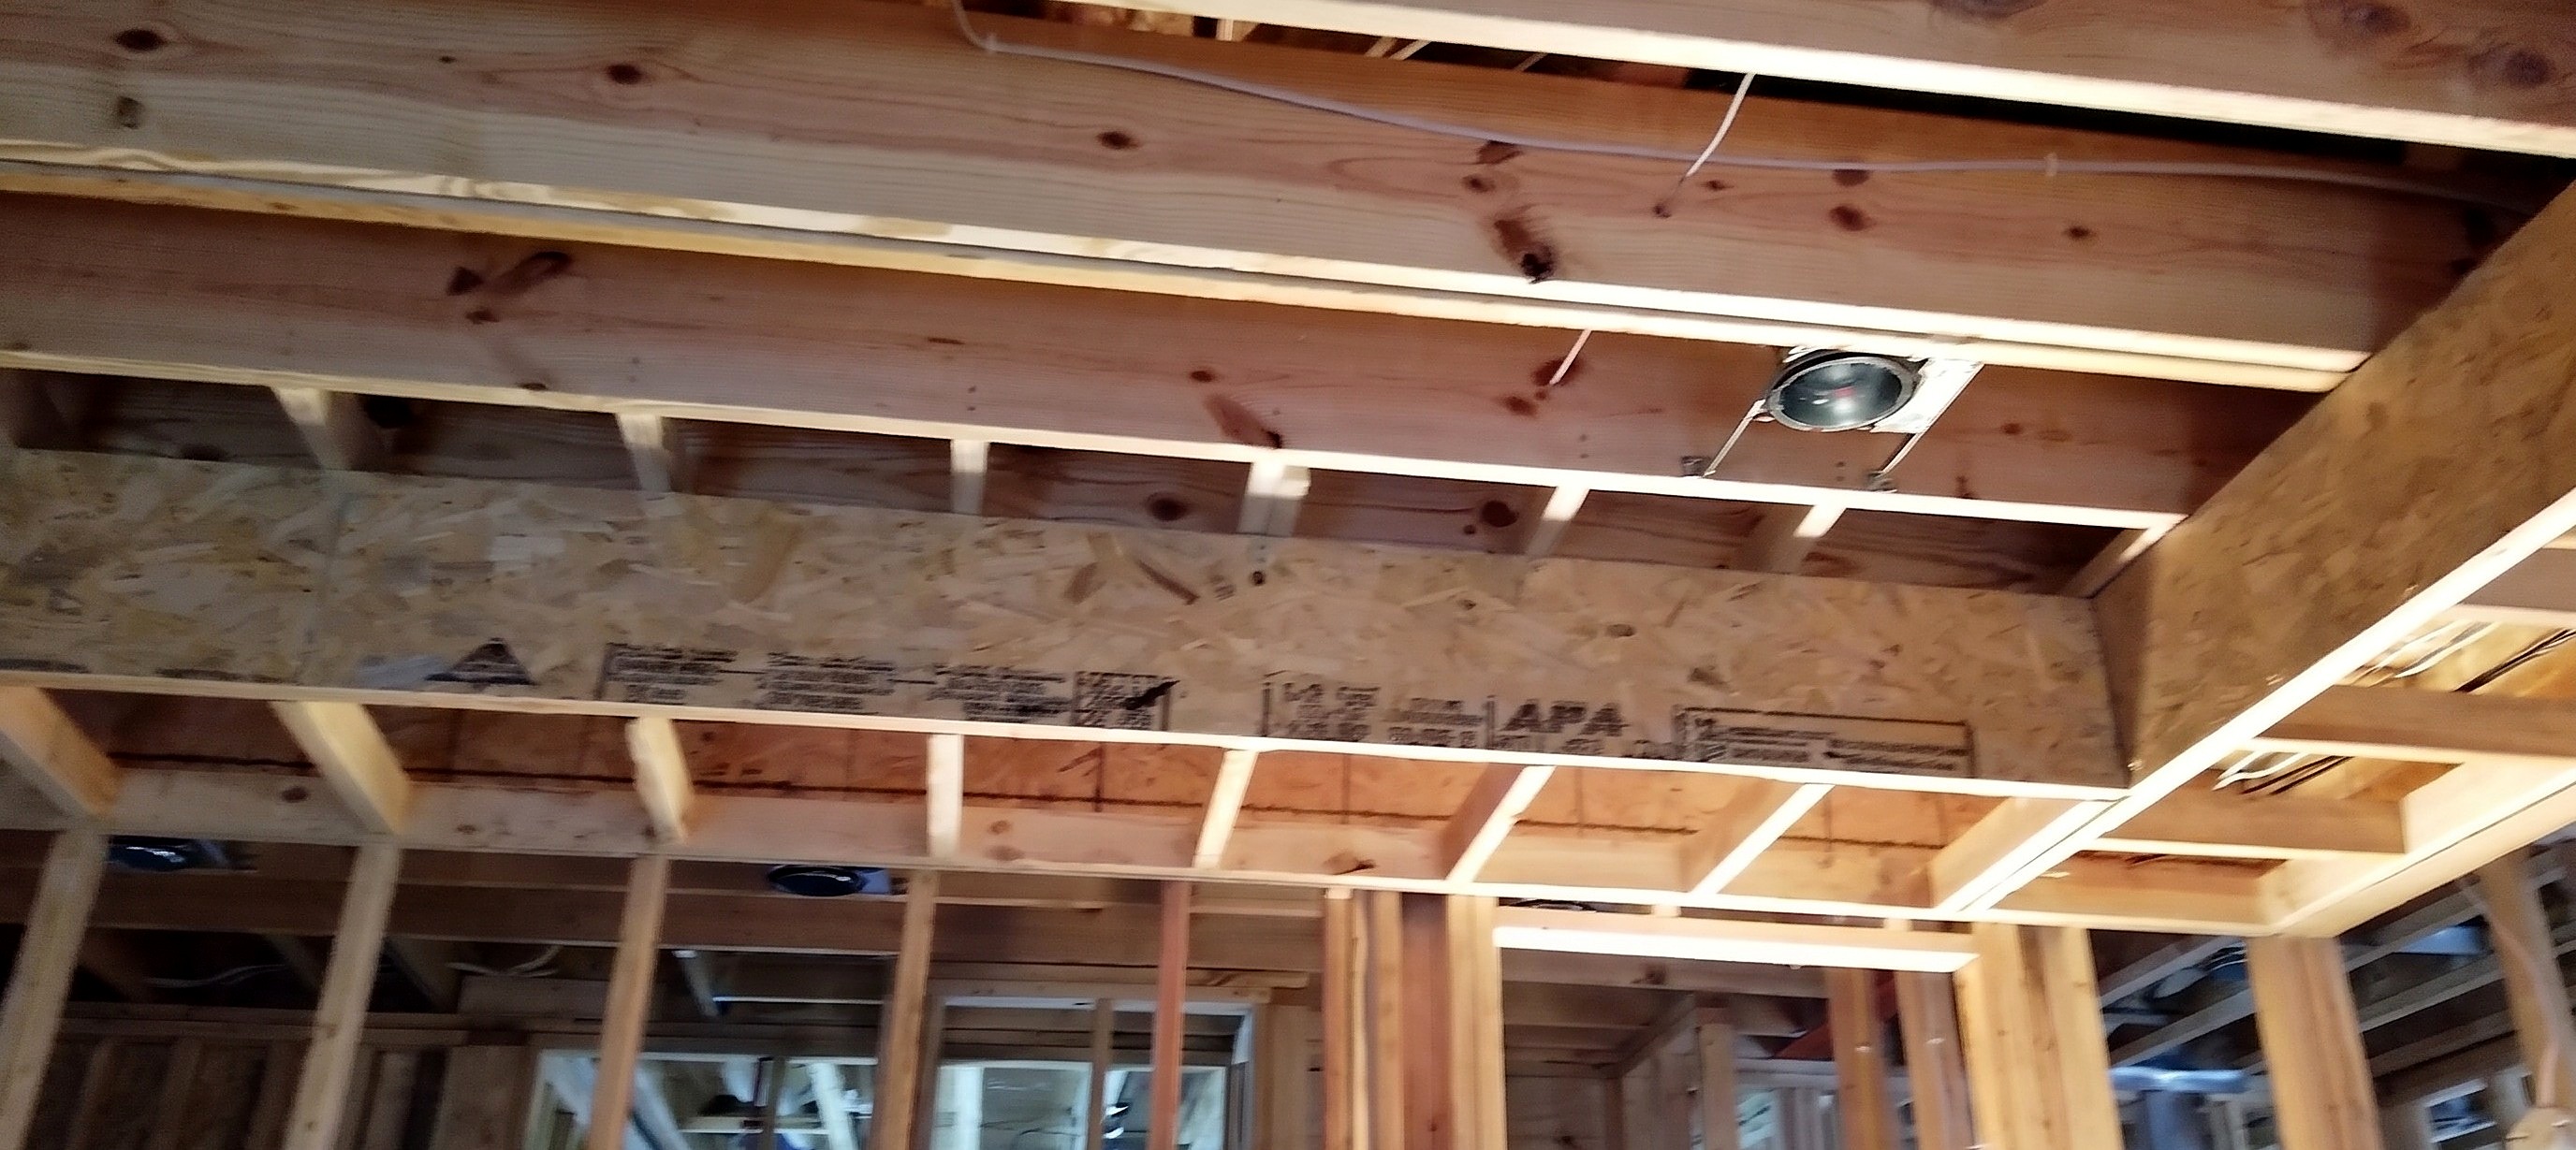
1/2-inch OSB fire blocking rings the upper walls and ceiling joists.
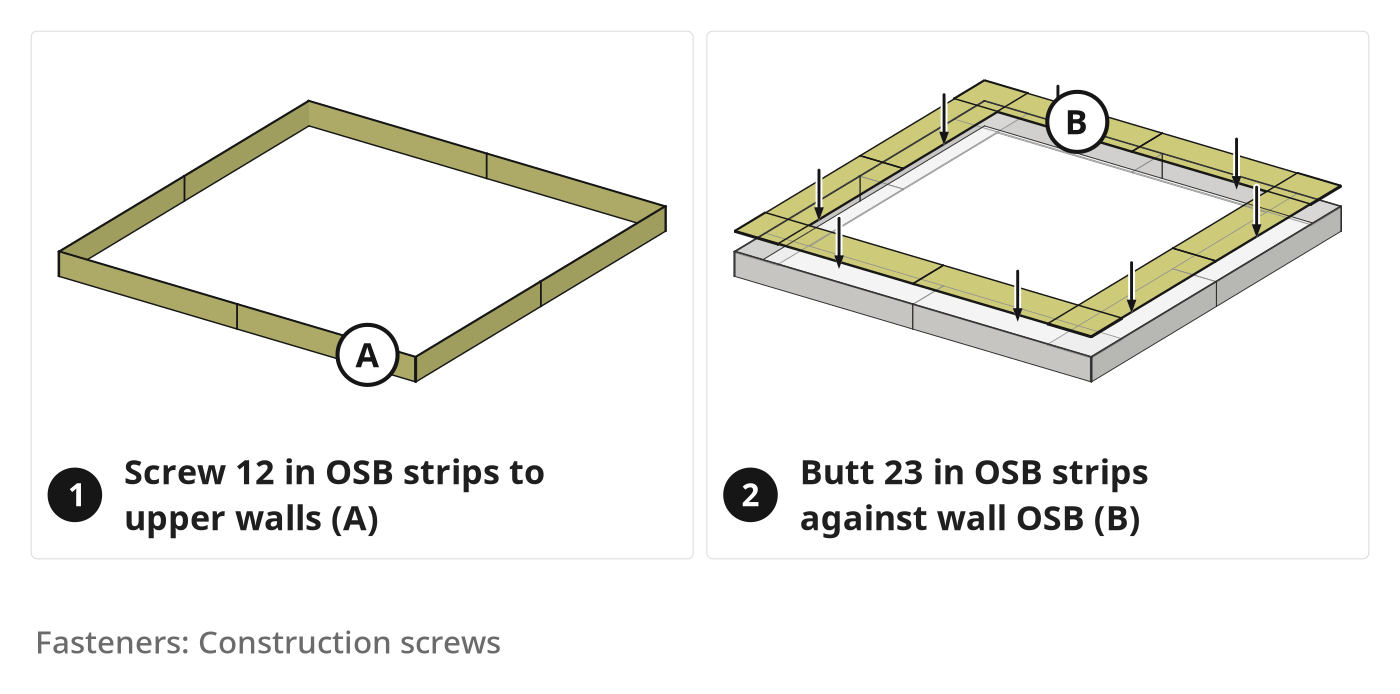
Parts in this step: (A) Wall fire-blocking strip, (B) Ceiling fire-blocking strip
You'll need: Table saw, Circular saw, Cordless drill or impact driver, Step ladder, 1/2-inch OSB sheathing, Construction screws
- 1.1 Fasten 12-inch OSB strips around the upper wall perimeter
- Rip 1/2 in OSB into 12 in wall fire-blocking strips (A) (lengths and quantities estimated).
- Hold each strip horizontally on wall studs, flush with ceiling joists.
- Drive construction screws through the OSB into every wall stud.
- Butt strip ends tightly over a stud to seal the wall cavity.
- 1.2 Attach 23-inch OSB strips to the ceiling joists
- Along the two joist-parallel walls, install Step 5's joist blocking first.
- Rip 1/2 in OSB into 23 in ceiling fire-blocking strips (B) (lengths and quantities estimated).
- Push each strip's back edge tight against the 1/2 in wall OSB.
- Drive construction screws up through the OSB into ceiling joists and blocking.
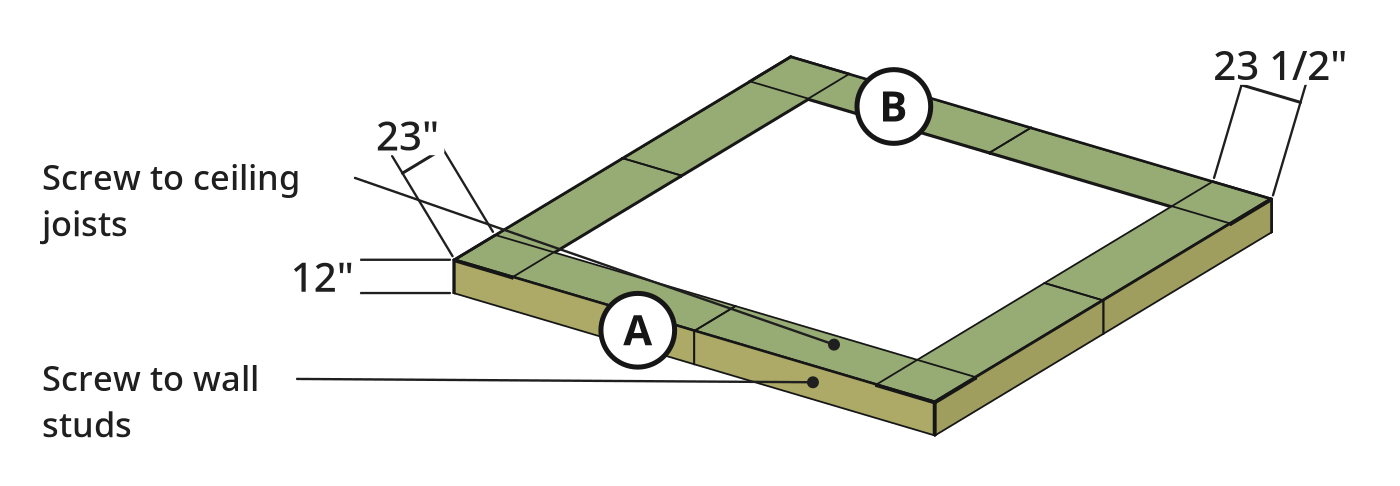
Key measurements
- Wall fire-blocking strip width: 12 in down from ceiling joists
- Ceiling fire-blocking strip width: 23 in out from the wall strip face
- Ceiling projection so far: 23-1/2 in from bare wall studs
- Tip: Rip OSB sheets on a table saw, not a circular saw, for straight edges.
- Tip: Skip the wall and ceiling OSB strips over finished drywall, which already fire-blocks.
- Tip: If preferred, fire-block with scrap 1/2 in or 5/8 in drywall instead of 1/2 in OSB.
- Heads up: Check local fire-blocking material and sealing codes so wall or wire fires cannot reach the attic.
Before you move on: Check the 23 in ceiling OSB butts tight to the 12 in wall OSB all around without gaps.
Step 2: Build the 2x4 Soffit Frames
Assemble manageable 23-inch wide 2x4 ladder frames flat on the floor.
Parts in this step: (C) Soffit frame top and bottom plate, (D) Soffit frame cross stud
You'll need: Circular saw, Cordless drill or impact driver, 2x4 framing lumber, Construction screws
- 2.1 Cut and assemble 23-inch wide 2x4 ladder frames on the floor
- Cut 12 ft or 14 ft 2x4s for soffit frame top and bottom plates (C) (lengths and counts estimated).
- Cut 2x4 soffit frame cross studs (D) to 20 in (44 count estimated).
- Lay plate pairs on edge on the floor with 20 in cross studs 16 in on center.
- Drive construction screws through both outer plate faces into every cross stud end.
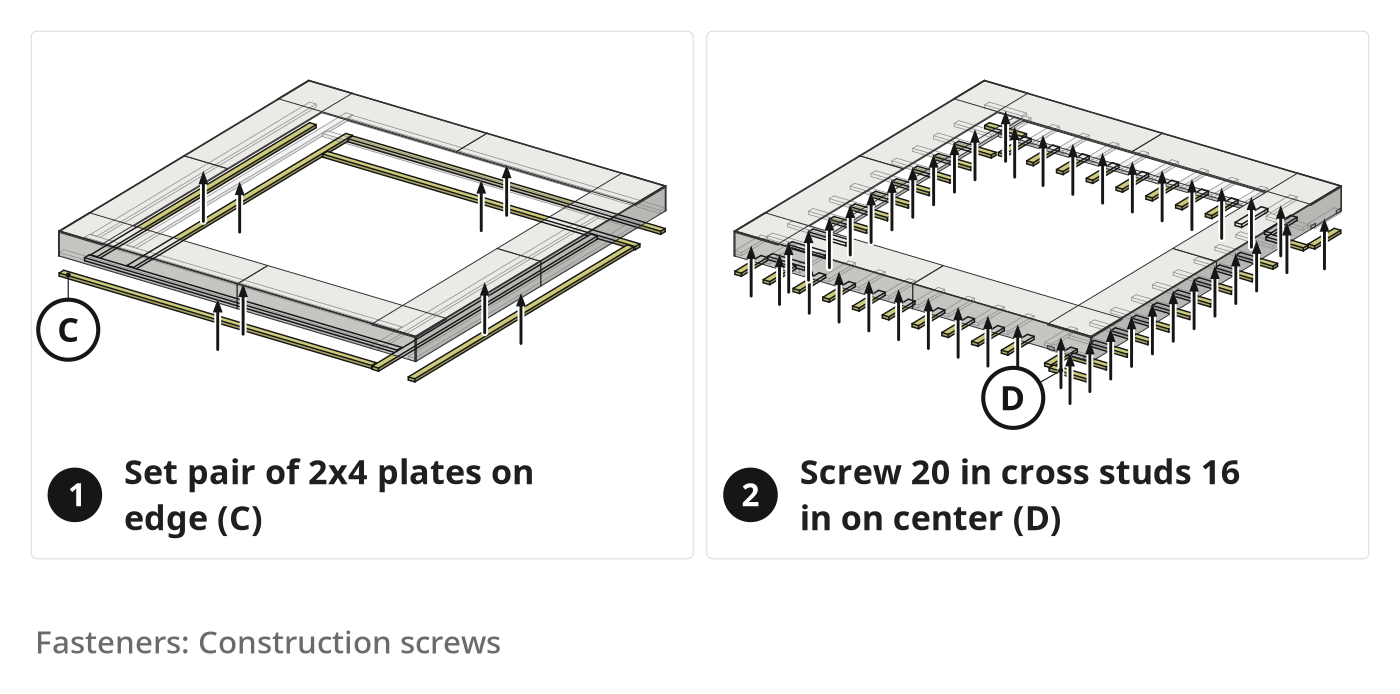
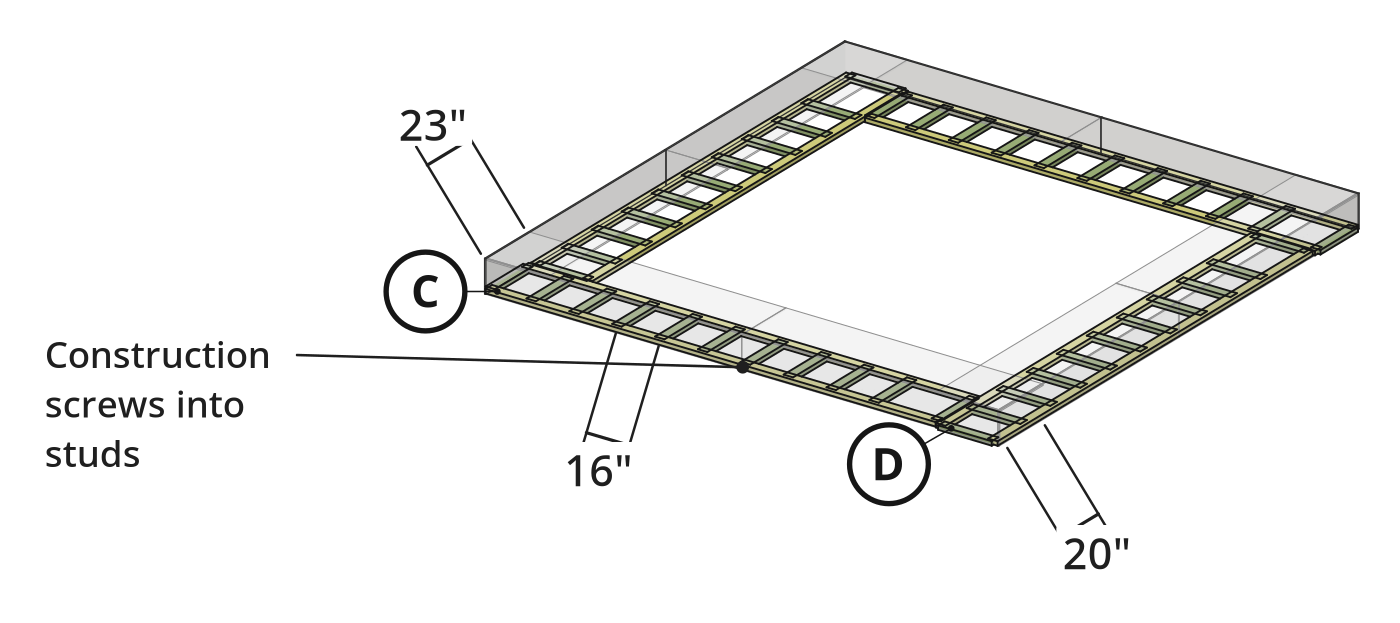
Key measurements
- Cross stud length: 20 in between both 1-1/2 in 2x4 plates
- Cross stud spacing: 16 in on center along plates
- Ladder frame width: 23 in outside-to-outside across plates and cross studs
- Tip: Build 12 ft or 14 ft sections on the floor instead of one heavy full-wall piece.
Before you move on: Measure across the outer frame faces to check the 23 in width.
Step 3: Install the Ceiling Ledger and Outer OSB Face
Hang the 2x4 ceiling ledger and 12-inch outer vertical OSB face from the outer ceiling OSB edge.
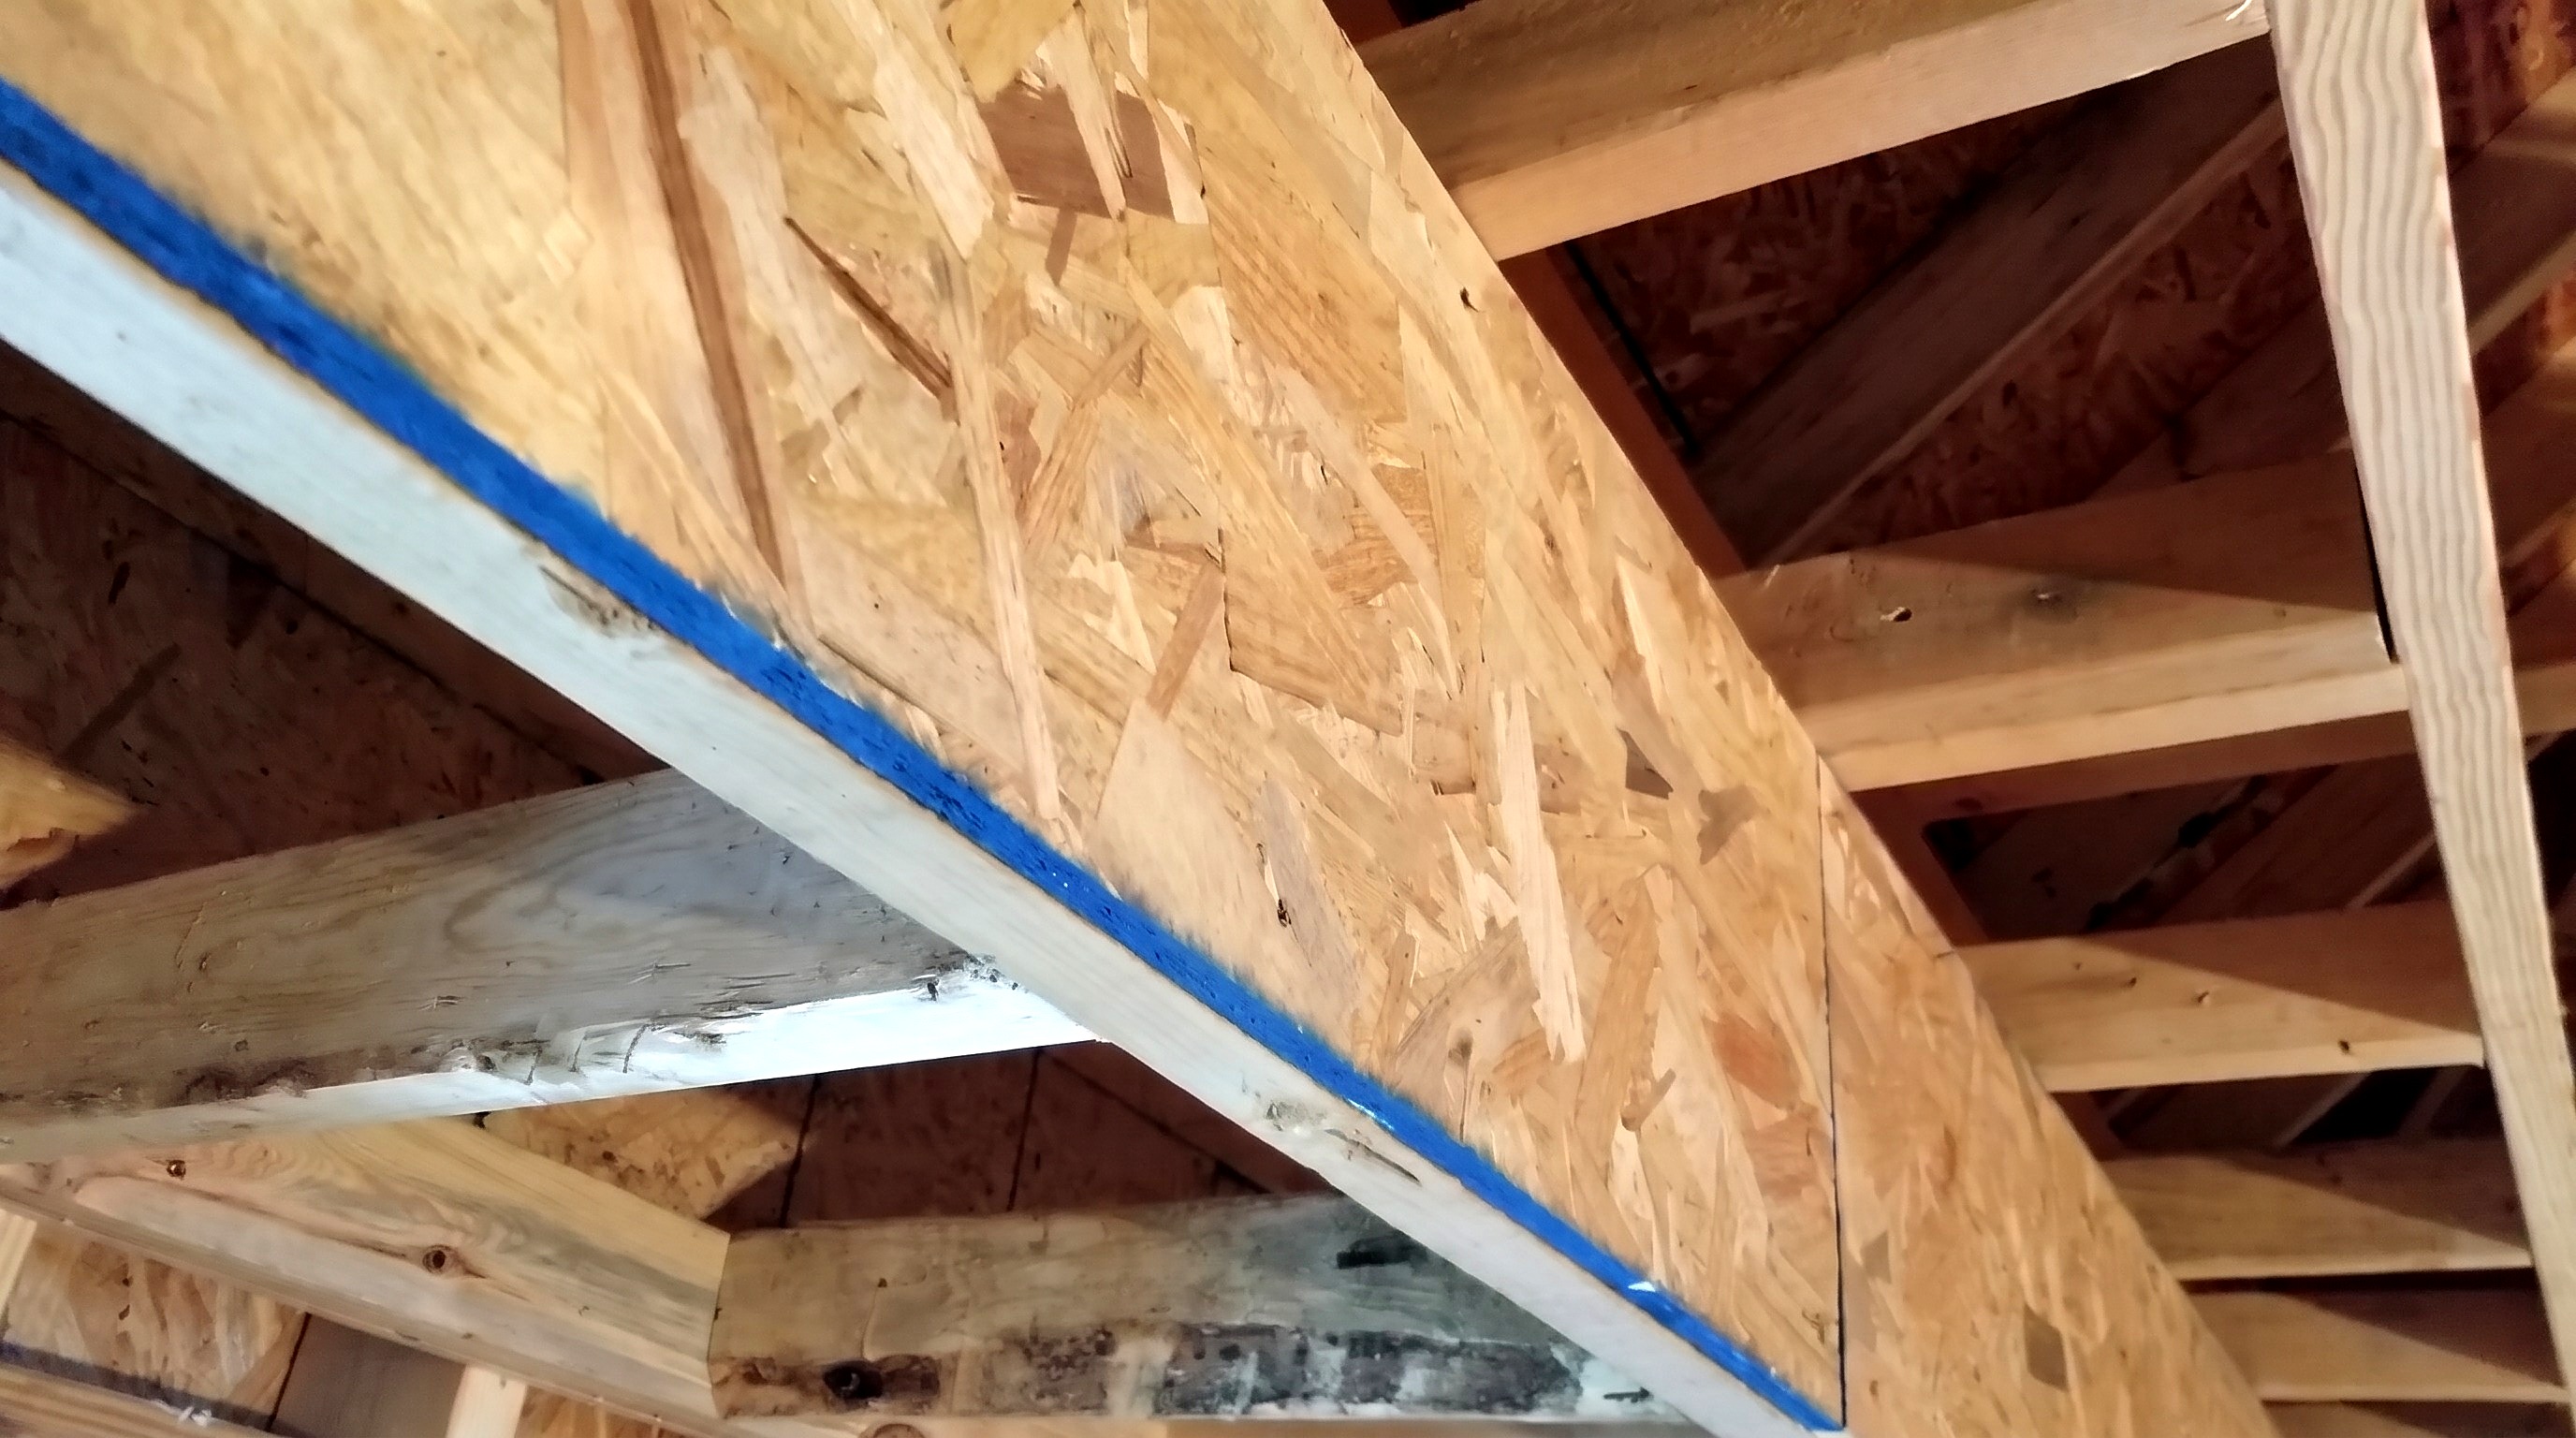
Parts in this step: (E) Ceiling ledger strip, (F) Outer vertical soffit face strip
You'll need: Table saw, Circular saw, Cordless drill or impact driver, Step ladder, 2x4 framing lumber, 1/2-inch OSB sheathing, Construction screws
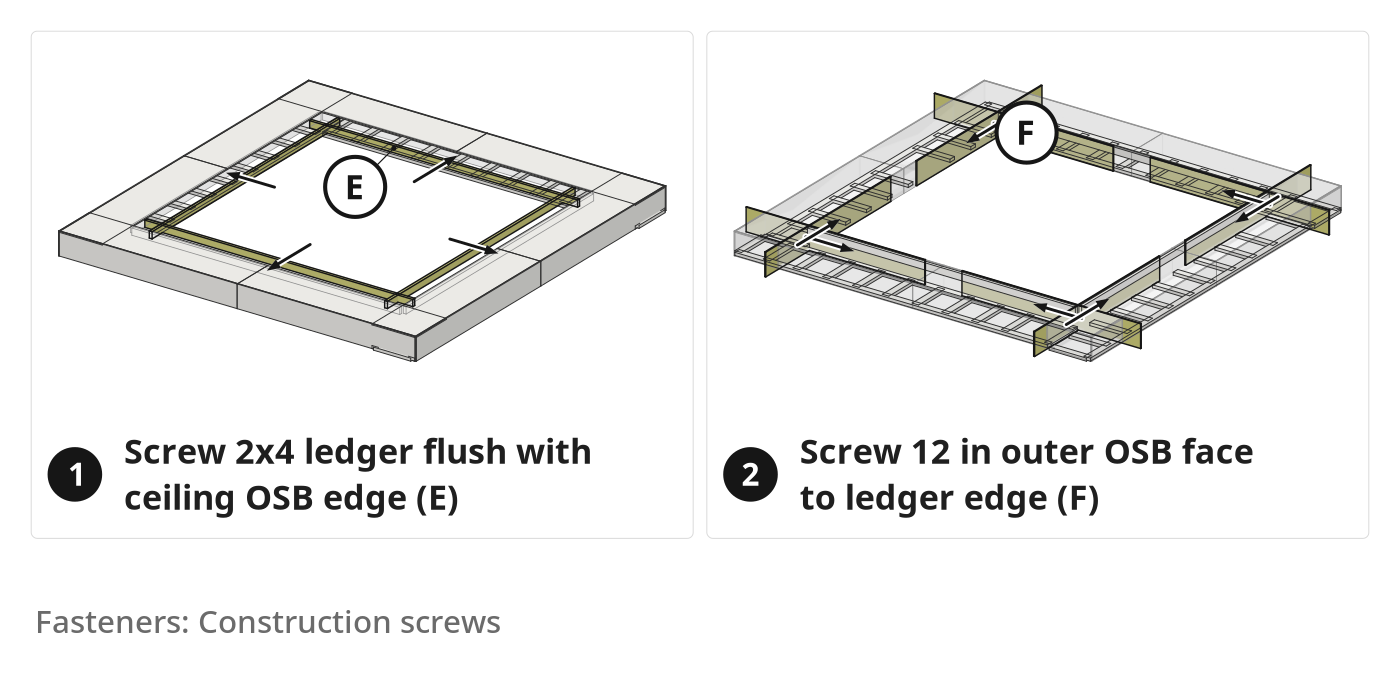
- 3.1 Screw a 2x4 ledger along the outer edge of the ceiling OSB
- Cut 2x4 ceiling ledger strips (E) (144 in length and count estimated).
- Set each 2x4 flat under the 23 in ceiling OSB, flush with its outer edge.
- Drive construction screws up through the 2x4 ledger and ceiling OSB into the joists and blocking.
- 3.2 Attach the 12-inch outer OSB face to the ceiling ledger
- Rip 1/2 in OSB into 12 in outer vertical soffit face strips (F) (lengths and counts estimated).
- Hold each strip vertically against the outer edge of 2x4 ceiling ledger strip (E).
- Press the top flush to the ceiling; drive construction screws through the OSB into the ledger edge.
- Leave the bottom edge free so 2x4 soffit frames tuck behind it in Step 4.
Key measurements
- Outer vertical OSB face width: 12 in hanging from the ceiling
- Total soffit box width: 24 in (1/2 in wall OSB, 23 in frame, 1/2 in outer OSB face)
- Tip: Hang the outer 12 in OSB strip before the 2x4 frames as a front alignment flange.
Before you move on: Check the 2x4 ledger is flush with the 23 in ceiling OSB outer edge and the outer 12 in OSB strip is screwed along its top.
Step 4: Hang the Soffit Frames and Frame the Corners
Hang and fasten 2x4 soffit frames and corner filler blocks at the bottom of the 12-inch drop.
Parts in this step: (C) Soffit frame top and bottom plate, (D) Soffit frame cross stud, (F) Outer vertical soffit face strip, (G) Corner plate filler block
You'll need: Circular saw, Cordless drill or impact driver, Step ladder, 2x4 framing lumber, Construction screws
- 4.1 Drive temporary support screws into the wall studs
- Find the bottom of the perimeter 12 in wall OSB strip.
- Drive construction screws partway into every couple of wall studs right under the wall OSB.
- Leave screw heads sticking out so the soffit frame back rests on them.
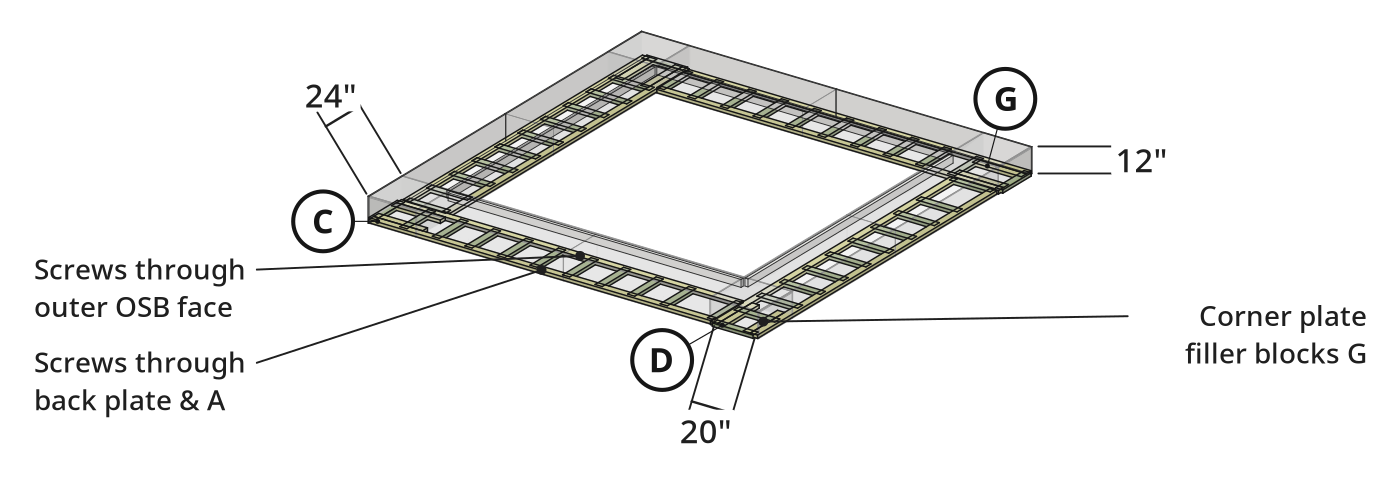
- 4.2 Lift the soffit frames and screw them into place
- With a helper, lift a pre-built 2x4 ladder frame of plates (C) and cross studs (D).
- Rest the back plate on the wall screws and pull outer vertical soffit face strip (F) out slightly.
- Tuck the front plate behind the outer OSB face strip, flush with its bottom.
- Drive construction screws through the outer OSB face into the front plate to hold the front.
- Drive construction screws through the back plate and wall OSB into the wall studs.
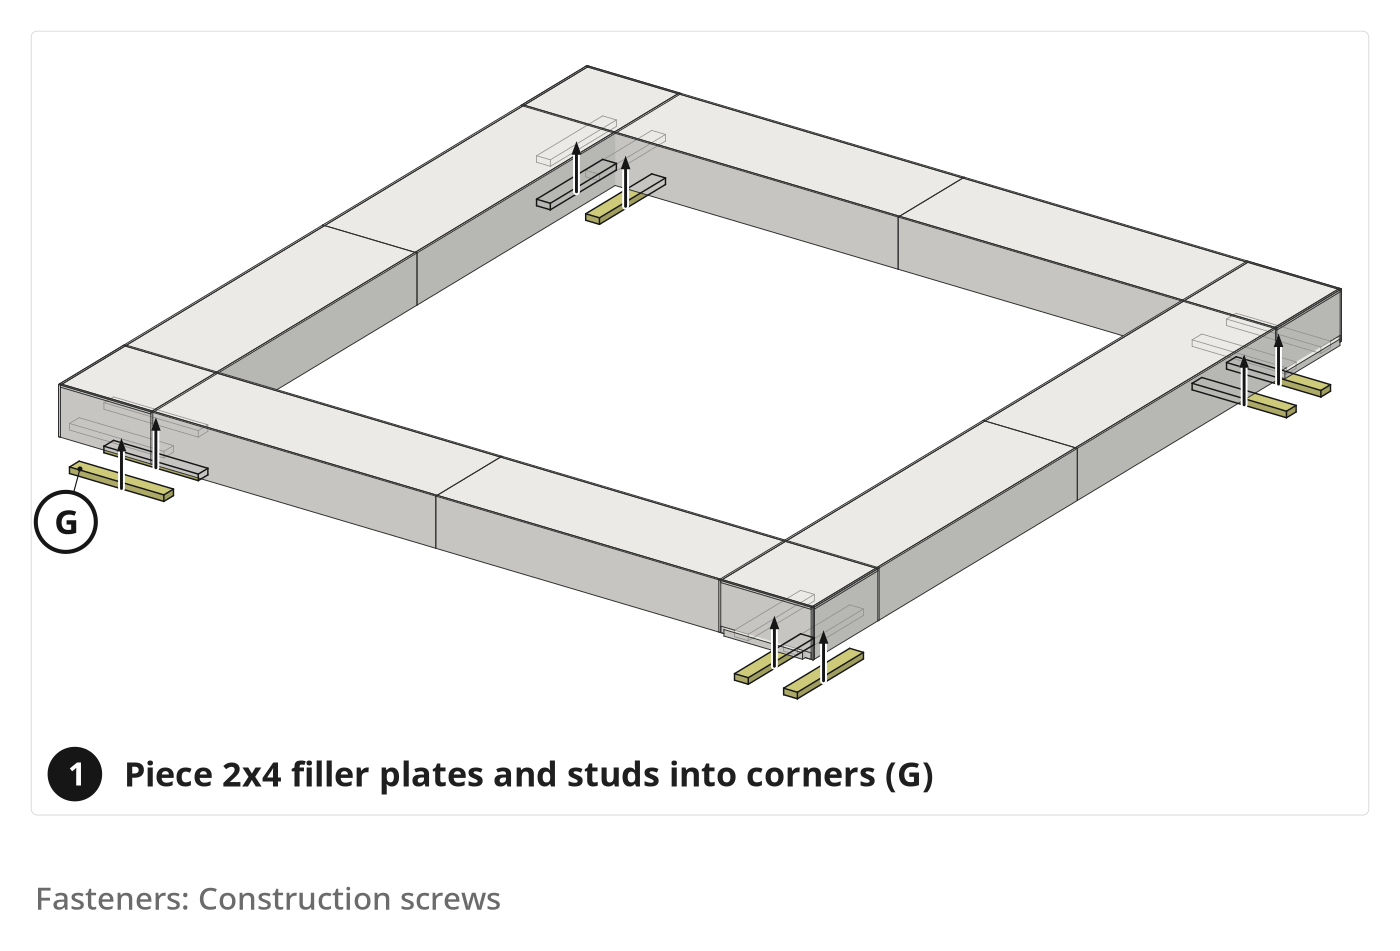
- 4.3 Piece in 2x4 blocking at the room corners
- Measure the corner spans left by the 12 ft or 14 ft ladder frames.
- Cut 2x4 corner plate filler blocks (G) and 20 in cross studs (D) (24 in filler length estimated).
- Piece the plates and 20 in cross blocks into the corners overhead, flush with the frames.
- Drive construction screws through the outer OSB face, corner plates, and cross studs into wall studs.
Key measurements
- Soffit drop height: 12 in from main ceiling to frame underside
- Clearance height under soffit: 9 ft under a 10 ft ceiling
- Tip: Frame the entire soffit piecemeal in place overhead if working solo without a helper.
- Tip: Route speaker wire or low-voltage lighting cables through the soffit before hanging drywall.
- Heads up: Have a helper on a second ladder lift and pin 12 ft to 14 ft 2x4 ladder frames overhead.
Before you move on: Check the 2x4 soffit frame and corner block undersides sit level and flush with the wall OSB and outer OSB face bottom edges.
Step 5: Install Joist Blocking for Parallel Runs
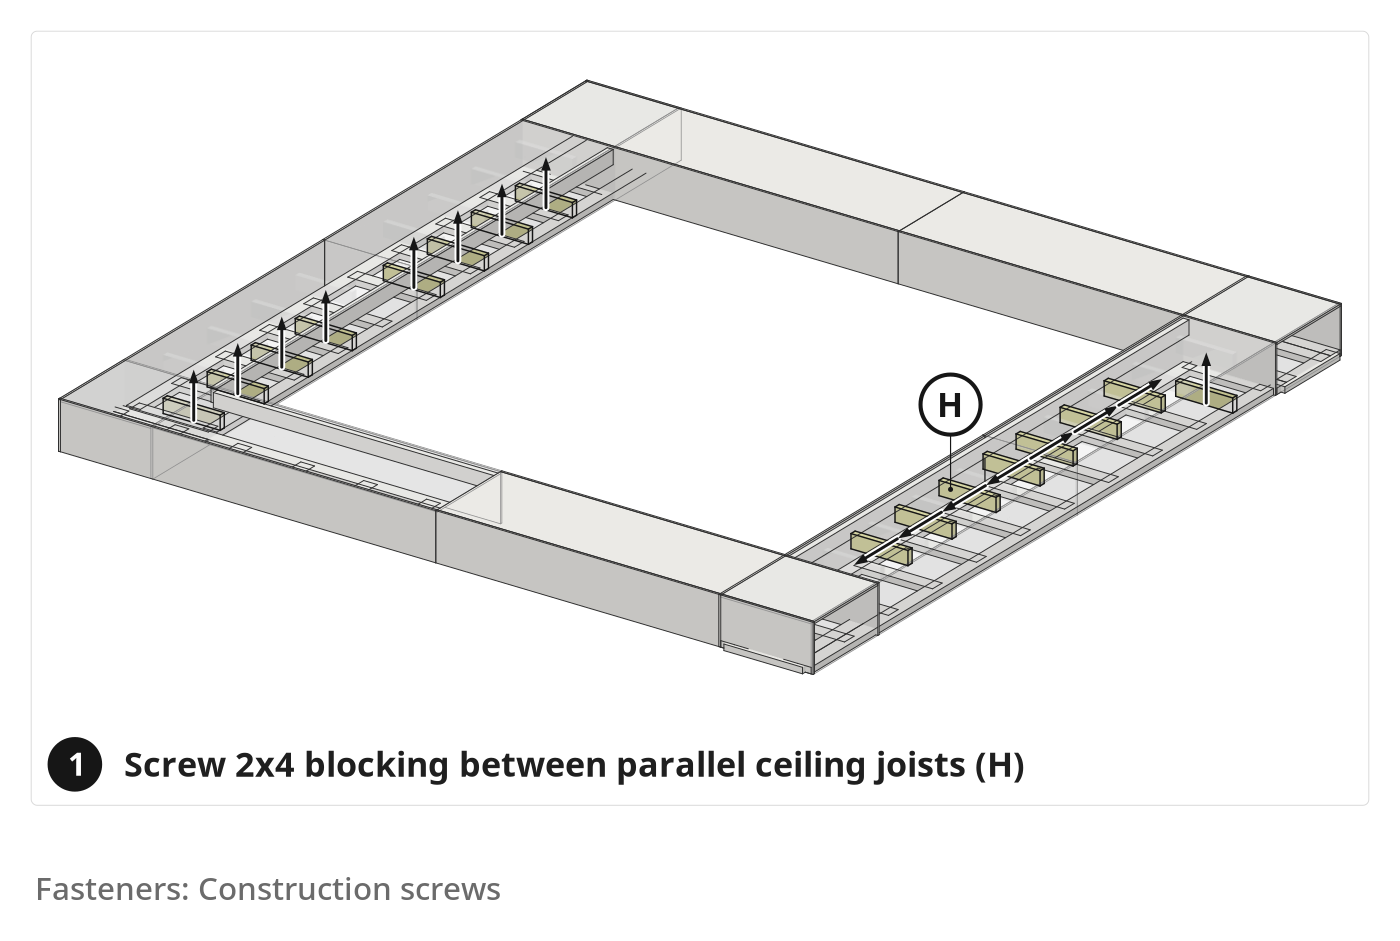
Perpendicular 2x4 blocking sits between ceiling joists on the two room sides parallel to the joists.
Parts in this step: (H) Ceiling joist blocking
You'll need: Circular saw, Cordless drill or impact driver, Step ladder, 2x4 framing lumber, Construction screws
- 5.1 Add perpendicular 2x4 blocking between parallel ceiling joists
- Finish this before installing the ceiling OSB in Step 1.2 and ledger in Step 3.1 on the parallel walls.
- Cut 2x4 ceiling joist blocking (H) to fit between the ceiling joists; the 14-1/2 in length and count are estimated.
- Set blocks perpendicular between the ceiling joists along the 23 in soffit path.
- Drive construction screws through the blocking into the joists for solid wood backing behind the ceiling OSB and ledger.
Key measurements
- Ceiling joist blocking length: 14-1/2 in estimated, perpendicular between parallel joists
- Tip: Place each block so both the 23 in ceiling OSB and inner 2x4 ceiling ledger screw into solid wood.
- Heads up: Do not hang parallel soffit runs without perpendicular joist blocking first, or ceiling screws will miss solid framing.
Before you move on: Check each piece of joist blocking sits tight and flush with the ceiling joist bottoms.
Finishing
Drywall and trim
- Fasten drywall under the 2x4 soffit frames and across the 12 in outer vertical OSB face.
- Install crown molding around the tray ceiling's inside face.
- Tuck rope lighting behind the crown molding for upward indirect ceiling light.
Cladding alternatives
- Cover the soffit underside and vertical face with wood planks or tongue-and-groove boards instead of drywall.
These Specs are built from Indy Farm Life's video “Framed Drop-Down Tray Ceiling”. Open the Framed Drop-Down Tray Ceiling project page.
