Spetz Specs No. 3207: step-by-step build guide
Cedar Fence Picket Raised Planter Bed
The complete step-by-step guide made from EmyLuDesigns's YouTube video, free on Spetz. For the video, a step-by-step player and answers to your questions, see the Cedar Fence Picket Raised Planter Bed project page.
10 steps, 12 parts, 12 tools, 10 materials
Overview
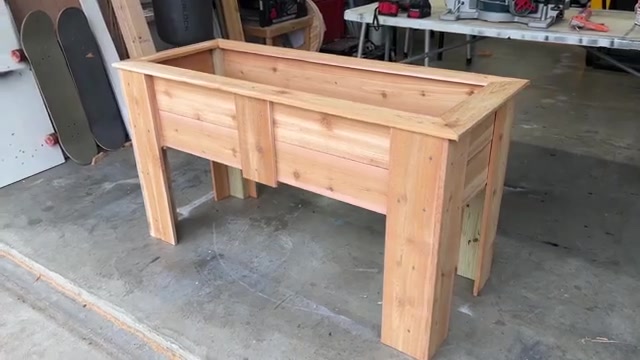
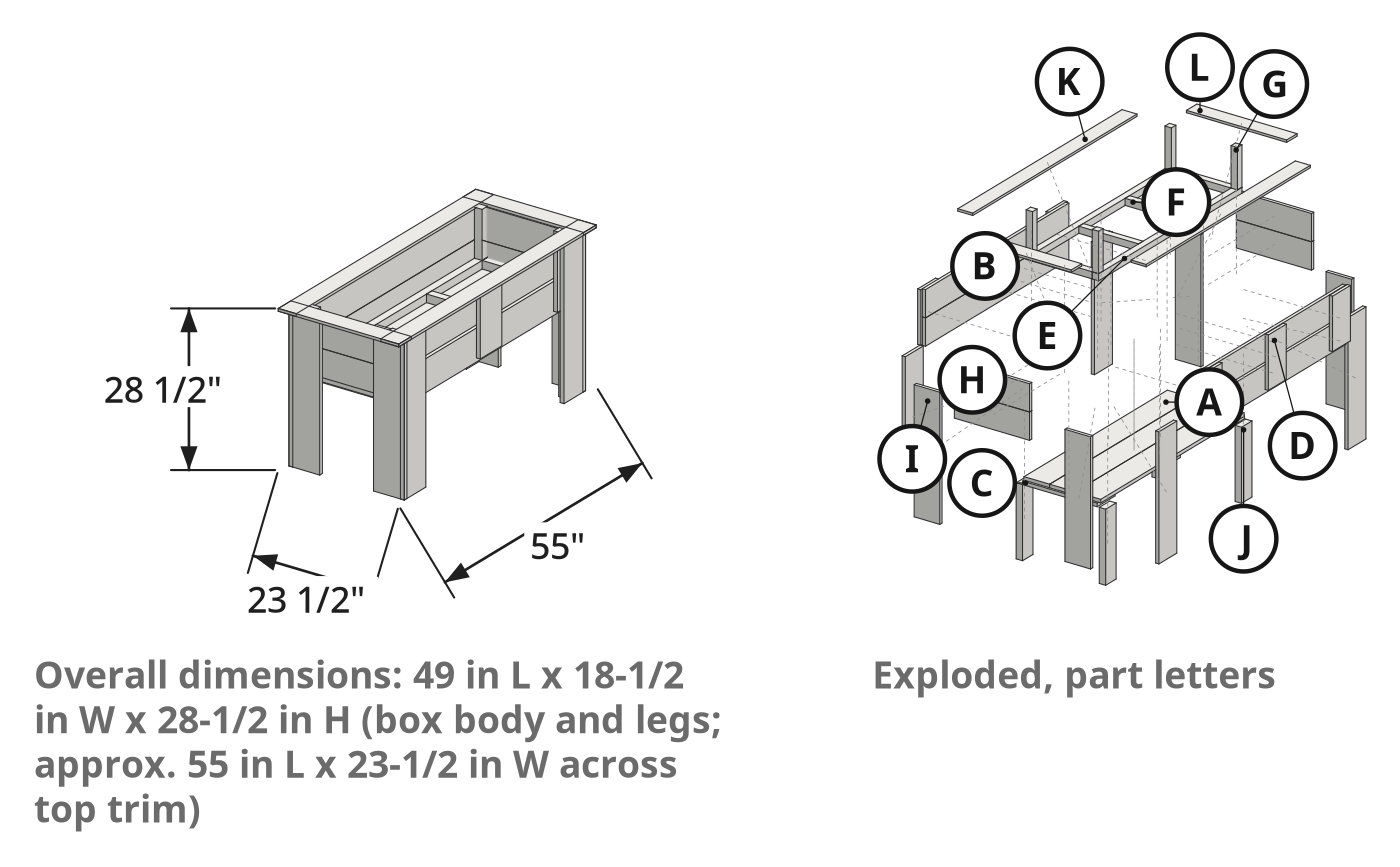
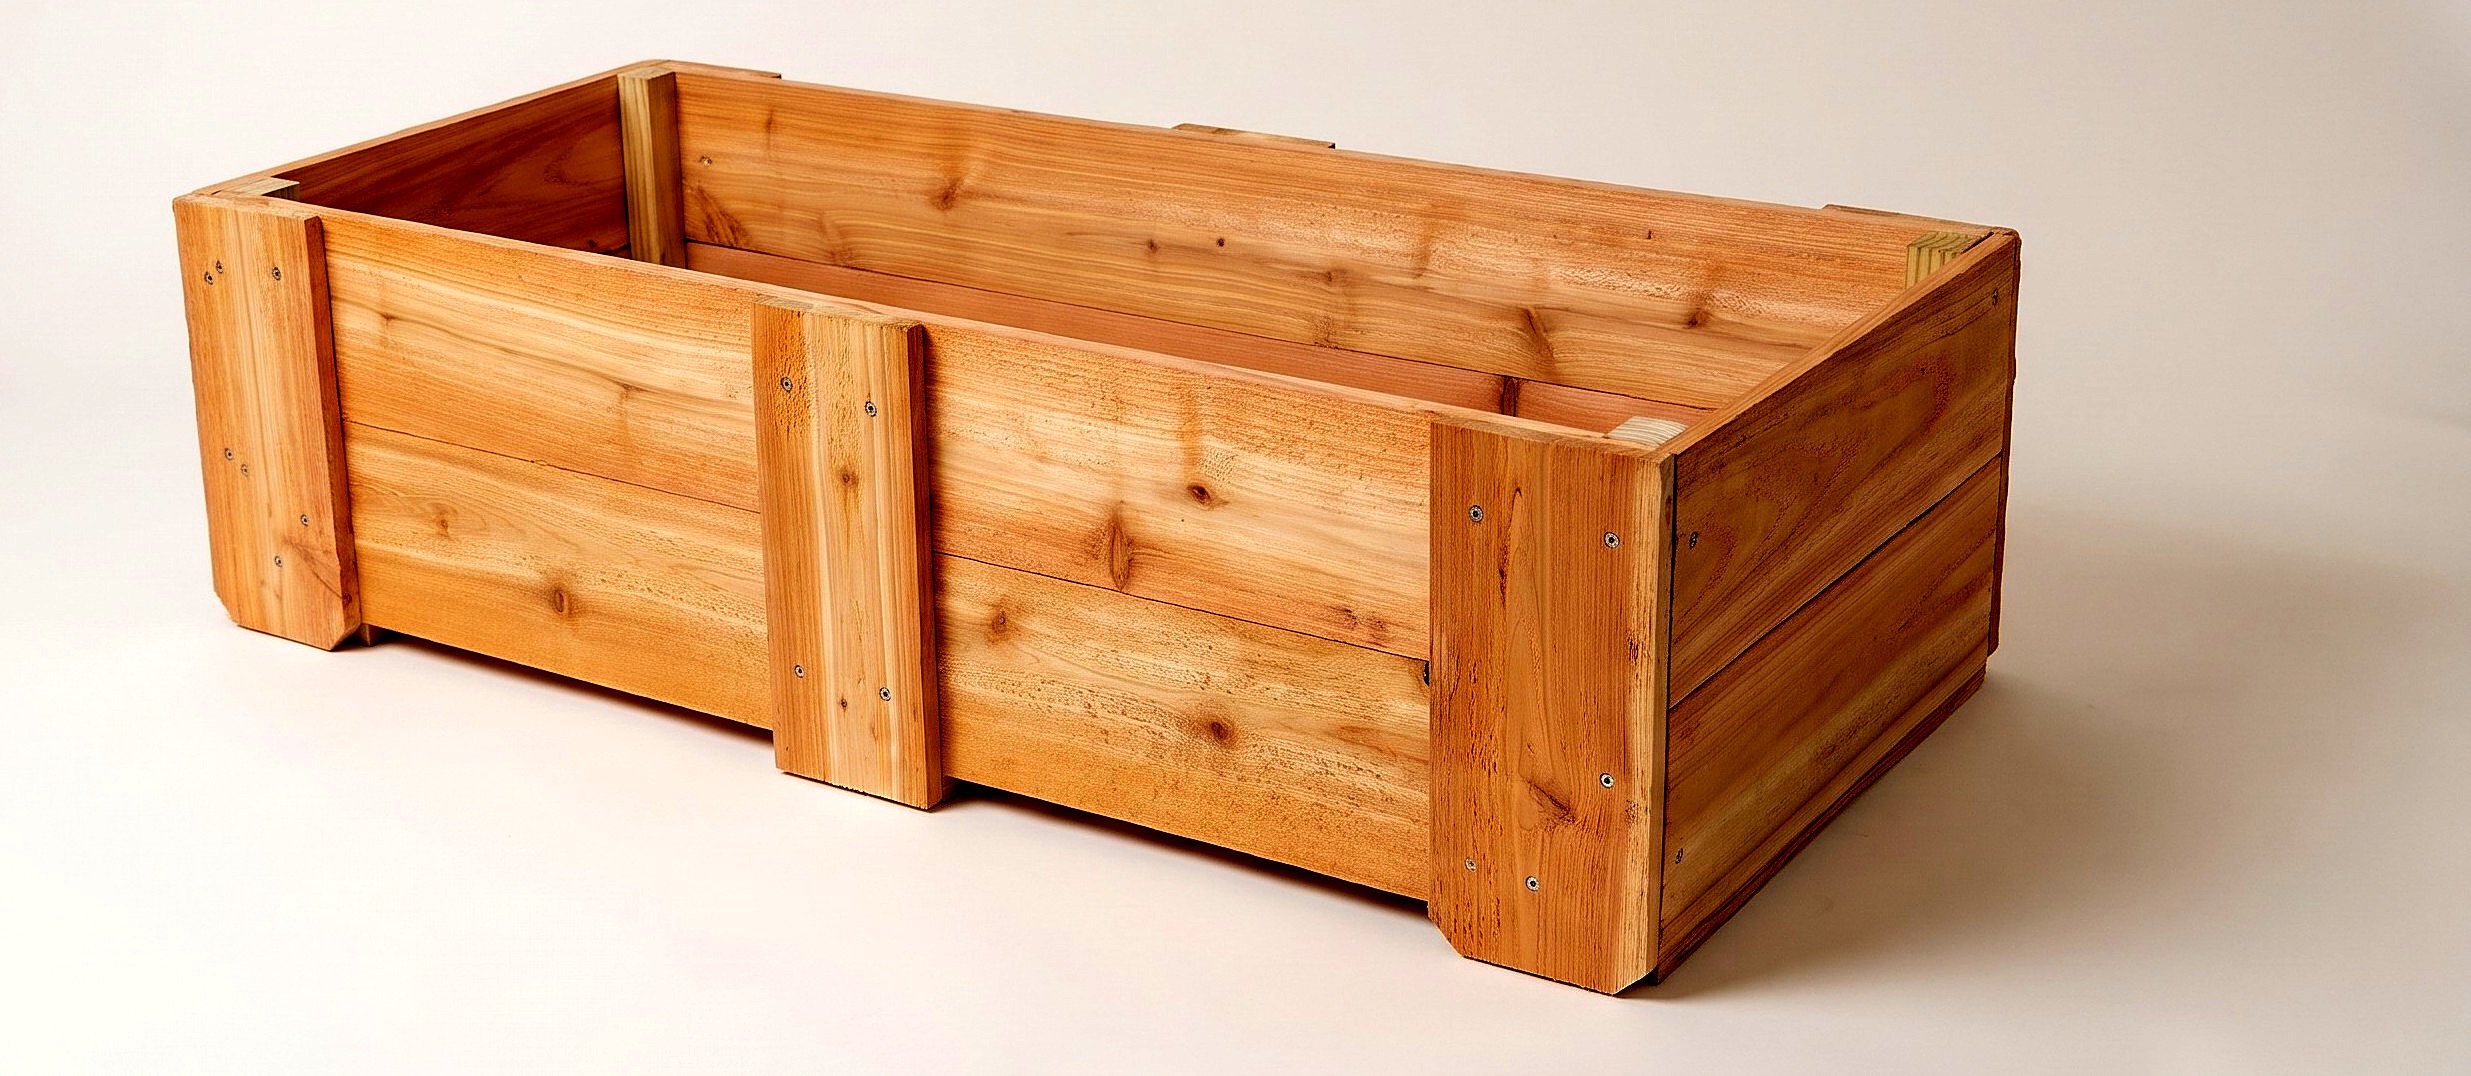
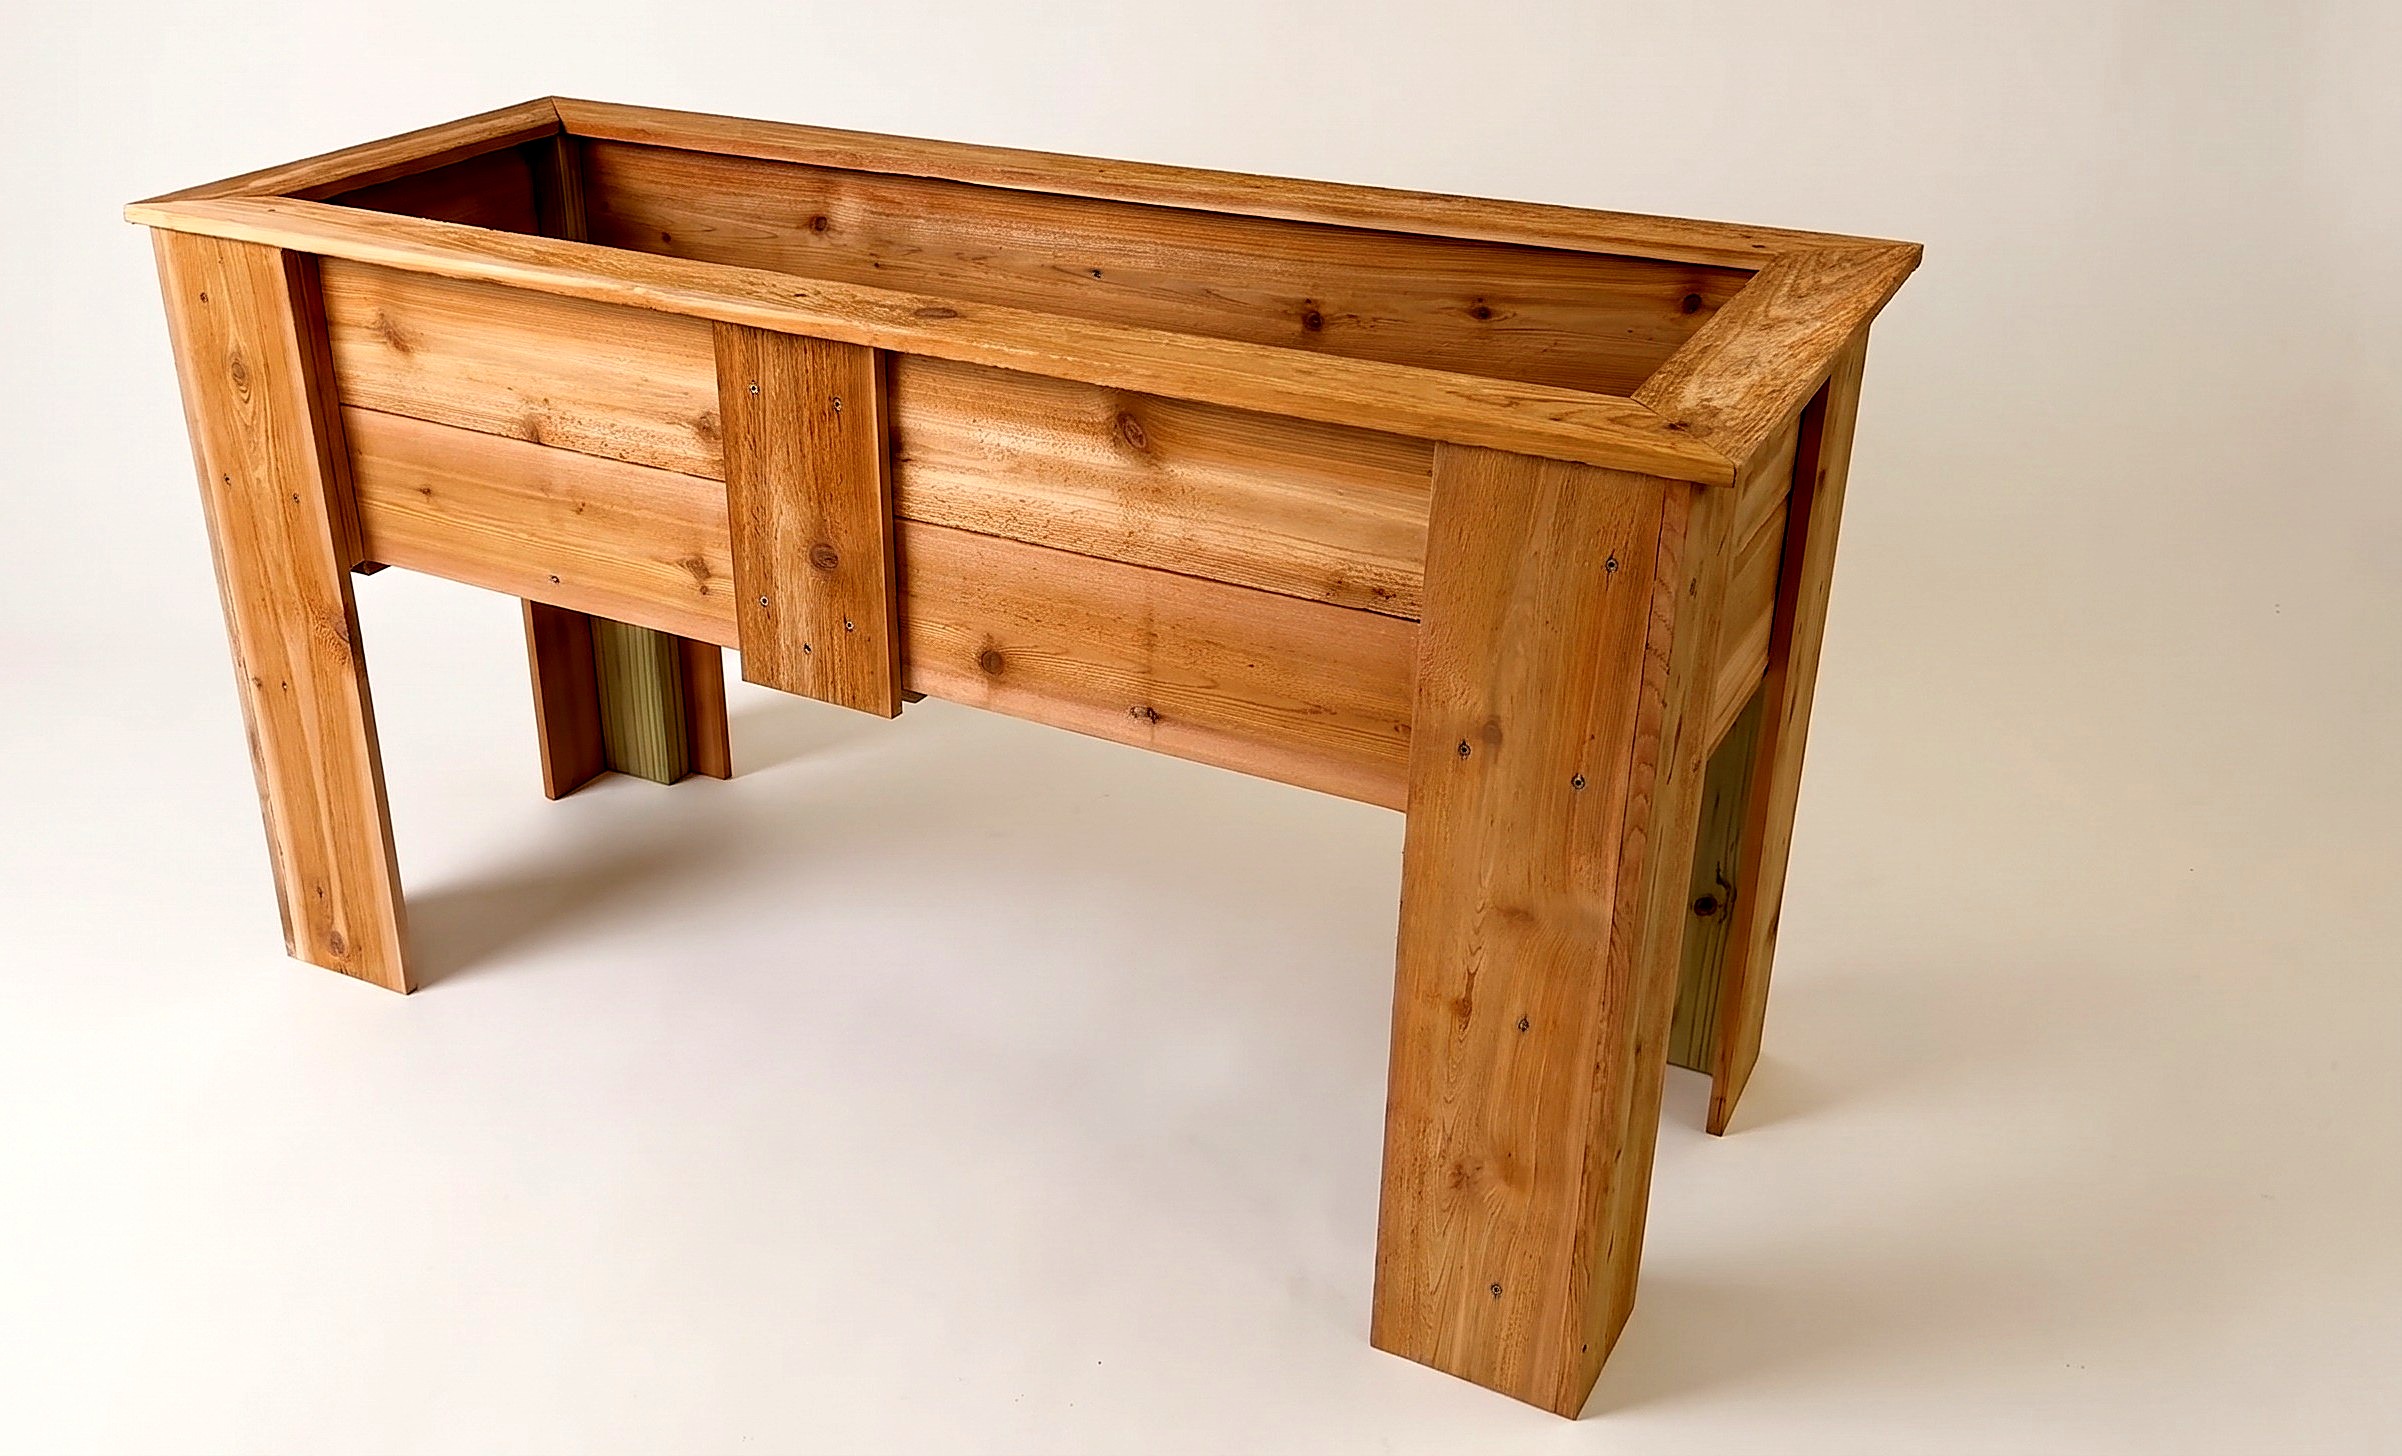
Finished size: 55 in W x 23-1/2 in D x 28-1/2 in H (across top trim; 49 in W x 18-1/2 in D box body)
What You Are Building
- Build a waist-height cedar planter for herbs, flowers and vegetables.
- Frame the 48-inch cedar box with pressure-treated 2x2s and 2x4 leg supports.
- Cap the rim with 45-degree mitered cedar trim and line the inside.
Why This Design Works
- Pair exterior screws with waterproof construction adhesive so joints never pull apart.
- An internal 2x2 ladder frame supports over 300 pounds of wet soil.
- Internal 2x4 leg blocks transfer box weight to the ground.
What It Takes
- Make crosscuts and 45-degree miters with a miter saw or circular saw.
- Pre-drill pilot holes and drive 1-inch and 2-inch screws with a driver.
- Allow time after assembly for the exterior waterproofer coat to dry.
What Decides Success
- Keep the 1/2-inch base cleat overhangs even so side panels seat squarely.
- Cut drainage openings in the liner over the drilled base holes.
Health and safety
Workspace And Power Saws
- Clear a flat workbench or floor space before assembling the 48-inch cedar panels to prevent tripping hazards.
- Wear eye and hearing protective equipment whenever operating the miter saw, circular saw, drill, or impact driver.
- Clamp or hold stacked cedar pickets tight against the miter saw fence when gang-cutting, keeping hands clear of the blade.
- Let the miter saw and circular saw blades come to a complete stop before lifting the saw or clearing offcuts.
Drilling, Driving And Stapling
- Remove the 18V battery pack from the drill or impact driver before changing between the 9/64-inch and 1/2-inch drill bits.
- Clamp small pressure-treated 2x4 leg blocks rather than holding them by hand while drilling pilot holes or driving 2-inch screws.
- Keep fingers away from the back face of double-layer 1/2-inch cedar pickets when driving 1-inch screws to avoid punctured skin.
- Keep your free hand clear of the heavy-duty staple gun nose when firing 1/4-inch staples into the weed barrier liner.
Treated Wood And Dust
- Wear a dust mask or respirator when cutting cedar fence pickets and pressure-treated 2x2 and 2x4 boards to avoid inhaling dust.
- Wear work gloves when handling rough cedar pickets and pressure-treated lumber to protect your hands from splinters and chemical preservatives.
- Wash your hands thoroughly after cutting or handling pressure-treated lumber, and never burn treated wood scraps or sawdust.
Adhesives And Exterior Sealer
- Apply the heavy duty construction adhesive and clear multi-surface waterproofer outdoors or in a well-ventilated space to avoid inhaling fumes.
- Wear chemical-resistant gloves and eye protective equipment when applying the exterior wood sealer with the stain pad and dispensing adhesive.
- Keep the waterproofer, stain tray, and used applicator pads away from heat, sparks, and open flames during use and drying.
Tools
- Miter saw (cordless sliding compound miter saw, Bosch, BiTurbo Brushless)
- Circular saw (cordless circular saw, Ryobi, Brushless) (optional)
- Tape measure (retractable tape measure)
- Rafter square (rafter / speed square, Milwaukee)
- Pencil and marker (marking tools)
- Cordless drill/driver (Bosch, 18V (CORE 18V))
- Impact driver (cordless impact driver, Bosch, GDX18V-1800C, 18V (CORE 18V))
- 9/64 in drill bit (twist drill bit, 9/64 in)
- 1/2 in drill bit (twist drill bit, 1/2 in)
- Caulking gun (manual caulk/adhesive dispenser, 10 fl oz cartridge size)
- Heavy-duty staple gun (manual heavy-duty staple gun, Arrow)
- Stain pad applicator and tray (paint/stain pad applicator with tray)
Materials
- 6 in cedar fence pickets (12, cedar fence picket, 6 in nominal width, 1/2 in thickness, 6 in wide (5-1/2 in actual) x 1/2 in thick x 6 ft (72 in) long)
- Standard cedar fence pickets (2-3, cedar fence picket, 3 in / 3-1/2 in width, 3 in (or 3-1/2 in) wide x 6 ft long)
- Pressure-treated 2x2 boards (2, pressure-treated lumber, pressure-treated, 2x2 x 8 ft (96 in) long)
- Pressure-treated 2x4 board (1, pressure-treated lumber, pressure-treated, 2x4 x 8 ft (96 in) long)
- 1 in zinc wood screws (100 pack, flat head Phillips zinc wood screws, Everbilt, #8 x 1 in, zinc-plated, #8 x 1 in)
- 2 in exterior screws (exterior wood screws, 2 in exterior, 2 in)
- Heavy duty construction adhesive (2 tubes, exterior construction adhesive, Liquid Nails, Heavy Duty, waterproof and weatherproof, 10.0 fl oz, 10.0 fl oz (295 mL))
- Clear multi-surface waterproofer (1 can, clear exterior wood sealer, Thompson's WaterSeal, 1 gal (3.78 L))
- Weed barrier fabric or plastic liner (landscape weed barrier fabric)
- 1/4 in staples (heavy-duty staples, 1/4 in leg length, 1/4 in)
Hardware
| Hardware | Size | Count | Used in steps |
|---|---|---|---|
| #8 x 1 in 1 in zinc wood screws | 100 | 1, 2, 3, 6 | |
| 10.0 fl oz Heavy duty construction adhesive | 1, 2, 3, 4, 5, 6, 7, 8, 9 | ||
| 2 in exterior screws | 106 | 3, 4, 5, 7, 8, 9 | |
| 1/4 in staples | 10 |
Cut list
| Part | Name | Qty | Size | Notes |
|---|---|---|---|---|
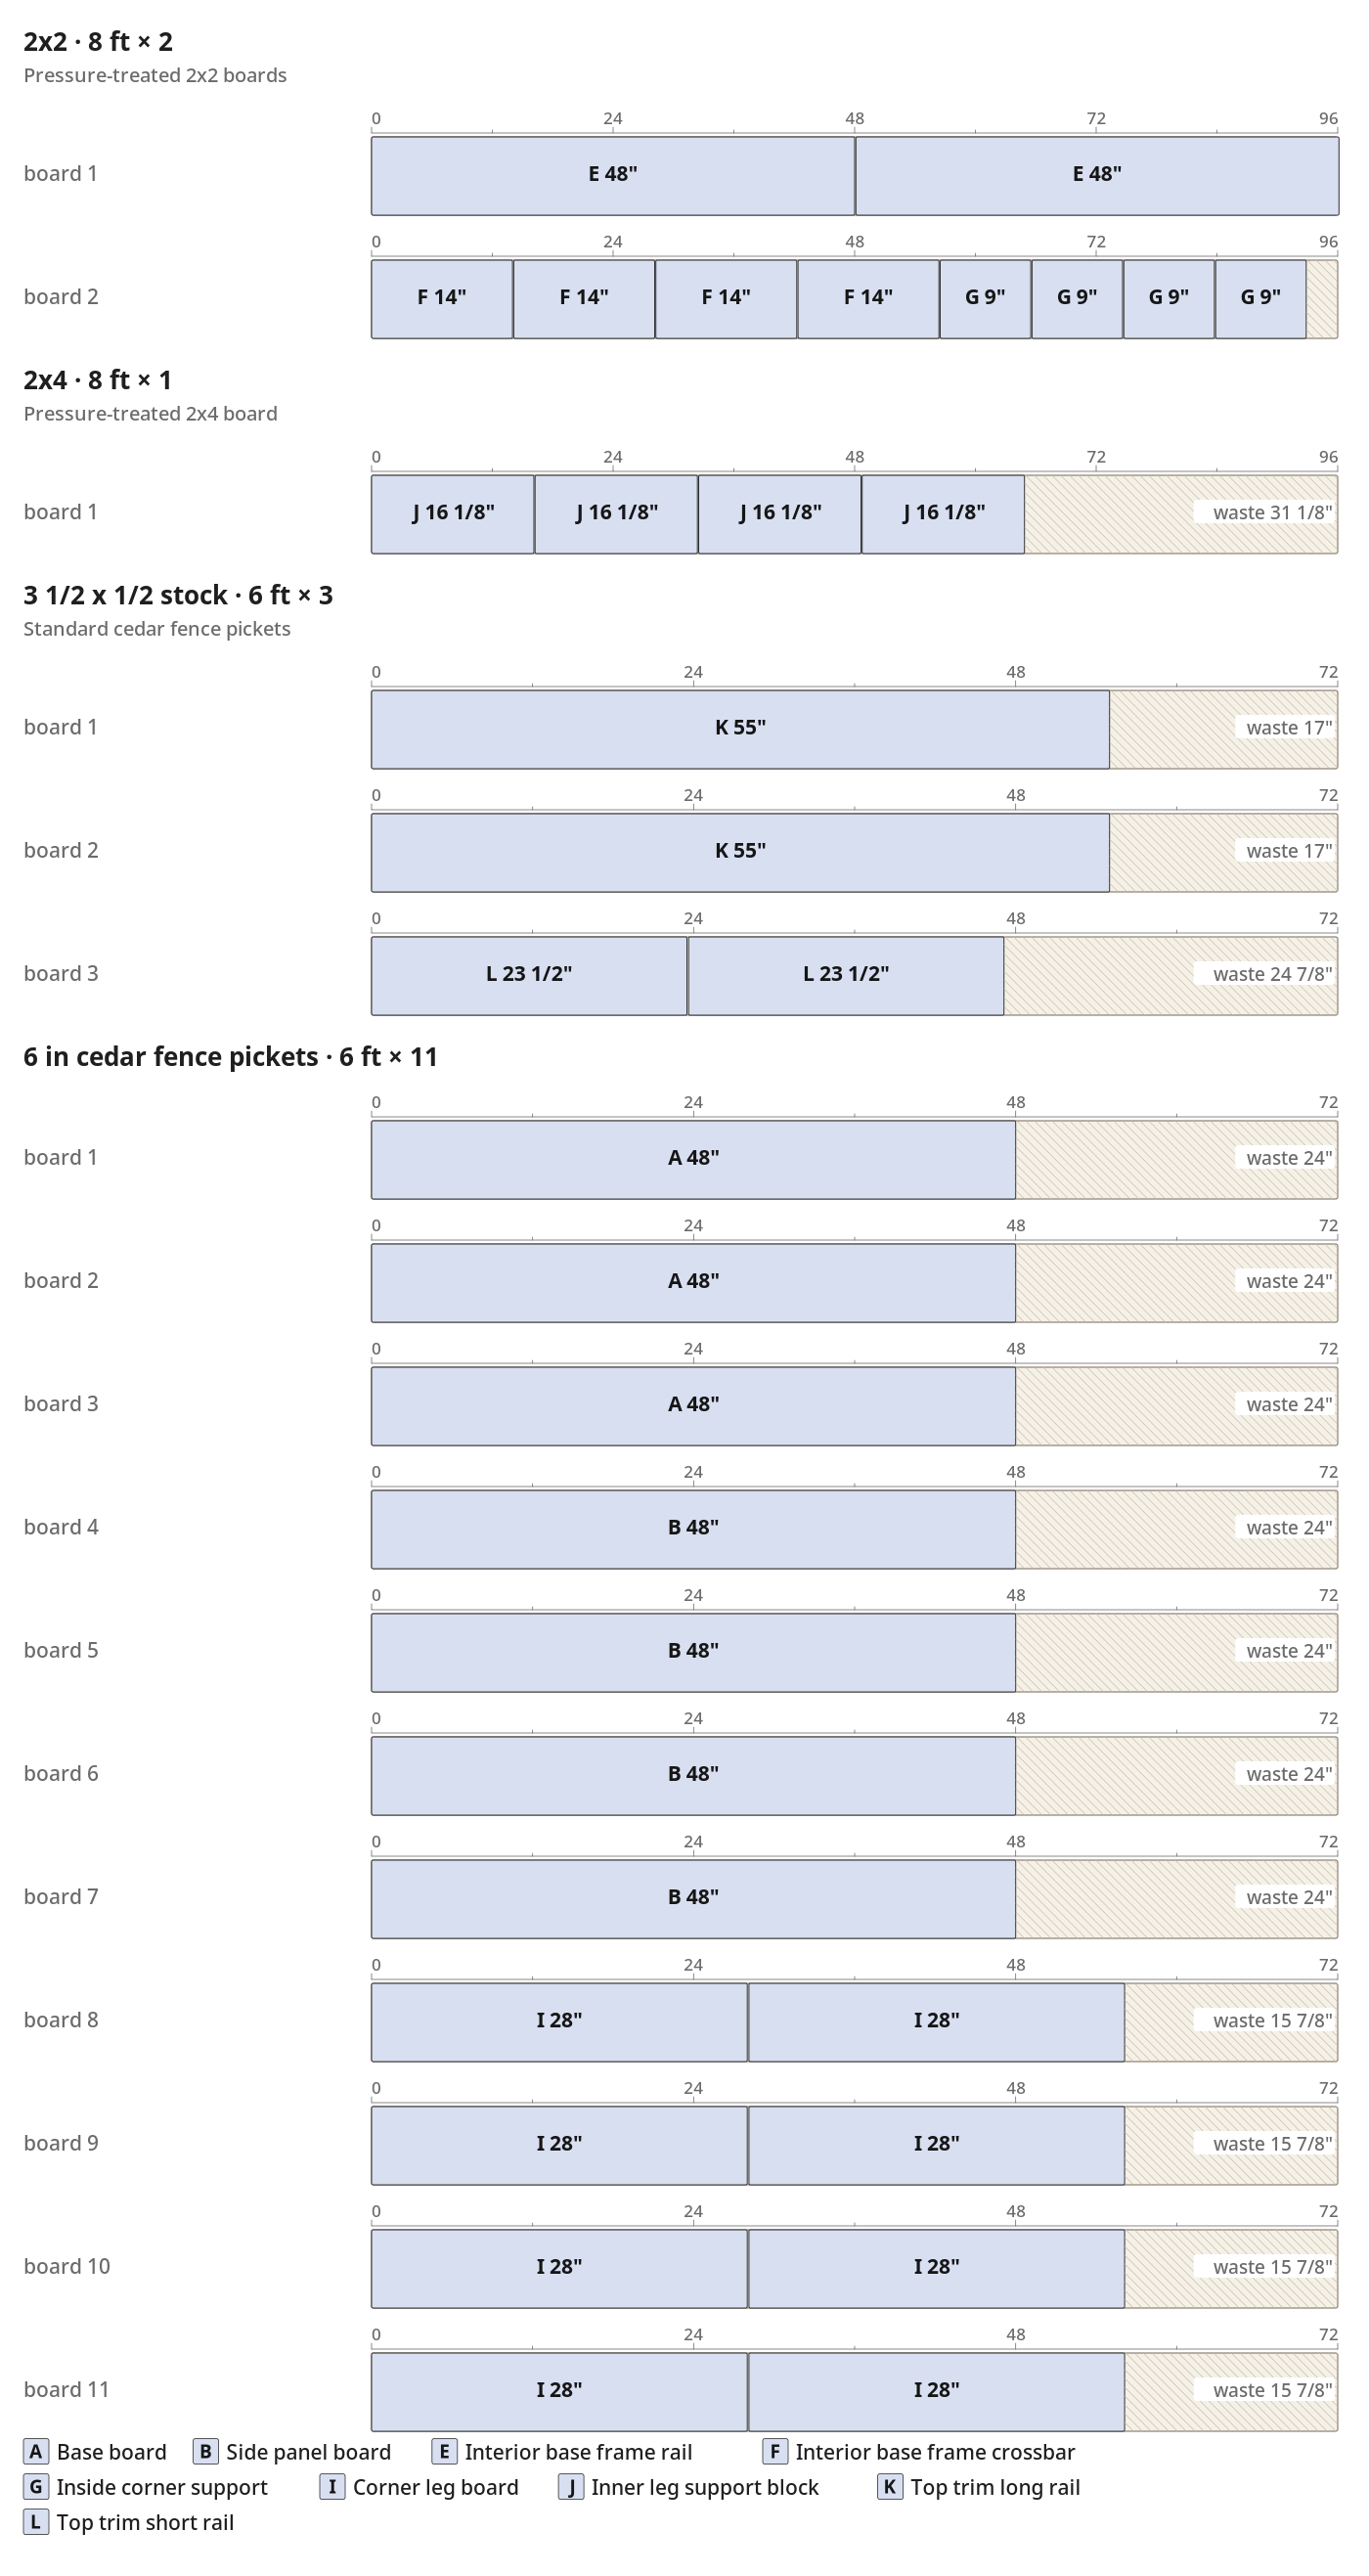
| A | Base board | x3 | 3/4" (T) × 6" (W) × 48" (L) | Save the ~24 in offcuts from these three pickets to cut the three 17-1/2 in base support cleats (Part C). |
| B | Side panel board | x4 | 3/4" (T) × 6" (W) × 48" (L) | Two boards per side panel. Save the four ~24 in offcuts to cut the 11-3/4 in side support cleats (Part D). |
| C | Base support cleat | x3 | 3/4" (T) × 6" (W) × 17 1/2" (L) | Cut from three of the saved 48 in picket offcuts; overhangs the 16-1/2 in wide base panel by 1/2 in on both sides and ends. |
| D | Side support cleat | x6 | 3/4" (T) × 6" (W) × 11 3/4" (H) | Cut the remaining four ~24 in picket offcuts in half to yield 8 pieces and use 6 (3 per side panel). Place dog-eared offcut ends on the outer ends of the panels where the corner legs will cover them. |
| E | Interior base frame rail | x2 | 1 1/2" (T) × 1 1/2" (W) × 48" (L) | Cut both 48 in rails from the first 8 ft pressure-treated 2x2. |
| F | Interior base frame crossbar | x4 | 1 1/2" (T) × 1 1/2" (W) × 14" (L) | Cut from the second 8 ft pressure-treated 2x2; save the remaining ~40 in length for the four inside corner supports (Part G). |
| G | Inside corner support | x4 | 1 1/2" (T) × 1 1/2" (W) × 9" (H) | Cut from the remaining ~40 in offcut of the second 2x2. Stand each piece in the inside corner on top of the 2x2 base rail and mark flush with the top edge of the side panel before cutting. |
| H | End panel board | x4 | 3/4" (T) × 6" (W) × 17 5/8" (L) | Cut all 4 boards (2 per end) from a single 6 ft picket; test-fit between the overhanging side cleats before gluing. |
| I | Corner leg board | x8 | 3/4" (T) × 6" (W) × 28" (H) | Cut 2 pieces from each of the remaining 4 pickets (8 pieces total). Two boards overlap at each corner to form 4 L-shaped legs. |
| J | Inner leg support block | x4 | 1 1/2" (T) × 3 1/2" (W) × 16 1/8" (H) | Measure inside each L-shaped leg from the underside of the box (base cleat) to the bottom of the 28 in leg and cut 4 blocks from the 8 ft 2x4. |
| K | Top trim long rail | x2 | 1/2" (T) × 3 1/2" (W) × 55" (L) | 45-degree miter both ends (48 in short point to short point to match the 48 in inside box length; 55 in long point to long point for 3-1/2 in wide pickets, or 54 in for 3 in wide pickets). Mark directly against the inside corners of the box. |
| L | Top trim short rail | x2 | 1/2" (T) × 3 1/2" (W) × 23 1/2" (L) | 45-degree miter both ends (16-1/2 in short point to short point to match the 16-1/2 in inside box width; 23-1/2 in long point to long point for 3-1/2 in wide pickets, or 22-1/2 in for 3 in wide pickets). Cut from the remaining picket lengths and mark directly against the installed long trim rails. |
What to buy
- Buy 2 × 2x2 8 ft (Pressure-treated 2x2 boards)
- Buy 1 × 2x4 8 ft (Pressure-treated 2x4 board)
- Buy 3 × 3 1/2 x 1/2 stock 6 ft (Standard cedar fence pickets)
- Buy 11 × 6 in cedar fence pickets 6 ft (6 in cedar fence pickets)
- Buy 13 × 6 in cedar fence pickets each (6 in cedar fence pickets)
Before you start
Lumber Selection
- Pick flat, dry 6-inch and 3-1/2-inch cedar pickets without cup or splits.
- Sight down the pressure-treated 2x2s and 2x4 to reject twisted stock.
- Check picket widths before cutting; nominal 6-inch pickets measure 5-1/2 inches.
Layout And Offcuts
- Label each board with its letter code right after cutting.
- Save the seven 48-inch picket offcuts for the cleats.
- Dry-fit end panels and mitered top trim before applying construction adhesive.
Step by step
Step 1: Cut and assemble the planter base
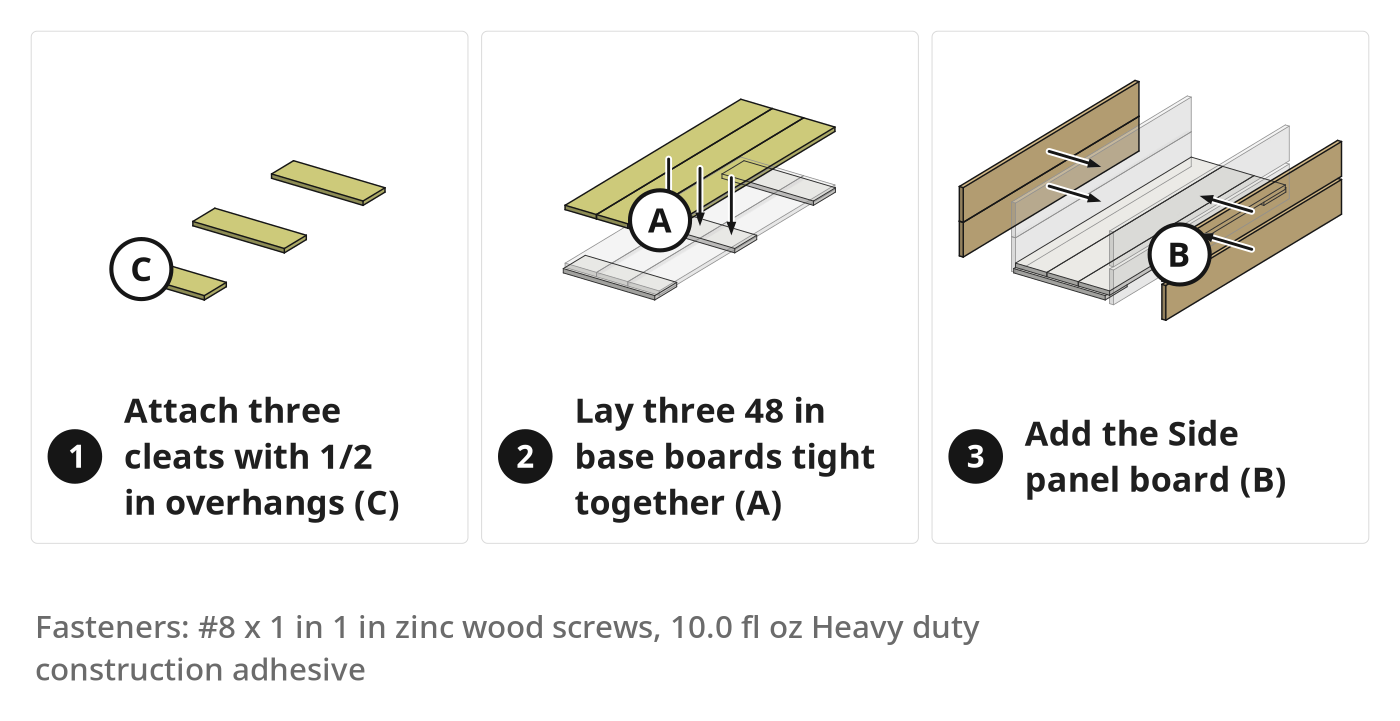
Build the three-board cedar base panel with three cross cleats.
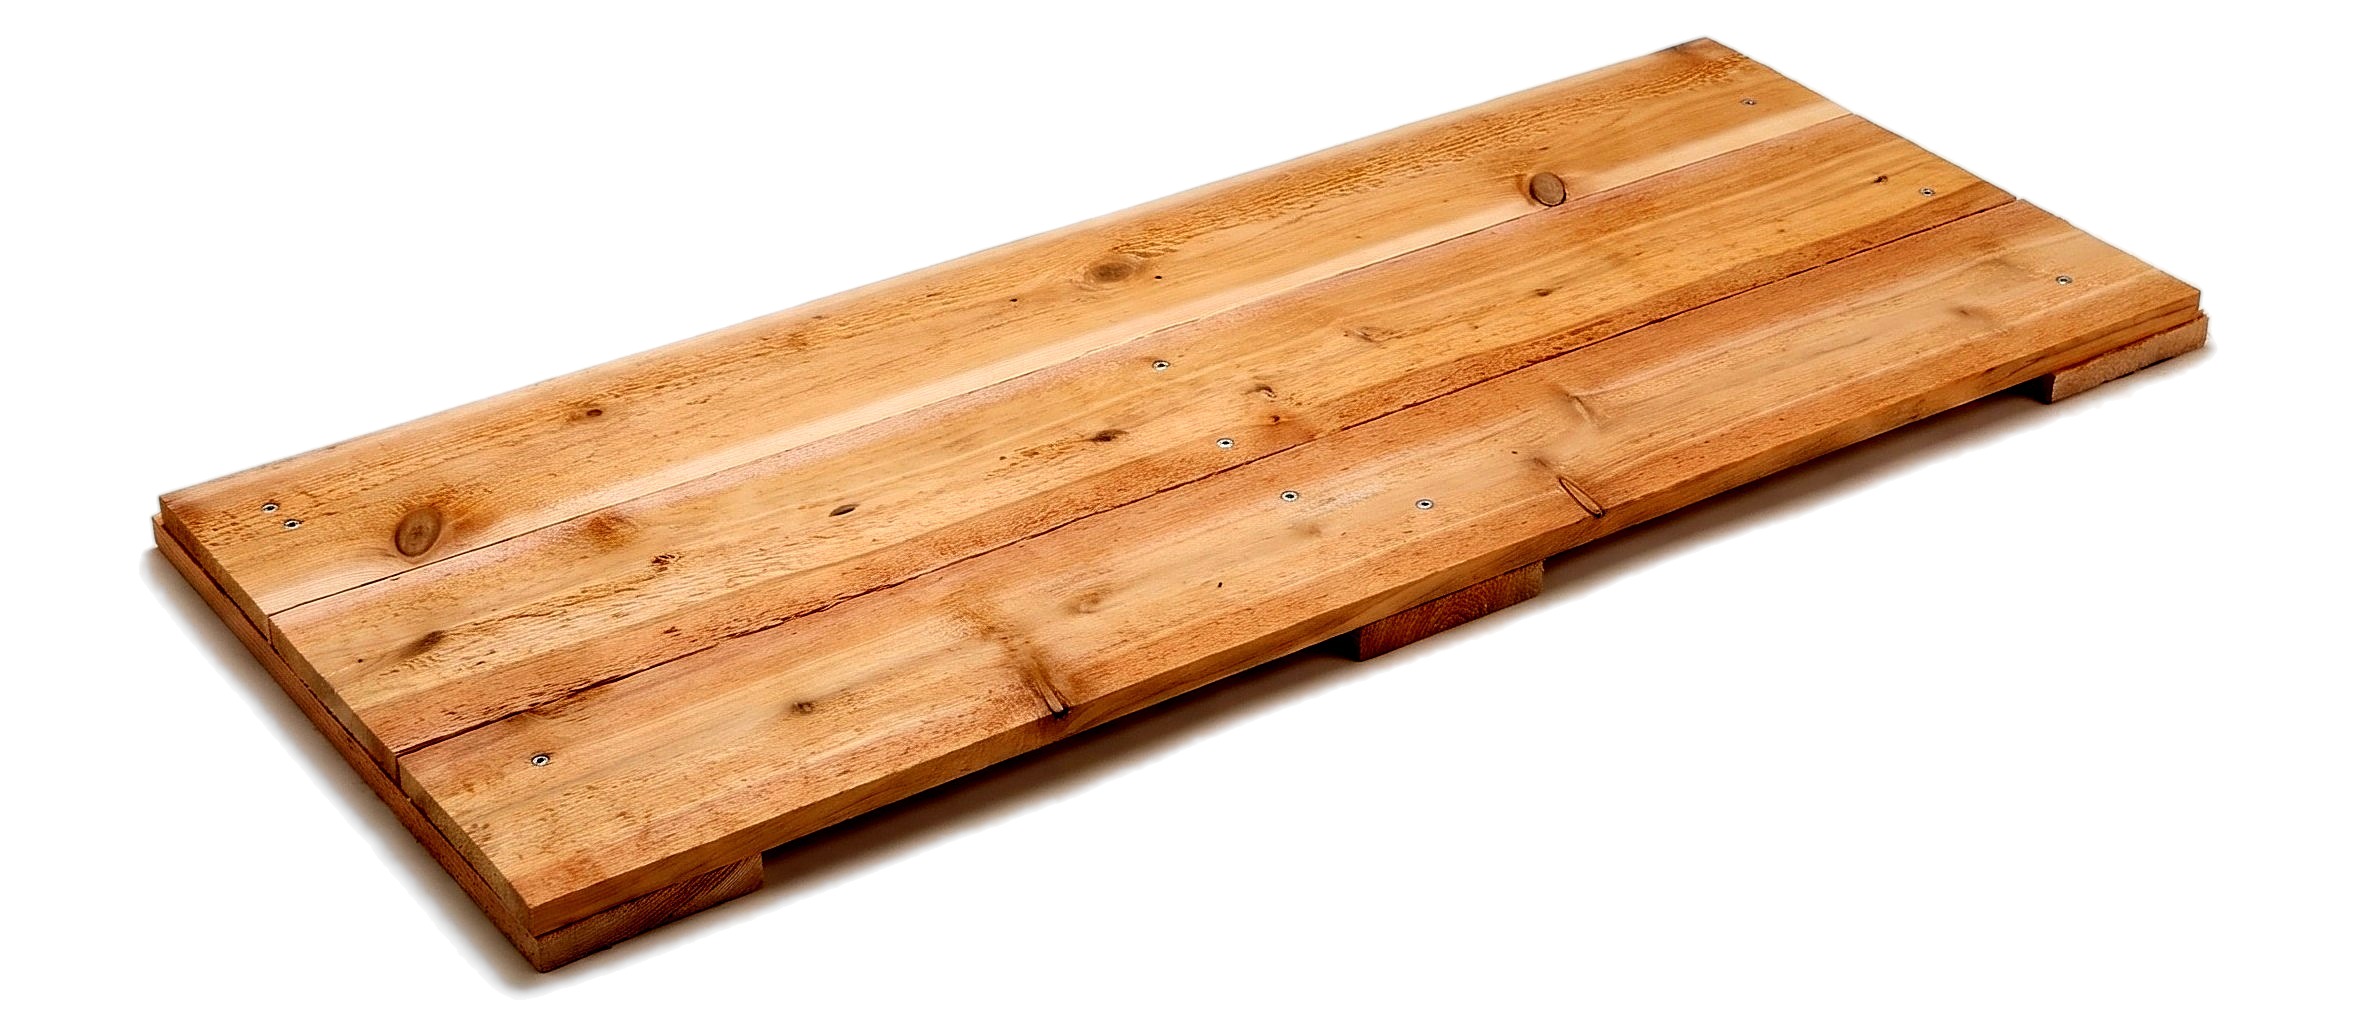
Parts in this step: (A) Base board, (B) Side panel board, (C) Base support cleat
You'll need: Miter saw, Tape measure, Rafter square, Pencil and marker, Caulking gun, Impact driver, 6 in cedar fence pickets, 1 in zinc wood screws, Heavy duty construction adhesive
- 1.1 Cut seven 6-inch cedar pickets to 48 inches
- Measure and mark seven 6-inch pickets to the estimated 48-inch length.
- Crosscut three base boards (A) and four side panel boards (B) on the miter saw.
- Set the four side panel boards (B) aside for Step 2.
- Save the seven 24-inch offcuts for the base and side cleats.
- 1.2 Cut three offcut cleats to 17-1/2 inches
- Push the three base boards (A) tight edge to edge.
- Measure their combined width, about 16-1/2 inches.
- Cut three offcuts to the estimated 17-1/2-inch length for base support cleats (C).
- Check each cleat exceeds the combined base width by 1 inch.
- 1.3 Mark and attach the center base cleat
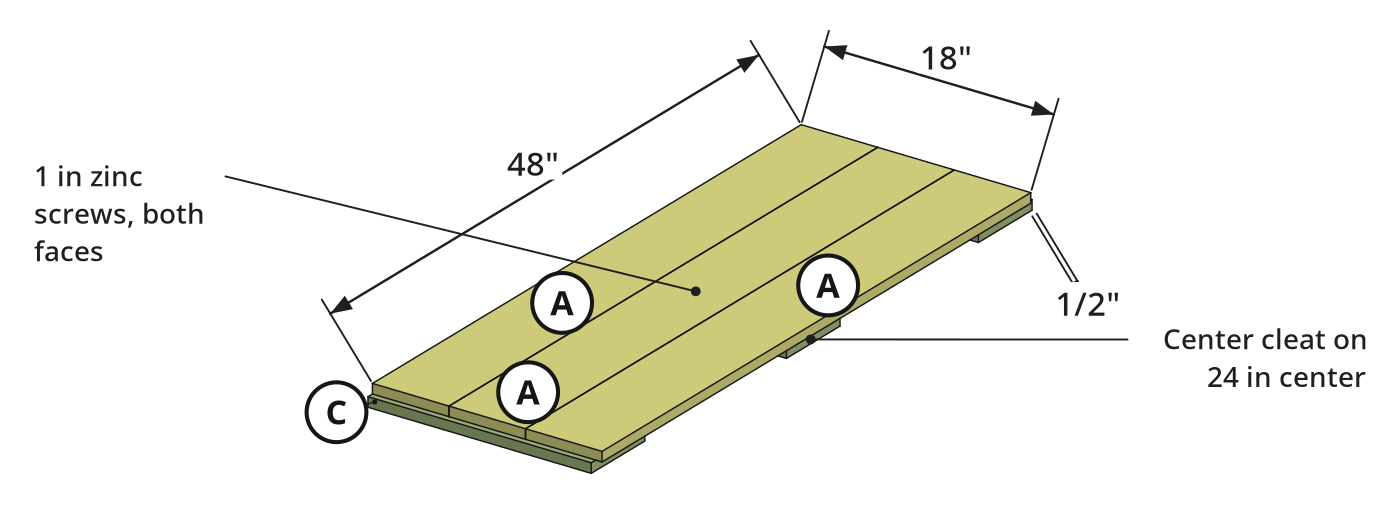
- Mark the 24-inch centerline across the three base boards (A).
- Mark the cleat edges 2-3/4 inches each side of center.
- Apply construction adhesive and set one base support cleat (C) with 1/2-inch side overhangs.
- Drive two 1-inch zinc screws per base board without countersinking.
- 1.4 Glue and screw the two end cleats with a 1/2-inch overhang
- Apply construction adhesive across both outer ends of base boards (A).
- Set the last two base support cleats (C) with 1/2-inch end and side overhangs.
- Keep screws off board edges; pre-drill if the cedar is dry.
- Drive two 1-inch zinc screws per cleat into each base board.
- 1.5 Flip the base and drive 1-inch screws from the opposite side
- Flip the base panel so the three base boards (A) face up.
- Align your driver with the three cleats (C) underneath.
- Drive two 1-inch zinc screws per board into each cleat below, sandwiching the joint.
Key measurements
- Base and side board length: 48 in along seven 6-inch cedar pickets
- Base cleat length: 17-1/2 in, overhanging the 16-1/2 in base 1/2 in per side
- Center cleat layout: 2-3/4 in each side of the 24 in centerline
- Base cleat overhang: 1/2 in past all four base edges
- Tip: Save the seven offcuts from the 48-inch cuts for base and side cleats.
- Tip: Do not countersink 1-inch screws, or they split or poke through the 1/2-inch cedar.
Before you move on: Check that a 1/2-inch cleat ledge overhangs the base sides and ends.
Step 2: Assemble the two side panels
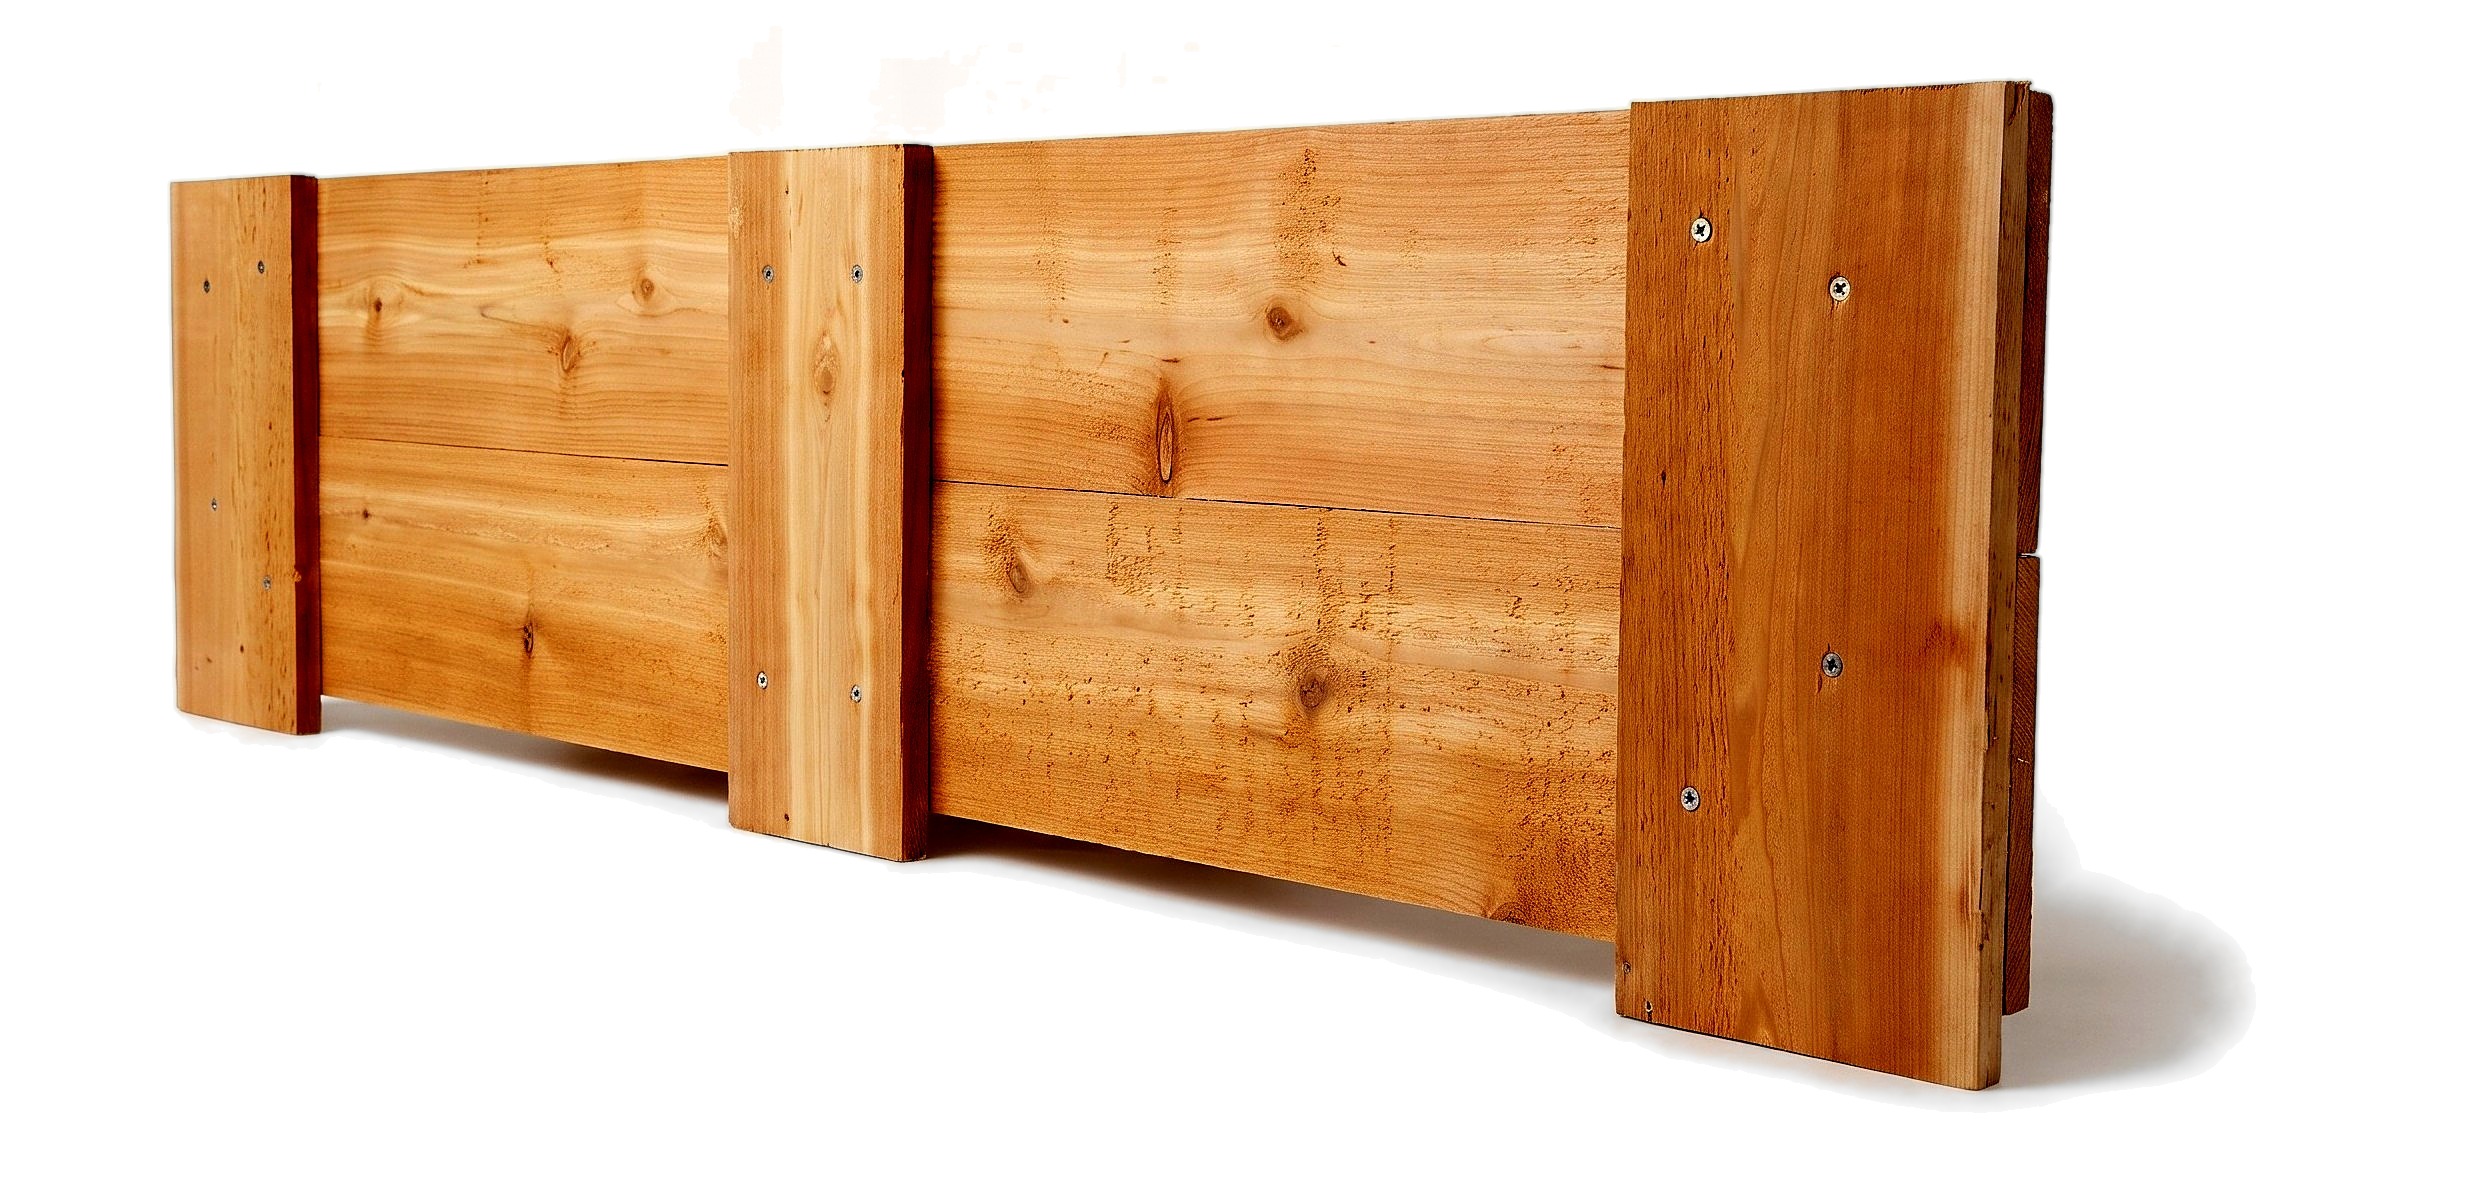
Build two 48-inch side panels with three vertical cleats each.
Parts in this step: (B) Side panel board, (D) Side support cleat
You'll need: Miter saw, Tape measure, Pencil and marker, Caulking gun, Impact driver, 6 in cedar fence pickets, 1 in zinc wood screws, Heavy duty construction adhesive
- 2.1 Cut the remaining picket offcuts to 11-3/4 inches
- Stack the last four picket offcuts against the miter saw fence.
- Cut the offcuts in half to the estimated 11-3/4-inch length to make eight pieces.
- Pick six pieces as side support cleats (D); set two extras aside.
- Save dog-eared cleats for the outer panel ends.
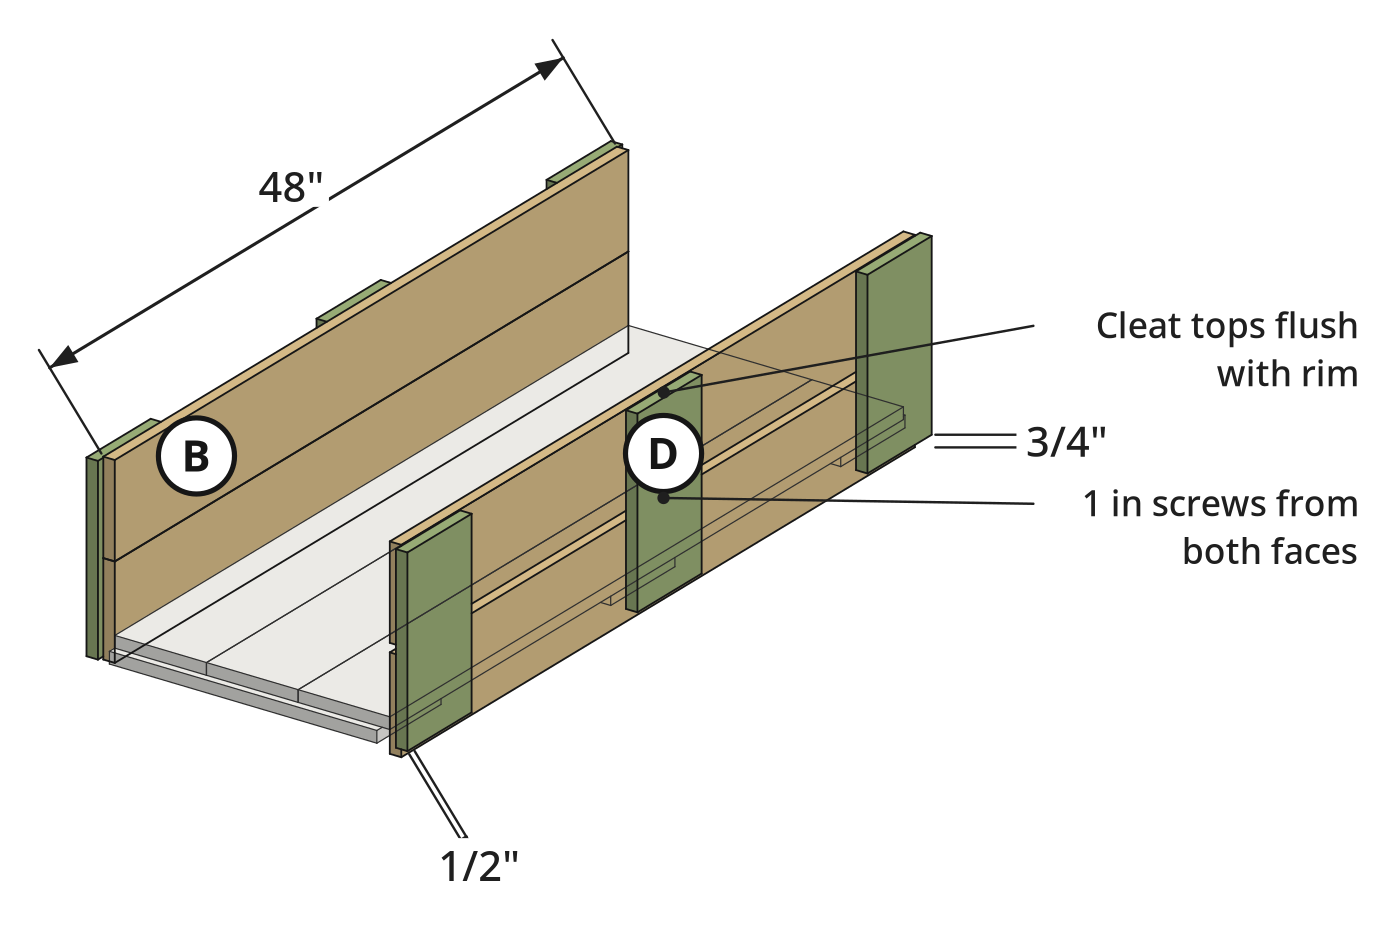
- 2.2 Glue and screw the cleats to the first side panel
- Lay two side panel boards (B) on the base to align cleats visually.
- Put dog-eared cleats at outer ends so corner legs hide them later.
- Set three side cleats (D) flush at the top with 1/2 inch end overhangs.
- Glue each cleat and drive two 1-inch zinc screws per board.
- 2.3 Flip the first side panel and assemble the second side panel
- Flip the first panel and drive 1-inch zinc screws from the inside into the cleats.
- Lay out the last two side boards (B) and three side cleats (D).
- Glue and screw the second panel from both faces to match.
Key measurements
- Side cleat length: 11-3/4 in from the remaining picket offcuts
- Top edge alignment: 0 in overhang, flush with the top rim
- Bottom cleat overhang: 3/4 in past the 11 in side panel bottom
- End cleat overhang: 1/2 in past both side panel ends
- Tip: Center the middle cleat visually against the base panel below, without re-measuring.
Before you move on: Check side cleats sit flush with the panel tops so the top trim sits flat.
Step 3: Build and attach the 2x2 interior base frame
Build the pressure-treated 2x2 ladder frame and fasten it inside the base panel.
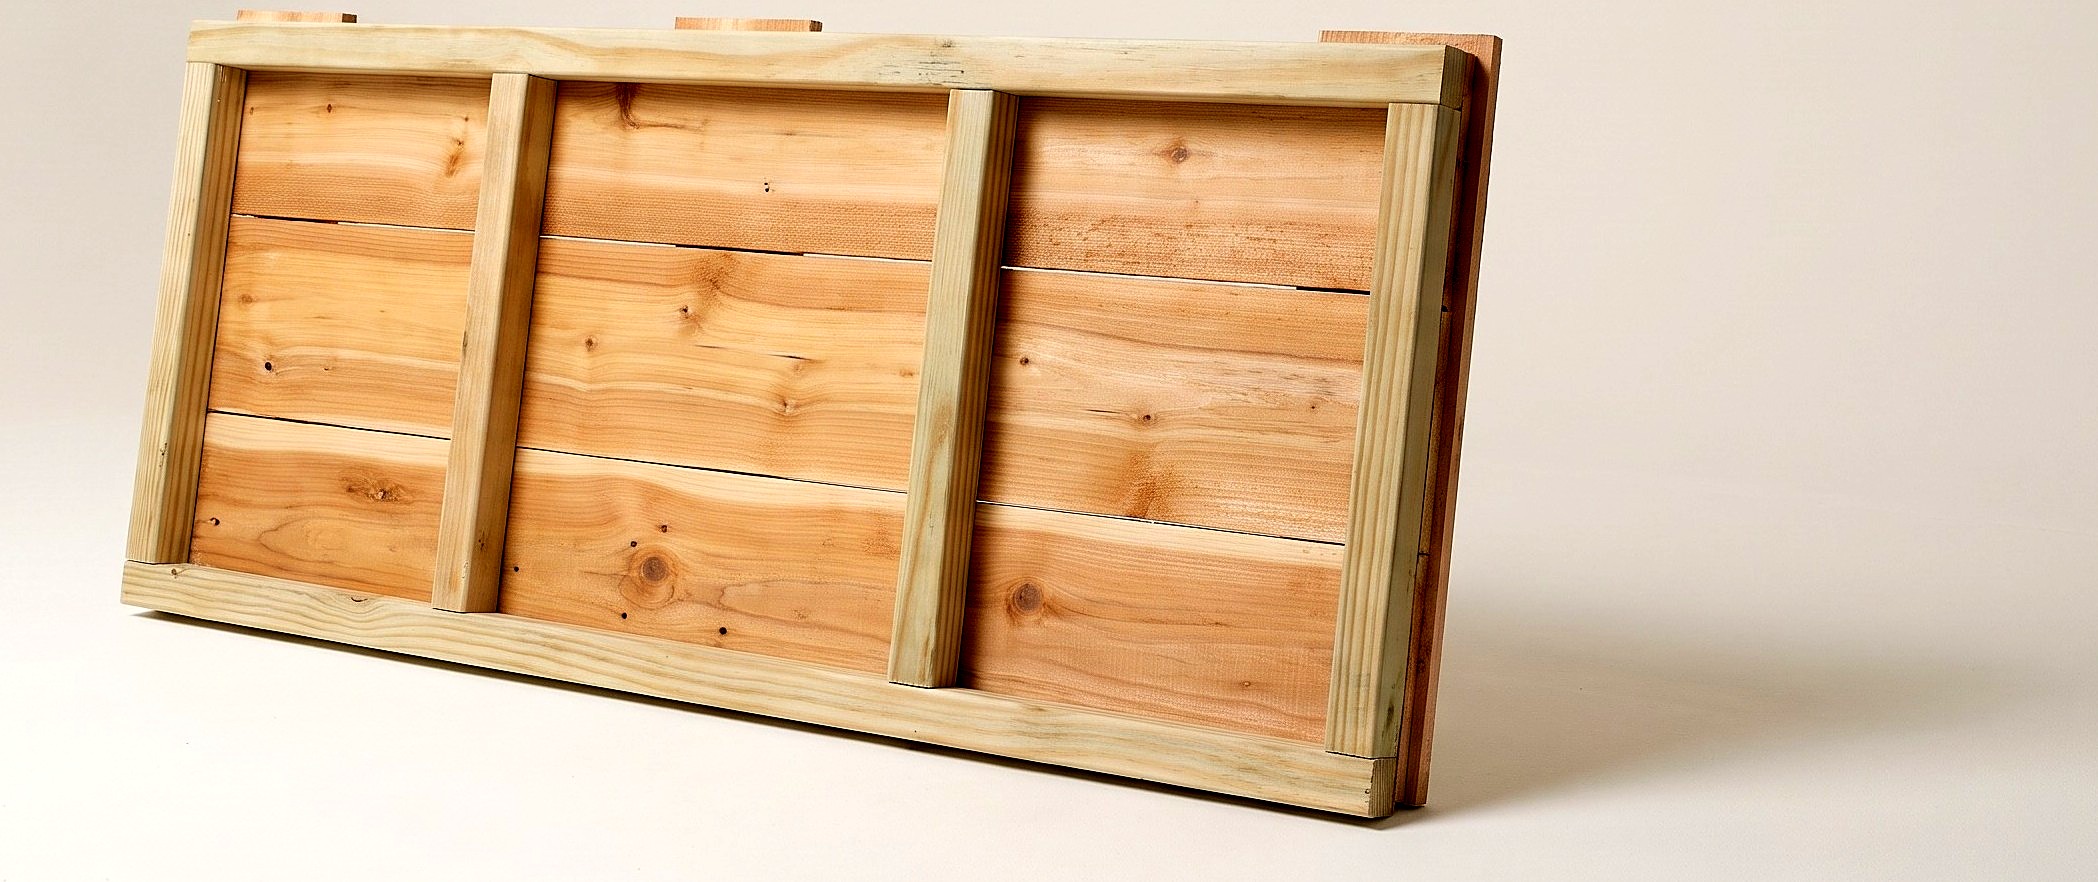
Parts in this step: (A) Base board, (C) Base support cleat, (E) Interior base frame rail, (F) Interior base frame crossbar
You'll need: Miter saw, Tape measure, Rafter square, Pencil and marker, Cordless drill/driver, 9/64 in drill bit, Caulking gun, Impact driver, Pressure-treated 2x2 boards, 2 in exterior screws, 1 in zinc wood screws, Heavy duty construction adhesive
- 3.1 Cut the 2x2 rails and crossbars
- Cut one pressure-treated 2x2 into two estimated 48-inch base rails (E).
- Cut four estimated 14-inch base crossbars (F) from the second pressure-treated 2x2.
- Save the remaining 40-inch 2x2 piece for Step 5 corner supports.
- 3.2 Pre-drill and screw the 2x2 ladder frame together
- Lay the two base rails (E) and four crossbars (F) on the base panel.
- Set two crossbars flush at the rail ends; space two evenly between.
- Pre-drill the rails at each joint with the 9/64-inch drill bit.
- Drive 2-inch exterior screws through the rails into each crossbar end.
- 3.3 Glue and screw the base panel onto the 2x2 frame
- Apply construction adhesive to the top of the 2x2 frame.
- Set the base boards' (A) flat inside face on the frame, cleats (C) up.
- Pre-drill and drive 2-inch exterior screws through double-thick cleats into the 2x2 frame.
- Drive 1-inch zinc screws through single-layer base boards into the 2x2 frame.
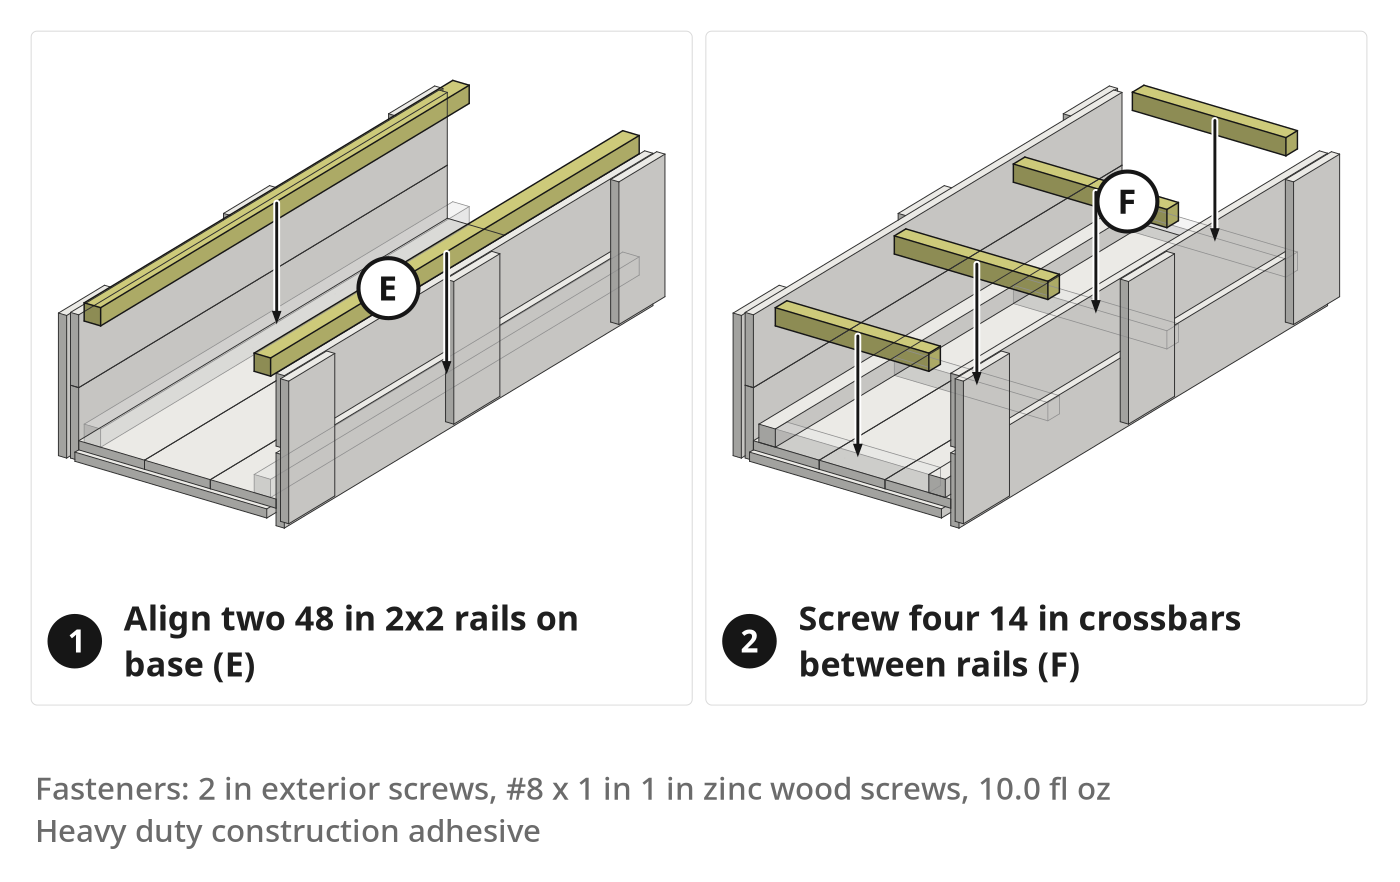
Key measurements
- Frame rail length: 48 in, matching the base panel
- Frame crossbar length: 14 in, fitting between the two 1-1/2 in rails
- Tip: Hold a rafter square on the panel edge to project hidden 2x2 crossbars across the center cleat before screwing.
- Heads up: Never attach the 2x2 frame to the cleated base underside; it sits on the flat inside face.
Before you move on: Align the 2x2 frame flush with the three base boards' outer edges, leaving 1/2-inch cleat ledges exposed.
Step 4: Attach the side panels to the base
Mount both side panels on the base cleat ledges and secure to the 2x2 frame.
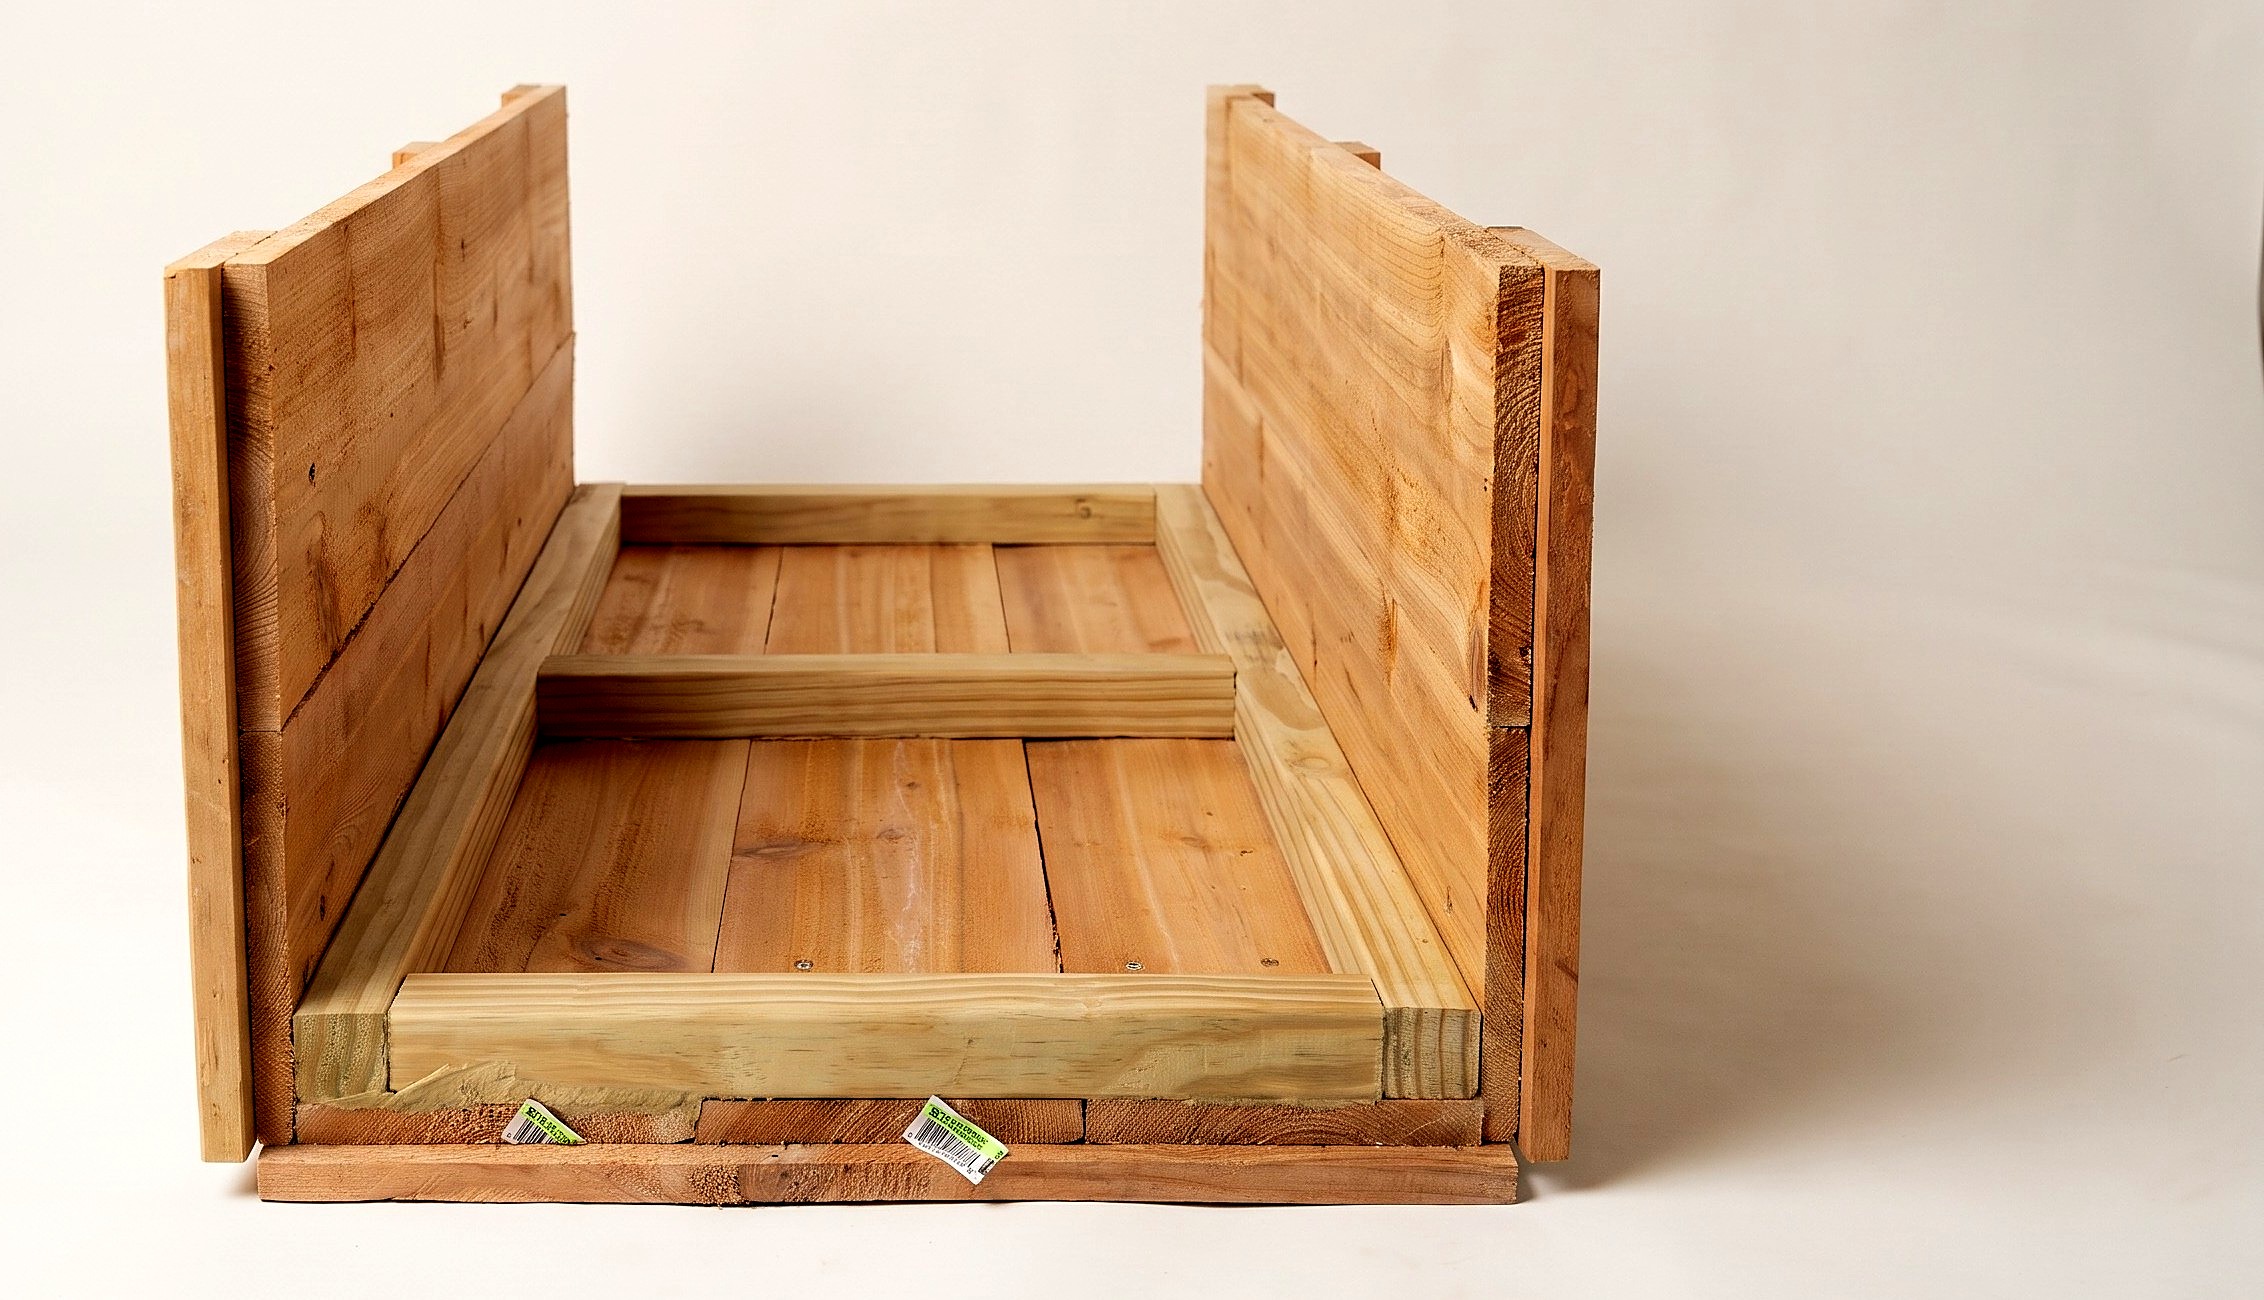
Parts in this step: (B) Side panel board, (D) Side support cleat, (E) Interior base frame rail
You'll need: Cordless drill/driver, 9/64 in drill bit, Caulking gun, Impact driver, 2 in exterior screws, Heavy duty construction adhesive
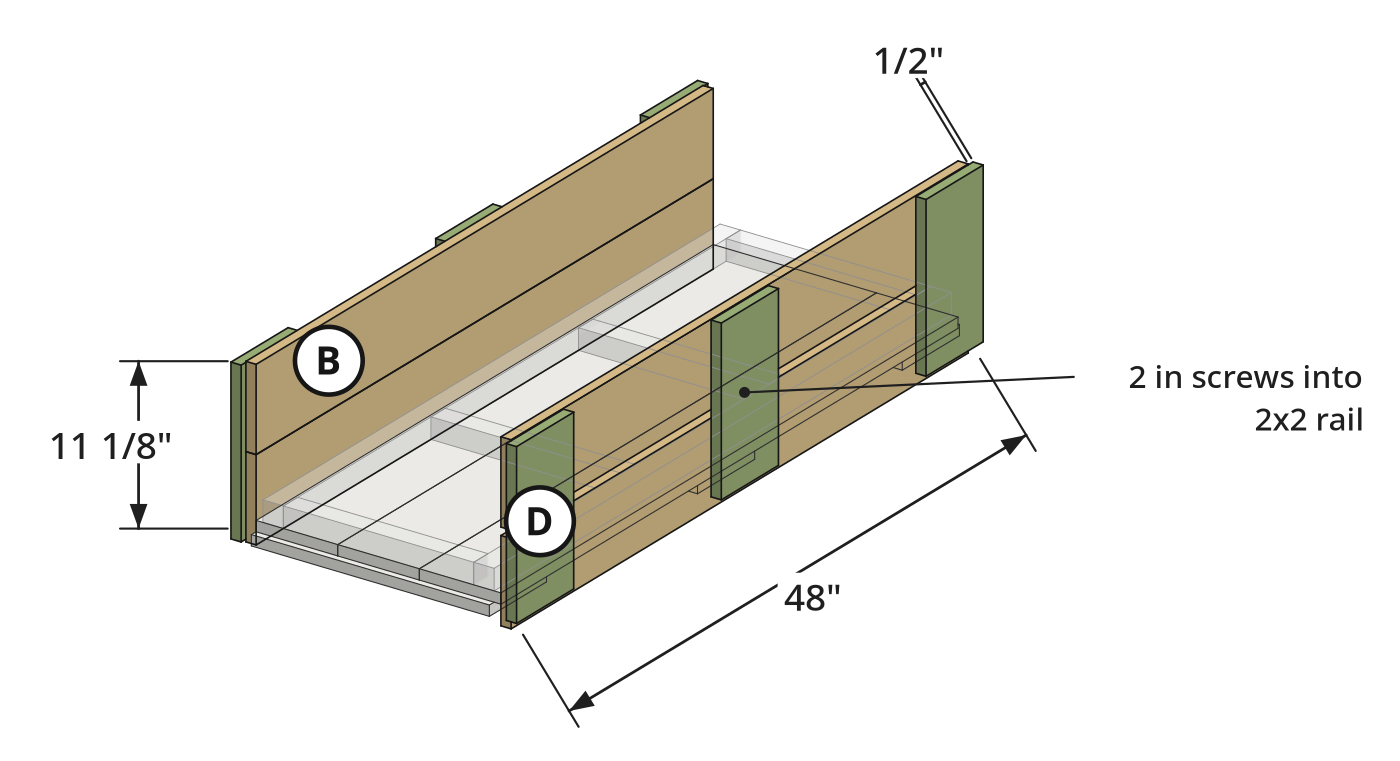
- 4.1 Glue and screw the first side panel to the base frame
- Flip the base: 2x2 rails (E) up, cleats down.
- Apply construction adhesive on the first 2x2 rail's outer edge and side cleats (D).
- Rest the first side panel (B, D) on the 1/2-inch base cleat ledge, ends flush.
- Pre-drill the side cleats (D) and drive 2-inch exterior screws into the 2x2 rail (E).
- 4.2 Glue and screw the second side panel to the base frame
- Apply construction adhesive on the opposite 2x2 rail (E) and second cleats (D).
- Set the second side panel (B, D) on the opposite 1/2-inch cleat ledge.
- Flush the panel ends with the base boards and pre-drill the outer cedar layer.
- Tack the panel with one 2-inch exterior screw, then drive the rest into the rail.
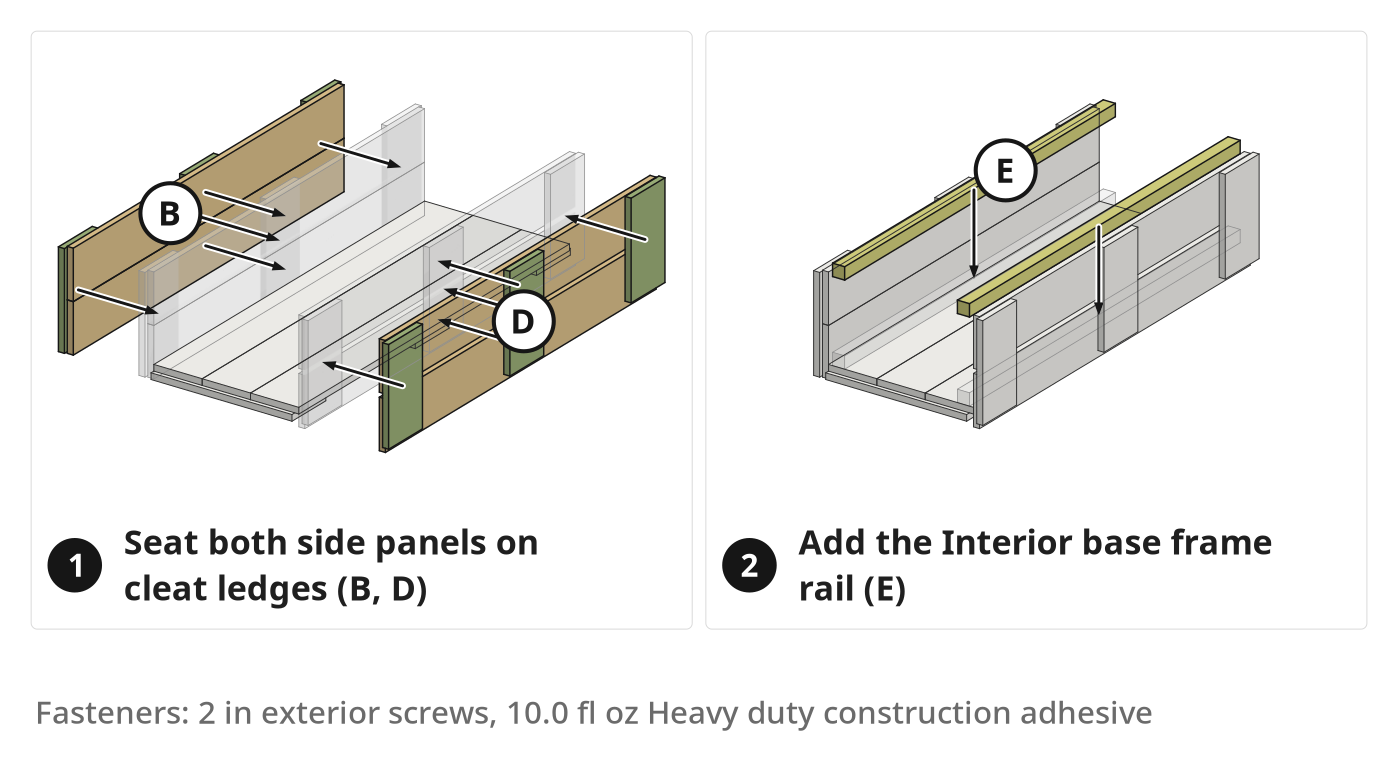
Key measurements
- Side support ledge: 1/2 in base cleat overhang under each side panel bottom
- Tip: Only drive 2-inch screws where cleats overlap side boards, so tips never poke through the inner 2x2 rail.
Before you move on: Check both side panels sit flat on the cleat ledges, long boards flush with the base ends.
Step 5: Install the 2x2 inside corner supports
Cut and install four vertical 2x2 inside corner posts.
Parts in this step: (G) Inside corner support
You'll need: Miter saw, Pencil and marker, Cordless drill/driver, 9/64 in drill bit, Caulking gun, Impact driver, Pressure-treated 2x2 boards, 2 in exterior screws, Heavy duty construction adhesive
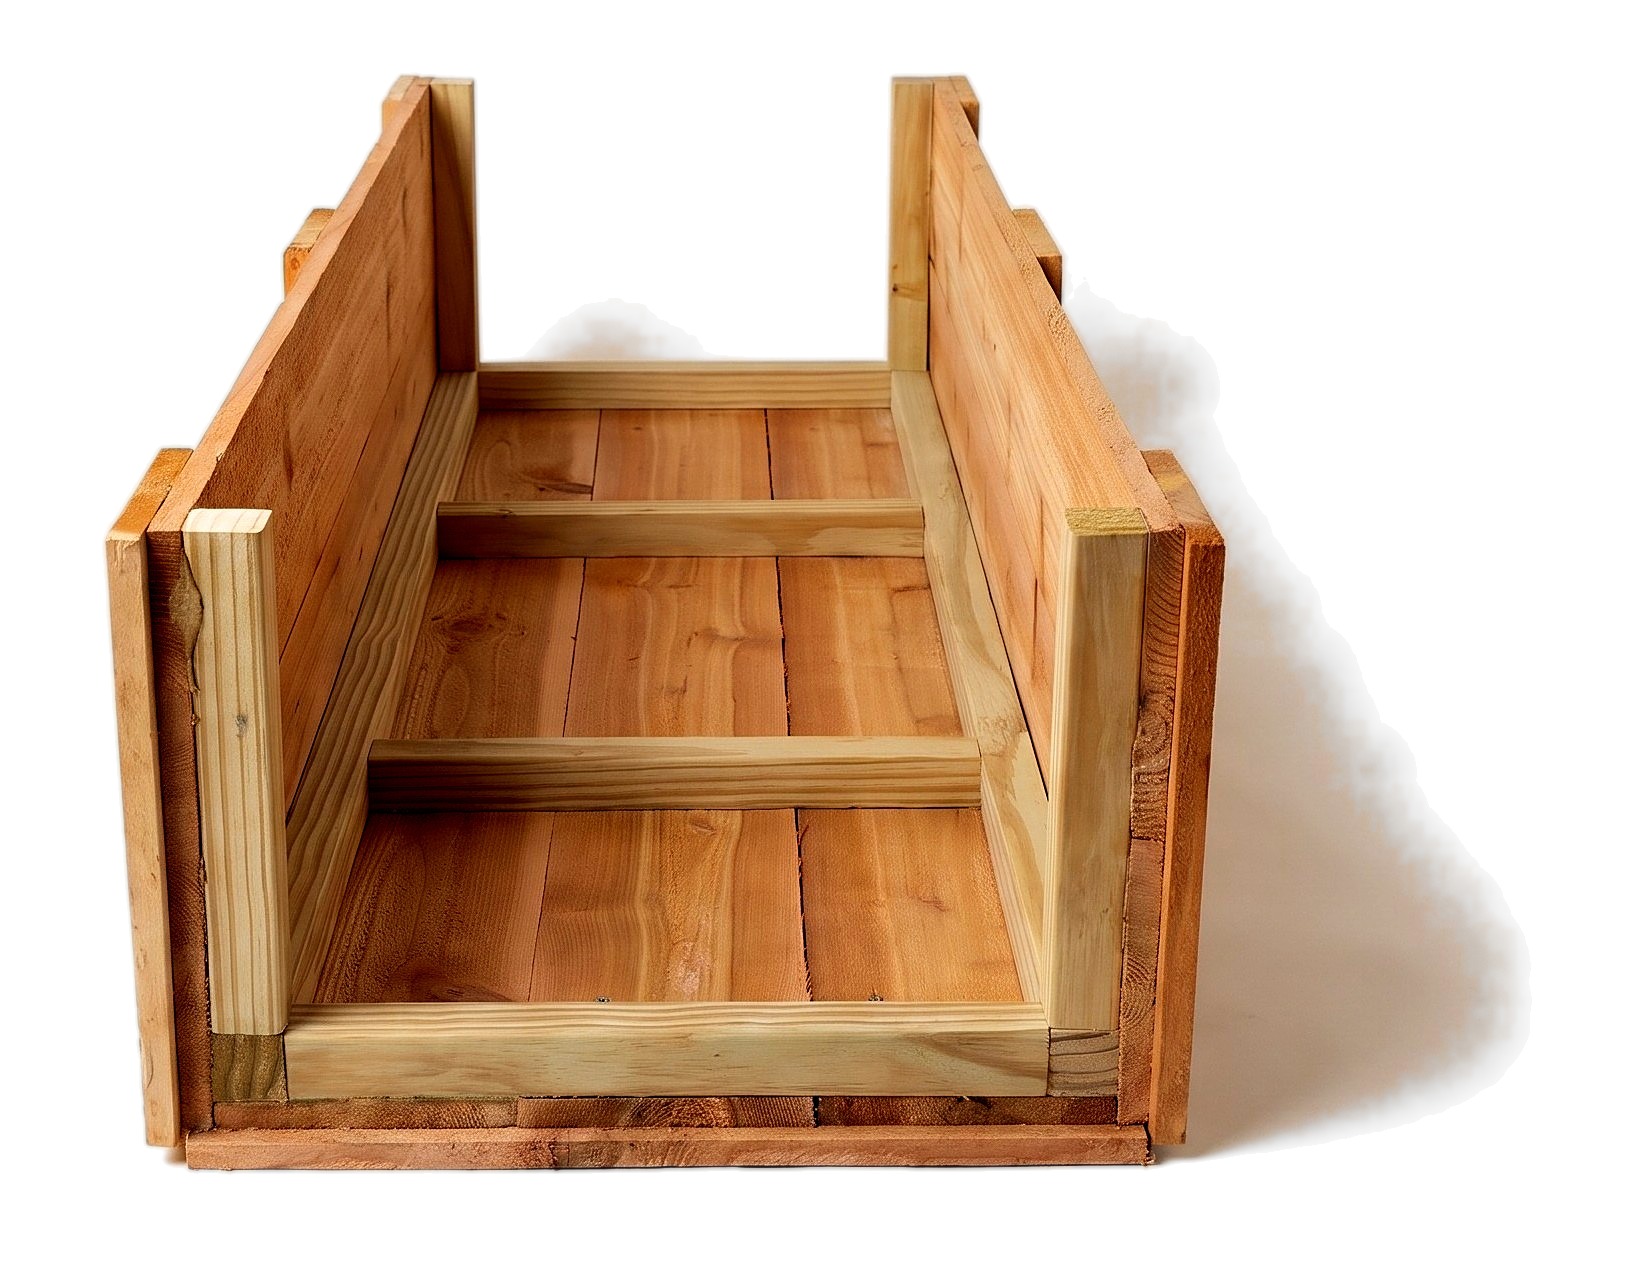
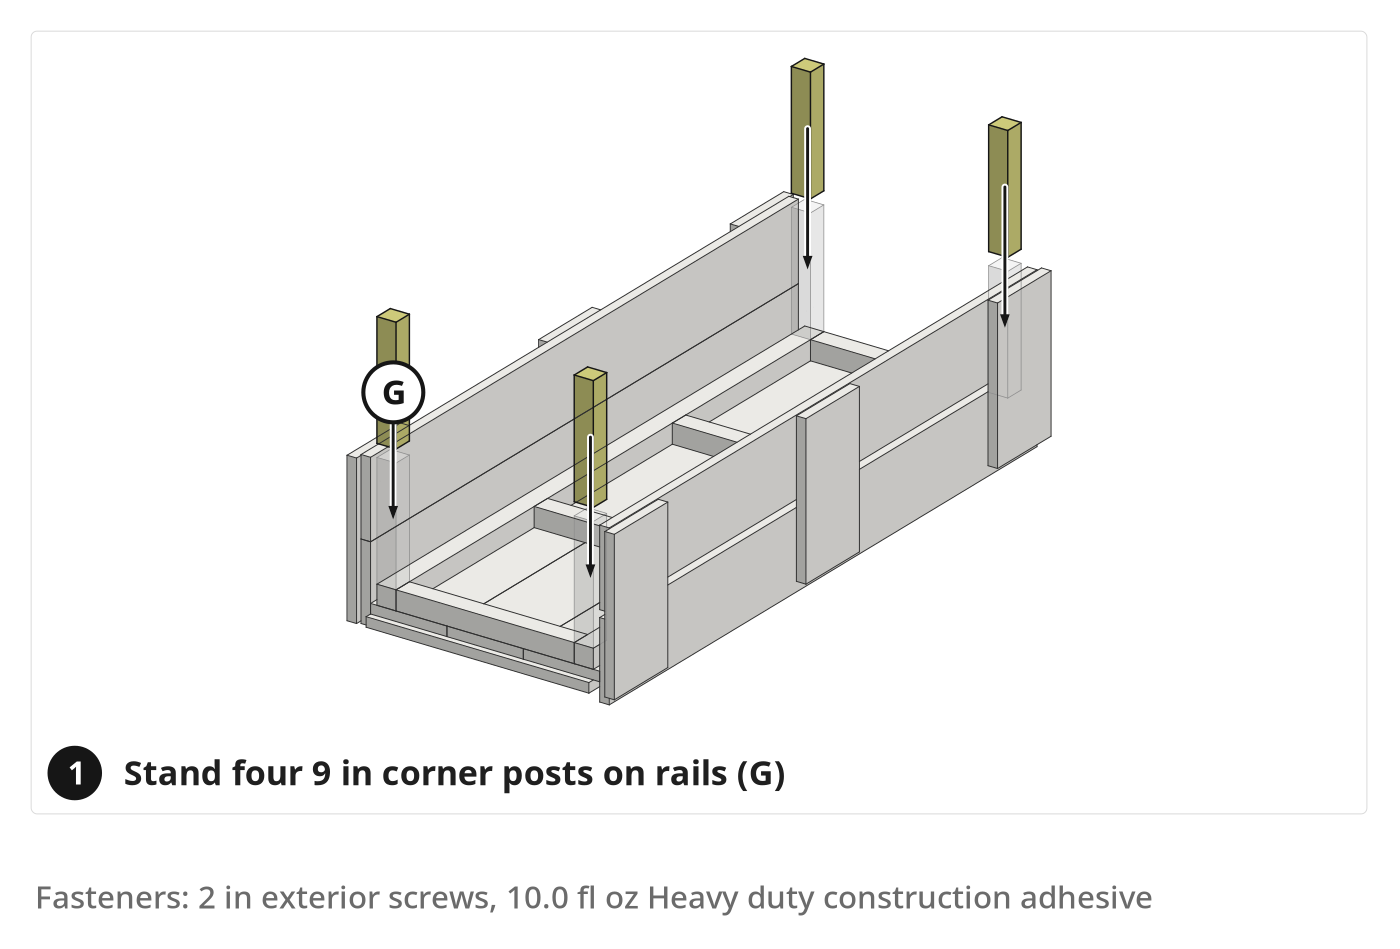
- 5.1 Mark, cut, and install the first corner 2x2 support
- Stand the leftover pressure-treated 2x2 on the first inside corner's base rail.
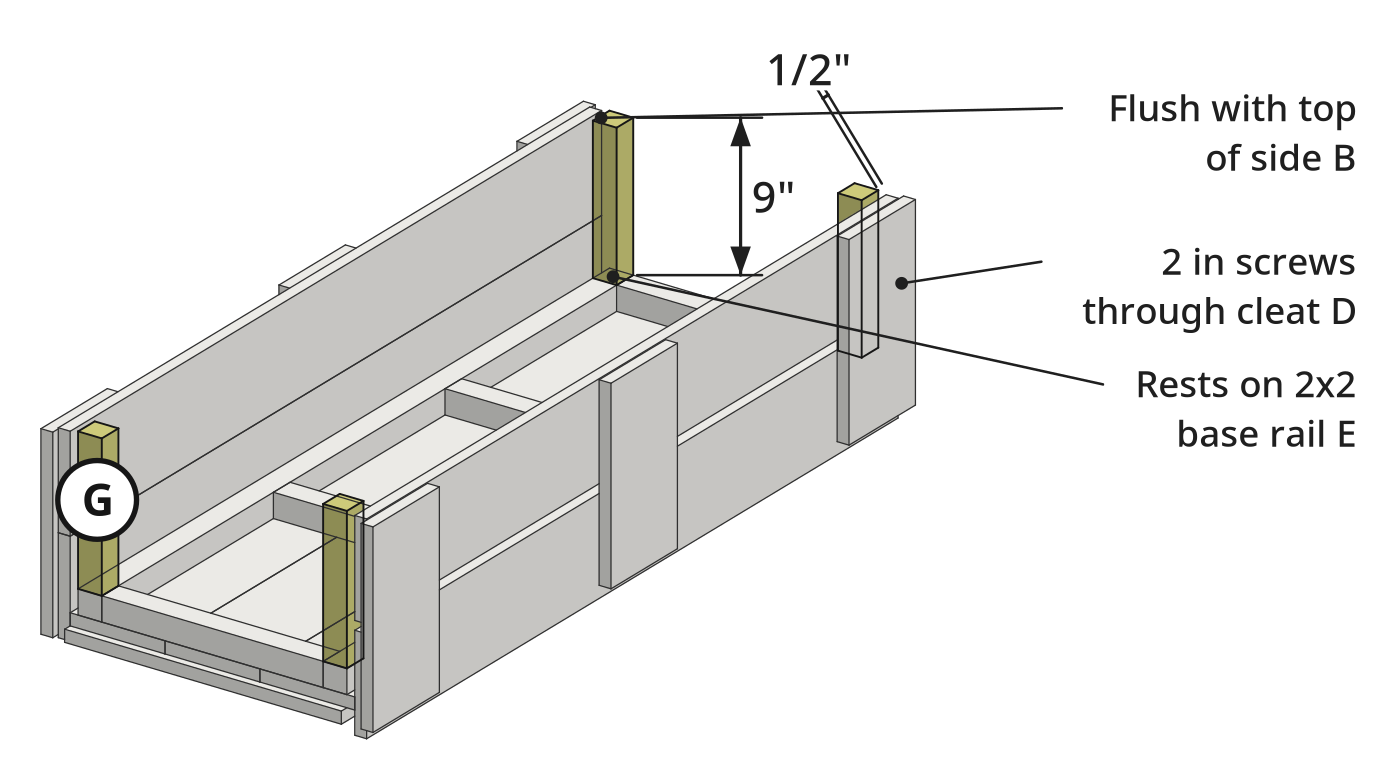
- Mark the post flush with the side panel top (derived at 9 inches).
- Cut the first inside corner support (G) on the miter saw; apply construction adhesive.
- Flush the post with the side board end, pre-drill from outside, and drive 2-inch screws.
- 5.2 Cut and install the remaining three inside corner supports
- Hold the remaining 2x2 in the other three corners and mark flush with the top.
- Cut the remaining three corner supports (G) on the miter saw.
- Glue and clamp or hold each post flush with the side board ends.
- Pre-drill from outside through the end cleats; drive 2-inch exterior screws into each post.
Key measurements
- Corner post height: 9 in (derived; mark directly in place flush with the top rim)
- Tip: Mark each corner support against the box, not with a tape measure.
Before you move on: Verify all four 2x2 corner posts sit flush with the top edge of the side panels and the ends of the side boards.
Step 6: Cut and attach the end panels
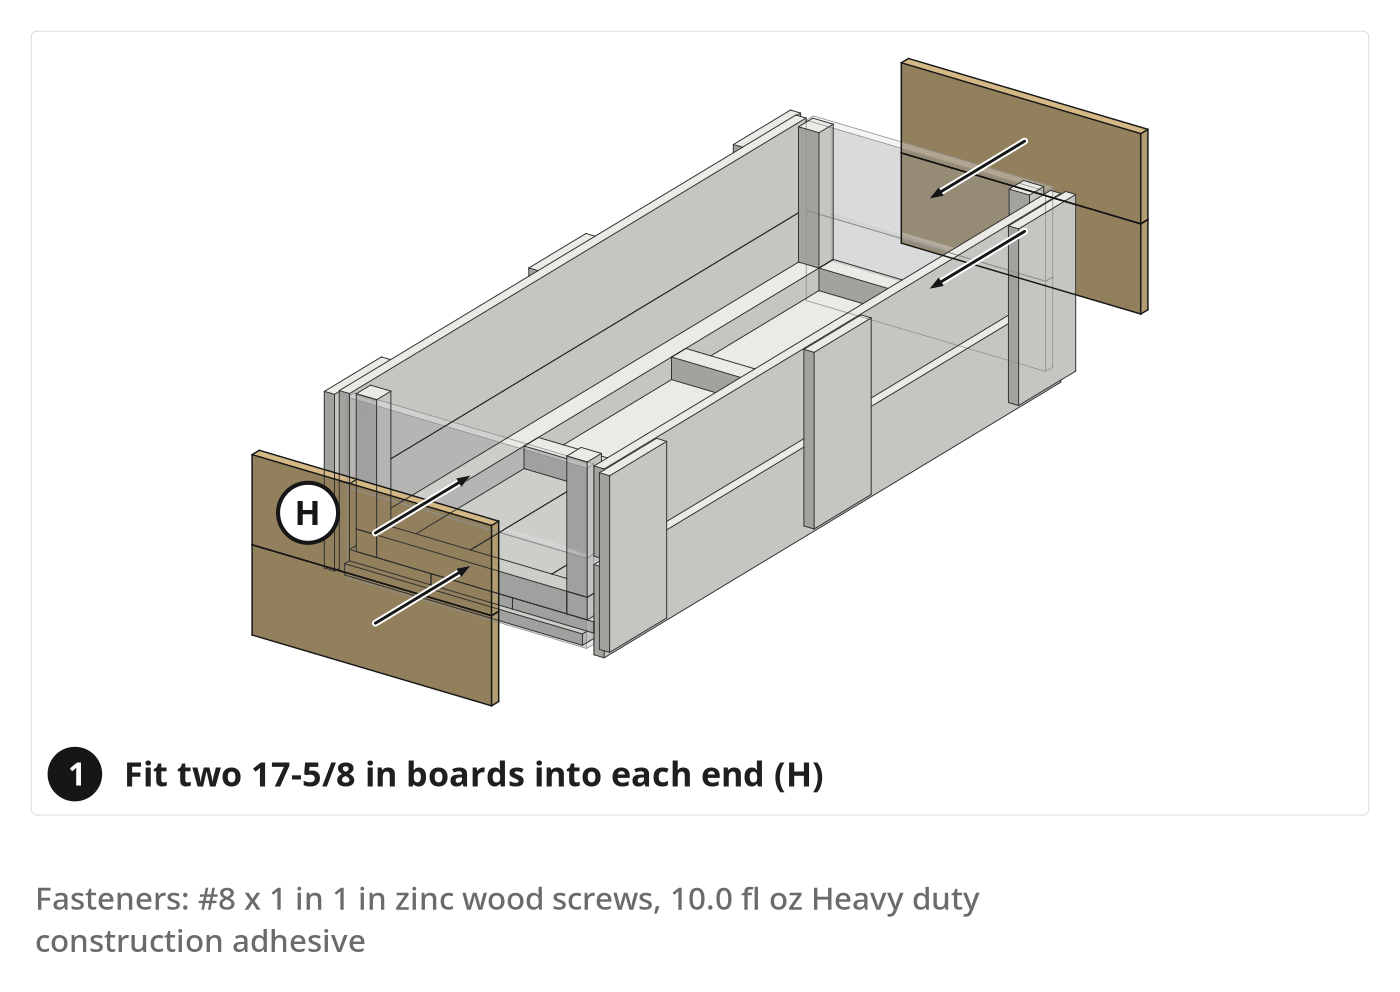
Enclose both ends of the planter box between the overhanging side cleats.
Parts in this step: (H) End panel board
You'll need: Miter saw, Tape measure, Rafter square, Pencil and marker, Caulking gun, Impact driver, 6 in cedar fence pickets, 1 in zinc wood screws, Heavy duty construction adhesive
- 6.1 Cut four 17-5/8-inch end boards from one 6-inch picket
- Measure and mark one 6-inch cedar picket into four estimated 17-5/8-inch sections.
- Square the cut lines with a rafter square.
- Crosscut all four end panel boards (H) on the miter saw.
- 6.2 Test-fit, glue, and screw the first end panel
- Dry-fit two end panel boards (H) into one end between the overhanging side cleats.
- Apply construction adhesive to the 2x2 corner posts, bottom crossbar, and inside cleat faces.
- Press the two end panel boards (H) tightly against the 2x2 corner posts.
- Drive one 1-inch zinc screw per board end into the 2x2 corner posts.
- 6.3 Glue and screw the second end panel
- Dry-fit the remaining two end panel boards (H) into the opposite end of the box.
- Apply construction adhesive to corner posts, bottom frame, and overhanging cleat faces.
- Seat both boards flush with the top rim; drive one 1-inch zinc screw per end.
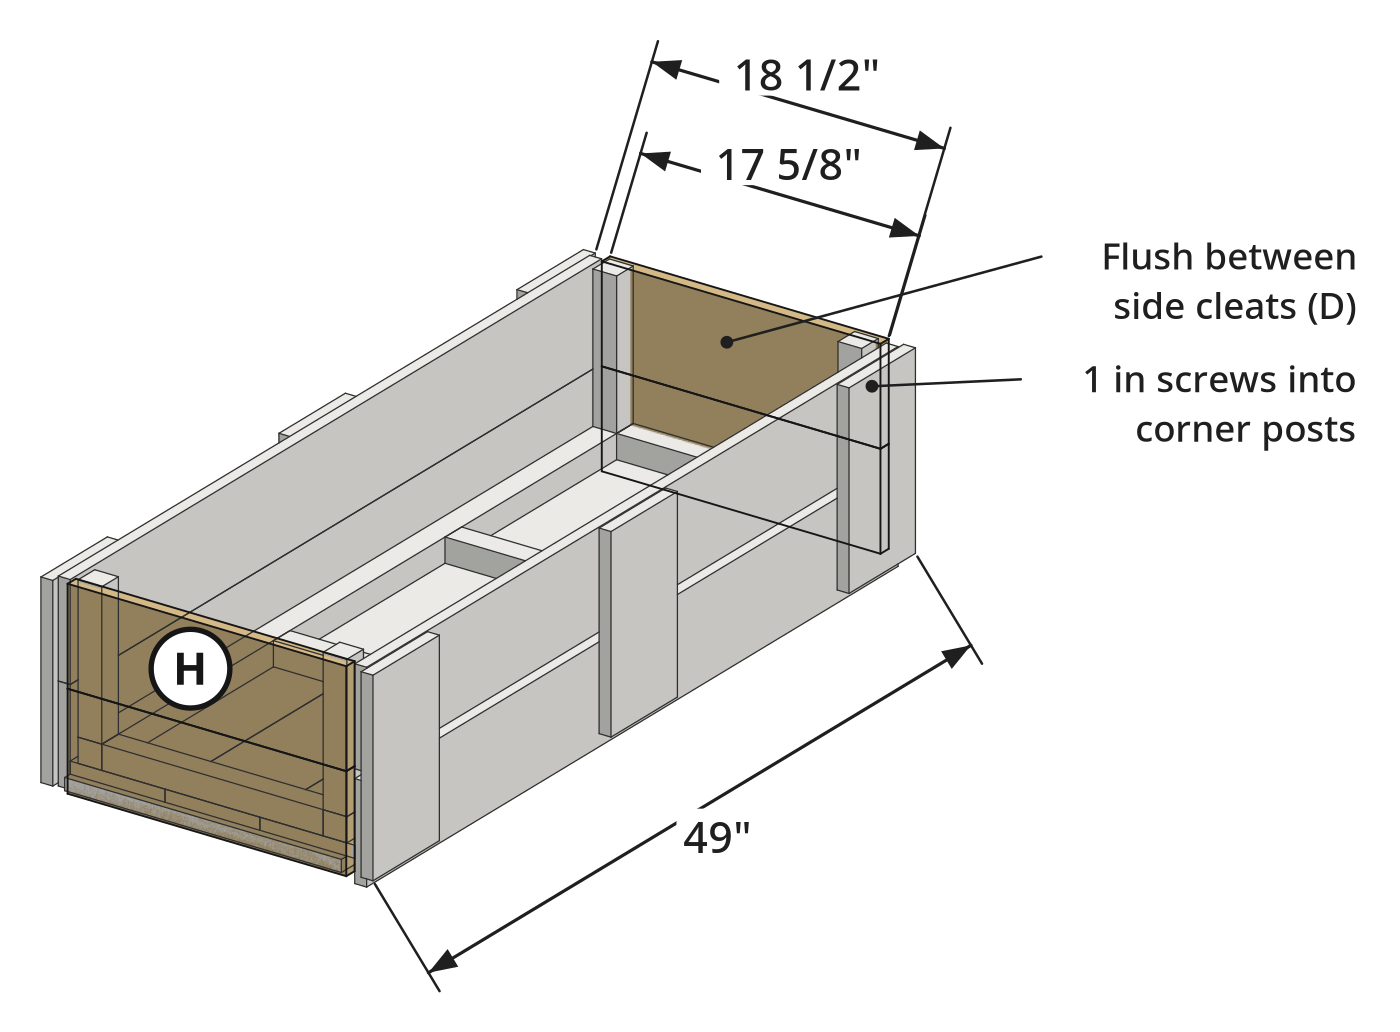
Key measurements
- End panel board length: 17-5/8 in (estimated; test-fit between the overhanging side cleats)
- Tip: Use only one 1-inch screw per end here; Step 7's 2-inch leg screws also anchor these corners.
Before you move on: Check that end panel board tops sit flush with the side panels and 2x2 corner posts.
Step 7: Cut and attach the L-shaped leg frames
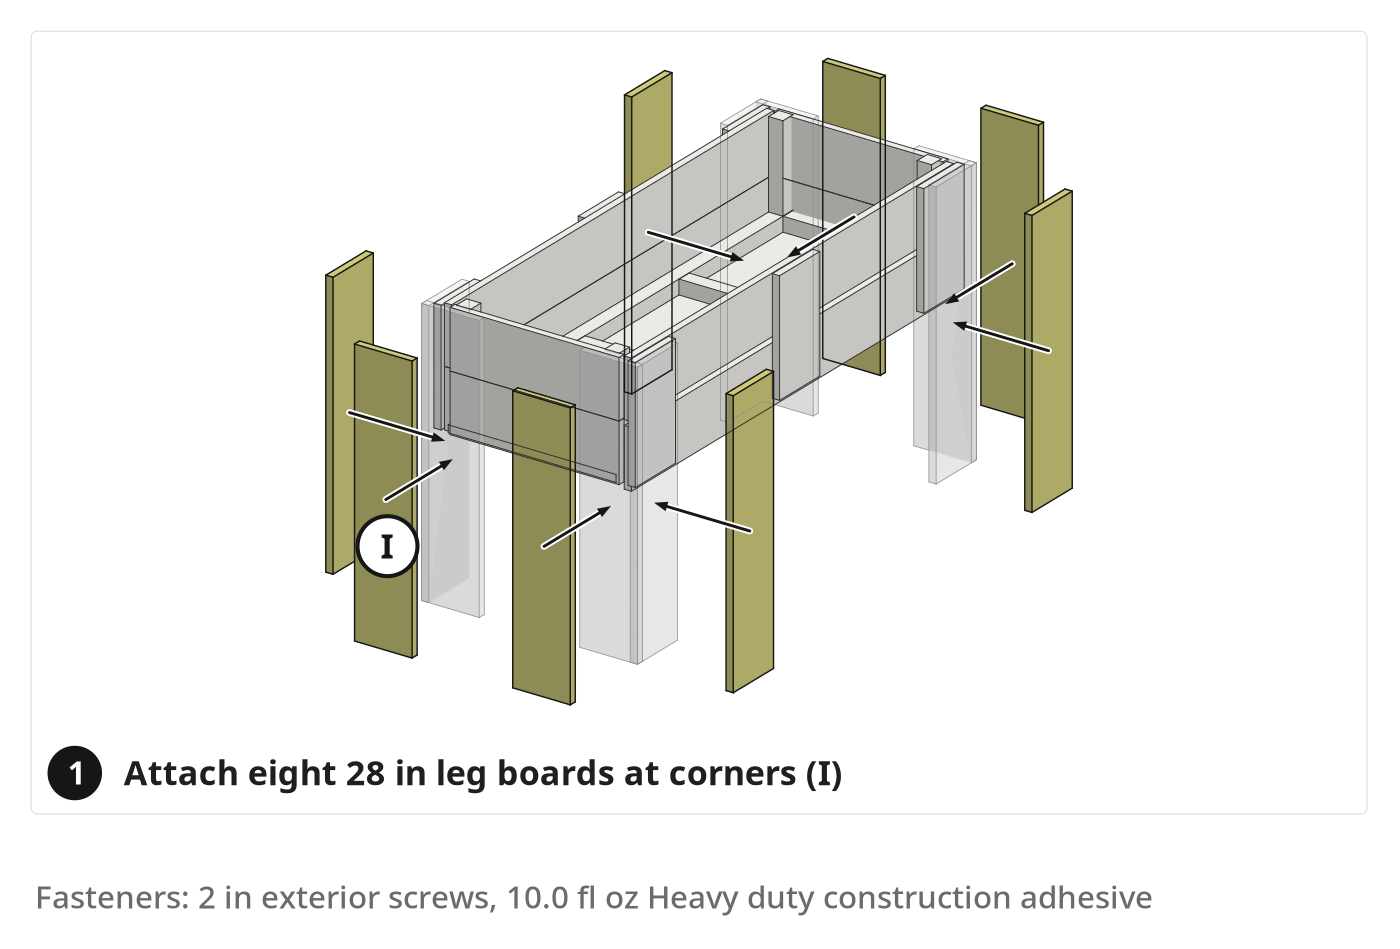
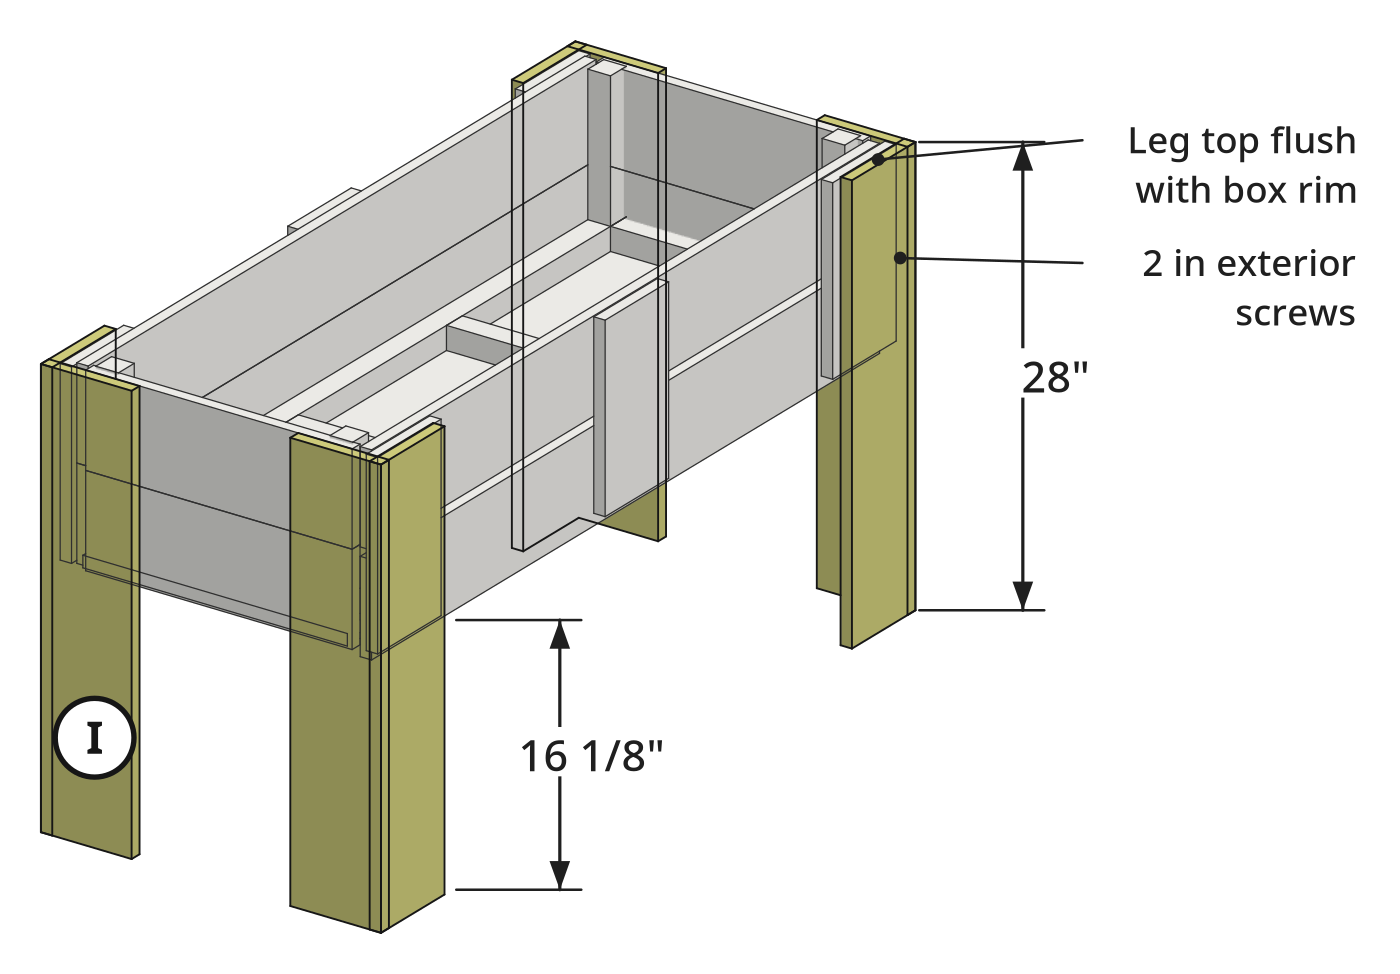
Elevate the box with eight 28-inch cedar boards in overlapping L-shapes at the four corners.
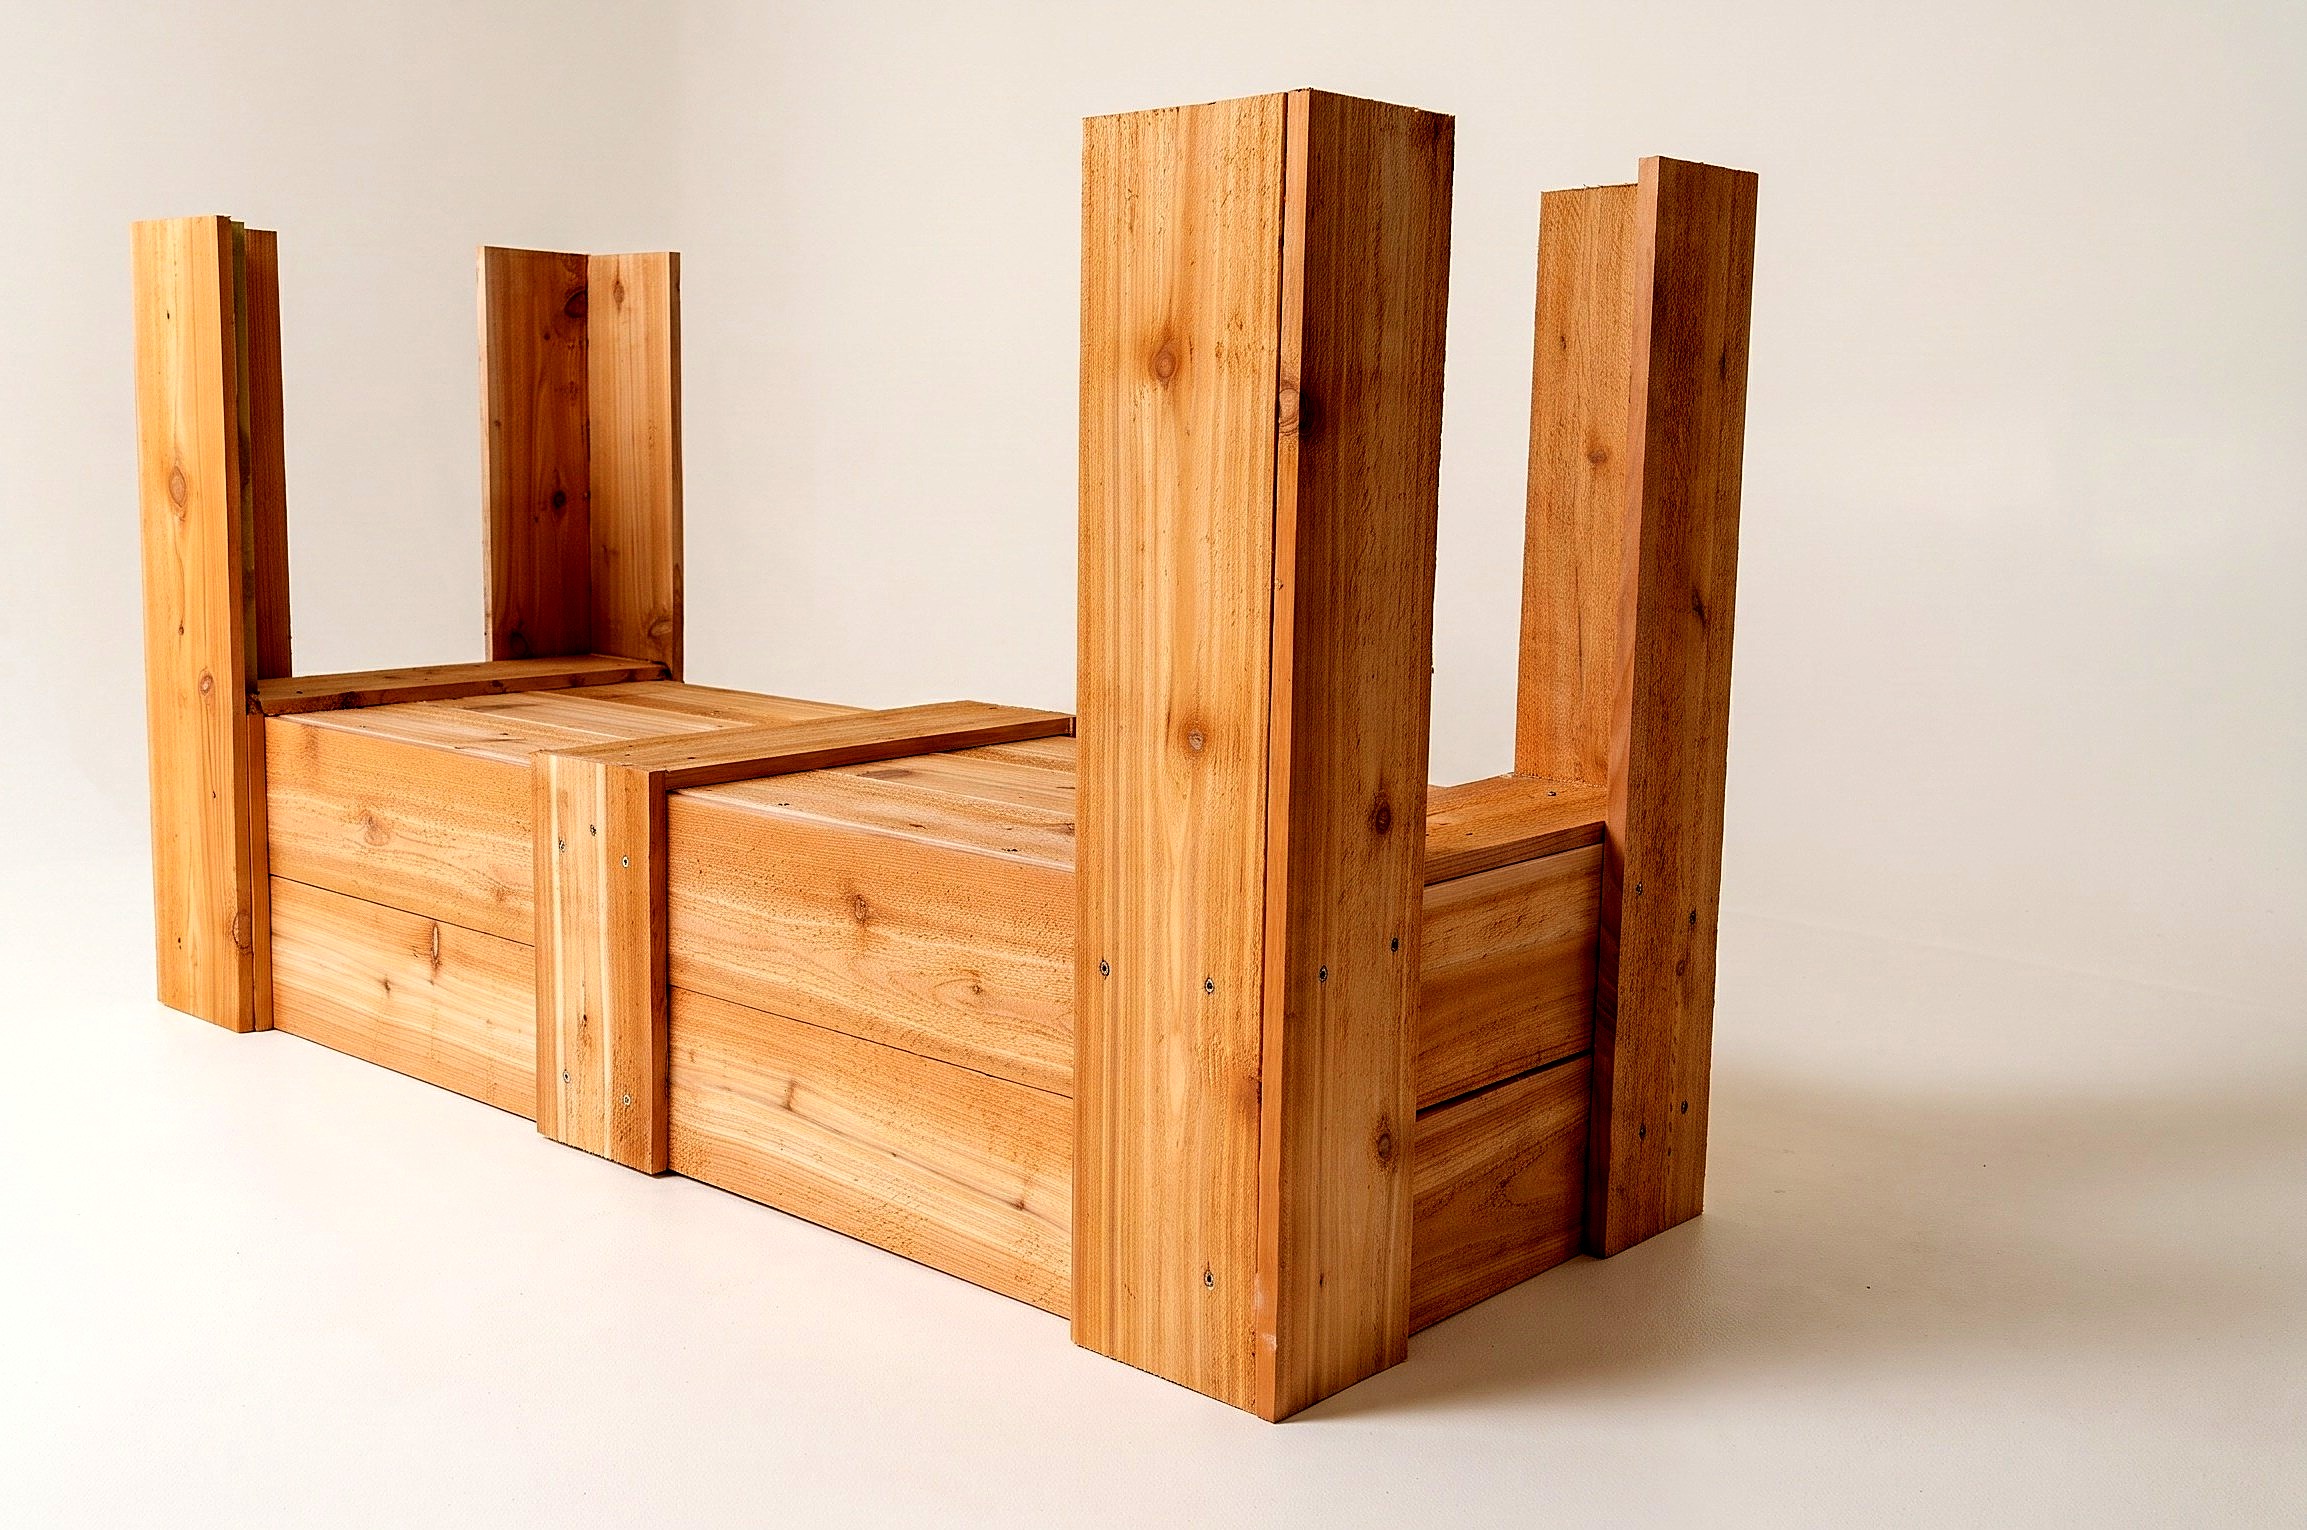
Parts in this step: (I) Corner leg board
You'll need: Miter saw, Tape measure, Rafter square, Pencil and marker, Cordless drill/driver, 9/64 in drill bit, Caulking gun, Impact driver, 6 in cedar fence pickets, 2 in exterior screws, Heavy duty construction adhesive
- 7.1 Cut eight 28-inch leg boards from the last four 6-inch pickets
- Measure and mark two 28-inch pieces on each of the last four 6-inch cedar pickets.
- Crosscut all eight corner leg boards (I) on the miter saw.
- Skip Steps 7 and 8 for a ground-level box without legs.
- 7.2 Flip the box and attach the first two L-shaped corner legs
- Flip the planter box upside down on your work surface.
- Glue and screw one corner leg board (I) to a side cleat, flush with the end and rim.
- Glue and screw a mating leg board (I) to the box end, overlapping the first leg's edge.
- Pre-drill and drive 2-inch exterior screws through the overlapping leg edges; repeat on the second corner.
- 7.3 Attach the remaining two L-shaped corner legs
- Glue and screw side-facing corner leg boards (I) to the remaining two corners first.
- Overlap end-facing corner leg boards (I) flush with each side leg board's outer face.
- Pre-drill and drive 2-inch exterior screws into corner posts and overlapping leg edges.
Key measurements
- Corner leg length: 28 in from top rim to ground
- Tip: Always attach the side leg board flush with the box end first so the end leg overlaps its edge cleanly.
Before you move on: Check all four L-shaped legs sit square to the box and flush with the top rim.
Step 8: Cut and install the 2x4 inner leg supports
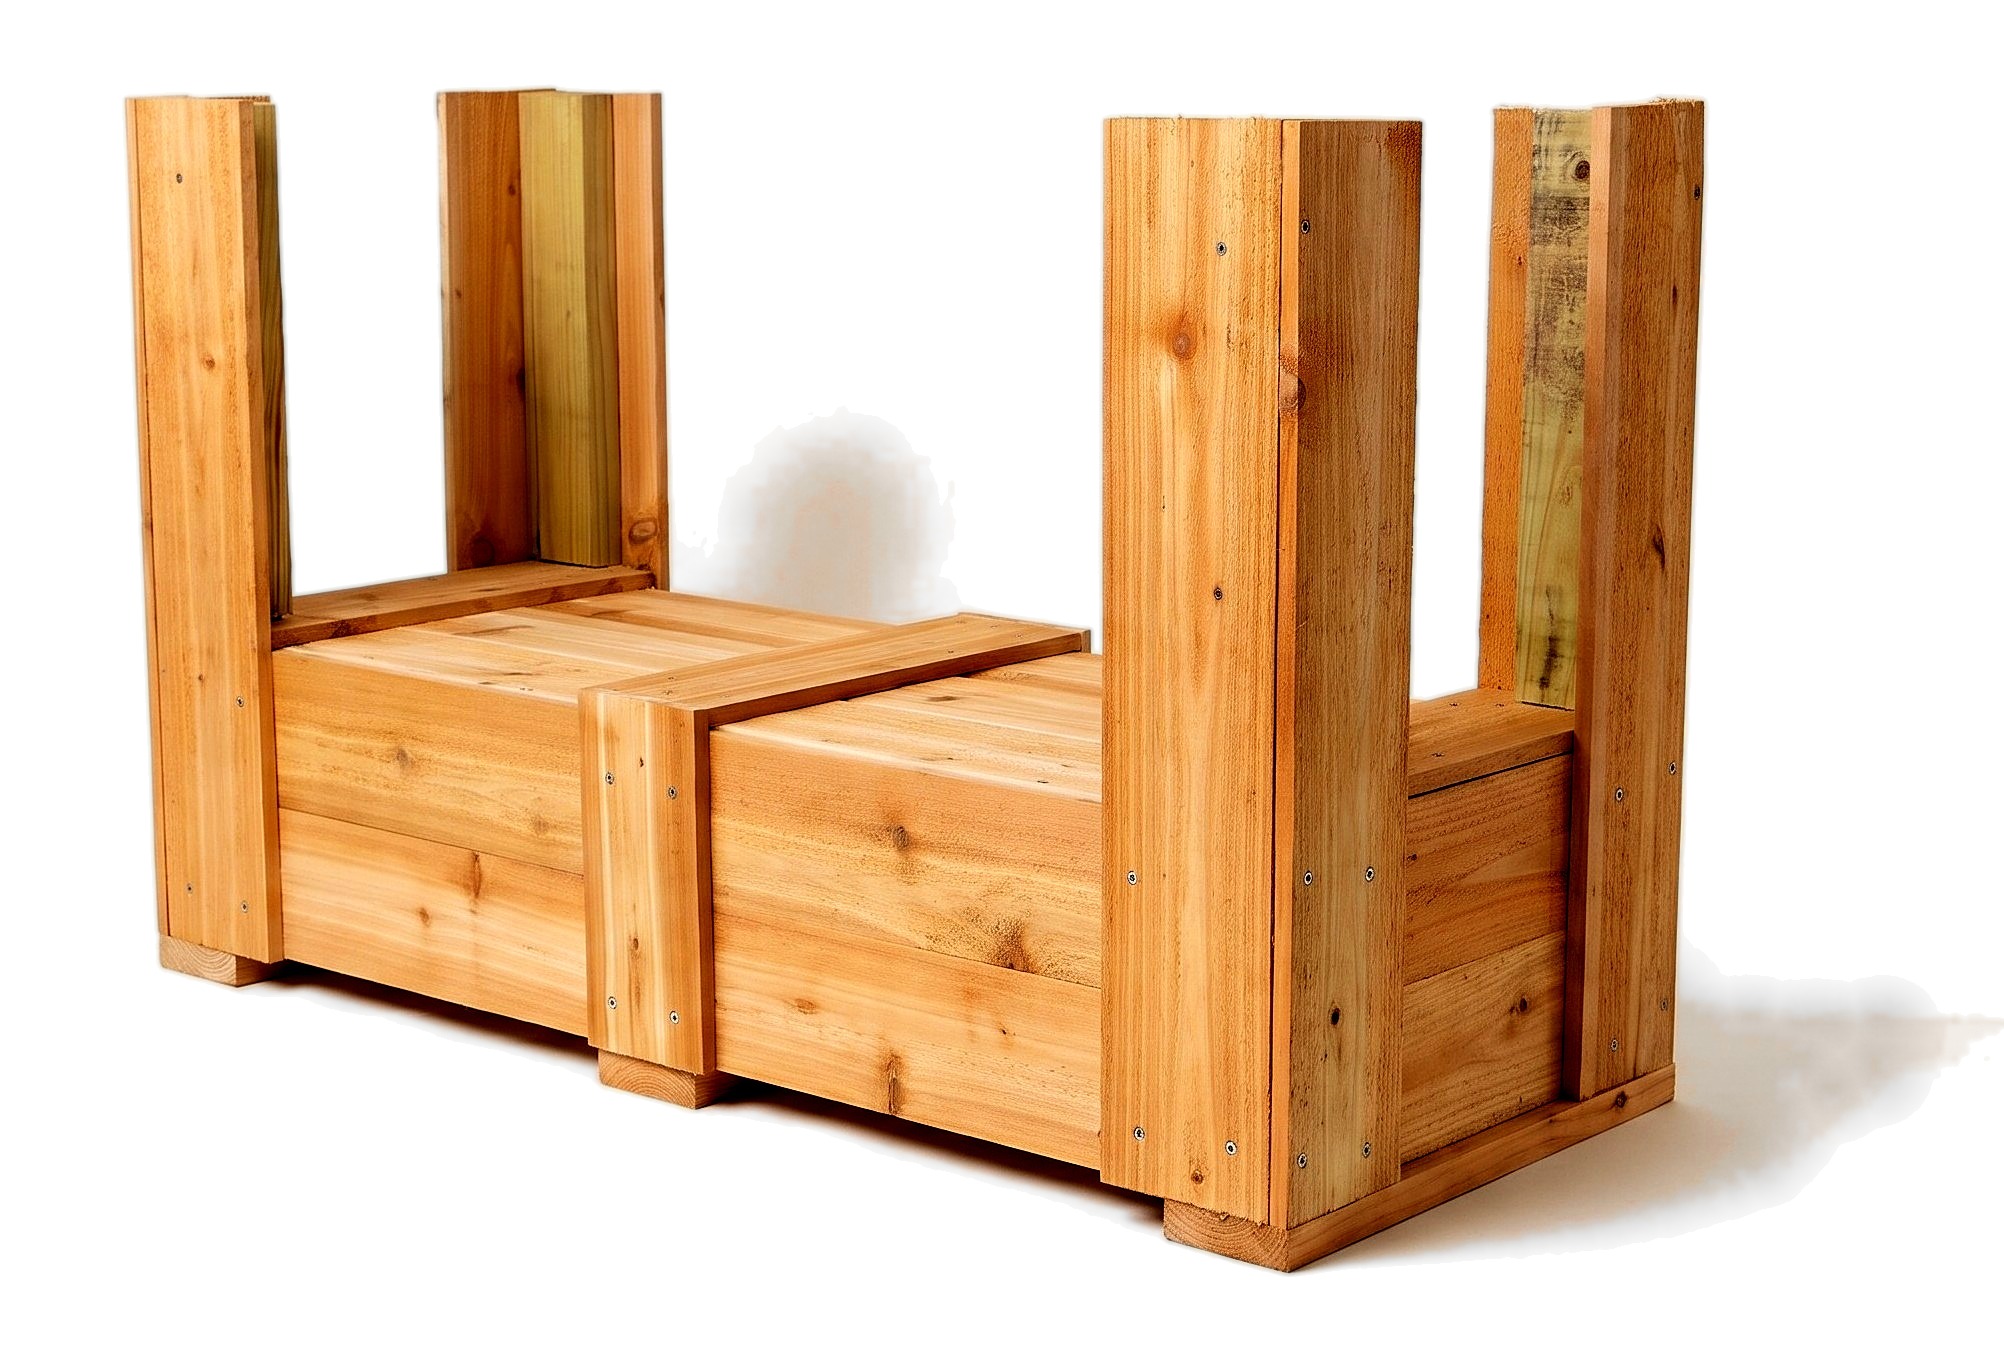
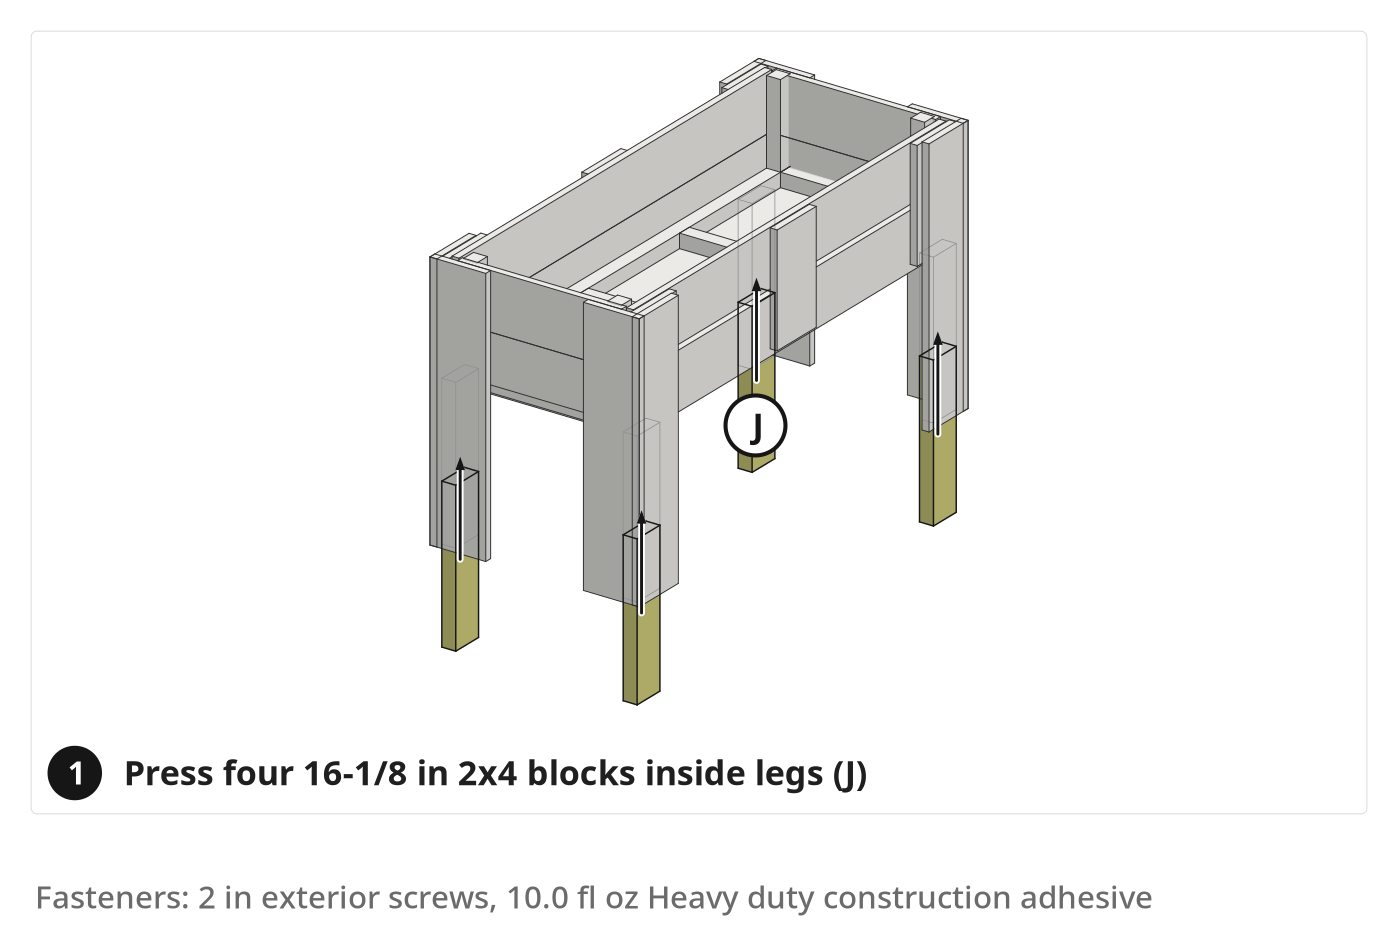
Reinforce the four corner legs with internal 2x4 support blocks under the box.
Parts in this step: (J) Inner leg support block
You'll need: Miter saw, Tape measure, Pencil and marker, Caulking gun, Impact driver, Pressure-treated 2x4 board, 2 in exterior screws, Heavy duty construction adhesive
- 8.1 Measure and cut four 2x4 inner leg support blocks
- Measure inside an L-shaped leg from the base cleat underside to the leg bottom.
- Mark four inner leg support blocks (J) at an estimated 16-1/8-inch length on the pressure-treated 2x4.
- Crosscut all four inner leg support blocks (J) on the miter saw.
- 8.2 Glue and screw the 2x4 blocks inside each leg
- Apply construction adhesive to one wide face and one narrow edge per 2x4 block (J).
- Press one block tightly into each inside leg corner against the box underside.
- Drive 2-inch exterior screws through the outside of both cedar leg boards into each 2x4 block.
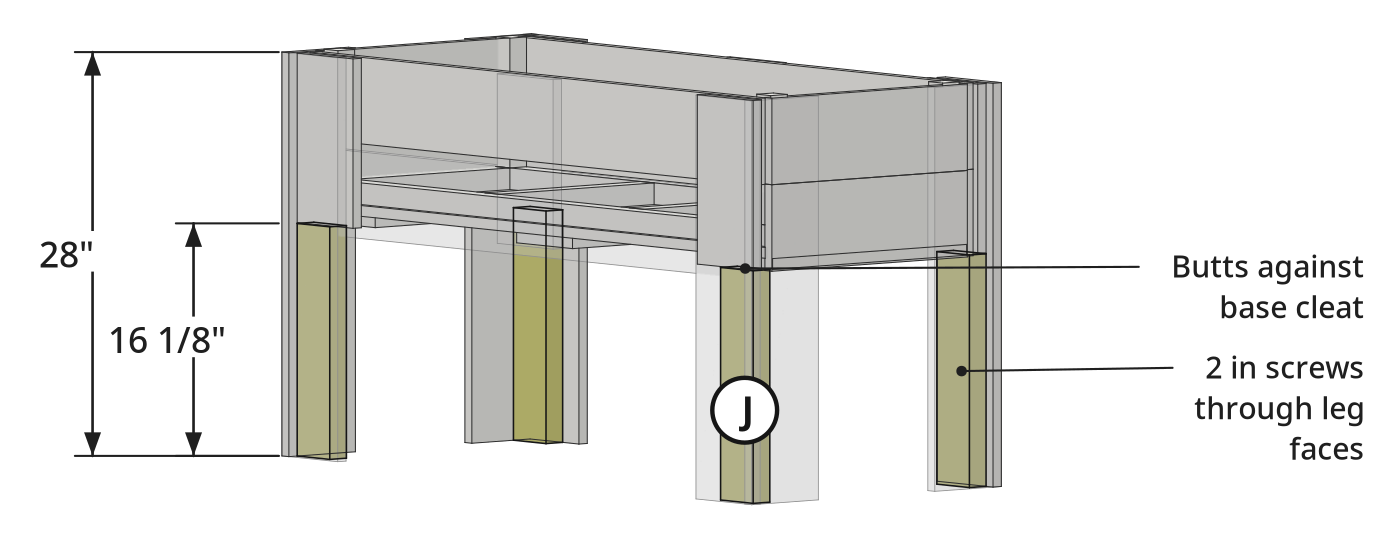
Key measurements
- Inner leg block length: 16-1/8 in (estimated; butts against the box underside without protruding past the leg bottom)
- Tip: Cut 2x4 blocks slightly shy, not long, so the cedar legs rest evenly on the ground while the 2x4 carries the box load.
- Heads up: Never omit 2x4 inner leg blocks on an elevated bed; thin cedar pickets alone cannot support wet soil weight.
Before you move on: Check every 2x4 block butts tightly against the base cleats' underside without protruding past the leg bottoms.
Step 9: Cut and attach the mitered top trim
Frame the top rim with 45-degree mitered 3-1/2-inch cedar trim.
Parts in this step: (K) Top trim long rail, (L) Top trim short rail
You'll need: Miter saw, Rafter square, Pencil and marker, Caulking gun, Impact driver, Standard cedar fence pickets, 2 in exterior screws, Heavy duty construction adhesive
- 9.1 Cut the two long 45-degree mitered top trim rails
- Stand the planter upright; miter-cut the dog-eared tip off a standard 3-1/2-inch picket at 45 degrees.
- Align the miter's inside heel with the rim's inside corner.
- Mark the opposite inside corner, draw the opposing 45-degree line with a rafter square, and cut the first top trim long rail (K).
- Trace the first rail onto a second 3-1/2-inch picket and cut the second top trim long rail (K); save offcuts.
- 9.2 Cut, glue, and screw the first end trim and both long trim rails
- Lay both top trim long rails (K) on the rim; cut a 45-degree miter on one saved picket offcut.
- Align that miter on one end, mark the opposite inside corner, and cut the first top trim short rail (L).
- Apply construction adhesive to the top rim.
- Fasten the first short rail (L) and both long rails (K) into corner posts and cleats with 2-inch exterior screws.
- 9.3 Mark, cut, and attach the final end trim piece
- Miter the remaining picket offcut at 45 degrees and lay it across the open end.
- Trace the second miter off the installed long rail and cut the final top trim short rail (L).
- Apply construction adhesive to the end rim and set the rail.
- Drive 2-inch exterior screws through the trim into the 2x2 corner posts.
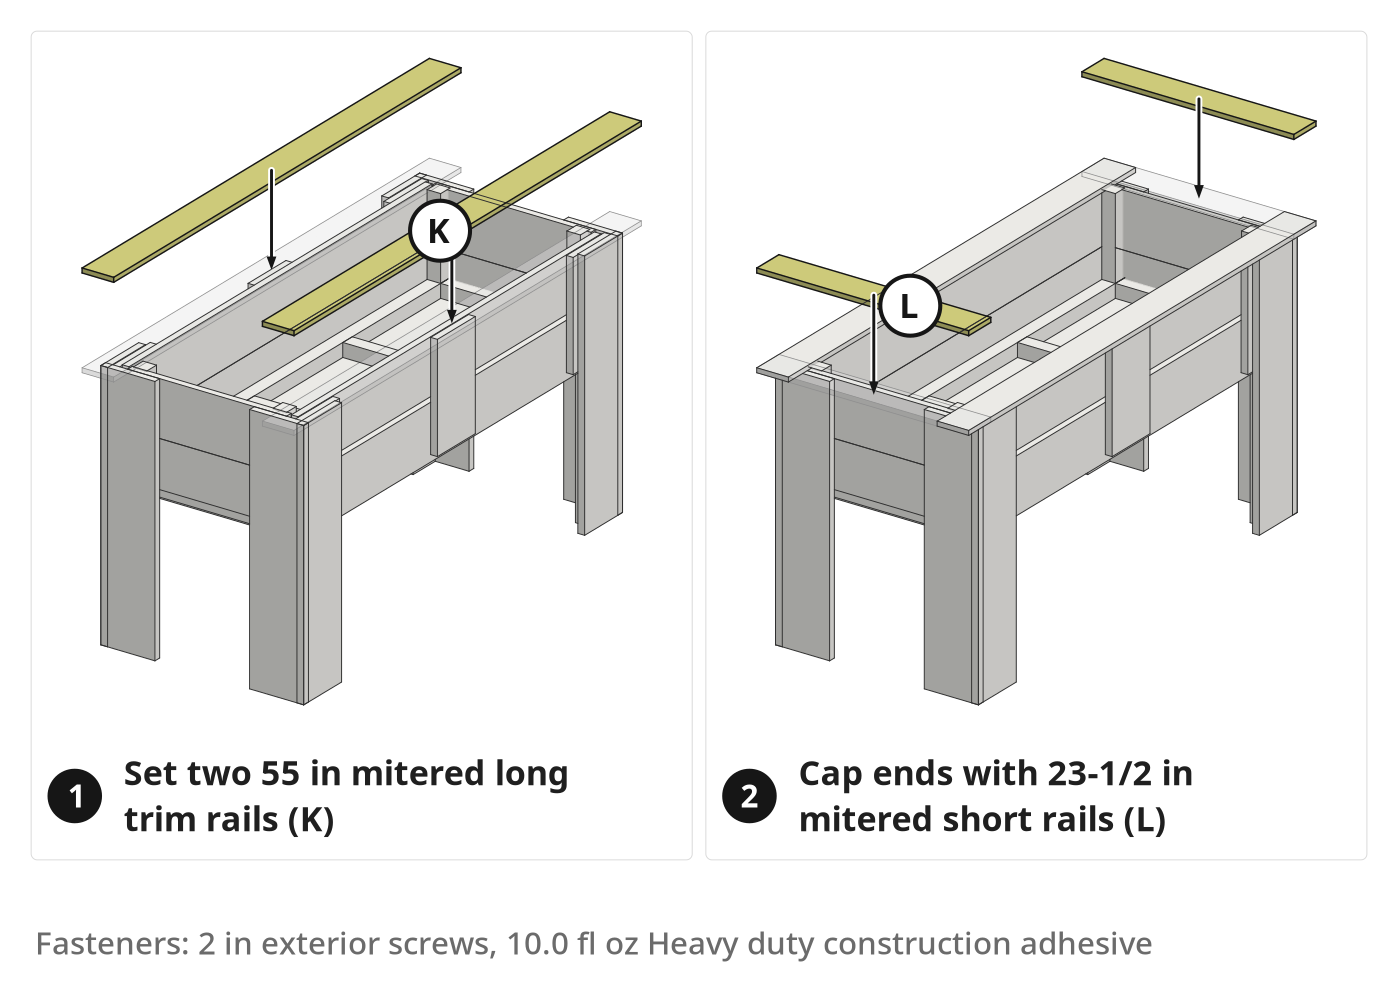
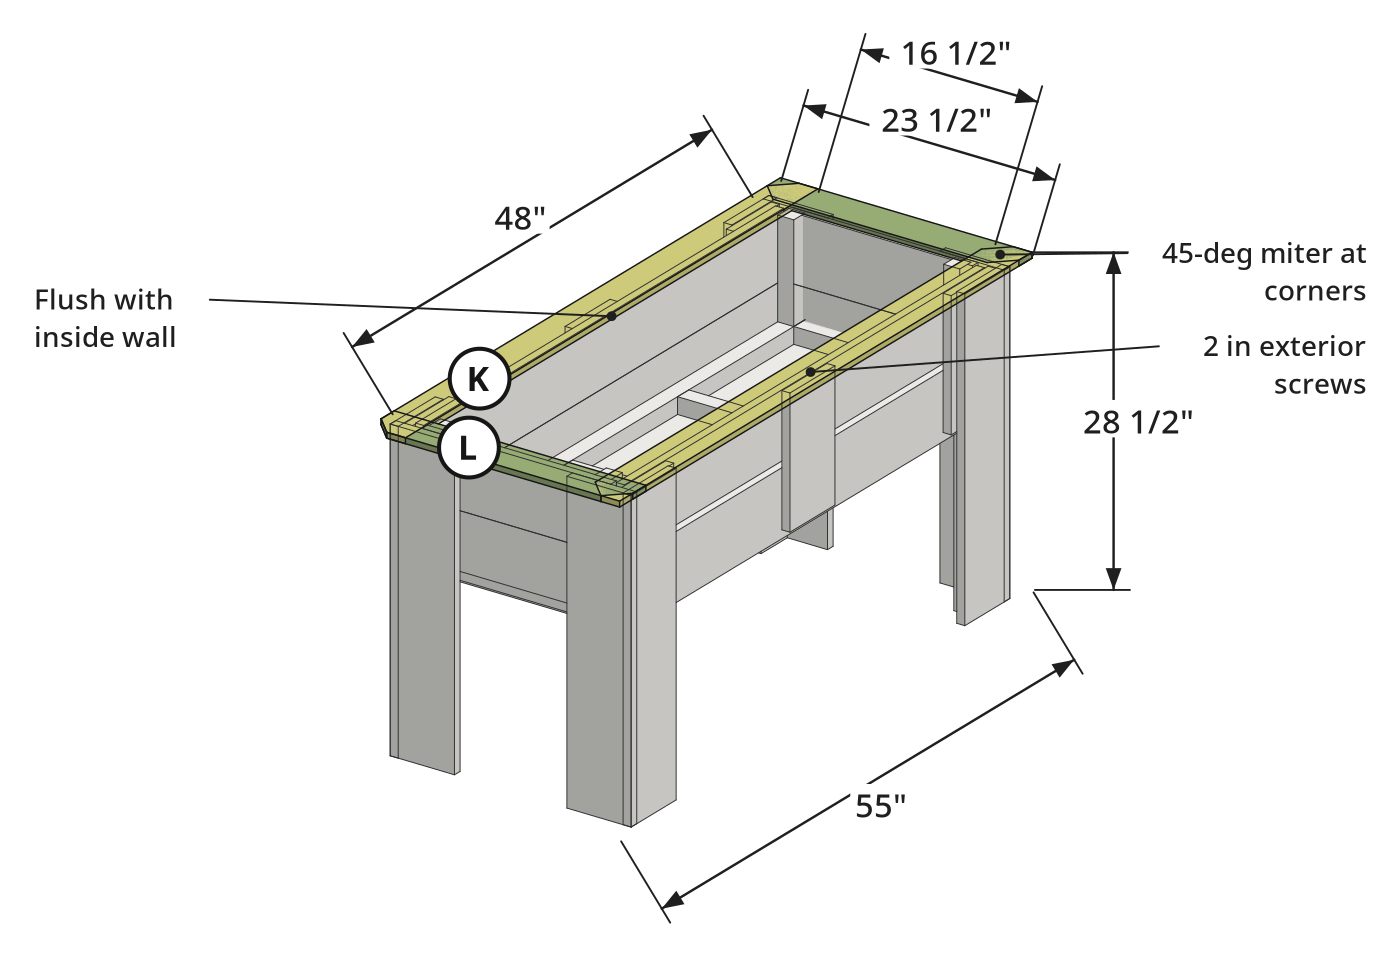
Key measurements
- Long trim rail: 48 in short point to short point (55 in overall for 3-1/2 in pickets)
- Short trim rail: 16-1/2 in short point to short point (23-1/2 in overall for 3-1/2 in pickets)
- Corner miter angle: 45 degrees at both ends of all four rails
- Tip: Save the two long rail offcuts to use only two 3-1/2-inch pickets for the top trim.
- Tip: For easier stapling access, install the weed barrier fabric before screwing down the top trim.
Before you move on: Check all four miters meet tightly and the inner trim edges sit flush with the inner box walls.
Step 10: Drill drainage holes, seal the wood, and install the liner
Add bottom drainage, weatherproof the cedar exterior, and line the interior.
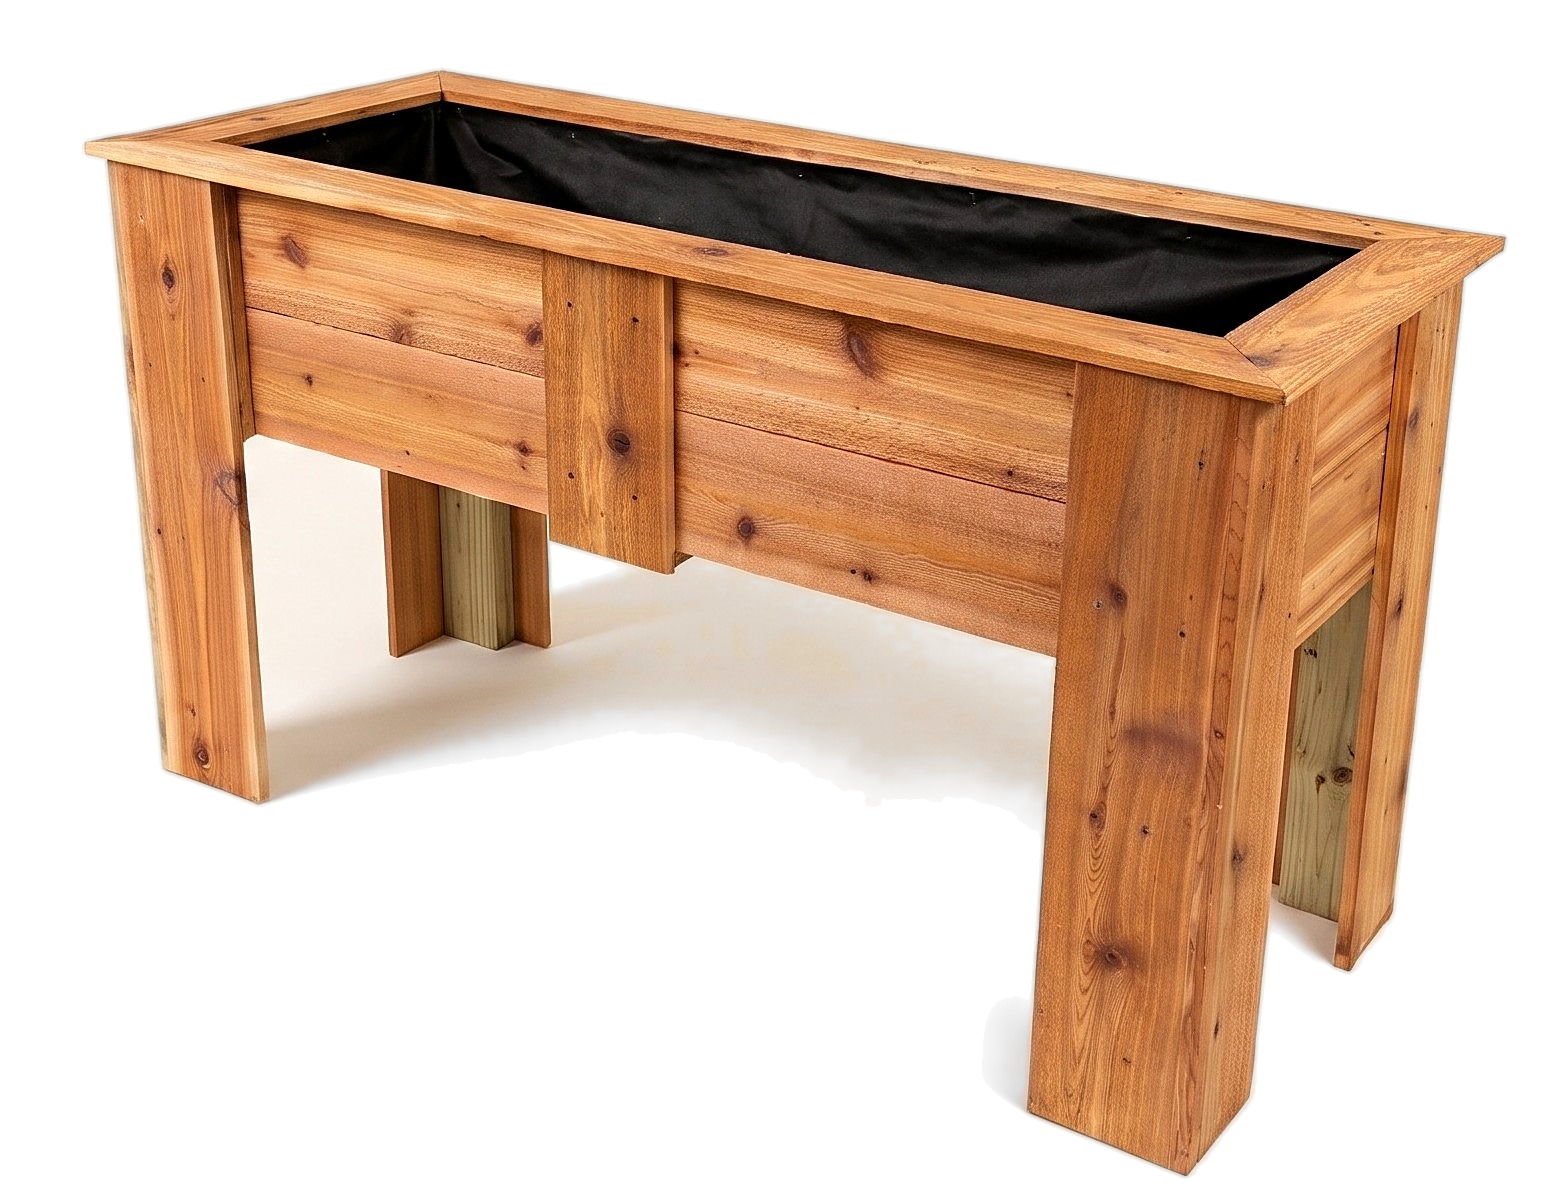
Parts in this step: (A) Base board
You'll need: Cordless drill/driver, 1/2 in drill bit, Stain pad applicator and tray, Heavy-duty staple gun, Clear multi-surface waterproofer, Weed barrier fabric or plastic liner, 1/4 in staples
- 10.1 Drill 1/2-inch drainage holes in the base
- Chuck the 1/2-inch drill bit into the cordless drill/driver.
- Drill several 1/2-inch drainage holes through the base boards (A) in each open bay between the 2x2 crossbars.
- 10.2 Apply clear waterproofer to the exterior wood
- Pour clear multi-surface waterproofer into the applicator tray.
- Coat all exterior cedar evenly with the stain pad applicator.
- Let the waterproofer dry before handling the liner.
- 10.3 Staple the weed barrier liner inside the box
- Roll the weed barrier fabric or plastic liner into the box bottom and corners.
- Fold the top edges under the inner lip of the top trim.
- Fasten the liner around the perimeter and corners with the heavy-duty staple gun and 1/4-inch staples.
- Cut or poke drainage slits in the liner over the 1/2-inch base holes if using non-porous plastic.
Key measurements
- Drainage hole diameter: 1/2 in across the three open base bays
- Heads up: Do not leave a non-porous plastic liner unpierced over the drainage holes, or trapped water will drown roots.
Before you move on: Check water drains freely through the liner and the 1/2-inch cedar base holes.
Finishing
Exterior Sealing
- Wipe sawdust off exterior cedar surfaces before applying the sealer.
- Apply one coat of clear multi-surface waterproofer with a stain pad applicator to keep the cedar tone.
Cure And Placement
- Let the construction adhesive cure and waterproofer dry before filling with wet soil.
- Move the planter to its sunny garden spot before adding heavy soil.
Finish And Fill Alternatives
- Use exterior wood stain instead of clear waterproofer for a tinted finish.
- Layer leaves, pine cones or cardboard under the potting mix to cut weight and soil cost.
These Specs are built from EmyLuDesigns's video “Cedar Fence Picket Raised Planter Bed”. Open the Cedar Fence Picket Raised Planter Bed project page.
