Spetz Specs No. 7377: step-by-step surface & covering guide
Patio String Line Leveling and Slab Laying Guide
The complete step-by-step guide made from Tidybricks patio restore's YouTube video, free on Spetz. For the video, a step-by-step player and answers to your questions, see the Patio String Line Leveling and Slab Laying Guide project page.
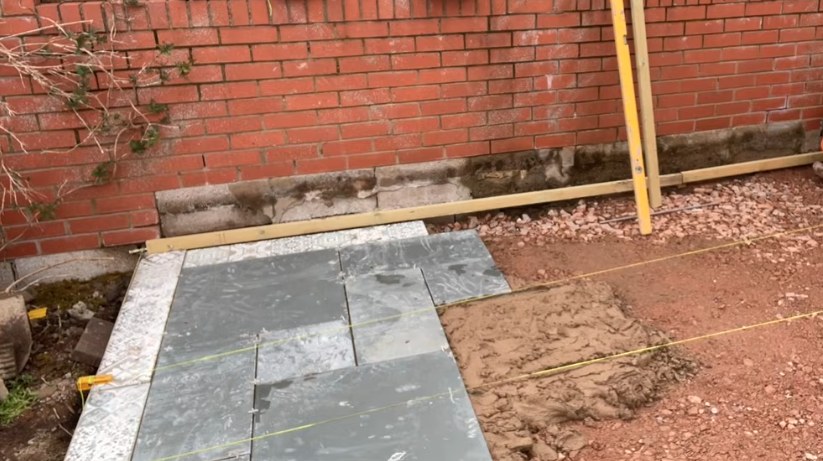
5 steps, 3 parts, 14 tools, 6 materials
Overview
Surface and Covering
- Cover compacted sub-base with 20 mm natural slate slabs on a 40 mm mortar bed.
- Bolt timber battens around perimeter walls to hold taut string lines.
Why Do It Yourself
- Perimeter battens and corner blocks let you pull and detach string lines anywhere.
- Accurate string levels keep slabs flush without hiring a landscaper.
What It Takes
- Tools: rotary hammer drill, spirit level, cement mixer, vacuum suction lifter.
- Includes drilling masonry, mixing heavy mortar, and brushing wet slurry primer onto stone.
What Decides Success
- A 10 mm per 1 m drainage fall stops rainwater pooling on the slabs.
- Timber packers behind each batten fixing leave a gap for string lines.
Layout at a glance
- Covering: Natural slate patio slab 20 mm thick
- Laid on: Compacted sub-base
- Pattern: horizontal
- Start: Lay the outer perimeter border first with a mitered corner edge, then lay the field slabs from the front border toward the back wall along the taut string lines.
- Reference line: Roofing battens bolted to the perimeter walls over timber packers, set to a 10 mm per 1 m drainage fall (spirit-level bubble just past the line).
- Gap: Spaced by eye to allow for natural stone size variations.
- Bond: Paving slurry primer brushed onto the underside of each 20 mm slab, bedded onto a 40 mm sand and cement mortar bed and tapped down flush with the string line.
- Perimeter masonry walls: Bolt roofing battens around the walls with short timber packers behind each fixing so the string line can slide behind the batten and hold the 10 mm per metre fall.
- Patio border and corners: Lay the outer border slabs first with a mitered joint at the corner to establish the front edge before filling in the field slabs.
Health and safety
Drilling and Mixing Equipment
- Scan brick and block perimeter walls for hidden cables and pipes before drilling with the corded SDS rotary hammer drill.
- Wear eye, ear, and hand protective equipment and a dust mask when drilling masonry walls to guard against debris and dust.
- Plug the electric drum mixer and corded SDS drill into a ground-fault protected outlet, keeping power cords clear of wet mortar.
- Never reach into the spinning electric drum mixer with hands or tools; switch it off before clearing stuck cement mortar.
Plate Compactor and Fuel Safety
- Operate the petrol vibrating plate compactor only in open outdoor areas to avoid inhaling toxic carbon monoxide exhaust fumes.
- Shut off the petrol plate compactor and let the engine cool completely before refueling, keeping petrol away from heat sources.
- Wear hearing protective equipment, padded gloves, and sturdy boots to guard against loud engine noise, vibration, and foot crushing hazards.
Cement, Primer, and Timber Dust
- Wear waterproof gloves and eye protective equipment when handling cement mortar or brushing paving slurry primer to prevent alkaline burns.
- Wear a dust mask when loading dry cement into the mixer or sawing treated timber roofing battens into wall packers.
- Wash skin immediately with clean water if wet cement mortar or paving slurry primer splashes onto your hands or arms.
Slab Lifting and Site Hazards
- Use the battery-powered vacuum slab lifter to move heavy 20 mm natural slate patio slabs and prevent back strain or pinched fingers.
- Check that the vacuum suction lifter maintains full grip on the slate slab, and keep feet clear underneath while lifting.
- Bend at the knees and lift with your legs when pushing a loaded builder's wheelbarrow or bedding heavy stone slabs.
- Watch your footing around the taut high-visibility mason's string lines and perimeter battens to avoid tripping across the work area.
The surface & its prep
- Compact the stone hardcore sub-base with a plate compactor before laying slabs.
- Check for at least 60 mm clearance between the taut string line and compacted sub-base.
- Depth: 40 mm sand and cement mortar bed plus 20 mm natural slate slab.
- Set a 10 mm per 1 m left-to-right drainage fall (spirit level bubble just past the line).
- Bolt roofing battens over timber packers on perimeter masonry walls to hold string lines.
- Lay the mitered-corner outer border slabs first to set the front reference edge.
Tools
- String line (high-visibility mason's line)
- Corner blocks (plastic mason's line blocks)
- Spirit level (box beam spirit level, Stabila)
- Rotary hammer drill (corded SDS rotary hammer drill, Bosch, Boschhammer)
- Claw hammer (hand hammer)
- Tape measure (pocket tape measure, Stanley, 8 m / 26 ft)
- Hand saw (wood hand saw, Irwin, Plus 880)
- Wheelbarrow (builder's wheelbarrow)
- Plate compactor (petrol vibrating plate compactor, Bomag) (optional)
- Primer brush (wide masonry brush)
- Vacuum suction lifter (battery-powered vacuum slab lifter, Grabo) (optional)
- Rubber mallet (white rubber paving mallet)
- Tile spacers (plastic cross spacers, 5 mm) (optional)
- Cement mixer (electric drum mixer) (optional)
Materials
- Roofing battens (treated timber batten)
- Timber packers (timber batten offcuts)
- Masonry hammer fixings (nylon wall plugs and masonry screws)
- Cement mortar (sand and cement mortar bed, 40 mm bed depth)
- Natural slate patio slabs (natural stone paving slabs, 20 mm thickness)
- Paving slurry primer (tile adhesive primer)
Hardware
| Hardware | Size | Count | Used in steps |
|---|---|---|---|
| Masonry hammer fixings | 2 |
Finishes & supplies, in the order they go on
| Product | What it does | Mix & coats | Dry time | Applied with |
|---|---|---|---|---|
| Paving slurry primer | Bonds the underside of each 20 mm natural slate slab to the cement mortar bed (coverage rate not stated in this guide) | 1 coats | Applied wet immediately before bedding the slab onto the mortar | Primer brush |
| Cement mortar | 40 mm bedding layer over the compacted sub-base to support and level the slabs (mix ratio and coverage not stated in this guide) | 1 coats | Trowel |
Covering elements
| Part | Name | Qty | Size | Notes |
|---|---|---|---|---|
| A | Natural slate patio slab | x1 | 20 mm thick | Primed on the underside with slurry primer before bedding onto the 40 mm mortar bed; border slabs mitered at corners. |
| B | Roofing batten | x1 | Bolted around perimeter masonry walls at a 10 mm per 1 m fall to serve as the level guide for the string lines. | |
| C | Timber packer | x1 | Short batten offcuts placed behind the perimeter battens at each fixing to create a gap for the string line. |
Before you start
Clear and Compact
- Clear perimeter masonry walls so battens bolt straight to brick, block, or posts.
- Compact the hardcore sub-base with a plate compactor.
- Lay the mitered-corner outer border slabs first to set the front edge.
Cut and Mix Station
- Cut roofing batten offcuts with a hand saw for wall packers.
- Park a wheelbarrow nearby to hold slabs while brushing on slurry primer.
- Mix sand and cement mortar in a cement mixer, then load the wheelbarrow.
Step by step
Step 1: Set Initial String Line and Drainage Fall
First string line: along the perimeter wall at a 10 mm per 1 m left-to-right drainage fall.
You'll need: String line, Corner blocks, Spirit level
- 1.1 Run end-to-end string line along the wall
- Anchor the string line at the left of the perimeter wall.
- Pull the string line taut to the right along the masonry wall.
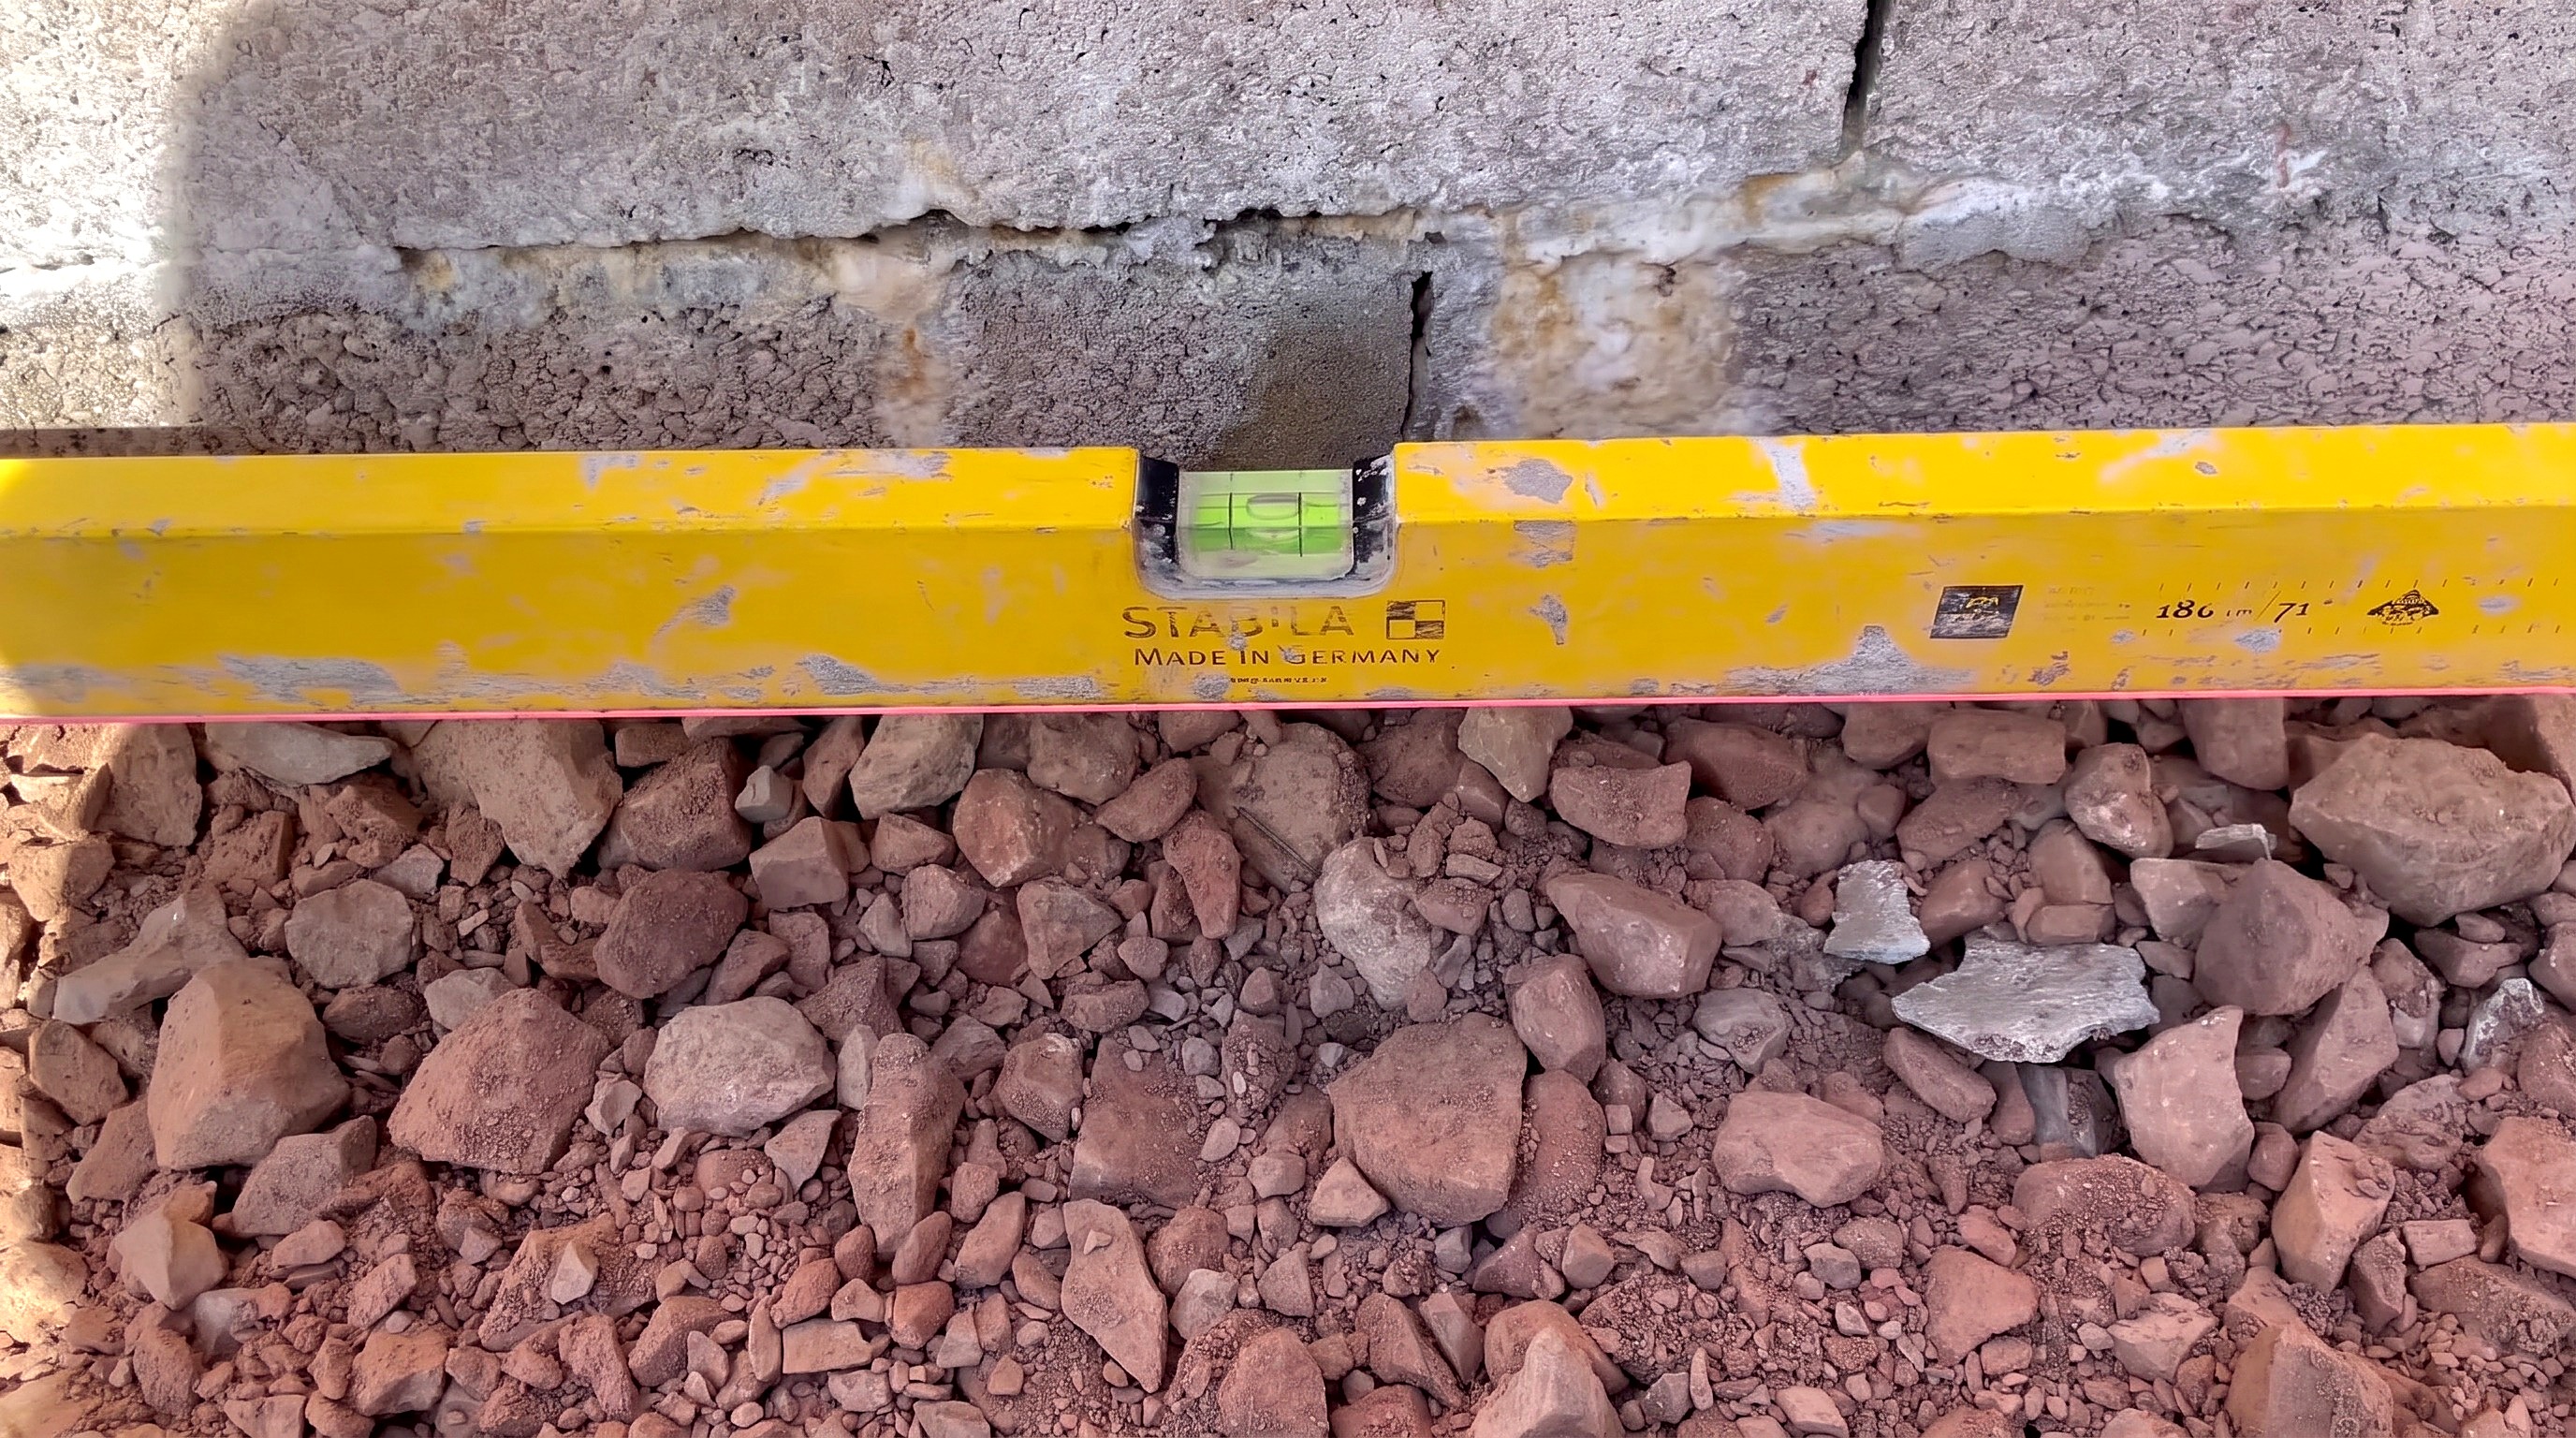
- 1.2 Set 10 mm per meter drainage fall on the spirit level
- Hold the spirit level along the string line.
- Lower the right end until the bubble sits just past the black vial line.
- Lock the line here for a 10 mm drop per 1 m run.
Key measurements
- Drainage fall: 10 mm drop per 1 m horizontal run, left to right.
- Tip: Set the spirit level bubble just past the black line for a 10 mm per 1 m fall.
- Heads up: Never center the spirit level bubble, or rainwater will pool on the patio.
Before you move on: Spirit level on the string line: bubble must sit just past the black line.
Step 2: Attach Leveling Battens to Perimeter Walls
Roofing battens bolt to perimeter walls over timber packers at the 10 mm per 1 m fall.
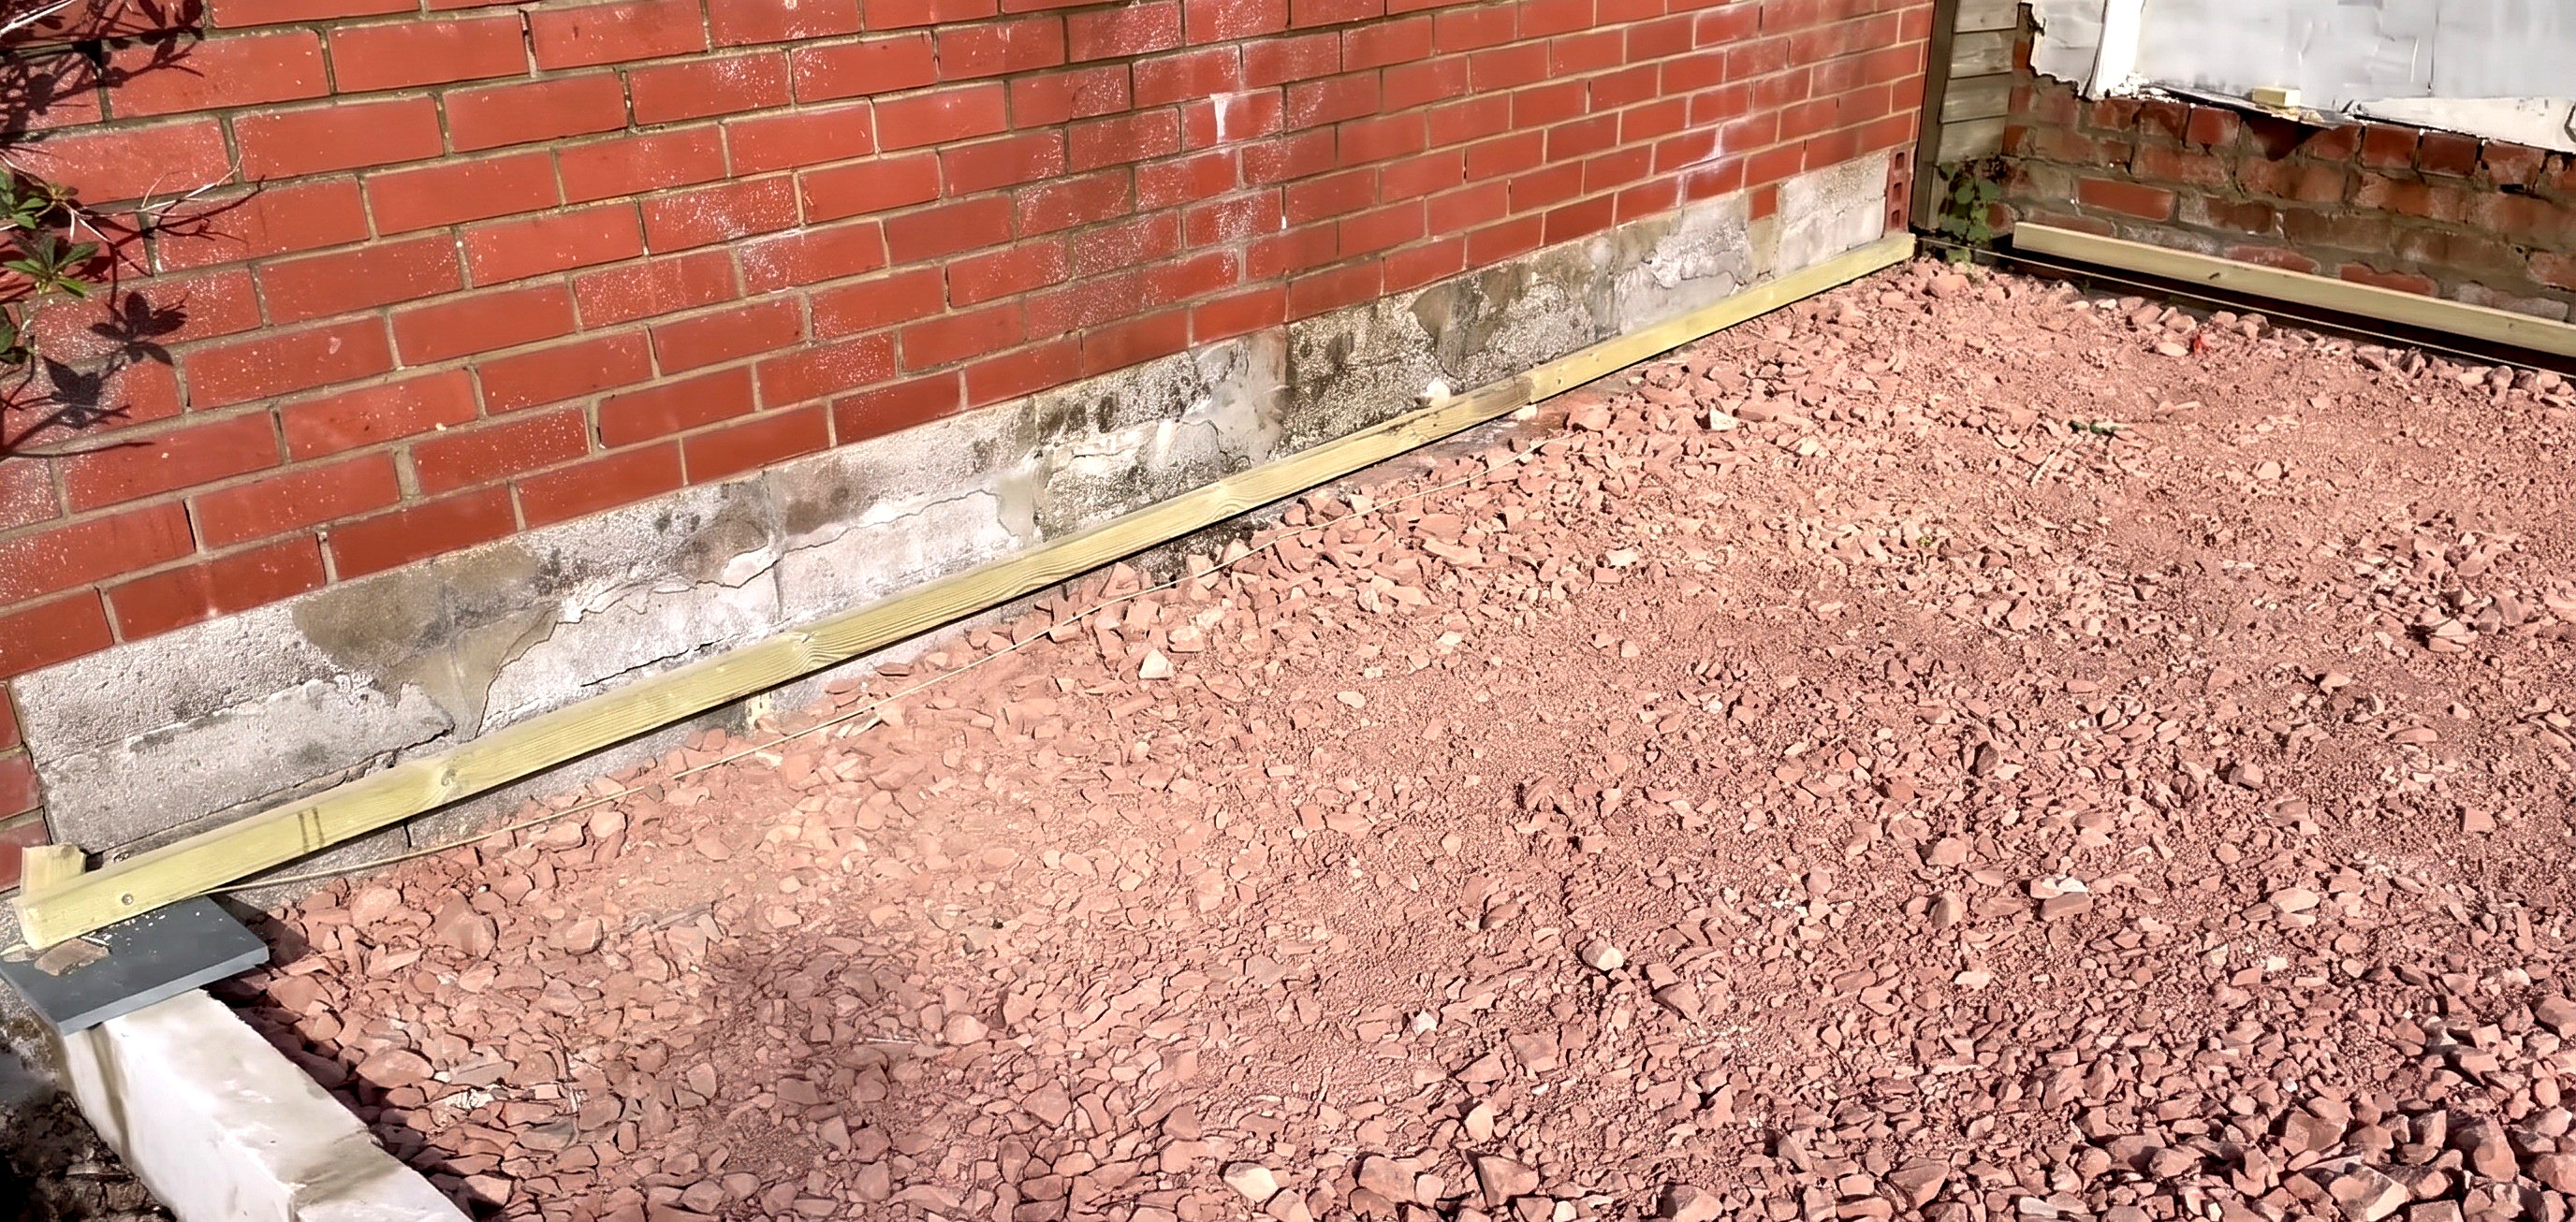
Parts in this step: (B) Roofing batten, (C) Timber packer
You'll need: Rotary hammer drill, Claw hammer, Spirit level, Tape measure, Hand saw, String line, Roofing battens, Timber packers, Masonry hammer fixings
- 2.1 Drill clearance holes through the timber batten
- Lay a roofing batten (B) flat on the ground.
- Drill one clearance hole per batten end with the rotary hammer drill.
- 2.2 Anchor the first end of the batten with a packer
- Hold the batten at the masonry wall starting height mark and drill into the brick.
- Slip a short timber packer (C) behind the batten beside the hole.
- Tap a masonry hammer fixing through the batten into the wall with a claw hammer.
- 2.3 Level the batten to the fall gradient and fix the opposite end
- Prop the loose batten end on a tape measure; rest the spirit level on top.
- Angle the batten until the bubble sits just past the indicator line for a 10 mm per 1 m fall.
- Drill the second hole into the masonry wall.
- Slip a timber packer behind the batten beside the hole; hammer the fixing tight.
- 2.4 Continue installing battens around the remaining perimeter walls
- For the remaining walls, cut battens and packers to length with a hand saw.
- Repeat drilling, packing, and leveling on the back and side walls.
- Align every batten's bottom edge into a continuous level perimeter guide.
Key measurements
- Batten slope: 10 mm drop per 1 m run (bubble just past spirit level line).
- Tip: Use BS5534 graded colour-coded roofing battens; they are straighter than standard green-treated battens.
- Tip: Place each timber packer beside the masonry screw so clamping pressure holds it tight.
- Tip: If packers slip, screw them to the wall first, then fix the batten to them.
- Heads up: Do not hammer the fixing in before the timber packer, or the string line cannot pass behind the batten.
Before you move on: Run the string line behind each batten to check the packers leave a clear bottom gap.
Step 3: Verify Sub-Base Depth Against String Line
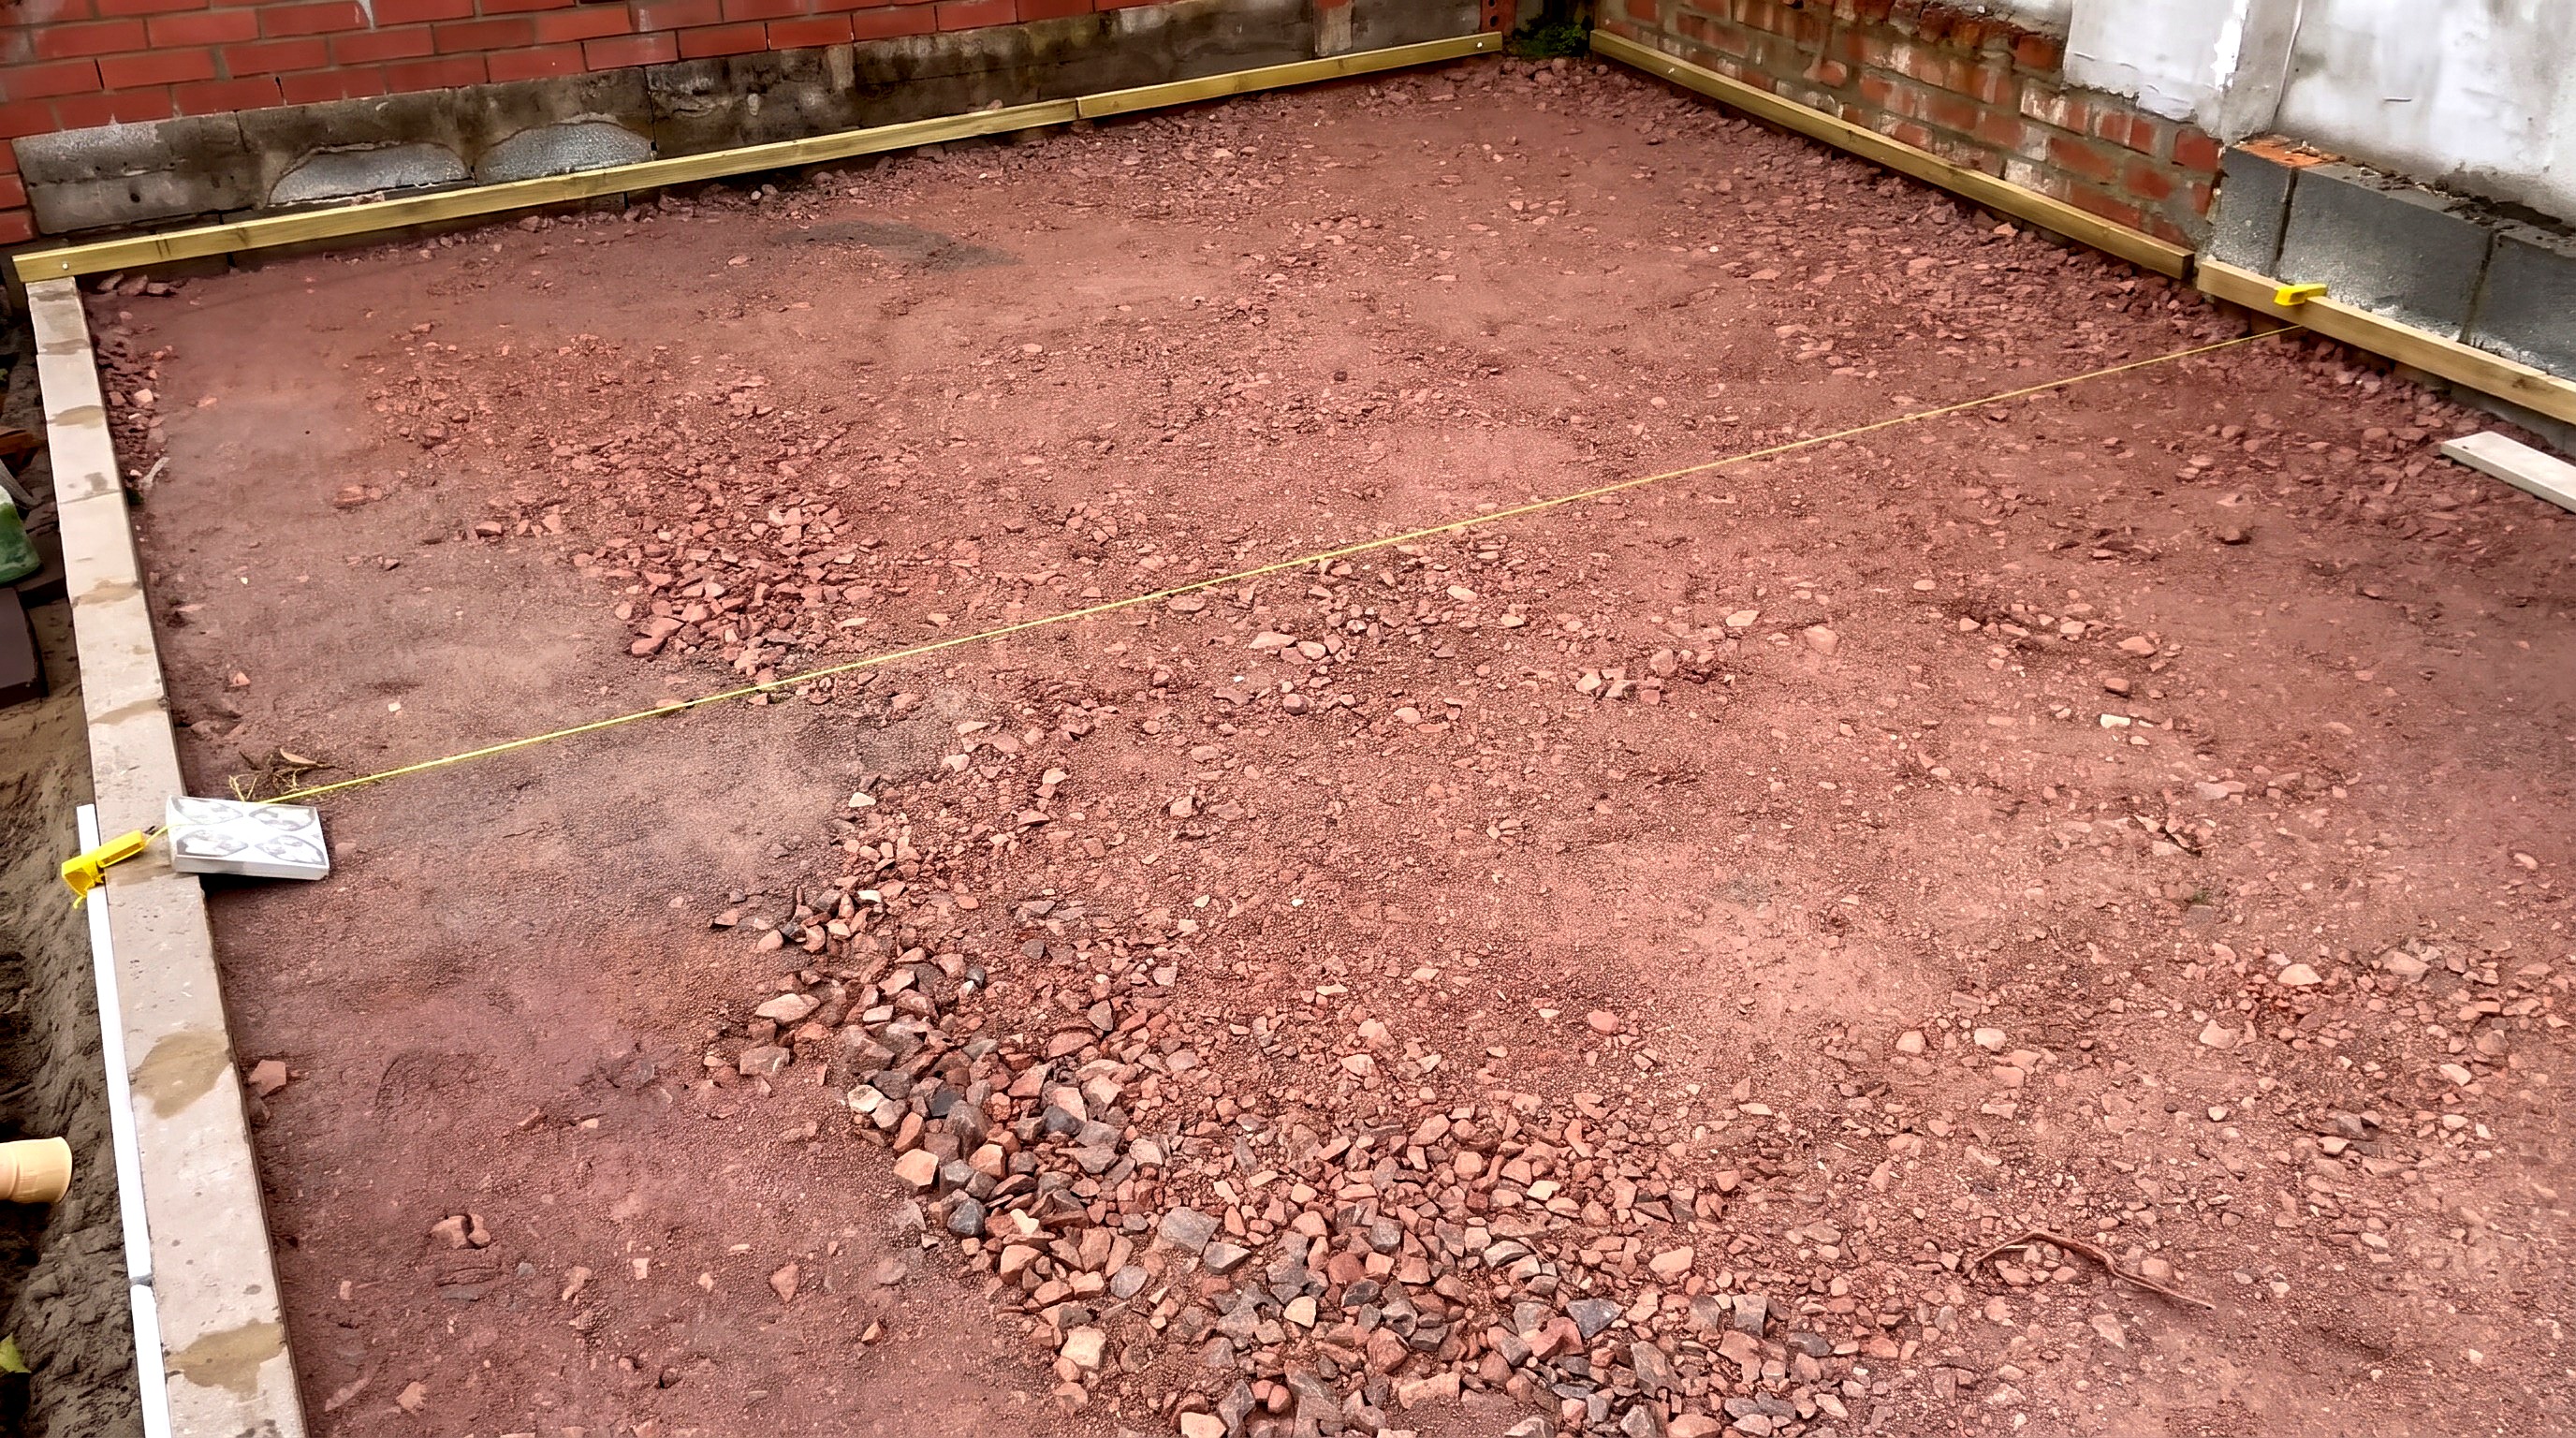
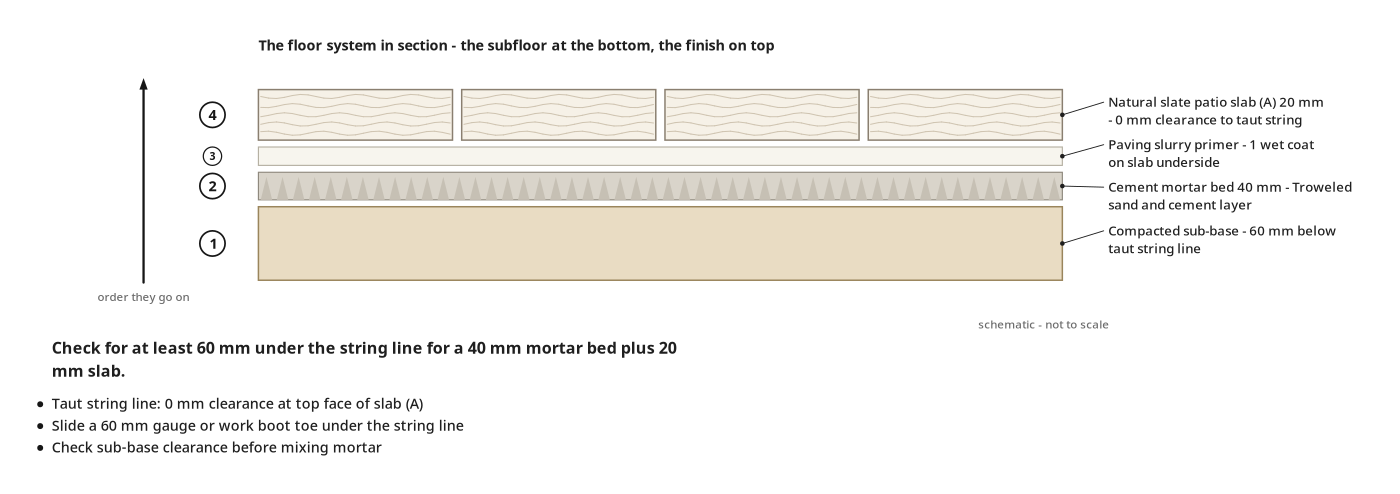
Compacted sub-base sits at least 60 mm below the taut string line across the patio.
You'll need: String line, Corner blocks, Plate compactor, Roofing battens
- 3.1 Stretch string line across the sub-base and check 60 mm clearance
- Stretch a string line taut from back wall batten to front border edge.
- Slide a 60 mm gauge or 60 mm work boot toe under the taut string line.
- Check the 60 mm gap everywhere fits a 40 mm mortar bed plus 20 mm slab.
Key measurements
- Clearance below string line: 60 mm to compacted sub-base.
- Mortar bed depth: 40 mm over compacted sub-base.
- Paving slab thickness: 20 mm natural slate
- Tip: Check sub-base clearance with the string line before mixing mortar to fix high spots early.
Before you move on: Check at least 60 mm clearance under the string line across the whole laying area.
Step 4: Prime and Lay Patio Slabs to String Lines
Parallel string lines span the patio with the primed slate slab bedded flush.
Parts in this step: (A) Natural slate patio slab
You'll need: String line, Corner blocks, Wheelbarrow, Primer brush, Vacuum suction lifter, Rubber mallet, Tile spacers, Cement mixer, Natural slate patio slabs, Paving slurry primer, Cement mortar
- 4.1 Set parallel string lines across the patio area
- Hook two parallel string lines to the front border with removable corner blocks.
- Pull both lines taut to the perimeter wall battens to guide the next slab row.
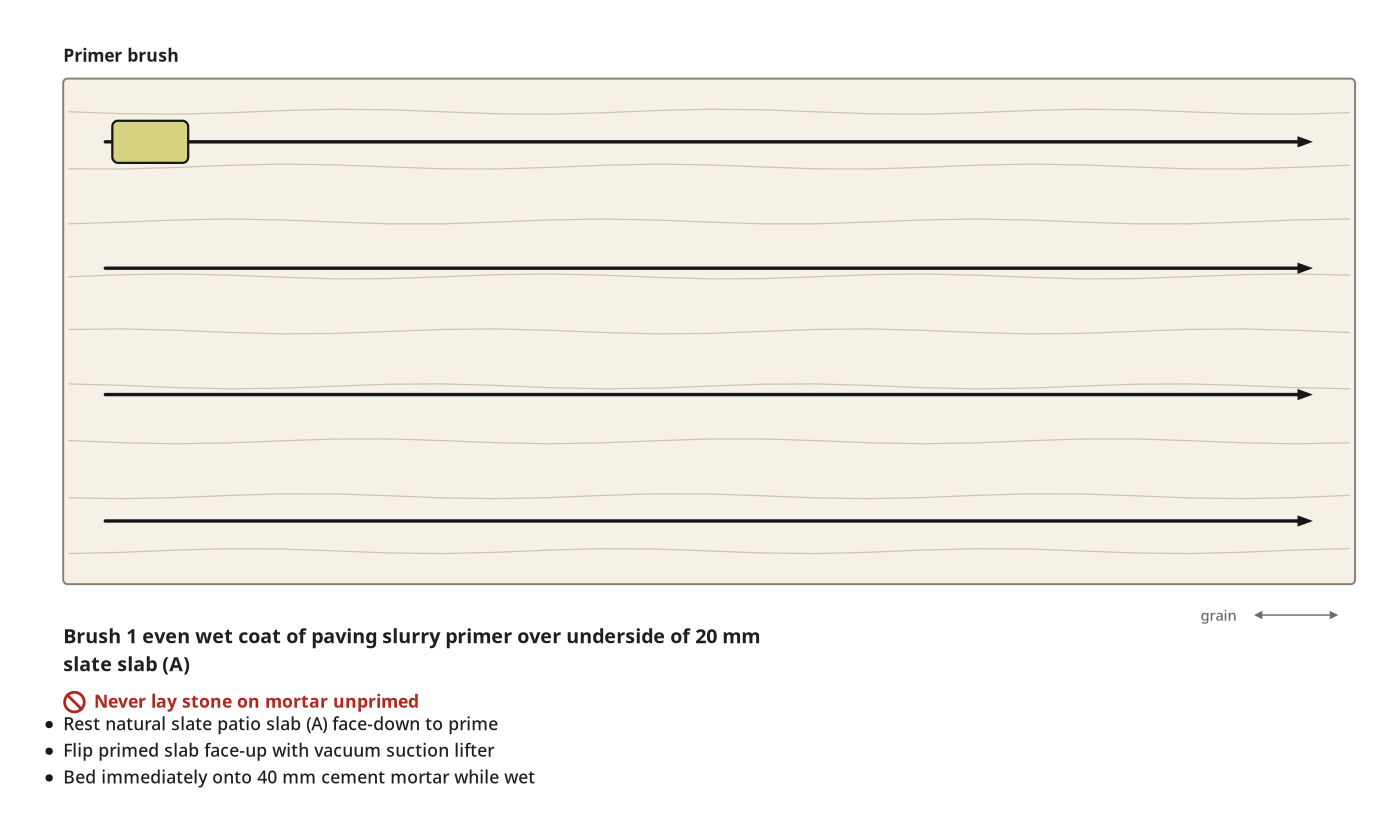
- 4.2 Brush slurry primer onto the back of the slab and attach suction lifter
- Rest a natural slate patio slab (A) face-down on the wheelbarrow.
- Brush an even paving slurry primer coat over the underside with a primer brush.
- Flip the primed slab face-up and press the vacuum suction lifter onto its center.
- 4.3 Lower the slab onto the mortar bed and space joints by eye
- Trowel a 40 mm cement mortar bed over the sub-base under the parallel string lines.
- With the suction lifter, lower the slab squarely onto the mortar bed and release the vacuum.
- Space joints against neighboring slabs by eye, not with 5 mm plastic spacers.
- Tap the slab down with a rubber mallet until the top face sits flush with the string lines.
Key measurements
- Mortar bed thickness: 40 mm troweled over sub-base.
- Slate slab thickness: 20 mm, primed on underside.
- Joint spacing: by eye for irregular natural stone (5 mm spacers only for uniform porcelain)
- Tip: Omit 5 mm plastic spacers on natural slate as stone sizes vary; space joints by eye to align rows.
- Tip: Use the vacuum suction lifter to keep wet slurry primer off your hands and avoid disturbing adjacent slabs.
- Heads up: Never lay natural stone on mortar before brushing paving slurry primer on the underside.
Before you move on: Sight along slab edges and string lines to check the stone sits flush, aligned with neighboring joints.
Step 5: Lay and Level Slab Using Intersecting String Lines
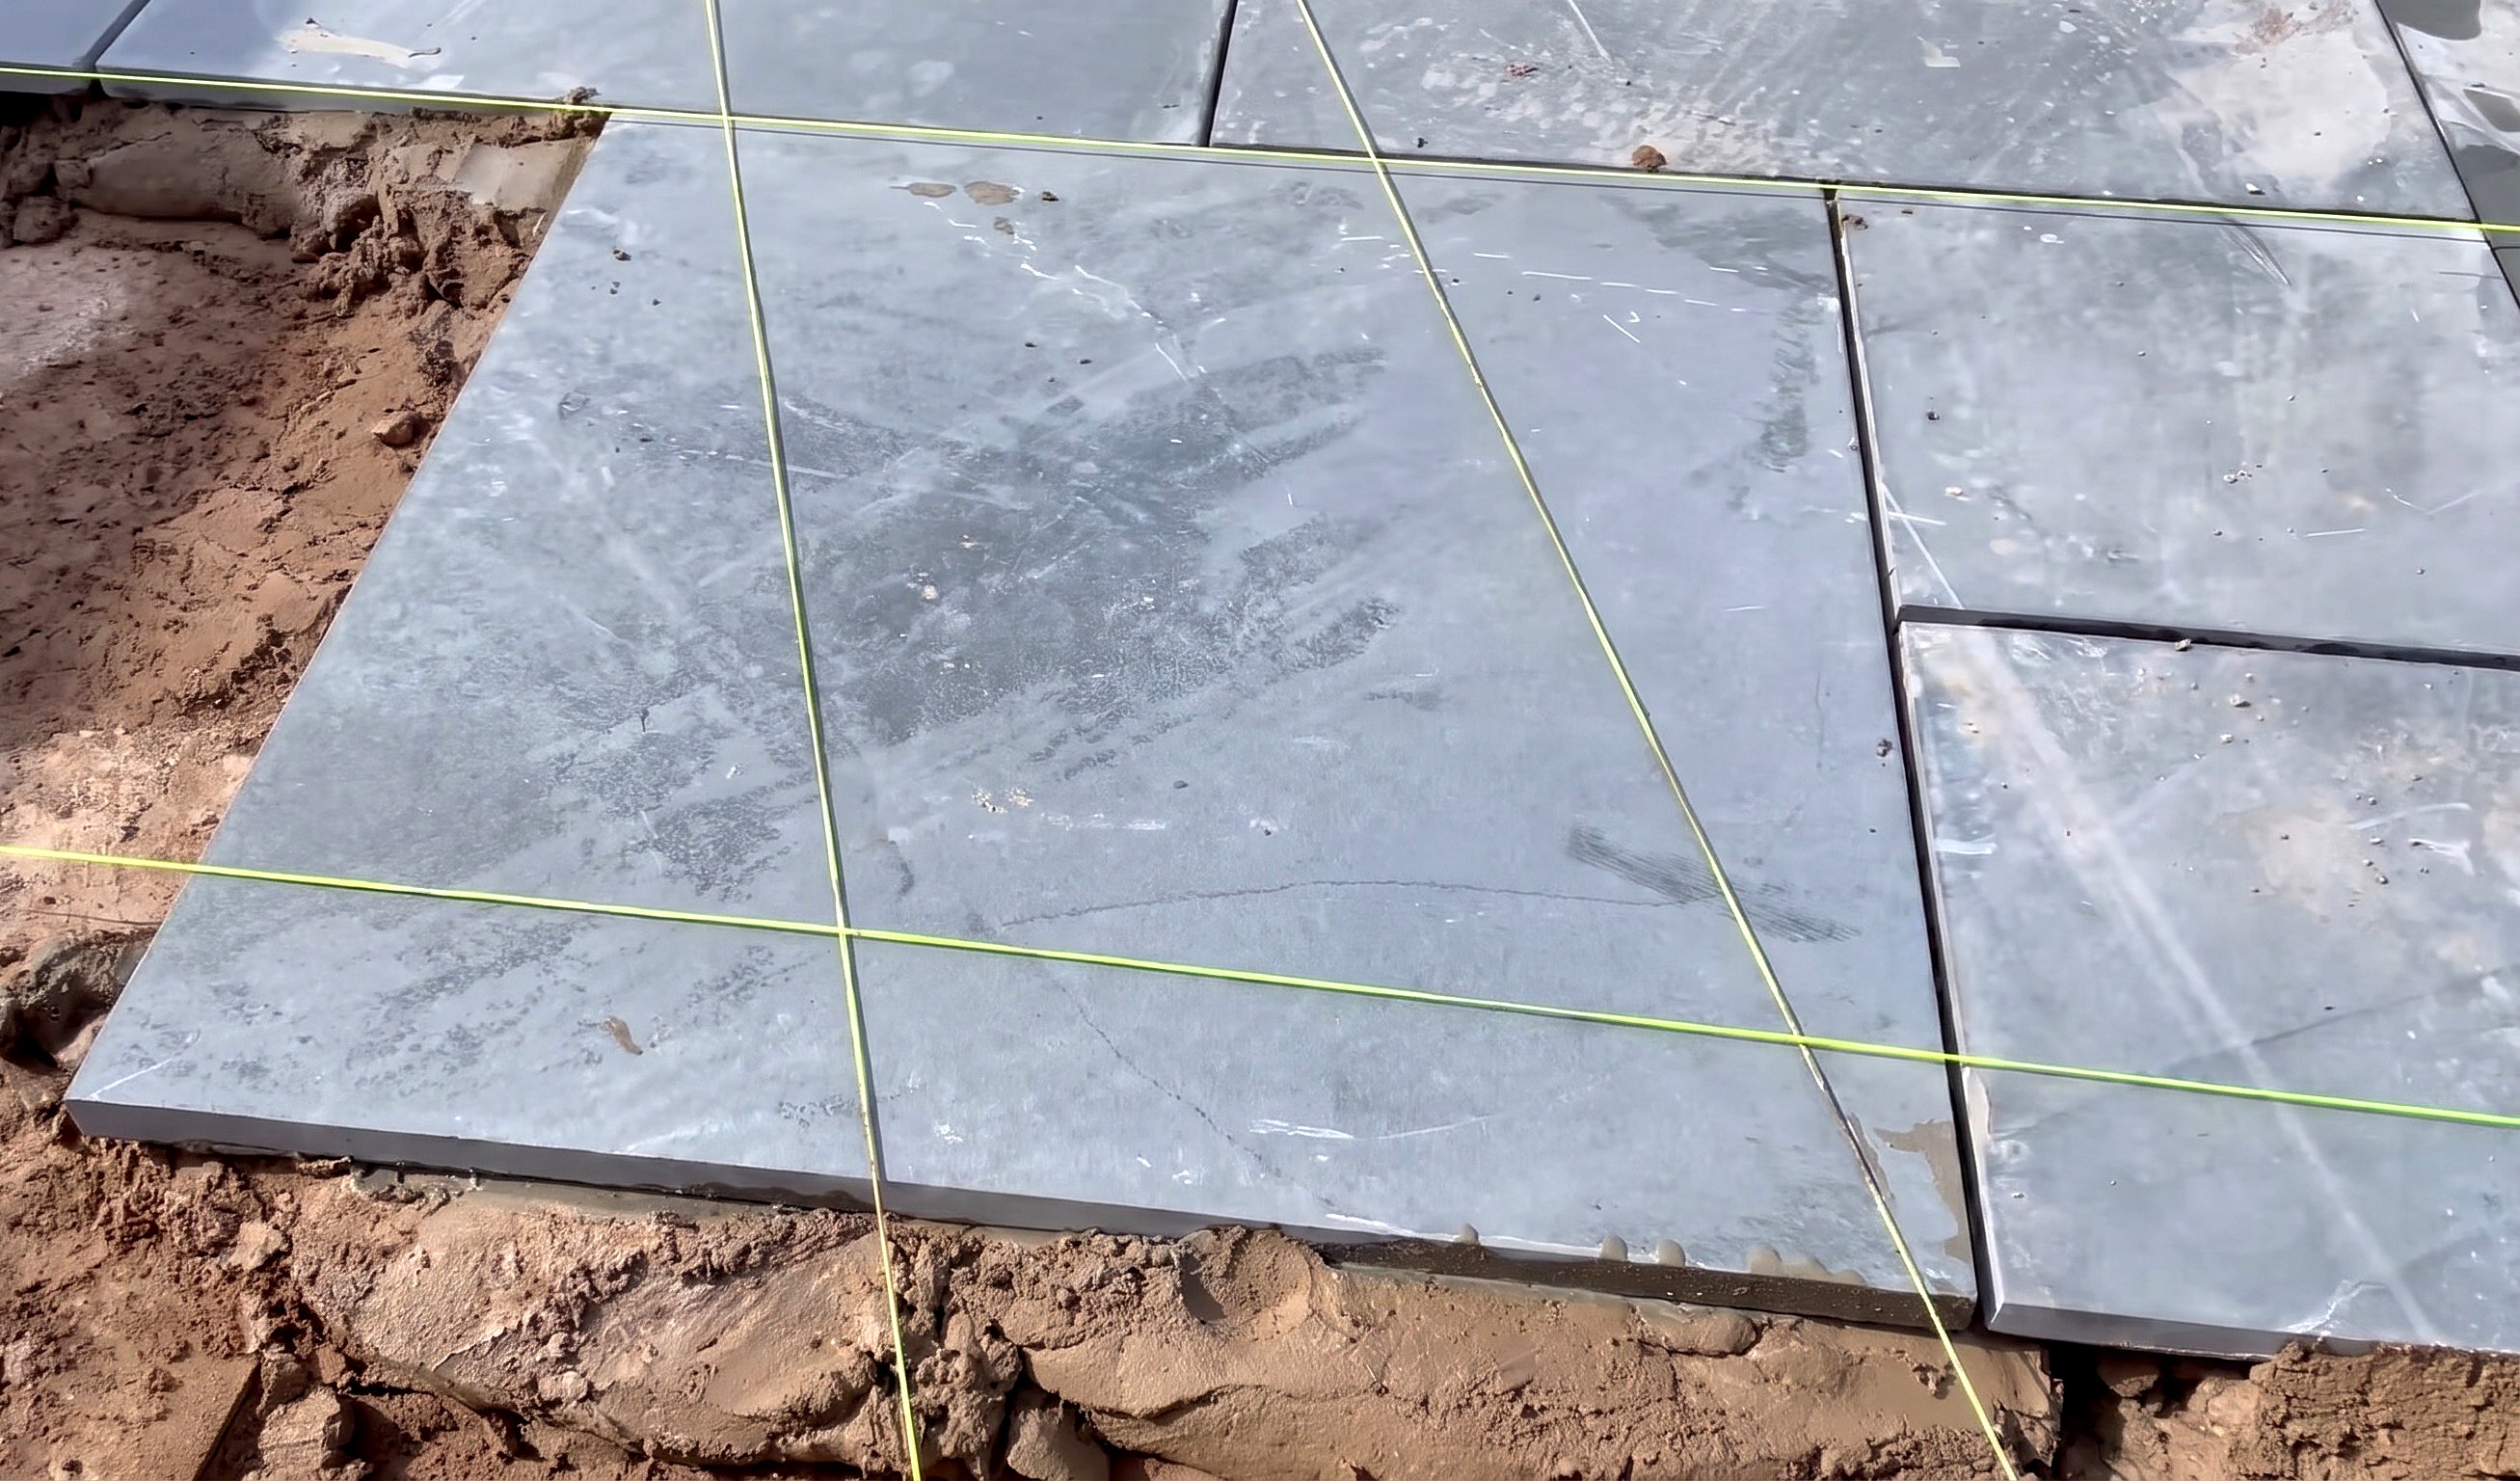
Final slab maneuvered under intersecting string lines and tapped down until lines flick freely across the top.
Parts in this step: (A) Natural slate patio slab
You'll need: String line, Corner blocks, Vacuum suction lifter, Rubber mallet, Natural slate patio slabs, Paving slurry primer, Cement mortar
- 5.1 Slide the slab underneath the intersecting string lines onto the mortar
- Grip primed natural slate patio slab (A) with the vacuum suction lifter.
- Hold intersecting string lines clear with your free hand.
- Angle the slab under crossing lines onto the furrowed 40 mm mortar bed.
- Switch off and remove the vacuum suction lifter once the stone rests flat on mortar.
- 5.2 Tap the slab down with a rubber mallet and flick-test the string lines
- Tap the slab corners and center down with a rubber mallet.
- Finger-flick each string line where it crosses the stone face.
- Stop tapping once the string line just kisses the stone and moves freely without lifting.
- Remove extra crossing string lines, leaving only two parallel lines for the remaining patio.
Key measurements
- String line clearance at finished slab face: 0 mm (just kissing stone when flicked)
- Tip: Two parallel string lines suffice for standard rows; remove four-way crossing lines once the plane is set.
- Heads up: Never leave a proud slab pushing up a string line, or it throws off every following slab's level.
Before you move on: Flick each string line across the slab face: it must vibrate freely and lightly kiss the stone without being pushed up.
Finishing
Line Removal and Jointing
- Once slabs are bedded, unhook the corner blocks and wind up the string lines.
- Unscrew the temporary roofing battens and timber packers from the walls.
- Fill slab joints once the mortar bed sets; pointing product is not specified.
Cure and Traffic
- Keep off new slabs until the 40 mm cement mortar bed cures.
- Check cement and slurry primer packs for cure times before adding garden furniture.
Alternatives
- For uniform manufactured porcelain slabs instead of natural slate, use 5 mm plastic tile spacers.
- With no perimeter walls, drive steel pins or wooden stakes to hold string lines.
Check before you call it done
| Check | What you should see | If not |
|---|---|---|
| Finger-flick the taut string lines above each laid slab. | The string line moves freely, barely kissing the stone surface without being pushed upward. | Tap proud areas down further with a rubber mallet until the string line sits slack-free on its plane. |
| Check the spirit level along perimeter battens and string lines. | Bubble sits just past the black indicator line for a 10 mm per 1 m drainage fall. | Adjust batten height or string line before laying more slabs. |
| Gauge the gap from taut string line to compacted sub-base before spreading mortar. | Full 60 mm clearance (work boot toe height) for a 40 mm mortar bed and 20 mm slab. | |
| Inspect joint widths between adjacent natural slate slabs along the row. | Evenly eye-adjust joints so slight natural stone size variations do not skew the pattern. |
These Specs are built from Tidybricks patio restore's video “Patio String Line Leveling and Slab Laying Guide”. Open the Patio String Line Leveling and Slab Laying Guide project page.
