Spetz Specs No. 6545: step-by-step build guide
Utility Pole Foot Bridge with 2x6 Wood Decking
The complete step-by-step guide made from Indy Farm Life's YouTube video, free on Spetz. For the video, a step-by-step player and answers to your questions, see the Utility Pole Foot Bridge with 2x6 Wood Decking project page.
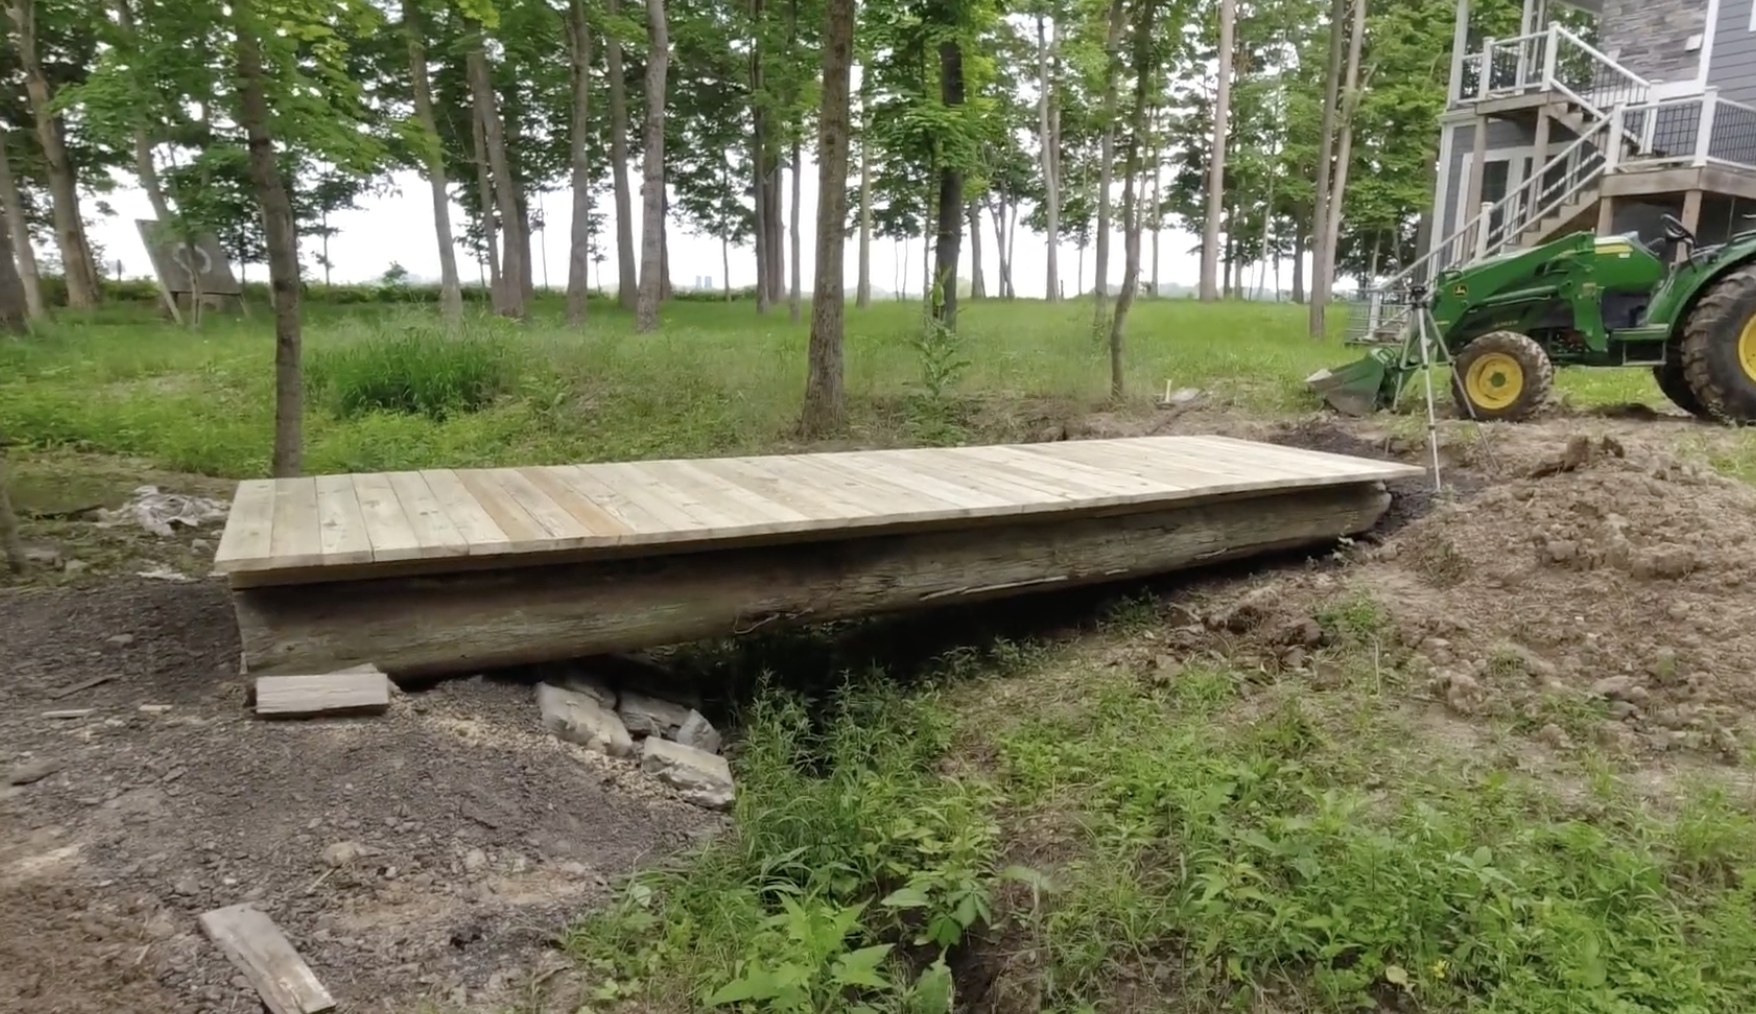
7 steps, 6 parts, 18 tools, 8 materials
Overview
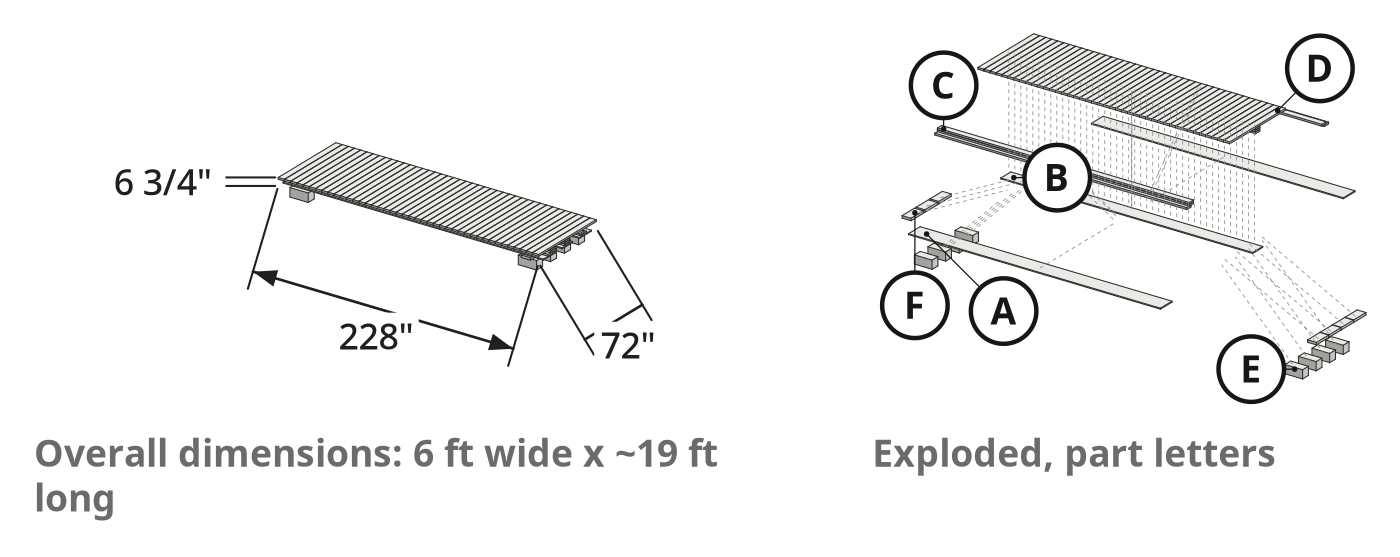
Finished size: 6 ft wide x ~19 ft long
What You Are Building
- Build a 6-foot-wide, 19-foot-long creek or drainage ditch bridge.
- Support foot traffic, lawn mowers, and golf carts; never drive a tractor across.
Why This Design Works
- Span the ditch with three repurposed utility poles on cinder block foundations.
- Shim multi-ply 2x6 runners on the tapered poles for a level deck frame.
- Screw horizontal 2x6 planks across the runners to lock the round poles laterally.
What It Takes
- Hoist the heavy poles with a tractor, pallet forks, bucket, and chains.
- Take several days so rain settles the ground before shimming.
- Cut and fasten pressure-treated 2x6 lumber: miter saw, circular saw, and impact driver.
What Decides Success
- Match both bank foundation elevations with a stretched string line.
- Shim the lengthwise 2x6 runners flat and level across the tapered poles.
Health and safety
Tractor Rigging and Trailer Safety
- Securely mount the pallet forks on the front-end loader and inspect all log chains for damage before lifting the utility poles.
- Stand well clear of suspended utility poles while lifting and positioning them, in case a log chain slips or a pole shifts.
- Chock the utility trailer wheels before uncoupling or parking on sloped or uneven ground while staging the 2x6 lumber.
- Keep the compact utility tractor on firm ground when dumping asphalt millings, and never drive the tractor onto the bridge deck.
Treated Wood and Dust Hazards
- Wear heavy gloves and long sleeves when handling repurposed utility poles and pressure-treated 2x6 boards to avoid skin contact with chemical preservatives.
- Wear a dust mask and eye protective equipment when cutting pressure-treated 2x6 boards or blowing sawdust with the cordless leaf blower.
- Wash hands thoroughly after handling treated utility poles, pressure-treated lumber, and asphalt millings, and never burn treated wood offcuts.
Saw and Driver Operation
- Wear eye and hearing protective equipment whenever operating the sliding compound miter saw, cordless circular saw, or cordless impact driver.
- Support 2x6 boards on the miter saw stand, keep hands clear of the blade, and let it stop completely before lifting.
- Keep both hands on the cordless circular saw and maintain stable footing on the deck when trimming the overhanging 2x6 board edges.
Manual Handling and Bank Work
- Use the cant hook to roll utility poles onto the cap blocks, keeping hands and feet clear of pinch zones.
- Lift cinder blocks, concrete cap blocks, and hardened concrete bags with your legs, and watch your footing on the sloped ditch banks.
- Wear eye protective equipment and keep limbs clear when swinging the sledgehammer or retracting the folding utility knife after cutting string lines.
Tools
- Sledgehammer (hand tool) (optional)
- Shovel (round-point shovel)
- String line (mason's line)
- Compact utility tractor with front-end loader (compact utility tractor, John Deere, 4052R, H180 front-end loader)
- Pallet forks attachment (front-end loader attachment, John Deere)
- Log chains (heavy-duty steel chain)
- Cant hook (log handling tool) (optional)
- Spirit level (box beam level, Pittsburgh)
- Utility trailer (tandem-axle utility trailer) (optional)
- Cordless impact driver (1/4-inch hex impact driver, DeWalt, 20V MAX)
- Sliding compound miter saw (corded miter saw, Makita)
- Miter saw stand (portable roller stand, Craftsman) (optional)
- Speed square (rafter square) (optional)
- Chalk line (chalk line reel)
- Cordless circular saw (handheld circular saw, DeWalt, 20V MAX)
- Cordless leaf blower (cordless axial leaf blower, DeWalt) (optional)
- 3-point hitch trailer mover (tractor 3-point hitch attachment) (optional)
- Utility knife (folding utility knife)
Materials
- Cinder blocks (8 blocks (4 per bank), concrete masonry unit, Standard 2-core concrete masonry units)
- Asphalt millings and fill dirt (aggregate fill)
- Hardened concrete bags (As needed to cover the bank slope, riprap / erosion control, Hardened bags of cement or mortar mix (or concrete slabs))
- Utility poles (3 poles, treated wood utility poles, 12 to 15 in diameter x ~19 ft long)
- 2x6 pressure-treated boards (pressure-treated dimensional lumber, 2x6)
- Solid concrete cap blocks (7 blocks, concrete cap block)
- Wood shims and scrap strips (wood shims)
- Exterior screws (exterior wood screws, 3 in or 3-1/2 in)
Hardware
| Hardware | Size | Count | Used in steps |
|---|---|---|---|
| 3 in or 3-1/2 in Exterior screws | ~252 | 3, 5 |
Cut list
| Part | Name | Qty | Size | Notes |
|---|---|---|---|---|
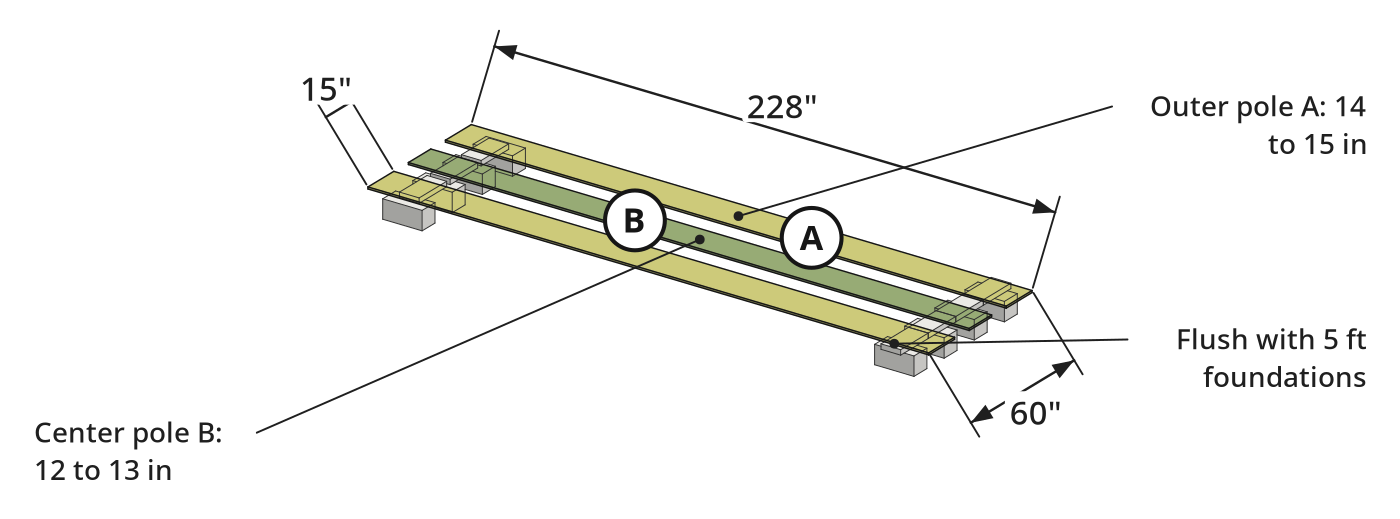
| A | Outer utility pole girder | x2 | 3/4" (T) × 15" (W) × 228" (L) | Uncut repurposed utility poles with a ~2 in end-to-end taper; positioned along the outer edges of the 5 ft wide foundations. |
| B | Center utility pole girder | x1 | 3/4" (T) × 13" (W) × 228" (L) | Uncut repurposed utility pole positioned down the center between the two outer poles. |
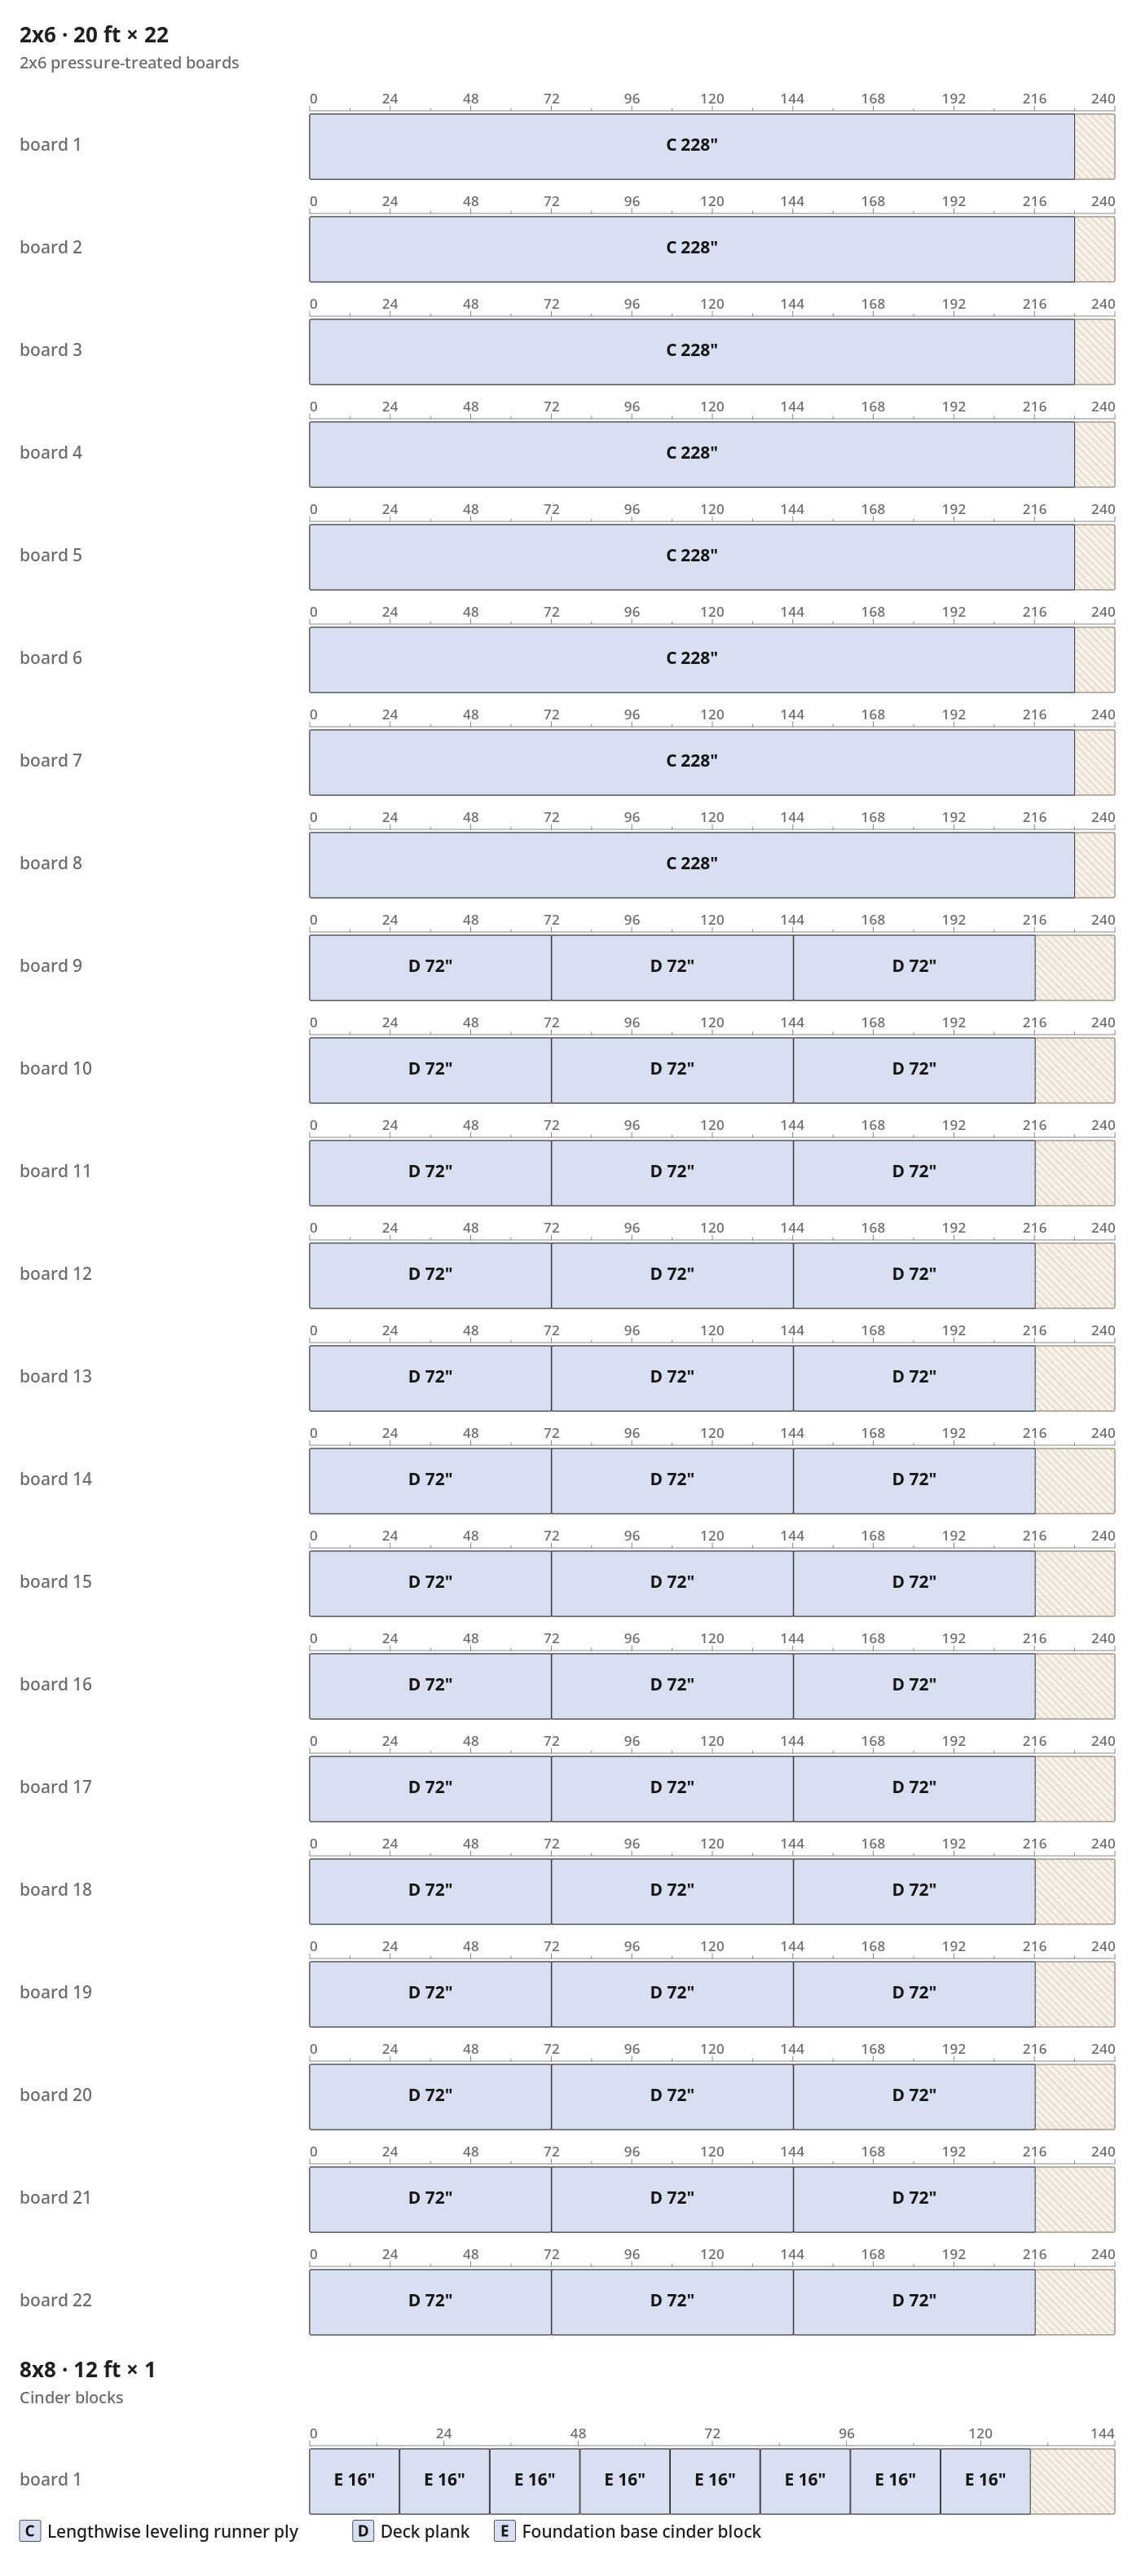
| C | Lengthwise leveling runner ply | x8 | 1 1/2" (T) × 5 1/2" (W) × 228" (L) | Full-length runner plies laid flat along the top of the three ~19 ft utility poles and shimmed between layers to level the framing: 3 plies on the near outer pole, 3 plies on the center pole, and 2 plies on the far outer pole. The two outer runners are spaced 4 ft apart (outside-to-outside). |
| D | Deck plank | x42 | 1 1/2" (T) × 5 1/2" (W) × 72" (L) | Crosscut to 6 ft on a miter saw, fastened side-by-side across the three leveled runners with a ~1 ft overhang on each side using a spacer jig, then chalk-lined and trimmed straight along both overhanging edges with a circular saw. |
| E | Foundation base cinder block | x8 | 7 1/2" (T) × 7 1/2" (W) × 16" (L) | Set vertically in trenches on both creek banks (4 blocks per bank spanning 5 ft wide). |
| F | Solid concrete cap block | x7 | 2" (T) × 8" (W) × 16" (L) | Placed atop the vertical cinder block foundations to distribute load and adjust elevation (3 blocks aligned with the poles on one bank and 4 spanning across the other before substituting a wood top plate). |
What to buy
- Buy 22 × 2x6 20 ft (2x6 pressure-treated boards)
- Buy 1 × 8x8 12 ft (Cinder blocks)
- Buy 7 × Solid concrete cap blocks each (Solid concrete cap blocks)
- Buy 3 × Utility poles each (Utility poles)
Before you start
Foundations and Site Prep
- Stretch a string line across the ditch to match bank elevations.
- Trench high banks and raise low banks with compacted asphalt millings.
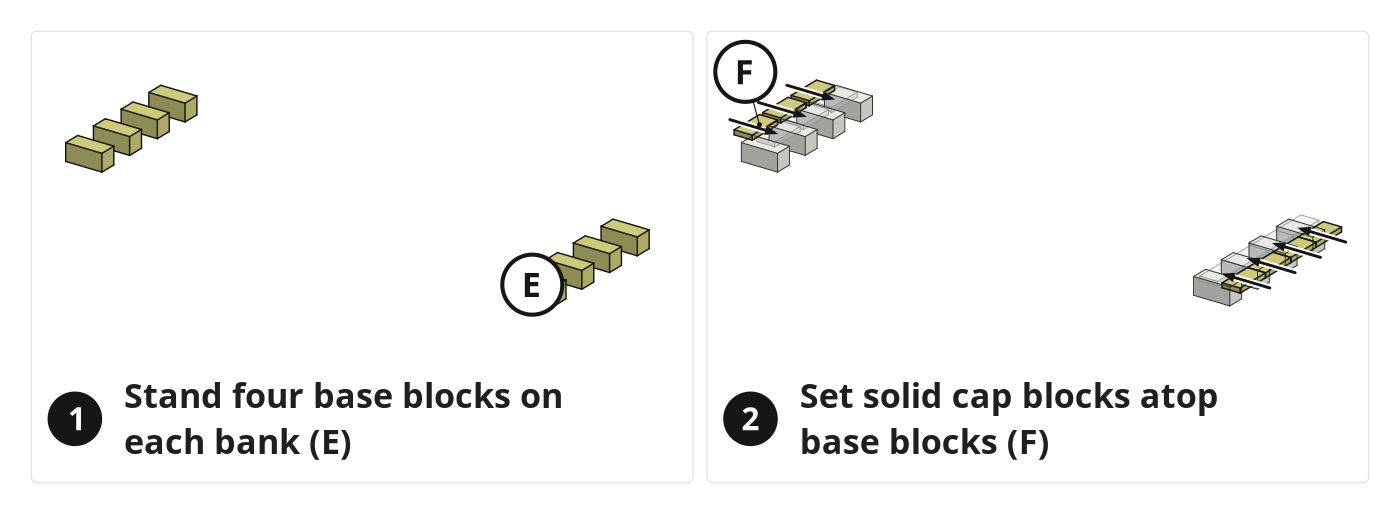
- Stand four foundation base cinder blocks (E) per bank across a 5-foot width.
- Pack asphalt millings around the blocks and tamp both foundations level.
Poles and Lumber
- Pick two 14-to-15-inch outer poles and one 12-to-13-inch center pole, about 19 feet long.
- Note the 2-inch end-to-end pole taper and mark curves so crowns face up.
- Cut a 1-foot scrap overhang jig and gather wood shims.
Step by step
Step 1: Reinforce the Bank and Set Foundation Cap Blocks
Armor the slope against washout and cap both cinder block foundations for the utility poles.
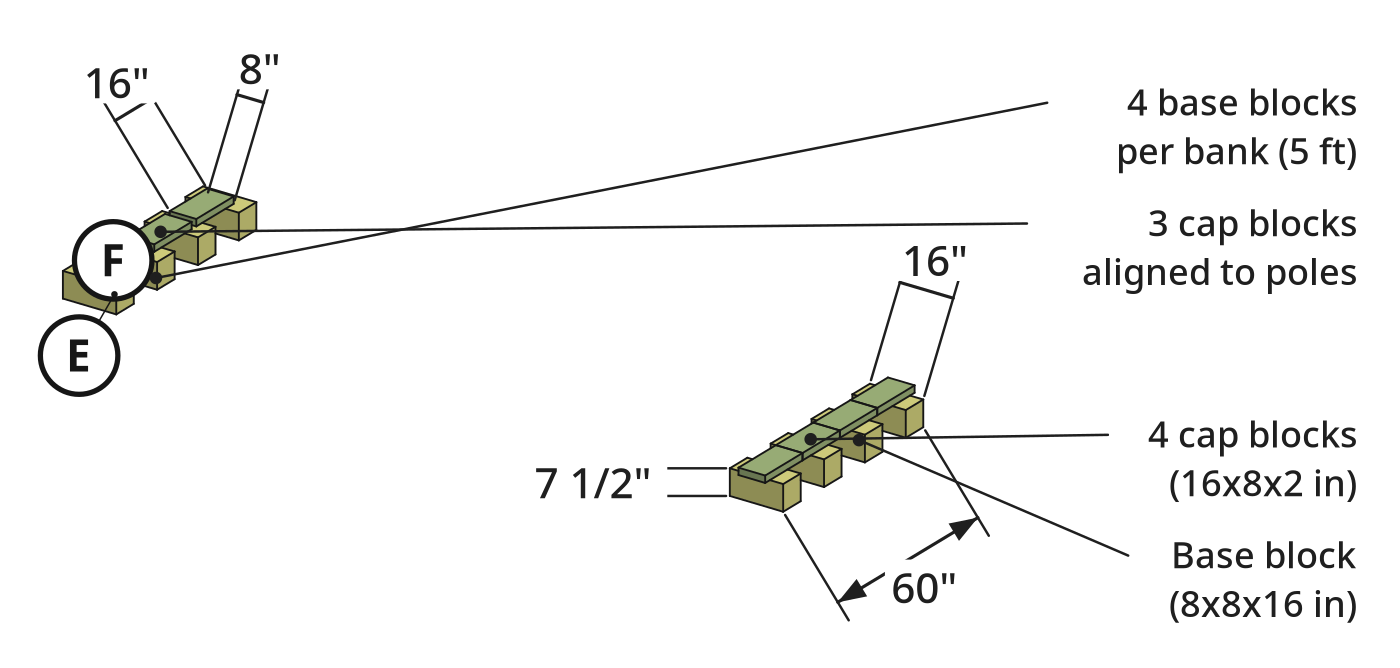
Parts in this step: (E) Foundation base cinder block, (F) Solid concrete cap block
You'll need: Compact utility tractor with front-end loader, Pallet forks attachment, String line, Sledgehammer, Shovel, Cinder blocks, Asphalt millings and fill dirt, Hardened concrete bags, Solid concrete cap blocks
- 1.1 Bring in hardened concrete bags and place them on the bank slope
- Move hardened concrete bags to the bank on the tractor pallet forks.
- Lay the bags down the front slope of the asphalt milling mound before decking.
- Cover exposed ditch-face fill so runoff cannot wash out the foundation.
- 1.2 Set solid concrete cap blocks on both cinder block foundations
- Set three pairs of solid concrete cap blocks (F) atop near-bank foundation base cinder blocks (E).
- The 16 x 8 x 2 in cap block cut-list dimensions are estimated.
- Align the three cap block pairs with the three poles along the 5-foot trench.
- Test-fit four far-bank cap blocks (F), then substitute a pressure-treated wood top plate.
Key measurements
- Foundation width: 5 ft (60 in) across 4 vertical cinder blocks per bank
- Cap block dimensions: 16 x 8 x 2 in (estimated, not stated in the sources)
- Tip: Install erosion control on the foundation mound face before decking, while access is open.
- Tip: Use solid cap blocks on top of vertical cinder blocks to distribute the heavy point load of the utility poles and adjust for minor elevation differences between banks.
Before you move on: Check both capped foundations sit level and match the string line elevation across the ditch.
Step 2: Move and Position the Utility Pole Girders
Stage all three utility poles and hoist them across onto both bank foundations.
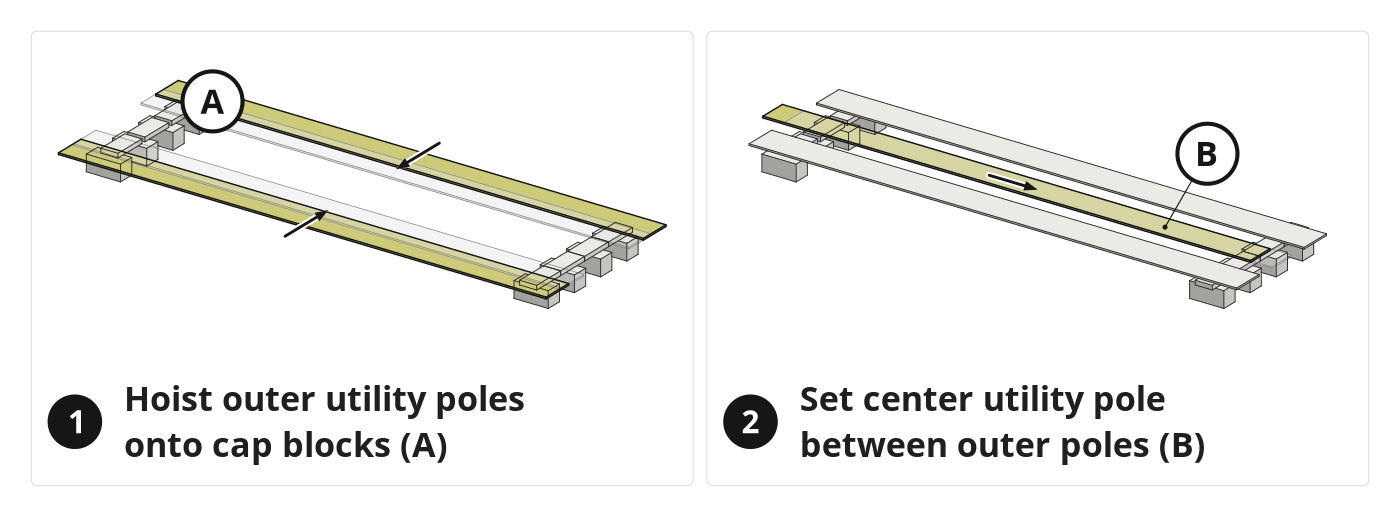
Parts in this step: (A) Outer utility pole girder, (B) Center utility pole girder
You'll need: Compact utility tractor with front-end loader, Pallet forks attachment, Log chains, Cant hook, Spirit level, Utility poles, Solid concrete cap blocks
- 2.1 Stage the utility poles near the ditch with pallet forks
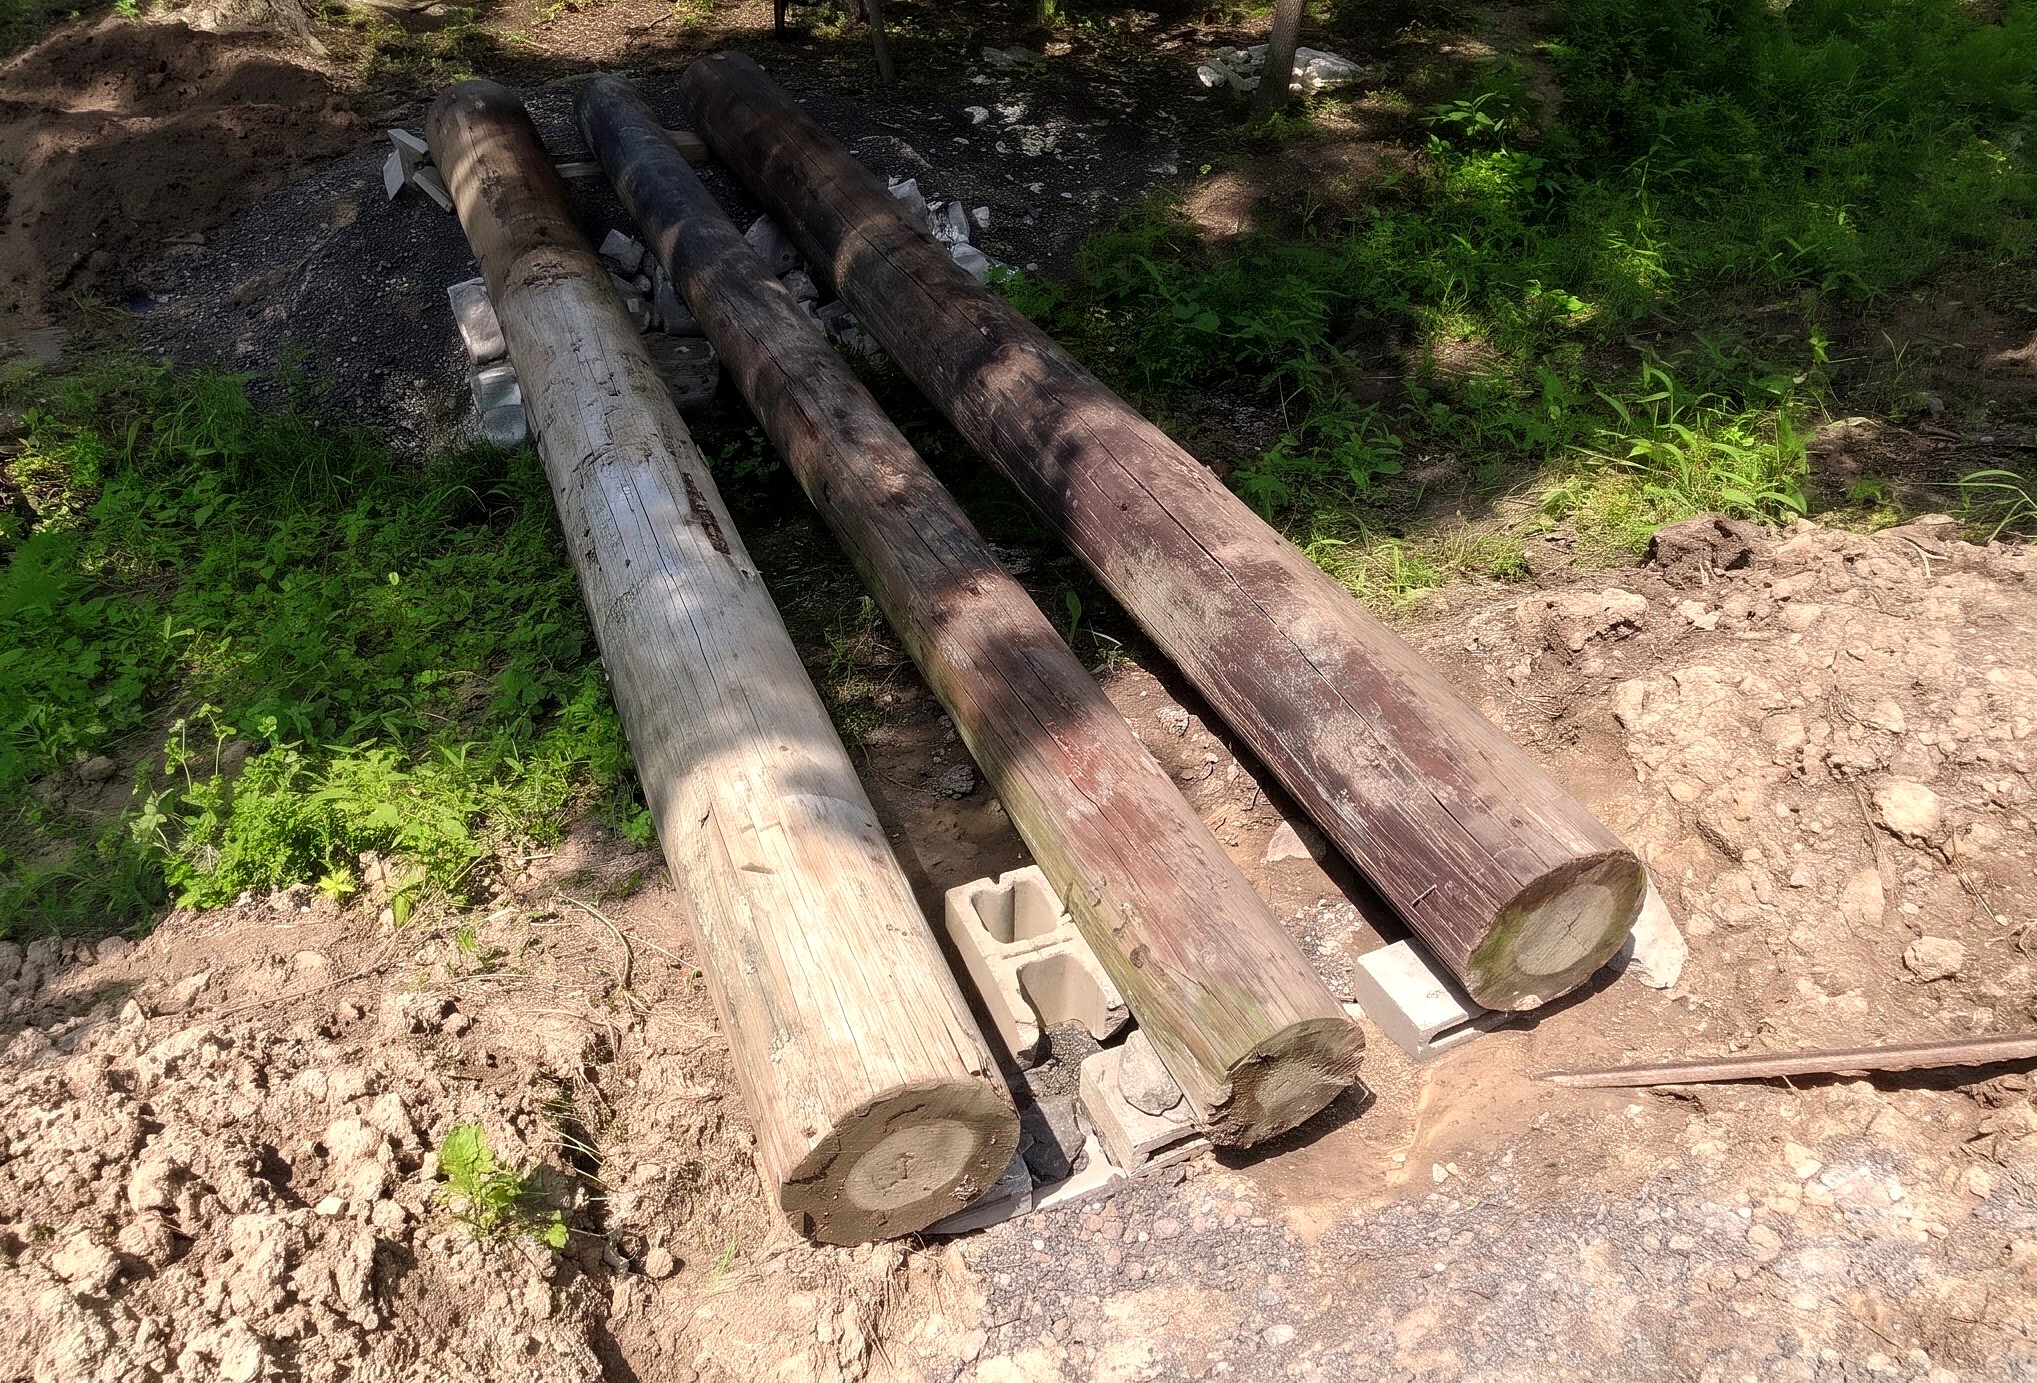
- Slide tractor pallet forks under the two outer utility pole girders (A) and center girder (B).
- Lift, spin, and push all three poles into staging by the ditch.
- Turn curved poles crown-up before rigging the chains.
- 2.2 Hoist and set the first outer utility pole across the ditch
- Lock both pallet forks together with a log chain as a boom lift point.
- Chain the first 14-to-15-inch outer utility pole girder (A) and pull it across the ditch.
- Hoist the near end onto outer cap blocks (F), drive across, and set the far end on the top plate.
- Align after setting all three poles so later lifts do not bump it.
- 2.3 Push and hoist the center utility pole into position
- Push the 12-to-13-inch center girder (B) across the ditch with the loader.
- Hoist both ends of center pole (B) onto middle supports with the chained forks.
- Rig and hoist the second outer girder (A) onto the opposite edge of the 5-foot foundations.
- Roll poles into alignment with a cant hook; let rain settle the foundations before shimming.
Key measurements
- Outer pole diameter: 14 to 15 in at thick end, ~2 in taper over ~19 ft
- Center pole diameter: 12 to 13 in across ~19 ft (~228 in) span
- Outer pole spacing: 5 ft outside-to-outside, flush with the cinder block foundations
- Tip: Stage all three utility poles right next to the ditch before parking the tractor on the opposite bank to hoist them across.
- Tip: Chain both pallet forks together when lifting heavy loads from one fork tip.
- Tip: Set all three poles across the ditch before aligning with a cant hook, or setting the others may bump the first.
- Tip: Let a rainstorm settle the ground and foundation millings under the utility poles before shimming the deck framing.
- Heads up: Stand clear of suspended utility poles when lifting with pallet forks and chains in case a chain slips or a pole shifts.
Before you move on: Check settled poles sit stable on the cap blocks and top plate with a spirit level.
Step 3: Stage Lumber and Attach Initial 2x6 Runners
Position the lumber trailer beside the bridge and build three shimmed, level 2x6 runners atop the utility poles.
Parts in this step: (C) Lengthwise leveling runner ply
You'll need: Compact utility tractor with front-end loader, 3-point hitch trailer mover, Utility trailer, Spirit level, Cordless impact driver, 2x6 pressure-treated boards, Wood shims and scrap strips, Exterior screws
- 3.1 Back the lumber trailer up to the bridge site
- Mount the tractor's 3-point hitch trailer mover and back the loaded utility trailer to the bridge.
- Chock trailer tires on slopes before uncoupling or working.
- Lower the trailer ramp for a level workstation by the ditch.
- 3.2 Stack, shim and level the 2x6 runners on the poles
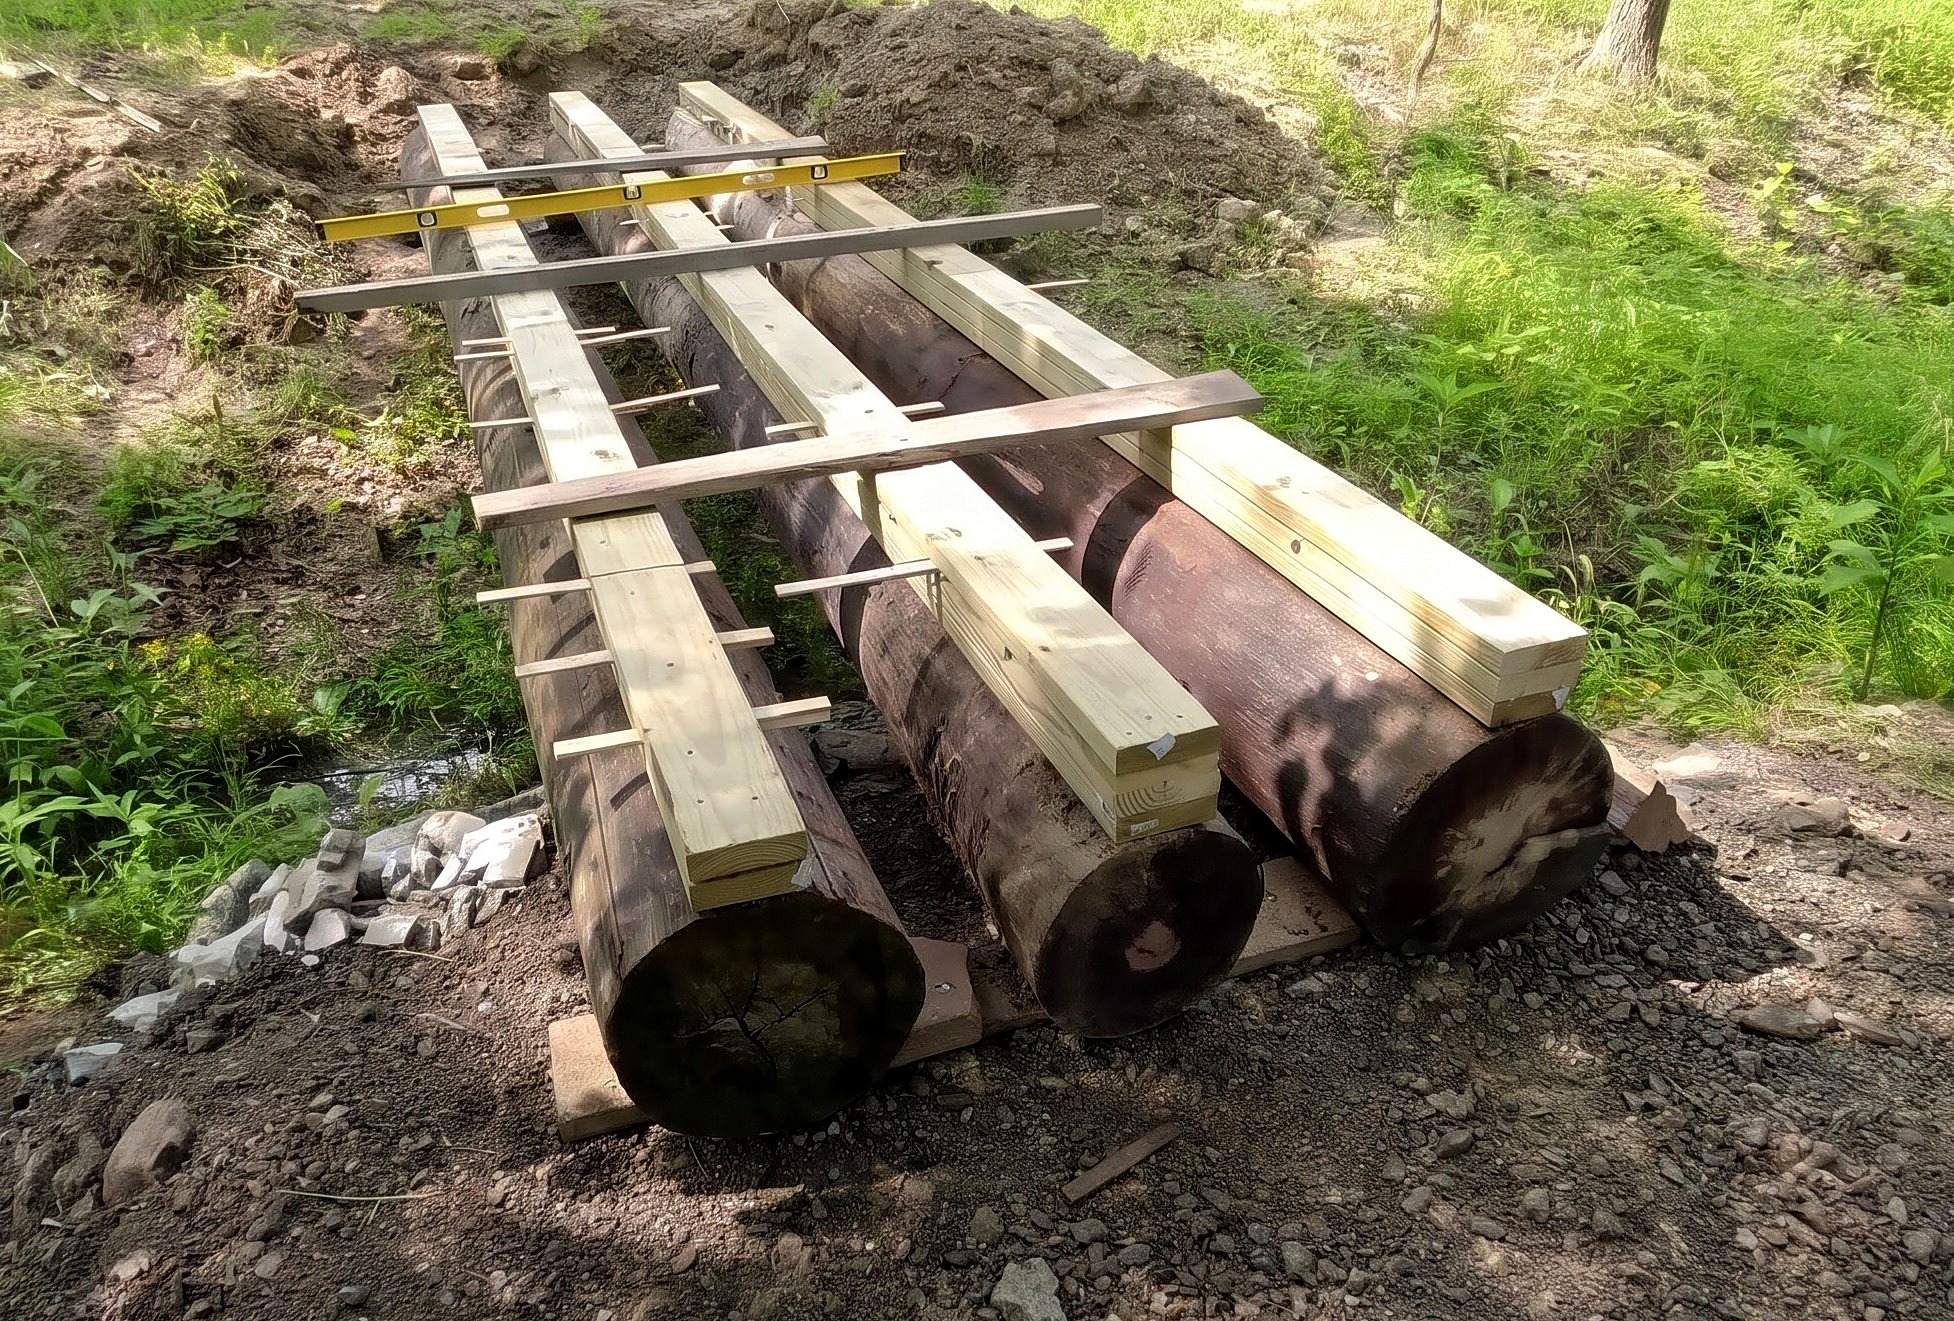
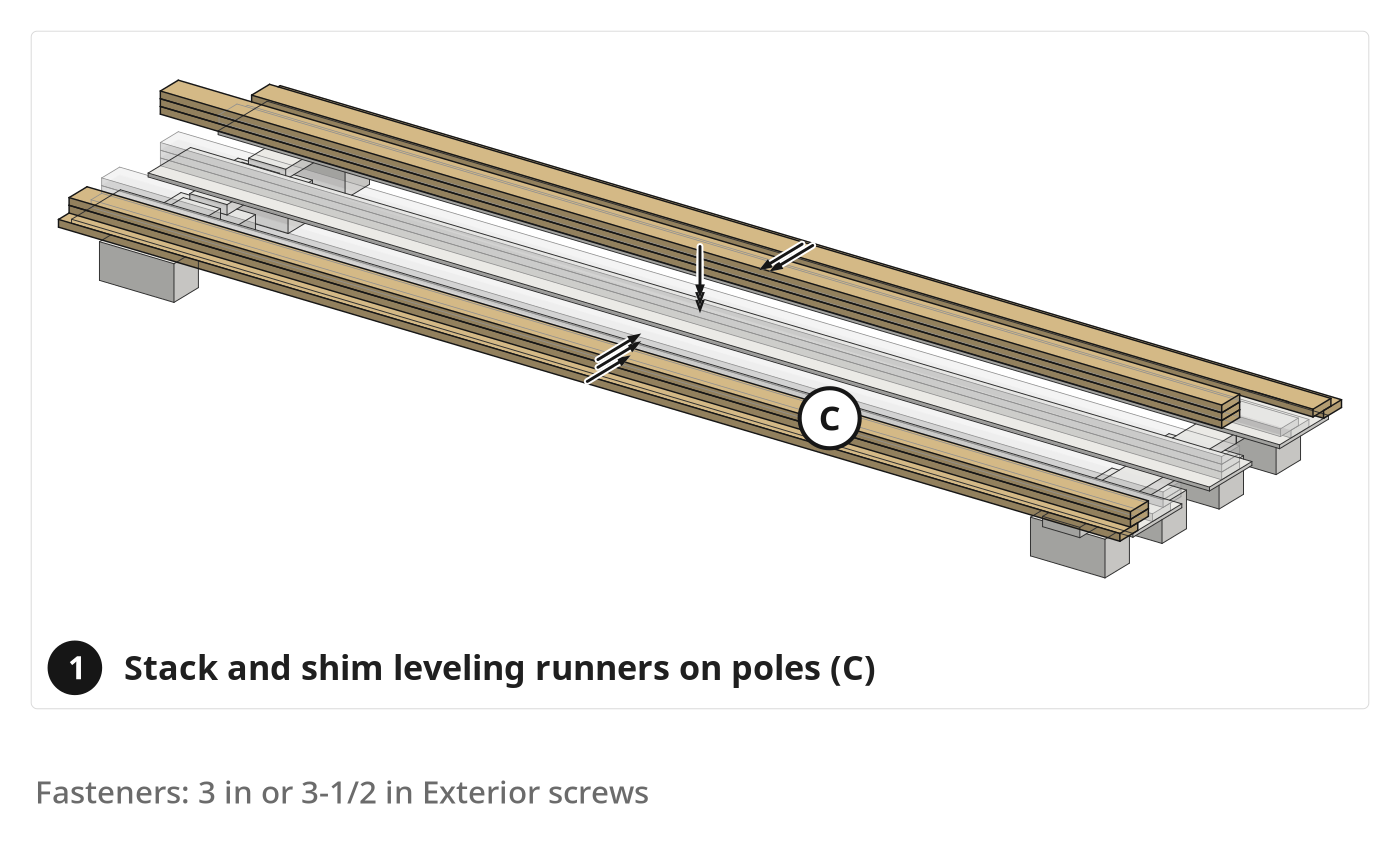
- Lay the first layer of leveling runner plies (C) flat along all three poles.
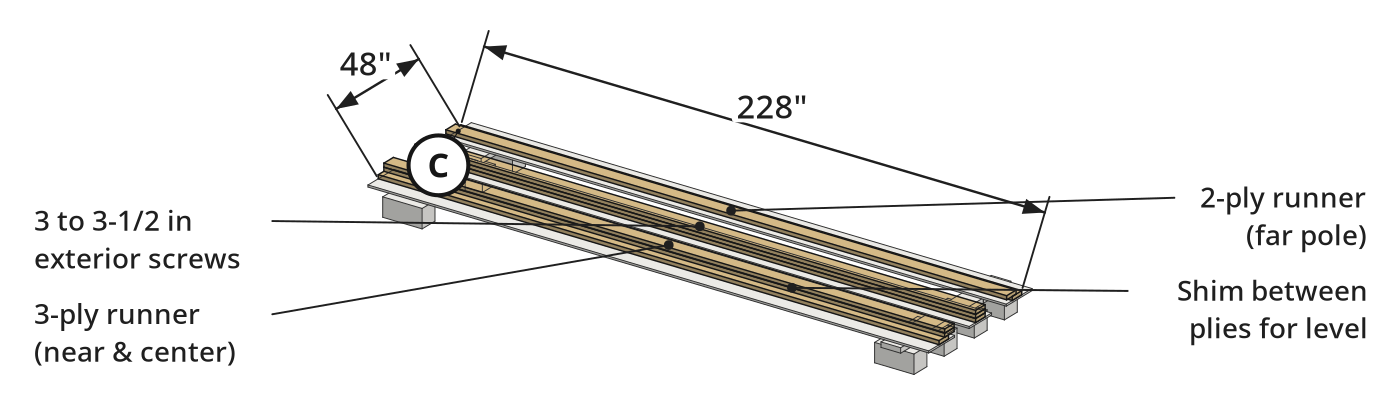
- Space outer runners (C) 4 feet apart outside-to-outside for a mower and golf cart wheelbase.
- Stack runner plies (C): two on the far outer pole, three on the center and near outer poles.
- Wedge wood shims between plies for pole taper and crown until all three runners read level.
- Drive 3-inch or 3-1/2-inch exterior screws through each ply; add temporary cross braces so poles cannot roll.
Key measurements
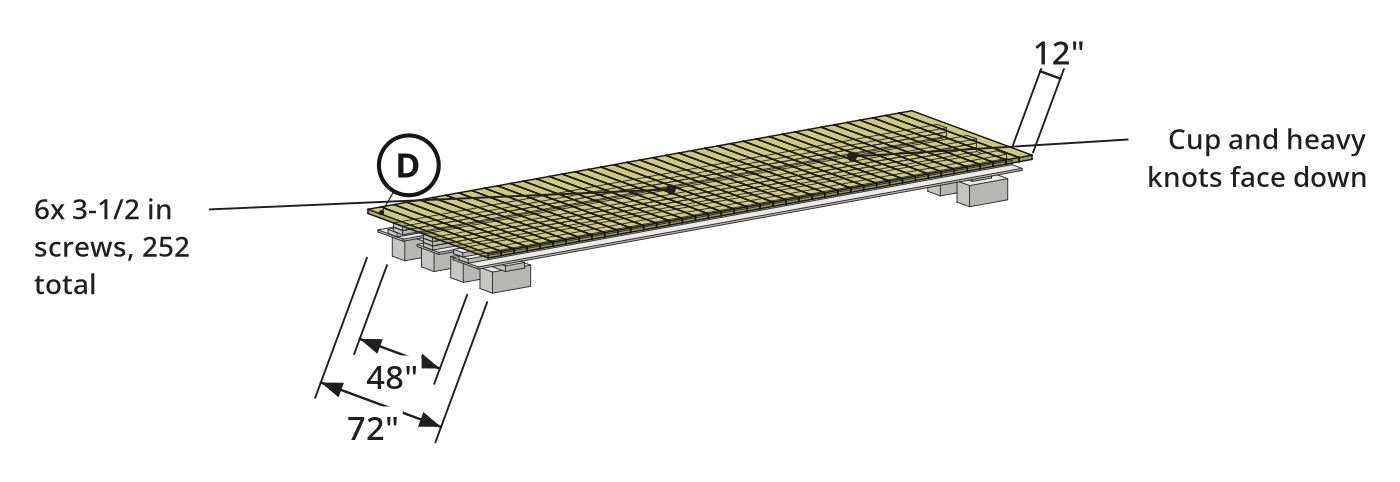
- Outer 2x6 runner span: 4 ft (48 in) outside-to-outside
- Runner ply stack: 3 plies on near outer and center poles, 2 plies on far outer pole
- Tip: Use a tractor 3-point hitch trailer mover to maneuver a loaded lumber trailer into tight wooded areas.
- Tip: Screw temporary cross braces across the runners so the round poles cannot roll out of square before decking.
- Heads up: Chock trailer tires when uncoupling or parking on uneven ground.
Before you move on: Check all three runners read level lengthwise and across the span with a spirit level.
Step 4: Cut and Dry-Fit the 2x6 Deck Boards
Cut 6-foot 2x6 deck planks, trim protruding shims, and dry-fit planks across the runners.
Parts in this step: (D) Deck plank
You'll need: Sliding compound miter saw, Miter saw stand, Utility knife, 2x6 pressure-treated boards, Wood shims and scrap strips
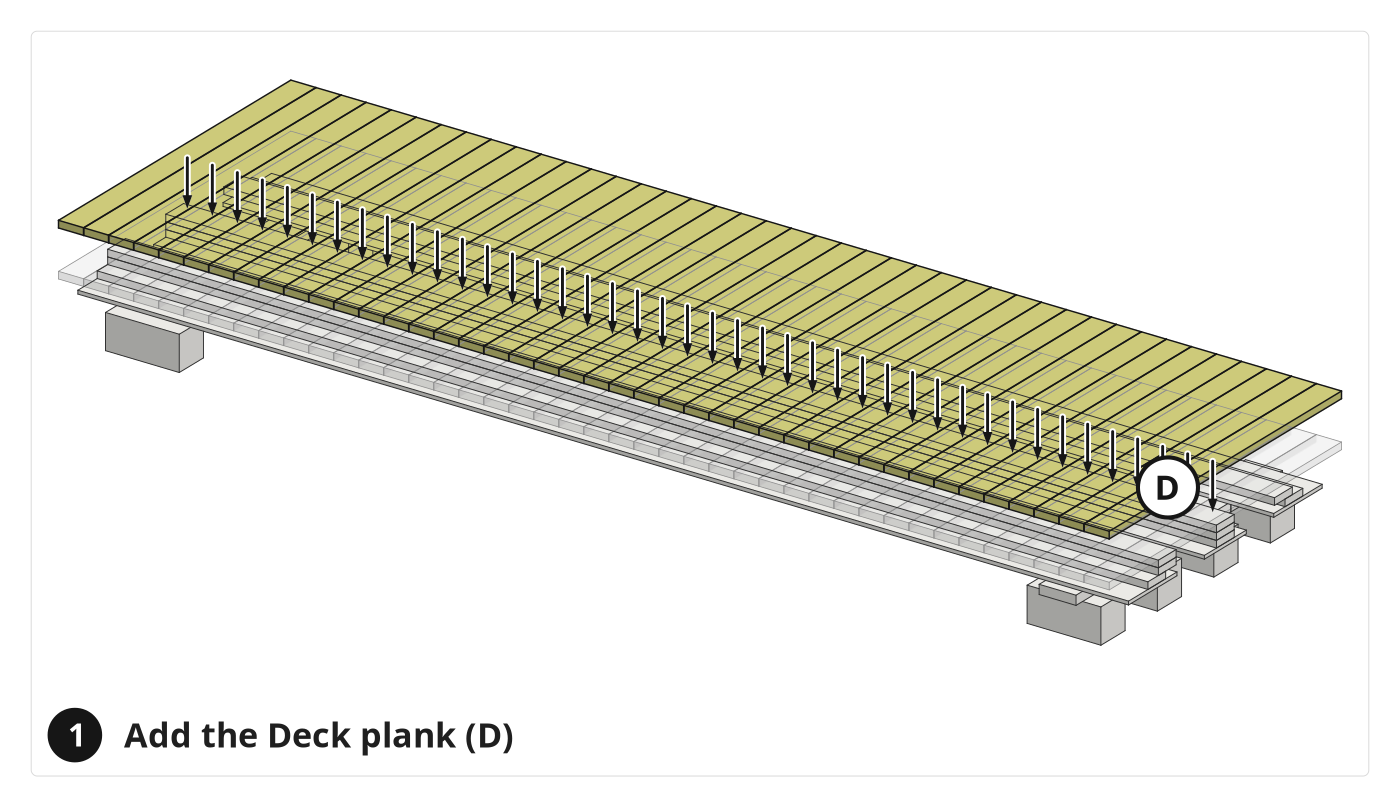
- 4.1 Cut the 2x6 deck boards to length and lay them across the runners
- Set the sliding compound miter saw on the miter saw stand by the bridge.
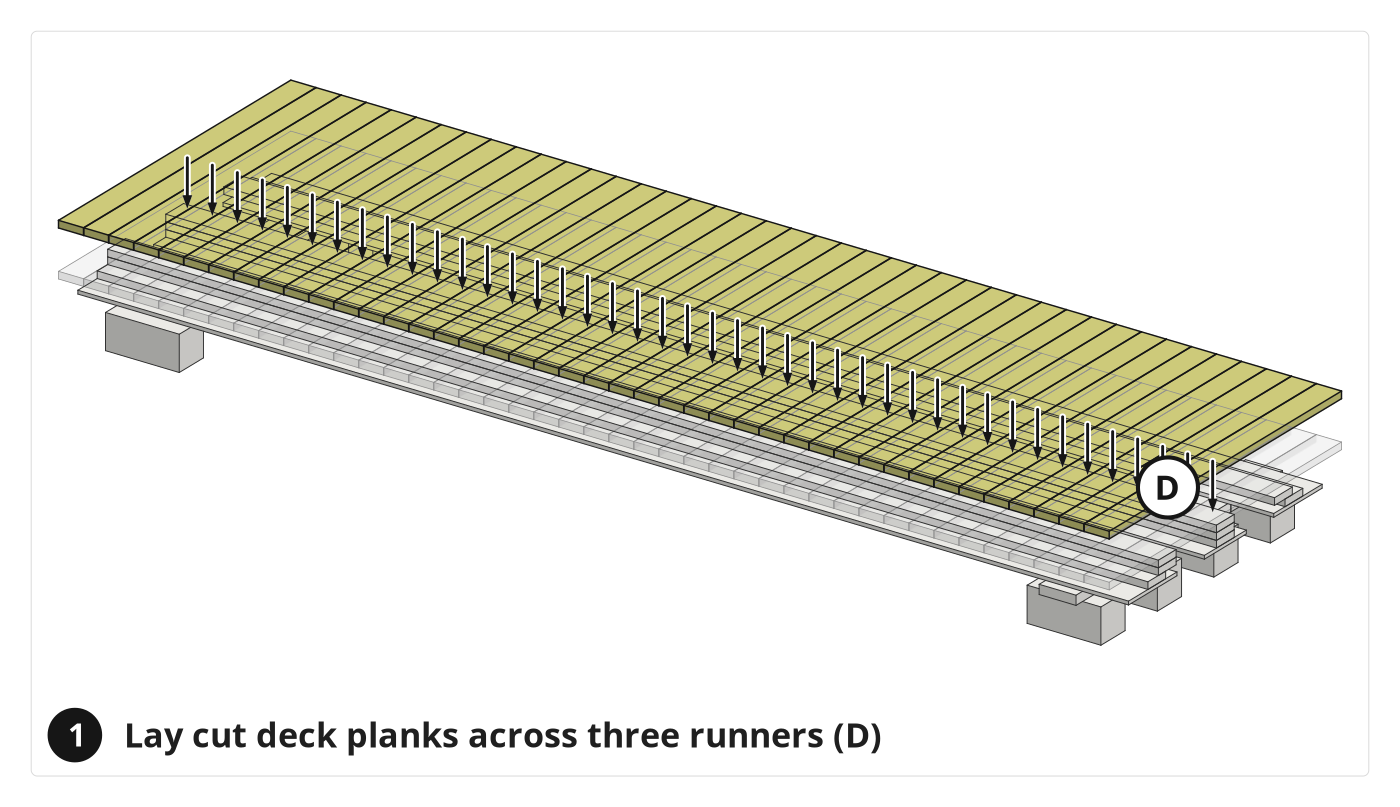
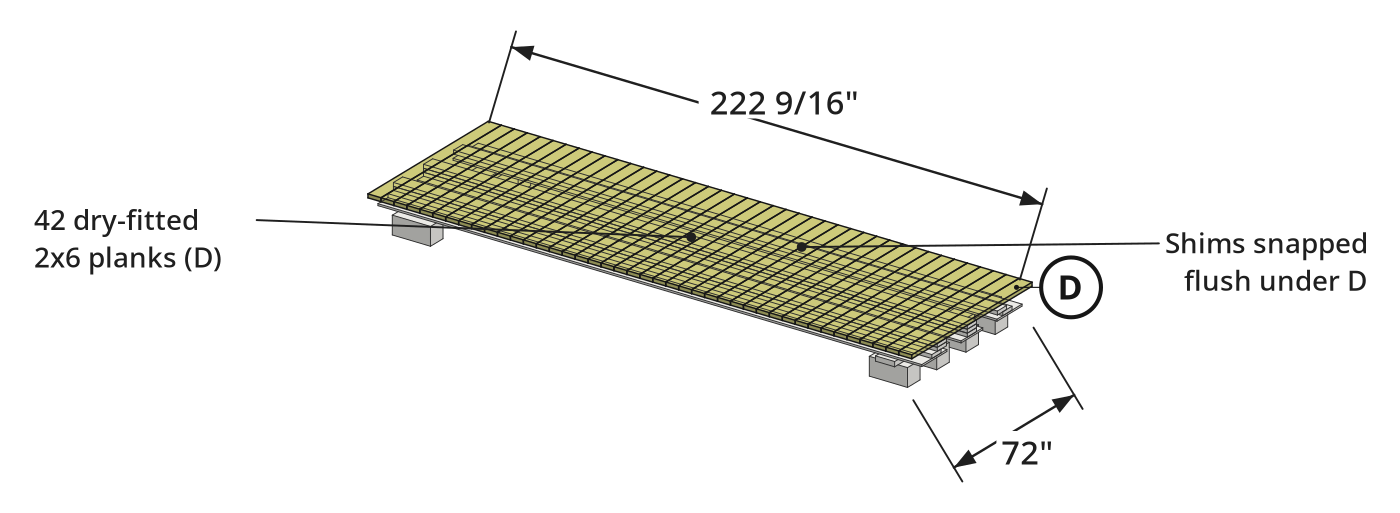
- Crosscut 42 deck planks (D) to 72 inches (6 feet) from 2x6 pressure-treated boards.
- Lay cut deck planks (D) side-by-side across the three runners (C) around the temporary braces.
- 4.2 Score and snap protruding shims and finish dry-fitting the deck
- Score protruding wood shims along the runners (C) with a utility knife.
- Snap scored shim ends flush with the runners; save offcuts for reuse.
- Remove temporary cross braces as you lay out remaining deck planks (D).
Key measurements
- Deck plank length: 6 ft (72 in) crosscut on miter saw
- Tip: Cut and dry-fit deck boards across the runners first to align and fasten them in one pass.
- Tip: Save snapped-off wood shim ends to reuse on the framing.
- Heads up: Wear eye and hearing protective equipment when using the miter saw.
Before you move on: Check all 42 deck planks lie flat across the three runners without rocking.
Step 5: Fasten the Deck Boards
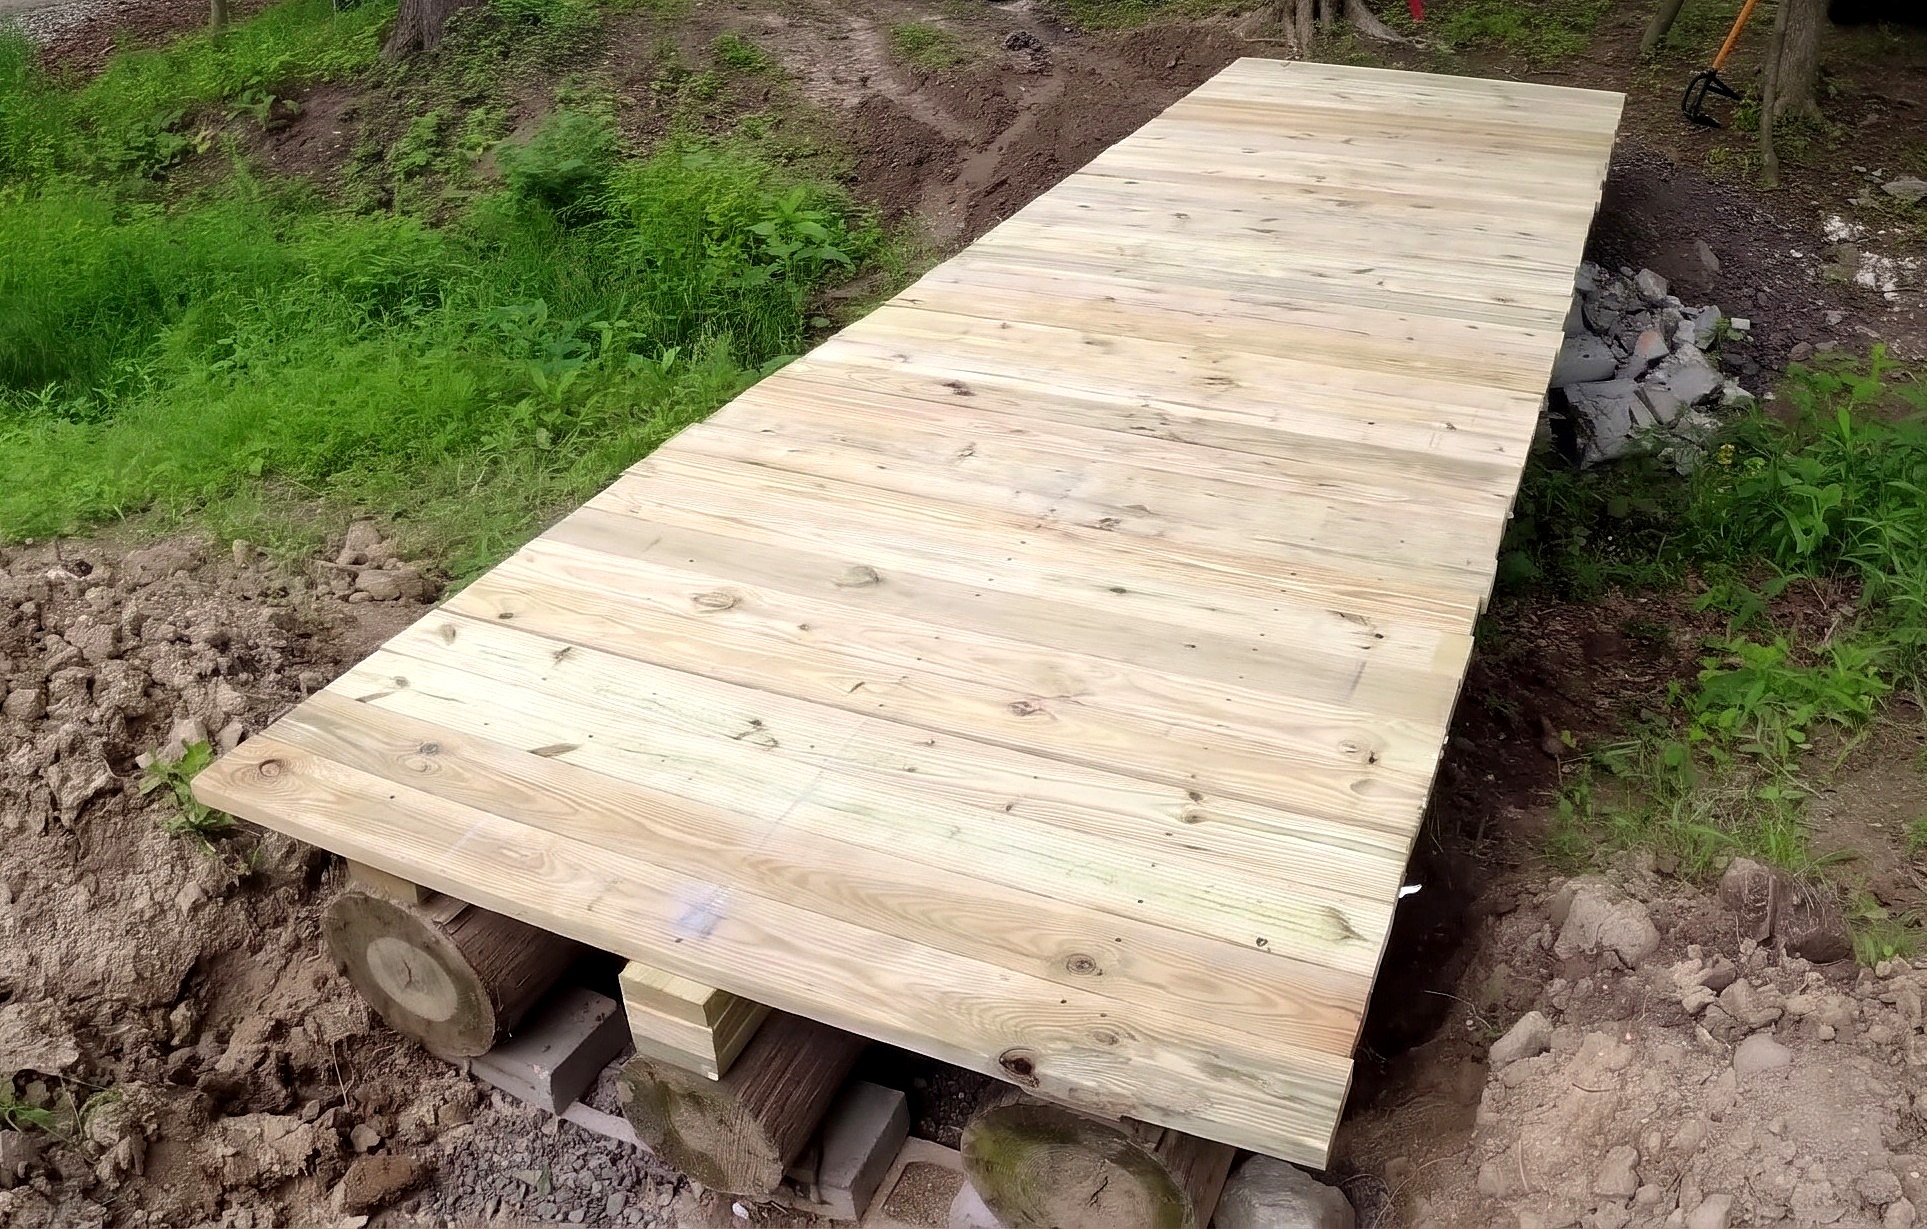
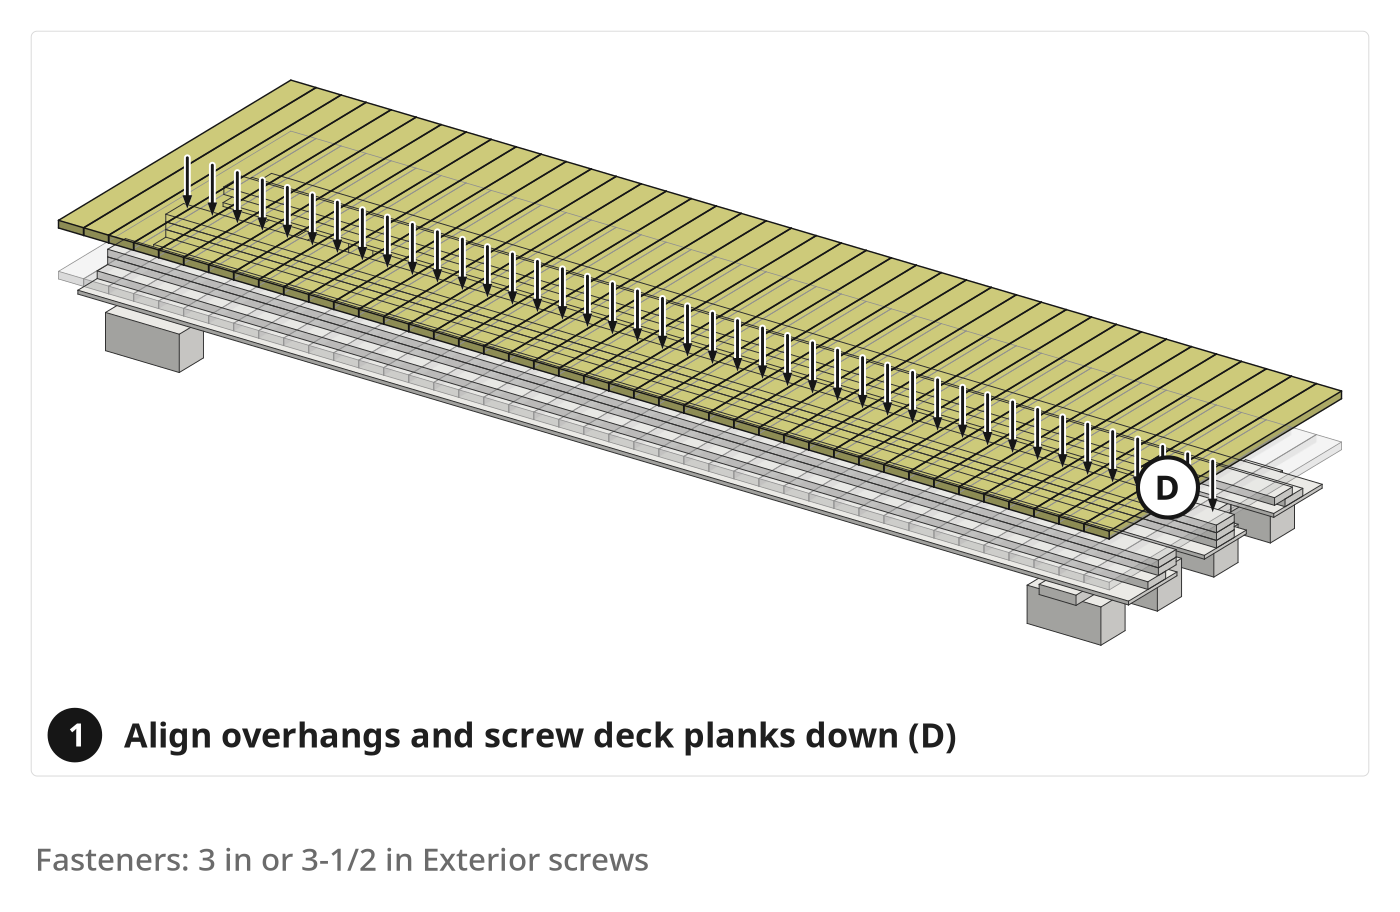
Align 6-foot deck planks with a 1-foot overhang on both sides and screw to the three runners.
Parts in this step: (D) Deck plank
You'll need: Cordless impact driver, Speed square, 2x6 pressure-treated boards, Exterior screws
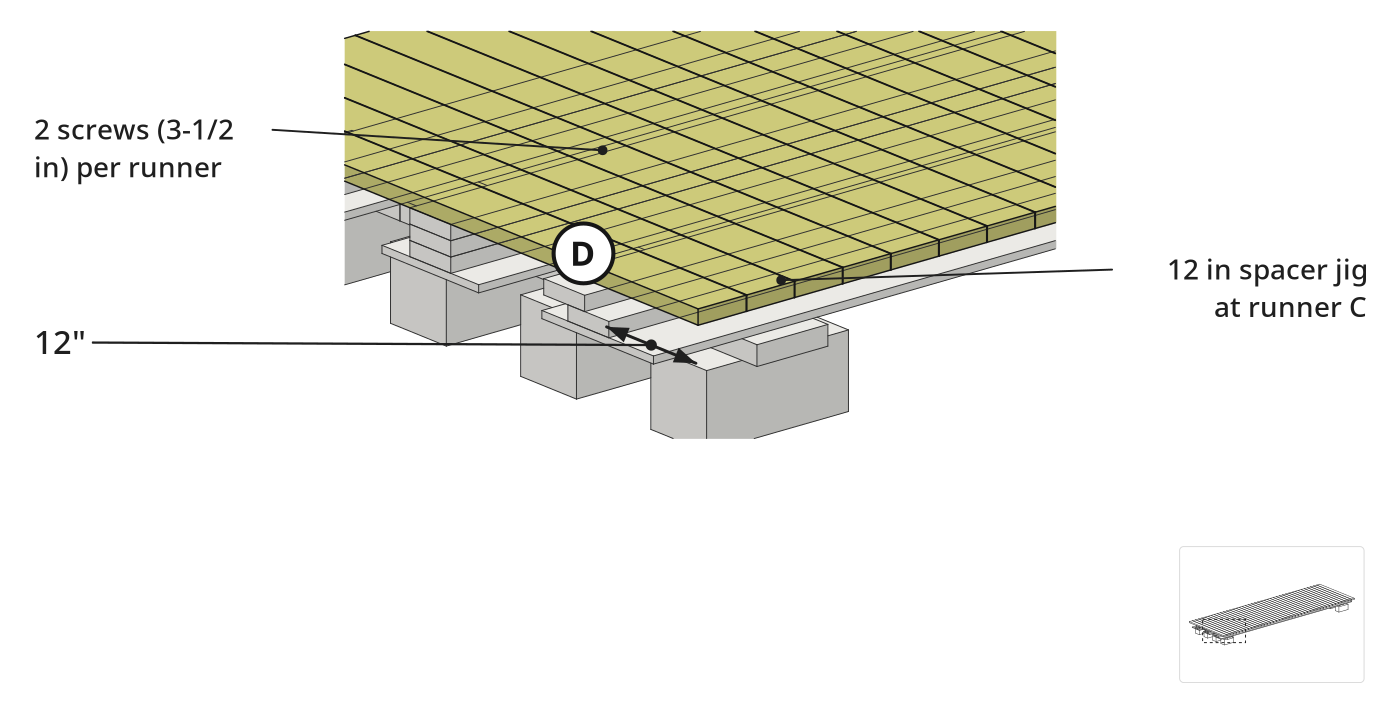
- 5.1 Align the deck boards with a spacer jig and screw the first half down
- Flip each deck plank (D) so heavy knots or cup face down toward the ditch.
- Hold a 1-foot scrap spacer jig against outer runner (C) to set a 1-foot overhang on both sides.
- Square the first plank with a speed square; drive two 3-inch or 3-1/2-inch exterior screws per runner.
- Offset a screw if the tip hits a buried runner screw head.
- 5.2 Fasten the remaining deck boards to the end of the bridge
- Slide each deck plank (D) snug against the last and set its overhang with the spacer jig.
- Drive six exterior screws per plank, two into each of the three runners (C) to the bridge end.
Key measurements
- Deck overhang: ~1 ft (~12 in) past the outside face of each outer runner on both sides
- Tip: Use a scrap block as a spacing jig against the outer runner for an even overhang on both sides without measuring.
- Tip: Orient deck boards with knots and cup facing down.
Before you move on: Check every plank has two screws seated in all three runners with no protruding heads.
Step 6: Snap a Chalk Line and Trim the Deck Edges
Trim both overhanging deck plank edges straight and flush.
Parts in this step: (D) Deck plank
You'll need: Chalk line, Cordless circular saw, 2x6 pressure-treated boards
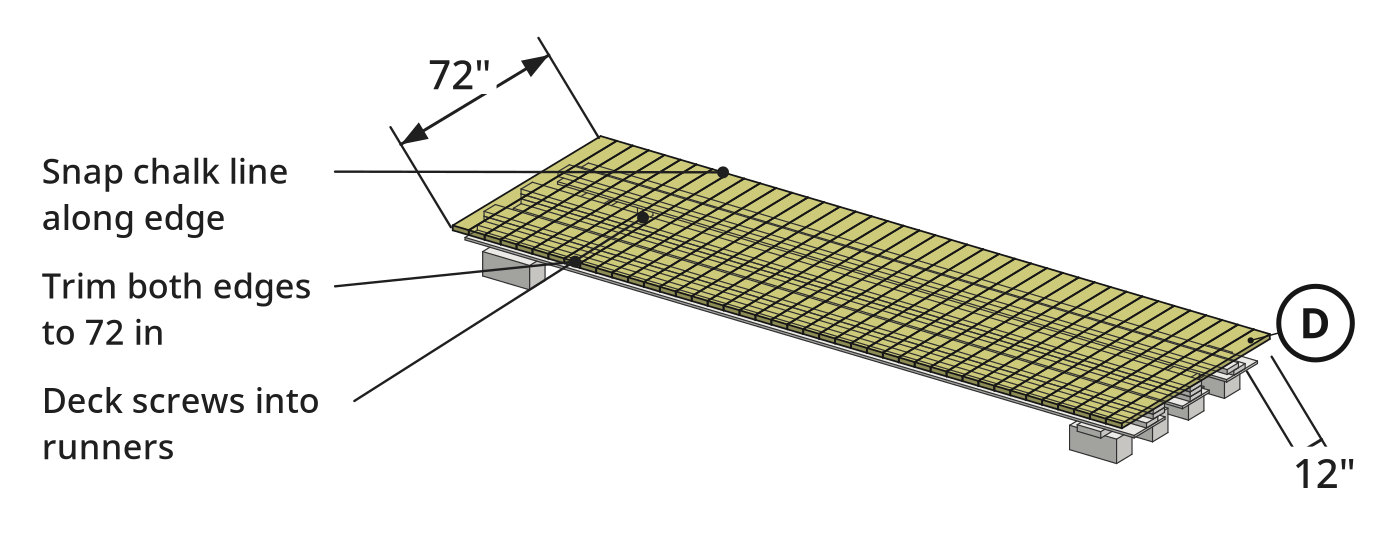
- 6.1 Snap a chalk line and rip the overhanging deck board ends flush
- Stretch a chalk line along the overhanging deck plank (D) ends from end to end.
- Snap a cut line along both outer edges of the 6-foot deck.
- Guide a cordless circular saw along both chalk lines to rip the plank ends flush.
Key measurements
- Finished deck width: ~6 ft (~72 in) after trimming overhanging ends flush
- Tip: Install deck boards slightly long, then snap a chalk line and trim all ends at once with a circular saw for a straight edge.
- Heads up: Wear eye and hearing protective equipment when ripping deck edges with the circular saw.
Before you move on: Sight down both cut edges to check for a straight line with no uncut ends.
Step 7: Backfill the Bridge Approach and Clean the Deck
Backfill and pack the approach ramp with asphalt millings, then blow the deck clean.
You'll need: Compact utility tractor with front-end loader, Shovel, Cordless leaf blower, Asphalt millings and fill dirt
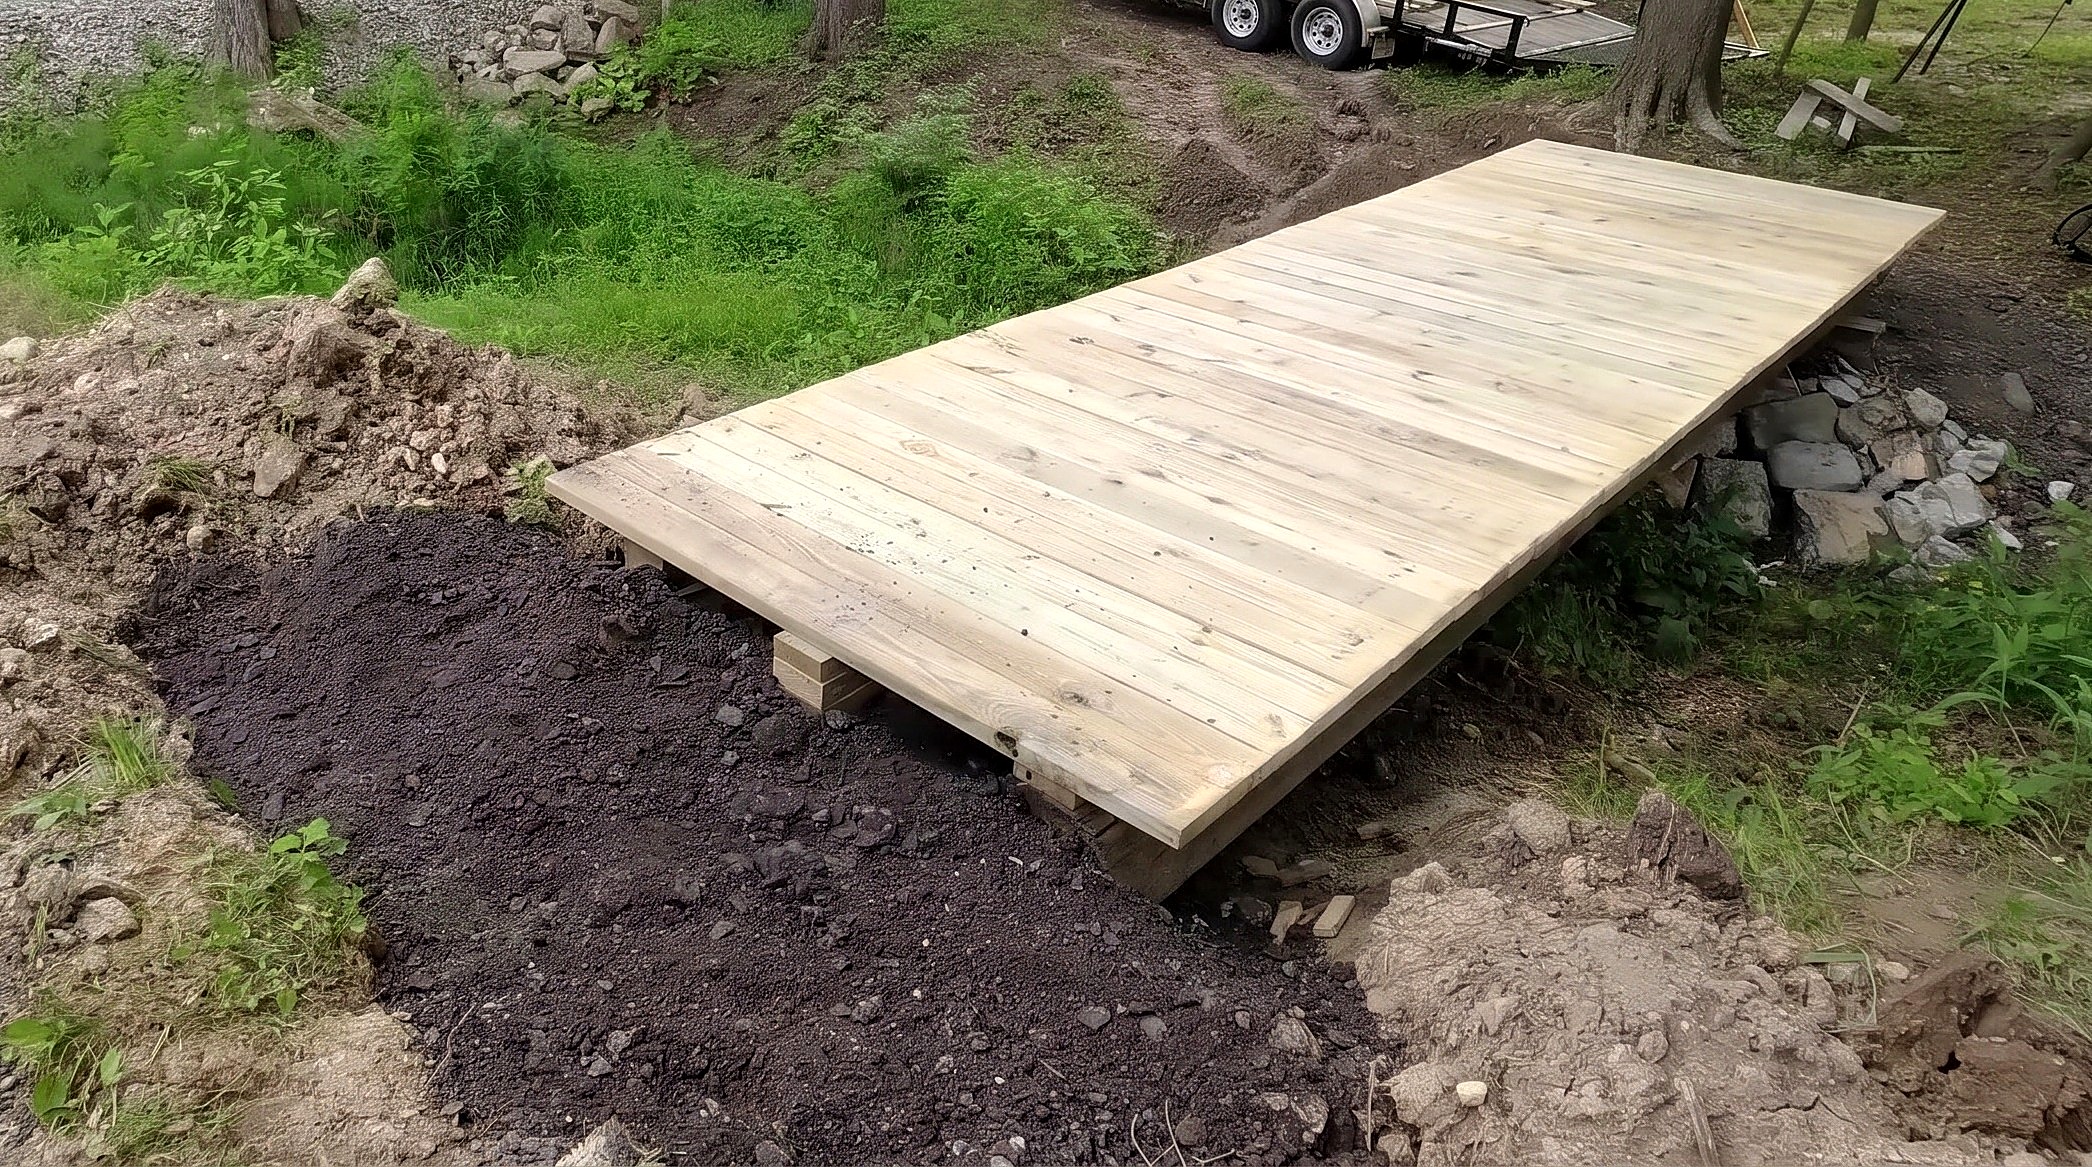
- 7.1 Dump two loader buckets of asphalt millings and dirt at the bridge approach
- Switch the tractor front-end loader from pallet forks to the bucket attachment.
- Dump two loader buckets of asphalt millings and fill dirt against the exposed bridge end.
- 7.2 Grade and tamp the approach ramp with a shovel
- Spread the millings and fill dirt across the 6-foot width with a shovel.
- Grade and tamp the transition ramp flush with the top of end deck plank (D).
- 7.3 Blow sawdust and dirt off the finished deck
- Clear sawdust, shim scraps and loose dirt off the bridge with a cordless leaf blower.
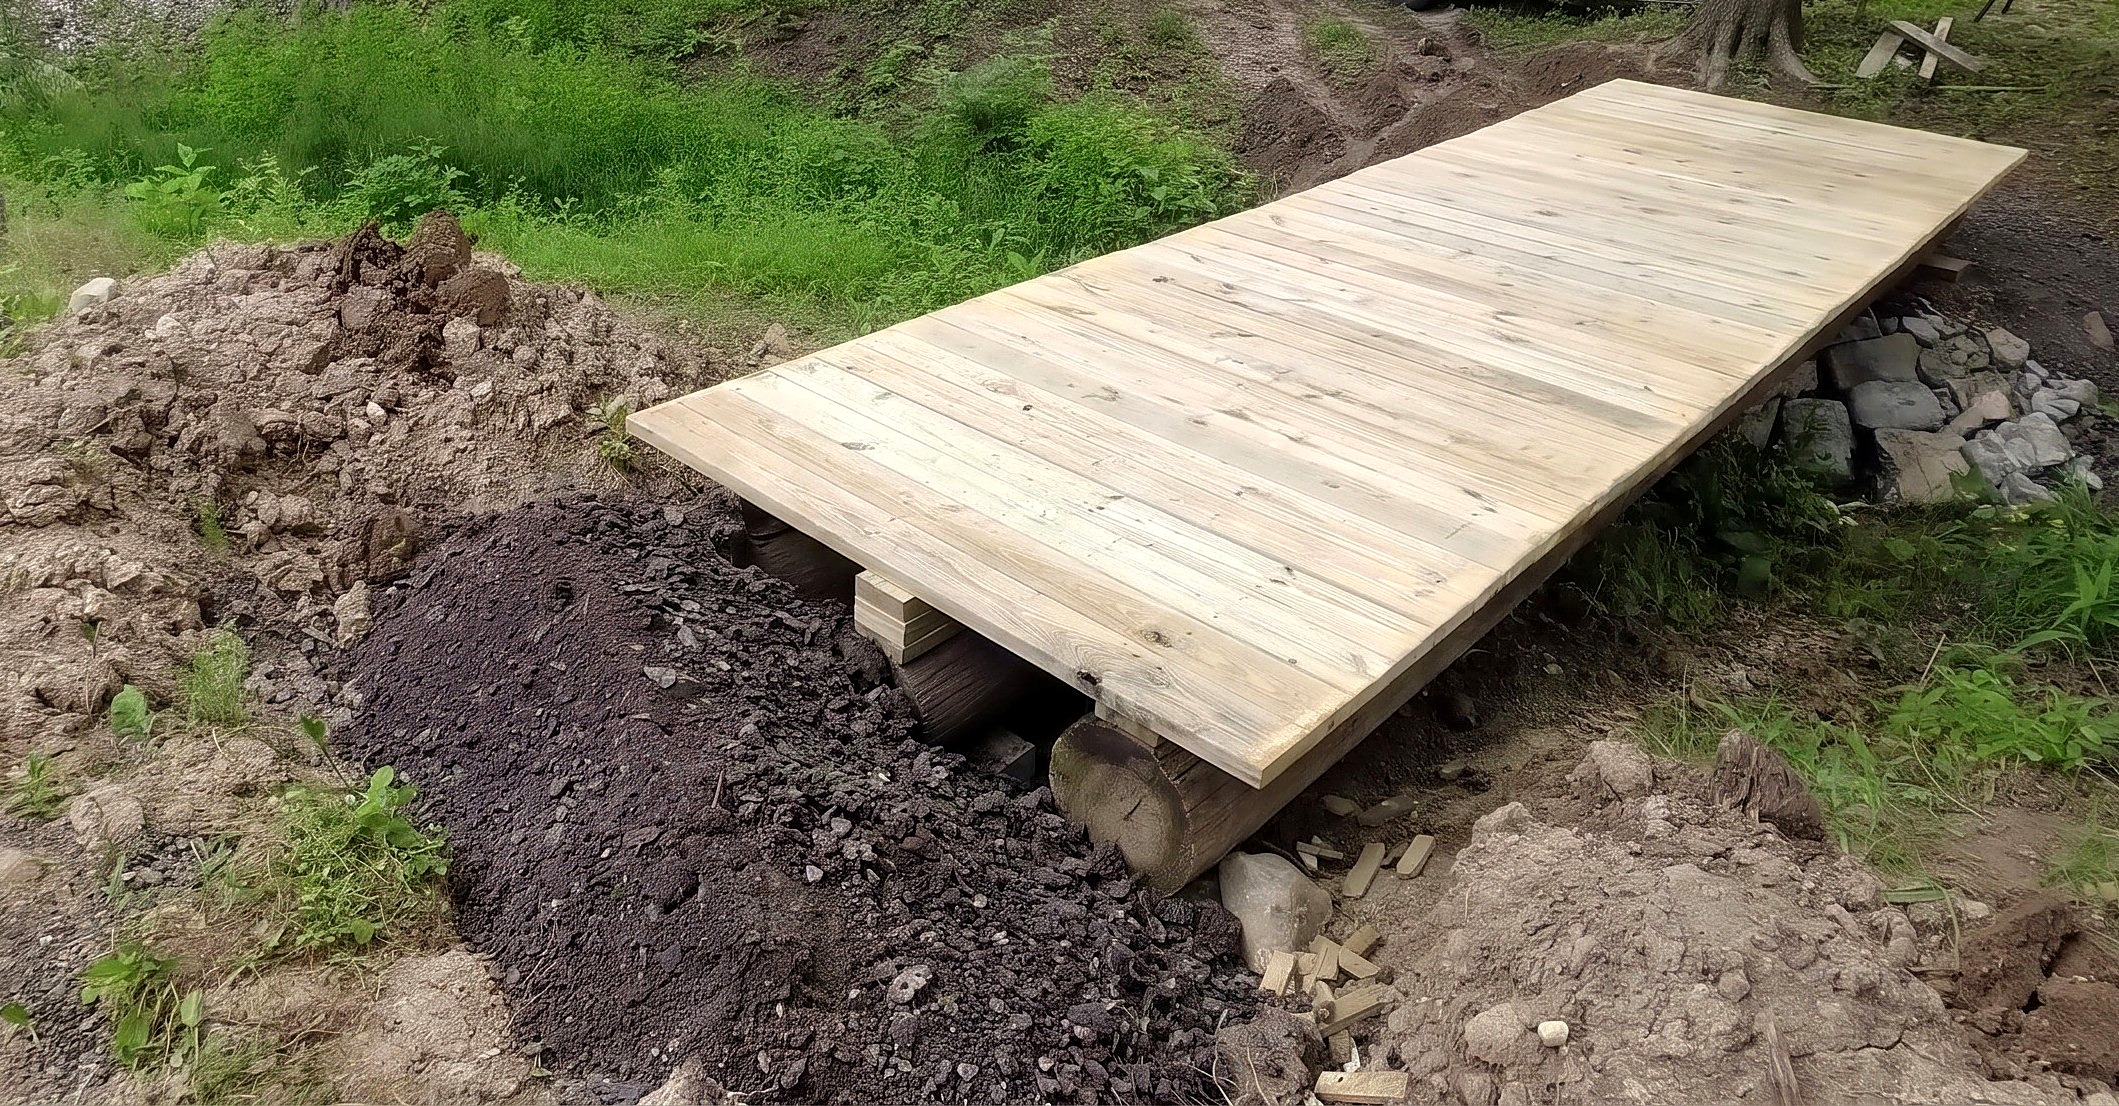
- Tip: Pack asphalt millings tightly against the bridge timbers for a smooth ramp that helps lock the structure in place.
- Heads up: Do not drive the compact utility tractor onto the bridge deck when dumping fill at the approach.
Before you move on: Walk both approaches to check the fill is tightly packed and flush with the end planks.
Finishing
Edge Stiffening and Railings
- Screw a continuous 2x6 strip above or below the plank overhangs to stiffen them.
- Add side railings later if desired after stiffening the edges.
Long-Term Weatherproofing
- Leave the pressure-treated 2x6 deck uncovered for immediate foot, mower, and golf cart use.
- For longest substructure life, top the 2x6 deck with a rubber membrane and composite decking.
- Never replace the structural 2x6 planks with composite decking.
Alternatives
- Flatten pole tops and bottoms on a portable sawmill, if available, to reduce shimming.
- Hide the hardened concrete bags on the bank slope with decorative boulders.
These Specs are built from Indy Farm Life's video “Utility Pole Foot Bridge with 2x6 Wood Decking”. Open the Utility Pole Foot Bridge with 2x6 Wood Decking project page.
