Spetz Specs No. 5732: step-by-step site work guide
Setting Heavy-Duty Steel Gate Posts in Concrete with Rebar Cages
The complete step-by-step guide made from Indy Farm Life's YouTube video, free on Spetz. For the video, a step-by-step player and answers to your questions, see the Setting Heavy-Duty Steel Gate Posts in Concrete with Rebar Cages project page.
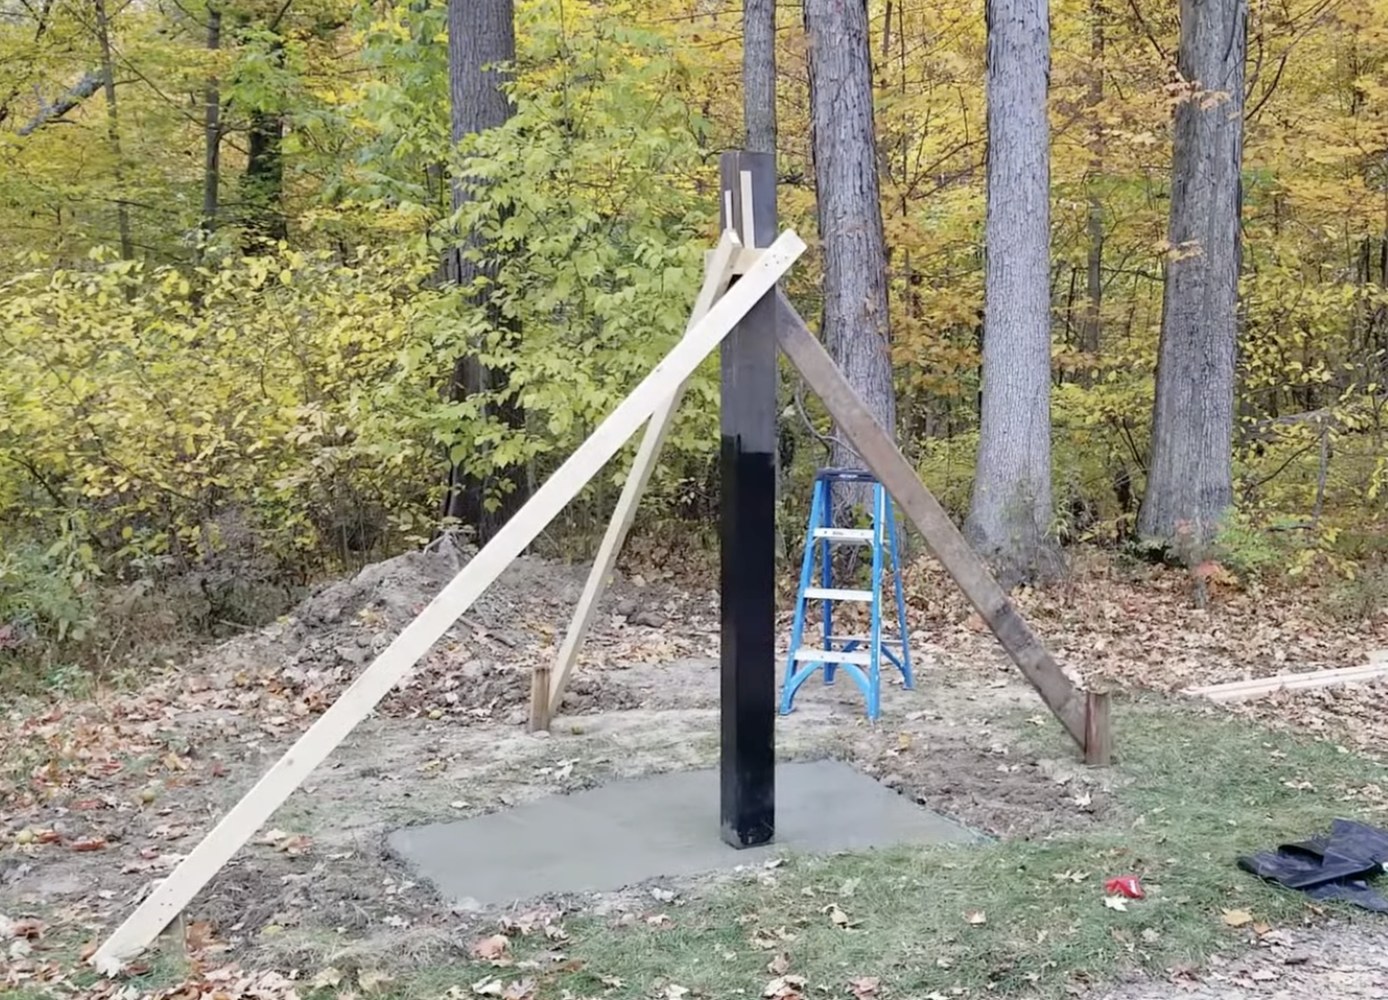
7 steps, 8 parts, 11 tools, 11 materials
Overview
Finished size: 6 in x 6 in x 12 ft steel posts set in 4 ft deep holes
The Job
- Set two 6 in x 6 in x 12 ft steel gate posts across a driveway.
- Each 1/4 in wall post sits 4 ft deep on #2 crushed gravel.
- Anchor both in tied rebar cages and almost 6 cubic yards of concrete.
- Footings support two 300 lb, nearly 9 ft wide steel gates.
Why Do It This Way
- Crushed gravel under the post drains water to prevent underground corrosion.
- Welded base angle iron and a 3D rebar cage lock each post in concrete.
- About 25,000 lb of fiber-reinforced concrete stops heavy gates pulling posts out of plumb.
What It Takes
- Dig the top 2 ft by backhoe, then hand-dig near buried utilities.
- Set posts using a tractor with loader, pallet forks, and a helper.
- Allow 12 minutes for mixer truck unloading, plus 1 week if staging beforehand.
- Clear driveway access for the ready-mix truck; ready spare forms for extra mix.
What Decides Success
- Hand-dig the lower 2 ft to avoid severing marked electrical, internet, and sewer lines.
- Re-plumb posts on pour day if rain settles the braced ground stakes.
- Check post-to-post gate spacing before tying rebar or pouring concrete.
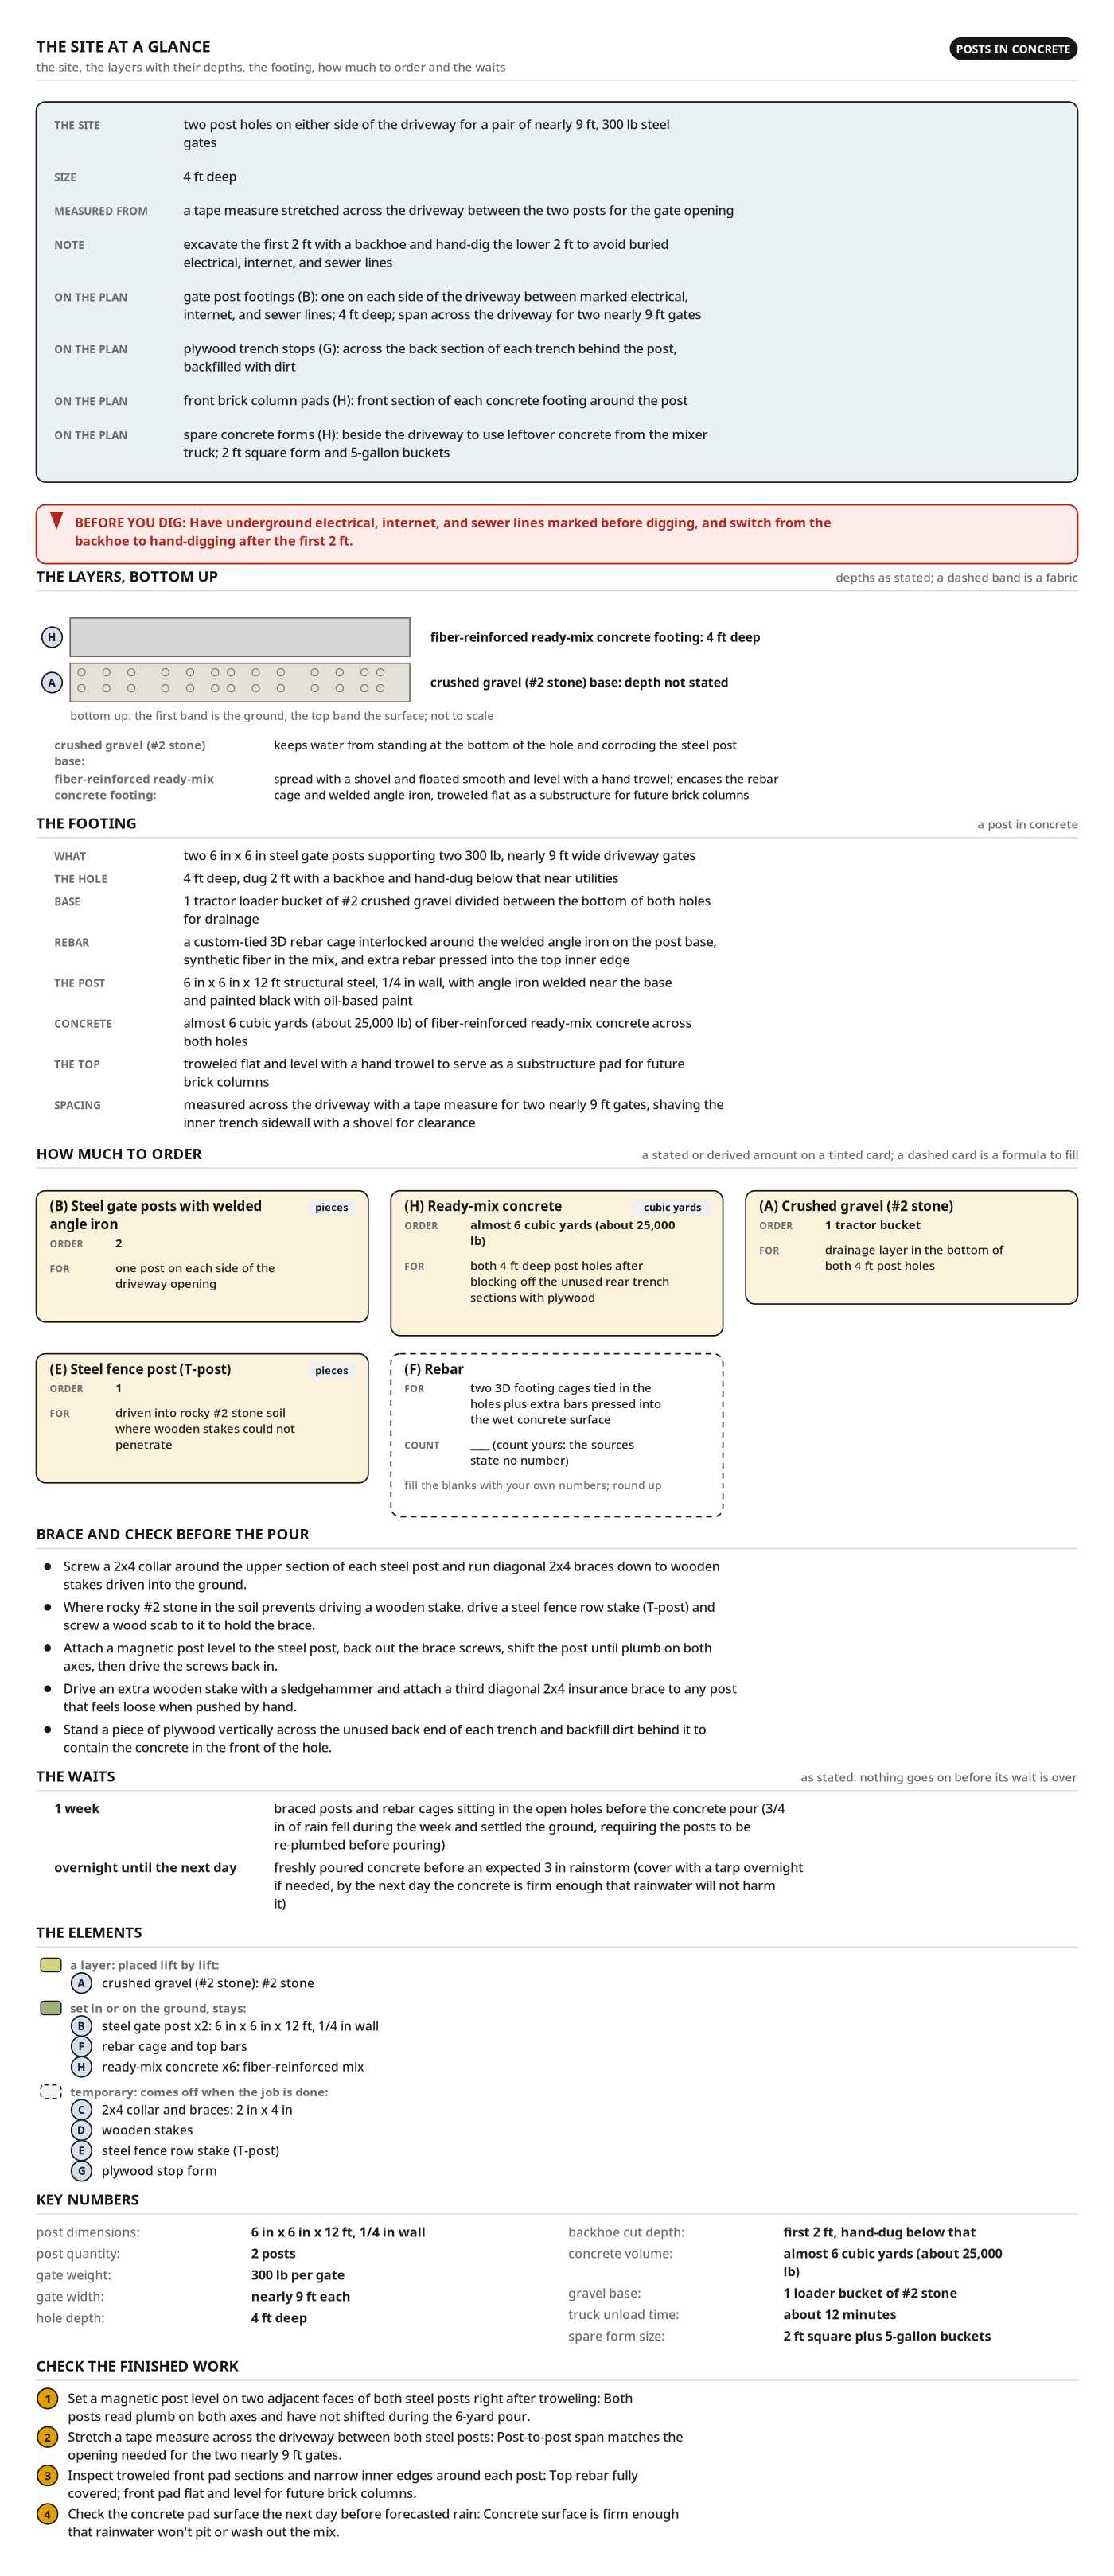
The site at a glance
- The site: two post holes on either side of the driveway for a pair of nearly 9 ft, 300 lb steel gates
- Size: 4 ft deep
- Measured from: a tape measure stretched across the driveway between the two posts for the gate opening
- Footing: two 6 in x 6 in steel gate posts supporting two 300 lb, nearly 9 ft wide driveway gates
- The hole: 4 ft deep, dug 2 ft with a backhoe and hand-dug below that near utilities
- Base: 1 tractor loader bucket of #2 crushed gravel divided between the bottom of both holes for drainage
- Rebar: a custom-tied 3D rebar cage interlocked around the welded angle iron on the post base, synthetic fiber in the mix, and extra rebar pressed into the top inner edge
- Post: 6 in x 6 in x 12 ft structural steel, 1/4 in wall, with angle iron welded near the base and painted black with oil-based paint
- Concrete: almost 6 cubic yards (about 25,000 lb) of fiber-reinforced ready-mix concrete across both holes
- Top: troweled flat and level with a hand trowel to serve as a substructure pad for future brick columns
- Order Steel gate posts with welded angle iron: 2
- Order Ready-mix concrete: almost 6 cubic yards (about 25,000 lb)
- Order Crushed gravel (#2 stone): 1 tractor bucket
- Order Steel fence post (T-post): 1
- Order Rebar: amount not stated, measure your site
- Wait: braced posts and rebar cages sitting in the open holes before the concrete pour: 1 week
- Wait: freshly poured concrete before an expected 3 in rainstorm: overnight until the next day
- post dimensions: 6 in x 6 in x 12 ft, 1/4 in wall
- post quantity: 2 posts
- gate weight: 300 lb per gate
- gate width: nearly 9 ft each
- hole depth: 4 ft deep
- backhoe cut depth: first 2 ft, hand-dug below that
- concrete volume: almost 6 cubic yards (about 25,000 lb)
- gravel base: 1 loader bucket of #2 stone
- truck unload time: about 12 minutes
- spare form size: 2 ft square plus 5-gallon buckets
The layers, bottom up
- 1. crushed gravel (#2 stone) base
- 2. fiber-reinforced ready-mix concrete footing: 4 ft deep
Brace and check before the pour
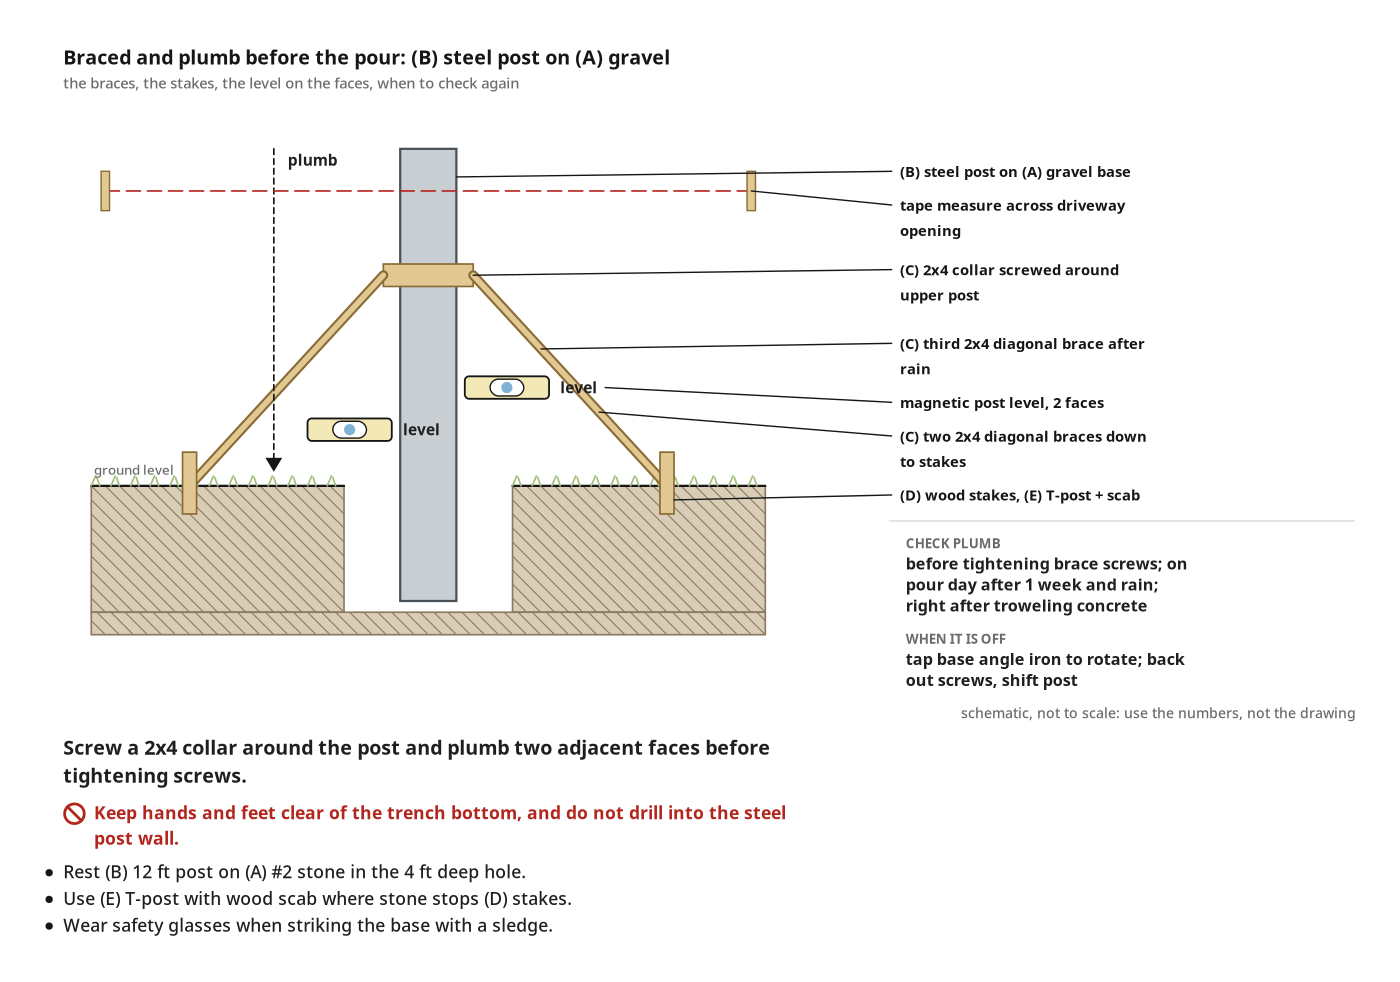
- Screw a 2x4 collar around the upper section of each steel post and run diagonal 2x4 braces down to wooden stakes driven into the ground.
- Where rocky #2 stone in the soil prevents driving a wooden stake, drive a steel fence row stake (T-post) and screw a wood scab to it to hold the brace.
- Attach a magnetic post level to the steel post, back out the brace screws, shift the post until plumb on both axes, then drive the screws back in.
- Drive an extra wooden stake with a sledgehammer and attach a third diagonal 2x4 insurance brace to any post that feels loose when pushed by hand.
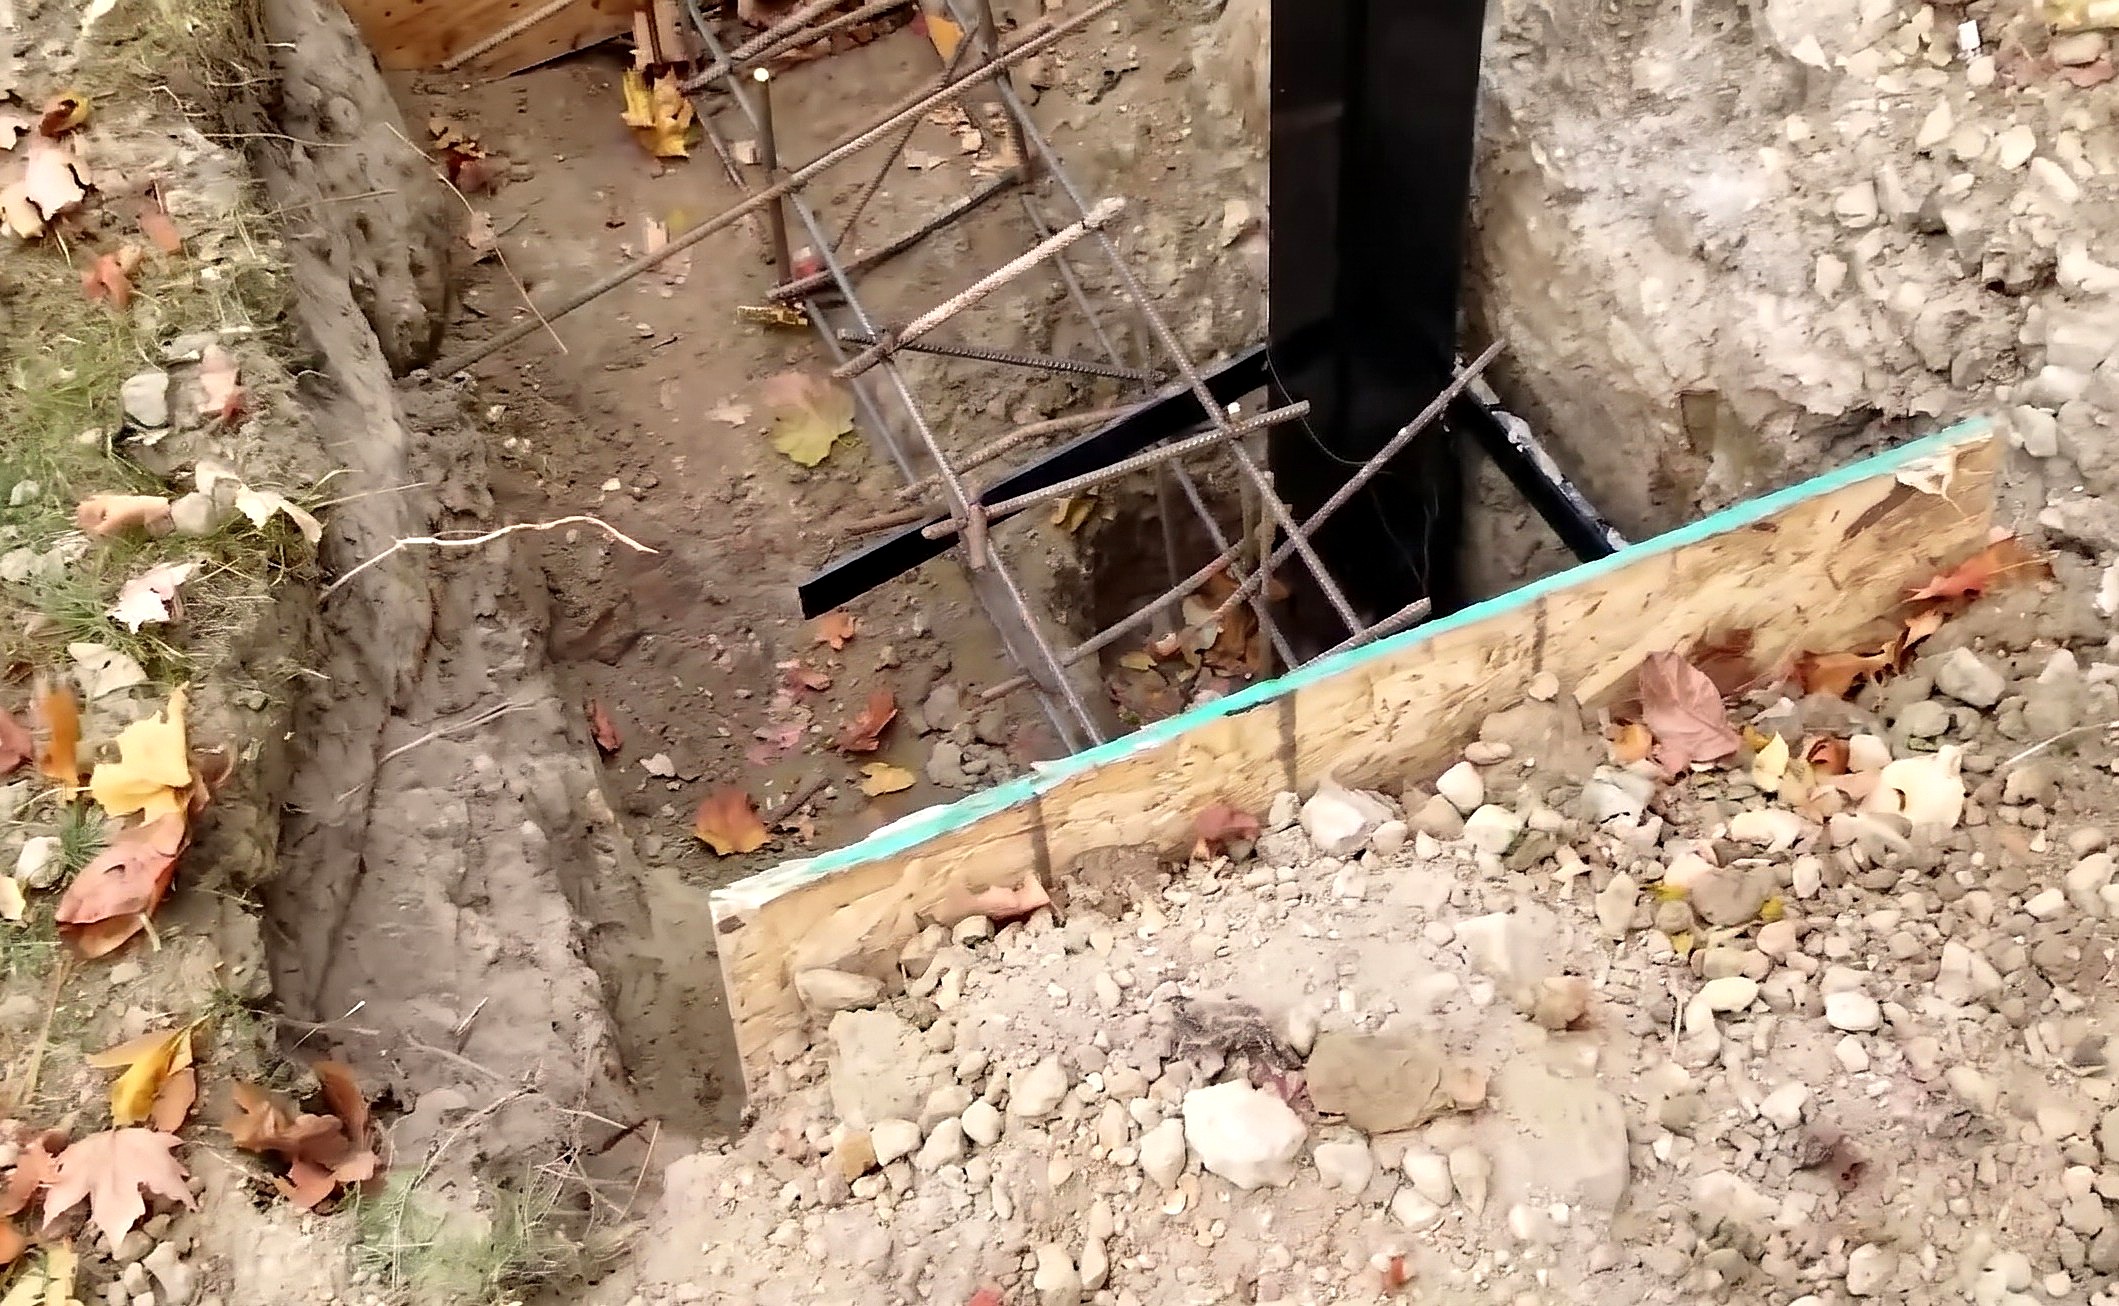
- Stand a piece of plywood vertically across the unused back end of each trench and backfill dirt behind it to contain the concrete in the front of the hole.
Before you dig
- Have underground electrical, internet, and sewer lines marked before digging, and switch from the backhoe to hand-digging after the first 2 ft.
Health and safety
Excavation and Underground Utilities
- Have all underground electrical, internet, and sewer lines marked before operating the backhoe loader on the site.
- Hand-dig the lower 2 feet of the 4-foot holes with a shovel to avoid striking buried utility lines.
- Keep bystanders and heavy equipment back from the 4-foot trench edges to prevent sidewall cave-ins.
Tractor Lifting and Heavy Posts
- Use the compact utility tractor pallet forks and a helper to lift and position the heavy 12-foot steel posts.
- Keep hands and feet completely clear of the trench bottom while sliding the steel post off the tractor forks.
- Stand clear of the ready-mix mixer truck tires and swinging chute while guiding concrete into the post holes.
Cutting Rebar and Sledgehammer Use
- Wear safety glasses and heavy work gloves when cutting steel rebar with the corded portable band saw.
- Secure rebar before cutting so the portable band saw blade does not pinch, bind, or jerk the stock.
- Wear impact-rated safety glasses before striking the welded base angle iron, wooden stakes, or steel T-posts with the sledgehammer.
- Fold sharp rebar tie wire tails inward to avoid puncture cuts while tying cages inside the 4-foot holes.
Wet Concrete and Oil Paint
- Wear waterproof rubber boots and work gloves in wet ready-mix concrete to prevent skin irritation and chemical burns.
- Rinse wet concrete off your skin immediately with clean water, and change out of any cement-soaked clothing right away.
- Apply the black oil-based paint in an open, ventilated area away from heat, sparks, and portable band saw cuts.
Before you dig
- Have buried electrical, internet, and sewer lines located and flagged before digging.
- Dig the top 2 ft by backhoe, then hand-dig to 4 ft near utilities.
- Have angle-iron crossbars welded near the base of both 6 in x 6 in x 12 ft steel posts.
- Paint both steel posts with black oil-based paint against corrosion; let dry before installing.
- Clear driveway access and turnaround room for a ready-mix concrete mixer truck.
- Ready a 2 ft square wooden form and 5-gallon buckets for leftover concrete.
- Wear protective equipment: safety glasses, work gloves, and waterproof rubber boots.
Tools
- Backhoe loader (tractor loader backhoe, Case) (optional)
- Shovel (round-point digging shovel)
- Compact utility tractor with loader and pallet forks (compact utility tractor, John Deere, 4105) (optional)
- Stepladder (fiberglass A-frame stepladder)
- Tape measure (retractable blade tape measure)
- Sledgehammer (long-handle sledgehammer)
- Magnetic post level (multi-axis magnetic post level)
- Portable band saw (corded portable deep-cut band saw, Harbor Freight)
- Leaf blower (handheld leaf blower) (optional)
- Cordless drill/driver (battery-powered cordless drill/driver, Ryobi)
- Concrete finishing trowel (rounded-end hand float / trowel)
Materials
- Steel gate posts with welded angle iron (2, square structural steel tubing, 1/4 in wall thickness, custom welded angle-iron crossbars, 6 in x 6 in x 12 ft)
- Ready-mix concrete (6 cubic yards, fiber-reinforced ready-mix concrete, with fiber reinforcement)
- Rebar (deformed steel reinforcing bar)
- Black oil-based paint (oil-based protective enamel, black)
- 2x4 lumber (dimensional framing lumber, 2 in x 4 in)
- Crushed gravel (#2 stone) (1 tractor bucket, crushed stone drainage aggregate, #2 stone)
- Exterior screws (construction screws)
- Wooden stakes (wood form stakes)
- Steel fence post (T-post) (1, studded steel T-post)
- Rebar tie wire (annealed steel tie wire)
- Plywood sheathing (OSB / plywood form board)
Hardware
| Hardware | Size | Count | Used in steps |
|---|---|---|---|
| Exterior screws | 2, 5 | ||
| Rebar tie wire | 4 |
Finishes & supplies, in the order they go on
| Product | What it does | Mix & coats | Dry time | Applied with |
|---|---|---|---|---|
| Black oil-based paint | Pre-coat the steel gate posts to prevent underground corrosion | Ready-to-use black oil-based protective enamel | ||
| Ready-mix concrete | Encase steel posts and rebar cages in 4 ft holes; form level substructure pads for future brick columns | Fiber-reinforced ready-mix concrete (almost 6 cubic yards, about 25,000 lb total) | Overnight until firm against rain; full cure time before loading gates is not stated in this guide | Mixer truck chute, shovel, and concrete finishing trowel |
Elements
| Part | Name | Qty | Size | Notes |
|---|---|---|---|---|
| A | crushed gravel (#2 stone) | x1 | #2 stone | 1 tractor bucket · dumped in the bottom of each hole to keep water from standing under the post |
| B | steel gate post | x2 | 6" (T) × 6" (W) × 144" (L) | angle iron welded to the base for anchoring, painted black with oil-based paint against corrosion |
| C | 2x4 collar and braces | count yours | 3/4" (T) × 2" (W) × 4" (L) | upper collar screwed around the post with diagonal braces down to ground stakes |
| D | wooden stakes | count yours | driven into the ground around the holes to anchor the diagonal 2x4 braces | |
| E | steel fence row stake (T-post) | x1 | driven into rocky #2 stone where wood stakes failed, with a wood block scabbed on | |
| F | rebar cage and top bars | count yours | tied 3D cage around the welded angle iron in the hole, plus bars pressed into the top edge | |
| G | plywood stop form | count yours | set vertically across the unused back trench and backfilled with dirt to stop the pour | |
| H | ready-mix concrete | x6 | fiber-reinforced mix | almost 6 cubic yards · poured into both holes and troweled level as a substructure for future brick columns |
Step by step
Step 1: Add a Gravel Drainage Base to the Post Holes
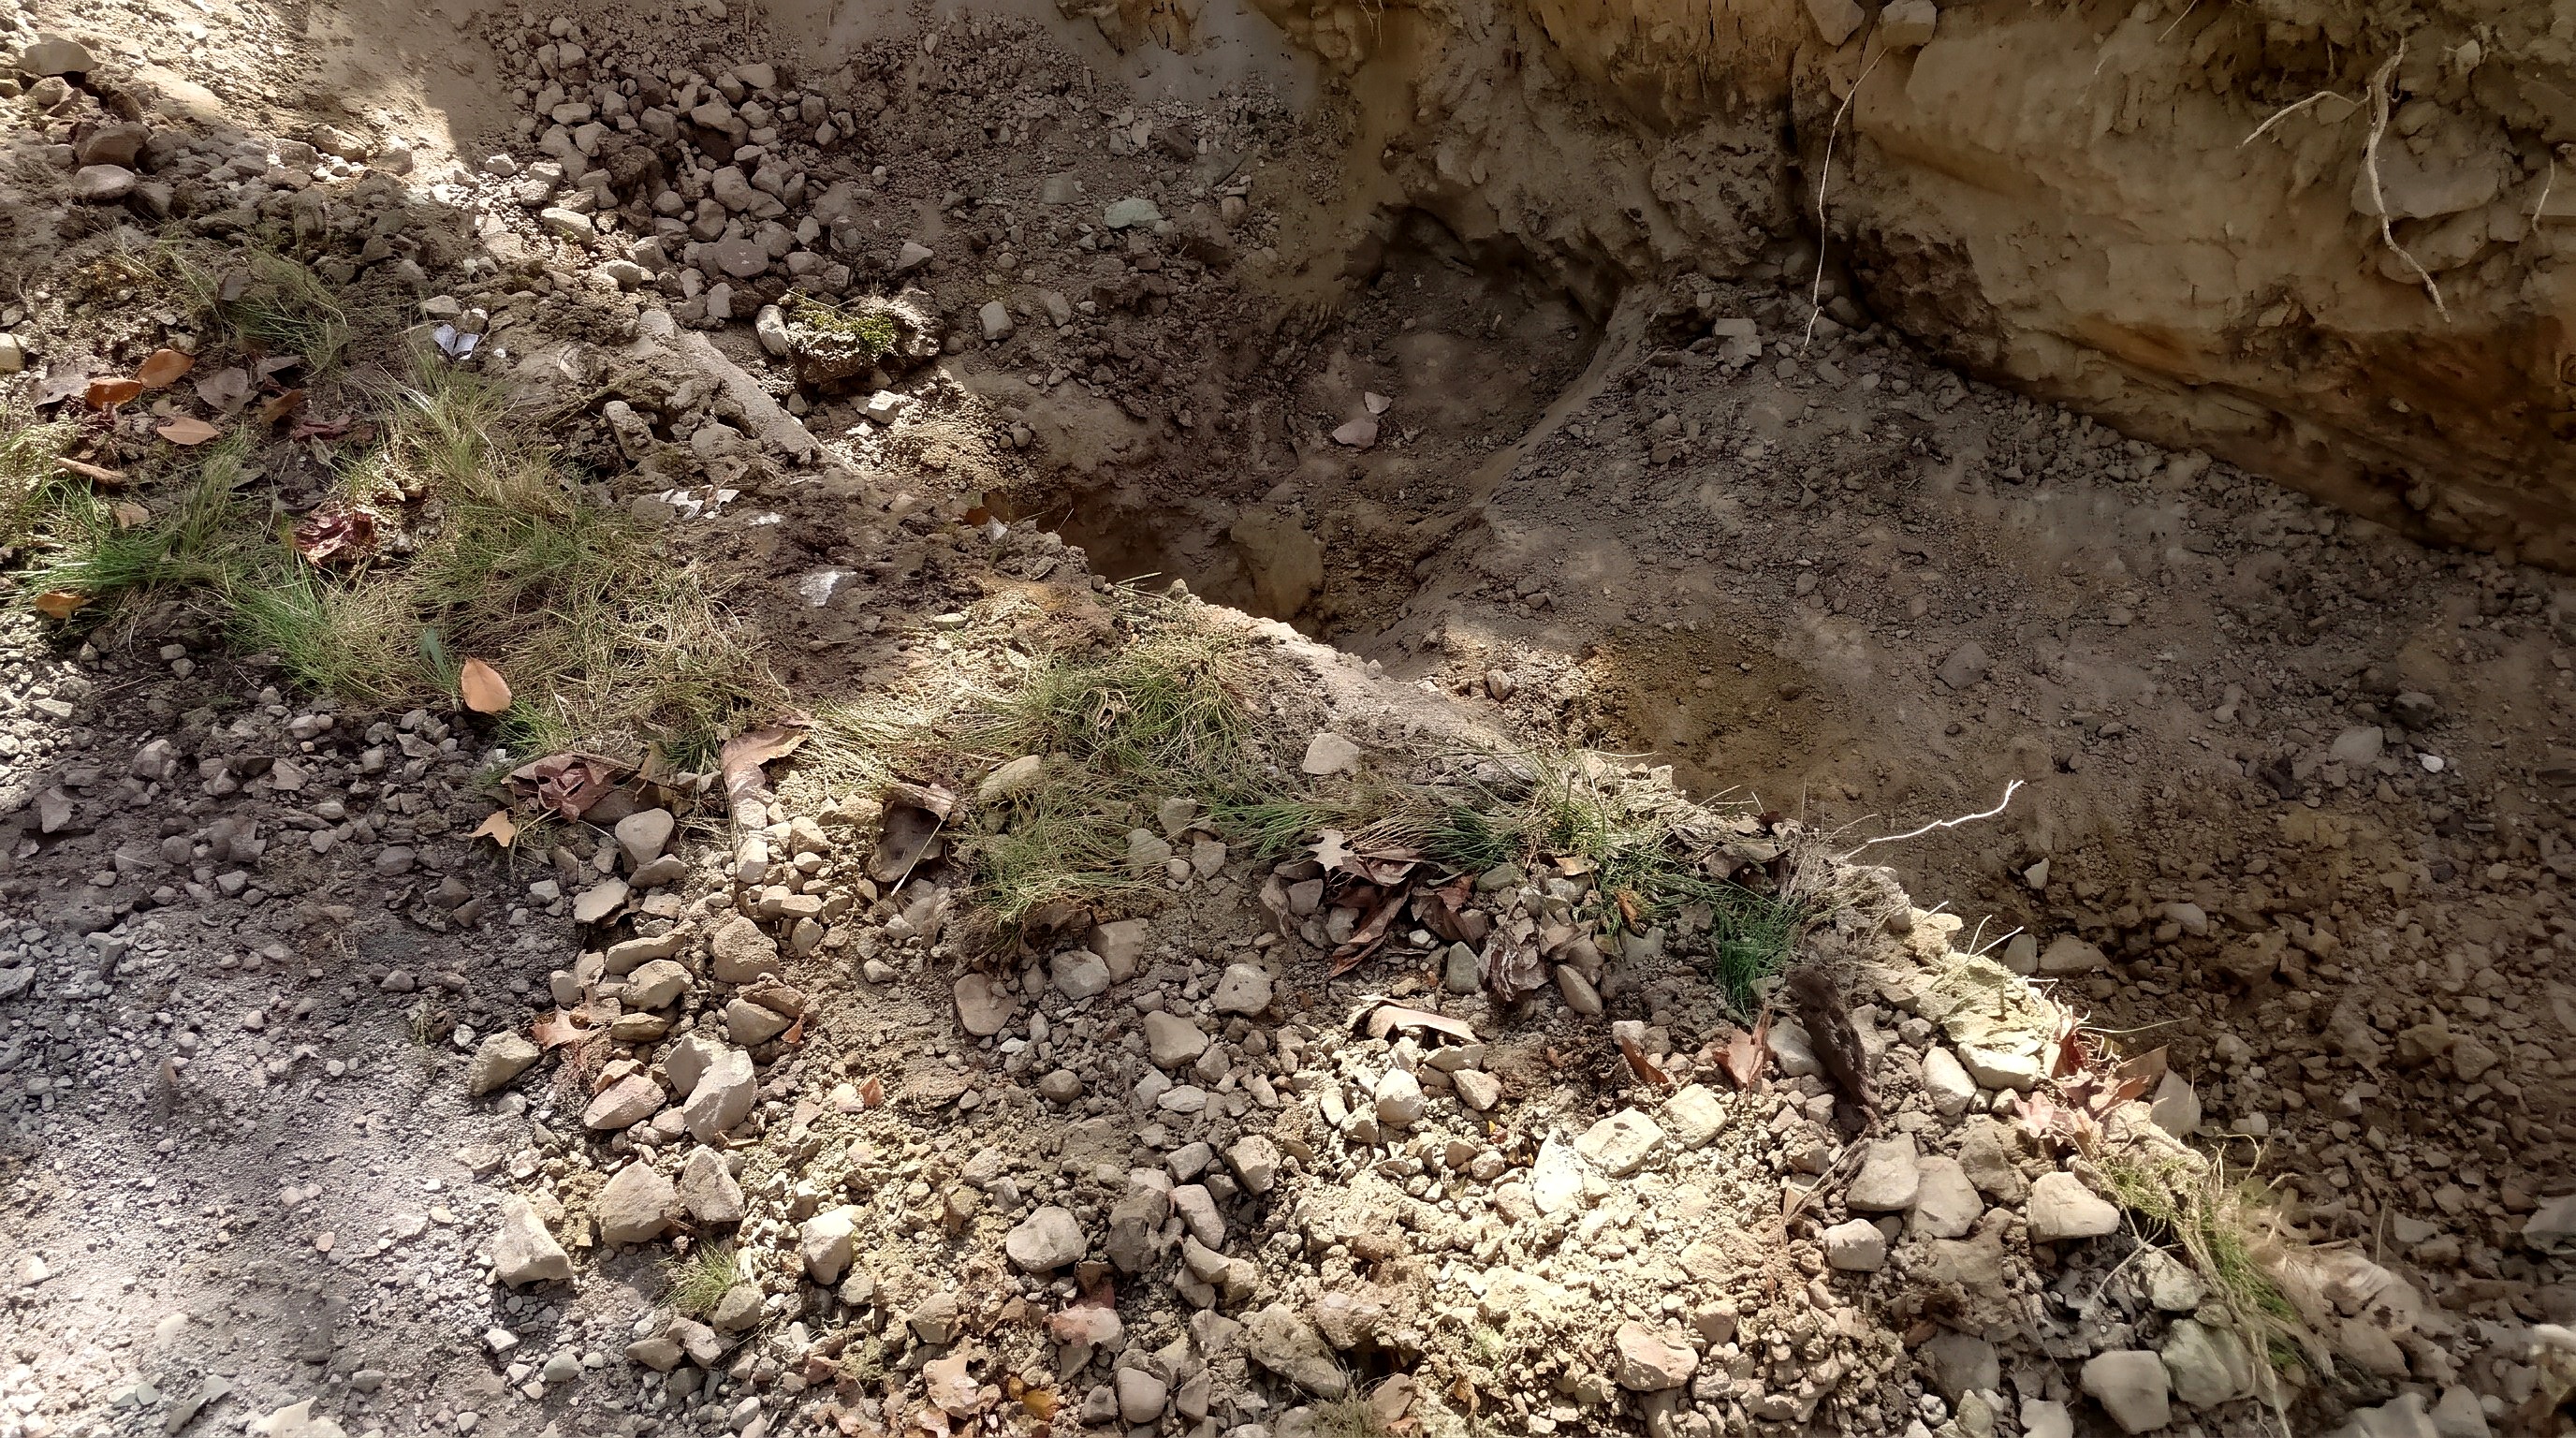
Both 4 ft deep post holes are clear of loose soil with a #2 crushed gravel drainage base.
Parts in this step: (A) crushed gravel (#2 stone)
You'll need: Shovel, Compact utility tractor with loader and pallet forks, Crushed gravel (#2 stone)
- 1.1 Haul and dump crushed gravel into the post holes
- Shovel loose dirt out of both 4 ft deep post holes.
- Scoop one loader bucket of crushed gravel (#2 stone) (A) with the tractor.
- Dump a layer of #2 stone into each post hole bottom.
- Spread stone across the bottom so water drains from the steel base.
- Gravel depth is not stated in this guide; cover the hole floor evenly.
Key measurements
- Post holes: 4 ft deep below grade (top 2 ft by backhoe, lower 2 ft hand-dug).
- Crushed gravel (#2 stone): 1 tractor loader bucket split between both holes.
- Tip: Floor each hole with crushed gravel so water drains instead of standing around the steel post.
- Heads up: Hand-dig the lower 2 ft of the 4 ft holes to avoid striking marked electrical, internet, and sewer lines.
Before you move on: Both 4 ft deep holes are clear of loose soil and lined with #2 crushed gravel.
Step 2: Set and Brace the Steel Posts in the Holes
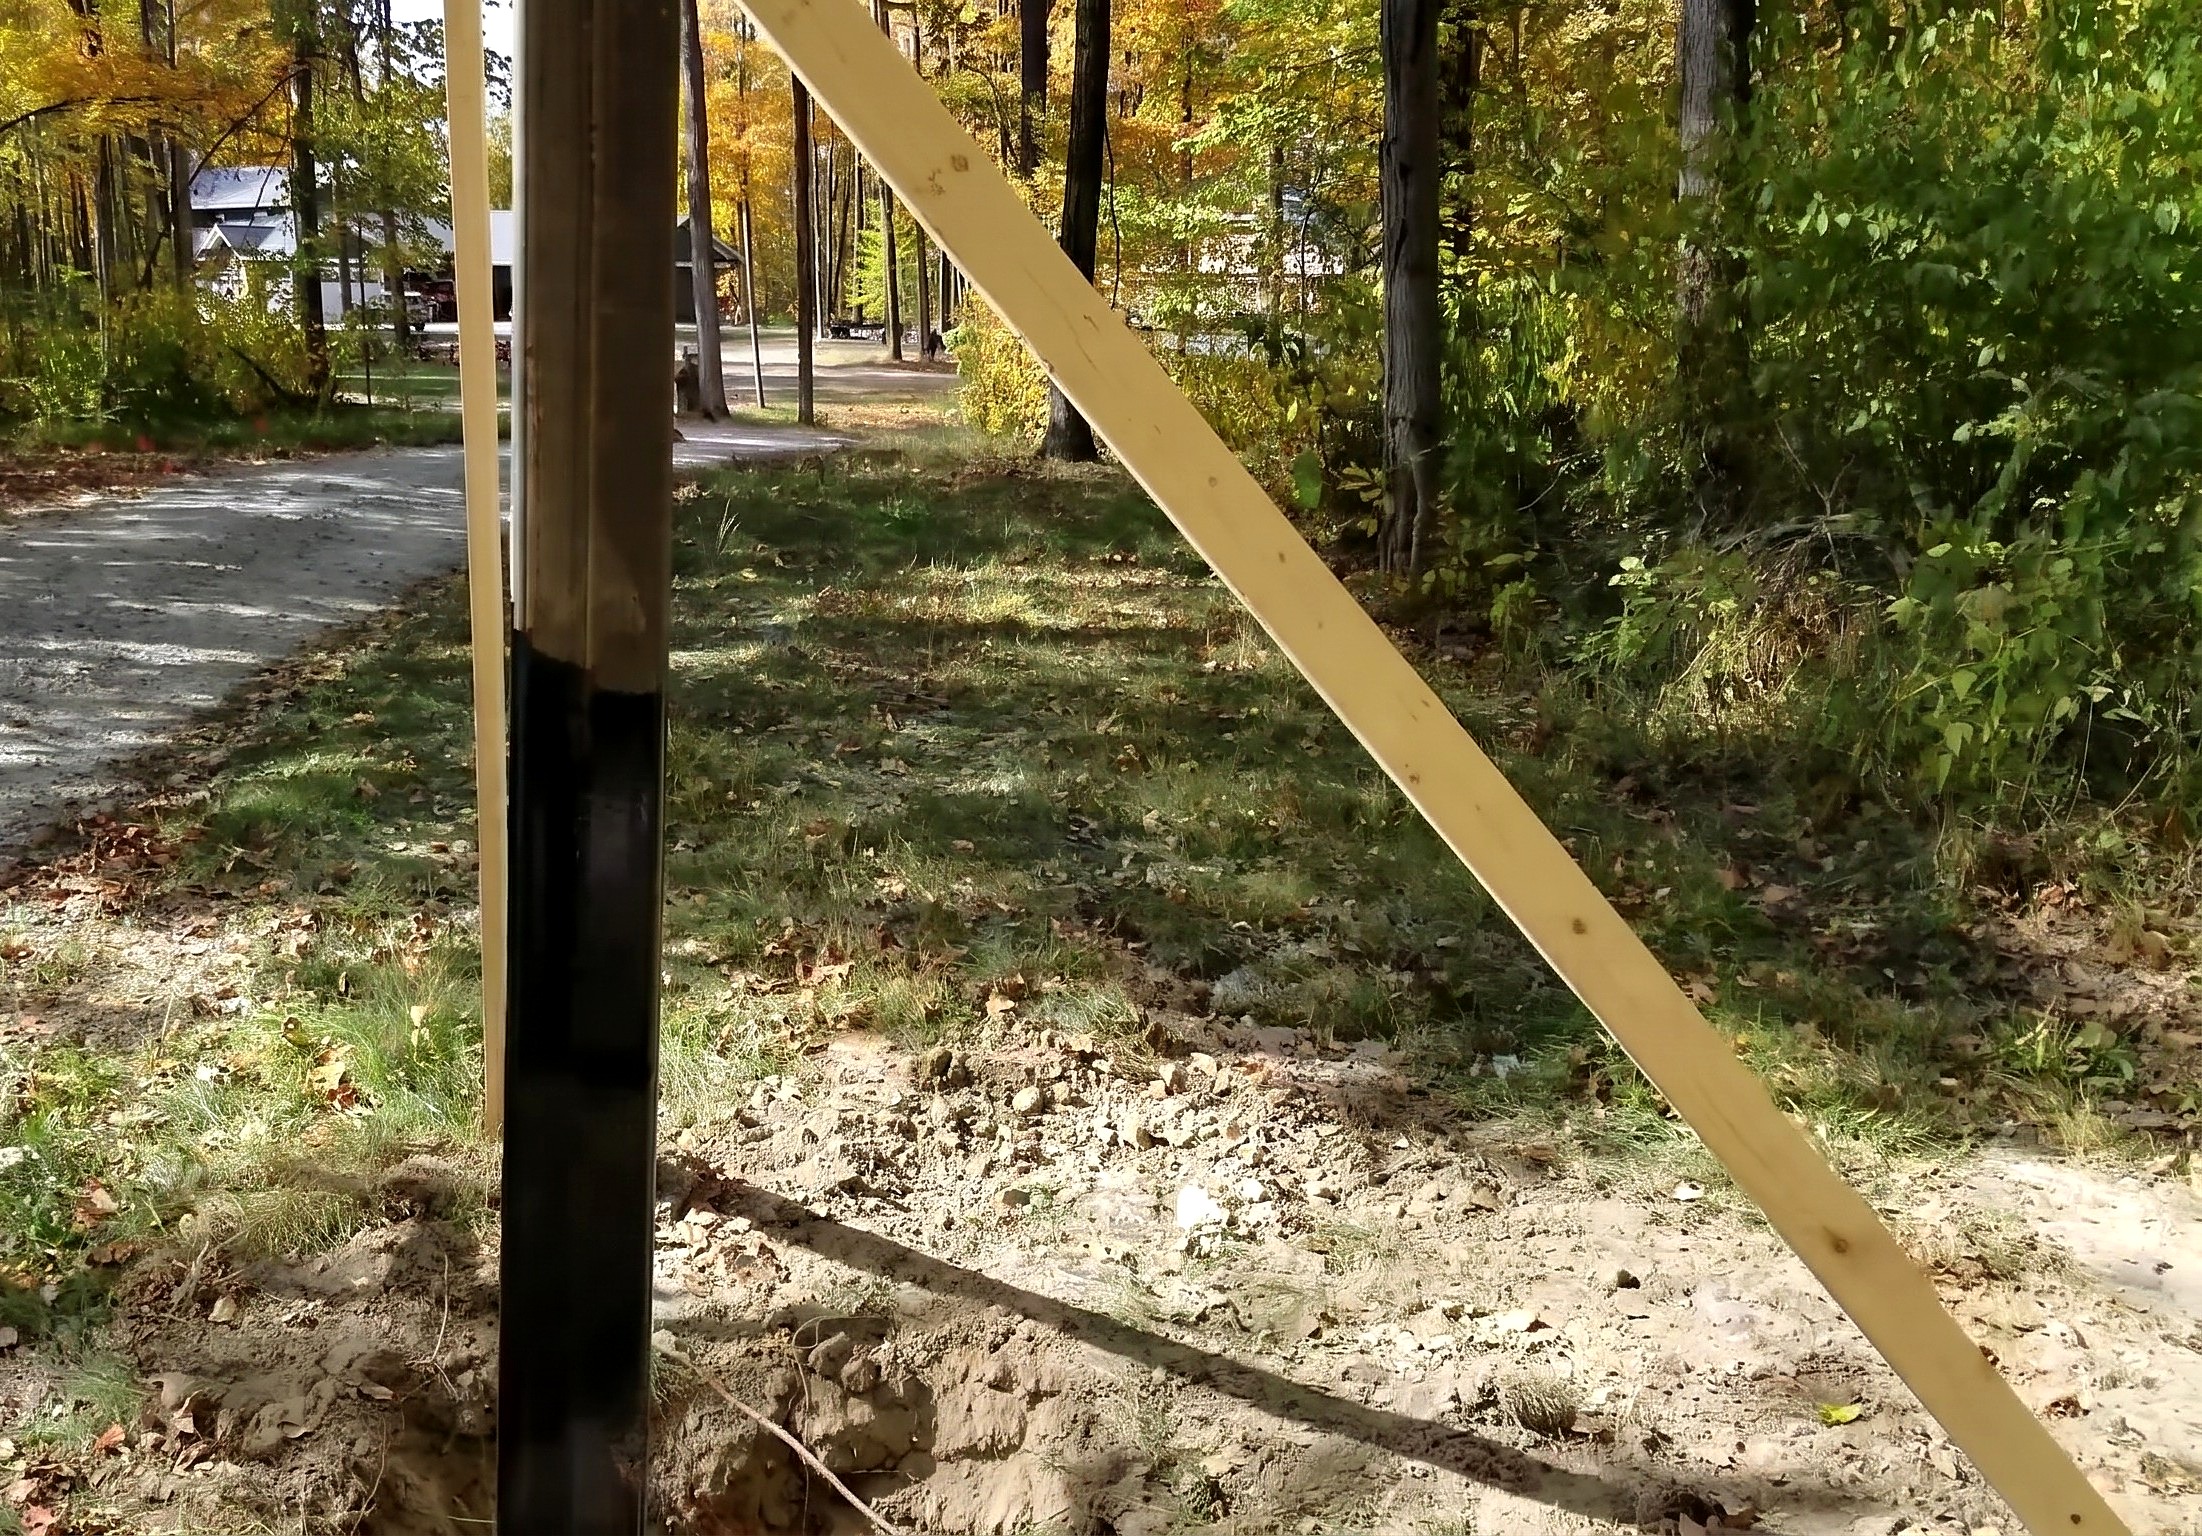
Both 12 ft steel gate posts stand on the gravel base, braced with 2x4 collars and staked diagonal braces.
Parts in this step: (A) crushed gravel (#2 stone), (B) steel gate post, (C) 2x4 collar and braces, (D) wooden stakes, (E) steel fence row stake (T-post)
You'll need: Compact utility tractor with loader and pallet forks, Stepladder, Sledgehammer, Magnetic post level, Cordless drill/driver, Steel gate posts with welded angle iron, Black oil-based paint, 2x4 lumber, Exterior screws, Wooden stakes, Steel fence post (T-post)
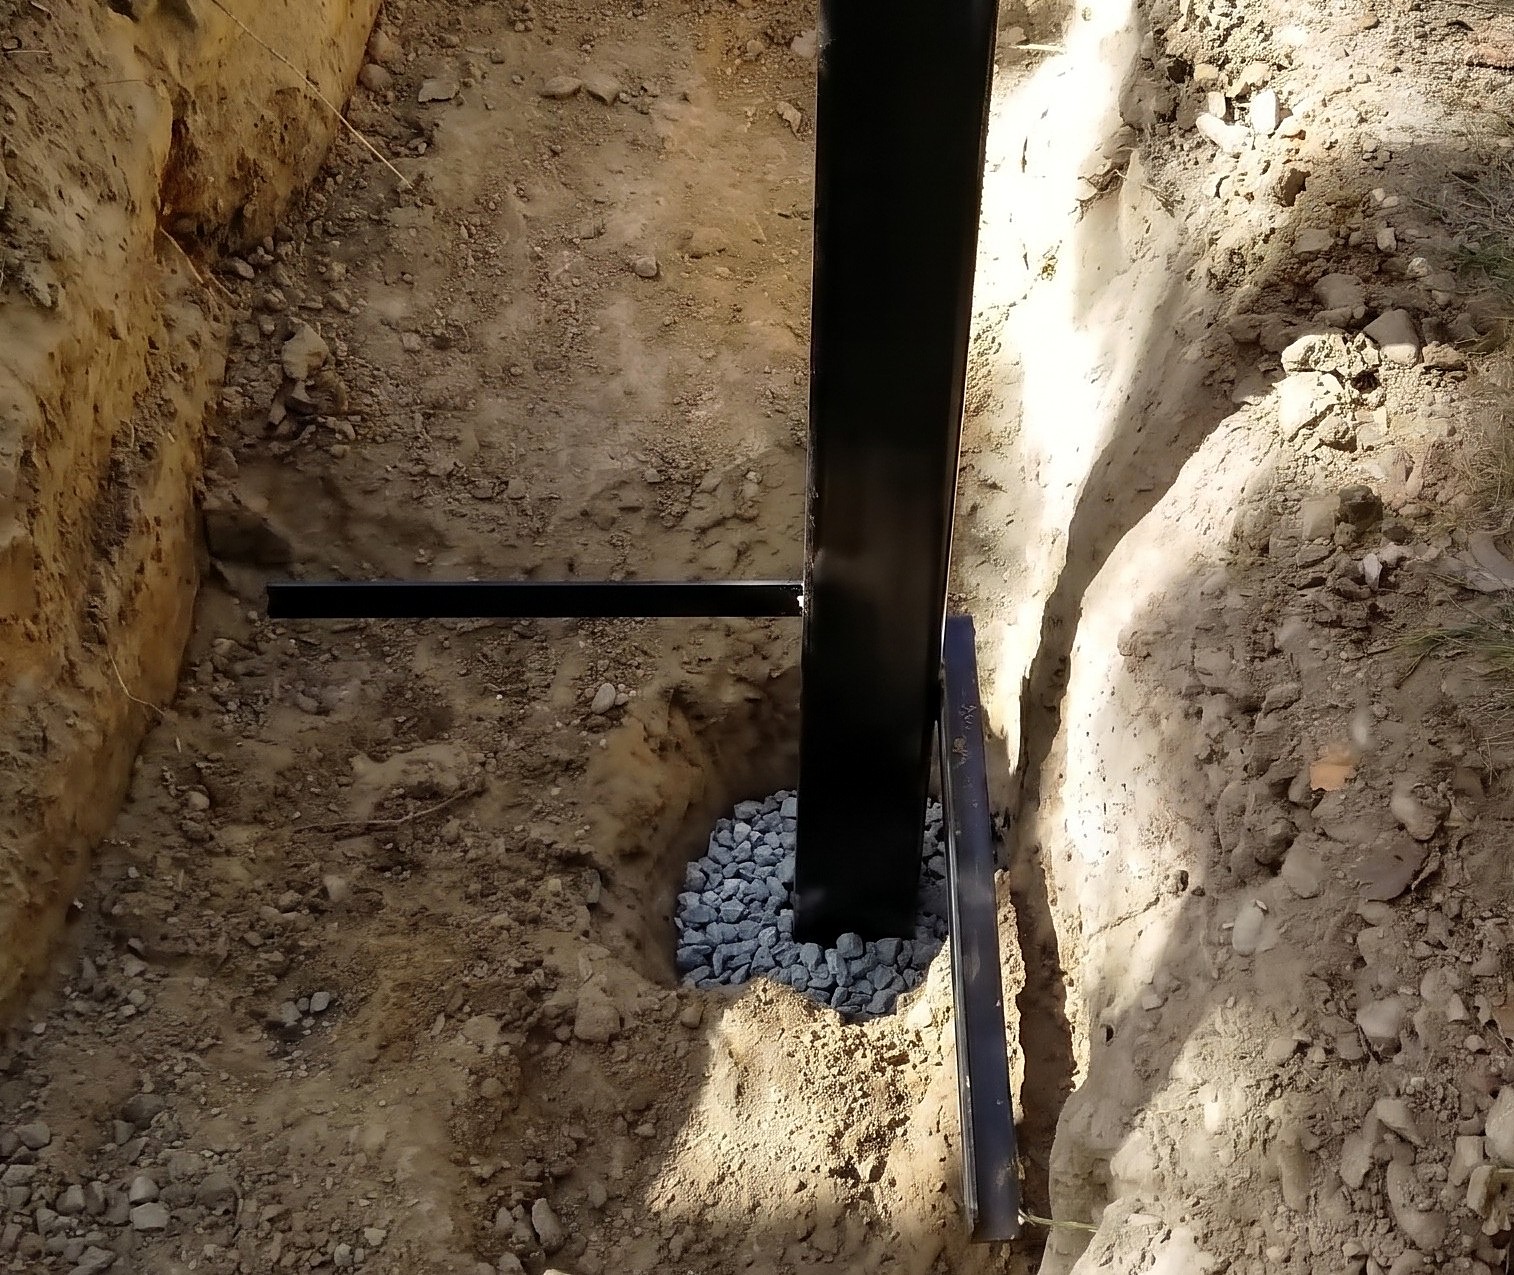
- 2.1 Transport the steel post on a tractor pallet fork
- Check steel gate post (B) for welded base angle iron and dry black paint.
- Slide the hollow 6 in x 6 in post onto one tractor pallet fork tine.
- Drive the post slowly down the driveway to the hole.
- 2.2 Tip the steel post upright into the hole
- Position the steel post base over the hole.
- Raise and tilt the pallet forks as a helper guides the top by hand.
- Slide the post off the fork tine onto the crushed gravel (#2 stone) (A).
- Rotate the post upright in the hole; keep hands and feet clear.
- 2.3 Prop the post with a 2x4 brace and adjust its position in the hole
- Screw a 2x4 collar and braces (C) around the upper post from a stepladder.
- Tap the bottom welded angle iron with a sledgehammer to rotate the post.
- Drive wooden stakes (D) into the ground and screw the diagonal braces to them.
- Drive a steel fence row stake (T-post) (E) with a wood scab where stone stops wood stakes.
- Plumb two adjacent faces with a magnetic post level before tightening brace screws.
Key measurements
- Steel gate posts: 6 in x 6 in x 12 ft, 1/4 in wall thickness
- Supported gate weight: 300 lb per gate
- Tip: Build a 2x4 collar around the upper post so diagonal braces hold it without drilling the steel.
- Tip: When #2 stone in the soil stops wooden stakes, drive a steel T-post and screw a wood scab board to it.
- Heads up: Keep hands and feet clear of the trench bottom while sliding the steel post off the tractor forks.
- Heads up: Wear safety glasses before striking the welded base angle iron with a sledgehammer.
Before you move on: Both steel posts rest on the gravel base, held upright by upper 2x4 collars and staked diagonal braces.
Step 3: Adjust Post Spacing and Trench Sidewalls
The inner trench sidewall is shaved back so both posts sit at the required gate opening span.
Parts in this step: (B) steel gate post
You'll need: Tape measure, Shovel, Steel gate posts with welded angle iron
- 3.1 Measure the span between posts and shave the trench sidewall
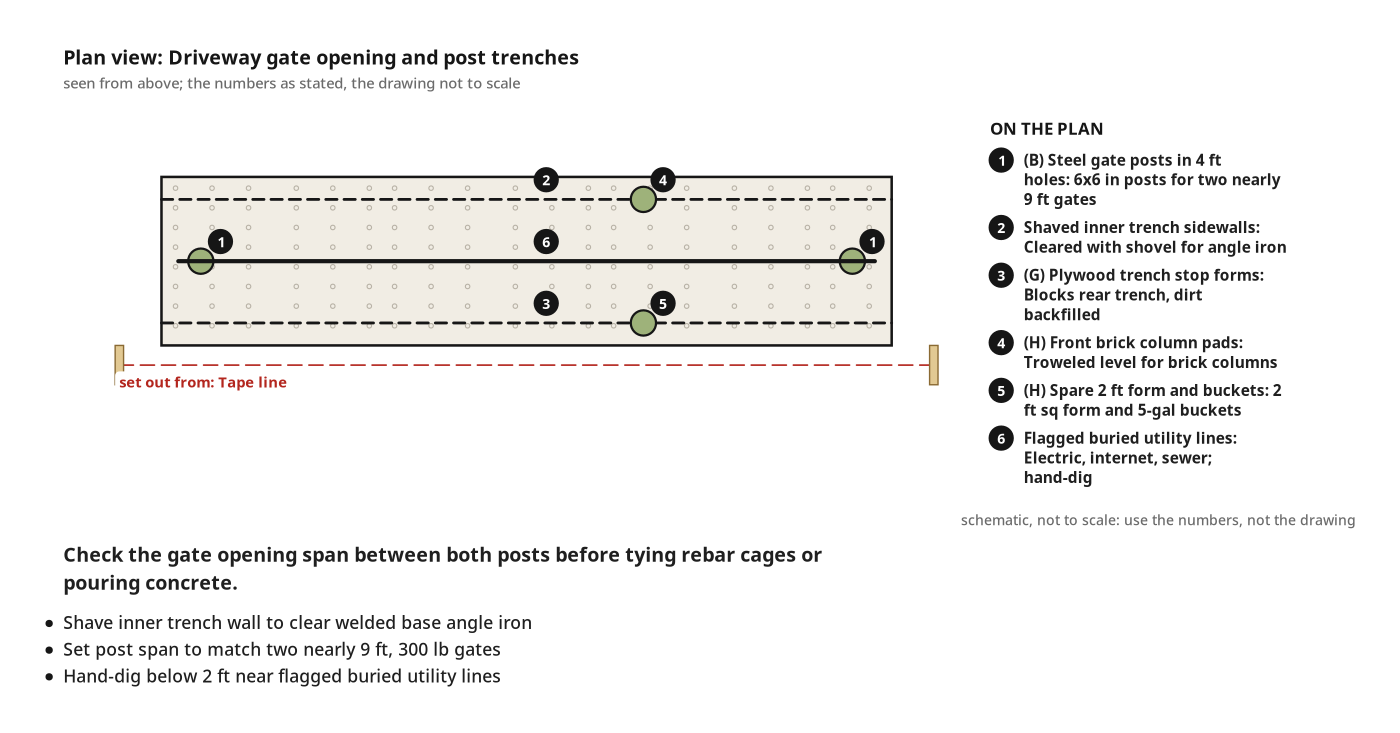
- Stretch a tape measure across the driveway between the steel gate posts (B).
- Compare the span against the width needed for two nearly 9 ft gates.
- Shave soil off the inner trench sidewall with a shovel to clear the angle iron.
- Shift the post inward until the tape measure reads the required gate opening.
Key measurements
- Gate width: nearly 9 ft per gate (post-to-post span not stated; match your gates and hinges).
- Tip: Check the gate opening span between both posts before tying rebar cages or pouring concrete.
Before you move on: The welded angle iron clears the trench wall and the post span matches the gate opening.
Step 4: Build the Rebar Cages and Prep the Footings for Concrete
Tied 3D rebar cages interlock around the post bases, plywood forms block unused rear trenches, and both holes are blown clean.
Parts in this step: (B) steel gate post, (F) rebar cage and top bars, (G) plywood stop form
You'll need: Portable band saw, Shovel, Leaf blower, Rebar, Rebar tie wire, Plywood sheathing
- 4.1 Cut rebar to length with a portable band saw
- Brace rebar for the rebar cage and top bars (F) across the tractor blade.
- Wear safety glasses and work gloves before cutting steel.
- Cut longitudinal, transverse, and vertical rebar pieces with a portable band saw.
- 4.2 Lay and tie the rebar cage in the post hole
- Lay horizontal rebar into the trench around the angle iron on steel gate post (B).
- Add vertical bars and twist rebar tie wire at every intersection to form a 3D cage.
- Interlock the rebar cage around the welded angle-iron crossbars at the post base.
- Rebar diameter and grid spacing are not stated; span the full footing.
- 4.3 Block off unused trench with plywood and clear the holes
- Stand a plywood stop form (G) vertically across the unused rear trench behind each post.
- Backfill dirt behind the plywood to brace the form against wet concrete.
- Blow leaves and loose debris from the holes and cages with a leaf blower.
Key measurements
- Concrete volume after blocking rear trench: almost 6 cubic yards (about 25,000 lb)
- Tip: Block unused rear trenches with plywood and backfill now; pour a separate opener pad once the opener location is known.
- Tip: Blow leaves and loose debris from the holes right before the concrete truck arrives.
- Heads up: Wear safety glasses and work gloves when cutting steel rebar with a portable band saw.
Before you move on: Both 3D rebar cages wired around base angle irons, plywood stop forms backfilled, hole bottoms clean.
Step 5: Re-Plumb the Posts and Reinforce Bracing
Both steel posts re-plumbed on pour day and braced with a third staked diagonal brace.
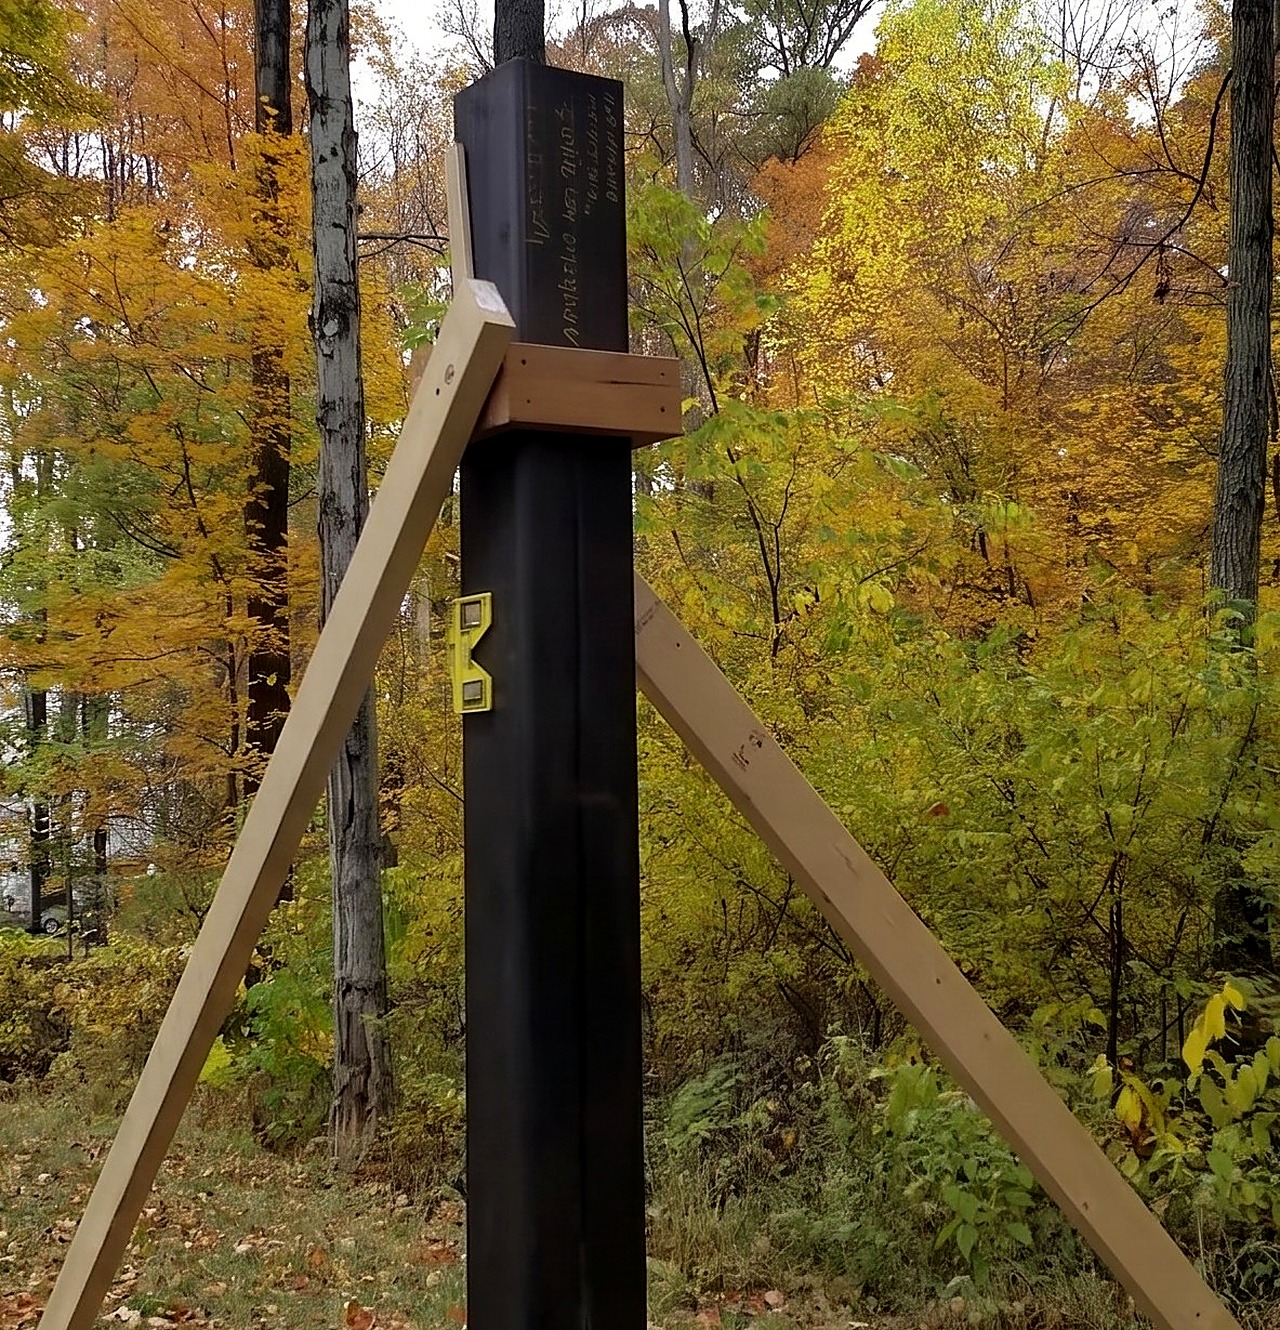
Parts in this step: (B) steel gate post, (C) 2x4 collar and braces, (D) wooden stakes
You'll need: Magnetic post level, Cordless drill/driver, Sledgehammer, 2x4 lumber, Wooden stakes, Exterior screws
- 5.1 Adjust the 2x4 braces using a magnetic post level
- Re-check both steel gate posts (B) if holes sit open a week or through rain.
- Stick a magnetic post level on the steel post to read two adjacent faces.
- Back out the 2x4 collar and braces (C) screws with a cordless drill/driver.
- Shift the post until both vials read plumb, then drive the screws tight.
- 5.2 Drive an extra stake and attach a third diagonal 2x4 brace
- Push each braced post by hand to check for wobble before the pour.
- Drive an extra wooden stake (D) into the ground beside the hole with a sledgehammer.
- Stop driving the wooden stake before the top splinters.
- Screw a third diagonal 2x4 brace from stake to upper collar.
Key measurements
- Wait before pour: 1 week (3/4 in rain settled soil and shifted braces)
- Tip: Use a magnetic post level on steel posts so both hands stay free to shift braces and drive screws.
- Tip: Add an extra stake and third diagonal brace to any wobbly post before pouring concrete.
- Heads up: Never pour without re-checking plumb if braced posts sat in open holes through rain.
Before you move on: Both posts read plumb on two adjacent faces and feel rigid when pushed.
Step 6: Pour Concrete into the Post Footings
Both post holes filled to the form tops with fiber-reinforced ready-mix concrete.
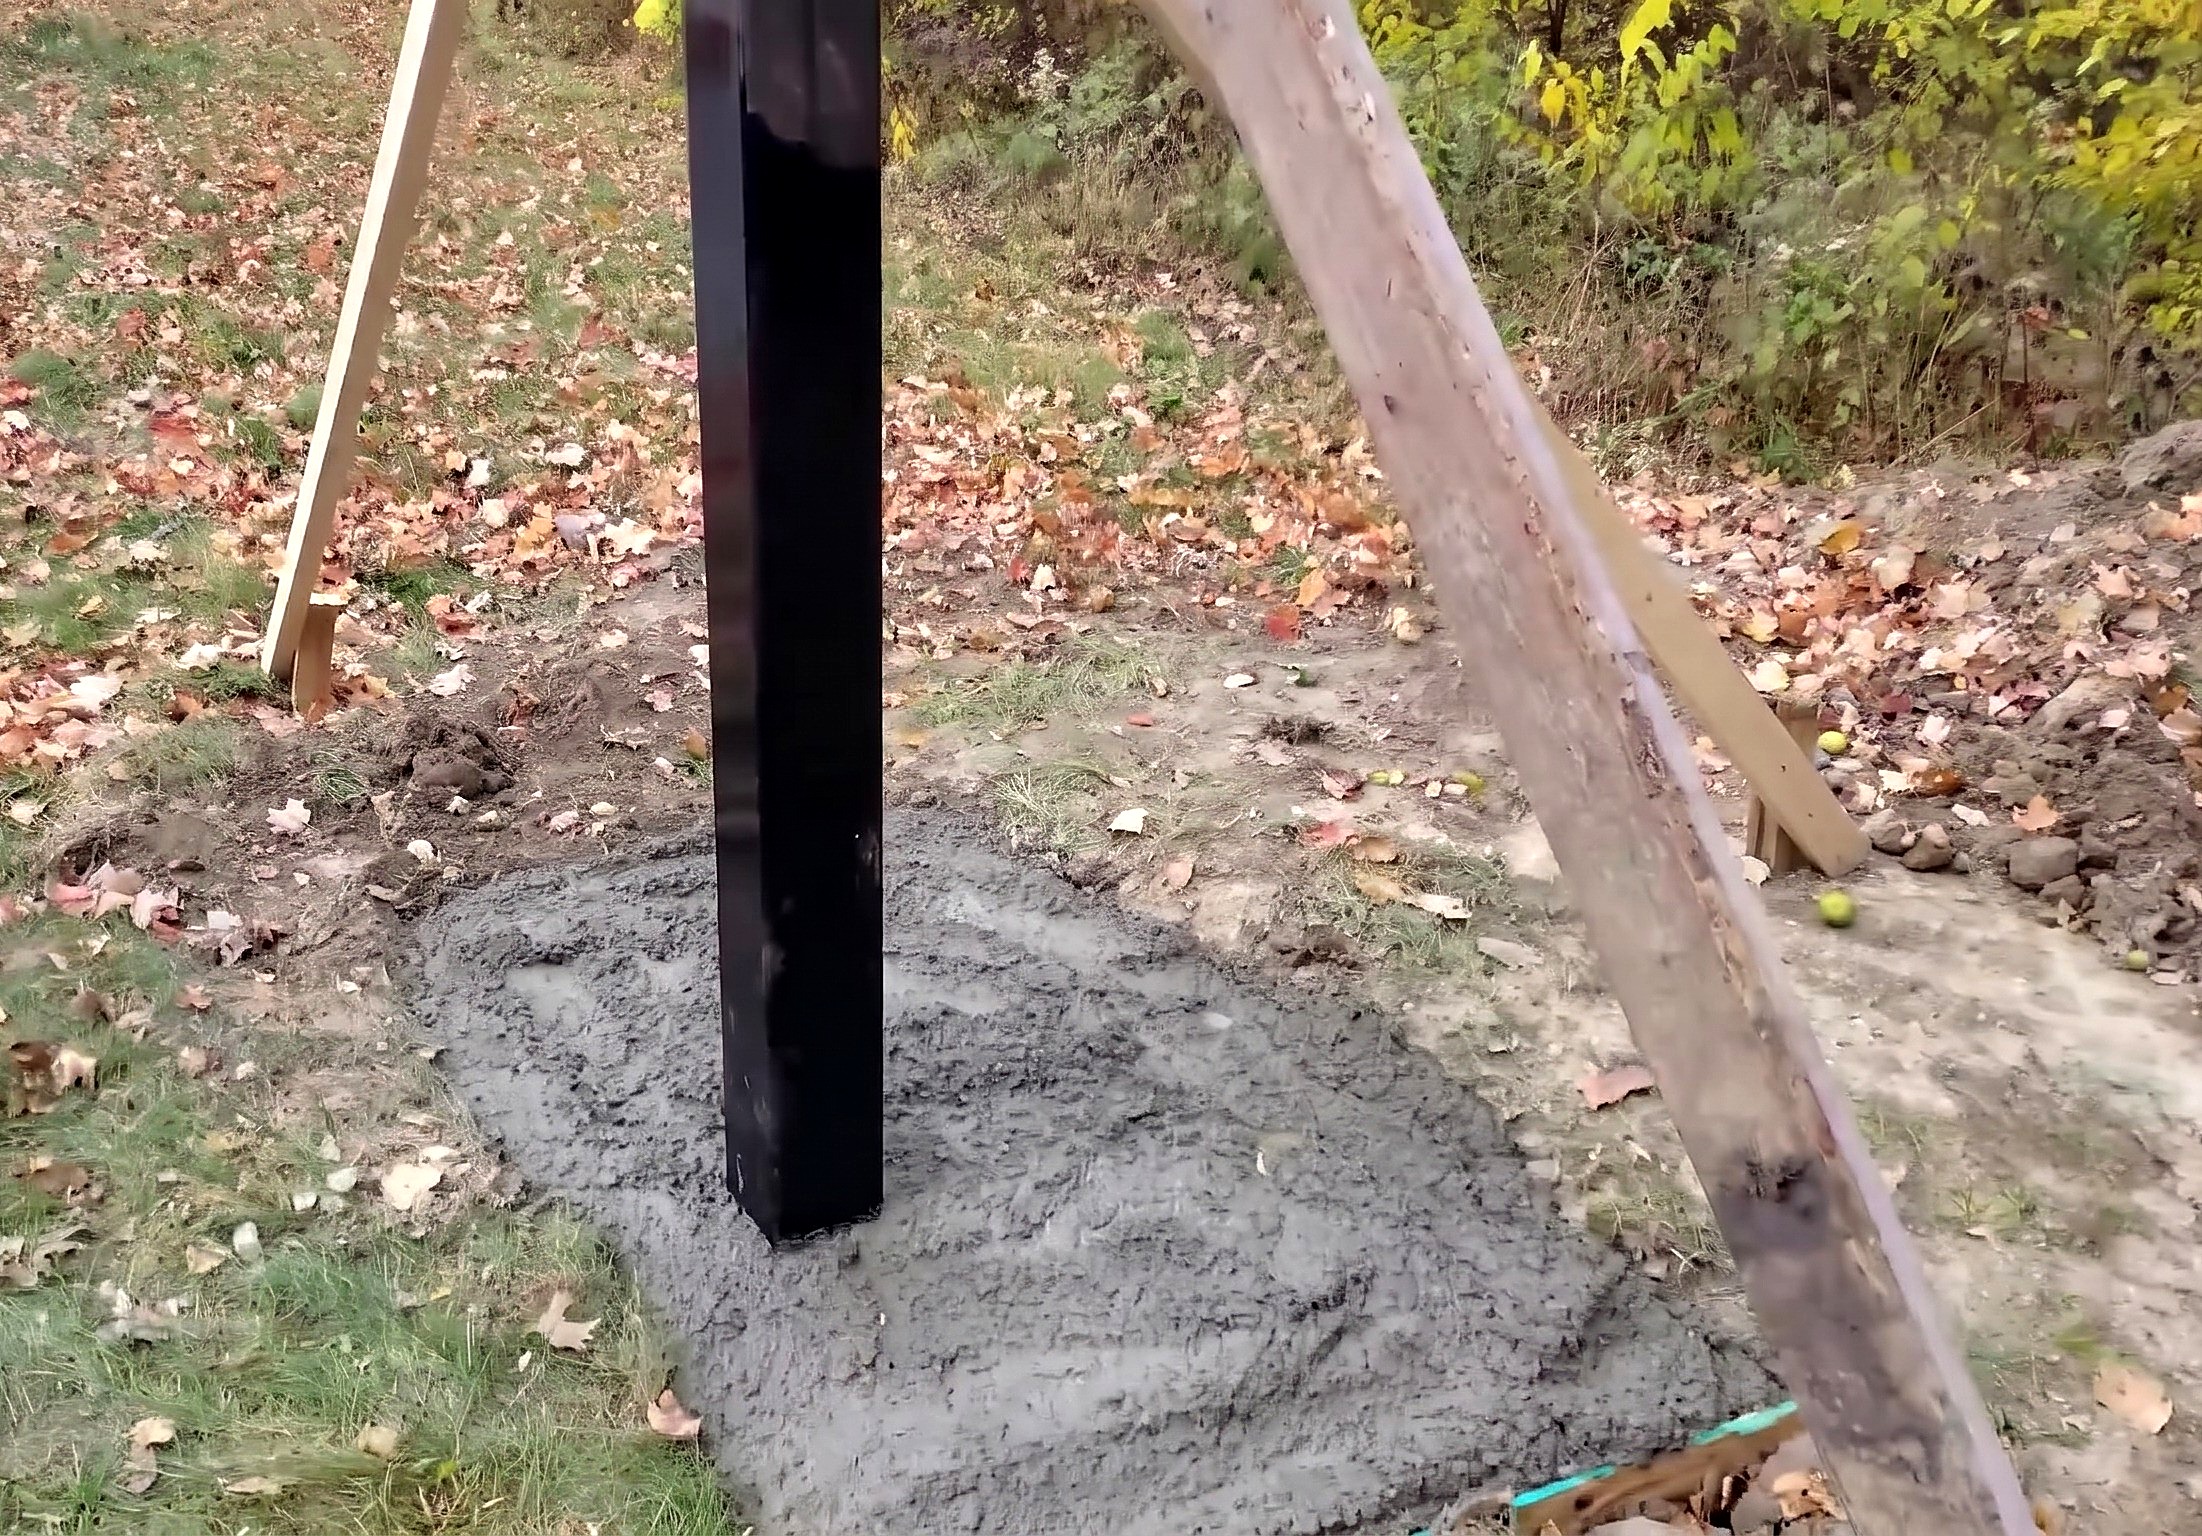
Parts in this step: (B) steel gate post, (F) rebar cage and top bars, (G) plywood stop form, (H) ready-mix concrete
You'll need: Shovel, Ready-mix concrete
- 6.1 Pour ready-mix concrete into the first post footing
- Wear waterproof rubber boots and gloves before handling wet concrete.
- Position the mixer truck chute over the first hole.
- Discharge ready-mix concrete (H) around steel gate post (B) and rebar cage and top bars (F).
- Fill the hole until concrete covers the cage and reaches the plywood stop form (G).
- 6.2 Pour and shovel concrete into the second post footing
- Move the mixer truck chute over the second post hole and fill it.
- Spread concrete evenly around the post and form edges with a shovel.
- Pour leftover concrete from the chute into the 2 ft square form and 5-gallon buckets.
- Unloading almost 6 cubic yards into both holes takes about 12 minutes.
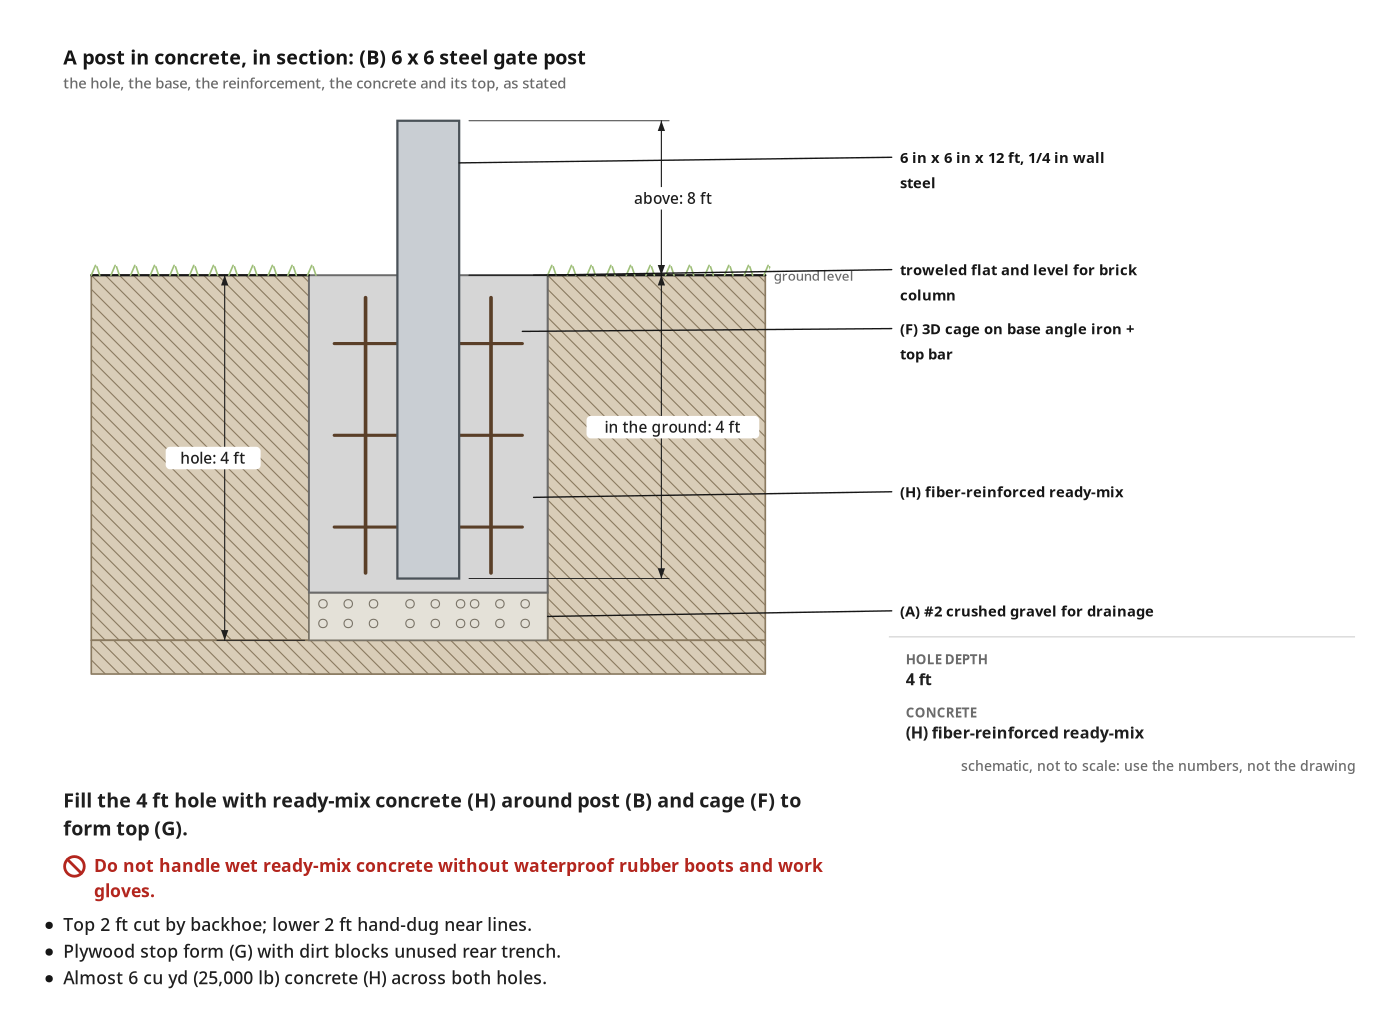
Key measurements
- Ready-mix concrete volume: almost 6 cubic yards (about 25,000 lb) across both holes
- Mixer truck unload time: about 12 minutes
- Leftover concrete forms: 2 ft square wooden form and 5-gallon buckets
- Tip: Set out 5-gallon buckets and a 2 ft square wooden form beforehand for leftover concrete from the truck.
- Heads up: Wear waterproof rubber boots and work gloves in wet ready-mix concrete to prevent skin irritation and chemical burns.
Before you move on: Both footings filled level with the plywood form tops, covering the rebar cages.
Step 7: Embed Top Rebar and Trowel the Concrete Pads
Extra rebar embedded in the top concrete and both footing pads troweled flat and level.
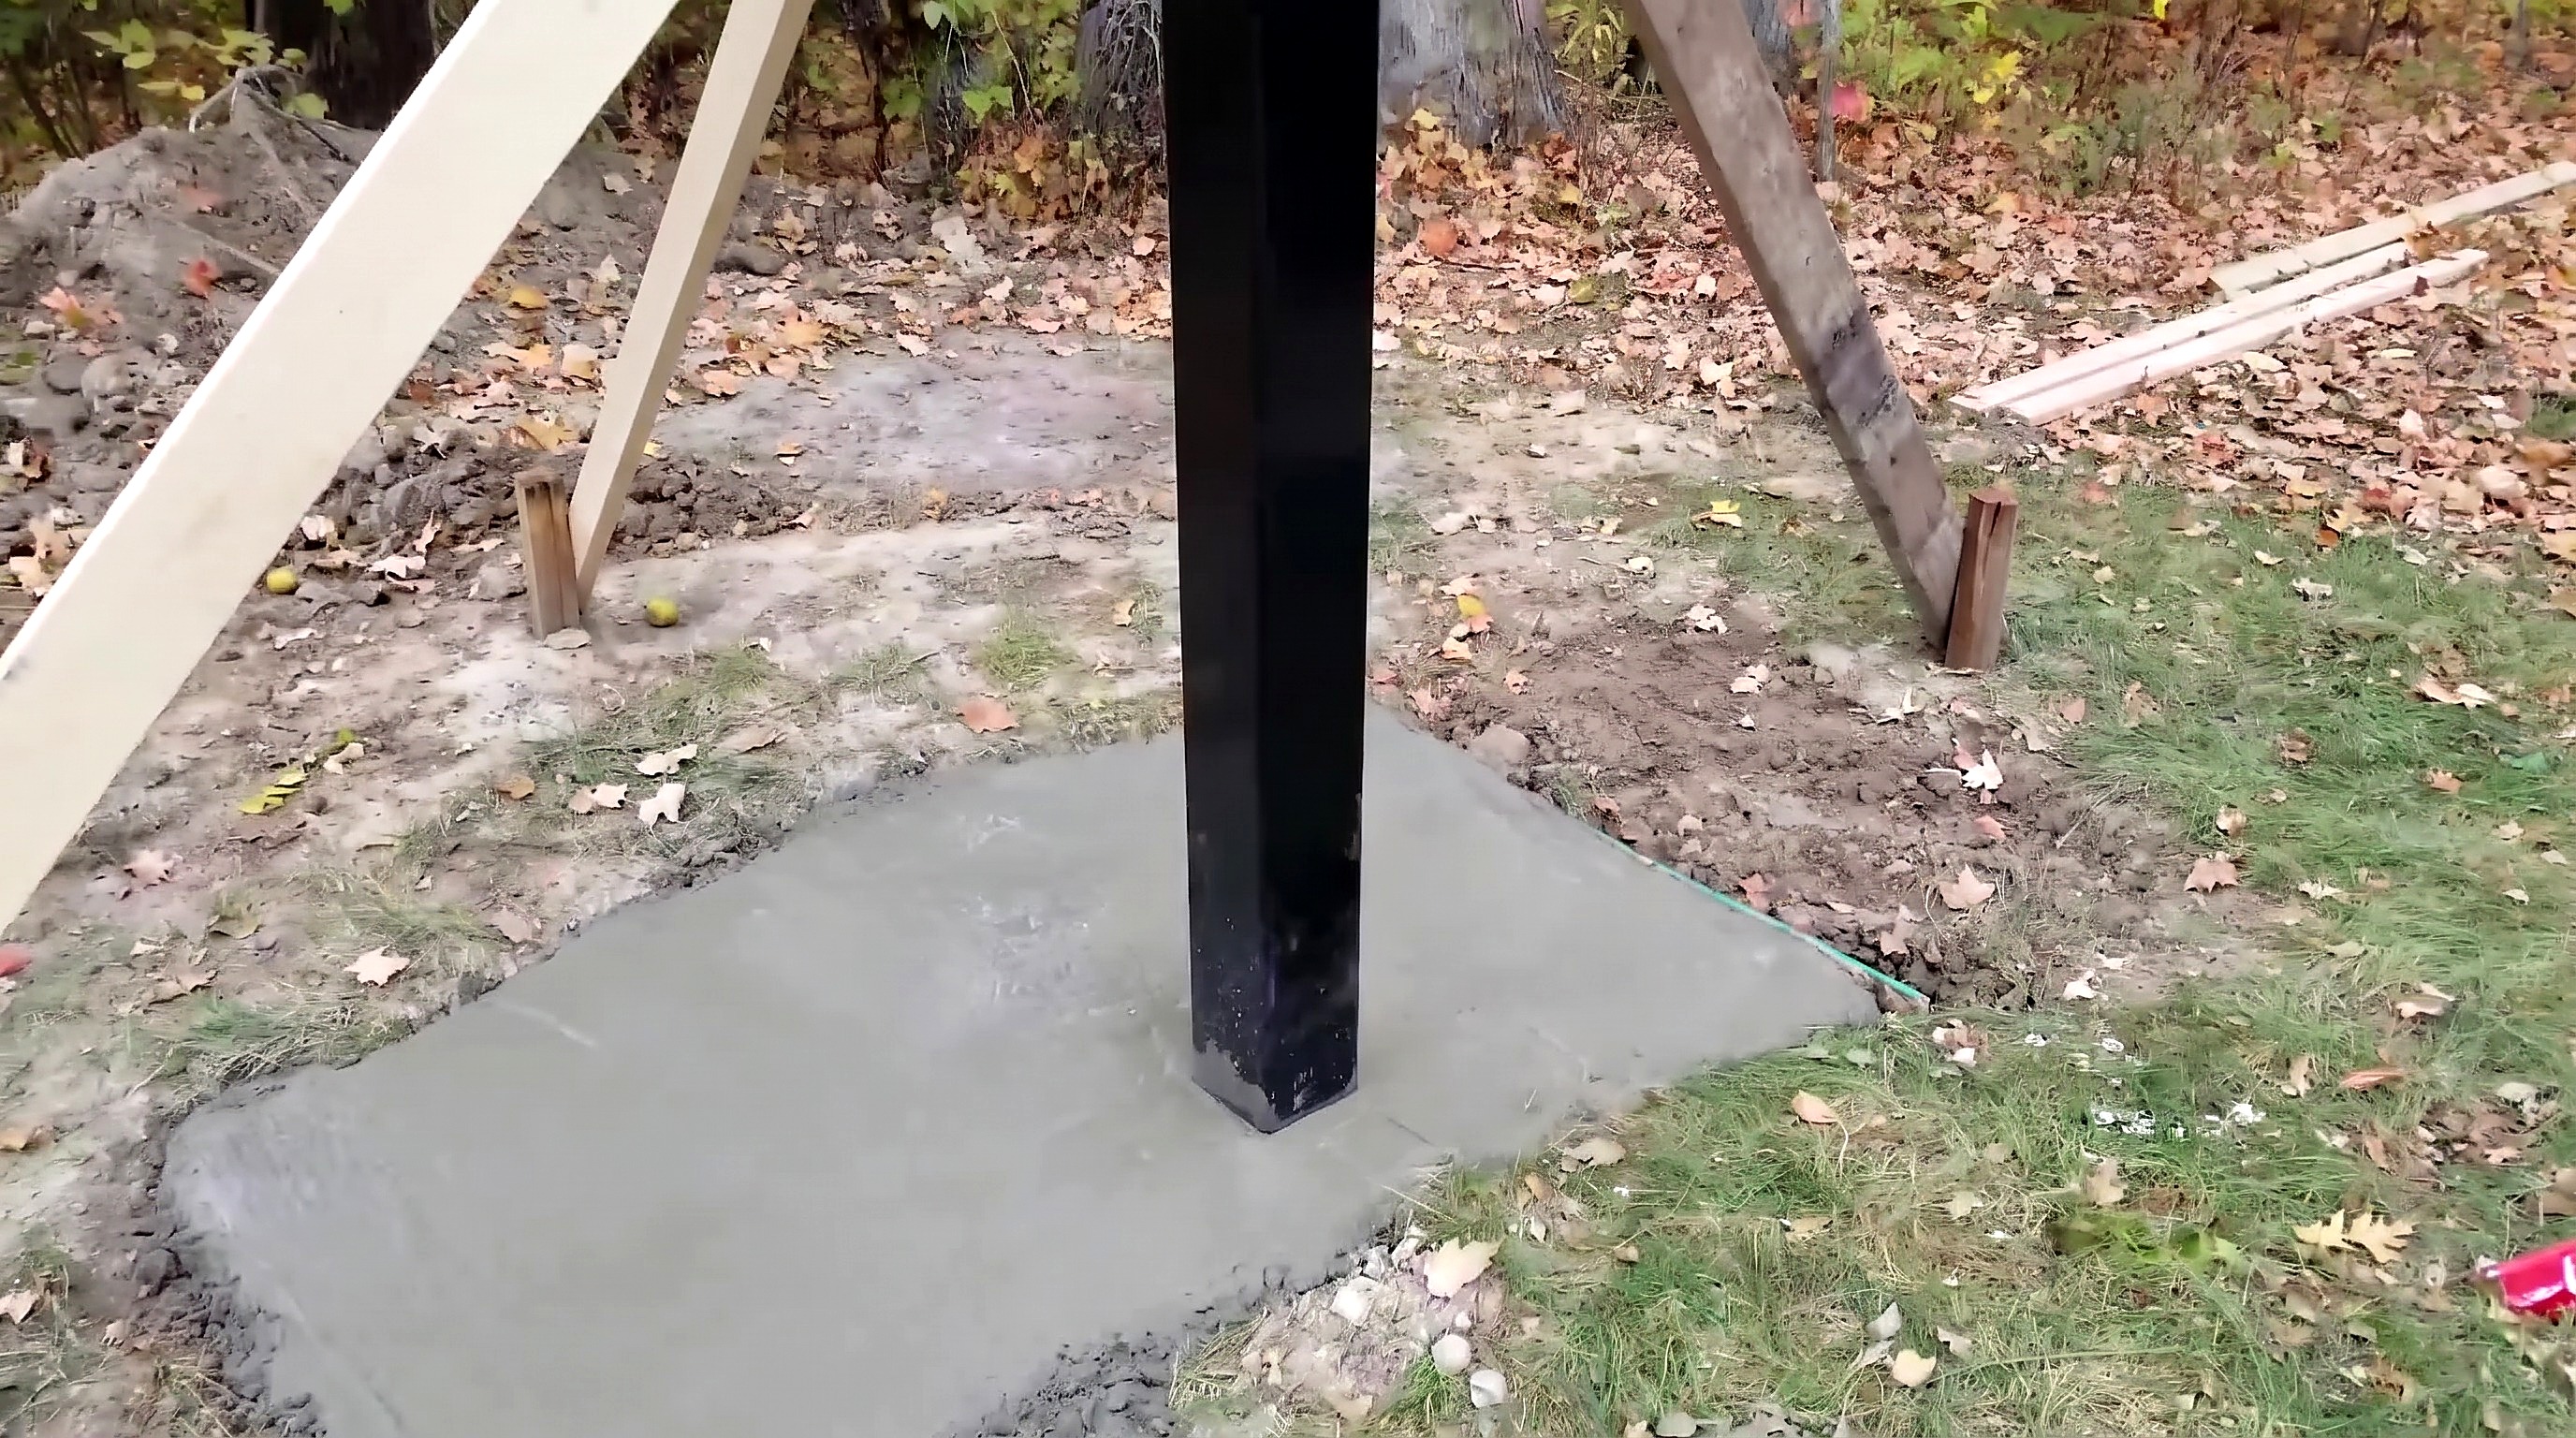
Parts in this step: (B) steel gate post, (F) rebar cage and top bars, (H) ready-mix concrete
You'll need: Concrete finishing trowel, Magnetic post level, Rebar, Ready-mix concrete
- 7.1 Press rebar into the spare form and trowel smooth
- Lay cut rebar cage and top bars (F) on the wet ready-mix concrete (H) in the spare form.
- Push the bars into the wet mix with a concrete finishing trowel.
- Float the spare slab top smooth.
- 7.2 Embed rebar and trowel the two gate post pads level
- Press a rebar length into the wet concrete along the narrow inner side of each steel gate post (B).
- Sweep a concrete finishing trowel in arcs around both posts to level the pads.
- Finish the front pad sections flat and level as a substructure for future brick columns.
- Check both posts stay plumb, then let set overnight before heavy rain.
Key measurements
- Wait before expected 3 in rainstorm: overnight until next day
- Full cure wait before hanging 300 lb gates: not stated in this guide; allow full concrete cure before loading
- Tip: Press rebar into wet concrete on the post's narrow driveway side so that thin edge won't crack.
- Tip: Trowel the front pad surface flat and level for building future brick columns directly on top.
Before you move on: Top rebar embedded, both front pad sections troweled flat and level, both posts plumb.
Finishing
Cure and Weather Protection
- Tarp fresh pads overnight if rain comes before the surface firms.
- Next-day concrete is firm enough to withstand 3 in of rain.
- Leave 2x4 collars, diagonal braces, and stakes on while concrete cures.
- Cure time before hanging the 300 lb gates is not stated; wait for full cure.
Backfill and Future Additions
- Remove stakes, 2x4 braces, and plywood stop forms once footings cure.
- Backfill dirt over the edges and rear trench.
- Lay future brick columns right on the leveled front concrete substructure pads.
- Pour a separate pad later if installing pedestal-style gate openers.
Variations
- Order ready-mix concrete with macro and micro synthetic fibers to control shrinkage cracking.
Check the finished work
| Check | What you should see | If not |
|---|---|---|
| Set a magnetic post level on two adjacent faces of both steel posts right after troweling. | Both posts read plumb on both axes and have not shifted during the 6-yard pour. | Adjust the 2x4 braces immediately while the concrete is wet. |
| Stretch a tape measure across the driveway between both steel posts. | Post-to-post span matches the opening needed for the two nearly 9 ft gates. | |
| Inspect troweled front pad sections and narrow inner edges around each post. | Top rebar fully covered; front pad flat and level for future brick columns. | Re-float uneven spots with the hand trowel before concrete sets. |
| Check the concrete pad surface the next day before forecasted rain. | Concrete surface is firm enough that rainwater won't pit or wash out the mix. | Cover pads with a tarp if rain starts before concrete firms up. |
These Specs are built from Indy Farm Life's video “Setting Heavy-Duty Steel Gate Posts in Concrete with Rebar Cages”. Open the Setting Heavy-Duty Steel Gate Posts in Concrete with Rebar Cages project page.
