Spetz Specs No. 8788: step-by-step build guide
Floating Dock Railing and Gangway
The complete step-by-step guide made from Indy Farm Life's YouTube video, free on Spetz. For the video, a step-by-step player and answers to your questions, see the Floating Dock Railing and Gangway project page.
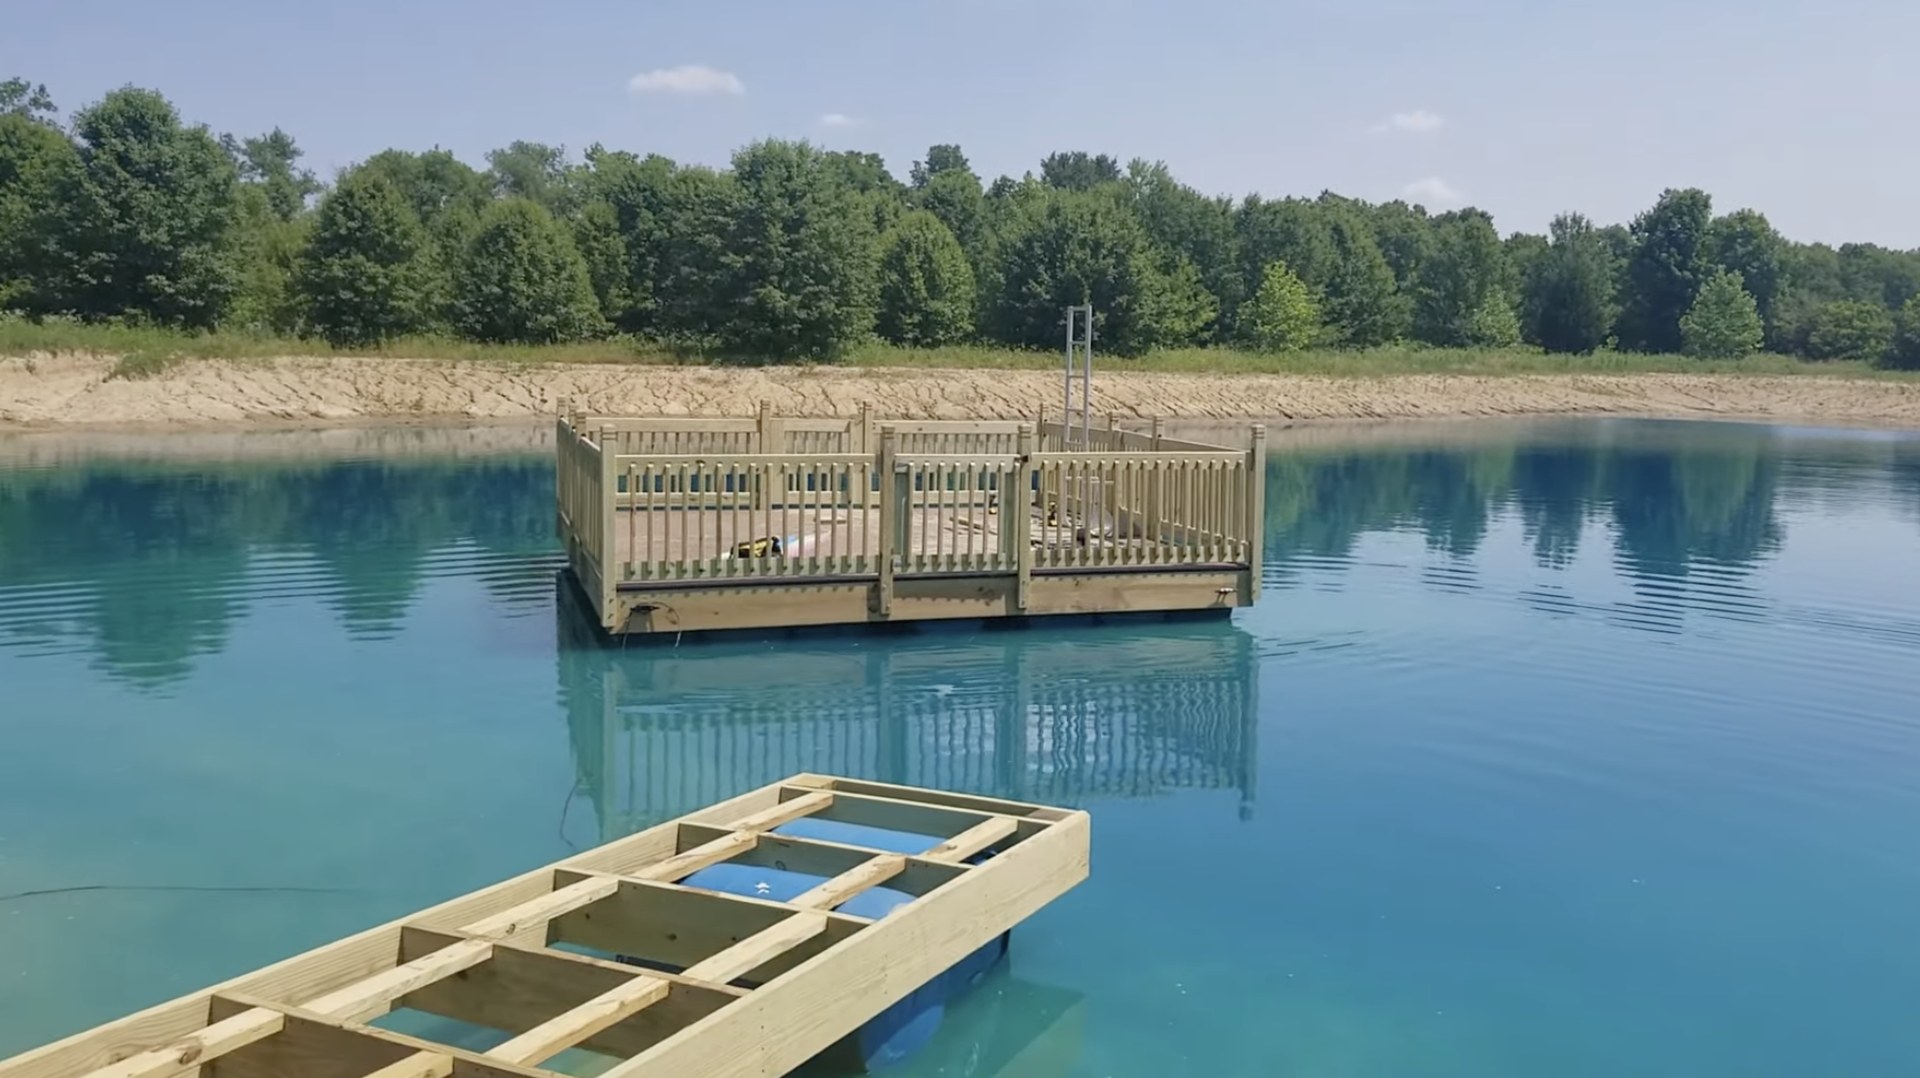
6 steps, 9 parts, 8 tools, 13 materials
Overview
Finished size: 192 in x 192 in dock railing perimeter with 48 in estimated post height
What You Are Building
- Add a perimeter wood railing, three gates, and a flip-up ladder to a floating dock.
- Build a 2x10 floating gangway on 55-gallon barrels from dock to shore.
Why This Design Works
- Notched 6x6 and 4x4 posts tuck the railing inside the deck edge over the frame.
- Pre-built 6 ft railing panels are faster and cheaper than loose balusters.
- 22 in joist slots let you add barrels anywhere along the gangway.
What It Takes
- Plan two days to frame, notch, and bolt waterside with a portable generator.
- Get a helper to launch the heavy gangway frame and place the flotation barrels.
What Decides Success
- Pre-drilling 3/8 in lag screws keeps the 2x12 dock frame from splitting.
- Plumbing and strapping posts before bracketing panels keeps the railing rigid.
Health and safety
Generator and Electrical Safety
- Keep the portable generator and all electrical cords on dry ground well away from the water to prevent electric shock.
- Run the portable generator outdoors in an open area so exhaust fumes cannot build up near your work zone.
- Use only cordless tools when working directly on the floating dock so power cords cannot fall into the water.
Sawing and Drilling Hazards
- Secure the 4x4 and 6x6 posts on stable ground before notching with the circular saw, jigsaw, or oscillating multi-tool.
- Keep your hands clear of the blade path on the circular saw, jigsaw, and oscillating multi-tool until blades stop completely.
- Brace the cordless drill firmly with both hands to prevent wrist twist when driving 3/8 inch lag screws into posts.
Treated Wood and Sealer
- Wear a dust mask, eye protective equipment, and hearing protective equipment when sawing or orbital sanding pressure-treated wood.
- Wear gloves when handling treated lumber and brushing water sealer onto the cut post ends to avoid skin irritation.
- Wash your hands thoroughly with soap and water after handling pressure-treated wood and before eating or drinking.
Gangway Handling and Water Safety
- Assemble the 2x10 and 2x6 gangway frame near the shore to avoid carrying the heavy structure a long distance.
- Keep your fingers and face clear of the ratchet mechanism when tensioning or releasing ratchet straps around the plastic barrels.
- Verify the gangway is tied securely to the dock and rests flat on the shore before walking across it.
- Check the water depth under the flip-up aluminum dock ladder before jumping in, as shallow banks can ground the rungs.
Tools
- Circular saw
- Oscillating multi-tool (optional)
- Sander (orbital sander) (optional)
- Generator (portable generator, WEN) (optional)
- Cordless drill (DeWalt)
- Jigsaw (Porter-Cable)
- Post level
- Ratchet straps (optional)
Materials
- Pre-built railing panels (Treated wood, 6 ft)
- 4x4 posts (4, Treated wood)
- 6x6 posts (4, Treated wood)
- 2x10 lumber (Treated wood)
- 2x6 lumber (Treated wood)
- Lag screws (3/8 inch)
- Washers (3/8 inch)
- Wood screws (#9, 3 inch)
- Water sealer (Thompson's WaterSeal)
- Plastic barrels (2+, 55 gallon)
- Railing brackets (Steel)
- Gate hinges
- Dock ladder (1, Aluminum, flip-up)
Hardware
| Hardware | Size | Count | Used in steps |
|---|---|---|---|
| 3/8 in Lag screws | 32 | 2 | |
| 3/8 in Washers | 32 | 2 | |
| 3 in #9 Wood screws | 236 | 2, 3, 4, 5 | |
| Railing brackets | 32 | 3 | |
| Gate hinges | 6 | 5 |
Cut list
| Part | Name | Qty | Size | Notes |
|---|---|---|---|---|
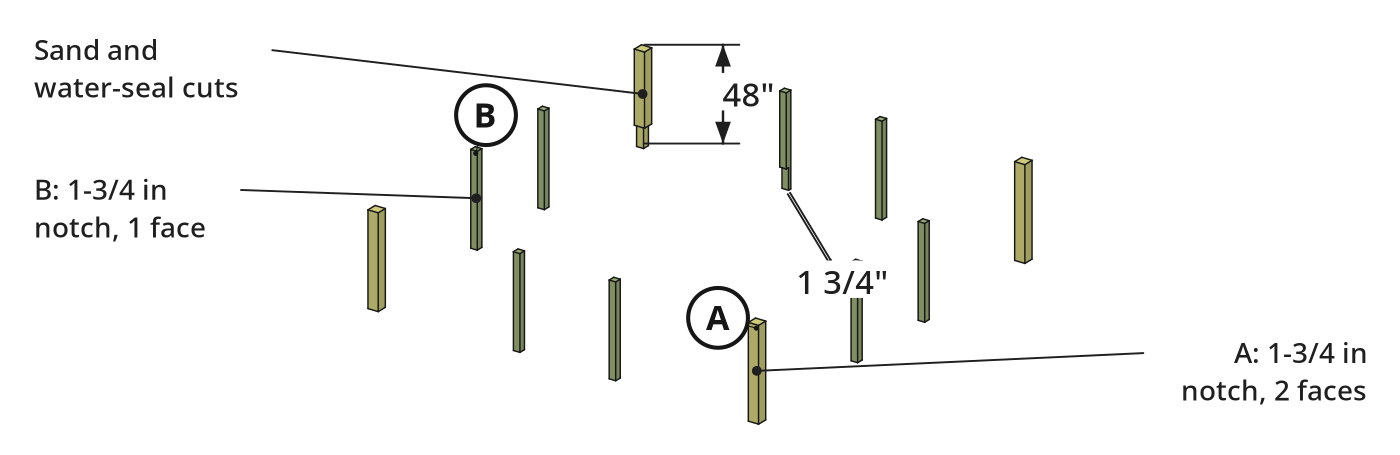
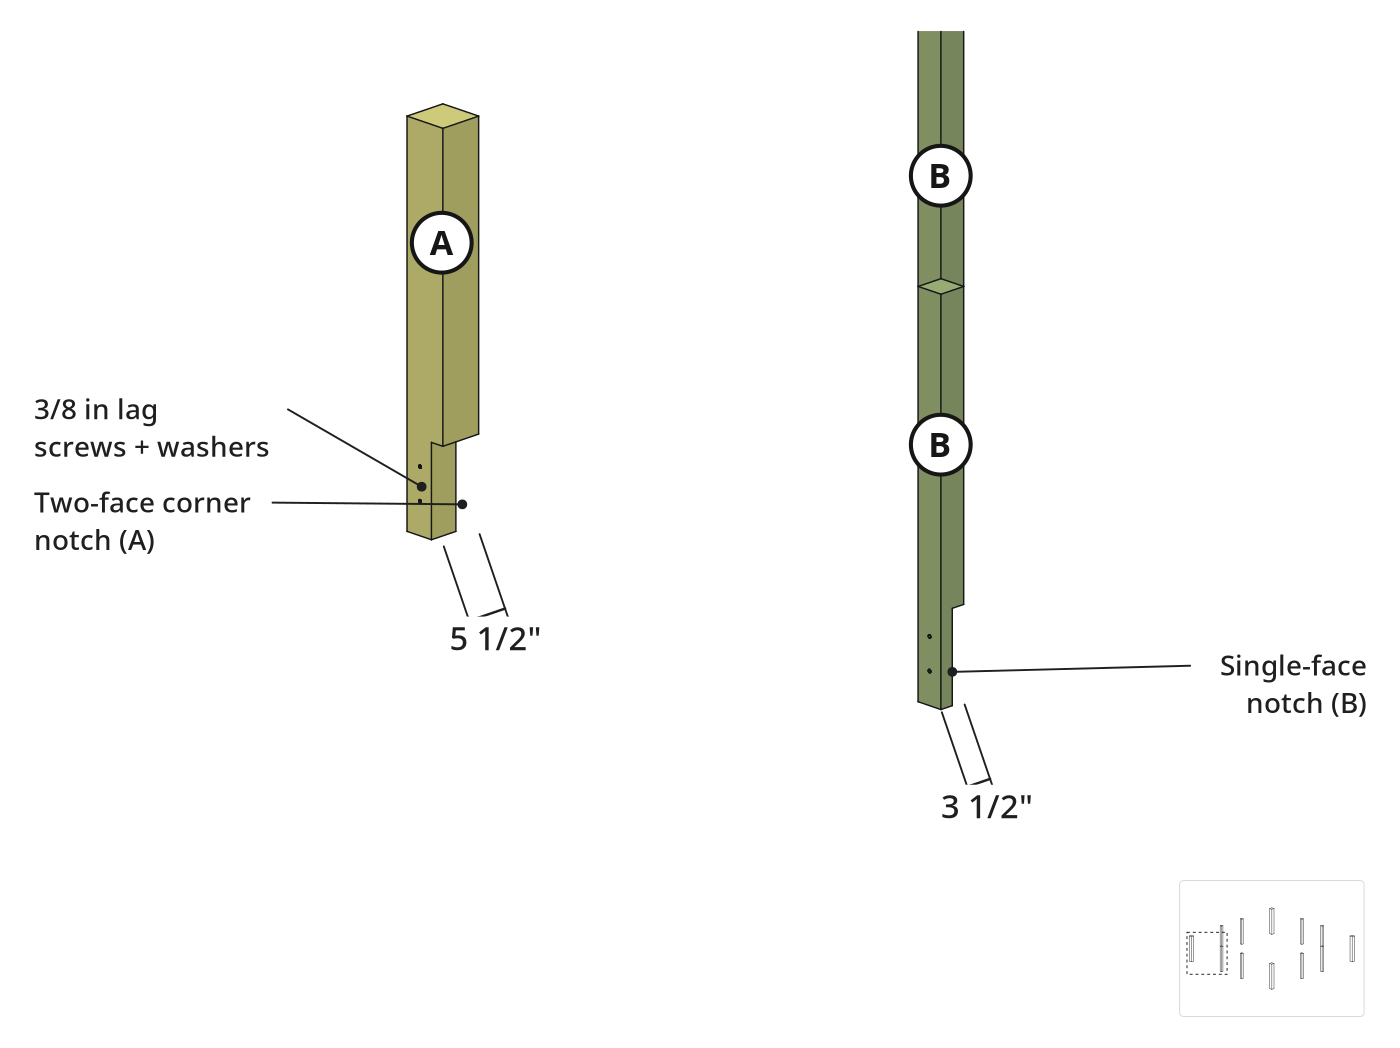
| A | Corner railing post | x4 | 5 1/2" (T) × 5 1/2" (W) × 48" (H) | Notch bottom corner 1-3/4 in deep on two adjacent inside faces to sit over the dock frame corner; sand and seal cut ends. |
| B | Intermediate railing post | x8 | 3 1/2" (T) × 3 1/2" (W) × 48" (H) | Notch bottom 1-3/4 in deep on one face to sit flush against the flat runs of the dock frame; sand and seal cut ends. |
| C | Full railing panel | x8 | 5 1/2" (T) × 32" (W) × 72" (L) | Used at full factory length (2 per dock side); secured to posts with steel railing brackets. |
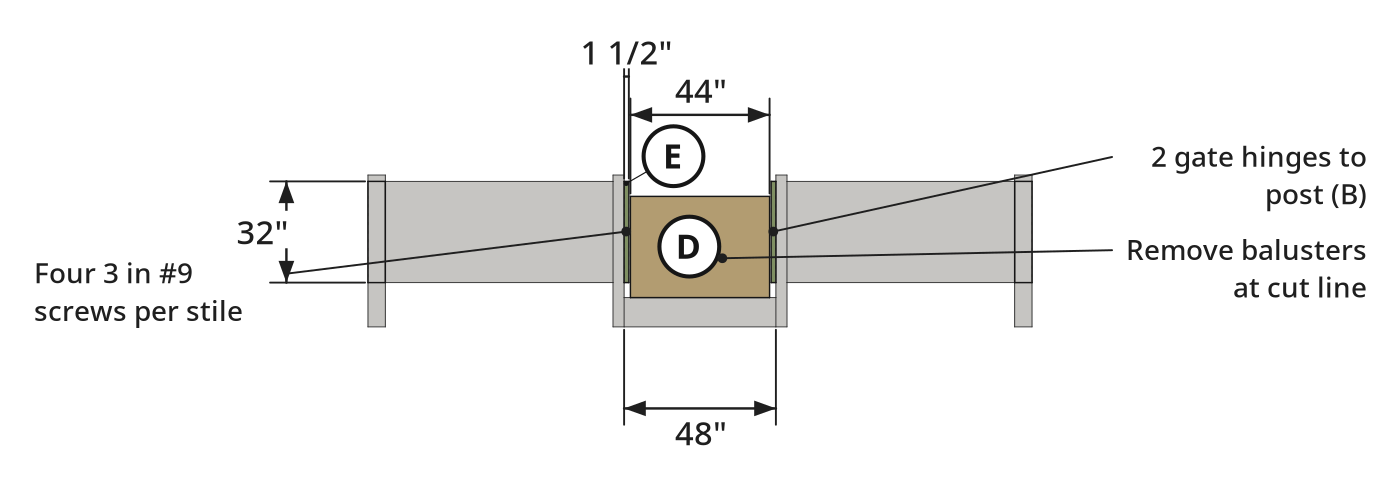
| D | Gate panel | x3 | 5 1/2" (T) × 32" (W) × 44" (L) | Cut down from a 6 ft pre-built railing panel to fit inside the 4 ft (48 in) center opening between intermediate posts after adding two 1-1/2 in thick 2x6 end stiles; remove balusters along the cut line first. |
| E | Gate vertical stile | x6 | 1 1/2" (T) × 5 1/2" (W) × 32" (H) | Cut to match the height of the modified gate panels; attach one 2x6 to each cut vertical end of the 3 gates for rigidity and hinge mounting. |
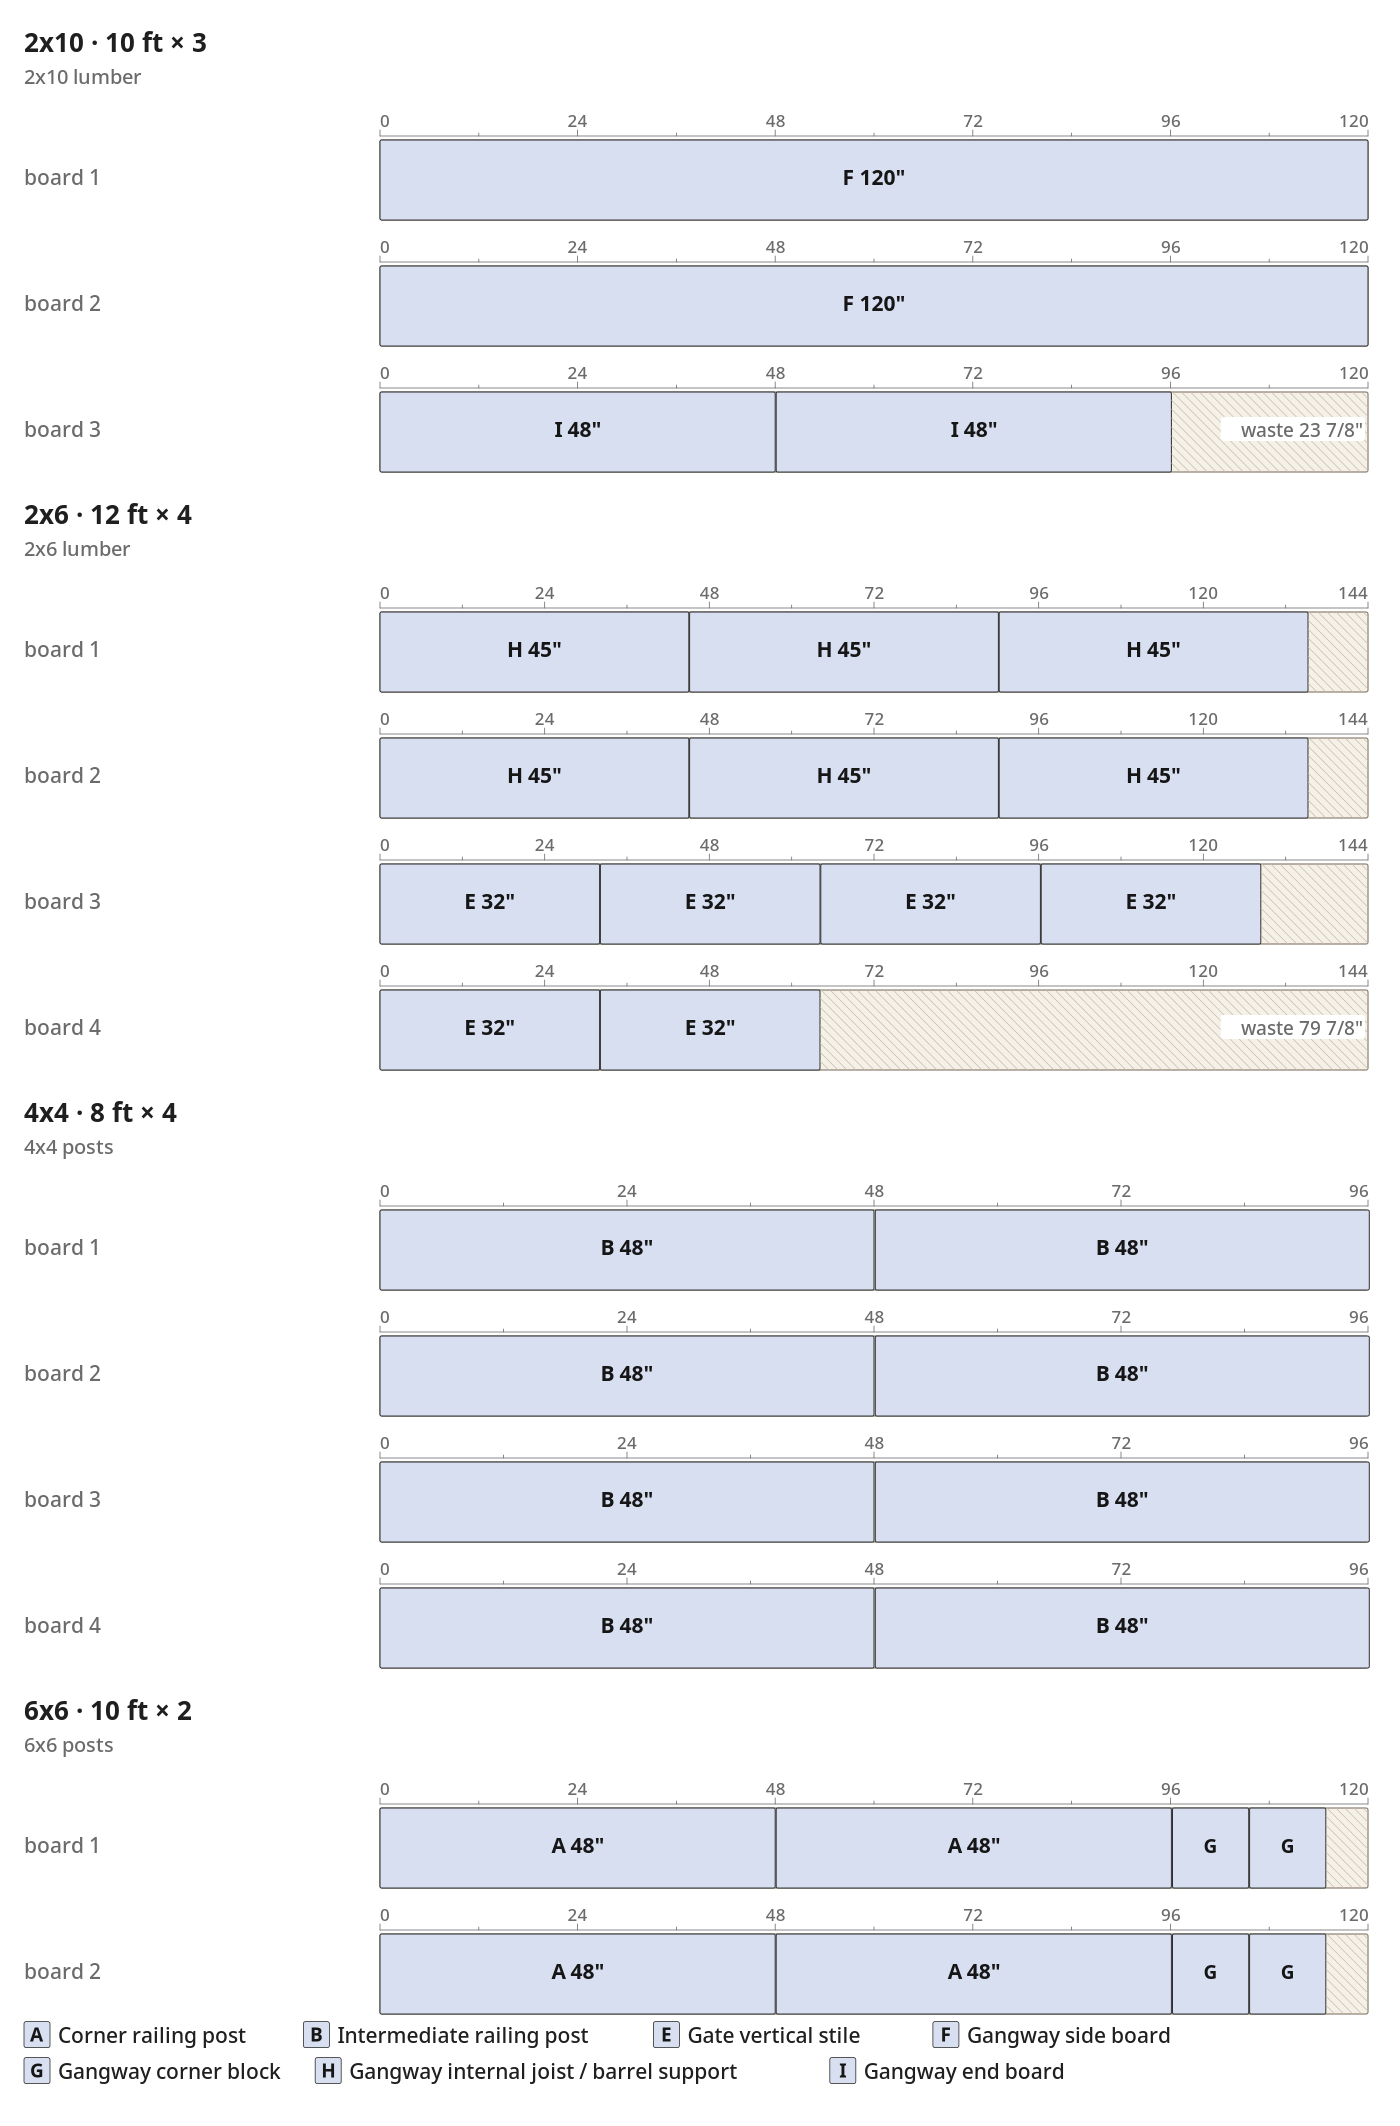
| F | Gangway side board | x2 | 1 1/2" (T) × 9 1/4" (W) × 120" (L) | 2 long side boards of the gangway frame. |
| I | Gangway end board | x2 | 1 1/2" (T) × 9 1/4" (W) × 48" (L) | 2 end boards: the 45 in inside width plus the two 1-1/2 in sides. |
| G | Gangway corner block | x4 | 5 1/2" (T) × 5 1/2" (W) × 9 1/4" (H) | Cut flush with the 9-1/4 in height of the 2x10 outer gangway frame and fastened inside all four corners. |
| H | Gangway internal joist / barrel support | x6 | 1 1/2" (T) × 5 1/2" (W) × 45" (L) | Cut to span the interior width of the 2x10 gangway frame and spaced to create 22 in wide slots for 55-gallon plastic barrels. |
What to buy
- Buy 3 × 2x10 10 ft (2x10 lumber)
- Buy 4 × 2x6 12 ft (2x6 lumber)
- Buy 4 × 4x4 8 ft (4x4 posts)
- Buy 2 × 6x6 10 ft (6x6 posts)
- Buy 11 × Pre-built railing panels each (Pre-built railing panels)
Before you start
Lumber Selection
- Pick straight, dry, twist-free pressure-treated 6x6, 4x4, 2x10, and 2x6 stock.
- Check pre-built 6 ft railing panels for tight 2x6 rails and balusters.
Layout and Labeling
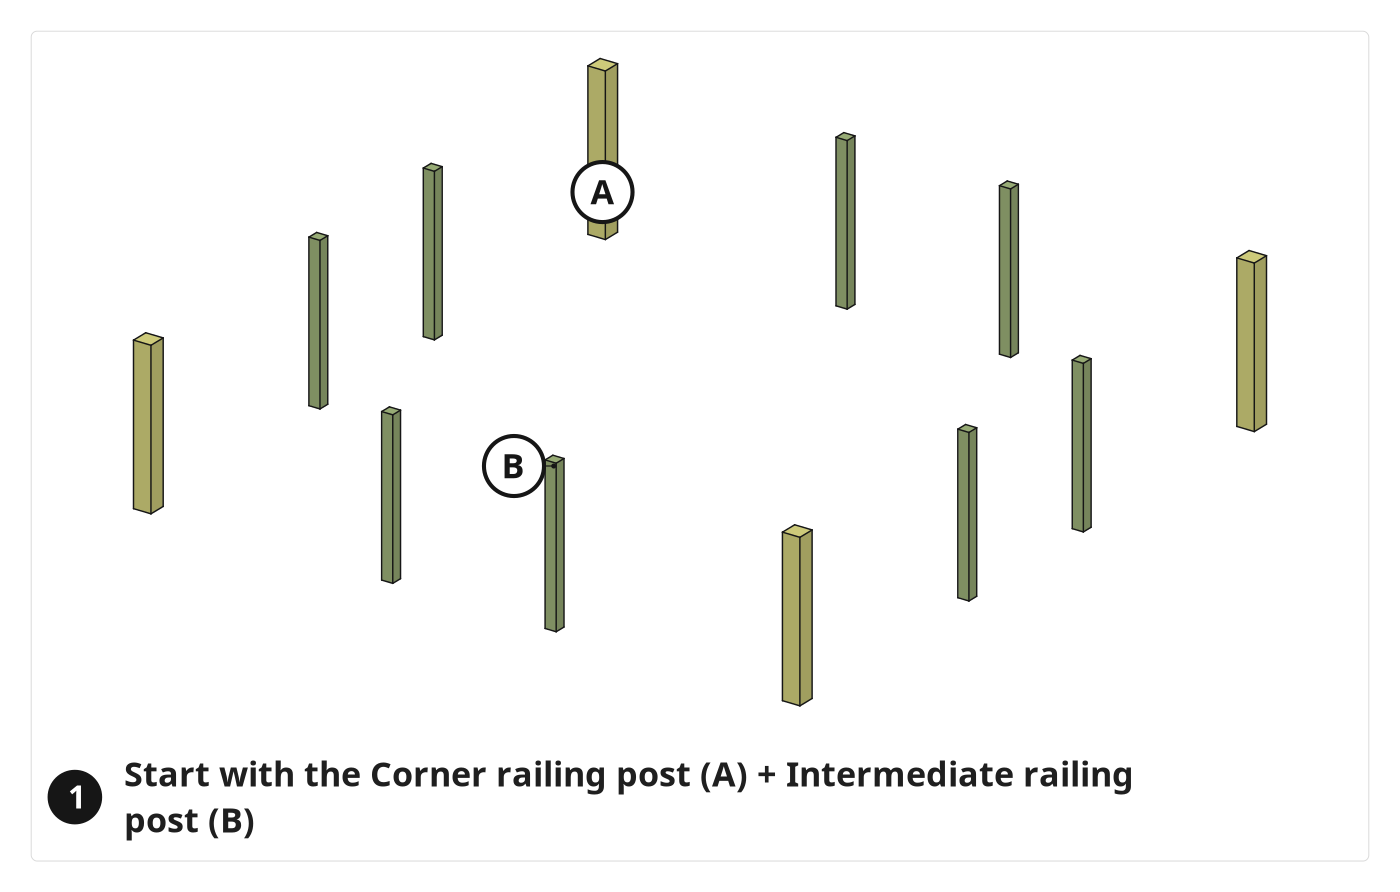
- Label four 6x6 corner posts (A), eight 4x4 intermediate posts (B), and gangway parts.
- Plan each dock side: two 6 ft outer bays flanking a 4 ft center opening.
Site Set-Up
- Use a flatbed trailer as a mobile workbench to haul lumber and tools pondside.
- Set a portable generator on dry ground for corded tools and battery chargers.
Step by step
Step 1: Prepare the Posts
Four corner posts and eight intermediate posts are notched, sanded smooth, and moisture-sealed.
Parts in this step: (A) Corner railing post, (B) Intermediate railing post
You'll need: Circular saw, Oscillating multi-tool, Sander, 6x6 posts, 4x4 posts, Water sealer
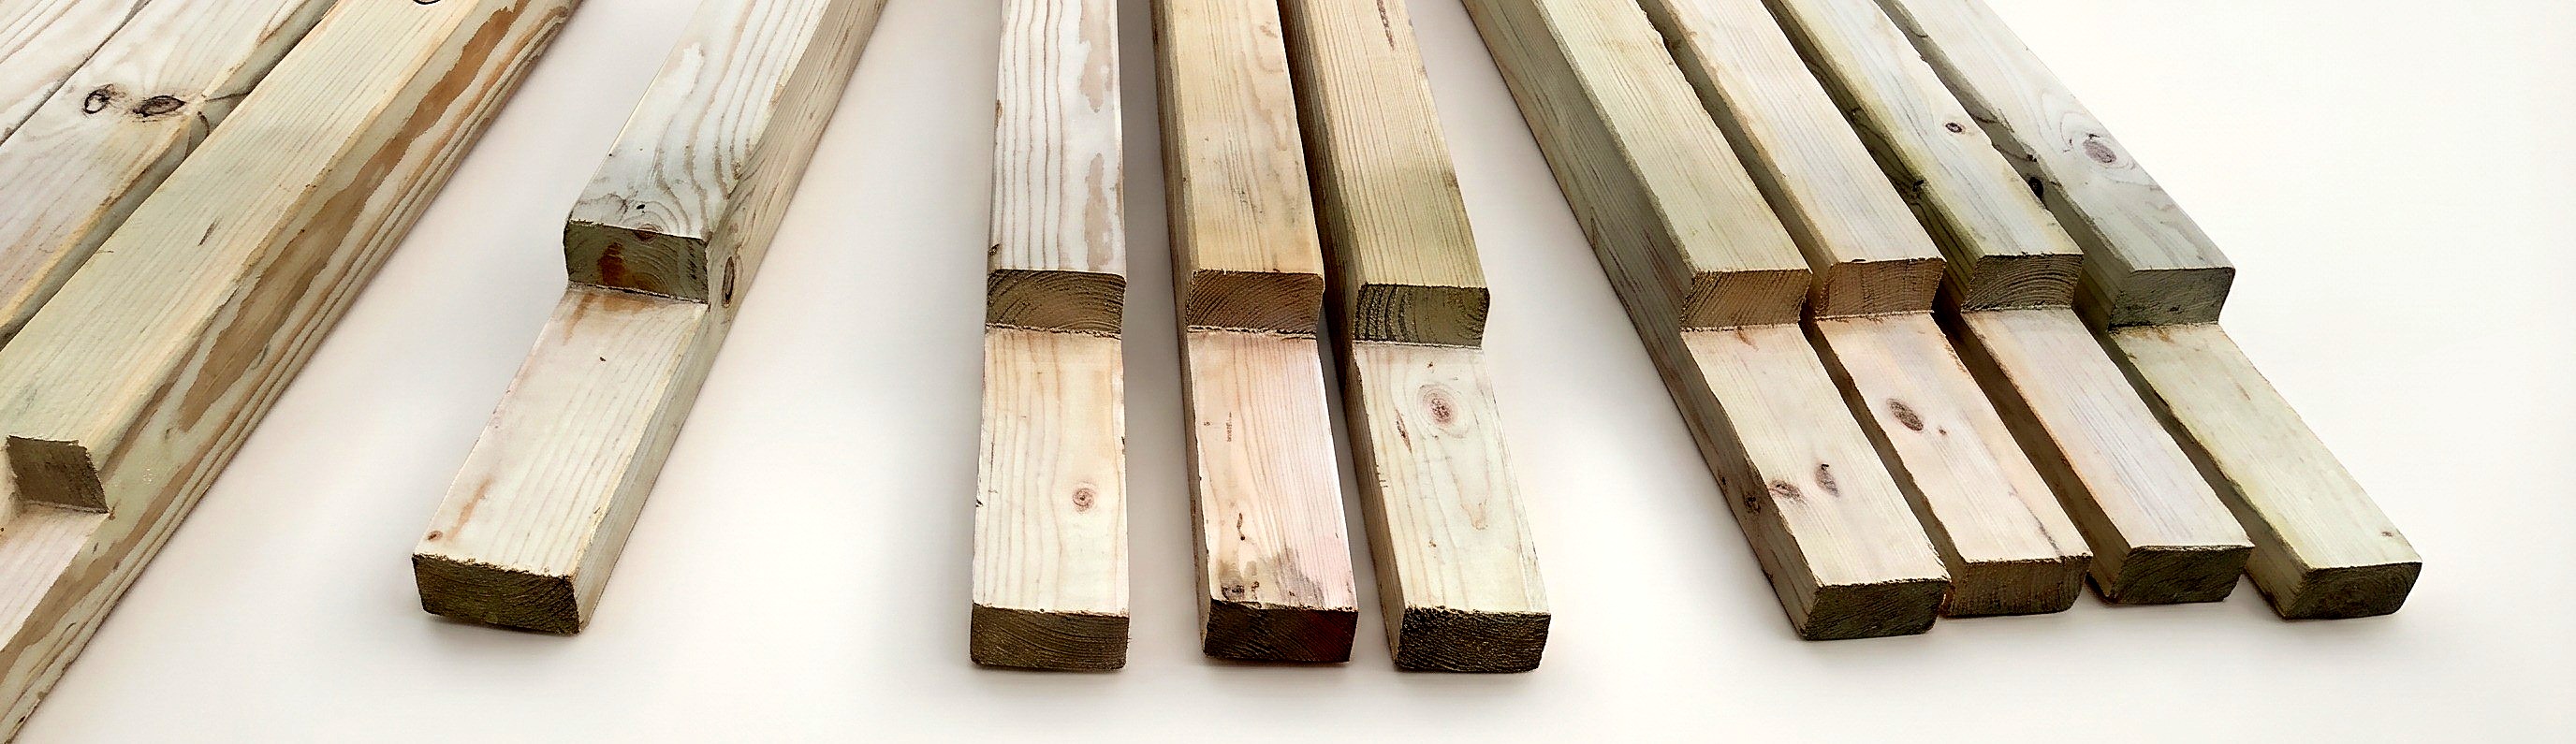
- 1.1 Notch the Posts
- Cut four corner (A) and eight intermediate (B) railing posts to an estimated 48 in.
- Mark 1-3/4 in deep bottom notches on two adjacent inside faces of corner posts (A).
- Mark a 1-3/4 in deep bottom notch on one inside face of intermediate posts (B).
- Make repeated 1-3/4 in deep circular saw cuts across each notch.
- Clear the waste wood and square the notch corners with an oscillating multi-tool.
- 1.2 Seal the Cut Ends
- Smooth all notched faces and rough saw cuts on posts (A, B) with an orbital sander.
- Brush water sealer on fresh cut ends and notches to prevent rot.
- Let the sealer soak in before taking the posts to the dock.
Key measurements
- Post notch depth: 1-3/4 in on bottom inside faces so the railing sits over the deck
- Estimated post height: 48 in for corner posts (A) and intermediate posts (B).
- Tip: Hold each 6x6 post steady in a portable jaw clamp workstation while notching.
- Heads up: Wear a dust mask and eye protective equipment to saw and sand pressure-treated wood.
Before you move on: Check or test-fit each notch for a clean 1-3/4 in depth and flat, square inside faces.
Step 2: Install the Dock Posts
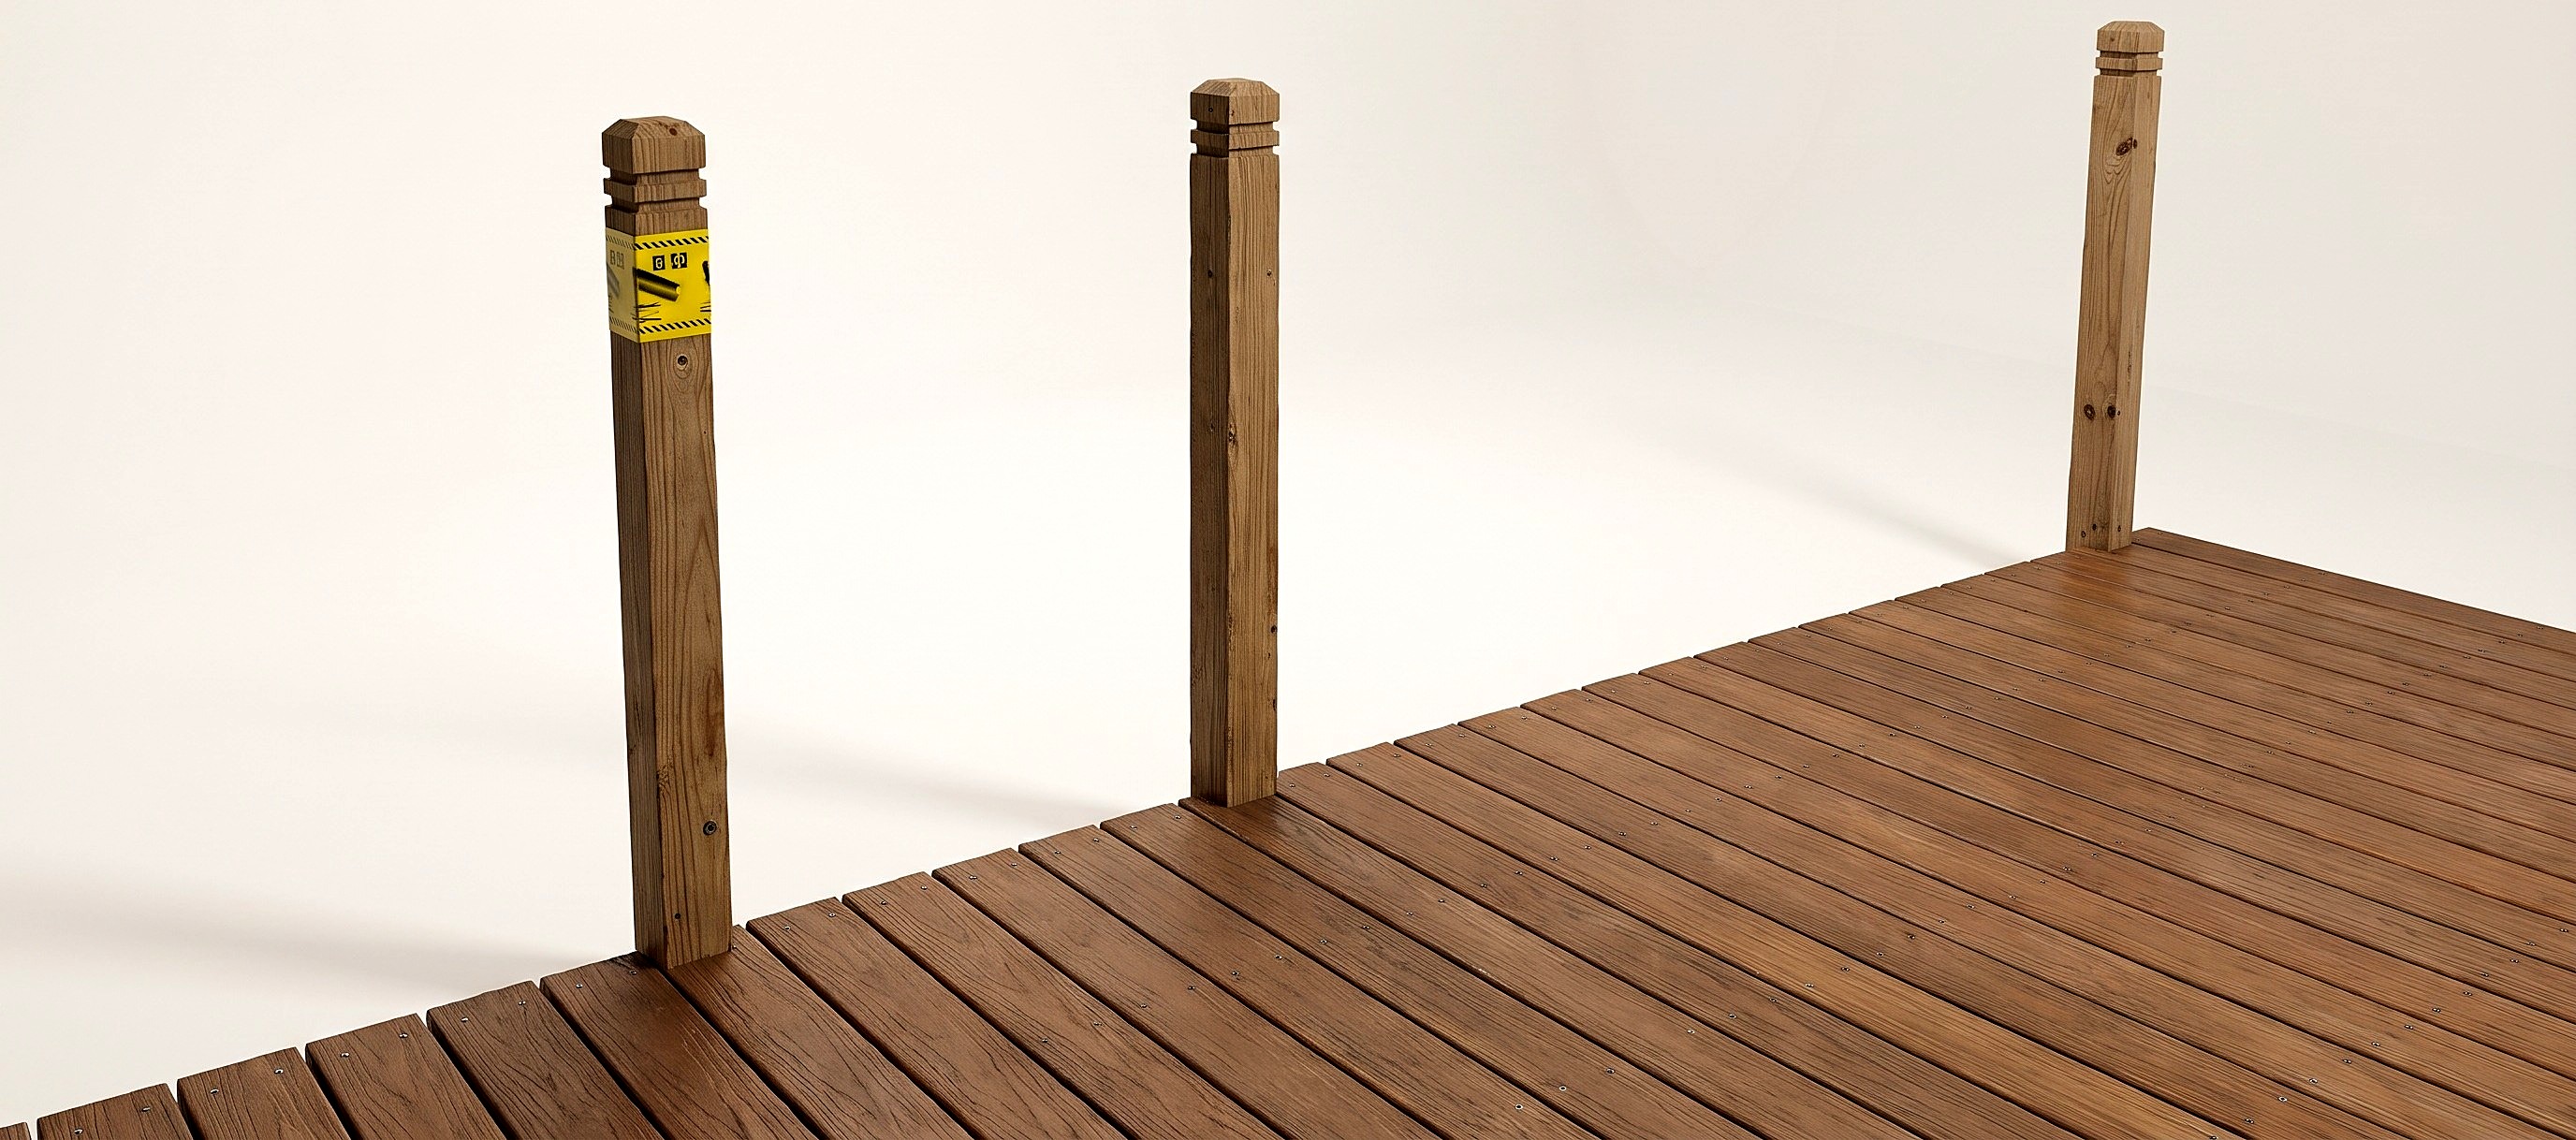
Corner and intermediate railing posts sit recessed in the deck boards, bolted plumb to the dock frame.
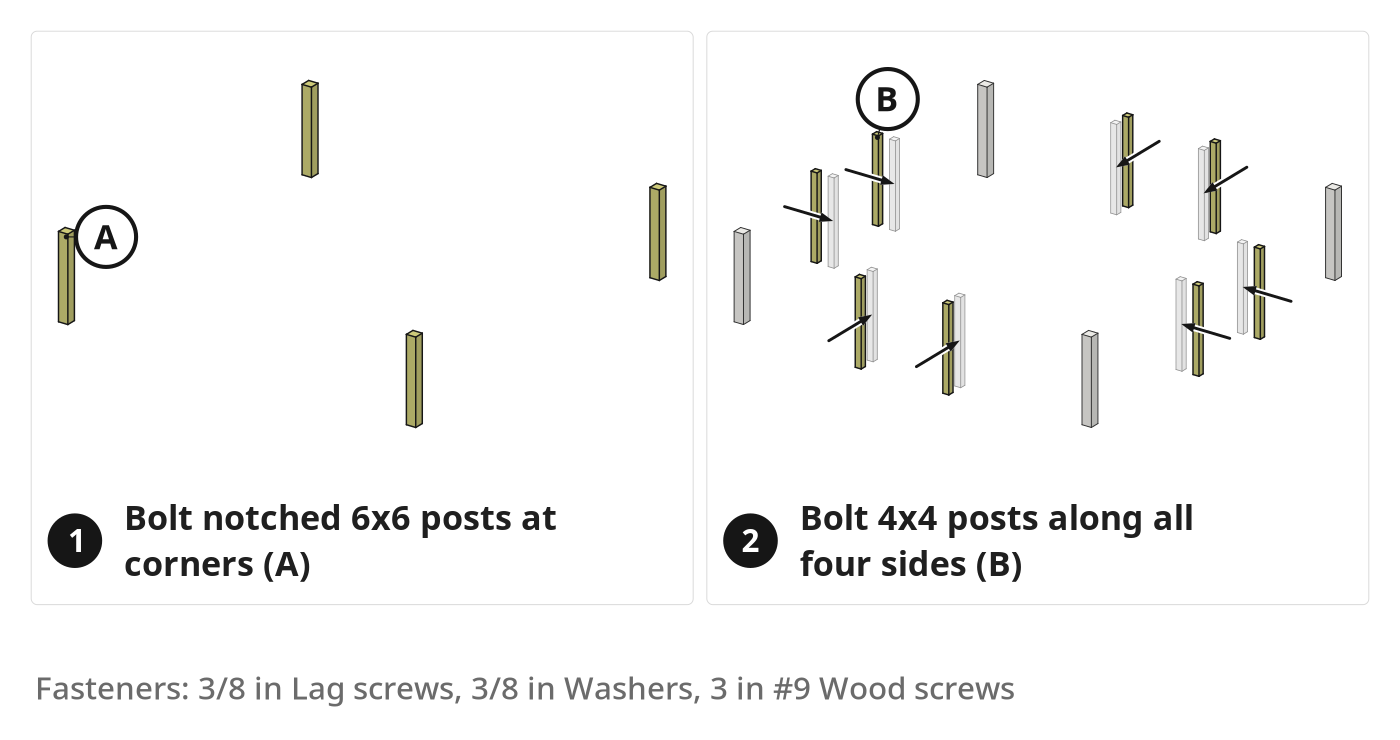
Parts in this step: (A) Corner railing post, (B) Intermediate railing post
You'll need: Generator, Cordless drill, Jigsaw, Post level, 6x6 posts, 4x4 posts, Lag screws, Washers, Wood screws
- 2.1 Cut Decking for Post Clearance
- Mark four corner railing posts (A) at the dock corners.
- Mark two intermediate railing posts (B) per side: two 6 ft outer runs and a 4 ft center gap.
- Jigsaw clearance notches into overhanging deck boards at each mark.
- 2.2 Secure Corner Posts
- Set each corner post (A) on its dock frame corner; check plumb with a post level.
- Pre-drill corner posts (A) into the dock frame so the 2x12 ends do not split.
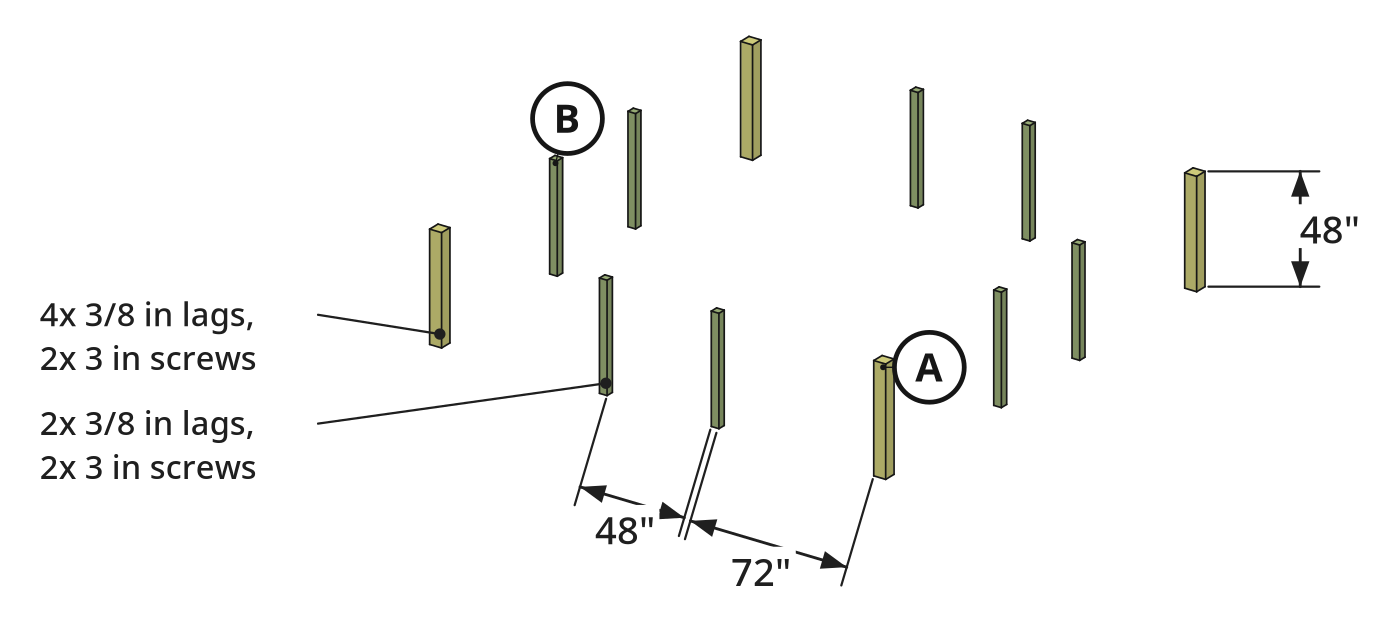
- Drive four 3/8 in lag screws with washers per corner post (A), two per face.
- Lock each corner post (A) joint tight with two 3 in #9 wood screws.
- Plumb, pre-drill, and fasten each intermediate post (B) with two 3/8 in lag screws, washers, and two 3 in screws.
Key measurements
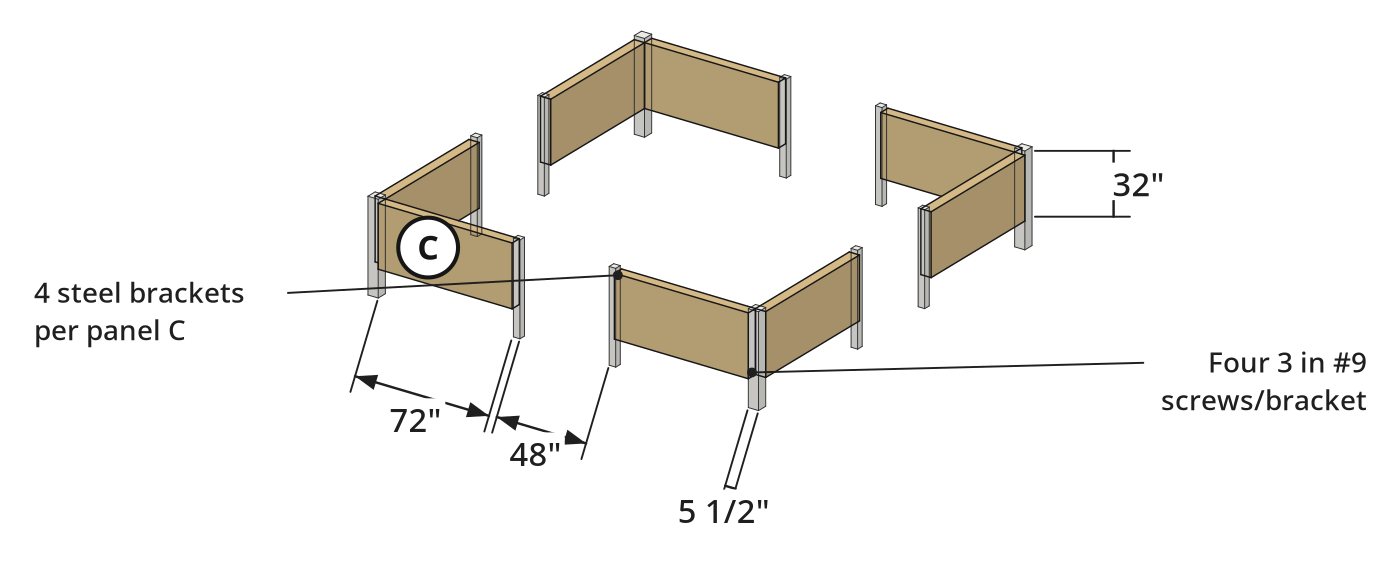
- Outer bay span: 72 in (6 ft) between corner post (A) and intermediate post (B).
- Center opening span: 48 in (4 ft) between each dock side's two intermediate posts (B).
- Tip: Shim any post reading out of plumb on the post level before tightening lag screws.
- Heads up: Never drive 3/8 in lag screws into 2x12 dock frame ends without pre-drilling pilot holes.
Before you move on: Check all posts stand plumb, with 72 in outer bays and 48 in center openings.
Step 3: Install Railing Panels
Secure all eight full-length railing panels between the dock's corner and intermediate posts.
Parts in this step: (C) Full railing panel
You'll need: Cordless drill, Post level, Ratchet straps, Pre-built railing panels, Railing brackets, Wood screws
- 3.1 Attach Railing Panels
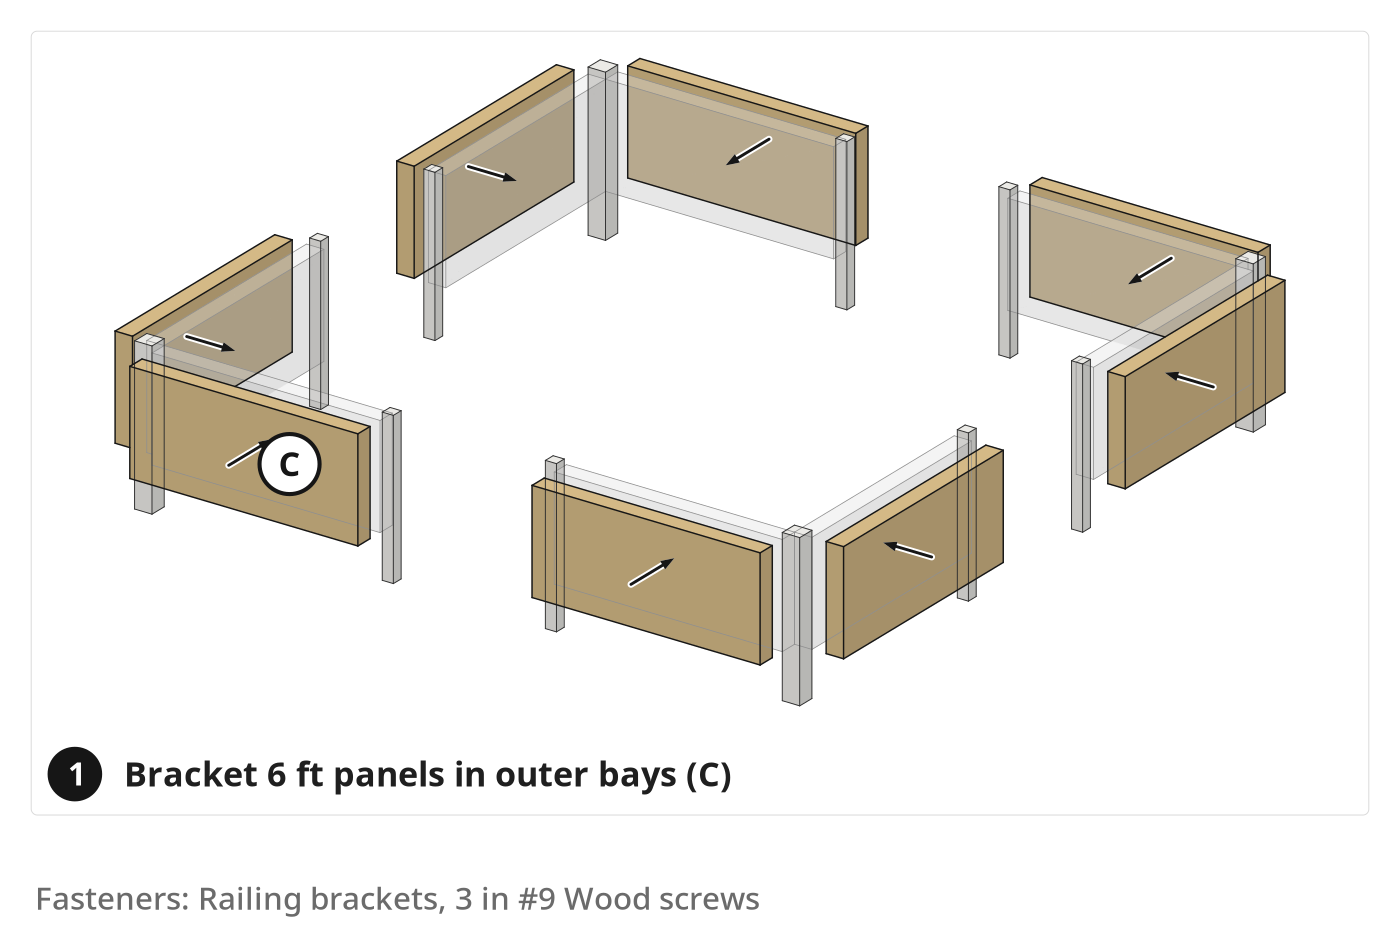
- Set full railing panel (C) (6 ft long, estimated 32 in high) between corner post (A) and intermediate post (B).
- Hook ratchet straps across post tops; tighten until posts stand plumb against the panel.
- Fit four steel railing brackets under the top and bottom 2x6 panel rail corners.
- Drive two wood screws per bracket into the inside rail face, then screw to the post.
- Repeat for all eight full railing panels (C) on all four dock sides.
Key measurements
- Full railing panel length: 72 in (6 ft) spanning each of eight outer dock bays.
- Tip: Use a ratchet strap across post tops to pull leaning posts plumb and hold panels solo.
- Heads up: Verify both posts read plumb on a post level before driving the bracket screws so the rail does not lock in crooked.
Before you move on: Push all eight railing panels firmly to check every bracket is tight and rattle-free.
Step 4: Build the Gangway
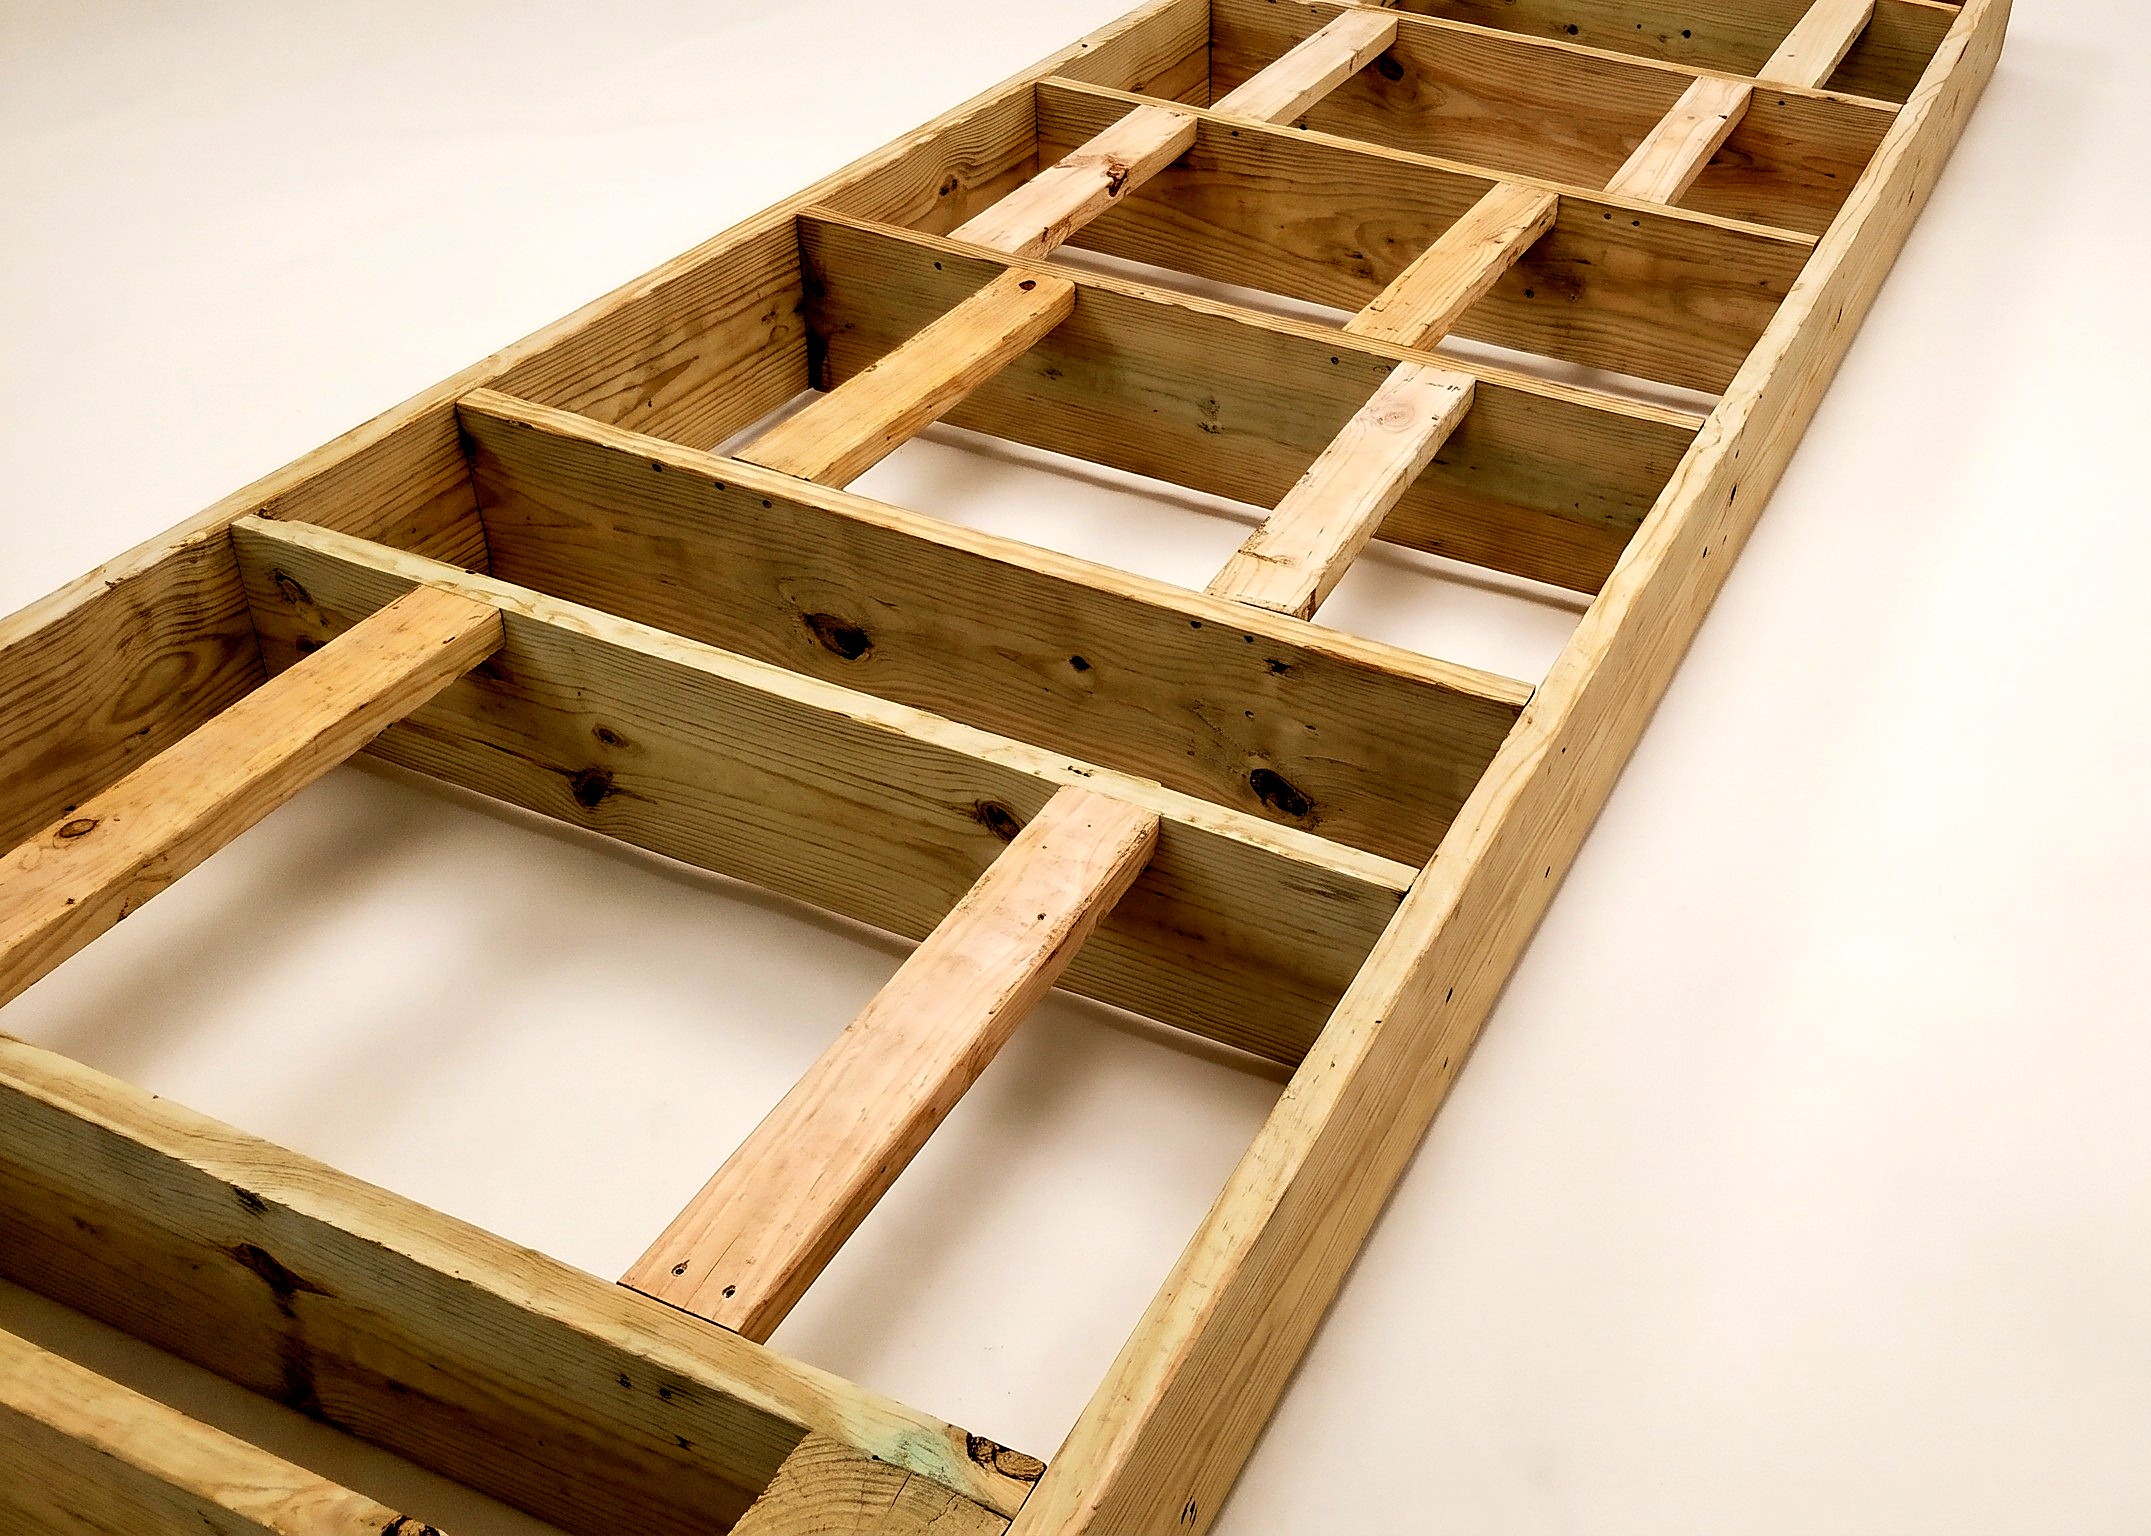
Assemble the rectangular 2x10 gangway frame on shore with 2x6 joists spaced for 55-gallon barrels.
Parts in this step: (F) Gangway side board, (G) Gangway corner block, (H) Gangway internal joist / barrel support, (I) Gangway end board
You'll need: Circular saw, Cordless drill, 2x10 lumber, 6x6 posts, 2x6 lumber, Wood screws
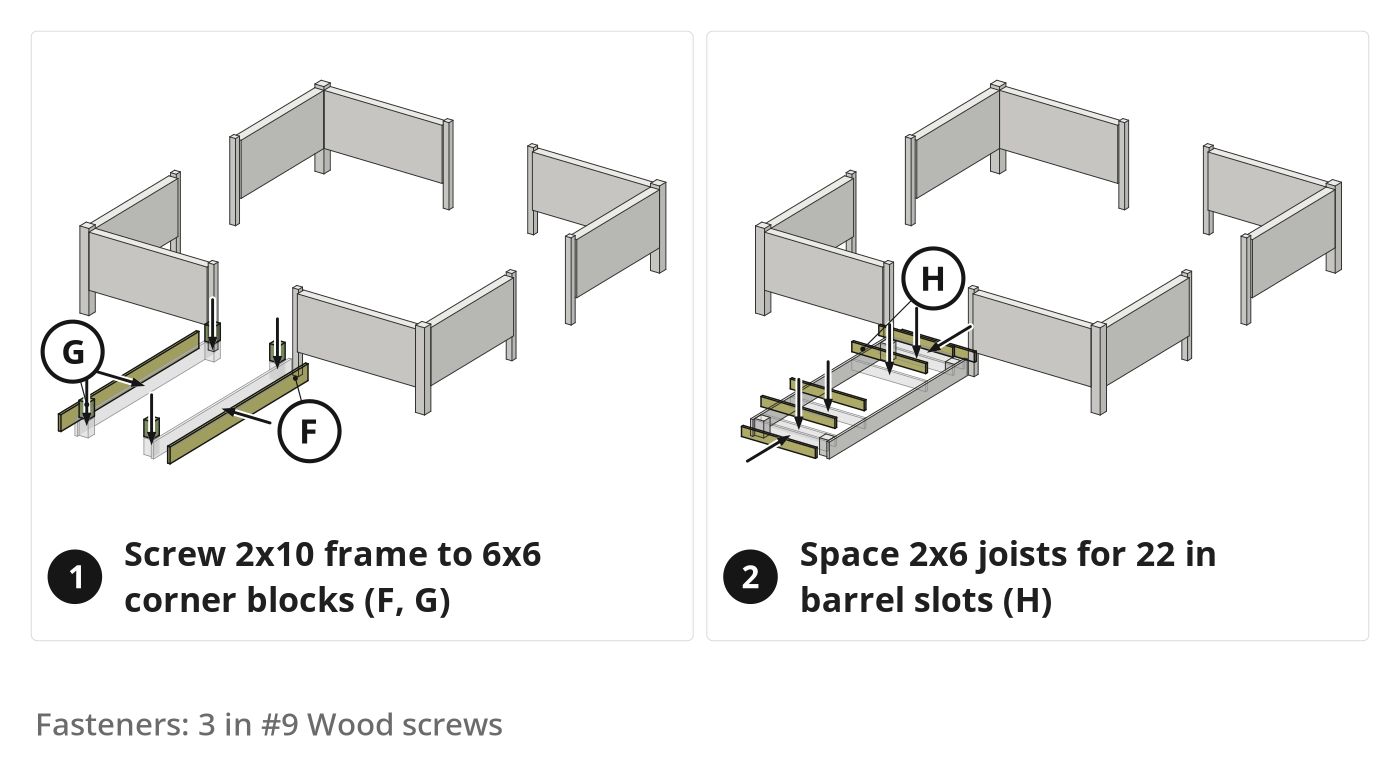
- 4.1 Assemble the Gangway Frame
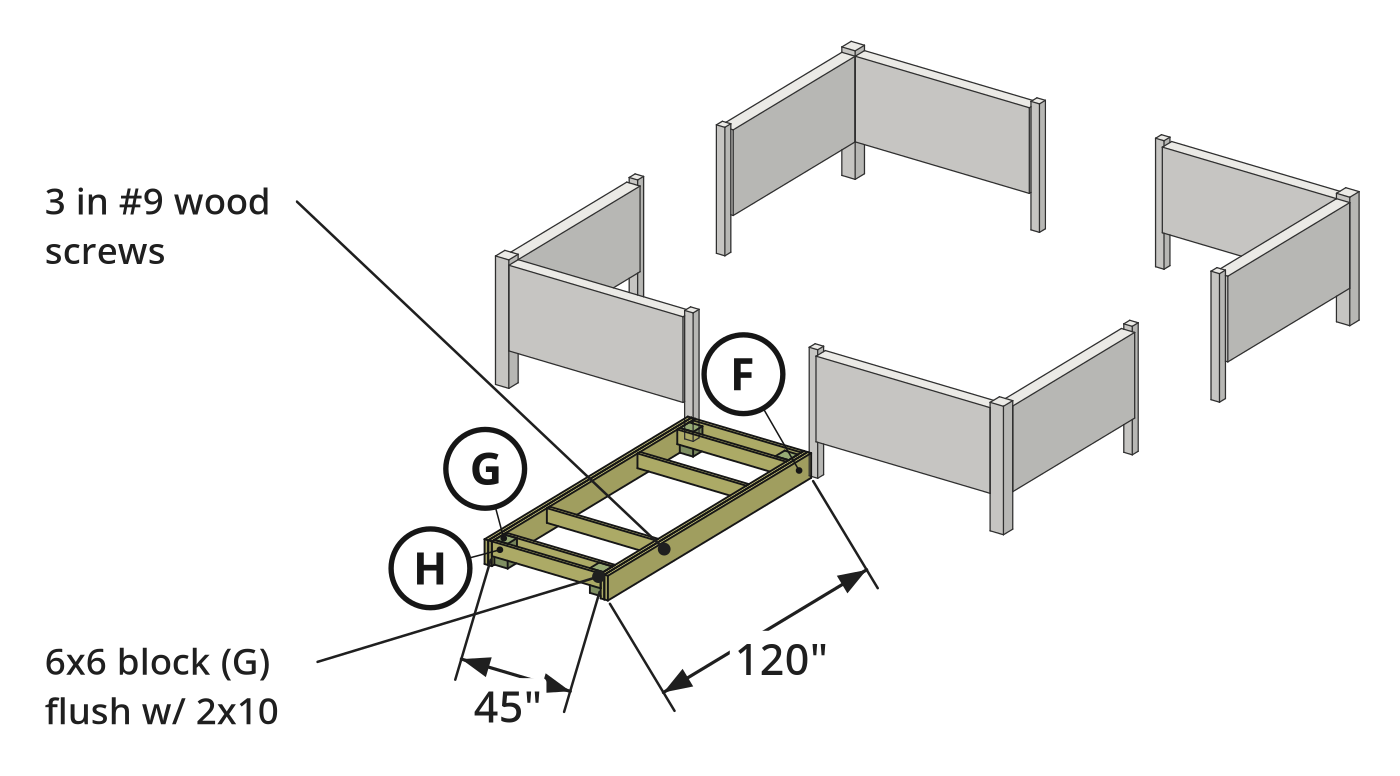
- Lay out the two 120 in side boards (F) and the two 48 in end boards (I) in a rectangle.
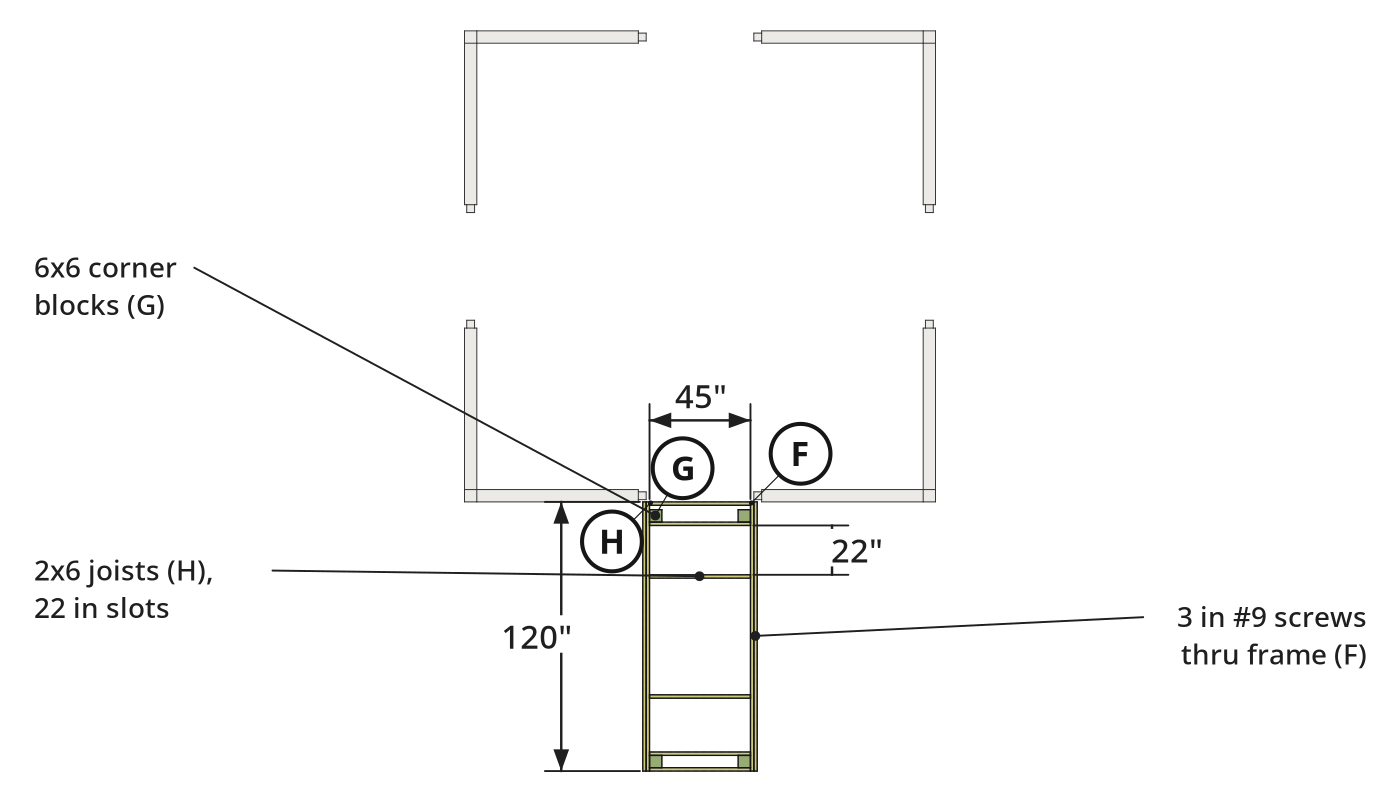
- Cut four gangway corner blocks (G) from 6x6 posts to 9-1/4 in, flush with the 2x10 height.
- Fasten the side (F) and end (I) boards to the 6x6 corner blocks (G) with 3 in #9 wood screws.
- 4.2 Install Joists and Barrel Supports
- Cut six gangway internal joists (H) from 2x6 lumber (estimated 45 in) to fit inside the frame.
- Space 2x6 internal joists (H) every 22 in along the frame to form 55-gallon barrel slots.
- Drive 3 in #9 wood screws through outer 2x10 frame boards (F) into each 2x6 joist (H) end.
- Omit metal joist hangers on 2x6 joists (H) to keep the floating gangway light.
Key measurements
- Corner block height: 9-1/4 in, matching the 2x10 perimeter frame boards (F).
- Barrel cradle spacing: 22 in clear width between 2x6 internal joists (H) for 55-gallon plastic barrels
- Tip: Frame 22 in slots the full gangway length to add barrels anywhere or use it as a fishing barge.
- Heads up: Assemble the gangway near shore to avoid carrying the heavy frame far.
Before you move on: Check every barrel slot between 2x6 joists measures 22 in to fit a 55-gallon drum.
Step 5: Install Gates and Ladder
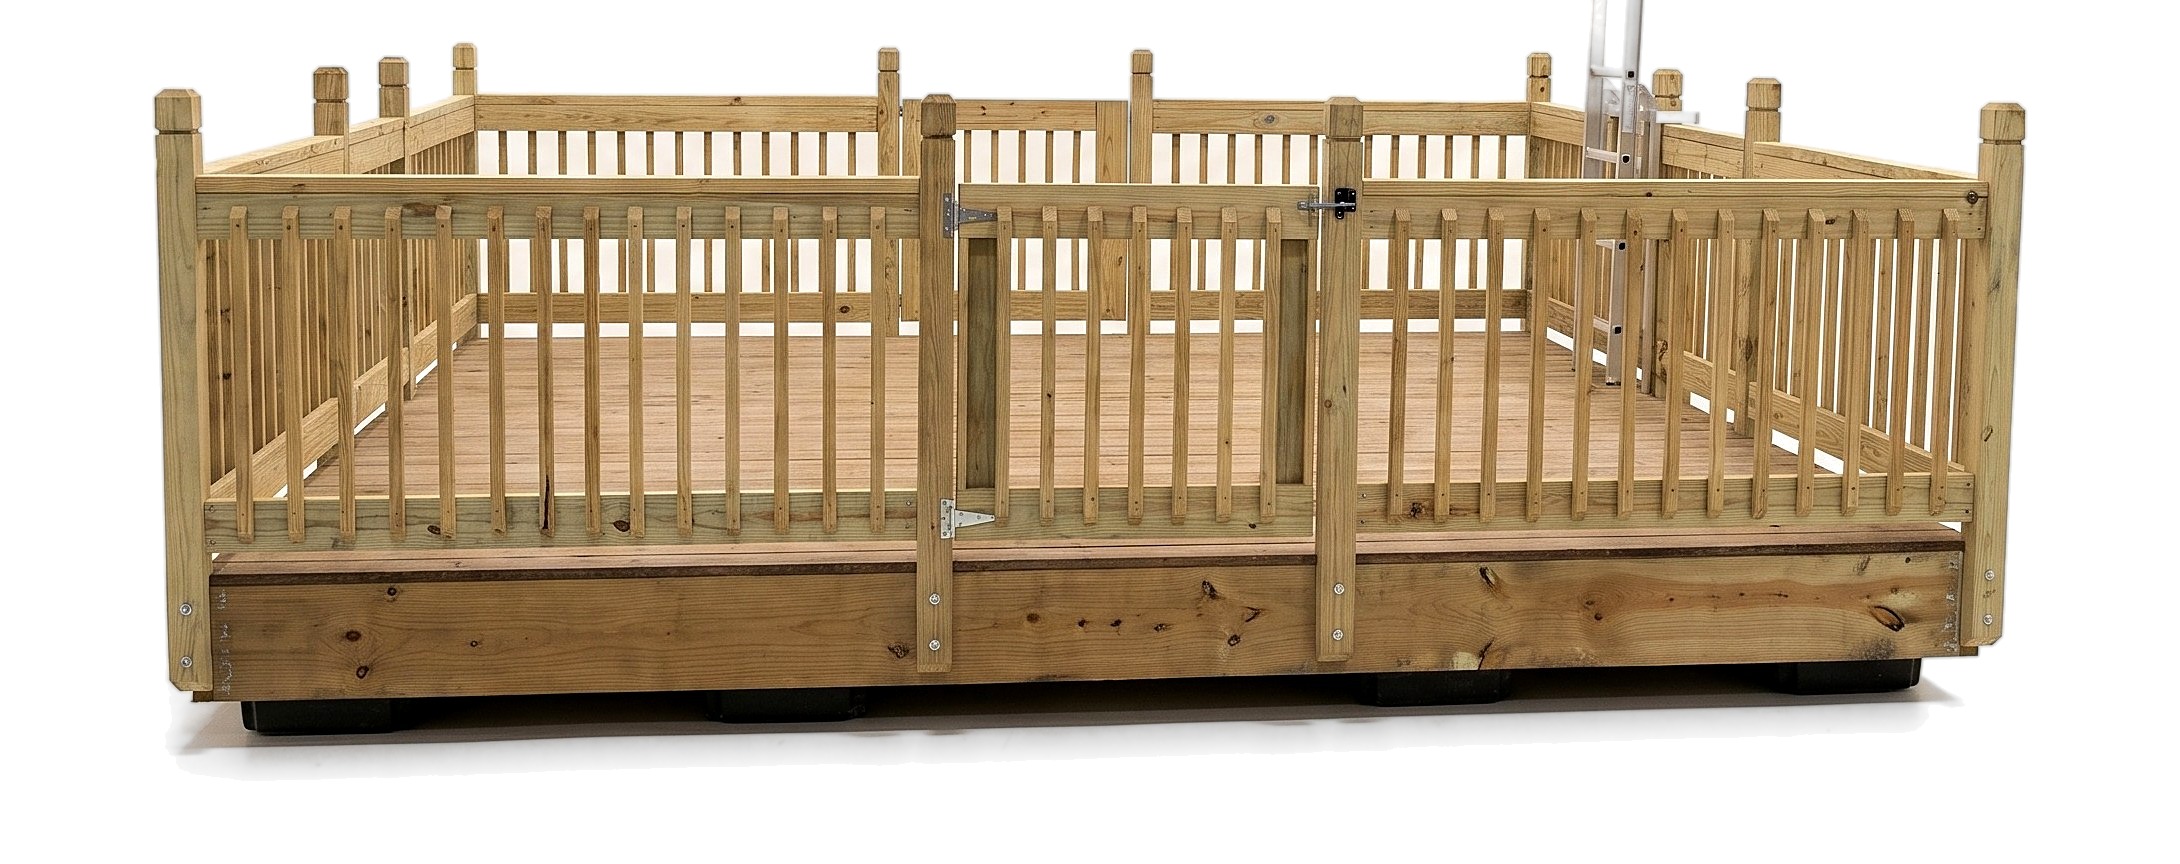
Mount three custom swinging gates and a flip-up aluminum ladder in the 4-foot center openings.
Parts in this step: (D) Gate panel, (E) Gate vertical stile
You'll need: Circular saw, Cordless drill, Pre-built railing panels, 2x6 lumber, Wood screws, Gate hinges, Dock ladder
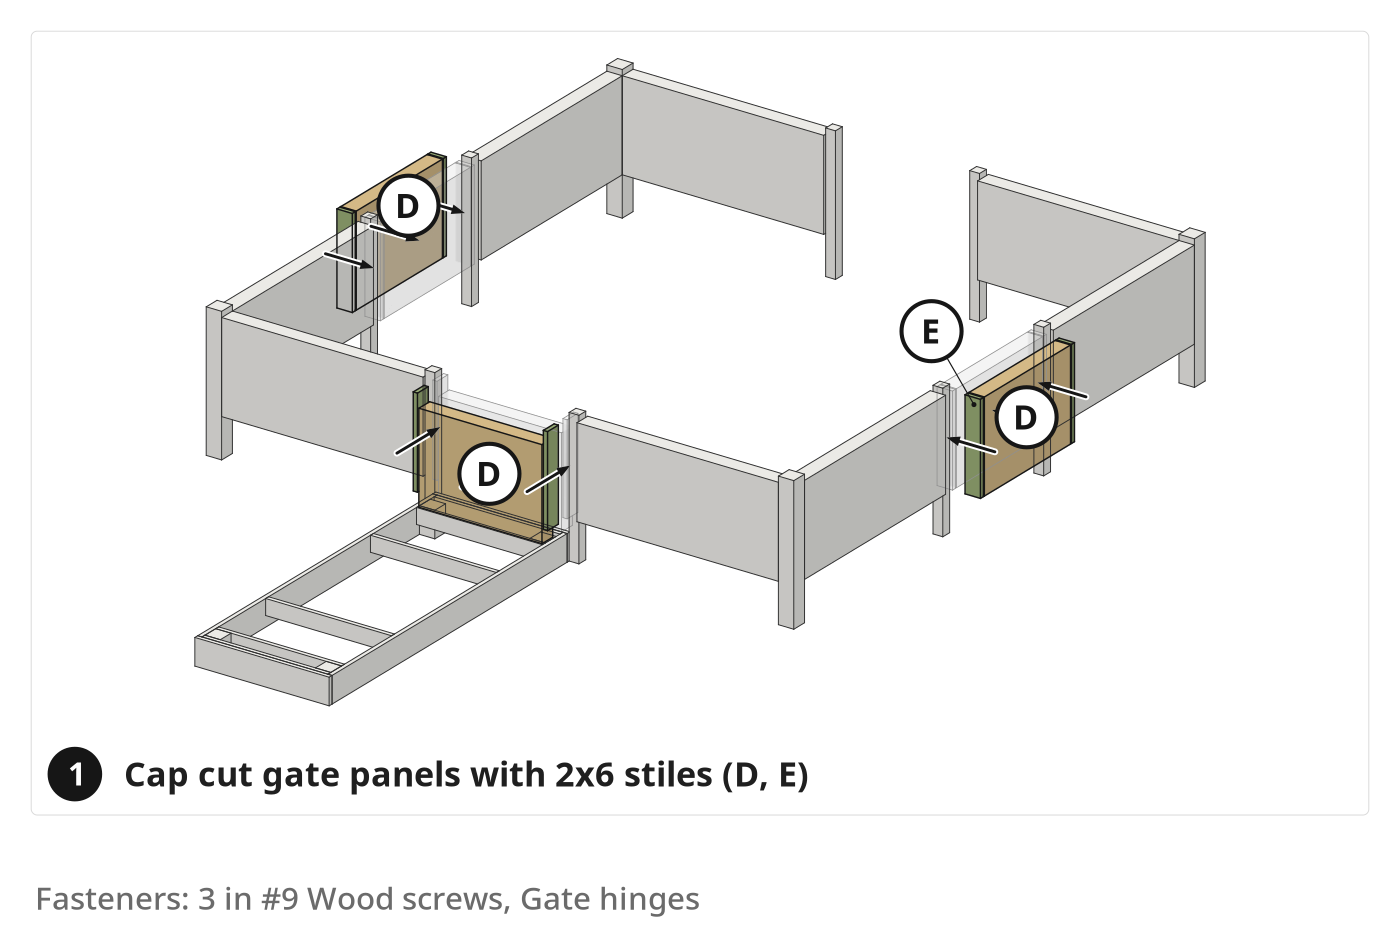
- 5.1 Fabricate Gates
- Mark three pre-built railing panels to an estimated 45 in width for three gate panels (D).
- Remove balusters at each cut line so the circular saw blade has a clear path.
- Cut the three gate panels' (D) top and bottom rails to length with a circular saw.
- Cut six gate vertical stiles (E) from 2x6 lumber, estimated 32 in high, matching the panels.
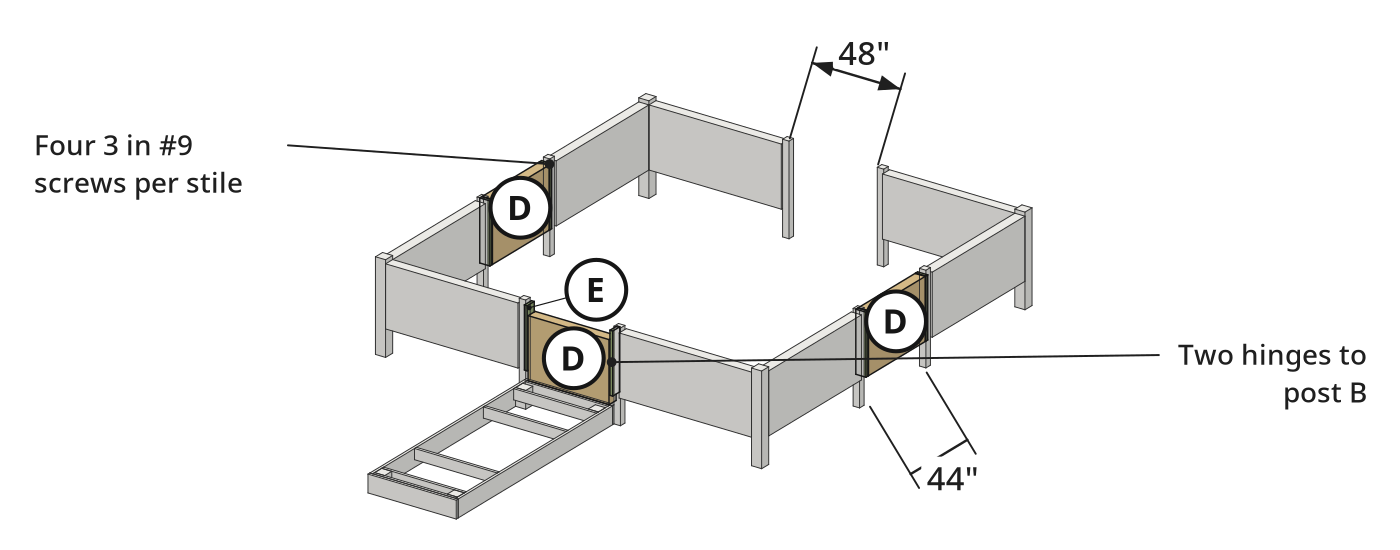
- Screw one 2x6 vertical stile (E) per gate panel (D) cut end with 3 in #9 wood screws.
- 5.2 Install Gates
- Screw gate hinges to one 2x6 vertical stile (E) on all three gates.
- Hold each gate in its 48 in center opening and screw the hinges to intermediate post (B).
- Mount gates at the gangway entrance, side opening, and behind the ladder opening.
- 5.3 Mount the Ladder
- Place the aluminum flip-up dock ladder's triangular pivot brackets on the deck outside the ladder gate.
- Fasten the ladder brackets to the deck and bolt the ladder frame to the pivot brackets.
- Pull the set pin, flip the ladder out of the water, and reinsert the pin to lock it upright.
Key measurements
- Gate panel cut width: about 44 in, so with two 1-1/2 in thick 2x6 stiles (E) it leaves about 1 in for the hinges and latch in the 48 in opening
- Estimated gate stile length: 32 in of 2x6 lumber to cap the cut panel ends
- Tip: Install a swinging gate behind the flip-up ladder so children cannot fall through the opening.
- Tip: Pull the set pin and flip the ladder upright after use so pond muck does not coat the steps.
- Heads up: Check water depth under the ladder before jumping in; shallow pond banks can ground out the bottom rung.
Before you move on: Swing all three gates through their full arc and pivot the ladder to check for smooth movement.
Step 6: Position and Connect the Gangway
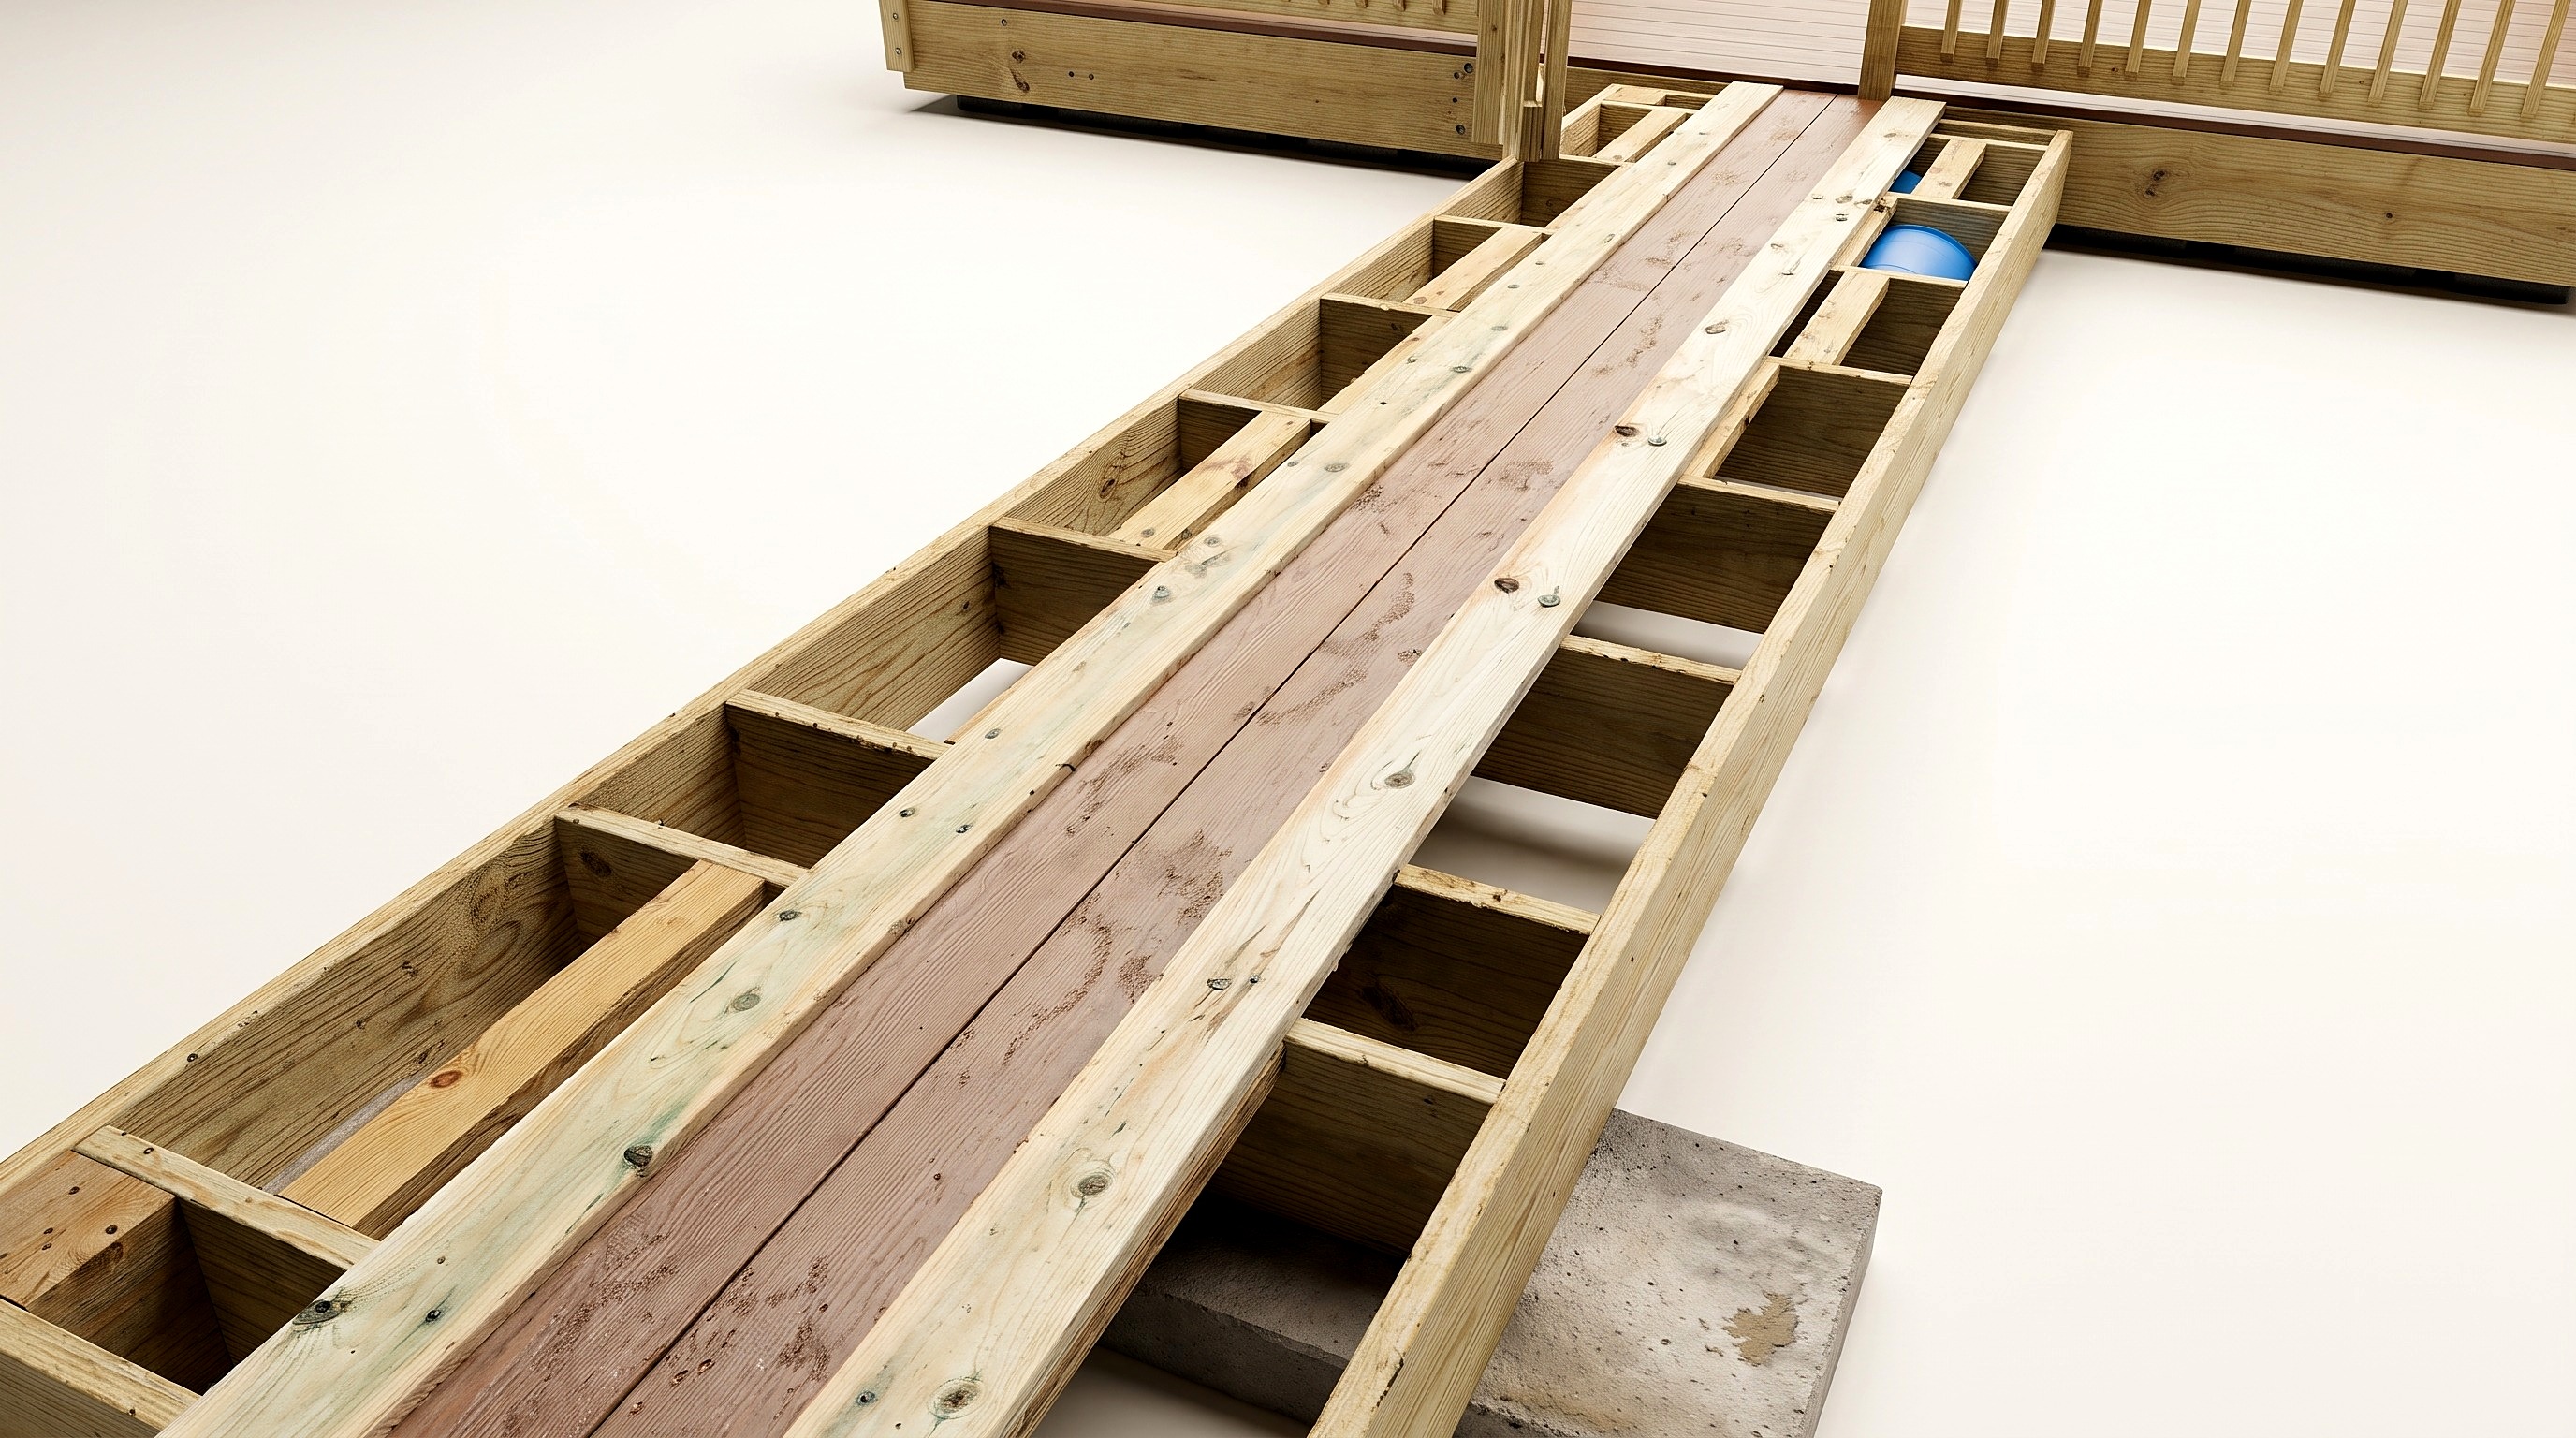
The gangway floats on 55-gallon barrels, linking the shore concrete slab to the dock entrance gate.
You'll need: Cordless drill, Plastic barrels
- 6.1 Float the Gangway
- Tuck two 55-gallon plastic barrels into the 22 in joist slots under the gangway's water end.
- Slide the gangway into the pond and add barrels if the frame needs more buoyancy.
- Fasten deck boards or temporary plywood across the gangway joists for walking.
- 6.2 Connect Gangway to Dock
- Clear and level the pond bank at the landing and set a flat concrete slab on shore.
- Set the gangway's shore end on the concrete slab and align the floating end with the dock gate.
- Tie the gangway to the dock with ropes and link them using cleats, D-rings, or pivot pins.
Key measurements
- Initial flotation: 2 plastic barrels (55-gallon) in the 22 in slots at the water end
- Tip: Set the gangway's shore end on an old concrete slab to keep the treated frame out of bank mud.
- Heads up: Check the gangway is tied to the dock and flat on the shore slab before crossing.
Before you move on: Cross the gangway to the dock gate to check the barrels keep the frame buoyant and level.
Finishing
Sanding and Sealing
- Sand rough circular saw marks on all notched post bases with an orbital sander.
- Brush water sealer on fresh cuts and notches of treated posts before installing.
Decking the Gangway
- Screw deck boards across the 2x6 gangway joists to match the floating dock.
- Use temporary plywood sheets on joists if permanent decking boards are delayed.
Hardware and Care
- Add cleats, D-rings, and hitch pins at the dock joint so the gangway hinges with water changes.
- When unoccupied, flip up the aluminum dock ladder and insert the set pin.
These Specs are built from Indy Farm Life's video “Floating Dock Railing and Gangway”. Open the Floating Dock Railing and Gangway project page.
