Spetz Specs No. 6793: step-by-step system install guide
Aluminium Threshold Drain and Underground Rainwater Pipe Installation
The complete step-by-step guide made from Tidybricks patio restore's YouTube video, free on Spetz. For the video, a step-by-step player and answers to your questions, see the Aluminium Threshold Drain and Underground Rainwater Pipe Installation project page.
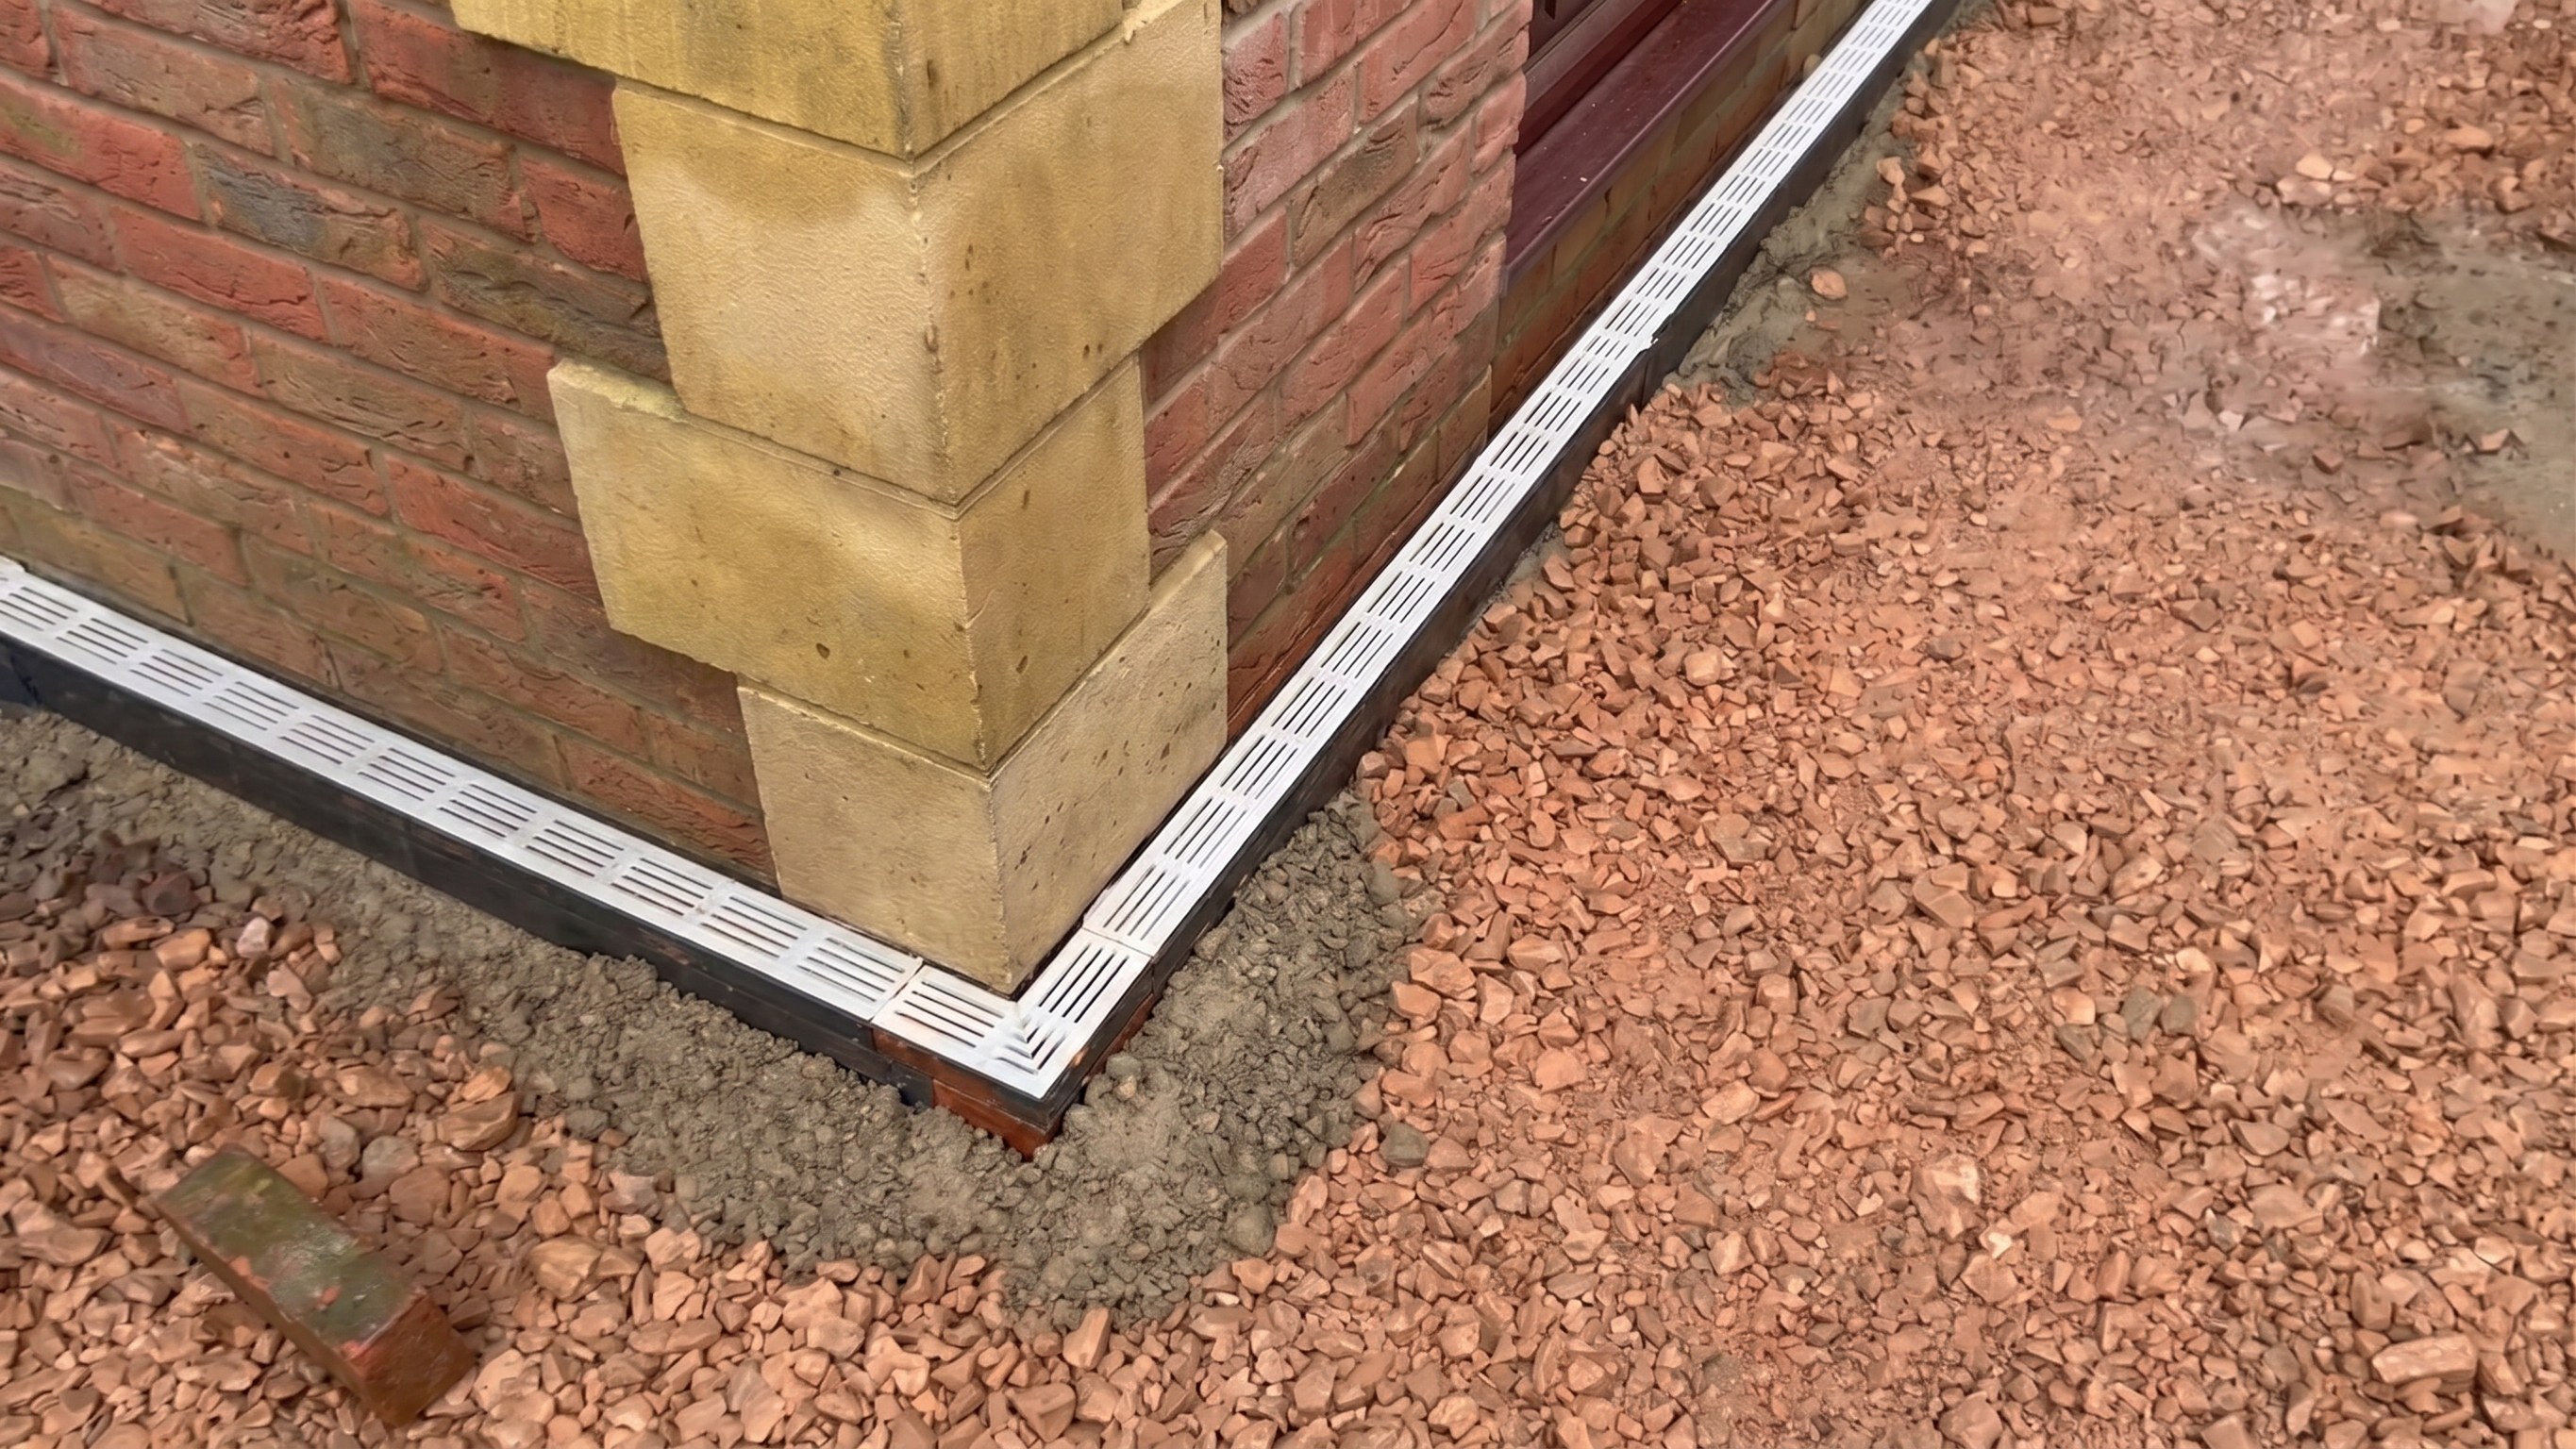
3 steps, 4 parts, 6 tools, 10 materials
Overview
Finished size: 100mm underground PVC pipework with slimline threshold channels set 2 brick courses below DPC
The system
- Polychannel slimline aluminium channels collect rainwater at exterior walls and doorways.
- Bottom outlets drain into 100mm underground PVC rainwater pipes via spliced junctions.
Why do it yourself
- Splicing into existing underground pipes stops doorway pooling without a new soakaway.
- Product sheets omit bridging fixed underground pipes with ridge-free slip collars.
What it takes
- Requires digging trenches, cutting PVC and aluminium with an angle grinder, and mortaring.
- A helper makes moving aggregate and hardcore by wheelbarrow easier.
What decides success
- Tapping the rainwater line, not the foul sewer, prevents escaping odors.
- Setting channels two brick courses below the damp proof course protects walls.
The system at a glance
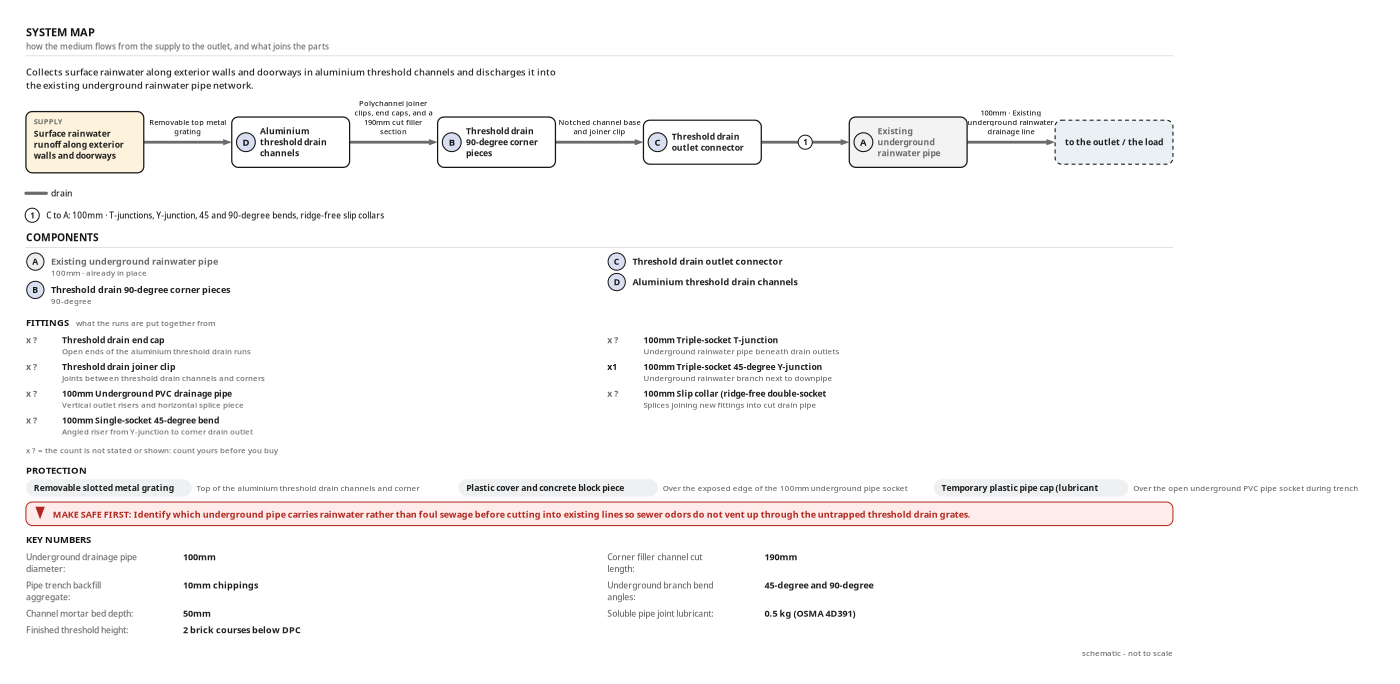
- Collects surface rainwater along exterior walls and doorways in aluminium threshold channels and discharges it into the existing underground rainwater pipe network.
- Supply: Surface rainwater runoff along exterior walls and doorways
- supply → Aluminium threshold drain channels: drain, direct, Removable top metal grating
- Aluminium threshold drain channels → Threshold drain 90-degree corner pieces: drain, direct, Polychannel joiner clips, end caps, and a 190mm cut filler section
- Threshold drain 90-degree corner pieces → Threshold drain outlet connector: drain, direct, Notched channel base and joiner clip
- Threshold drain outlet connector → Existing underground rainwater pipe: drain, pipe, 100mm, T-junctions, Y-junction, 45 and 90-degree bends, ridge-free slip collars with soluble lubricant
- Existing underground rainwater pipe → out: drain, pipe, 100mm, Existing underground rainwater drainage line
- Protection: Removable slotted metal grating, Top of the aluminium threshold drain channels and corner units
- Protection: Plastic cover and concrete block piece sealed with mortar, Over the exposed edge of the 100mm underground pipe socket where it extends past the narrower
- Protection: Temporary plastic pipe cap (lubricant tub lid), Over the open underground PVC pipe socket during trench excavation
- Underground drainage pipe diameter: 100mm
- Pipe trench backfill aggregate: 10mm chippings
- Channel mortar bed depth: 50mm
- Finished threshold height: 2 brick courses below DPC
- Corner filler channel cut length: 190mm
- Underground branch bend angles: 45-degree and 90-degree
- Soluble pipe joint lubricant: 0.5 kg (OSMA 4D391)
Make safe first
- Identify which underground pipe carries rainwater rather than foul sewage before cutting into existing lines so sewer odors do not vent up through the untrapped threshold drain grates.
Health and safety
Angle Grinder and Cutting Hazards
- Clamp short PVC pipe sections firmly before cutting or beveling; never hold pipe with your boot near a spinning diamond disc.
- Keep both hands on the corded angle grinder and keep the guard in place to prevent kickback and flying debris.
- Let the diamond cutting disc come to a complete stop before setting the angle grinder down on the ground.
- Route the grinder power cord away from standing water, damp trenches, and the path of the cutting disc.
Dust, Noise, and Sharp Edges
- Wear eye, ear, and respiratory protective equipment when cutting PVC pipes, aluminium channels, or masonry with the angle grinder.
- Wear a dust mask when pouring and mixing dry sand and cement for the 50mm mortar bed to avoid inhaling dust.
- Wear cut-resistant gloves when handling freshly cut aluminium threshold drain channels, corner pieces, and removable metal gratings.
Mortar and Chemical Handling
- Wear waterproof gloves and long sleeves when laying the 50mm cement mortar bed, as wet cement causes alkaline skin burns.
- Wash skin immediately with clean water if wet cement mortar or soluble pipe lubricant contacts your hands or eyes.
Excavation and Material Moving
- Locate buried electrical cables, gas lines, and water pipes before digging trenches around existing underground rainwater pipes with a shovel.
- Lift with your legs and keep your back straight when shoveling 10mm stone chippings and moving loaded wheelbarrows.
- Keep open drainage trenches, shovels, and loose 10mm chippings clear of walkways and door thresholds to prevent trips and falls.
Checks before you start
- Check which underground pipe carries rainwater versus foul sewage before cutting.
- Never connect an untrapped threshold drain to a foul sewer or odors escape.
- Check local building regulations on surface water drainage and sealed underground joints.
- Check the underground rainwater pipe is 100mm PVC to match the fittings.
- Use 100mm pipe slip collars without a center ridge for in-situ splices.
- Dig a wide trench around and under the pipes for collar room.
- Clean moss and algae off lower bricks; mark two courses below DPC.
Tools
- Spirit level (Box beam level)
- Shovel (Square-mouth shovel)
- Marker pen (Permanent marker, Sharpie) (optional)
- Rubber mallet (Soft-faced mallet)
- Angle grinder (Corded angle grinder with diamond cutting disc, Makita)
- Wheelbarrow (Single-wheel builder's wheelbarrow) (optional)
Materials
- Underground drainage pipes and fittings (PVC underground drainage pipe, T-junctions, Y-junction, 45-degree and 90-degree bends, 100mm)
- Aluminium threshold drain channels (Slimline aluminium channel drain with removable metal grating, Polychannel)
- Threshold drain outlet connector (Bottom outlet connector, Polychannel)
- 10mm chippings (Pea gravel / stone chippings, 10mm)
- Threshold drain 90-degree corner pieces (Internal and external 90-degree corner channel units, Polychannel)
- Soluble pipe lubricant (1 tub, Water-soluble pipe joint lubricant, OSMA, 0.5 kg, Part No. 4D391)
- Pipe slip collars (Double-socket repair coupler without center ridge, 100mm)
- Threshold drain connector clips (Channel joiner bracket, Polychannel)
- Cement mortar mix (Sand and cement mortar, 50mm bed depth)
- Threshold drain end caps (Channel end cap, Polychannel)
Hardware
| Hardware | Size | Count | Used in steps |
|---|---|---|---|
| 100mm Pipe slip collar | 3 | 1, 2 | |
| 100mm Triple-socket T-junction | 2 | 1, 2 | |
| 100mm Triple-socket 45-degree Y-junction | 1 | 2 | |
| 100mm Single-socket 45-degree bend | 1 | 2 | |
| Threshold drain connector clip | 3 | ||
| Threshold drain end cap | 3 |
Finishes & supplies, in the order they go on
| Product | What it does | Mix & coats | Dry time | Applied with |
|---|---|---|---|---|
| Soluble pipe lubricant | Lubricates rubber ring seals and bevelled pipe ends so slip collars slide smoothly | By hand | ||
| Cement mortar mix | Forms a 50mm levelling bed under channels and seals exposed pipe gaps | Shovel |
Components
| Part | Name | Qty | Size | Notes |
|---|---|---|---|---|
| A | Existing underground rainwater pipe | x1 | 100mm | Existing PVC rainwater line and downpipe branches spliced into using T-junctions, a Y-junction, and slip collars. |
| B | Threshold drain 90-degree corner pieces | count yours | 90-degree | Polychannel aluminium internal and external corner units that route the surface channel around building corners. |
| C | Threshold drain outlet connector | count yours | Bottom outlet connector unit that drops water from the threshold channel into the vertical 100mm underground riser. | |
| D | Aluminium threshold drain channels | count yours | Polychannel slimline aluminium channels with grates, joined with clips, capped at open ends, and bedded on 50mm mortar. |
Step by step
Step 1: Splice into the first rainwater pipe and backfill
Splice the first 100mm T-junction and vertical riser into the rainwater pipe and backfill.
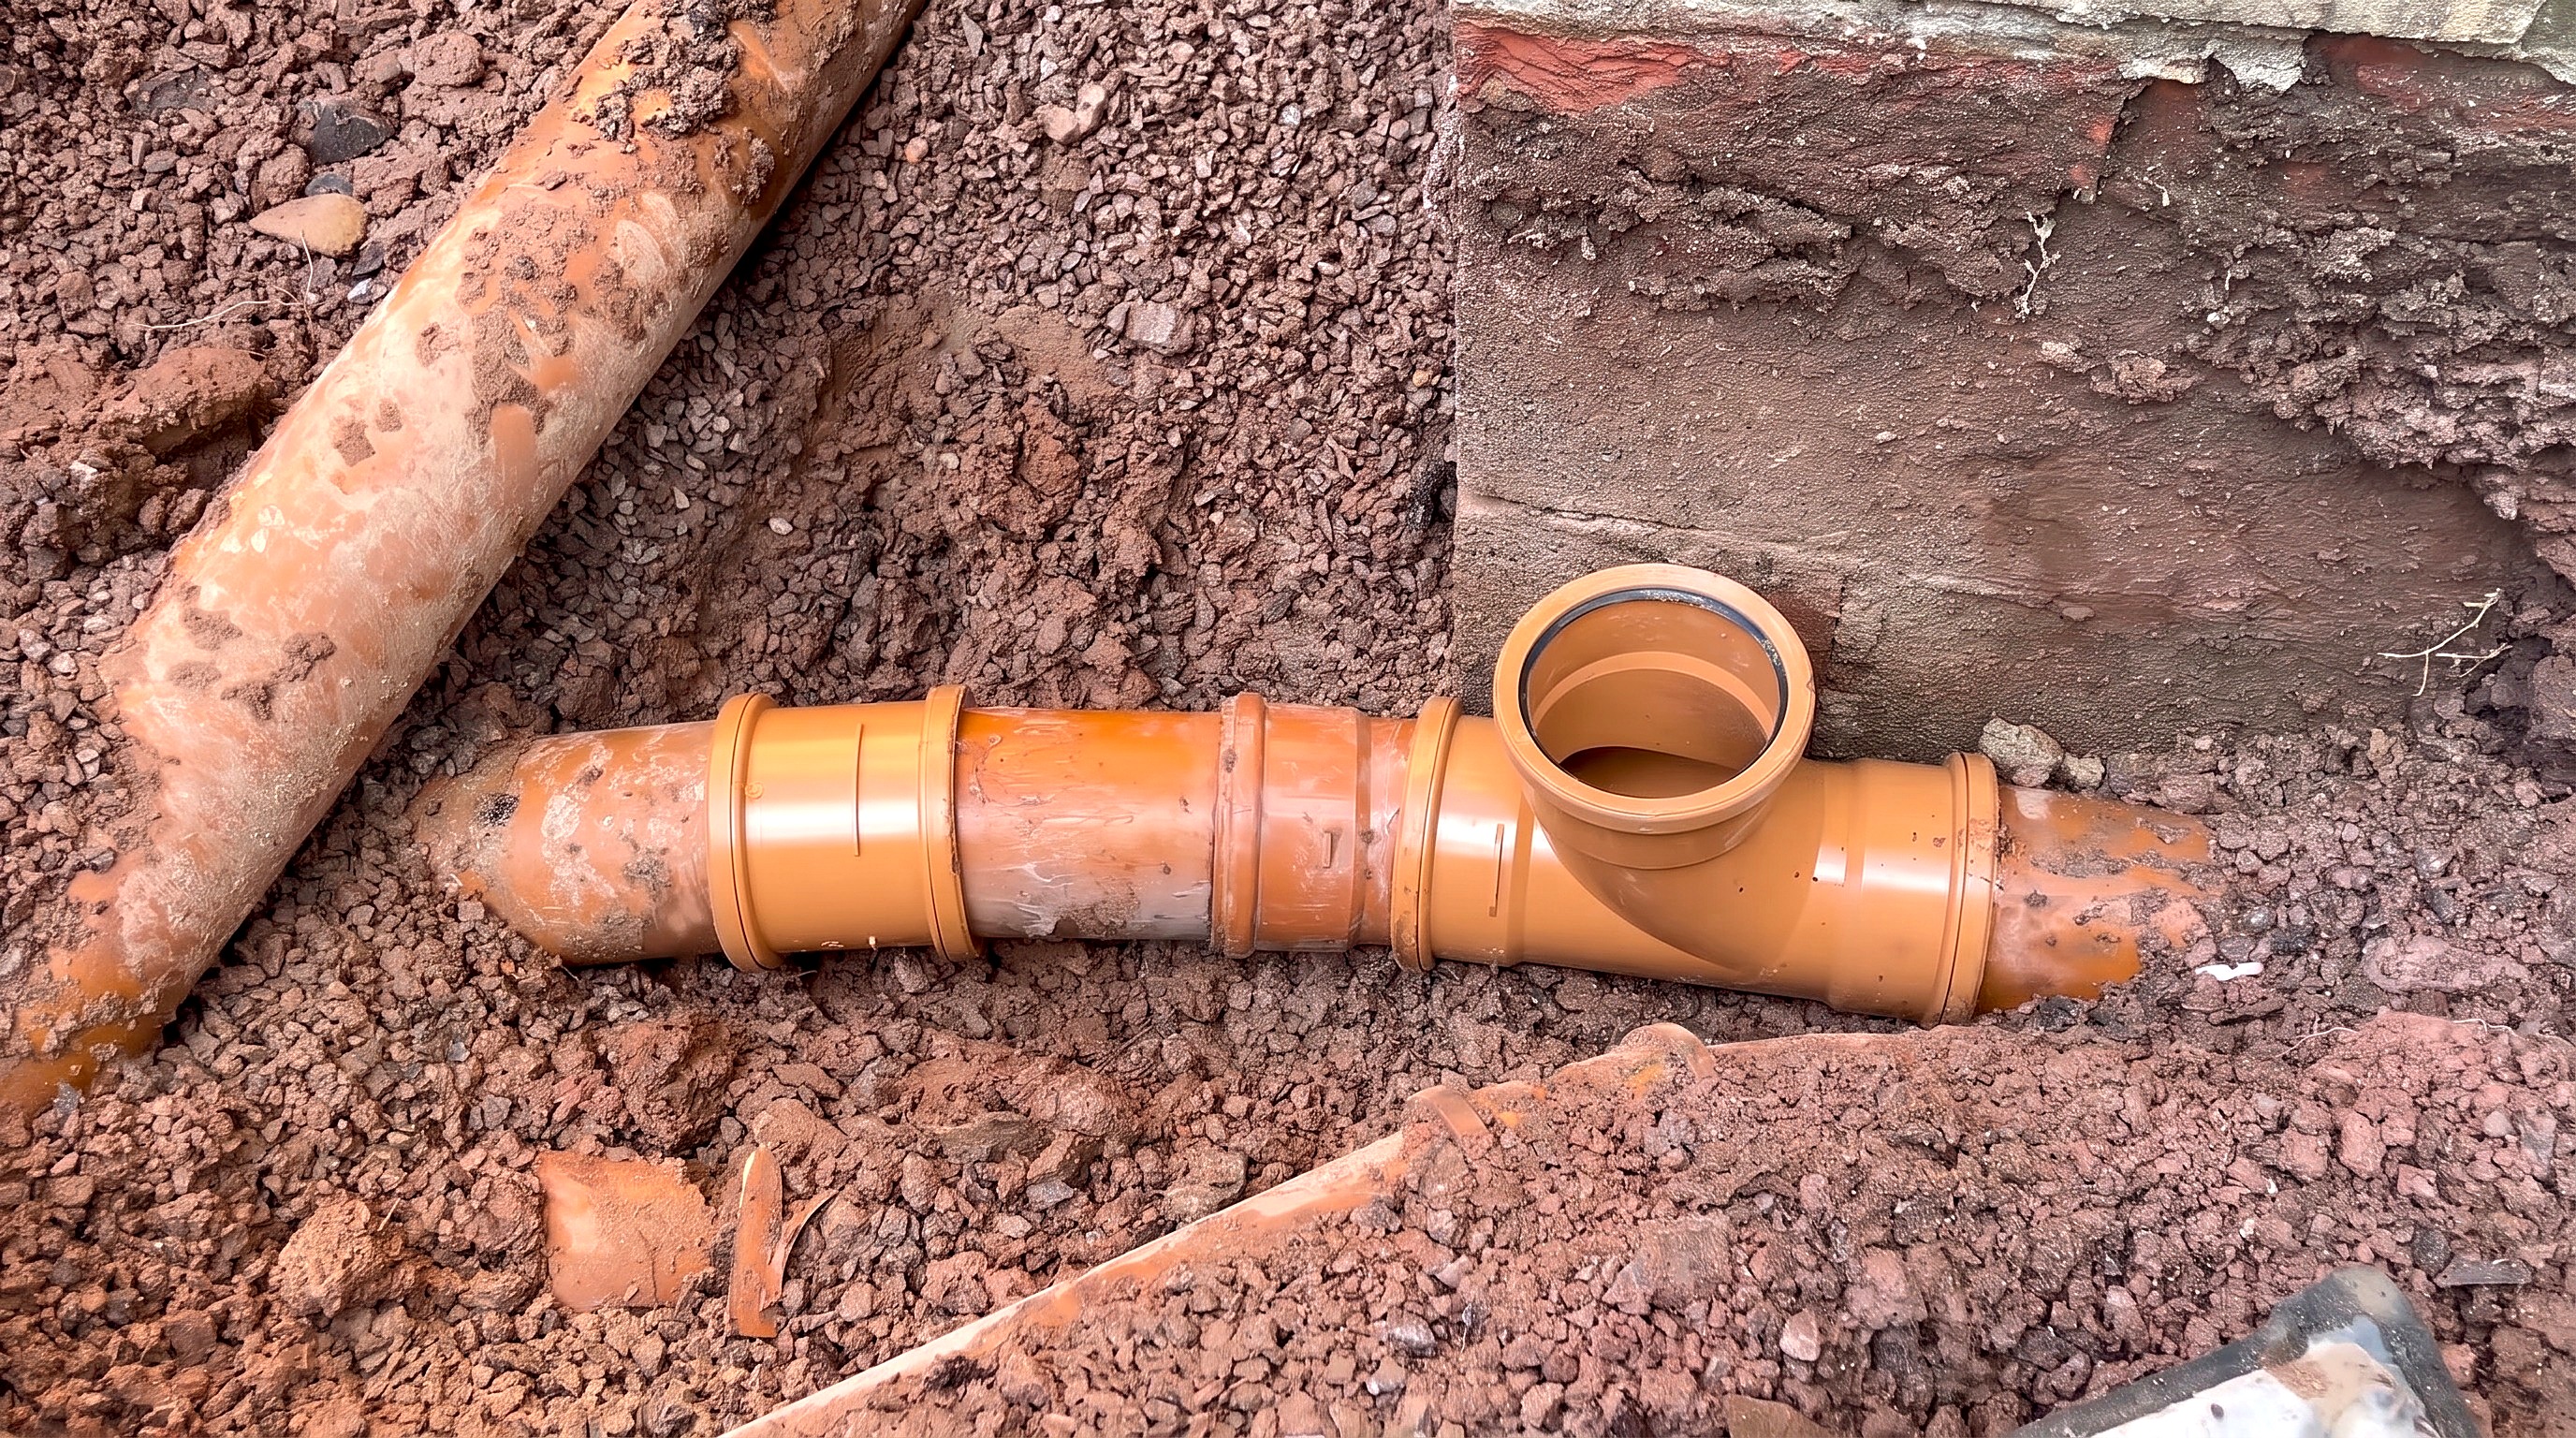
Parts in this step: (A) Existing underground rainwater pipe, (B) Threshold drain 90-degree corner pieces, (C) Threshold drain outlet connector
You'll need: Shovel, Rubber mallet, Angle grinder, Underground drainage pipes and fittings, Threshold drain outlet connector, 10mm chippings, Threshold drain 90-degree corner pieces, Soluble pipe lubricant, Pipe slip collars, Pipe slip collar, Triple-socket T-junction
- 1.1 Position corner drain and cut existing rainwater pipe
- Hold 90-degree corner piece (B) and outlet connector (C) against the wall.
- Mark the vertical outlet drop over underground rainwater pipe (A).
- Cut the marked section from rainwater pipe (A) with an angle grinder.
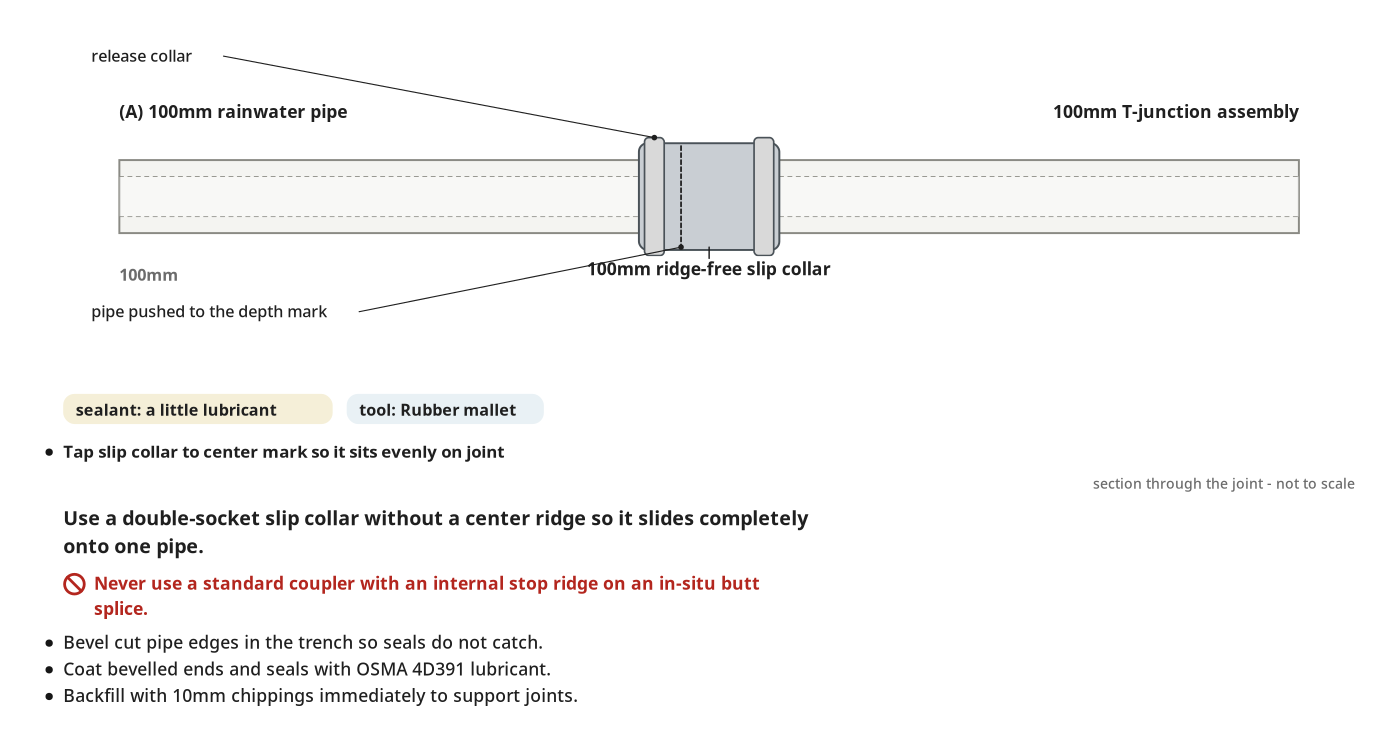
- Bevel cut pipe edges in the trench so rubber seals do not catch.
- 1.2 Splice T-junction using a slip collar
- Coat the bevelled pipe ends and seals with OSMA 4D391 soluble pipe lubricant.
- Push the 100mm T-junction and angled bend onto the right-hand pipe, facing downstream.
- Slide a ridge-free 100mm slip collar fully onto the opposite cut pipe end.
- Align the pipe ends and tap the slip collar over the joint.
- 1.3 Fit vertical riser pipe and backfill with 10mm chippings
- Cut a short 100mm vertical riser pipe and push it into the T-junction.
- Test-fit outlet connector (C) and corner piece (B) on the vertical riser.
- Shovel 10mm chippings around the underground pipes immediately to support the joints.
Key measurements
- Underground drainage pipe diameter: 100mm PVC
- Trench backfill aggregate size: 10mm stone chippings
- Soluble pipe joint lubricant tub: 0.5 kg (OSMA Part No. 4D391)
- Tip: Use a double-socket slip collar without a center ridge so it slides completely onto one pipe.
- Tip: Backfill with 10mm chippings right after connecting each underground pipe section.
- Heads up: Wear eye, ear, and respiratory protective equipment when cutting PVC pipe with an angle grinder.
- Heads up: Never use a standard coupler with an internal stop ridge on an in-situ butt splice.
Before you move on: Check the slip collar sits evenly on the cut joint and the vertical riser aligns under the corner.
Step 2: Connect the Y-junction and second corner drainage pipes
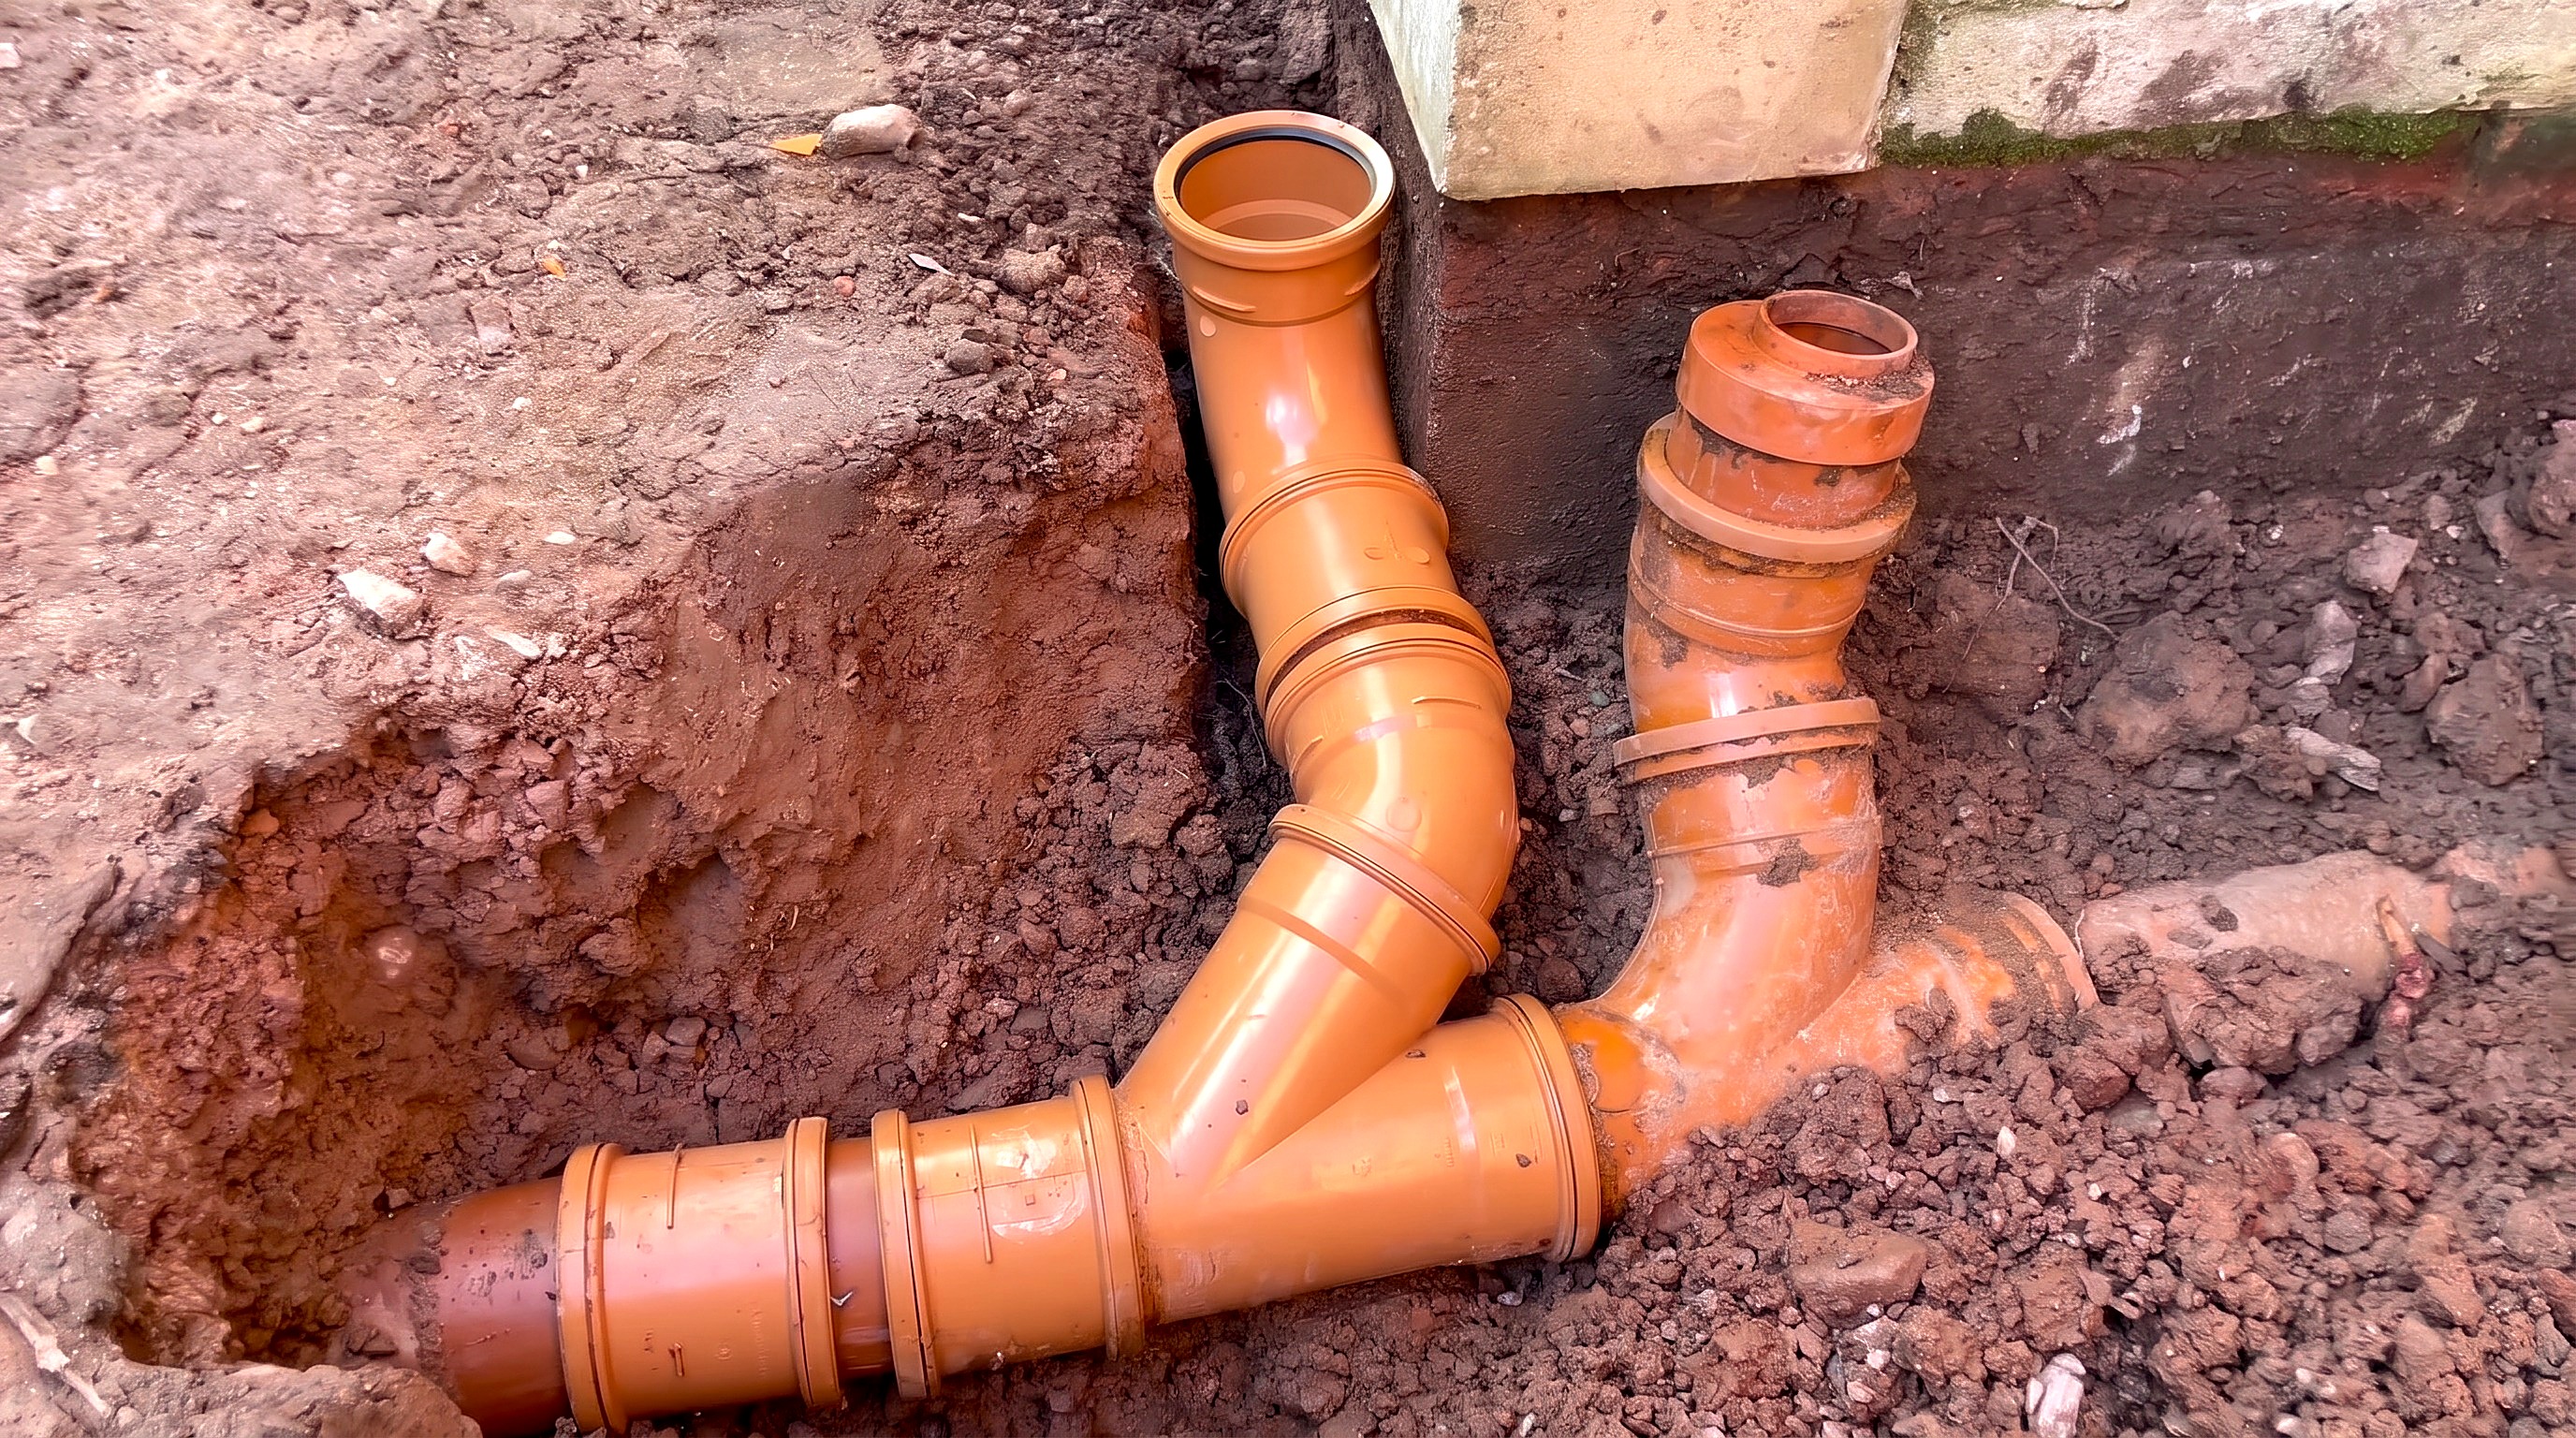
Splice the Y-junction, angled corner branch, and second T-junction into the opposite rainwater line.
Parts in this step: (A) Existing underground rainwater pipe
You'll need: Shovel, Marker pen, Rubber mallet, Angle grinder, Underground drainage pipes and fittings, 10mm chippings, Soluble pipe lubricant, Pipe slip collars, Pipe slip collar, Triple-socket 45-degree Y-junction, Single-socket 45-degree bend, Triple-socket T-junction
- 2.1 Dry-fit the Y-junction and angled corner riser
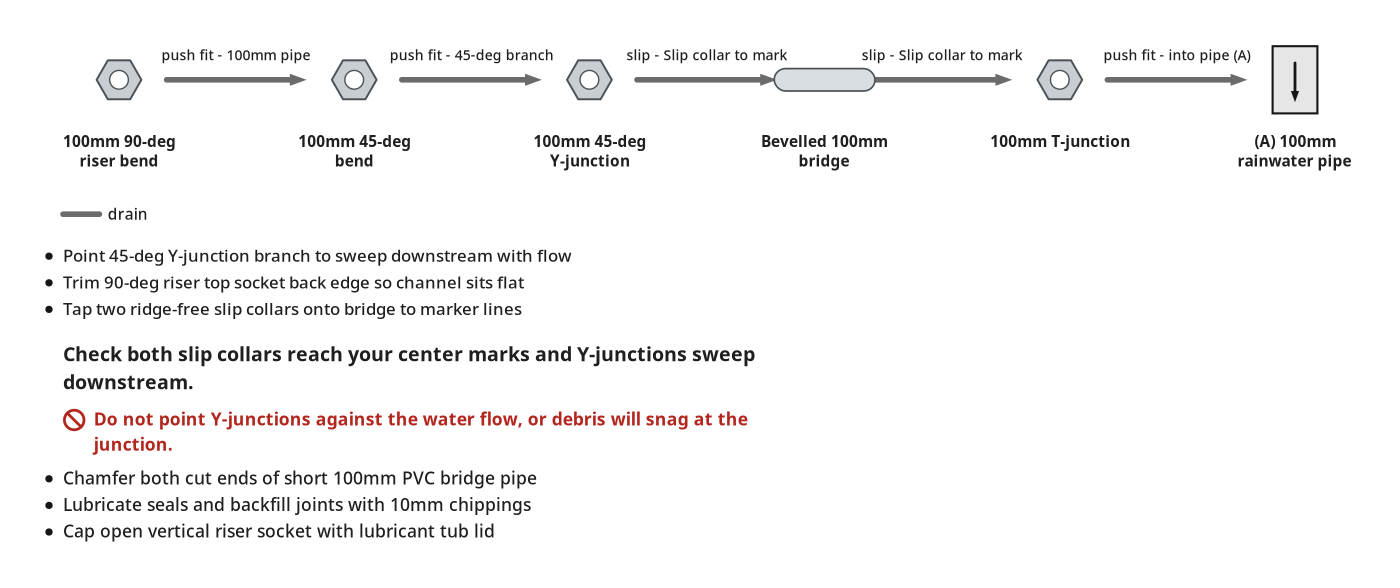
- Assemble the 100mm Y-junction, 45-degree bend, straight pipe, and 90-degree bend on the branch.
- Point the 45-degree Y-junction branch to sweep downstream.
- Trim the top socket's back edge so the drain channel sits flat.
- Cover the open riser socket with the plastic lubricant tub lid while digging.
- 2.2 Bevel the short connector pipe with an angle grinder
- Measure and cut a short 100mm PVC pipe bridge.
- Chamfer both cut outer edges with a grinder or rasp.
- Smooth rough edges so the pipe slides past the rubber seals.
- 2.3 Splice the Y-junction and second T-junction and backfill
- Dig all soil from under existing pipe (A) to clear the collars.
- Lubricate pipe ends and slide two ridge-free slip collars onto the bridge.
- Mark each collar's center stop on the pipe with a marker pen.
- Tap both slip collars to the marks, splice the second T-junction, and backfill.
Key measurements
- Underground branch fittings: 100mm diameter, 45-degree and 90-degree bends
- Backfill aggregate: 10mm chippings around all PVC joints
- Tip: Mark the pipe with a permanent marker to show when the slip collar centers on the joint.
- Tip: Cap open vertical sockets with the lubricant tub lid while digging to prevent stone blockages.
- Heads up: Secure short PVC pipe pieces before beveling with an angle grinder; never hold them with your boot.
- Heads up: Do not point Y-junctions against the water flow, or debris will snag at the junction.
Before you move on: Check both slip collars reach your center marks and Y-junctions sweep downstream.
Step 3: Bed and connect the threshold drain channels in mortar
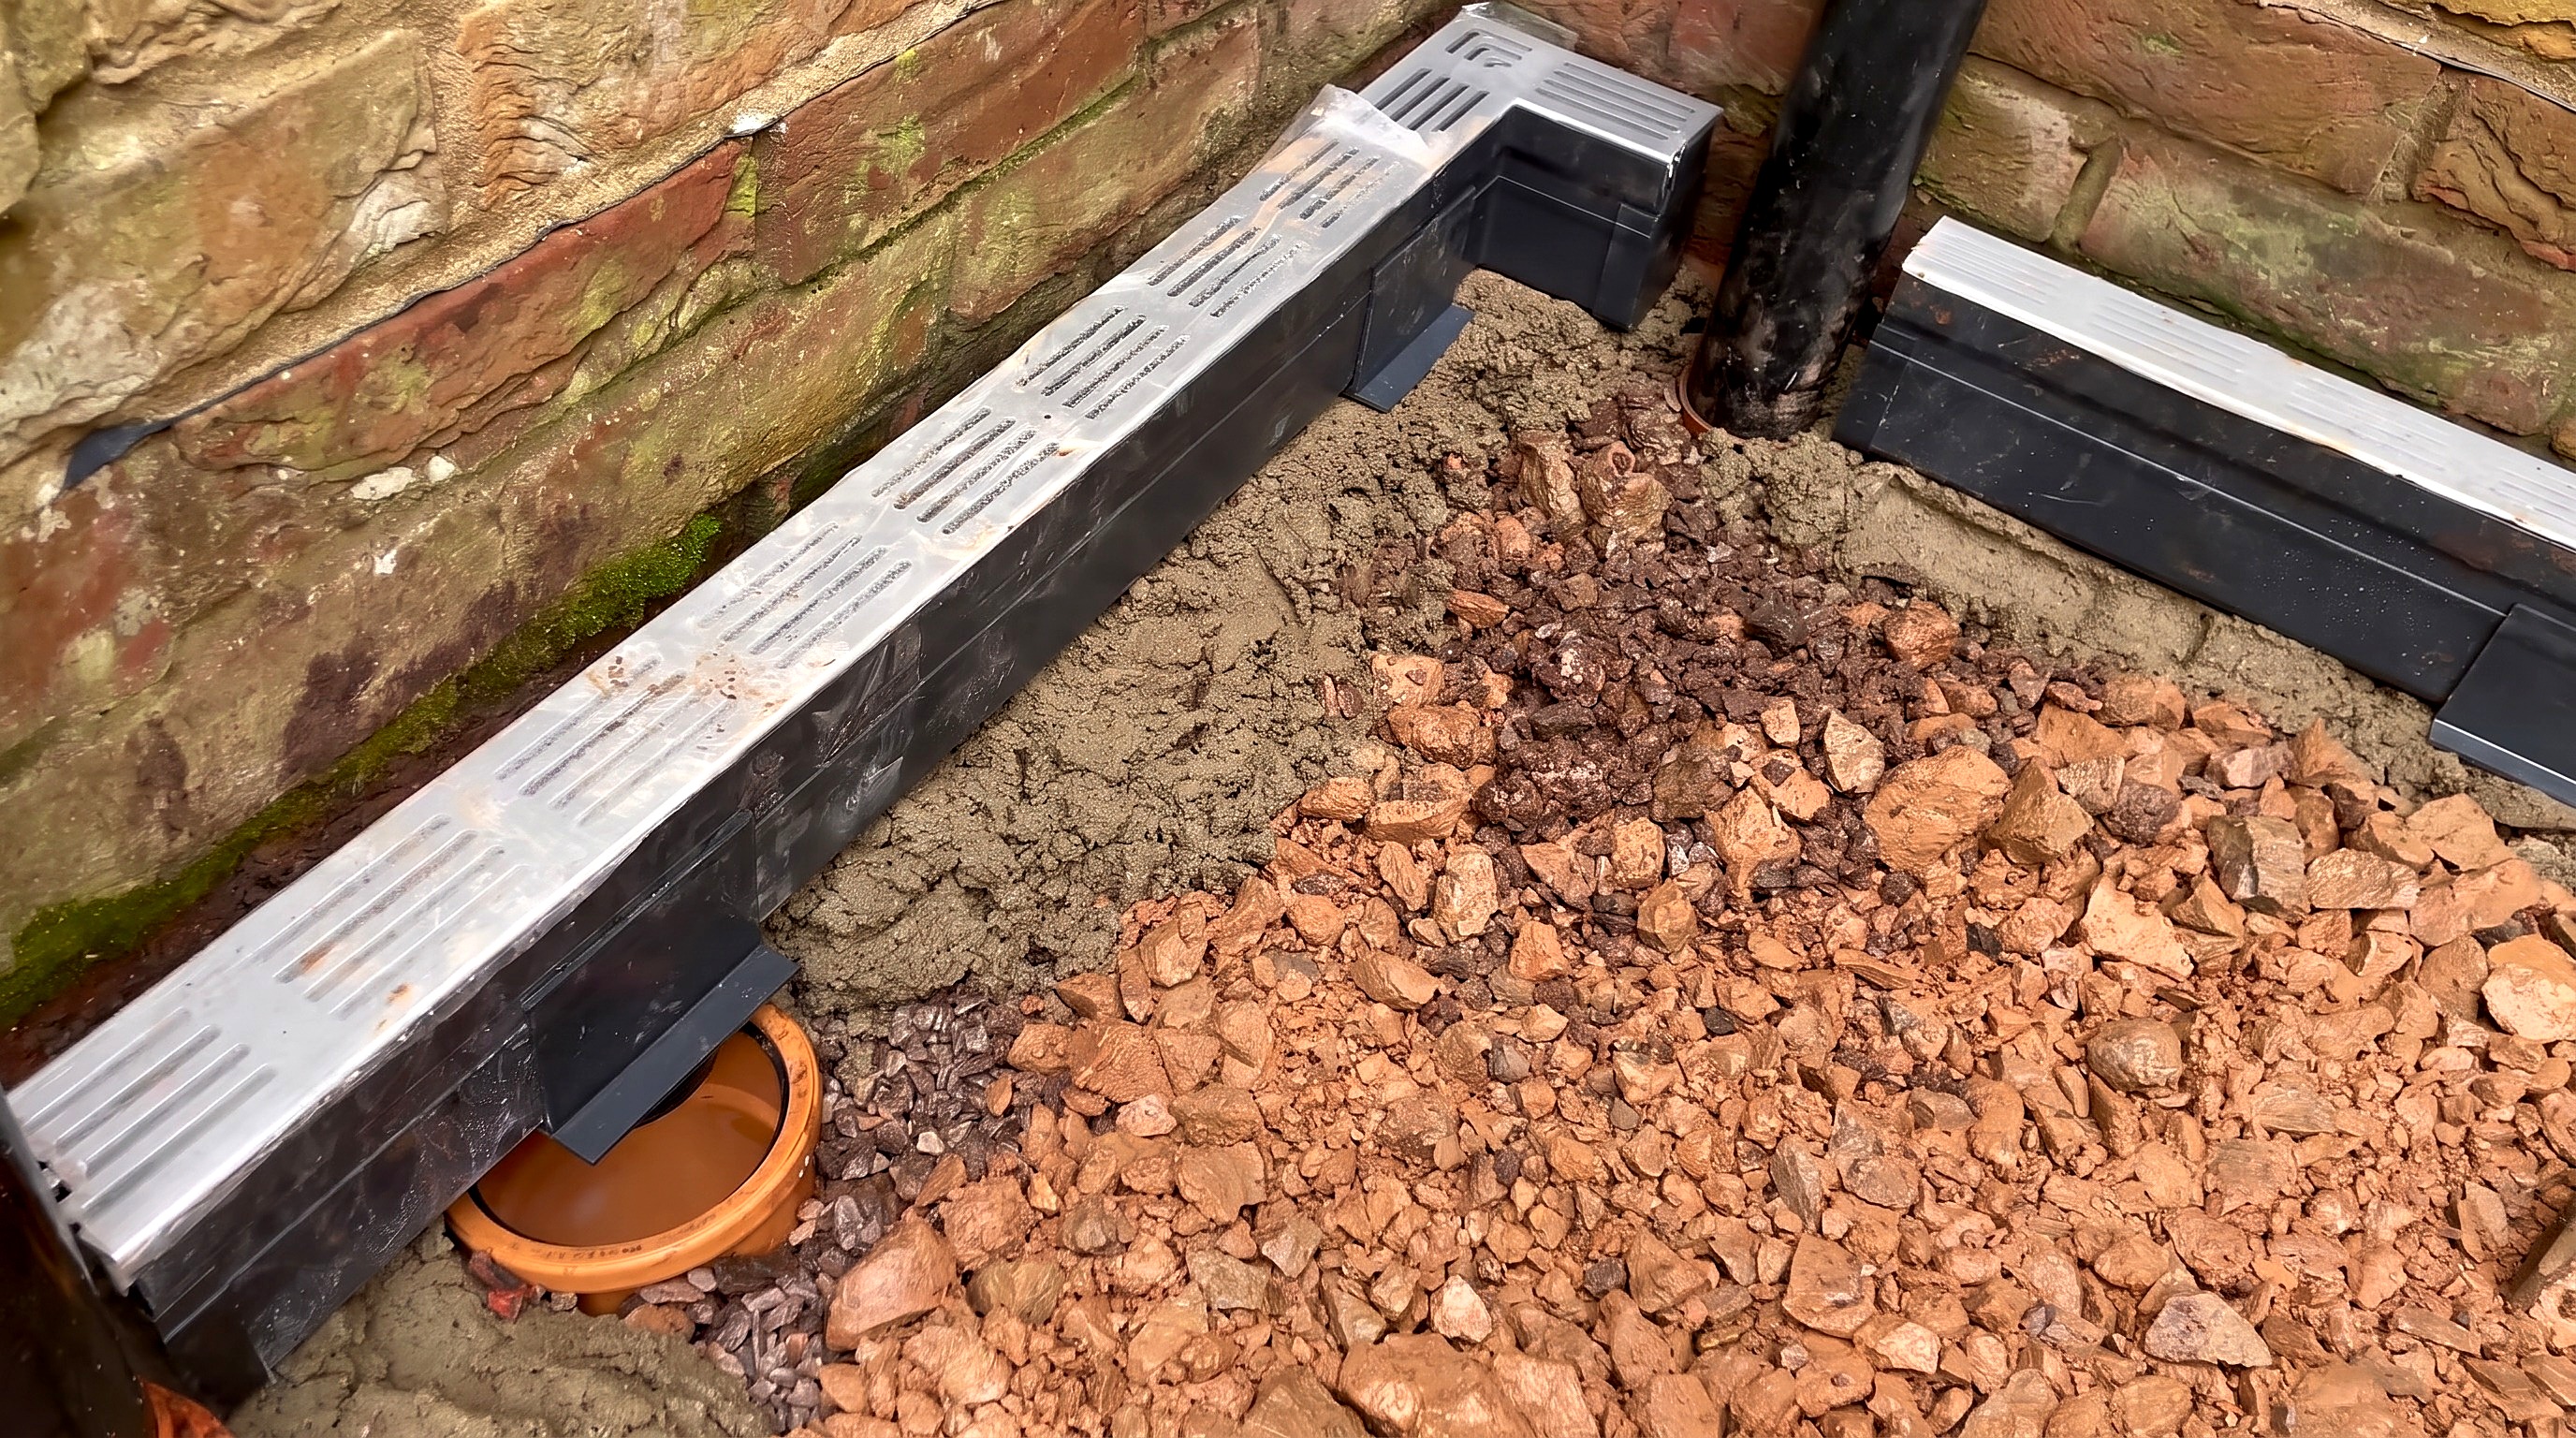
Bed aluminium threshold drain channels, corners, and end caps level in mortar two courses below the DPC.
Parts in this step: (A) Existing underground rainwater pipe, (B) Threshold drain 90-degree corner pieces, (C) Threshold drain outlet connector, (D) Aluminium threshold drain channels
You'll need: Spirit level, Shovel, Rubber mallet, Angle grinder, Wheelbarrow, Aluminium threshold drain channels, Threshold drain outlet connector, Threshold drain 90-degree corner pieces, Threshold drain connector clips, Cement mortar mix, Threshold drain end caps, Threshold drain connector clip, Threshold drain end cap
- 3.1 Notch the first corner channel and set over the outlet pipe
- Cut a drainage notch in the base of channel (D) at the corner.
- Set outlet connector (C) and 90-degree corner piece (B) over riser (A).
- Cover exposed 100mm riser gaps with plastic to block mortar.
- 3.2 Join and level straight channels along the doorway
- Lay a 50mm deep cement mortar bed along the wall base.
- Push an end cap onto the starting channel before bedding in mortar.
- Clip a connector bracket half on seated channel (D), half protruding.
- Tap channels level with a mallet, two brick courses below the DPC.
- 3.3 Cap the end run by the downpipe
- Trim final straight channel (D) to length with an angle grinder.
- Fit a plastic end cap to the open end before setting the drain channel.
- Press the capped channel into the 50mm mortar bed against the rainwater downpipe.
- Level the top grating with a spirit level and straighten the run.
- 3.4 Fit the 90-degree corners and cover the oversized pipe opening
- Cut a 190mm threshold channel (D) filler with an angle grinder.
- Cut between grate slot groups so the slot pattern matches the corner.
- Bed the 190mm filler and 90-degree corner (B) level on 50mm of mortar.
- Cover the exposed 100mm pipe (A) gap with concrete and seal with mortar.
Key measurements
- Mortar bed depth underneath channels: 50mm
- Threshold drain top finished height: 2 brick courses below damp proof course (DPC).
- Corner filler channel cut length: 190mm
- Tip: Fit end caps and joiner clips before pressing a channel section into wet mortar.
- Tip: Cut channels between grate slot groups to match the slot pattern at corners.
- Heads up: Wear eye, ear, and respiratory protective equipment when cutting aluminium channels with an angle grinder.
- Heads up: Unsealed push-fit channel joints and oversized outlet sockets leak into soil if the underground pipe backs up.
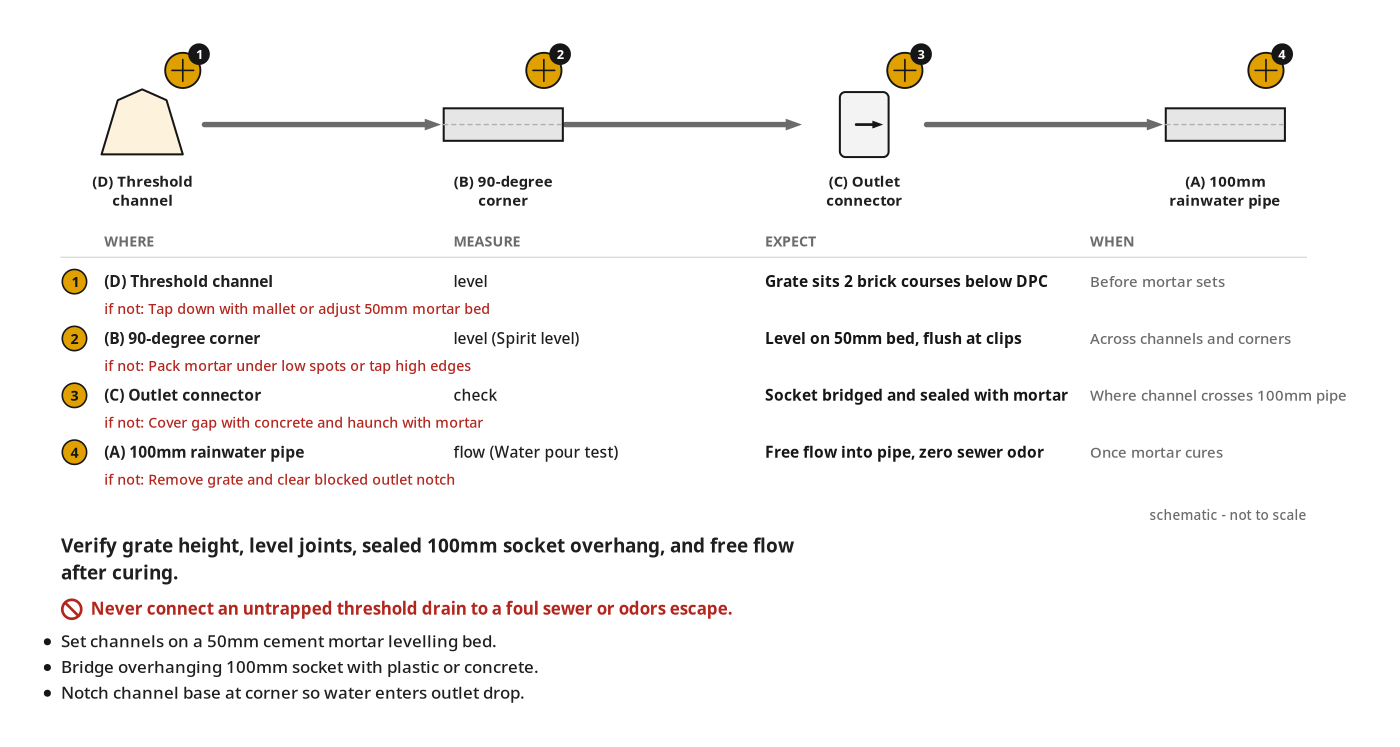
Before you move on: With a spirit level, check channels sit flush across joints, two courses below the DPC, with exposed 100mm pipe gaps sealed.
Finishing
Last touches
- Haunch cement mortar smoothly around the concrete covers on the 100mm pipe sockets.
- Wipe mortar off the aluminium grates before it sets.
Settle and cure
- Let the 50mm cement mortar bed cure before laying adjacent patio paving.
Care
- Lift the removable metal grates periodically to clear leaves and silt.
- Keep corner notches and bottom outlets clear so rainwater does not back up.
Alternatives
- Bevel PVC pipes with a plumber's rasp, not an angle grinder.
- Without soluble pipe lubricant, use dish soap.
Commission & test
| Check | What you should see | If not |
|---|---|---|
| Check aluminium threshold channel finished height along the house wall. | Grating top sits two brick courses below the damp proof course (DPC). | Tap high sections down with a rubber mallet or adjust the 50mm mortar bed before setting. |
| Lay a spirit level across adjacent channels and 90-degree corner units. | Channels sit flush across joiner clips and level along doorway and walls. | Lift low sections and pack cement mortar underneath, or tap high edges down with the mallet. |
| Check where the narrow threshold channel crosses the wider 100mm underground pipe socket. | Overhanging 100mm pipe opening is bridged with plastic or concrete and sealed with mortar. | Cover any remaining gap with a flat concrete piece and haunch around it with mortar so debris cannot enter. |
| Pour water along threshold grates once mortar cures. | Water runs freely through notched corner bases and outlet connectors into the 100mm rainwater pipe without sewer odor. | Remove the top metal grating and clear mortar or gravel blocking the outlet notch. |
These Specs are built from Tidybricks patio restore's video “Aluminium Threshold Drain and Underground Rainwater Pipe Installation”. Open the Aluminium Threshold Drain and Underground Rainwater Pipe Installation project page.
