Spetz Specs No. 9235: step-by-step repair guide
Grasshopper 721D Mower Transmission Troubleshooting and Drive Belt Replacement
The complete step-by-step guide made from Indy Farm Life's YouTube video, free on Spetz. For the video, a step-by-step player and answers to your questions, see the Grasshopper 721D Mower Transmission Troubleshooting and Drive Belt Replacement project page.
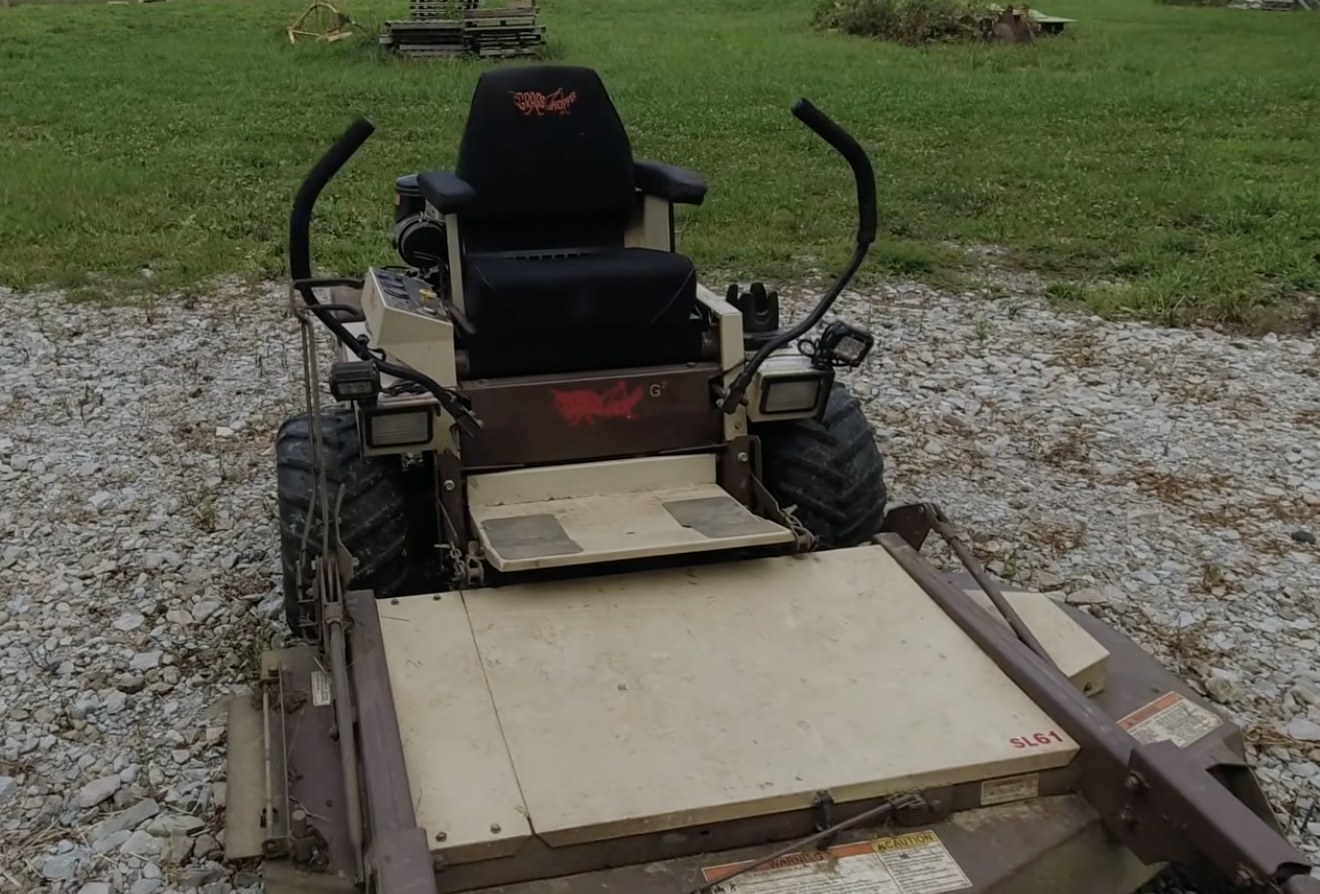
4 steps, 3 parts, 2 tools, 1 materials
Overview
The Fault
- Right drive wheel loses power on straights, stalls on inclines.
- Right steering lever must sit further ahead than left to track straight.
- Stretched, worn hydraulic pump drive belt slips on pulley under load.
- New OEM belt (part 381540) restores full hydraulic drive power.
Why Fix It Yourself
- New hydraulic pump motor: $800 to $900 before labor or rebuild downtime.
- OEM replacement drive belt: about $20, swaps in with two wrenches.
What It Takes
- Socket wrench and combination wrench to unbolt center drive shaft coupling.
- One OEM Grasshopper hydraulic pump drive belt, part 381540 (2001 721D).
What Decides Success
- Rule out low hydraulic fluid, open valves, loose steering linkages before buying parts.
- Fit heavy-duty OEM belt so right tension matches left pump belt.
The fault at a glance
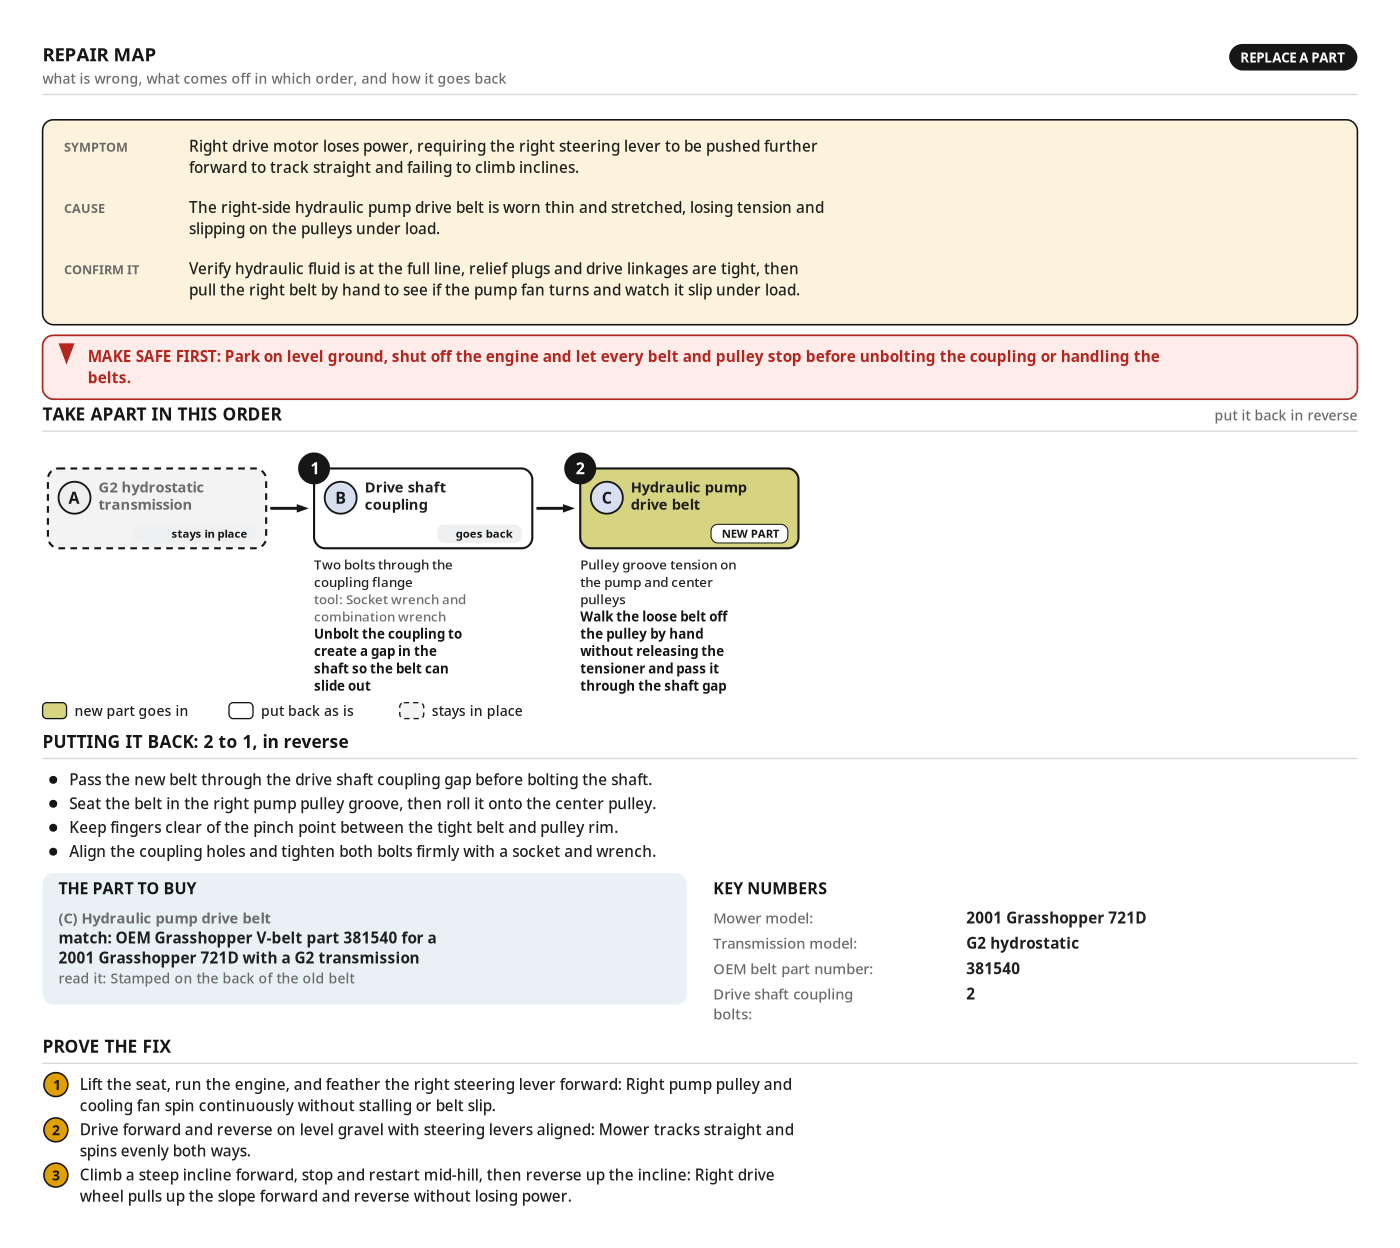
- What you see: Right drive motor loses power, requiring the right steering lever to be pushed further forward to track straight and failing to climb inclines.
- What is wrong: The right-side hydraulic pump drive belt is worn thin and stretched, losing tension and slipping on the pulleys under load.
- Confirm it: Verify hydraulic fluid is at the full line, relief plugs and drive linkages are tight, then pull the right belt by hand to see if the pump fan turns and watch it slip under load.
- Buy: C, OEM Grasshopper V-belt part 381540 for a 2001 Grasshopper 721D with a G2 transmission, Stamped on the back of the old belt
- Mower model: 2001 Grasshopper 721D
- Transmission model: G2 hydrostatic
- OEM belt part number: 381540
- Drive shaft coupling bolts: 2
Make safe first
- Park on level ground, shut off the engine and let every belt and pulley stop before unbolting the coupling or handling the belts.
Health and safety
Live Engine and Switch Bypass
- Stand clear of the tires and mower path when bypassing the seat safety switch so the machine cannot run you over.
- Feather the steering lever lightly when testing drive motors from beside the mower to prevent sudden, uncontrolled movement.
- Keep hands, fingers, and clothing clear of spinning fans, belts, and pulleys when inspecting the running engine with the seat lifted.
Pinch Points and Hand Tools
- Shut off the engine and let all moving parts stop before unbolting the drive coupling or handling the pump belts.
- Keep fingers out of the pinch point between the tight new V-belt and the pulley rim when rolling the belt into place.
- Brace your hand when pulling wrenches on the coupling so a slipping tool does not cut your knuckles on the radiator fins.
Transmission Heat and Test Driving
- Let the G2 hydrostatic transmission and engine cool before inspecting hydraulic fluid levels, relief valves, or drive linkages near hot parts.
- Restore the seat safety switch and lower the seat completely before mounting the mower for the operational test drive.
- Verify full forward, reverse, and stopping power on flat, clear ground before testing the mower on a hill climb.
Diagnose & make safe
- Check for a G2 hydrostatic transmission (A): front G2 sticker and single tucked-under oil filter.
- Distinguish the G2 from an older one-piece pump-and-motor Gemini unit with two top white oil filters.
- Check the symptom: right steering lever sits further forward than left, and right wheel stalls on hills.
- Park level and shut off the engine before hand-checking fluid, valves, linkages, or belt tension.
- Match OEM part 381540 stamped on the old belt (2001 Grasshopper 721D) before ordering.
Tools
- Socket wrench (hand ratchet with socket)
- Combination wrench (open-end / box-end hand wrench)
Materials
- Hydraulic pump drive belt (1, OEM V-belt, Grasshopper / Mitsuboshi, Part # 381540)
Hardware
| Hardware | Size | Count | Used in steps |
|---|---|---|---|
| Drive shaft coupling bolt | 4 | 2, 3 |
Parts
| Part | Name | Qty | Size | Notes |
|---|---|---|---|---|
| A | G2 hydrostatic transmission | x1 | Grasshopper G2 | Identified by the G2 front sticker, separate pump and wheel motor units, and a single tucked-under hydraulic oil filter. |
| B | Drive shaft coupling | x1 | Unbolted to open a clean gap in the center shaft so the pump belt can pass through. | |
| C | Hydraulic pump drive belt | x1 | Grasshopper part 381540 | Drives the right-side hydraulic pump; routed through the drive shaft gap onto the center and right pump pulleys. |
Step by step
Step 1: Troubleshoot the Transmission and Drive Belts
Check hydraulic fluid, plugs, and left belt are sound; prove the right belt slips under load.
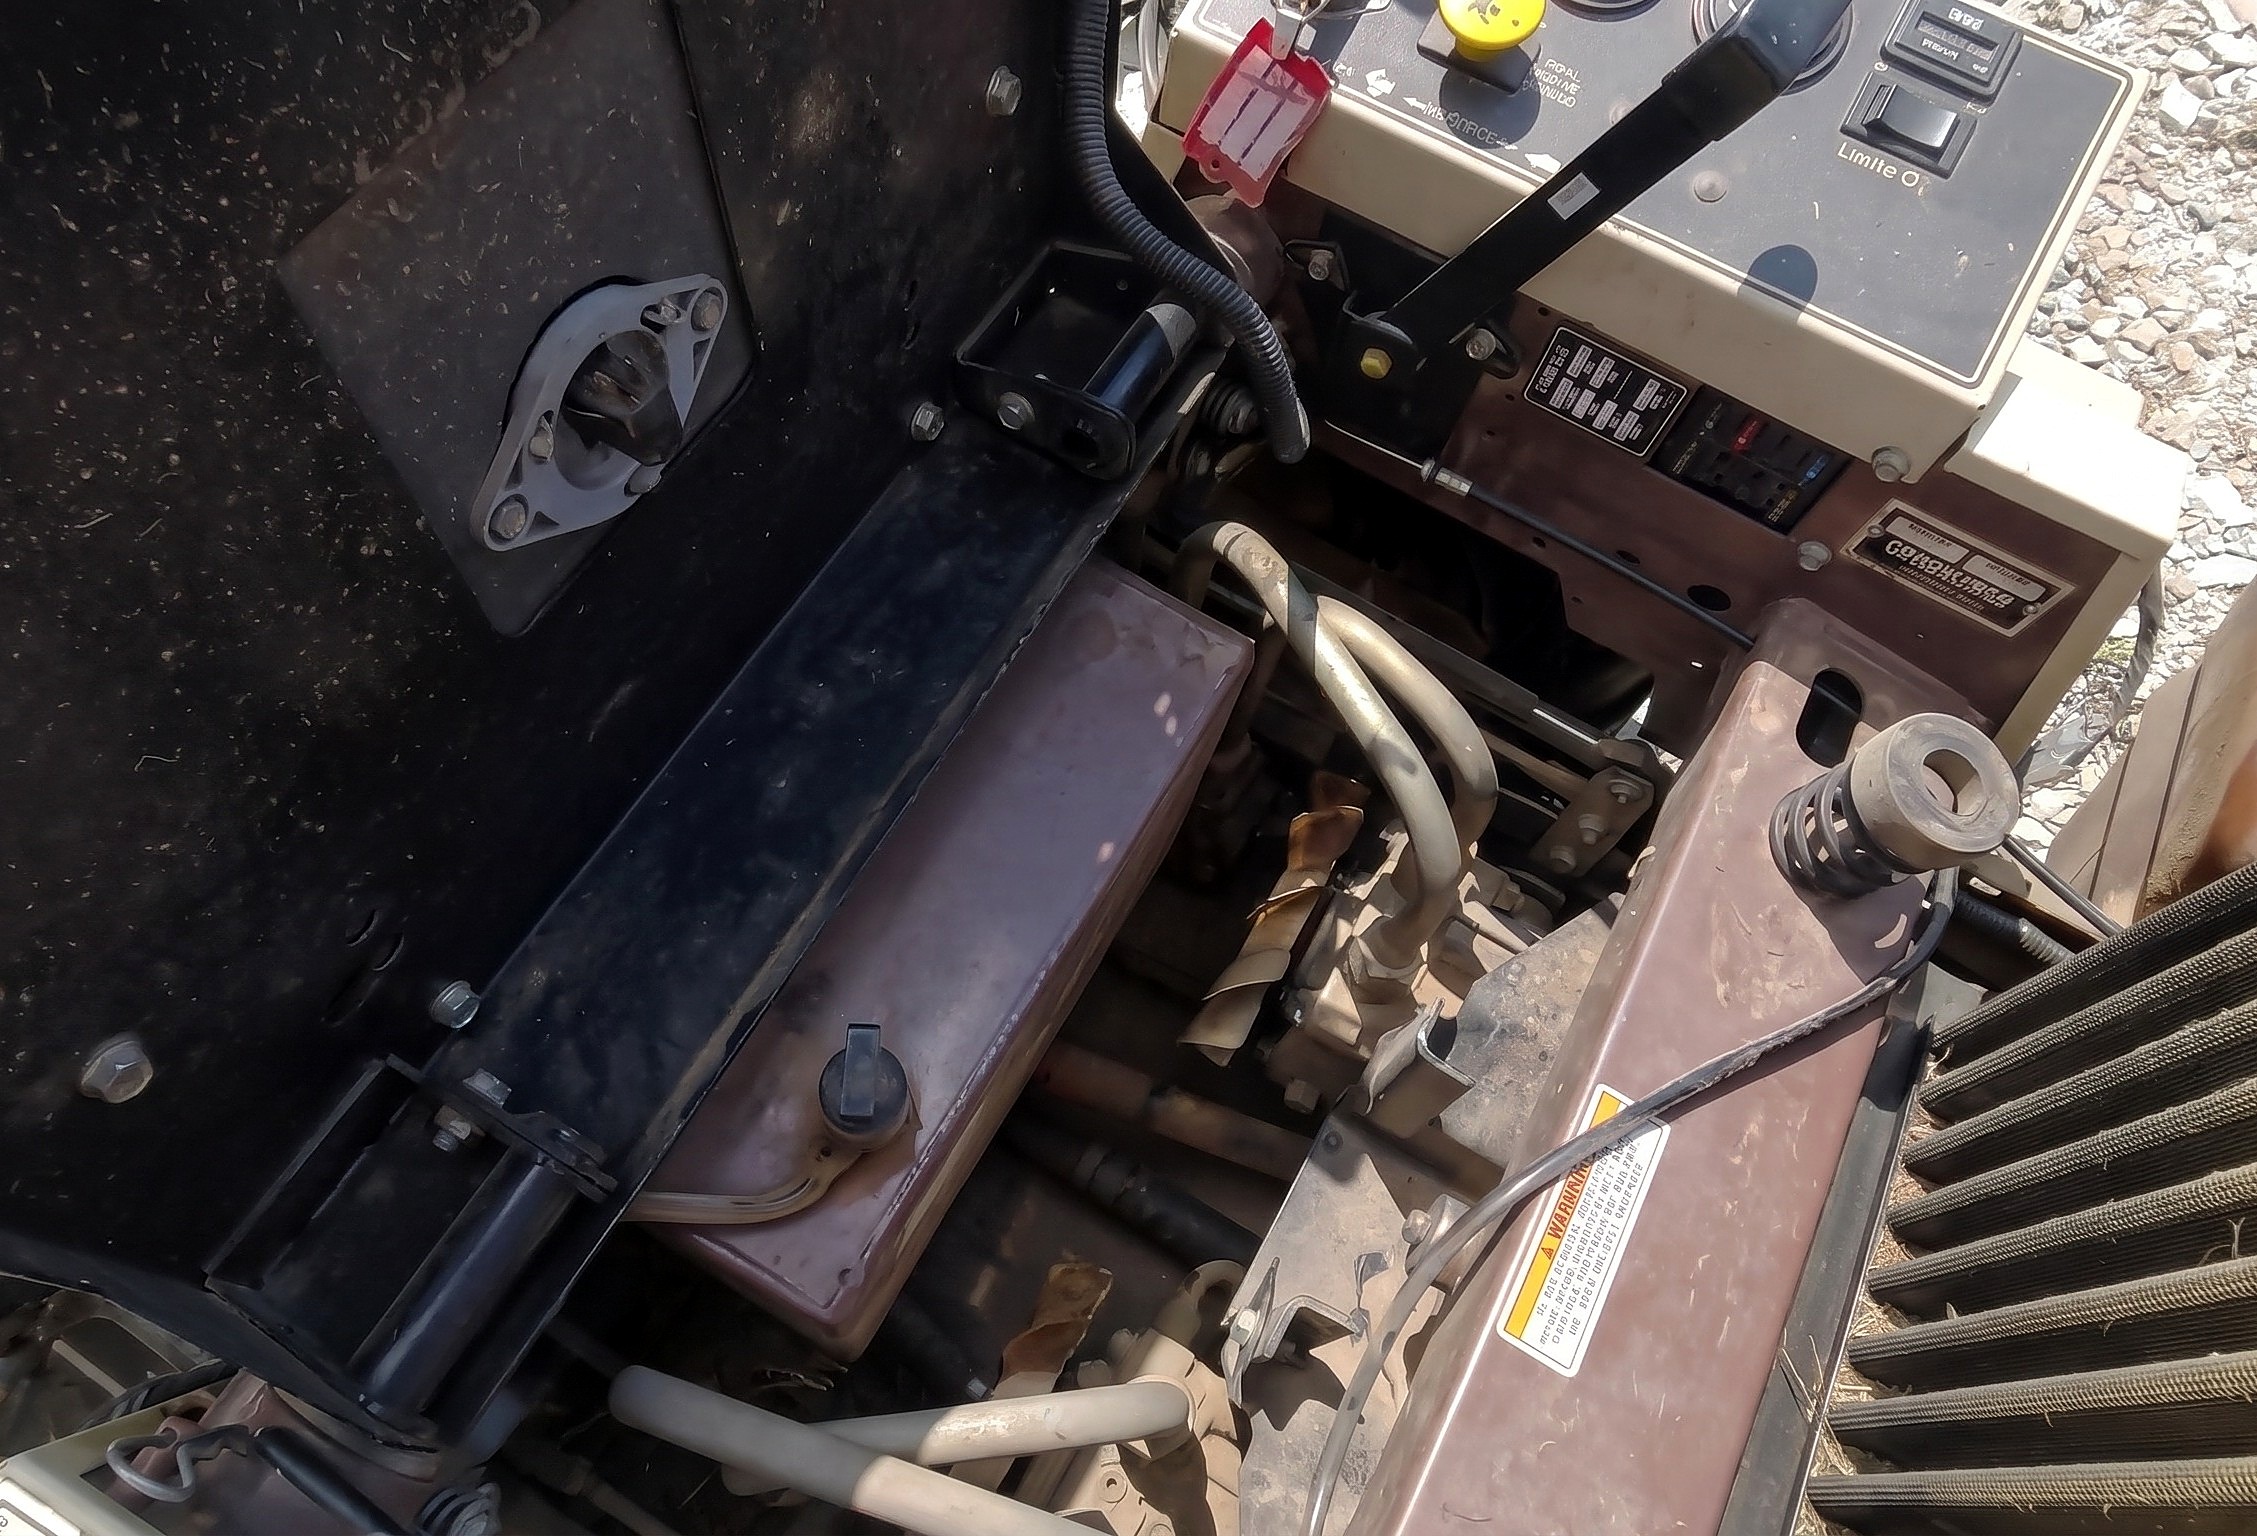
Parts in this step: (A) G2 hydrostatic transmission, (C) Hydraulic pump drive belt
- 1.1 Check the hydraulic fluid level
- Lift the mower seat to reach the G2 hydrostatic transmission (A) rectangular hydraulic reservoir.
- Unscrew and pull the dipstick cap from the reservoir top.
- Check hydraulic fluid reaches the dipstick full mark before suspecting pump failure.
- Thread the dipstick cap snug into the reservoir.
- 1.2 Inspect the transmission valves
- Find the recessed Allen-head plugs atop the left and right hydraulic pumps.
- Check both plugs and tow bypass valves are closed and not vibrated loose.
- Top Allen plug: pressure diagnostic port, not tow bypass valve.
- Allen wrench size is unstated; use a wrench that fits without play.
- 1.3 Compare left and right pump belt tension by hand
- Shut off the engine; reach between radiator frame and transmission.
- Pull left pump belt up and down: a healthy belt stays taut without sliding.
- Pull the right hydraulic pump drive belt (C) by hand.
- Hand-rotate the right pump cooling fan to check the belt slides loosely in the pulley.
- 1.4 Run the engine and engage the drive lever to confirm belt slip
- Tilt the seat forward (seat safety switch bypassed) and stand clear of both rear tires.
- Start engine; check center pulley and both pump cooling fans spin at idle.
- Feather the right steering lever slightly forward to load the right hydraulic pump.
- Watch right pump pulley and cooling fan slow and slip in the moving belt.
Key measurements
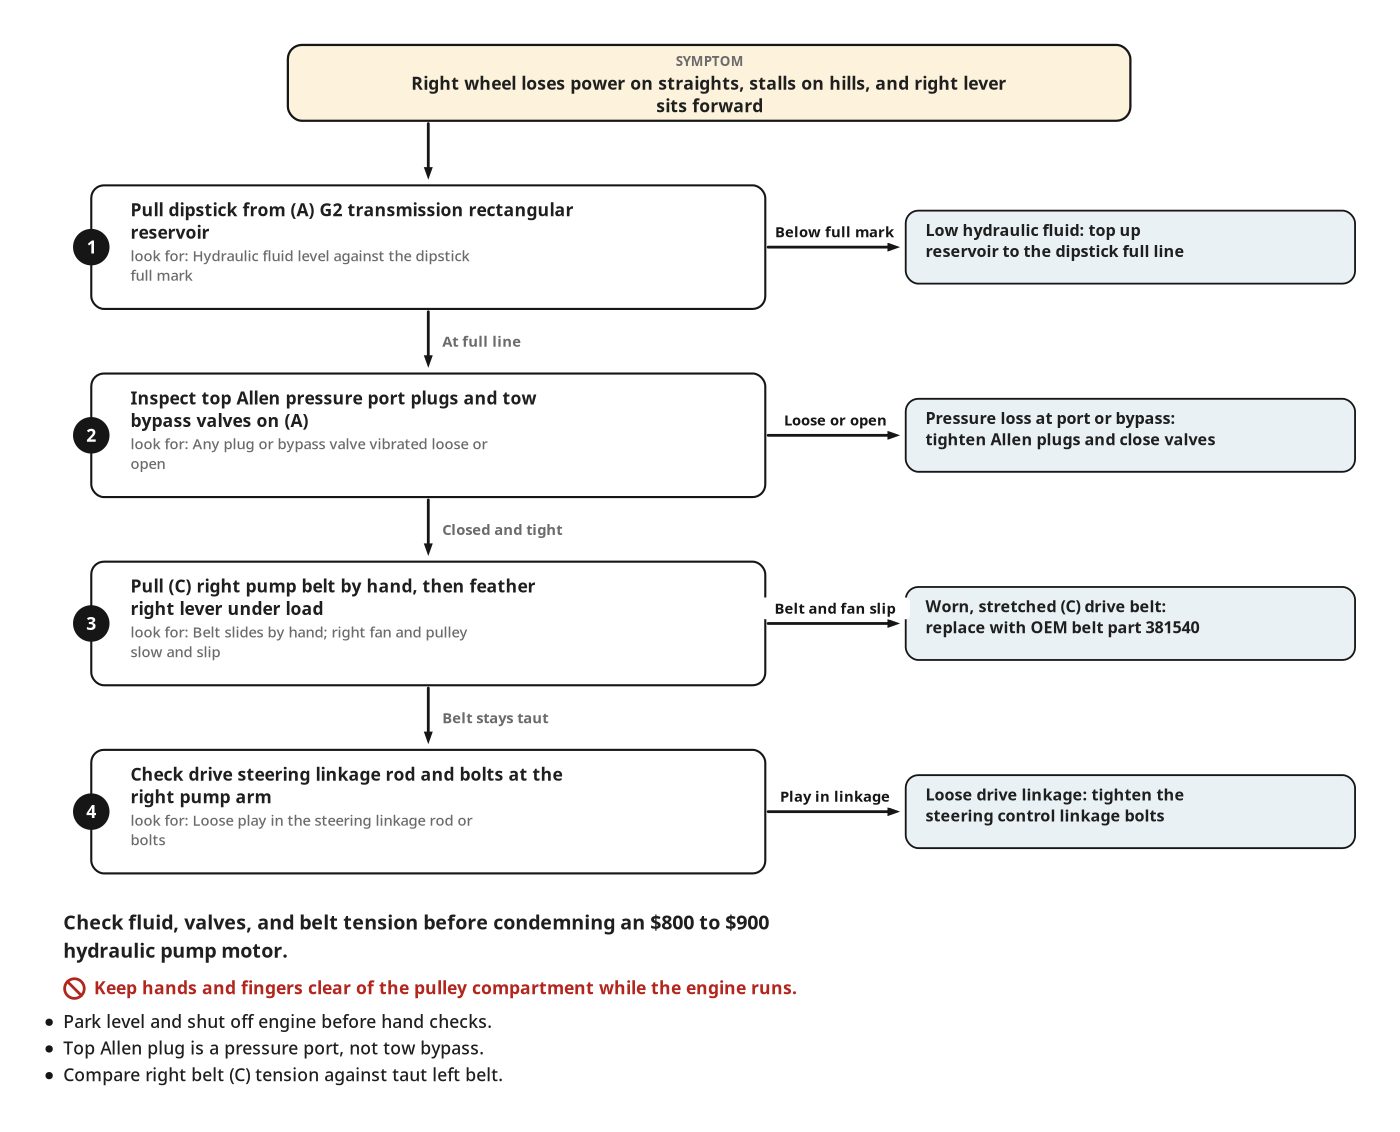
- Hydraulic fluid level: at reservoir dipstick full line
- Tip: Check hydraulic fluid, bypass valves, and belt tension before condemning an $800 to $900 pump motor.
- Tip: Compare the suspect right belt to the taut left belt by hand-pulling each.
- Heads up: Keep hands and fingers clear of the pulley compartment while the engine runs.
- Heads up: Stand clear of tires; lightly feather the steering lever with the seat switch bypassed.
Before you move on: Reservoir full, top plugs tight, and right belt visibly slipping under load.
Step 2: Unbolt the Drive Coupling and Remove the Old Belt
Check steering linkages are tight, open the drive shaft coupling gap, and remove the stretched belt.
Parts in this step: (A) G2 hydrostatic transmission, (B) Drive shaft coupling, (C) Hydraulic pump drive belt
You'll need: Socket wrench, Combination wrench, Drive shaft coupling bolt
- 2.1 Locate the drive shaft coupling bolts and check drive linkages
- Shut off the engine; park in a shaded, level workspace.
- Wiggle the steering control linkage rods atop G2 hydrostatic transmission (A) to check for play.
- Verify no linkage bolts are loose or disconnected where the rod meets the right pump arm.
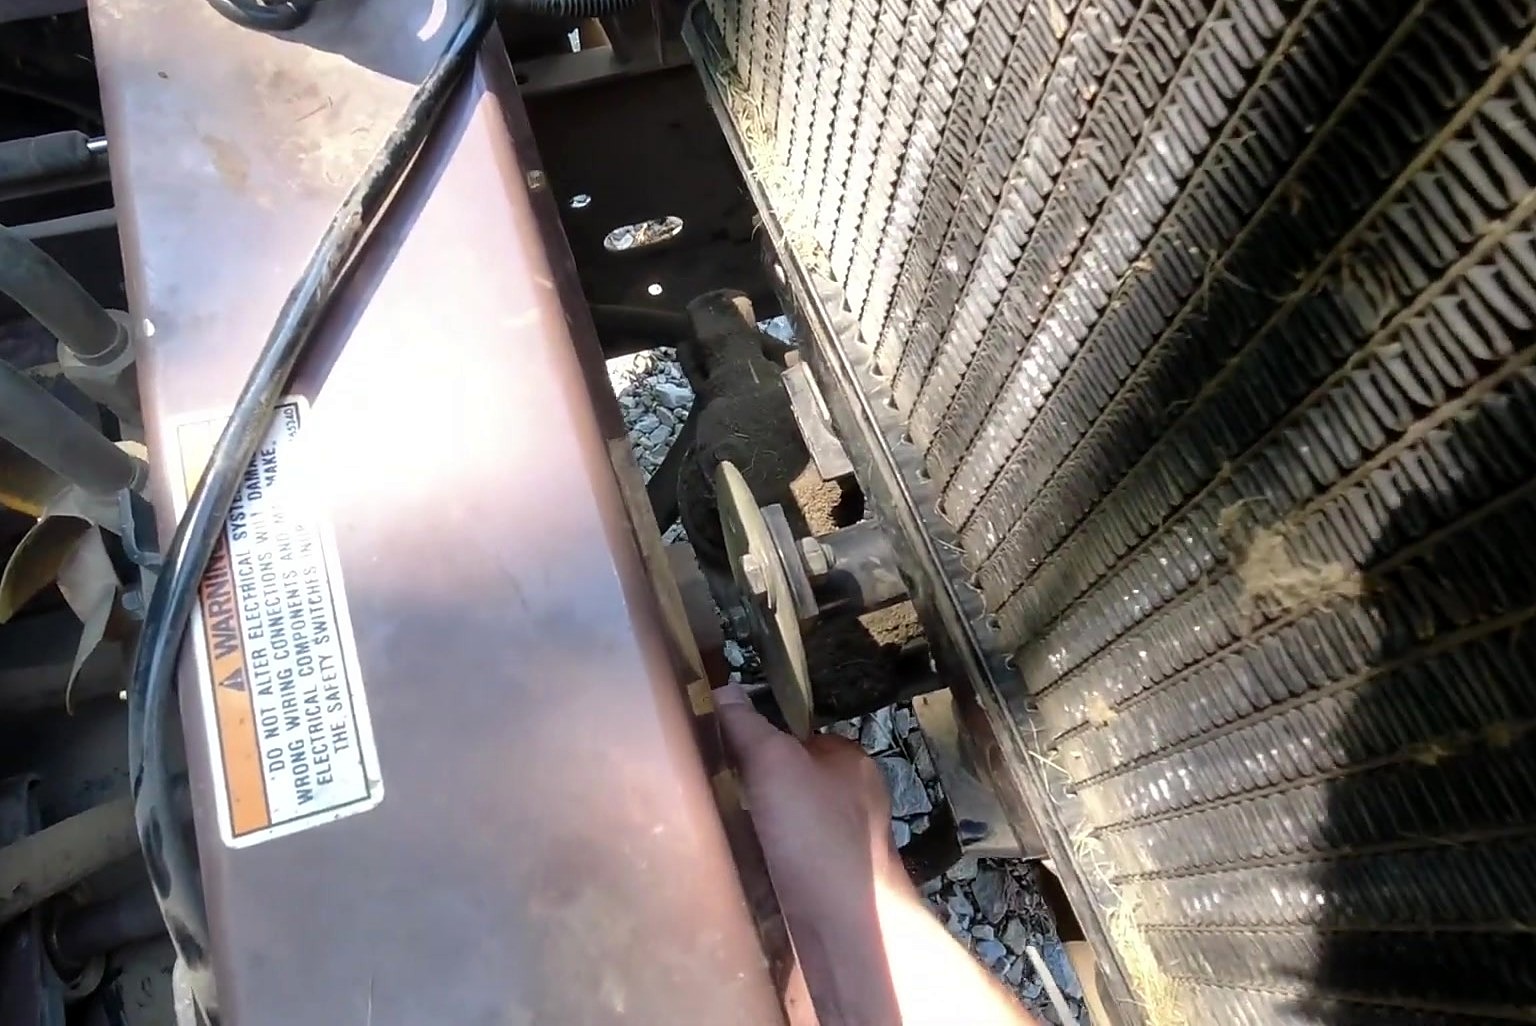
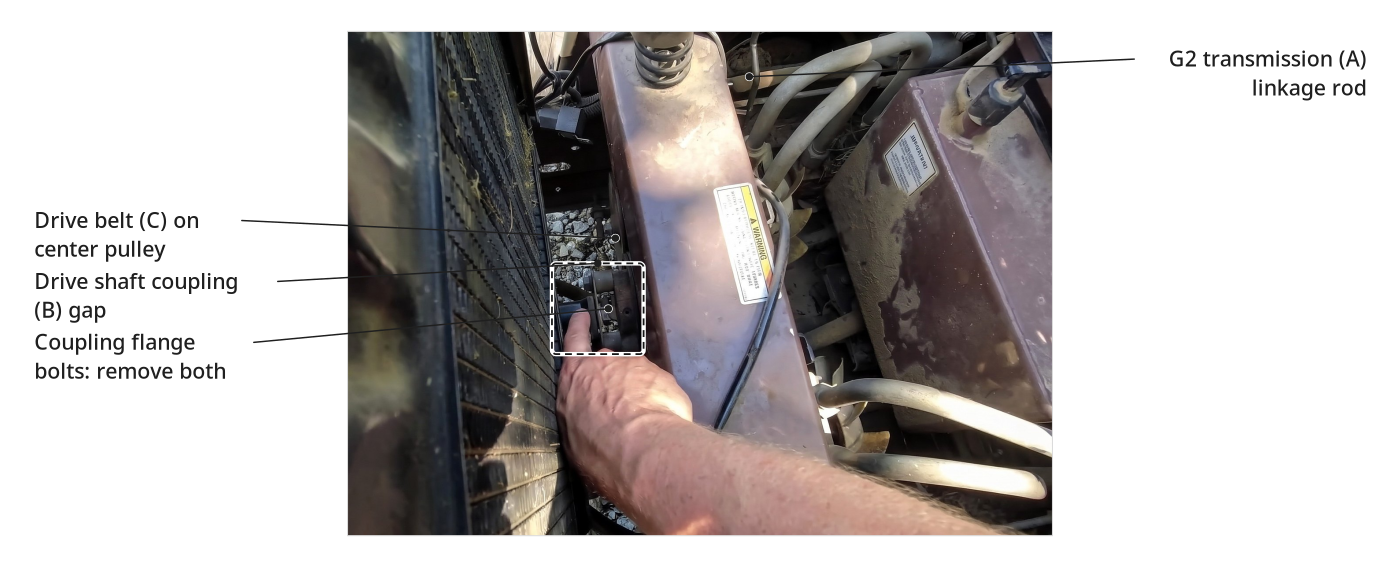
- Find the two drive shaft coupling (B) bolts directly behind the radiator.
- 2.2 Remove the two drive shaft coupling bolts
- Fit a socket wrench and combination wrench onto both coupling bolts and nuts.
- Bolt head size is not stated: pick the socket and wrench that fit snugly.
- Remove both drive shaft coupling bolts.
- Separate the coupling faces slightly to open a center drive shaft gap.
- 2.3 Walk the worn belt off the pulley and out through the coupling gap
- Grab the loose right hydraulic pump drive belt (C) one-handed without releasing the belt tensioner.
- Pull the belt toward the outer pulley rim while hand-turning the pulley.
- Walk the stretched belt off the pump and center pulleys.
- Slide the old belt out through the unbolted drive shaft coupling gap.
Key measurements
- Drive shaft coupling fasteners: 2 bolts behind radiator
- Tip: A stretched belt walks off the pulley rim by hand without loosening the tensioner.
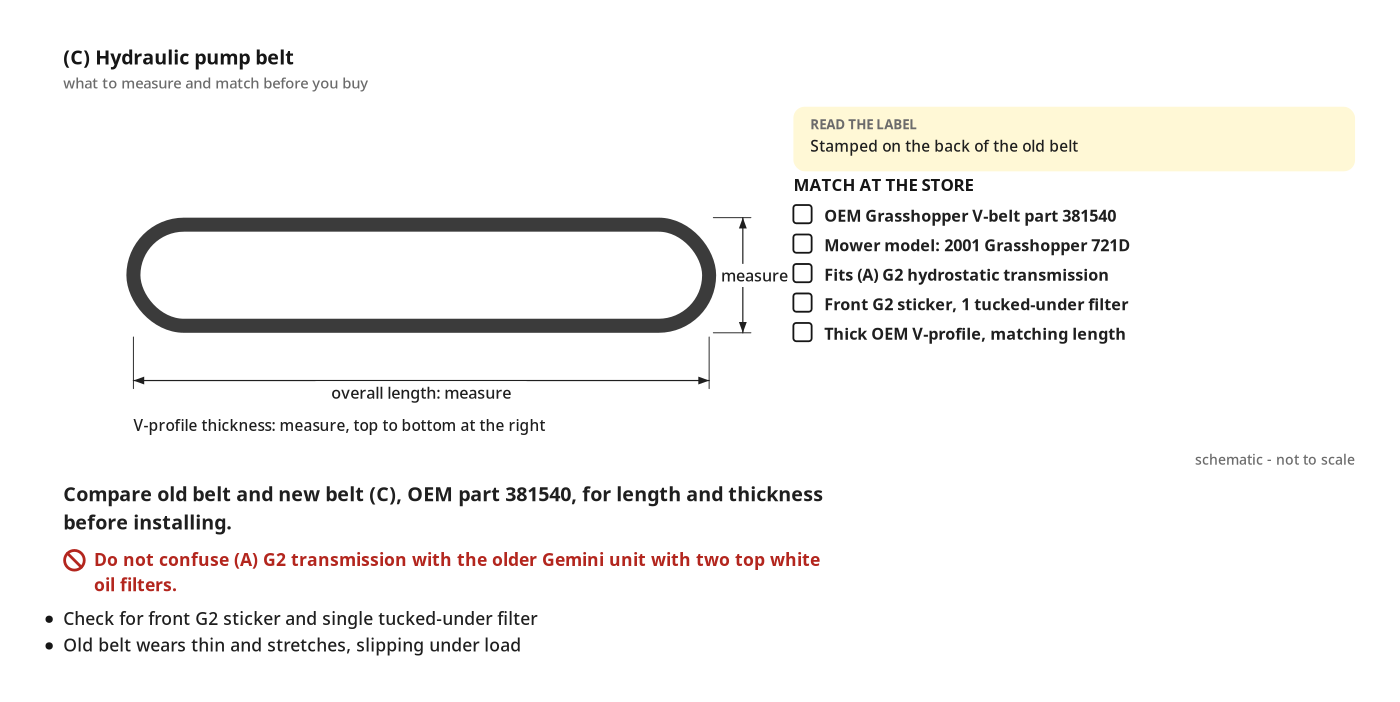
- Tip: Check the old belt back for stamped part number 381540.
Before you move on: Both coupling bolts out, steering linkage tight, and old belt clear of the shaft.
Step 3: Install the New Belt and Reconnect the Coupling
Seat the new OEM belt on both pulleys, re-bolt the drive shaft coupling, and check engagement.
Parts in this step: (A) G2 hydrostatic transmission, (B) Drive shaft coupling, (C) Hydraulic pump drive belt
You'll need: Socket wrench, Combination wrench, Hydraulic pump drive belt, Drive shaft coupling bolt
- 3.1 Route and seat the new belt onto the pulleys
- Compare old belt and new hydraulic pump drive belt (C), OEM part 381540, for length and thickness.
- Pass the new belt through the open drive shaft coupling (B) gap.
- Seat the belt V-profile fully in the right pump pulley groove first.
- Stretch and roll the belt onto the center pulley, keeping fingers clear of the rim.
- 3.2 Reinstall and tighten the two drive coupling bolts
- Align the two drive shaft coupling flange bolt holes.
- Insert both coupling bolts through the flange holes and hand-thread the nuts.
- Hold each nut with the combination wrench; firmly tighten both bolts with the socket wrench.
- Torque is not stated: tighten until the coupling faces cannot shift.
- 3.3 Start the engine, verify belt engagement, and lower the seat
- With the seat tilted up, start the engine and watch the new belt run on G2 hydrostatic transmission (A).
- Push the right steering lever slightly forward and back to check immediate wheel engagement without belt slip.
- Fold the mower seat down over the transmission compartment.
Key measurements
- Replacement OEM belt: Grasshopper part 381540
- Drive shaft coupling fasteners: 2 bolts tightened firmly
- Tip: Pass the belt through the coupling gap before bolting the shaft, or it cannot reach the center pulley.
- Heads up: Keep fingers out of the pinch point between the tight new belt and pulley groove.
- Heads up: Brace your hand when pulling wrenches near radiator fins so a slipping tool does not cut your knuckles.
Before you move on: New belt sits squarely in both pulley grooves; both drive shaft coupling bolts are tight.
Step 4: Test Drive and Hill Climb Verification
Check the new belt restores balanced tracking and full forward and reverse climbing power.
Parts in this step: (A) G2 hydrostatic transmission, (C) Hydraulic pump drive belt
- 4.1 Test zero-turn spins and straight tracking on gravel
- From the operator seat, drive onto level gravel.
- Push both steering levers evenly forward and reverse; check G2 hydrostatic transmission (A) tracks straight.
- Do tight zero-turn spins both ways to check right wheel power matches left.
- 4.2 Test forward and reverse hill climbing on a steep incline
- Drive up a steep dirt incline and stop midway.
- Engage the right drive motor from the incline standstill to check hydraulic pump drive belt (C) holds without slipping.
- Reverse all the way up the steep incline to check full hydraulic load capacity.
- Tip: Stopping mid-hill and backing up a steep incline maximizes right pump belt load.
Before you move on: Mower climbs a steep incline forward and reverse with steering levers even.
Finishing
Last Touches
- Log part 381540 for future maintenance, then discard the stretched belt.
- Check seat latches cleanly and seat safety switch works.
Care
- Periodically check reservoir dipstick hydraulic fluid and compare left and right pump belt tension.
- Always install the thicker OEM Grasshopper belt; thin aftermarket belts stretch early.
Alternatives
- If an older mower has a one-piece Gemini transmission (two top white filters), upgrade to the split G2 platform rather than rebuild.
Prove the fix
| Check | What you should see | If not |
|---|---|---|
| Lift the seat, run the engine, and feather the right steering lever forward. | Right pump pulley and cooling fan spin continuously without stalling or belt slip. | Recheck the belt sits in both pulley grooves and steering linkages are not loose. |
| Drive forward and reverse on level gravel with steering levers aligned. | Mower tracks straight and spins evenly both ways. | |
| Climb a steep incline forward, stop and restart mid-hill, then reverse up the incline. | Right drive wheel pulls up the slope forward and reverse without losing power. |
These Specs are built from Indy Farm Life's video “Grasshopper 721D Mower Transmission Troubleshooting and Drive Belt Replacement”. Open the Grasshopper 721D Mower Transmission Troubleshooting and Drive Belt Replacement project page.
