Spetz Specs No. 5609: step-by-step build guide
Freestanding Wood-Sided Outdoor Shower with Rain Head
The complete step-by-step guide made from Indy Farm Life's YouTube video, free on Spetz. For the video, a step-by-step player and answers to your questions, see the Freestanding Wood-Sided Outdoor Shower with Rain Head project page.
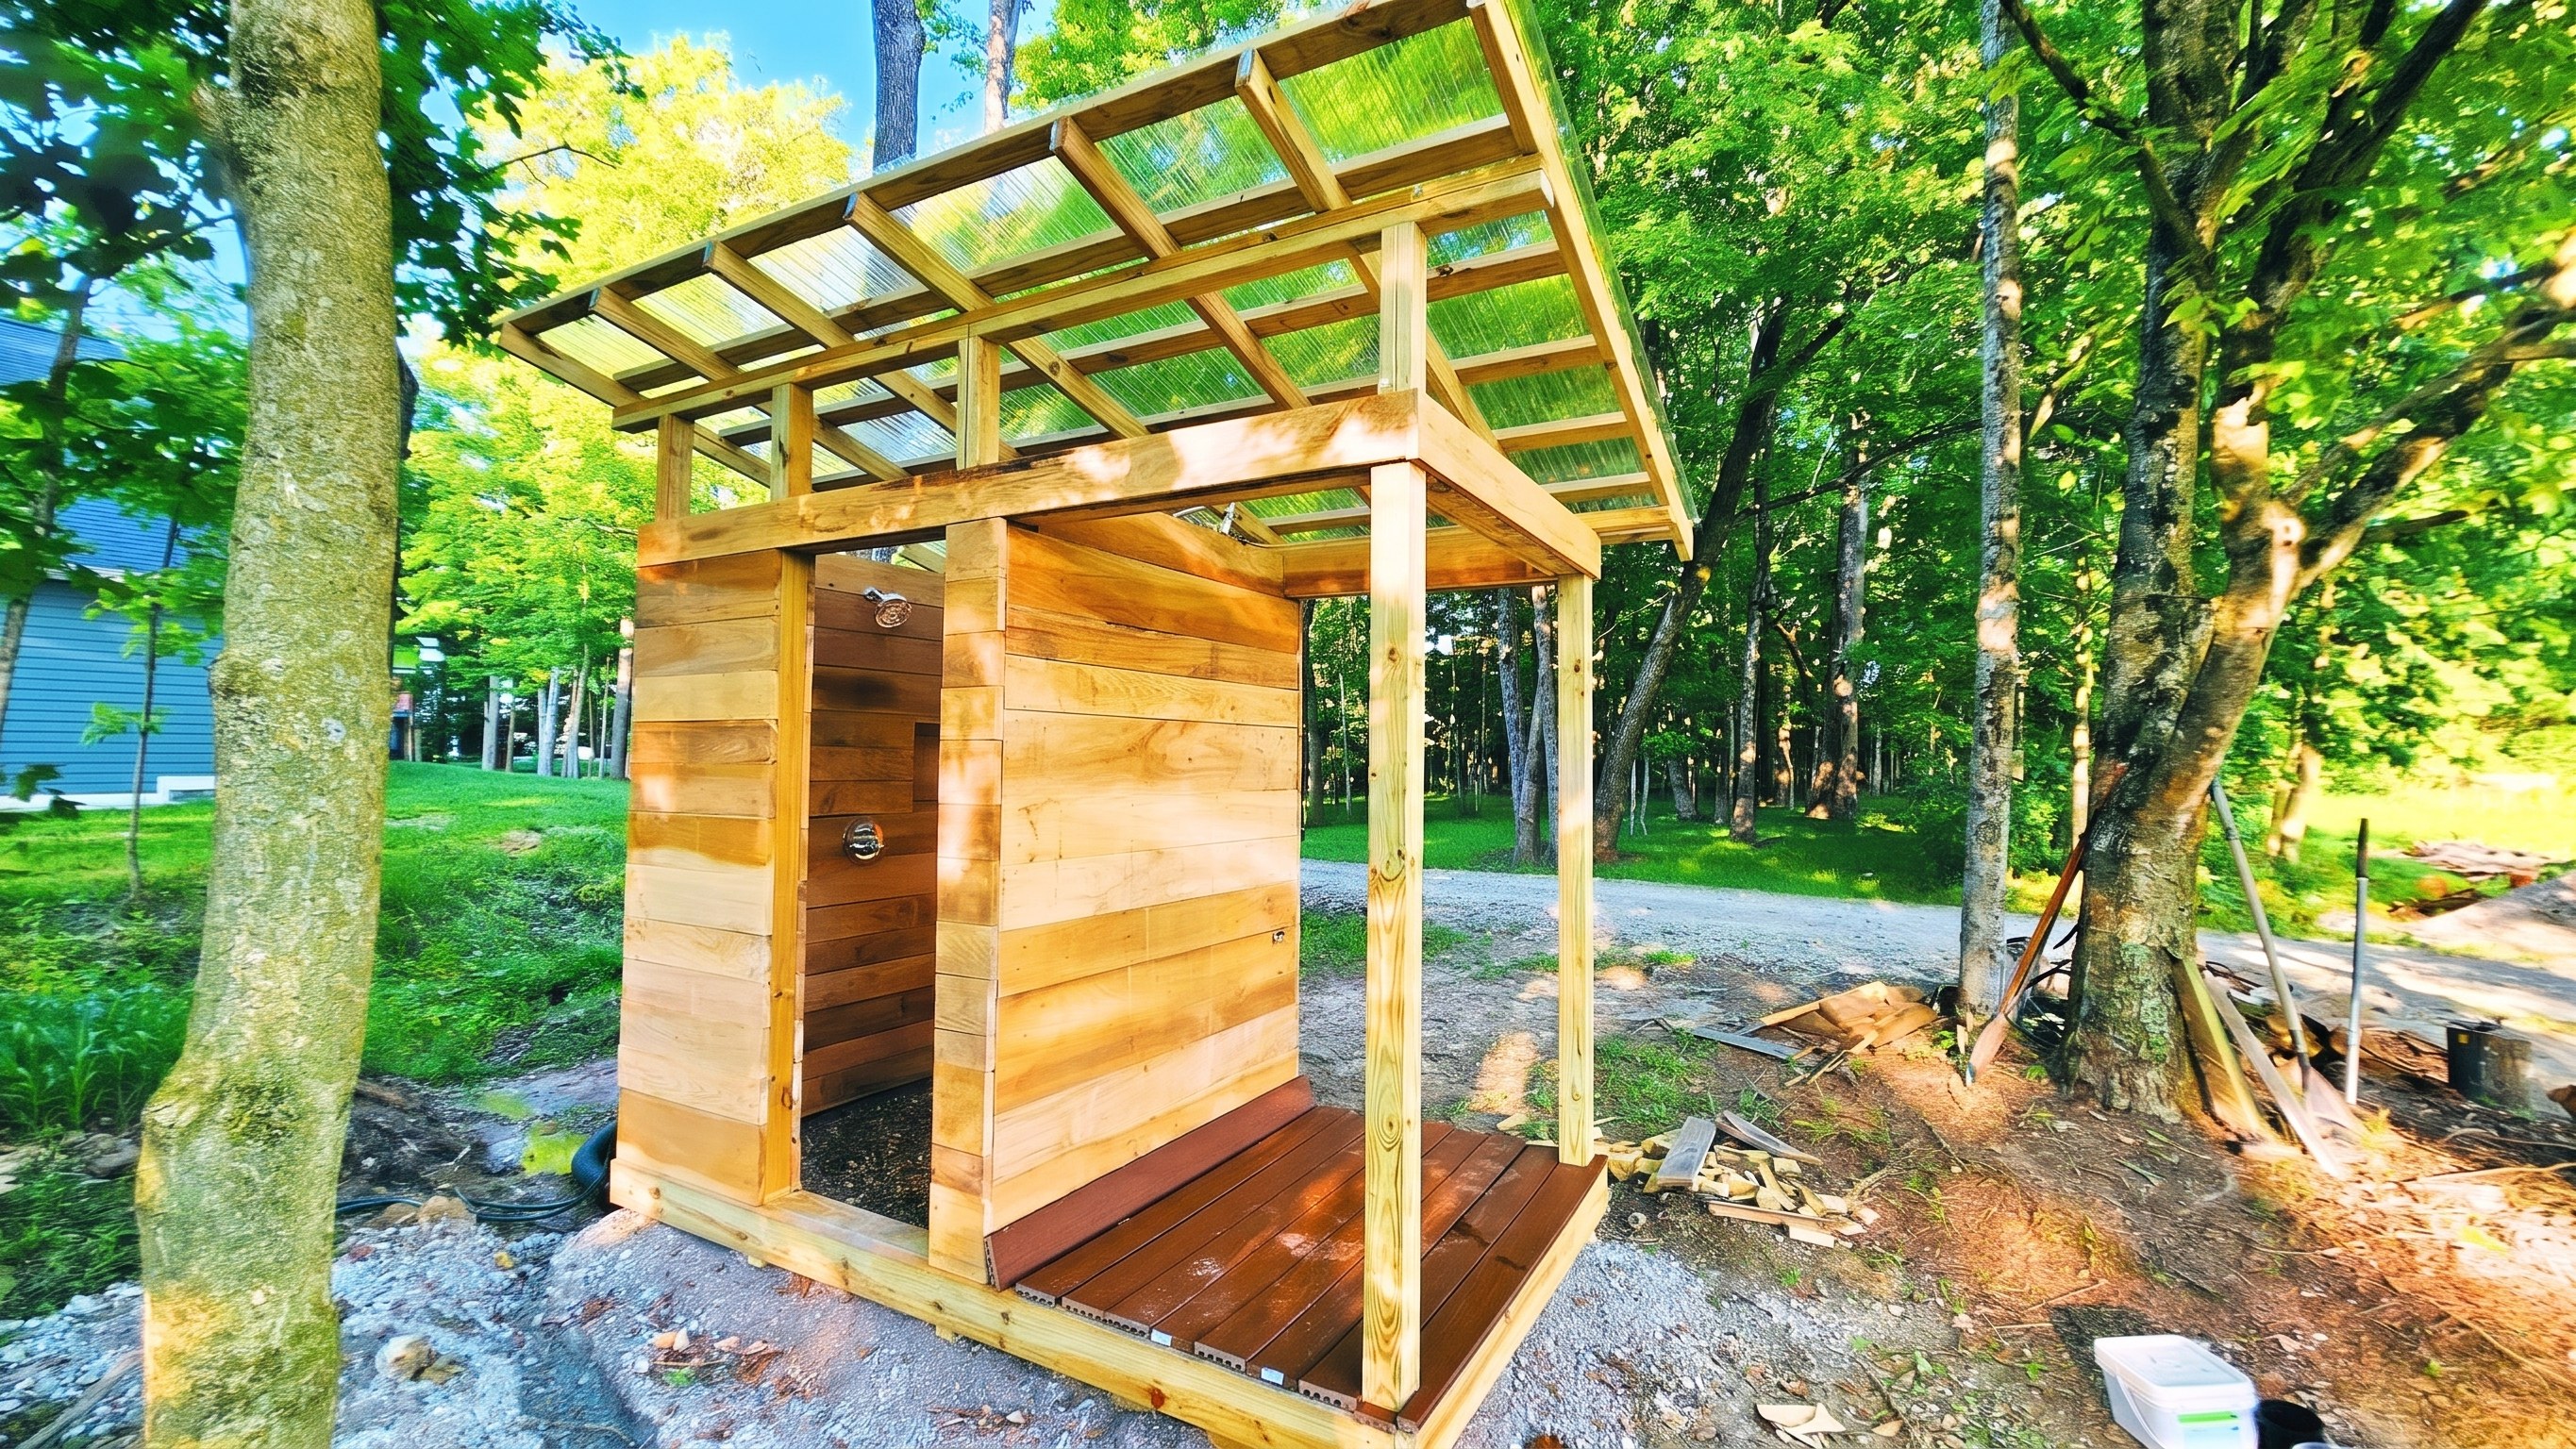
7 steps, 16 parts, 13 tools, 24 materials
Overview
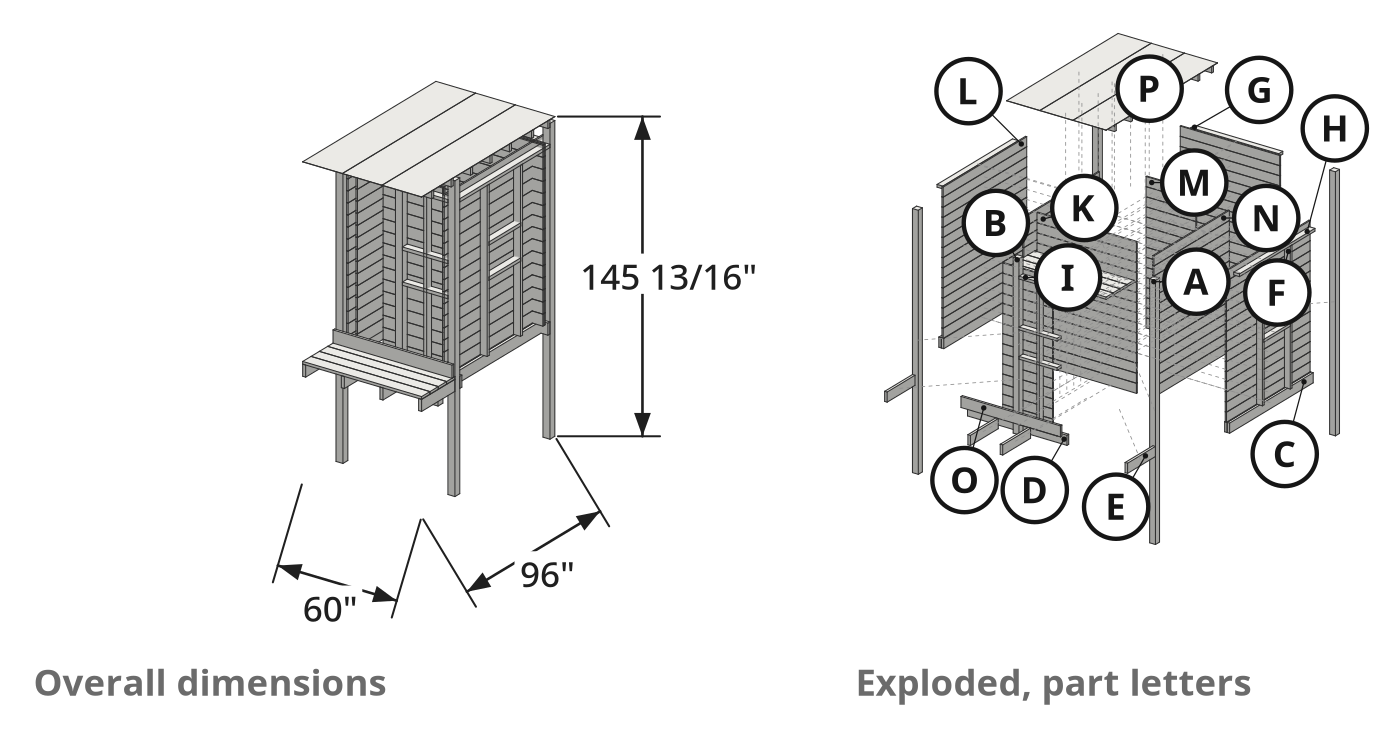
Finished size: 60 in W x 96 in D x 90 in H
What You're Building
- Build a freestanding 60 in by 96 in wood-sided outdoor shower.
- Plumb a three-way diverter to a wall shower head, rain head, and hose bib.
- Drain through a pan-free #8 river rock floor and French drain pipes.
Why This Design Works
- Set pre-wrapped drainage pipes on sloped #53 limestone to skip a concrete slab.
- Feed plumbing via three above-ground garden hoses and basement drain valves.
- Top 2x4 roof purlins with clear polycarbonate panels to block leaves yet admit light.
What It Takes
- Plan several evenings for digging, hauling gravel, framing, PEX crimping, and nailing siding.
- Use a miter saw, circular saw, framing nailer, impact driver, post hole digger, and sprayer.
- Move aggregate with a tractor loader or by hand with a shovel.
What Decides Success
- Grade the limestone sub-base to slope continuously toward the drainage ditch.
- Set and brace four 4x4 corner posts square before nailing wall framing.
Health and safety
Saws, Nailer, and Impact Driver
- Wear eye and hearing protective equipment when operating the miter saw, circular saw, cordless framing nailer, and impact driver.
- Let the sliding miter saw and circular saw blades come to a complete stop before lifting the saw or moving stock.
- Keep hands clear of the fastener path and never point the cordless framing nailer toward yourself or anyone else.
- Support 2x4 framing lumber, composite decking boards, and polycarbonate roof panels securely during cuts to prevent blade binding and kickback.
Wood Preservative and Treated Lumber
- Wear skin and eye protective equipment and chemical-resistant gloves when applying fungicide and termiticide wood preservative with the pump sprayer.
- Do not breathe spray mist; wear a cartridge respirator and maintain airflow when spraying clear wood preservative inside the shower stall.
- Wear a dust mask when cutting pressure-treated posts, pressure-treated 2x6 lumber, and composite decking to avoid inhaling chemical or plastic dust.
- Wash hands and exposed skin with soap and water after handling pressure-treated lumber or spraying clear wood preservative.
Excavation, Aggregate, and Tractor Work
- Verify the location of buried power, gas, and water lines before digging the three-foot-deep post holes.
- Keep bystanders clear of the tractor and carry the front-end loader bucket low when transporting #53 limestone and #8 gravel.
- Bend at the knees and lift with a helper when placing heavy stone hearthstones and setting 4x4 pressure-treated posts.
- Wear heavy work gloves and sturdy boots when operating the steel hand tamper, post hole digger, and rough-sawn 1x lumber.
Ladder Work and Structural Stability
- Place the step ladder and aluminum multi-position ladder on stable, level ground before installing roof rafters, purlins, and polycarbonate panels.
- Keep your hips between the ladder rails and never overreach when fastening overhead rain head plumbing or washered roofing screws.
- Compact the three-foot post holes thoroughly and brace the 4x4 posts and 2x4 walls to withstand wind and weather.
Tools
- Shovel (round-point shovel)
- Post hole digger (manual clamshell post hole digger)
- Hand tamper (manual steel tamper)
- Pump sprayer (handheld tank sprayer)
- Tractor with front-end loader (compact utility tractor, John Deere) (optional)
- Miter saw with stand (sliding compound miter saw)
- Ladder (step ladder and multi-position aluminum ladder)
- Level (spirit level)
- Cordless framing nailer (battery-powered framing nailer, DeWalt)
- Circular saw (cordless circular saw, DeWalt)
- Impact driver (cordless impact driver, DeWalt)
- Speed square (rafter square)
- Tape measure (retractable tape measure)
Materials
- Garden hoses (3, water supply hoses)
- Quarter-turn ball valves (brass quarter-turn hose bibs and shutoff valves)
- Pressure-treated posts (pressure-treated lumber, 4x4x12 ft)
- #53 limestone gravel (crushed limestone aggregate, #53)
- 2x6 framing lumber (pressure-treated dimensional lumber, 2x6)
- Pre-wrapped drainage pipe (3, aggregate-free French drain pipe)
- #8 gravel (river rock gravel, #8)
- Hearthstones (9, stone floor slabs)
- Shower rough-in valve (shower mixing and 3-way diverter rough-in valve, Delta)
- Shower valve trim kit (shower valve and diverter trim kit, Delta, chrome)
- Rough-sawn 1x lumber (rough-sawn wood boards, 1x)
- Corrugated drain pipe (flexible perforated drainage pipe)
- Drainage pipe end caps (plastic pipe caps)
- 2x4 framing lumber (dimensional framing lumber, 2x4)
- PEX tubing (cross-linked polyethylene plumbing pipe, 1/2 in for hot/cold lines, 3/4 in for well water line, 1/2 in, 3/4 in)
- PEX fittings and garden hose adapters (brass PEX crimp fittings and garden hose adapters)
- Shower heads and shower arm (wall-mounted shower head and overhead rain shower head, Delta, chrome)
- Composite decking boards (composite deck boards, Trex)
- Corrugated polycarbonate roof panels (clear corrugated polycarbonate roofing)
- Clear wood preservative (2 gallons, penetrating fungicide, termiticide, and wood preservative, Nisus, PenaShield, clear)
- Car siding boards (tongue-and-groove wood siding)
- Framing and siding nails (collated nails)
- Exterior structural wood screws (exterior wood screws, Grip-Rite)
- Washered roofing screws (roofing screws with sealing washers)
Hardware
| Hardware | Size | Count | Used in steps |
|---|---|---|---|
| Framing and siding nails | 2, 3, 4, 5, 6, 7 | ||
| Exterior structural wood screws | 5 | ||
| Washered roofing screws | 6 |
Cut list
| Part | Name | Qty | Size | Notes |
|---|---|---|---|---|
| A | Corner post | x4 | 3 1/2" (T) × 3 1/2" (W) × 144" (H) | Set 3 ft deep into post holes; approximately 1.5 ft of additional post height is buried when bringing the base up to grade. |
| B | Doorway partition post | x1 | 3 1/2" (T) × 3 1/2" (W) × 96" (H) | Set into a hole dug against the 2x6 threshold to leave a 30 in doorway opening; fastened to the base framing and upper cross brace with structural screws. |
| C | Base side containment board | x4 | 1 1/2" (T) × 5 1/2" (W) × 72" (L) | Installed two boards high on the inside of the 4x4 posts along both left and right sides to retain #8 gravel. |
| D | Base crossmember | x2 | 1 1/2" (T) × 5 1/2" (W) × 60" (L) | Spans across the width of the structure to separate the entryway from the interior shower bay and retain gravel. |
| E | Entryway floor joist and blocking | x4 | 1 1/2" (T) × 5 1/2" (W) × 24" (L) | Framed into a grid across the entryway floor bays outside the shower stall to support the composite decking and retain gravel. |
| F | Wall stud | x8 | 1 1/2" (T) × 3 1/2" (W) × 78" (H) | Installed vertically between the 4x4 corner posts (2 studs on the rear plumbing wall, 3 on the left side wall, and 3 on the right side wall). |
| G | Rear wall horizontal plate | x2 | 1 1/2" (T) × 3 1/2" (W) × 53" (L) | Fits horizontally between the rear 4x4 corner posts for the rear plumbing wall framing. |
| H | Side wall top plate | x2 | 1 1/2" (T) × 3 1/2" (W) × 65" (L) | Spans horizontally between the front and rear 4x4 corner posts on the left and right walls. |
| I | Front partition and niche framing member | x6 | 1 1/2" (T) × 3 1/2" (W) × 23" (L) | Horizontal framing and recessed wall niche blocking between the front corner post and the doorway partition post. |
| J | Roof purlin | x7 | 1 1/2" (T) × 3 1/2" (W) × 60" (L) | Spaced 16 in on center across the roof framing to support the corrugated polycarbonate roof panels. |
| K | Rear wall rough-sawn siding board | x30 | 3/4" (T) × 5 1/2" (W) × 60" (L) | Rough-sawn 1x boards of varying widths nailed horizontally from the bottom up without spacers on the rear exterior wall and interior plumbing wall. |
| L | Side wall exterior rough-sawn siding board | x30 | 3/4" (T) × 5 1/2" (W) × 72" (L) | Rough-sawn 1x boards of varying widths nailed horizontally without spacers across the left and right exterior walls. |
| M | Front partition rough-sawn siding board | x30 | 3/4" (T) × 5 1/2" (W) × 30" (L) | Nailed horizontally across the exterior and interior faces of the front partition wall and trimmed around the recessed niche. |
| N | Interior side wall car siding board | x28 | 3/4" (T) × 5 1/2" (W) × 65" (L) | Tongue-and-groove car siding boards installed horizontally across the left and right interior shower stall walls. |
| O | Entryway deck board | x5 | 1 1/4" (T) × 6" (W) × 60" (L) | Fitted over the 2x6 entryway floor framing; rear board ripped to width and corners notched around the 4x4 posts. |
| P | Corrugated polycarbonate roof panel | x3 | 1/16" (T) × 20" (W) × 96" (L) | Fastened to the seven 2x4 roof purlins with washered roofing screws. |
What to buy
- Buy 38 × 1x6 12 ft (Rough-sawn 1x lumber)
- Buy 14 × 1x6 12 ft (Car siding boards)
- Buy 11 × 2x4 12 ft (2x4 framing lumber)
- Buy 4 × 2x6 12 ft (2x6 framing lumber)
- Buy 5 × 4x4 12 ft (Pressure-treated posts)
- Buy 3 × 6 x 1 1/4 stock 10 ft (Composite decking boards)
- Buy 2 × Corrugated polycarbonate roof panels 4x8 sheet (Corrugated polycarbonate roof panels)

Before you start
Posts and Sub-Base
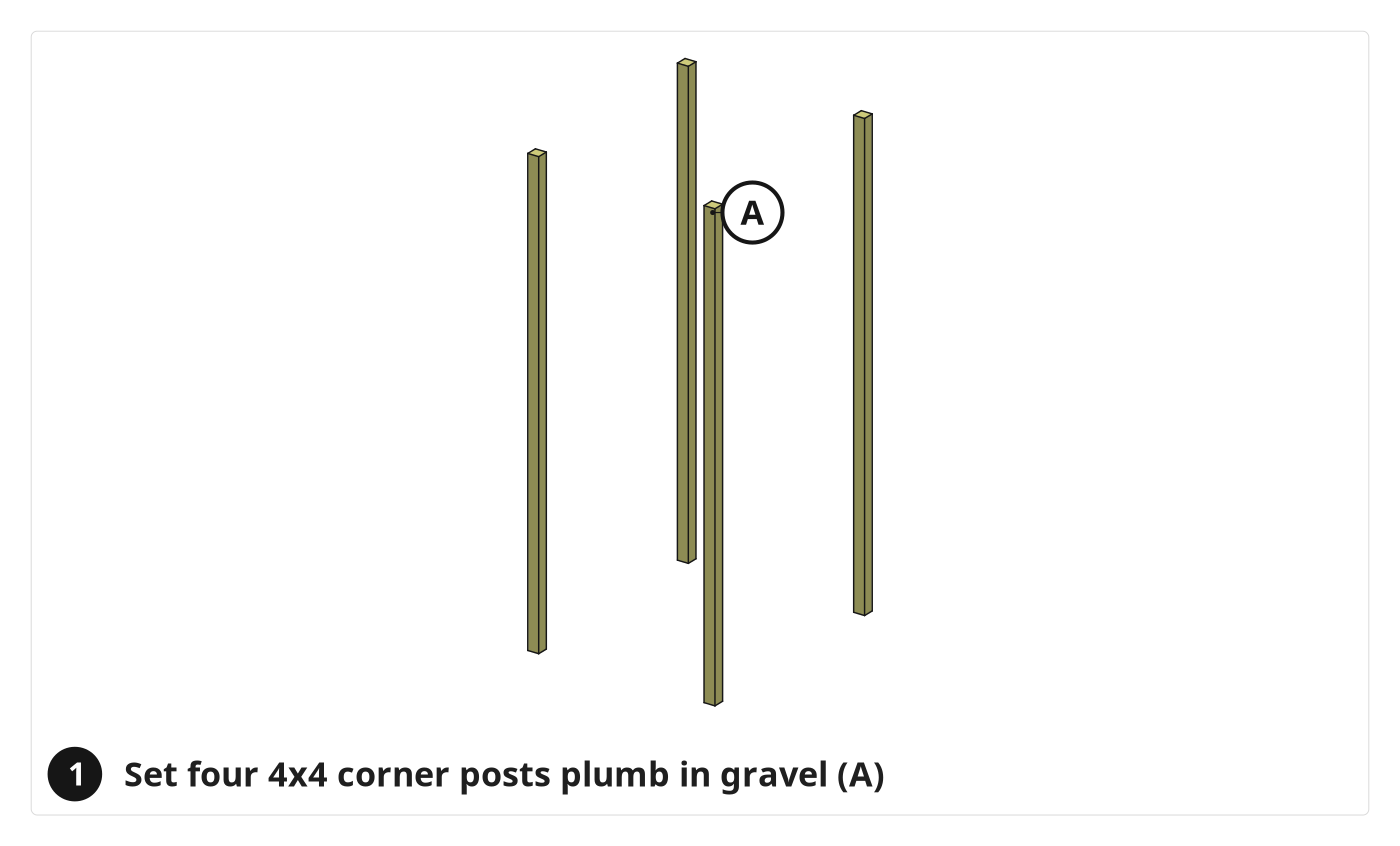
- Dig four 36 in deep holes for the 144 in corner posts (A) across a 60 in width.
- Measure diagonals to square the layout before backfilling with #53 limestone gravel.
- Compact backfill in lifts with a hand tamper to lock posts plumb.
- Rake #53 limestone between posts into an even slope toward the rear ditch.
Water Supply Setup
- Tee 1/2 in hot and softened cold PEX lines and a 3/4 in well line inside.
- Install basement shutoffs and low-point drain valves for winter draining.
- Mount exterior quarter-turn ball valves and run three garden hoses to the shower.
Step by step
Step 1: Lay out the drainage pipes
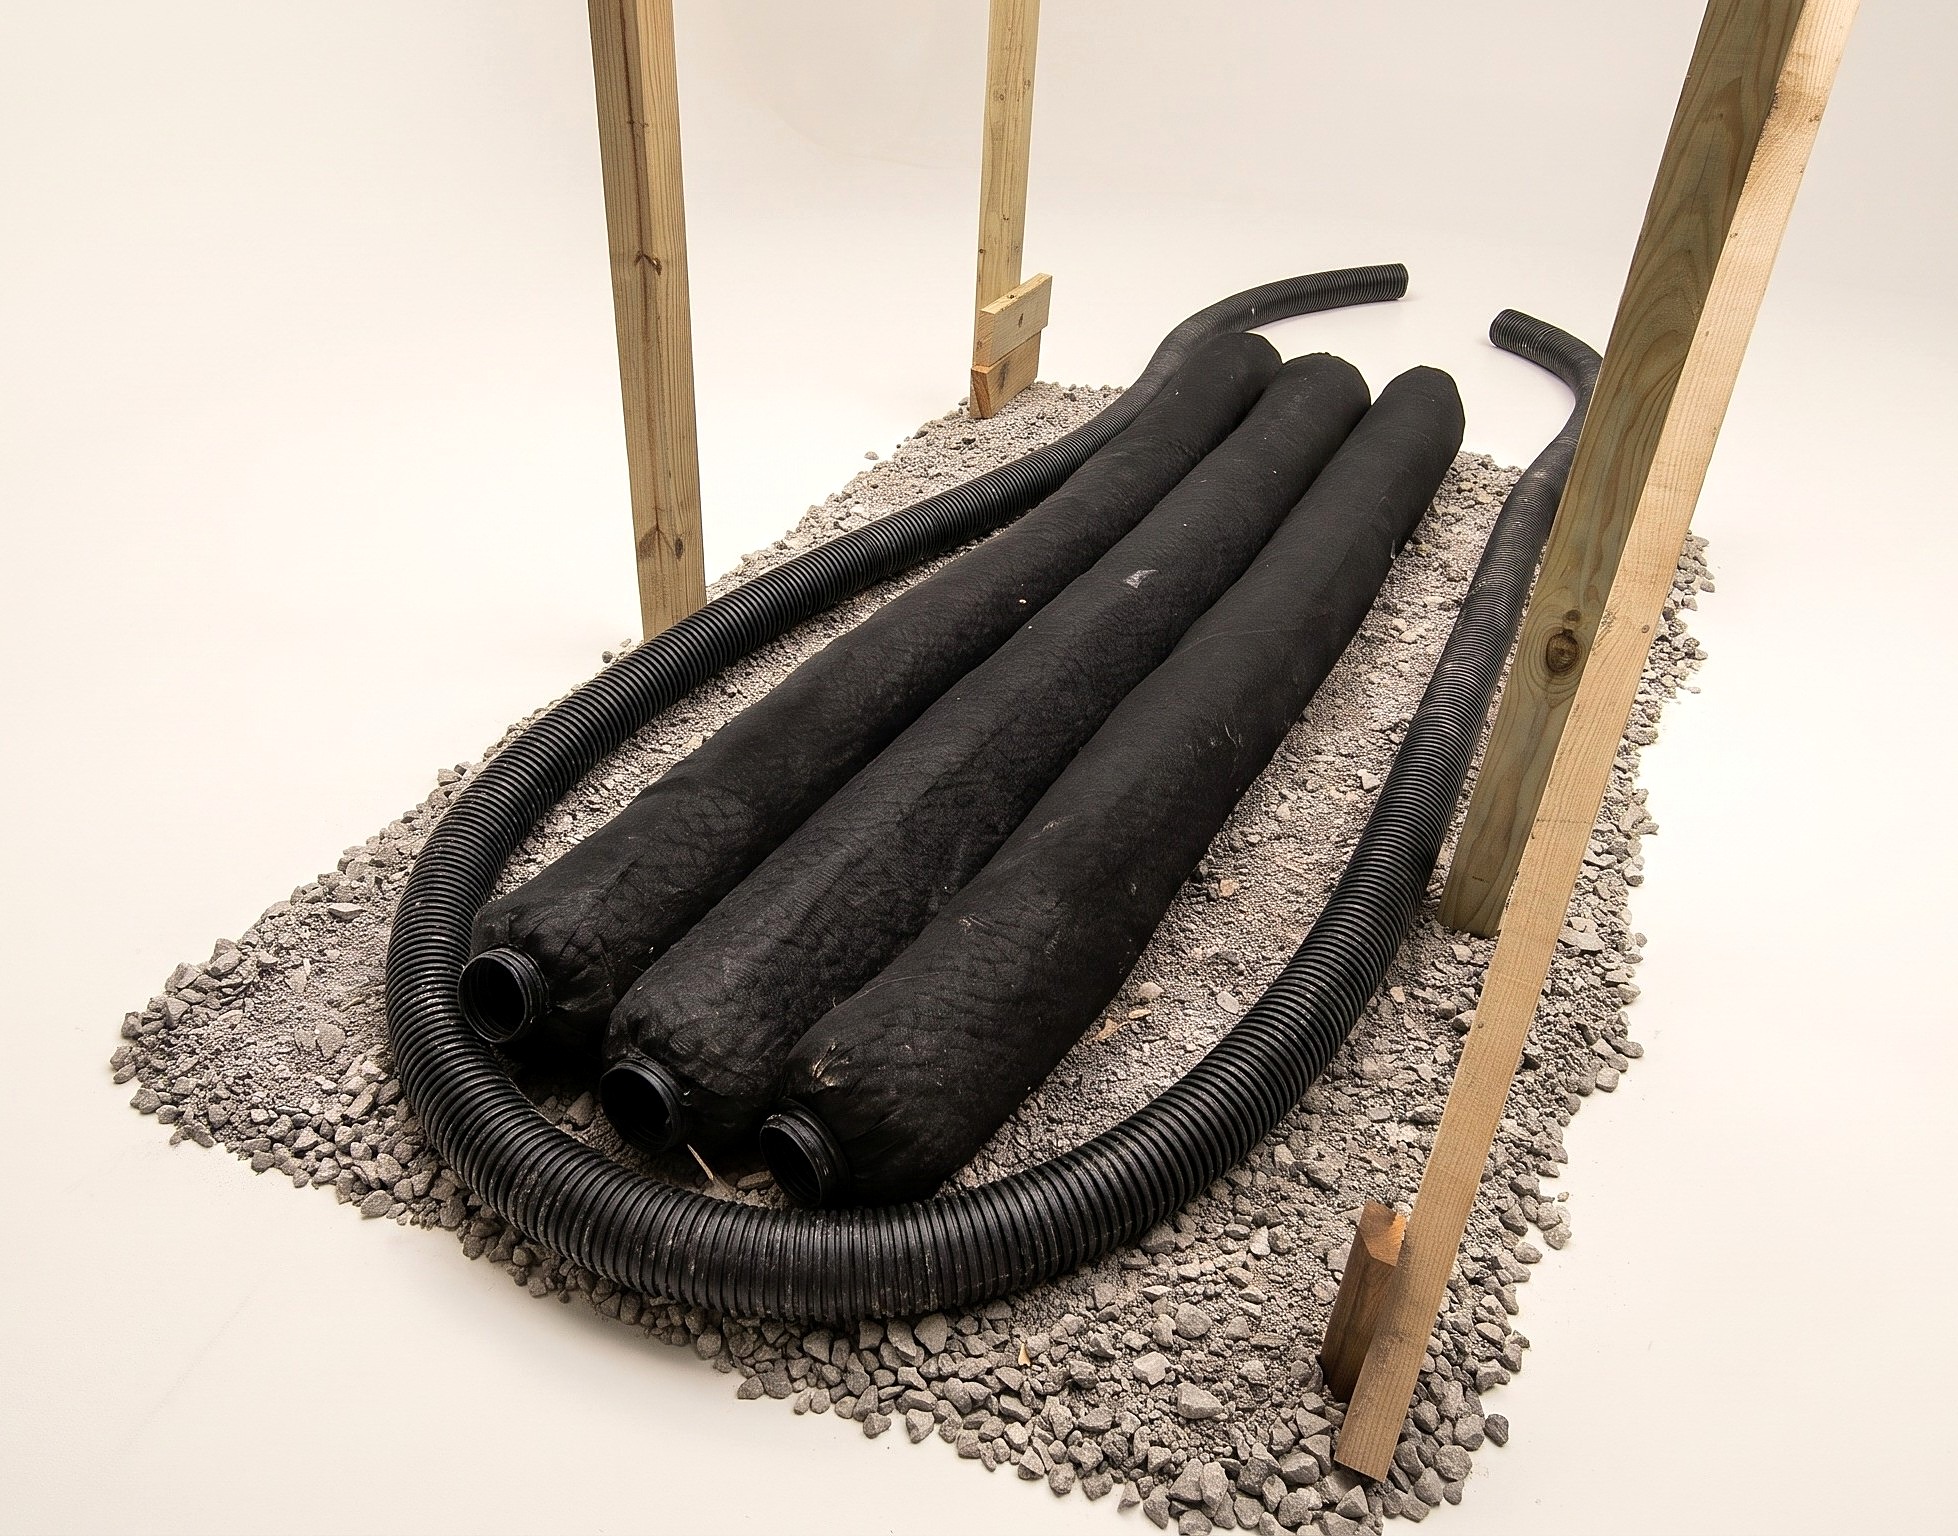
Three pre-wrapped French drain pipes span the sloped base between corner posts.
Parts in this step: (A) Corner post
You'll need: Shovel, Post hole digger, Hand tamper, Pressure-treated posts, #53 limestone gravel, Pre-wrapped drainage pipe, Corrugated drain pipe
- 1.1 Set the first pre-wrapped drainage pipe
- Set the first pre-wrapped drainage pipe between the corner posts (A).
- Lay the pipe on the sloped #53 limestone base toward the rear drainage ditch.
- Extend the rear end past back posts to discharge water away from the base.
- 1.2 Place the remaining two drainage pipes
- Set two more pre-wrapped drainage pipes side by side against the first.
- Span the full interior stall width with the three parallel pipes.
- Route flexible corrugated drain pipe from the outlets into the drainage ditch.
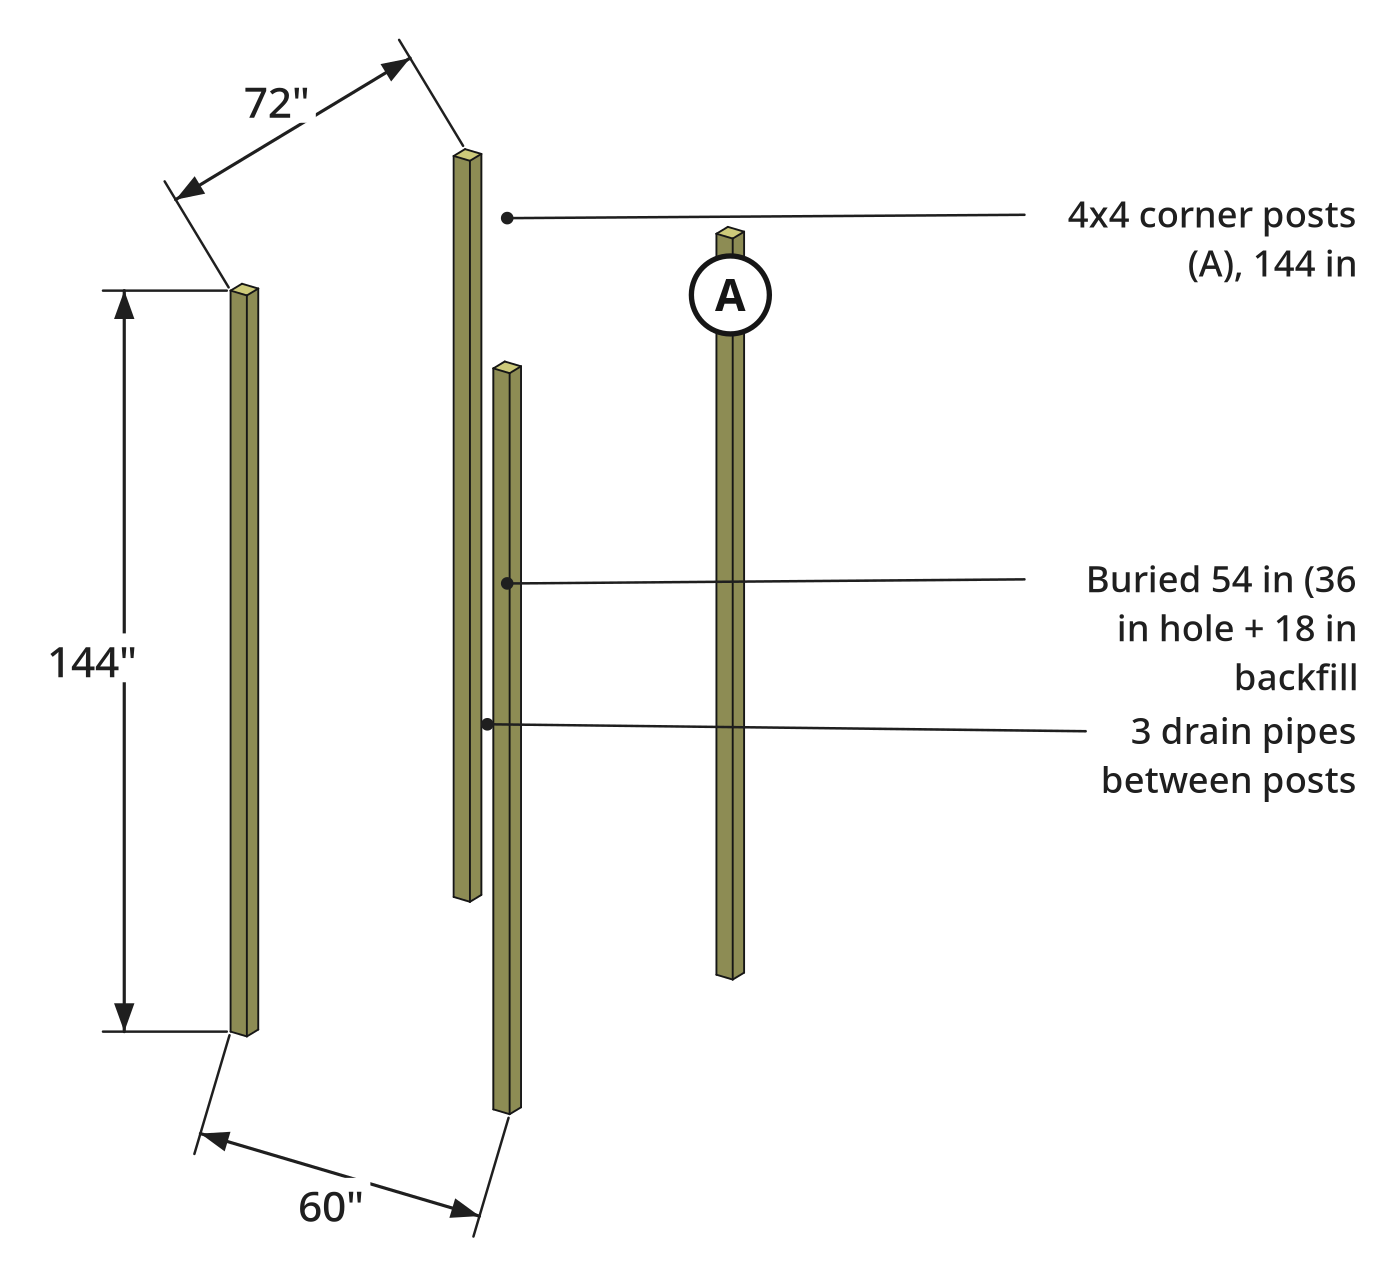
Key measurements
- Corner post hole depth: 36 in below grade
- Post buried in backfill after grading: 18 in additional
- Shower entrance width: 60 in across front corner posts
- Tip: Fill ground dips with #53 limestone so the drain pipes keep a steady fall.
Before you move on: Check the limestone bed and three drainage pipes slope continuously to the rear ditch with no belly.
Step 2: Backfill the perimeter and shower base with aggregate
2x6 containment box around the base: backfilled outside with #53 limestone, inside with #8 river rock.
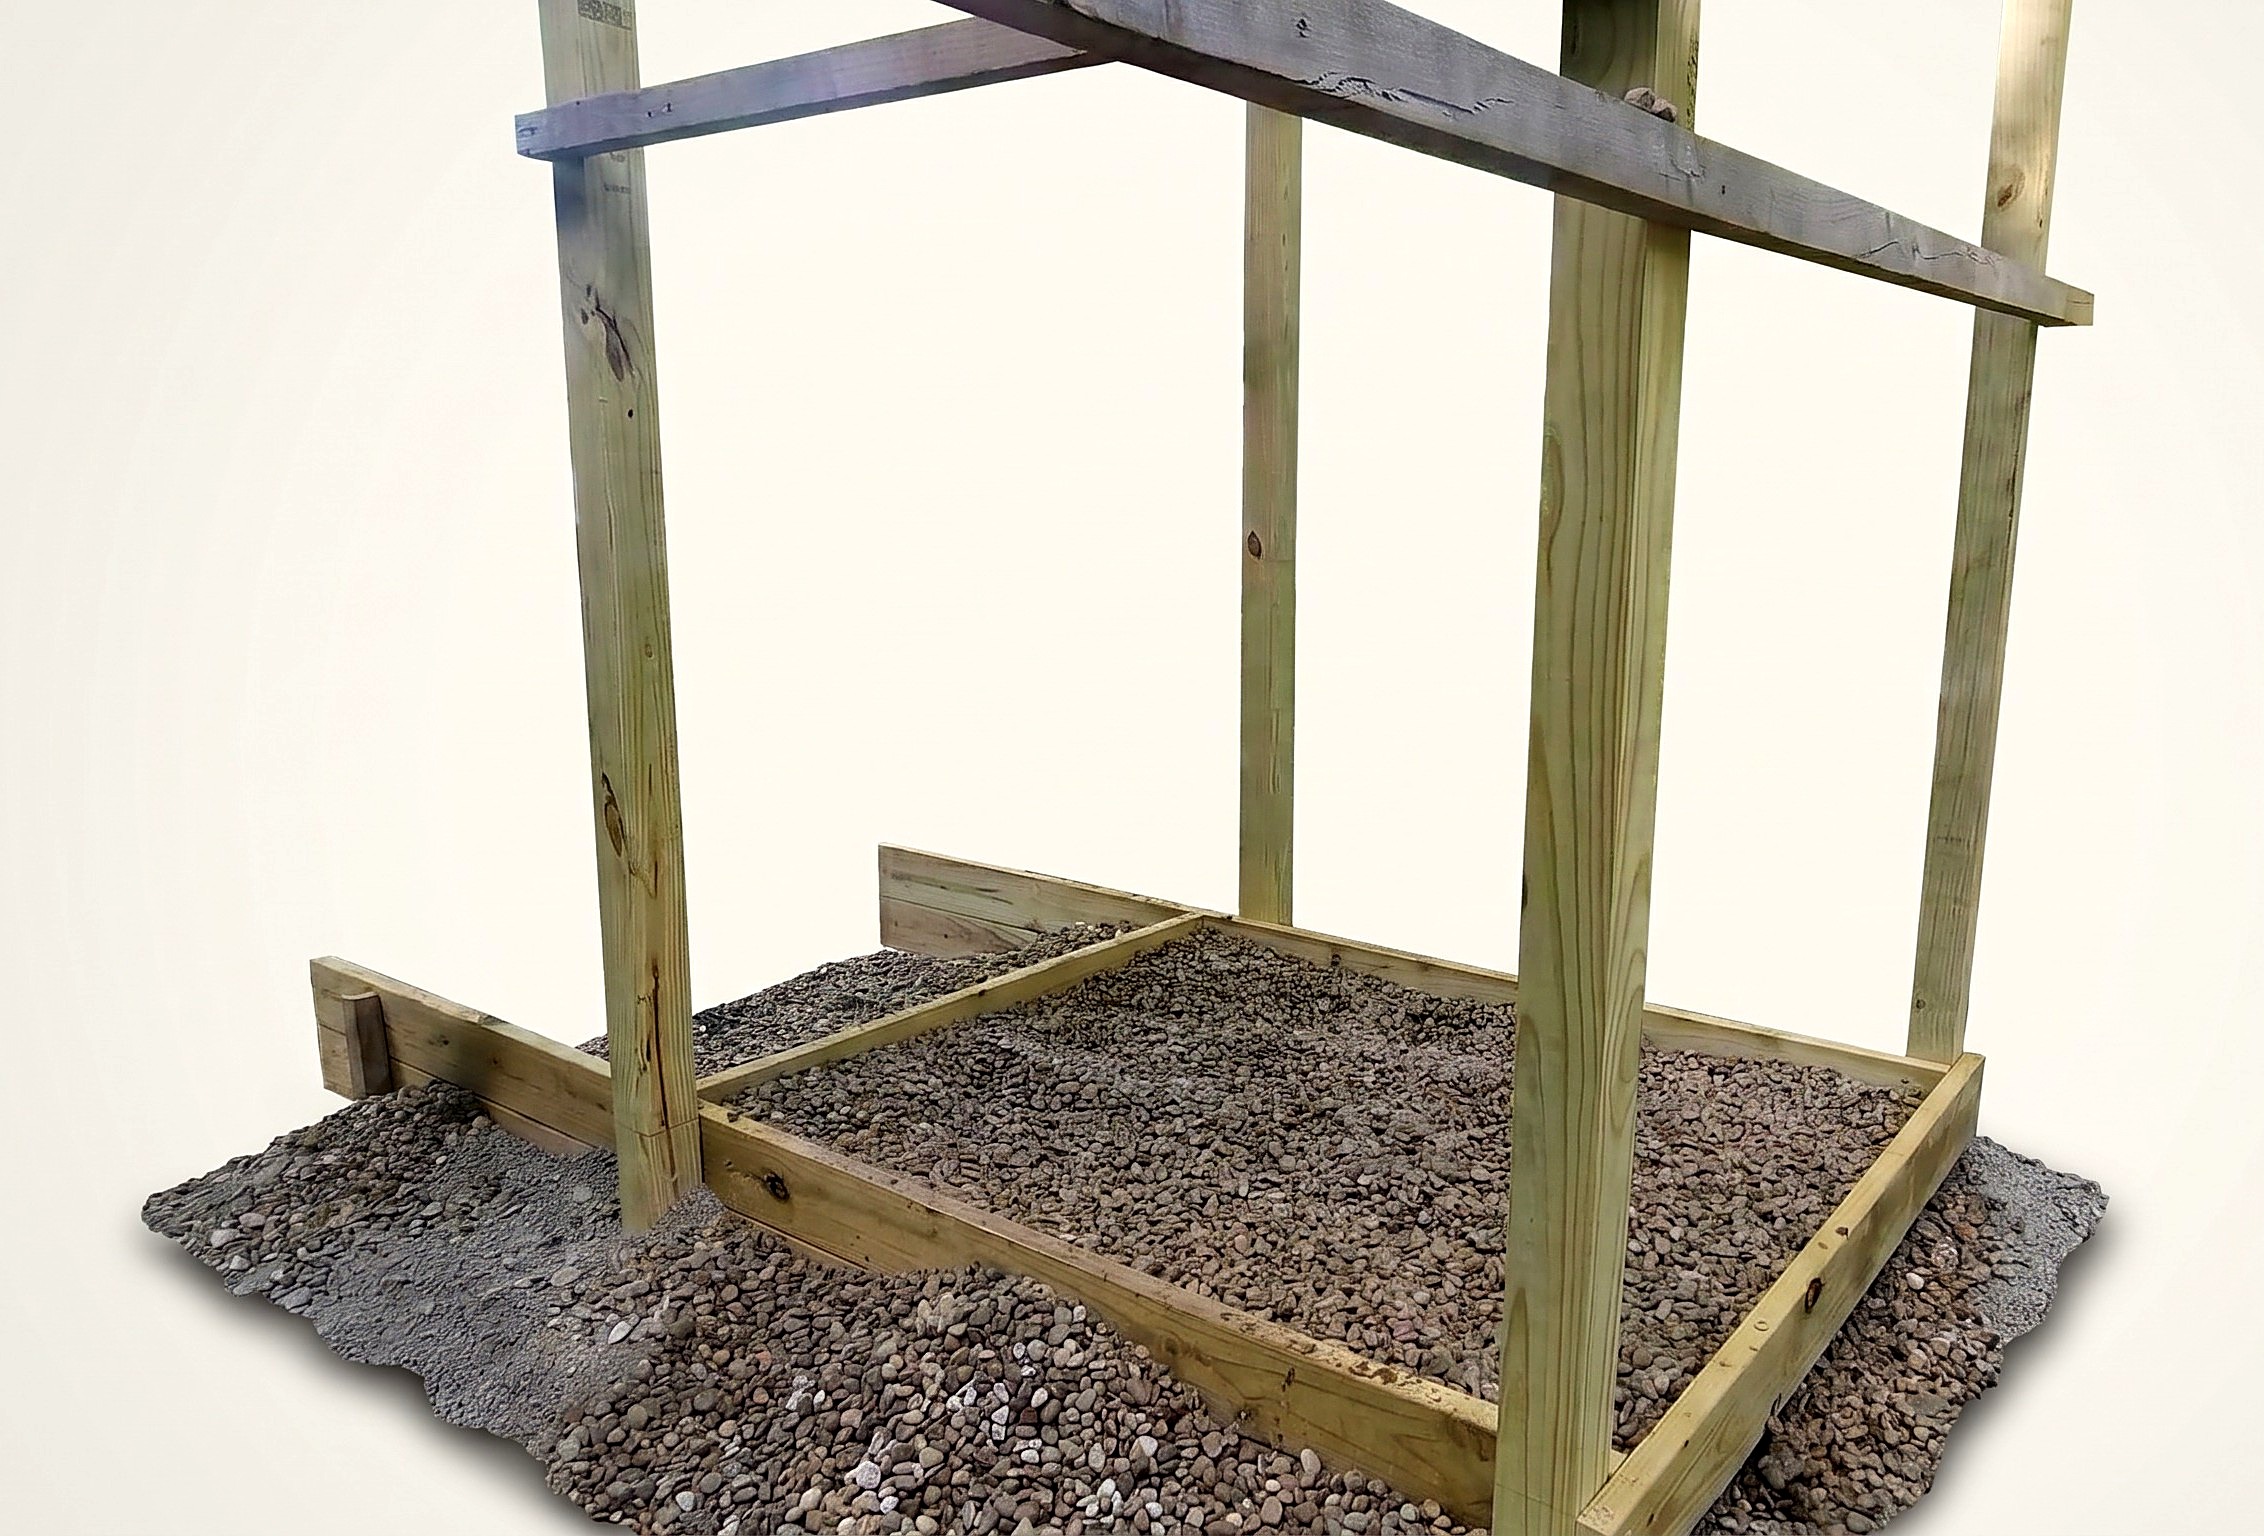
Parts in this step: (A) Corner post, (C) Base side containment board, (D) Base crossmember
You'll need: Tractor with front-end loader, Shovel, Cordless framing nailer, 2x6 framing lumber, #53 limestone gravel, #8 gravel, Drainage pipe end caps, Hearthstones, Framing and siding nails
- 2.1 Dump and shovel #53 limestone around the base perimeter
- Nail four estimated 72 in base side containment boards (C) two-high inside corner posts (A).
- Attach two 60 in base crossmembers (D) across front and middle to retain gravel.
- Dump and shovel #53 limestone gravel outside the 2x6 box.
- 2.2 Spread and level the exterior limestone
- Shovel #53 limestone to bury the exposed exterior corrugated drain pipes.
- Rake the outer limestone into a smooth ramp meeting the ground.
- 2.3 Shovel #8 river rock over the interior drainage pipes
- Press plastic drainage pipe end caps onto the pre-wrapped pipe ends.
- Place a loader bucket of clean #8 gravel by the shower frame.
- Hand-shovel #8 gravel into the shower bay over the three drainage pipes.
- 2.4 Level the #8 gravel bed inside the shower bay
- Fill the inner bay with #8 gravel to the top of lower crossmembers (D).
- Spread and flatten the river rock with a shovel and your boot.
- Set nine leftover hearthstones on the level gravel later for solid footing.
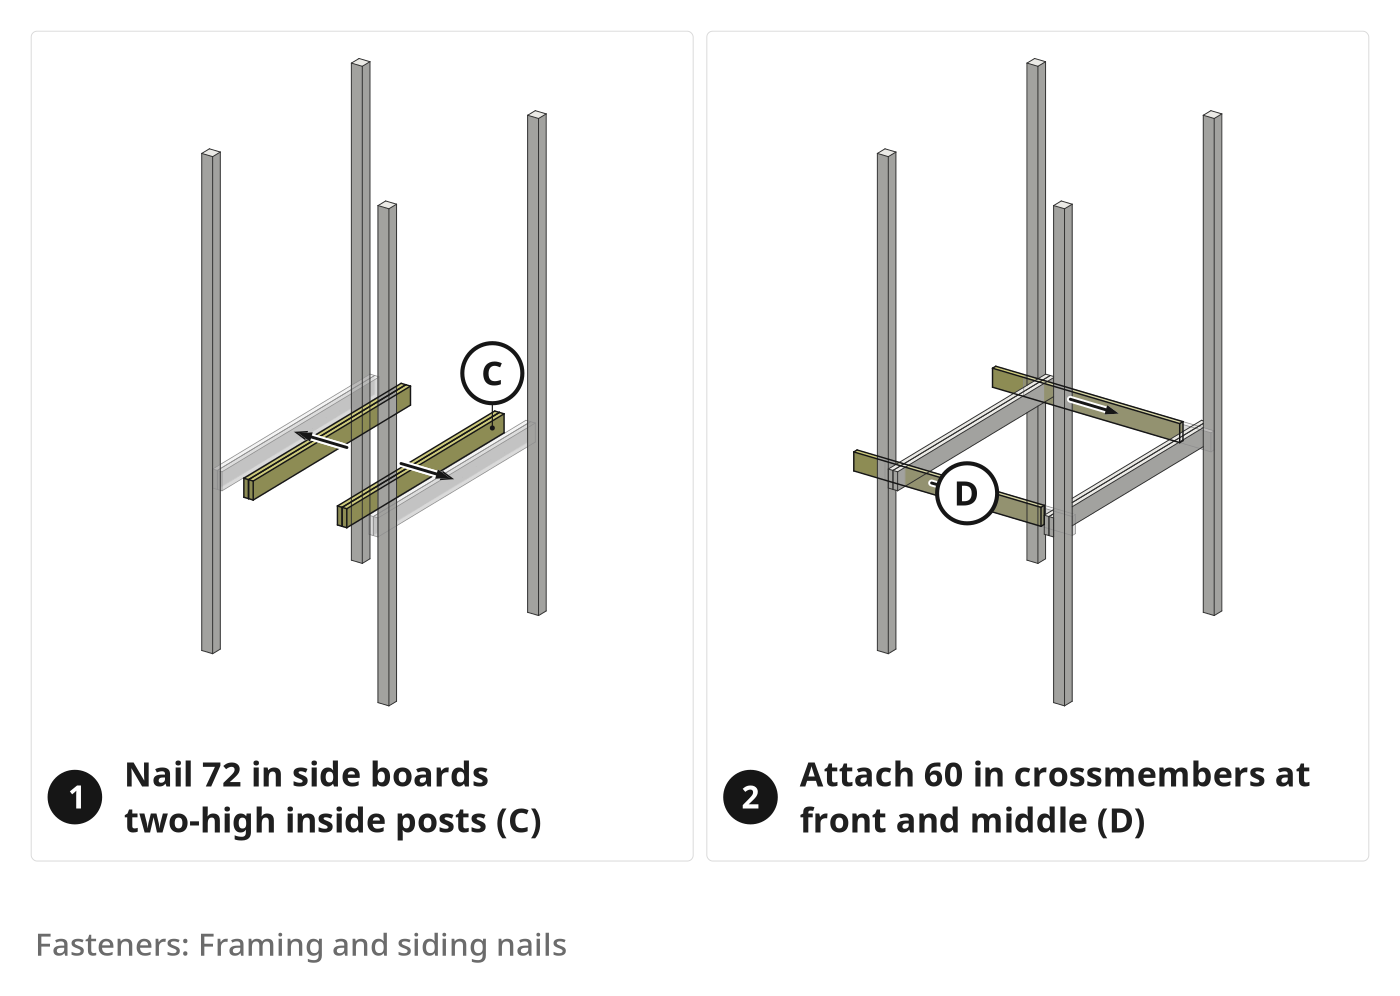
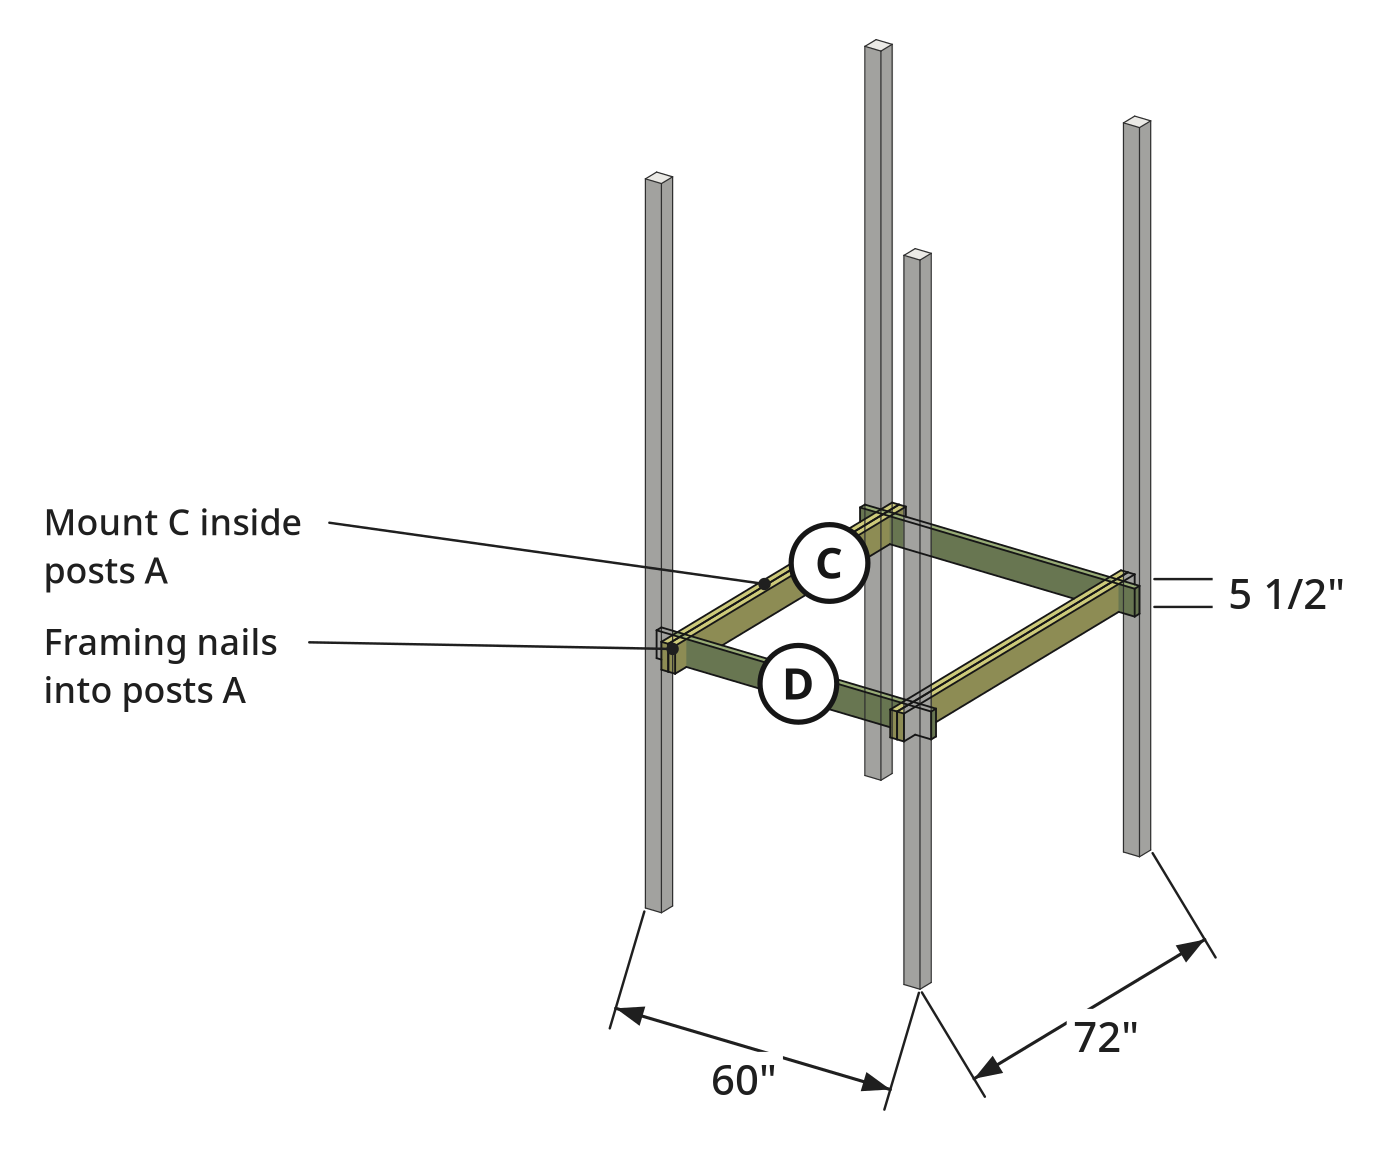
Key measurements
- Base side containment board length: 72 in (estimated), stacked two-high per side
- Base crossmember length: 60 in across shower width
- Tip: Cap the pre-wrapped pipes before shoveling #8 gravel so loose stones never block the drain channels.
- Tip: Hand-shovel #8 gravel from the bucket so angled dumping never spills clean stone outside.
Before you move on: Check drainage pipe ends are capped and buried under level #8 river rock.
Step 3: Fill the entryway floor framing with gravel
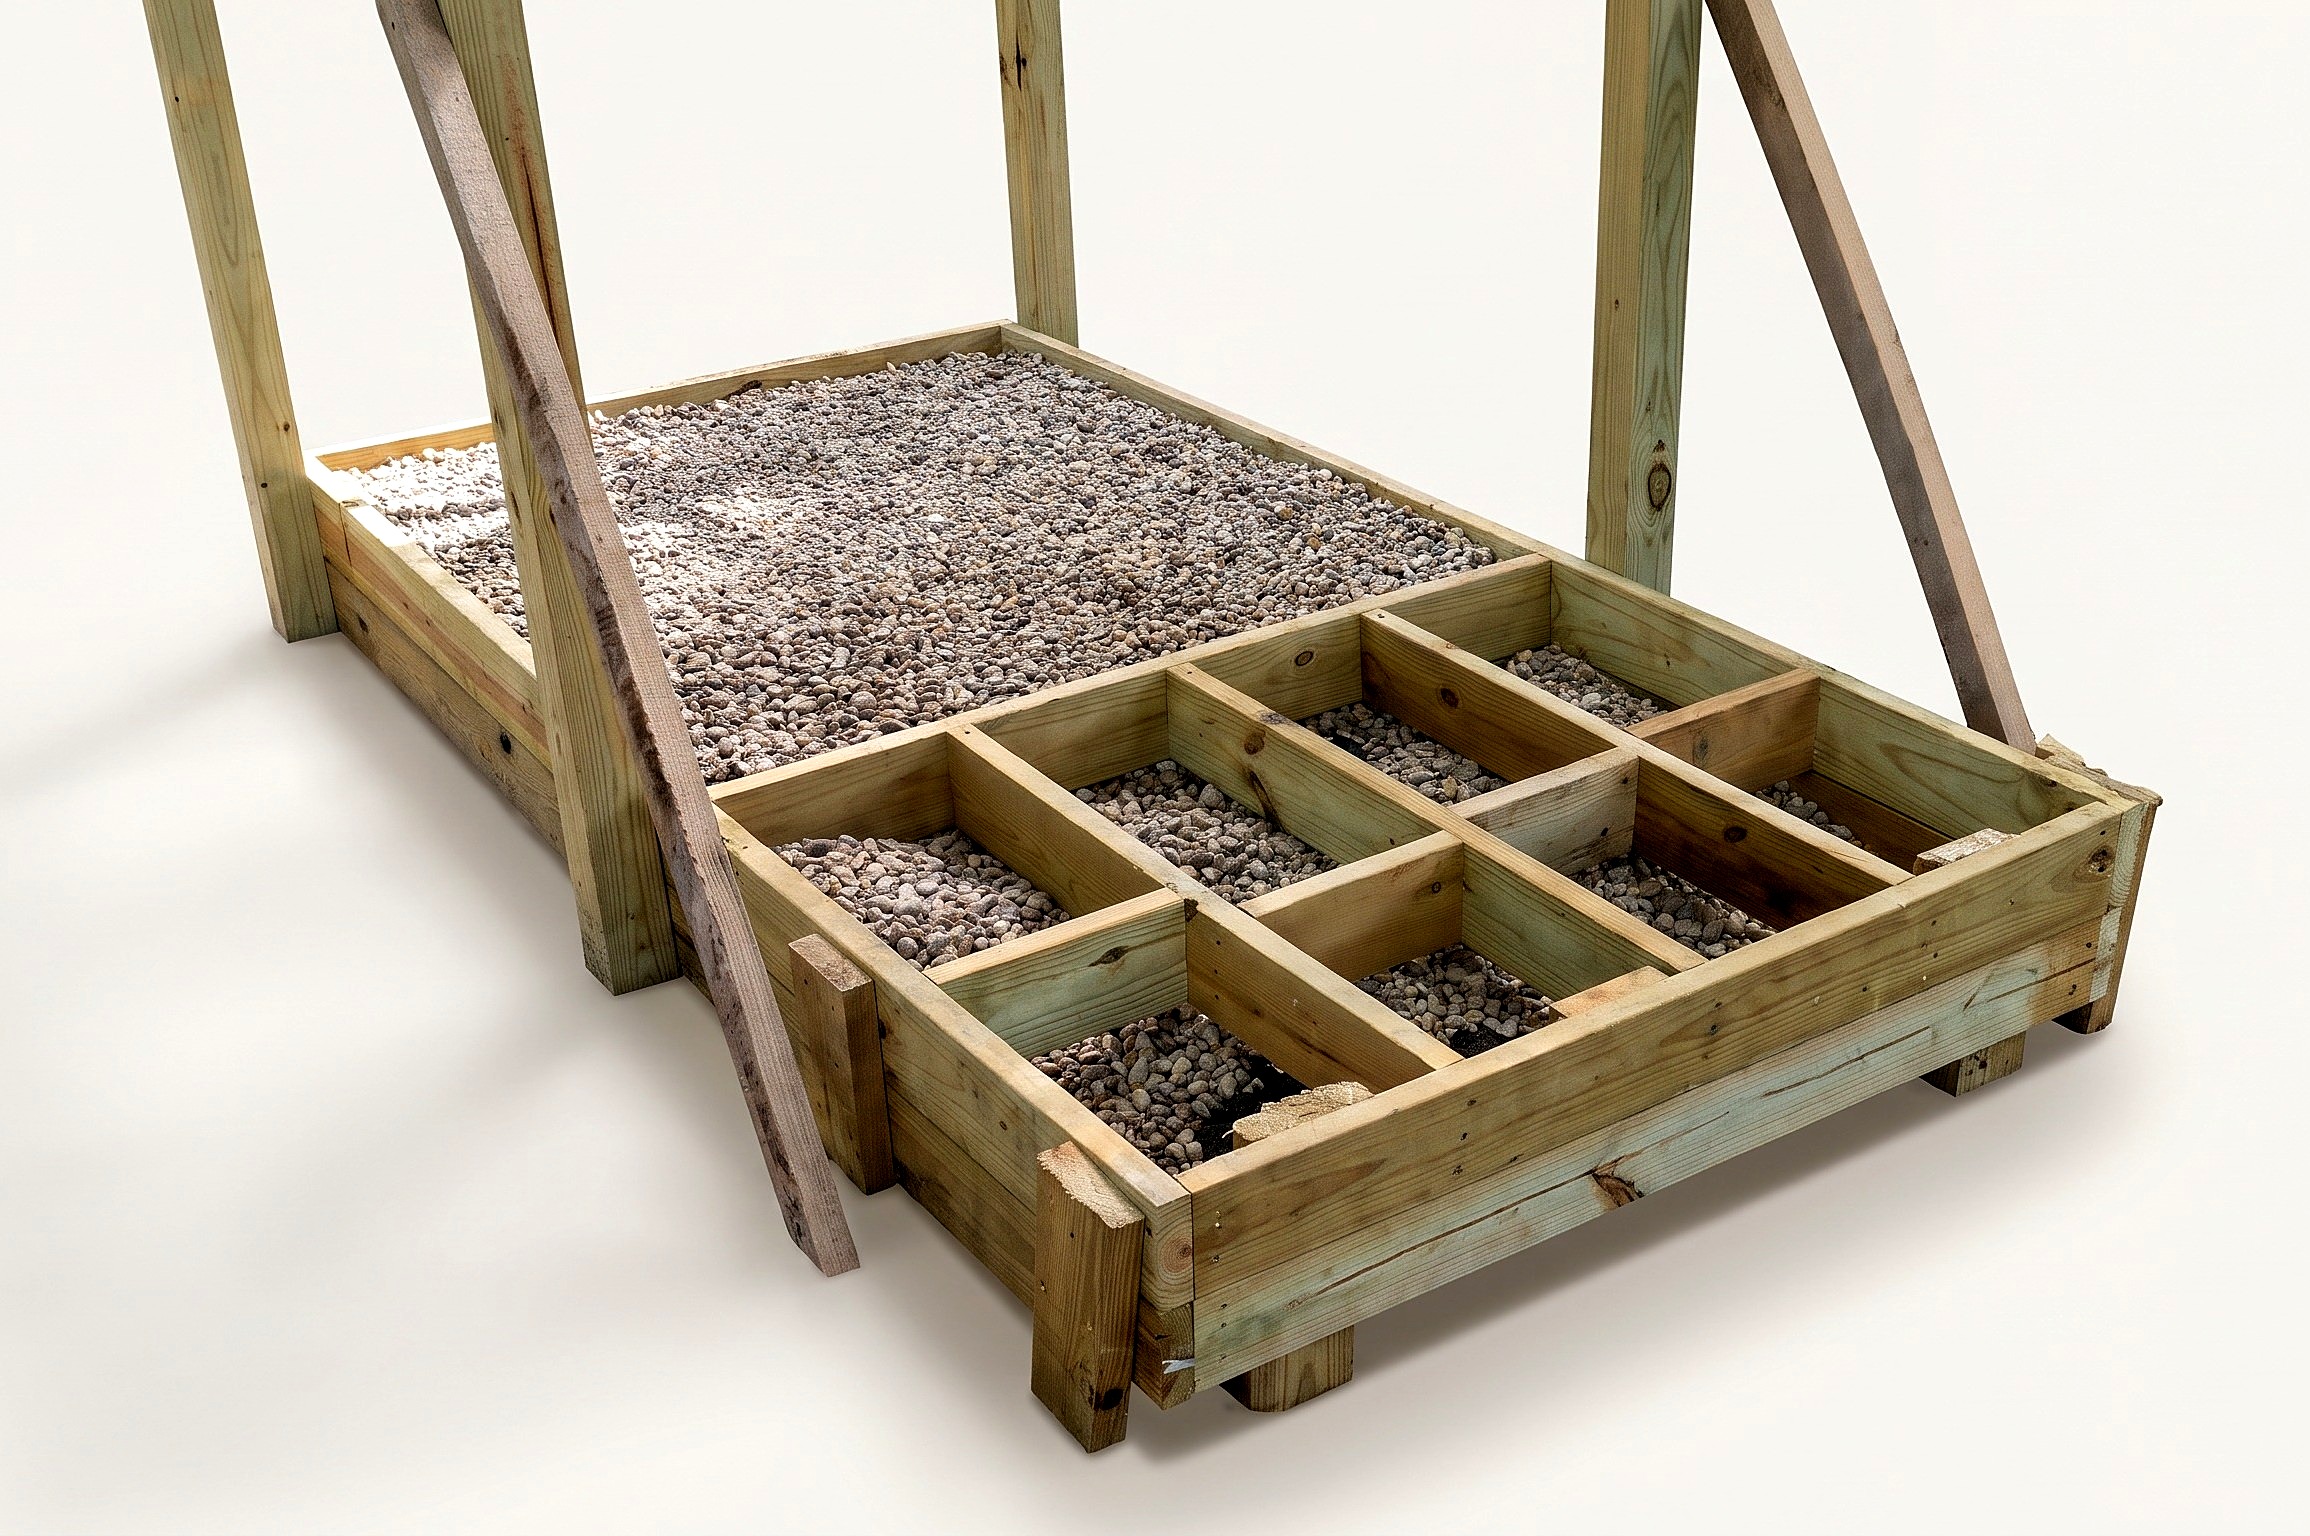
2x6 entryway floor grid, reinforced with blocking and filled level with #8 gravel.
Parts in this step: (D) Base crossmember, (E) Entryway floor joist and blocking
You'll need: Tractor with front-end loader, Shovel, Cordless framing nailer, 2x6 framing lumber, #8 gravel, Framing and siding nails
- 3.1 Position the loader bucket over the entryway framing
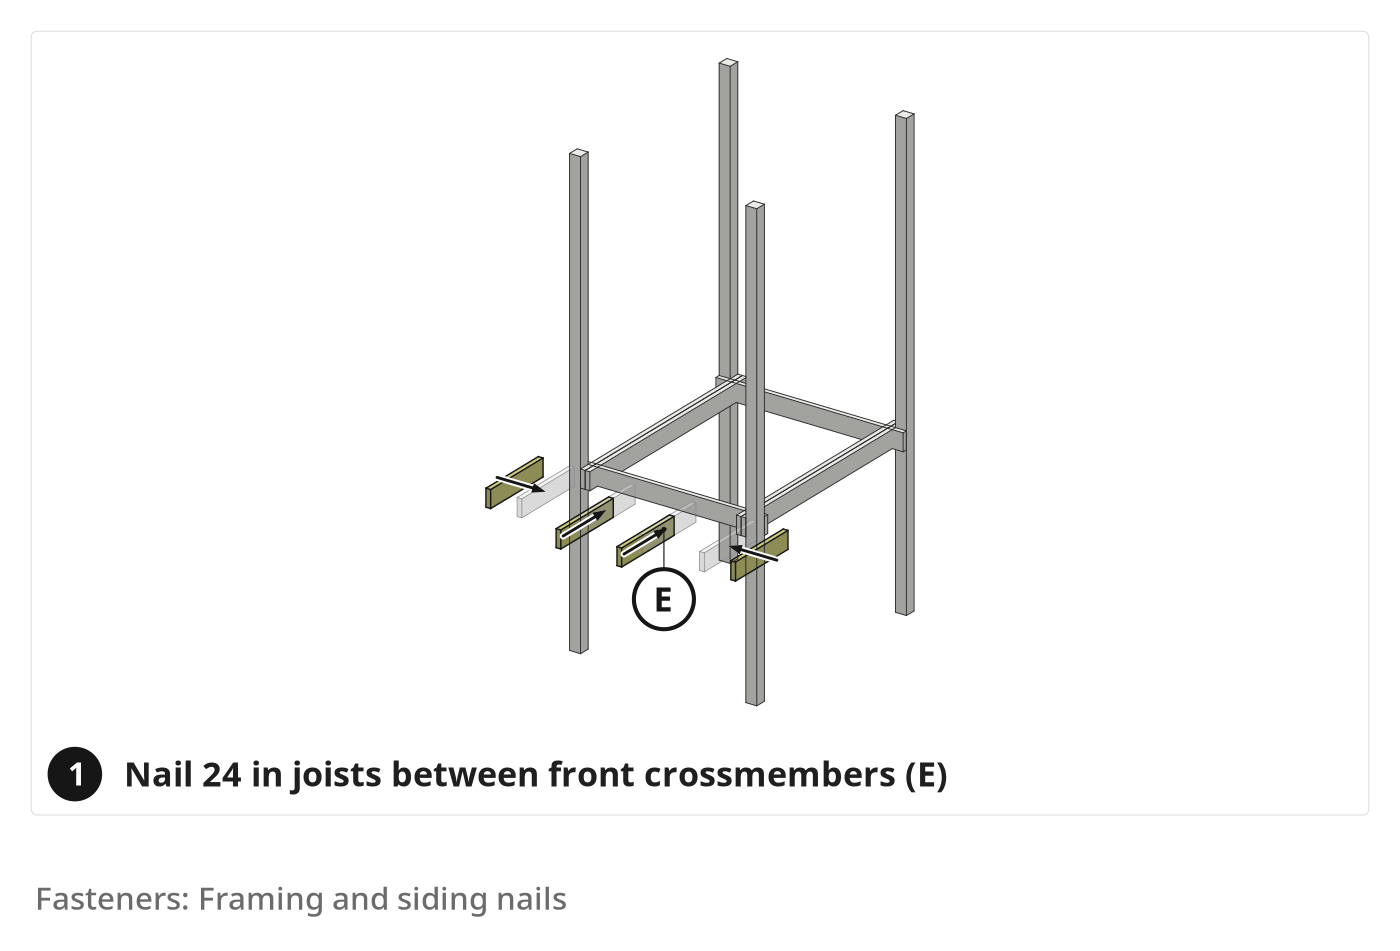
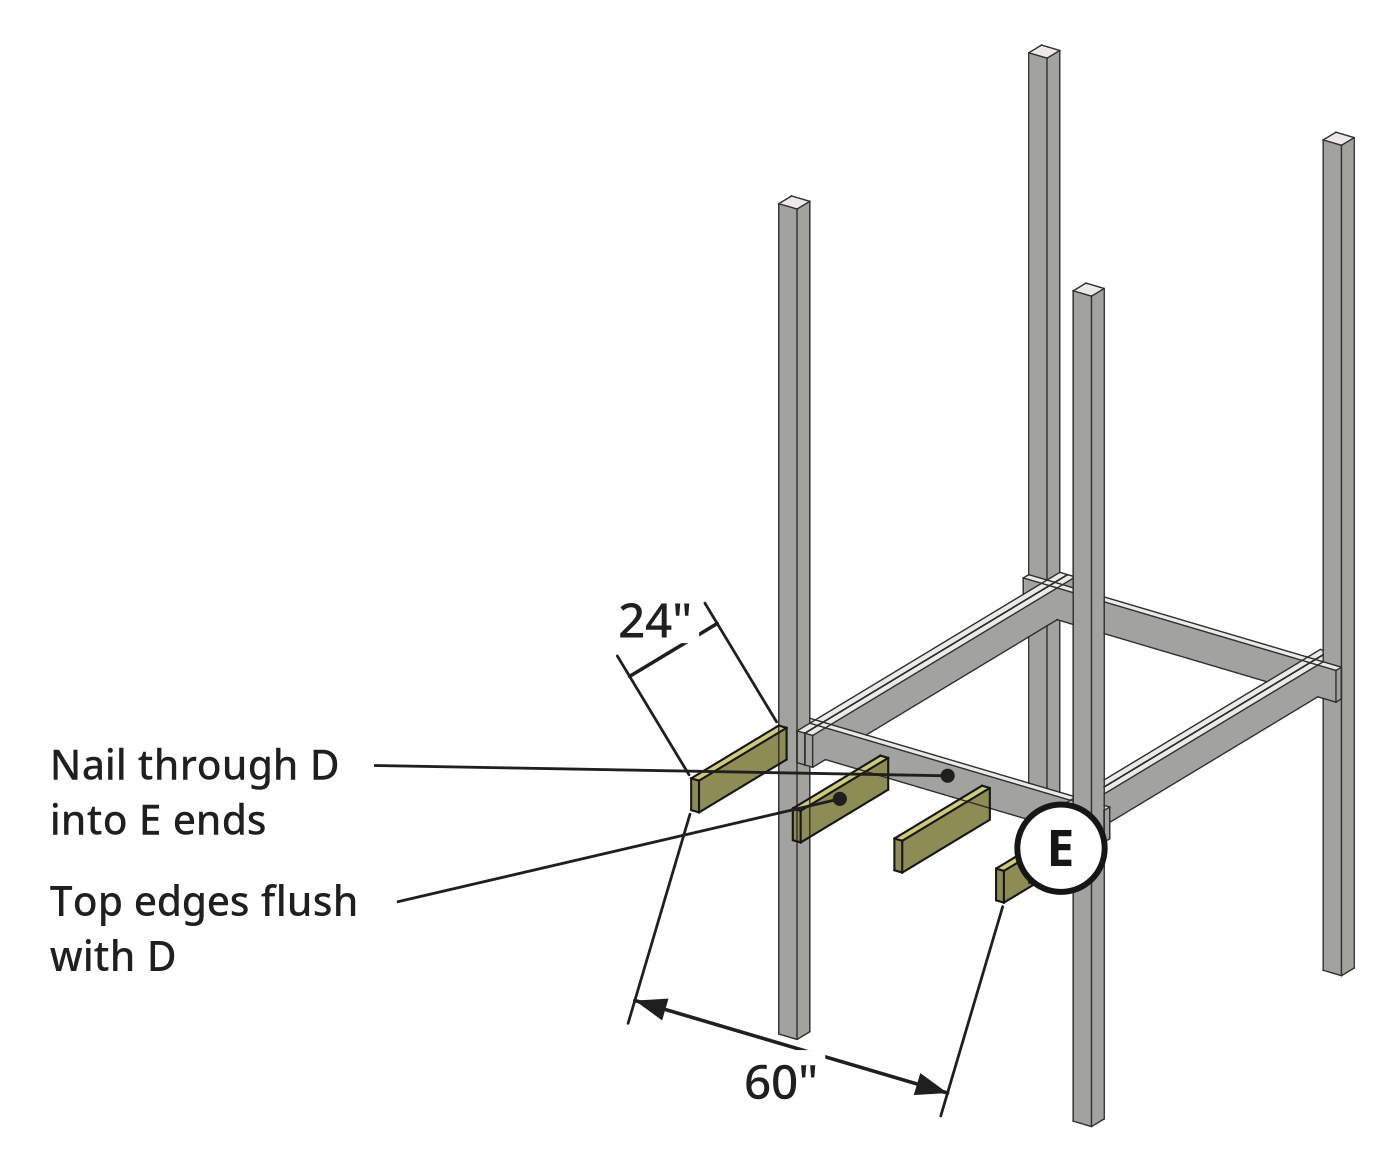
- Nail four estimated 24 in entryway floor joists and blocking (E) between front crossmembers (D).
- Drive the tractor loader bucket of #8 gravel to the front entryway grid.
- Hold the bucket above the 2x6 framing for easy shoveling.
- 3.2 Shovel #8 gravel into the entryway joist bays
- Shovel #8 gravel from the loader bucket into each entryway grid bay.
- Spread stone flush with the top of the 2x6 entryway blocking (E).
Key measurements
- Entryway joist and blocking length: 24 in (estimated) across the front bay
- Tip: Add 2x6 entryway blocking before gravel so the composite decking will not flex.
Before you move on: Check the 2x6 entryway frame sits level with gravel flush to the blocking top.
Step 4: Frame the shower walls
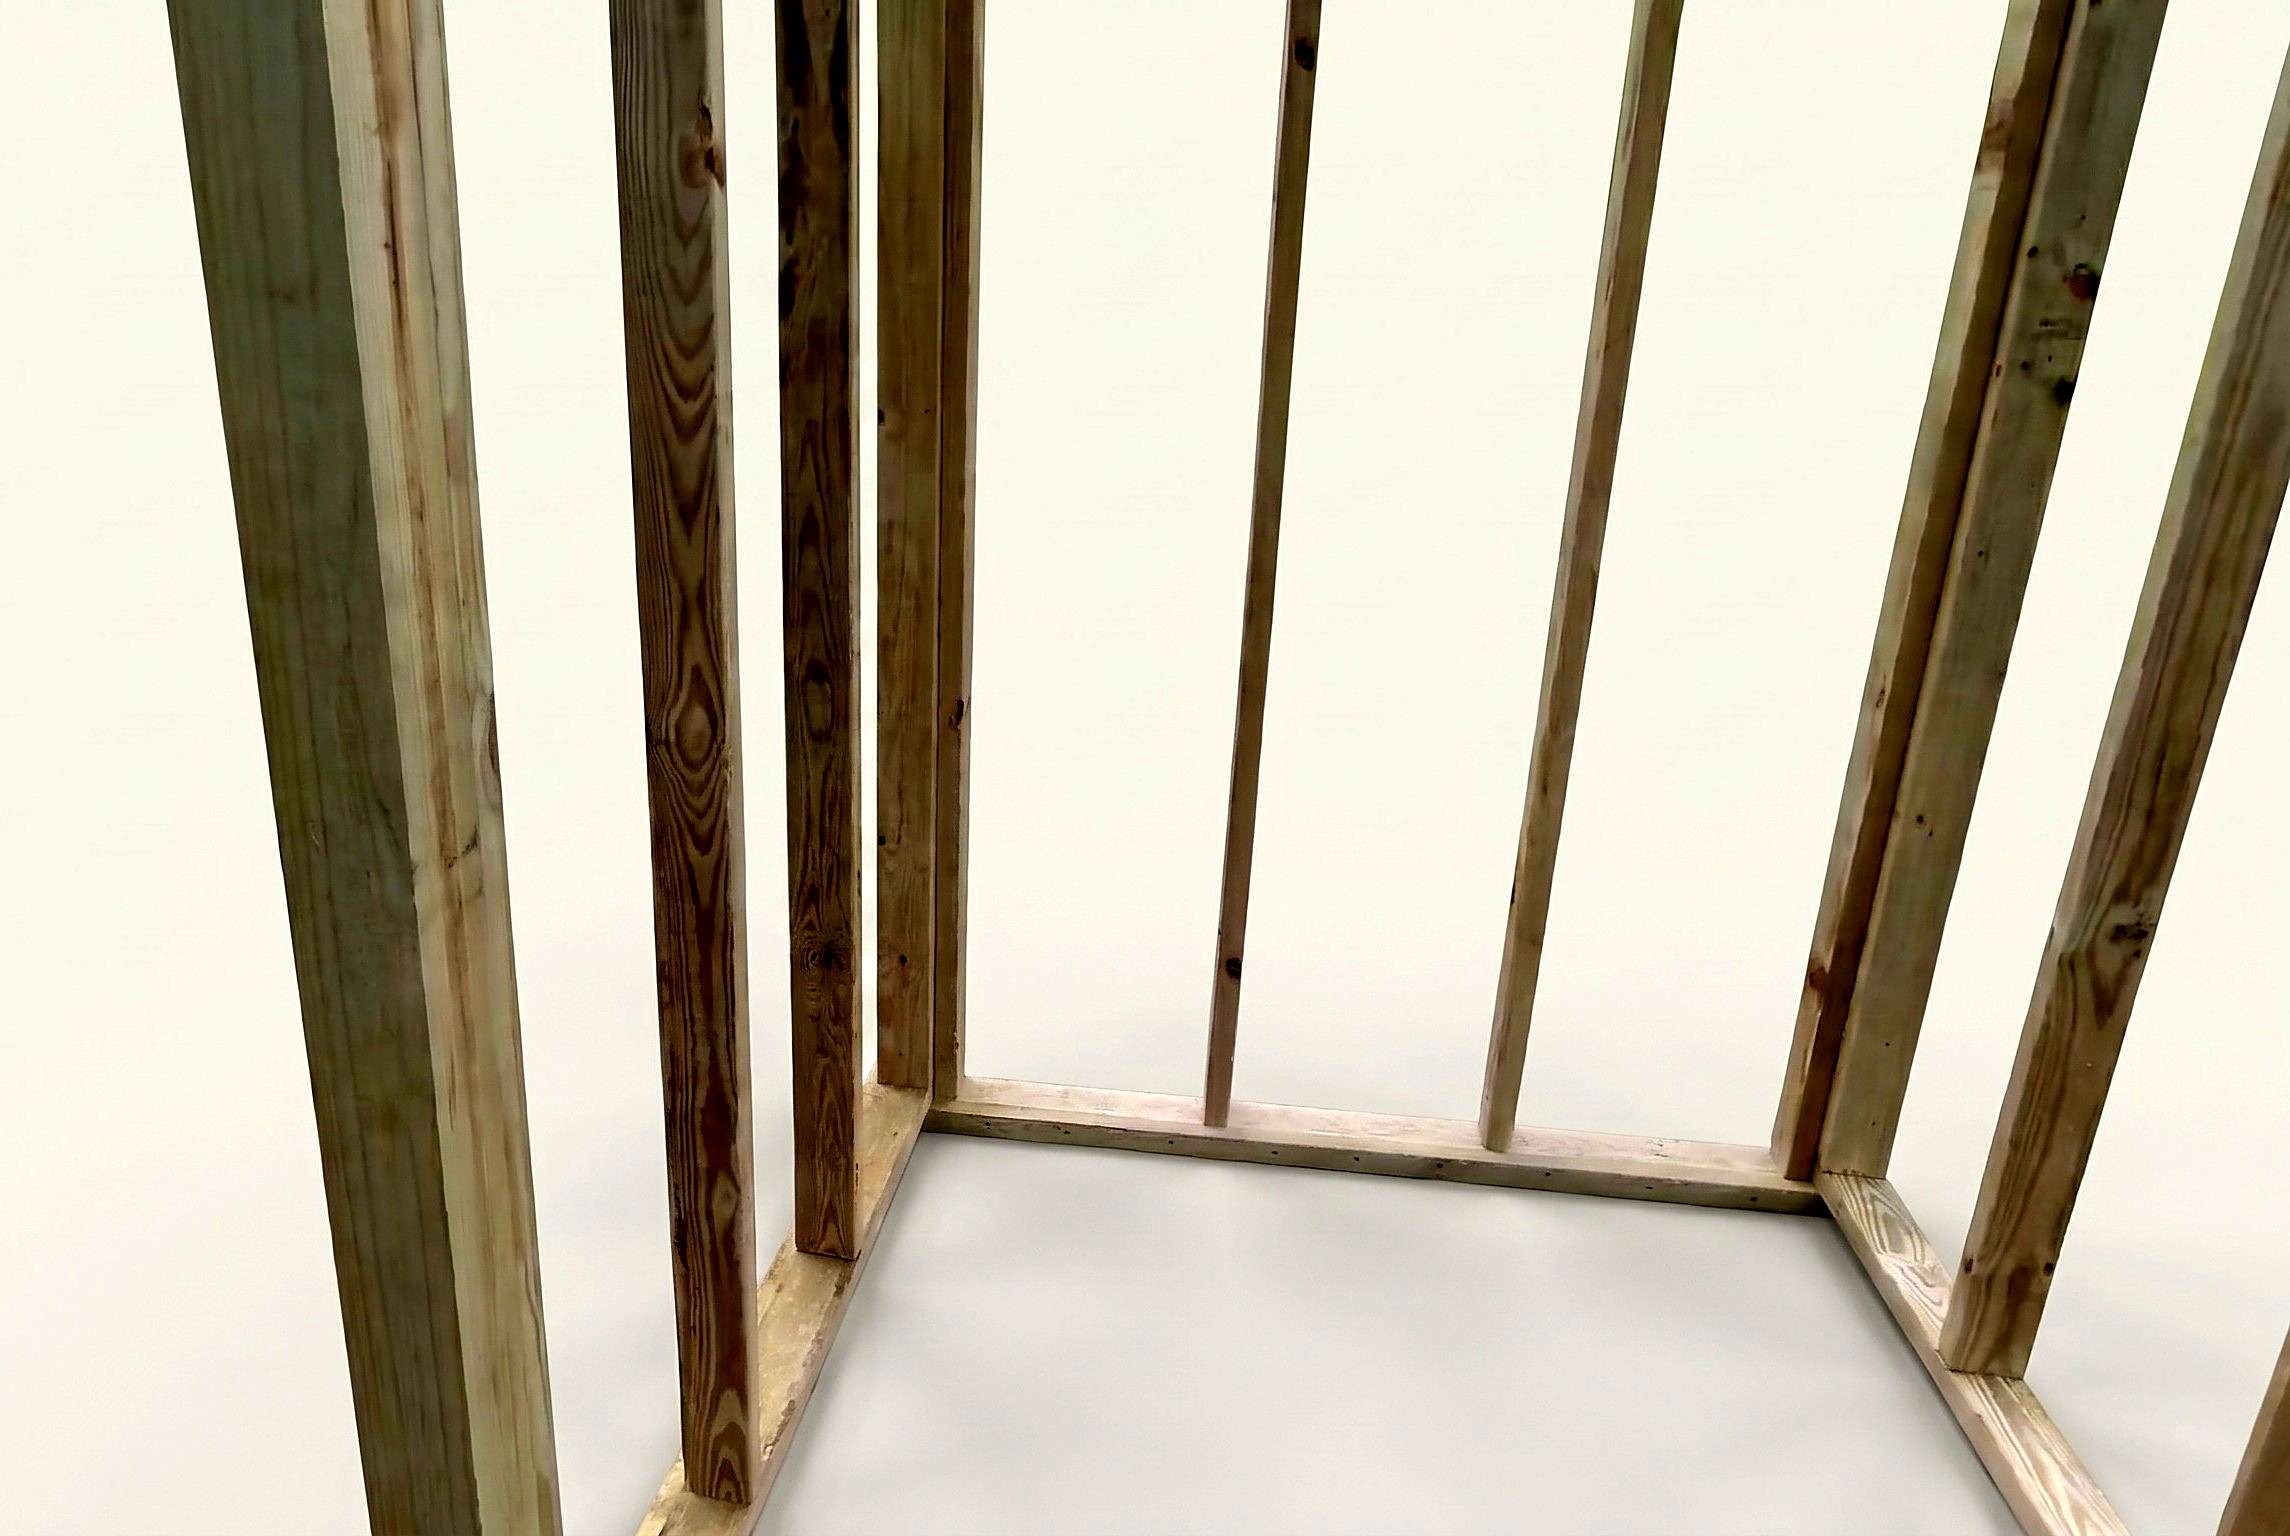
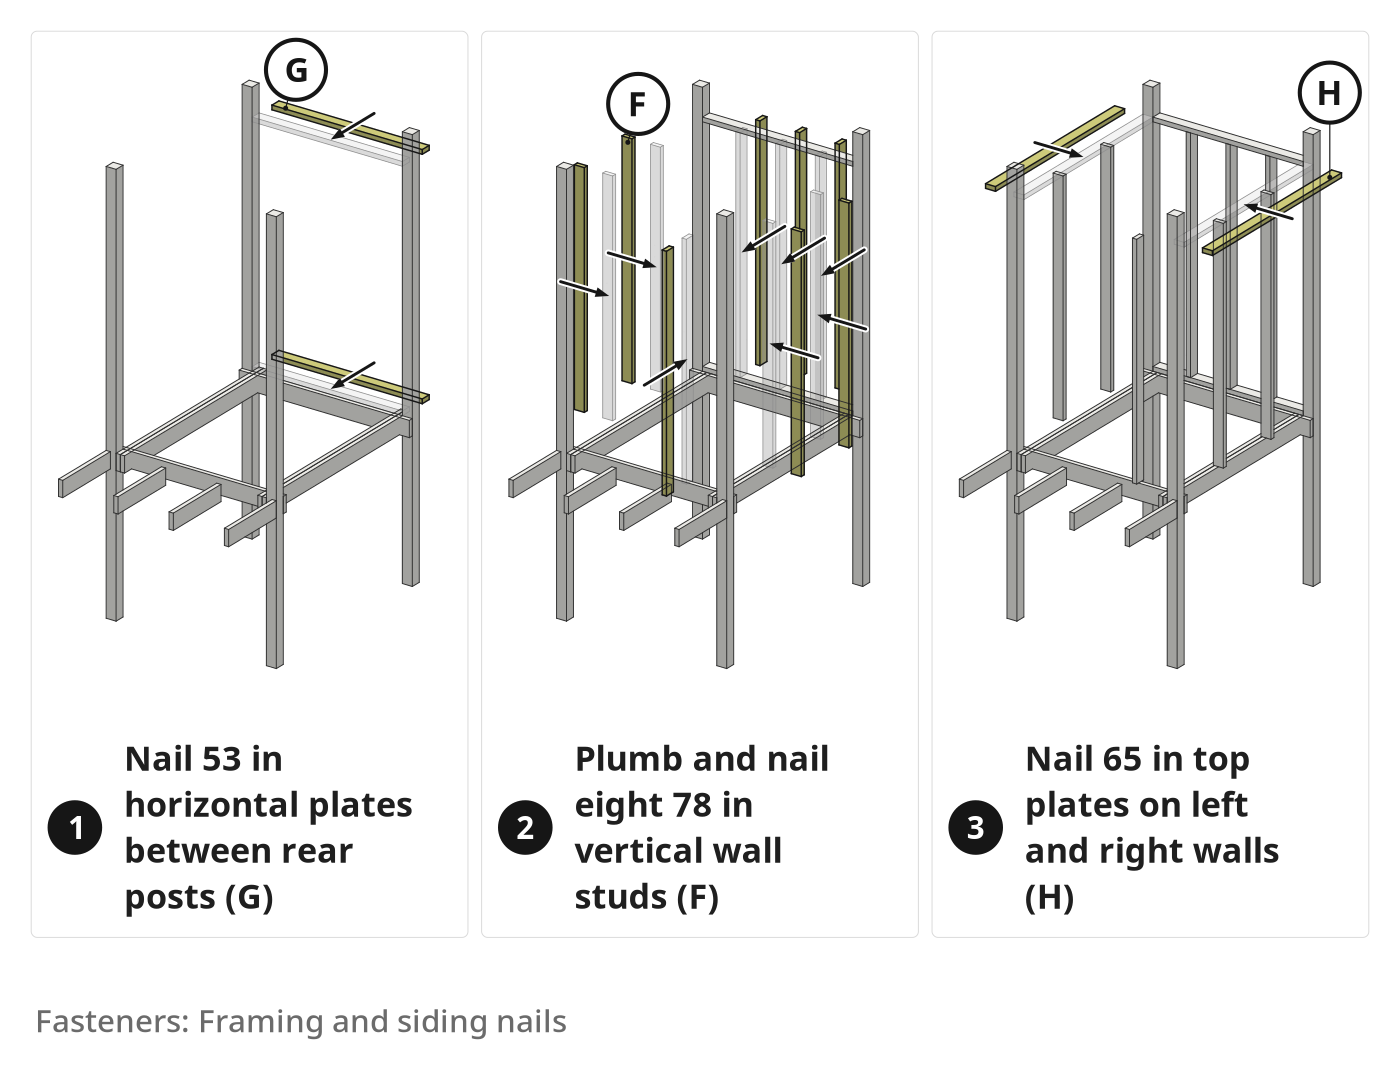
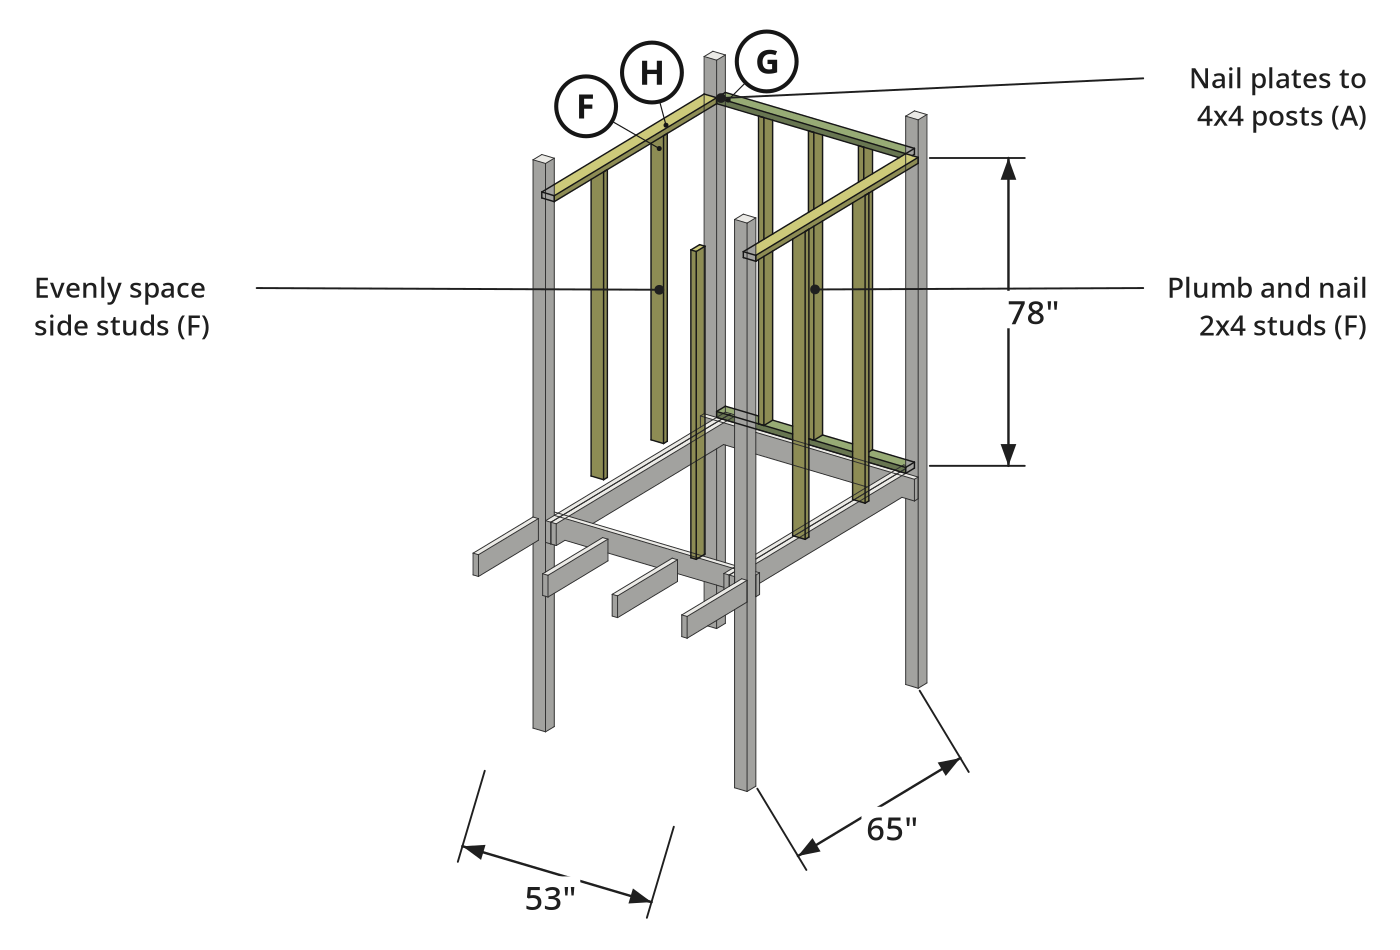
Vertical 2x4 studs and horizontal plates frame the rear, left, and right walls between corner posts.
Parts in this step: (A) Corner post, (F) Wall stud, (G) Rear wall horizontal plate, (H) Side wall top plate
You'll need: Miter saw with stand, Circular saw, Cordless framing nailer, Level, Speed square, Tape measure, Ladder, 2x4 framing lumber, Framing and siding nails
- 4.1 Frame the rear plumbing wall with 2x4 studs
- Cut two 53 in rear wall horizontal plates (G) to fit between rear corner posts (A).
- Miter-cut two estimated 78 in wall studs (F) for the rear plumbing wall.
- Plumb the rear plates (G) and studs (F) with a level, then nail.
- 4.2 Frame the left side wall
- Cut one estimated 65 in side wall top plate (H) and three 78 in studs (F).
- Nail top plate (H) horizontally between the left front and rear corner posts (A).
- Plumb and nail the three vertical studs (F) evenly across the left wall.
- 4.3 Frame the right side wall
- Cut the second estimated 65 in side wall top plate (H) and three 78 in studs (F).
- Check corners with a speed square; adjust stud alignment if a post sits out of square.
- Nail top plate (H) and three vertical studs (F) between the right corner posts (A).
Key measurements
- Rear wall horizontal plate length: 53 in between rear 4x4 posts
- Side wall top plate length: 65 in (estimated) between front and rear 4x4 posts
- Wall stud height: 78 in (estimated) between base and top plates
- Tip: Shift 2x4 stud framing flush on out-of-square corner posts before nailing siding.
Before you move on: Check all three framed walls for plumb with a spirit level before setting the front doorway post.
Step 5: Install the doorway post
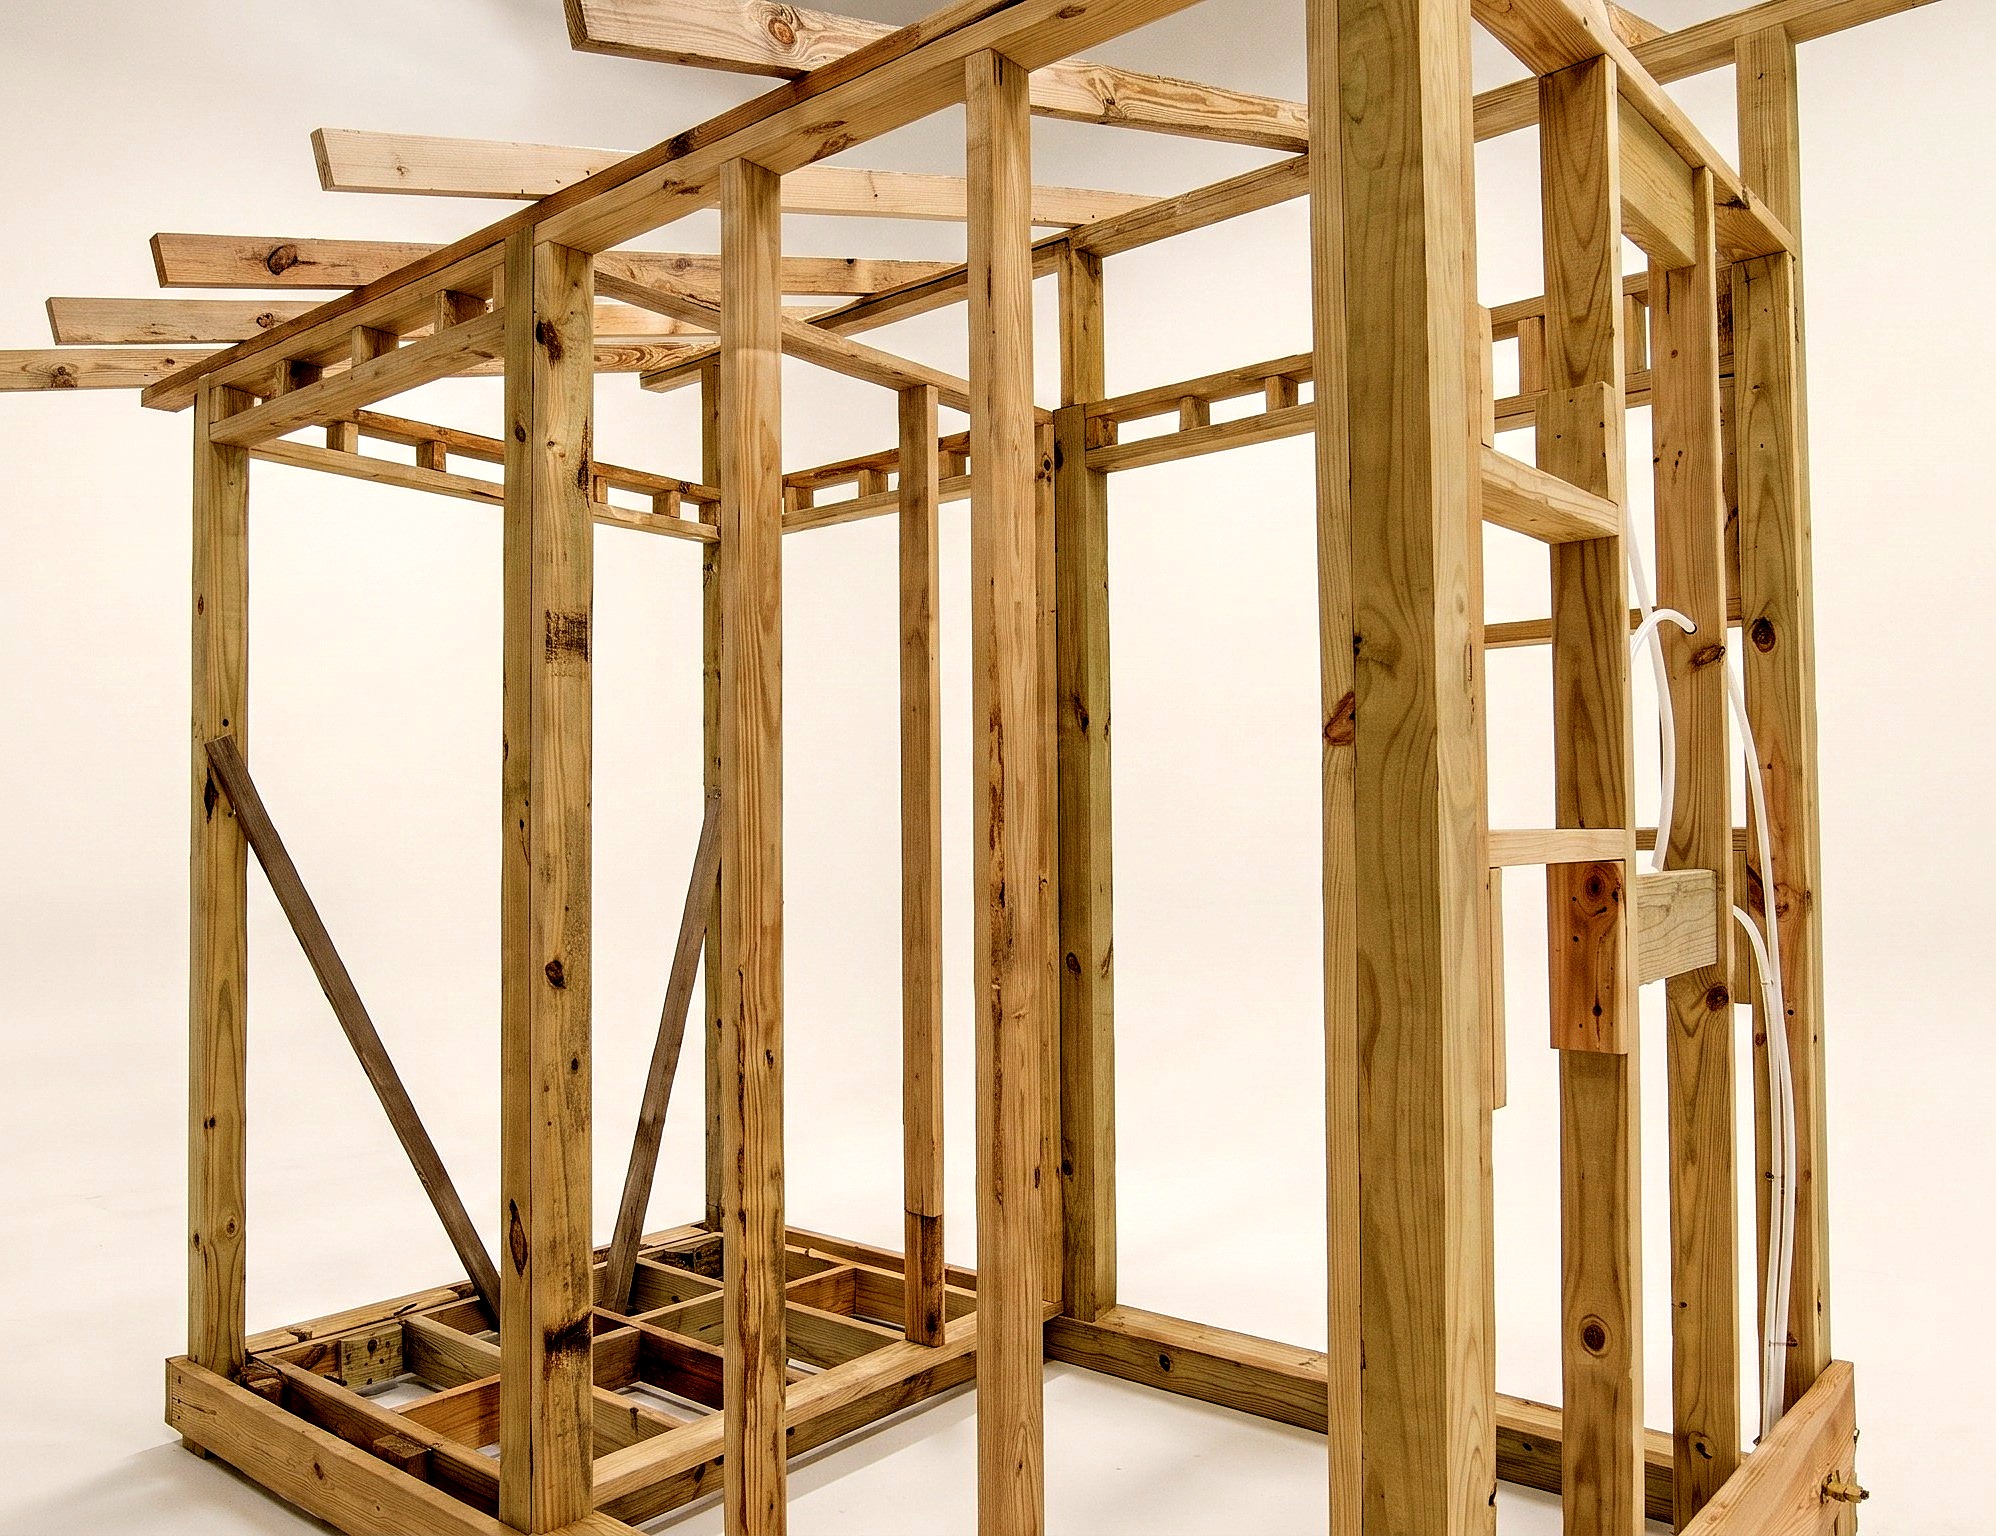
Install the 4x4 doorway post, recessed niche framing, and PEX rough-in plumbing.
Parts in this step: (A) Corner post, (B) Doorway partition post, (I) Front partition and niche framing member
You'll need: Shovel, Level, Impact driver, Cordless framing nailer, Tape measure, Pressure-treated posts, 2x4 framing lumber, Exterior structural wood screws, Framing and siding nails, Shower rough-in valve, PEX tubing, PEX fittings and garden hose adapters, Quarter-turn ball valves
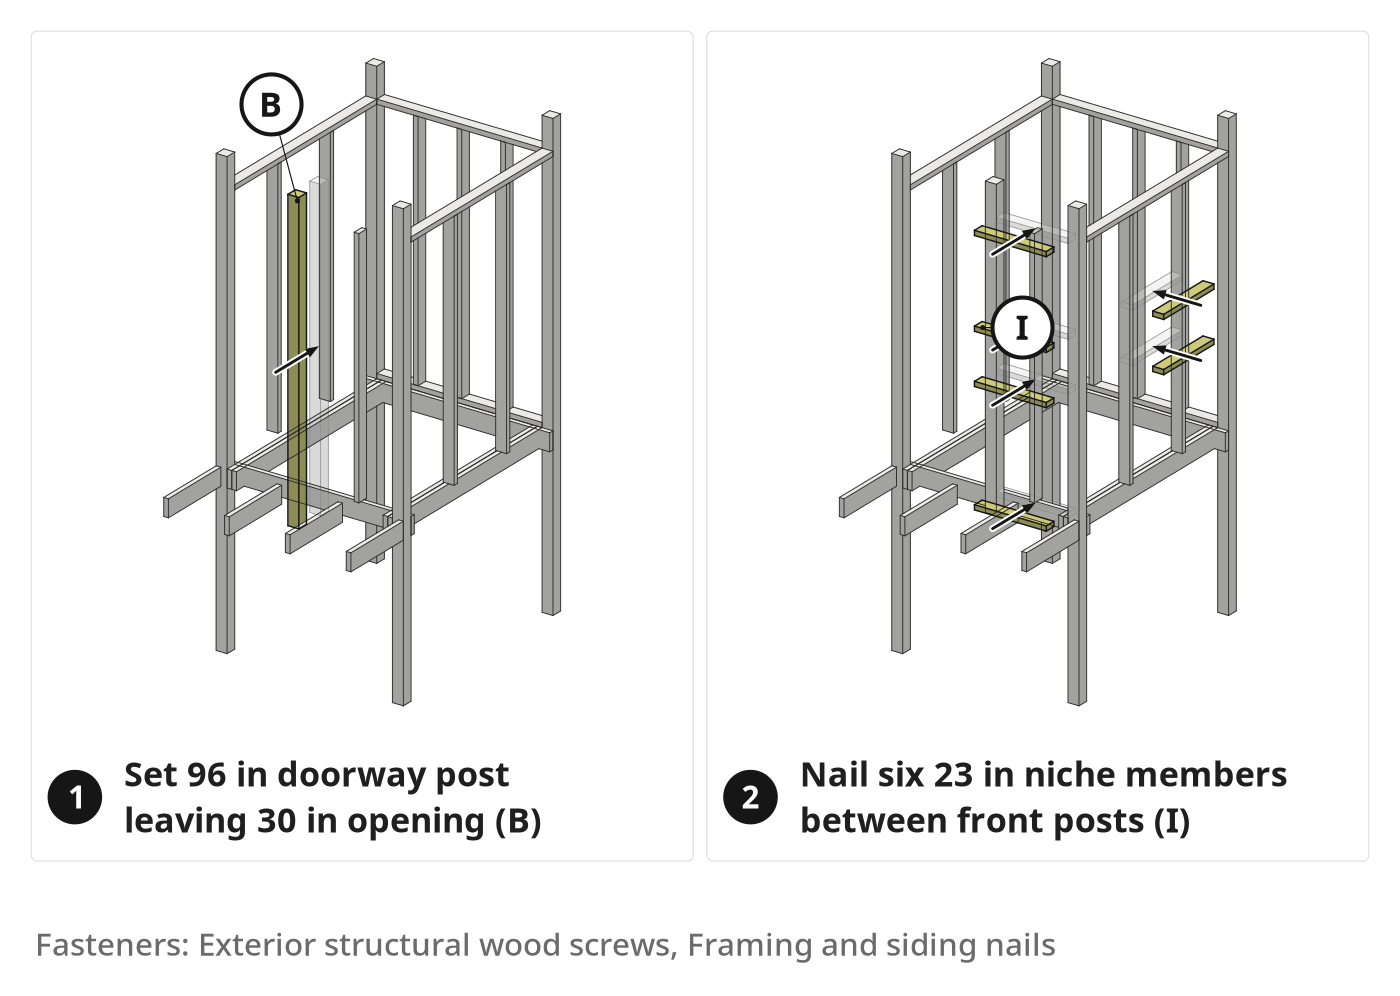
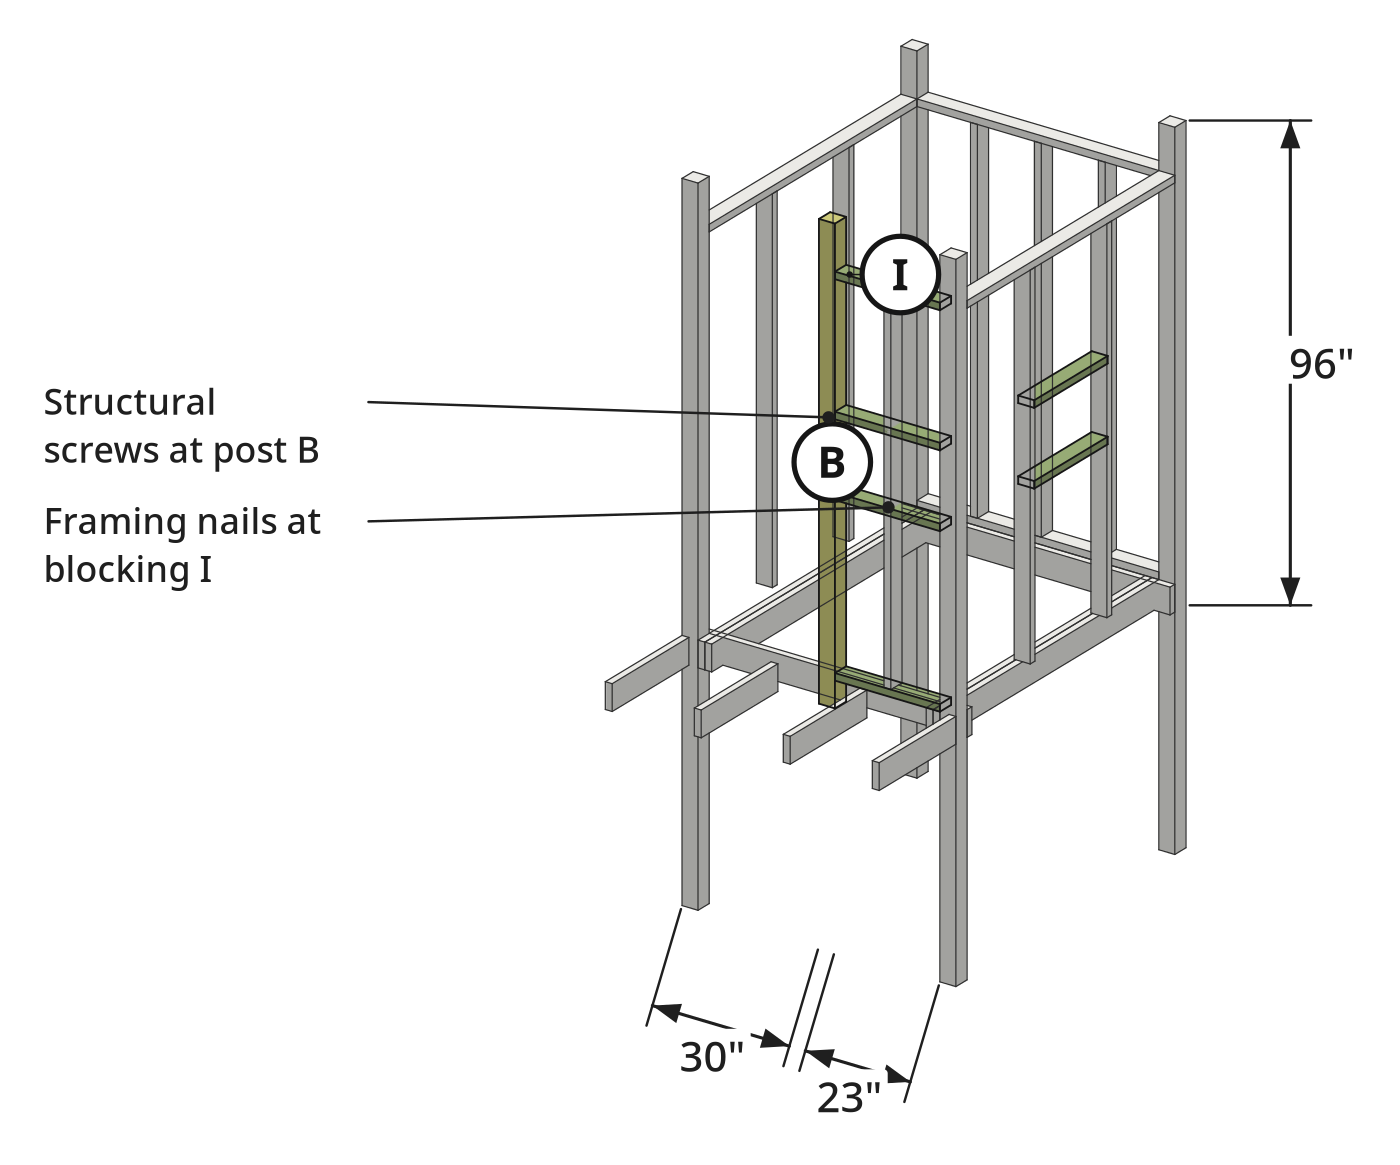
- 5.1 Set and fasten the 4x4 doorway post
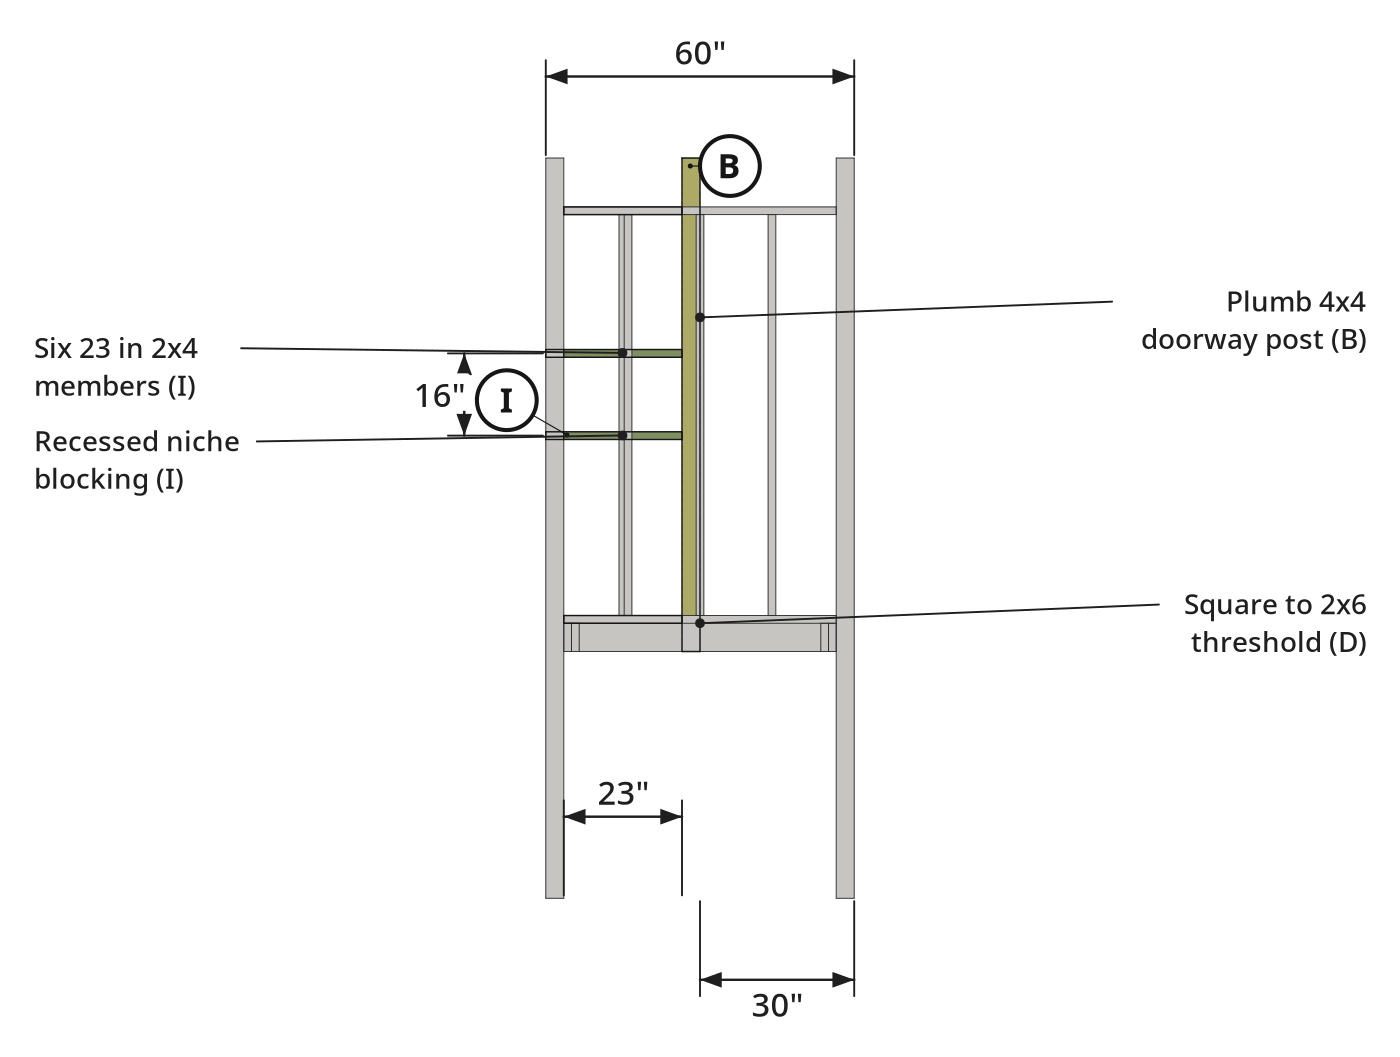
- Dig a post hole against the 2x6 threshold leaving a 30 in doorway opening.
- Set and plumb the estimated 96 in doorway partition post (B); fasten with structural screws.
- Nail six 23 in niche framing members (I) between front corner post (A) and doorway post (B).
- Mount the shower rough-in valve; crimp 1/2 in PEX lines to the wall head, rain head, and exterior hose bib.
- Extend rear PEX garden hose stubs past framing so uncoupling hoses does not wet the wood.
Key measurements
- Doorway width: 30 in between doorway partition post and right corner post
- Front partition and niche blocking: 23 in between front left corner and doorway posts
- PEX pipe sizes: 1/2 in for hot and cold shower lines, 3/4 in for untreated well water
- Tip: Run the third diverter port to an exterior quarter-turn hose bib for outside hot or softened water.
- Heads up: Wrap exterior PEX stubs in UV-resistant tape or a sleeve against sunlight degradation.
Before you move on: Pressurize PEX lines with garden hoses and leak-check all crimp fittings and valve joints before sheathing.
Step 6: Install the exterior wood siding
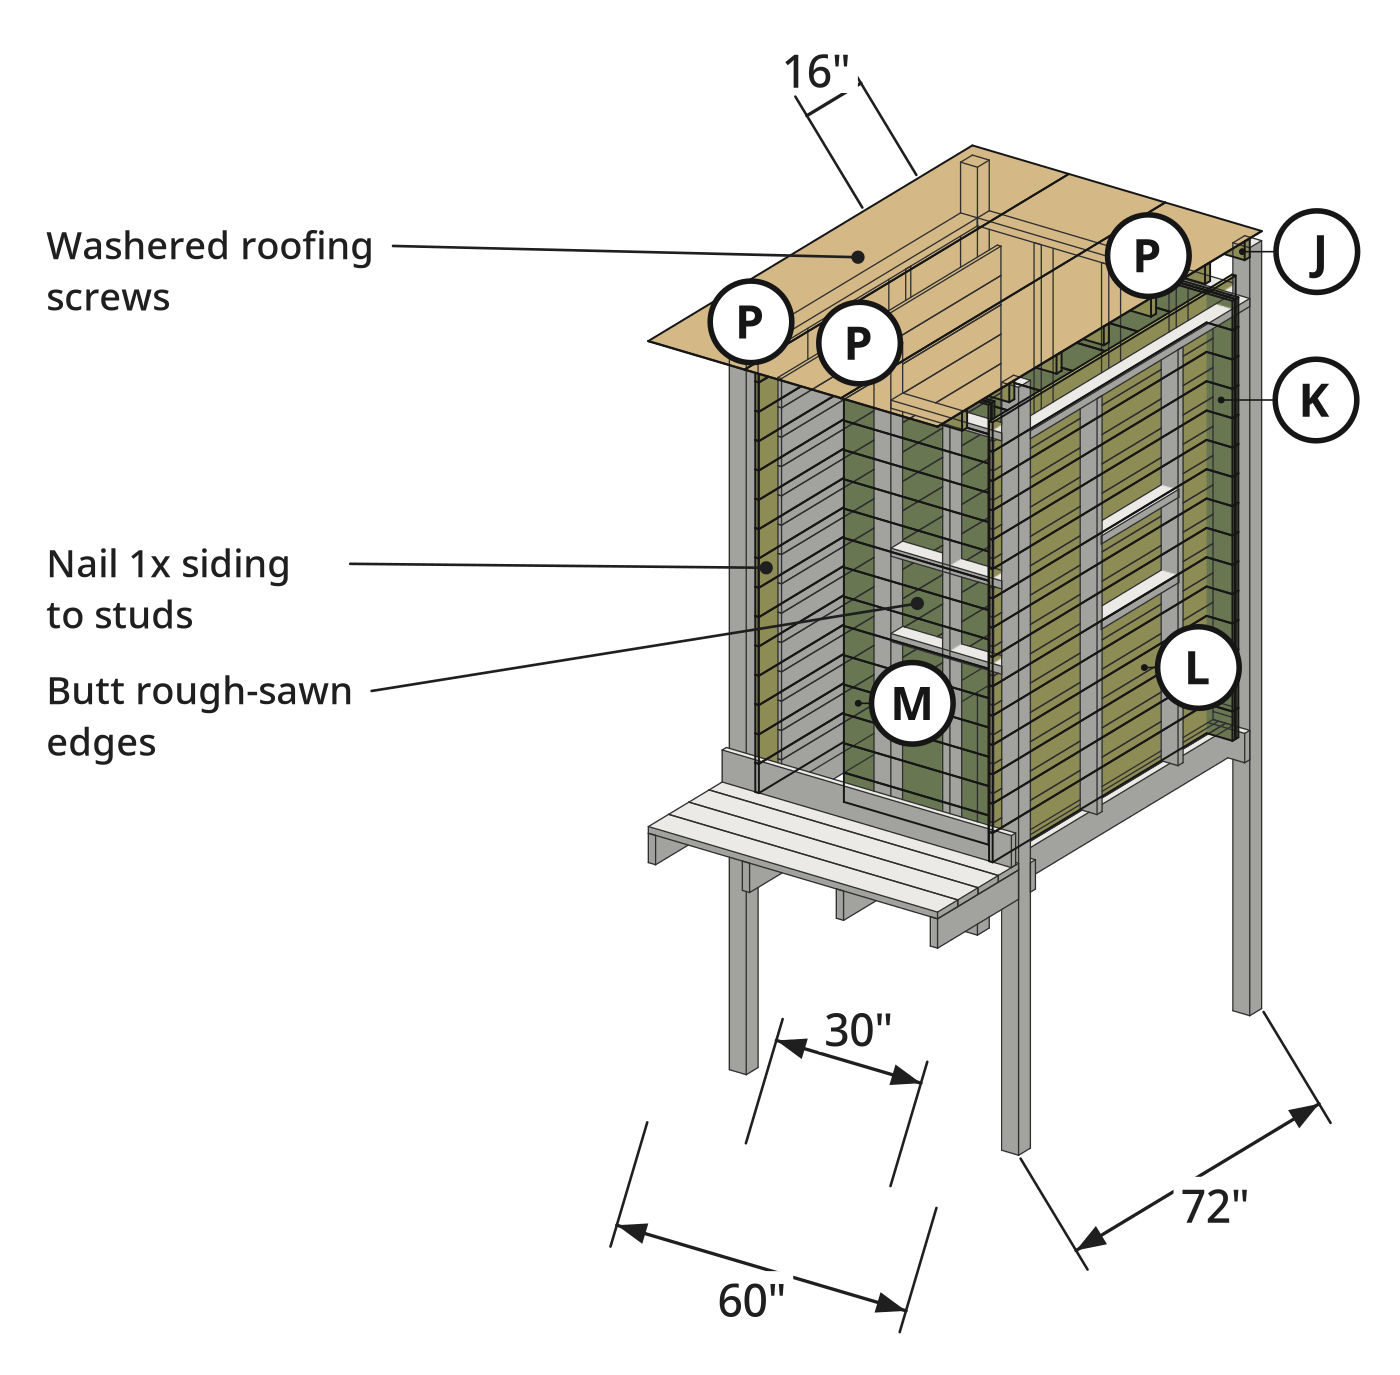
Rough-sawn 1x siding wraps the exterior walls and polycarbonate panels cover the 2x4 roof purlins.
Parts in this step: (A) Corner post, (F) Wall stud, (J) Roof purlin, (K) Rear wall rough-sawn siding board, (L) Side wall exterior rough-sawn siding board, (M) Front partition rough-sawn siding board, (P) Corrugated polycarbonate roof panel
You'll need: Miter saw with stand, Cordless framing nailer, Impact driver, Tape measure, Ladder, Pump sprayer, Rough-sawn 1x lumber, 2x4 framing lumber, Corrugated polycarbonate roof panels, Framing and siding nails, Washered roofing screws, Clear wood preservative
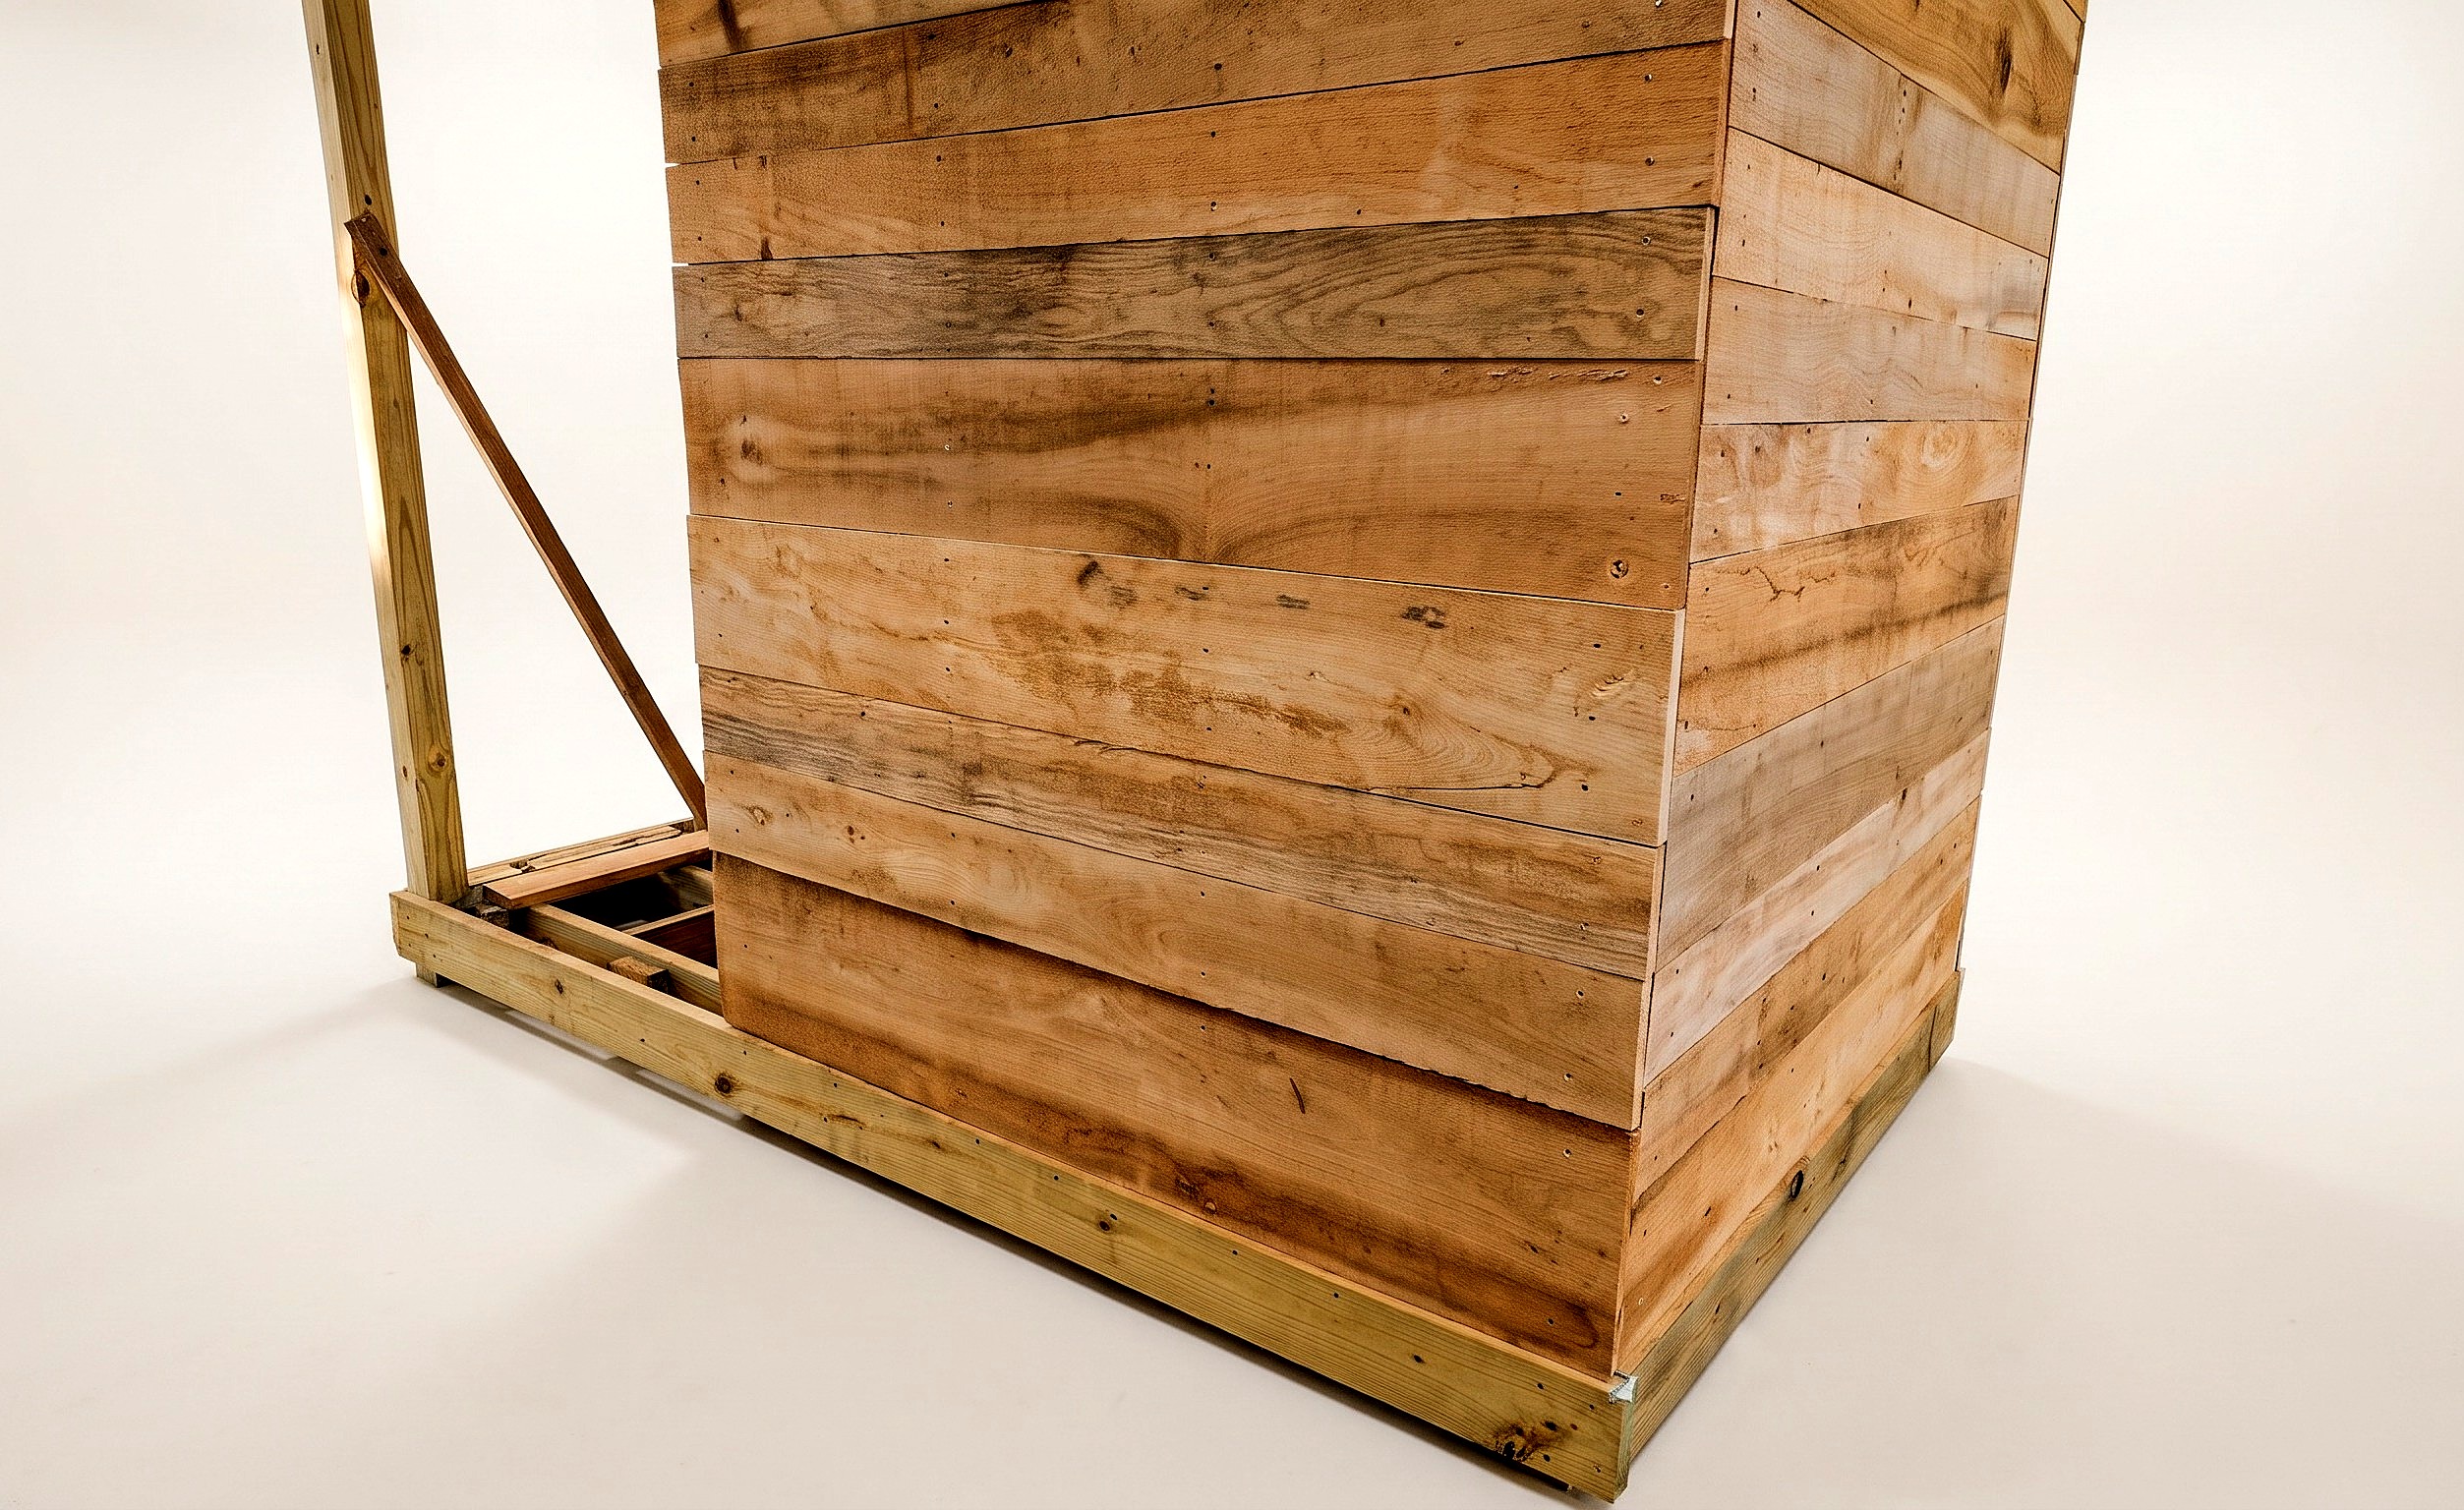
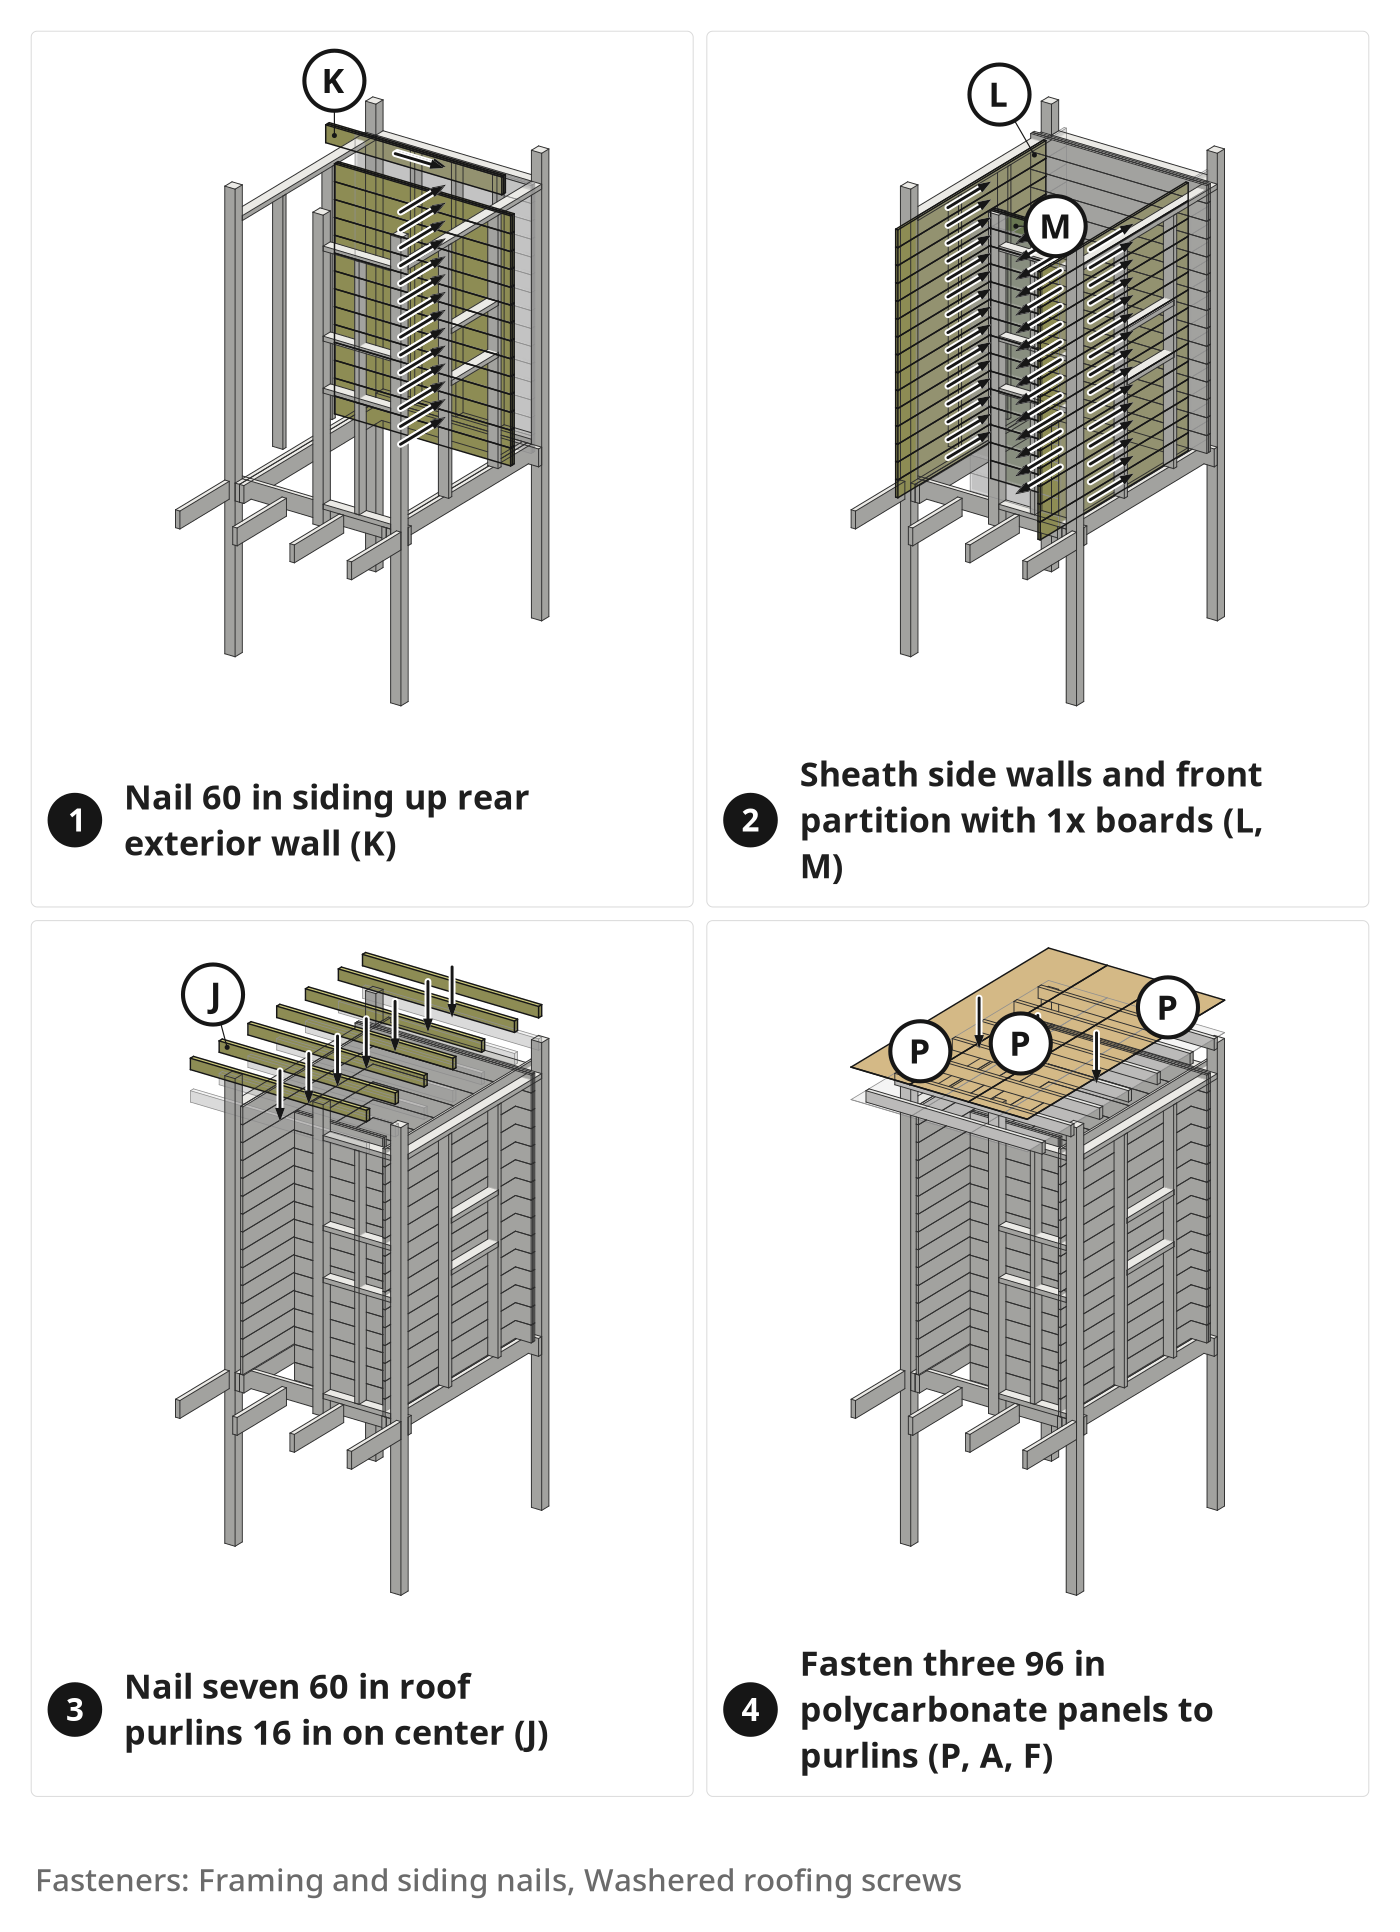
- 6.1 Nail rough-sawn 1x boards up the rear exterior plumbing wall
- Cut rear rough-sawn siding boards (K) to 60 in on the miter saw.
- Stack courses bottom-up without spacers, butting wavy edges together.
- Alternate board widths and tones; nail into rear studs (F) and corner posts (A).
- 6.2 Sheath the left side and entryway walls with 1x boards
- Cut and nail estimated 72 in side siding boards (L) up both exterior side walls.
- Nail 30 in front partition siding boards (M) across the exterior entryway partition.
- Spray exterior siding and wall cavities with clear wood preservative; dry overnight.
- Nail seven 60 in roof purlins (J) 16 in on center across the top framing.
- Fasten three 96 in by 20 in corrugated polycarbonate roof panels (P) to purlins with washered roofing screws.
Key measurements
- Rear siding boards: 60 in across rear exterior wall
- Side siding boards: 72 in (estimated) across both exterior side walls
- Front partition siding boards: 30 in across front partition wall
- Roof purlins: seven 60 in 2x4 purlins spaced 16 in on center
- Tip: Space 2x4 roof purlins 16 in on center to support heavier metal panels later.
Before you move on: Coat the inside of the exterior siding with wood preservative before enclosing interior walls.
Step 7: Apply wood preservative to the interior walls
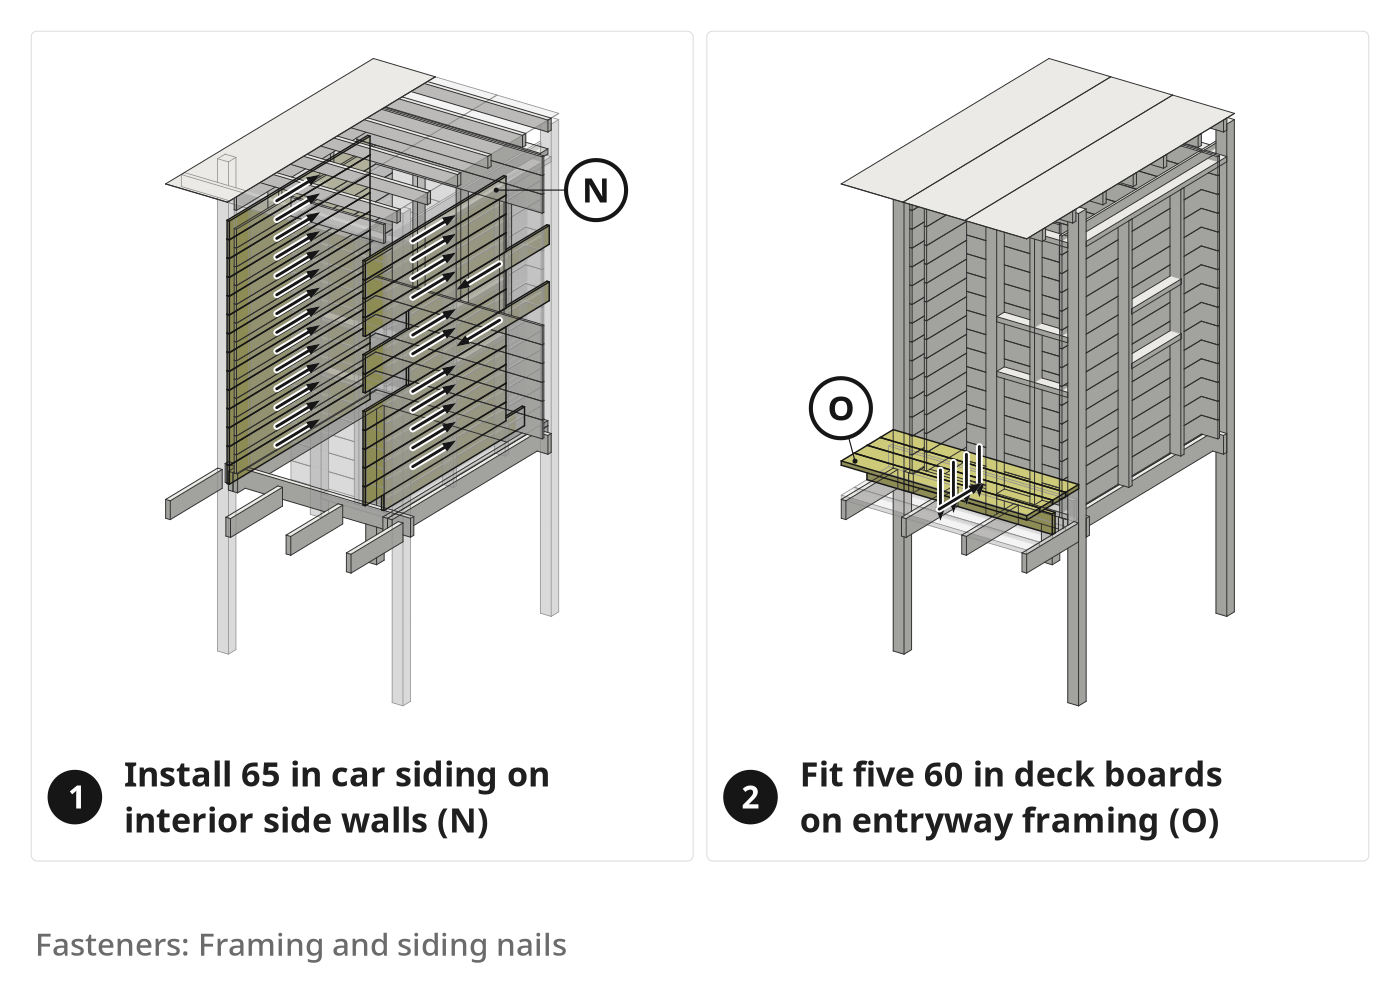
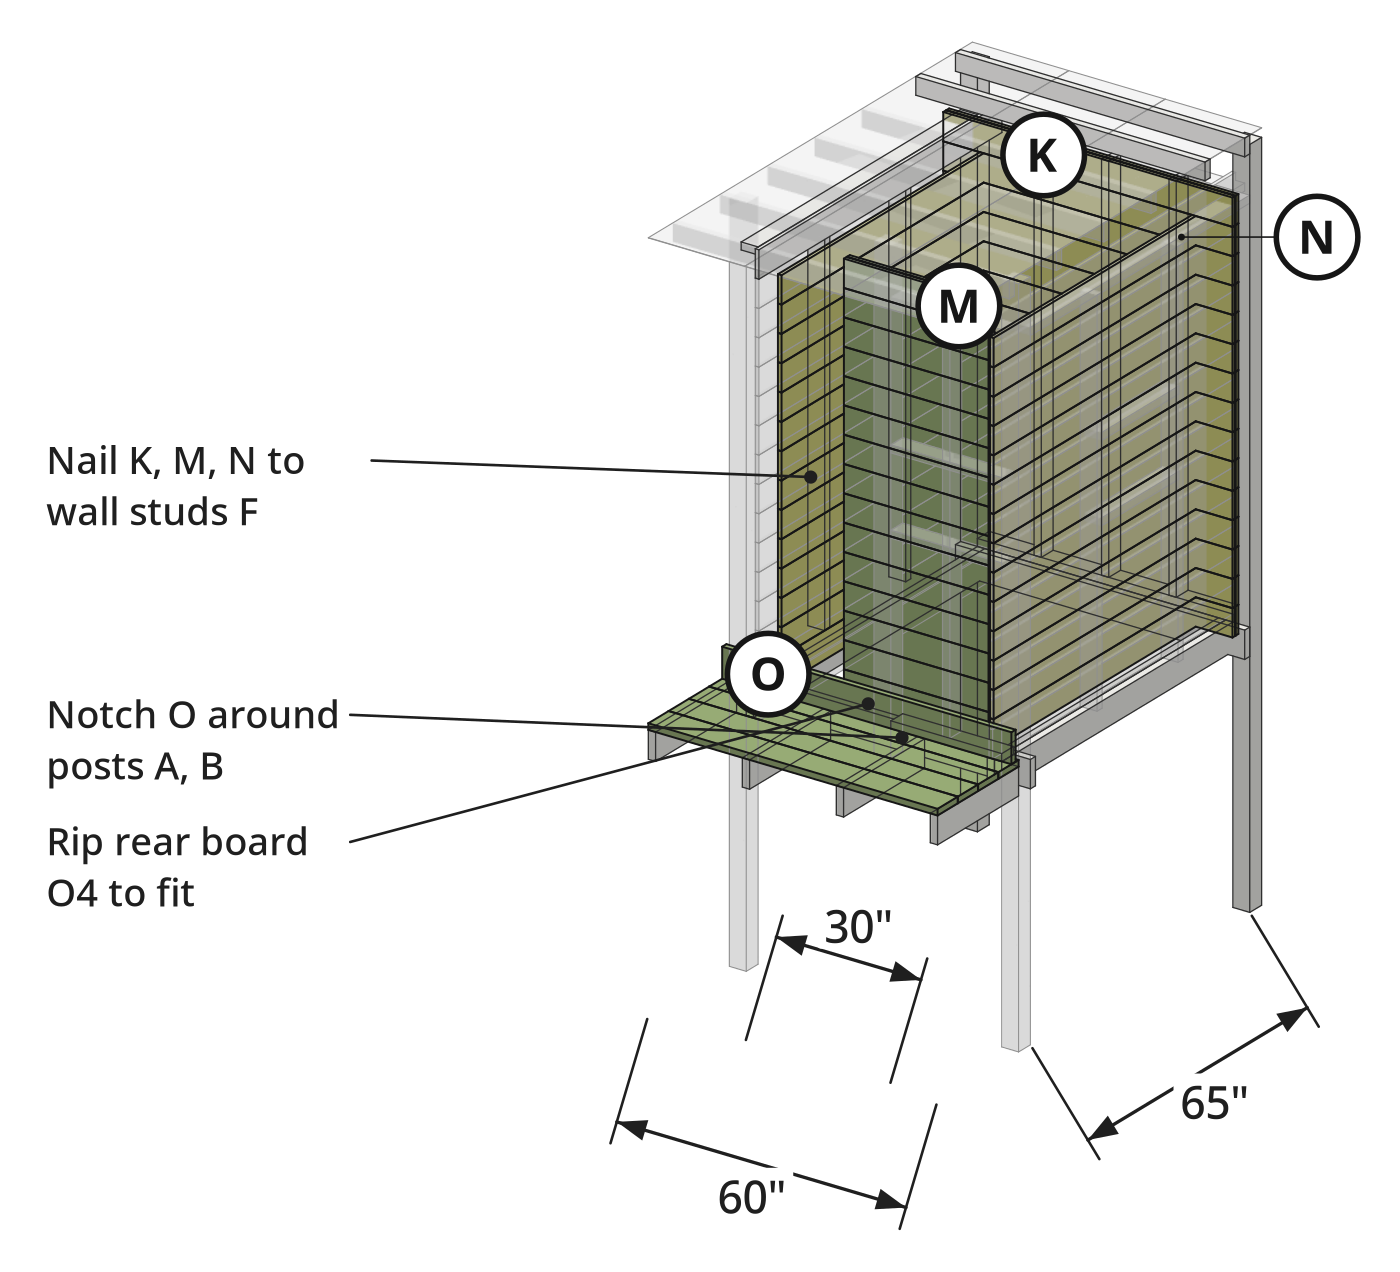
Sheathe interior walls, spray clear wood preservative, and fit shower trim and entryway decking.
Parts in this step: (K) Rear wall rough-sawn siding board, (M) Front partition rough-sawn siding board, (N) Interior side wall car siding board, (O) Entryway deck board
You'll need: Miter saw with stand, Circular saw, Cordless framing nailer, Pump sprayer, Impact driver, Rough-sawn 1x lumber, Car siding boards, Clear wood preservative, Shower valve trim kit, Shower heads and shower arm, Composite decking boards, Framing and siding nails
- 7.1 Spray clear wood preservative onto the interior siding
- Nail remaining 60 in boards (K) and 30 in boards (M) to interior plumbing and niche walls.
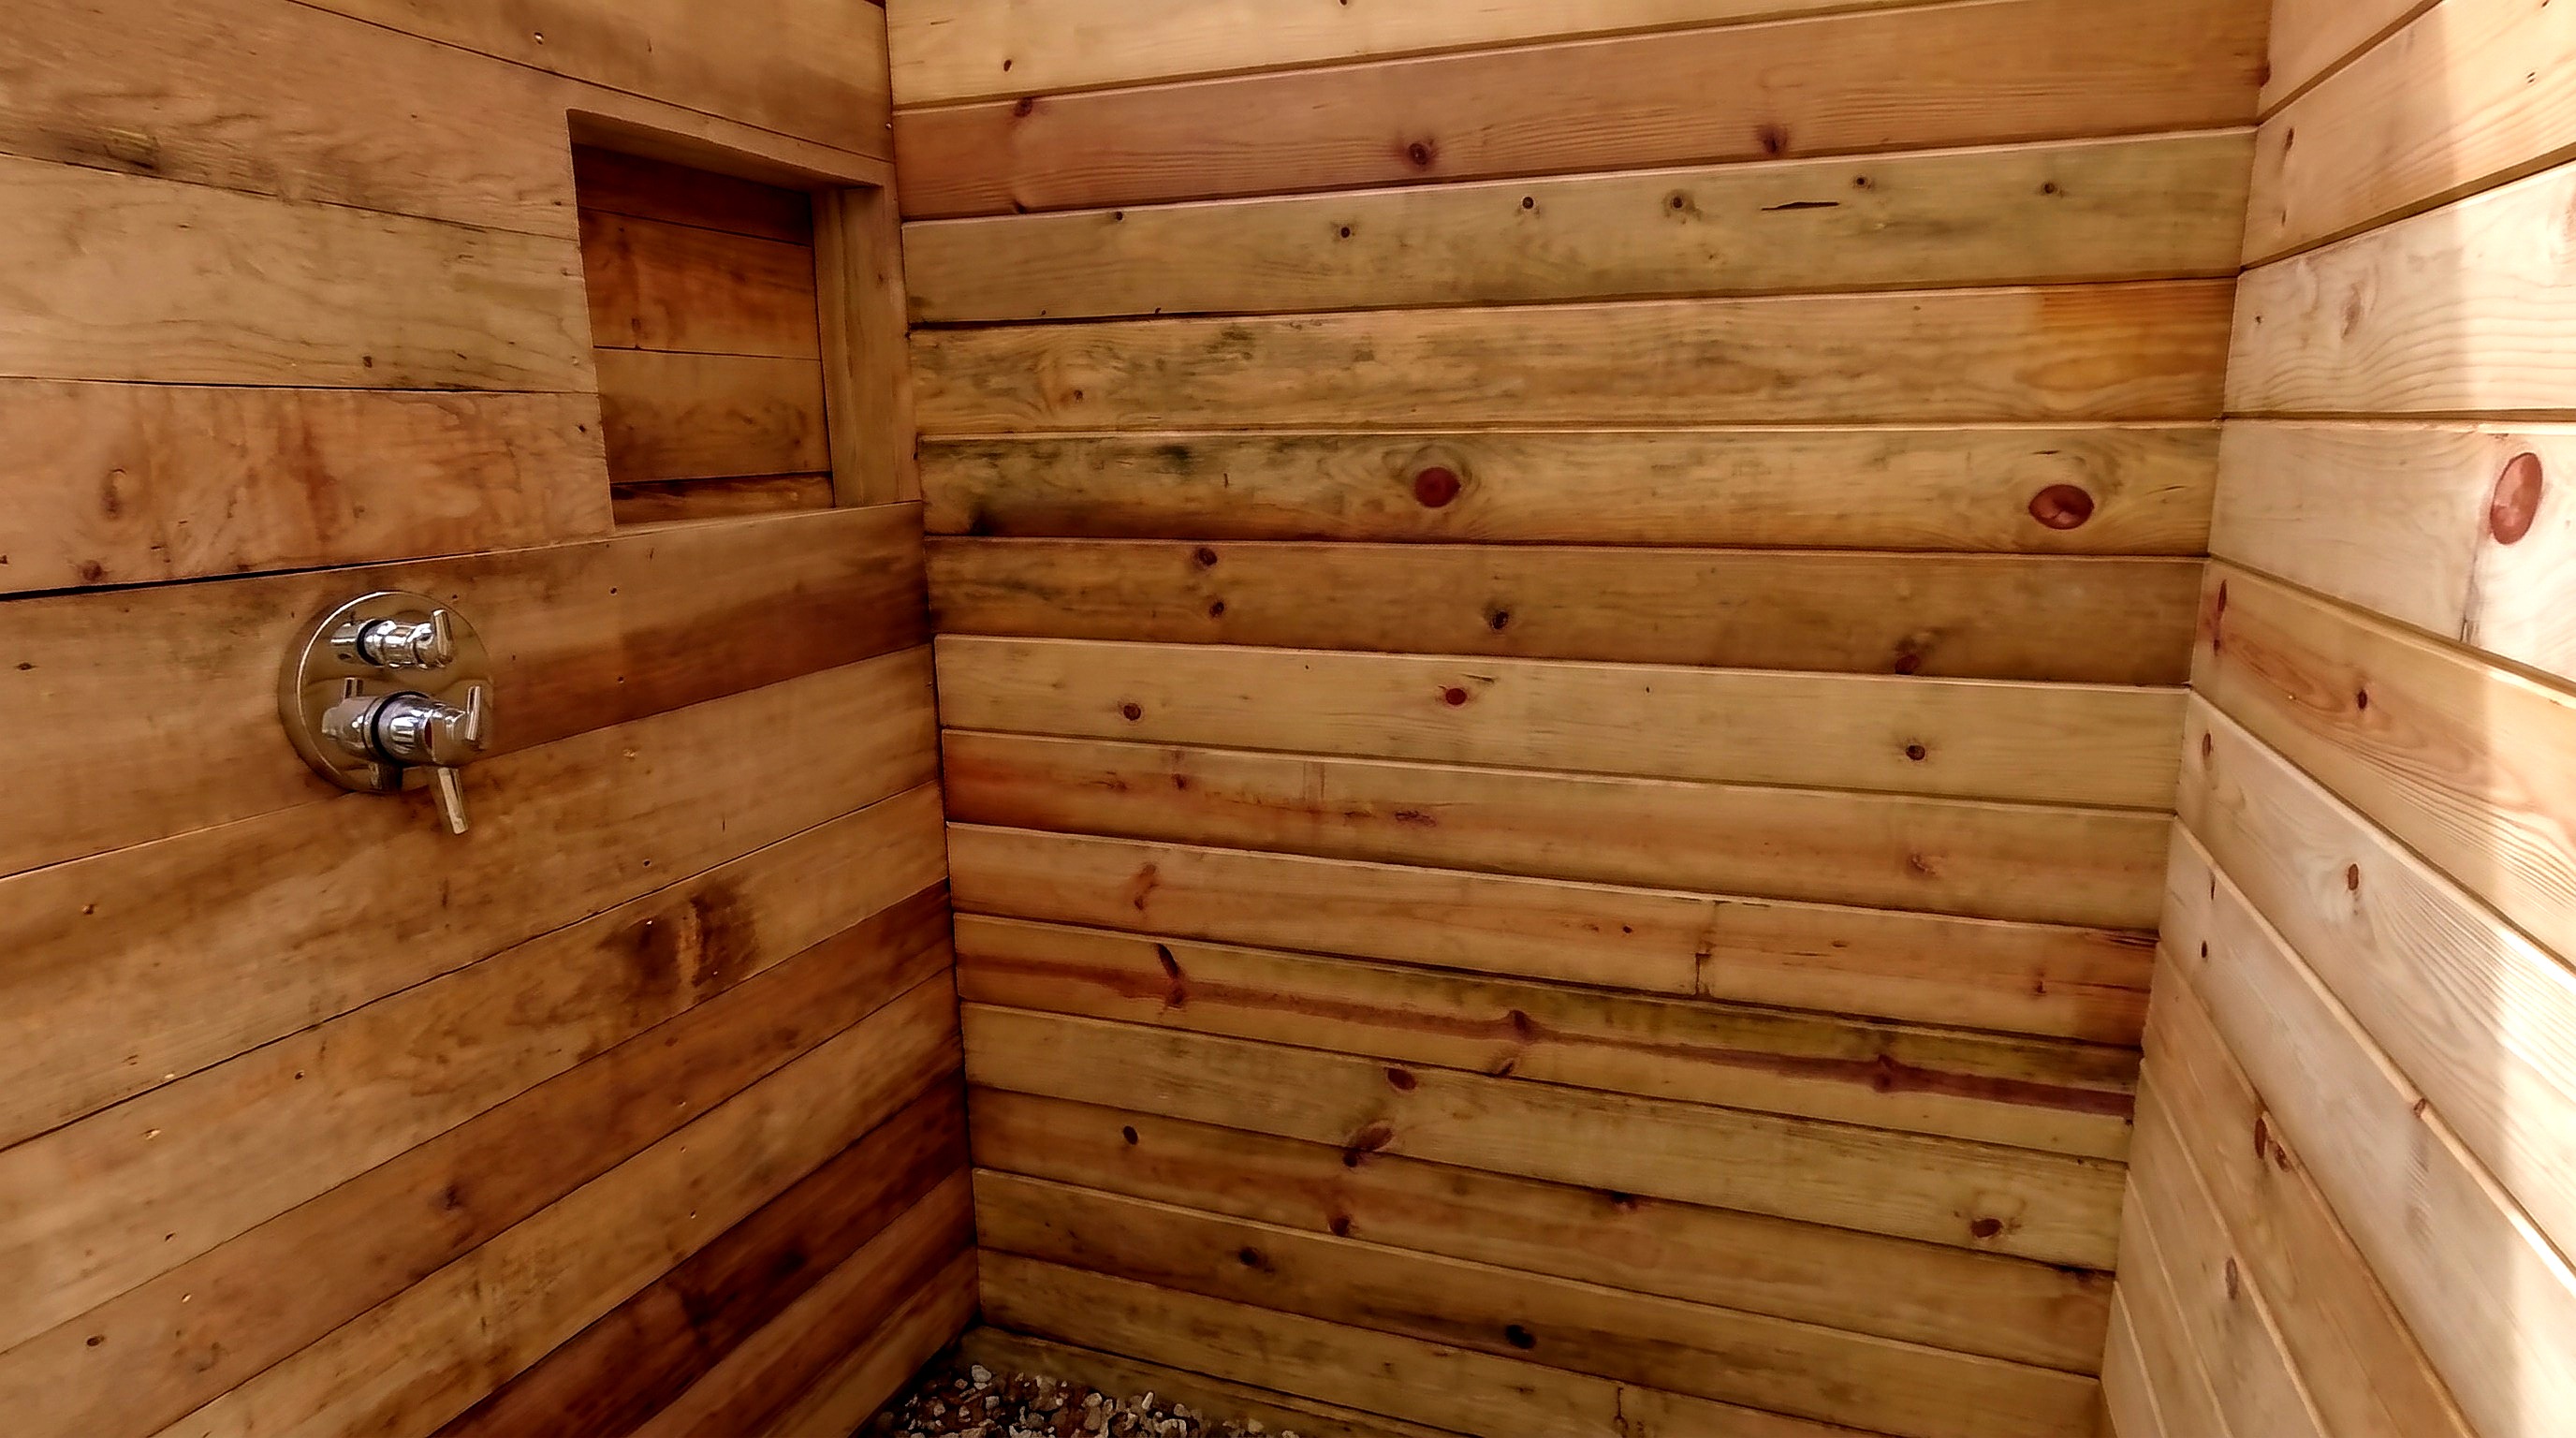
- Install estimated 65 in tongue-and-groove car siding boards (N) on both interior side walls.
- Fill the pump sprayer with clear wood preservative and wet-coat all interior wood.
- Install the shower valve trim kit, wall shower head, and overhead rain shower head once dry.
- Rip, notch, and dry-fit five estimated 60 in entryway deck boards (O) on the entryway framing.
Key measurements
- Interior car siding boards: 65 in (estimated) along interior side walls
- Entryway composite deck boards: 60 in (estimated) across entryway floor
- Wood preservative: 2 gallons total for exterior, cavity, and interior coats
- Tip: Let the sprayed interior preservative dry before running the wall shower head so water does not wash away the treatment.
- Heads up: Do not breathe mist; protect skin and eyes while spraying wood preservative inside the stall.
Before you move on: Test all six diverter combinations between wall head, rain head, and exterior hose bib.
Finishing
Floor and Decking
- Fasten notched composite entryway deck boards (O) to the 2x6 entryway joists.
- Bed the nine hearthstones level into the interior #8 river rock floor.
Stain and Sealer
- Let the clear wood preservative dry on all interior and exterior surfaces.
- Apply exterior wood stain and water sealer to untreated rough-sawn and car siding boards.
Winterizing Care
- Close basement supply shutoff valves before freezing weather.
- Open exterior quarter-turn and basement drain valves to empty lines into a bucket.
Alternatives
- Upgrade polycarbonate panels to heavy-gauge corrugated metal roofing on 2x4 purlins if desired.
These Specs are built from Indy Farm Life's video “Freestanding Wood-Sided Outdoor Shower with Rain Head”. Open the Freestanding Wood-Sided Outdoor Shower with Rain Head project page.
