Spetz Specs No. 8202: step-by-step site work guide
Multi-Layer Limestone Gravel Driveway
The complete step-by-step guide made from Indy Farm Life's YouTube video, free on Spetz. For the video, a step-by-step player and answers to your questions, see the Multi-Layer Limestone Gravel Driveway project page.
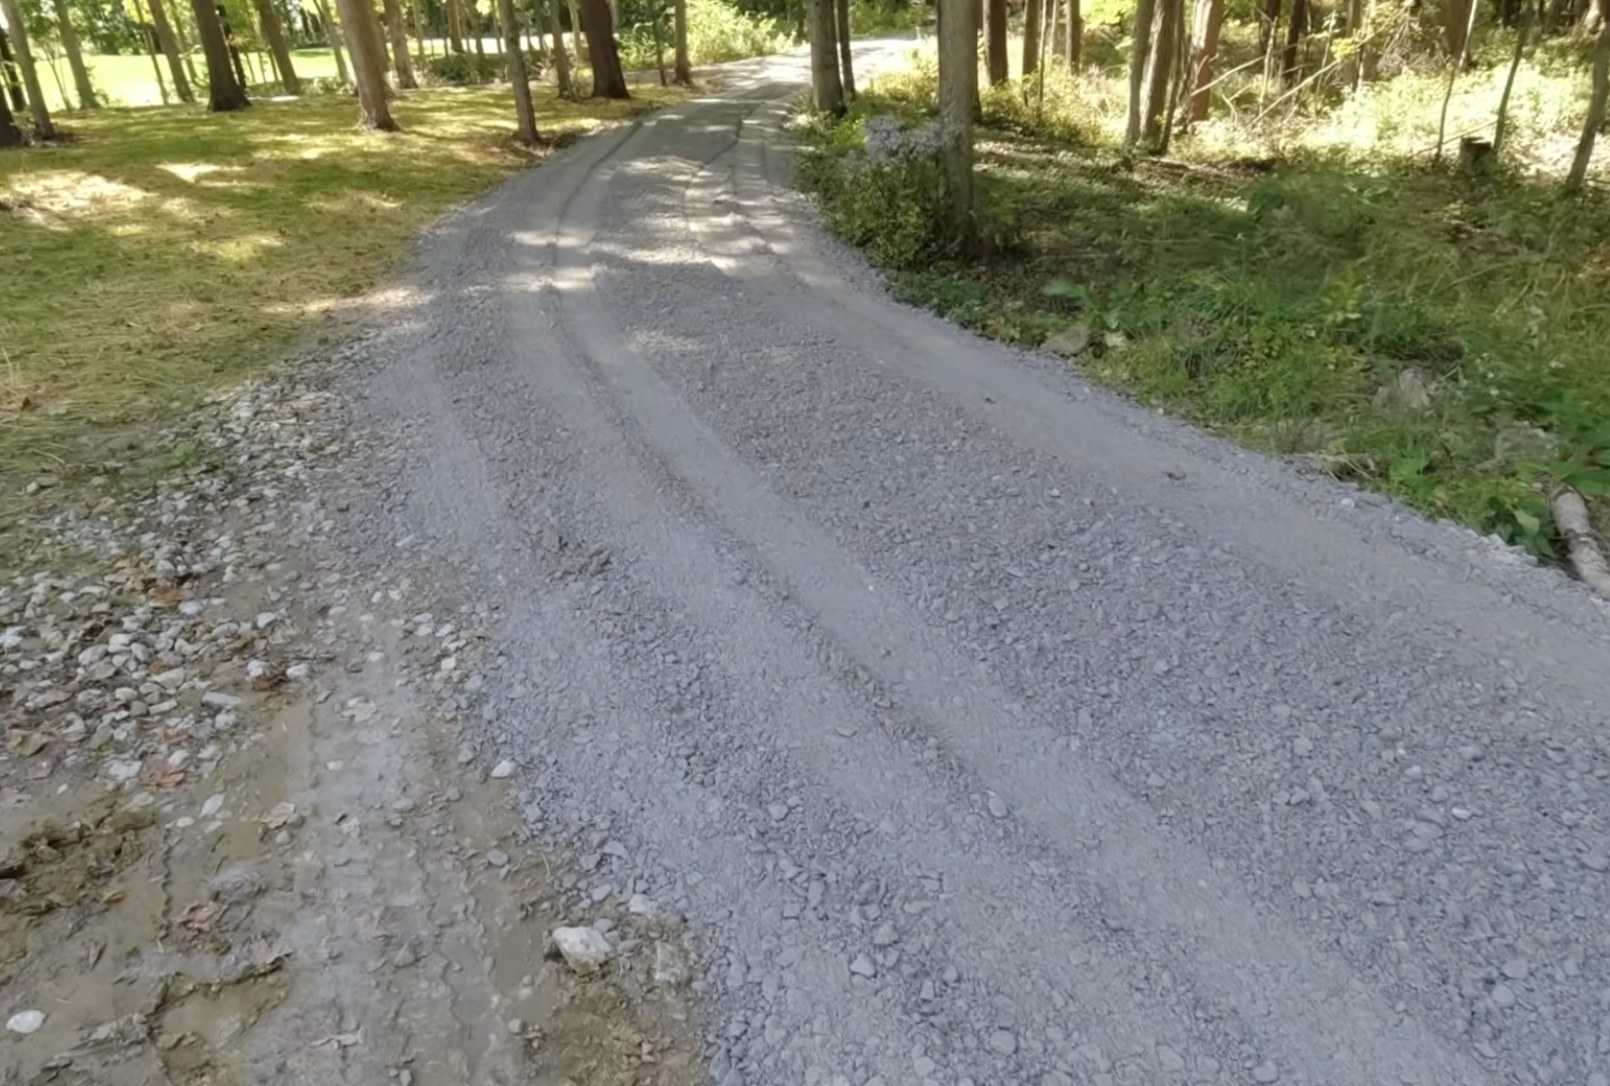
4 steps, 5 parts, 4 tools, 4 materials
Overview
Finished size: 6 to 8 in topsoil stripped to clay; length and width not stated
The job
- Build and top-dress a gravel drive and barn road over 6 to 8 in stripped clay subgrade.
- Layer clean #2 base stone, 4 quad-axle loads (about 85 tons) of #53 stone, and #8 top dressing.
Why this layer order
- Hard clay or geotextile fabric stops stone sinking into spongy earth.
- Large #2 stone forms the structural base, #53 fines lock crevices, and dust-free #8 keeps vehicles clean.
What it takes
- Compact tractor with box blade, and access for quad-axle dump trucks to back in and tailgate.
- Build in waves: let 1.5 to 2 years of rain and traffic compact the base before topping.
What decides success
- Strip spongy topsoil to well-drained clay before dumping gravel.
- Let rain and heavy traffic pack each layer firm before adding the next.
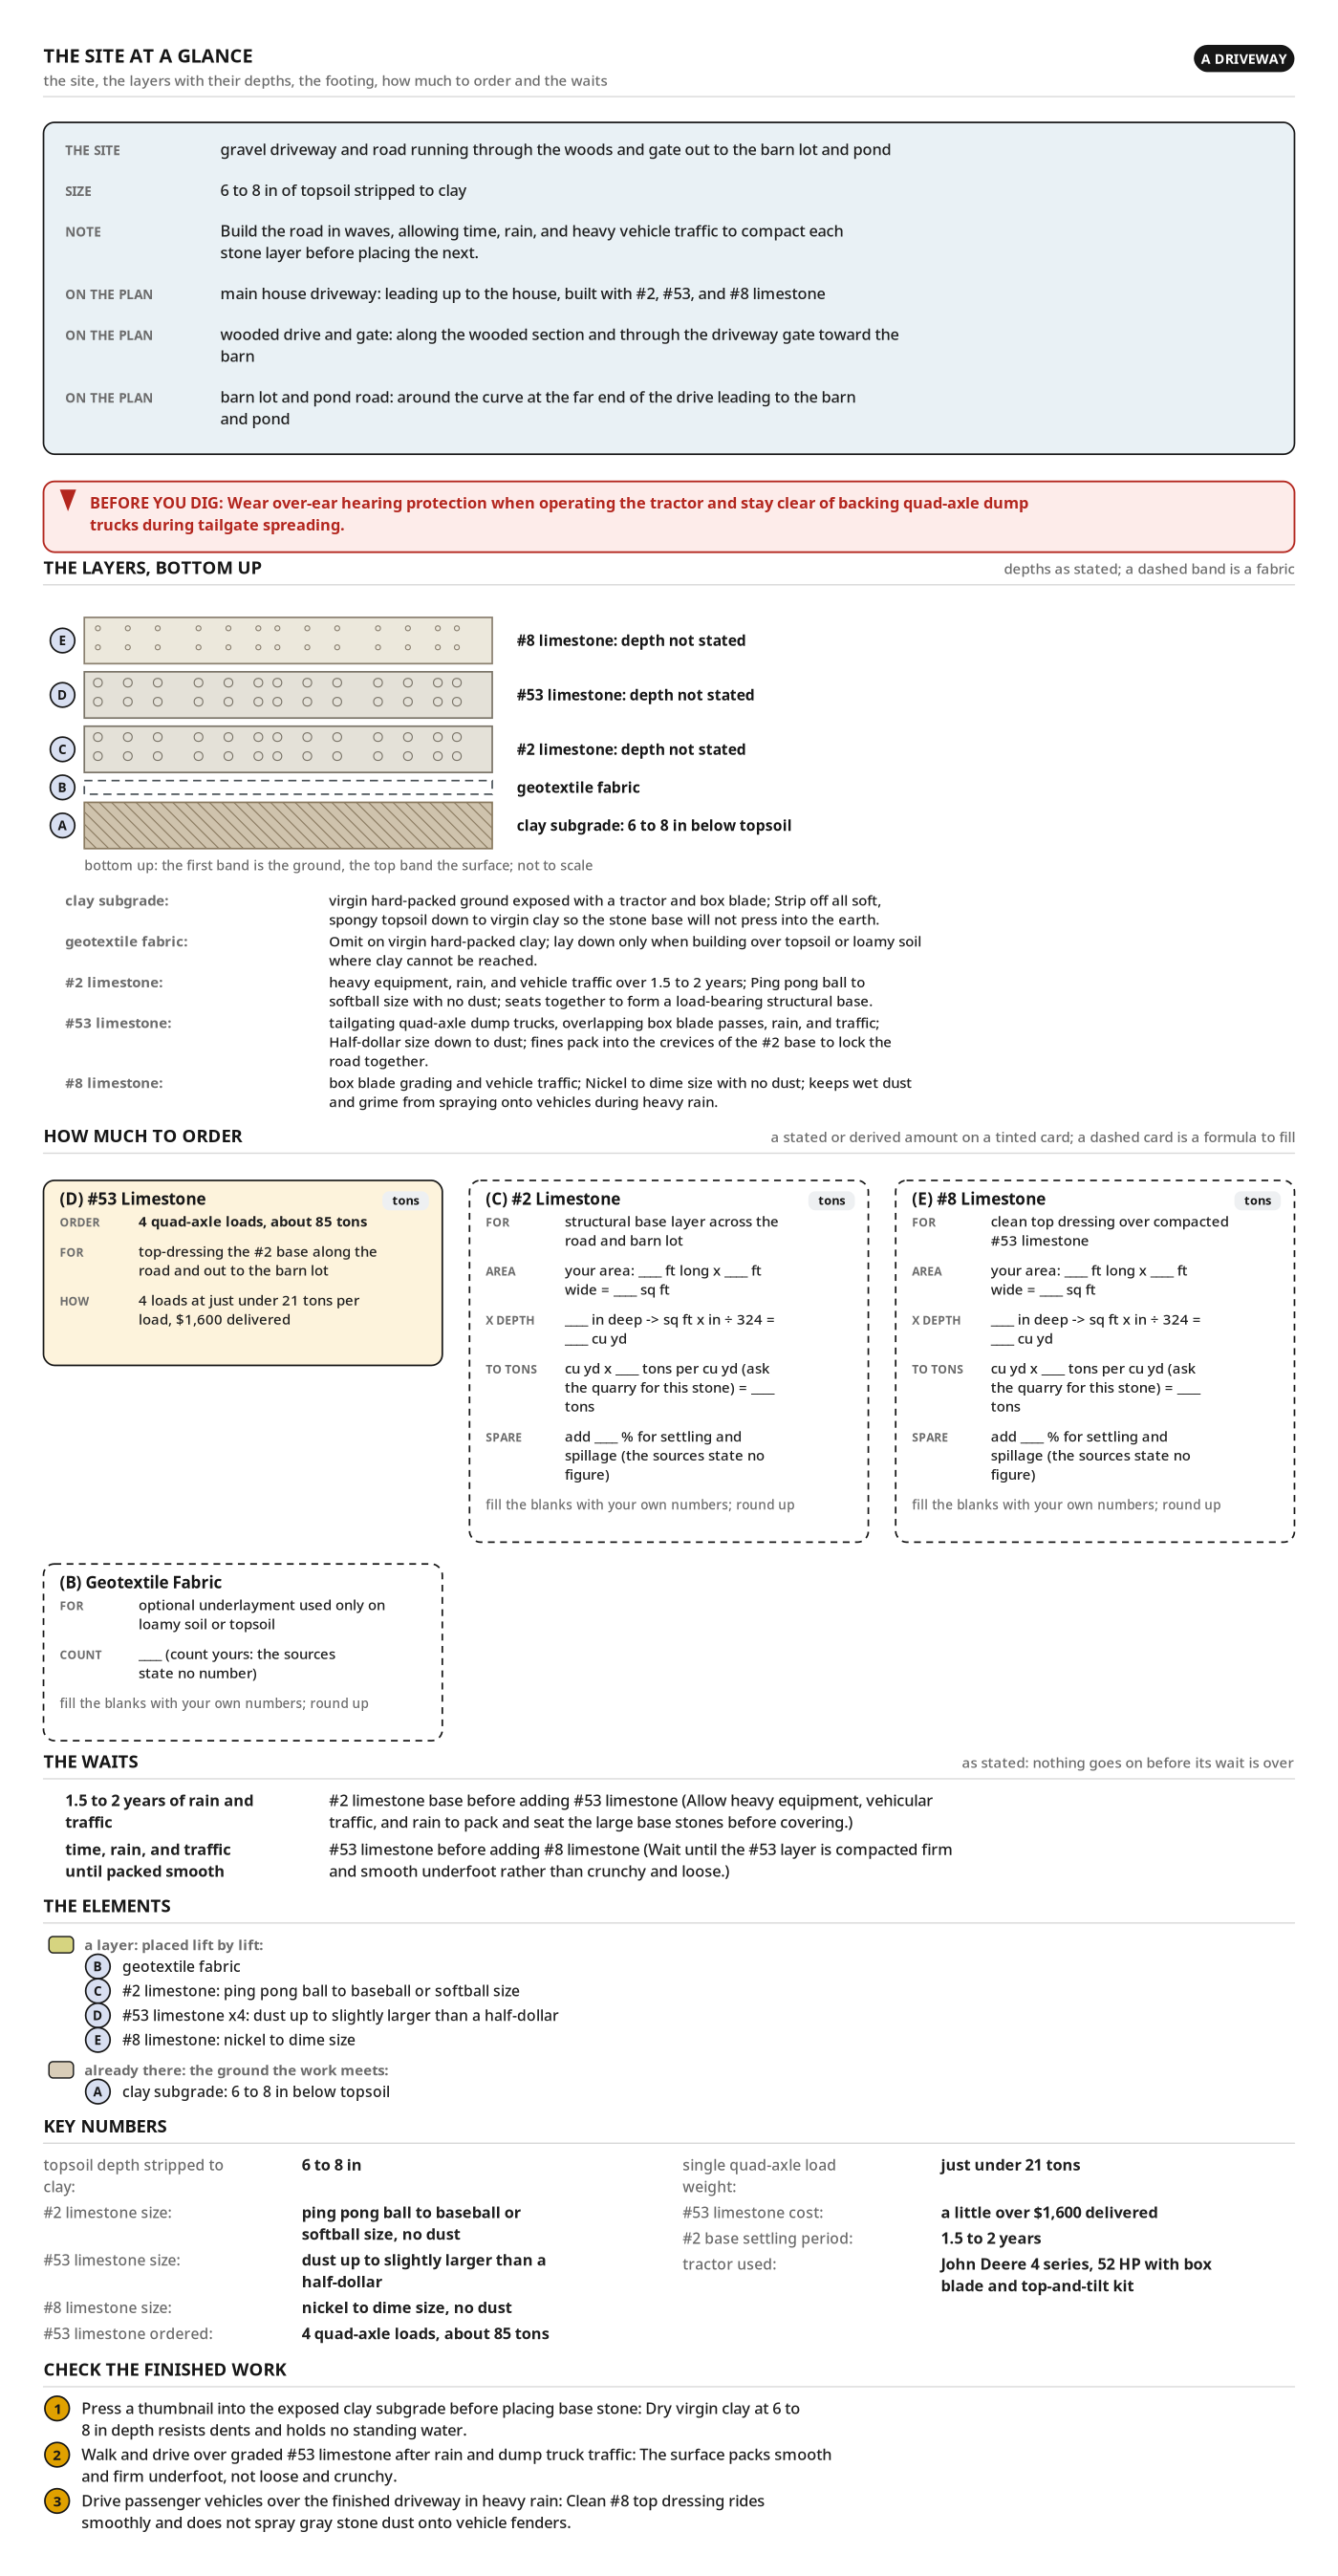
The site at a glance
- The site: gravel driveway and road running through the woods and gate out to the barn lot and pond
- Size: 6 to 8 in of topsoil stripped to clay
- Order #53 Limestone: 4 quad-axle loads, about 85 tons
- Order #2 Limestone: amount not stated, measure your site
- Order #8 Limestone: amount not stated, measure your site
- Order Geotextile Fabric: amount not stated, measure your site
- Wait: #2 limestone base before adding #53 limestone: 1.5 to 2 years of rain and traffic
- Wait: #53 limestone before adding #8 limestone: time, rain, and traffic until packed smooth
- topsoil depth stripped to clay: 6 to 8 in
- #2 limestone size: ping pong ball to baseball or softball size, no dust
- #53 limestone size: dust up to slightly larger than a half-dollar
- #8 limestone size: nickel to dime size, no dust
- #53 limestone ordered: 4 quad-axle loads, about 85 tons
- single quad-axle load weight: just under 21 tons
- #53 limestone cost: a little over $1,600 delivered
- #2 base settling period: 1.5 to 2 years
- tractor used: John Deere 4 series, 52 HP with box blade and top-and-tilt kit
The layers, bottom up
- 1. clay subgrade: 6 to 8 in below topsoil
- 2. geotextile fabric
- 3. #2 limestone
- 4. #53 limestone
- 5. #8 limestone
Before you dig
- Wear over-ear hearing protection when operating the tractor and stay clear of backing quad-axle dump trucks during tailgate spreading.
Health and safety
Dump Truck Delivery Safety
- Keep all bystanders, equipment, and cameras well clear of backing quad-axle dump trucks during gravel delivery and tailgate spreading.
- Direct dump trucks from a visible position in the driver's side mirror, and never walk behind a moving truck.
- Verify the driveway route is free of low overhead hazards before the dump truck raises its bed to tailgate limestone.
Compact Tractor Operation
- Keep the front-end loader bucket low while traveling and grading to maintain a stable center of gravity on uneven stone.
- Check behind you before backing the 52 HP compact tractor between gravel piles, and keep bystanders out of the grading zone.
- Lower both the front-end loader and the rear box blade completely to the ground before leaving the tractor seat.
Box Blade and Hydraulics
- Keep hands and feet clear of 3-point hitch arms and hydraulic top and tilt linkages while adjusting the box blade.
- Shut off the tractor engine and relieve hydraulic pressure before connecting, disconnecting, or servicing the top and tilt kit.
- Never inspect hydraulic hoses for leaks with bare hands; escaping high-pressure fluid can penetrate skin and cause severe injury.
Noise and Limestone Dust
- Wear over-ear hearing protection earmuffs as protective equipment during extended tractor and box blade grading sessions.
- Wear a dust mask and safety glasses when dumping or grading #53 crushed limestone to avoid inhaling fine stone dust.
- Stay clear of the box blade while scraping #2, #53, or #8 limestone, as heavy steel edges can eject sharp stones.
Before you dig
- Check drainage first so ponding water cannot soften the clay subgrade.
- Rip 6 to 8 in of soft topsoil with the box blade down to dry, hard virgin clay.
- Lay geotextile fabric only over loamy soil, sand, or wet spots where firm clay cannot be reached.
- Lay the #2 limestone base first; let rain and traffic compact it 1.5 to 2 years.
- Clear overhead branches and gates so quad-axle dump trucks can back in to tailgate.
- Keep bystanders clear of backing dump trucks; wear hearing protection on the tractor.
Tools
- Compact Tractor with Front-End Loader (4WD utility compact tractor, John Deere, 4052R with H180 Loader, 52 HP)
- Box Blade (3-point hitch tractor box scraper)
- Top and Tilt Kit (Hydraulic 3-point hitch angling kit) (optional)
- Hearing Protection Earmuffs (Over-ear hearing protection) (optional)
Materials
- #2 Limestone (Clean crushed limestone base stone, #2 grade, no dust, Ping pong ball to softball size)
- #53 Limestone (4 quad-axle loads (approx. 85 tons), Crushed limestone with fines, #53 grade with stone dust, Dust up to slightly larger than a half-dollar)
- #8 Limestone (Clean crushed limestone top dressing, #8 grade, no dust, Nickel to dime size)
- Geotextile Fabric (Road stabilization fabric)
Elements
| Part | Name | Qty | Size | Notes |
|---|---|---|---|---|
| A | clay subgrade | count yours | 6 to 8 in below topsoil | virgin hard-packed clay exposed after ripping off topsoil |
| B | geotextile fabric | count yours | used only on loamy soil or topsoil where firm clay cannot be reached | |
| C | #2 limestone | count yours | ping pong ball to baseball or softball size | clean stone with no dust; locks together as the structural base |
| D | #53 limestone | x4 | dust up to slightly larger than a half-dollar | 4 quad-axle loads (about 85 tons) · contains small stones and dust that pack into the crevices of #2 |
| E | #8 limestone | count yours | nickel to dime size | clean top dressing with no dust so rain does not splash mud on cars |
Step by step
Step 1: Grade the First Load of #53 Limestone
First #53 limestone load leveled and feathered across the compacted #2 base.
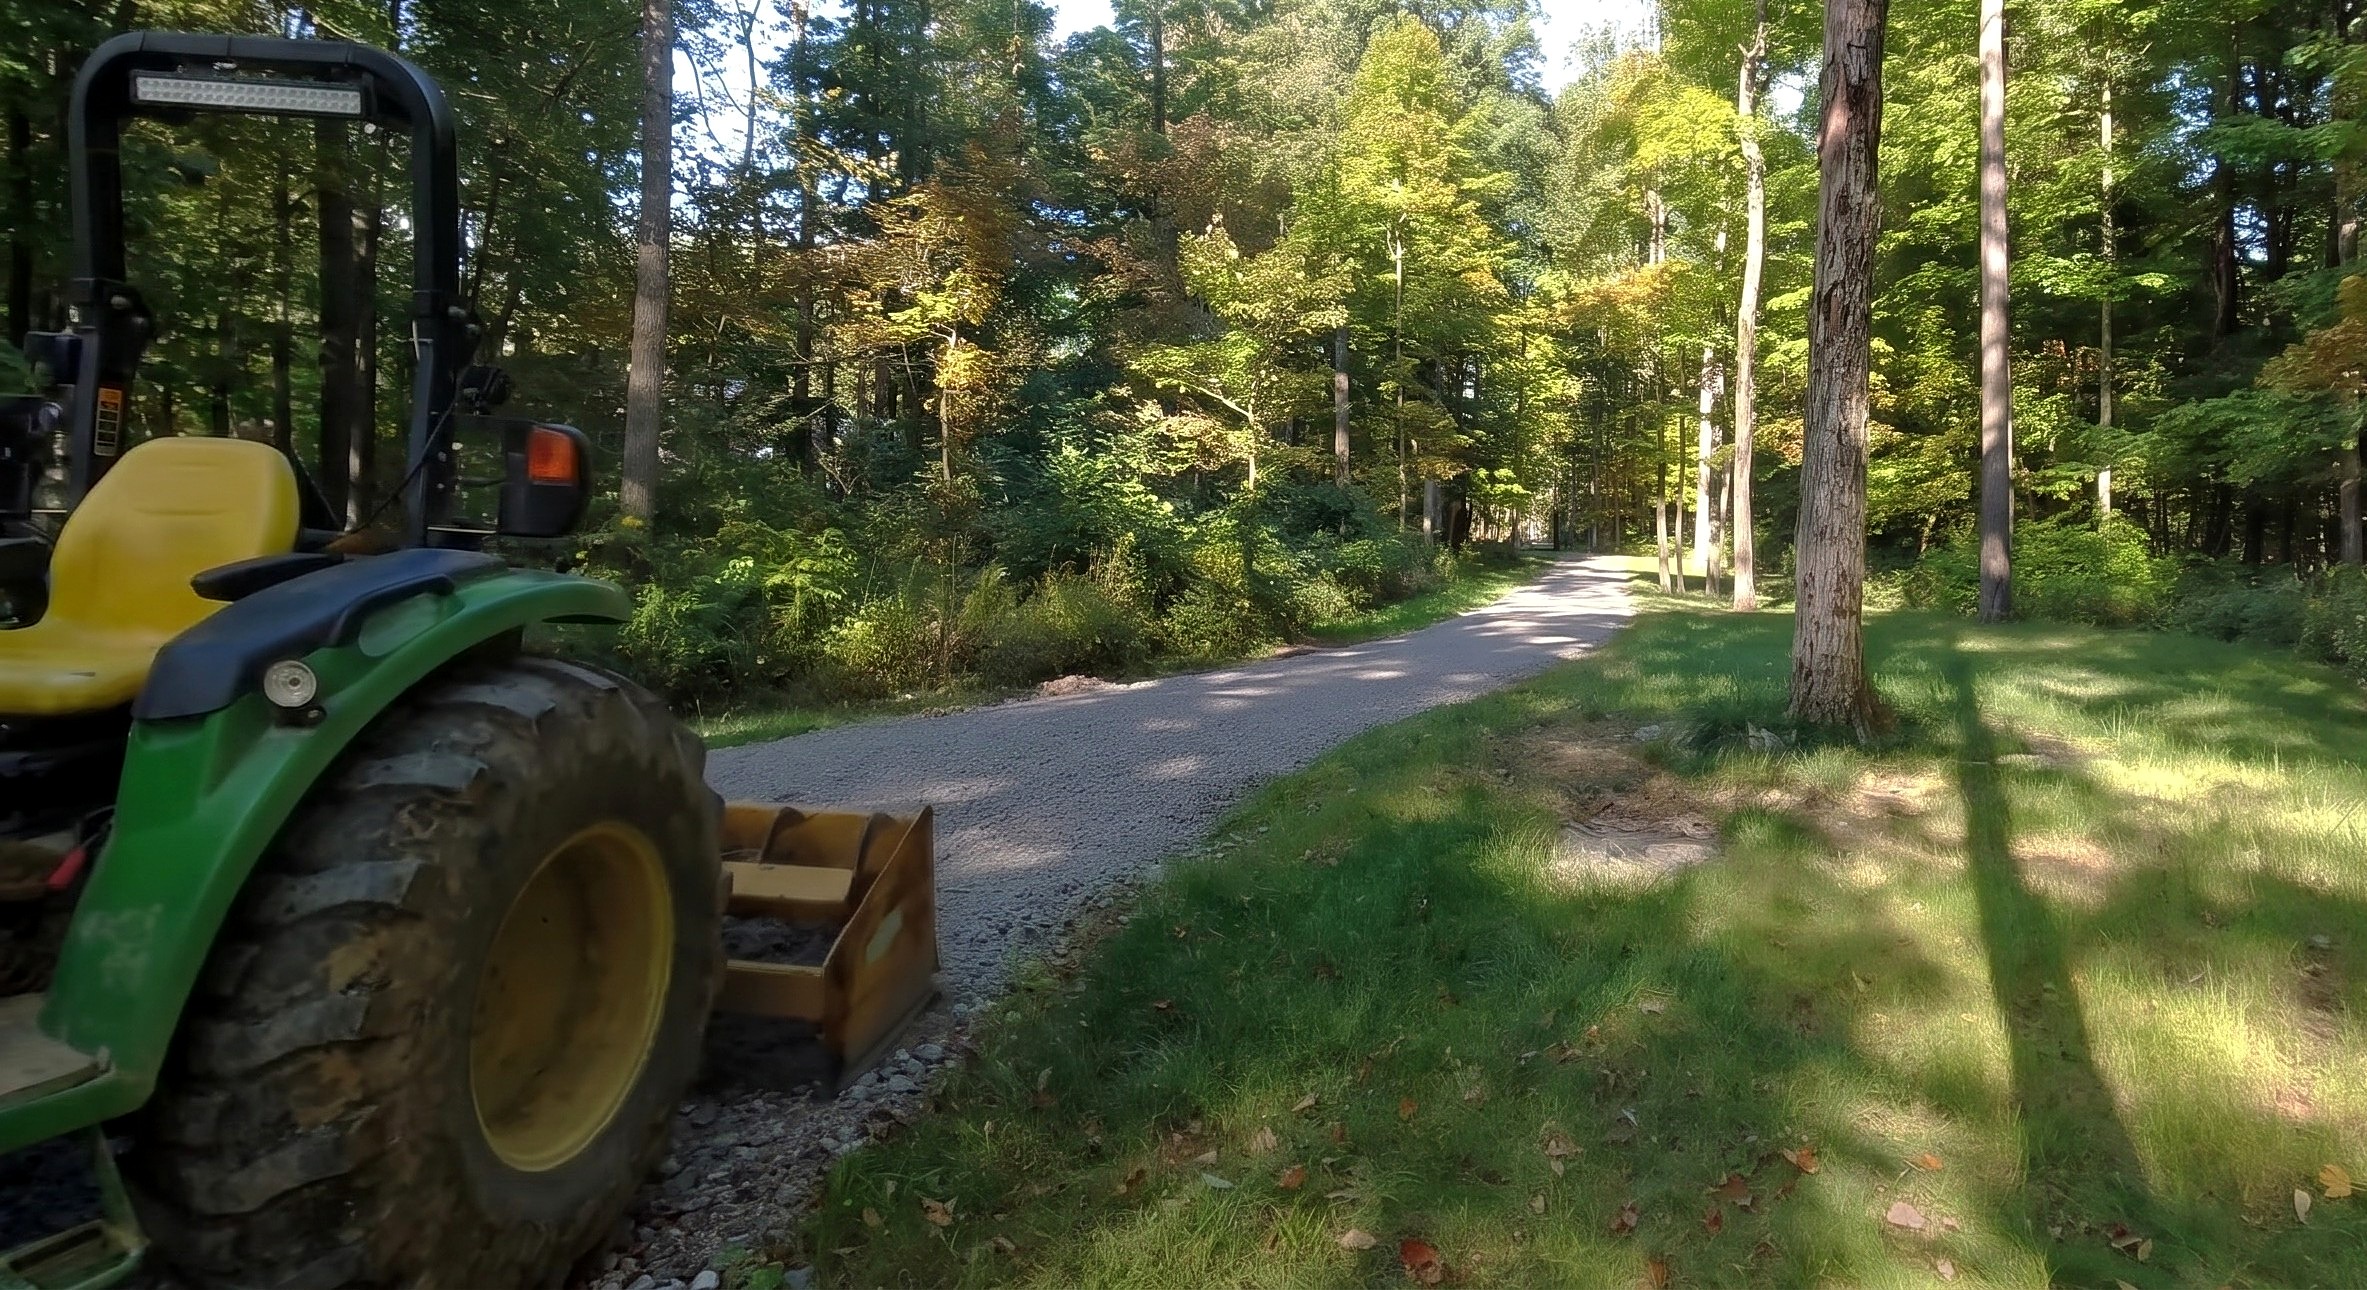
Parts in this step: (A) clay subgrade, (B) geotextile fabric, (C) #2 limestone, (D) #53 limestone
You'll need: Compact Tractor with Front-End Loader, Box Blade, Top and Tilt Kit, #2 Limestone, #53 Limestone, Geotextile Fabric
- 1.1 Make the initial grading pass over the dumped #53 stone
- First strip 6 to 8 in of topsoil to virgin clay subgrade (A).
- Lay geotextile fabric (B) first only on soft topsoil or loamy soil without clay.
- Spread #2 limestone (C); let traffic compact it 1.5 to 2 years.
- Lower the box blade onto the first #53 limestone (D) pile; drive forward.
- 1.2 Make follow-up passes to feather and smooth the surface
- Angle the box blade from the seat with the hydraulic top-and-tilt kit.
- Make overlapping forward passes both ways to fill ruts and remove ridges.
- Feather edges so #53 dust packs into #2 limestone (C) crevices.
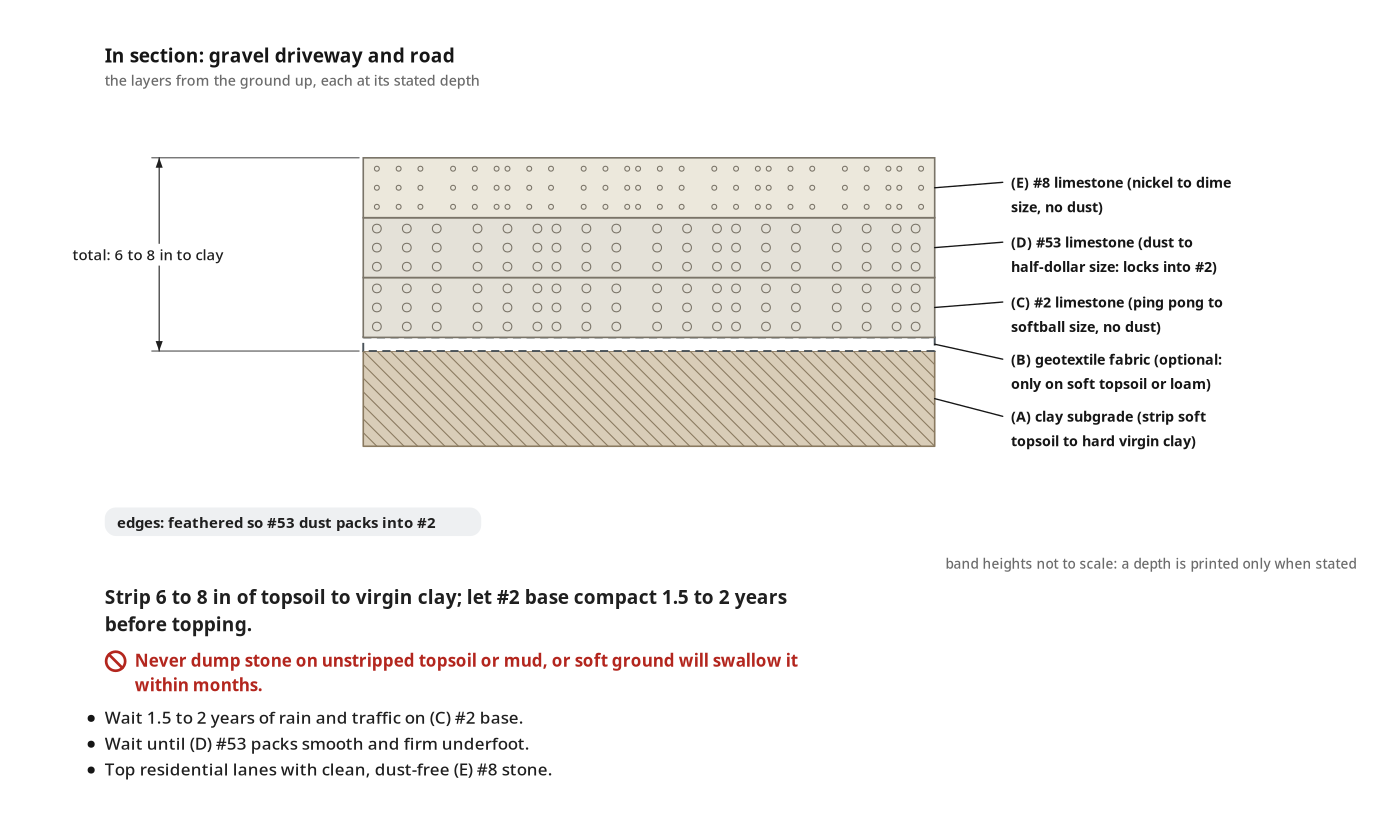
Key measurements
- Topsoil stripped to clay: 6 to 8 in deep
- #2 limestone base size: ping pong ball to baseball or softball, no dust
- #2 limestone compaction wait: 1.5 to 2 years of rain and traffic
- #53 limestone size: dust to slightly over half-dollar size
- Tip: Make overlapping box blade passes both ways to fill tire ruts and remove ridges.
- Tip: Hire out the 6 to 8 in topsoil stripping and haul-off if you cannot dump the dirt.
- Heads up: Never dump stone on unstripped topsoil or mud, or soft ground will swallow it within months.
Before you move on: First #53 limestone load lies flat over the compacted #2 base without ridges or ruts.
Step 2: Tailgate the Second Load of #53 Limestone
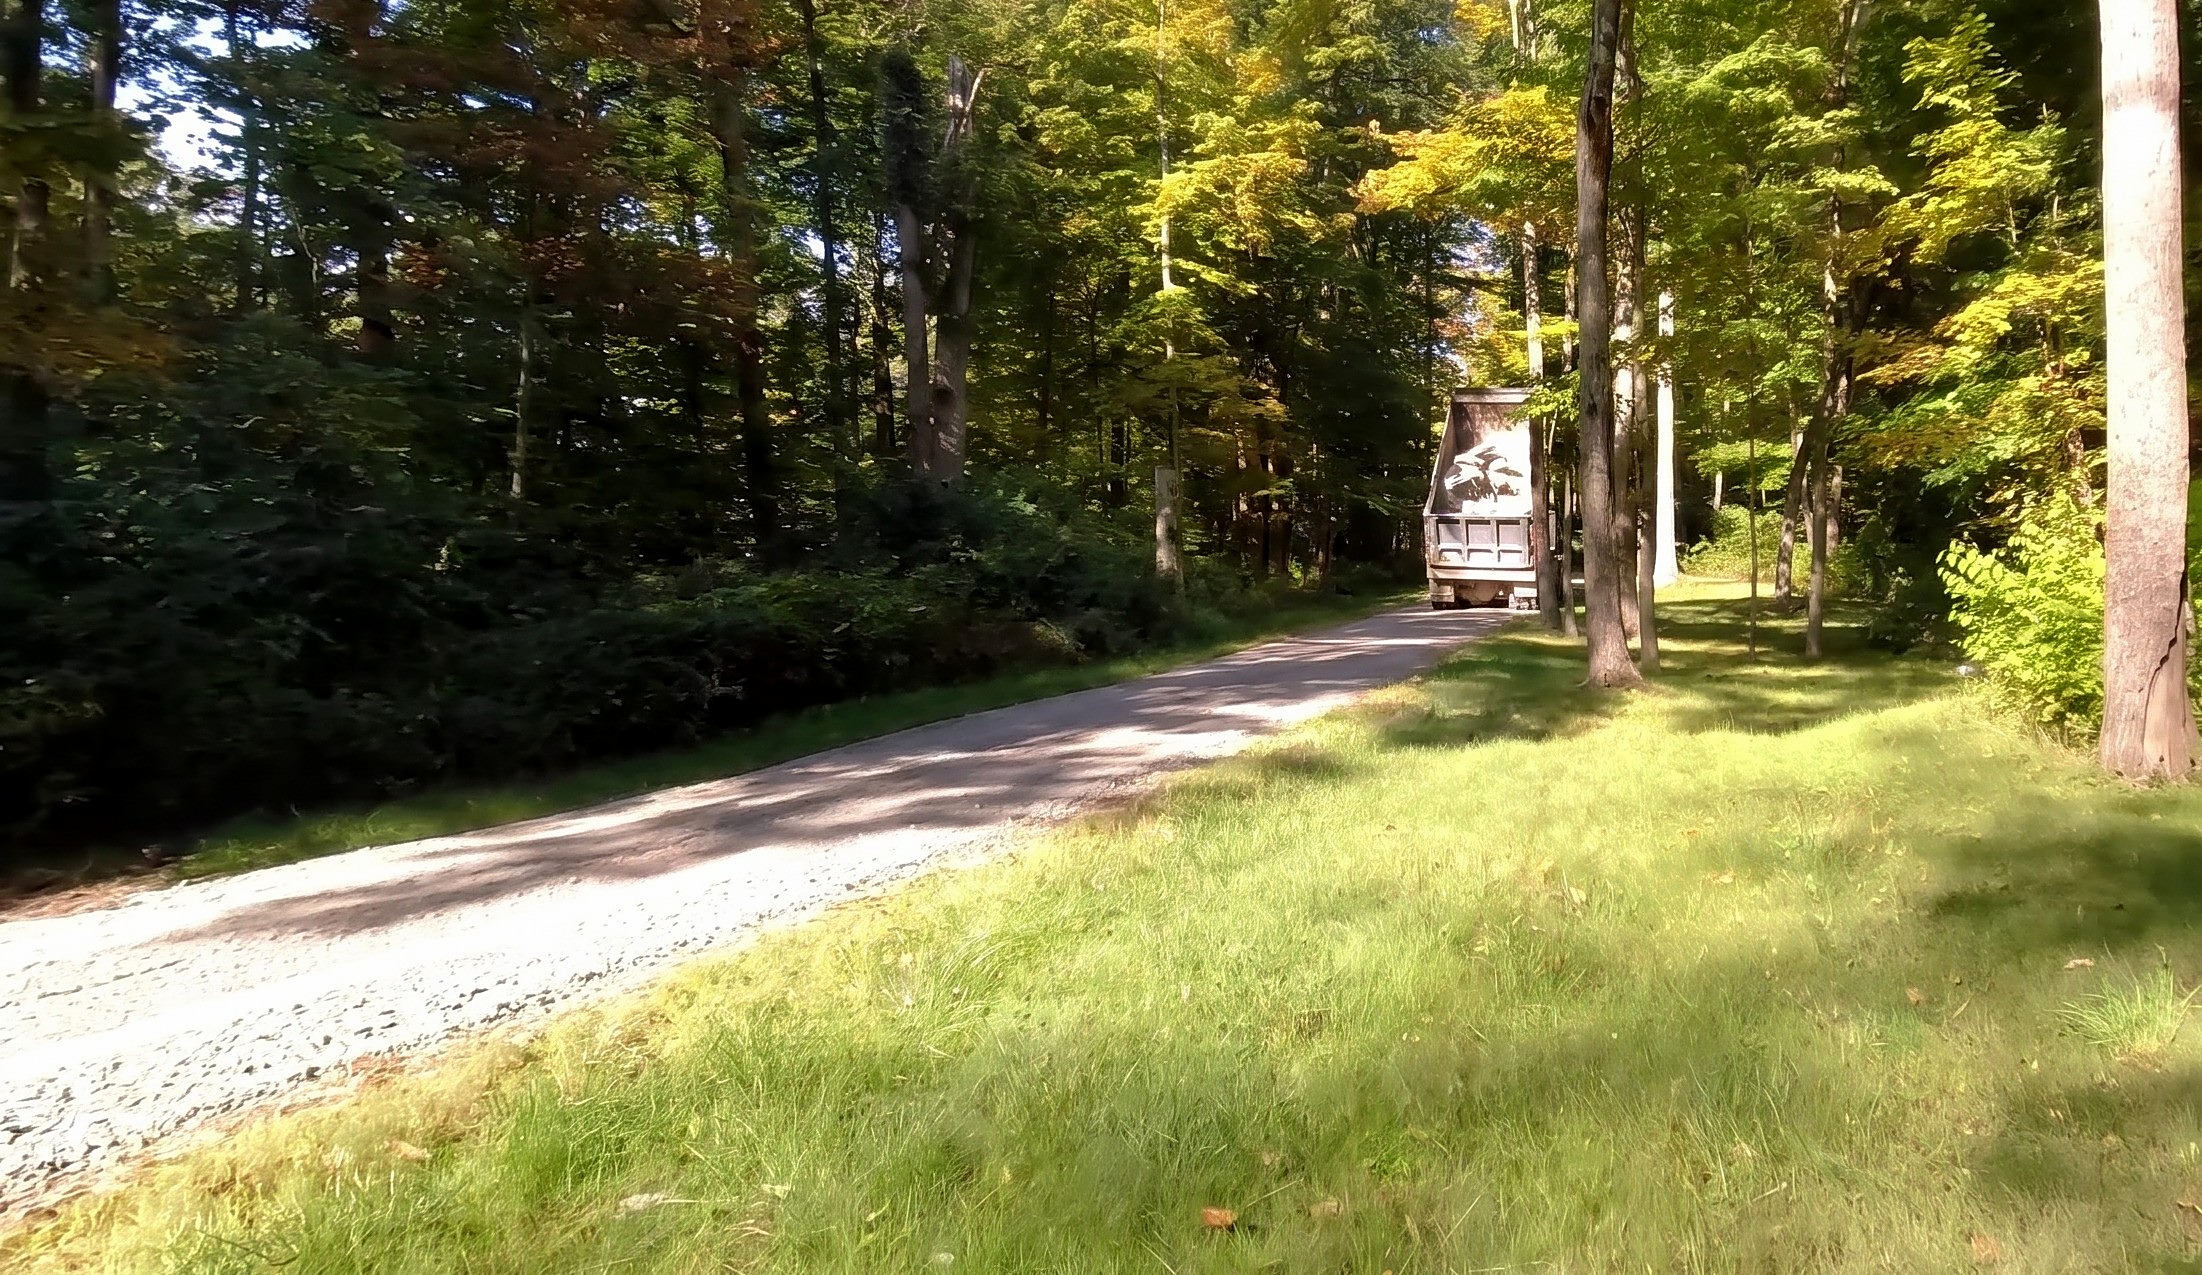
Second quad-axle #53 limestone load tailgate-spread along the wooded drive.
Parts in this step: (D) #53 limestone
You'll need: #53 Limestone
- 2.1 Tailgate spread the second quad-axle load of #53 stone
- Clear bystanders from the drive before the quad-axle dump truck backs in.
- Direct the loaded truck over the spread #53 limestone (D) to compact it.
- Have the driver tailgate the second 21-ton load along the wooded road.
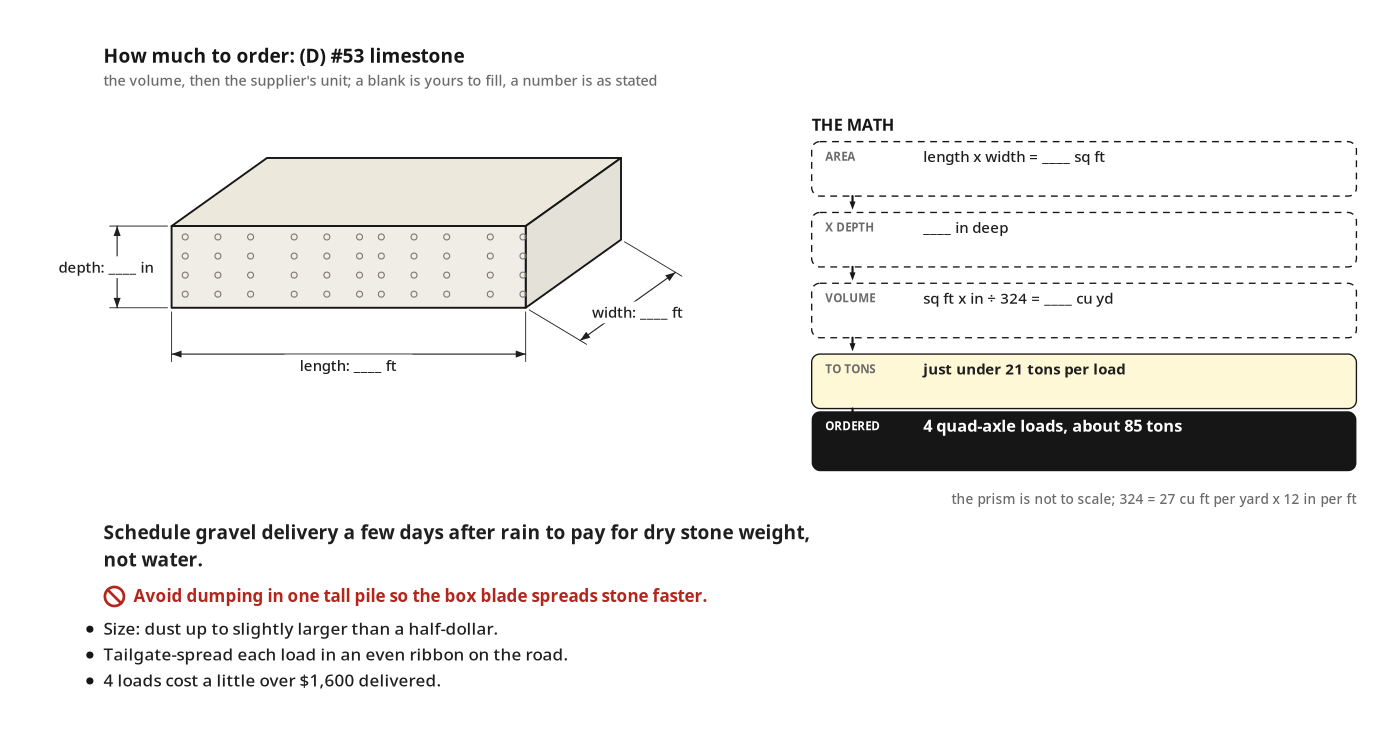
- Avoid one tall pile so the box blade spreads stone faster.
Key measurements
- Single quad-axle load weight: under 21 tons of #53 limestone
- Total #53 limestone ordered: 4 quad-axle loads, about 85 tons
- Tip: Have the gravel hauler tailgate stone along the road, not dump one tall pile.
- Tip: Schedule gravel delivery a few days after rain to pay for dry stone weight, not water.
- Heads up: Keep people and equipment clear of backing quad-axle dump trucks during tailgate spreading.
Before you move on: Second load tailgated in an even ribbon along the wooded road, not one mound.
Step 3: Spread and Grade Loads Two and Three with the Box Blade
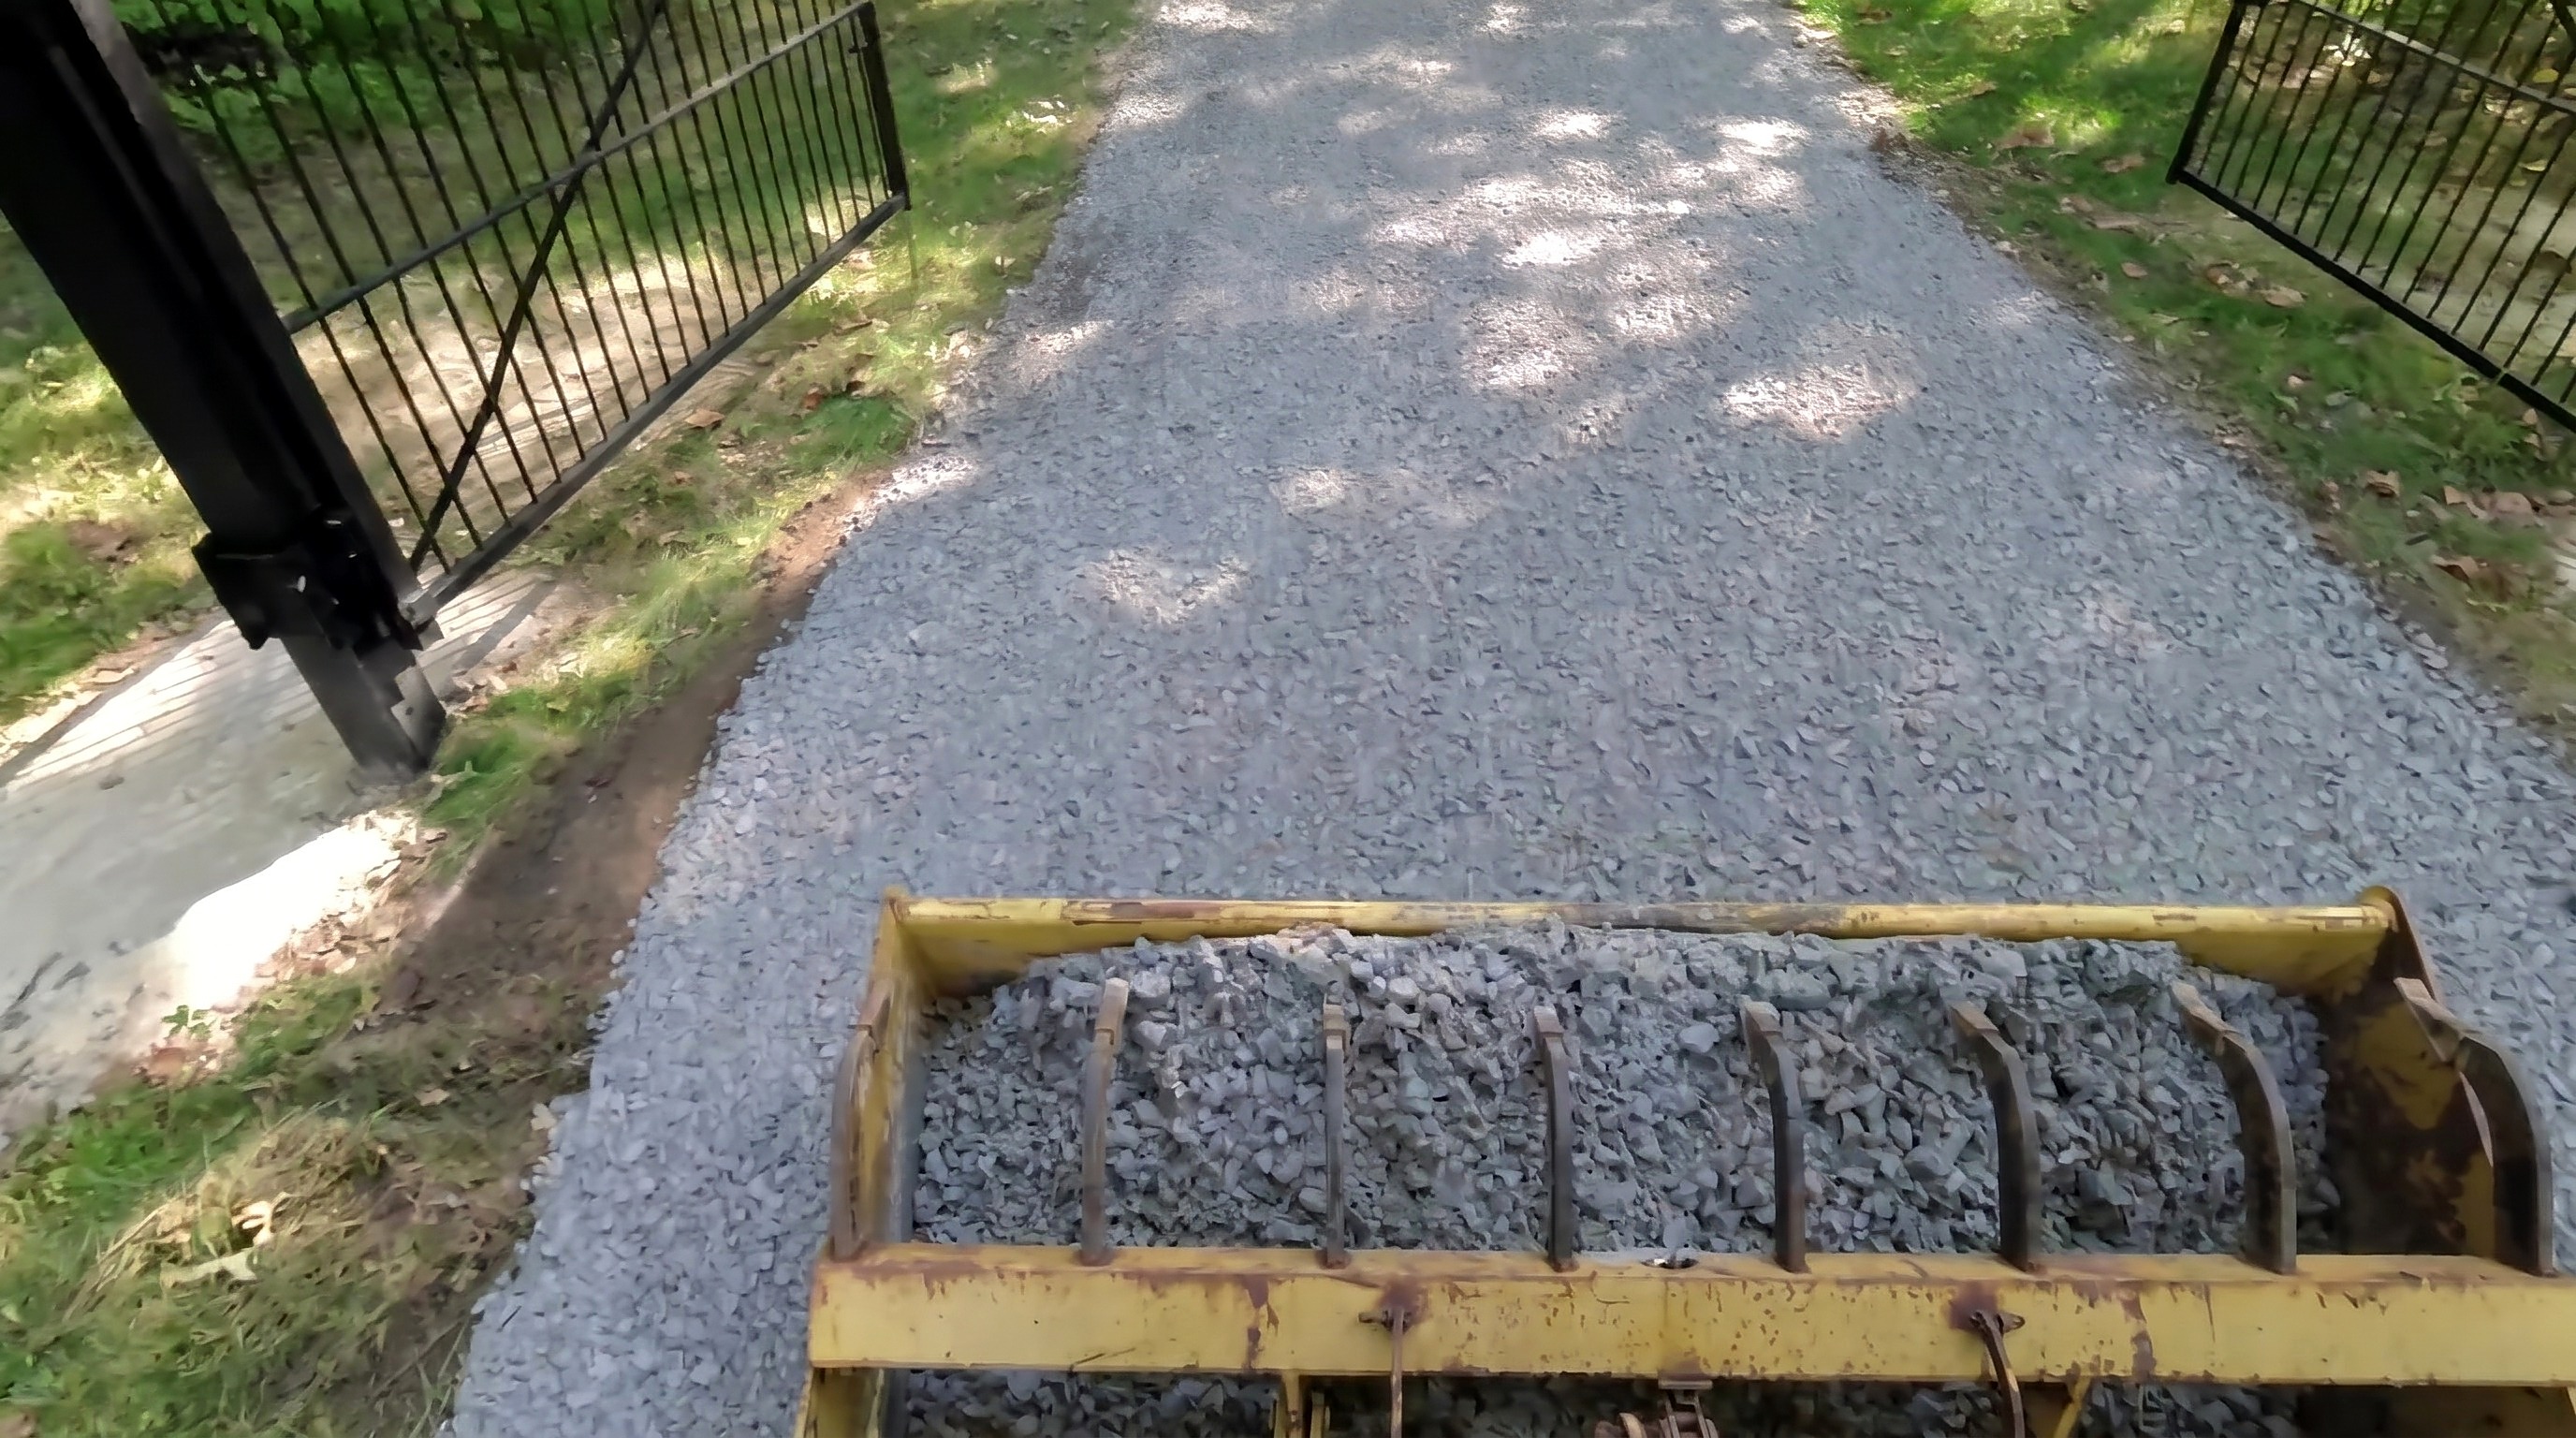
#53 limestone loads two and three graded level through the wooded drive and gate.
Parts in this step: (C) #2 limestone, (D) #53 limestone, (E) #8 limestone
You'll need: Compact Tractor with Front-End Loader, Box Blade, Top and Tilt Kit, Hearing Protection Earmuffs, #2 Limestone, #53 Limestone, #8 Limestone
- 3.1 Grade the second load of #53 limestone along the wooded drive
- Wear over-ear hearing protection before grading with the tractor.
- Lower the box blade onto the second #53 limestone (D) load in the woods.
- Drive back and forth, leveling stone over compacted #2 limestone (C).
- 3.2 Drag a full box of gravel through the driveway gate
- Pull the loaded box blade straight through the open driveway gate.
- Keep #53 limestone (D) rolling in the box to auto-fill low spots.
- 3.3 Feather and level the third load of #53 stone
- Have the third load tailgated and knock it down with forward grading passes.
- Grade the center and edges both ways to blend the third load.
- Let rain and traffic pack #53 firm before adding #8 limestone (E).
Key measurements
- Compaction wait before #8 top dressing: until #53 stone is firm underfoot, not crunchy
- #8 limestone size: nickel to dime, no dust
- Tip: Keep gravel rolling in the box blade while pulling forward so the cutting edge auto-fills low spots.
- Tip: Wait until the #53 layer packs smooth and solid underfoot before adding #8 limestone top dressing.
- Heads up: Wear over-ear hearing protection as protective equipment during extended tractor grading.
Before you move on: #53 limestone through the woods and gate grades level and packs firm underfoot before adding #8 stone.
Step 4: Grade the Final Load of #53 Limestone
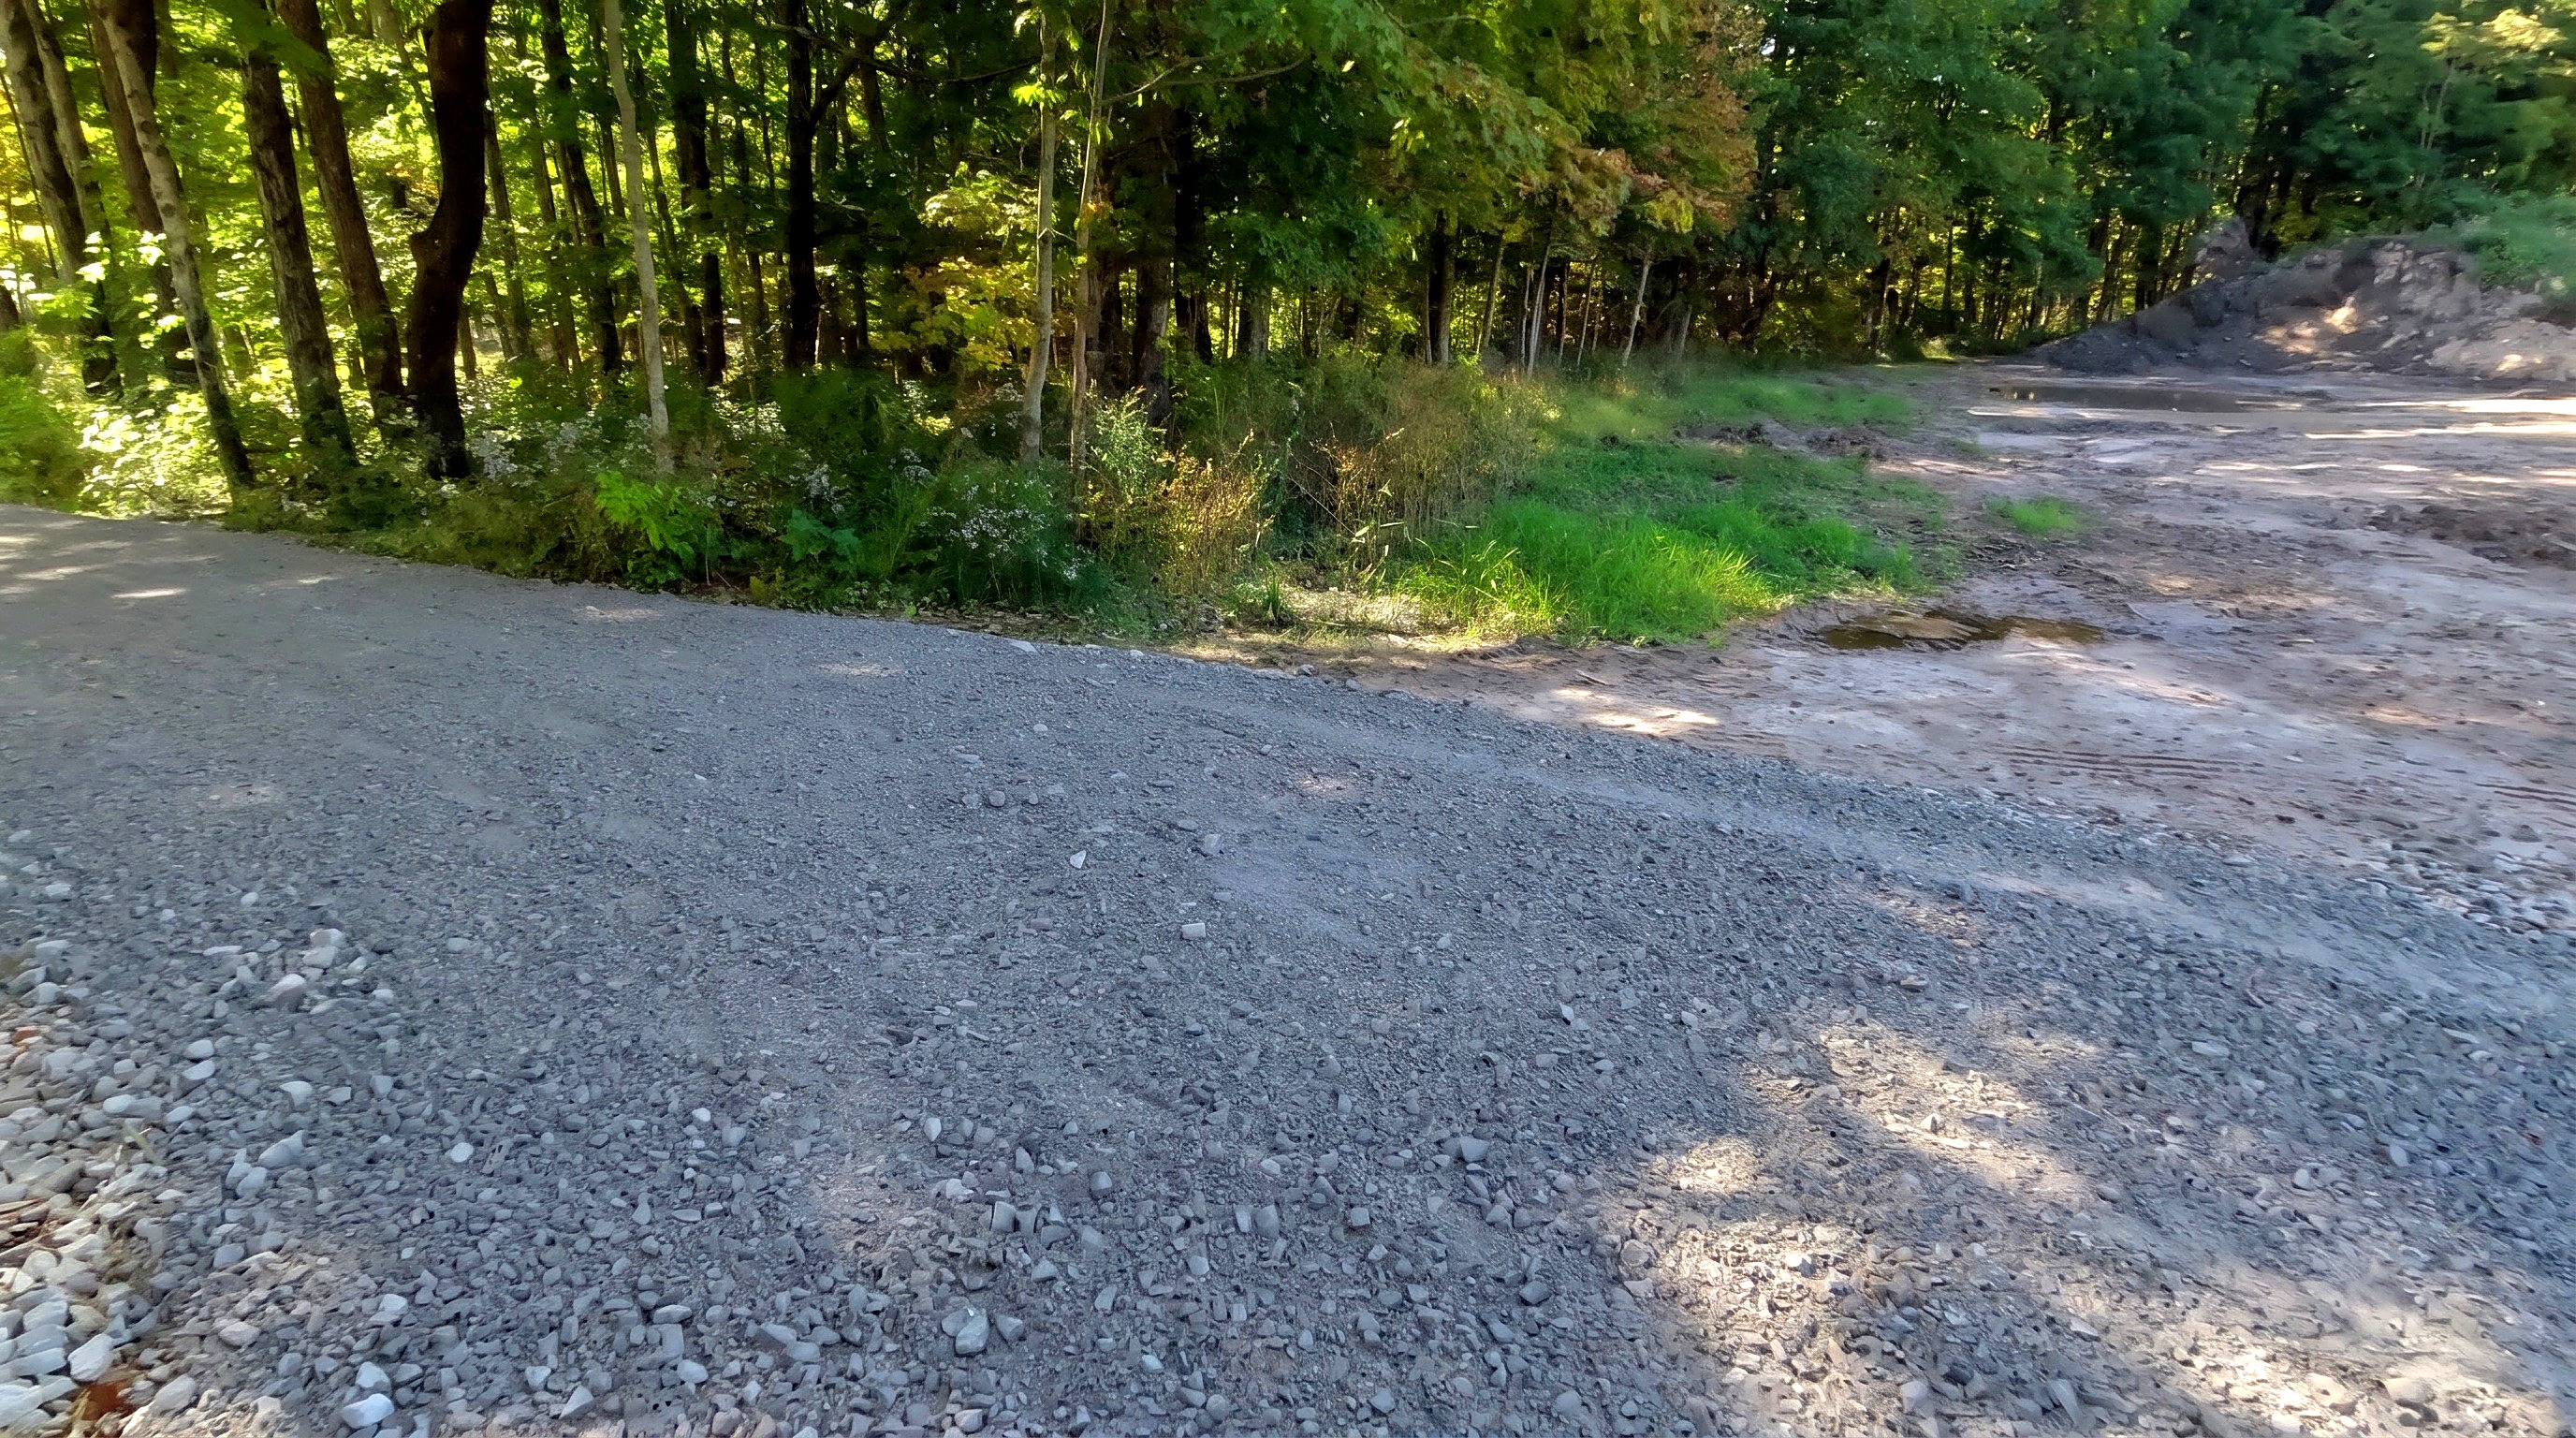
Fourth #53 limestone load spread around the curve and blended smoothly into the barn lot.
Parts in this step: (C) #2 limestone, (D) #53 limestone, (E) #8 limestone
You'll need: Compact Tractor with Front-End Loader, Box Blade, Top and Tilt Kit, Hearing Protection Earmuffs, #2 Limestone, #53 Limestone, #8 Limestone
- 4.1 Knock down the fourth tailgated pile on the curve
- Drive over the fourth tailgated #53 limestone (D) load on the curve.
- Drop the box blade to spread stone over the exposed #2 limestone (C) base.
- 4.2 Grade the curve smooth toward the barn lot
- Make follow-up passes around the curve to blend into the barn lot.
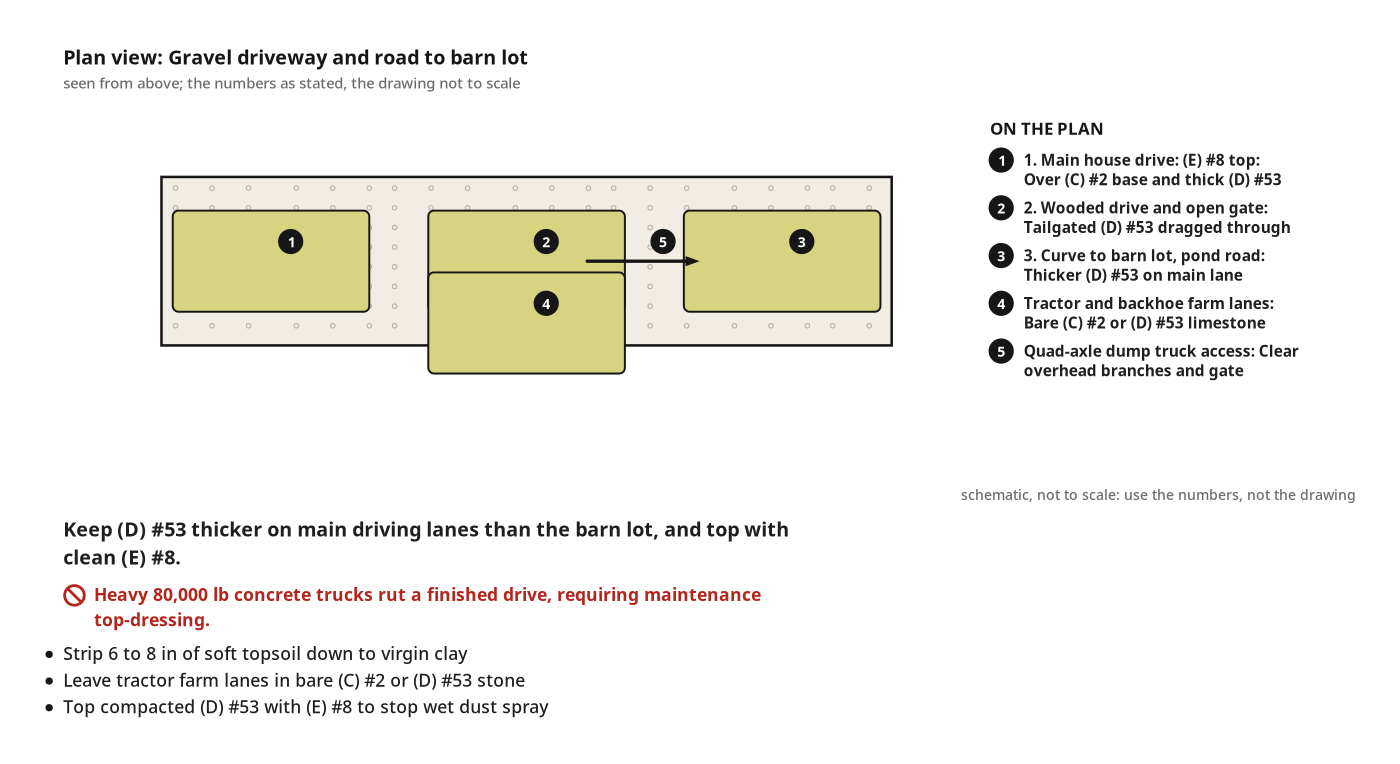
- Keep #53 limestone (D) thicker on main driving lanes than the barn lot.
- Top compacted #53 with clean #8 limestone (E) to stop wet dust spraying vehicles.
Key measurements
- Total #53 limestone delivered across 4 loads: about 85 tons, over $1,600
- Tip: Put thicker #53 stone on main driving lanes than low-traffic barn lots when stretching the final load.
- Tip: Leave tractor- and backhoe-only farm lanes in bare #2 limestone.
- Heads up: Heavy construction traffic like 80,000 lb concrete trucks ruts a finished drive, requiring maintenance top-dressing.
Before you move on: Curve into the barn lot transitions smoothly, with thickest #53 coverage on the main driving lane.
Finishing
Last touches
- Spread clean, dust-free #8 limestone over compacted #53 stone on residential lanes.
- Leave low-traffic farm lanes or heavy equipment lots in #2 or #53 limestone.
Compaction and settling
- Build in waves so rain and vehicle weight lock each stone grade before adding the next.
Care and maintenance
- When ruts form, scarify with box blade teeth, churn the stone, and re-grade.
- Top-dress with fresh #53 or #8 limestone after heavy construction trucks wear the road.
Variations
- Use local quarry equivalents: 5/8 in minus for #53; 3/8 in clean stone or asphalt millings for #8.
Check the finished work
| Check | What you should see | If not |
|---|---|---|
| Press a thumbnail into the exposed clay subgrade before placing base stone. | Dry virgin clay at 6 to 8 in depth resists dents and holds no standing water. | Strip spongy topsoil deeper, or lay geotextile fabric over soft spots. |
| Walk and drive over graded #53 limestone after rain and dump truck traffic. | The surface packs smooth and firm underfoot, not loose and crunchy. | Let more rain and vehicle traffic compact the #53 layer before adding #8 stone. |
| Drive passenger vehicles over the finished driveway in heavy rain. | Clean #8 top dressing rides smoothly and does not spray gray stone dust onto vehicle fenders. | Top exposed #53 stone with clean, dust-free #8 limestone. |
These Specs are built from Indy Farm Life's video “Multi-Layer Limestone Gravel Driveway”. Open the Multi-Layer Limestone Gravel Driveway project page.
