Spetz Specs No. 8089: step-by-step system install guide
DIY Fireplace Heat Exchanger
The complete step-by-step guide made from Indy Farm Life's YouTube video, free on Spetz. For the video, a step-by-step player and answers to your questions, see the DIY Fireplace Heat Exchanger project page.
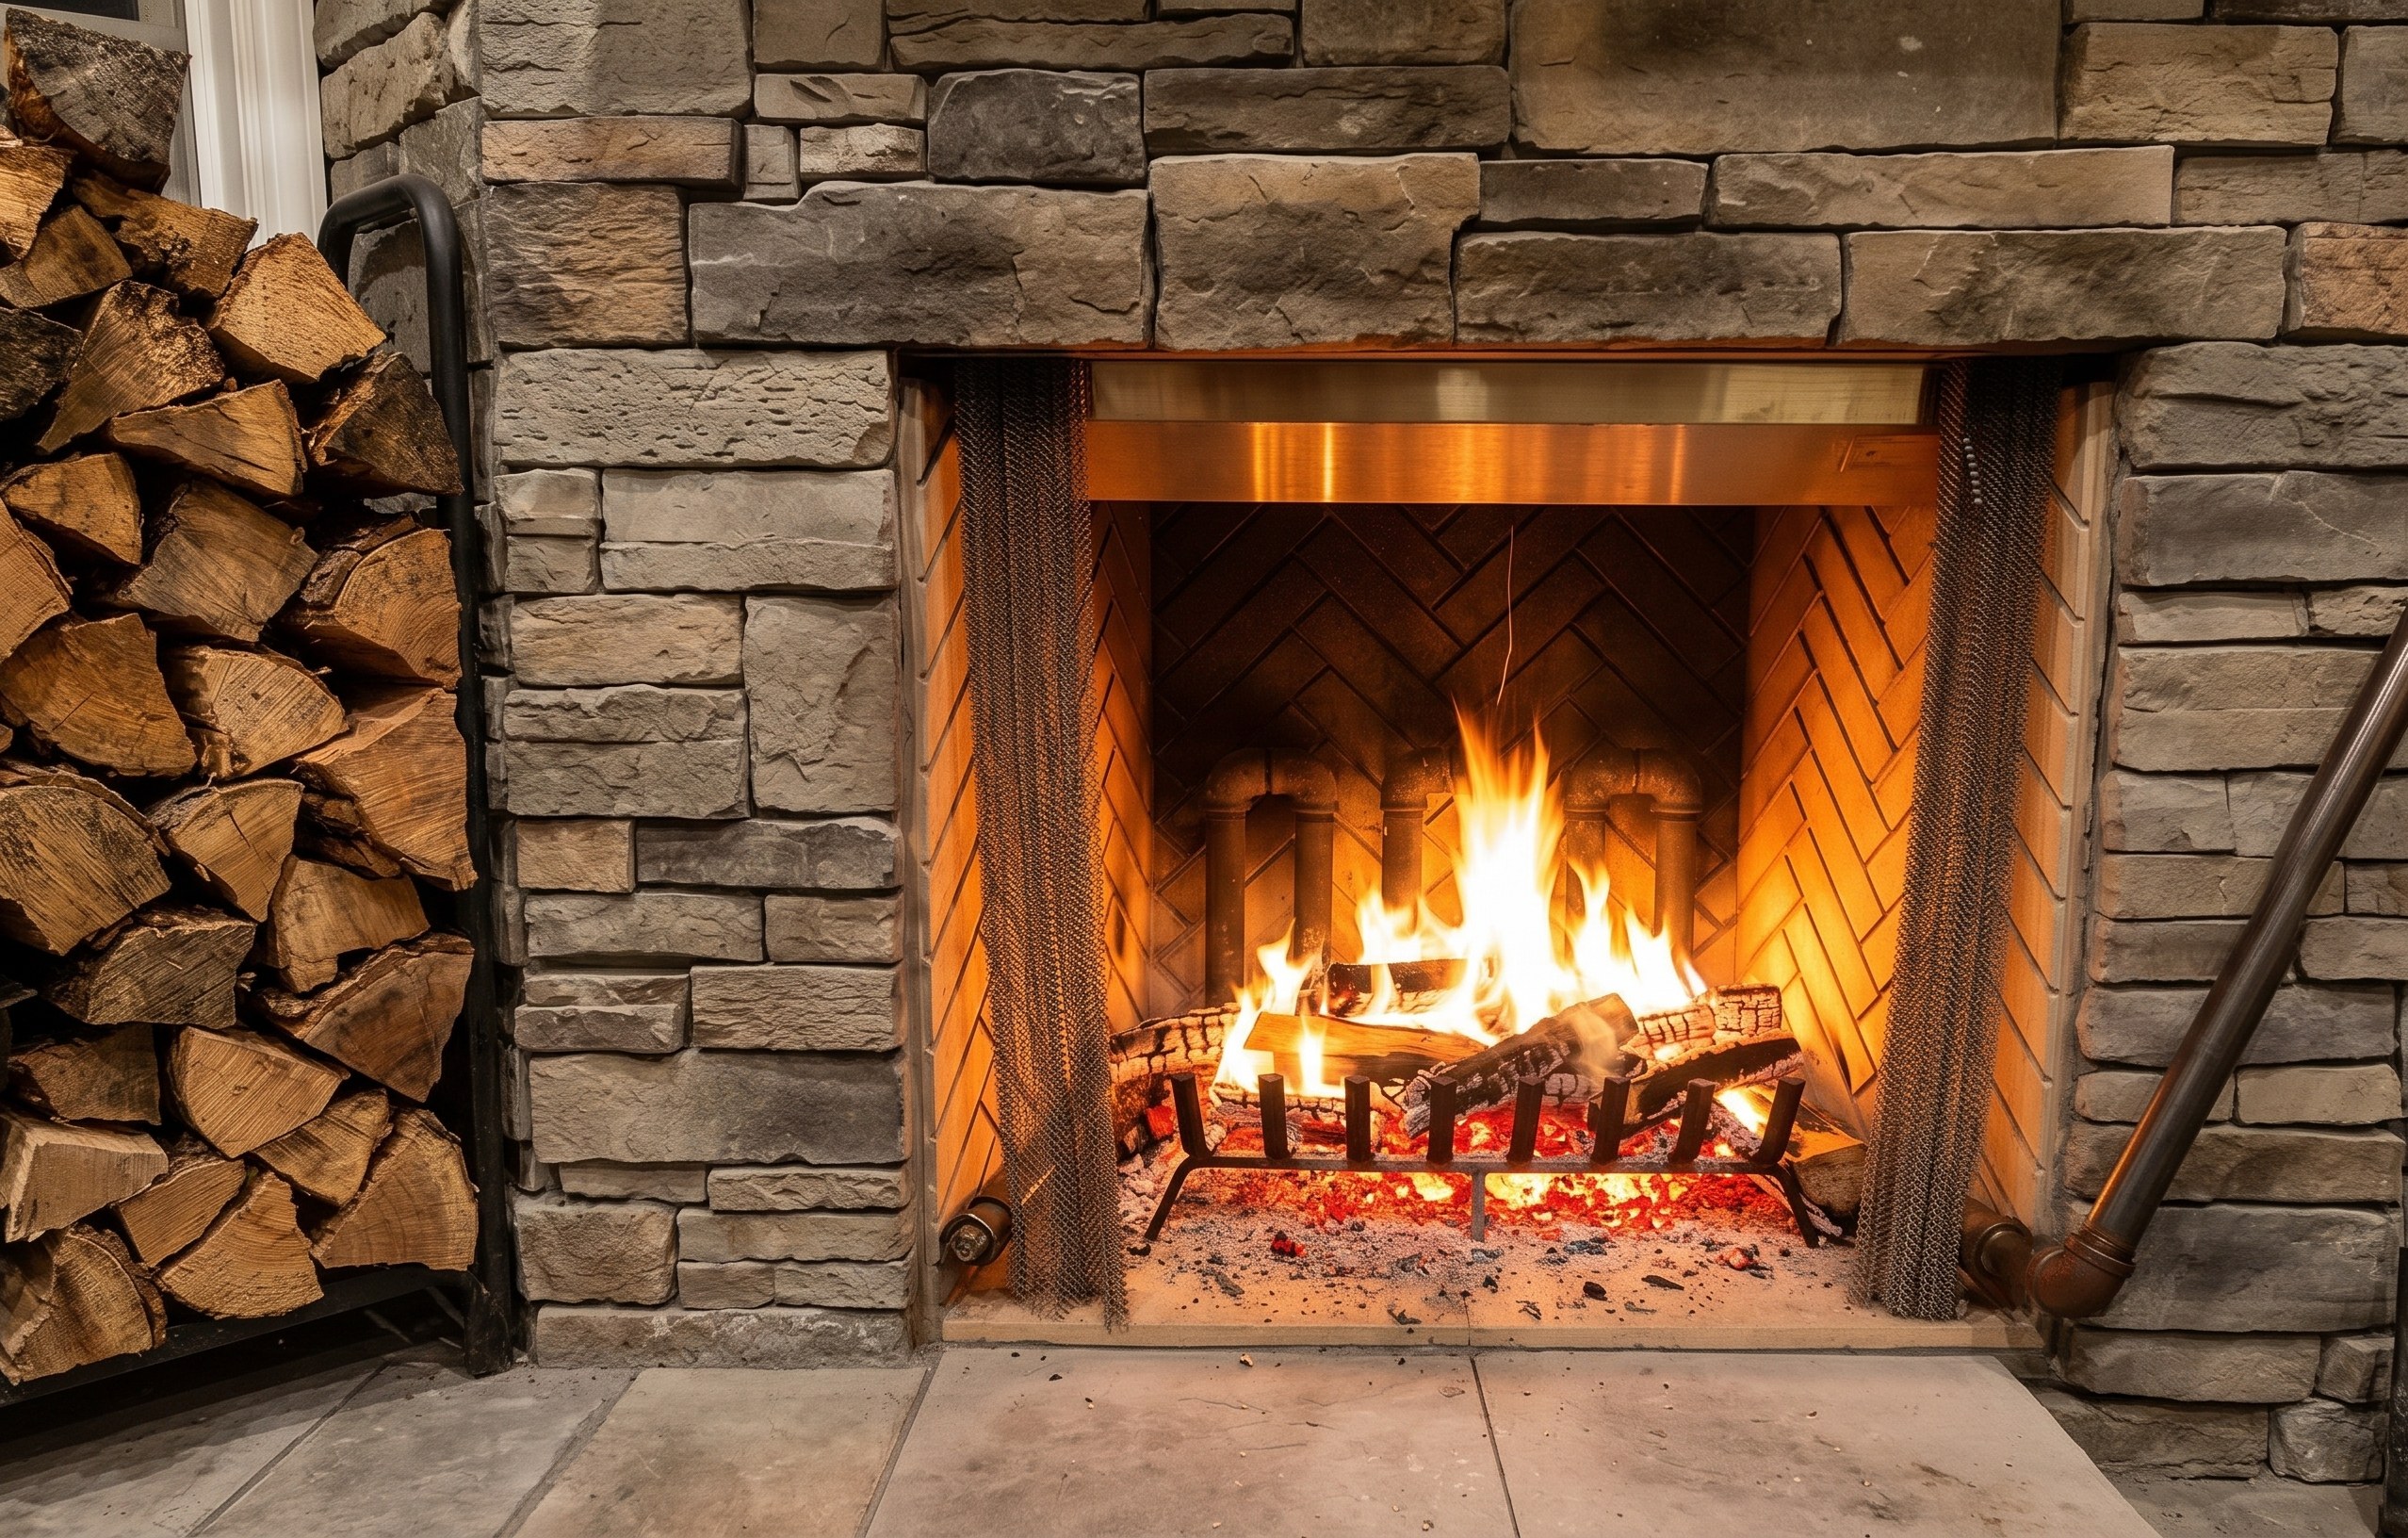
5 steps, 4 parts, 5 tools, 6 materials
Overview
Finished size: Fits a 42-inch fireplace; manifold is 24 to 26 inches wide
The system
- A 4-inch inline fan pushes room air through a 1.5-inch black steel pipe manifold.
- Sits behind the fire in a 42-inch fireplace, blowing heated air into the room.
Why do it yourself
- Prefabricated heat exchangers cost $700 to $1,200; this black pipe system costs under $350.
- Set behind a tall grate, the manifold pipes clear the coal bed and gas log lighter.
What it takes
- Thread 1.5-inch black gas pipe fittings with pipe wrenches and couple 4-inch flexible duct.
- One person can assemble and test it, with open-door ventilation on the first burn.
What decides success
- Use dry-threaded uncoated black steel pipe, never galvanized pipe or thread dope.
- Push enough airflow through the 1.5-inch pipe bends once the fire burns down to hot coals.
The system at a glance
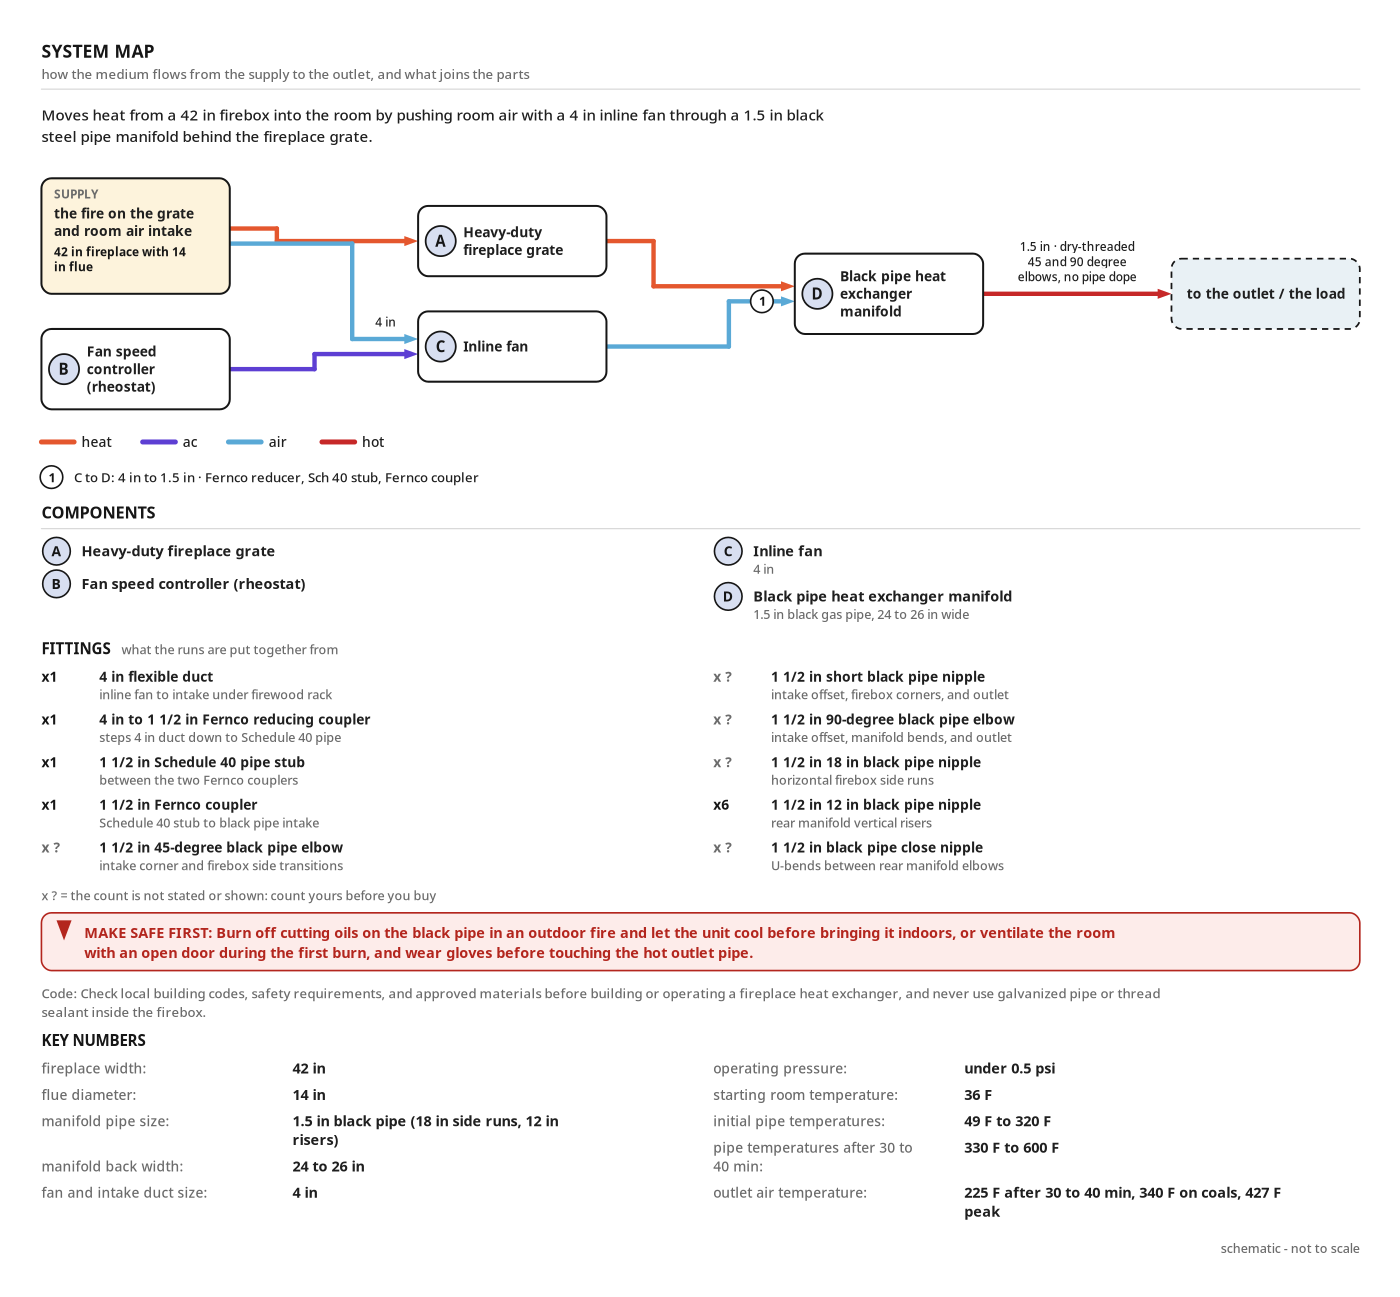
- Moves heat from a 42 in firebox into the room by pushing room air with a 4 in inline fan through a 1.5 in black steel pipe manifold behind the fireplace grate.
- Supply: the fire on the grate and room air intake, 42 in fireplace with 14 in flue
- supply → Heavy-duty fireplace grate: heat, direct
- Heavy-duty fireplace grate → Black pipe heat exchanger manifold: heat, direct
- Fan speed controller (rheostat) → Inline fan: ac, cable
- supply → Inline fan: air, direct, 4 in
- Inline fan → Black pipe heat exchanger manifold: air, duct, 4 in to 1.5 in, Fernco reducer, Sch 40 stub, Fernco coupler
- Black pipe heat exchanger manifold → out: hot, pipe, 1.5 in, dry-threaded 45 and 90 degree elbows, no pipe dope
- fireplace width: 42 in
- flue diameter: 14 in
- manifold pipe size: 1.5 in black pipe (18 in side runs, 12 in risers)
- manifold back width: 24 to 26 in
- fan and intake duct size: 4 in
- operating pressure: under 0.5 psi
- starting room temperature: 36 F
- initial pipe temperatures: 49 F to 320 F
- pipe temperatures after 30 to 40 min: 330 F to 600 F
- outlet air temperature: 225 F after 30 to 40 min, 340 F on coals, 427 F peak
Make safe first
- Burn off cutting oils on the black pipe in an outdoor fire and let the unit cool before bringing it indoors, or ventilate the room with an open door during the first burn, and wear gloves before touching the hot outlet pipe.
Codes
- Check local building codes, safety requirements, and approved materials before building or operating a fireplace heat exchanger, and never use galvanized pipe or thread sealant inside the firebox.
Health and safety
Toxic Fume Prevention
- Never substitute galvanized pipe for black steel pipe; extreme firebox heat vaporizes zinc into toxic fumes.
- Assemble firebox pipe fittings dry without pipe dope or thread sealant, which burn off into harmful fumes.
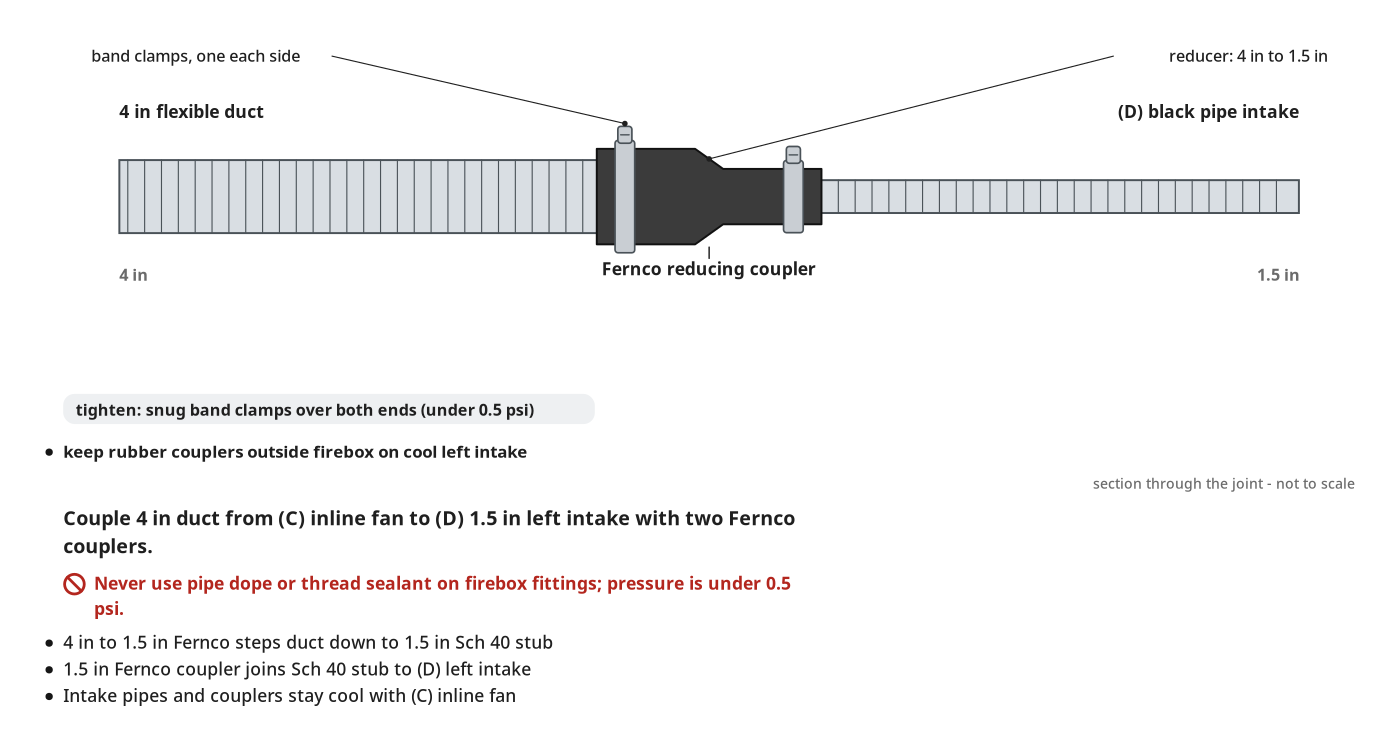
- Keep rubber Fernco couplers and flexible ductwork on the cool intake side, well clear of the firebox and open flames.
Extreme Heat and Burns
- Keep bare hands off the outlet pipe and discharge nozzle, which reach 200 F to 427 F and burn skin immediately.
- Wear heat-resistant hand protective equipment before adjusting or modifying the output nozzle during or after a burn test.
- Position the hot discharge pipe where children and pets cannot touch it or walk into the heated air stream.
Live Fire and Airflow Safety
- Keep a working carbon monoxide detector in the room and a fire extinguisher within reach whenever burning firewood.
- Route the inline fan, rheostat speed controller, and power cords safely away from the hearth, hot pipes, and embers.
- Keep the intake and discharge clear of loose ash before running the cordless leaf blower to avoid blowing glowing embers.
Pipe Assembly and Tools
- Wear hand protective equipment when handling 1.5-inch black gas pipe and heavy grates to prevent cuts from sharp threads.
- Seat pipe wrenches squarely on the black pipe fittings before pulling so the jaws do not slip and injure your hands.
- Never point the infrared thermometer laser directly at eyes or reflect it off bare metal surfaces during temperature tests.
Checks before you start
- Check for a 42-inch firebox with refractory back panels and a 14-inch flue.
- Use only uncoated 1.5-inch black gas pipe and fittings, never toxic galvanized steel.
- Thread firebox pipes dry without pipe dope or sealant; pressure stays under 0.5 psi.
- Burn off factory cutting oils outdoors first, or open a door on the first burn.
- Build the rear manifold 24 to 26 inches wide with six 12-inch vertical risers, close nipples, and 18-inch side runs.
- Reduce the 4-inch inline fan and flexible duct to the 1.5-inch intake with two Fernco couplers and Schedule 40 pipe.
- Check local codes; keep a working carbon monoxide detector and fire extinguisher in the room.
Tools
- Inline Fan (4 inch)
- Fan Speed Controller (Rheostat) (optional)
- Pipe Wrenches
- Infrared Thermometer (VEVOR) (optional)
- Leaf Blower (Cordless, DeWalt) (optional)
Materials
- Black Gas Pipe (1.5 inch diameter)
- Black Pipe Fittings (multiple, black gas pipe fittings, 1.5 inch)
- Flexible Ductwork (4 inch diameter)
- Fernco Couplers (2, rubber coupler, Fernco, 4 inch)
- Firewood
- Fireplace Grate (1, Heavy-duty)
Hardware
| Hardware | Size | Count | Used in steps |
|---|---|---|---|
| 4 in to 1.5 in Fernco reducing coupler | 1 | 1 | |
| 1.5 in Fernco coupler | 1 | 1 | |
| 1.5 in 90-degree black pipe elbow | 1 | 4 | |
| 1.5 in Short black pipe nipple | 1 | 4 |
Components
| Part | Name | Qty | Size | Notes |
|---|---|---|---|---|
| A | Heavy-duty fireplace grate | x1 | Tall grate elevates the fire above the floor to keep the heat exchanger pipes and log lighter out of the hot coal bed. | |
| B | Fan speed controller (rheostat) | x1 | Adjusts the speed and noise output of the 4 in inline fan. | |
| C | Inline fan | x1 | 4 in | Pushes cool room air through the 4 in flexible duct and reducer into the pipe manifold. |
| D | Black pipe heat exchanger manifold | x1 | 3/4" (T) × 1 1/2" (W) × 26" (L) | Assembled from an 18 in run, 12 in vertical risers, close nipples, and 90-degree and 45-degree elbows behind the fire. |
Step by step
Step 1: Preparing and Lighting the Fire
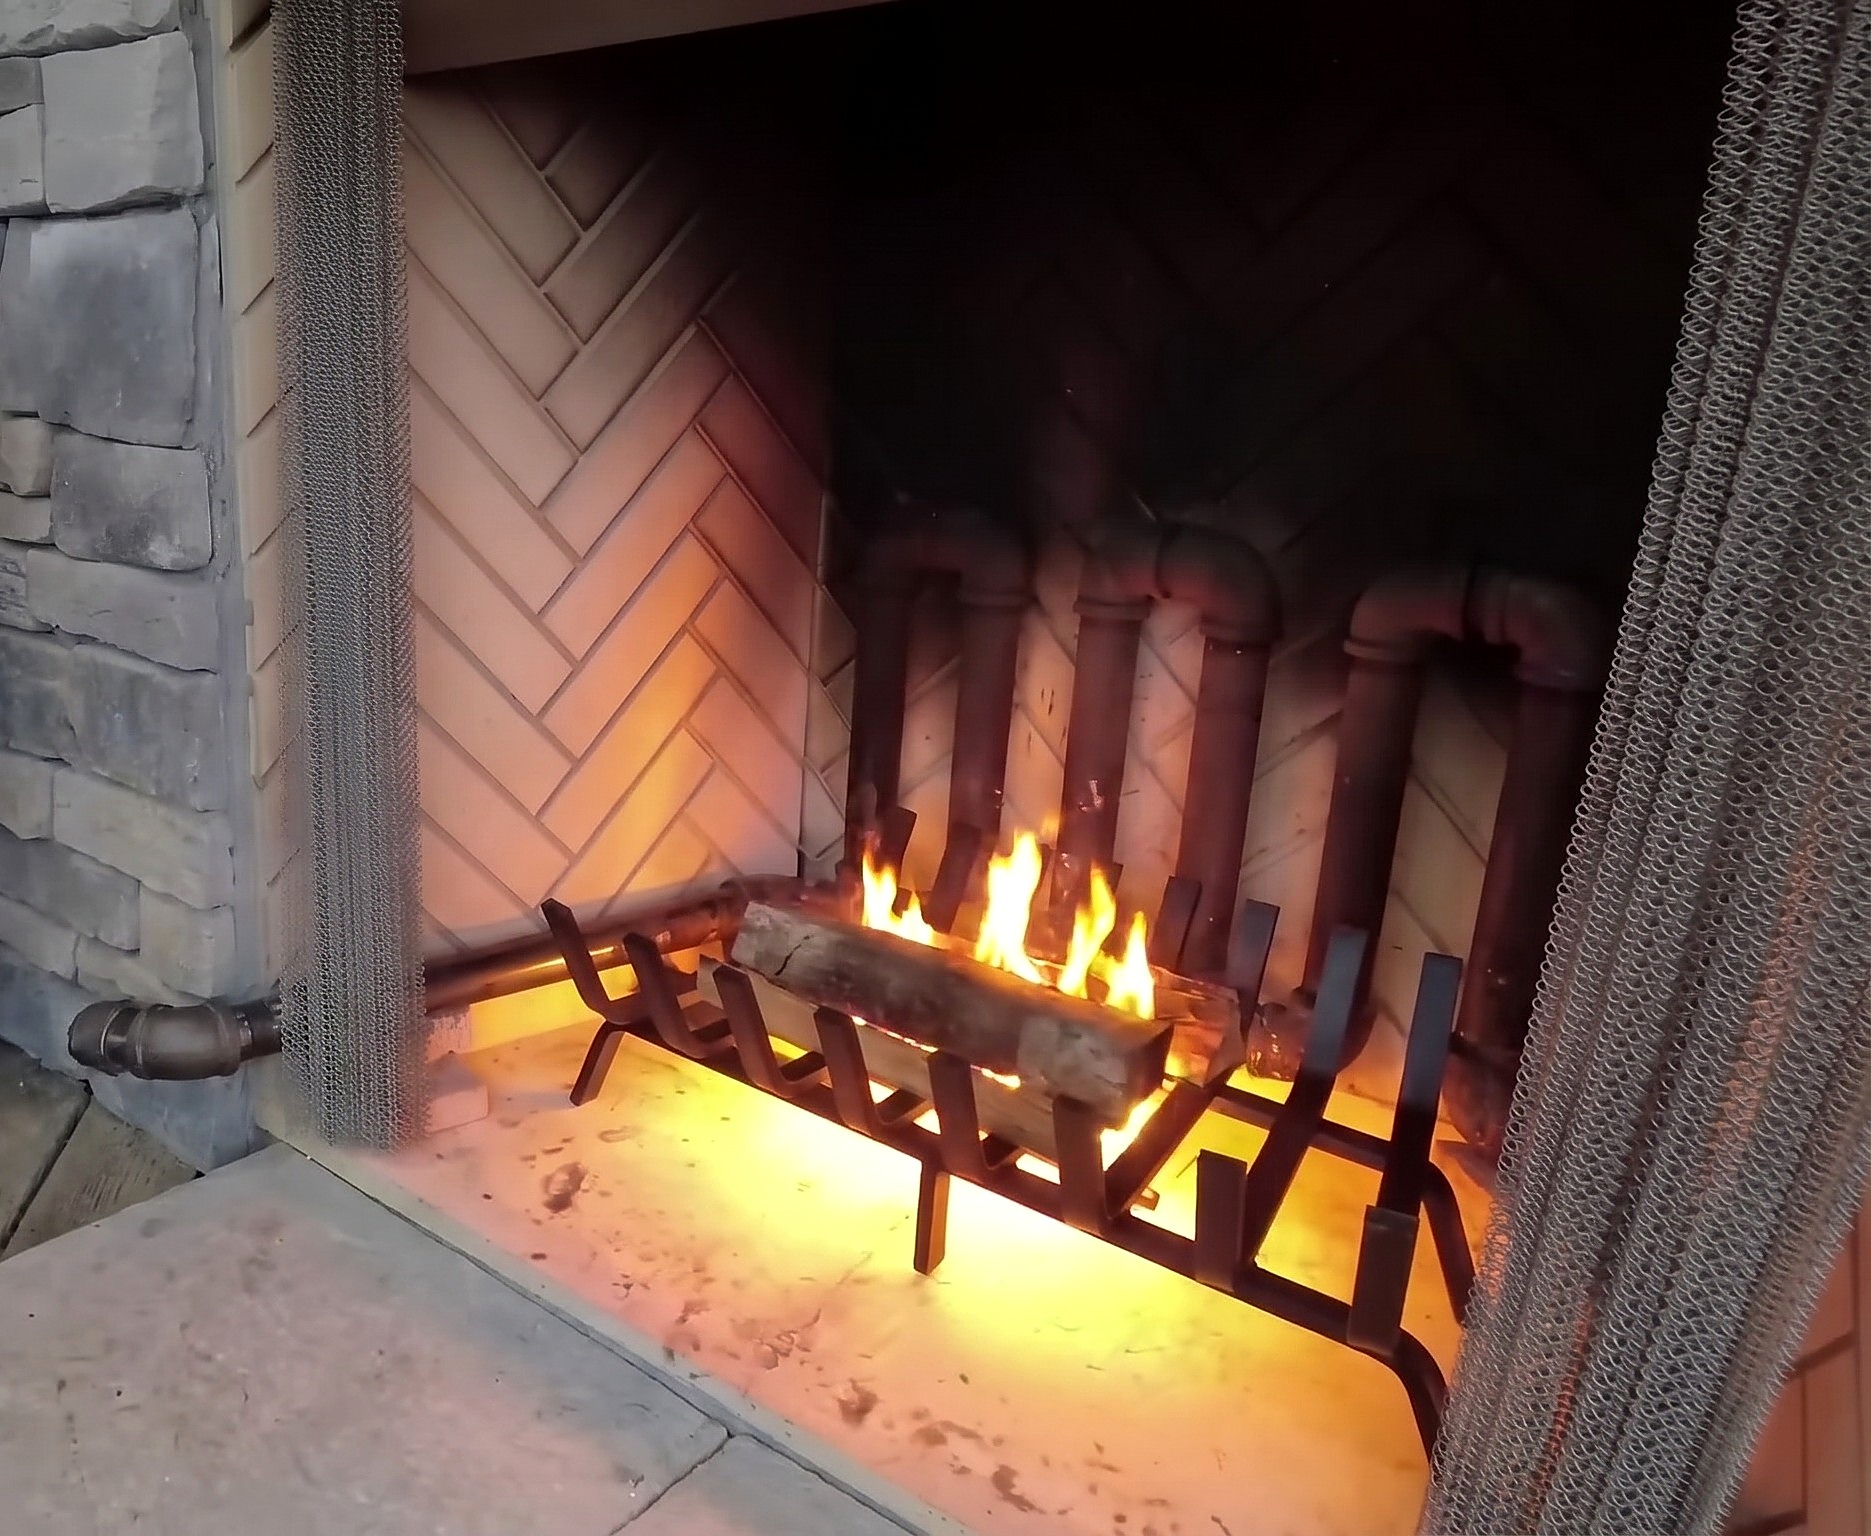
Manifold and tall fireplace grate in the firebox with a wood fire burning above the floor.
Parts in this step: (A) Heavy-duty fireplace grate, (B) Fan speed controller (rheostat), (C) Inline fan, (D) Black pipe heat exchanger manifold
You'll need: Inline Fan, Fan Speed Controller, Black Gas Pipe, Black Pipe Fittings, Flexible Ductwork, Fernco Couplers, Firewood, Fireplace Grate, Fernco reducing coupler, Fernco coupler
- 1.1 Position the Fireplace Grate
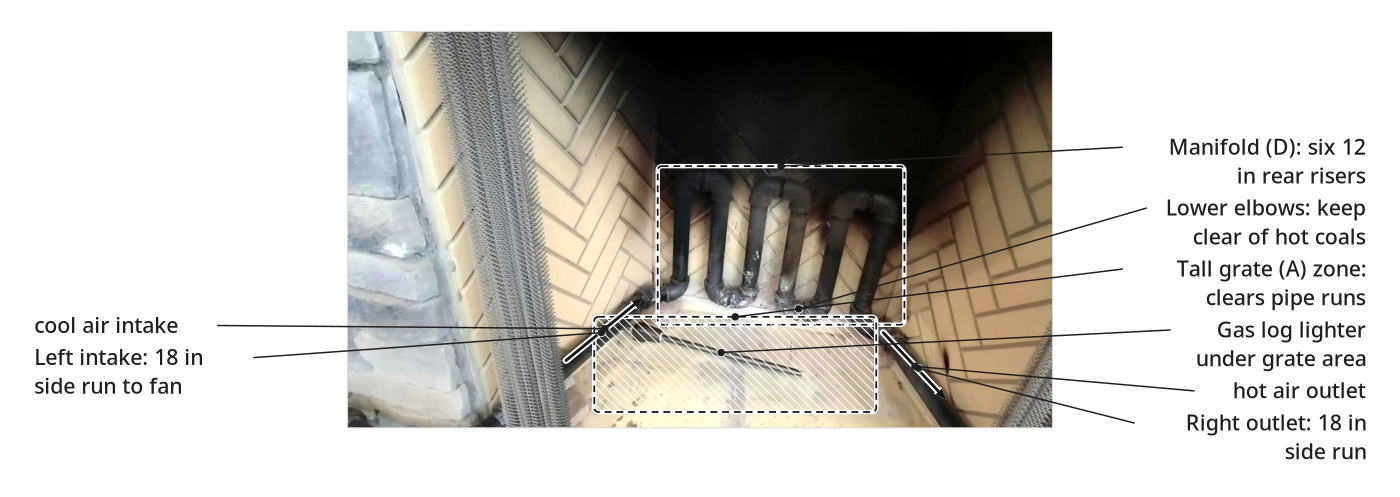
- Set black pipe heat exchanger manifold (D) against the rear refractory panels.
- Point the 18-inch side runs forward: intake left, outlet right.
- Couple inline fan (C) and fan speed controller (B) to the left intake with 4-inch duct and two Fernco couplers.
- Set heavy-duty fireplace grate (A) before the manifold so coals clear the pipes.
- 1.2 Light the Fire
- Stack kindling and firewood on the tall grate over the gas log lighter.
- Light the kindling with the gas log lighter until the firewood catches.
- Shut off the gas once the wood burns on its own.
- Prop open an outside door on the first burn to vent cutting oil smoke.
Key measurements
- Fireplace size: 42 in firebox, 14 in flue
- Manifold width: 24 to 26 in across rear risers
- Manifold pipes: 1 1/2 in black gas pipe, six 12 in vertical risers, 18 in side runs
- Old grate height: 1.5 to 2 in; replace with a tall grate to clear the coal bed
- Tip: Use a tall grate so hot coals do not soften or deform the steel pipes.
- Tip: To avoid indoor smoke, burn off factory pipe cutting oils outdoors first.
- Heads up: Never use galvanized pipe; heating it releases toxic zinc fumes.
- Heads up: Never use pipe dope or thread sealant on firebox fittings; pressure is under 0.5 psi and dope burns into fumes.
Before you move on: Confirm the gas log lighter is turned off and no manifold pipes rest inside the coal bed zone.
Step 2: Initial Performance Test
Record baseline manifold temperatures and start room airflow with the inline fan.
Parts in this step: (B) Fan speed controller (rheostat), (C) Inline fan, (D) Black pipe heat exchanger manifold
You'll need: Inline Fan, Fan Speed Controller, Infrared Thermometer, Black Gas Pipe
- 2.1 Measure Pipe Temperatures
- Aim the infrared thermometer at black pipe heat exchanger manifold (D) before starting the fan.
- Measure the lower intake and front outlet corners, starting between 49 F and 130 F.
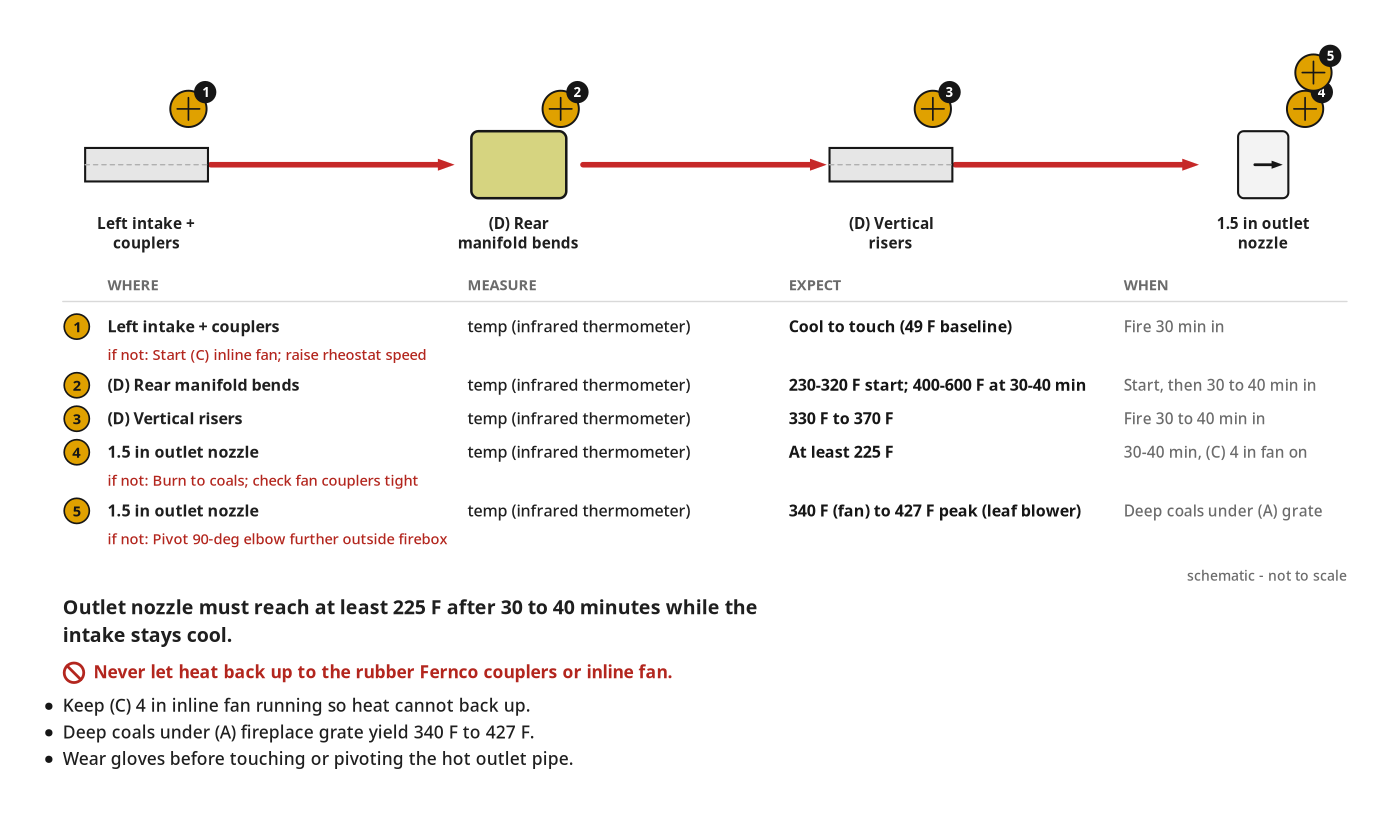
- Measure upper rear manifold bends behind the flames (230 F to 320 F).
- 2.2 Measure Air Output Temperature
- Turn on 4-inch inline fan (C) with fan speed controller (B).
- Run the fan one minute so room air flows through the hot manifold.
- Turn the rheostat dial to balance airflow volume and fan noise.
- Check initial discharge temperature in the right-hand outlet pipe with the infrared thermometer.
Key measurements
- Starting room temperature: 36 F
- Baseline intake and outlet corner temperature: 49 F
- Baseline lower right and far corners: 100 F to 130 F
- Baseline upper rear manifold: 230 F to 320 F
- Operating air pressure: under 0.5 psi
- Tip: Expect modest outlet heat on fresh flames; heat transfer peaks over a deep coal bed.
Before you move on: Check for steady airflow from the right-hand outlet pipe with the inline fan running.
Step 3: Testing After 30 Minutes
Check manifold and discharge air temperatures after burning 30 to 40 minutes.
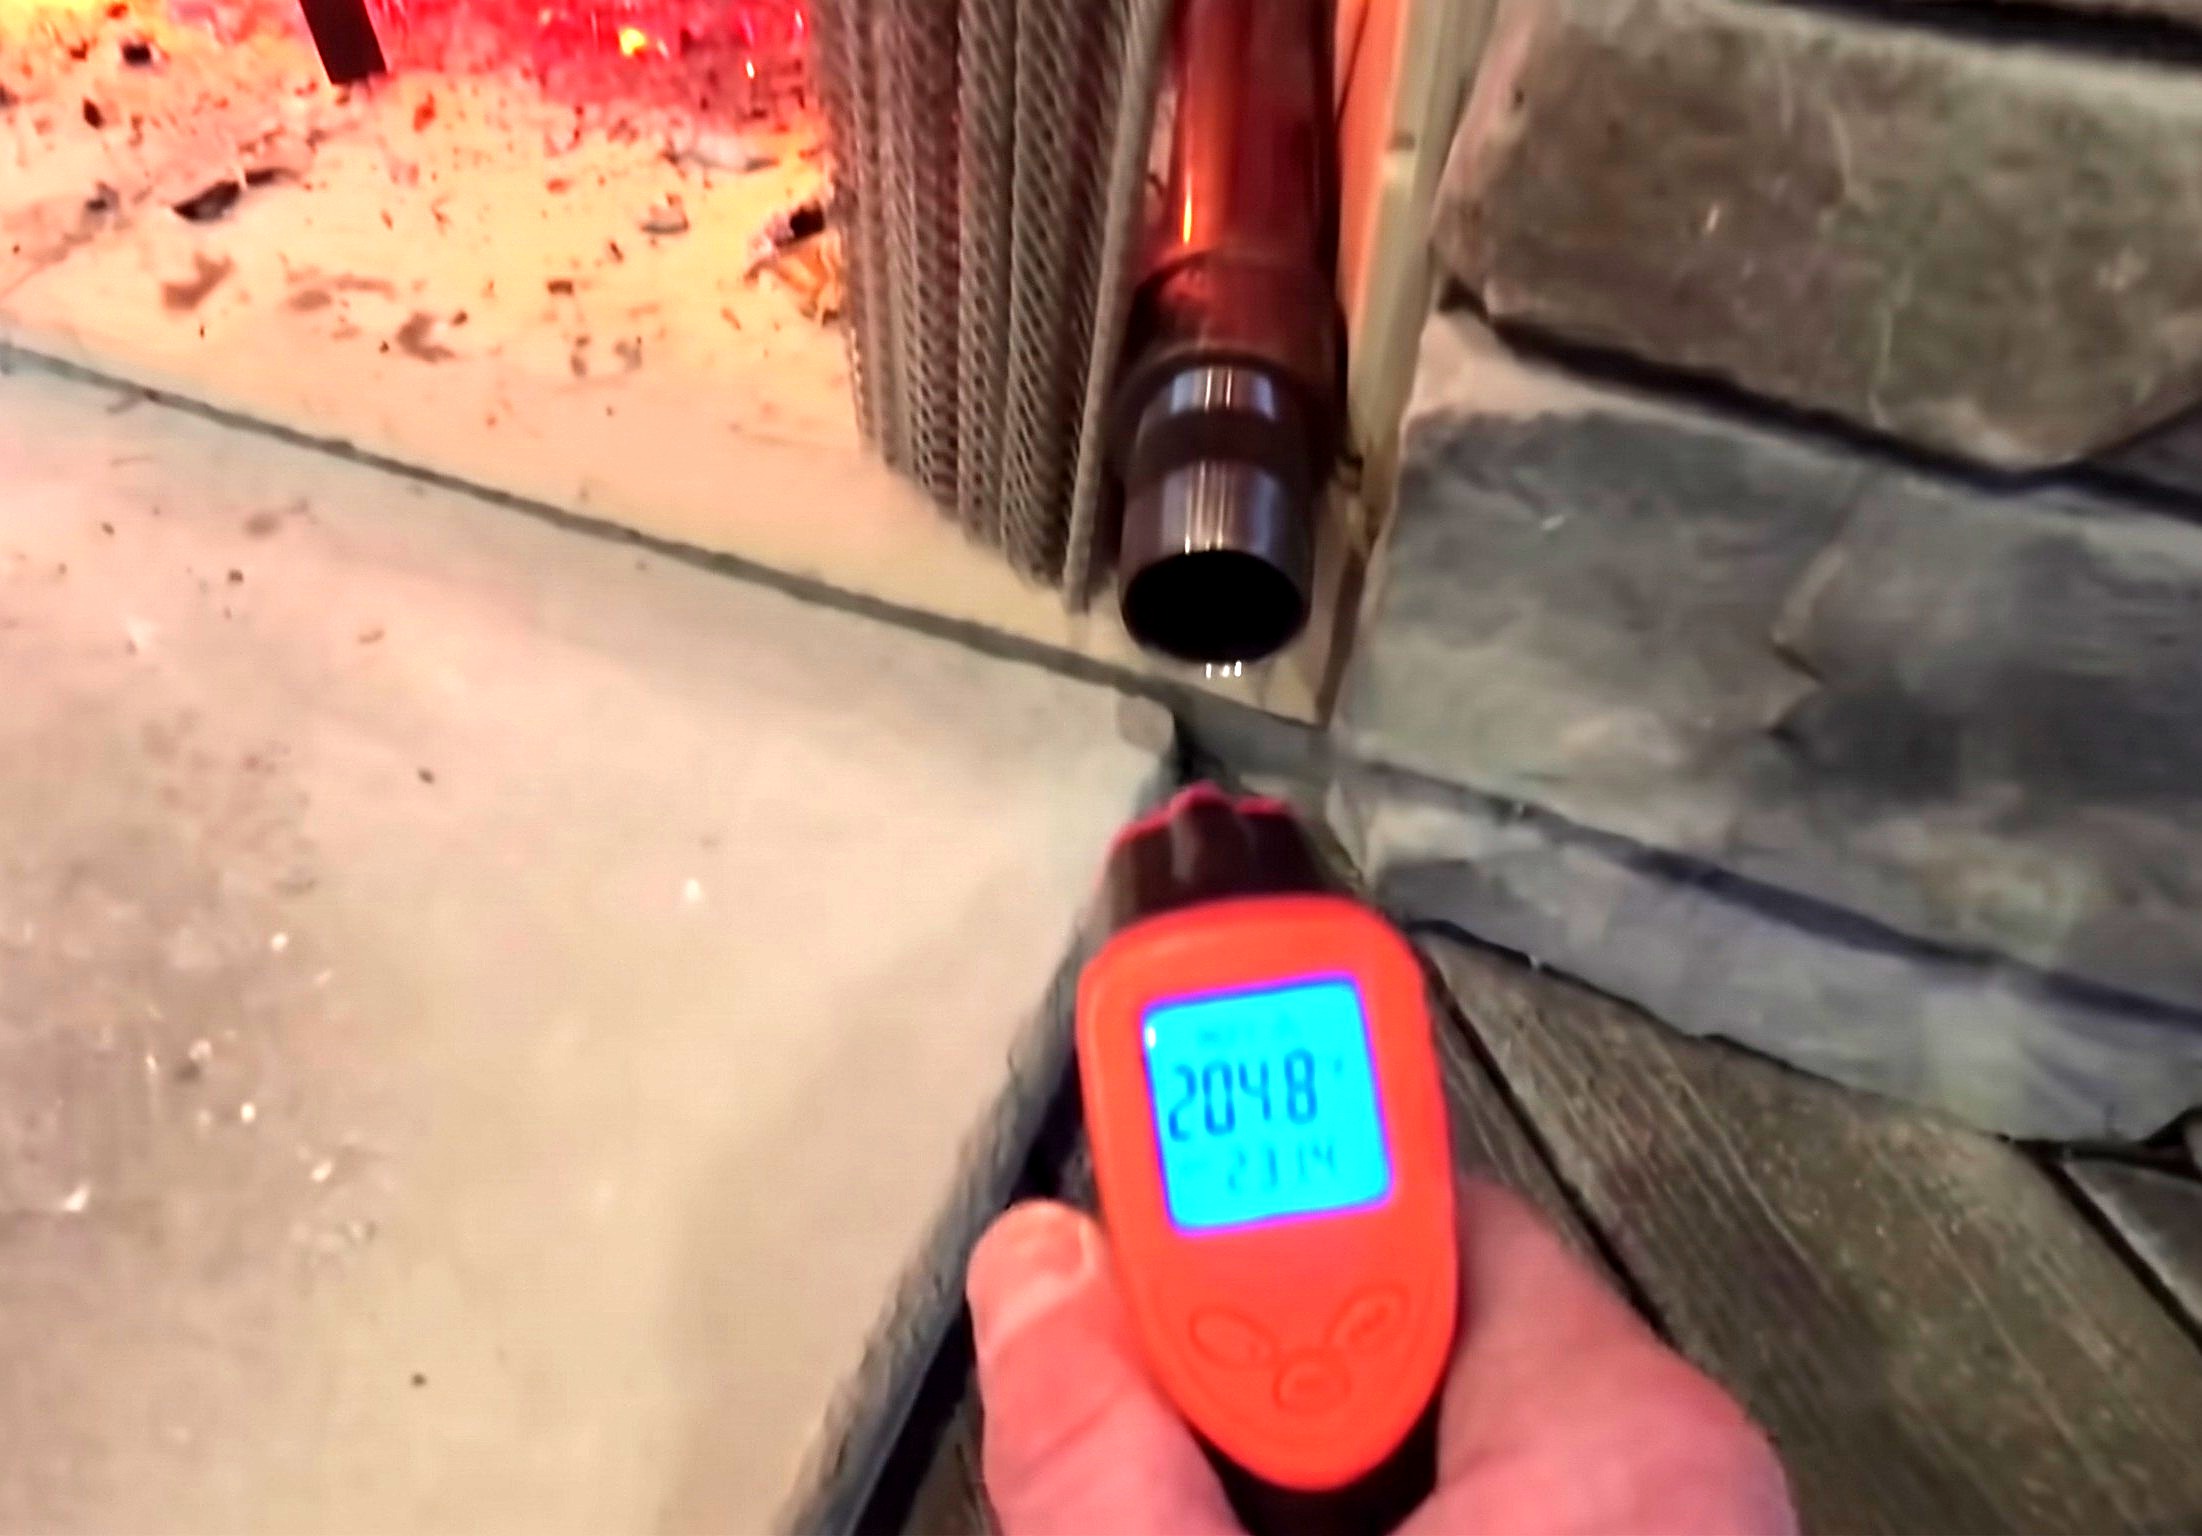
Parts in this step: (C) Inline fan, (D) Black pipe heat exchanger manifold
You'll need: Inline Fan, Infrared Thermometer, Black Gas Pipe
- 3.1 Re-Measure Pipe Temperatures
- Check the outside left-side intake pipes to confirm heat does not move backward.
- Scan the upper rear corners of black pipe heat exchanger manifold (D) with the infrared thermometer (400 F to 600 F).
- Scan the middle and right-side vertical firebox pipes (330 F to 370 F).
- 3.2 Measure Hot Air Output
- Keep inline fan (C) running to push room air through the hot manifold.
- Aim the infrared thermometer inside the front right outlet.
- Check that discharged air reaches at least 225 F.
Key measurements
- Second-test burn time: 30 to 40 minutes
- Upper rear manifold: 400 F to 600 F
- Mid and right manifold risers: 330 F to 370 F
- Outlet air at 30 to 40 minutes: 225 F
- Tip: Check the intake pipe near the rubber Fernco couplers stays ice cold while feeding room air.
- Heads up: Keep bare hands off the outlet pipe once discharge temperatures pass 200 F.
Before you move on: Check the intake couplers stay cool while outlet air exceeds 225 F.
Step 4: Modifying the Output Nozzle
A directional nozzle extension routes hot discharge air up and outside the firebox.
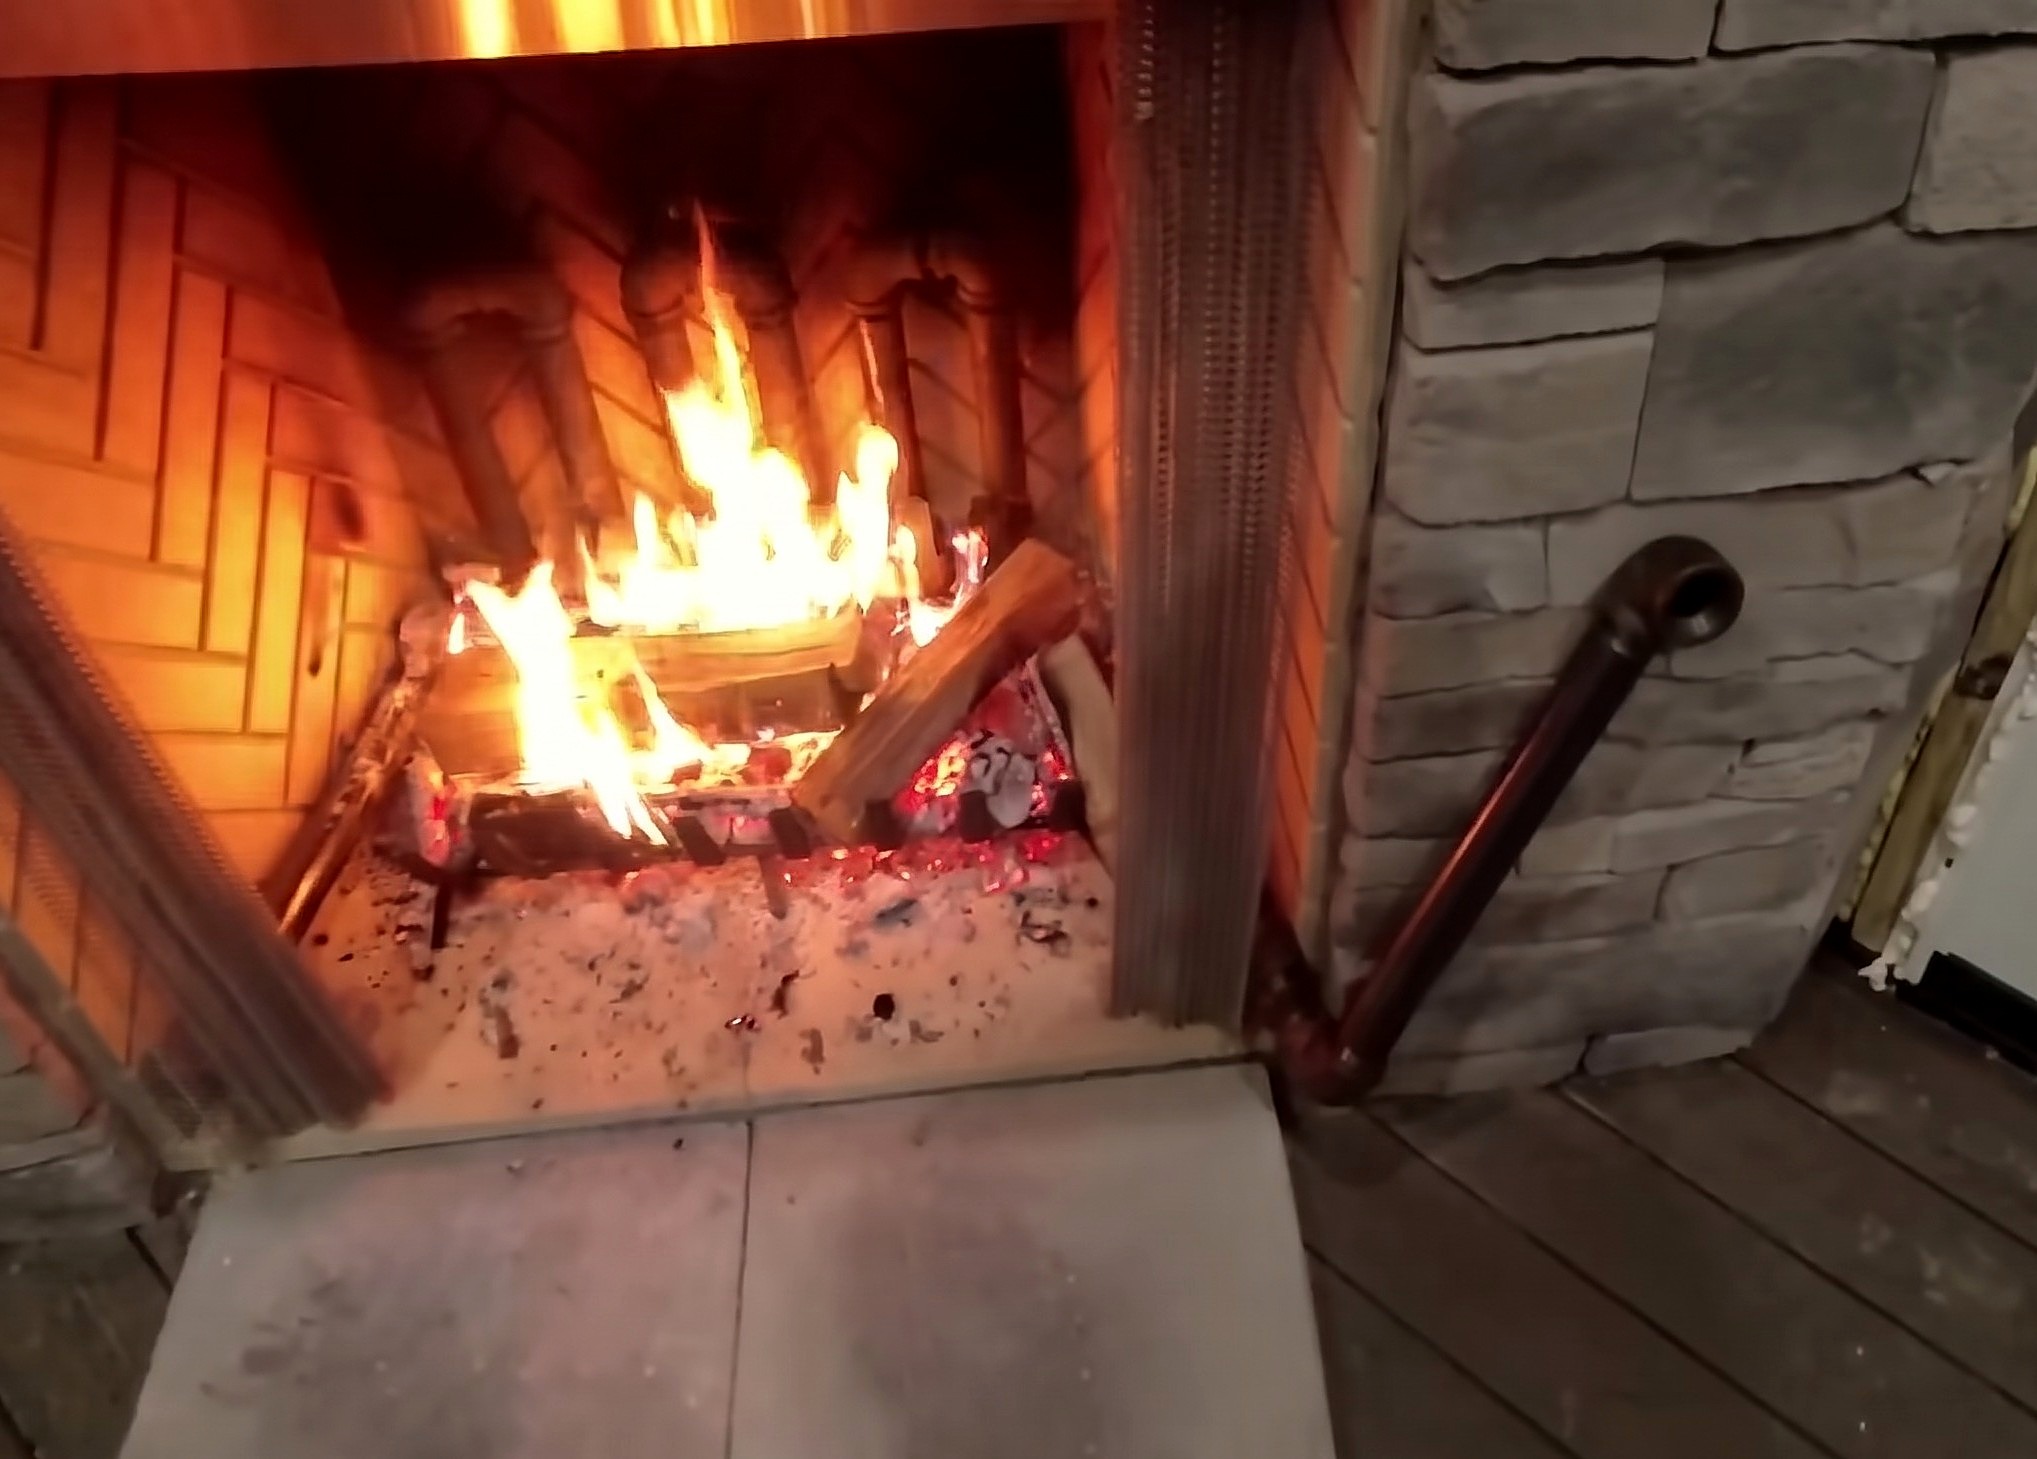
Parts in this step: (D) Black pipe heat exchanger manifold
You'll need: Pipe Wrenches, Black Gas Pipe, Black Pipe Fittings, 90-degree black pipe elbow, Short black pipe nipple
- 4.1 Attach Elbow and Extension Pipe
- Wear protective equipment, including heavy heat-resistant gloves, before touching outlet fittings.
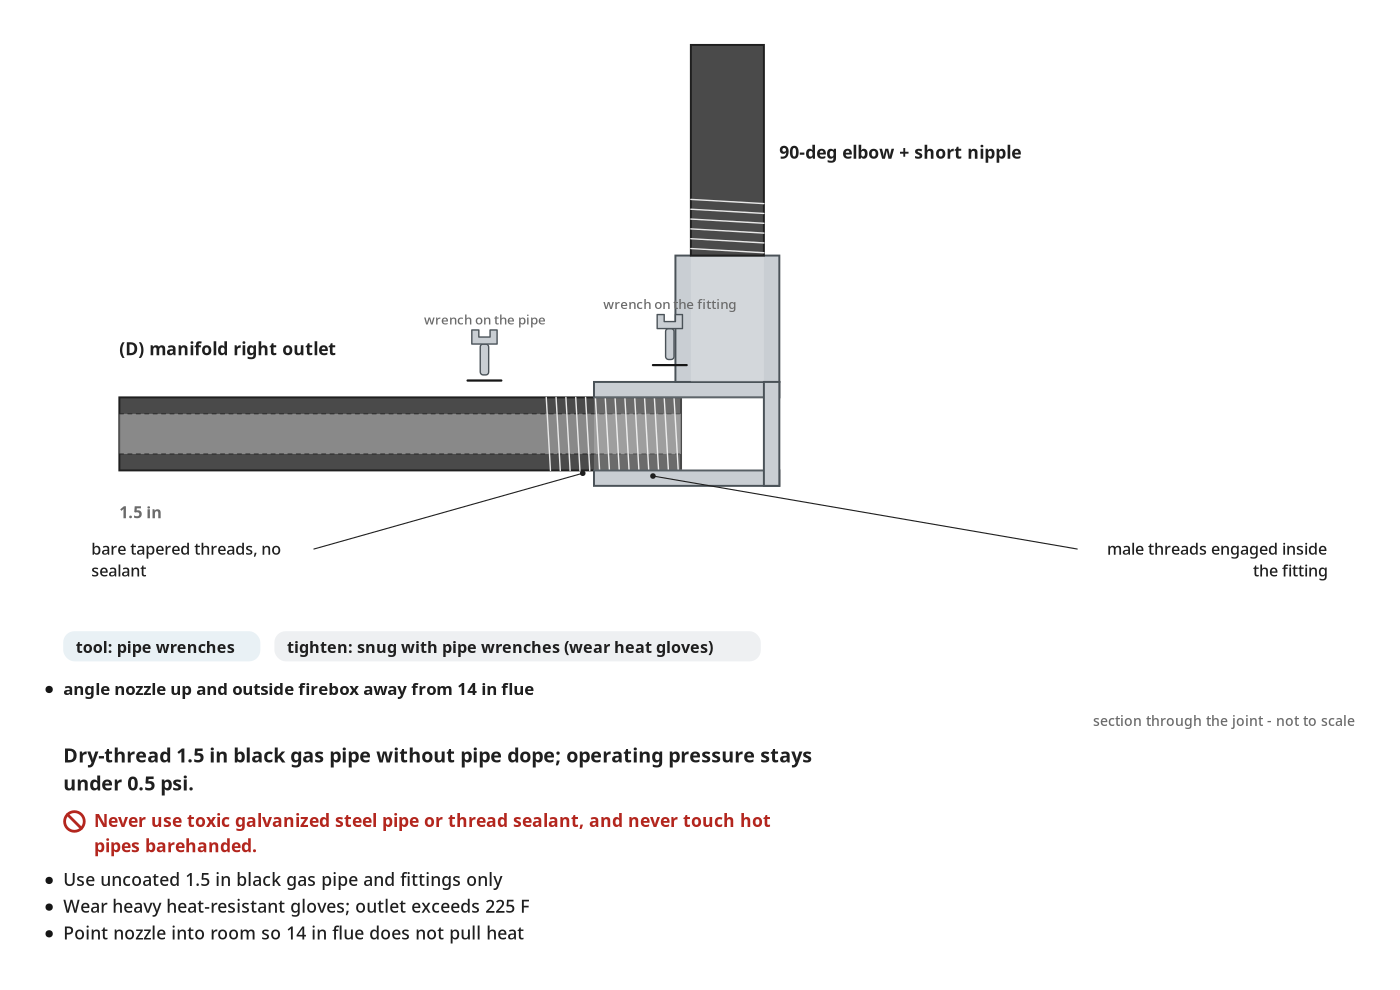
- Dry-thread a 1.5-inch 90-degree elbow onto the hot outlet of black pipe heat exchanger manifold (D).
- Thread a short 1.5-inch black pipe nipple into the 90-degree elbow without pipe dope.
- Snug the joint with pipe wrenches and angle the pipe up, away from the firebox.
Key measurements
- Extension nozzle: 1 1/2 in black gas pipe elbow and short nipple
- Tip: Point the extension pipe outside the firebox so the 14-inch flue draft does not suck heated air up the chimney.
- Heads up: Wear hand protective equipment; the outlet pipe exceeds 225 F and burns immediately.
Before you move on: Check the angled extension pipe rests steady and blows hot air into the room, not the firebox.
Step 5: High-Airflow Test with Leaf Blower
Test peak heat over hot coals with high-volume airflow, then return to the quiet inline fan.
Parts in this step: (A) Heavy-duty fireplace grate, (C) Inline fan, (D) Black pipe heat exchanger manifold
You'll need: Inline Fan, Infrared Thermometer, Leaf Blower, Black Gas Pipe, Flexible Ductwork
- 5.1 Connect the Leaf Blower
- Let the logs on heavy-duty fireplace grate (A) burn to a glowing coal bed.
- With inline fan (C) running, measure the outlet nozzle; it climbs to 340 F over coals.
- Disconnect the inline fan and attach a cordless leaf blower to the black pipe heat exchanger manifold (D) intake.
- 5.2 Measure Maximum Temperature Output
- Trigger the leaf blower to force high static pressure air through the 1.5-inch manifold bends.
- Aim the infrared thermometer at the outlet nozzle to check for 340 F to 427 F peaks.
- Remove the loud leaf blower; reconnect the 4-inch inline fan for quiet, continuous room heat.
Key measurements
- Upper fireplace brick temperature: 59 F
- Coal-bed outlet temperature (4-inch inline fan): 340 F
- Peak recorded outlet air temperature: 427 F
- Tip: After peak testing, switch back to the 4-inch inline fan for comfortable room noise.
- Heads up: Keep children and pets clear of the discharge nozzle (340 F to 427 F).
Before you move on: Check the reconnected 4-inch inline fan runs smoothly before leaving the fireside.
Finishing
Last touches
- Tuck the 4-inch flexible duct and inline fan by the hearth and firewood rack.
- Dial the fan speed controller to balance heat and noise.
Settle and cure
- Open a door or window on the first fire until cutting oil smoke clears.
Care
- Rake coals forward under the tall grate so embers never bury the steel manifold pipes.
- Periodically check that the intake rubber Fernco couplers stay cool and tight.
Alternatives
- Add a centrifugal squirrel-cage blower or 4-inch to 1.5-inch transition plenum to quietly boost static pressure.
- Draw outdoor intake air to prevent negative room pressure and cold drafts.
Commission & test
| Check | What you should see | If not |
|---|---|---|
| Check the left-hand intake pipe and Fernco couplers after firing 30 minutes. | Intake pipes stay cool to the touch; no heat backs up to rubber couplers or fan. | Start the inline fan immediately and raise rheostat speed to push cool room air inward. |
| Measure discharge air at the 1.5-inch outlet nozzle after burning 30 to 40 minutes. | Infrared thermometer reads at least 225 F with the 4-inch inline fan on. | Let logs burn down to a hot coal bed; check fan duct couplers are tight. |
| With a deep coal bed under the tall grate, measure the angled outlet extension nozzle. | Outlet air reaches 340 F (4-inch inline fan) and up to 427 F (high-airflow testing). | Pivot the 90-degree outlet elbow further outside the firebox so heated air is not pulled up the 14-inch flue. |
These Specs are built from Indy Farm Life's video “DIY Fireplace Heat Exchanger”. Open the DIY Fireplace Heat Exchanger project page.
