Spetz Specs No. 7003: step-by-step system install guide
Sewer Grinder Pump Installation and Plumbing Hookup
The complete step-by-step guide made from Indy Farm Life's YouTube video, free on Spetz. For the video, a step-by-step player and answers to your questions, see the Sewer Grinder Pump Installation and Plumbing Hookup project page.
6 steps, 3 parts, 12 tools, 13 materials
Overview
Finished size: 3 ft x 3 ft (basin with ballast collar)
The System
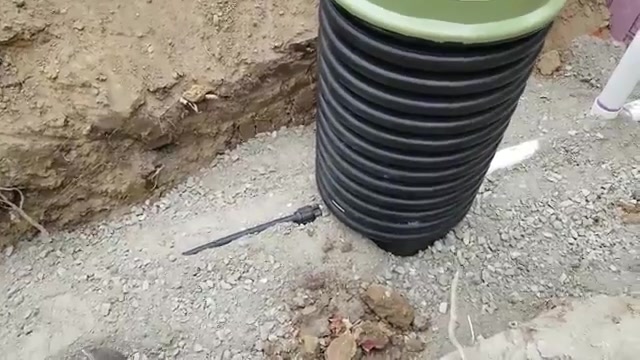
- An E-One DH-071 sewer grinder pump basin buried outside a house foundation.
- Sewage gravity-flows through a 4 in PVC inlet, is ground and pressurized, then pushed through 1-1/4 in HDPE pipe over 850 ft to a sewer manhole.
- Eliminates a graded gravity sewer line across flat terrain.
Why Do It Yourself
- Hookup is straightforward: one solvent-weld inlet, one compression discharge fitting.
- The heavy work is excavation and rigging, not covered by a product sheet.
What It Takes
- Backhoe, compact tractor with forks, hand tamper, reciprocating saw, spirit level.
- A helper for rigging and lowering the basin.
- Separate trencher rental for the 850 ft discharge run.
- Electrical hookup and final trenching are separate phases not covered here.
What Decides Success
- A level, compacted gravel pad at the correct elevation for 1/8 in per foot inlet slope.
- Correct insertion depth (3 to 3-1/2 in) on the inlet pipe and a leak-free compression joint on the discharge.
The system at a glance
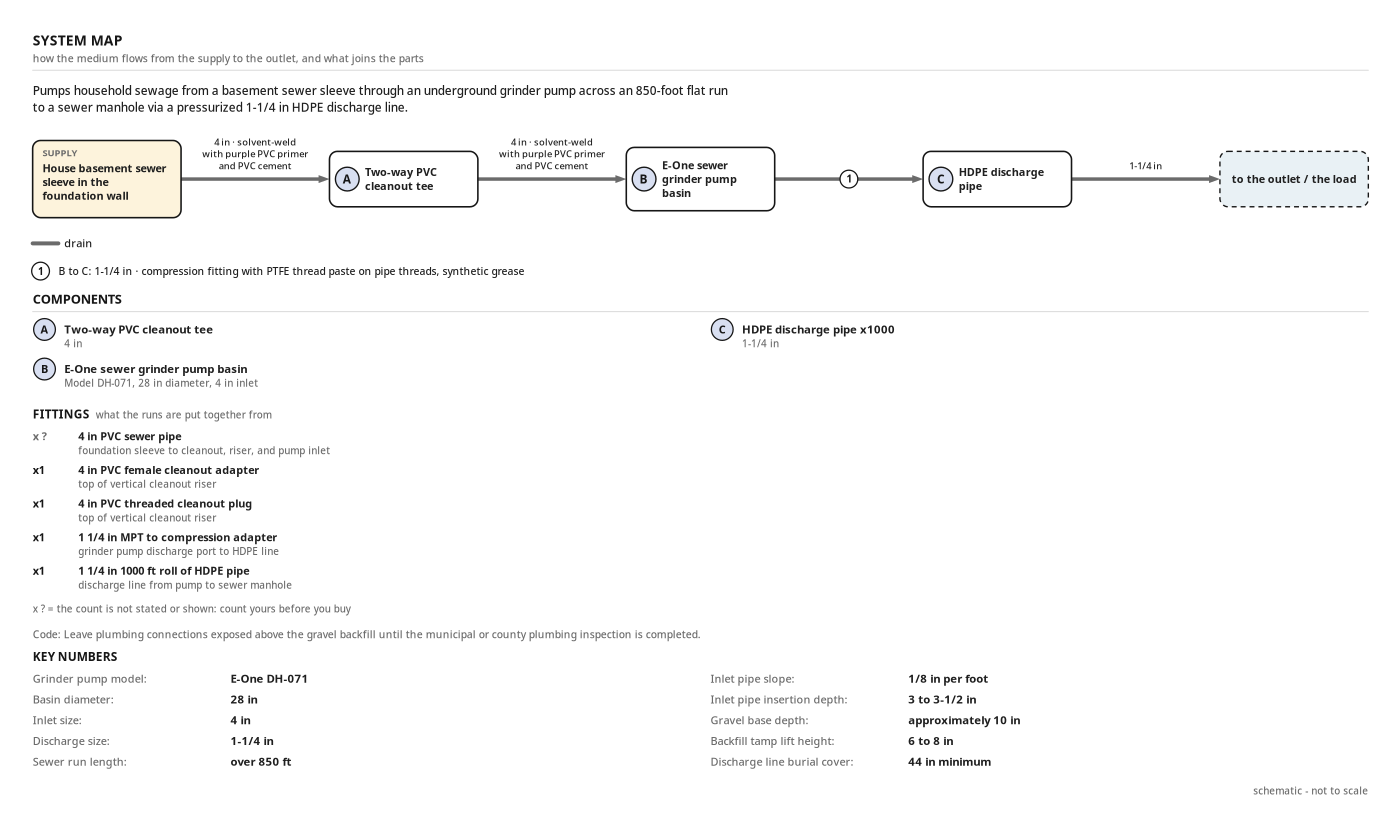
- Pumps household sewage from a basement sewer sleeve through an underground grinder pump across an 850-foot flat run to a sewer manhole via a pressurized 1-1/4 in HDPE discharge line.
- Supply: House basement sewer sleeve in the foundation wall
- supply → Two-way PVC cleanout tee: drain, pipe, 4 in, solvent-weld with purple PVC primer and PVC cement
- Two-way PVC cleanout tee → E-One sewer grinder pump basin: drain, pipe, 4 in, solvent-weld with purple PVC primer and PVC cement
- E-One sewer grinder pump basin → HDPE discharge pipe: drain, pipe, 1-1/4 in, compression fitting with PTFE thread paste on pipe threads, synthetic grease on internal O-ring
- HDPE discharge pipe → out: drain, pipe, 1-1/4 in
- Grinder pump model: E-One DH-071
- Basin diameter: 28 in
- Inlet size: 4 in
- Discharge size: 1-1/4 in
- Sewer run length: over 850 ft
- Inlet pipe slope: 1/8 in per foot
- Inlet pipe insertion depth: 3 to 3-1/2 in
- Gravel base depth: approximately 10 in
- Backfill tamp lift height: 6 to 8 in
- Discharge line burial cover: 44 in minimum
Codes
- Leave plumbing connections exposed above the gravel backfill until the municipal or county plumbing inspection is completed.
Health and safety
Excavation and Trench Safety
- Locate all buried utilities, drain lines, and gas lines before any digging begins; contact your local 811 service for a utility locate.
- Never enter an unshored deep pit or trench; soil can collapse without warning and bury a person in seconds.
- Keep the backhoe loader and compact utility tractor stabilized well back from trench edges to prevent cave-ins.
- Barricade open pits and trenches when unattended to prevent falls by workers, children, or animals.
Heavy Equipment and Lifting
- Only operate the backhoe loader and front-end loader tractor if you are trained and familiar with their hydraulic controls.
- Use only a rated nylon lifting strap attached at the correct lift point when suspending the grinder pump basin over the open pit.
- Keep all personnel completely clear of the suspended load path while the basin is being lowered into the excavation.
- Lift the precast concrete ballast blocks with the tractor's pallet forks; never position hands or feet beneath a suspended block.
Solvent Cement and Chemical Fumes
- PVC primer, PVC solvent cement, and pipe cleaner release harmful vapors; work in open air or ensure strong ventilation in any enclosed area.
- Wear chemical-resistant gloves and safety glasses when handling purple PVC primer, solvent cement, and pipe cleaner to avoid skin and eye contact.
- Keep solvent cement, primer, and pipe cleaner away from open flames, sparks, and heat sources; they are highly flammable.
Reciprocating Saw and Sharp Edges
- Let the reciprocating saw blade come to a full stop before withdrawing it from a cut; keep your free hand well away from the blade path.
- Freshly cut PVC and HDPE pipe ends are sharp; deburr every cut end with the hand file before handling or assembling.
- Wear work gloves when handling steel wool, the hand file, and cut pipe sections to prevent cuts and abrasions.
Checks before you start
- Turn off and lock out nearby utilities before excavating; call 811 or local utility locate service first.
- Locate all buried drain lines and utilities in the dig zone before breaking ground.
- Confirm the foundation sewer sleeve is 4 in PVC and positioned where the pit will be dug.
- Check local code for inlet pipe slope; 1/8 in per foot is used here.
- Check local frost line depth; discharge line needs at least 44 in of cover in this climate.
- Have the E-One DH-071 installation manual on site for pump-specific torque and wiring specs.
- A plumbing inspection is required before final backfill; plan work so joints stay exposed.
Tools
- Backhoe loader (heavy excavator / backhoe, Case, 580)
- Spirit level (box beam level)
- Round-point shovel (hand shovel, Truper)
- Compact utility tractor (front-end loader tractor with bucket and pallet forks, John Deere)
- Hand tamper (steel ground tamper)
- Steel wool (abrasive pad) (optional)
- Reciprocating saw (cordless reciprocating saw, DeWalt)
- Nylon lifting strap (webbing strap)
- Stepladder (A-frame stepladder) (optional)
- Tape measure (retractable tape measure)
- Tongue-and-groove pliers (adjustable pliers) (optional)
- Hand file (metal file)
Materials
- Sewer grinder pump (1, grinder pump basin unit, E-One, Model DH-071, 28 in diameter, 4 in inlet)
- HDPE discharge pipe (1000 ft roll, high-density polyethylene pipe, 1-1/4 in, 1-1/4 in diameter)
- #53 crushed stone (2 tractor buckets for base pad plus backfill, crushed gravel, #53, 6 to 10 in base depth)
- PVC sewer pipe (non-pressure PVC sewer pipe, ASTM F891-16, 4 in, 4 in diameter)
- PVC pipe cleaner (1 can, solvent pipe cleaner)
- Two-way PVC cleanout tee (1, PVC sanitary cleanout tee, 4 in)
- Precast modular concrete ballast (4 pieces, precast concrete anchor collar, 3 ft x 3 ft assembled)
- Dish soap (1 bottle, liquid dish soap / pipe lubricant)
- PVC primer and cement (1 can each, solvent weld primer and PVC glue, Purple PVC primer and PVC solvent cement)
- Compression fitting coupler (1, 1-1/4 in male pipe thread (MPT) to compression adapter, 1-1/4 in)
- Pipe thread sealant (PTFE pipe thread paste, RectorSeal, T Plus 2)
- Synthetic grease (3 oz tube, synthetic lubricant, Super Lube)
- PVC cleanout adapter and threaded cap (1, PVC female cleanout adapter and threaded plug, 4 in)
Hardware
| Hardware | Size | Count | Used in steps |
|---|---|---|---|
| 1-1/4 in MPT to compression adapter | 1 | 6 |
Finishes & supplies, in the order they go on
| Product | What it does | Mix & coats | Dry time | Applied with |
|---|---|---|---|---|
| PVC pipe cleaner | Remove waterproofing residue and prep PVC surfaces for solvent welding | Steel wool and rag | ||
| Purple PVC primer | Soften PVC surfaces before applying solvent cement | Dauber in can lid | ||
| PVC solvent cement | Solvent-weld 4 in PVC pipe joints and cleanout assembly | Dauber in can lid | ||
| Dish soap | Lubricate the beveled PVC pipe end and rubber inlet grommet for insertion | By hand | ||
| Pipe thread sealant | Seal the male pipe threads on the compression adapter at the discharge port | By hand or brush | ||
| Synthetic grease | Lubricate the internal O-ring inside the HDPE compression coupler | By hand |
Components
| Part | Name | Qty | Size | Notes |
|---|---|---|---|---|
| A | Two-way PVC cleanout tee | x1 | 4 in | Installed inline between the house sewer sleeve and the pump inlet with a vertical riser and threaded cap for service access. |
| B | E-One sewer grinder pump basin | x1 | 3/4" (T) × 4" (W) × 28" (L) | Lower onto compacted #53 stone pad using tractor pallet forks and a nylon strap. Assemble four modular concrete ballast blocks around the base flange to prevent floating. |
| C | HDPE discharge pipe | x1000 | 1-1/4 in | 1000 ft roll · Pressurized discharge line from the pump to the sewer manhole. Bury below frost line. Trench with a dedicated trencher rather than a backhoe. |
Before you start
Site Preparation
- Call 811 or local utility locate service; mark all buried lines.
- Confirm sewer sleeve location and diameter from the foundation plan.
- Stage the pump basin, ballast blocks, and HDPE roll near the dig site.
- Have #53 crushed stone delivered in bulk before excavation day.
Step by step
Step 1: Excavate the Pump Pit and Trench
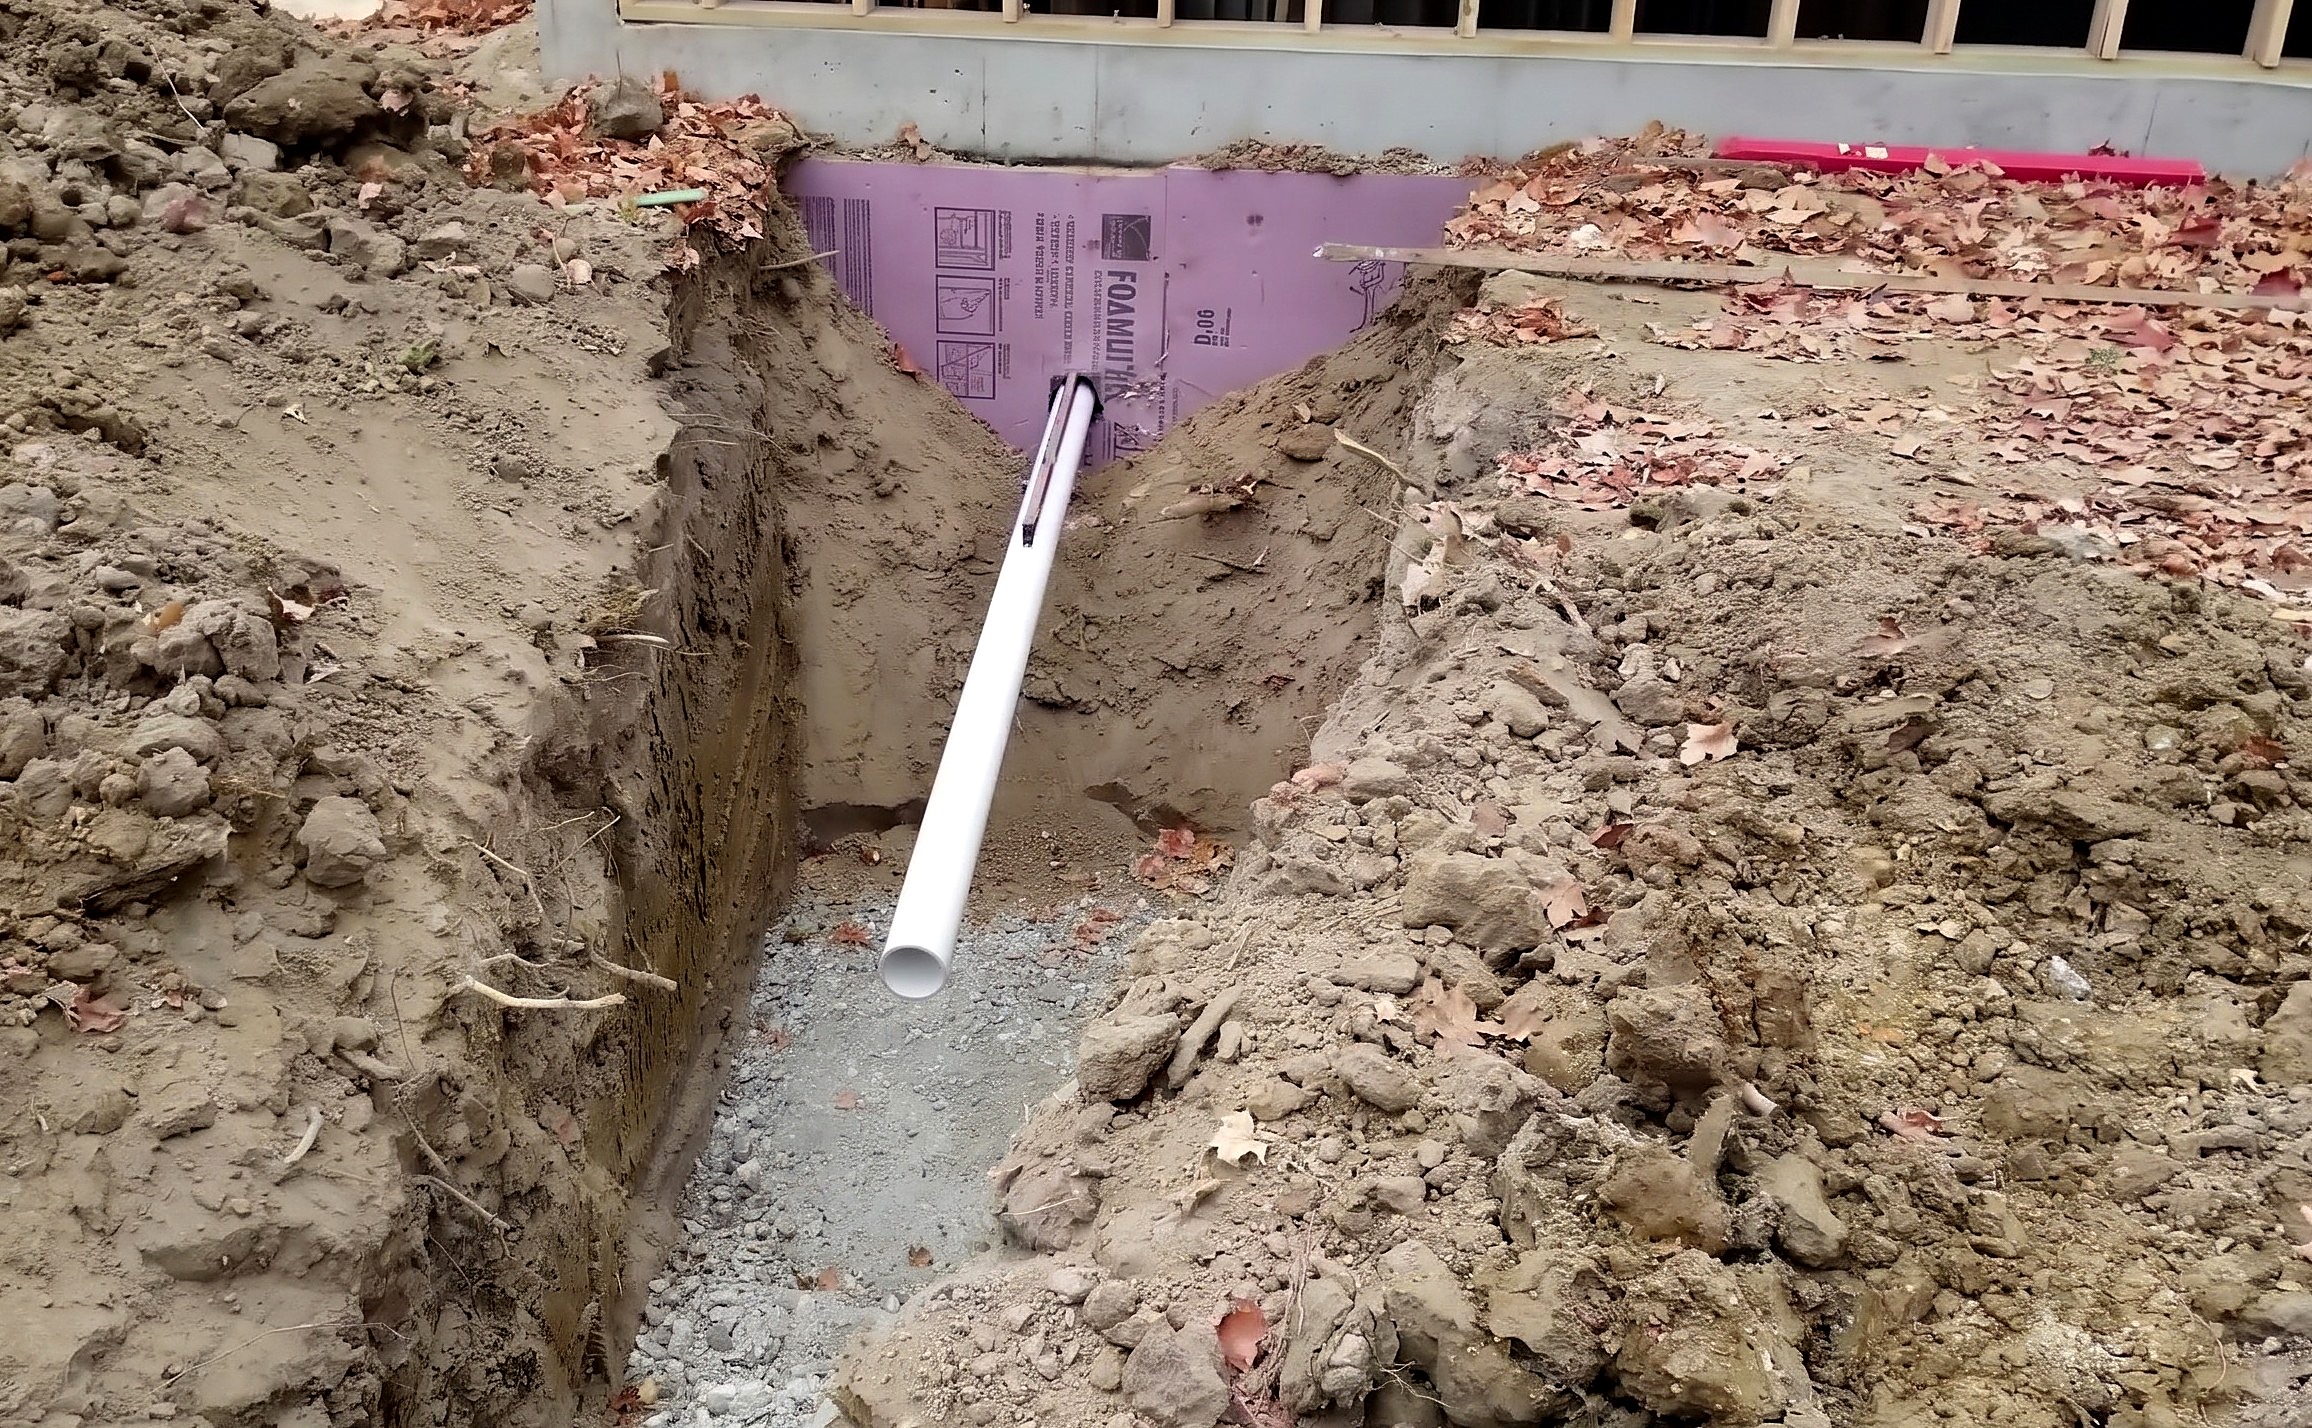
A deep pit sits outside the foundation sewer sleeve; the discharge trench is open, with all buried utilities identified.
Parts in this step: (C) HDPE discharge pipe
You'll need: Backhoe loader, Round-point shovel
- 1.1 Excavate the pit outside the foundation sewer sleeve
- Dig the pit with a backhoe directly in front of the house sewer sleeve.
- Over-dig depth by 6 to 10 in beyond the final basin seat elevation.
- The extra depth gets filled back with compacted #53 crushed stone.
- Account for 1/8 in per foot of fall on the 4 to 5 ft gravity inlet run when setting pit depth.
- 1.2 Excavate the initial discharge trench and verify buried drain depth
- Dig the first section of discharge trench leading away from the pit.
- Expose intersecting gravity drain lines now, before the pump is in the way.
- Confirm the trench provides at least 44 in of cover for the HDPE discharge line.
- Mark the trench route toward the sewer manhole for later trenching.
Key measurements
- Pit over-dig: 6 to 10 in below final basin seat
- Inlet slope: 1/8 in per foot over 4 to 5 ft run (about 1/2 in total fall)
- Discharge trench cover: 44 in minimum
- Tip: Over-dig, not under-dig: adding gravel is easier than re-excavating.
- Tip: Uncover intersecting drain lines before backfilling so you don't break them later.
- Heads up: Locate all buried utilities and drain lines before excavating.
- Heads up: Keep heavy equipment clear of trench edges; do not enter unshored deep trenches.
Before you move on: Pit depth: 6 to 10 in of gravel plus basin height puts the inlet at the correct elevation below the sewer sleeve.
Step 2: Prepare the Gravel Base and Clean the Sewer Sleeve
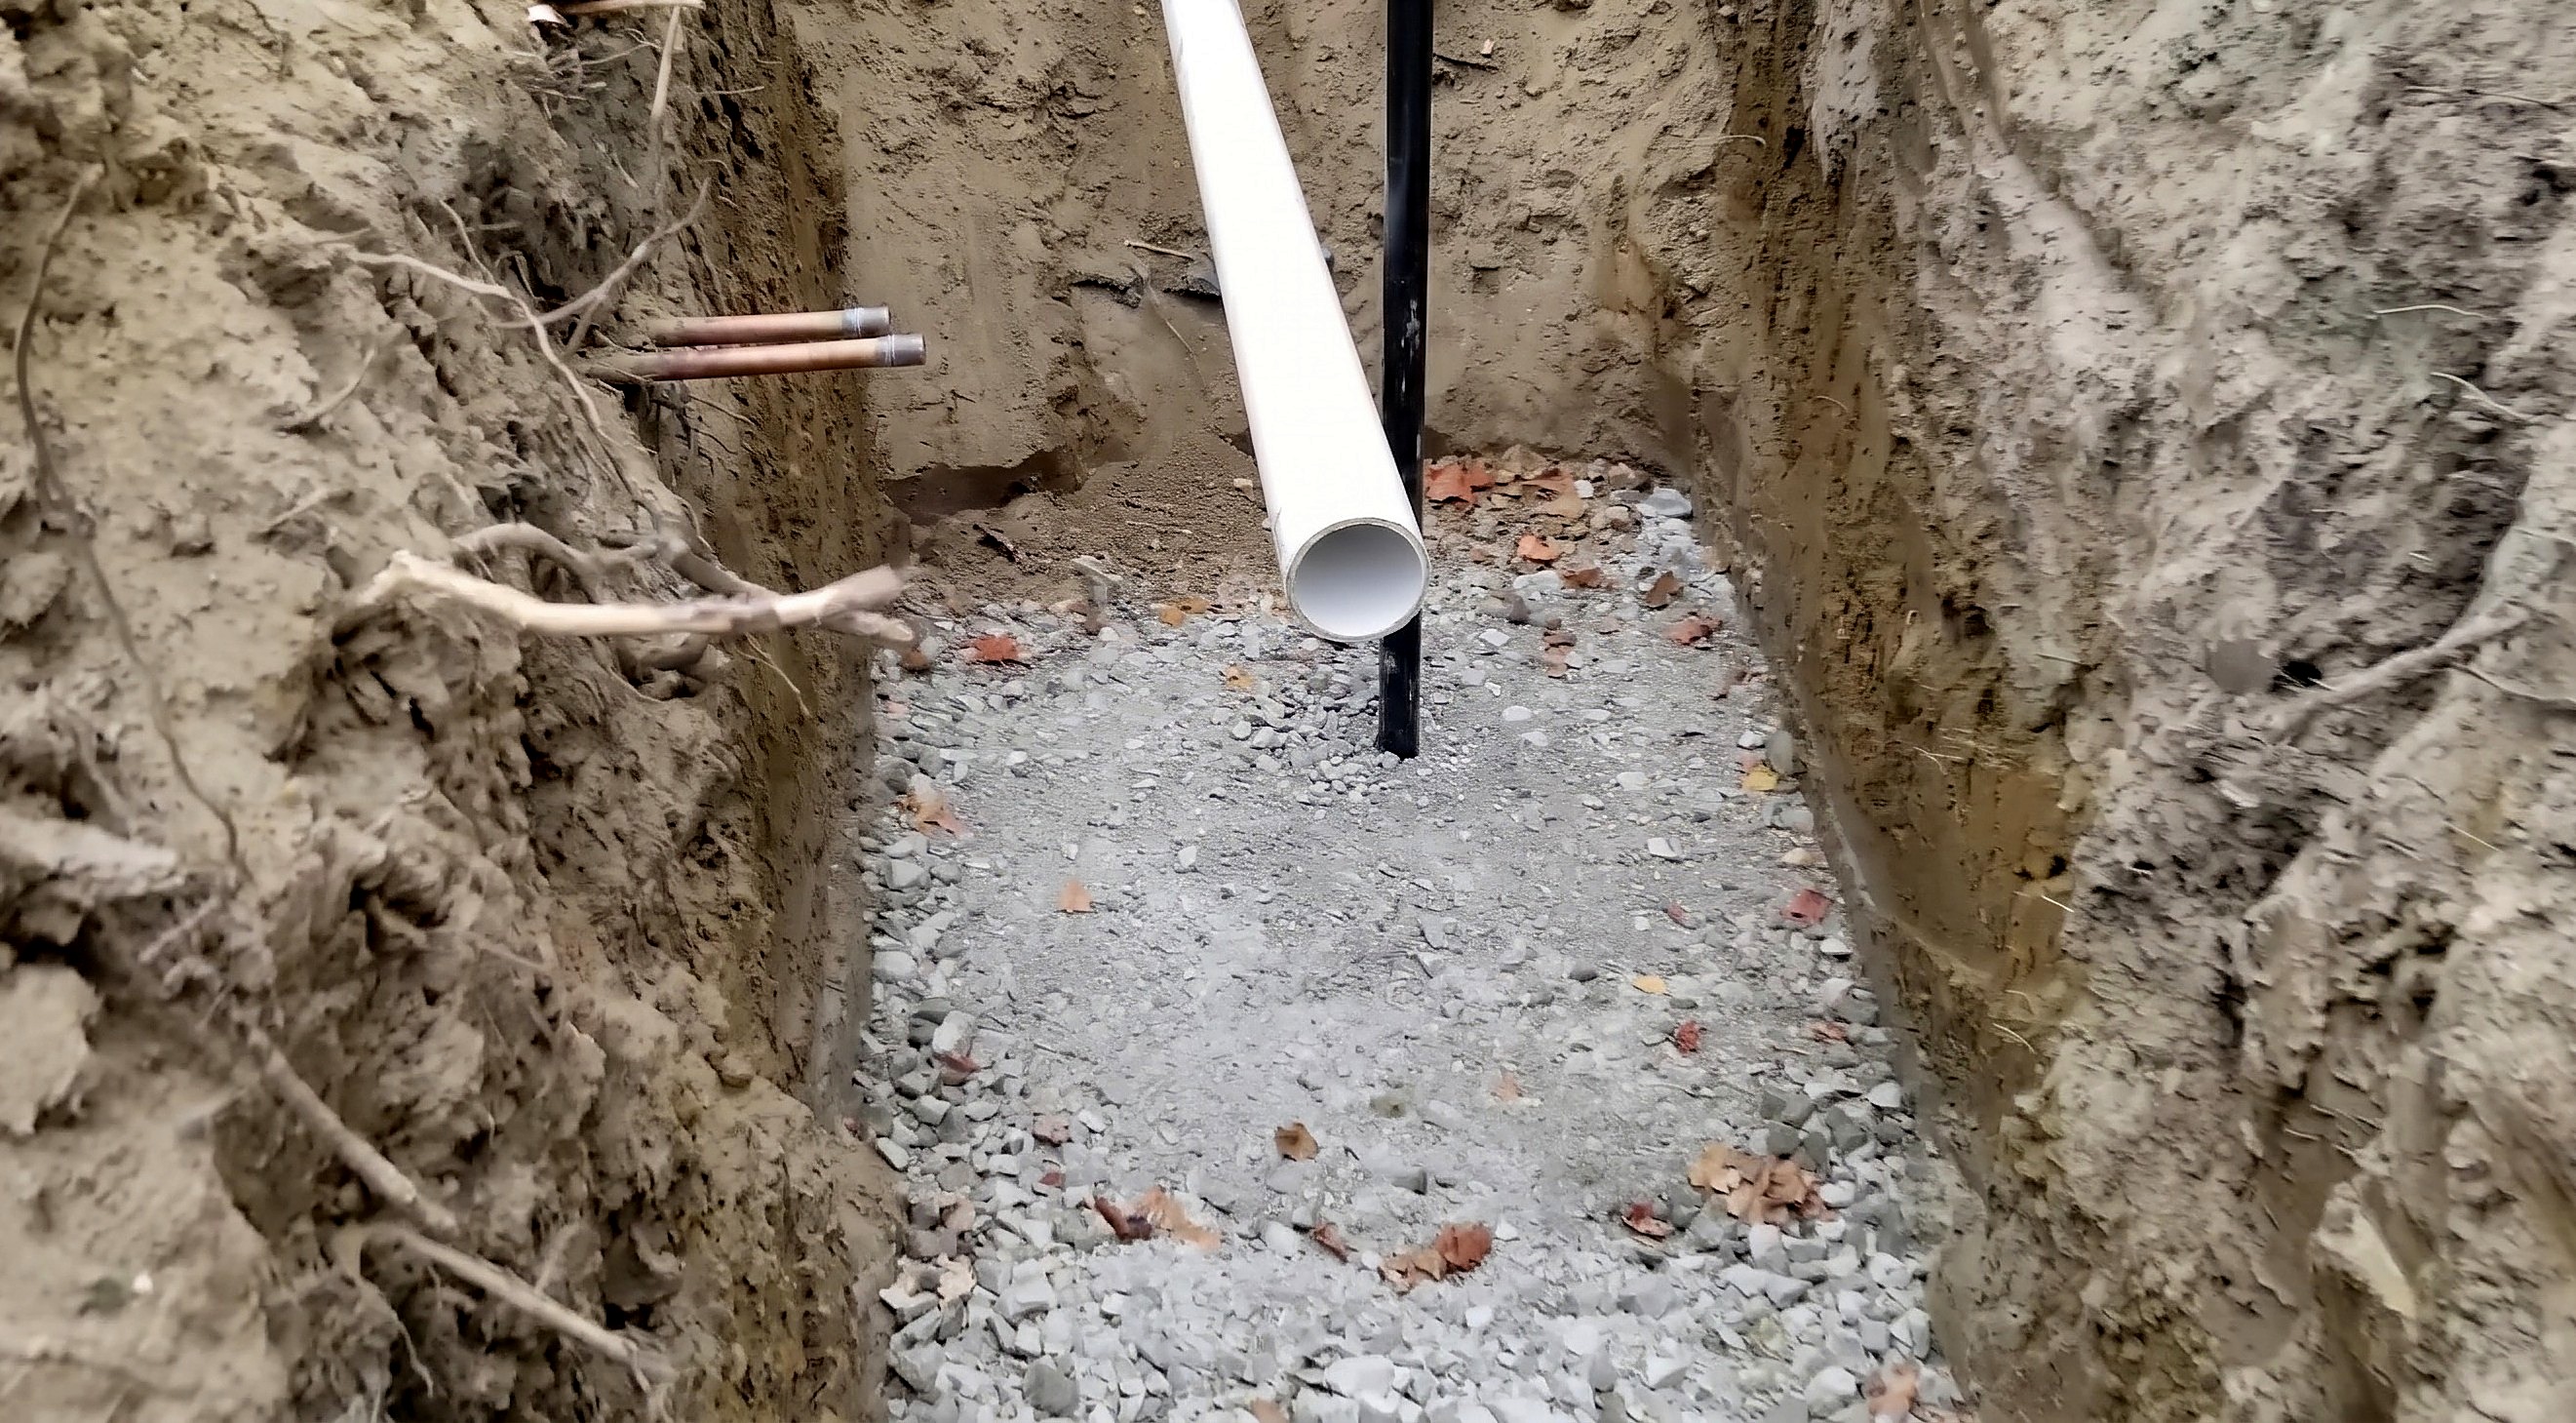
A compacted 10-inch #53 stone pad sits at the correct elevation; the sewer sleeve is clean and ready for solvent welding.
You'll need: Compact utility tractor, Hand tamper, Spirit level, Round-point shovel, Steel wool, #53 crushed stone, PVC pipe cleaner
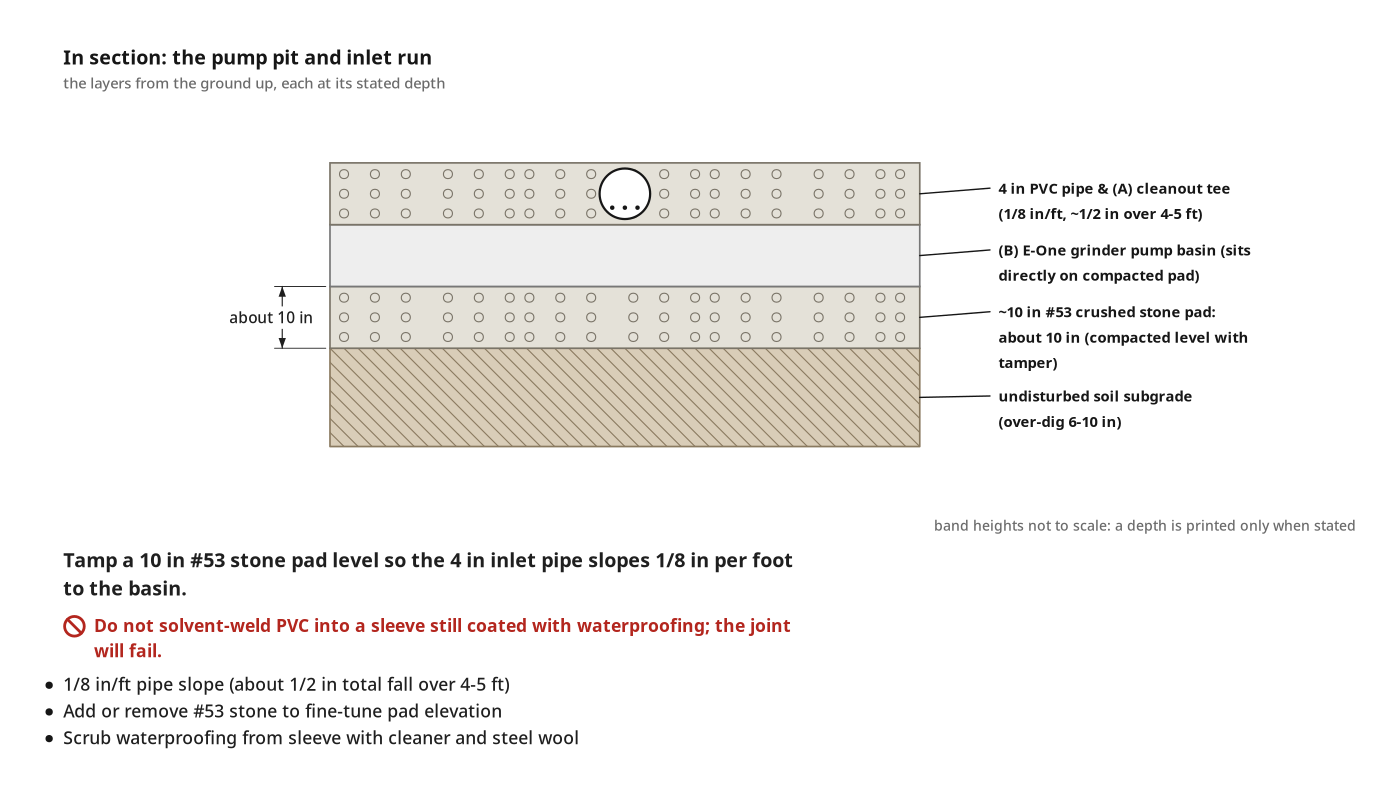
- 2.1 Dump and tamp the #53 crushed stone pad and check pipe elevation
- Dump two tractor buckets of #53 crushed stone into the pit.
- Spread and tamp the stone level with a hand tamper to form a ~10 in pad.
- Dry-fit a length of 4 in PVC pipe from the sewer sleeve toward the pump inlet.
- Set a spirit level on the dry-fit pipe: confirm 1/8 in per foot slope toward the pump.
- Add or remove stone to fine-tune pad height if needed.
- 2.2 Clean foundation waterproofing out of the sewer sleeve
- Cut away any foam insulation around the sewer sleeve exterior.
- Scrub waterproofing residue from inside the sleeve with PVC pipe cleaner and steel wool.
- Continue until bare PVC is exposed: solvent cement will not bond to waterproofing.
- Wipe the sleeve interior dry before gluing.
Key measurements
- Gravel base depth: about 10 in, compacted
- Inlet pipe slope: 1/8 in per foot confirmed with spirit level
- Tip: Dry-fit the pipe and level it before setting the pump: adjusting the pad later is much harder.
- Tip: Standard PVC pipe cleaner and steel wool remove foundation waterproofing effectively.
- Heads up: Do not solvent-weld PVC into a sleeve still coated with waterproofing; the joint will fail.
Before you move on: Spirit level on the dry-fit pipe shows 1/8 in per foot fall from sleeve to planned pump inlet height.
Step 3: Place the Ballast and Lower the Pump into the Pit
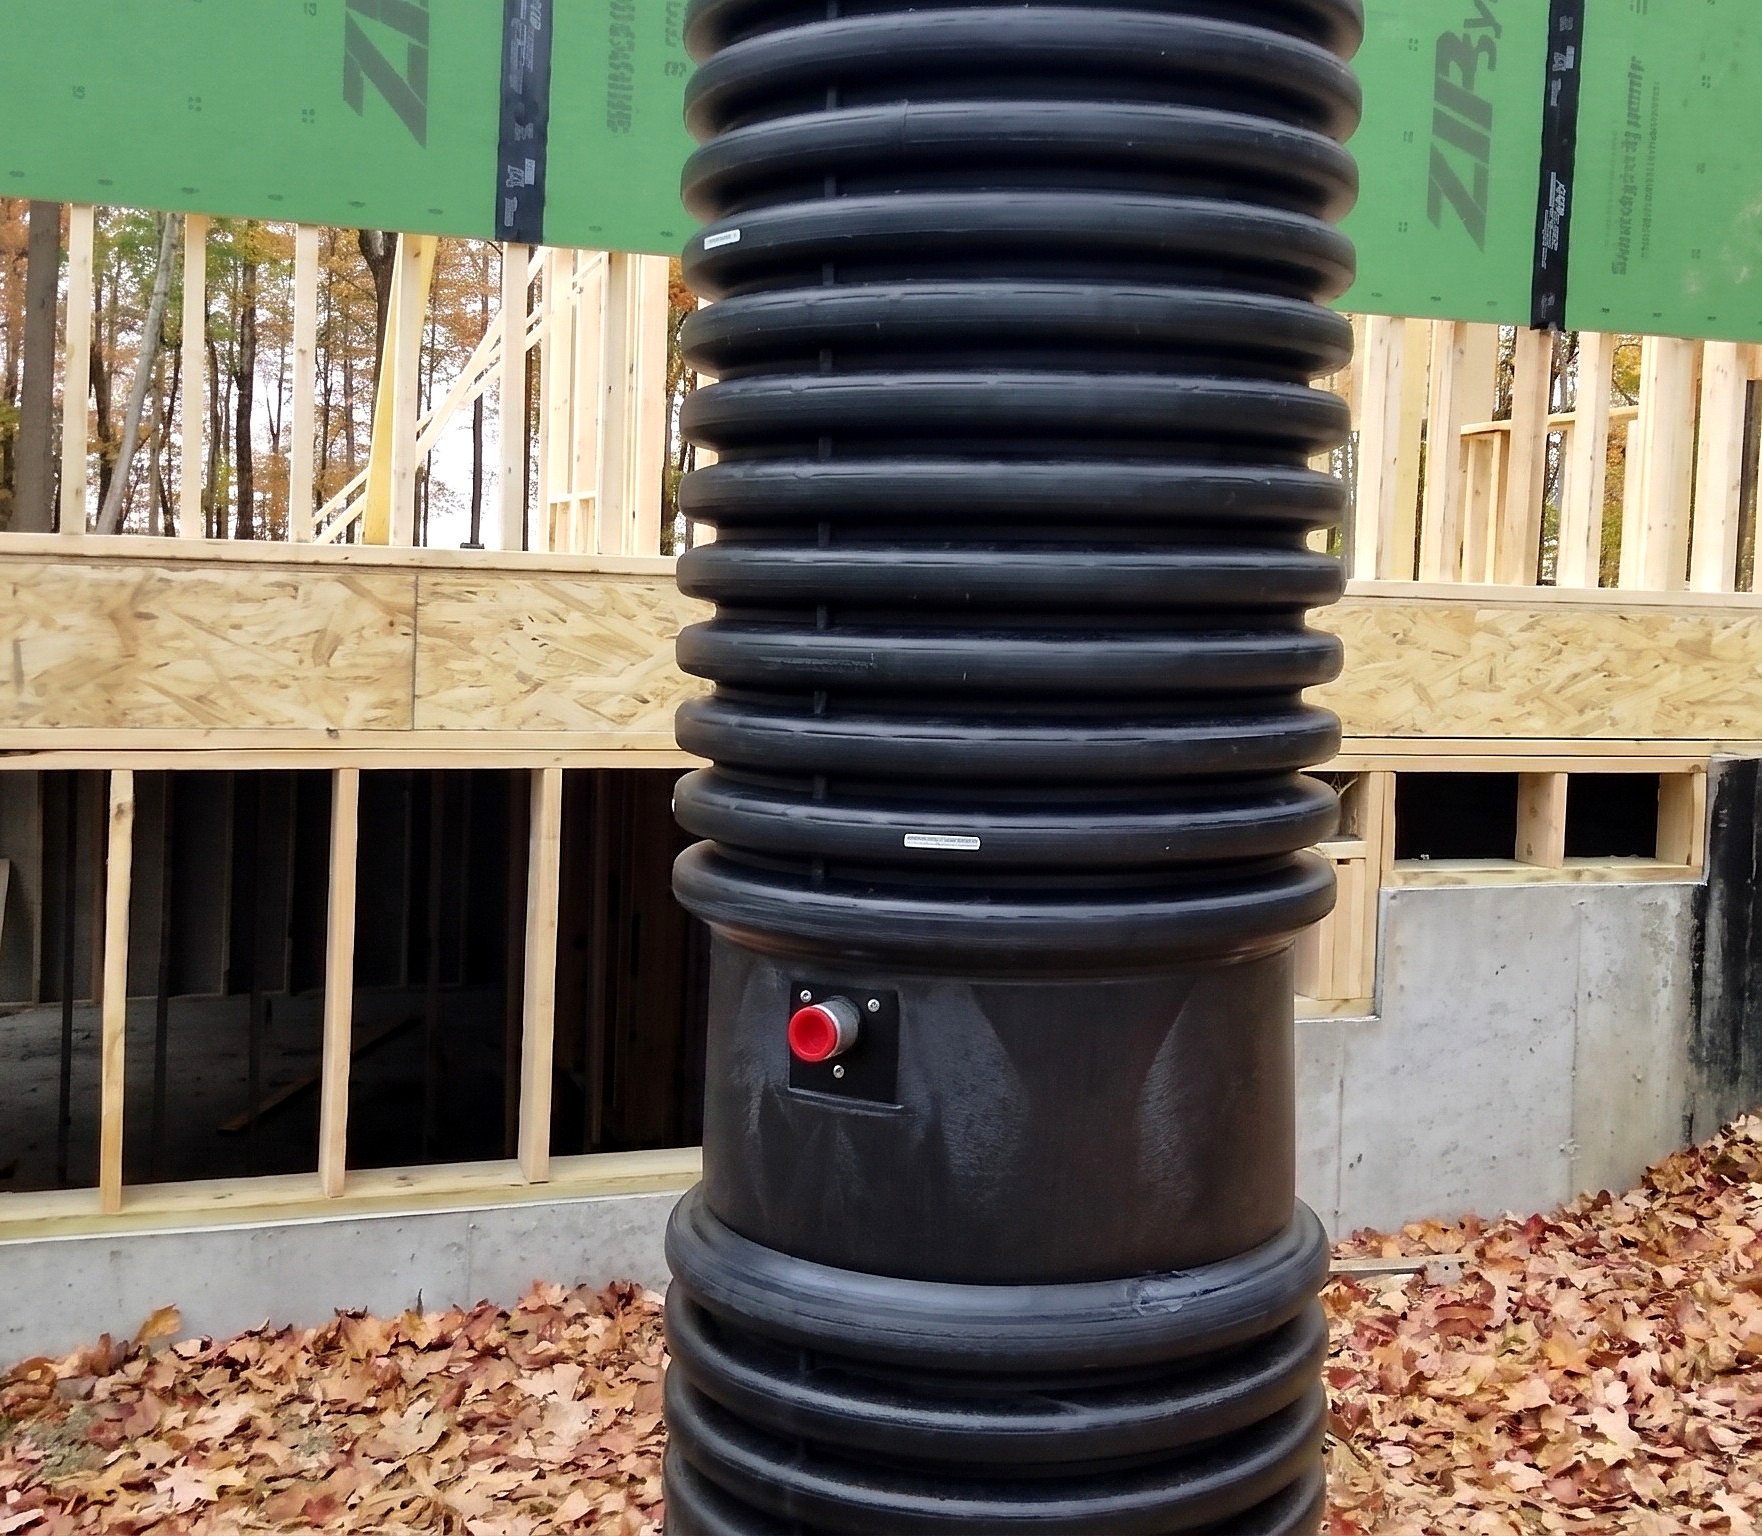
The grinder pump basin (B) sits upright and level on the compacted gravel pad; ballast blocks staged nearby in the pit.
Parts in this step: (B) E-One sewer grinder pump basin
You'll need: Compact utility tractor, Nylon lifting strap, Stepladder
- 3.1 Stage the modular concrete ballast blocks in the pit
- Lower the four precast concrete ballast blocks into the pit before the pump.
- Spread them apart on the gravel pad so the basin can land between them.
- Placing ballast first avoids wrestling heavy concrete around the basin later.
- 3.2 Rig the lifting strap and lower the pump basin with tractor forks
- Choke a nylon lifting strap around the upper corrugations of the basin (B).
- Suspend the basin from tractor pallet forks; use the machine with the smoothest hydraulics.
- Slowly lower the basin onto the center of the gravel pad.
- Guide the basin upright as it descends; keep hands clear of pinch points.
- If the tractor lacks height, use the backhoe, but expect jerkier control.
Key measurements
- Basin diameter: 28 in
- Tip: Use the compact tractor over the backhoe for smoother hydraulic control when lowering.
- Tip: A stepladder helps reach the basin top to attach the strap.
- Heads up: Lift by the upper body strap only when ballast is not pre-cast onto the basin; if ballast is integral, lift by the lower wire eyes.
- Heads up: Keep all personnel clear of the suspended load path.
Before you move on: Basin sits upright and level on the gravel pad, 4 in inlet facing the house sewer sleeve.
Step 4: Connect the PVC Inlet Pipe and Cleanout
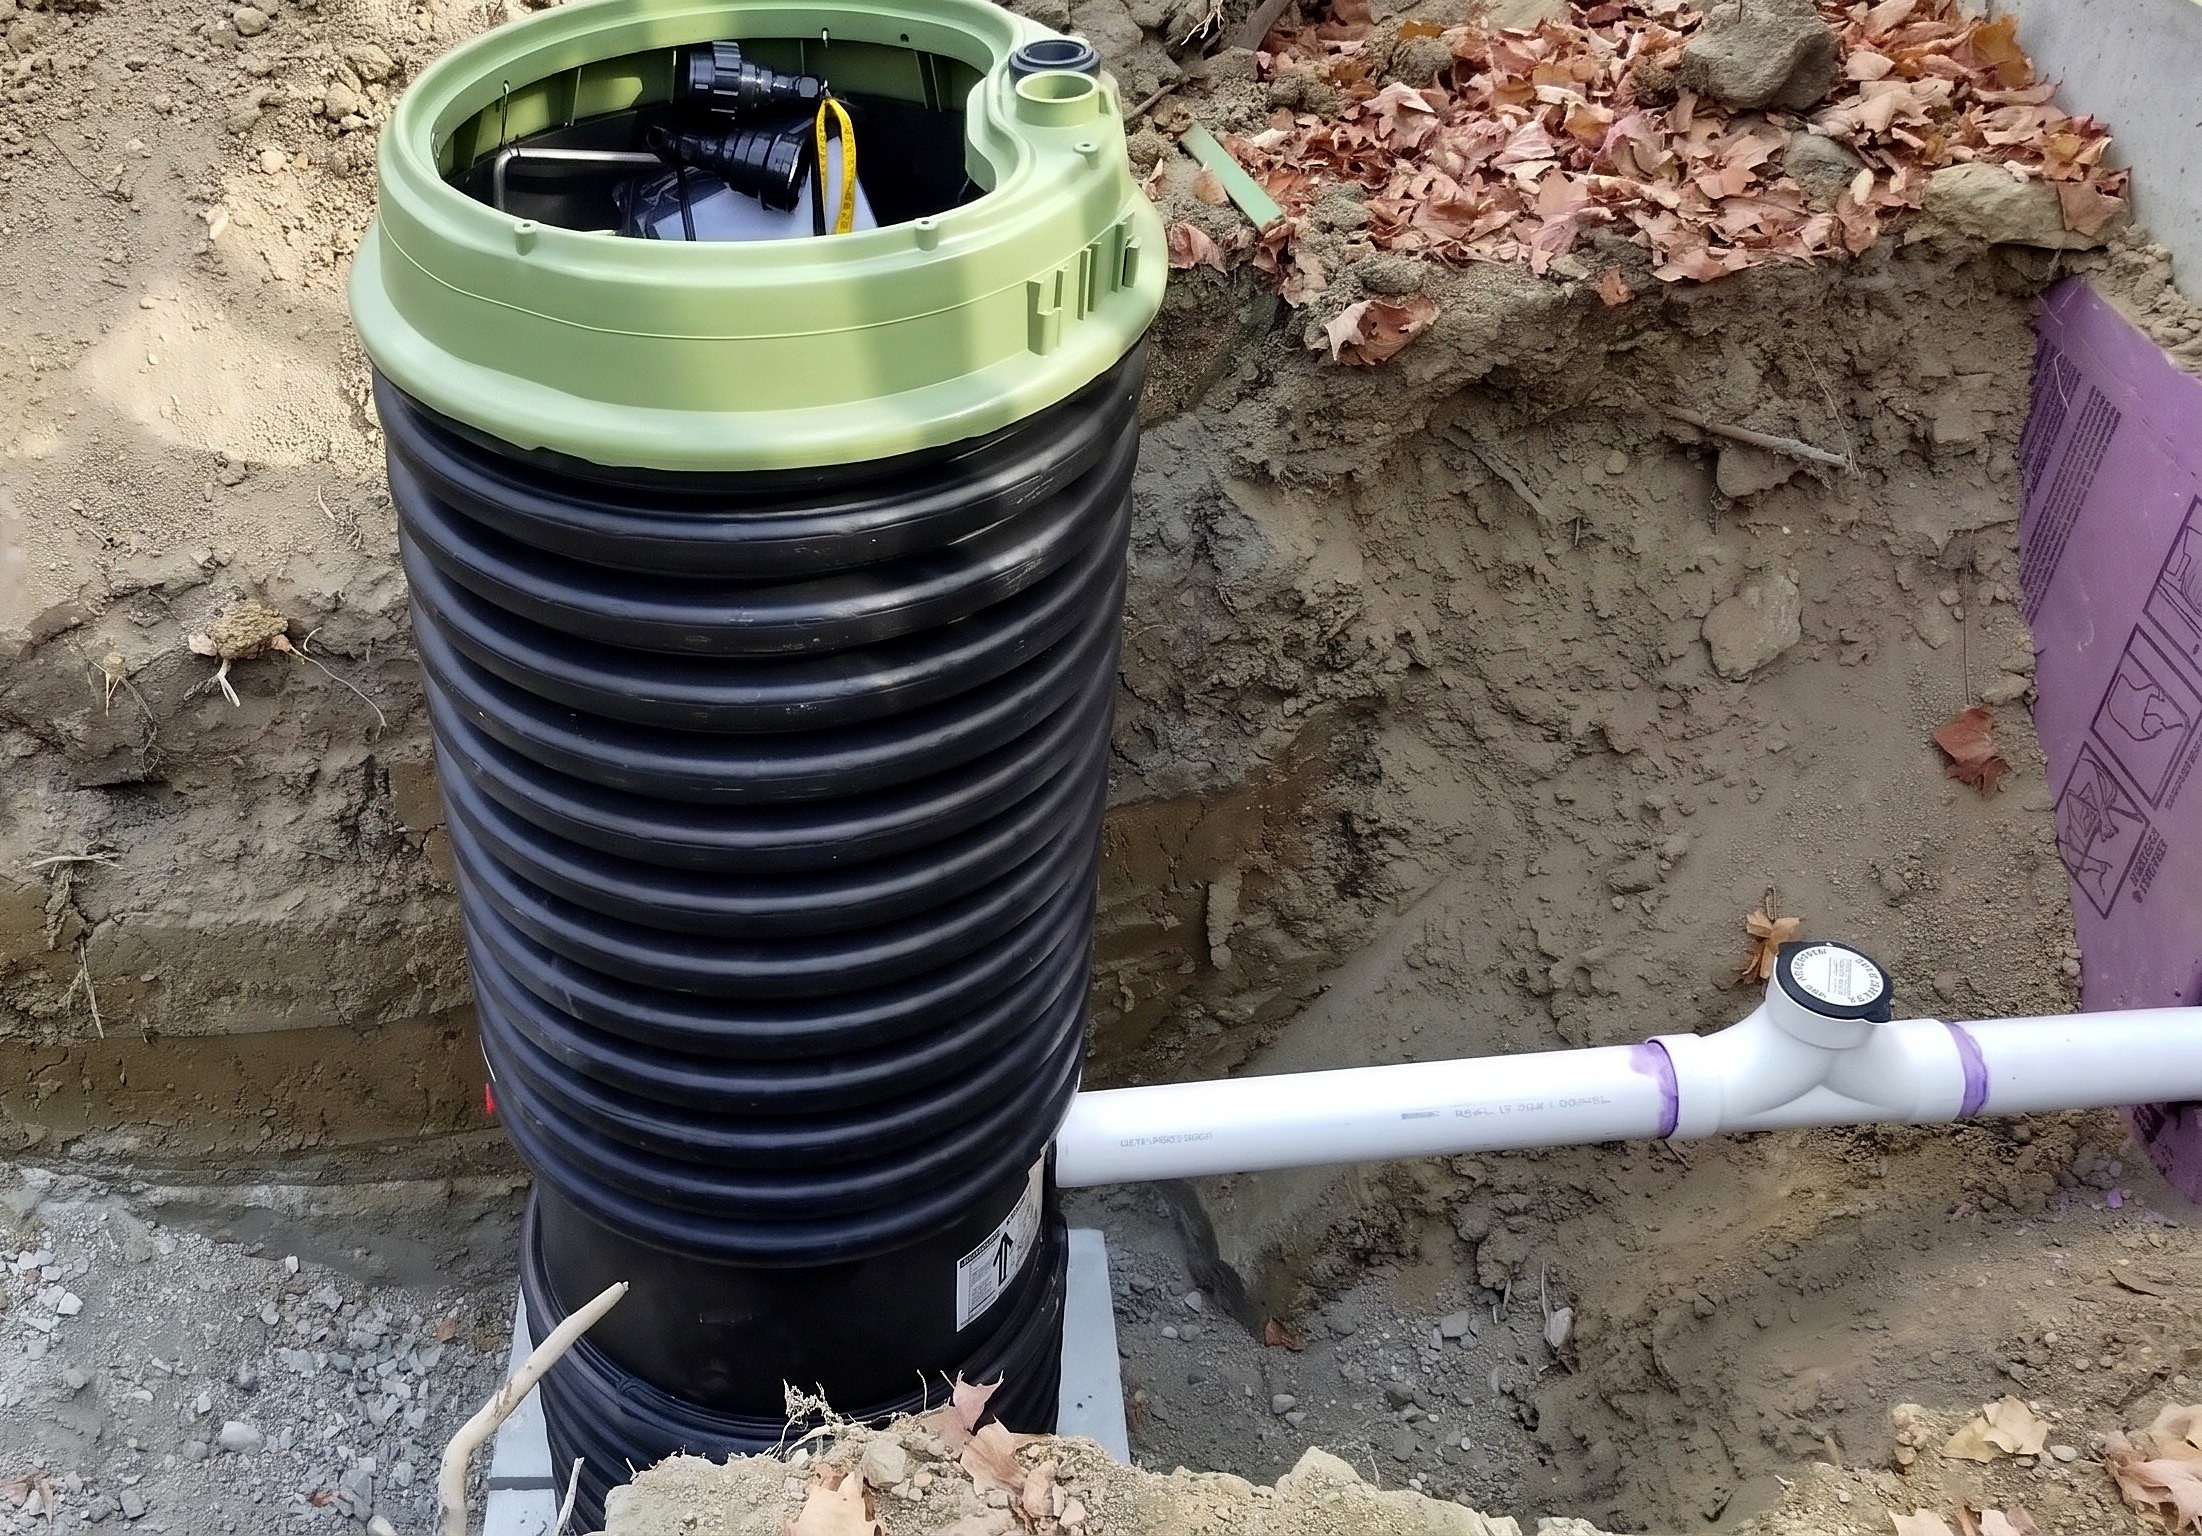
The 4 in PVC inlet pipe is solvent-welded from the house sewer sleeve through the two-way cleanout tee (A) and into the pump basin (B) rubber grommet to correct depth.
Parts in this step: (A) Two-way PVC cleanout tee, (B) E-One sewer grinder pump basin
You'll need: Reciprocating saw, Hand file, Tape measure, Spirit level, Tongue-and-groove pliers, PVC sewer pipe, PVC primer and cement, Two-way PVC cleanout tee, PVC cleanout adapter and threaded cap, Dish soap
- 4.1 Level the basin and align the cleanout tee with the house sleeve
- Level the basin (B) with a spirit level; adjust the gravel pad as needed.
- Note the burial line molded into the green cap; compare it to foundation grade.
- Sight through the house sewer sleeve to confirm dead-on alignment with the pump inlet.
- Position the two-way cleanout tee (A) inline between the sleeve and the pump.
- 4.2 Mark insertion depth on the inlet pipe and remove the pump inlet plug
- From the cut end of the 4 in PVC inlet pipe, mark a solid line at 3 in.
- Mark a dotted line at 3-1/2 in as the maximum insertion depth.
- Pull the protective cap from the rubber inlet grommet on the basin (B).
- Do not insert the pipe past the 3-1/2 in mark.
- 4.3 Glue the cleanout tee, bevel the pipe end, and insert into the pump
- Cut the 4 in PVC pipe to length with a reciprocating saw.
- Bevel the pump-side cut end with a hand file for smooth grommet entry.
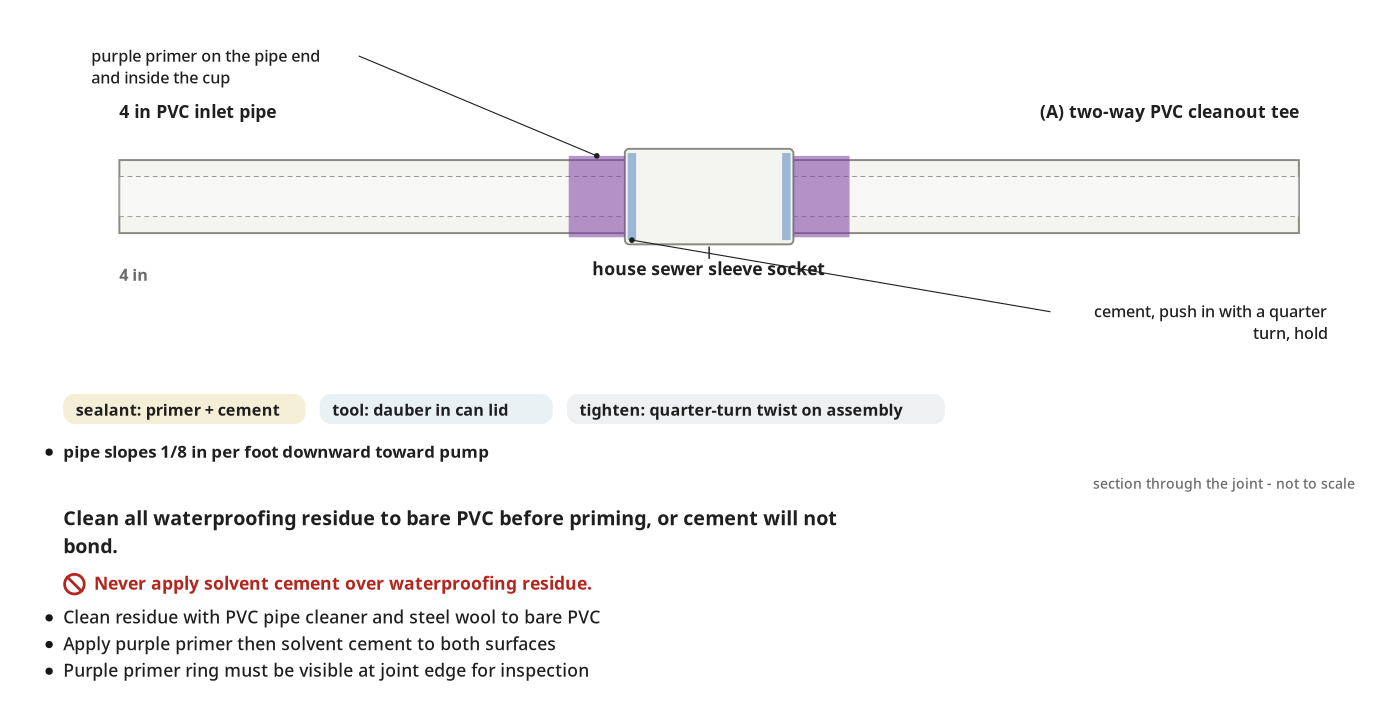
- Apply purple PVC primer then solvent cement to the sleeve and pipe; assemble the cleanout tee (A) inline.
- Coat the beveled pipe end and rubber inlet grommet with dish soap.
- Slide the pipe into the pump grommet to the 3-1/2 in mark.
Key measurements
- Inlet pipe insertion depth: 3 to 3-1/2 in into the rubber grommet
- Inlet pipe diameter: 4 in
- Inlet pipe slope: 1/8 in per foot
- Tip: Bevel the cut end with a file; lubricate pipe and grommet with dish soap before pushing together.
- Tip: Mark both 3 in and 3-1/2 in lines around the full circumference for a clear visual stop.
- Heads up: Do not push the inlet pipe past the 3-1/2 in mark into the basin.
Before you move on: The dotted 3-1/2 in line is flush with the grommet outside, solvent-weld joints are set, and a level confirms 1/8 in per foot slope.
Step 5: Assemble the Ballast Collar and Backfill with Gravel
Four concrete ballast blocks lock around the basin base flange; compacted #53 stone fills the pit to inlet and discharge pipe level.
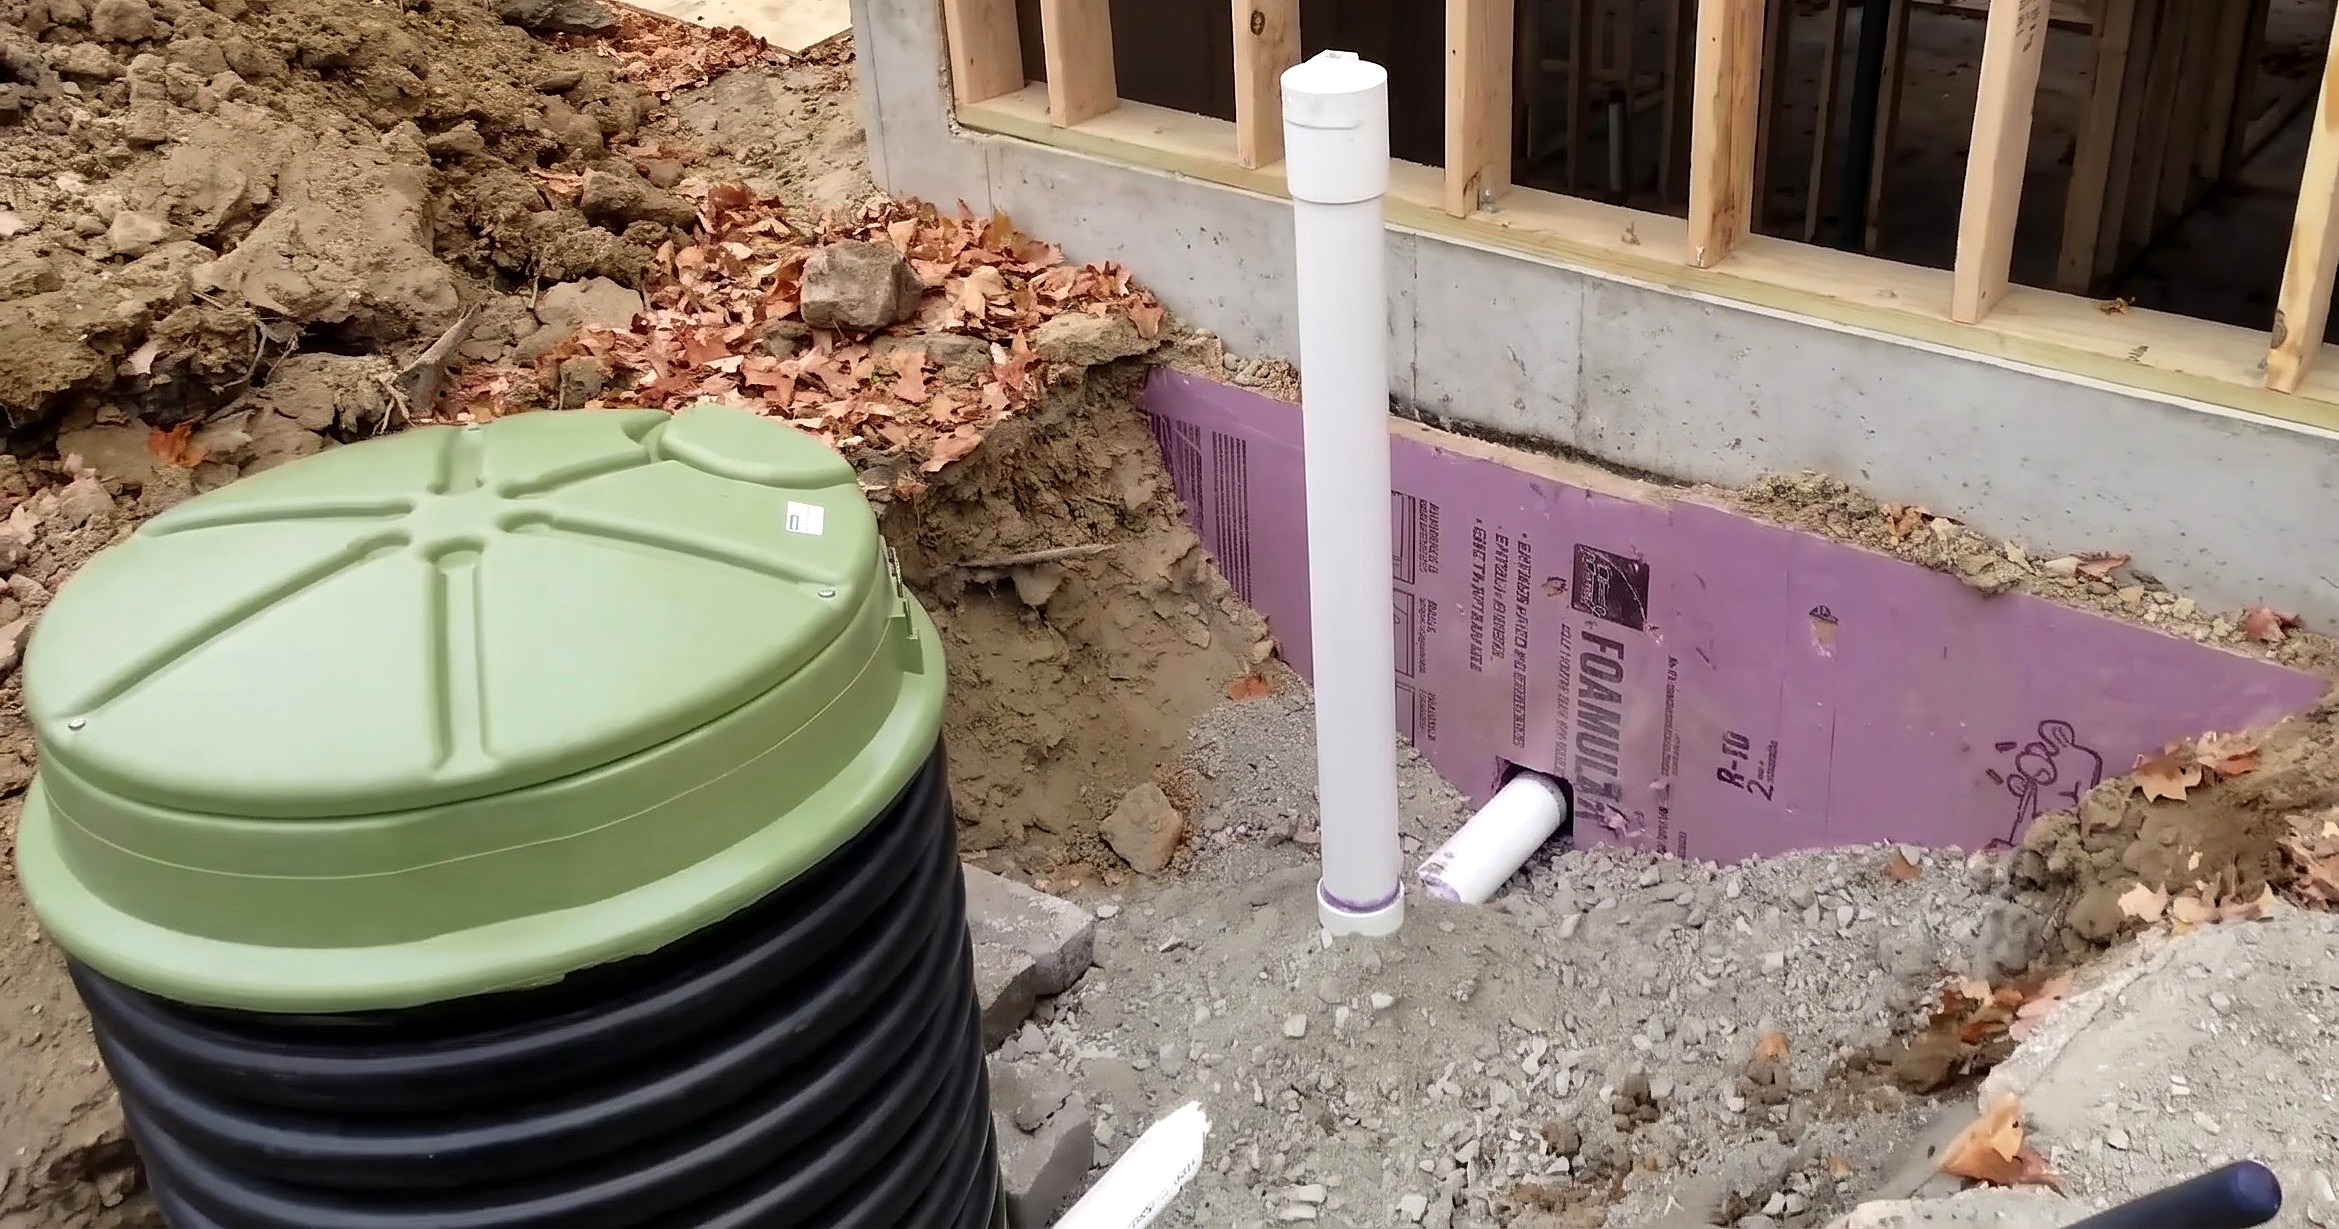
Parts in this step: (B) E-One sewer grinder pump basin
You'll need: Hand tamper, Round-point shovel, Compact utility tractor, #53 crushed stone
- 5.1 Set the four modular concrete ballast blocks around the pump base
- Slide each of the four concrete ballast blocks tight against the basin base flange.
- Curved inner edges should lock over the bottom lip of the basin (B).
- The assembled collar prevents the basin from floating when groundwater rises.
- 5.2 Backfill and tamp #53 crushed stone in 6 to 8 inch lifts
- Shovel #53 crushed stone into the pit around the ballast and basin.
- Tamp each 6 to 8 in lift with a hand tamper before adding the next.
- Stop gravel at inlet pipe and cleanout riser level.
- Leave all plumbing joints exposed for the plumbing inspection.
Key measurements
- Backfill tamp lift height: 6 to 8 in per lift
- Backfill stop: at inlet and discharge pipe level
- Tip: Tamp every 6 to 8 in lift; dumping all stone at once causes settling around the pipes.
- Tip: Stop backfill at pipe level so the inspector can see every joint.
- Heads up: Do not complete final backfill until the plumbing inspection is passed.
Before you move on: All four ballast blocks are tight against the basin flange, gravel is compacted and level with the pipes, and all joints are visible.
Step 6: Connect the HDPE Discharge Line
The 1-1/4 in HDPE discharge pipe (C) is sealed and secured to the pump discharge port with a compression fitting; the first pipe length is laid in the trench.
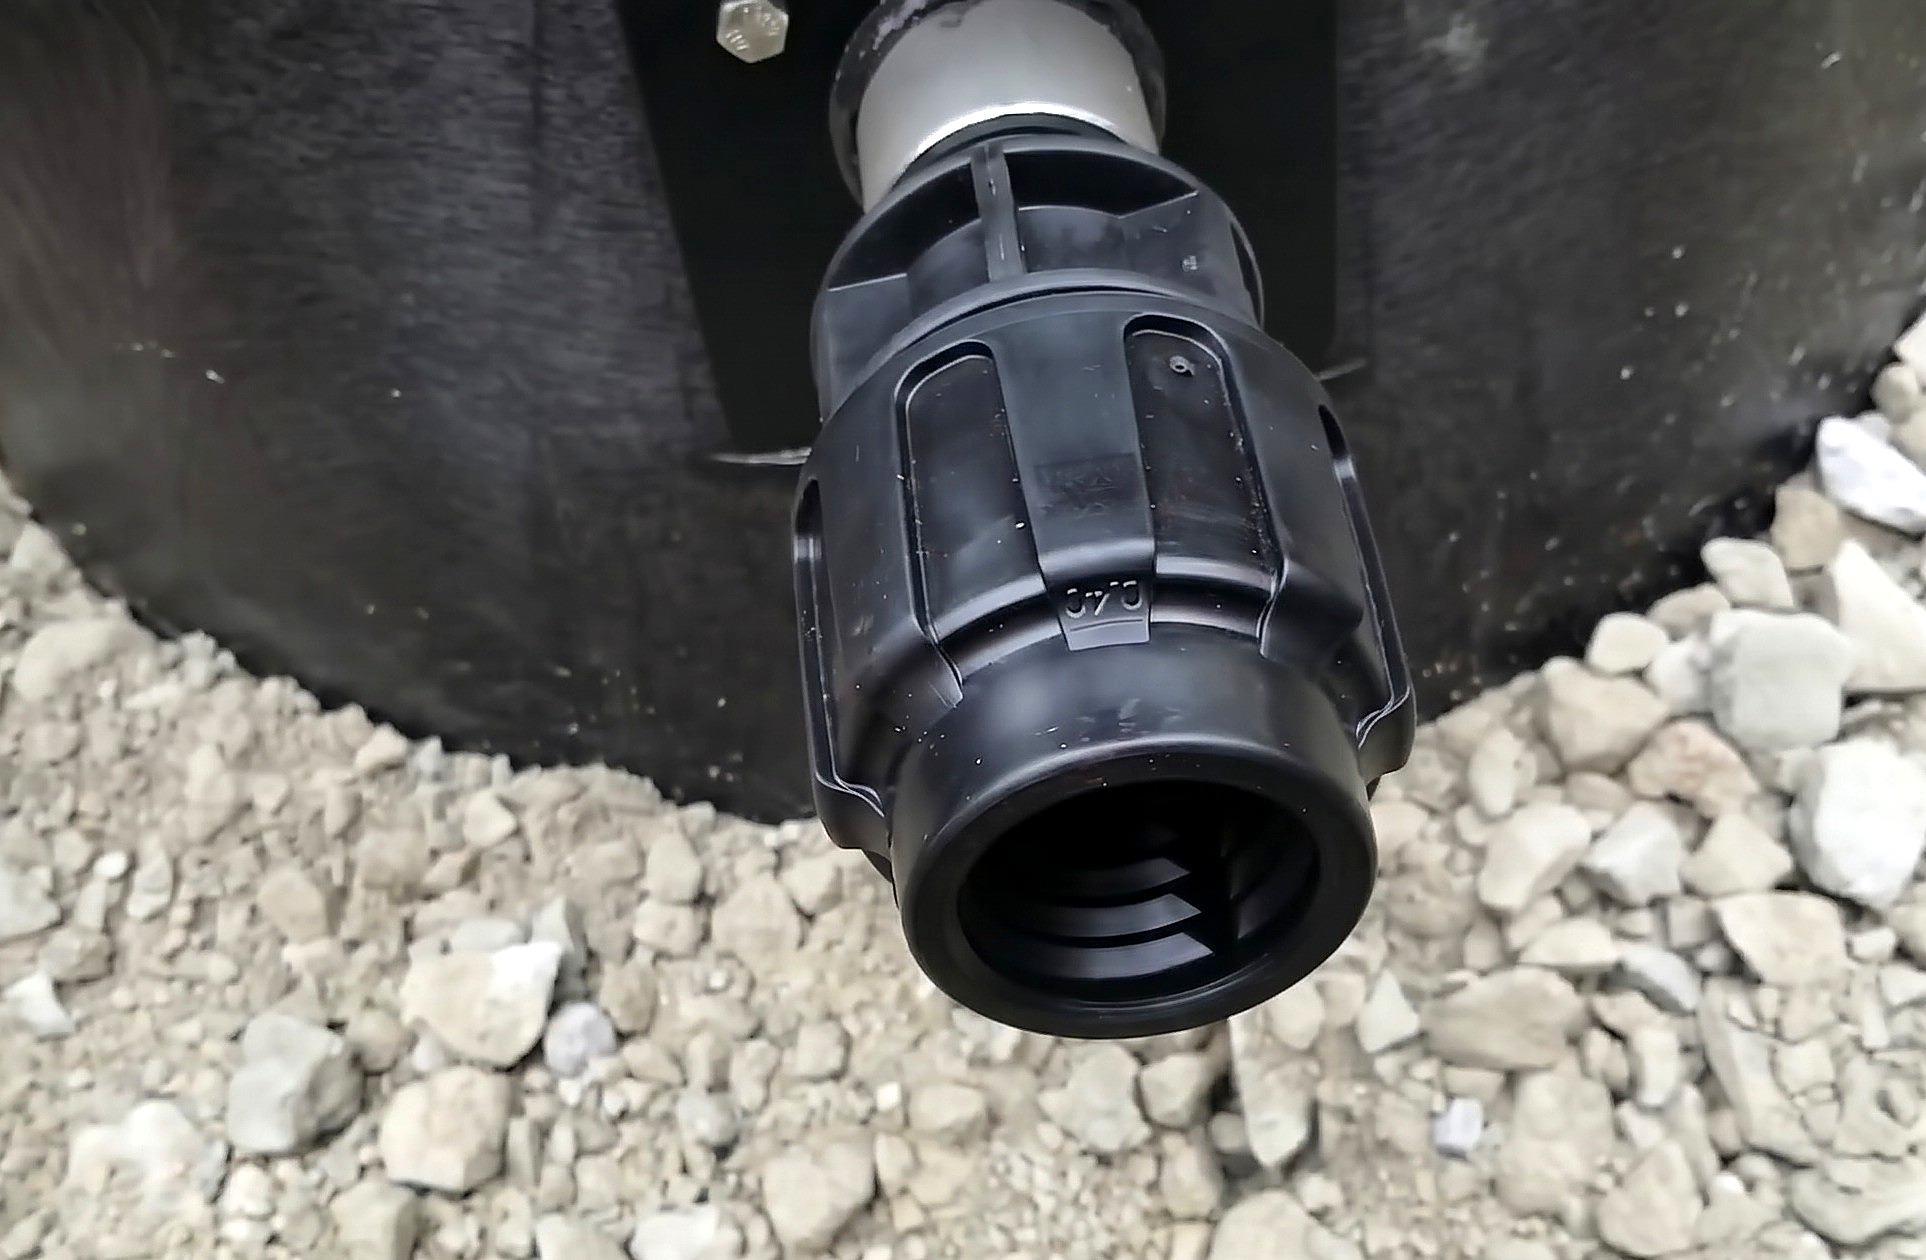
Parts in this step: (B) E-One sewer grinder pump basin, (C) HDPE discharge pipe
You'll need: Tongue-and-groove pliers, Tape measure, Compression fitting coupler, Pipe thread sealant, Synthetic grease, HDPE discharge pipe, MPT to compression adapter
- 6.1 Position the HDPE pipe roll and remove the red discharge plug
- Set the 1000 ft coil of 1-1/4 in HDPE pipe (C) at the discharge trench edge.
- Pull the red plastic shipping plug from the stainless steel female-threaded discharge port on the basin (B).
- 6.2 Seal the pipe threads and lubricate the compression fitting O-ring
- Apply RectorSeal T Plus 2 thread sealant to the compression adapter male threads.
- Thread the adapter into the pump discharge port and snug it.
- Unscrew the outer compression nut from the adapter.
- Apply Super Lube synthetic grease to the internal O-ring inside the coupler.
- Forgetting to grease the O-ring risks a leak under pressure.
- 6.3 Insert the 1-1/4 inch HDPE pipe and tighten the compression coupler
- Insert the 1-1/4 in HDPE pipe (C) end into the compression fitting.
- Slide the compression nut over the pipe and thread it onto the adapter body.
- Tighten the compression collar by hand, then snug with pliers.
- Lay the first ~10 ft of pipe into the trench.
Key measurements
- Discharge pipe diameter: 1-1/4 in HDPE
- Discharge line burial cover: 44 in minimum
- Total discharge run: over 850 ft to sewer manhole
- Tip: Grease the O-ring with synthetic grease before assembly; a dry O-ring can pinch and leak.
- Tip: Use PTFE thread paste, not tape, on the stainless steel threads.
- Tip: Rent a dedicated trencher for the 850 ft discharge run instead of the backhoe.
- Heads up: Bury the HDPE discharge line below the frost line (44 in of cover here) to prevent freezing.
Before you move on: Compression fitting snug with no gaps, O-ring greased, pipe in trench without kinking.
Finishing
Last Touches
- Thread the 4 in cleanout cap finger-tight so it can be removed for service.
- Secure the HDPE pipe in the trench so it cannot shift before final burial.
- Label the cleanout riser location on the house plan for future reference.
Before Final Backfill
- Pass plumbing inspection with all joints exposed.
- After approval, backfill over the pipes and grade dirt up to the green cap burial line.
Remaining Work
- Trench and bury the full 850 ft HDPE discharge run to the sewer manhole below frost line.
- Connect the electrical panel to the pump (separate phase, requires power to the house).
- Confirm pump operation and check for leaks once power is live.
Seasonal Care
- Inspect the cleanout cap and green basin lid each spring for damage or settling.
- If the pump alarm triggers, check for blockages at the cleanout tee before calling service.
Commission & test
| Check | What you should see | If not |
|---|---|---|
| Sight through the house sewer sleeve: the 4 in PVC pipe runs straight to the pump inlet, no offset. | Dead-on alignment visible through the sleeve. | Adjust basin position on the gravel pad before backfilling. |
| Place a spirit level on the 4 in inlet pipe. | 1/8 in per foot downward slope from house sleeve to pump inlet. | Add or remove gravel under the basin to correct elevation. |
| Inspect inlet pipe insertion depth at the pump grommet. | The 3-1/2 in mark is flush with the outside face of the rubber grommet. | Pull back or push the pipe to the correct mark. |
| Inspect all solvent-weld PVC joints for full primer and cement coverage. | Purple primer ring visible around every joint; no dry spots or gaps. | Cut out and re-glue any suspect joint before inspection. |
| Check the discharge-port compression fitting is snug and the O-ring greased. | No play in the fitting; grease visible on the O-ring seat. | Disassemble, grease the O-ring, and re-tighten. |
| Confirm all four ballast blocks are locked tight around the basin base flange. | No gaps between blocks and basin lip; blocks cannot be rocked by hand. | Reposition blocks and re-tamp the gravel beneath them. |
| Leave all joints exposed and schedule the municipal or county plumbing inspection. | Inspector can see every connection: sleeve joint, cleanout, inlet grommet, and discharge fitting. | Do not backfill past pipe level until inspection is passed. |
These Specs are built from Indy Farm Life's video “Sewer Grinder Pump Installation and Plumbing Hookup”. Open the Sewer Grinder Pump Installation and Plumbing Hookup project page.
