Spetz Specs No. 8372: step-by-step assembly & installation guide
Adjustable Clamp-On Gate Hinge Plates for Steel Gate Posts
The complete step-by-step guide made from Indy Farm Life's YouTube video, free on Spetz. For the video, a step-by-step player and answers to your questions, see the Adjustable Clamp-On Gate Hinge Plates for Steel Gate Posts project page.
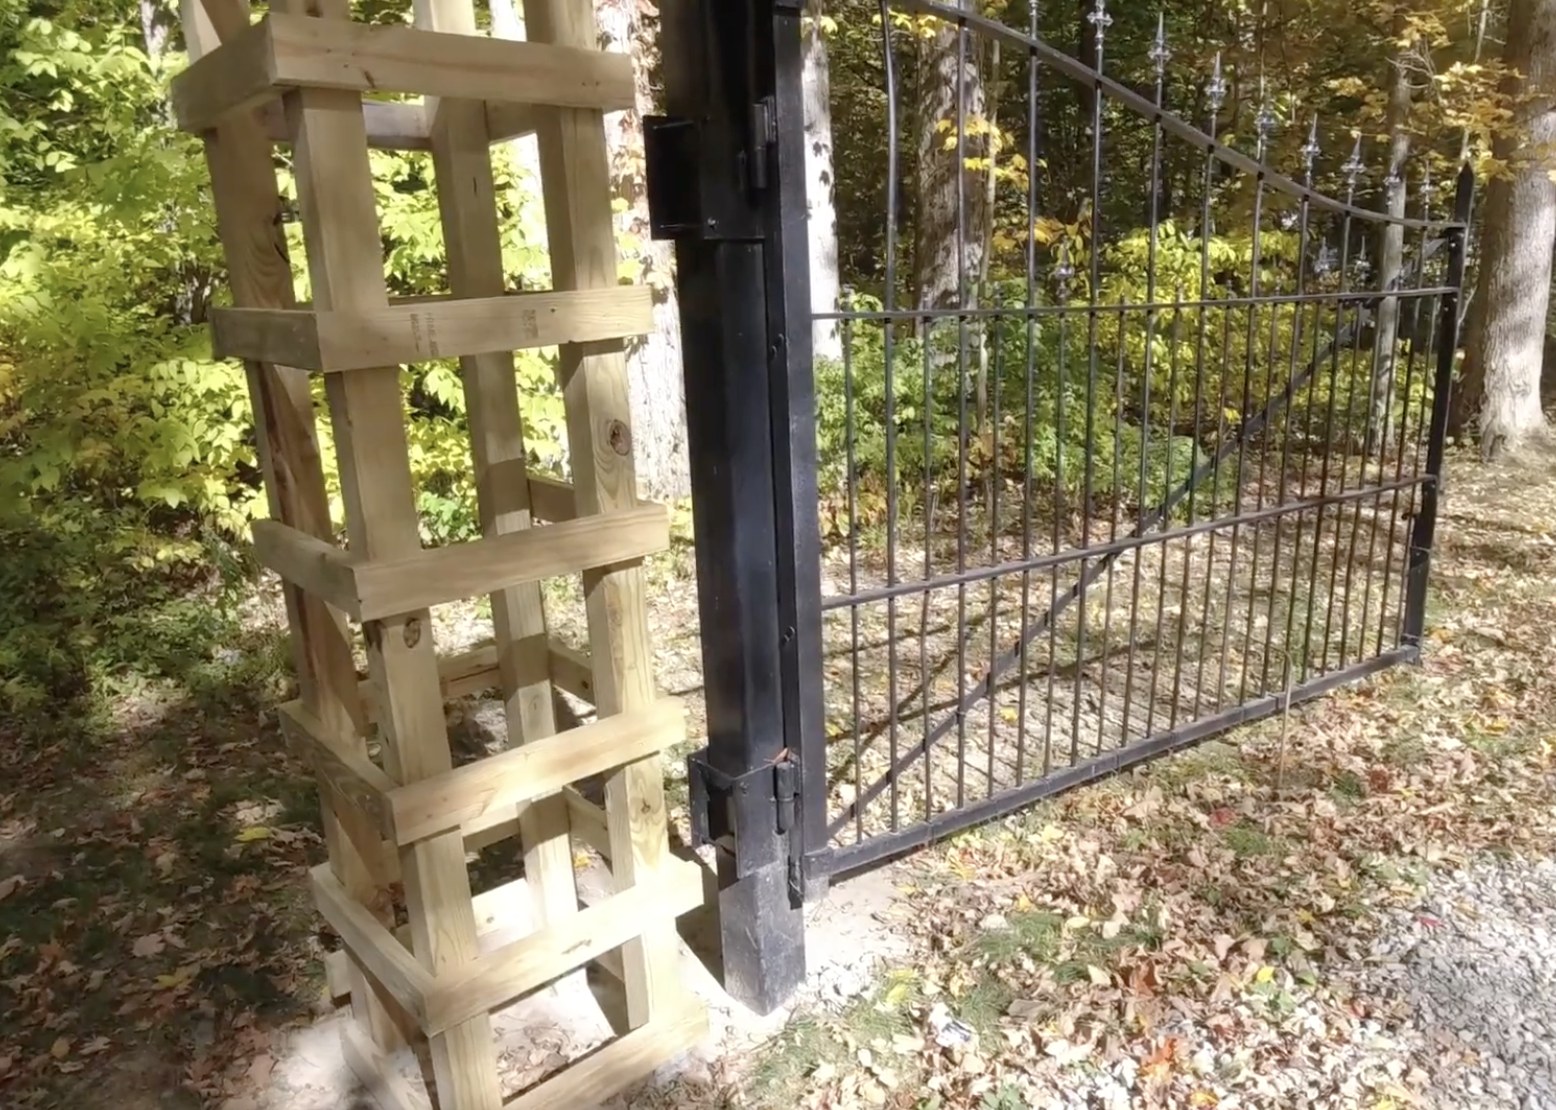
3 steps, 9 parts, 3 tools, 11 materials
Overview
Finished size: 6 in x 6 in x 12 ft posts
The Unit
- Bolt-on steel clamping plates hold 7 in barrel hinges on 6x6 steel posts.
- Four bolts clamp each post's front and rear plates for vertical adjustment.
Why Do It Yourself
- Clamping plates adjust gate height or swap gates without cutting the post.
- This guide details the clamping plate setup not included with standard barrel hinges.
What It Takes
- Weld steel plates, pour concrete footings, and hang 350 lb gates with a helper.
What Decides Success
- Align post tops within 1/2 in and clamp plates tight with lock washers.
Health and safety
Welding and Hot Metal Safety
- Wear welding protective equipment: a shaded welding helmet, leather gloves, and a flame-resistant jacket.
- Work outdoors or in a well-ventilated space to keep welding fumes away from your breathing zone.
- Clear dry grass and flammable materials from the work area to prevent fires from welding sparks and slag.
- Allow welded barrel hinges, clamping plates, and angle iron to cool before touching them with bare hands.
Heavy Gate and Steel Handling
- Support the full 350 lb weight of each steel gate securely before loosening the four clamping bolts to adjust height.
- Keep hands and feet clear of the pinch point between the barrel halves when lowering the 350 lb gate.
- Wear steel-toe boots and heavy work gloves when moving the 6x6 steel posts, clamping plates, angle iron, and rebar.
Concrete and Grease Handling
- Wear waterproof gloves, eye protection, and long sleeves when pouring wet concrete to prevent skin irritation and alkaline burns.
- Wash any skin exposed to wet concrete immediately with clean water, and wear a dust mask if handling dry mix.
- Wear protective gloves and eye protection when applying lubricating grease through the bottom zerk fittings on the barrel hinges.
Laser Level and Site Safety
- Never look directly into the rotary or line laser beam, and avoid aiming the laser toward anyone's eyes.
- Mark taut layout string lines around the gate post footings to prevent tripping while carrying heavy steel or concrete.
- Brace the 1/2 in wall 6x6 steel posts securely while the footing concrete cures so they cannot tip.
Before you open the box
- Dig driveway footings for 3 yards of concrete per steel gate post.
- Check each 12 ft steel post measures 6x6 in with a 1/2 in wall.
- Drill four bolt holes per plate, spaced to clear the 6x6 post sides.
- Get lifting equipment or helpers to support each 350 lb steel gate.
- Size unstated plate thickness, bolt size, and torque for 350 lb gates.
Tools
- String line (layout string line) (optional)
- Laser level (rotary or line laser level) (optional)
- Welder (metal welder)
Materials
- Steel gate post (2, square structural steel tubing, 1/2 in wall thickness, 6 in x 6 in x 12 ft)
- Angle iron (2 per post, steel angle iron)
- Concrete (3 yards per post, poured concrete)
- Weld-on barrel gate hinges (2 per gate, two-piece lift-off barrel hinges with grease zerk, 7 in)
- Steel clamping plates (2 plates per hinge, flat steel plate)
- Bolts (4 per hinge, hex bolts)
- Nuts (4 per hinge, hex nuts)
- Lock washers (4 per hinge, split lock washers)
- Rebar (steel reinforcing bar)
- Steel driveway gates (2, metal swing gates, approx. 350 lbs each)
- Grease (lubricating grease)
Hardware
| Hardware | Size | Count | Used in steps |
|---|---|---|---|
| large bolt | 4 | 2 | |
| lock washer | 4 | 2 | |
| nut | 4 | 2 |
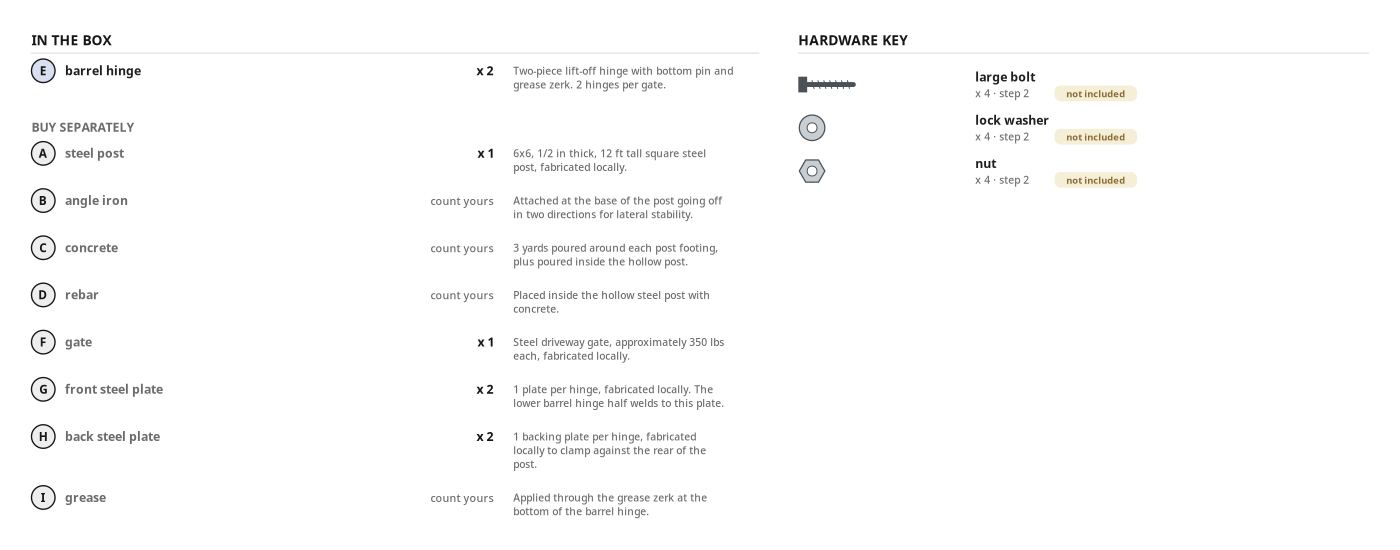
What's in the box
| Part | Name | Qty | Size | Notes |
|---|---|---|---|---|
| A | steel post | x1 | 6x6, 1/2 in thick, 12 ft tall square steel post, fabricated locally. | |
| B | angle iron | count yours | Attached at the base of the post going off in two directions for lateral stability. | |
| C | concrete | count yours | 3 yards poured around each post footing, plus poured inside the hollow post. | |
| D | rebar | count yours | Placed inside the hollow steel post with concrete. | |
| E | barrel hinge | x2 | Two-piece lift-off hinge with bottom pin and grease zerk. 2 hinges per gate. | |
| F | gate | x1 | Steel driveway gate, approximately 350 lbs each, fabricated locally. | |
| G | front steel plate | x2 | 1 plate per hinge, fabricated locally. The lower barrel hinge half welds to this plate. | |
| H | back steel plate | x2 | 1 backing plate per hinge, fabricated locally to clamp against the rear of the post. | |
| I | grease | count yours | Applied through the grease zerk at the bottom of the barrel hinge. |
Before you start
Unbox & Sort
- Lay out barrel hinges, steel plates, large bolts, nuts, and lock washers.
- Separate each two-piece barrel hinge into upper female and lower pin halves.
- Group four large bolts, four lock washers, and four nuts per hinge plate.
Tool Set-Up
- Ready a welder for structural steel plate and barrel hinge fabrication.
- Check post heights across the driveway with a string line or laser level.
Step by step
Step 1: Set the steel gate posts in concrete
Both 6x6 steel gate posts are braced with angle iron, top-aligned, and set in cured concrete footings.
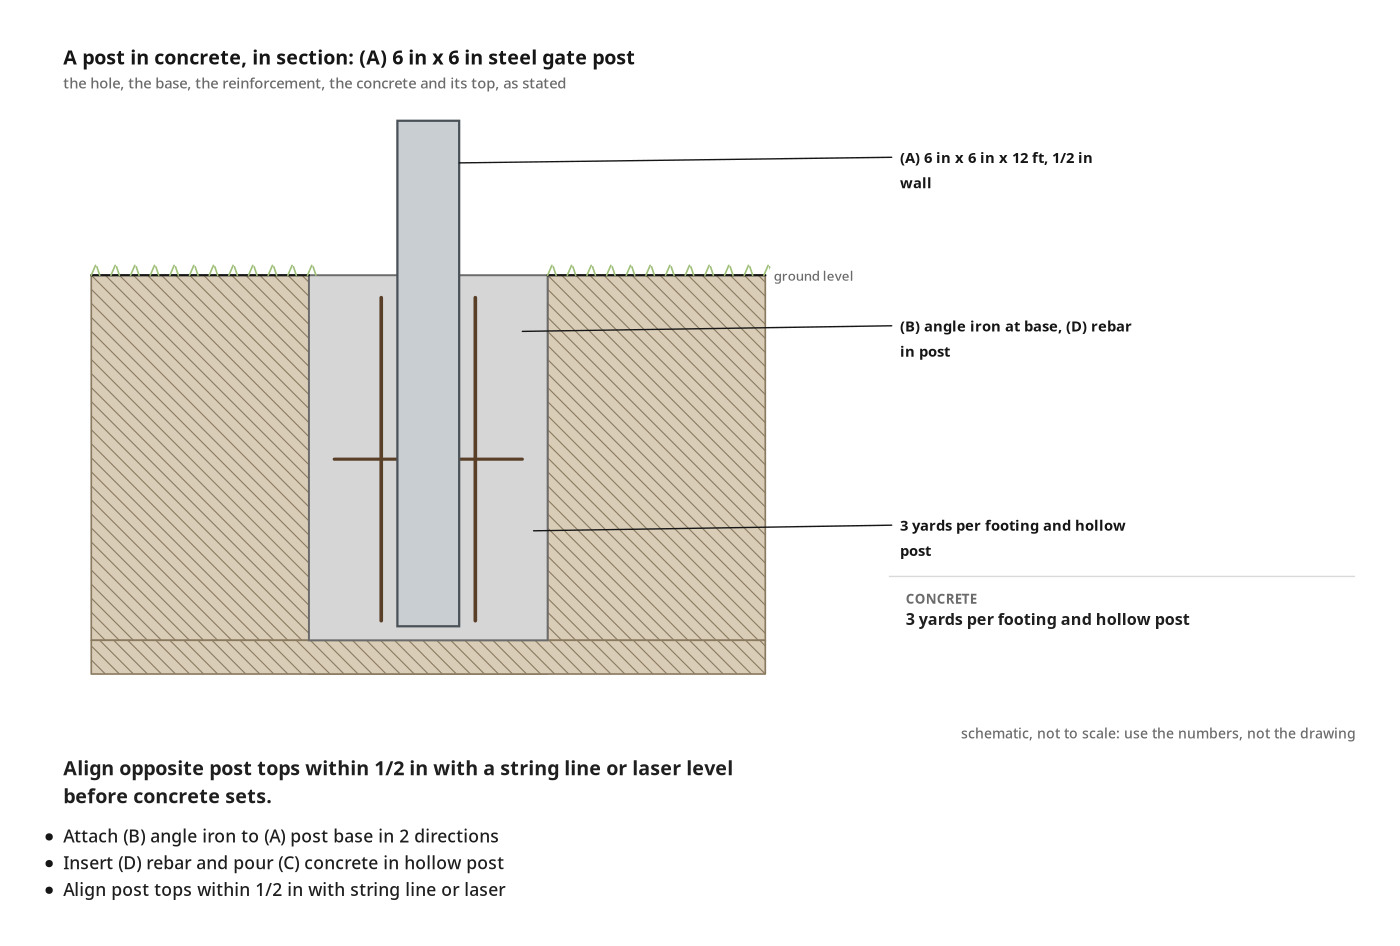
Parts in this step: (A) steel post, (B) angle iron, (C) concrete, (D) rebar
You'll need: String line, Laser level, Steel gate post, Angle iron, Concrete, Rebar
- 1.1 Brace the 6x6 steel post base with angle iron
- Attach angle iron (B) to the steel post (A) base in two directions.
- Set the 6x6, 1/2 in wall, 12 ft post in the footing.
- 1.2 Align the opposite driveway post heights and pour concrete
- Align post tops across the driveway with a string line or laser level.
- Set opposite post heights within 1/2 in before pouring concrete.
- Insert rebar (D) into each hollow steel post.
- Pour 3 yards of concrete (C) per footing and fill the hollow post.
Key measurements
- Post dimensions: 6 in x 6 in x 12 ft, 1/2 in wall
- Post top height alignment: within 1/2 in between opposite posts
- Concrete volume: 3 yards per footing and hollow post
- Tip: Fill the hollow steel post with concrete and rebar, making it permanent for future gates.
Before you move on: With the string line or laser level, check post tops align within 1/2 in before concrete sets.
Step 2: Install the bolt-on clamping hinge plates
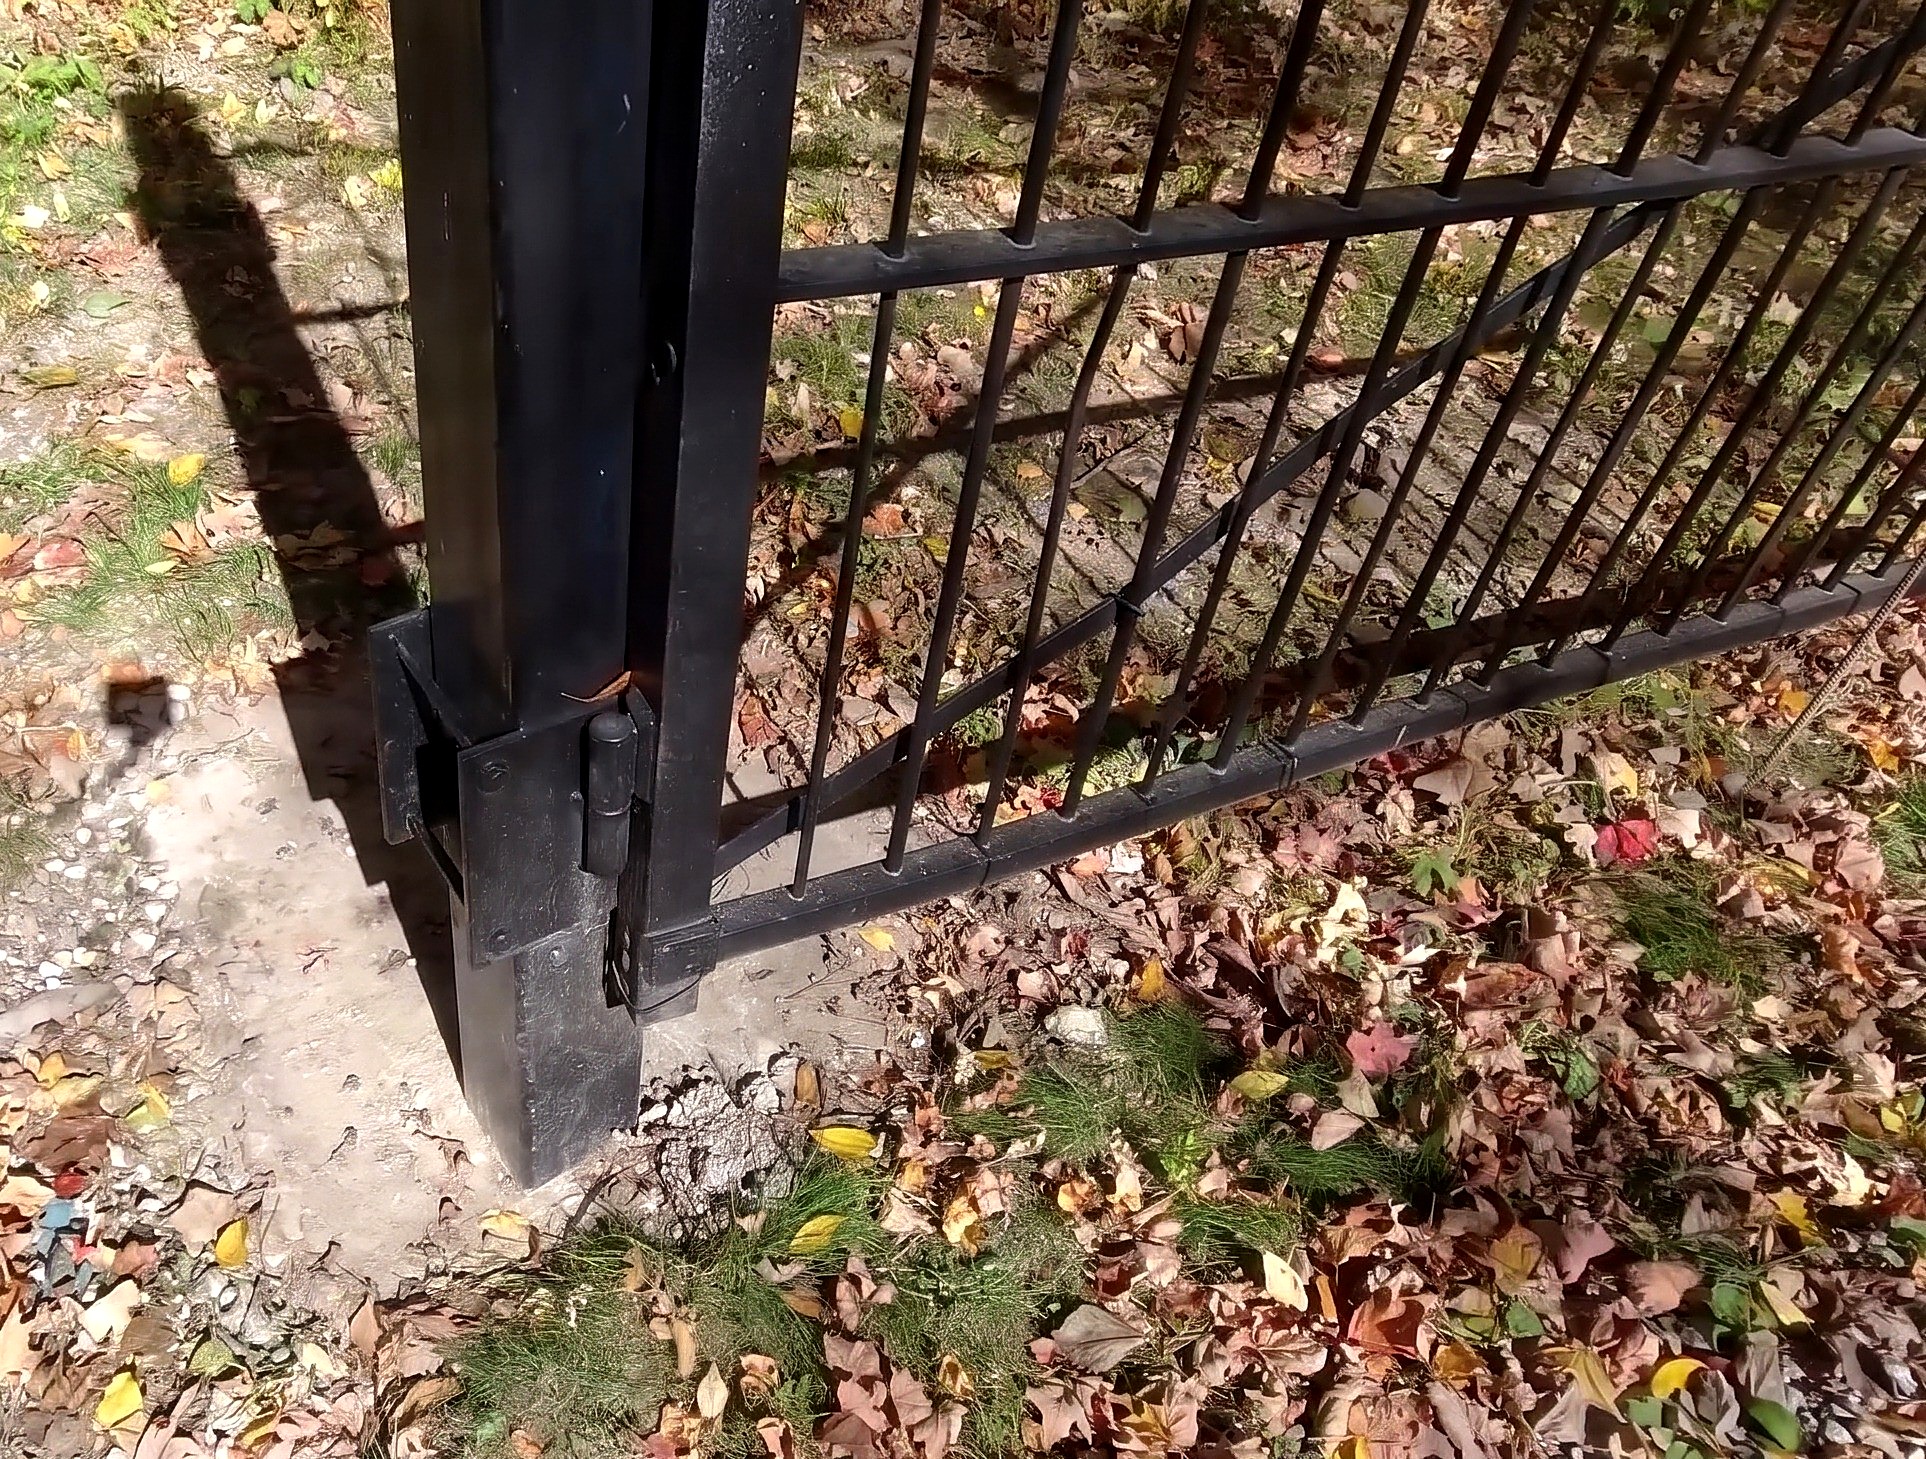
Barrel hinge halves weld to the gate and front steel plate; plates clamp at height on the post.
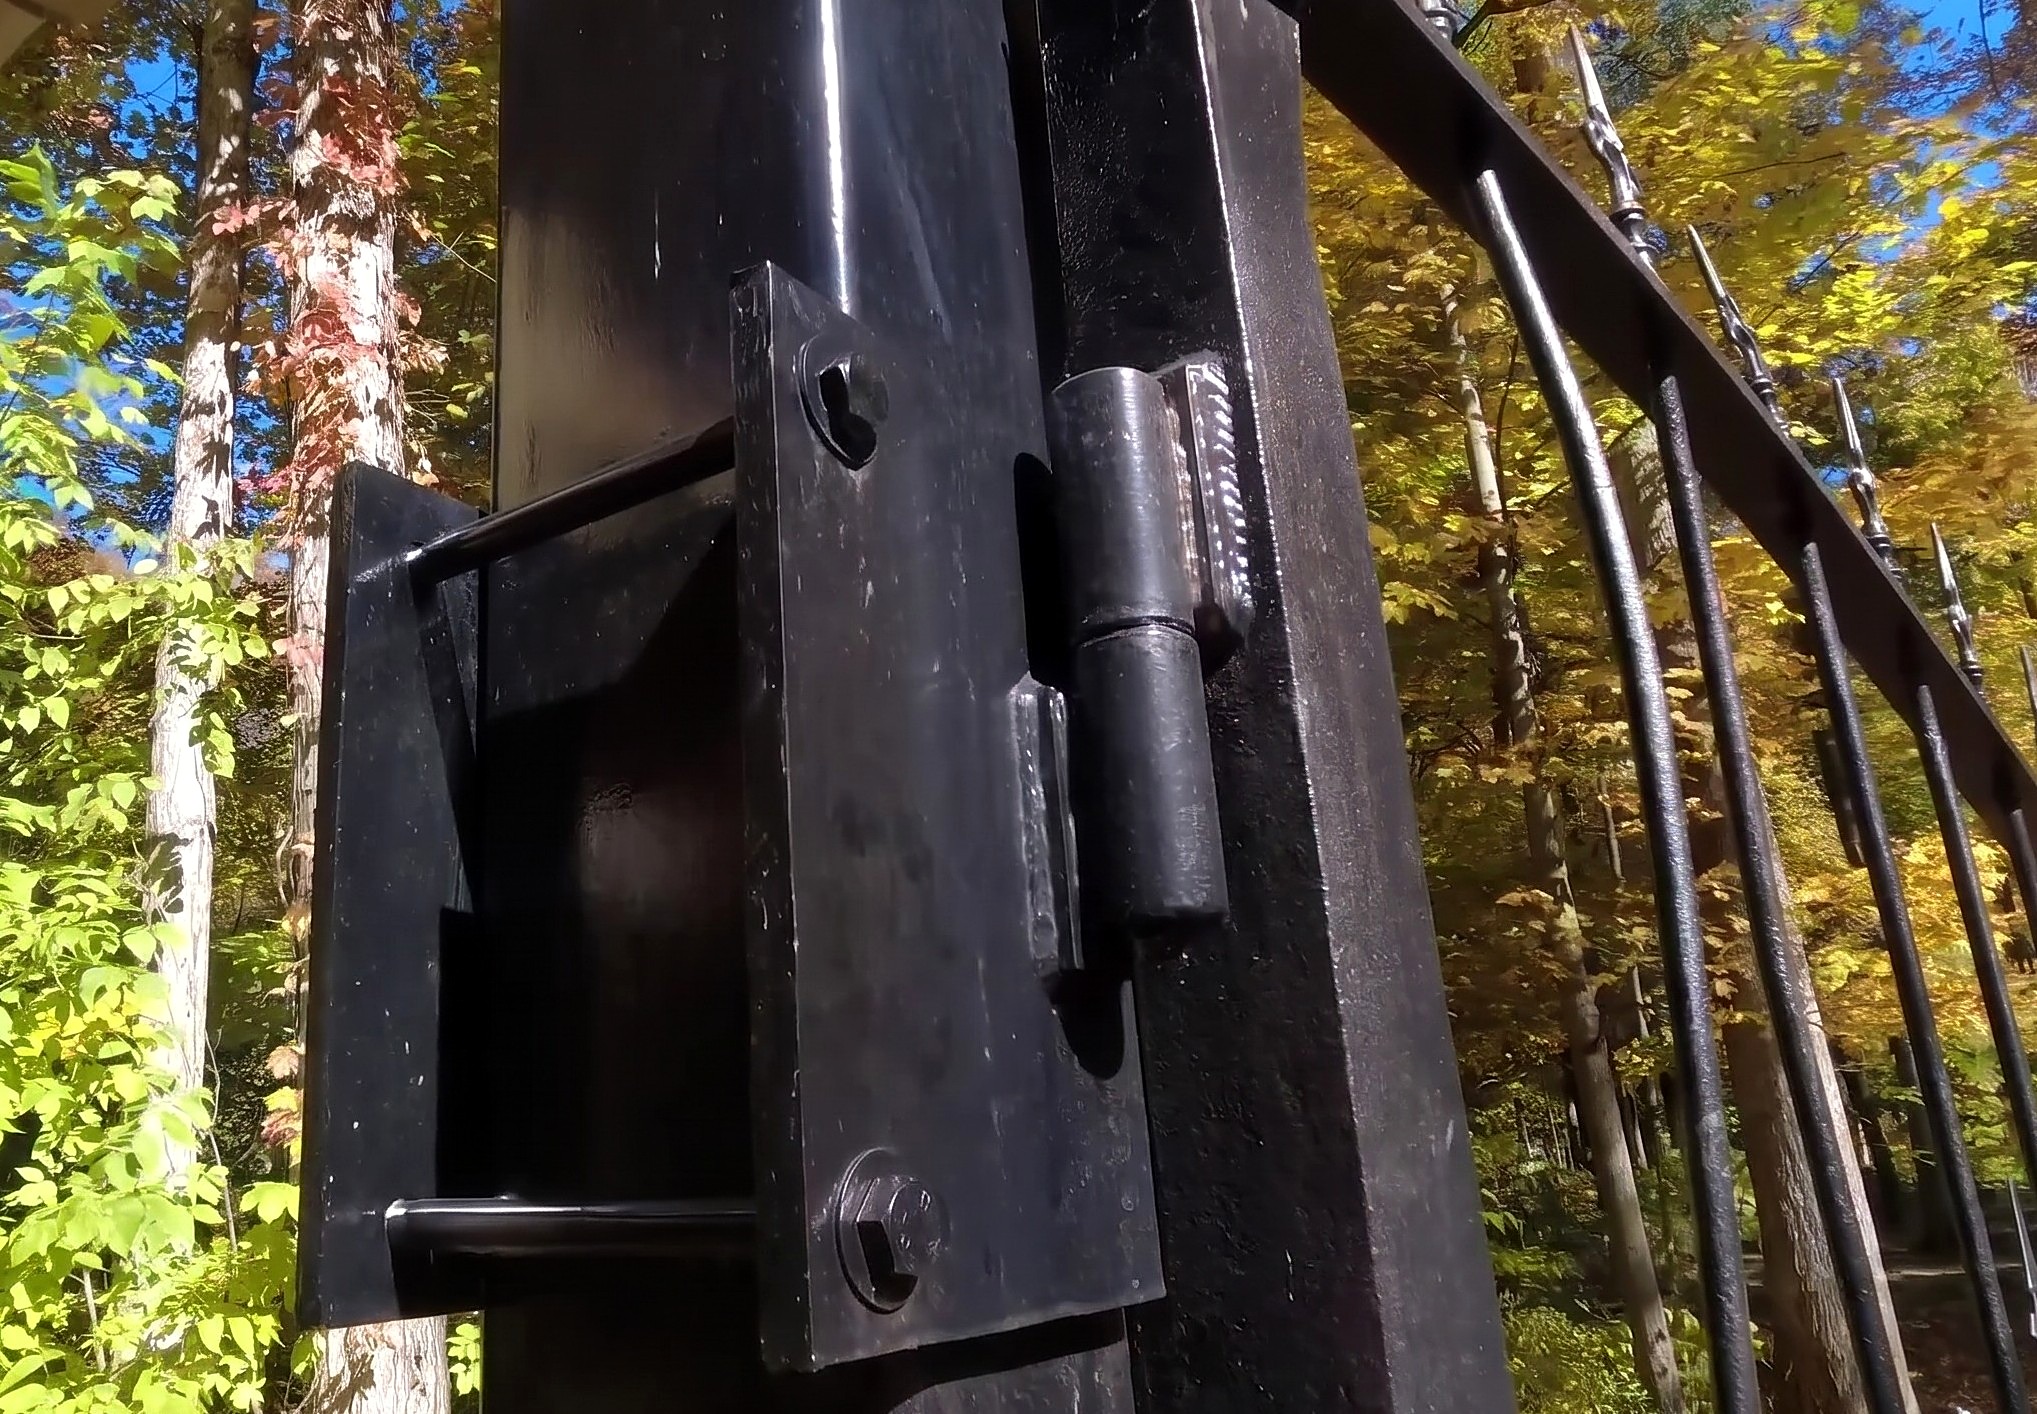
Parts in this step: (A) steel post, (E) barrel hinge, (F) gate, (G) front steel plate, (H) back steel plate
You'll need: Welder, Steel gate post, Weld-on barrel gate hinges, Steel clamping plates, Bolts, Nuts, Lock washers, Steel driveway gates, large bolt, lock washer, nut
- 2.1 Weld the barrel hinge halves to the gate and front steel plate
- Separate each 7 in barrel hinge (E): upper barrel and lower pin halves.
- Set the lower pin half vertically, grease zerk at the bottom.
- Weld the upper barrel half to gate (F) frame.
- Weld the lower pin half to front steel plate (G).
- Hold back steel plate (H) behind post (A) with four large bolts.
- 2.2 Slide the hinge plate to height and tighten the rear lock nuts
- Slide the clamped plates vertically on the post to the gate height.
- Put a lock washer and nut on each bolt against the back steel plate.
- Tighten all four nuts evenly against the lock washers to lock the hinge height.
- 2.3 Adjust gate height or swap the bolt-on clamping plates as needed
- Support the gate, loosen the four nuts, and slide the plates to adjust height.
- Unbolt the clamping plates to install new hinges when swapping gates.
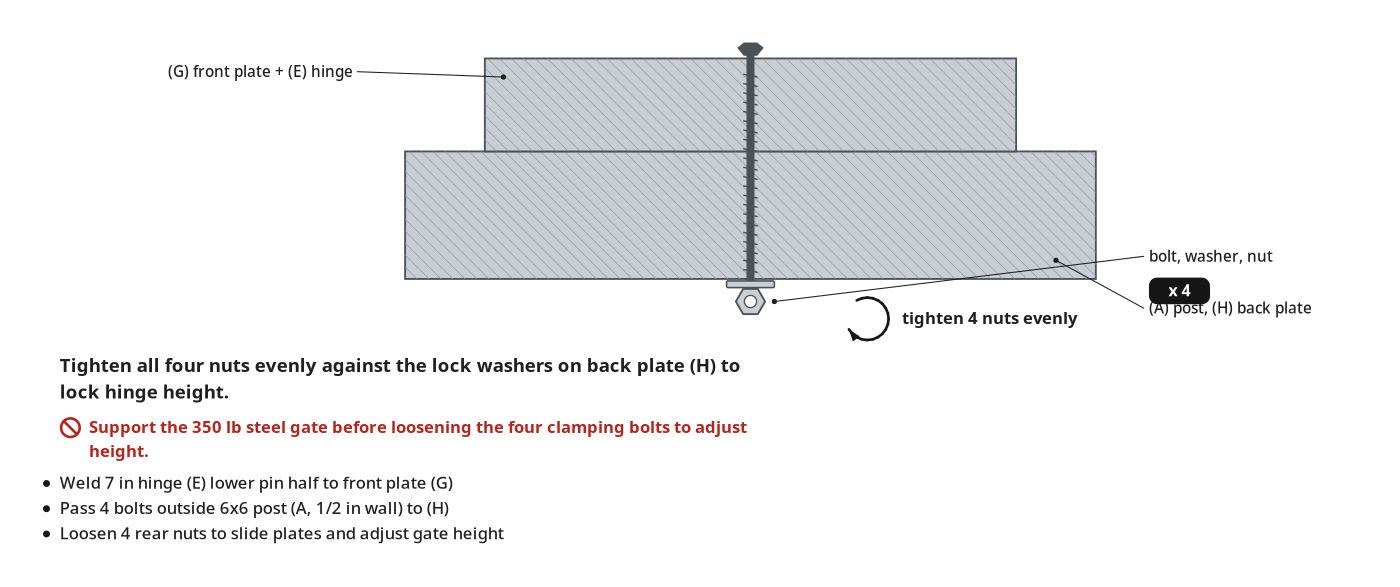
Key measurements
- Hinge length: 7 in two-piece weld-on barrel hinge (2 per gate)
- Clamping hardware: 4 large bolts, 4 lock washers, and 4 nuts per hinge.
- Tip: Weld hinges to the removable front steel plates, not the post, so you never cut welds on the post.
- Heads up: Support the 350 lb steel gate before loosening the four clamping bolts to adjust vertical height.
Before you move on: Check the lower hinge grease zerk points down and the four nuts with lock washers are tight against the back steel plate.
Step 3: Mount and lubricate the lift-off barrel hinges
Both 350 lb gate panels sit on the lower hinge pins, greased at the bottom zerks, swinging smoothly.
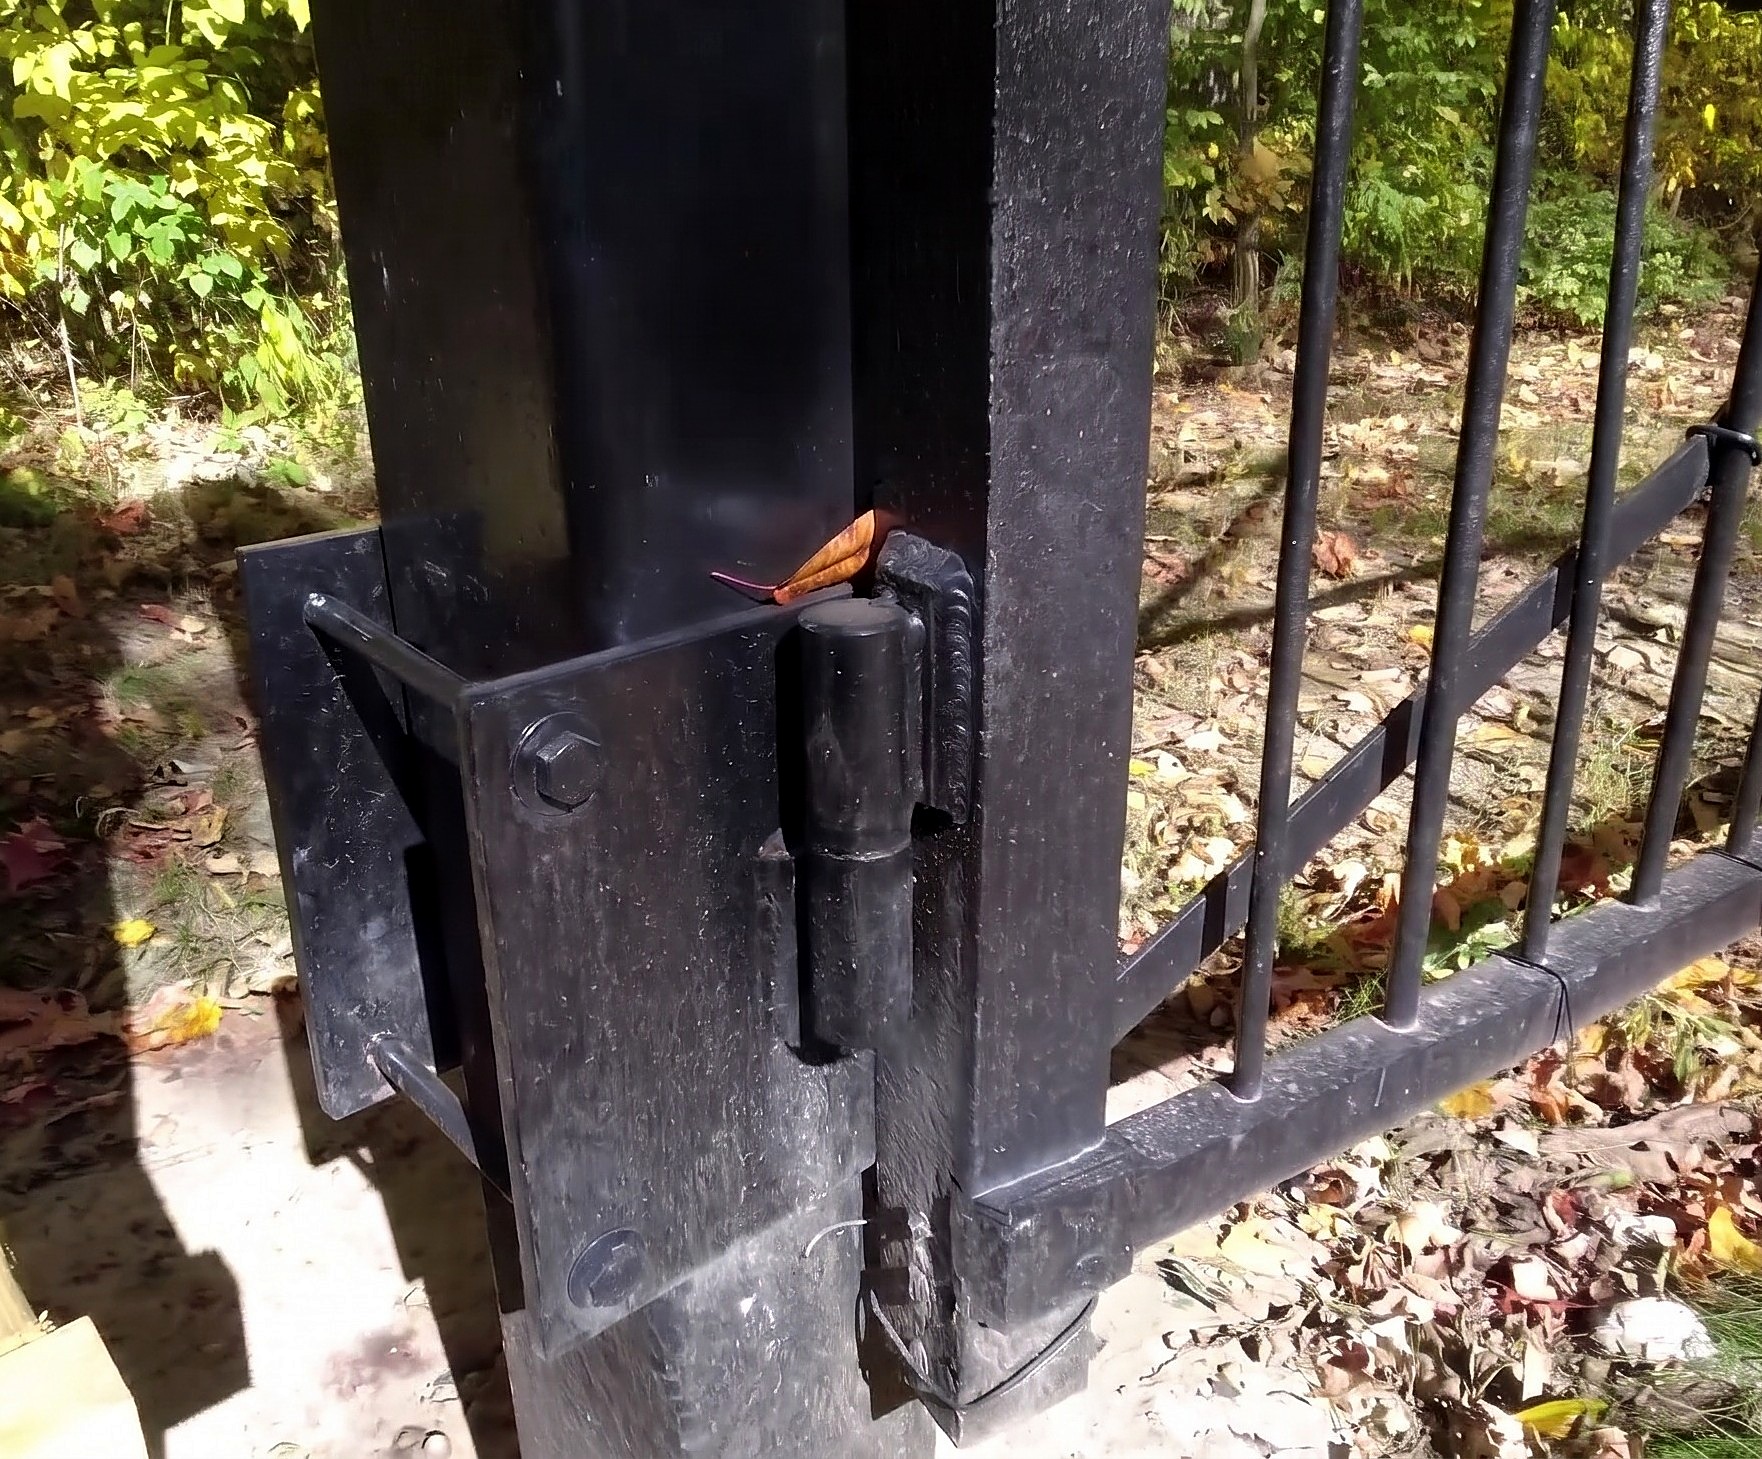
Parts in this step: (E) barrel hinge, (F) gate, (G) front steel plate, (I) grease
You'll need: Weld-on barrel gate hinges, Steel driveway gates, Grease
- 3.1 Set the upper barrel hinge onto the bottom pin and grease the zerk fitting
- Place the gate (F) above the pins on each front steel plate (G).
- Lower each upper barrel hinge (E) straight onto its bottom hinge pin.
- Pump grease (I) into the bottom zerk fitting until it shows at the seam.
- 3.2 Test the swing of the 350 lb gate panels
- Push and pull each 350 lb gate panel by hand through its full arc.
- Check both gates hang level and swing smoothly with minimal effort.
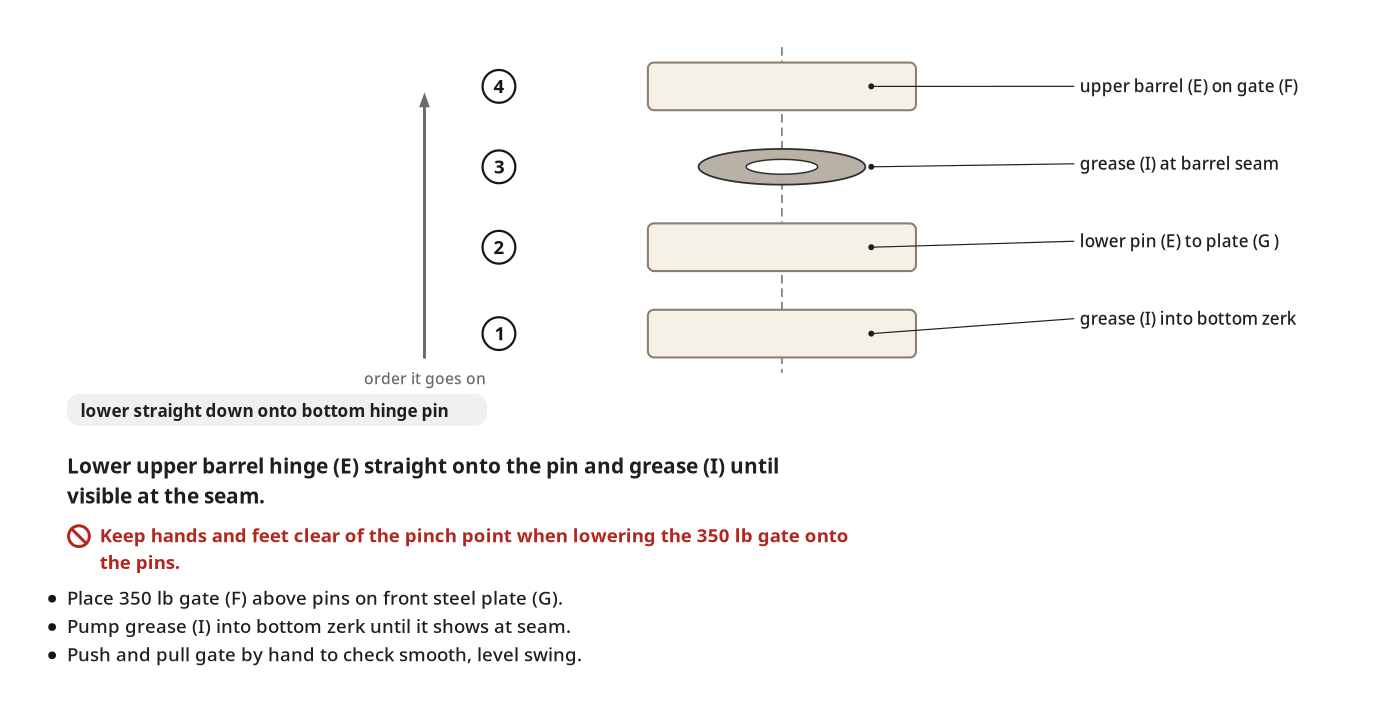
Key measurements
- Gate weight: about 350 lbs per steel driveway gate panel.
- Tip: Grease until visible at the barrel separation joint for smooth movement.
- Heads up: Keep hands and feet clear of the pinch point between the barrel halves when lowering the 350 lb gate onto the pins.
Before you move on: Swing both gate panels by hand to check smooth movement and aligned heights across the driveway.
Finishing
Cure & Settle
- Let the 3 yards of concrete per post cure before hanging gates.
- Recheck gate alignment after ground settles; slide plates vertically if needed.
Care
- Lubricate bottom grease zerk fittings periodically so hinge pins move smoothly.
Alternatives
- Use galvanized threaded rod and galvanized plates against rust in wet climates.
- Install adjustable pilot bearing hinges if you want a lower-profile adjustable setup.
Test it before you call it done
| Check | What you should see | If not |
|---|---|---|
| Swing each 350 lb gate panel open and closed by hand. | The gate moves smoothly through its full swing arc with little to no effort. | Pump more grease into the bottom zerk fitting and check both hinges align vertically. |
| Sight across the tops of both closed driveway gates. | Both gate panels meet at the same height across the driveway. | Support the gate, loosen the four rear clamping nuts, slide the plates vertically to level, and retighten. |
| Check the barrel hinge joint and bottom zerk fitting. | The upper barrel sits flush on the bottom pin with grease at the seam. |
These Specs are built from Indy Farm Life's video “Adjustable Clamp-On Gate Hinge Plates for Steel Gate Posts”. Open the Adjustable Clamp-On Gate Hinge Plates for Steel Gate Posts project page.
