Spetz Specs No. 2824: step-by-step build guide
Simple Plywood Garage Cabinet
The complete step-by-step guide made from Indy Farm Life's YouTube video, free on Spetz. For the video, a step-by-step player and answers to your questions, see the Simple Plywood Garage Cabinet project page.
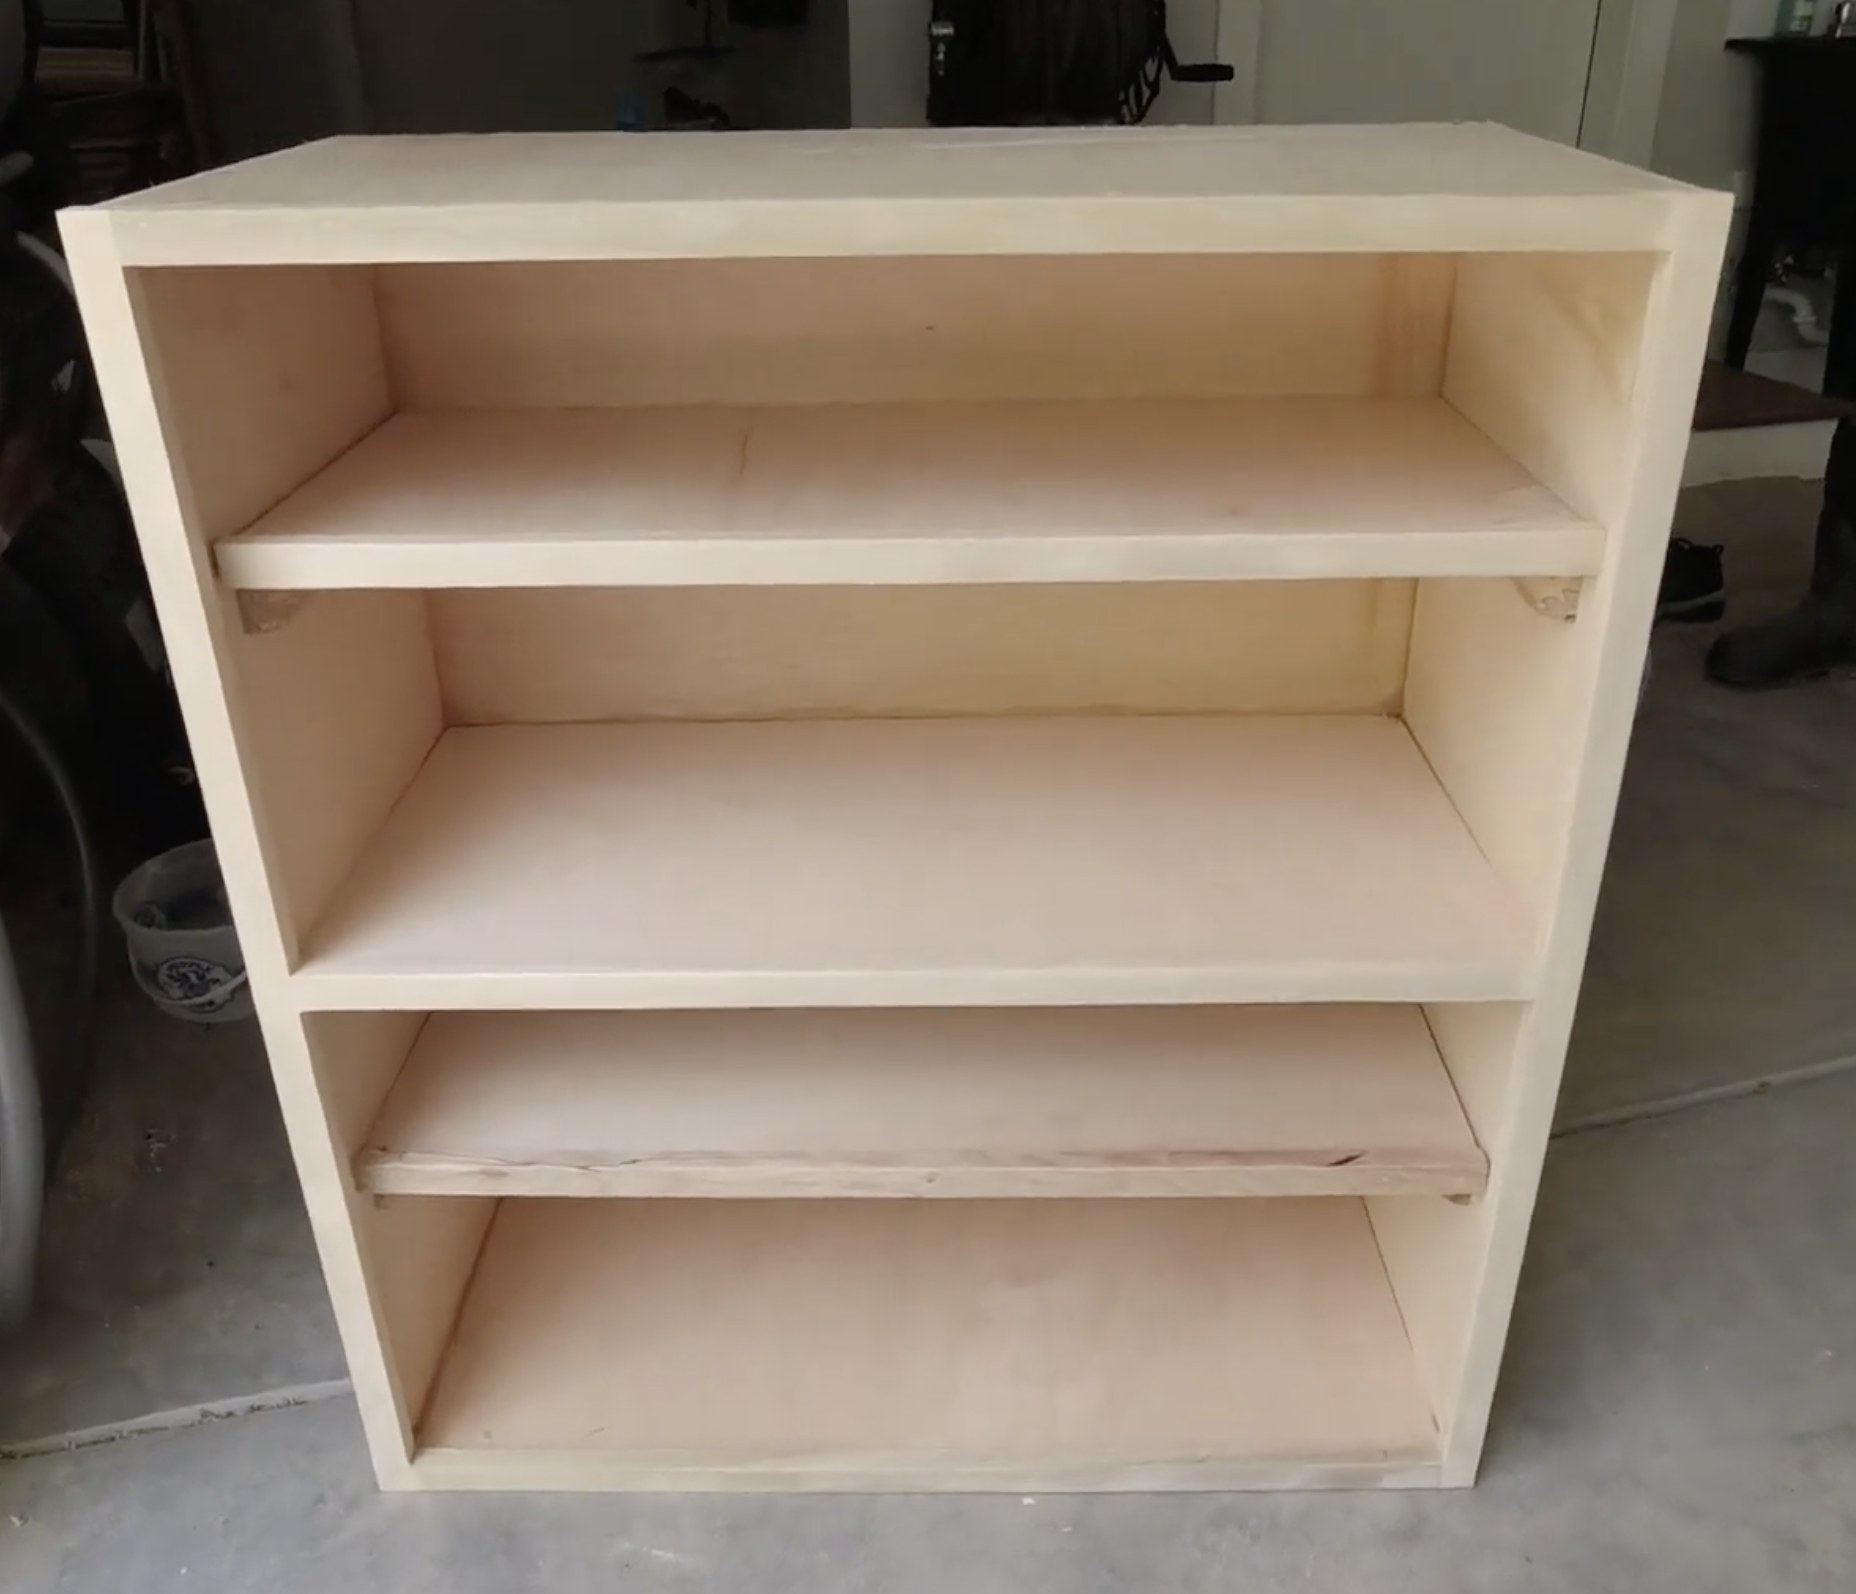
4 steps, 9 parts, 7 tools, 7 materials
Overview
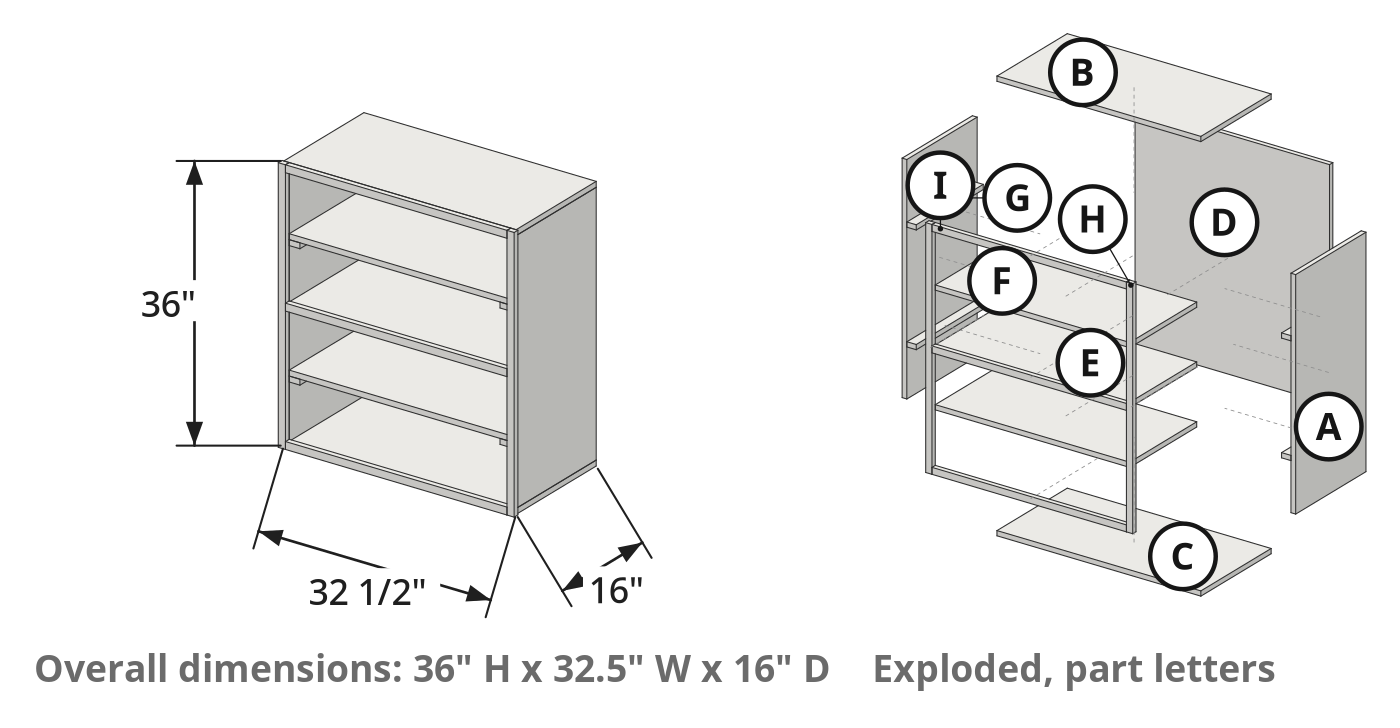
Finished size: 36" H × 32.5" W × 16" D
What You're Building
- A frameless utility cabinet of 3/4" sanded plywood; sturdy and economical.
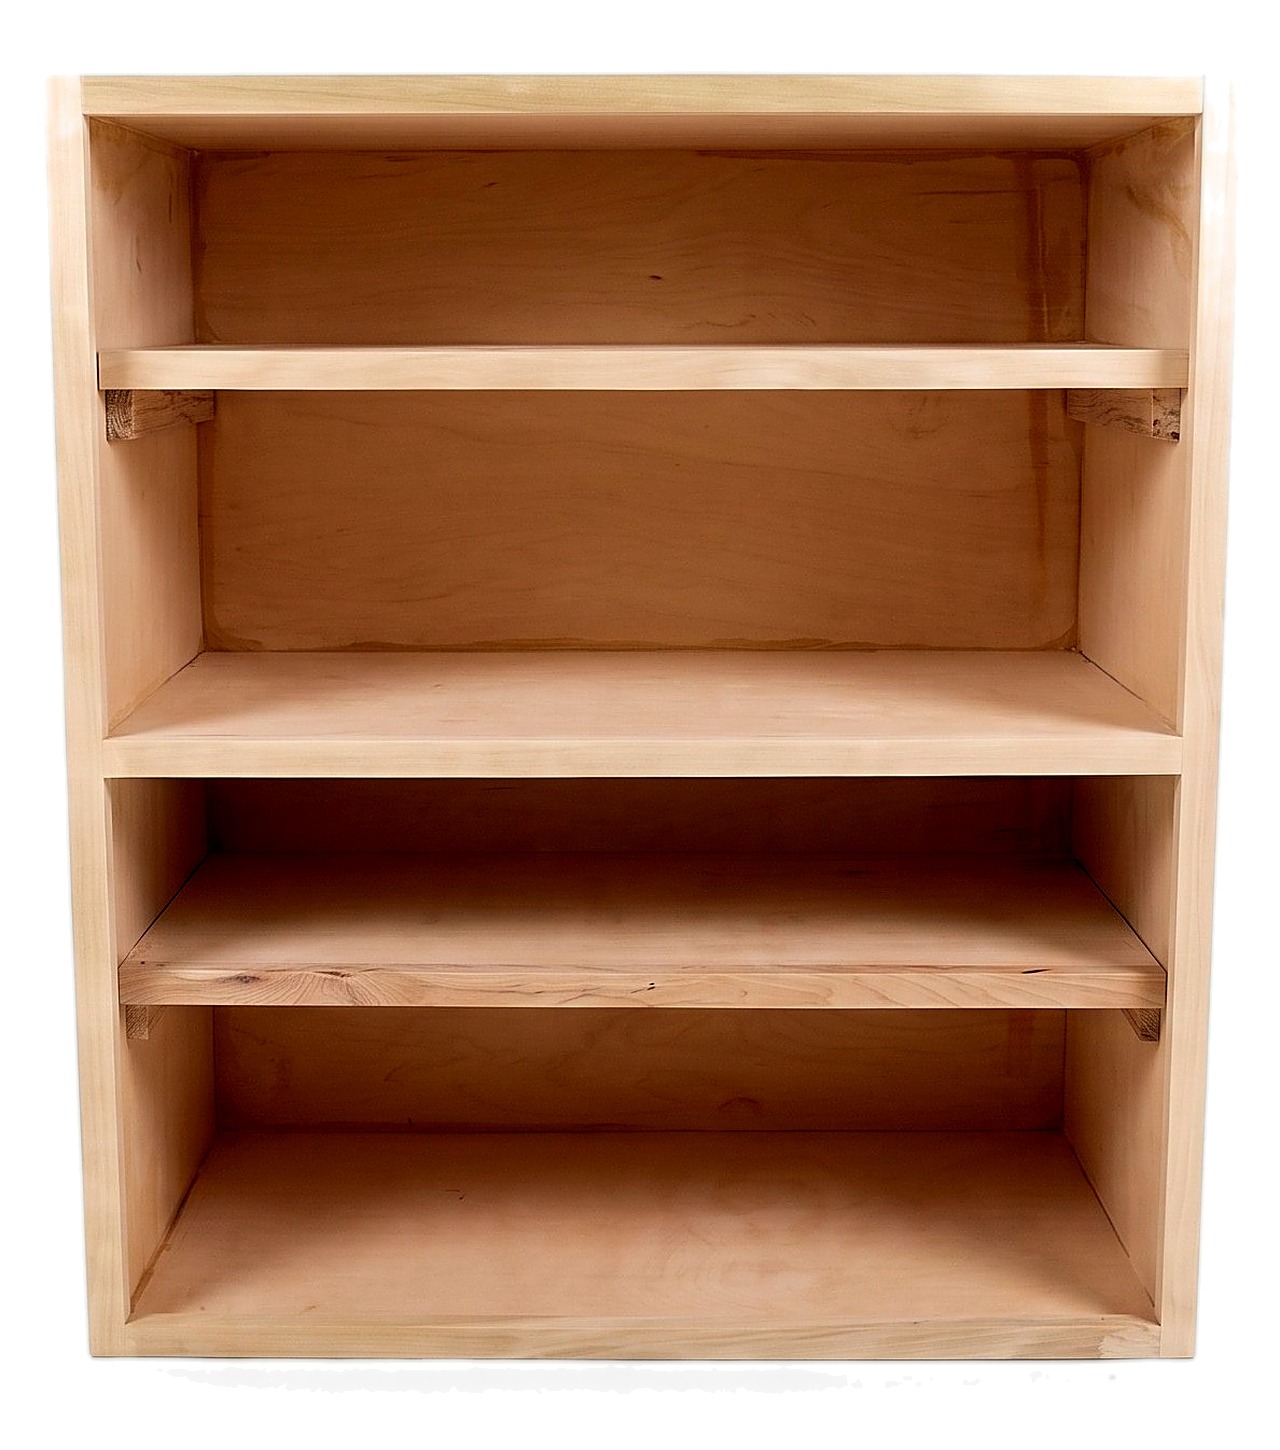
- A fixed middle shelf divides the interior; hardwood cleats support two removable shelves.
- A 3/4" × 1" strip face frame gives a clean look.
Why This Design Works
- 3/4" plywood panels make the cabinet more rigid than store-bought alternatives.
- Building costs a fraction of retail; multiple cabinets use a few plywood sheets.
What It Takes
- The only joinery is glue and brad nails.
- Cut and assemble one cabinet per session; allow time for wood filler.
- No helper required, but a second person makes holding panels easier.
What Decides Success
- Straight, accurate plywood cuts: everything depends on square panels.
- Keep every joint flush and square during glue-up before brads lock it.
Health and safety
Table and Circular Saw Safety
- Support full 3/4-inch plywood sheets across their entire length before cutting with the circular saw to prevent blade pinch and kickback.
- Clamp the 8-foot track saw guide firmly to the plywood so it cannot shift into the spinning circular saw blade.
- Use a riving knife and push stick when ripping plywood or hardwood scraps on the table saw; never reach over the blade.
- Let the circular saw or table saw blade come to a complete stop before lifting the tool or clearing cutoffs.
Cordless Brad Nailer Hazards
- Keep your free hand well back from the joint line when firing 18-gauge brad nails; nails can deflect through plywood edges.
- Never point the cordless brad nailer at yourself or anyone else, and keep your finger off the trigger until ready to fire.
- Remove the battery from the cordless brad nailer before loading 18-gauge nails, clearing a jam, or setting the tool down.
Dust, Filler, and Paint Fumes
- Wear a dust mask and safety glasses when ripping 3/4-inch sanded plywood, which throws fine airborne sawdust and adhesive particles.
- Apply Plastic Wood filler, caulk, primer, and paint in a well-ventilated space to avoid inhaling solvent and chemical vapors.
- Keep Plastic Wood filler and paints away from heat, sparks, and open flames, and seal all containers tightly after use.
Handling Heavy Plywood and Carcass
- Lift full 3/4-inch plywood sheets and the assembled cabinet carcass with a helper, bending at the knees to protect your back.
- Let the wood glue set before flipping or moving the cabinet carcass so heavy panels do not separate and collapse on you.
- Wear work gloves when carrying raw plywood sheets to guard your hands against sharp splinters along the cut edges.
- Anchor the finished garage cabinet securely to wall studs before loading the shelves so the heavy unit cannot tip forward.
Tools
- Circular Saw
- Table Saw (optional)
- Track Saw Guide (Straight edge guide, 8 feet long)
- Brad Nailer (Cordless Brad Nailer, DeWalt, 18-gauge)
- Clamps (Bar clamps)
- Tape Measure
- Level (Spirit level) (optional)
Materials
- Plywood (Sanded Plywood, 3/4 in)
- Wood Glue
- Brad Nails (Harbor Freight, 18-gauge)
- Wood Filler (All-purpose wood filler, DAP, Plastic Wood)
- Caulk
- Primer and Paint
- Hardwood scraps (Hardwood)
Hardware
| Hardware | Size | Count | Used in steps |
|---|---|---|---|
| 18-gauge brad nails | 2, 3, 4 |
Cut list
| Part | Name | Qty | Size | Notes |
|---|---|---|---|---|
| A | Side panel | x2 | 3/4" (T) × 16" (W) × 34 1/2" (H) | |
| B | Top panel | x1 | 3/4" (T) × 16" (W) × 32 1/2" (L) | |
| C | Bottom panel | x1 | 3/4" (T) × 16" (W) × 32 1/2" (L) | |
| D | Back panel | x1 | 3/4" (T) × 31" (W) × 34 1/2" (H) | |
| E | Fixed middle shelf | x1 | 3/4" (T) × 15 1/4" (W) × 31" (L) | Installed dead center of the cabinet interior |
| F | Removable shelf | x2 | 3/4" (T) × 15 1/4" (W) × 31" (L) | Rests on hardwood cleats; not permanently attached |
| G | Hardwood shelf cleat | x4 | 3/4" (T) × 1 1/2" (W) × 15 1/4" (L) | Cut from scrap hardwood; ends slightly curved per creator |
| H | Face frame vertical strip | x2 | 3/4" (T) × 1" (W) × 36" (H) | Milled from 1" lumber to 3/4" thick; attached flush with inside of cabinet |
| I | Face frame horizontal strip | x3 | 3/4" (T) × 1" (W) × 31" (L) | Scribed to fit between vertical strips; top, middle, and bottom positions |
What to buy
- Buy 1 × 1 1/2 x 3/4 stock 8 ft (Hardwood scraps)
- Buy 2 × Plywood 4x8 sheet (Plywood)
Before you start
Lumber Selection
- Buy sanded 3/4" plywood (not construction-grade sheathing). Sight down each sheet; reject a visible bow or twist.
- For the face frame, use 3/4" × 1" solid stock milled from 1" lumber, or rip plywood strips and clean edges with wood filler.
- Gather hardwood scraps for shelf cleats (G); any species works.
Layout & Labeling
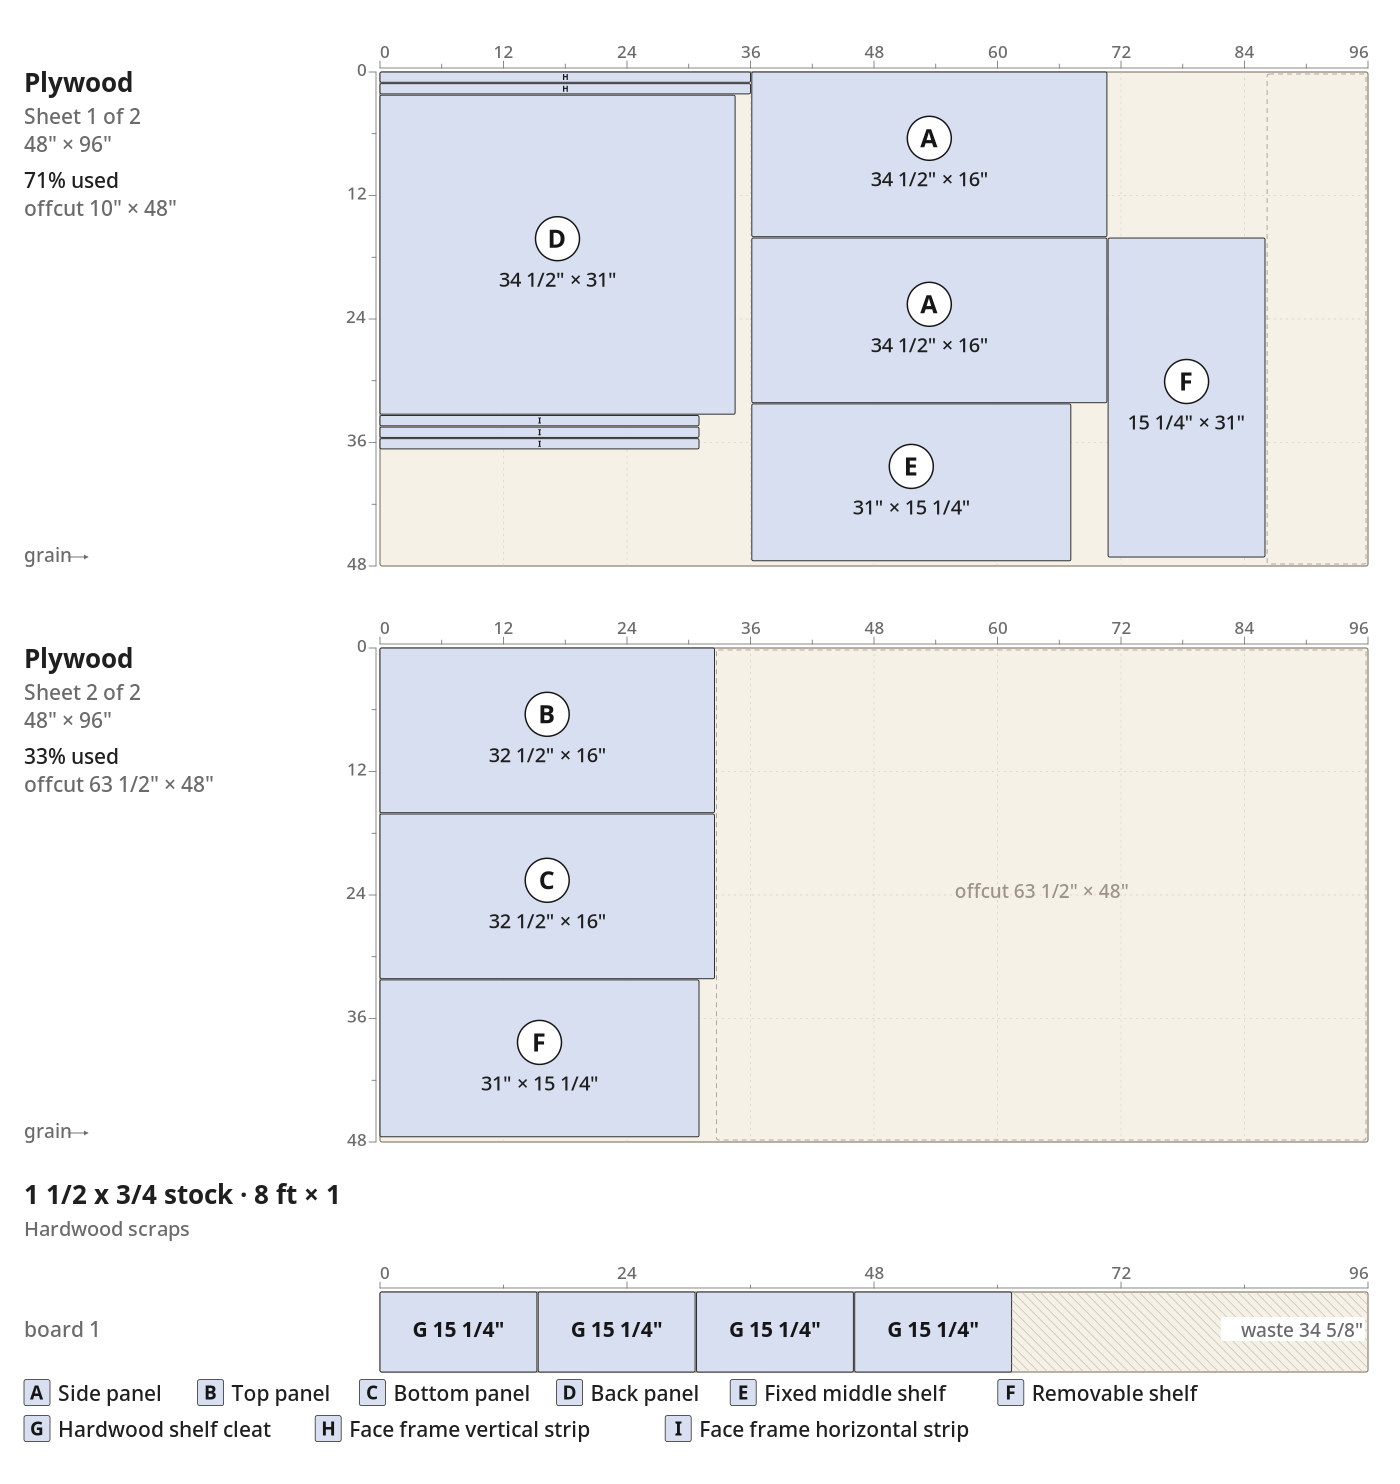
- Write a cut list before sawing. Plan cuts to minimize waste from two 4×8 sheets.
- Label each piece with a marker when cut; unlabeled pieces cause mix-ups.
- Square each panel factory edge and check critical dimensions with a tape measure before continuing.
Step by step
Step 1: Breaking Down Plywood Sheets
Plywood panels and strips are cut to final dimensions, labeled and ready for assembly.
Parts in this step: (A) Side panel, (B) Top panel, (C) Bottom panel, (D) Back panel, (E) Fixed middle shelf, (F) Removable shelf, (G) Hardwood shelf cleat, (H) Face frame vertical strip, (I) Face frame horizontal strip
You'll need: Circular Saw, Track Saw Guide, Table Saw, Tape Measure, Plywood, Hardwood scraps
- 1.1 Set Up the Track Saw Guide
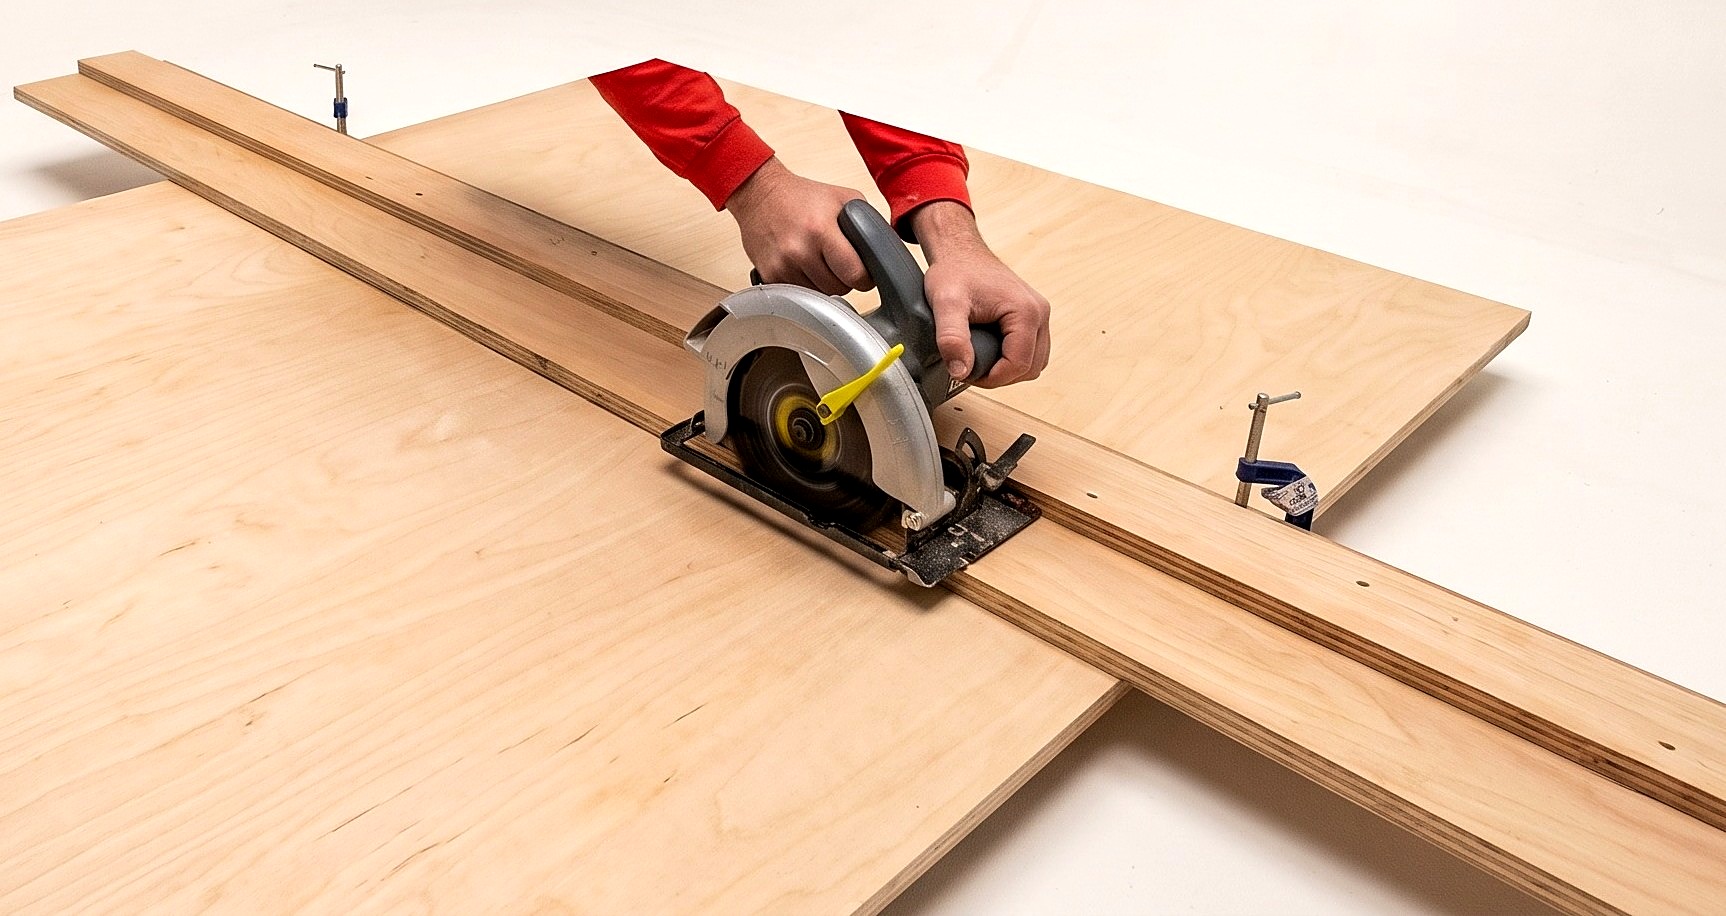
- Clamp an 8-ft straight-edge guide to the plywood sheet, offset from the cut line by the distance between the saw blade and saw base plate edge.
- Check the guide is parallel to your mark along its full length before cutting.
- A homemade straight-edge jig with a circular saw is an economical track saw alternative for breaking down full sheets.
- 1.2 Measure and Mark the Plywood
- Measure each panel on the plywood sheet: two side panels (A) at 34.5 × 16 in, one top (B) and one bottom (C) at 32.5 × 16 in, one back (D) at 34.5 × 31 in, one fixed shelf (E) and two removable shelves (F) at 31 × 15.25 in, and the face-frame strips (H, I) at 3/4 × 1 in.
- Mark each cut line with a pencil and straightedge.
- Label every piece when marked; writing prevents confusion later.
- 1.3 Cut the Plywood
- Align the track saw guide on the marked line, clamp it and rip-cut with the circular saw.
- Use the table saw for smaller pieces like face-frame strips (H, I) and shelf cleats (G) after breaking down large sheets.
- Support the plywood off-cut side so it never pinches the blade or falls and splinters.
Key measurements
- Side panels (A): 34.5 × 16 in
- Top/bottom panels (B, C): 32.5 × 16 in
- Back panel (D): 34.5 × 31 in
- Fixed shelf (E) and removable shelves (F): 31 × 15.25 in
- Face-frame verticals (H): 3/4 × 1 × 36 in
- Face-frame horizontals (I): 3/4 × 1 × ~31 in (scribe to fit)
- Tip: Plan cuts so the plywood sheet factory straight edge serves as a reference edge wherever possible.
- Heads up: Ripping plywood throws fine sawdust. Wear a dust mask and safety glasses; work in a ventilated space.
Before you move on: Verify every panel is labeled and matches its cut-list dimension. A mismatch caught now saves a wasted sheet later.
Step 2: Assembling the Cabinet Carcass
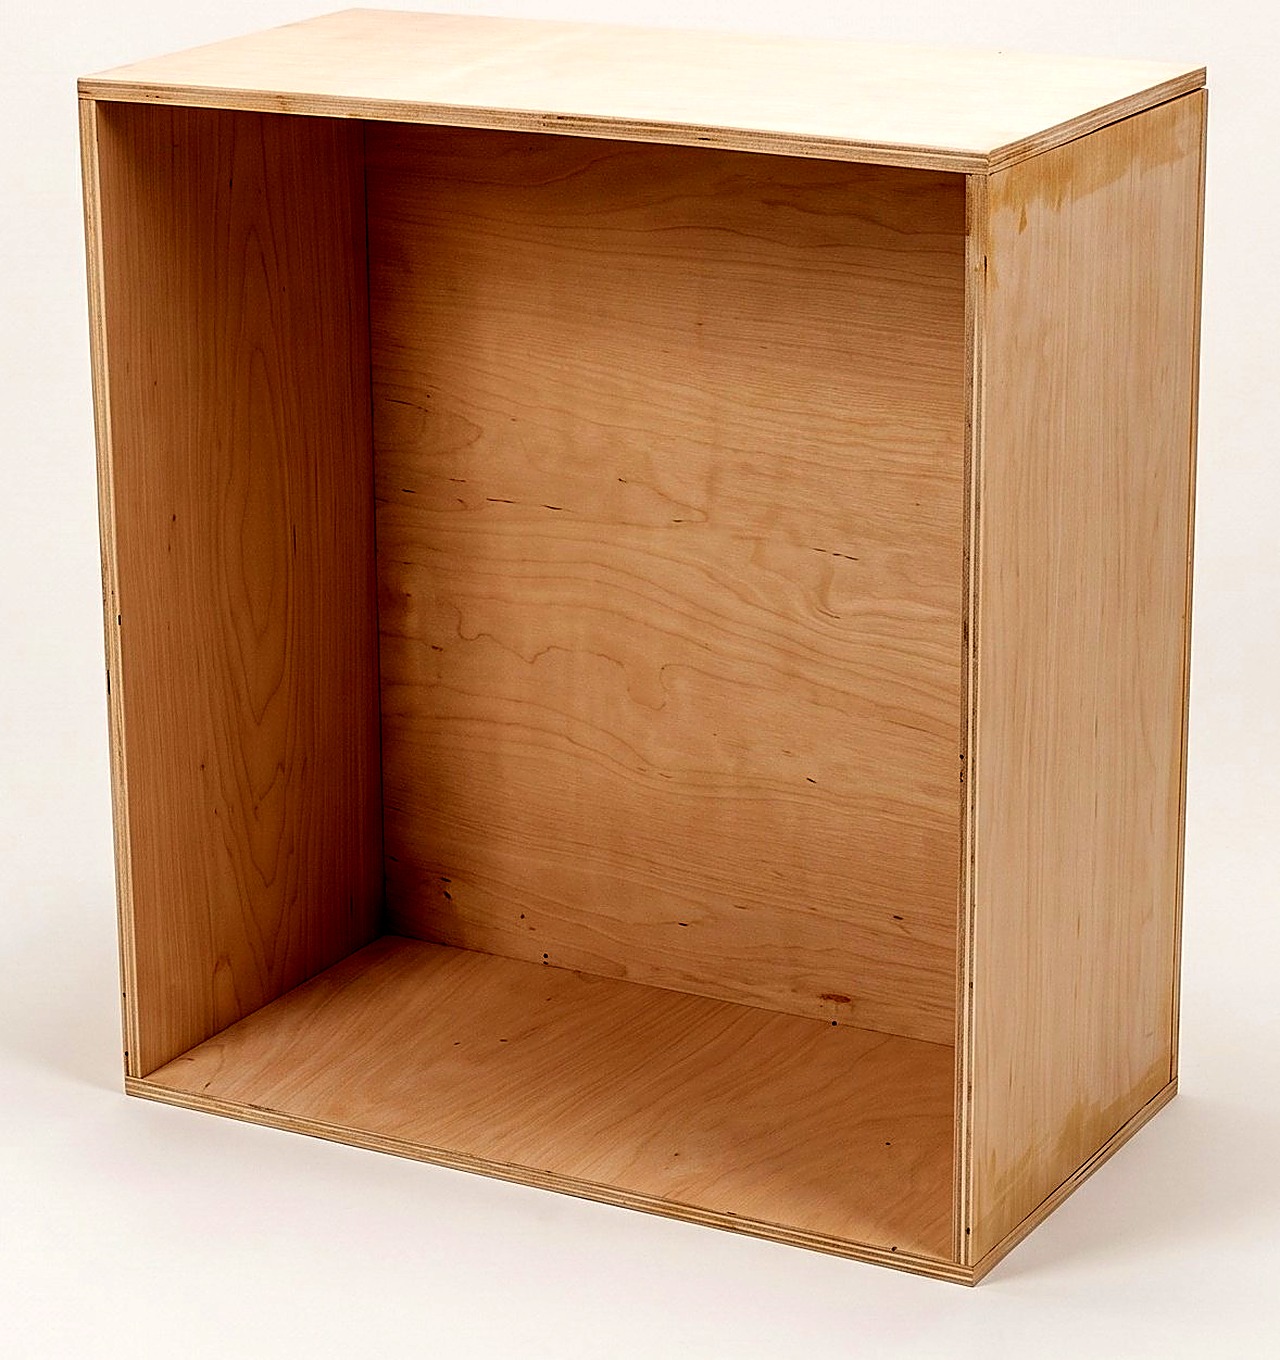
Glue and nail the cabinet carcass (two sides, top, bottom, and back) into a rigid, square box.
Parts in this step: (A) Side panel, (B) Top panel, (C) Bottom panel, (D) Back panel
You'll need: Brad Nailer, Clamps, Wood Glue, Brad Nails, 18-gauge brad nails
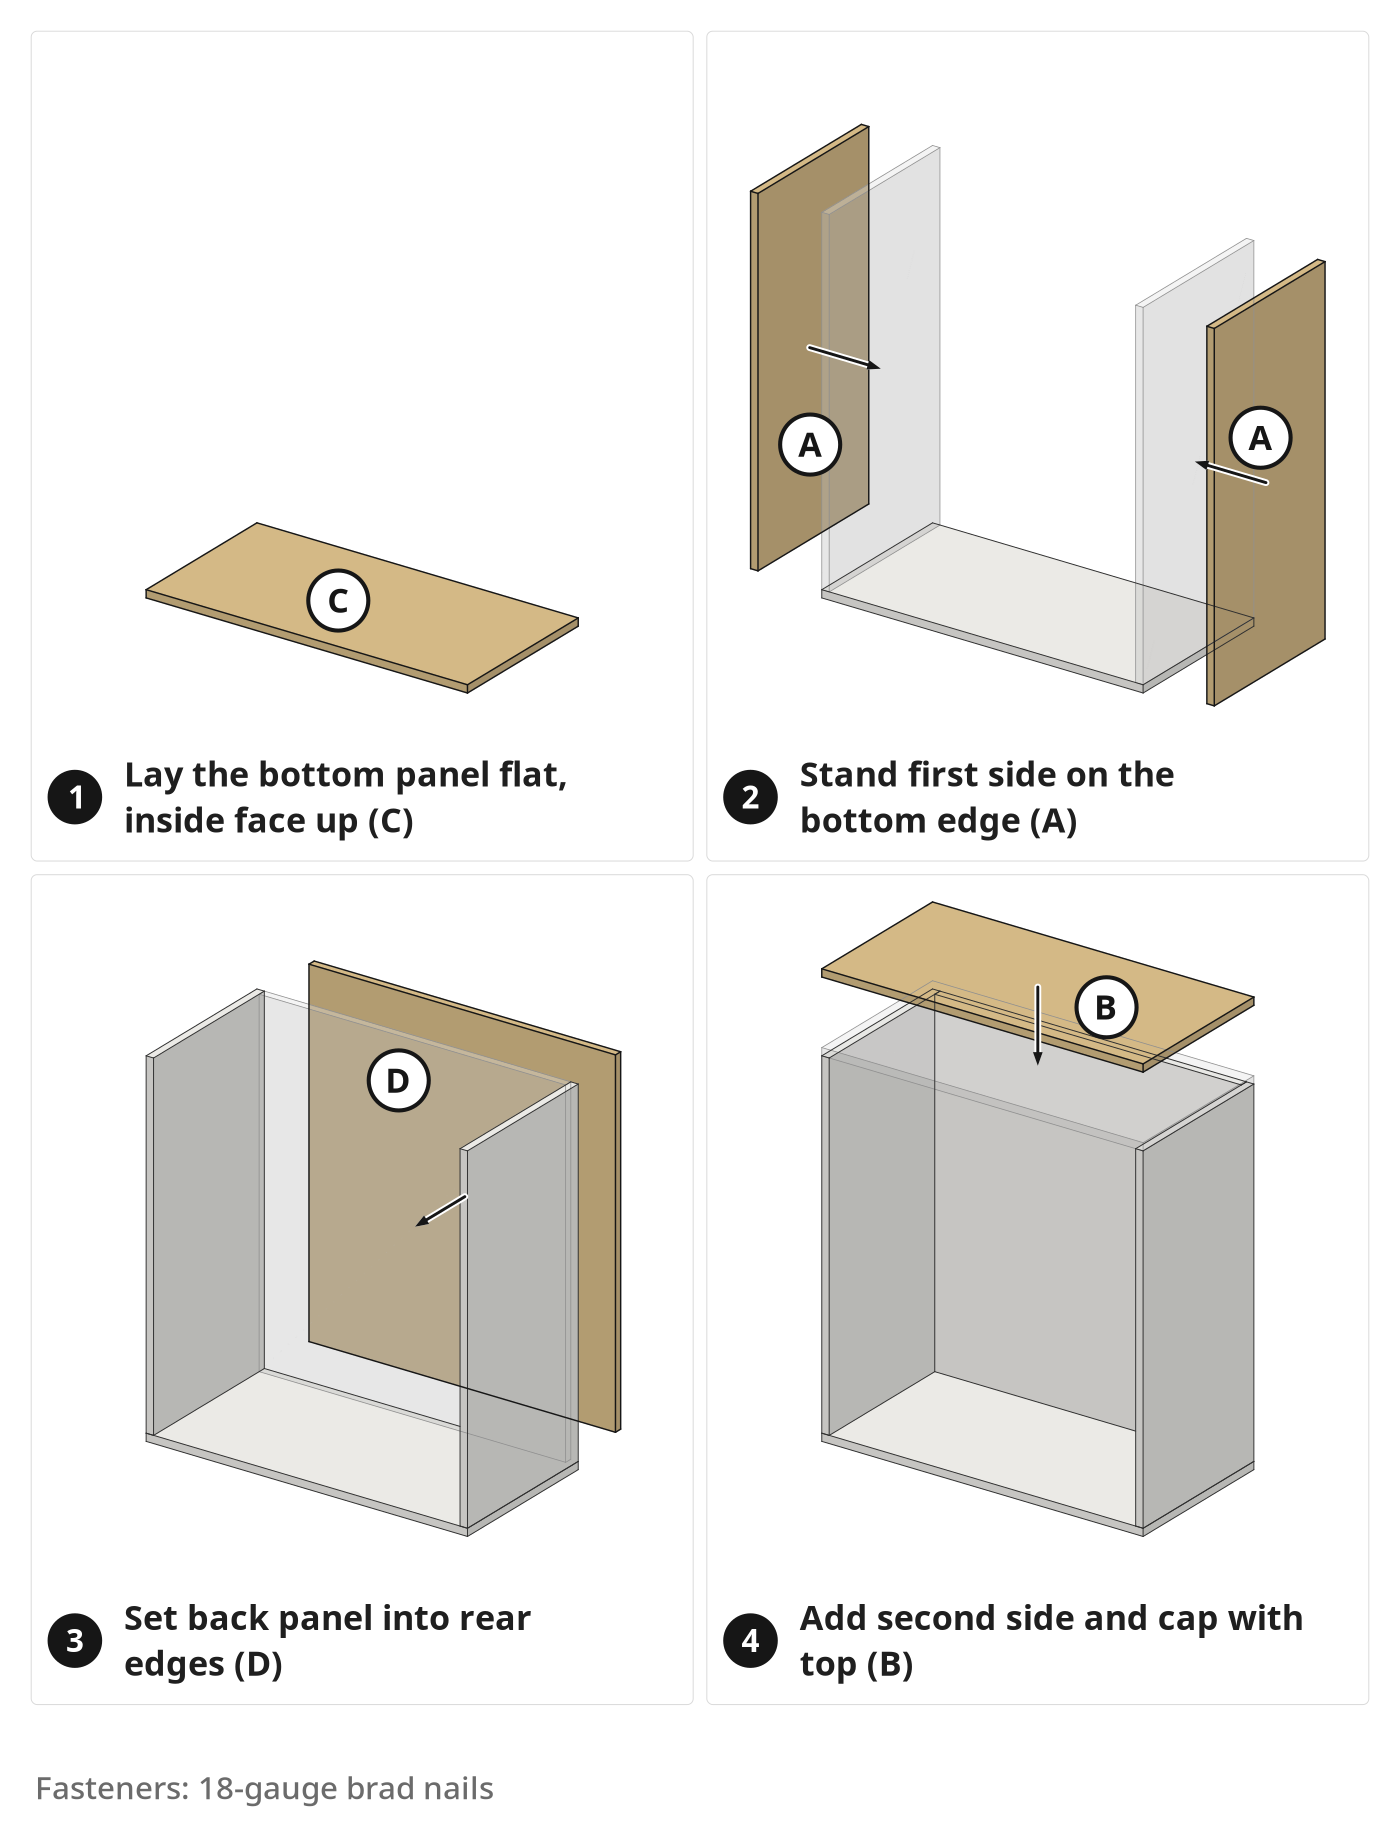
- 2.1 Join the First Side Panel
- Lay the bottom panel (C) flat, inside face up.
- Apply generous wood glue along the end-grain edge where the first side panel (A) attaches.
- Stand the side panel (A) on the glued edge, flush with the bottom panel, and clamp.
- Wipe away glue squeeze-out with a wet rag before it dries; dried glue creates lumps showing through paint.
- 2.2 Fasten with Brad Nails
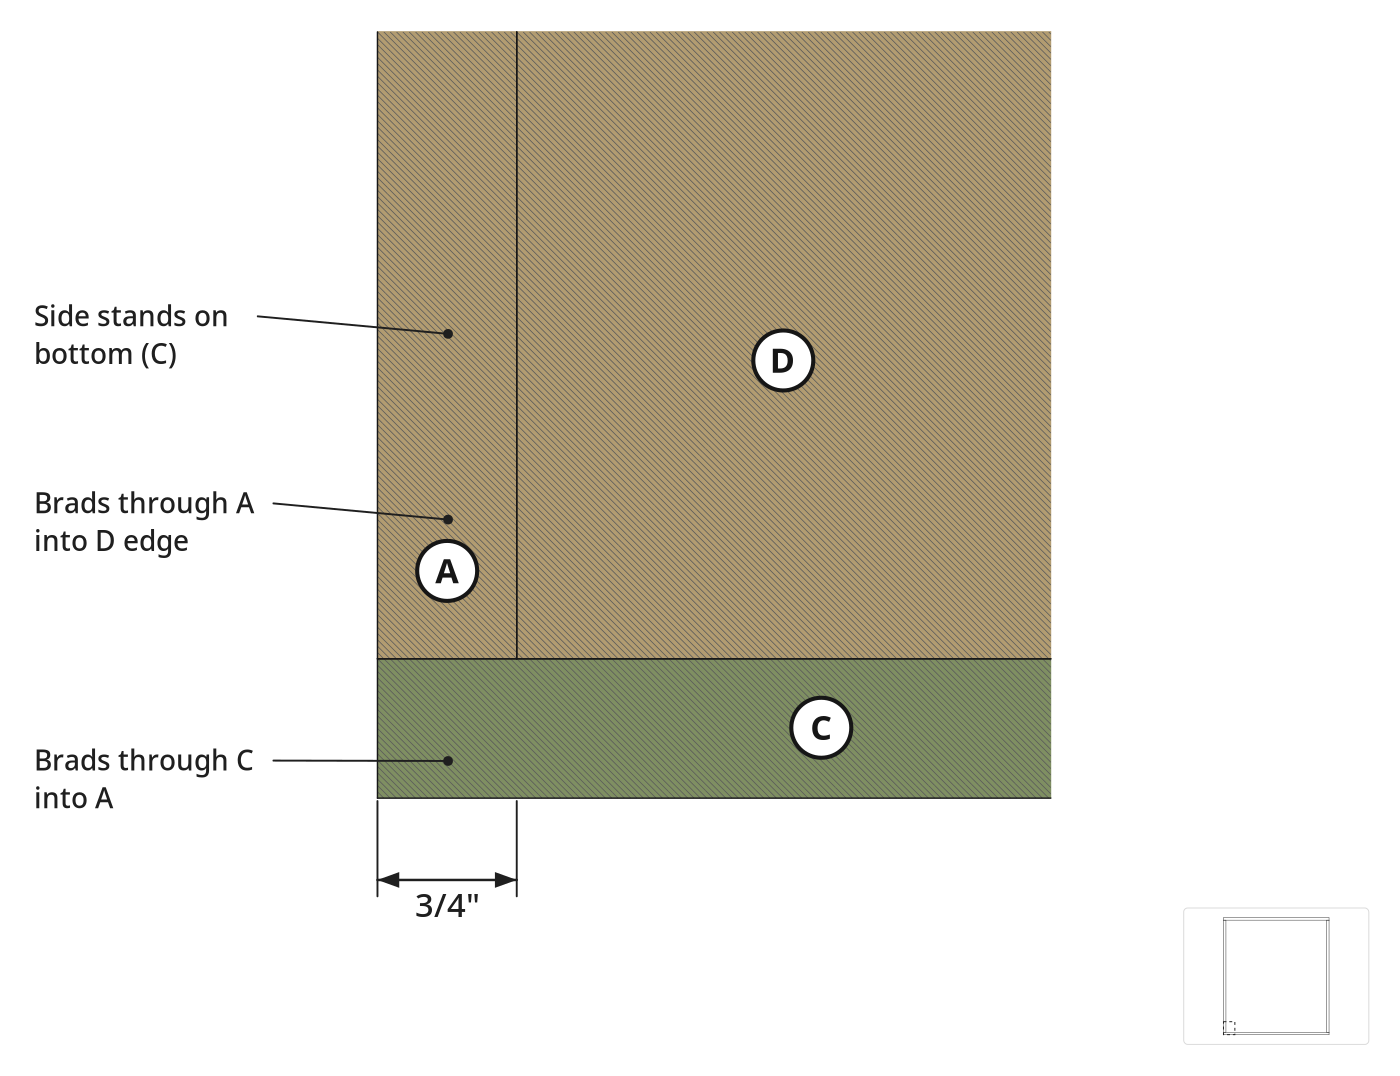
- While clamped, drive 18-gauge brad nails through the bottom panel (C) into the side panel (A) end grain every 3–4 inches.
- Use plenty of brads; they are cheap and the extra holding power lets you unclamp almost immediately.
- Release the clamps and check the joint is tight and flush before the glue sets.
- 2.3 Attach the Second Side and Back
- Glue and clamp the second side panel (A) onto the other end of the bottom (C), flush with its edge.
- Brad-nail through the bottom (C) into the side's end grain every 3–4 in.
- Glue the back panel (D), set it between the side panels (A) and nail through the sides and the bottom into its edges.
- Assembly order: bottom, first side, second side, back, then the top.
- 2.4 Attach the Top Panel
- Apply glue to the top edges of both side panels (A) and the back panel (D).
- Set the top panel (B) flush on top, clamp, and brad-nail through the top into the sides and back.
- Wipe excess glue from the interior corners.
Key measurements
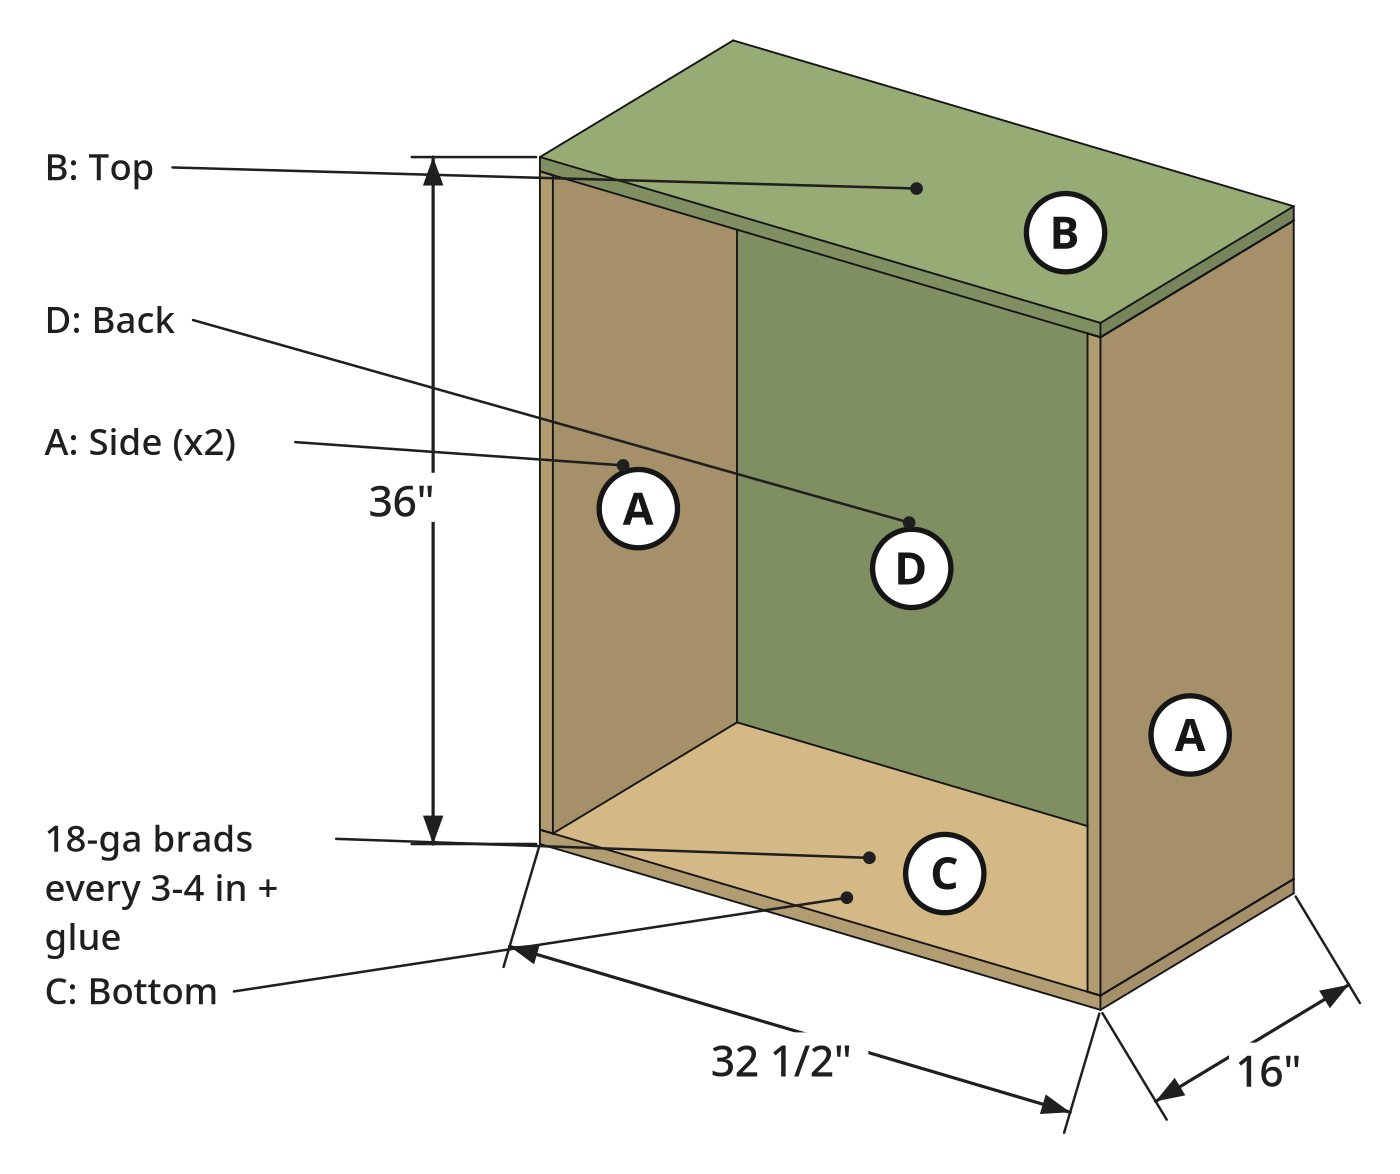
- Cabinet exterior: 36 in tall × 32.5 in wide × 16 in deep
- The side panels (A) stand on the bottom (C) and the top (B) caps them; the back panel (D) fits between the sides.
- Tip: Clamps are only needed until the brads are in; glue and heavy brad-nailing create a very strong joint.
- Tip: If a side panel has a slight bow, use clamps to pull it straight before nailing.
- Heads up: Do not stress freshly glued joints immediately; let the glue set before flipping or moving the carcass.
Before you move on: Measure both open front diagonals; equal means the box is square. Adjust before the glue sets if they differ by more than 1/8 in.
Step 3: Installing Shelves
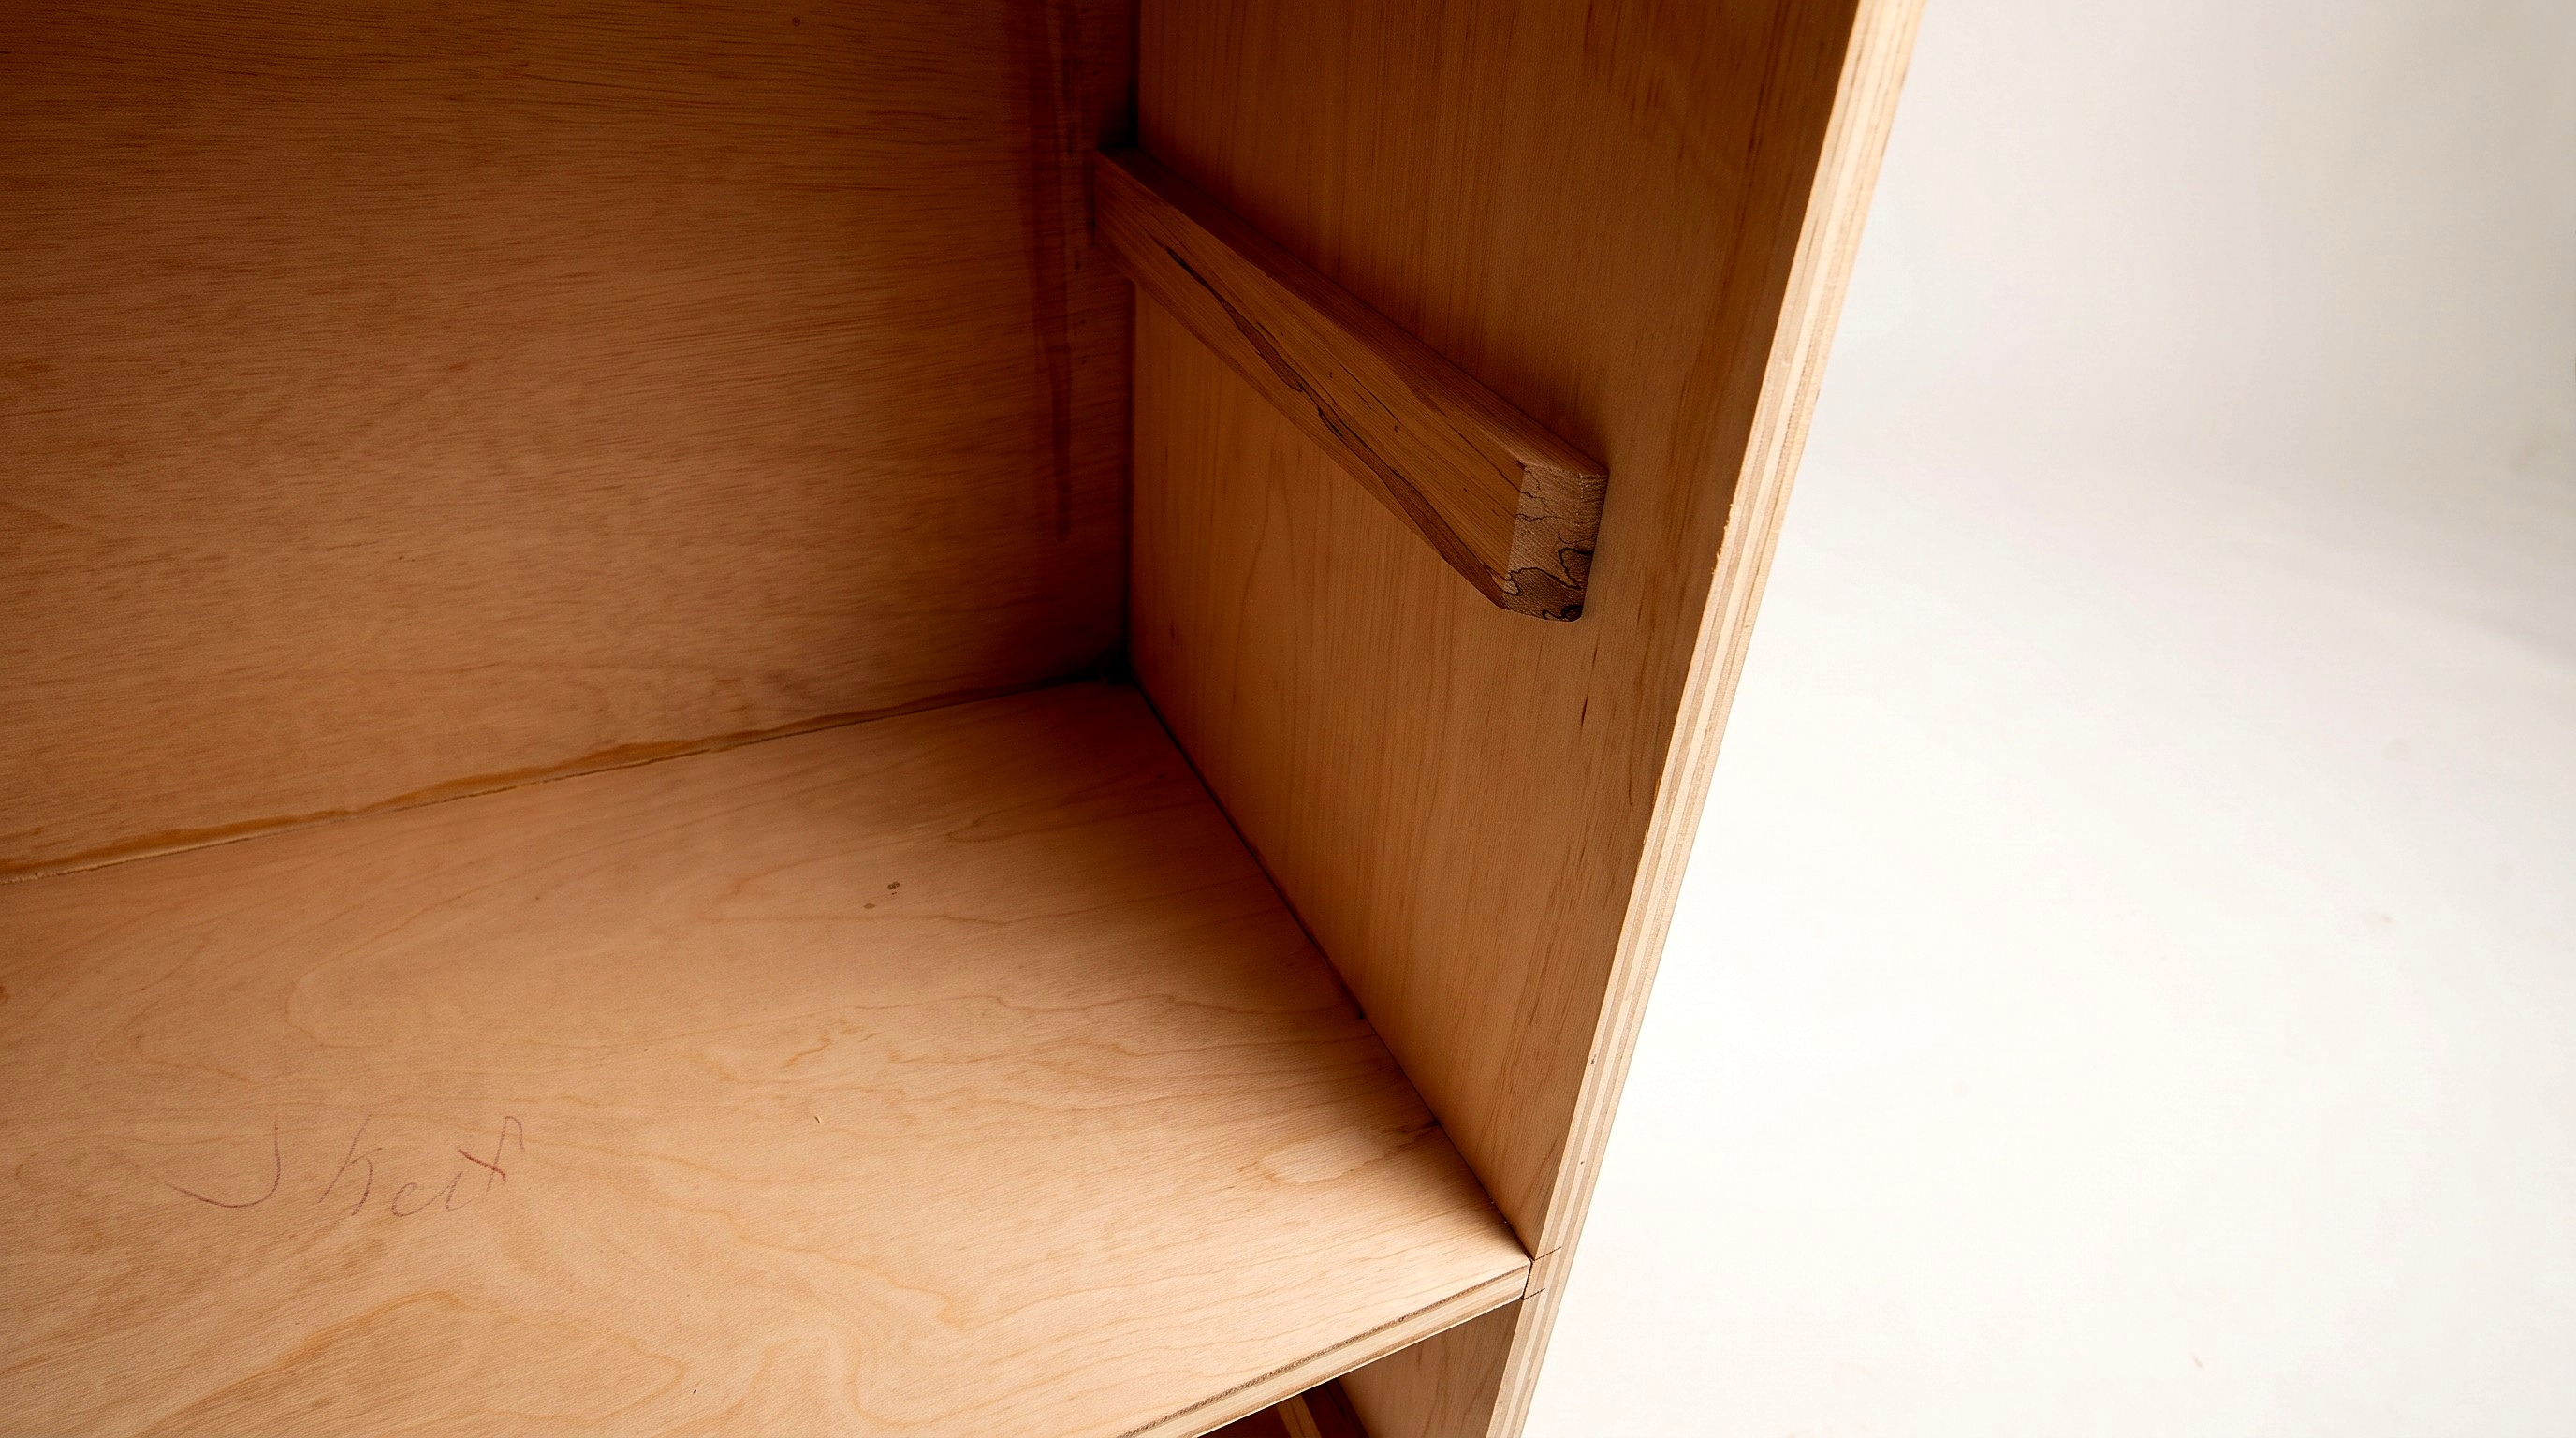
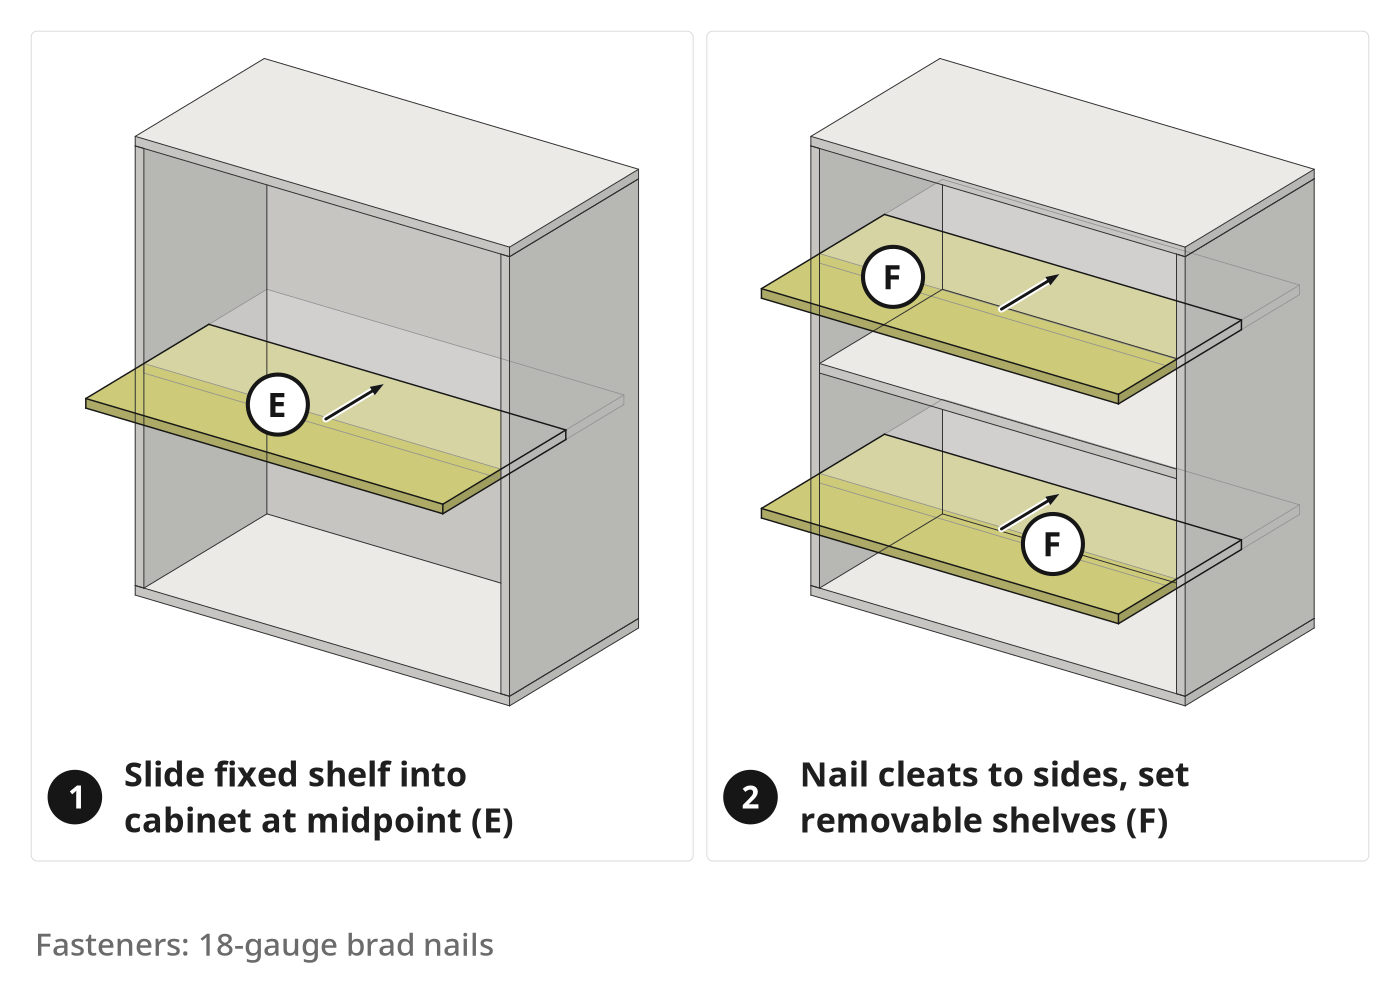
A fixed middle shelf divides the interior; hardwood cleats support two removable shelves.
Parts in this step: (E) Fixed middle shelf, (F) Removable shelf, (G) Hardwood shelf cleat
You'll need: Brad Nailer, Tape Measure, Level, Clamps, Wood Glue, Brad Nails, Hardwood scraps, 18-gauge brad nails
- 3.1 Install the Fixed Middle Shelf
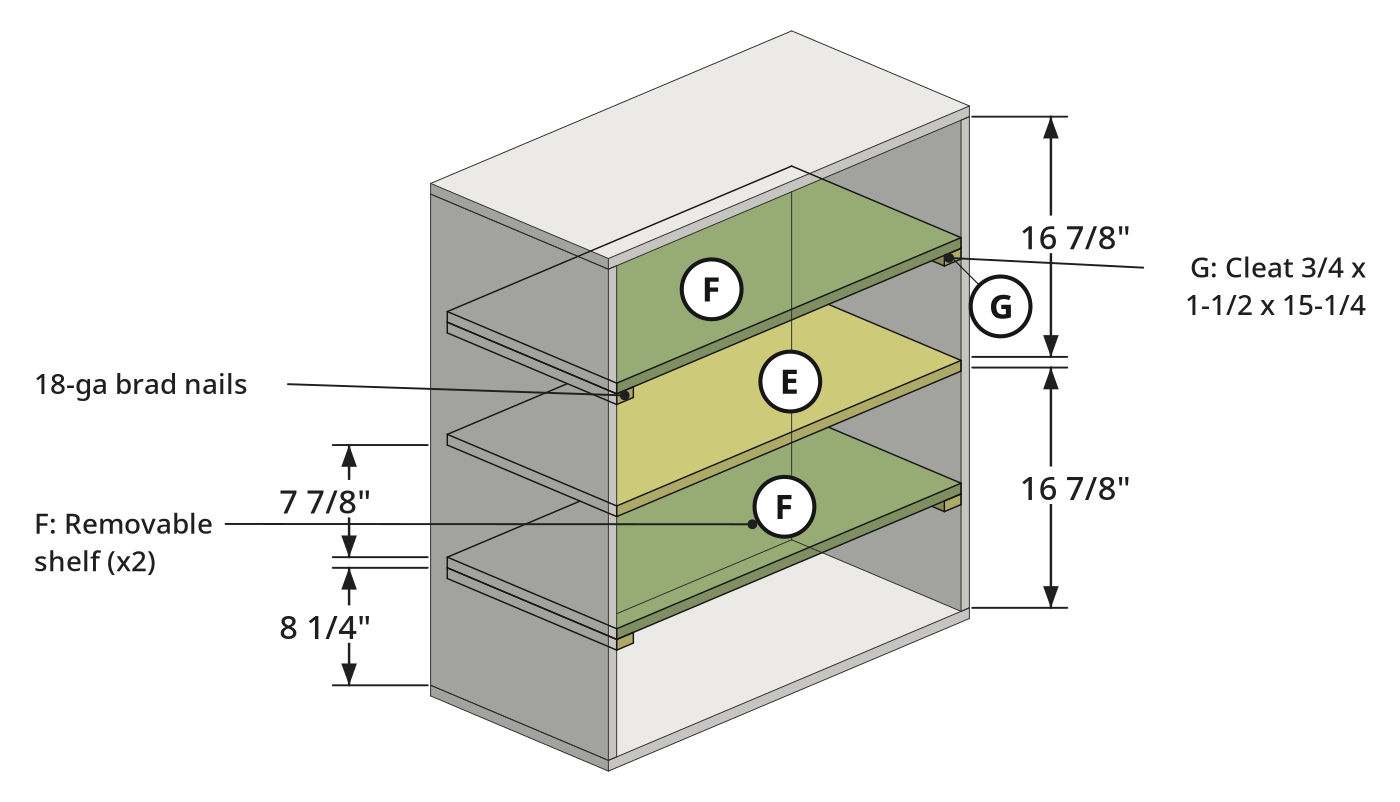
- Mark the interior height midpoint outside both side panels (A) and the back panel (D); this centers the fixed shelf (E), creating two 16 7/8 in openings.
- Apply glue along the marked inside lines and the fixed shelf (E) edges.
- Slide the shelf (E) in, align with the exterior marks, and check with a level.
- Nail through the sides and back into the shelf edges from outside; shoot above your marked lines so brads hit the shelf, not empty space.
- Test-fit the shelf before gluing to check it slides without binding.
- 3.2 Add Cleats for Removable Shelves
- Cut four small cleats (G) from scrap hardwood, about 3/4 × 1.5 × 15.25 in; size them to your interior depth.
- Round the exposed ends slightly for a cleaner look.
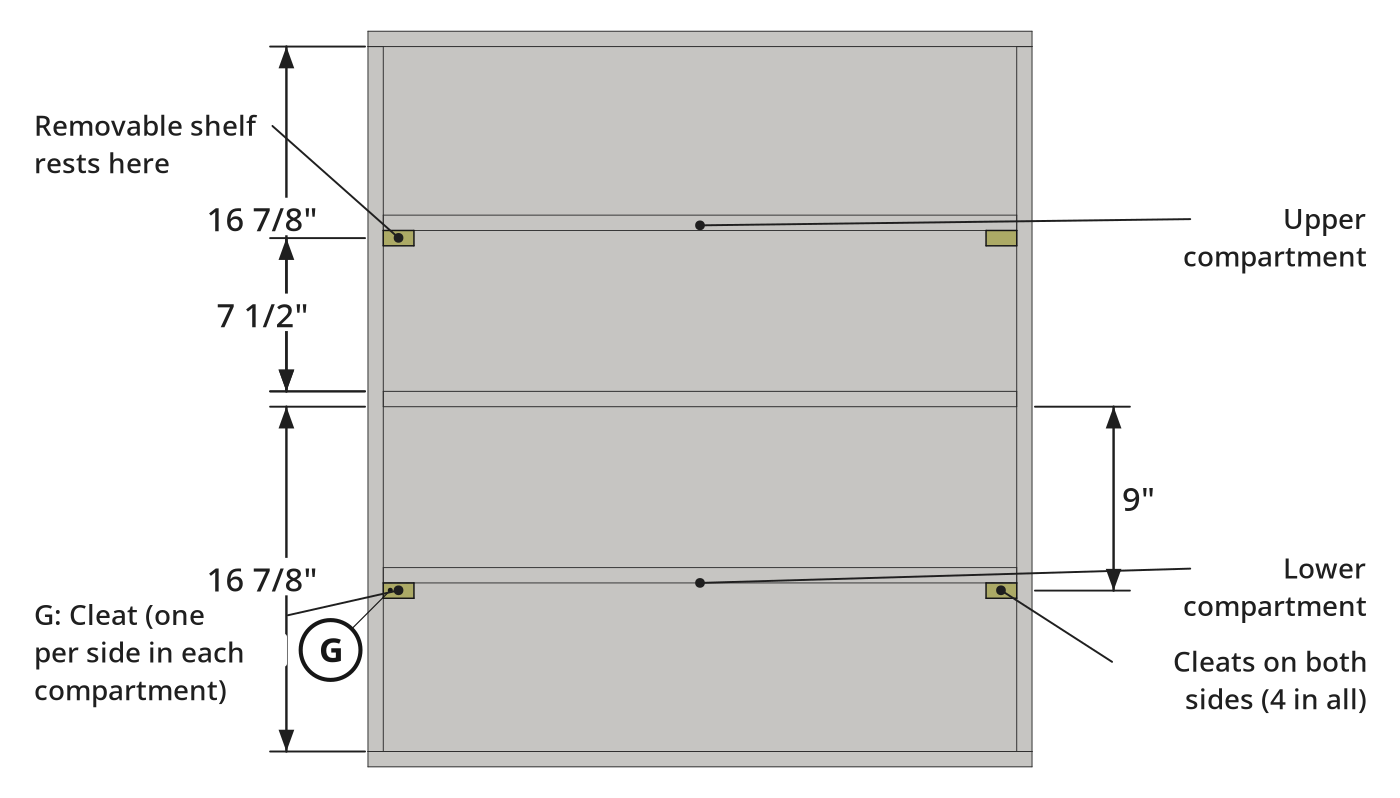
- Nail one cleat (G) to each side panel in each compartment: one pair above the fixed shelf, one pair below it, offset from center for a smaller upper space and a larger lower opening.
- Nail each cleat to the side panel with brad nails; no glue is needed since these just support removable shelves.
- Set each removable shelf (F) on its pair of cleats to check it sits flat and slides easily.
Key measurements
- Fixed shelf (E) centered: 16 7/8 in from the bottom panel and from the top panel.
- Each compartment opening is 16 7/8 in tall before the removable shelves go in.
- Tip: Hardwood cleats give a finished edge and more durable shelf support than plywood scraps.
- Tip: Offset the cleats rather than centering them; a smaller upper space fits towels or gloves, and a larger lower space fits buckets or tall items.
Before you move on: Check the fixed shelf is level and both removable shelves slide freely on their cleats.
Step 4: Adding the Face Frame and Prepping for Paint
Apply a face frame to the front; fill, sand, and caulk all surfaces, ready for primer and paint.
Parts in this step: (H) Face frame vertical strip, (I) Face frame horizontal strip
You'll need: Brad Nailer, Tape Measure, Brad Nails, Wood Filler, Caulk, 18-gauge brad nails
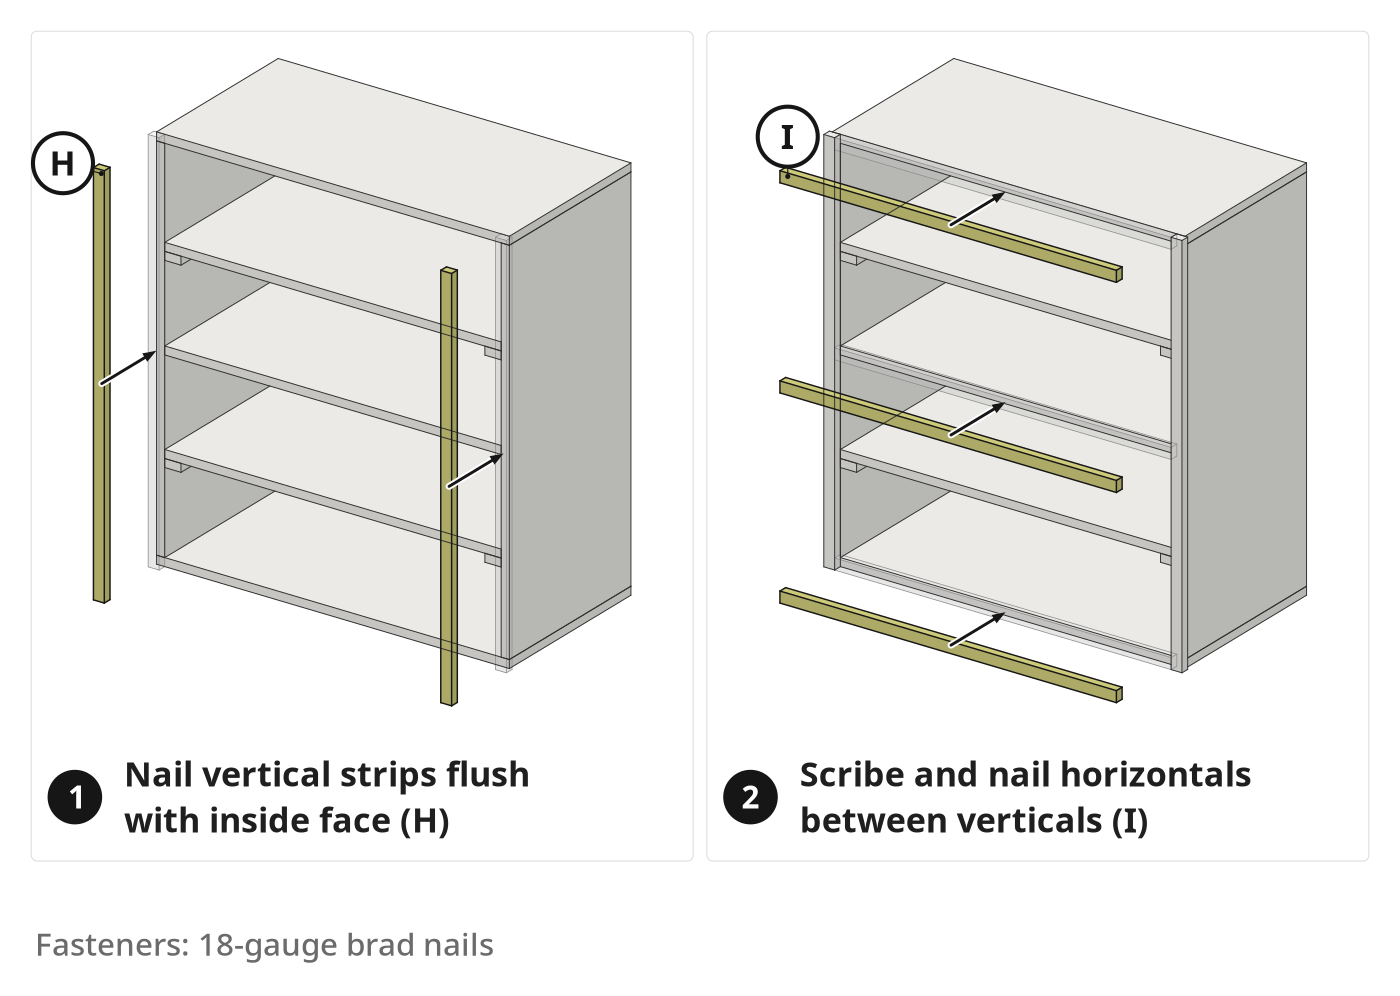
- 4.1 Attach Vertical Face Frame Pieces
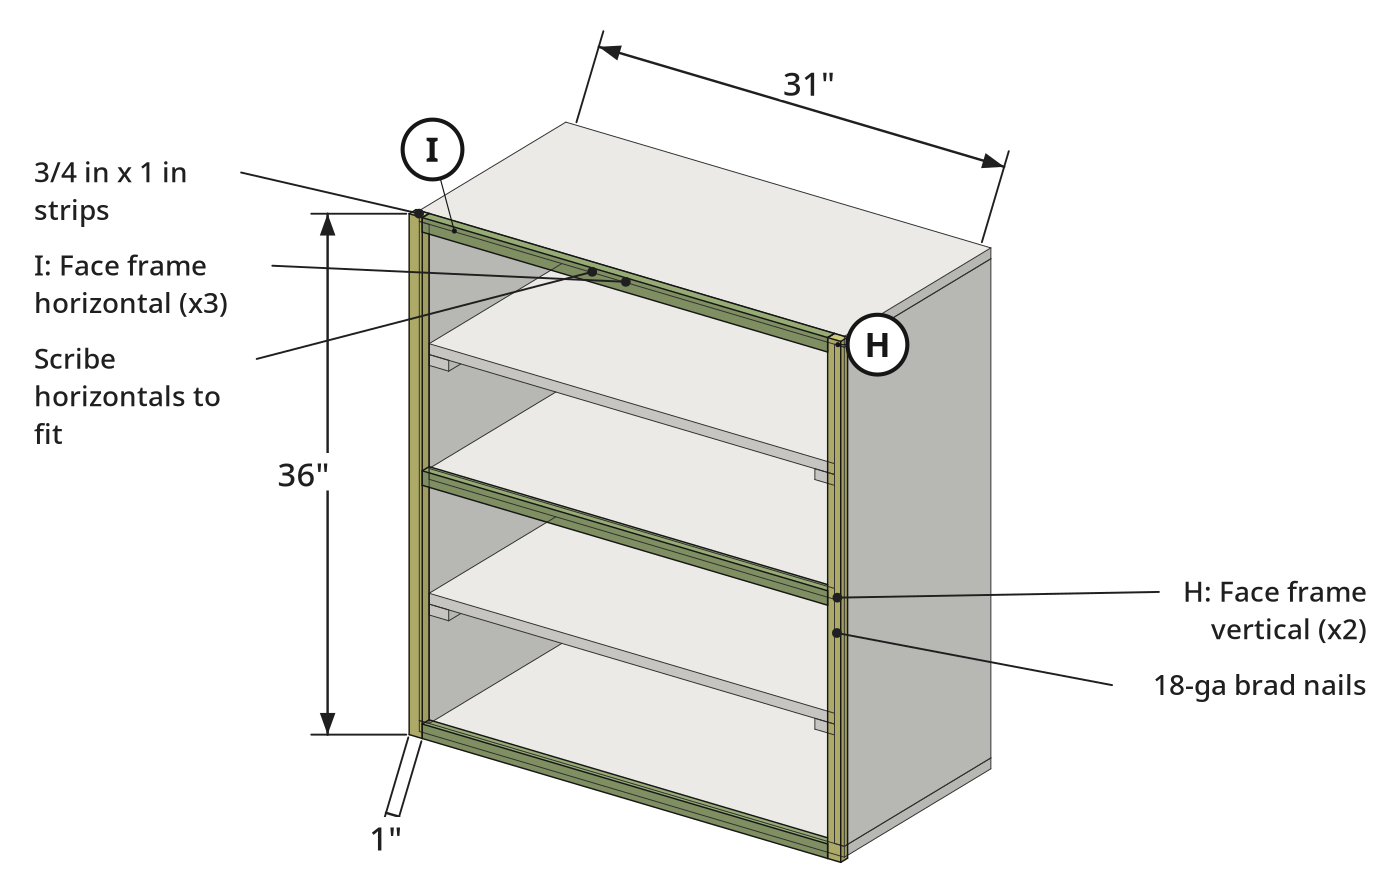
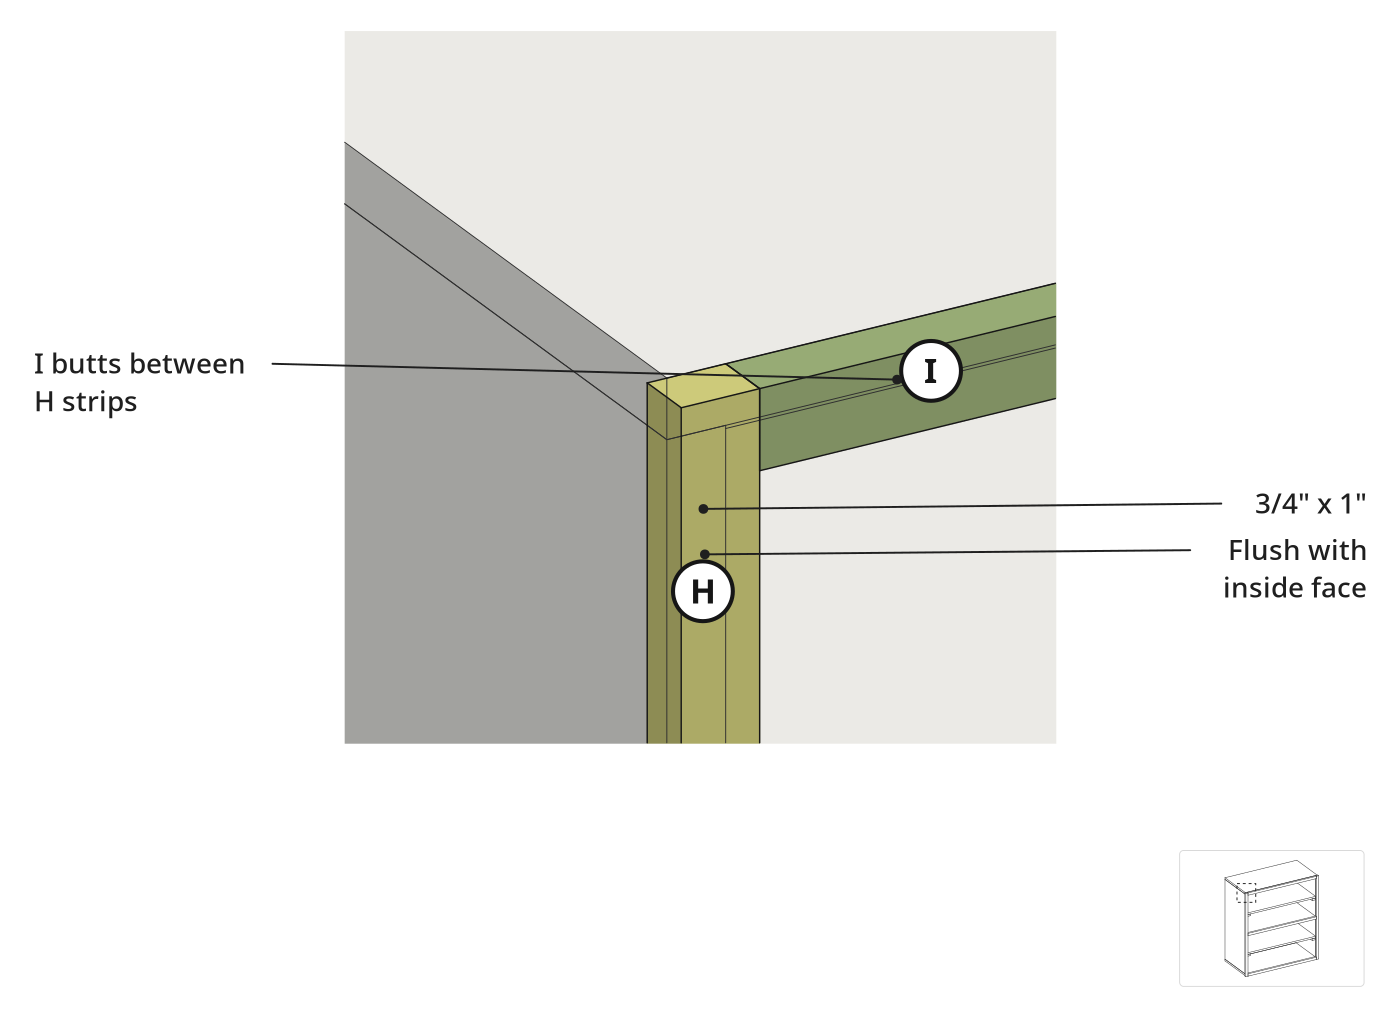
- Position the two vertical face-frame strips (H), 3/4 × 1 × 36 in, on the front edge of each side panel (A), flush with the inside face.
- Nail each strip in place with the brad nailer; no glue is needed for a garage-grade cabinet.
- Lay the cabinet on its back for easier nailing alignment.
- 4.2 Attach Horizontal Face Frame Pieces
- Hold each horizontal face-frame strip (I) between the verticals and scribe the length directly instead of measuring for a tight fit.
- Cut three horizontals (I) to length: top, bottom and aligned with the fixed middle shelf.
- Nail each horizontal strip in place with the brad nailer, checking for a snug fit at both ends.
- 4.3 Fill Nail Holes and Seams
- Apply wood filler (DAP Plastic Wood or similar) to every face frame brad-nail hole and exposed plywood edge gap.
- Spread a thin coat of wood filler over visible end-grain plywood edges, let dry, and sand smooth; this hides the layered grain under paint.
- Sand all filled areas smooth once dry.
- 4.4 Caulk Interior Joints
- Caulk every interior corner joint for a seamless, paintable surface.
- Smooth each caulk line with a wet finger or caulk tool immediately.
- Let the caulk dry fully before priming. Painting is not covered but follows standard practice; a roller works well for cabinet interiors and avoids spray-back in enclosed cubbies.
Key measurements
- Face-frame strips are 3/4 in thick × 1 in wide
- Vertical strips (H) run the full 36 in cabinet height.
- Horizontal strips (I) span ~31 in between the verticals (scribe to fit)
- Tip: Scribing horizontal strips is faster and more accurate than measuring; hold the piece and mark the cut line directly.
- Tip: If you don't have milled solid stock for the face frame, rip 1 in strips from plywood and clean the edges with wood filler before painting.
- Heads up: Wipe excess glue and filler before it dries; dried lumps are hard to sand flush and telegraph through paint.
Before you move on: Run your hand over every filled and sanded area; any bump or rough spot will show through paint.
Finishing
Sanding
- Sand the cabinet with 120-grit sandpaper, focusing on filled nail holes and plywood edges.
- Wipe surfaces with a tack cloth or damp rag to remove sanding dust before priming.
Priming & Painting
- Apply one coat of primer to all surfaces and let it dry.
- Roll paint instead of spraying; a small foam roller avoids spray-back inside cabinet cubbies and gives an even finish.
- Apply two coats of paint, sanding lightly with 220-grit between coats for a smooth result.
Cure & Installation
- Let the final coat cure fully before loading the cabinet with heavy items.
- Mount the cabinet to the wall using appropriate fasteners for your wall type; the build does not include doors, but hinged doors can be added later.
Alternatives
- For a quicker finish, skip the face frame and fill and sand exposed plywood edges; the cabinet remains functional and paintable.
- Plywood strips can substitute for milled solid stock on the face frame; clean edges with wood filler and sanding.
These Specs are built from Indy Farm Life's video “Simple Plywood Garage Cabinet”. Open the Simple Plywood Garage Cabinet project page.
