Spetz Specs No. 1220: step-by-step build guide
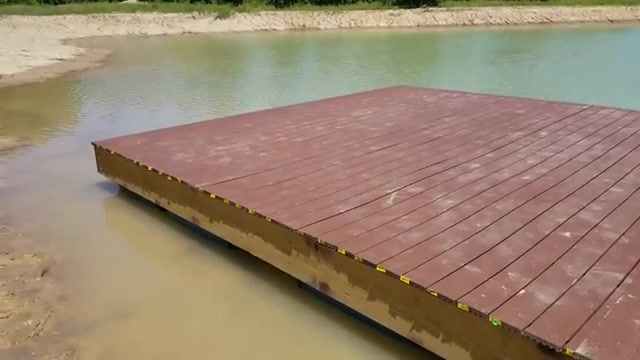
16x16 Floating Dock Using 55-Gallon Barrels
The complete step-by-step guide made from Indy Farm Life's YouTube video, free on Spetz. For the video, a step-by-step player and answers to your questions, see the 16x16 Floating Dock Using 55-Gallon Barrels project page.
6 steps, 8 parts, 10 tools, 16 materials
Overview
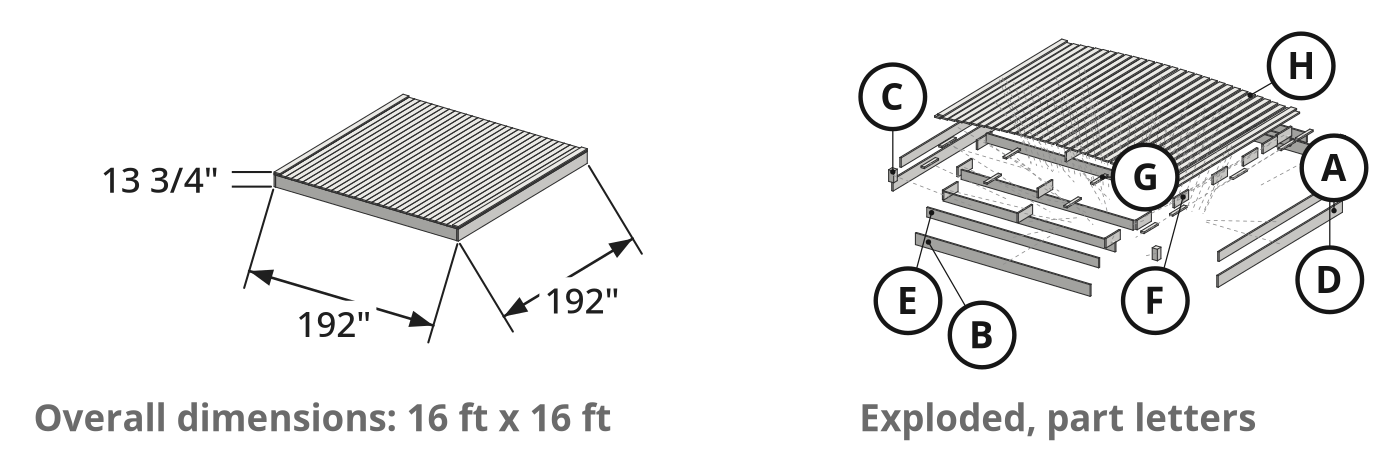
Finished size: 192 in x 192 in (16 ft x 16 ft)
What You're Building
- Frame a 16 ft by 16 ft floating pond dock with pressure-treated lumber.
- Support it on twenty 55-gallon plastic barrels (about 9,500 lb buoyancy).
- Top with grooved composite decking and hidden fasteners for a splinter-free surface.
Why This Design Works
- Use round plastic barrels so winter ice lifts the dock without crushing floats.
- Fasten composite deck boards with hidden clips for no screw holes or maintenance.
- Lock barrels in 22 in joist bays with 2x4 struts so floats stay captive.
What It Takes
- Have two helpers and two loader tractors lift the 2,000 lb frame.
- With wet treated lumber, the finished dock weighs nearly 4,000 lb.
- Build at the shoreline so tractors can push the frame into the water.
What Decides Success
- Space joists 22 in clear to pinch the 23 in barrels snugly.
- Seal barrel bungs in moderate temperatures so cooling air does not collapse the drums.
Health and safety
Tractor and Heavy Frame Handling
- Stage stable cinder blocks or scrap wood waterside to support and raise the heavy frame off the ground during assembly.
- Lift and launch the 2,000 lb dock frame using heavy chains and two loader tractors moving together at low speed.
- Stay completely clear of lifted edges and suspended loads while the tractors move the 2,000 lb frame into the water.
- Chock the trailer wheels securely before tying the 4,000 lb dock to the trailer to prevent unintended rolling.
Saws, Drills, and Tension Tools
- Support pressure-treated lumber and composite decking on both sides of the cut to prevent circular saw blade pinch and kickback.
- Hold the cordless drill firmly against high rotational torque when driving the 1/2 in by 5 in lag screws.
- Keep hands clear of the strike zone when swinging the sledgehammer or framing hammer to align timbers and drive 16-penny nails.
- Stand clear of the recoil path when squaring the frame with 27-foot ratchet straps and securing corners with bar clamps.
Treated Wood and Cutting Dust
- Wear protective equipment, including safety glasses, gloves, and a dust mask, when cutting and handling pressure-treated lumber and composite decking.
- Saw pressure-treated wood and composite boards outdoors so chemical-treated sawdust and fine plastic dust disperse away from your breathing zone.
- Wear heavy work gloves when fastening metal joist hangers and hidden deck fasteners to protect your hands from sharp edges.
- Wash your hands thoroughly after handling pressure-treated lumber, and never burn treated wood scraps, which release toxic smoke and ash.
Primers, Cements, and Sealers
- Wear protective equipment such as safety glasses and chemical-resistant gloves when applying PVC cleaner, purple PVC primer, PVC cement, and water sealer.
- Apply flammable PVC cleaner, primer, and cement outdoors away from sparks or open flames to prevent vapor ignition and dizziness.
Tools
- Tractor with loader (tractor with front-end loader, John Deere) (optional)
- Circular saw
- Cordless drill/driver
- Ratchet straps (27 foot) (optional)
- Tape measure
- Hammer (framing hammer)
- Bar clamps (bar clamp) (optional)
- Sledgehammer (optional)
- Paintbrush
- Caulk gun
Materials
- 55-gallon plastic drums (20, plastic drums, 55-gallon)
- Pressure-treated lumber (dimensional lumber, 2x12)
- Pressure-treated lumber (dimensional lumber, 2x10)
- Composite decking boards (composite decking, Trex)
- Pressure-treated post (6x6)
- Water sealer (1, Thompson's, 1 Gallon)
- Lag screws (1/2 in x 5 in)
- Joist hangers
- PVC Primer (1, purple PVC primer, Oatey, 8 oz)
- PVC Cement (1, Oatey, 8 oz)
- Silicone Caulk (DAP, 100% Silicone)
- Hidden Deck Fasteners (hidden clip fastener system)
- Pressure-treated lumber (2x4)
- PVC Cleaner (Oatey)
- 16 penny nails
- Shims
Hardware
| Hardware | Size | Count | Used in steps |
|---|---|---|---|
| 16 penny nails | 1 | ||
| 1/2 in x 5 in Lag screws | 1 | ||
| 2x10 Joist hangers | 16 | 2 | |
| Hidden Deck Fasteners | 6 |
Cut list
| Part | Name | Qty | Size | Notes |
|---|---|---|---|---|
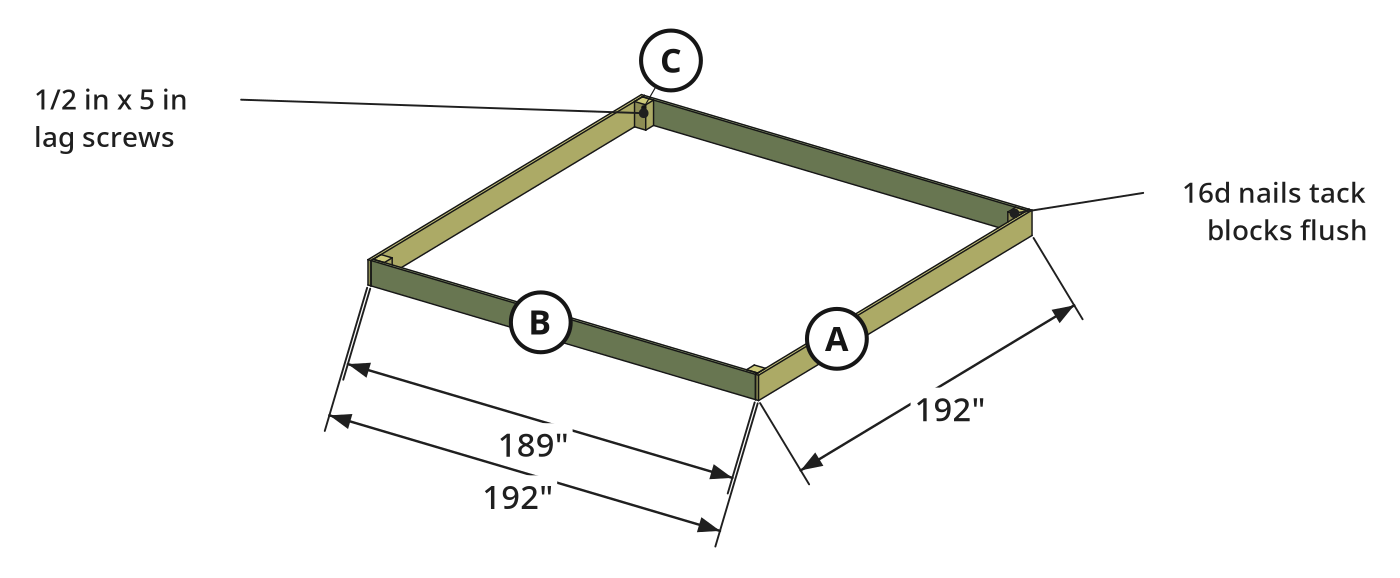
| A | Outer frame end cap | x2 | 1 1/2" (T) × 11 1/4" (W) × 192" (L) | Full 16 ft length; caps the ends of the two 189 in side skirt boards. Coat cut ends with water sealer. |
| B | Outer frame side skirt | x2 | 1 1/2" (T) × 11 1/4" (W) × 189" (L) | Cut 3 in shy of 16 ft (15 ft 9 in) to account for the 1-1/2 in thickness of the two 2x12 end caps. Coat cut ends with water sealer. |
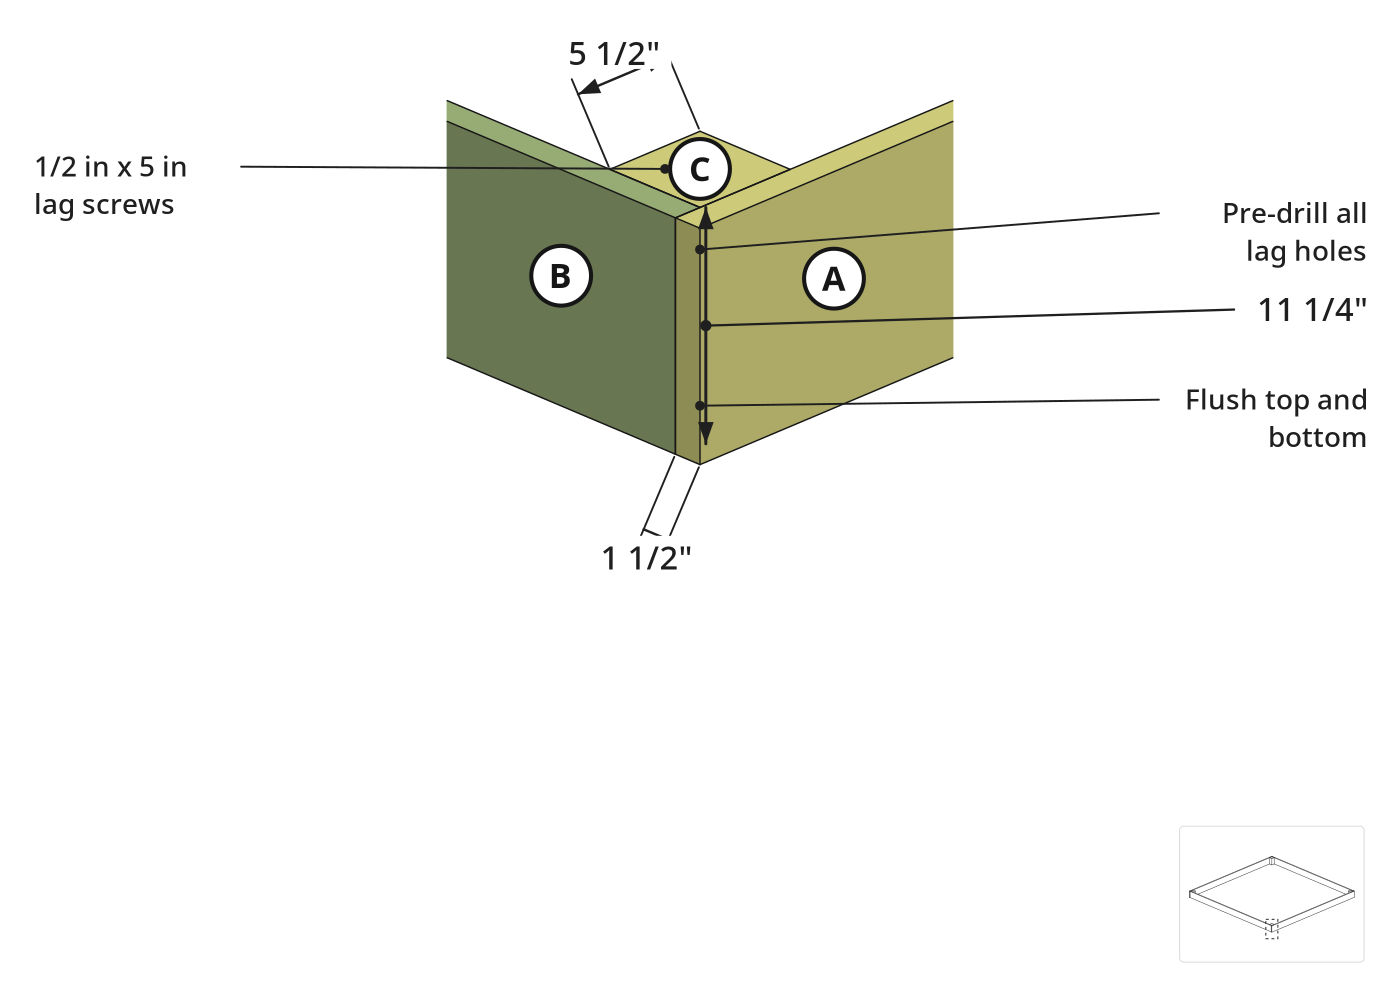
| C | Corner reinforcement block | x4 | 5 1/2" (T) × 5 1/2" (W) × 11 1/4" (H) | Cut from a 6x6 (5-1/2 in x 5-1/2 in actual) post and lag-bolted vertically flush inside the four corners of the 2x12 outer frame. Coat cut ends with water sealer. |
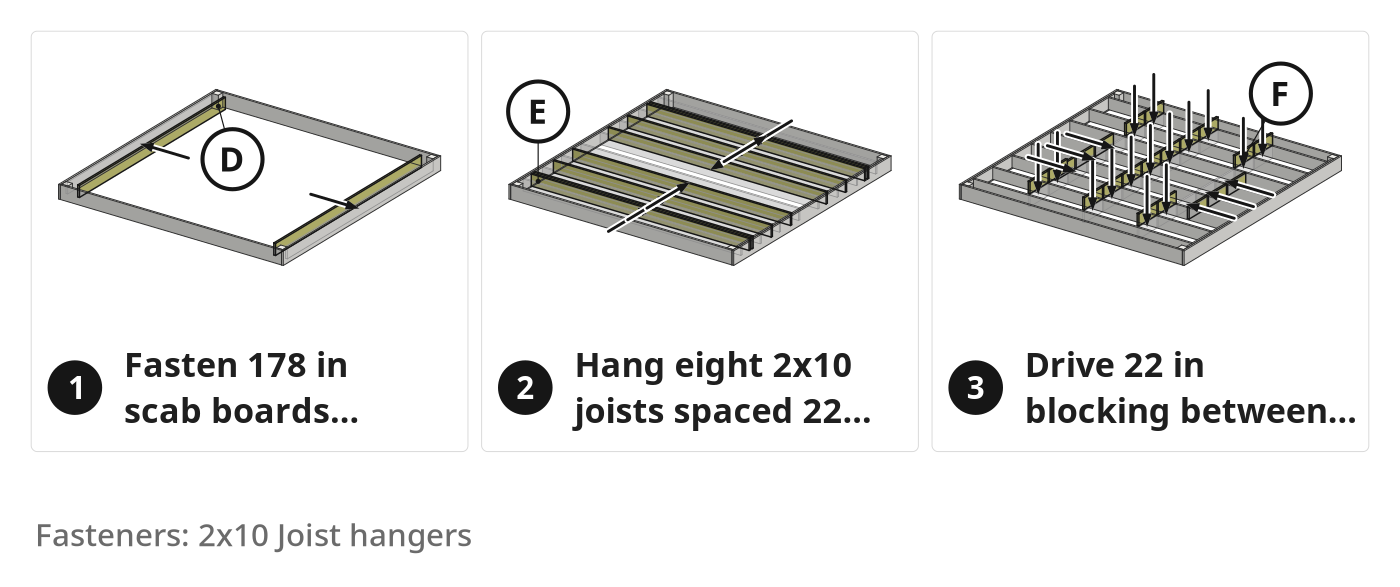
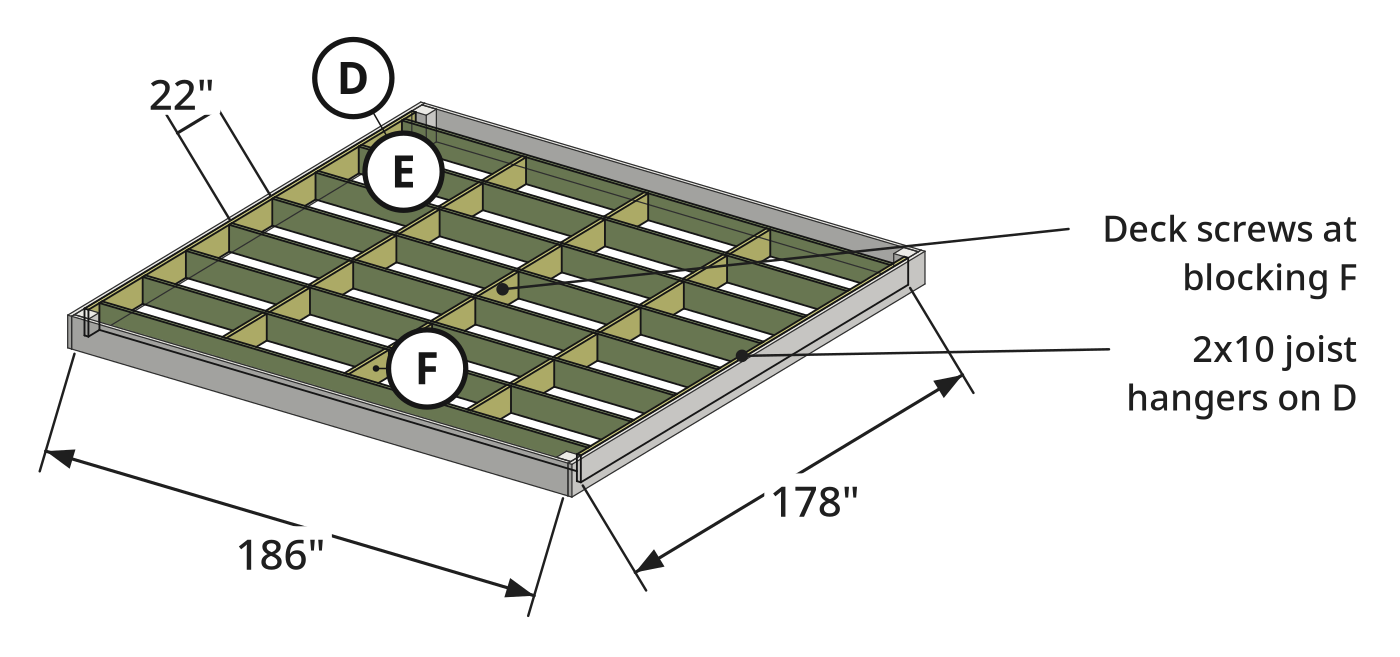
| D | Inner ledger scab board | x2 | 1 1/2" (T) × 9 1/4" (W) × 178" (L) | Scabbed inside the two 2x12 end caps between the 6x6 corner blocks so 3 in joist hanger nails do not poke through. Coat cut ends with water sealer. |
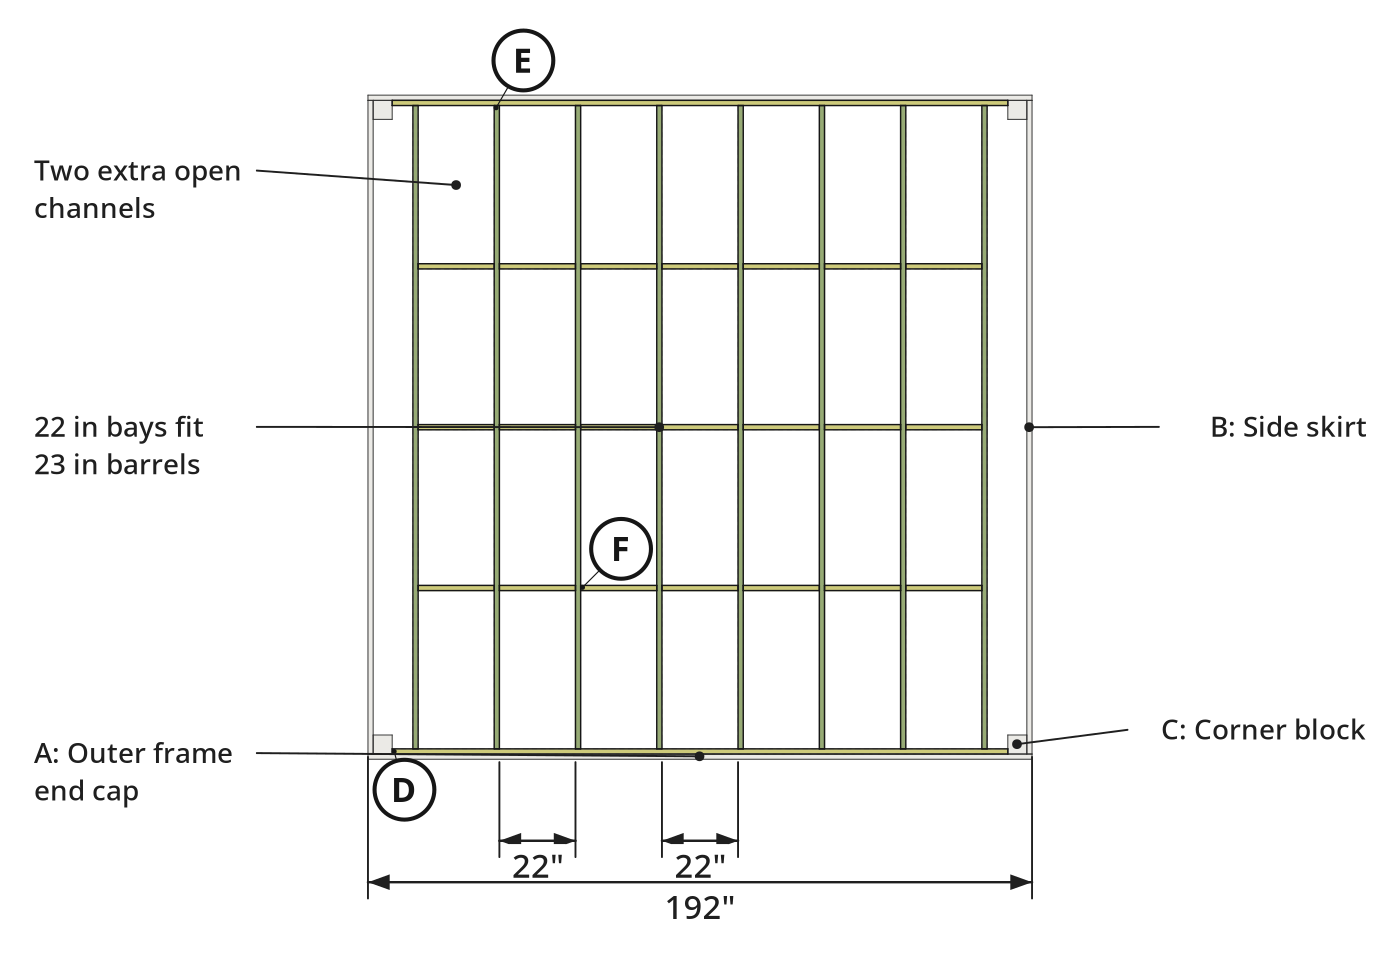
| E | Internal joist | x8 | 1 1/2" (T) × 9 1/4" (W) × 186" (L) | Installed with joist hangers parallel to the 189 in side skirts, spaced for 22 in clear openings between joists. Coat cut ends with water sealer. |
| F | Joist cross-blocking | x21 | 1 1/2" (T) × 9 1/4" (W) × 22" (L) | Installed perpendicular between the 2x10 joists to maintain the 22 in channel width for the 23 in diameter barrels. Coat cut ends with water sealer; exact quantity not stated. |
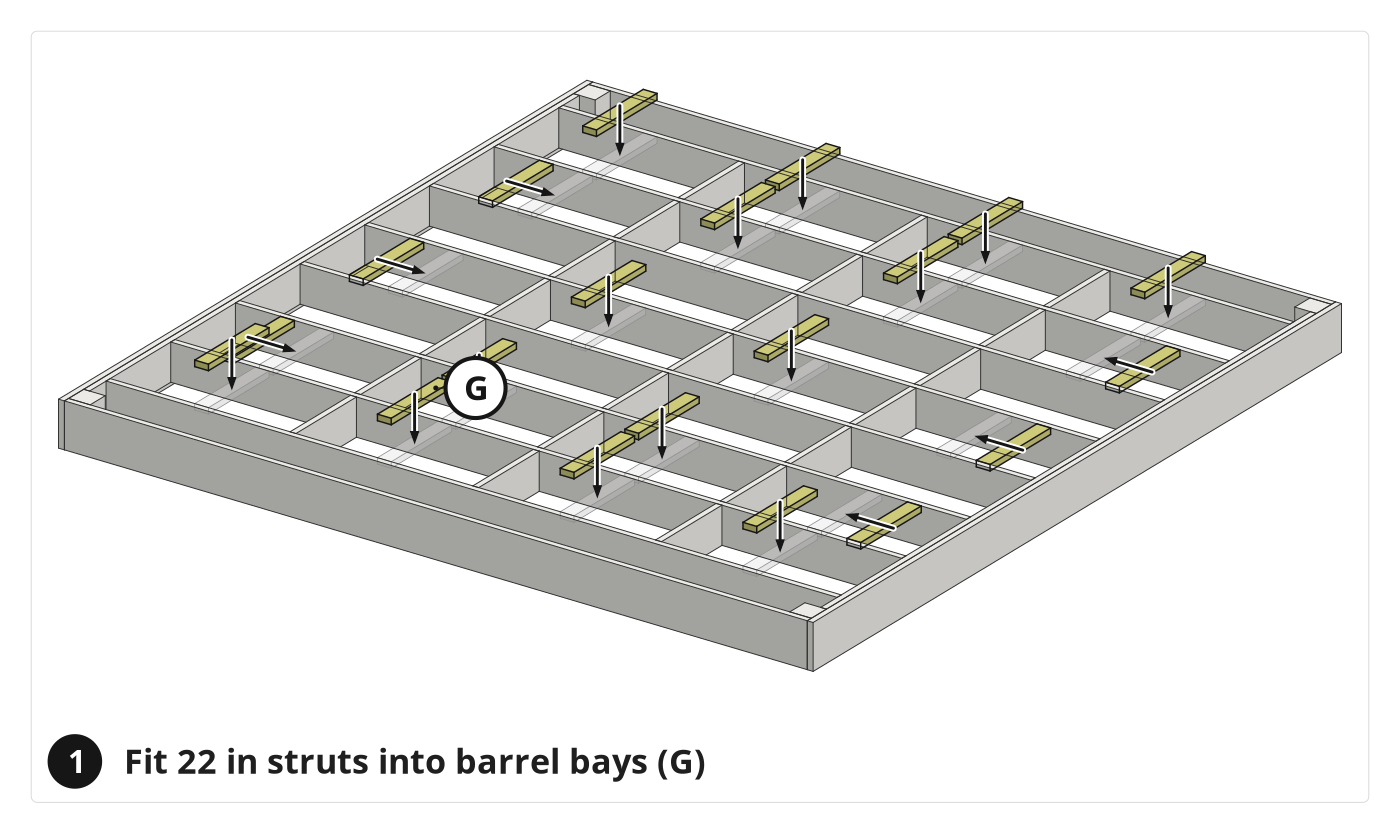
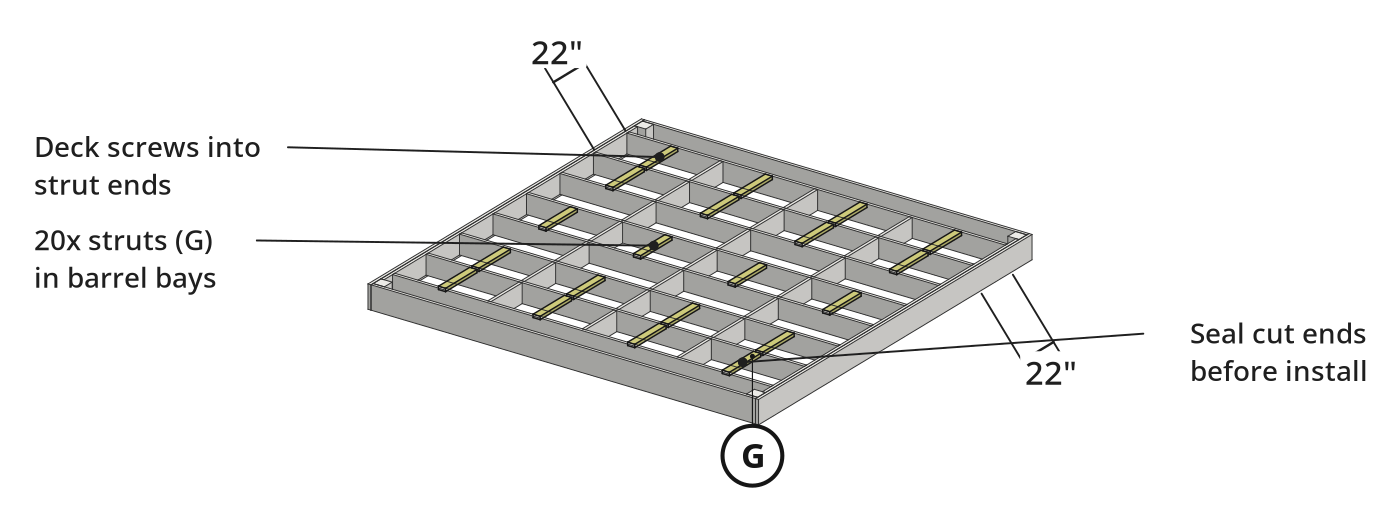
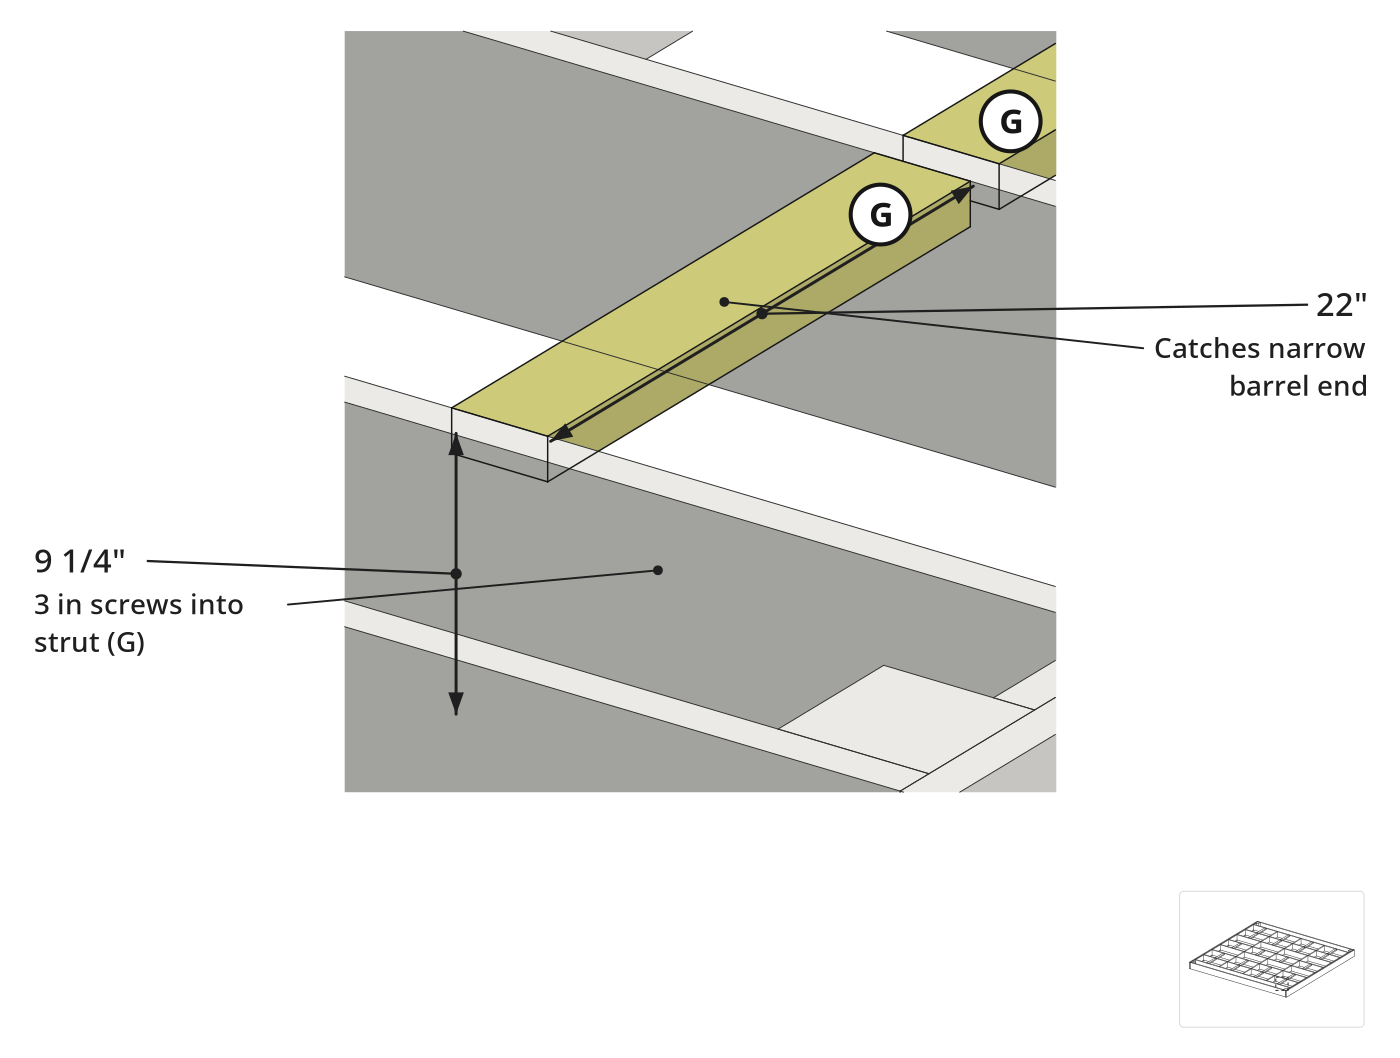
| G | Barrel support strut | x20 | 1 1/2" (T) × 3 1/2" (W) × 22" (L) | Installed between joists inside the barrel bays to catch the narrower non-ringed end of each barrel so it cannot slip through. Coat cut ends with water sealer. |
| H | Composite deck board | x34 | 1 1/4" (T) × 6" (W) × 192" (L) | Full 16 ft grooved composite boards laid perpendicular across the joists and attached with hidden starter clips and T-clips. |
What to buy
- Buy 13 × 2x10 16 ft (Pressure-treated lumber)
- Buy 4 × 2x12 16 ft (Pressure-treated lumber)
- Buy 4 × 2x4 10 ft (Pressure-treated lumber)
- Buy 34 × 6 x 1 1/4 stock 16 ft (Composite decking boards)
- Buy 1 × 6x6 8 ft (Pressure-treated post)

Before you start
Lumber & Barrels
- Check all twenty 55-gallon plastic drums for intact bung rubber gaskets.
- Use 27 ft ratchet straps to pull warped, wet framing boards tight.
- Use deck screws, not smooth nails, where wet pressure-treated lumber forces joints apart.
Layout & Labeling
- Check cut lengths against the cut list and label parts A through H.
- Check the composite decking span rating; 22 in gaps flex slightly underfoot.
Step by step
Step 1: Cut and Assemble the Outer Frame
Cut, seal and lag-bolt 2x12 perimeter boards and 6x6 corner blocks into a square 192 in x 192 in outer frame.
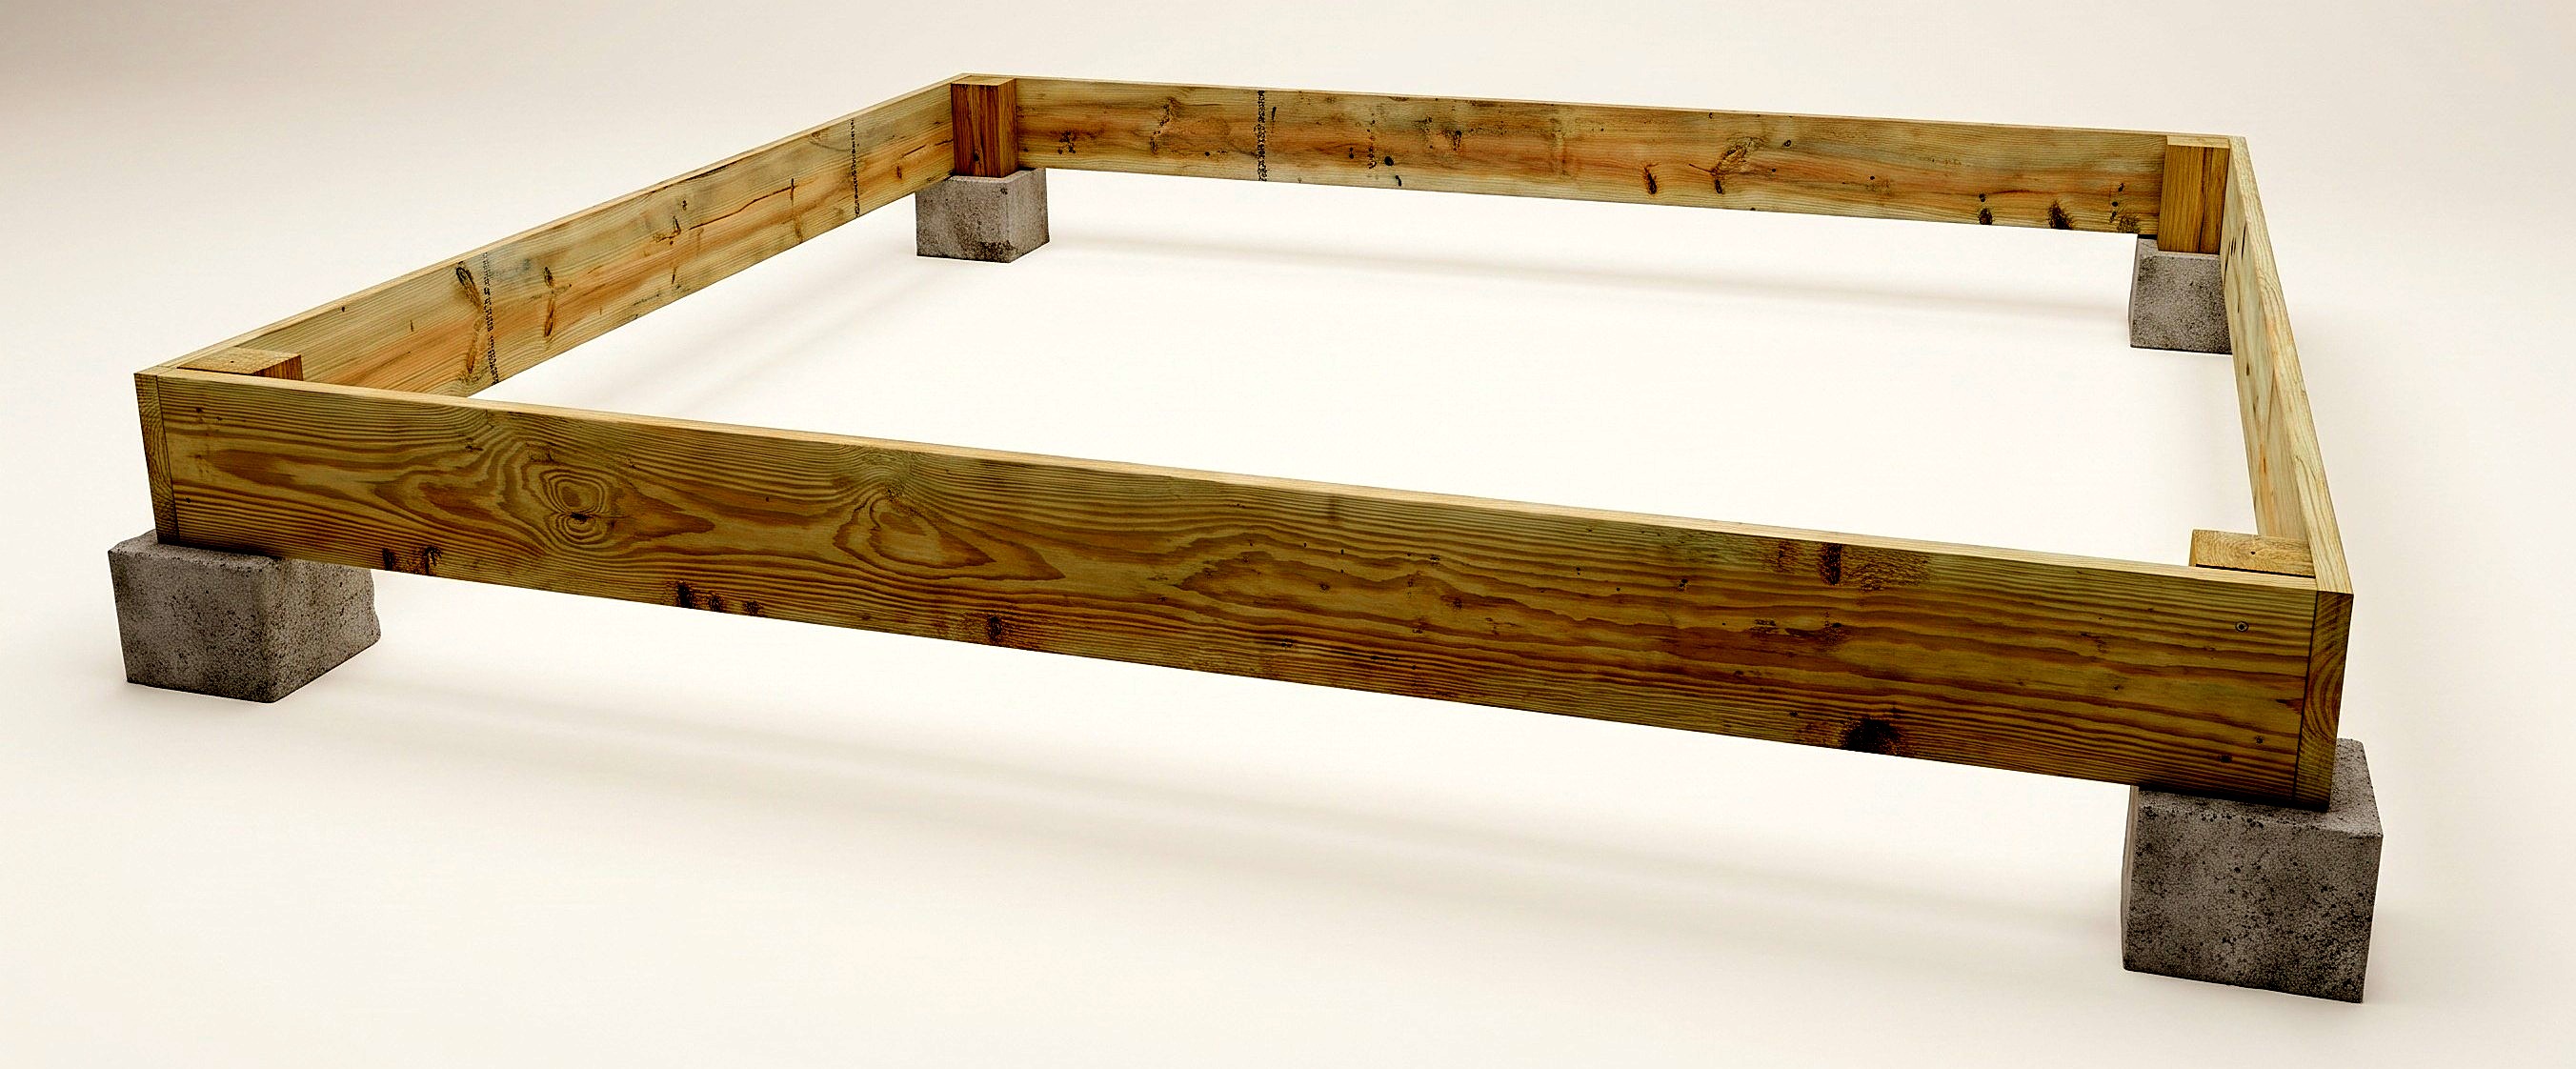
Parts in this step: (A) Outer frame end cap, (B) Outer frame side skirt, (C) Corner reinforcement block
You'll need: Tractor with loader, Circular saw, Cordless drill/driver, Tape measure, Hammer, Bar clamps, Paintbrush, Pressure-treated lumber, Pressure-treated post, Water sealer, 16 penny nails, Lag screws
- 1.1 Cut Frame Lumber and Corner Blocks
- Cut two 2x12 outer frame end caps (A) to 192 in.
- Cut two 2x12 outer frame side skirts (B) to 189 in.
- Cut four 6x6 corner reinforcement blocks (C) to 11-1/4 in (estimated).
- 1.2 Seal Cut Ends
- Pour water sealer into a wide-mouth jar fitting your paintbrush.
- Generously brush water sealer onto the cut ends of parts A, B and C.
- Coat every new pressure-treated cut immediately to stop water wicking and rot.
- 1.3 Assemble the Outer Frame
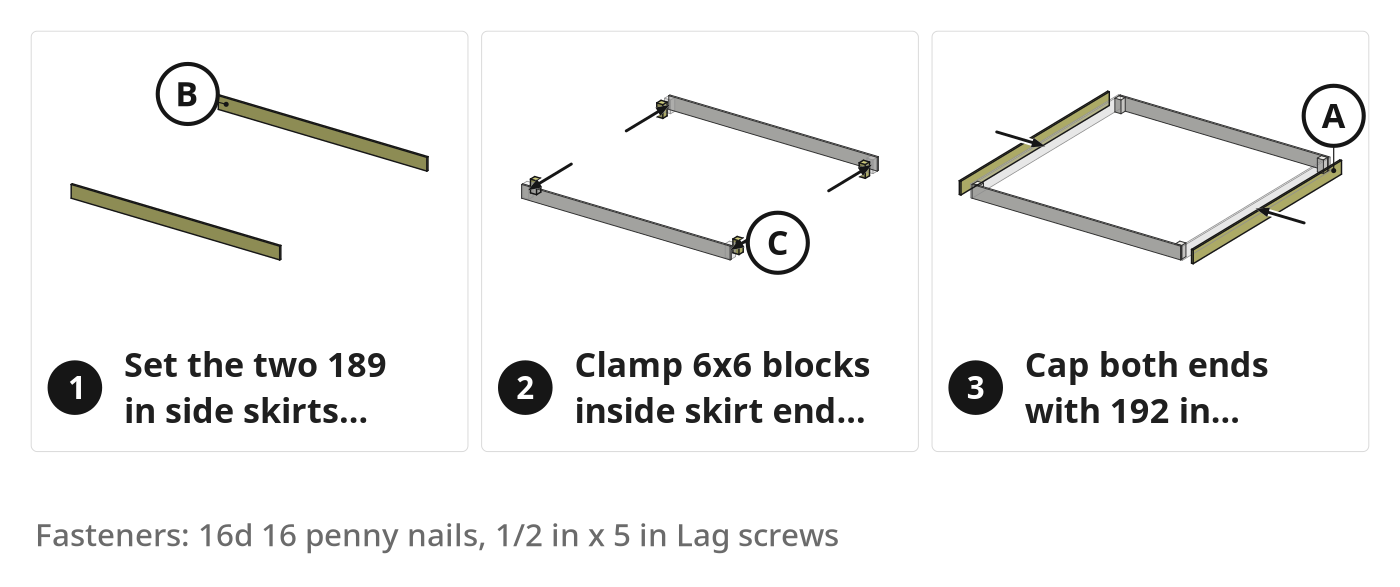
- Set the 189 in side skirts (B) on scrap blocks by the shoreline.
- Clamp a corner reinforcement block (C) flush inside each end of side skirts (B).
- Tack corner blocks (C) flush with 16 penny nails.
- Set the 192 in end caps (A) across the side skirt (B) ends.
- Pre-drill and drive 1/2 in x 5 in lag screws through the frame into blocks (C).
Key measurements
- Outer end caps (A) length: 192 in (16 ft).
- Outer side skirts (B) length: 189 in (3 in under 16 ft).
- Outer perimeter: 192 in x 192 in square.
- Tip: Cut heavy boards at waist height on tractor forks or a loader bucket.
- Tip: Build on scrap blocks near the water to shorten moving distance.
- Heads up: Never skip sealing cut ends; bare end grain absorbs water and rots fast.
Before you move on: Measure both corner-to-corner diagonals and adjust the frame until they match.
Step 2: Install Joists and Blocking
Scab end caps, hang 2x10 joists with 22 in barrel openings, and add 2x10 cross-blocking.
Parts in this step: (D) Inner ledger scab board, (E) Internal joist, (F) Joist cross-blocking
You'll need: Circular saw, Cordless drill/driver, Ratchet straps, Tape measure, Hammer, Sledgehammer, Paintbrush, Pressure-treated lumber, Water sealer, Joist hangers
- 2.1 Install Joists
- Cut two 178 in 2x10 inner ledger scab boards (D) and seal ends.
- Fasten scab boards (D) inside end caps (A) between corner blocks (C).
- Cut eight 2x10 internal joists (E) to fit (about 186 in) and seal ends.
- Mount joist hangers and set joists (E) parallel to skirts (B) with 22 in clear openings.
- Pull bowed runs tight to joists with 27 ft ratchet straps before fastening.
- 2.2 Install Cross-Blocking
- Cut 22 in 2x10 cross-blocking (F) (about 21 pieces) and seal ends.
- Sledgehammer the 22 in cross-blocking (F) between joists (E) to form bays.
- Screw the blocking so wet pressure-treated lumber cannot push joints apart.
- Leave two extra 22 in channels open for adding barrels later if needed.
Key measurements
- Joist (E) clear opening: 22 in to hold 23 in barrels snugly.
- Joist cross-blocking (F) length: 22 in
- Inner scab board (D) length: 178 in (between 6x6 corner blocks).
- Tip: Double outer ledgers with 2x10 scab boards (D) so 3 in hanger nails do not poke through.
- Tip: Test-fit a 23 in barrel in the first 22 in bay before hanging other joists.
- Heads up: 22 in joist openings exceed the 16 in span rating of most composite decking, causing slight flex.
Before you move on: Ratchet-strap the frame diagonally until both diagonals match.
Step 3: Prepare and Seal the Barrels
Clean, prime, cement, and caulk bungs on twenty 55-gallon plastic drums until watertight.
You'll need: Caulk gun, 55-gallon plastic drums, PVC Cleaner, PVC Primer, PVC Cement, Silicone Caulk
- 3.1 Seal Barrel Bungs
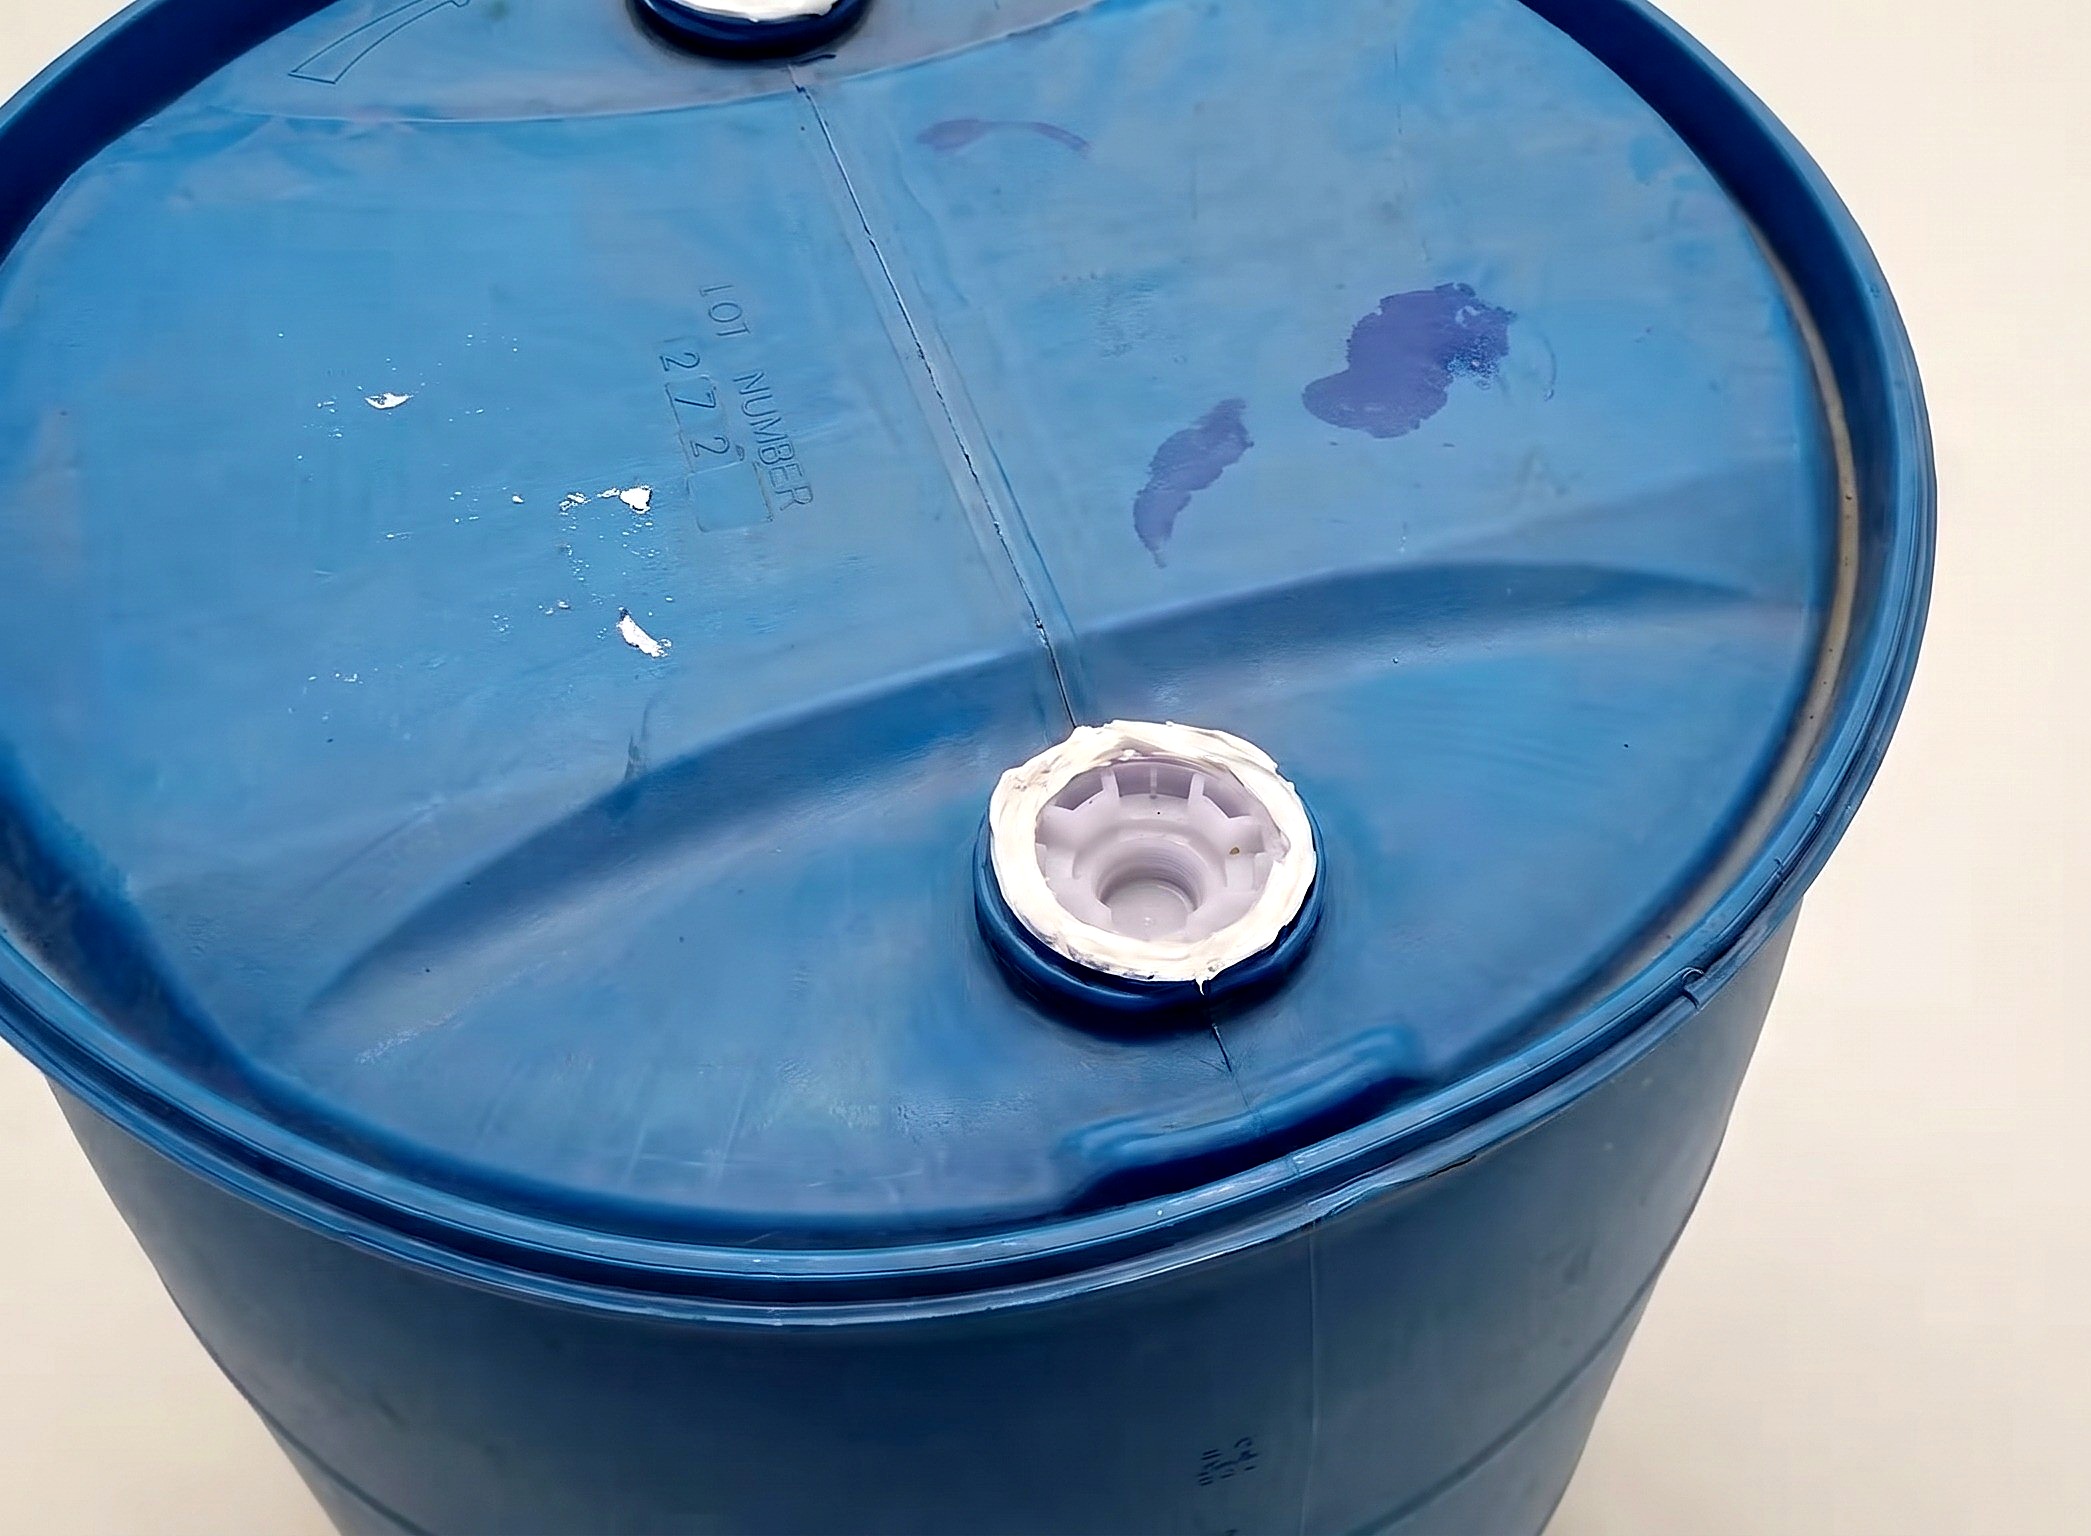
- Unscrew the bungs from all twenty 55-gallon plastic drums and check the rubber gaskets.
- Swab PVC cleaner and purple PVC primer on barrel and bung threads.
- Coat threads with PVC cement and screw every bung in tight.
- Run 100% silicone caulk around the top of every sealed bung.
Key measurements
- Sealed flotation barrels: 20 drums (55-gallon each).
- Tip: Use an assembly line to clean, prime, cement, and caulk twenty barrels in one session.
- Tip: Seal barrels in moderate or cool weather so cooling air inside does not cave sides in.
- Heads up: PVC cement does not weld polyethylene plastic; rely on tight threads, intact gaskets, and caulk.
Before you move on: Check all 40 bungs on the 20 barrels are tight and ringed with silicone.
Step 4: Install Barrel Supports
Add 2x4 barrel support struts inside bays so narrow barrel ends cannot slip through.
Parts in this step: (G) Barrel support strut
You'll need: Circular saw, Cordless drill/driver, Tape measure, Paintbrush, Pressure-treated lumber, Water sealer
- 4.1 Cut and Install 2x4 Barrel Supports
- Cut twenty 22 in barrel support struts (G) from 2x4 lumber.
- Brush water sealer on cut ends of each 2x4 strut (G).
- Fit a strut (G) between joists (E) at each barrel bay end.
- Screw struts (G) into joists where non-ringed barrel ends rest.
Key measurements
- Barrel support strut (G) length: 22 in
- Tip: Set the 2x4 strut under the smooth, non-ringed barrel end; it narrows when temperatures drop.
- Heads up: Barrels sealed on a hot day contract when cool and can pop through unbraced 22 in bays.
Before you move on: Check all twenty bays have a screwed 2x4 strut at the non-ringed barrel end.
Step 5: Launch the Dock Frame
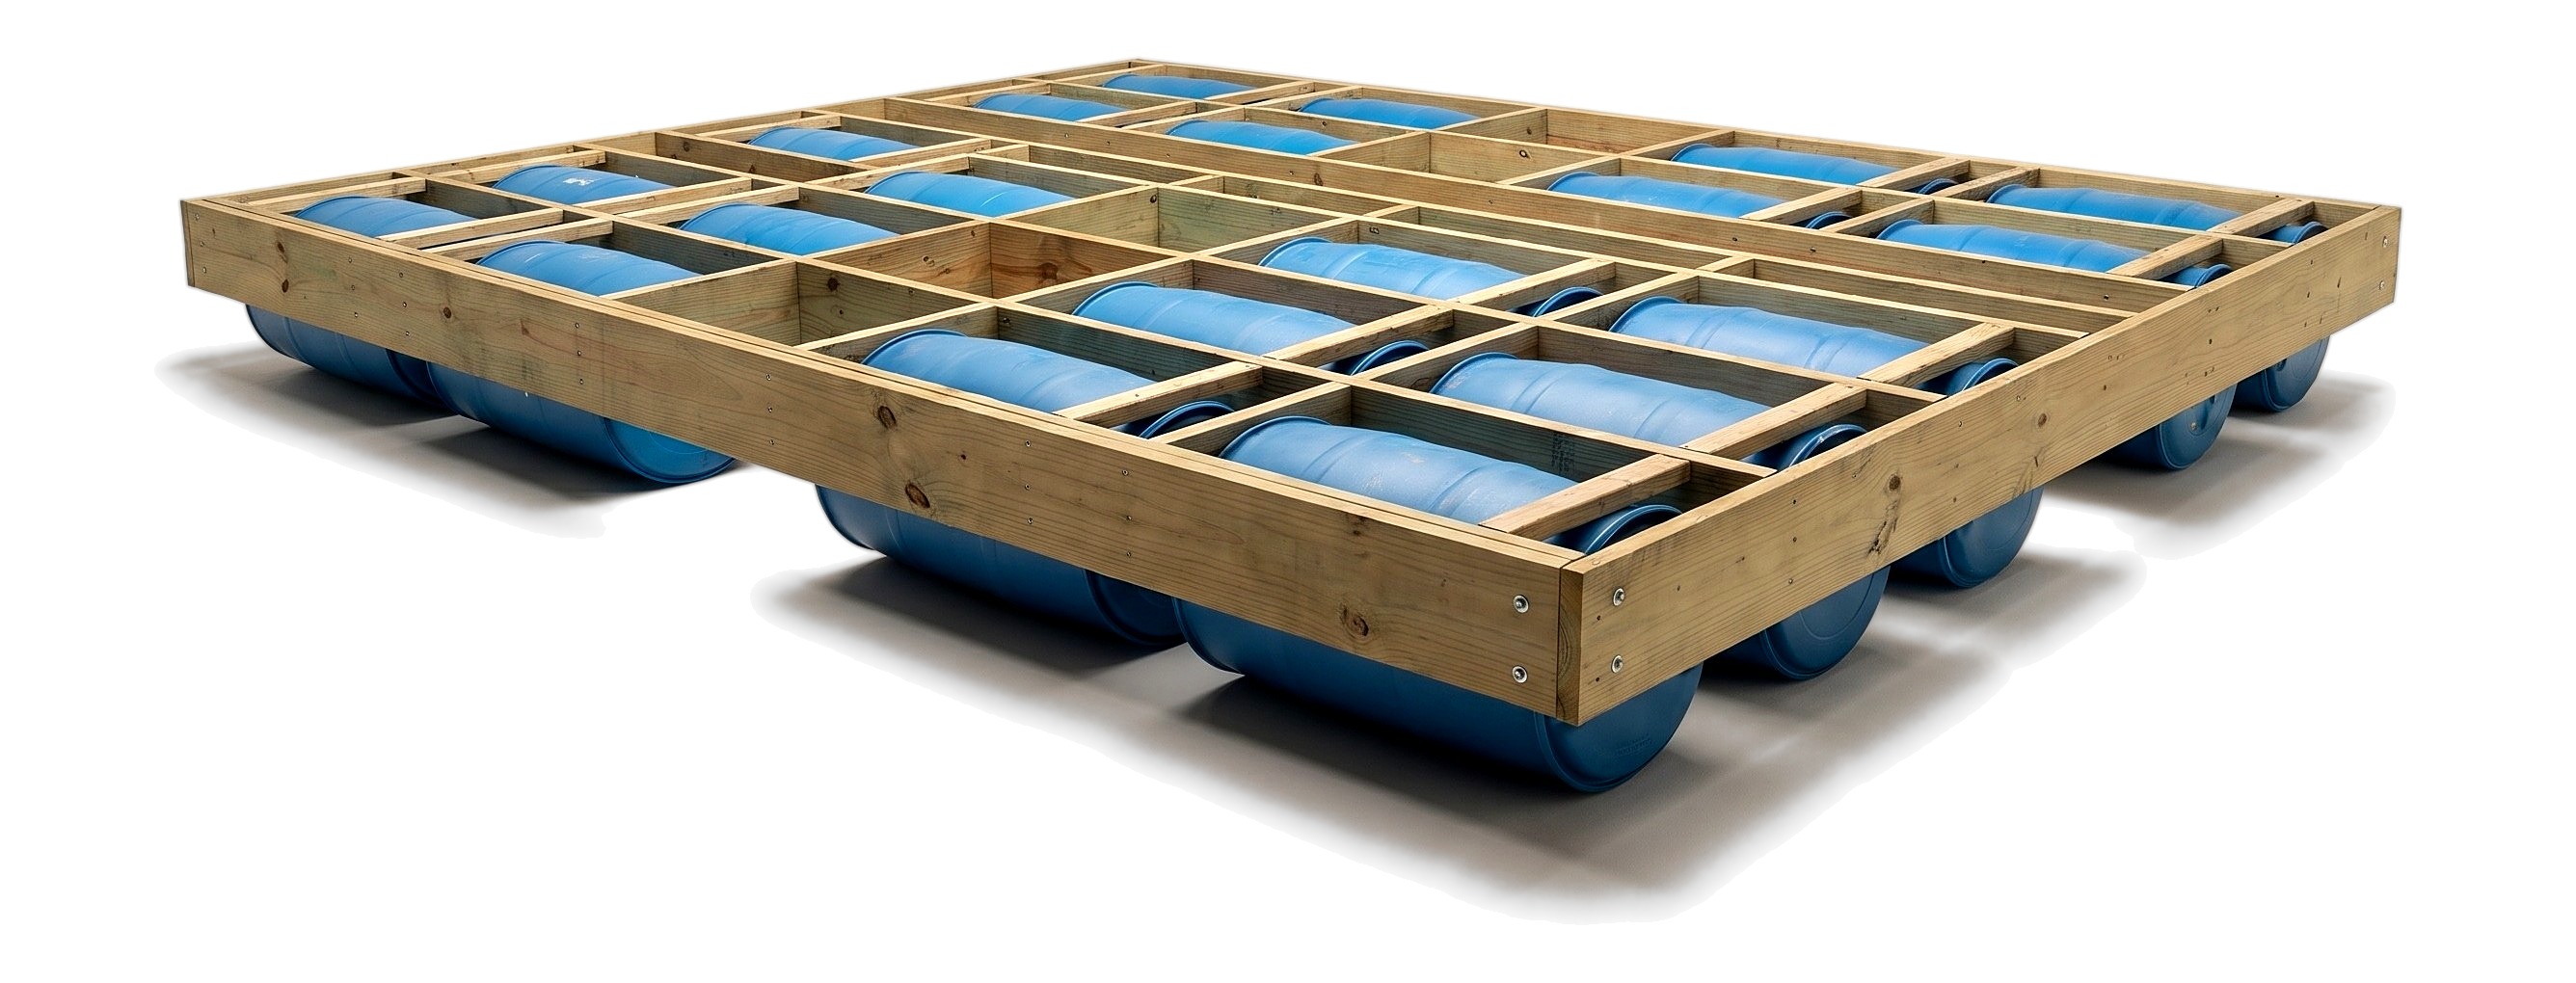
Lift the frame with two loader tractors, tuck twenty barrels into bays, and launch into the pond.
You'll need: Tractor with loader, 55-gallon plastic drums
- 5.1 Position Barrels and Lift Frame
- Roll the twenty sealed 55-gallon drums to the shoreline launch area.
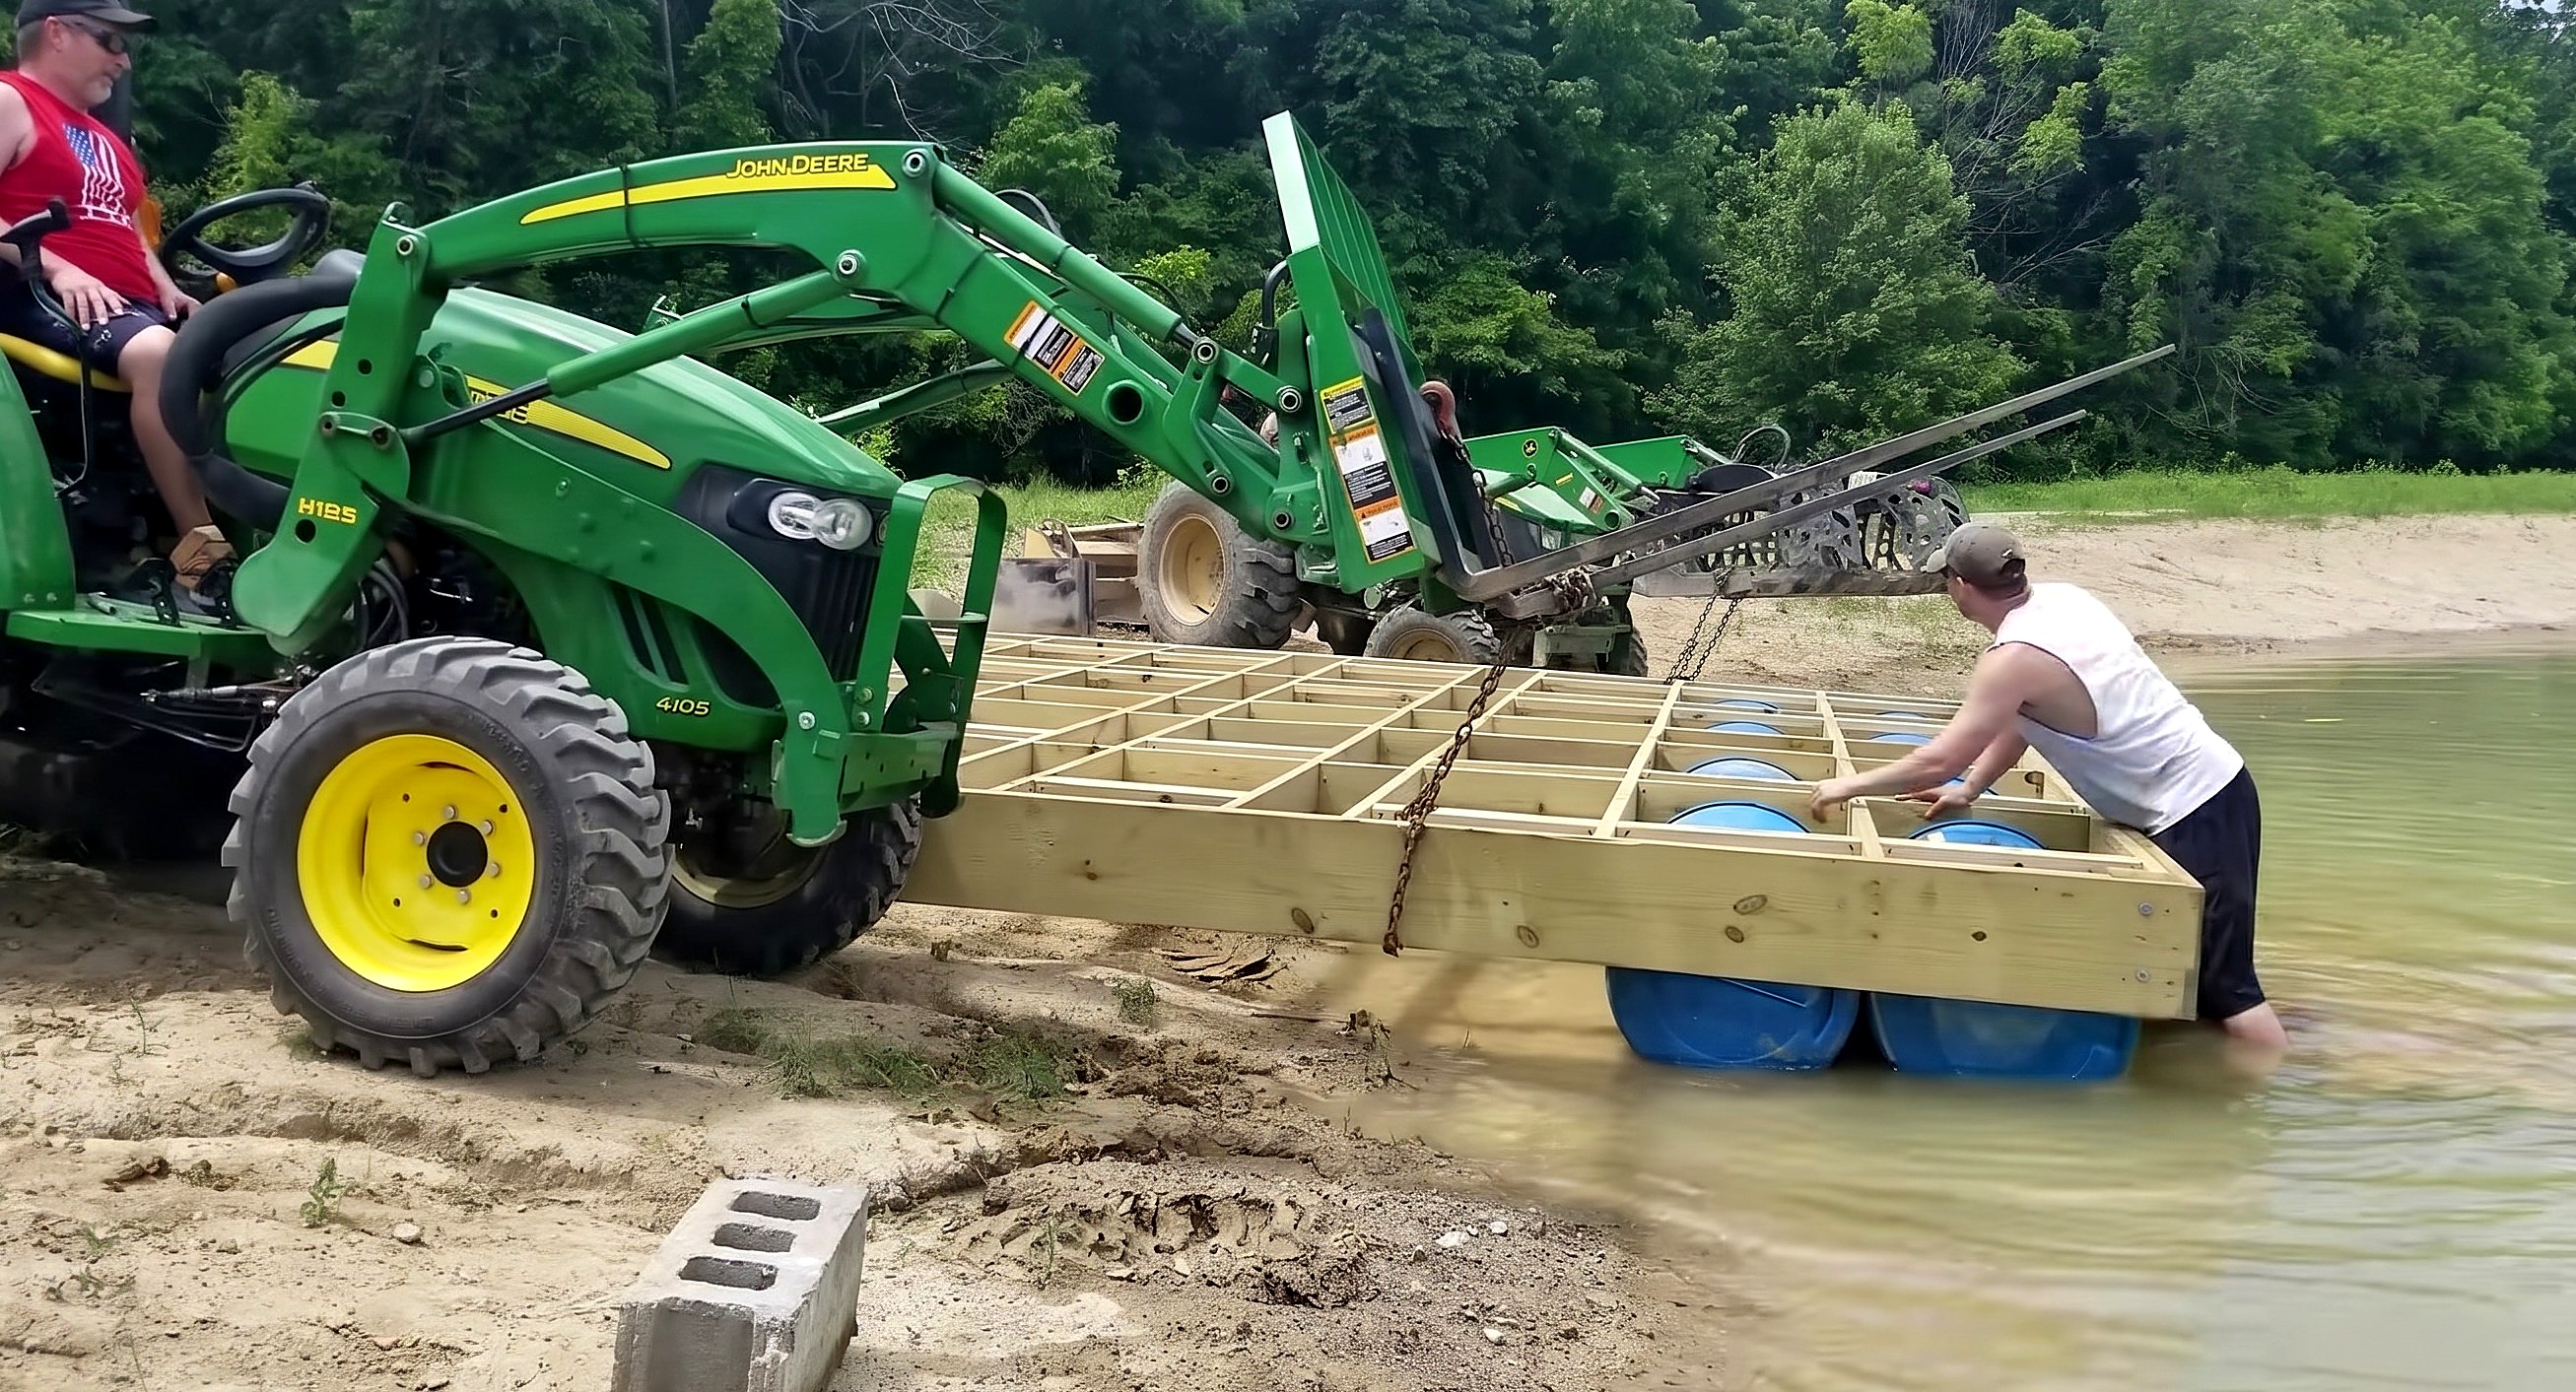
- Rig chains to opposite frame sides using two tractor loaders.
- Lift the frame and advance both tractors until the front edge overhangs water.
- 5.2 Insert Barrels and Launch
- Slide barrels under the front rows, bungs inward away from sunlight.
- Rest each narrower non-ringed barrel end against its 2x4 barrel support strut (G).
- Place one barrel in each braced bay until all twenty are in.
- Push the frame into water while stuffing barrels into trailing bays.
- Tie the floating frame to the bank before decking.
Key measurements
- Barrel layout: 20 barrels across bays, about 9,500 lb buoyancy
- Bare frame weight: about 2,000 lb before decking
- Tip: Wear water shoes in pond sediment when placing barrels underneath.
- Tip: Load front bays first so water carries the front weight while loading the rear.
- Heads up: Stay clear of lifted edges while tractors move the 2,000 lb frame.
Before you move on: Check all 20 barrels sit in their 22 in bays and float the frame level.
Step 6: Install Composite Decking
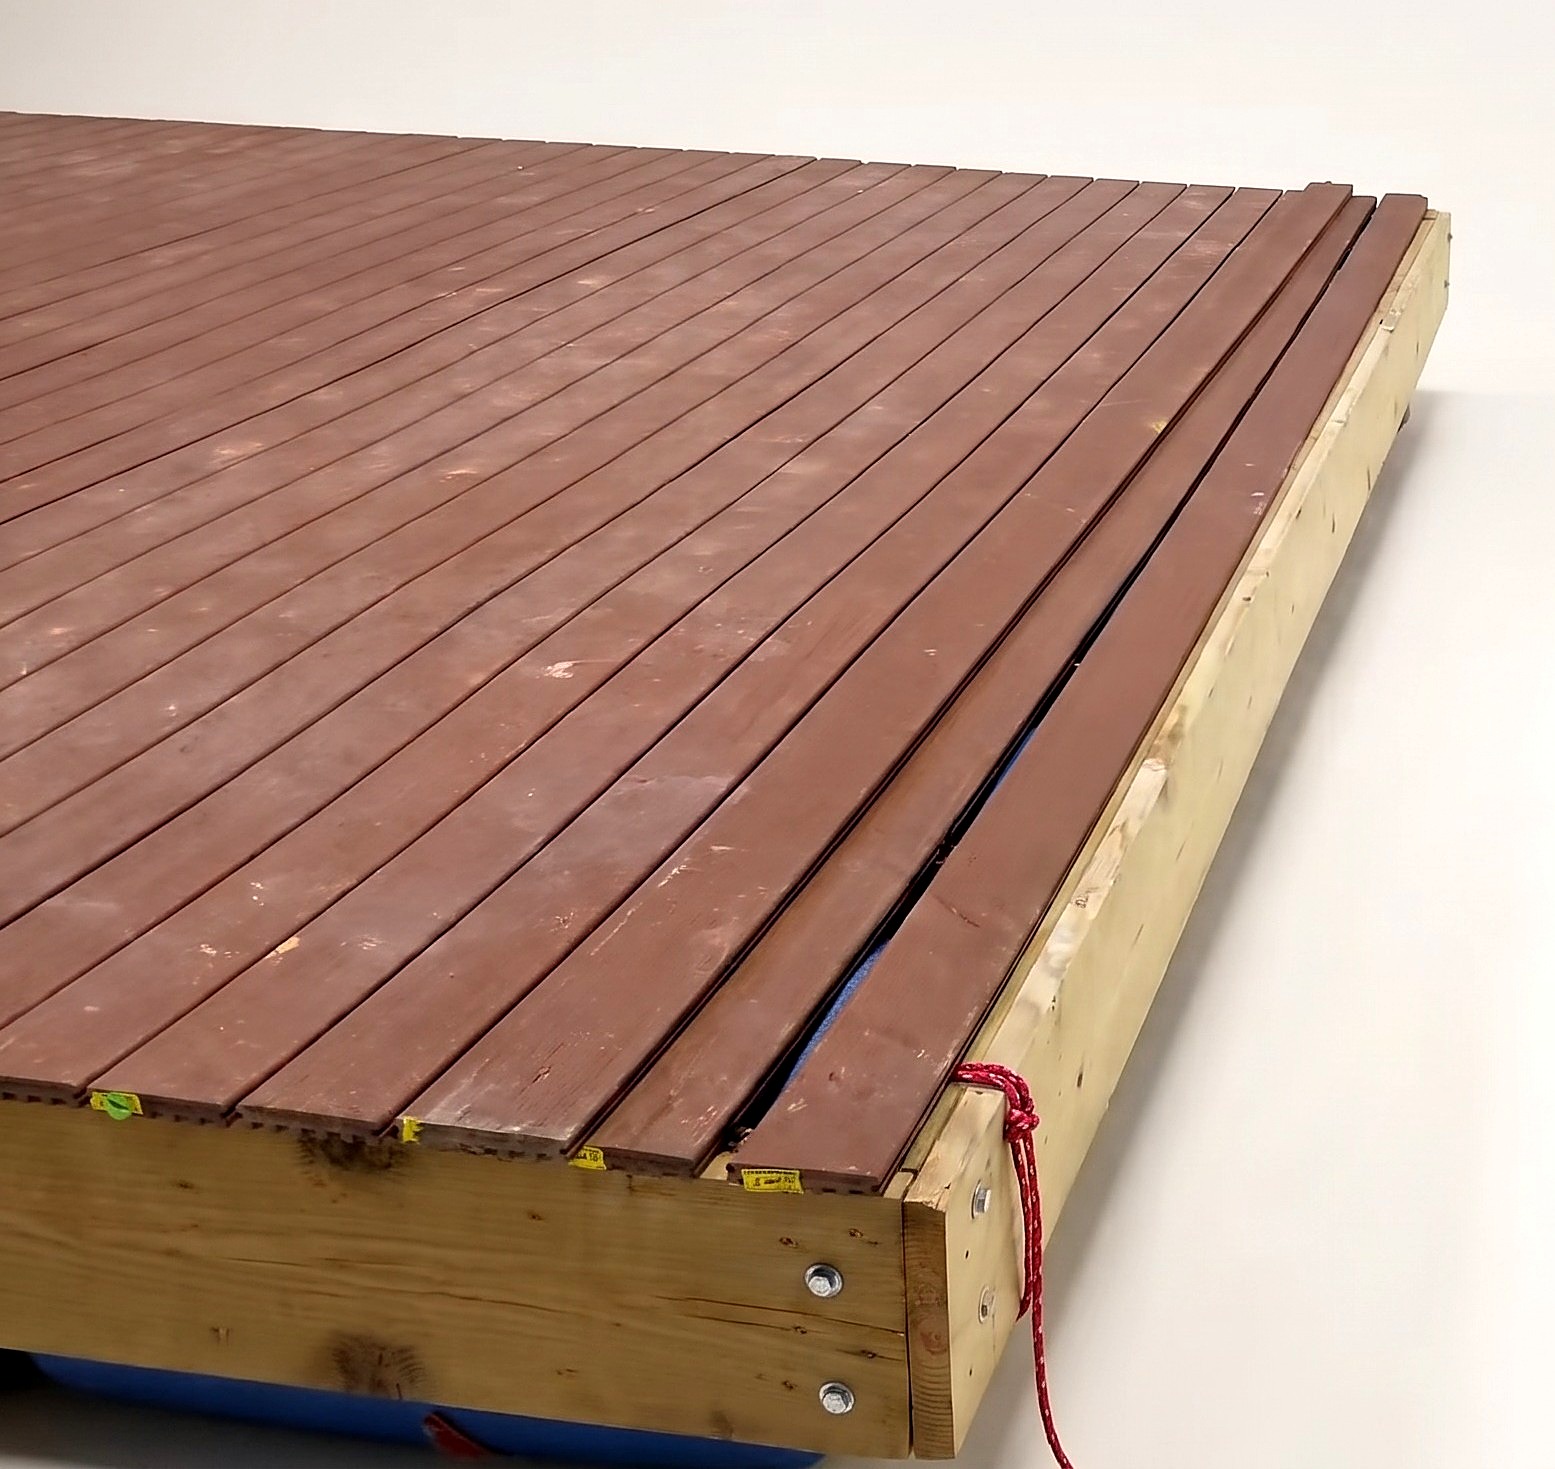
Moor to a shore platform; fasten 16 ft composite deck boards across joists with hidden clips.
Parts in this step: (H) Composite deck board
You'll need: Cordless drill/driver, Composite decking boards, Hidden Deck Fasteners, Shims
- 6.1 Create a Work Platform
- Back the decking trailer to the shore and chock the tires.
- Tie the dock frame tight to the trailer to prevent drifting.
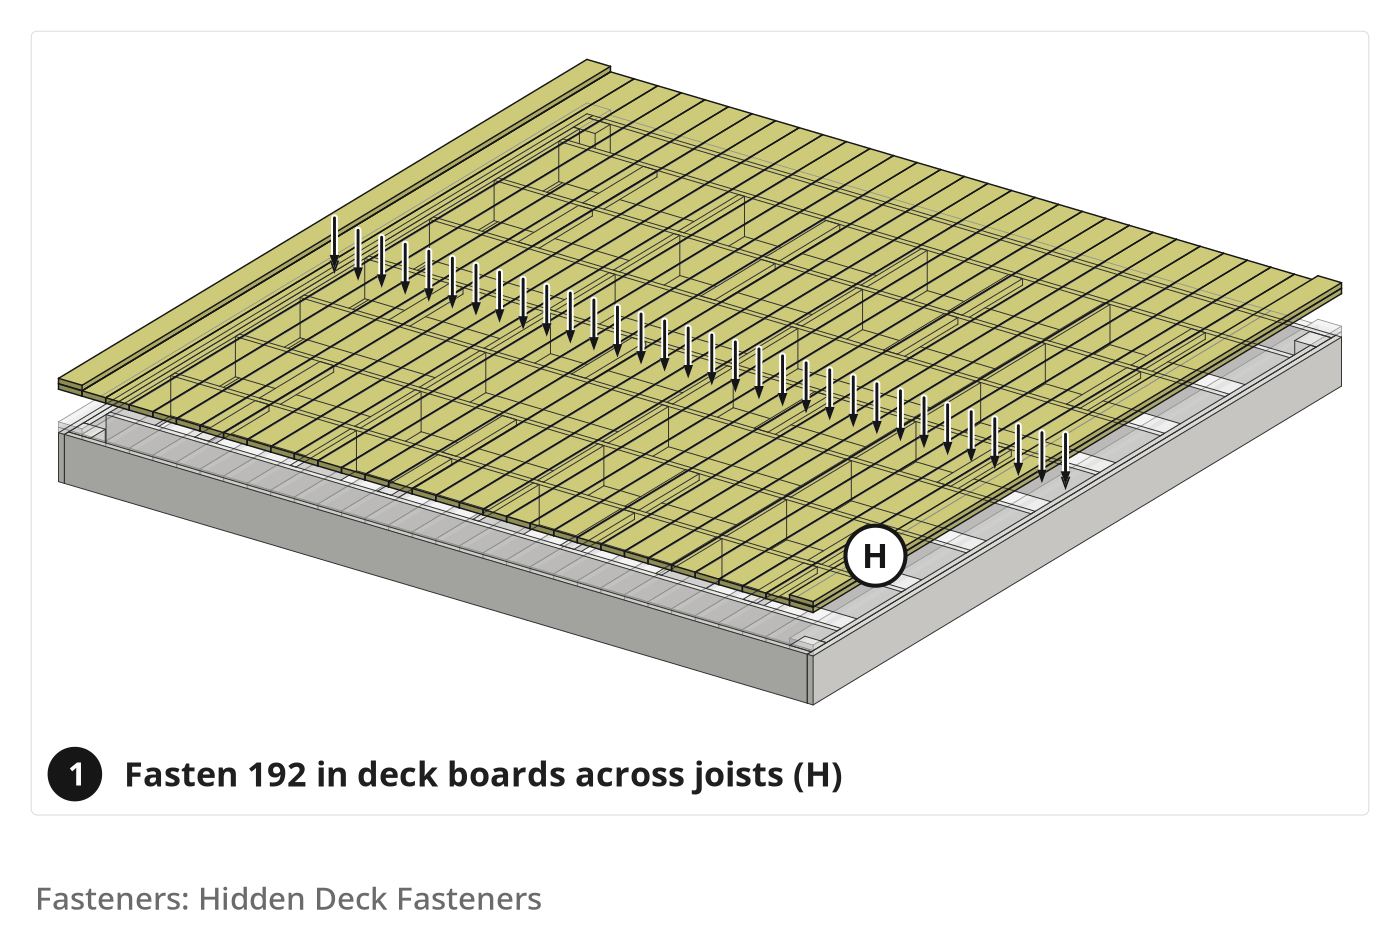
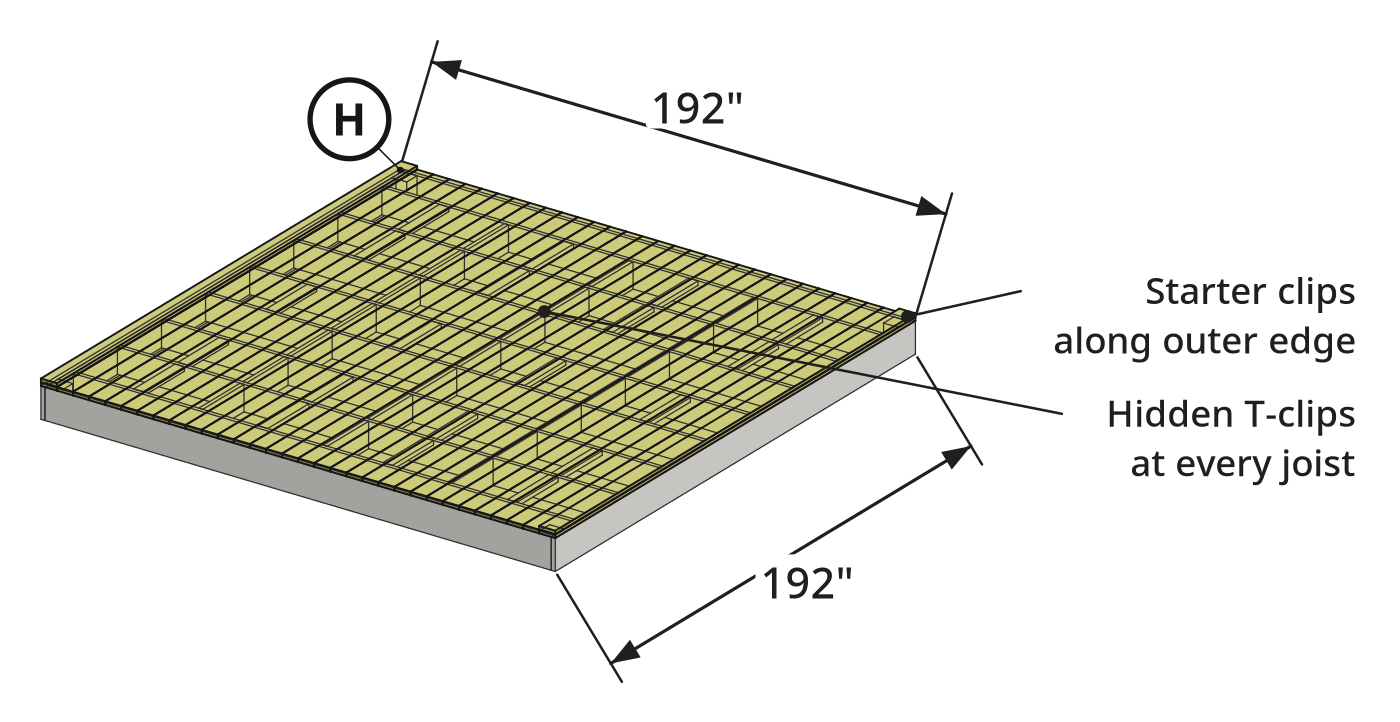
- Lay the 192 in composite deck boards (H) (about 34) across joists as a floor.
- 6.2 Install the First Deck Board
- Align starter clips along the far outer edge over every joist.
- Anchor starter clips to the frame with the provided clip screws.
- Slide the first composite deck board (H) groove into the starter clips.
- 6.3 Install Subsequent Deck Boards
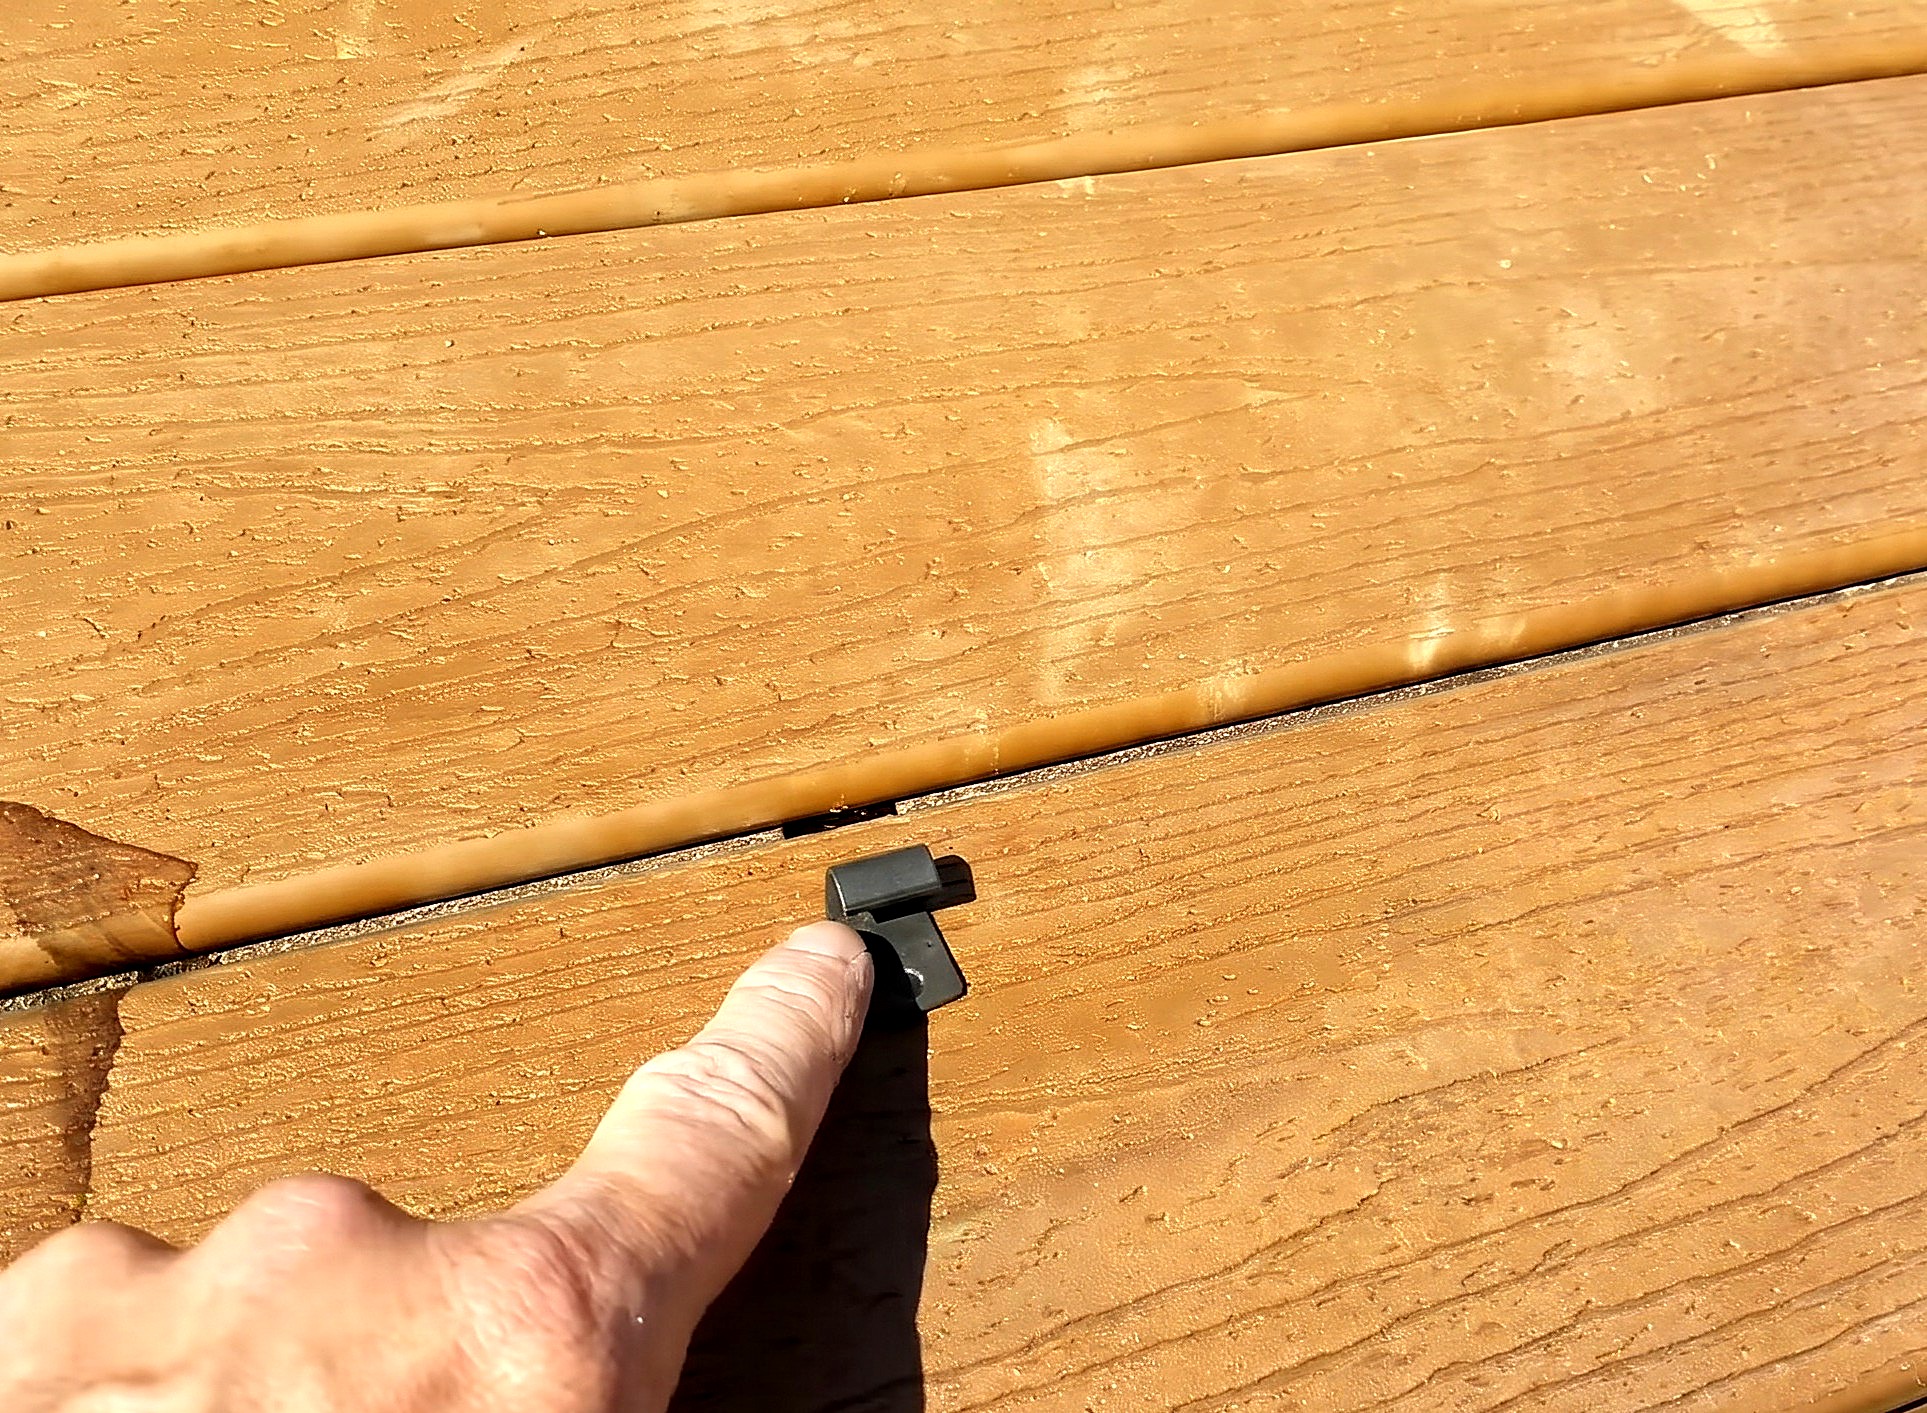
- Set hidden T-clip fasteners into the first board's open groove at each joist.
- Drive clip screws halfway to float, slide in the next board (H), and tighten the prior row.
- Slip shims between low joists and deck boards (H) to keep the walking surface level.
- Repeat until all composite deck boards (H) are locked down.
Key measurements
- Composite deck board (H) length: 192 in (16 ft, perpendicular to joists)
- Completed dock weight: about 4,000 lb with wet pressure-treated framing
- Tip: Spread deck boards across joists first for a solid floor that keeps tools out of water.
- Tip: Kneel on a folded towel; dark composite boards reach 128 to 137 degrees F in the sun.
- Heads up: Chock trailer wheels before tying the 4,000 lb dock to the trailer.
Before you move on: Walk the deck; check every hidden T-clip screw is tight and no high corner blocks lift boards.
Finishing
Trim & Leveling
- Shave proud 6x6 corner blocks (C) flush with joists before fastening the last boards.
- Scab an extra board onto the final outer edge if needed to support the last deck board without ripping.
Sealing & Care
- Brush water sealer on pressure-treated wood exposed by trimming high corner blocks.
- Have a towel or footwear on sunny days; dark composite decking gets hot.
Alternatives
- Choose light gray composite decking over dark brown for less heat in direct sun.
- Use standard pressure-treated deck boards to cut cost and flex on 22 in spans.
These Specs are built from Indy Farm Life's video “16x16 Floating Dock Using 55-Gallon Barrels”. Open the 16x16 Floating Dock Using 55-Gallon Barrels project page.
