Spetz Specs No. 6976: step-by-step surface & covering guide
Garden Feature Wall with Slate and Patterned Tiles
The complete step-by-step guide made from Tidybricks patio restore's YouTube video, free on Spetz. For the video, a step-by-step player and answers to your questions, see the Garden Feature Wall with Slate and Patterned Tiles project page.
9 steps, 6 tools, 7 materials
Overview
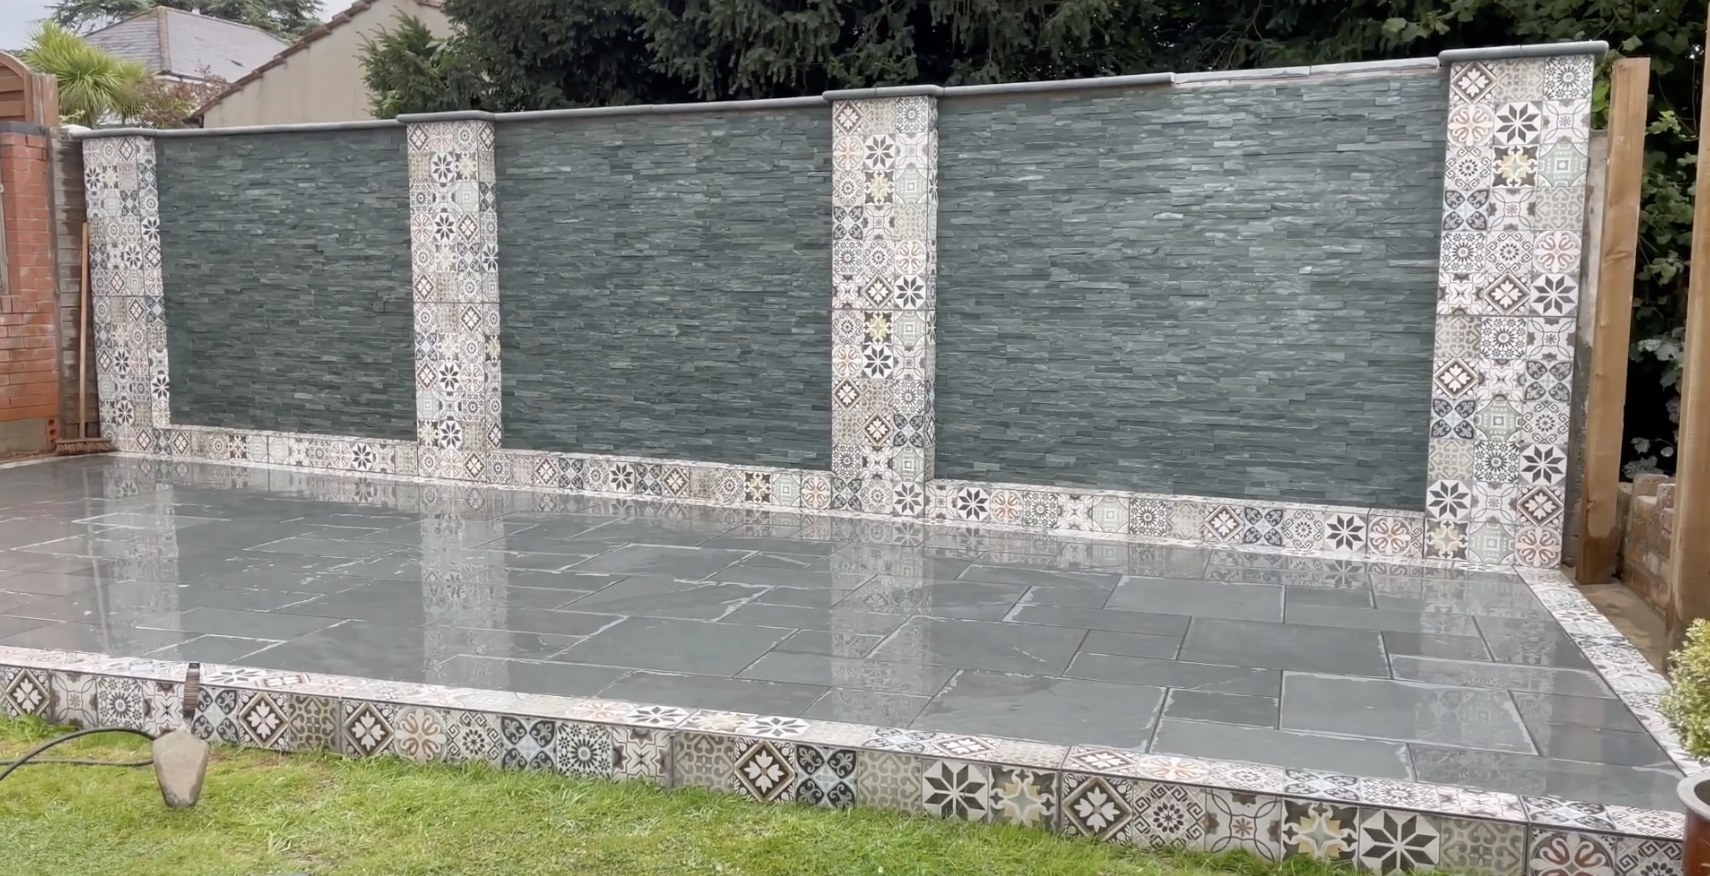
Finished size: Three panels of a garden feature wall, plus pillars
The Surface & Covering
- A block-built garden feature wall is clad with thin slate veneer tiles (Slate Verter, Slate Vera color) on three panels, patterned ceramic tiles on the pillars, and coping stones on top.
- The finished wall blends with an existing Casarta slate patio for a cohesive outdoor look.
Why Do It Yourself
- Tiling uses a caulk-gun adhesive instead of troweled thinset, so no mixing or notched-trowel skill is needed.
- The main challenge is cutting slate cleanly with an angle grinder and keeping joints randomly staggered.
What It Takes
- Angle grinder for slate, caulk gun, wet tile saw for the drip groove, and basic measuring and marking tools.
- At least two days: tiles one day, coping stones the next.
What Decides Success
- A true, flat wall surface; dub out wobbly areas before tiling.
- Prime both the wall and every tile back before applying adhesive.
Layout at a glance
- Covering: Slate Verter tile
- Laid on: block wall with rendered/dubbed-out sections
- Pattern: random stagger
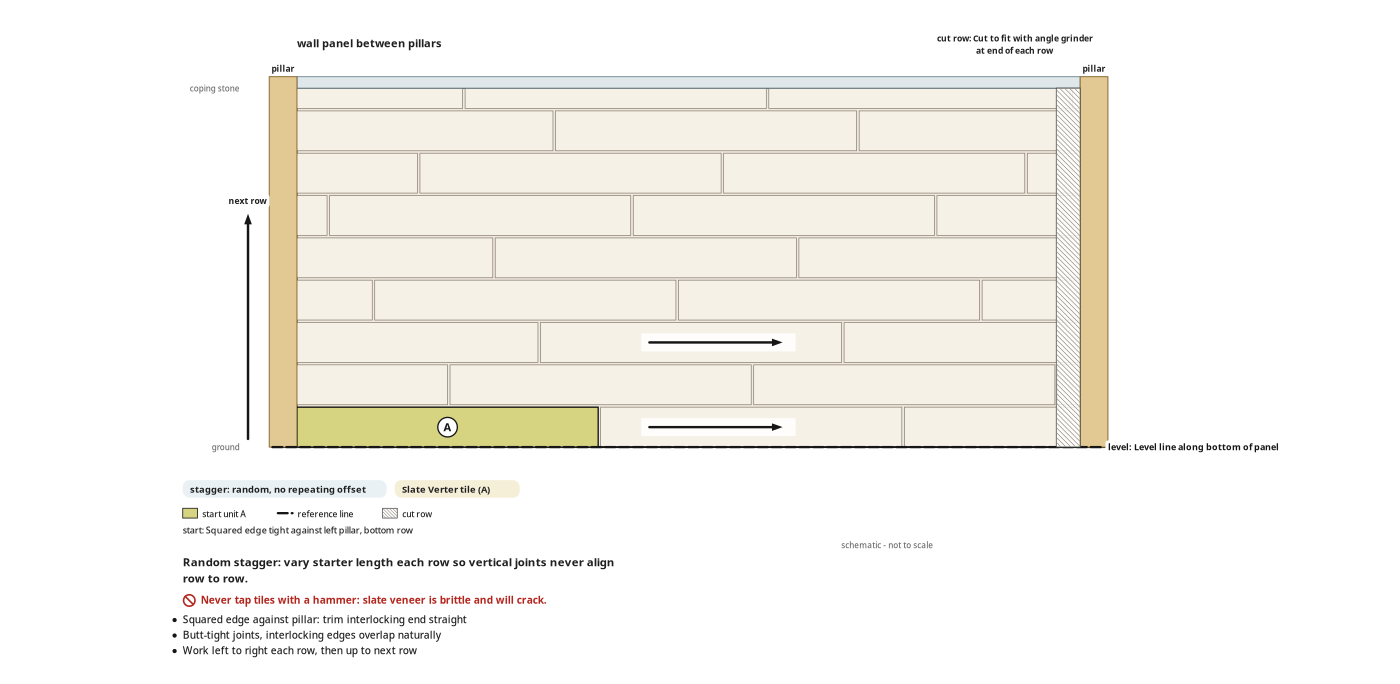
- Offset: stagger joints with different-size starter pieces each row for a random, natural look
- Start: bottom of the panel, tight against the pillar, with the first tile squared off at the interlocking edge
- Gap: butt tight, interlocking edges overlap naturally
- Bond: Sika Primer-3 N on both the wall and tile back, then Sikaflex EBT+ adhesive applied in beads to the middle three strips of the tile, pressed firmly by hand
- pillar edge (start of row): trim the interlocking stepped end off the first tile to create a straight, square edge that sits tight against the pillar
- end of row: measure the remaining gap, mark with a square, and cut the tile to length with an angle grinder
- outside corner (pillar miters): miter-cut the patterned tiles at the corners; smooth cut edges with a polishing/buffer pad on an angle grinder for a cleaner finish
- top of wall: coping stones bedded on mortar mixed with Marshall's primer admixture cap the wall and pillars
- coping stone underside: a drip groove cut along the underside with a wet tile saw prevents rainwater from running down the slate face
Health and safety
Angle Grinder Safety
- Wear safety glasses, hearing protection, and a dust mask every time you cut slate with the angle grinder.
- Keep the guard installed and hold the grinder firmly with both hands; slate can shatter and send fragments flying.
- Let the disc reach full speed before touching the workpiece, and never force the cut.
- Unplug the grinder before changing or inspecting the disc; check for cracks each time.
Wet Tile Saw Safety
- Wear safety glasses and hearing protection when cutting patterned ceramic tiles on the wet saw.
- Keep the water reservoir filled so the blade stays cool and silica dust is suppressed.
- Feed tiles slowly and steadily; never reach across or behind the spinning blade.
Dust and Silica Exposure
- Cutting slate and ceramic tiles releases fine silica dust; wear at least an N95 dust mask or respirator.
- Cut outdoors or in a well-ventilated area and position yourself upwind of the dust.
- Clean up dust with water or a damp cloth rather than dry sweeping, which re-suspends particles.
Chemical and Solvent Hazards
- Sika Primer-3 N is a strong solvent that melts certain plastics on contact; keep it away from plastic containers and surfaces.
- Wear chemical-resistant gloves and safety glasses when handling primers and adhesives; avoid skin and eye contact.
- Work in open air when applying primer and Sikaflex adhesive to ensure adequate ventilation and reduce fume inhalation.
The surface & its prep
- The block wall must be solid, clean, and flat; dub out (render) uneven or wobbly areas and let them cure before tiling.
- Remove loose debris or dust from the wall face.
- Confirm you have enough slate veneer tiles for all three panels, plus offcuts for staggered starters.
- Have Sika Primer-3 N and Sikaflex EBT+ on hand; they are a matched system and must be used together.
- Test your primer container first; the primer is a strong solvent that melts thin plastic. Use metal, glass, or chemical-resistant plastic.
- Dry-lay a few tiles against the wall to check color match and plan the stagger pattern before committing.
Tools
- Paintbrush
- Caulk gun
- Angle grinder
- Wet tile saw (optional)
- Measuring tape
- Square
Materials
- Slate Verter tiles (Slate veneer, Slate Vera color)
- Sika Primer-3 N (1000ml, Primer, Sika, 300ml)
- Sikaflex EBT+ Adhesive Sealant (Adhesive, Sika, 300ml)
- Patterned ceramic tiles
- Coping stones
- Mortar
- Marshall's Primer (Primer/Admixture, Marshalls)
Finishes & supplies, in the order they go on
| Product | What it does | Mix & coats | Dry time | Applied with |
|---|---|---|---|---|
| Sika Primer-3 N | Primes wall surface and tile backs for maximum adhesive bond. | 1 coats | Paintbrush | |
| Sikaflex EBT+ Adhesive Sealant | Bonds slate veneer tiles to the primed wall; applied in beads via caulk gun | Caulk gun | ||
| Mortar | Beds coping stones onto the wall and pillar tops for a permanent bond. | Trowel / by hand |
Before you start
Protect & Clear
- Cover the patio and adjacent surfaces with drop cloths to catch primer drips and tile dust.
- Clear the base of the wall so you can move freely.
Cut Station
- Set up the angle grinder with a masonry disc in a clear area away from the wall.
- Have a square and measuring tape at the cutting station for marking tiles.
Primer Station
- Pour Sika Primer-3 N into a metal or glass container, not thin plastic.
- Keep the paintbrush and container close to the wall for quick priming between tiles.
Step by step
Step 1: Review Materials
All slate veneer tiles inspected and confirmed to match the existing patio color.
You'll need: Slate Verter tiles
- 1.1 Introduce the Slate Tiles
- Unpack the Slate Verter tiles and inspect each for damage or color variation.
- Confirm the Slate Vera color complements the existing Casarta slate patio.
- Set aside chipped or cracked tiles; slate veneer is brittle.
Step 2: Prepare Primer and Adhesive
Sika primer and Sikaflex adhesive identified; primer decanted into a safe container, ready for brushing.
You'll need: Paintbrush, Sika Primer-3 N, Sikaflex EBT+ Adhesive Sealant
- 2.1 Review the Primer and Adhesive
- Identify the two-part system: Sika Primer-3 N (primer) and Sikaflex EBT+ (adhesive).
- These products work together; do not substitute one without the other.
- 2.2 Find a Suitable Primer Container
- Pour the primer into a metal, glass, or chemical-resistant plastic container.
- Do not use thin household plastic; the solvent in the primer will burn through it.
- Keep the container small enough to dip a paintbrush easily.
- Tip: Test your container with a small splash of primer before filling it.
- Heads up: Sika primer is a strong solvent that melts certain plastics on contact.
Step 3: Apply Primer to Wall and Tiles
Wall section primed, starter tile squared, tile backs primed; all ready for adhesive.
You'll need: Paintbrush, Angle grinder, Square, Sika Primer-3 N, Slate Verter tiles
- 3.1 Prime the Wall
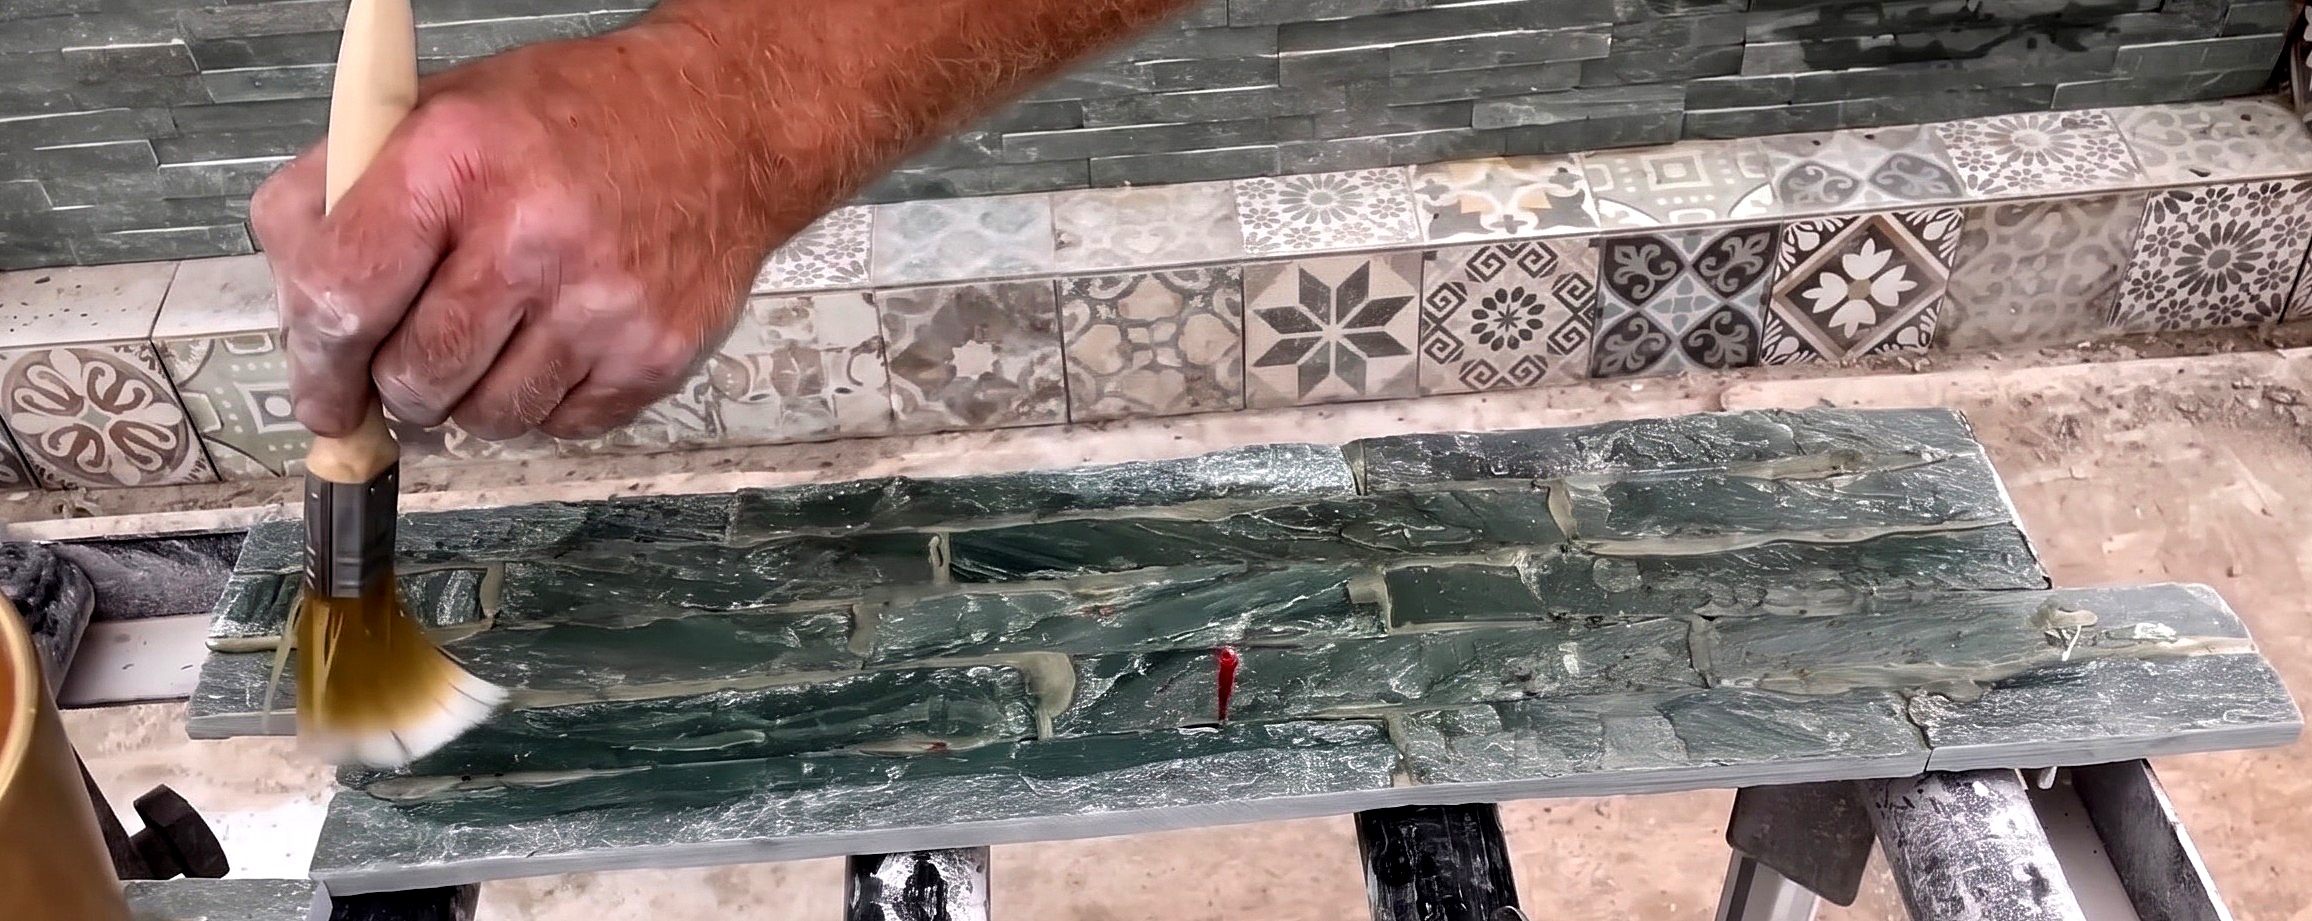
- Brush an even coat of Sika Primer-3 N over the entire wall section where tiles will go.
- Apply a thin coat: too much primer can seep through tile gaps and stain the face.
- Let the primer become tacky before setting tiles.
- 3.2 Square the Starter Tile
- Trim the stepped interlocking end off the first tile with an angle grinder.
- The cut edge must be straight and square so it sits tight against the pillar.
- Check the squared edge against the pillar before priming.
- 3.3 Prime the Back of the Tiles
- Brush Sika Primer-3 N onto each tile back before applying adhesive.
- Apply a thin, even coat: primer that seeps through gaps will stain the face.
- Both surfaces, wall and tile back, must be primed for the strongest bond.
- Tip: Prime both wall and tile back every time: skipping one weakens the bond.
- Heads up: Do not apply primer too thickly; it can migrate through gaps and stain the slate face.
Before you move on: Check the primer is even and tacky on the wall, and the starter tile edge is square against the pillar with no gap.
Step 4: Install the First Rows of Slate Tiles
First slate tiles bonded to the wall, tight against the pillar, adhesive on middle strips only.
You'll need: Caulk gun, Sikaflex EBT+ Adhesive Sealant, Slate Verter tiles
- 4.1 Apply Adhesive to the Tile
- Load the Sikaflex EBT+ cartridge into the caulk gun.
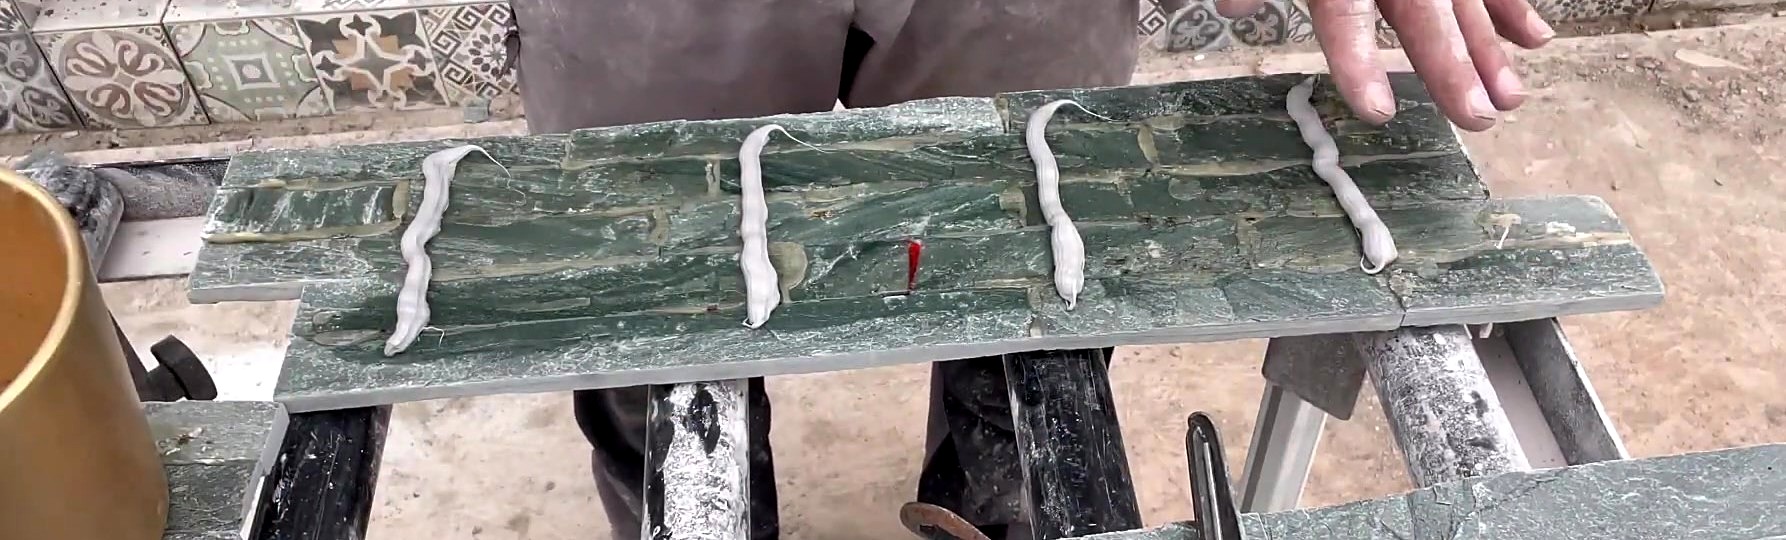
- Apply beads of adhesive to the middle three strips of the tile back only.
- Keep adhesive away from top, bottom, and side edges to prevent squeeze-out.
- 4.2 Set the First Tile
- Place the squared edge of the first tile tight against the pillar.
- Press the tile onto the wall with both hands, steadily.
- Do not tap with a hammer; slate veneer is brittle and will crack.
- Check the tile sits flat and flush against the wall.
- Tip: Adhesive on the middle strips only prevents glue squeezing out of joints when you press the tile on.
- Heads up: Never use a hammer on slate veneer tiles: they are brittle and will break. Firm hand pressure only.
Before you move on: Check the first tile is flat to the wall, tight to the pillar, with no adhesive squeezed out at the edges.
Step 5: Continue Tiling the Wall Panels
First two wall panels fully clad with slate tiles, joints randomly staggered for a natural stone look.
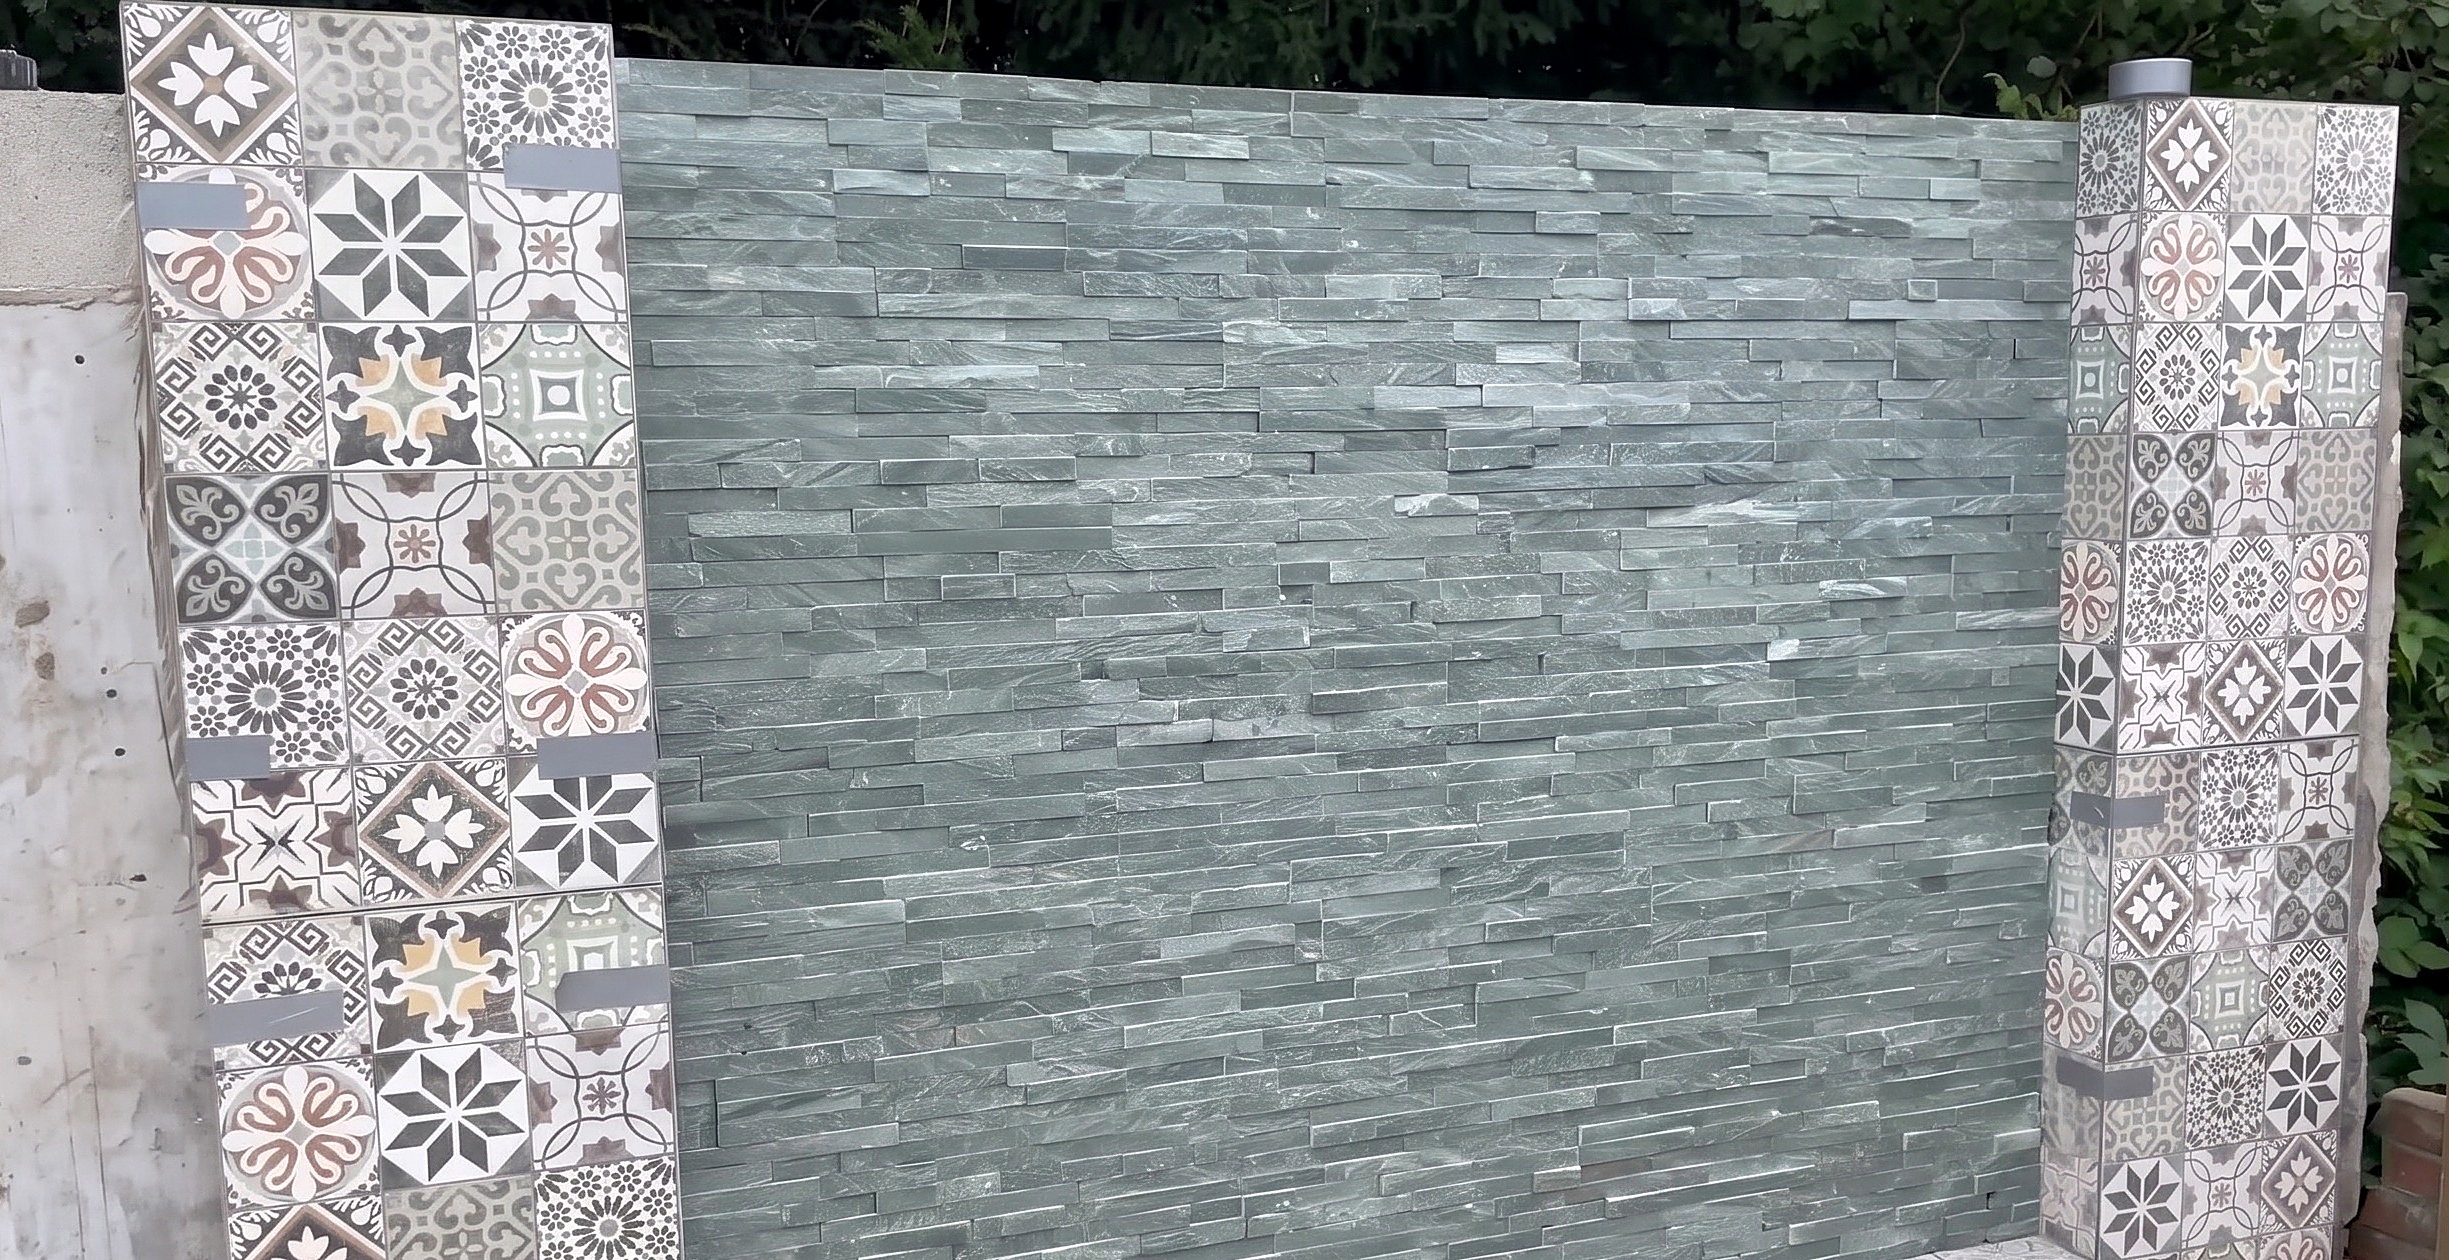
You'll need: Angle grinder, Measuring tape, Square, Caulk gun, Paintbrush, Slate Verter tiles, Sika Primer-3 N, Sikaflex EBT+ Adhesive Sealant
- 5.1 Stagger the Joints
- Cut starter pieces of different lengths for each new row.
- Vary the starting length so vertical joints never align row to row.
- A random stagger looks more natural than a repeating offset pattern.
- If you trim the same amount off every starter, joints will form visible vertical lines.
- 5.2 Measure and Cut End Pieces
- At each row's end, measure the remaining gap with a tape.
- Transfer the measurement to a tile and mark a square cut line.
- Cut the tile to length with an angle grinder and masonry disc.
- 5.3 Continue Tiling Up the Wall
- For every tile: prime the wall section, prime the tile back, apply adhesive to the middle strips, press firmly.
- Work bottom up, row by row, across each panel.
- Check each tile is flush and flat before moving on.
- If the wall is uneven, dub it out with render and let it set before tiling over it.
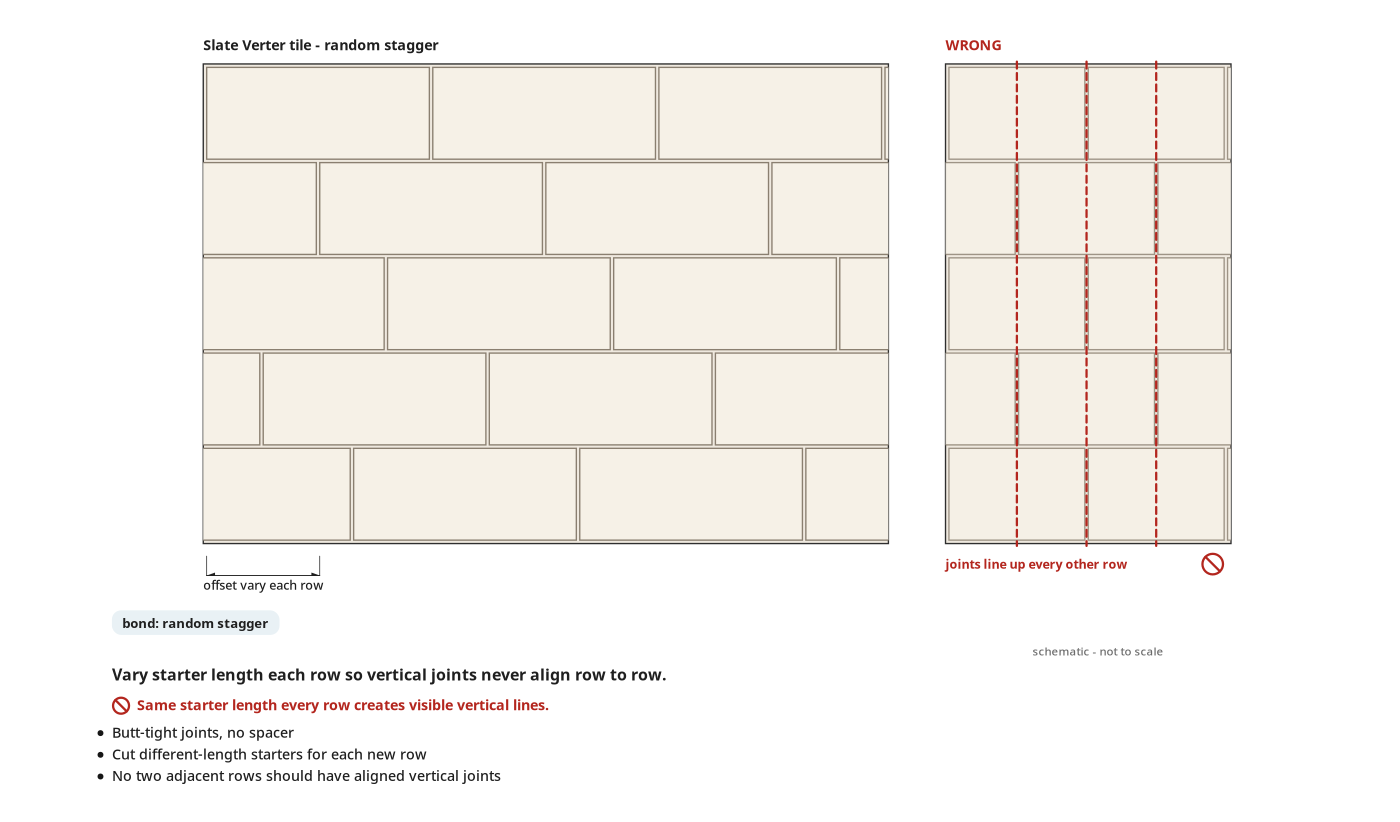
- Tip: Stagger joints with random-length starters: a trained eye will spot repeating vertical lines even if the customer does not.
- Tip: If a wall section is wobbly, dub it out (render it flat) before tiling.
- Heads up: Wear a dust mask and safety glasses every time you cut slate with the angle grinder.
Before you move on: Step back and sight across the panels: no two adjacent rows should have aligned vertical joints, and all tiles should sit flat.
Step 6: Complete the Final Wall Panel
The third and final panel is fully clad with slate veneer tiles, completing all three panels.
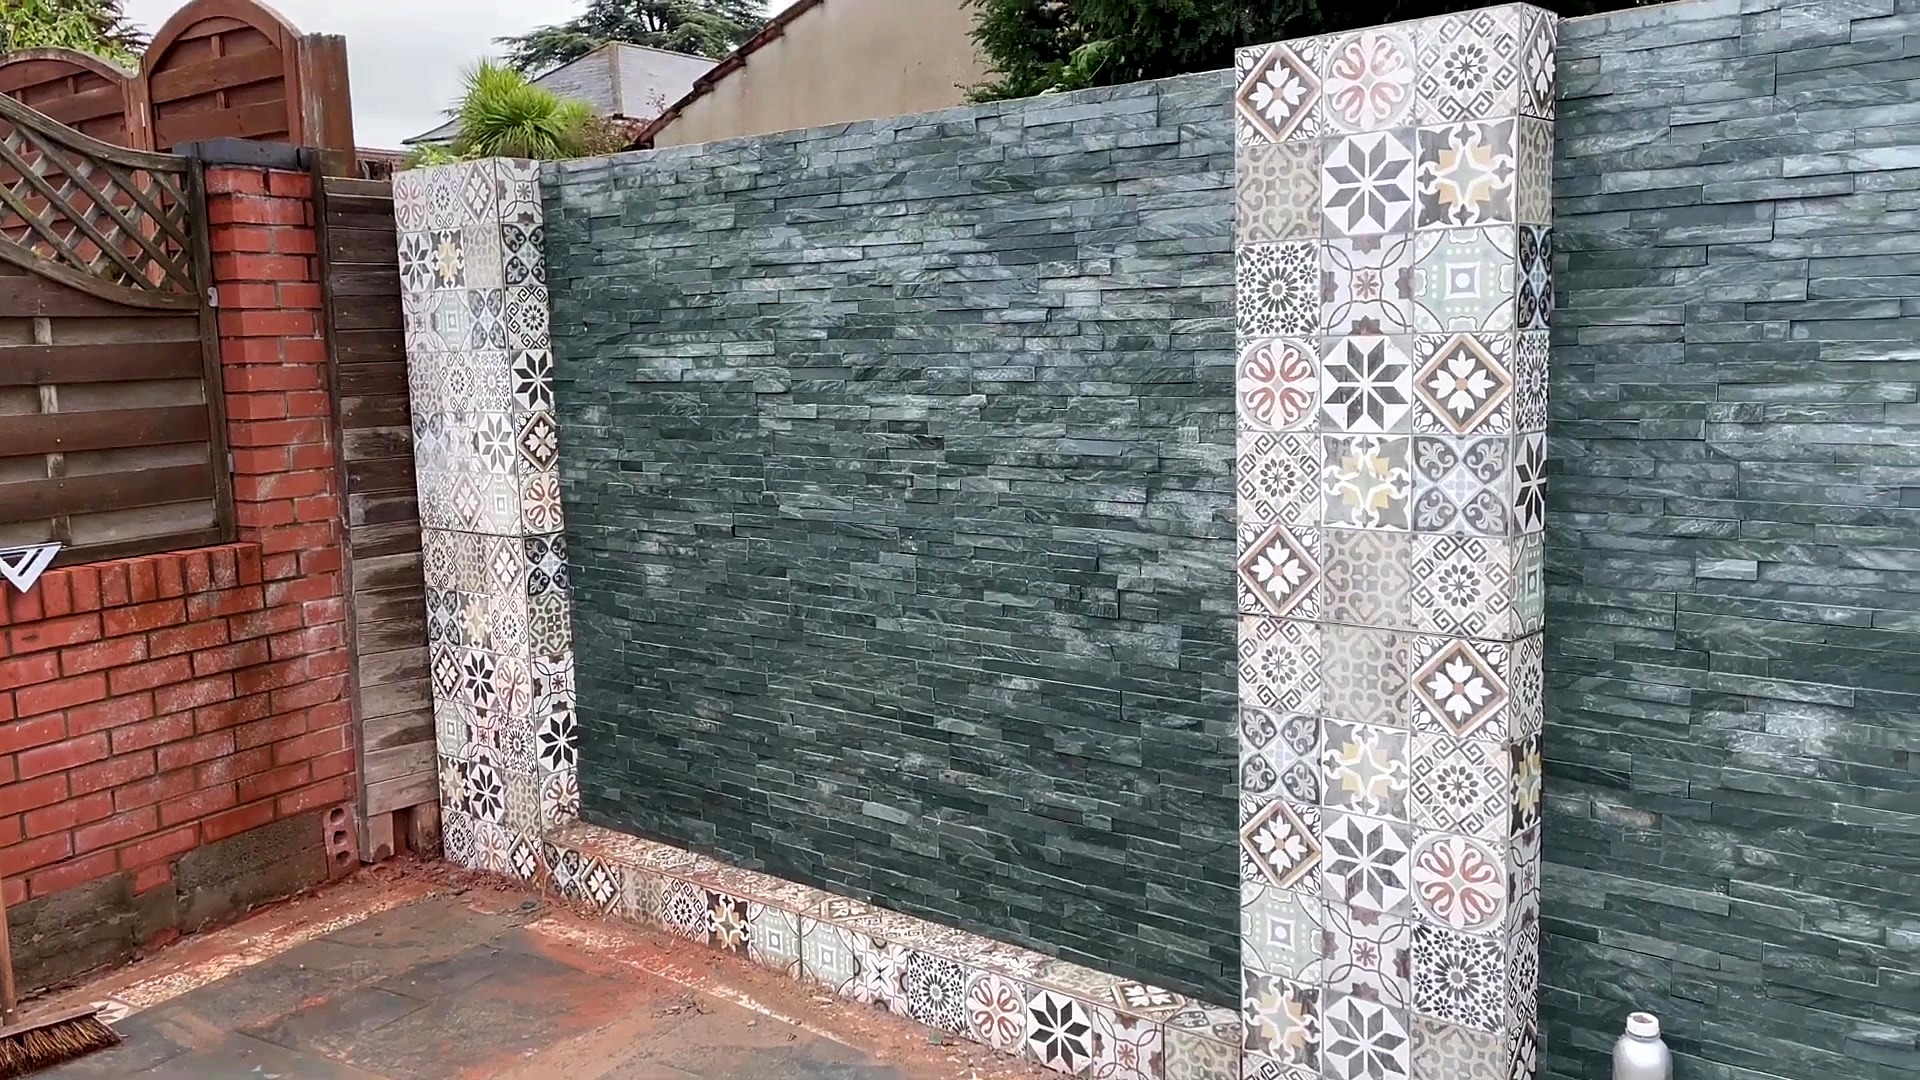
You'll need: Angle grinder, Measuring tape, Square, Caulk gun, Paintbrush, Slate Verter tiles, Sika Primer-3 N, Sikaflex EBT+ Adhesive Sealant
- 6.1 Tile the Final Panel
- Repeat on the third panel: prime the wall, prime each tile, apply adhesive to the middle strips, press firmly.
- Continue the random stagger pattern from the first two panels.
- Cut end pieces to fit with the angle grinder.
- Inspect all three panels for tiles not sitting flat.
Before you move on: All three panels are fully tiled; no gaps, no squeeze-out, all tiles flat.
Step 7: Prepare to Install Coping Stones
Mortar is mixed with Marshall's Primer admixture and ready for bedding the coping stones.
You'll need: Mortar, Marshall's Primer
- 7.1 Prepare Mortar Mix
- Cut the drip groove into every coping stone first (see step 9), then mix mortar to a firm, workable consistency.
- Add Marshall's Primer admixture for a stronger bond.
- Admixture ratio is not stated here: follow the Marshall's Primer product label.
- Tip: The admixture greatly strengthens the bond: do not skip it for exterior coping.
Step 8: Install the Coping Stones
All coping stones are bedded in mortar on the wall and pillars, pressed firmly into place.
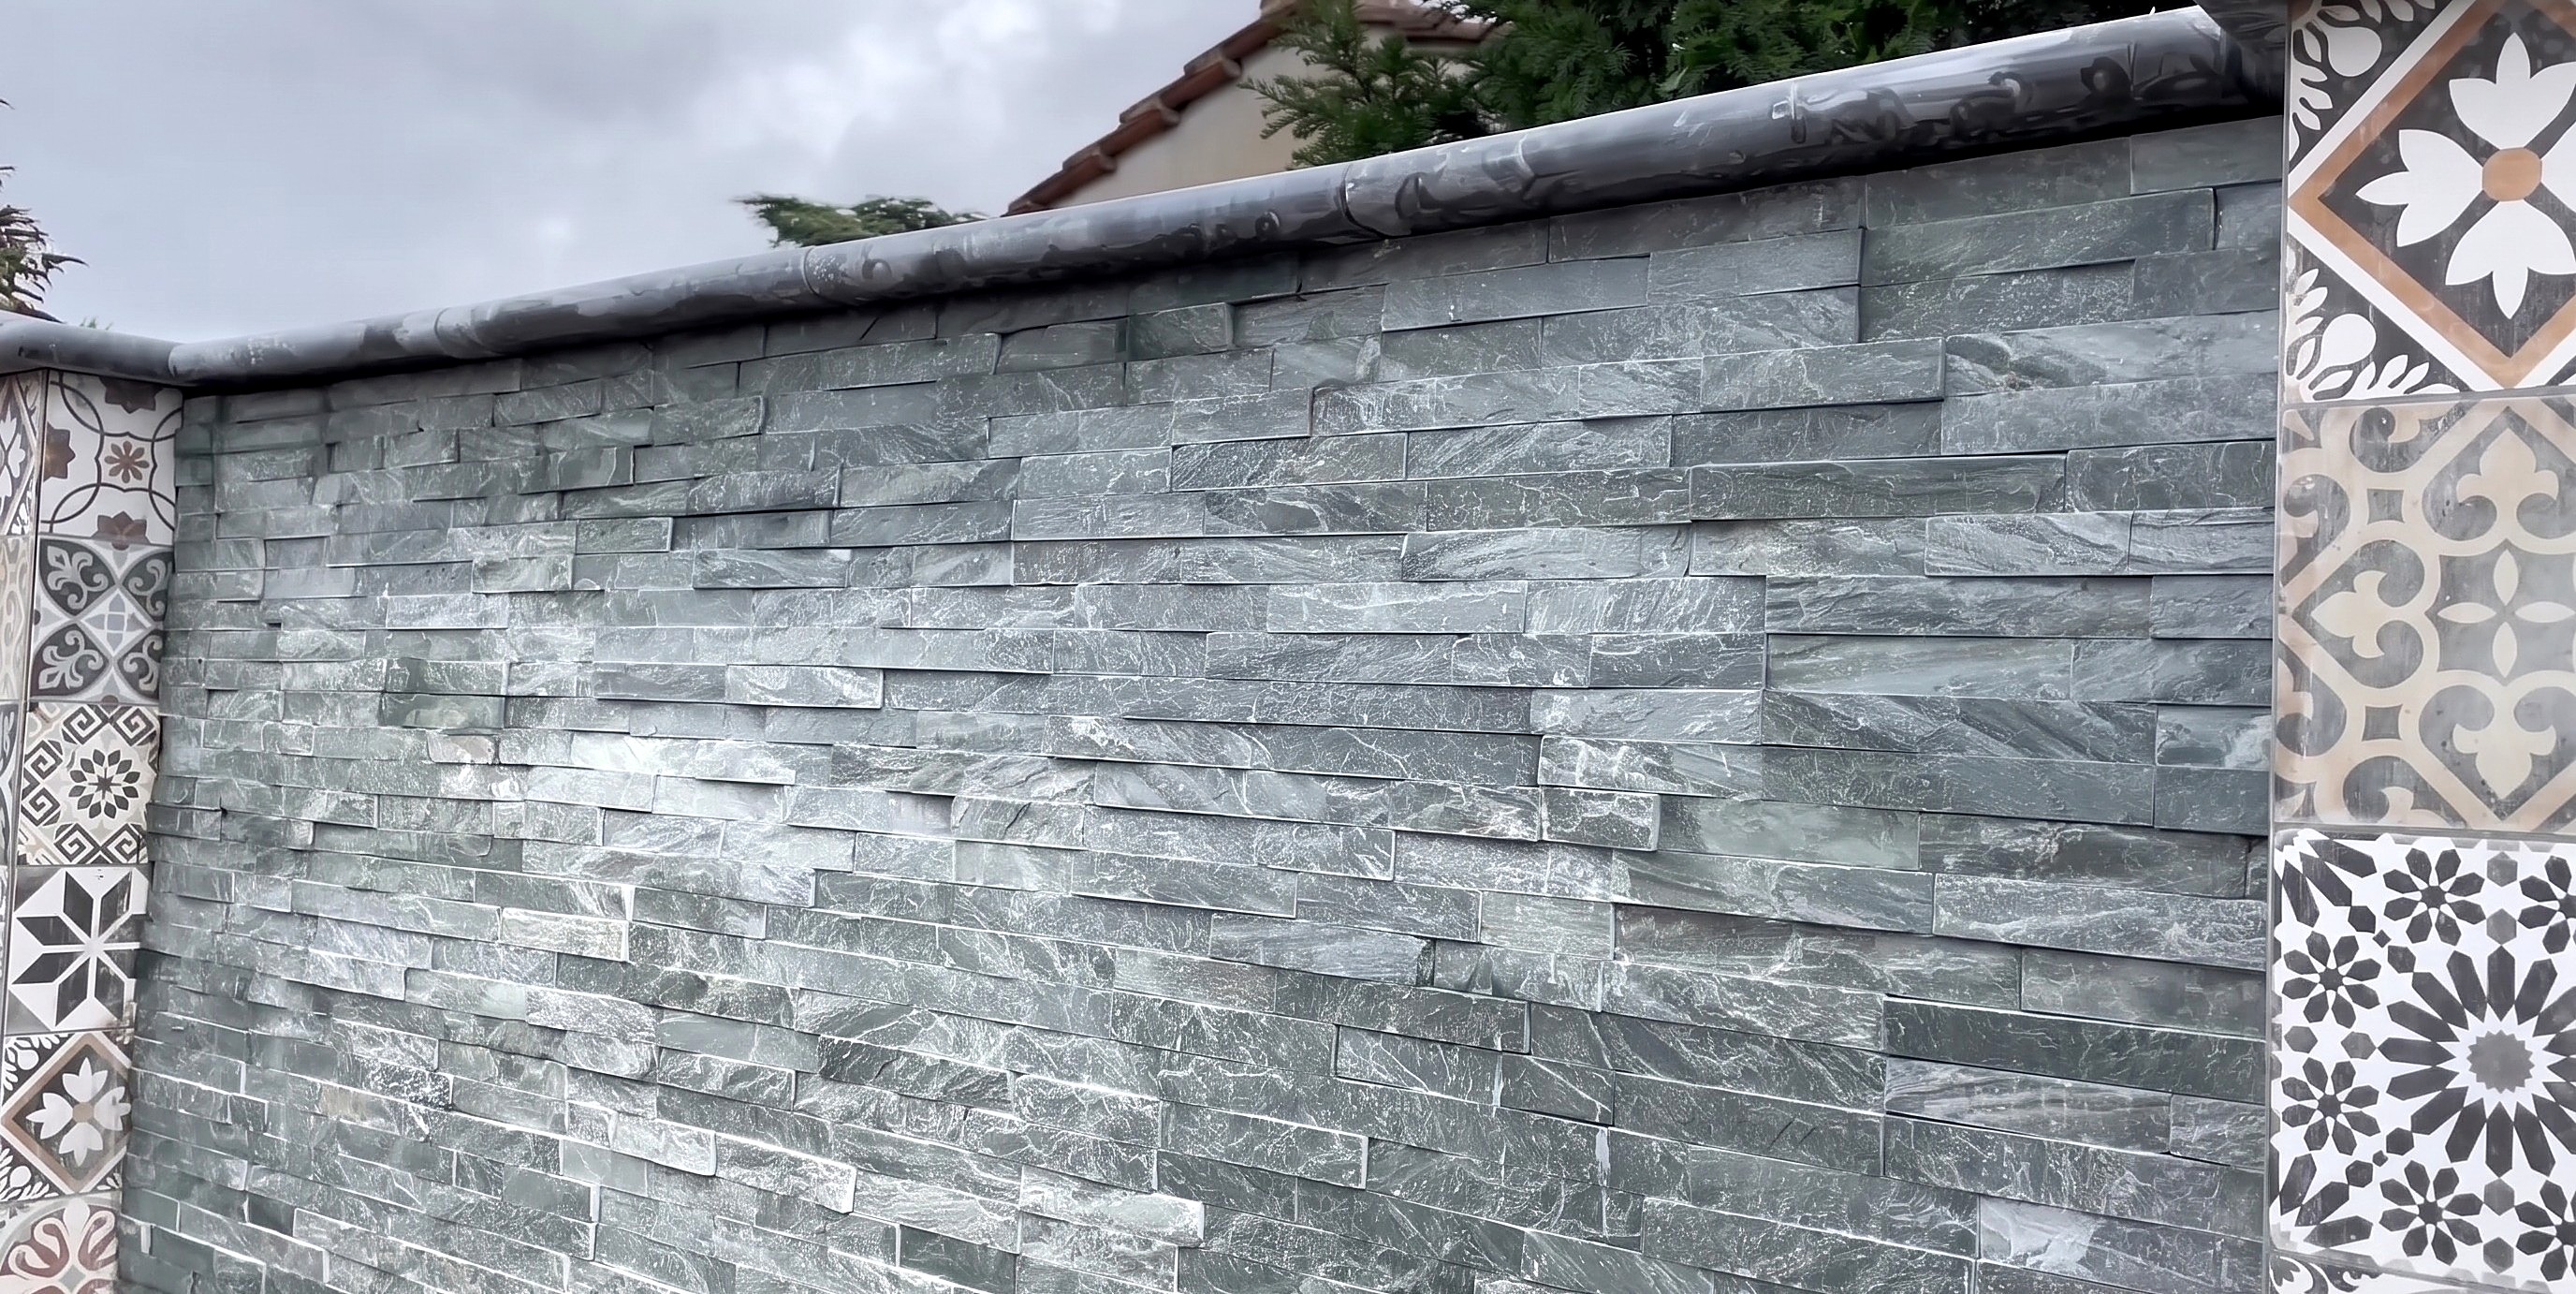
You'll need: Coping stones, Mortar, Marshall's Primer
- 8.1 Lay the Mortar Bed
- Spread a thick, even layer of prepared mortar onto each pillar top and wall section.
- Do pillar copings first, then fit wall copings between them.
- 8.2 Set the Coping Stones
- Dry-lay the grooved coping stones first, groove down and toward the front, to confirm fit and spacing.
- Set each coping stone onto the mortar bed and press down firmly.
- Check each stone is level and aligned with its neighbors.
- Clean mortar squeeze-out from the edges before it sets.
- Tip: Dry-lay copings first to confirm dimensions before applying mortar.
Before you move on: All coping stones are level, aligned, and firmly bedded with no rocking.
Step 9: The Drip Groove (Cut Before Bedding)
Every coping stone gets a drip groove along its underside before it is bedded in step 8, so rainwater drips off instead of running down the slate face.
You'll need: Wet tile saw, Coping stones
- 9.1 Cut a Drip Groove
- Before bedding, cut a shallow groove along the underside of each coping stone on a wet tile saw, parallel to the front edge.
- The groove catches rainwater and forces it to drip off the coping instead of running down the wall.
- Groove depth and width are not specified here: a shallow channel is enough.
- Run the groove the full length of each coping stone for continuous water management.
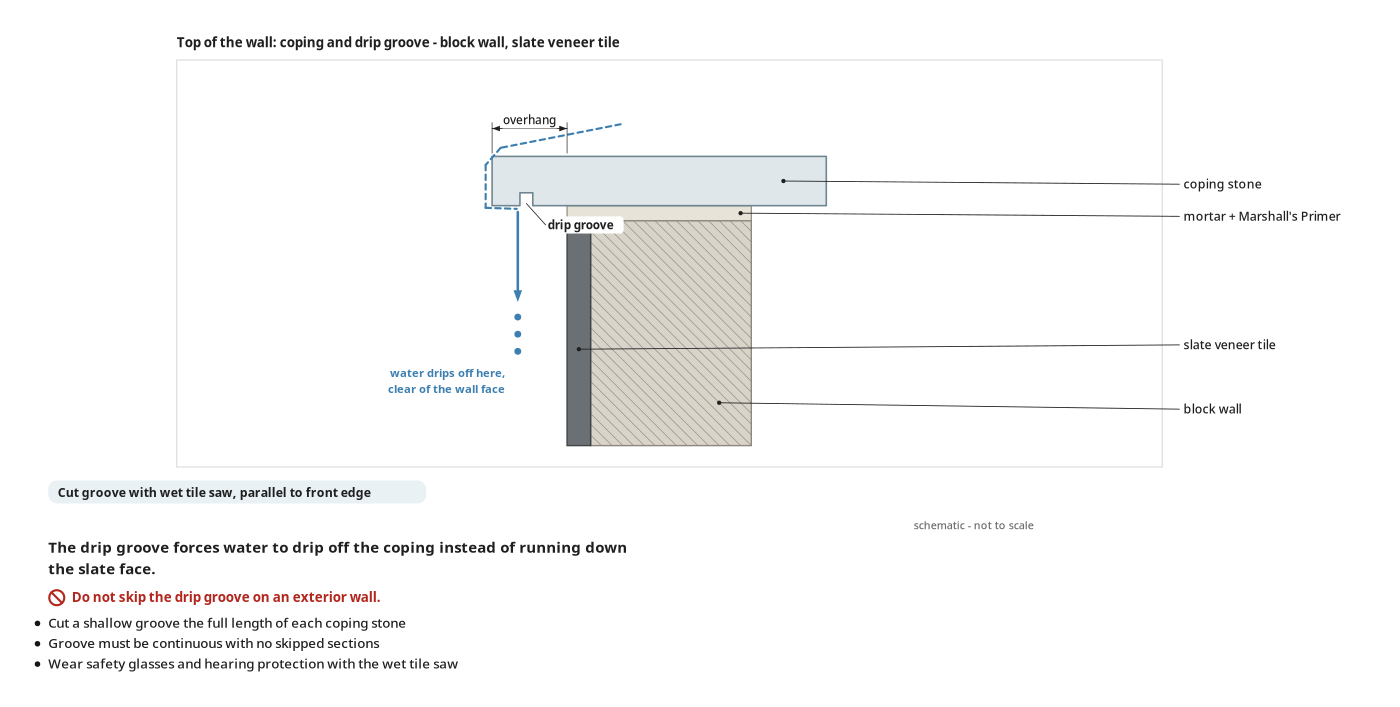
- Tip: The drip groove prevents water staining on the slate below: do not skip this on an exterior wall.
- Heads up: Wear safety glasses and hearing protection when using the wet tile saw.
Before you move on: Run a finger along each coping underside: the groove should be continuous with no skipped sections.
Finishing
Trim & Clean-up
- Clean primer or adhesive residue from the slate face before it fully cures.
- If mitering patterned tiles on the pillars, smooth cut edges with a polishing or buffing pad on the angle grinder for a cleaner finish.
- Fill remaining mortar gaps at the coping joints.
Cure Time
- Let the Sikaflex adhesive cure fully before loading or leaning anything against the wall; check the label for cure time.
- Let the mortar under the coping stones set before working on the wall top.
Care & Maintenance
- Periodically check that no tiles have loosened, especially after freeze-thaw cycles.
- The drip groove on the coping keeps water off the slate face; clear debris from the groove seasonally.
Alternatives
- A polishing or buffer pad for the angle grinder gives smoother miter edges on patterned tiles; worth having if you plan more tiling.
- Standard exterior tile adhesive may not bond as well as the Sika primer-and-adhesive system: use the complete matched system for best results.
Check before you call it done
| Check | What you should see | If not |
|---|---|---|
| Sight across each slate panel from an angle: all tiles should be flat with no rocking or lifting edges. | Every tile sits flush with no visible gaps between tile and wall. | Press the tile firmly again; if it still lifts, remove it, re-prime, re-glue, and reset. |
| Inspect all joints for adhesive squeeze-out. | No Sikaflex visible between tiles or at edges. | Scrape or peel away cured adhesive with a blade. |
| Check that vertical joints are randomly staggered across all three panels. | No two adjacent rows share an aligned vertical joint. | |
| Check all coping stones are level and firmly bedded. | No stone rocks when pressed; mortar joints are clean. | Lift the stone, add mortar, and reset before it cures. |
| Check the drip groove runs continuously along the underside of every coping stone. | A continuous shallow channel with no gaps. | Re-cut any missed sections with the wet tile saw. |
These Specs are built from Tidybricks patio restore's video “Garden Feature Wall with Slate and Patterned Tiles”. Open the Garden Feature Wall with Slate and Patterned Tiles project page.
