Spetz Specs No. 3661: step-by-step system install guide
Battery-Powered Backpack Sprayer Conversion
The complete step-by-step guide made from Indy Farm Life's YouTube video, free on Spetz. For the video, a step-by-step player and answers to your questions, see the Battery-Powered Backpack Sprayer Conversion project page.
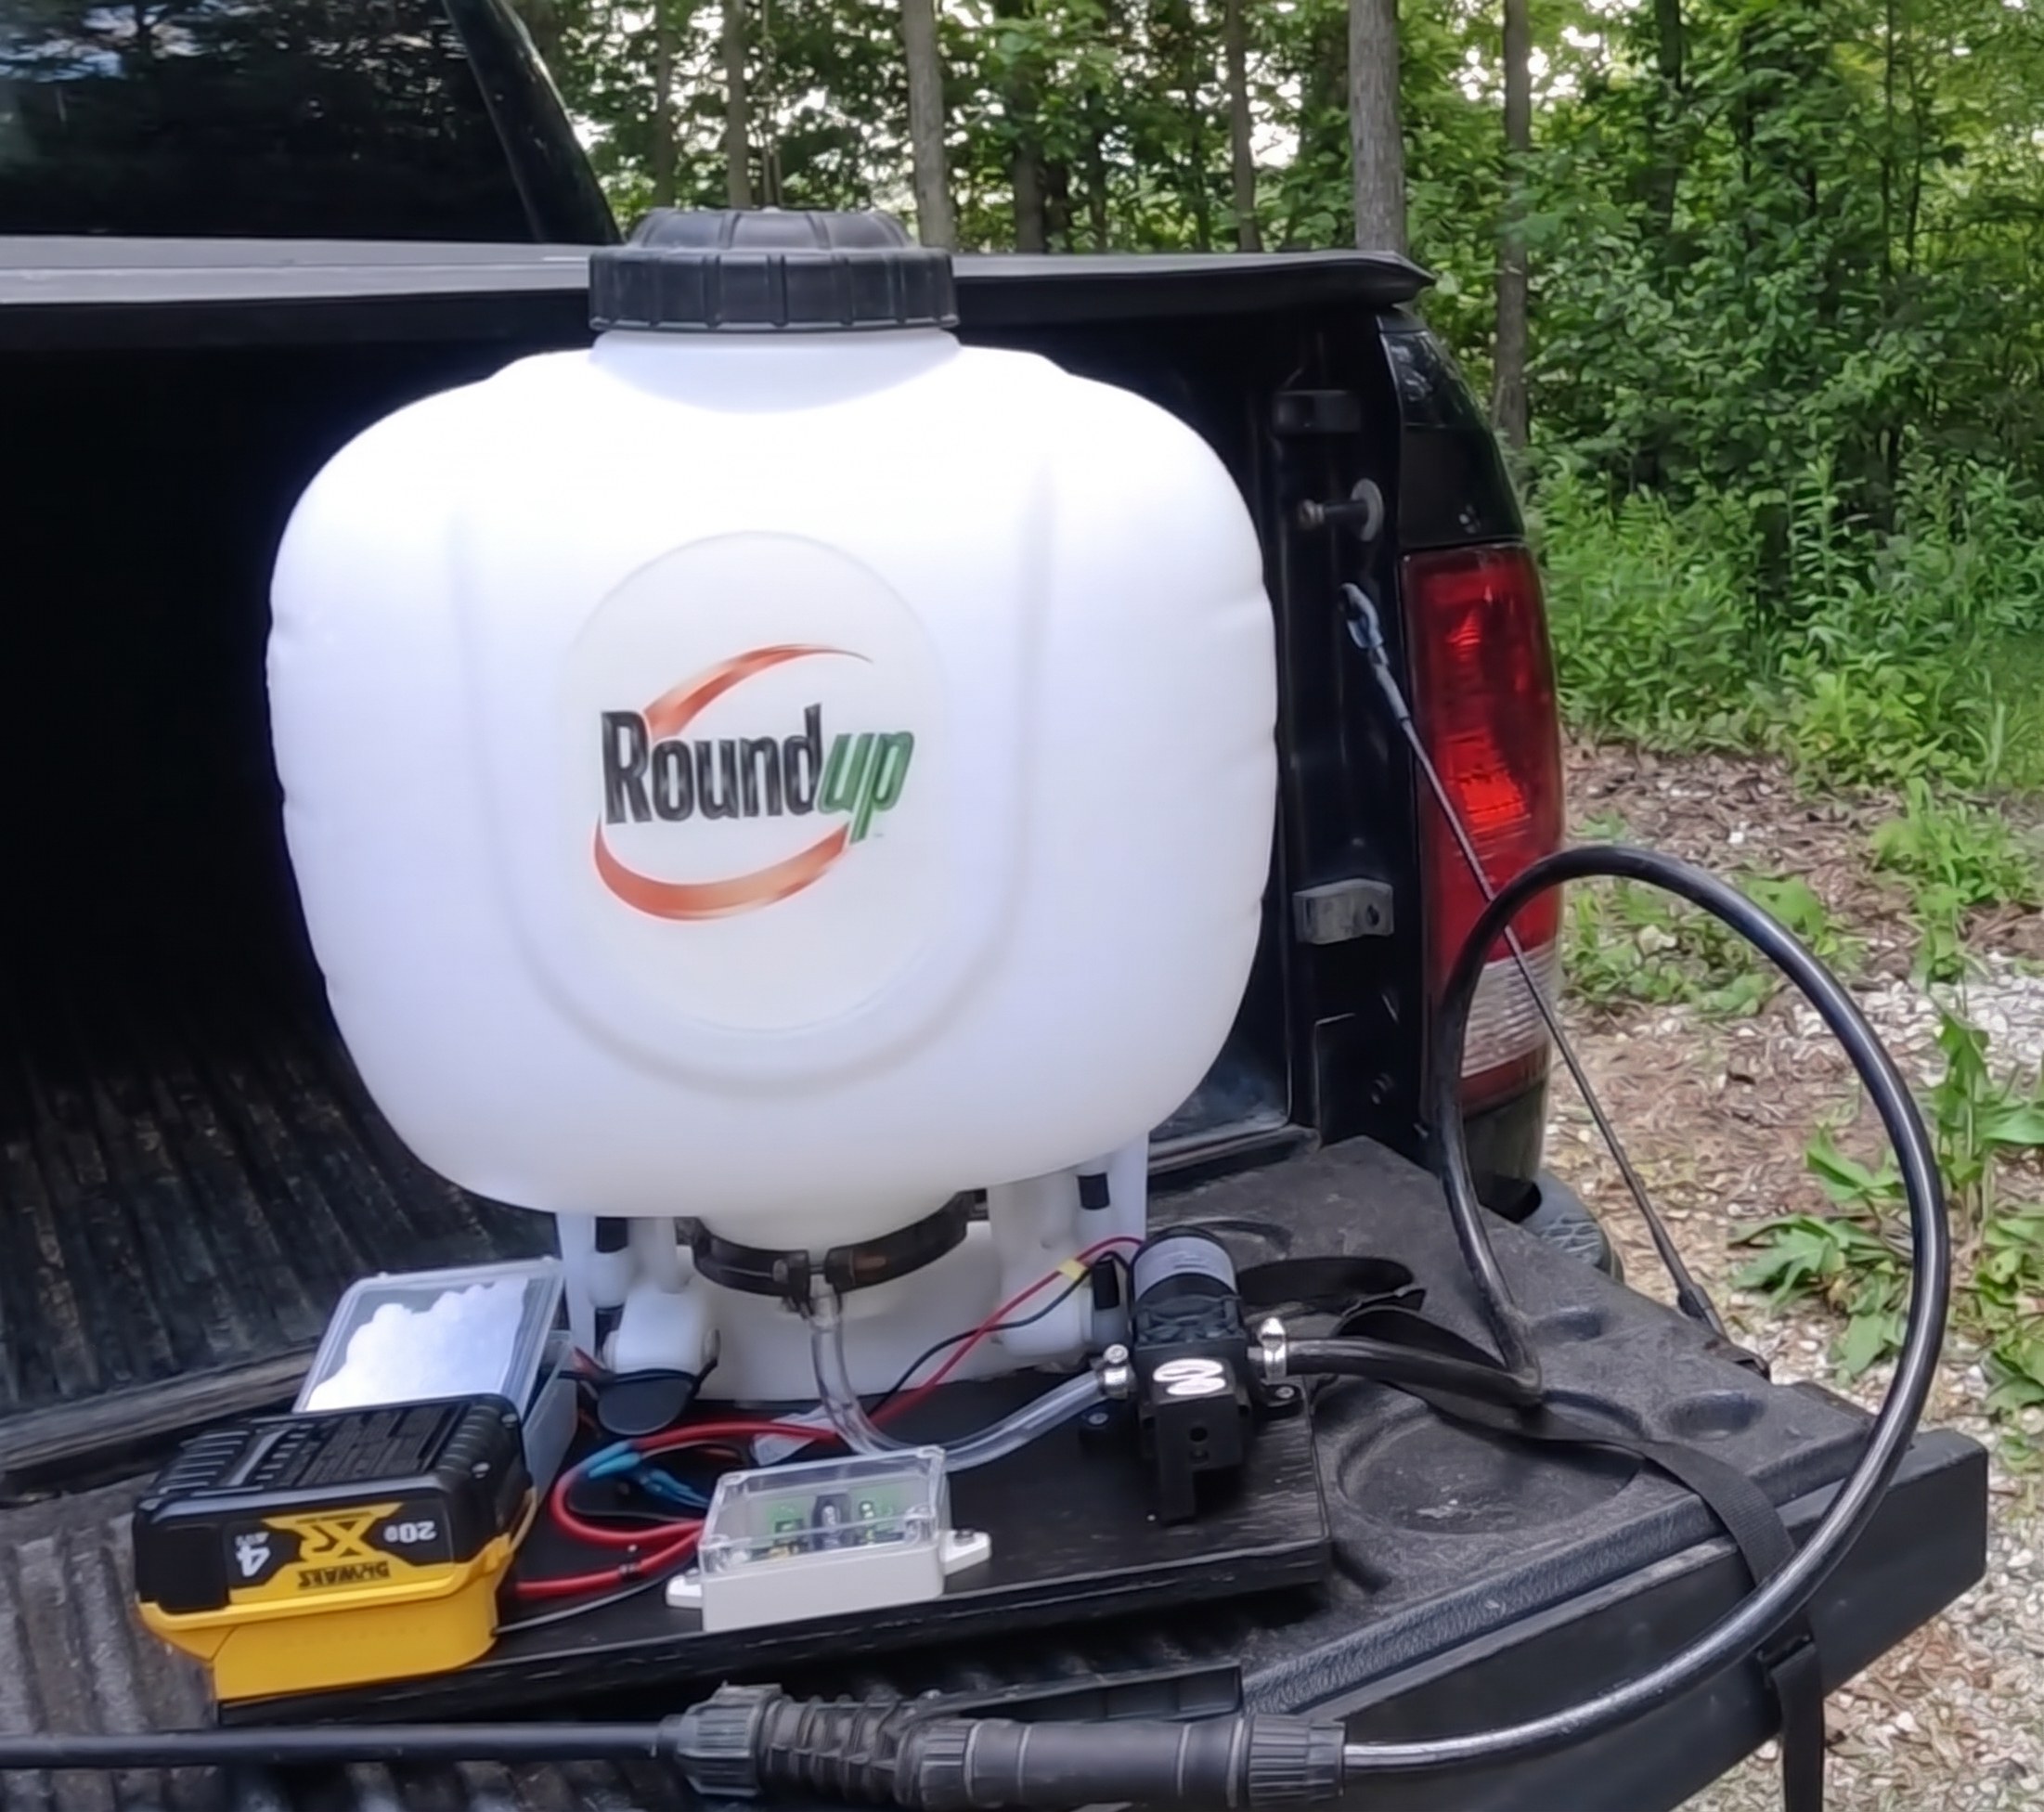
5 steps, 7 parts, 6 tools, 15 materials
Overview
The system
- Convert a 4-gallon Roundup manual backpack sprayer to 20 V battery power.
- Gravity-feed liquid into a 12 V, 1.4 GPM Amariver diaphragm pump.
- Regulate 20.4 V battery power to 12 V via a cutoff board and controller.
Why do it yourself
- End manual lever pumping on large properties at a fraction of commercial sprayer cost.
- Wire modular components with quick-connects so a failed pump swaps in minutes.
What it takes
- Use hacksaw, cordless drill, wire strippers, screwdriver, and propane torch for heat-shrink splices.
- Let the silicone sealant and black paint cure before wet testing.
What decides success
- Seal the cut internal cylinder so the tank gravity-feeds without leaking.
- Set a 15.9 V cutoff and calibrate the regulator to 12 V while spraying.
The system at a glance
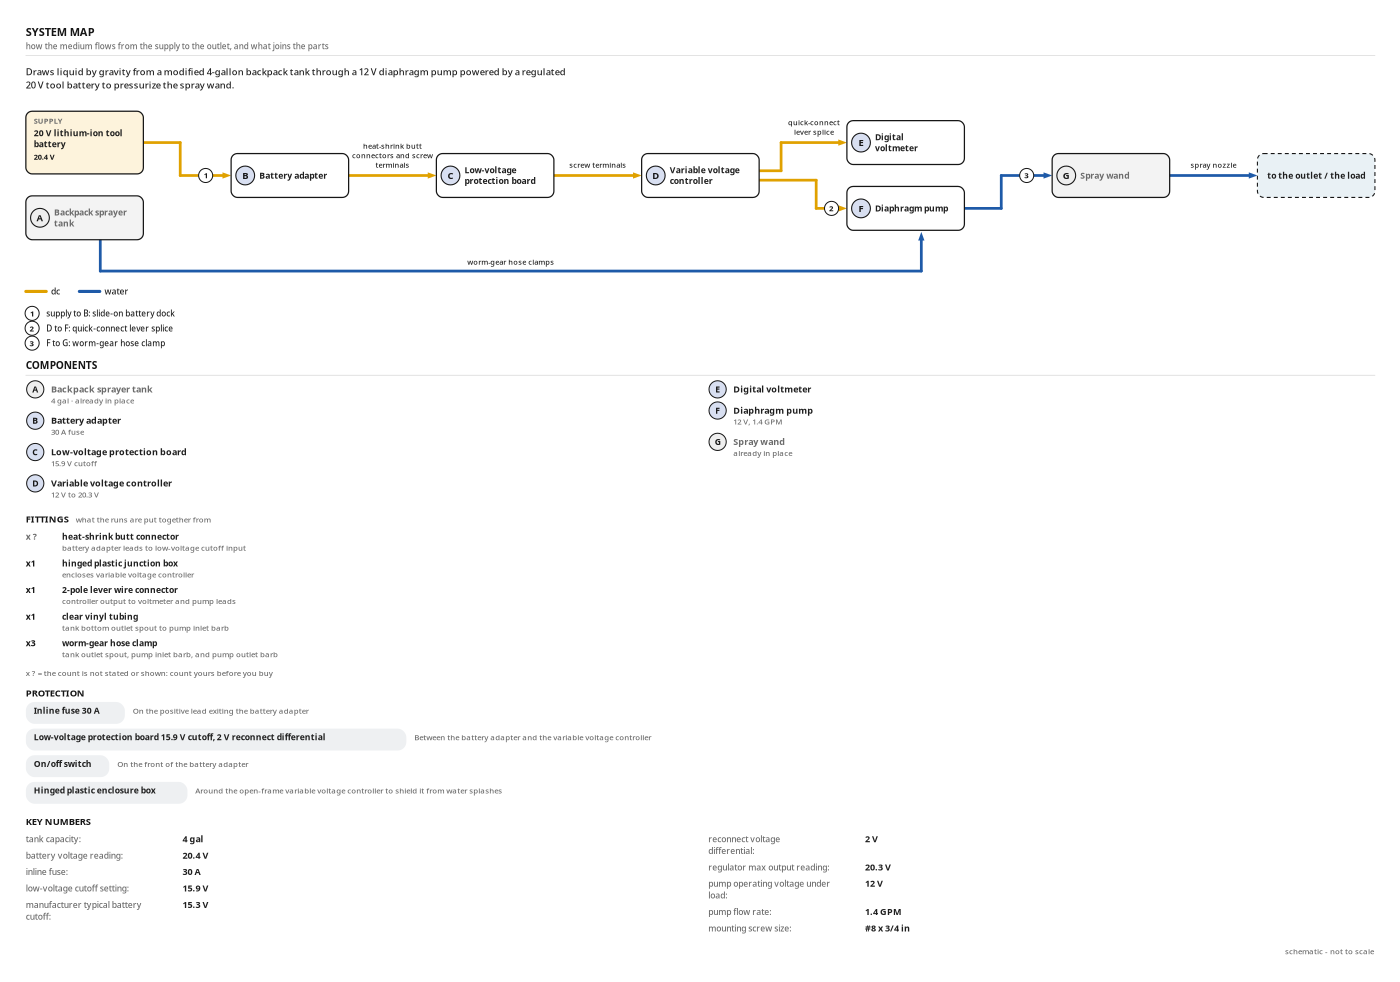
- Draws liquid by gravity from a modified 4-gallon backpack tank through a 12 V diaphragm pump powered by a regulated 20 V tool battery to pressurize the spray wand.
- Supply: 20 V lithium-ion tool battery, 20.4 V
- supply → Battery adapter: dc, direct, slide-on battery dock
- Battery adapter → Low-voltage protection board: dc, wire, heat-shrink butt connectors and screw terminals
- Low-voltage protection board → Variable voltage controller: dc, wire, screw terminals
- Variable voltage controller → Digital voltmeter: dc, wire, quick-connect lever splice
- Variable voltage controller → Diaphragm pump: dc, wire, quick-connect lever splice
- Backpack sprayer tank → Diaphragm pump: water, tube, worm-gear hose clamps
- Diaphragm pump → Spray wand: water, hose, worm-gear hose clamp
- Spray wand → out: water, direct, spray nozzle
- Protection: Inline fuse, 30 A, On the positive lead exiting the battery adapter
- Protection: Low-voltage protection board, 15.9 V cutoff, 2 V reconnect differential, Between the battery adapter and the variable voltage controller
- Protection: On/off switch, On the front of the battery adapter
- Protection: Hinged plastic enclosure box, Around the open-frame variable voltage controller to shield it from water splashes
- tank capacity: 4 gal
- battery voltage reading: 20.4 V
- inline fuse: 30 A
- low-voltage cutoff setting: 15.9 V
- manufacturer typical battery cutoff: 15.3 V
- reconnect voltage differential: 2 V
- regulator max output reading: 20.3 V
- pump operating voltage under load: 12 V
- pump flow rate: 1.4 GPM
- mounting screw size: #8 x 3/4 in
Health and safety
Chemical Residue Protection
- Thoroughly rinse and neutralize any herbicide or chemical residue inside the 4-gallon tank and pump cylinder before disassembling or sawing parts.
- Wear chemical-resistant gloves and eye protection when handling internal sprayer components that previously held garden chemicals.
- Wash your hands and tools after modifying the internal pressure cylinder to avoid transferring lingering chemical traces to your skin.
Battery and Wiring Safety
- Remove the 20V lithium-ion battery pack and turn the adapter switch off before stripping wires or landing them in screw terminals.
- Always wire the 30A inline fuse and low-voltage protection board into the circuit to prevent short circuits and permanent battery damage.
- Never bypass the low-voltage cutoff board, because the cordless tool battery pack lacks internal over-discharge protection circuitry.
Water and Heat Management
- Keep the open-frame voltage controller inside the plastic storage box to shield live circuits from water and chemical splashes during filling.
- Check hoses and worm-gear hose clamps for leaks during initial priming so pressurized liquid does not spray onto electrical connections.
- Vent the plastic enclosure box slightly during extended spraying sessions if the variable DC voltage regulator becomes warm.
Torch, Cutting, and Fumes
- Keep the handheld propane torch flame aimed away from the plastic tank, vinyl tubing, and freshly painted plywood when shrinking butt connectors.
- Secure the internal pressure cylinder and scrap plywood before cutting with the hacksaw so the blade does not slip toward your hand.
- Apply the black paint and silicone sealant in a well-ventilated space to avoid inhaling solvent vapors and curing fumes.
Checks before you start
- Rinse and neutralize chemical residue inside the 4-gallon tank before cutting.
- Remove the 20 V battery and switch the adapter off while wiring.
- Check the battery adapter fits your 20 V lithium-ion cordless tool battery.
- Check the positive battery adapter lead has a 30 A blade fuse.
- Check the diaphragm pump rating: 12 V DC at 1.4 GPM.
- Cut the scrap plywood board to fit the bottom tubular metal stand footprint.
Tools
- Hacksaw (manual hacksaw)
- Propane torch (handheld propane torch) (optional)
- Cordless tool battery (lithium-ion slide battery pack, DeWalt, XR, 20V Max, 4.0Ah)
- Wire strippers (manual wire stripper and crimper, Irwin Vise-Grip)
- Screwdriver (manual screwdriver)
- Cordless drill (cordless drill/driver, DeWalt, Atomic, 20V Max)
Materials
- Manual backpack sprayer (1, manual pump backpack sprayer, Roundup, 4 gal)
- Silicone sealant (1 tube, silicone caulk)
- Battery adapter and voltage regulator kit (1 kit, Power Wheels battery adapter and PWM speed controller kit, 20V battery adapter with switch, 30A fuse, low-voltage protection board, variable DC voltage regulator, and voltmeter)
- 12V diaphragm pump (1, 12V DC diaphragm water pump, Amariver, 12V, 1.4 GPM)
- Quick-connect lever wire connector (1, 2-pole lever splice connector)
- Plywood board (1 piece, scrap plywood)
- Black paint (1 can, paint, black)
- Conduit clamps (one-hole metal conduit straps)
- Wood screws (1 box, flat-head Phillips wood screws, Hillman, #8 x 3/4 in, zinc plated, 100 pack, #8 x 3/4 in)
- Heat-shrink butt connectors (insulated crimp butt splices)
- Plastic storage box (1, clear hinged plastic container)
- Double-sided mounting tape (1 roll, double-sided adhesive tape, 3M)
- Zip ties (nylon cable ties)
- Clear vinyl tubing (1 piece, flexible clear hose)
- Hose clamps (2, worm-gear hose clamps)
Hardware
| Hardware | Size | Count | Used in steps |
|---|---|---|---|
| 2-pole Quick-connect lever wire connector | 2 | 2, 3 | |
| #8 x 3/4 in Wood screws | 3 | ||
| Heat-shrink butt connectors | 3 | ||
| Hose clamps | 2 | 3 | |
| Conduit clamps | 3 | ||
| Zip ties | 3 |
Finishes & supplies, in the order they go on
| Product | What it does | Mix & coats | Dry time | Applied with |
|---|---|---|---|---|
| Silicone sealant | Fill and seal the cut pressure cylinder housing top, bottom, and inlet ports. | |||
| Black paint | Coat and seal the scrap plywood mounting board | |||
| Heat-shrink butt connectors | Insulate and seal wire splices between the battery adapter and low-voltage protection board | Propane torch |
Components
| Part | Name | Qty | Size | Notes |
|---|---|---|---|---|
| A | Backpack sprayer tank | x1 | 4 gal | Internal pressure cylinder cut below outlet spout, sealed with silicone, and notched to gravity-feed. |
| B | Battery adapter | x1 | 30 A fuse | Slides onto tool battery; includes front on/off switch and inline fuse holder, screwed to plywood base. |
| C | Low-voltage protection board | x1 | 15.9 V cutoff | Screwed to plywood base; disconnects power before the lithium-ion battery discharges below 80%. |
| D | Variable voltage controller | x1 | 12 V to 20.3 V | Open-frame regulator with dial knob, stuck with 3M tape inside a clear plastic box screwed to the base. |
| E | Digital voltmeter | x1 | Zip-tied to the base and pigtailed into the regulator output to show voltage delivered to the pump. | |
| F | Diaphragm pump | x1 | 12 V, 1.4 GPM | Mounted to the right side of the plywood base with four #8 x 3/4 in wood screws. |
| G | Spray wand | x1 | Existing sprayer wand and trigger assembly fed by the pump outlet. |
Before you start
Tank and base preparation
- Flush the sprayer tank and wand hose with clean water to clear chemical residue.
- Cut the scrap plywood board to fit the bottom metal frame stand; paint it black.
Step by step
Step 1: Modify and install the tank outlet housing
Turn the backpack sprayer tank (A) internal pressure cylinder into a sealed, gravity-fed bottom outlet.
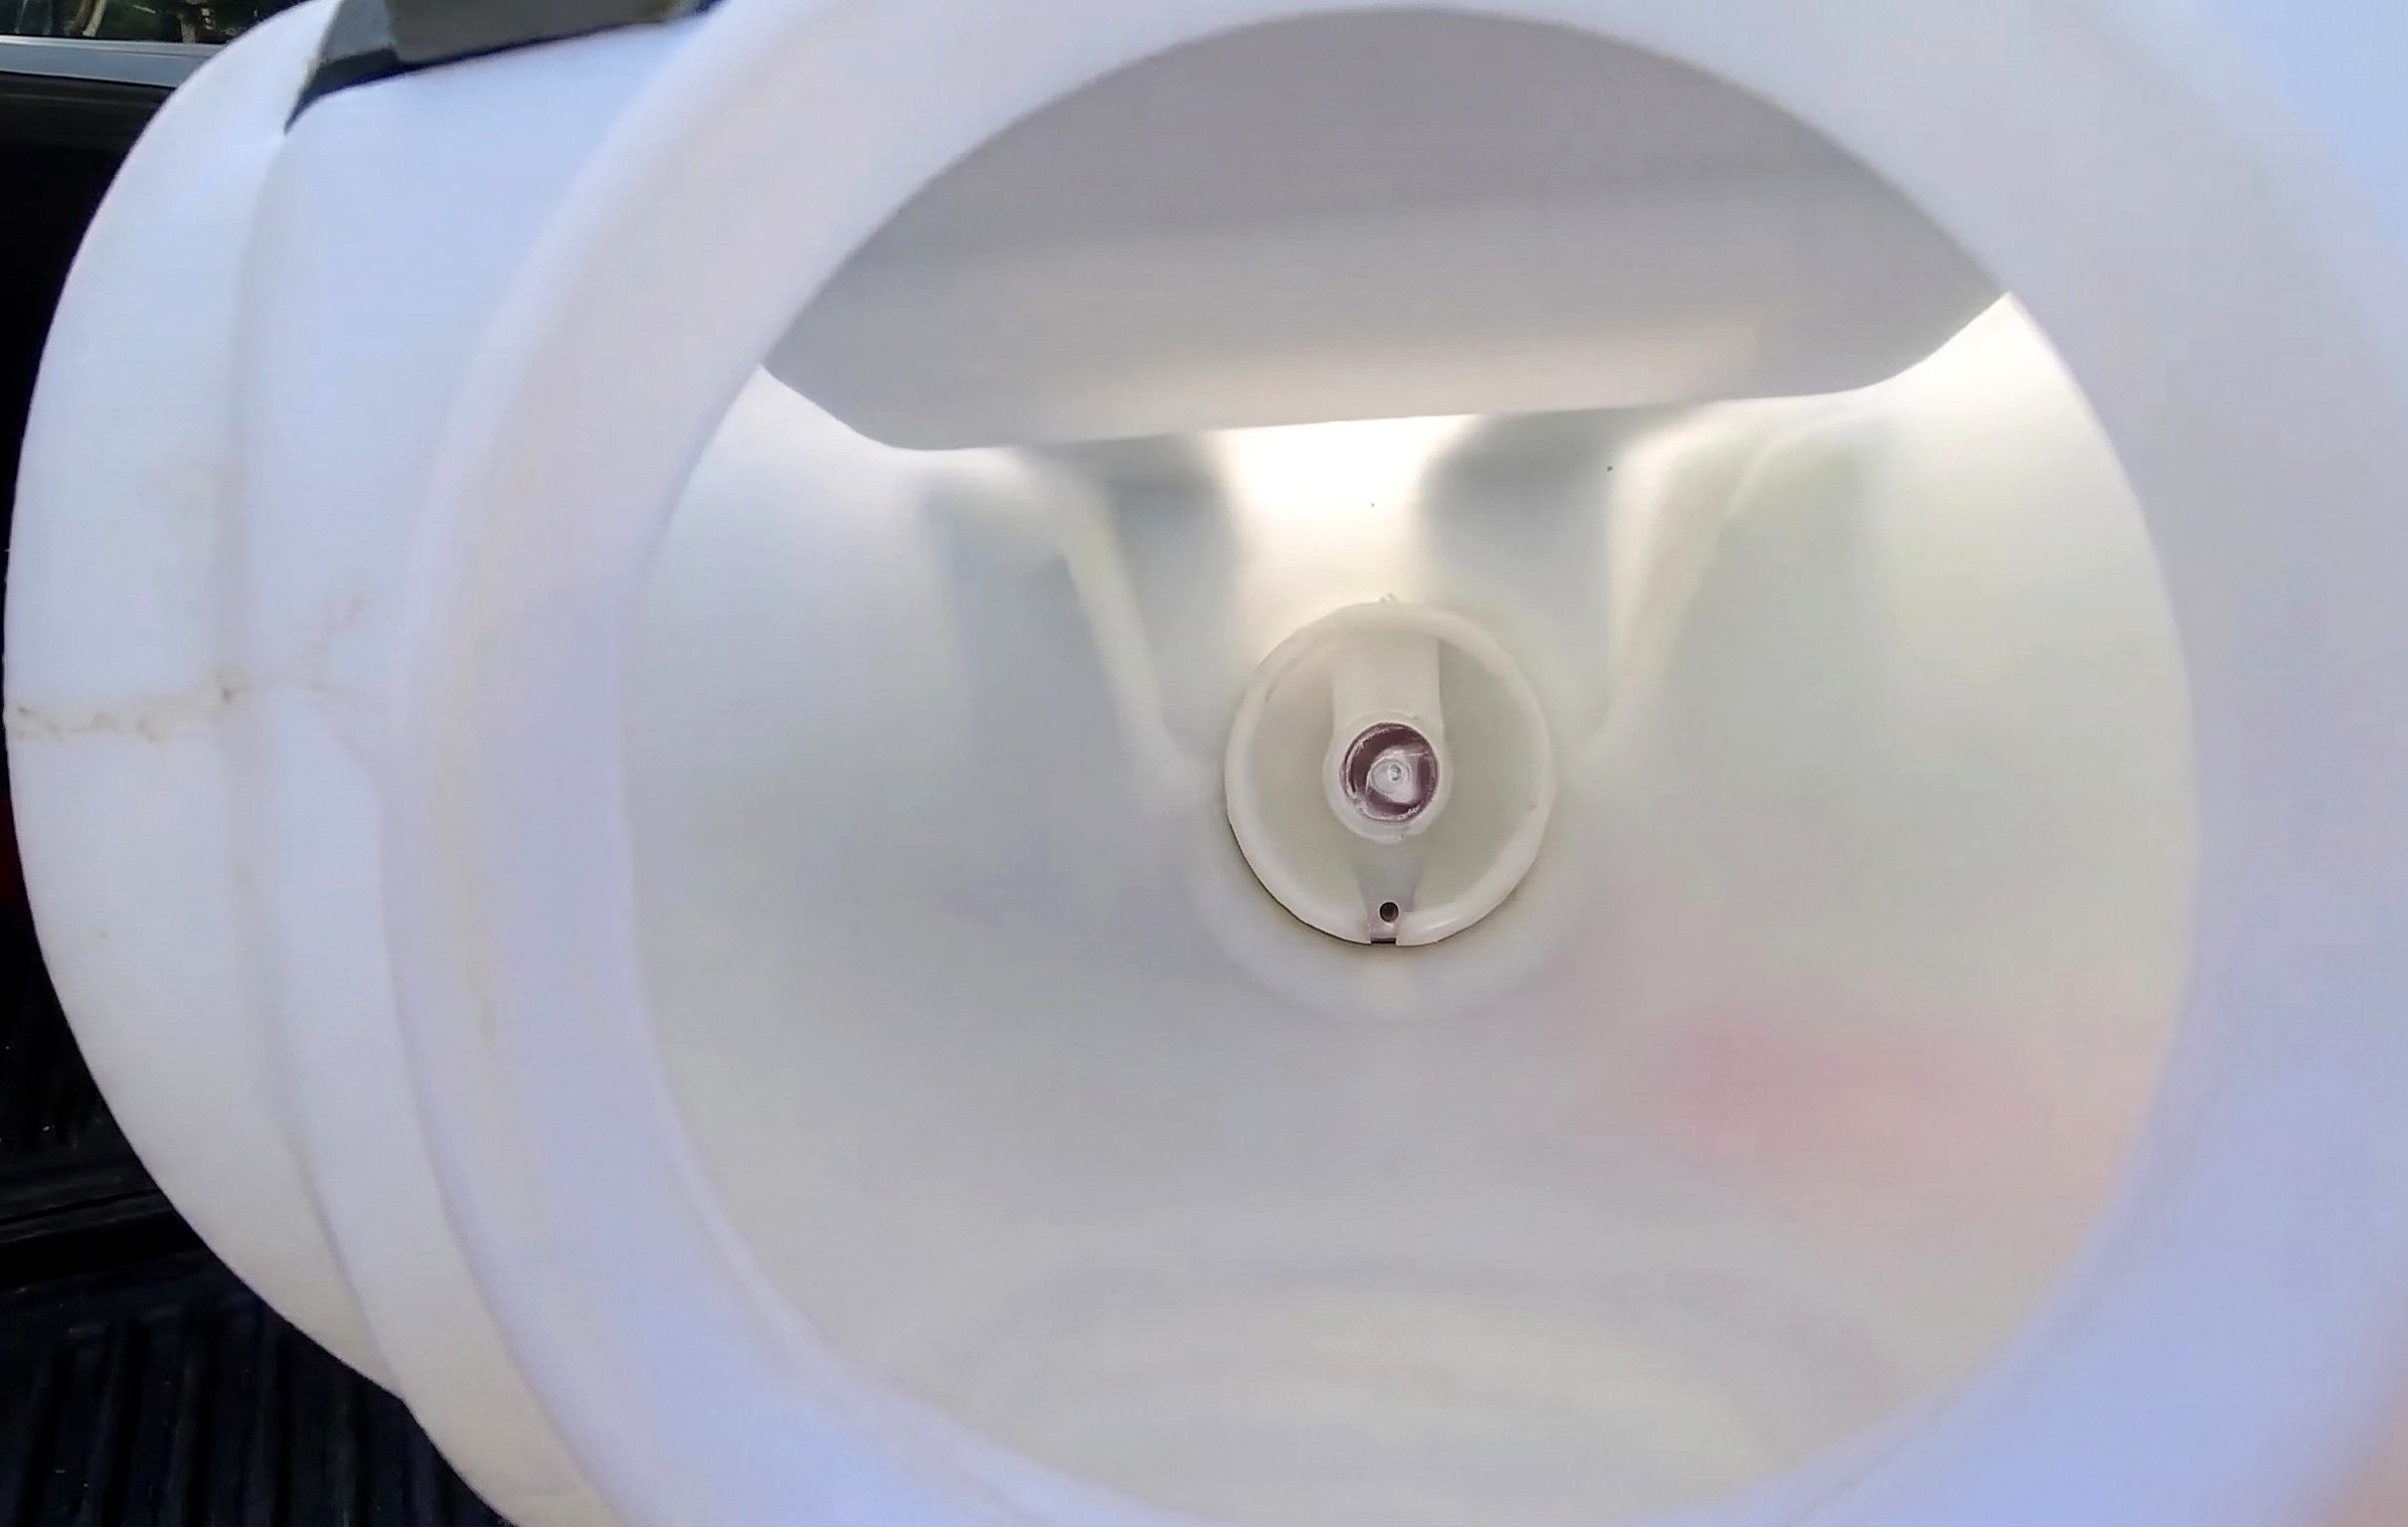
Parts in this step: (A) Backpack sprayer tank
You'll need: Hacksaw, Screwdriver, Manual backpack sprayer, Silicone sealant
- 1.1 Disassemble the manual pump linkage and remove the internal cylinder
- Unbolt the pump lever arm and connecting rod from backpack sprayer tank (A).
- Pull the bottom plunger assembly down out of the cylinder base.
- Pull the internal plastic pressure cylinder out the tank bottom opening.
- 1.2 Cut the top and bottom off the internal pressure cylinder
- Hacksaw the upper dome off the plastic pressure cylinder.
- Find the side outlet spout on the lower threaded collar housing.
- Cut off the lower plunger tube below the side outlet spout.
- Never cut above or into the side outlet spout, or liquid leaks.
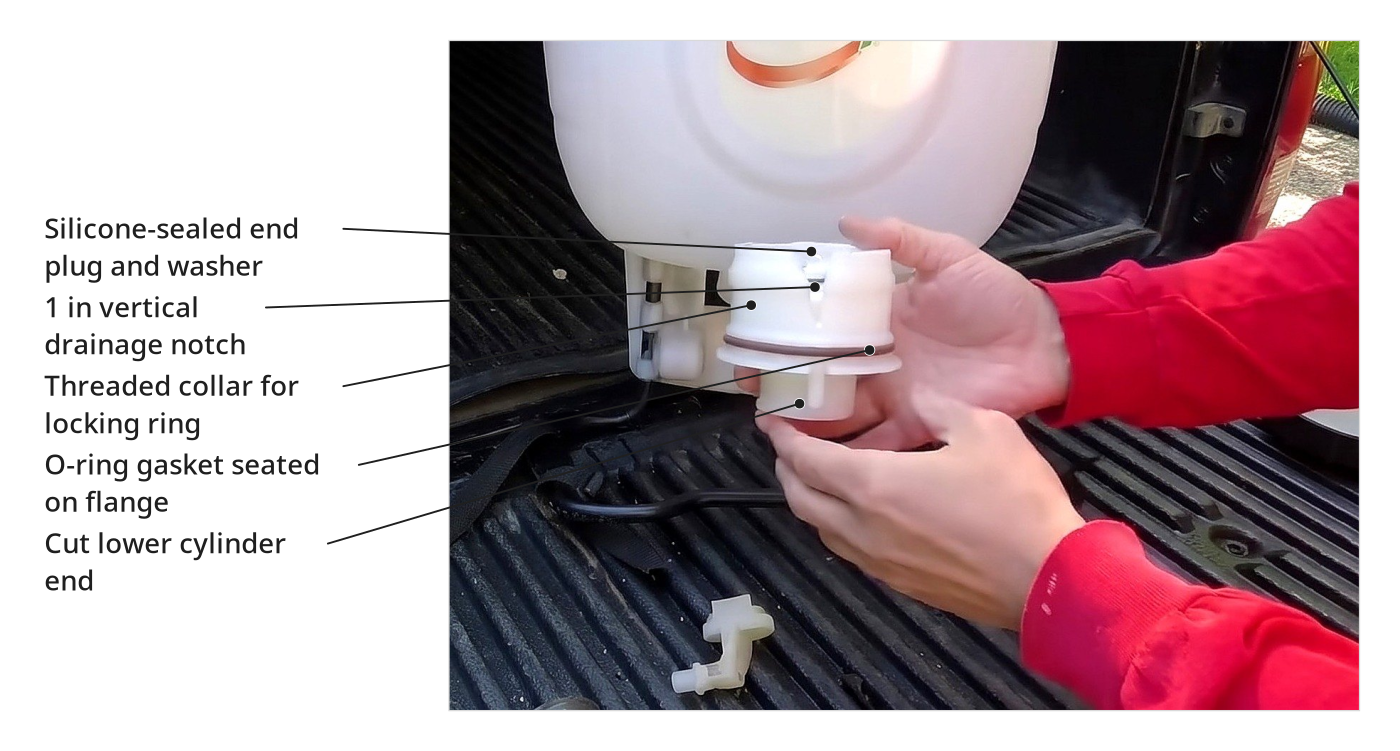
- 1.3 Seal the cylinder housing ports with silicone
- Unscrew the washer and screw from both ends of the cut housing.
- Fill the top, bottom, and small inlet cavities with silicone sealant.
- Reinstall both washers and screws over wet silicone to block the pressure passages.
- 1.4 Cut a drainage notch and reinstall the outlet housing
- Saw a vertical drainage notch in the threaded housing collar wall.
- Seat the O-ring gasket on the modified housing and insert it into the tank.
- Hand-tighten the plastic locking ring onto the collar until the gasket seals.
Key measurements
- Tank capacity: 4 gal nominal (slightly more after removing the internal cylinder).
- Drainage notch depth: ~1 in through the bottom collar rim to drain the tank floor.
- Tip: Removing the internal pressure cylinder raises liquid capacity, throwing off the side volume markings.
- Tip: Cut the vertical notch full-depth so the last inch of liquid drains.
- Heads up: Rinse and neutralize chemical residue in the tank before sawing or handling internal parts.
Before you move on: Check cured silicone plugs and bottom locking ring: only the side spout stays open.
Step 2: Wire the test circuit and fit the mounting board
Bench-test the 20 V to 12 V circuit and fit the painted plywood base to the sprayer frame.
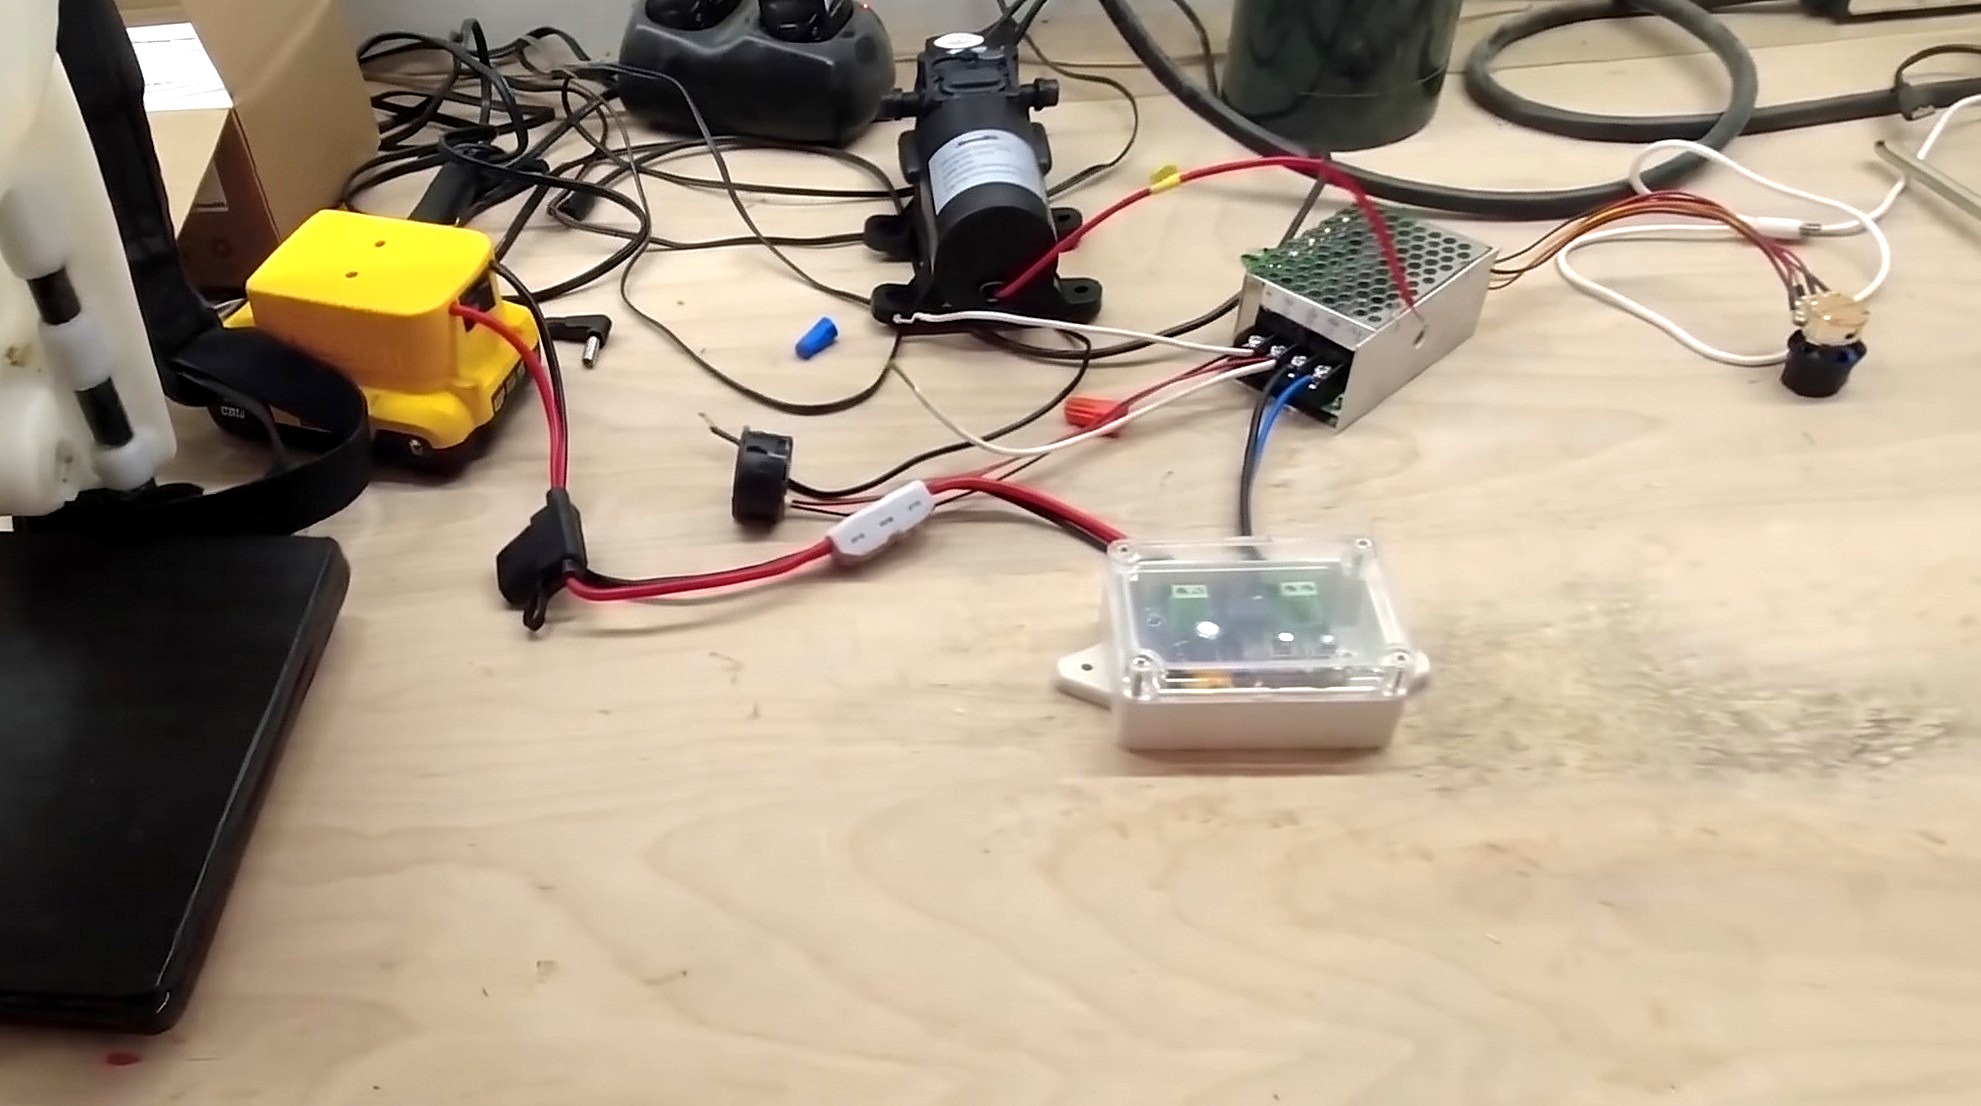
Parts in this step: (A) Backpack sprayer tank, (B) Battery adapter, (C) Low-voltage protection board, (D) Variable voltage controller, (E) Digital voltmeter, (F) Diaphragm pump
You'll need: Wire strippers, Screwdriver, Cordless tool battery, Battery adapter and voltage regulator kit, 12V diaphragm pump, Quick-connect lever wire connector, Plywood board, Black paint
- 2.1 Wire the battery harness, cutoff board, and voltage controller on the bench
- Land battery adapter (B) leads on low-voltage protection board (C) input terminals.
- Wire protection board outputs to variable voltage controller (D) input terminals.
- Splice digital voltmeter (E) and diaphragm pump (F) leads to the controller output.
- Match positive and negative polarity at every terminal to prevent board damage.
- 2.2 Test-fit the painted plywood mounting board on the sprayer frame
- Cut the plywood board to fit the under-tank metal stand.
- Paint the plywood board black and let it dry.
- Set the board on the tubular frame to plan component and clamp positions.
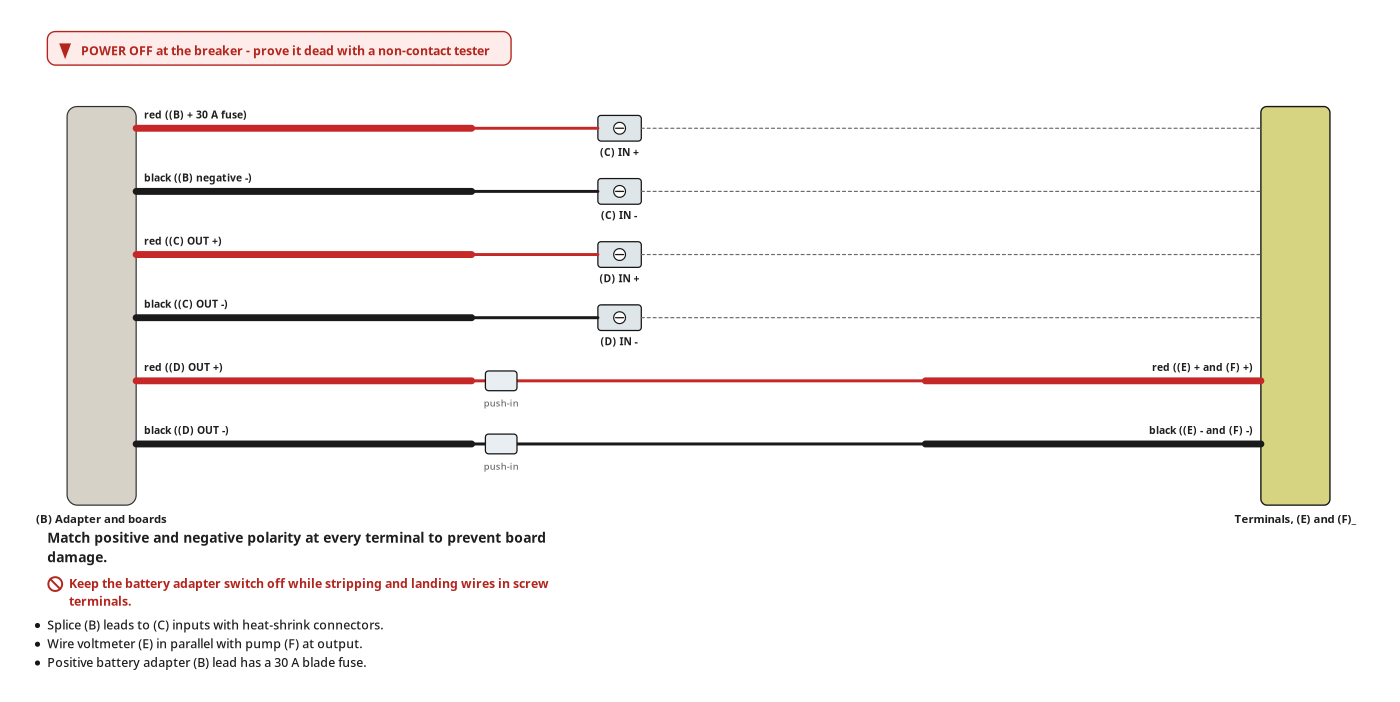
Key measurements
- Supply voltage: 20.4 V from a charged 20 V Max lithium-ion battery
- Inline fuse rating: 30 A on the positive battery adapter lead
- Regulator output range: adjustable from 12 V to 20.3 V.
- Tip: Wire the digital voltmeter in parallel with the regulator output to read pump voltage.
- Heads up: Keep the battery adapter switch off while stripping and landing wires in screw terminals.
Before you move on: Slide the battery onto the adapter, switch on, and check both digital displays light up.
Step 3: Mount the components, plumbing, and enclosure to the base
Mount electrical modules, enclosure, plumbing hoses, and plywood base to the backpack sprayer frame.
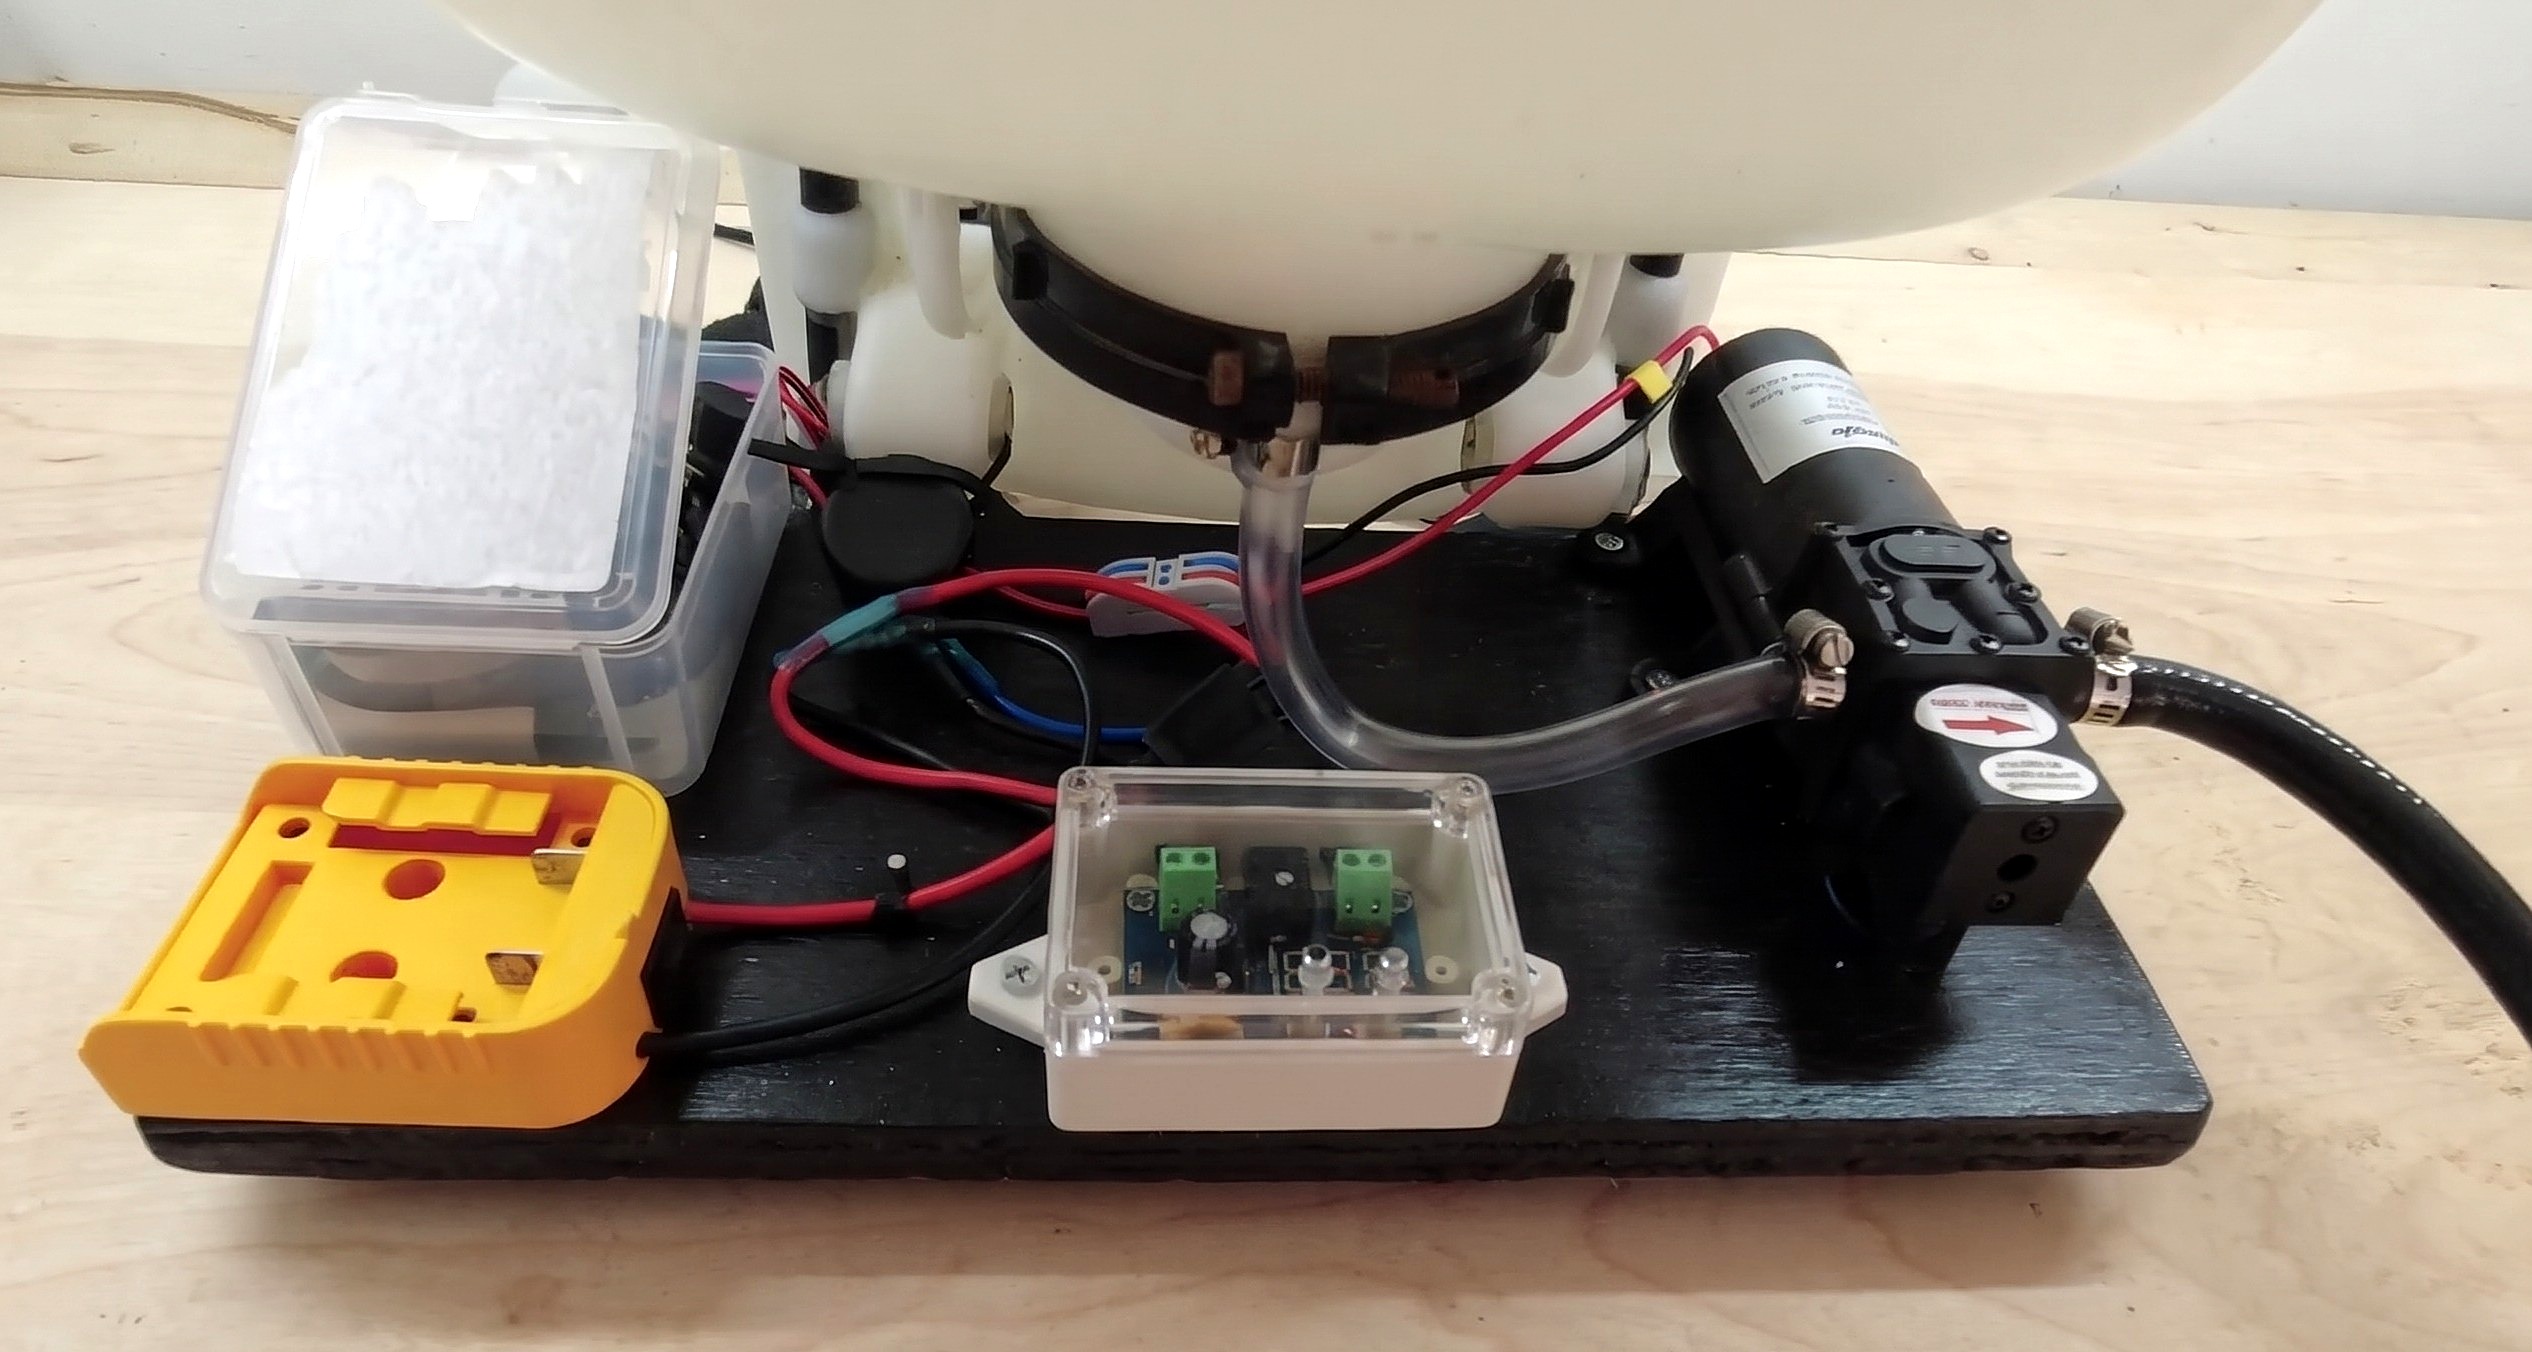
Parts in this step: (A) Backpack sprayer tank, (B) Battery adapter, (C) Low-voltage protection board, (D) Variable voltage controller, (E) Digital voltmeter, (F) Diaphragm pump, (G) Spray wand
You'll need: Cordless drill, Screwdriver, Wire strippers, Propane torch, Manual backpack sprayer, Battery adapter and voltage regulator kit, 12V diaphragm pump, Quick-connect lever wire connector, Plywood board, Conduit clamps, Wood screws, Heat-shrink butt connectors, Plastic storage box, Double-sided mounting tape, Zip ties, Clear vinyl tubing, Hose clamps
- 3.1 Mount the battery adapter and low-voltage cutoff board and crimp leads
- Screw battery adapter (B) and low-voltage protection board (C) to the plywood base.
- Crimp heat-shrink butt connectors onto leads between the adapter and protection board.
- Pass a propane torch flame briefly over each butt connector to shrink the insulation.
- 3.2 Mount the voltage controller inside a plastic box and wire the pump
- Drill individual wire pass-through holes in the plastic storage box front wall.
- Screw the box to the base and stick the variable voltage controller (D) inside.
- Route input and output leads through the holes so the lid closes.
- Zip-tie digital voltmeter (E) in place and splice diaphragm pump (F) leads.
- 3.3 Connect the hoses and mount the 12V pump to the base
- Place diaphragm pump (F) on the right side, outlet facing right.
- First connect clear tubing between backpack sprayer tank (A) spout and pump inlet.
- Curve the tube smoothly and tighten hose clamps on both barbs.
- Fasten the four pump feet to the base with #8 x 3/4 in screws.
- Clamp the black hose from spray wand (G) onto the pump outlet barb.
- 3.4 Clamp the plywood base to the sprayer frame
- Tilt the sprayer up to expose the tubular metal frame underside.
- Fit one-hole conduit clamps over the metal frame tubes against the plywood underside.
- Drive #8 x 3/4 in wood screws through each conduit clamp into the plywood.
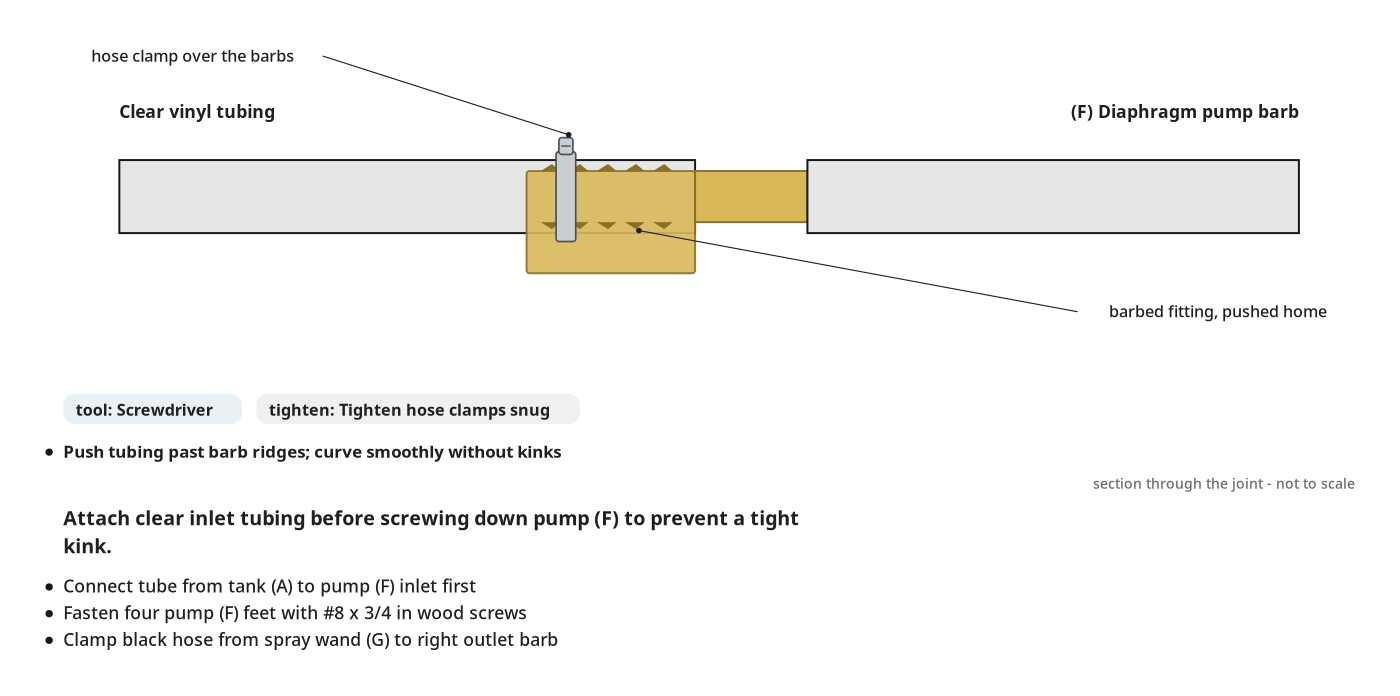
Key measurements
- Fastener size: #8 x 3/4 in flat-head wood screws for board mounts.
- Pump flow rating: 1.4 GPM at 12 V DC
- Tip: Attach clear inlet tubing before screwing down the pump to prevent a tight kink.
- Tip: Use a lever quick-connect on pump leads so a failed pump swaps in minutes.
- Heads up: Vent the plastic enclosure slightly on long runs if the voltage controller gets warm.
Before you move on: Check the clear inlet tube curves smoothly without kinks and hose clamps are snug.
Step 4: Configure the low-voltage cutoff board
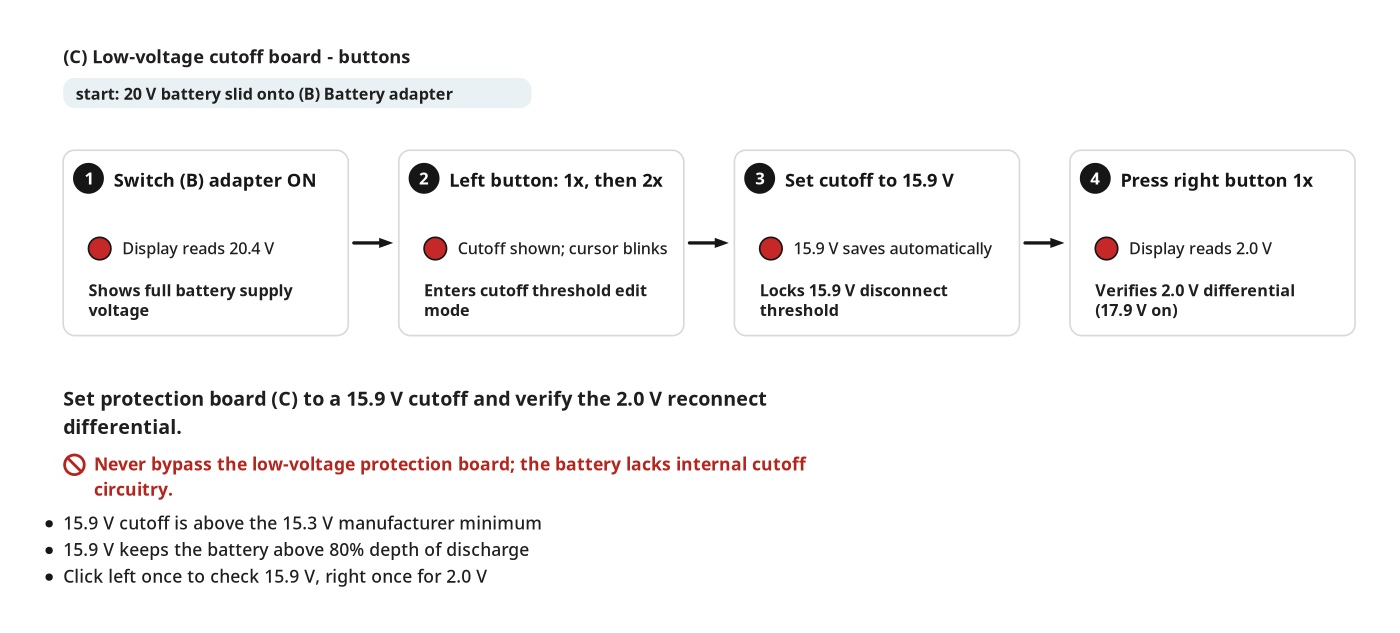
Set low-voltage protection board (C) to cut power at 15.9 V before the lithium-ion battery over-discharges.
Parts in this step: (B) Battery adapter, (C) Low-voltage protection board
You'll need: Cordless tool battery, Battery adapter and voltage regulator kit
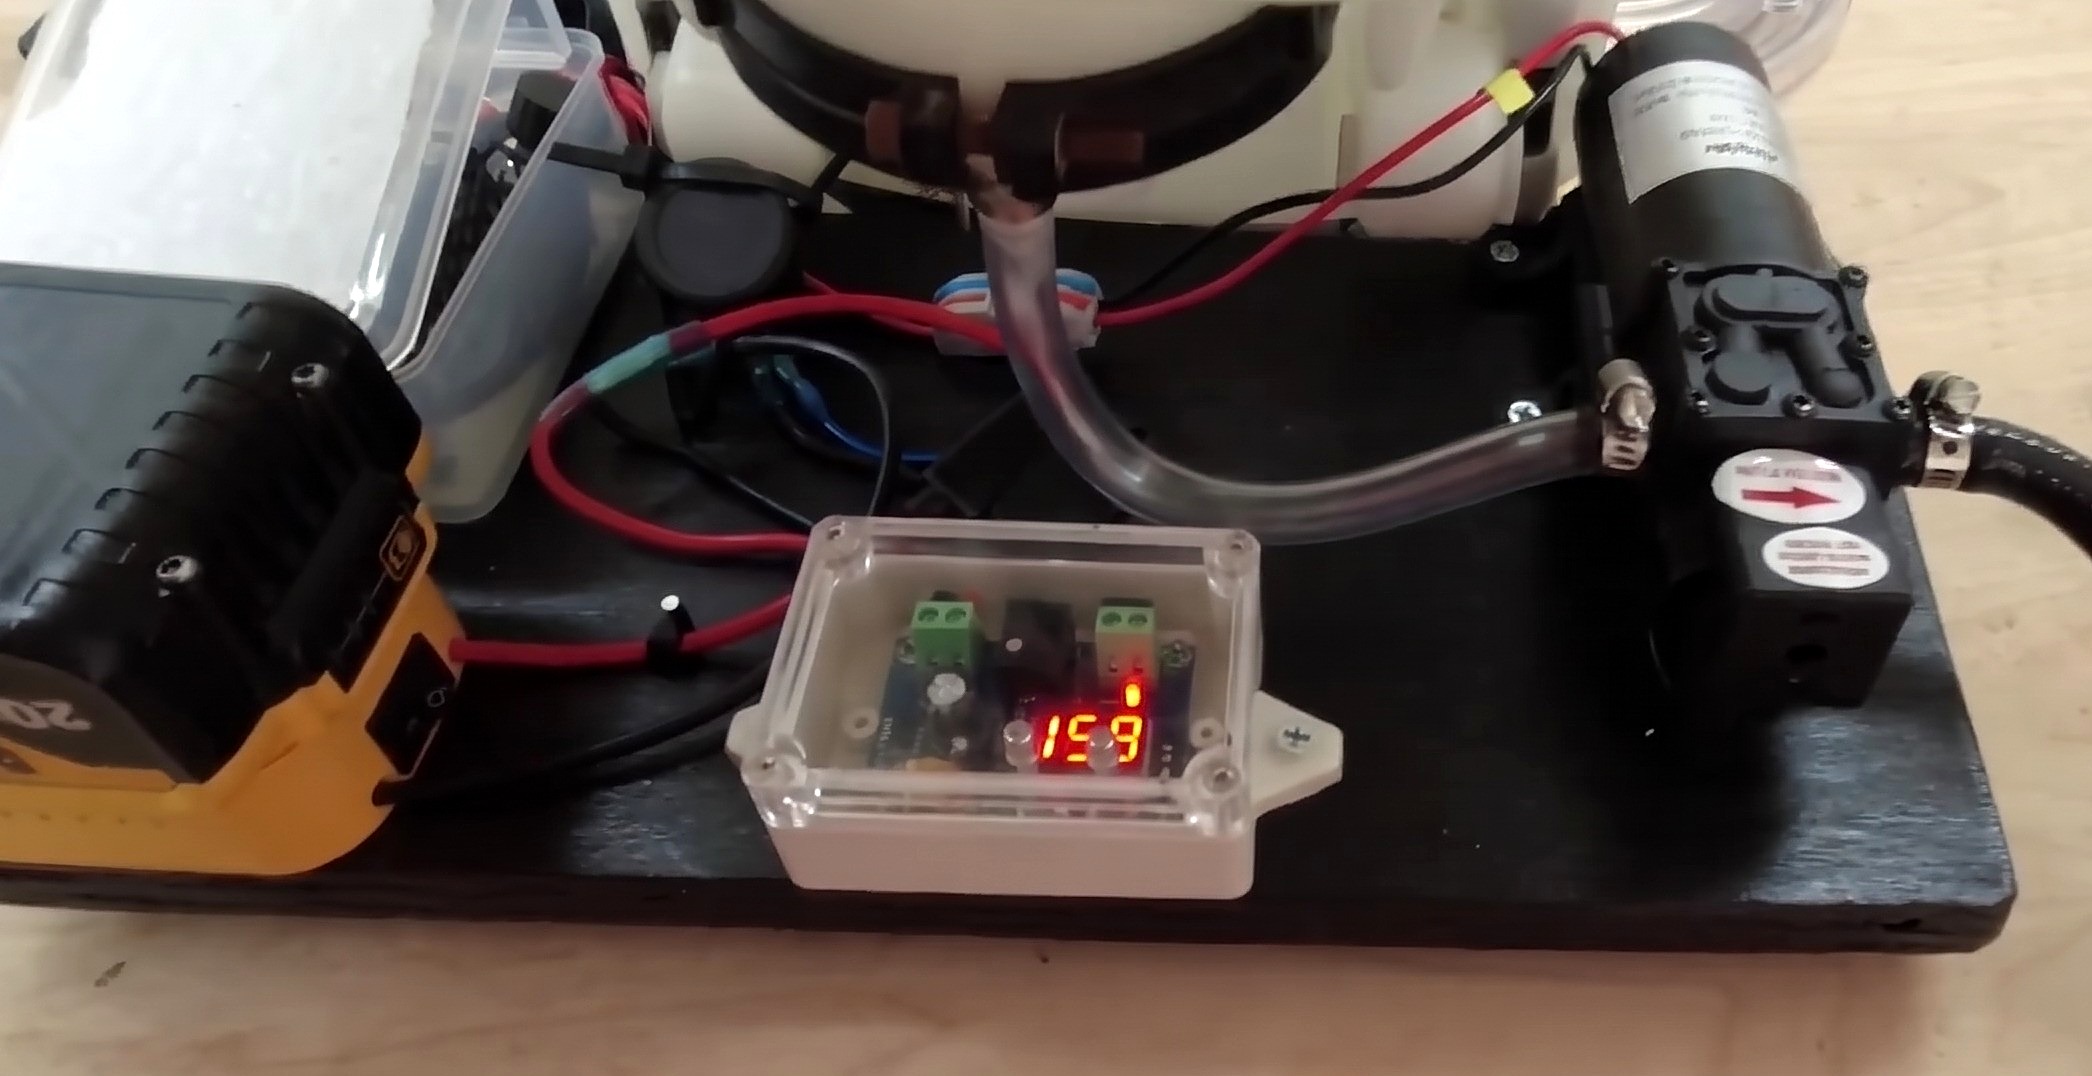
- 4.1 Set the low-voltage disconnect threshold to 15.9V
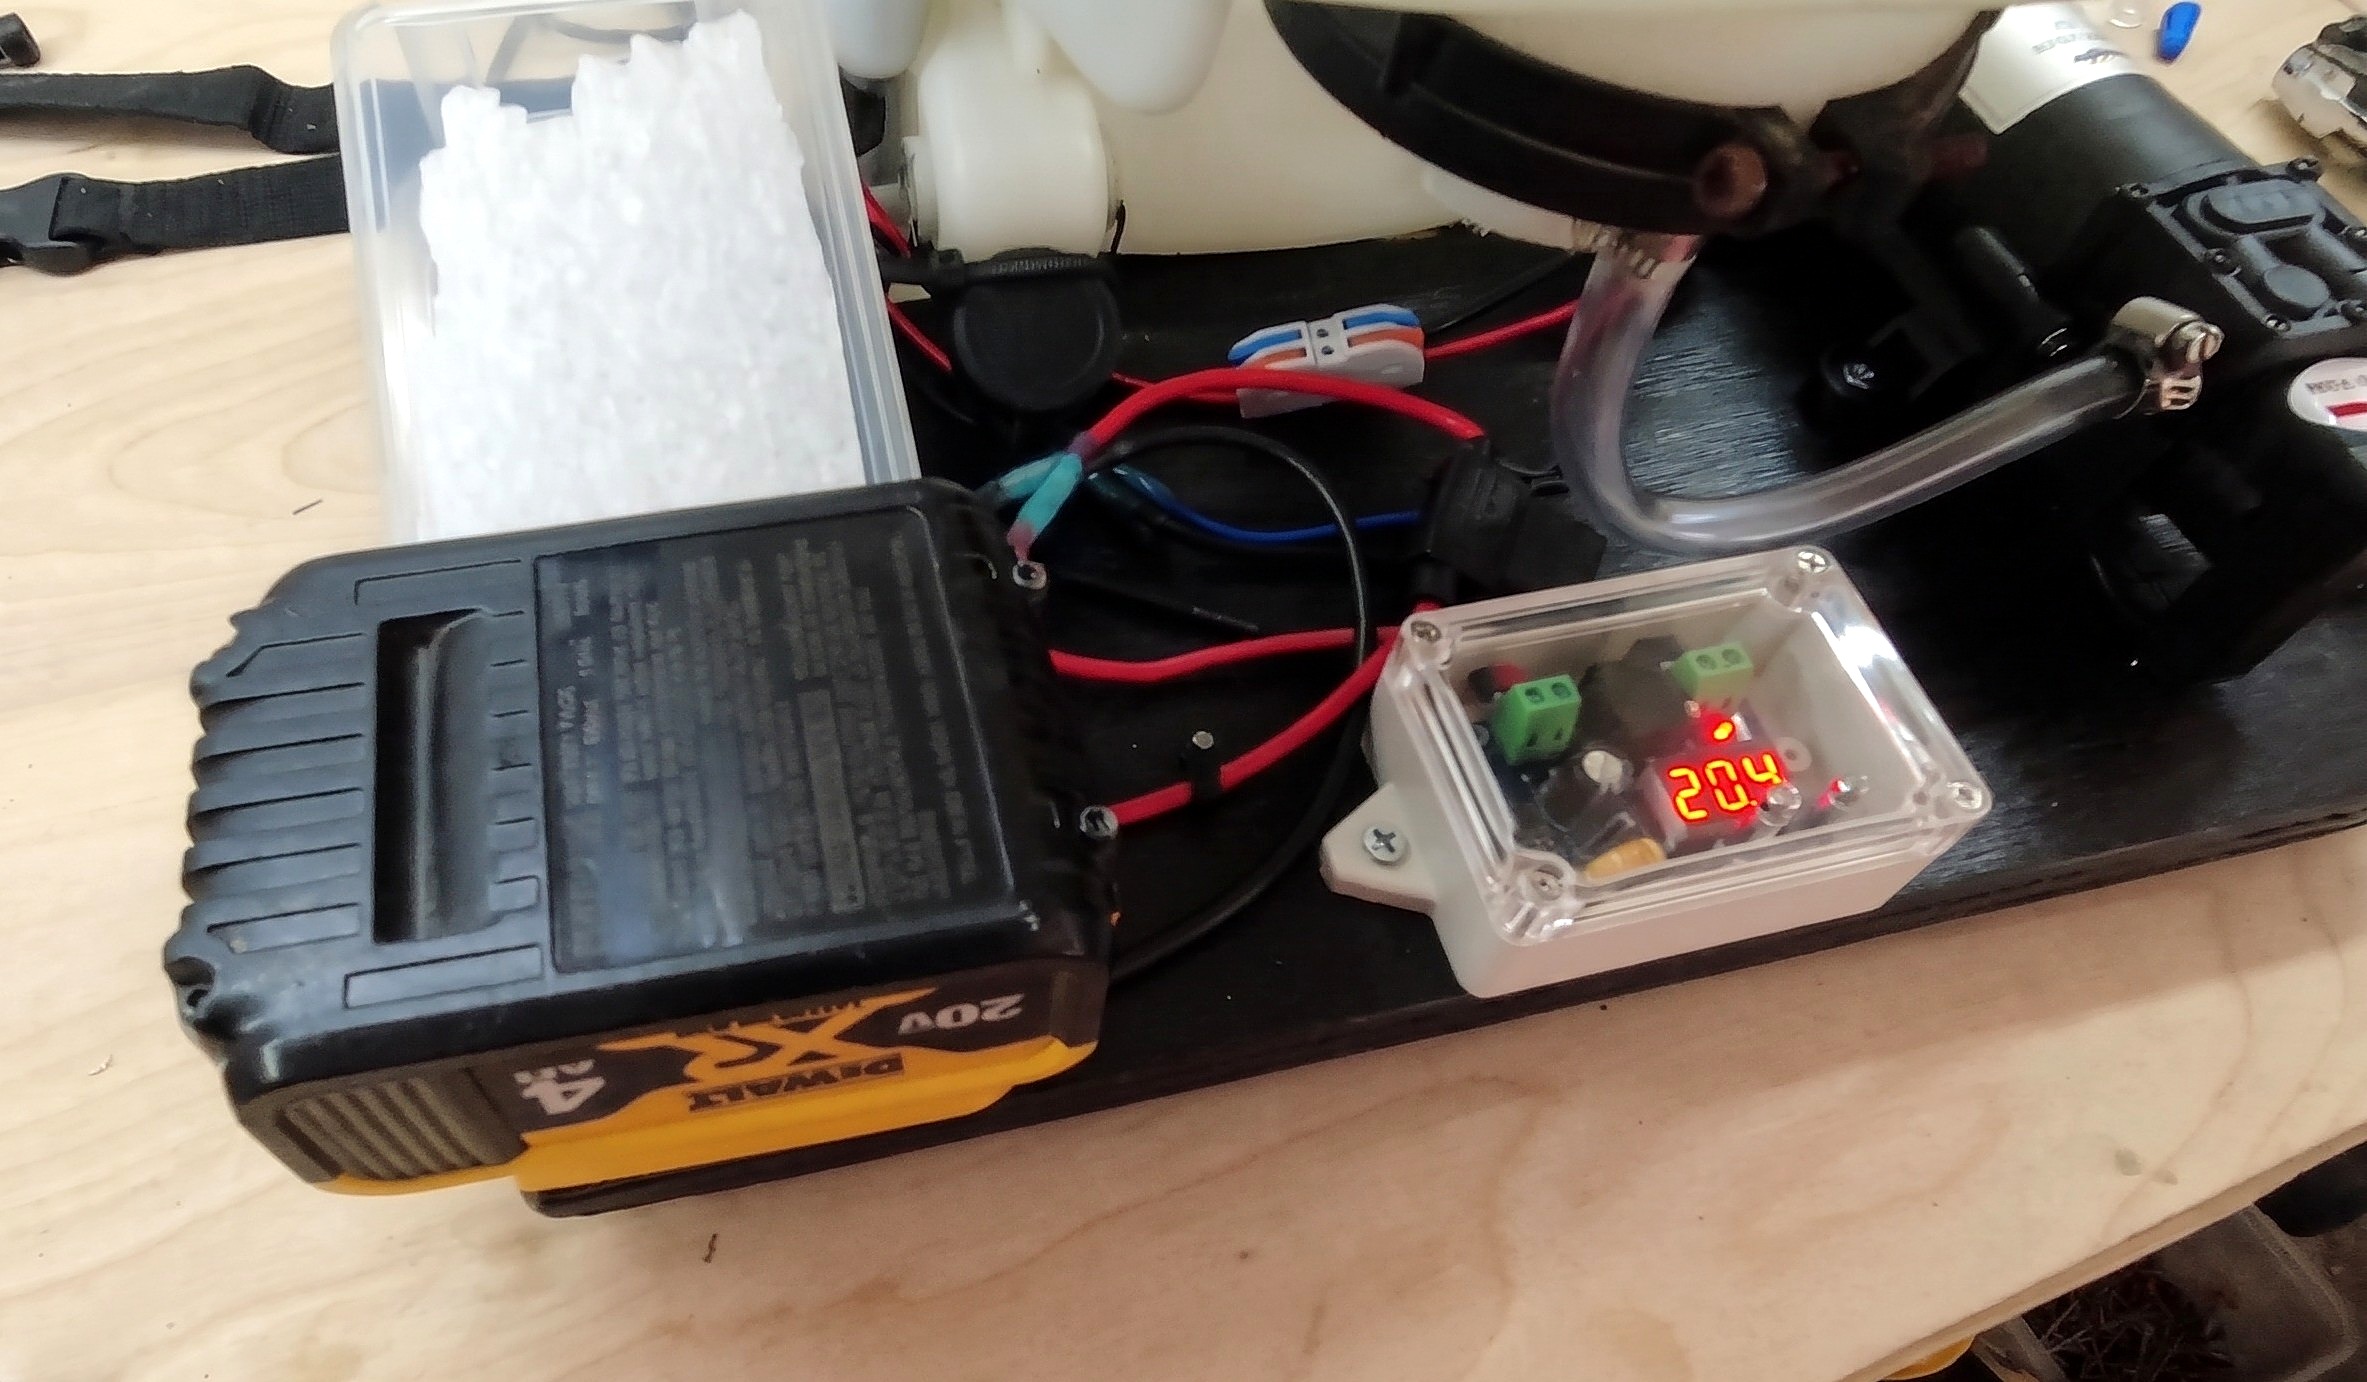
- Slide a battery onto battery adapter (B) and switch the power on.
- Press the low-voltage protection board (C) left button to view the cutoff.
- Double-tap the left button until the digital display cursor blinks.
- Set the disconnect threshold to 15.9 V and let the display save.
- 4.2 Verify the reconnect voltage differential setting
- Press the low-voltage protection board (C) right button to check the differential.
- Check the display reads 2.0 V, requiring 17.9 V to restart after cutoff.
Key measurements
- Full battery voltage reading: 20.4 V
- Low-voltage cutoff threshold: 15.9 V (above the 15.3 V manufacturer minimum).
- Reconnect voltage differential: 2.0 V above cutoff
- Tip: A 15.9 V cutoff keeps the battery above 80% depth of discharge.
- Heads up: Never bypass the low-voltage protection board; the tool battery lacks internal cutoff circuitry.
Before you move on: Click the left button once to check 15.9 V, and the right once for 2.0 V.
Step 5: Prime the pump, calibrate voltage, and test spray
Leak-test the gravity feed, prime the diaphragm pump (F), set voltage to 12 V under load, and test-spray.
Parts in this step: (A) Backpack sprayer tank, (B) Battery adapter, (D) Variable voltage controller, (E) Digital voltmeter, (F) Diaphragm pump, (G) Spray wand
You'll need: Cordless tool battery, Manual backpack sprayer, Battery adapter and voltage regulator kit, 12V diaphragm pump
- 5.1 Fill the tank with water, prime the pump, and calibrate to 12V under load
- Close the plastic lid over variable voltage controller (D) to block water splashes.
- Pour 1 gallon of water into backpack sprayer tank (A) and check joints.
- Switch battery adapter (B) on and squeeze the spray wand (G) to prime.
- Turn the controller knob while spraying until digital voltmeter (E) reads 12 V.
- 5.2 Test-spray the backpack sprayer until empty
- Release the spray wand (G) trigger; check that diaphragm pump (F) stops automatically.
- Squeeze the trigger again to check the pump restarts at steady pressure.
- Spray the tank empty to check the bottom notch drains nearly all liquid.
- Switch battery adapter (B) off once the tank runs dry.
Key measurements
- Test fill volume: 1 gal of fresh water
- Calibrated pump voltage: 12 V on the voltmeter while spraying.
- Tip: Hold the plastic box lid shut with your foot while filling the tank so splashes never hit the board.
- Tip: Always set the regulator to 12 V while the wand is spraying, not at idle.
- Heads up: Never splash water or chemicals onto the open-frame voltage controller in the plastic box.
Before you move on: Check the voltmeter reads 12 V while spraying and bottom tank and hose joints stay dry.
Finishing
Last touches
- Wrap the exposed two-pole lever connector in electrical tape to block splashes.
- Keep the plastic regulator box closed with a side latch or tape tab.
Settle and venting
- Install a one-way check valve in the tank top or lid to prevent vacuum lock.
- Remark the tank's exterior gallon lines for the removed internal cylinder.
Care
- Flush tank, pump, and wand with clean water after spraying herbicides or chemicals.
- Switch off the battery adapter and remove the 20 V battery before storage.
Alternatives
- Replace the variable voltage controller with a fixed 12 V step-down reducer to simplify wiring.
Commission & test
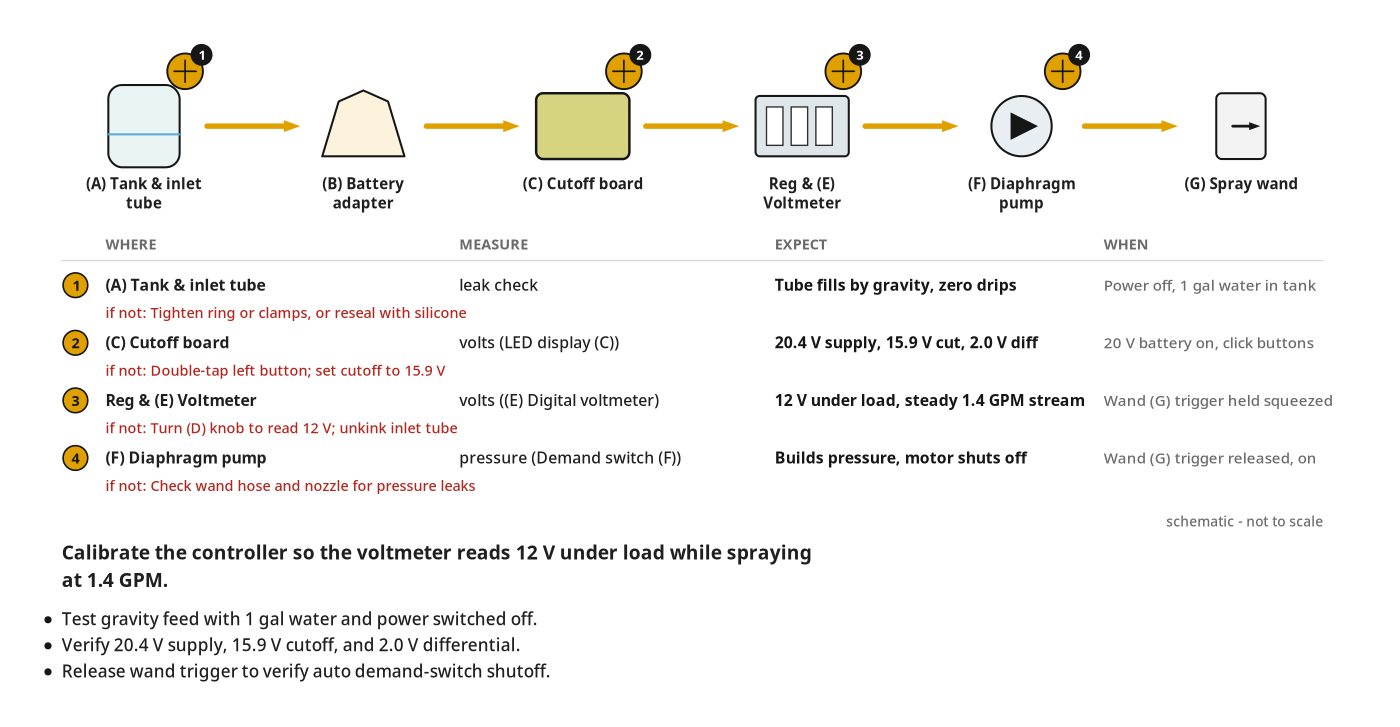
| Check | What you should see | If not |
|---|---|---|
| With power off, pour 1 gallon of water into the tank and check the bottom collar and hose barbs. | Water fills the clear pump inlet tube with zero drips at the tank gasket, silicone plugs, or hose clamps. | Tighten the bottom locking ring or worm-gear hose clamps, or reseal internal cylinder ports with silicone. |
| With a charged 20 V battery attached, click the low-voltage protection board left and right buttons. | The board shows 20.4 V supply, 15.9 V cutoff (left button), and 2.0 V differential (right button). | Double-tap the left button until the cursor blinks; set the threshold to 15.9 V. |
| Hold the spray wand trigger squeezed while watching the digital voltmeter. | The pump primes, sprays a steady stream, and the voltmeter reads 12 V under load. | Turn the variable voltage controller knob until the voltmeter reads 12 V while spraying; unkink the inlet tube. |
| Release the spray wand trigger with the power switch on. | The pump builds line pressure and its internal demand switch shuts the motor off automatically. | Check the wand hose and nozzle for leaks stopping line pressure from building. |
These Specs are built from Indy Farm Life's video “Battery-Powered Backpack Sprayer Conversion”. Open the Battery-Powered Backpack Sprayer Conversion project page.
