Spetz Specs No. 5105: step-by-step build guide
DIY Retractable Sun Shade for a Floating Dock
The complete step-by-step guide made from Indy Farm Life's YouTube video, free on Spetz. For the video, a step-by-step player and answers to your questions, see the DIY Retractable Sun Shade for a Floating Dock project page.
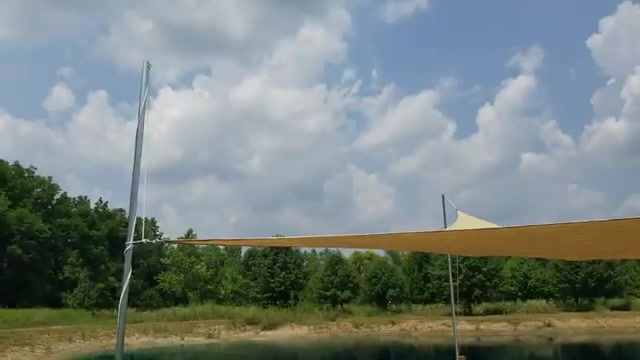
2 steps, 4 parts, 3 tools, 9 materials
Overview
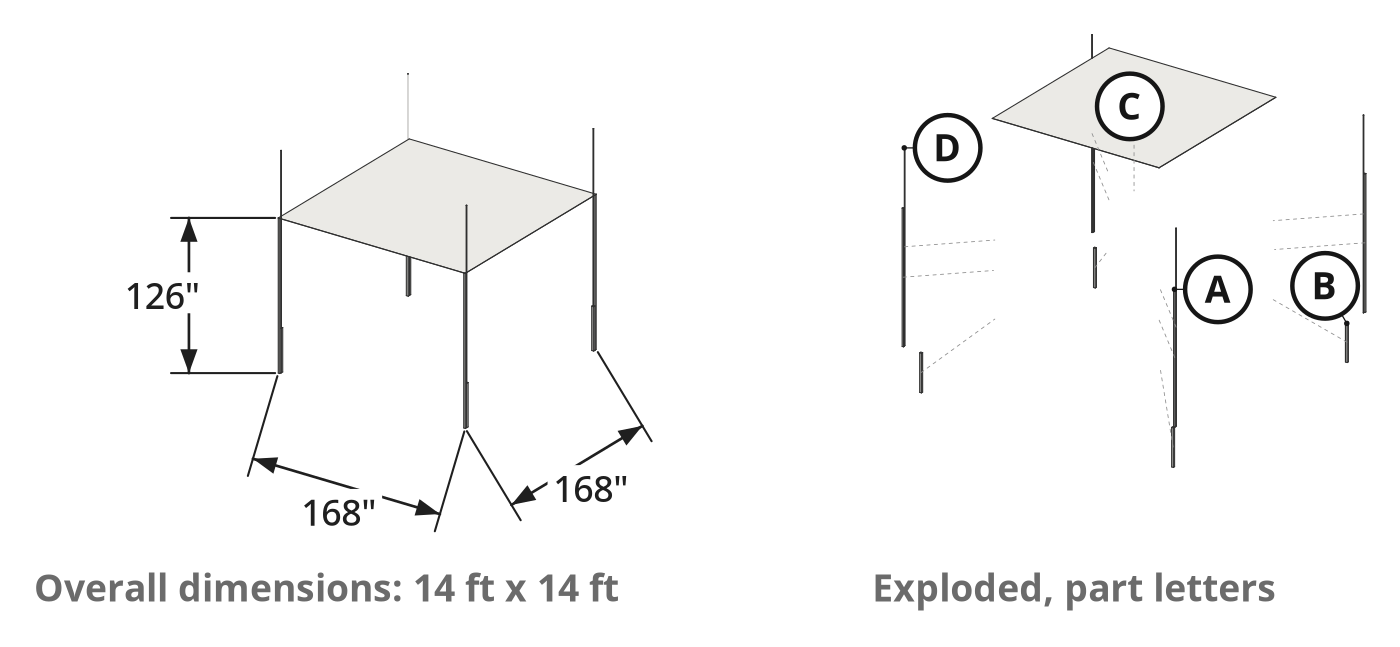
Finished size: 168 in x 168 in x 126 in
What You Are Building
- Build a retractable 14 ft by 14 ft floating-dock sun shade.
- Replace bulky pop-up tents with four dock-post corner flagpoles.
- Raise, lower, or tilt the canopy with corner hoist ropes and cleats.
Why This Design Works
- Galvanized fence top rails slide into three-foot pipe sleeves on 4x4 posts.
- Gravity holds poles in sleeves for tool-free winter removal.
- Corner eye bolts and cleats drop one side against low sun.
What It Takes
- Cut steel pipe with a metal saw; drill steel and wood.
- Have a helper hold sleeves and hoist poles.
What Decides Success
- Drive stop pins through sleeve bottoms to keep poles out of water.
- A 14 ft shade in a 16 ft post footprint keeps tension tight.
Health and safety
Cutting and Drilling Metal
- Wear protective equipment, including safety glasses and gloves, when cutting the metal pipe sleeves and drilling the galvanized top rails.
- Secure the round metal pipes and fence rails before cutting or drilling so the stock cannot spin or bind the blade.
- Keep bare hands clear of sharp burrs and hot metal shavings on freshly cut pipe ends and drilled eye-bolt holes.
Floating Dock and Water Hazards
- Clear the dock deck and secure tools and hardware away from the edge so nothing rolls into the water.
- Keep loose rope, conduit clamps, and tools out of walkways so nobody trips and falls off the floating dock.
- Keep a balanced stance on the moving dock deck when lifting the long chain-link fence top rails into their sleeves.
Pole and Hardware Security
- Insert the 16-penny nail stop pin into each 3-foot sleeve before loading a main pole so it cannot plunge into the water.
- Drill through the sleeve and pole to install a locking bolt if strong winds could lift the gravity-mounted poles.
- Fasten all conduit clamps and rope cleats tightly to the 4x4 dock posts to hold the 14x14 foot shade against wind.
Canopy Use and Clearance
- Check walk-under clearance after angling one side of the shade down so nobody hits their head on the low edge.
- Keep fingers clear of the eye bolts and rope cleats while hoisting or lowering the canopy under rope tension.
- Lower the retractable sun shade during strong winds so the 14x14 foot canopy cannot catch wind and overload the poles.
Tools
- Drill (Cordless drill/driver)
- Metal saw
- Tape measure
Materials
- Sun Shade (1, canopy shade, 14' x 14')
- Chain-link fence top rail (4, galvanized steel top rail, 10' 6")
- Metal pipe (2, 6')
- Conduit clamps (8)
- Rope cleats (4)
- Bolt snaps (4)
- Eye bolts with nuts (4, metal eye bolt)
- Rope (1 roll, white rope)
- 16-penny nails (4)
Hardware
| Hardware | Size | Count | Used in steps |
|---|---|---|---|
| Conduit clamps | 8 | 1 | |
| 16-penny nails | 4 | 1 | |
| Eye bolts with nuts | 4 | 1 | |
| Screws | 1 | ||
| Bolt snaps | 4 | 2 |
Cut list
| Part | Name | Qty | Size | Notes |
|---|---|---|---|---|
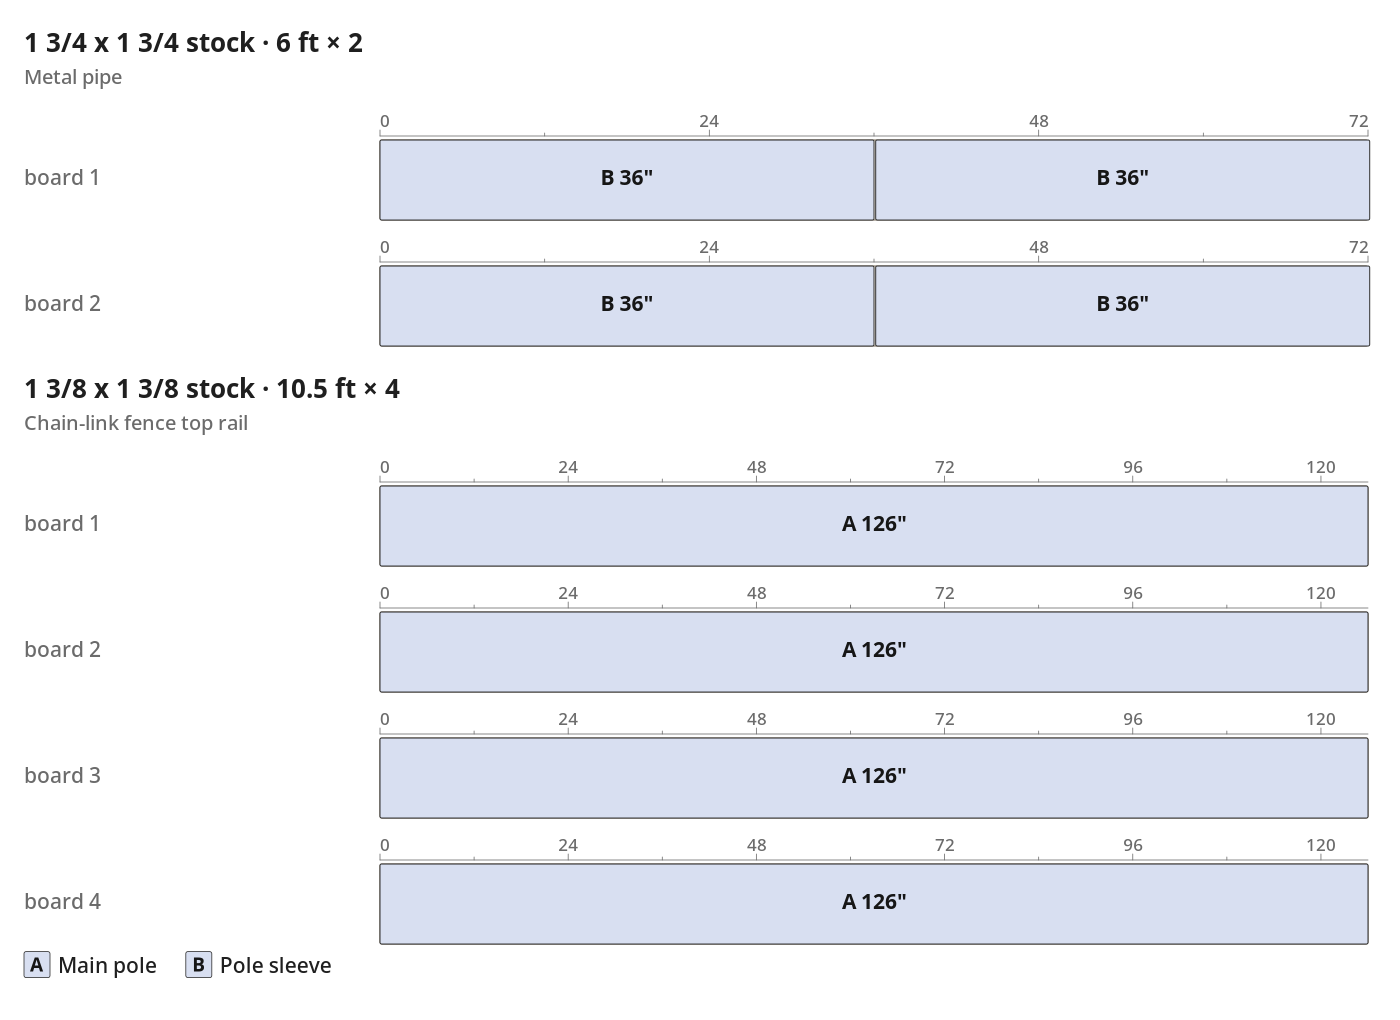
| A | Main pole | x4 | 1 3/8" (T) × 1 3/8" (W) × 126" (H) | Used at full stock length; drill a through-hole near the top of each pole to install an eye bolt. |
| B | Pole sleeve | x4 | 1 3/4" (T) × 1 3/4" (W) × 36" (H) | Cut two 6 ft pipes in half to yield four 3 ft sections; drill a through-hole near the bottom of each sleeve to accept a 16-penny nail stop pin. |
| C | Sun shade canopy | x1 | 1/8" (T) × 168" (W) × 168" (L) | |
| D | Hoist line | x4 | 3/8" (T) × 3/8" (W) × 240" (H) | Cut four lengths from the rope roll to run from each shade corner through the top eye bolt down to the post cleat; tie a loop in one end of each line for the bolt snap. |
What to buy
- Buy 2 × 1 3/4 x 1 3/4 stock 6 ft (Metal pipe)
- Buy 4 × 1 3/8 x 1 3/8 stock 10.5 ft (Chain-link fence top rail)
- Buy 1 × Rope 80 ft in all (Rope)
- Buy 1 × Sun Shade each (Sun Shade)
Before you start
Material Check
- Test-fit main poles (A) in the metal pipes before cutting sleeves (B).
- Cut-list pipe diameters are estimates; check for a smooth sliding fit.
Layout and Labeling
- Mark both 6 ft metal pipes at their 36 in midpoint.
- Mark main pole (A) top holes and sleeve (B) bottom pin holes.
Step by step
Step 1: Assemble and Mount the Poles
Four pole sleeves with stop pins and rope cleats mount to the dock corner posts, holding four main poles with top eye bolts.
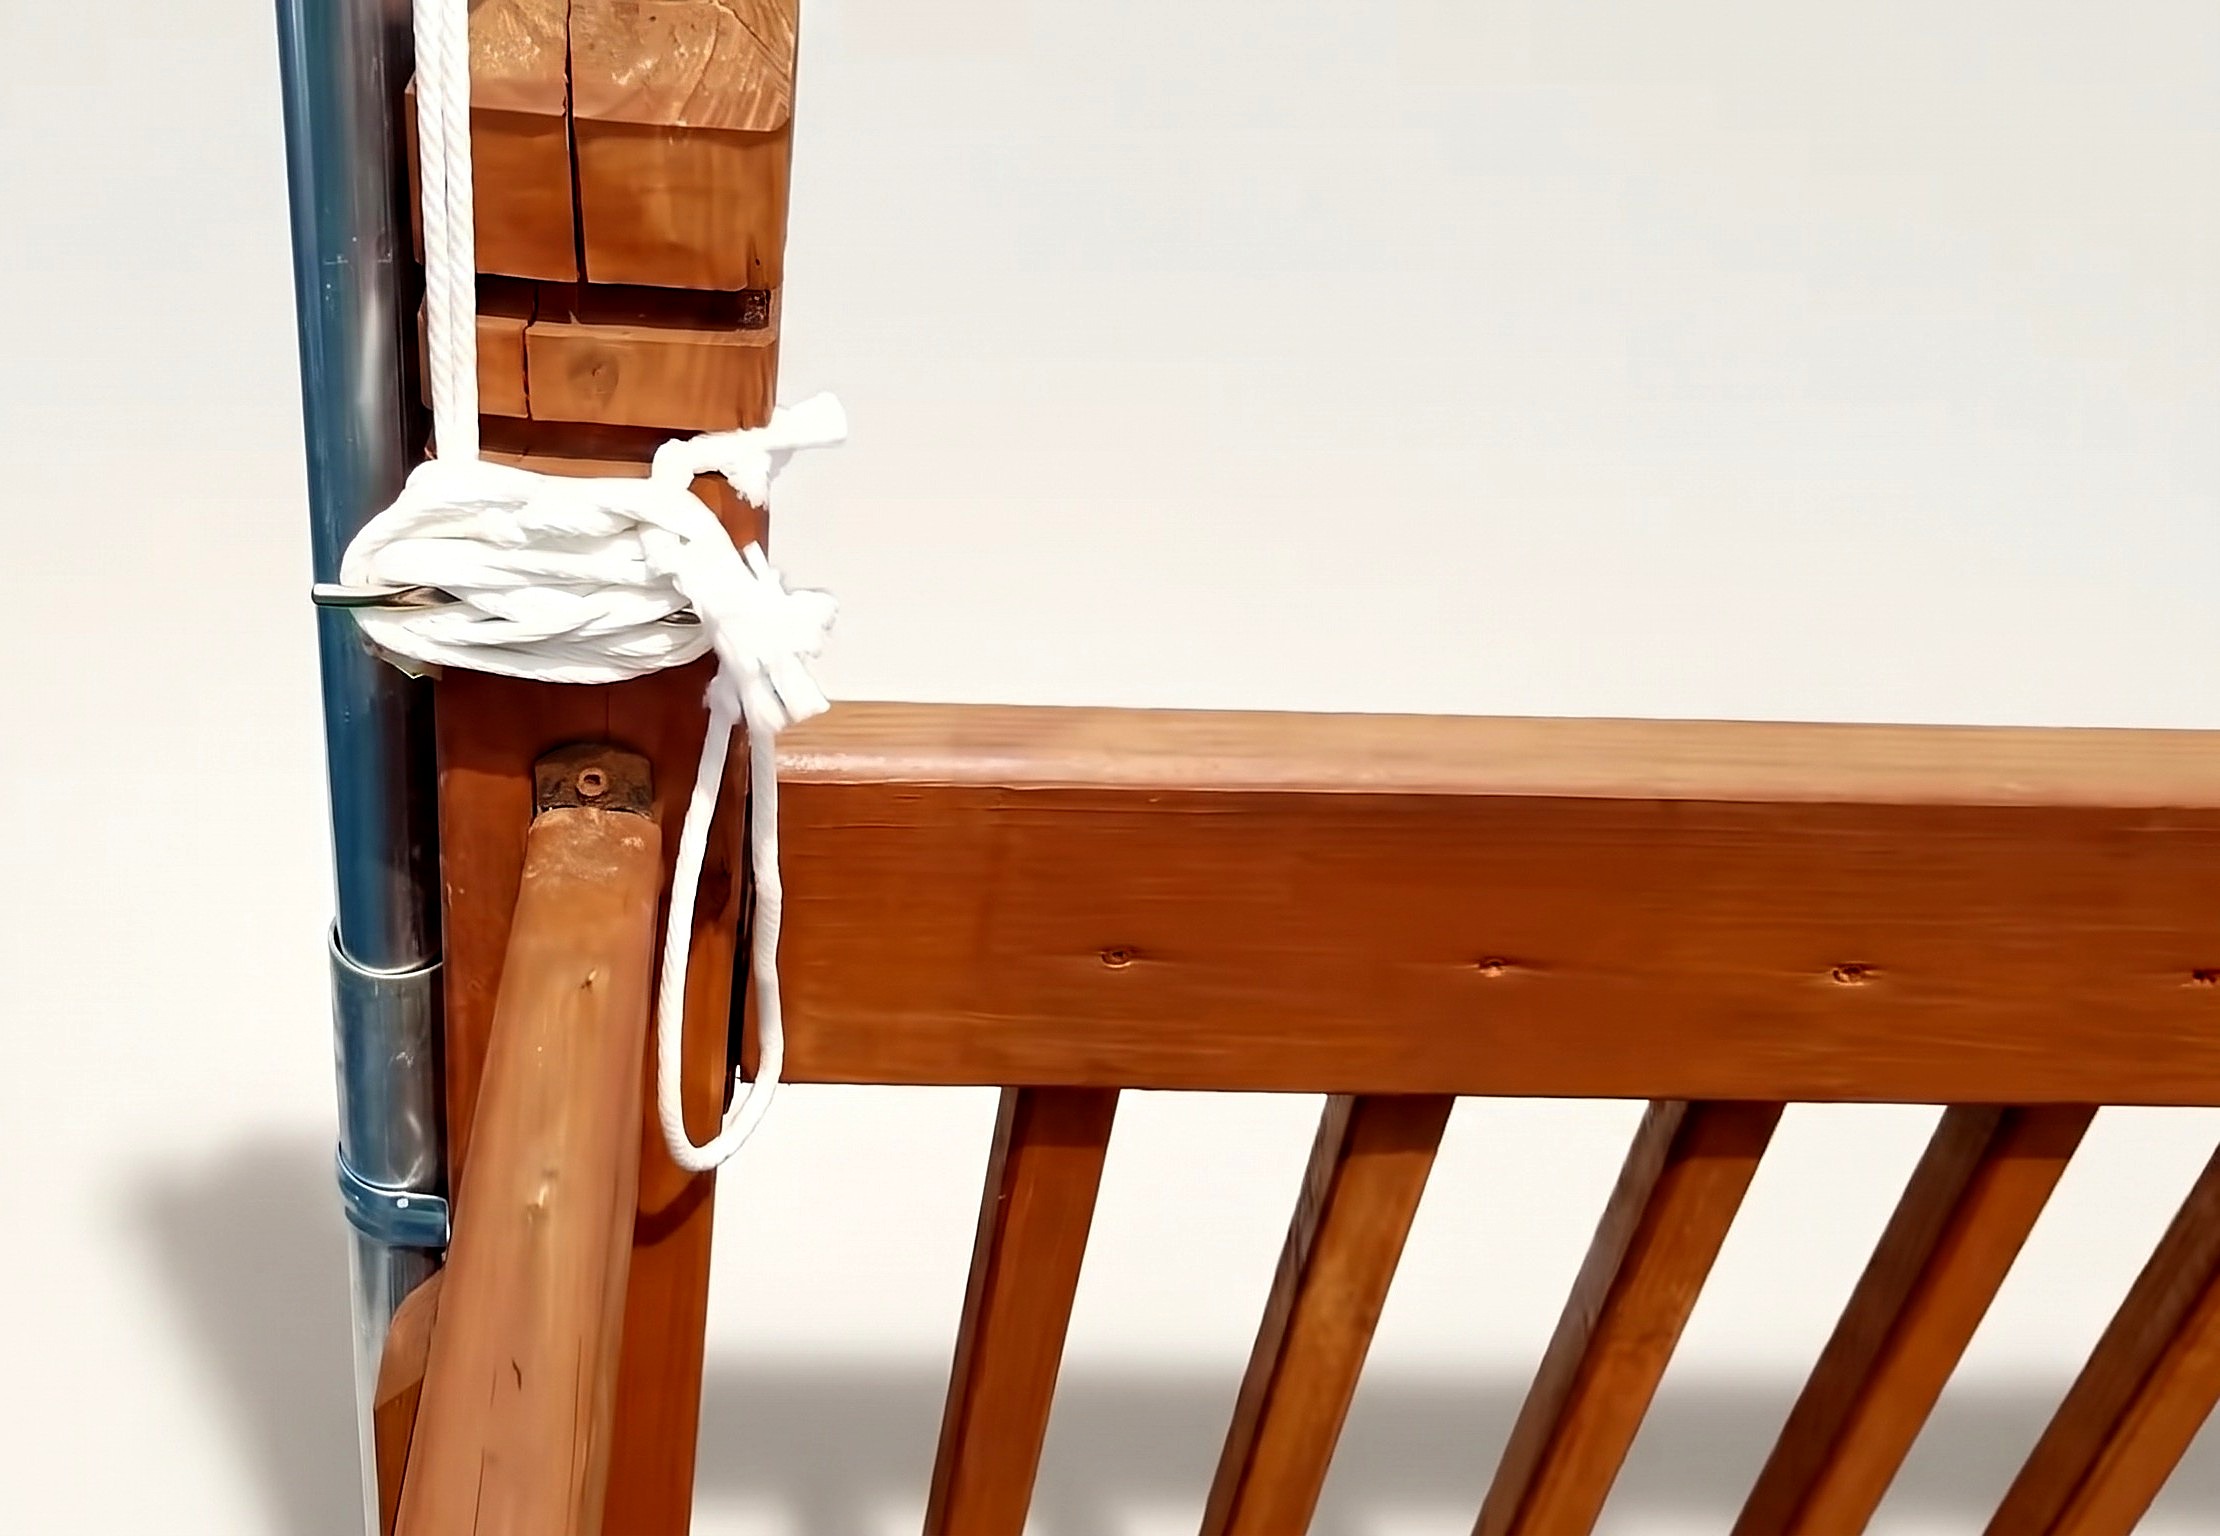
Parts in this step: (A) Main pole, (B) Pole sleeve
You'll need: Drill, Metal saw, Tape measure, Chain-link fence top rail, Metal pipe, Conduit clamps, Rope cleats, Eye bolts with nuts, 16-penny nails, Screws
- 1.1 Mount the Pole Sleeves
- Halve both 6 ft pipes into four 36 in pole sleeves (B).
- Hold each pole sleeve (B) plumb on a 4x4 corner dock post.
- Fasten each pole sleeve (B) to its 4x4 post with two conduit clamps.
- Keep sleeve interiors clear so main poles (A) slide in by gravity.
- 1.2 Add Stop Pins to Sleeves
- Drill through both walls near the bottom of each pole sleeve (B).
- Push one 16-penny nail through each pole sleeve (B) bottom hole.
- Exact hole height is not stated, so drill just above the bottom edge.
- Never skip this pin, or main pole (A) falls into the water.
- 1.3 Prepare the Main Poles
- Drill through the top end of each 126 in main pole (A).
- Install an eye bolt and nut through each main pole (A) top.
- Lower all four main poles (A) into sleeves (B) onto the nail stops.
- 1.4 Attach Rope Cleats
- Position a chest-height rope cleat on each 4x4 wood corner post.
- Screw each cleat into the 4x4 post with the drill.
- Mount cleats on the wood post instead of drilling the metal pipe.
Key measurements
- Pole sleeve (B) length: 36 in each, from two 6 ft metal pipes
- Main pole (A) length: 126 in (10 ft 6 in) full stock
- Conduit clamps per sleeve: 2 clamps on each 36 in sleeve and 4x4 post
- Tip: Have a helper steady the pipe sleeves and 10 ft 6 in poles.
- Tip: Leave main poles unbolted in sleeves so they lift out for winter storage.
- Tip: For extra overhead height, use 21 ft chain-link top rails instead.
- Heads up: Insert a 16-penny nail stop pin in every sleeve before a main pole, or the pole plunges into the water.
Before you move on: Check each main pole rests on its 16-penny nail stop pin and all four top eye bolts face the dock.
Step 2: Install and Hoist the Sun Shade
14 ft by 14 ft sun shade canopy on corner hoist lines, pulled taut overhead between four poles and tied to post cleats.
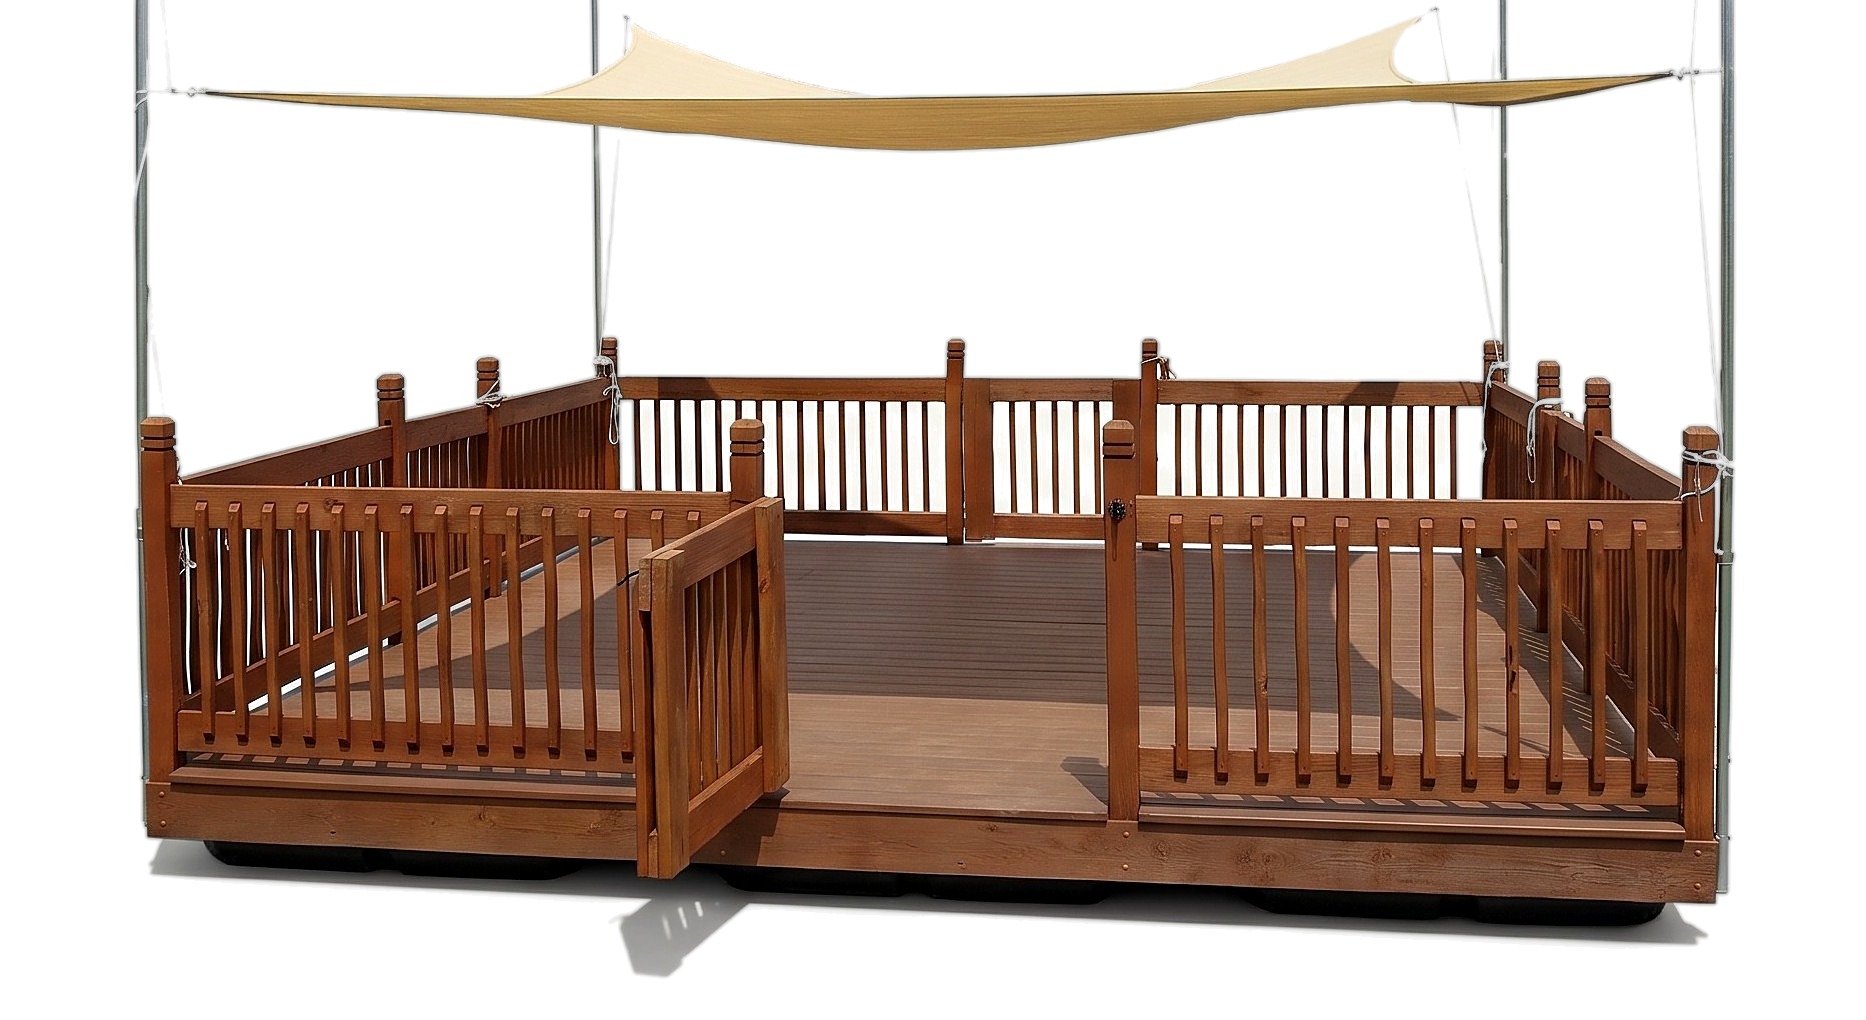
Parts in this step: (A) Main pole, (B) Pole sleeve, (C) Sun shade canopy, (D) Hoist line
You'll need: Tape measure, Sun Shade, Rope, Bolt snaps, Eye bolts with nuts, Rope cleats
- 2.1 Rig the Ropes
- Cut four hoist lines (D) from the rope, each about 20 ft: long enough to run from the deck up through the eye bolt and back down to the cleat with spare to wrap.
- Loop each hoist line (D) to attach one bolt snap.
- Thread each hoist line (D) free end through a top eye bolt.
- Seat rigged main poles (A) into the pole sleeves (B).
- 2.2 Attach and Hoist the Shade
- Spread the 168 in by 168 in sun shade canopy (C) on the dock.
- Clip each bolt snap to a sun shade canopy (C) corner ring.
- Hoist one side before the other to keep the canopy out of water.
- Raise all four corners to 6.5 ft to 7 ft overhead walk-under clearance.
- 2.3 Secure the Ropes
- Pull hoist lines (D) tight to flatten the sun shade canopy (C).
- Wrap each hoist line (D) excess tail around its post rope cleat.
- Lower two sunny-side corners to angle the shade against low sun.
Key measurements
- Sun shade canopy (C) size: 168 in by 168 in (14 ft by 14 ft)
- Hoist line (D) length: about 20 ft per corner, enough to run from the deck up through the eye bolt and back down to the cleat with spare to wrap
- Walk-under clearance above dock deck: 78 in to 84 in (6.5 ft to 7 ft)
- Tip: Raise one canopy side first so the fabric does not drag in the water.
- Tip: Pair a 14 ft by 14 ft canopy with an about 16 ft by 16 ft post layout so corners pull tight.
- Heads up: Check walk-under clearance after angling one side down so nobody hits their head on the low edge.
- Heads up: If strong winds may lift the gravity-mounted poles, drill through the sleeve and pole for a locking bolt.
Before you move on: Check all four hoist lines are wrapped on their post cleats and the taut canopy has at least 6.5 ft headroom.
Finishing
Tension and Adjustment
- Adjust corner hoist lines on cleats to track the sun across the dock.
- Tension all four corners on cleats so wind cannot flap the canopy.
Seasonal Storage
- Lower hoist lines and unclip the four bolt snaps before winter.
- Lift the four main poles from the sleeves and store everything indoors.
Hardware Alternatives
- Swap top eye bolts for small flagpole pulleys for smoother rope hoisting.
- To shorten the rope gap when angling, add metal corner rings.
These Specs are built from Indy Farm Life's video “DIY Retractable Sun Shade for a Floating Dock”. Open the DIY Retractable Sun Shade for a Floating Dock project page.
