Spetz Specs No. 7064: step-by-step build guide
Modern Slatted Wood Bench from a Single 2x12 Board
The complete step-by-step guide made from EmyLuDesigns's YouTube video, free on Spetz. For the video, a step-by-step player and answers to your questions, see the Modern Slatted Wood Bench from a Single 2x12 Board project page.
7 steps, 3 parts, 14 tools, 5 materials
Overview
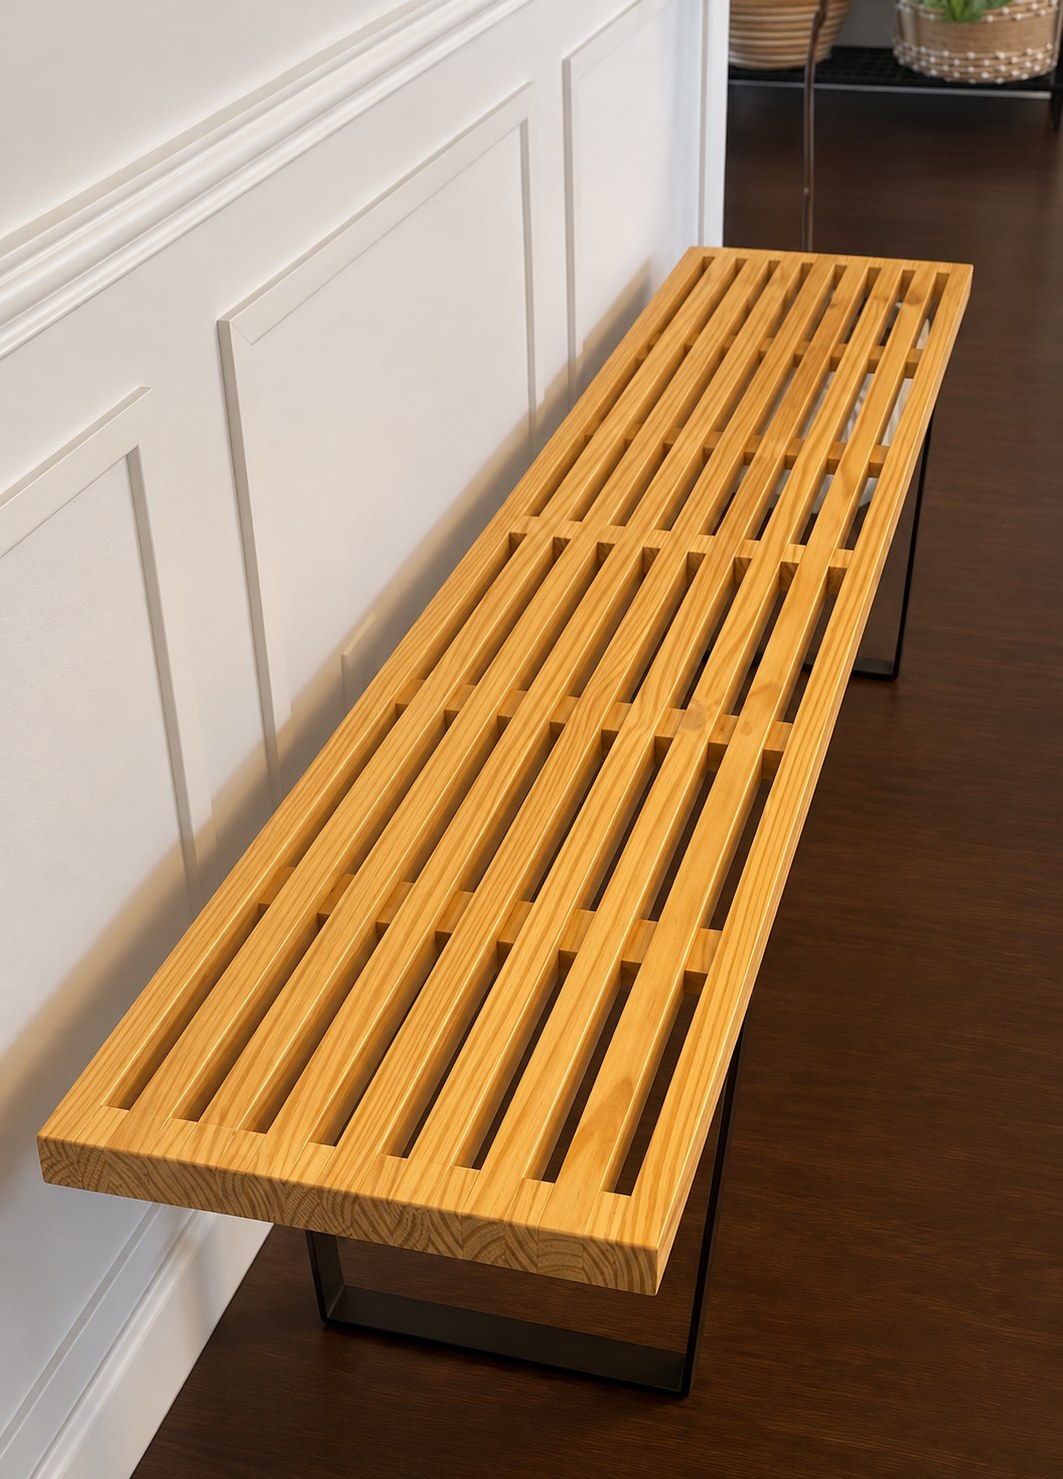
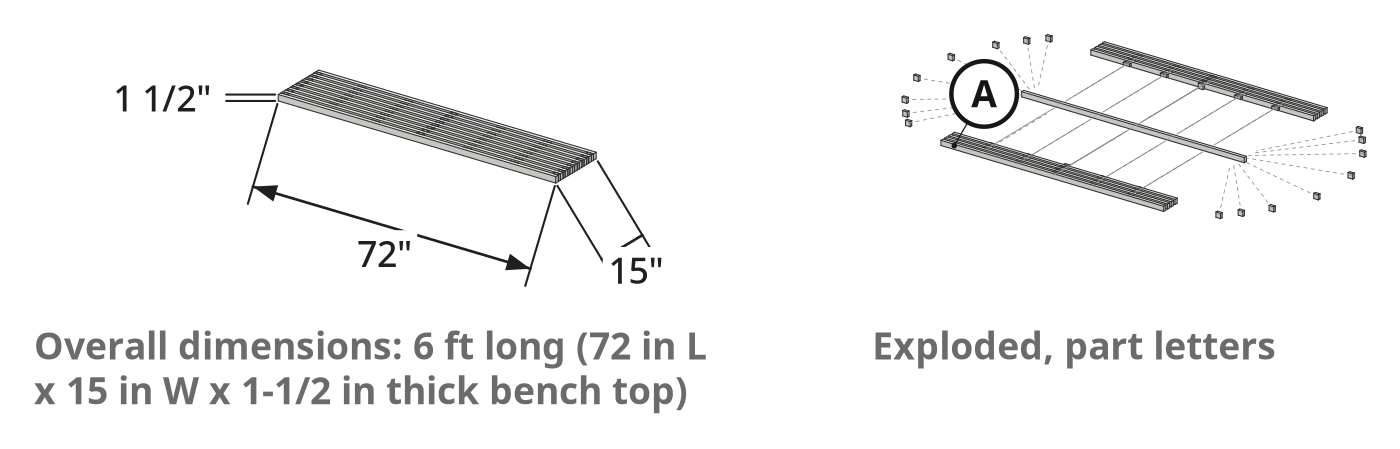
Finished size: 72 in L x 15 in W x 1-1/2 in thick bench top (leg height not stated)
What you're building
- Build a 72 in by 15 in modern slatted bench.
- Mill nine slats and fifty-six spacer blocks from one 8 ft 2x12 board.
- Mount the laminated wood top on two trapezoid metal bench legs.
Why this design works
- One construction board yields almost every wood piece with minimal waste.
- Full-depth end and center blocks lock the frame square.
- Shallow intermediate spacers sit flush underneath to form recessed top slots.
What it takes
- Rip narrow strips on a table saw; chop blocks on a miter saw.
- Tack glued joints with an 18-gauge brad nailer and clamp flat.
- Let the wood glue and multiple aerosol polyurethane coats dry.
What decides success
- Sand all four slat faces before gluing the narrow gaps.
- Keep intermediate spacers flush underneath and nail away from knots.
Health and safety
Sawing and Ripping Hazards
- Wear eye and hearing protective equipment whenever operating the table saw, circular saw, miter saw, and brad nailer.
- Support both sections of the 8-foot 2x12 board during the circular saw crosscut so the kerf cannot pinch the blade.
- Always use a push stick and riving knife when ripping narrow 1-inch slats and 3/4-inch strips on the table saw.
- Let the miter saw blade stop completely before lifting the head so small 1-1/2-inch spacer blocks do not catch the teeth.
Brad Nailer and Power Sanders
- Keep your stabilizing hand several inches from the joint when brad nailing; nails can hit pine knots and exit the side.
- Never point the cordless 18-gauge brad nailer at yourself or others, and keep your finger off the trigger between shots.
- Clamp the bench top before running the corded belt sander or detail sander, and keep the power cord clear of the belt.
Dust and Polyurethane Spray Fumes
- Wear a dust mask when sanding the Southern Yellow Pine bench with the belt sander and corner detail sander.
- Wear an organic vapor respirator when spraying oil-based polyurethane; a paper dust mask filters only sanding dust, not solvent fumes.
- Apply the aerosol oil-based polyurethane in a well-ventilated area away from open flames, pilot lights, and tool sparks.
Handling Lumber and Steel Legs
- Keep a firm footing and brace the U-shaped steel legs securely before bending them into a trapezoid angle.
- Wear eye protective equipment when pulling misfired 1-1/4-inch brad nails with slip-joint pliers in case a wire nail snaps.
- Fasten all leg mounting screws tightly into solid wood and test the 6-foot bench for stability before sitting on it.
Tools
- Table saw (Jobsite table saw, Ryobi)
- Circular saw (Cordless brushless circular saw, Ryobi)
- Miter saw (Corded miter saw)
- Brad nailer (Cordless 18-gauge brad nailer, Ryobi, AirStrike, 18-gauge)
- Detail sander (Cordless corner detail sander, Ryobi)
- Belt sander (Corded handheld belt sander) (optional)
- Rafter square (12 in layout square, Empire, 12 in)
- Tape measure (Pocket tape measure)
- Pencil (Carpenter pencil)
- Bar clamps (One-handed trigger clamps) (optional)
- Combination square (Adjustable combination square) (optional)
- Pliers (Slip-joint pliers) (optional)
- Drill/driver (Cordless drill/driver, Ryobi)
- Framing square (Steel carpenter framing square) (optional)
Materials
- 2x12 lumber board (1 board, Kiln-dried Southern Yellow Pine construction lumber, #2 KD SYP, 2 in x 12 in x 8 ft)
- Brad nails (18-gauge brad nails, 18-gauge, 1-1/4 in, 1-1/4 in)
- Wood glue (1 bottle, PVA wood glue, Gorilla)
- Polyurethane spray (3 cans, Aerosol oil-based polyurethane finish, Varathane, Semi-gloss, oil-based)
- Metal bench legs (2 legs, U-shaped steel furniture legs with mounting screws, Black, includes mounting screws)
Hardware
| Hardware | Size | Count | Used in steps |
|---|---|---|---|
| 1-1/4 in, 18-gauge Brad nails | 112 | 5 | |
| Wood glue | 5 | ||
| Mounting screws | 7 |
Cut list
| Part | Name | Qty | Size | Notes |
|---|---|---|---|---|
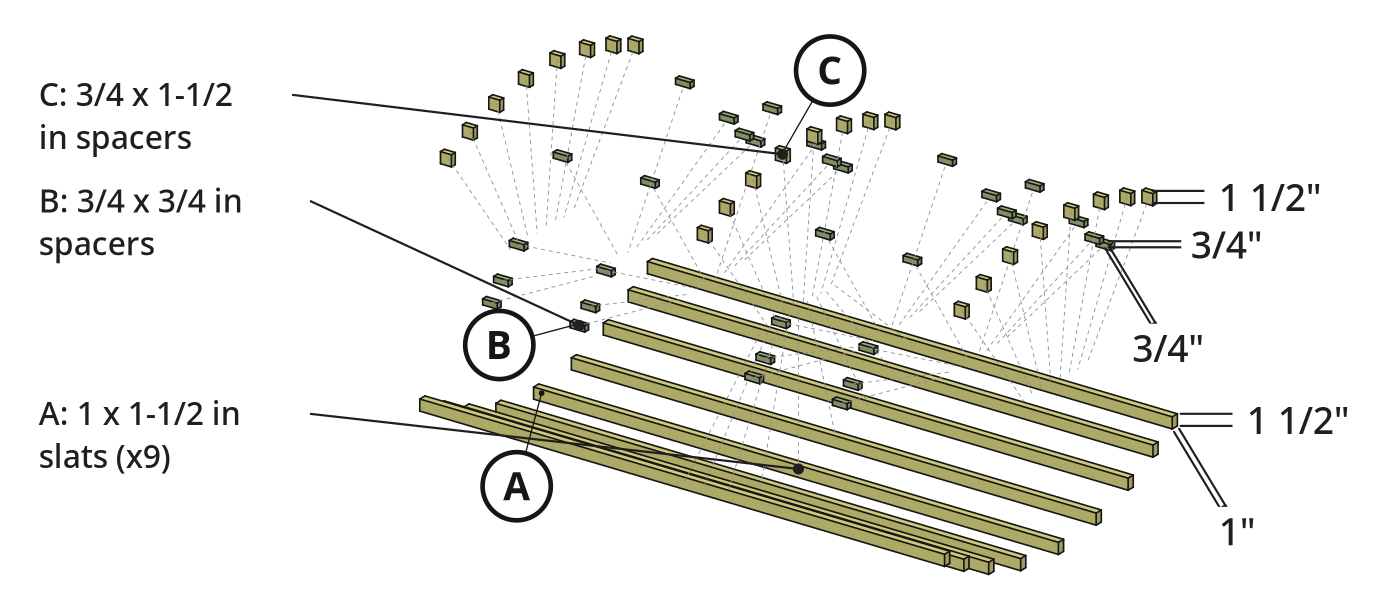
| A | Bench slat | x9 | 1" (T) × 1 1/2" (W) × 72" (L) | Crosscut a 6 ft (72 in) section from the 8 ft 2x12 board, then rip it on the table saw with the fence set to 1 in into nine 1 in x 1-1/2 in strips. Stand on the 1 in edge during assembly. |
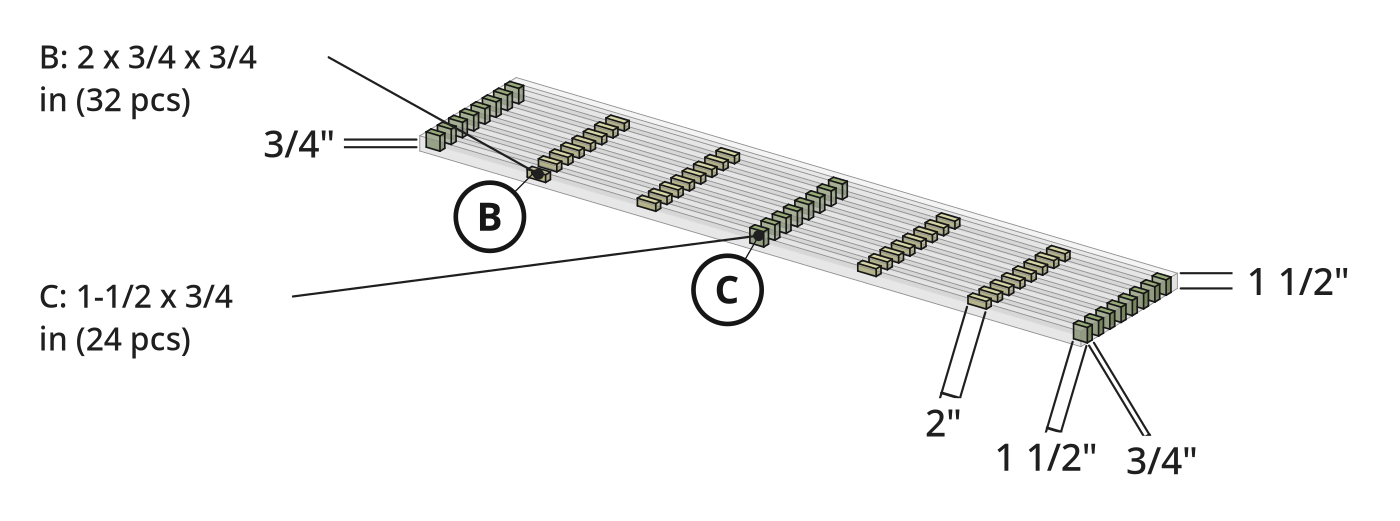
| B | Intermediate spacer block | x32 | 3/4" (T) × 3/4" (W) × 2" (L) | From the 2 ft cutoff of the 2x12, rip six strips at a 3/4 in fence setting, then rip three of those 3/4 in x 1-1/2 in strips in half at the same 3/4 in fence setting to produce six 3/4 in x 3/4 in strips. Crosscut on the miter saw into thirty-two 2 in blocks (4 blocks per gap across 8 gaps, placed at the 1 ft, 2 ft, 4 ft, and 5 ft layout marks flush with the bottom of the bench). |
| C | End and center spacer block | x24 | 3/4" (T) × 1 1/2" (W) × 1 1/2" (L) | Take the remaining three 3/4 in x 1-1/2 in strips ripped from the 2 ft cutoff of the 2x12 and crosscut them on the miter saw into twenty-four 1-1/2 in square blocks (3 blocks per gap across 8 gaps, placed at both ends and the 3 ft center mark). |
What to buy
- Buy 1 × 2x12 8 ft (2x12 lumber board)
Before you start
Lumber selection
- Pick a straight, dry 8 ft 2x12 board without twist or cup.
- Use narrower 2x10 boards if straight 2x12 stock is unavailable.
- Check grain and knots so the cleanest edges face up.
Layout and labeling
- Pre-sand ripped slats with 100-grit sandpaper before assembly.
- Group and label spacer blocks by size before glue-up.
Shop setup
- Put a flat worktable behind the table saw for outfeed support.
- Ready bar clamps to hold the glued assembly flat while drying.
Step by step
Step 1: Crosscut the 2x12 board to length
Crosscut the 8-foot 2x12 board into a 6-foot slat blank and 2-foot spacer blank.
Parts in this step: (A) Bench slat, (B) Intermediate spacer block, (C) End and center spacer block
You'll need: Circular saw, Rafter square, Tape measure, Pencil, Bar clamps, 2x12 lumber board
- 1.1 Measure and cut the 6-foot bench length
- Mark 72 in from one end of the 2x12 board with a pencil.
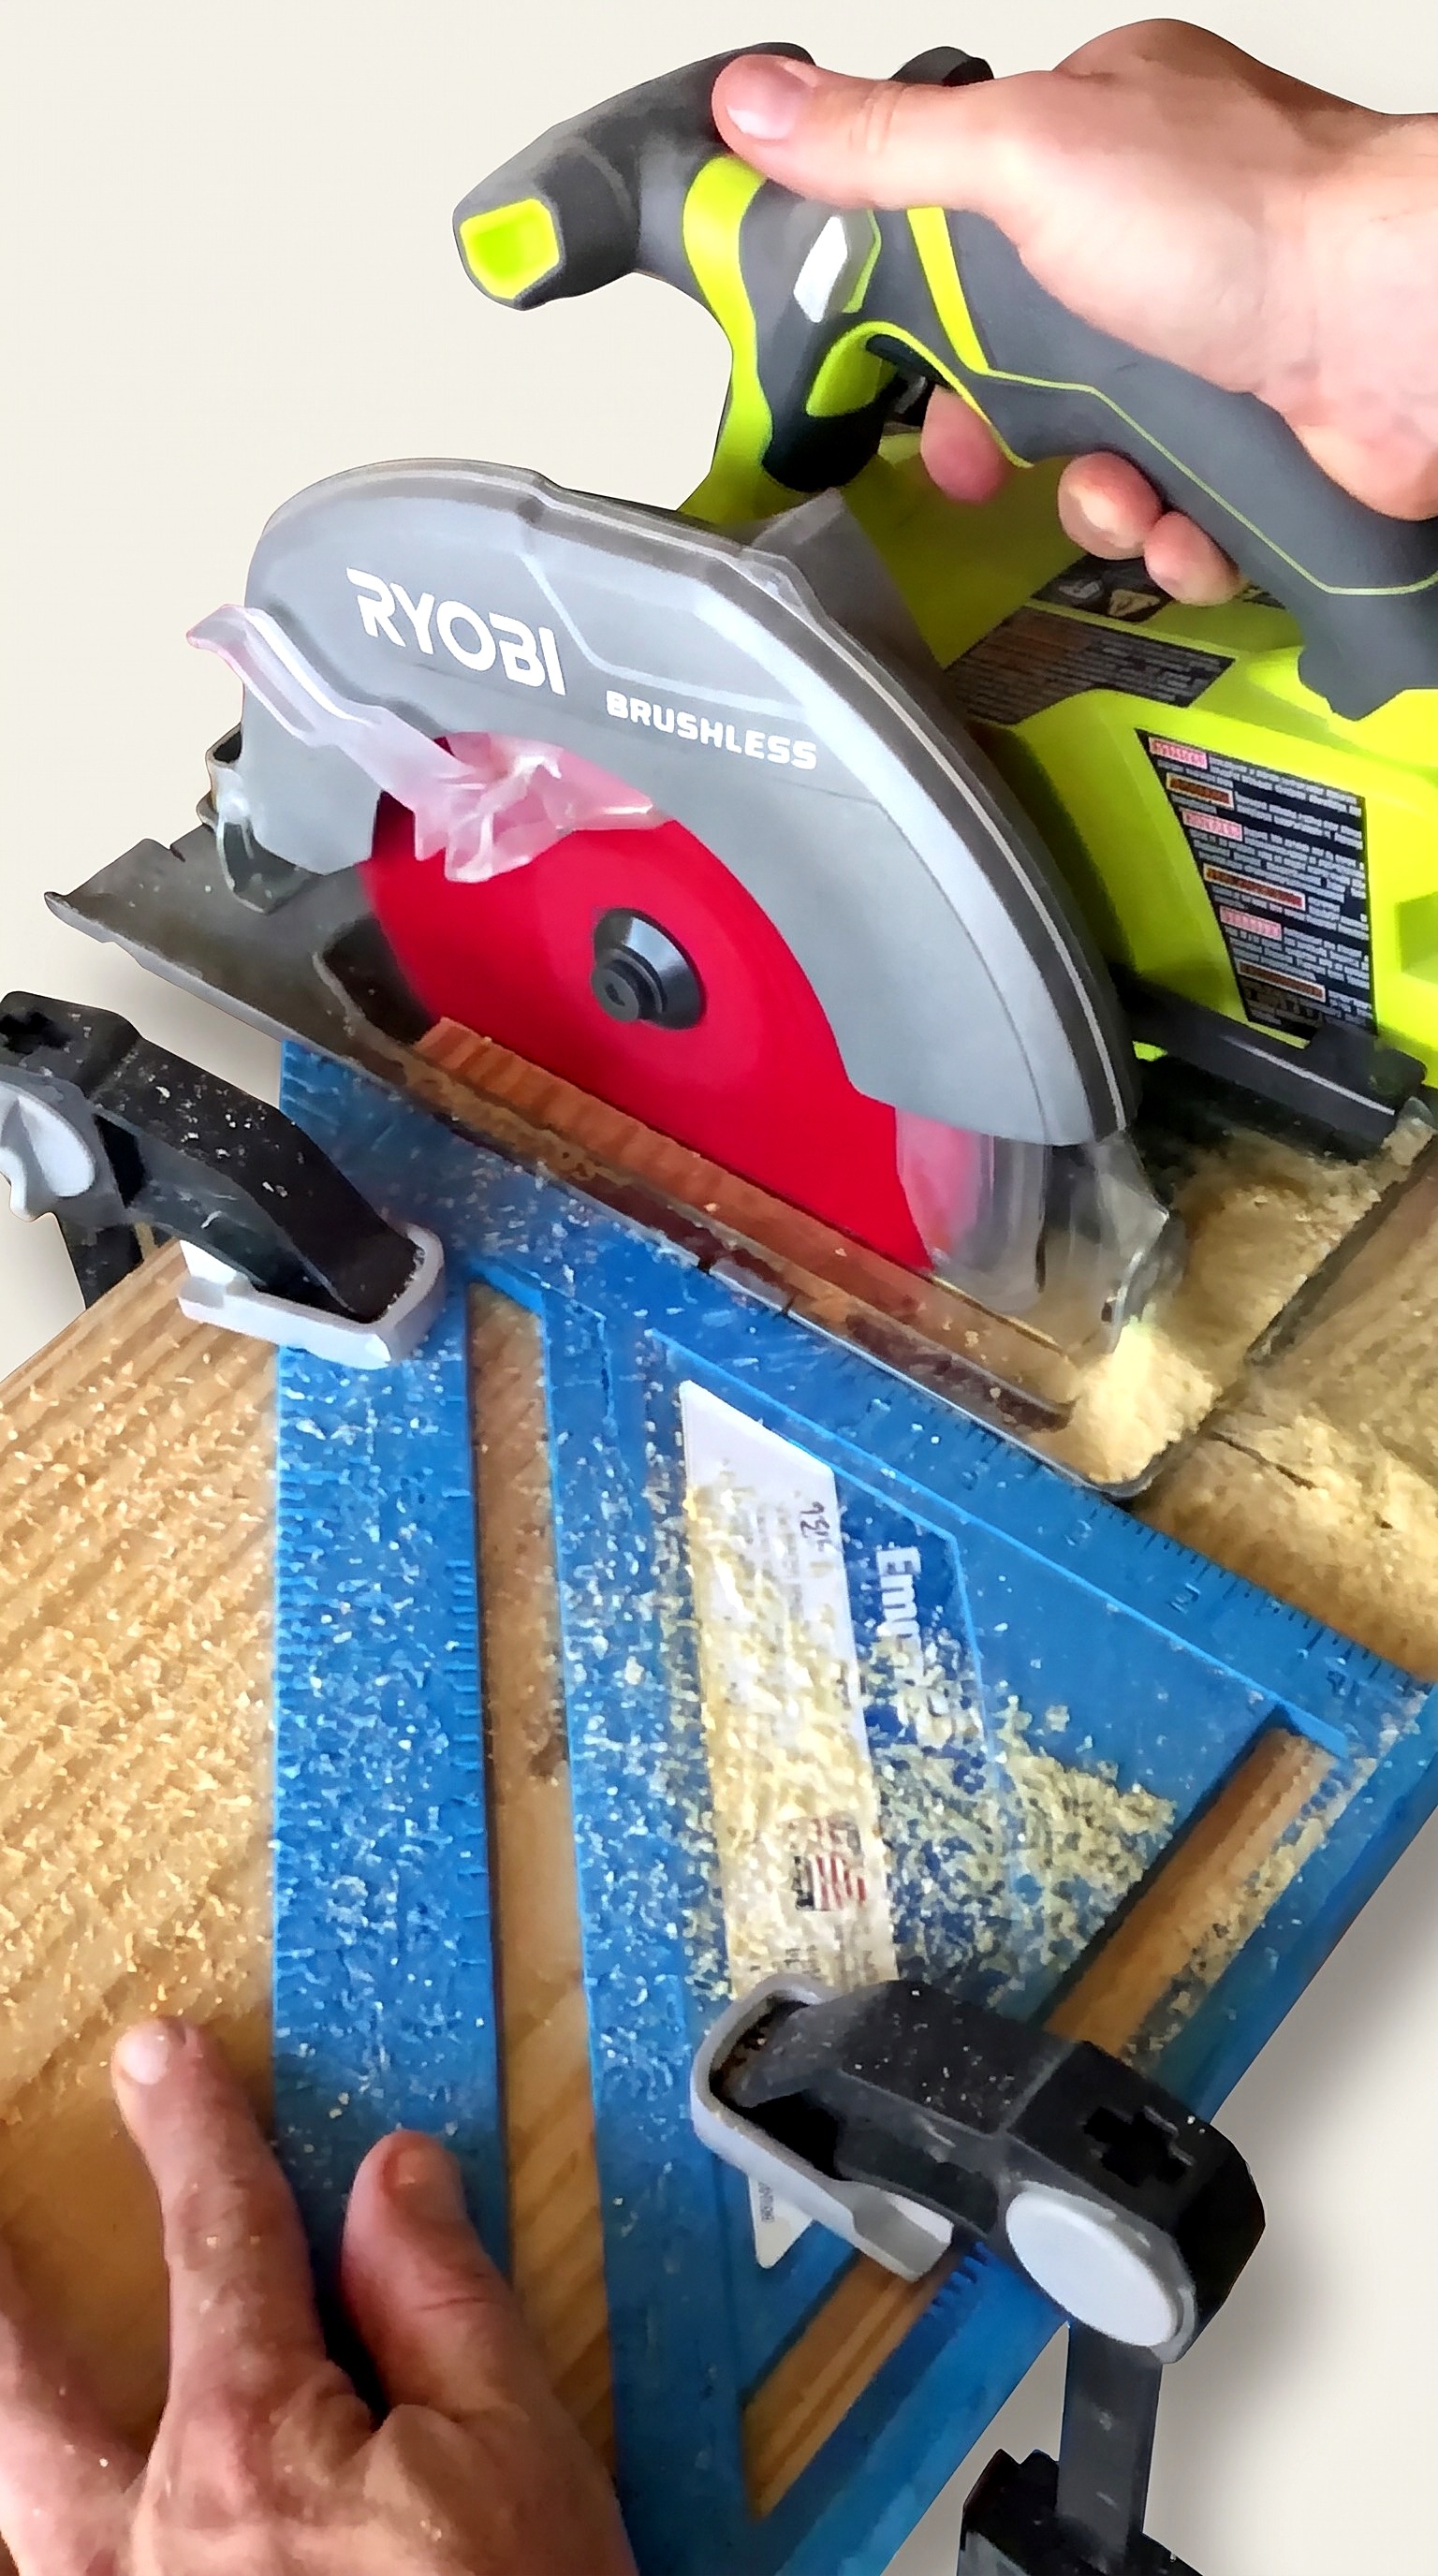
- Mark a square cut line across the face with the 12 in rafter square.
- Clamp the rafter square parallel to the line, offset for the circular saw shoe.
- Run the circular saw shoe along the square to crosscut the 6 ft bench slat (A) blank.
- Save the 24 in cutoff to rip intermediate spacer blocks (B) and end and center spacer blocks (C).
Key measurements
- Slat blank length: 72 in (6 ft) from one end of the 8 ft 2x12
- Spacer blank length: 24 in (2 ft) cutoff from the 8 ft 2x12
- Tip: Clamp the 12 in rafter square to the board as a straightedge fence.
- Heads up: Support both sections during the cut so the kerf does not pinch the blade.
Before you move on: Check that the cut face is square and the long section measures 72 in.
Step 2: Rip the slats and spacer strips on the table saw
Rip the 6-foot section into nine 1-inch slats and the 2-foot cutoff into 3/4-inch spacer strips.
Parts in this step: (A) Bench slat, (B) Intermediate spacer block, (C) End and center spacer block
You'll need: Table saw, Detail sander, 2x12 lumber board
- 2.1 Rip and sand the nine 1-inch bench slats
- Set the table saw fence 1 in from the blade.
- Rip the 72 in 2x12 section into nine 1 in by 1-1/2 in bench slats (A).
- Feed the last several inches with a push stick.
- Sand all four faces of bench slats (A) with a detail sander and 100-grit paper.
- 2.2 Rip the 3/4-inch spacer strips from the 2-foot cutoff
- Set the table saw fence 3/4 in from the blade.
- Rip six 3/4 in by 1-1/2 in strips from the 24 in board cutoff.
- Save three 3/4 in by 1-1/2 in strips for end and center spacer blocks (C).
- Turn the other three strips 90 degrees and rip them in half at 3/4 in.
- Save the six 3/4 in by 3/4 in strips for intermediate spacer blocks (B).
Key measurements
- Slat rip width: 1 in from blade to table saw fence (nine 1 in x 1-1/2 in slats).
- Spacer strip rip width: 3/4 in from blade to table saw fence (three 1-1/2 in tall, three ripped 3/4 in square).
- Tip: Set a worktable behind the table saw as outfeed support for the 6 ft slats.
- Tip: Sand the slats thoroughly now because you cannot reach inside the 3/4 in slots after assembly.
- Heads up: Always use a push stick on 1 in and 3/4 in rips to keep fingers from the blade.
Before you move on: Count nine 72 in slats, three 3/4 in by 1-1/2 in strips and six 3/4 in square strips.
Step 3: Cut the spacer strips into blocks on the miter saw
Crosscut spacer strips into thirty-two 2-inch blocks and twenty-four 1-1/2-inch square blocks.
Parts in this step: (B) Intermediate spacer block, (C) End and center spacer block
You'll need: Miter saw, Pencil, 2x12 lumber board
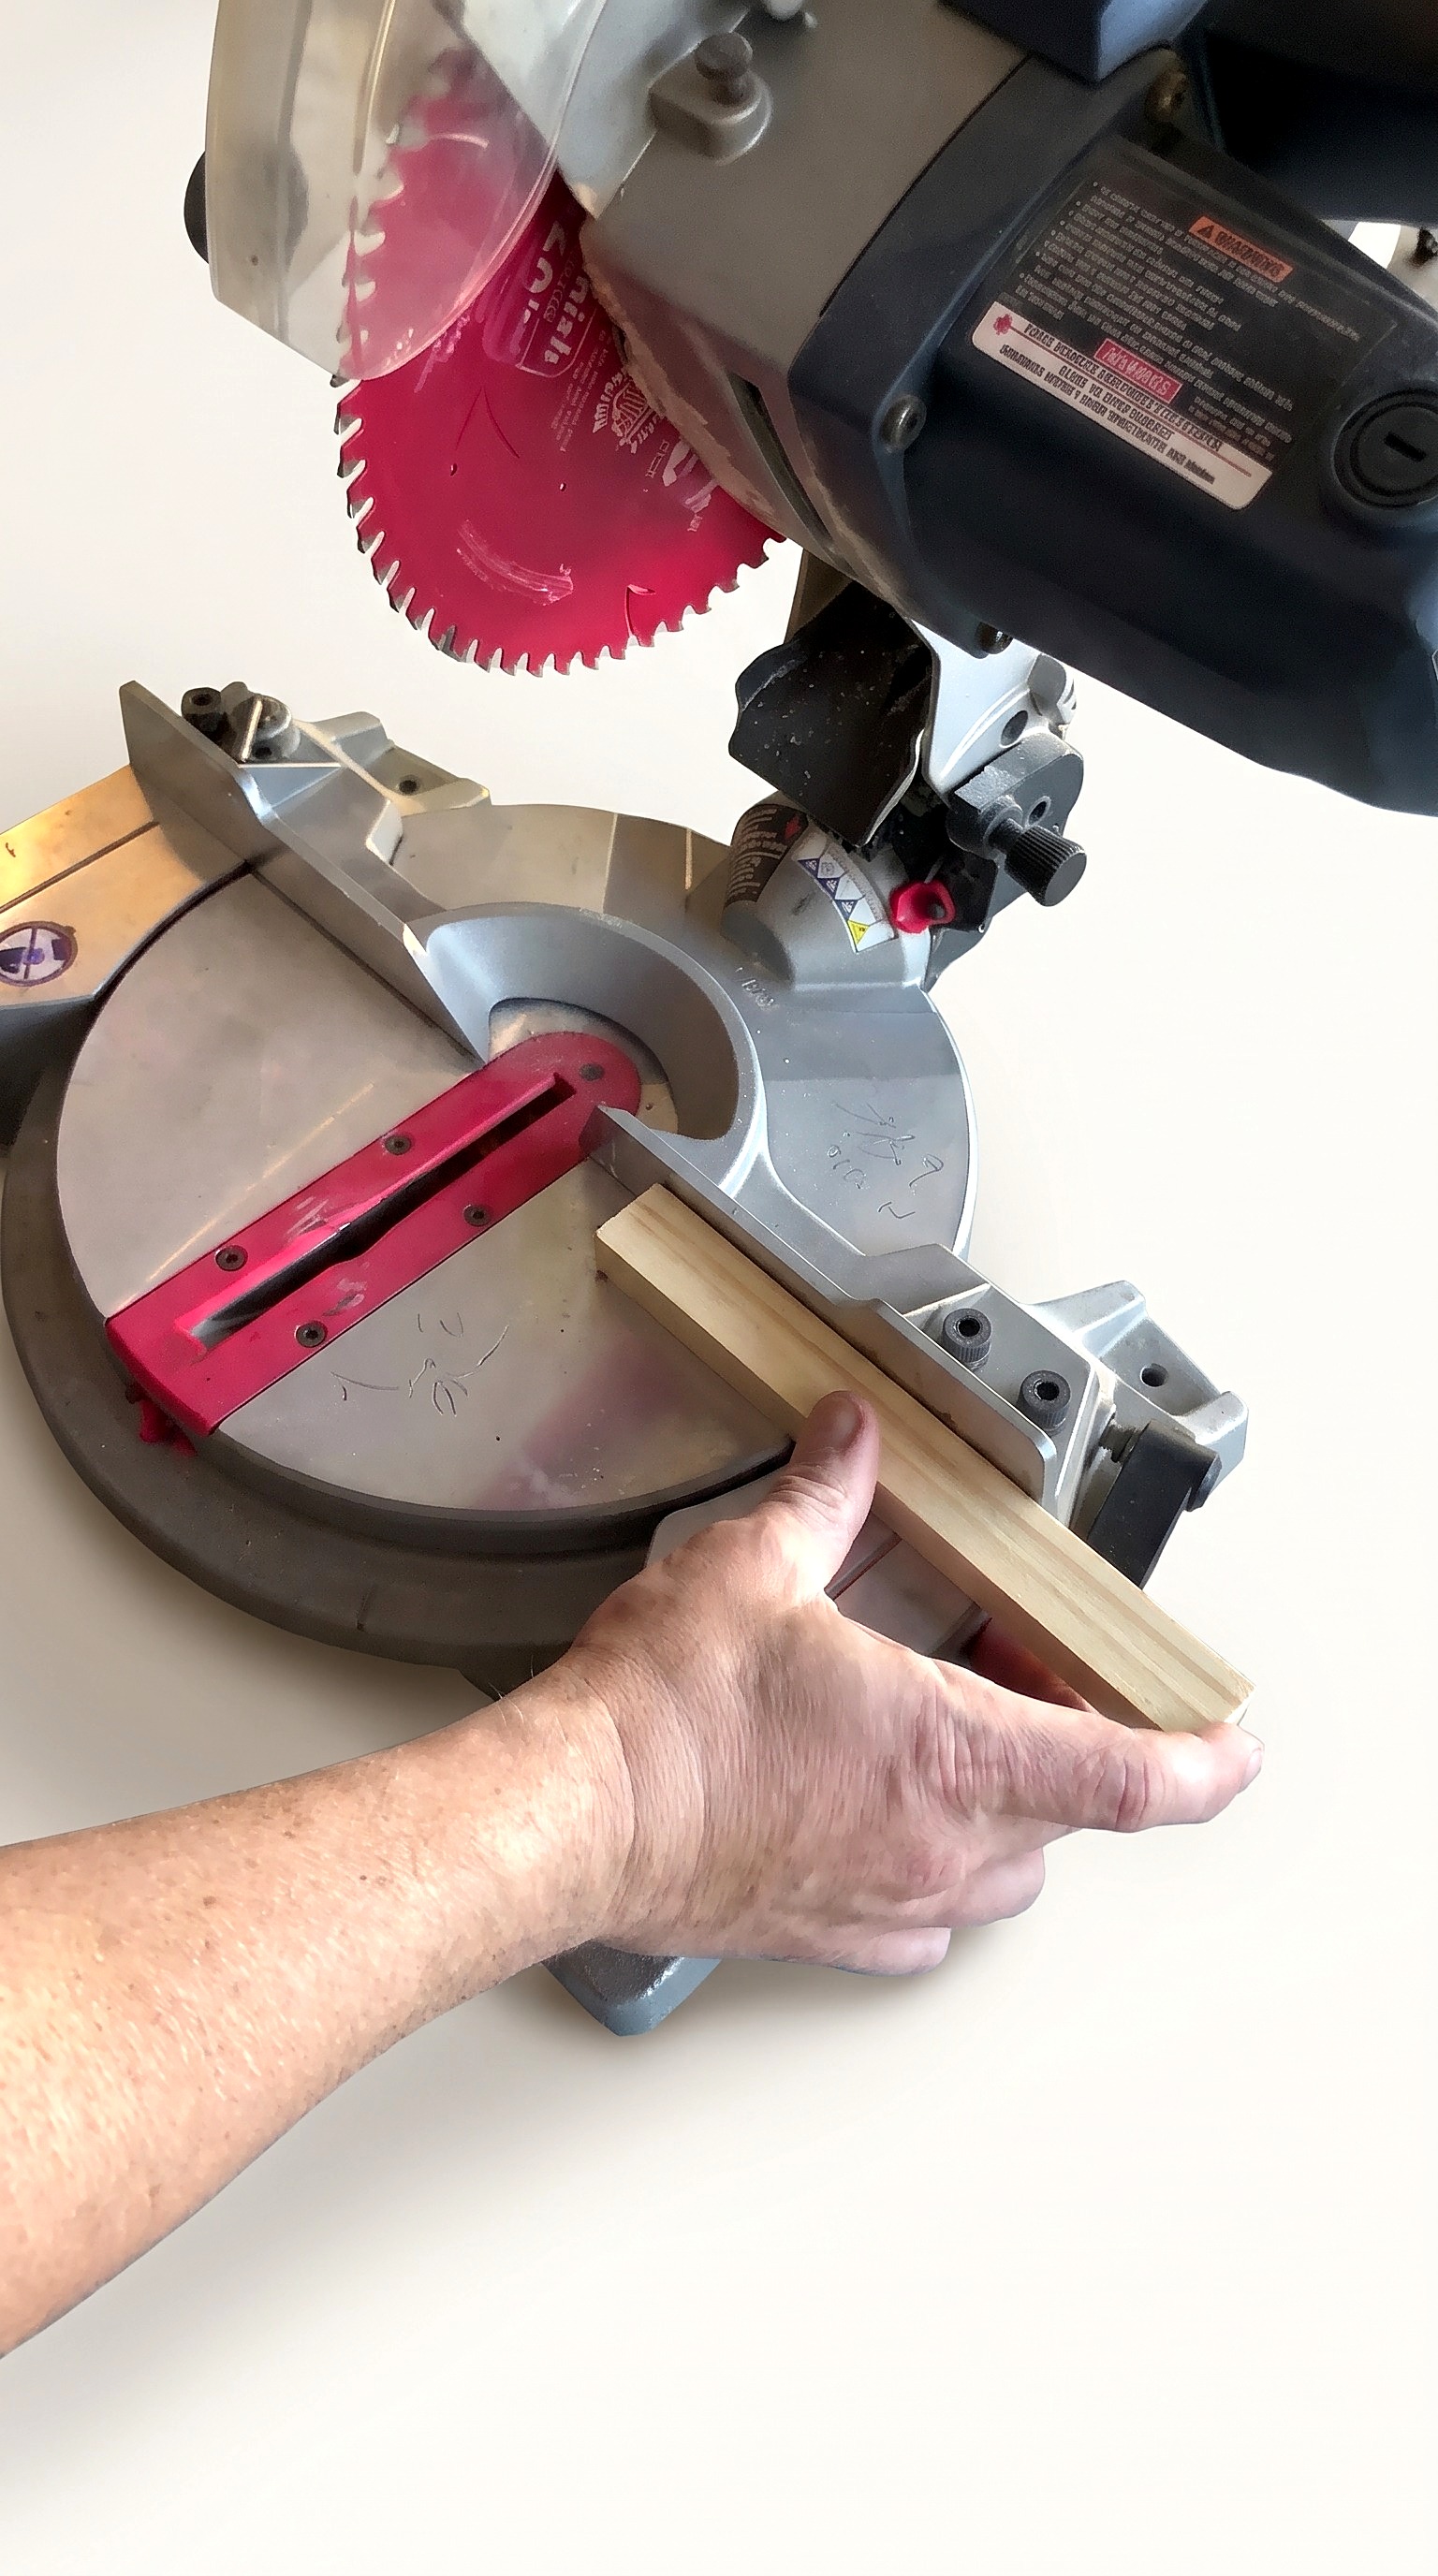
- 3.1 Chop the 3/4-inch strips into 2-inch blocks and 1-1/2-inch squares
- Mark 2 in on the miter saw fence ruler.
- Crosscut six 3/4 in by 3/4 in strips into thirty-two 2 in intermediate spacer blocks (B).
- Mark 1-1/2 in on the miter saw fence ruler.
- Crosscut three 3/4 in by 1-1/2 in strips into twenty-four 1-1/2 in end and center spacer blocks (C).
Key measurements
- Intermediate spacer block (B) length: 2 in (3/4 in x 3/4 in cross-section, 32 pieces).
- End and center spacer block (C) length: 1-1/2 in (3/4 in x 1-1/2 in cross-section, 24 pieces).
- Tip: Use the miter saw fence ruler to repeat the 2 in and 1-1/2 in cuts quickly.
- Heads up: Let the miter saw blade stop before lifting so small 1-1/2 in blocks do not catch the teeth.
Before you move on: Check for thirty-two 2 in blocks and twenty-four 1-1/2 in square blocks.
Step 4: Mark layout lines on the slats and spacers
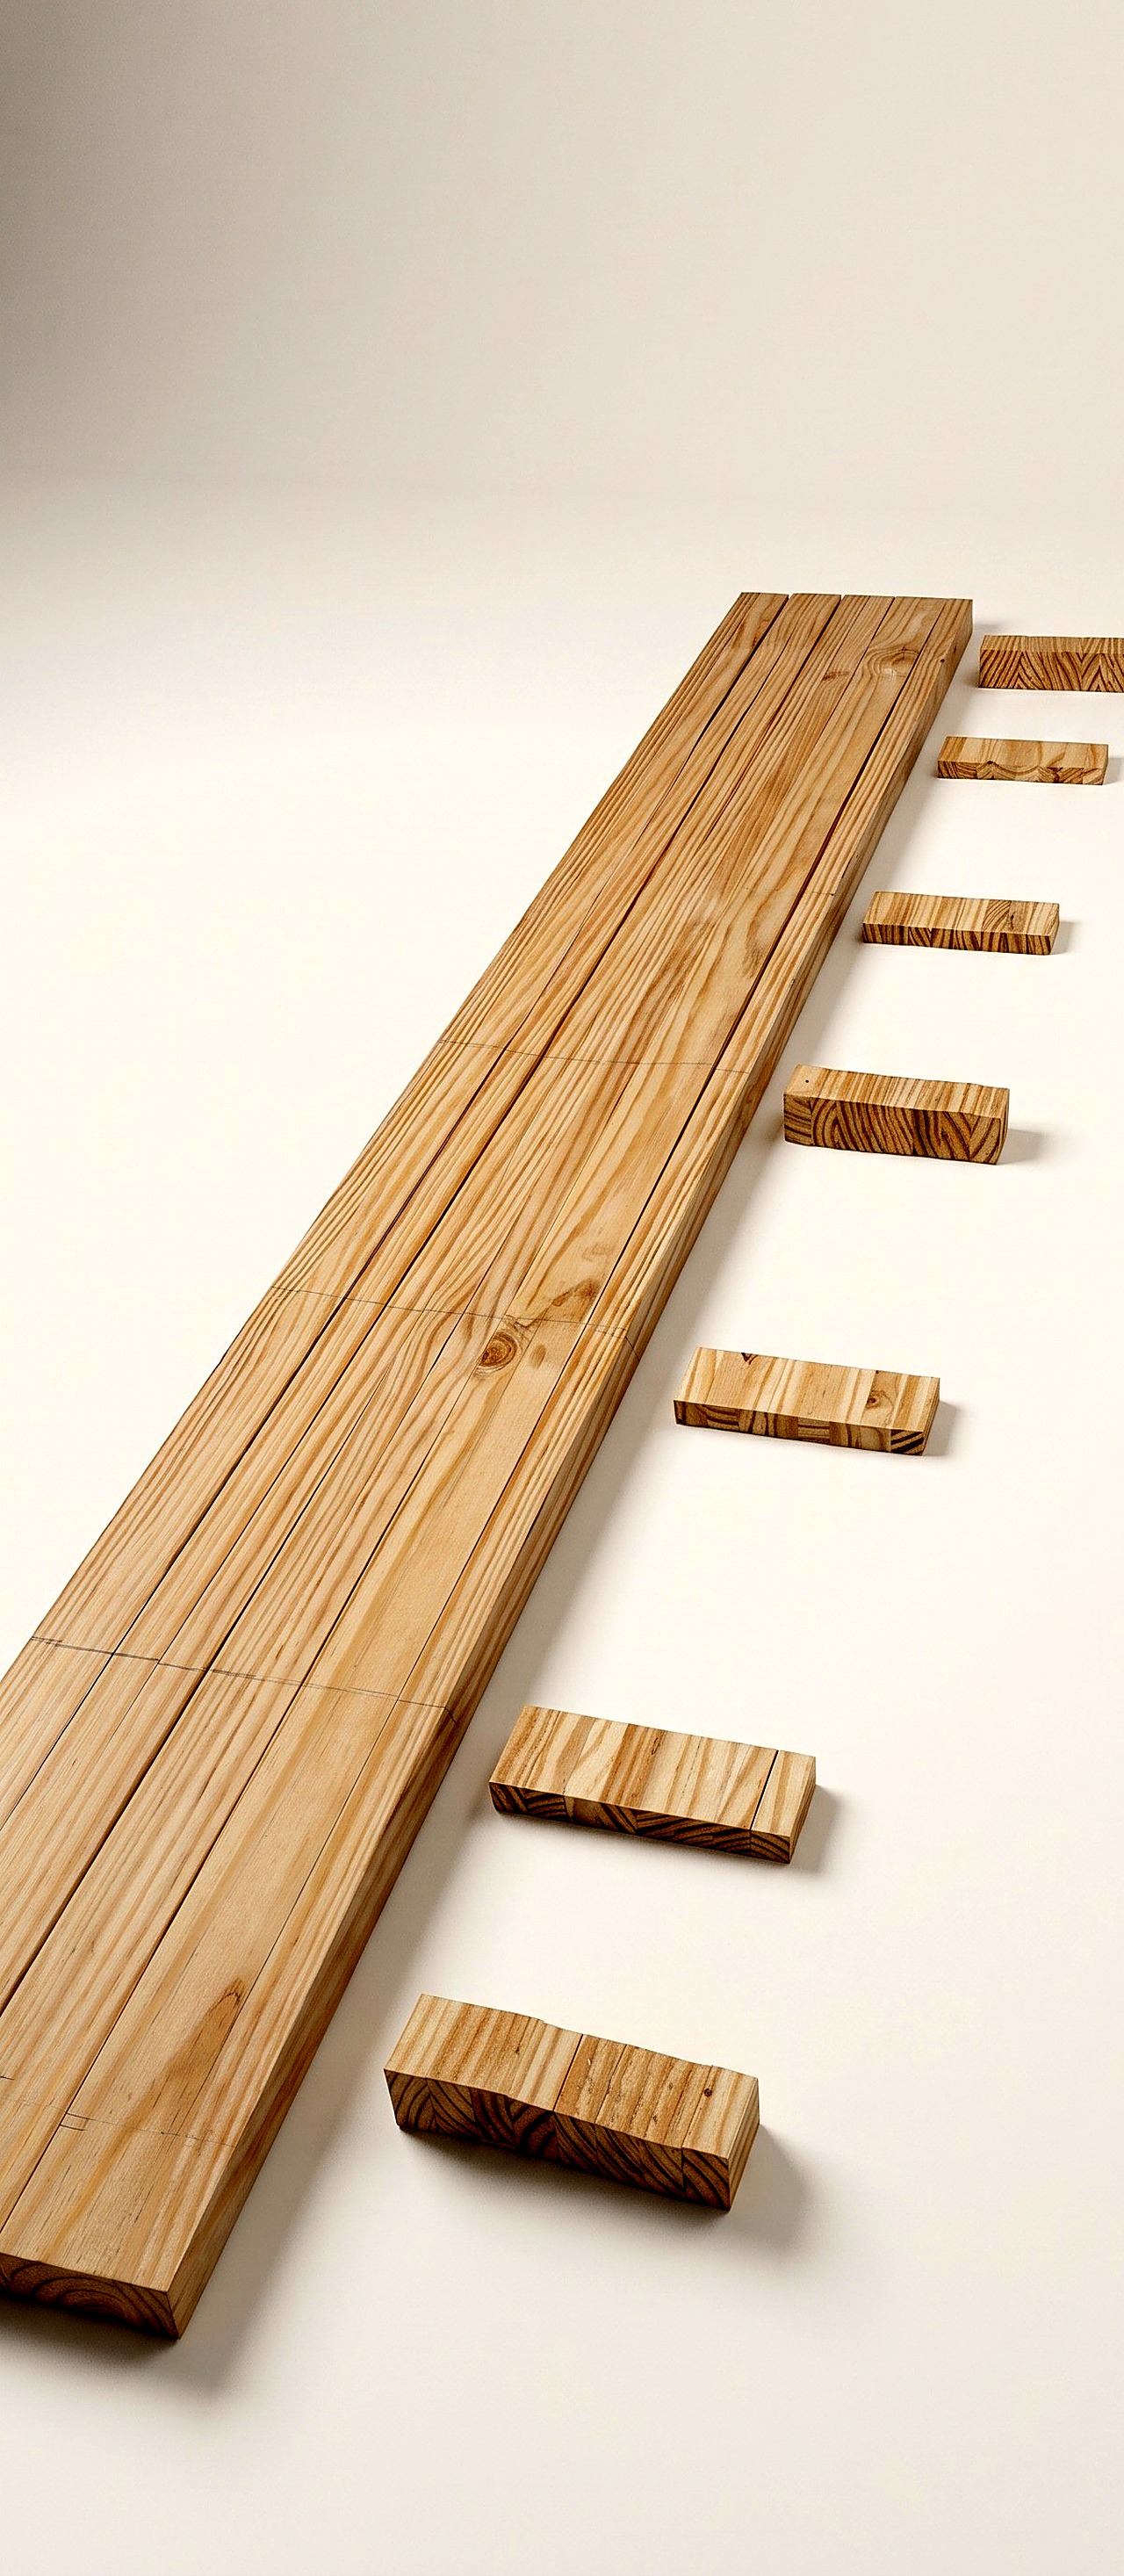
Mark 1-foot spacer intervals on the slats and centerlines on the 2-inch spacer blocks.
Parts in this step: (A) Bench slat, (B) Intermediate spacer block, (C) End and center spacer block
You'll need: Rafter square, Combination square, Framing square, Tape measure, Pencil, 2x12 lumber board
- 4.1 Mark 1-foot intervals across the 6-foot slats
- Set the nine bench slats (A) together on the worktable, 1 in edges up.
- Face the clearest slat edges up for the visible bench top.
- Flush the slat ends and measure 1 ft intervals at 12, 24, 36, 48, and 60 in.
- Use a rafter square to pencil lines across all nine slats at each 1 ft mark.
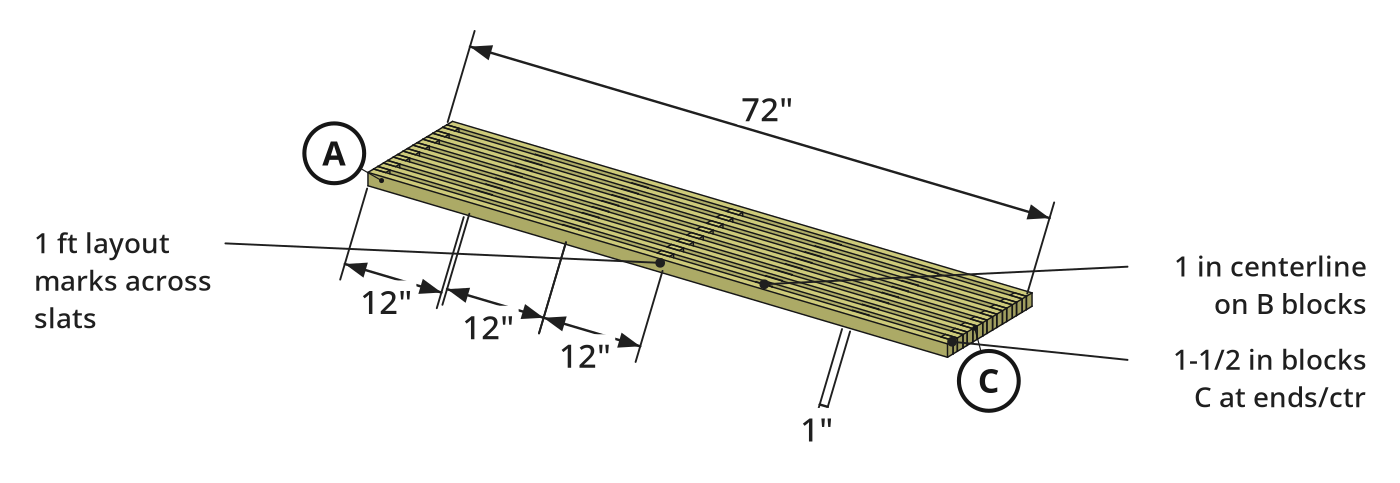
- 4.2 Mark the centerlines on the spacer blocks and group them by row
- Set a combination square to 1 in; mark the midpoint on one intermediate spacer block (B).
- Align intermediate spacer blocks (B) in four rows of eight.
- Mark the 1 in centerline across each stack of eight with a framing square or rafter square.
- Stack the twenty-four end and center spacer blocks (C) in three groups of eight at the ends and 36 in mark.
Key measurements
- Slat layout intervals: 12 in (1 ft) apart along the 72 in length on the 1 in edge
- Intermediate spacer centerline: 1 in from either end of 2 in intermediate spacer blocks (B).
- Tip: Keep the nine slat ends flush while marking so spacer rows align across the bench.
Before you move on: Check marks are on the 1 in slat edges, not the 1-1/2 in side faces.
Step 5: Glue and brad-nail the slats and spacers together
Laminate the nine slats and eight spacer rows with wood glue and 1-1/4-inch brad nails.
Parts in this step: (A) Bench slat, (B) Intermediate spacer block, (C) End and center spacer block
You'll need: Brad nailer, Pliers, Bar clamps, 2x12 lumber board, Brad nails, Wood glue
- 5.1 Glue and nail the first two slats and spacer row
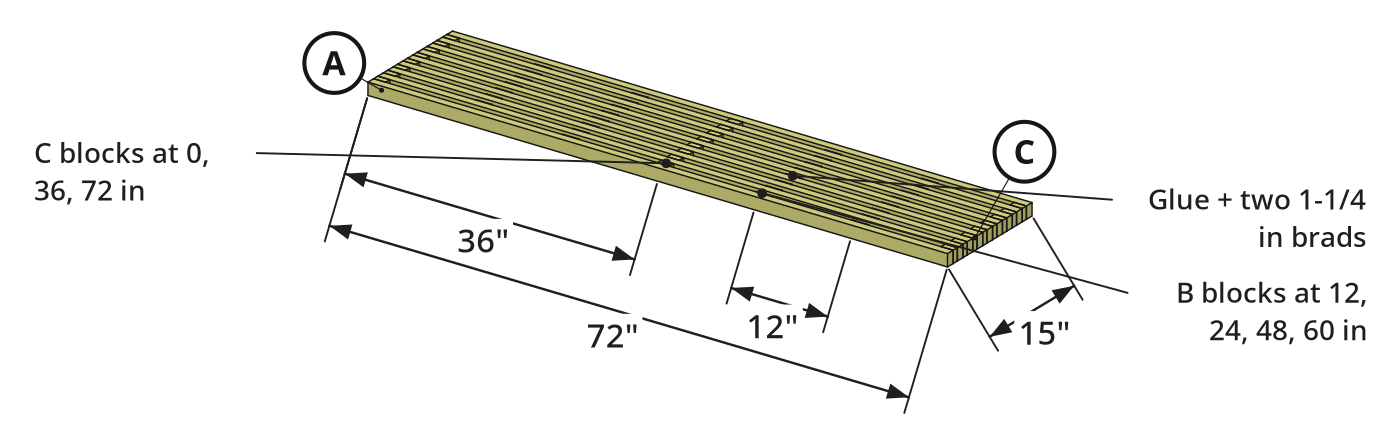
- Lay the first bench slat (A) on its 1-1/2 in face and dab wood glue at the seven marks.
- Place end and center spacer blocks (C) flush at the ends, centered on the 36 in mark.
- Align four intermediate spacer blocks (B) on the 12, 24, 48, and 60 in marks, flush to the table.
- Apply wood glue to the seven spacer tops, then set the second bench slat (A) on top.
- Hold the brad nailer perpendicular to the slat; fire two 1-1/4 in brad nails into each spacer.
- 5.2 Stack and nail the remaining slats and remove any deflected nails
- Glue and nail the remaining seven bench slats (A) and spacer rows layer by layer.
- Flush each intermediate spacer block (B) with the bottom face so top slots stay recessed.
- Check each joint before firing and offset brad nails from knots so nails do not deflect out.
- Pull out any nail that blows out the side with pliers.
- Clamp the assembled top flat on the worktable with bar clamps until the glue cures.
Key measurements
- End and center spacer positions along slats: 0 in, 36 in, and 72 in
- Intermediate spacer positions: centered on 12 in, 24 in, 48 in, and 60 in marks, flush with bottom face
- Tip: Hold the brad nailer perpendicular to the workpiece; clamp the glued bench flat on a table to dry without warping.
- Heads up: Keep your stabilizing hand several inches from the joint when firing in case a brad nail hits a knot and exits the side.
Before you move on: Check intermediate spacers sit flush with the bottom face and no deflected nails protrude.
Step 6: Sand the bench and apply polyurethane finish
Sand the glued bench top flush and seal with oil-based polyurethane spray.
Parts in this step: (A) Bench slat, (B) Intermediate spacer block, (C) End and center spacer block
You'll need: Belt sander, Detail sander, Bar clamps, Polyurethane spray
- 6.1 Sand the bench flush and spray semi-gloss polyurethane
- Let the wood glue dry completely, then secure the bench top to the worktable with bar clamps.
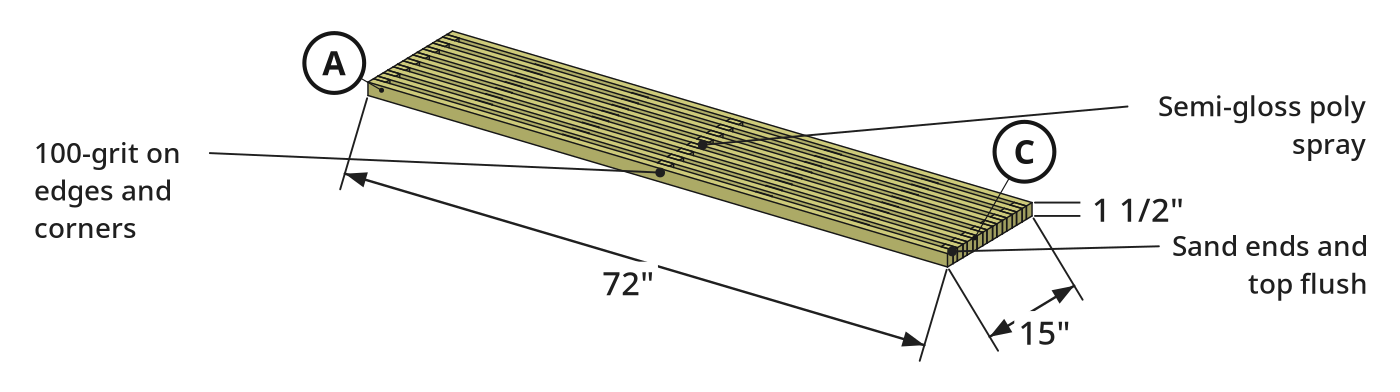
- Level laminated slats and flush bench slats (A) and spacer blocks (B, C) ends with a belt sander.
- Smooth outer edges and corners with a detail sander and 100-grit sandpaper, then wipe off dust.
- Apply several even coats of oil-based semi-gloss polyurethane spray to the top, sides, and slots.
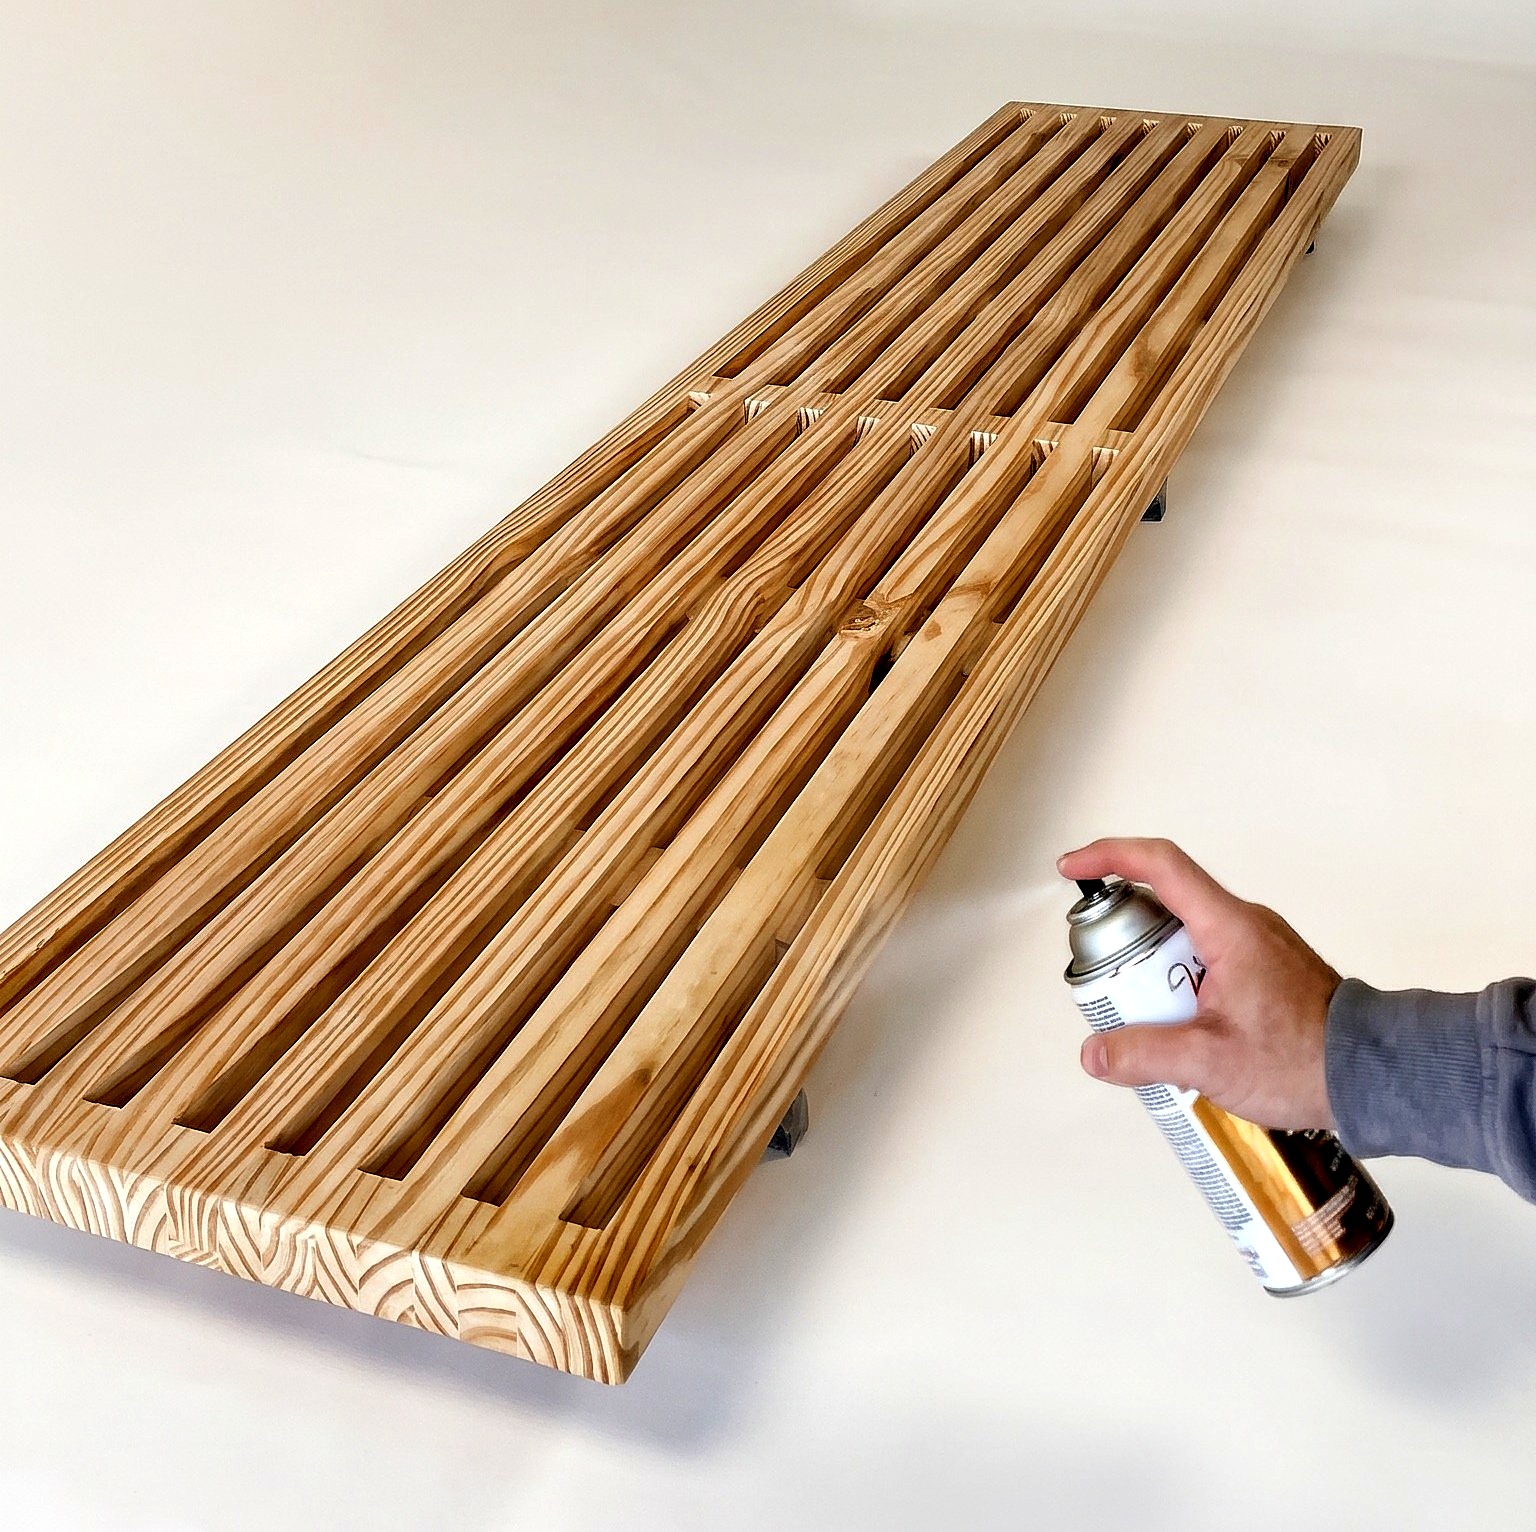
- Tip: Use aerosol polyurethane spray so mist evenly coats inside the narrow 3/4 in slots without brush drips.
- Heads up: Spray oil-based aerosol polyurethane in a ventilated space wearing an organic vapor respirator, not a paper dust mask.
Before you move on: Let the final polyurethane coat dry completely before flipping the bench top upside down.
Step 7: Bend and mount the metal legs
Bend the metal legs to a trapezoid profile and screw them under the bench.
Parts in this step: (A) Bench slat, (B) Intermediate spacer block
You'll need: Combination square, Pencil, Drill/driver, Metal bench legs, Mounting screws
- 7.1 Bend the legs to a trapezoid angle and screw them to the underside
- Hand-flex both U-shaped metal bench legs slightly outward to form a matching trapezoid angle.
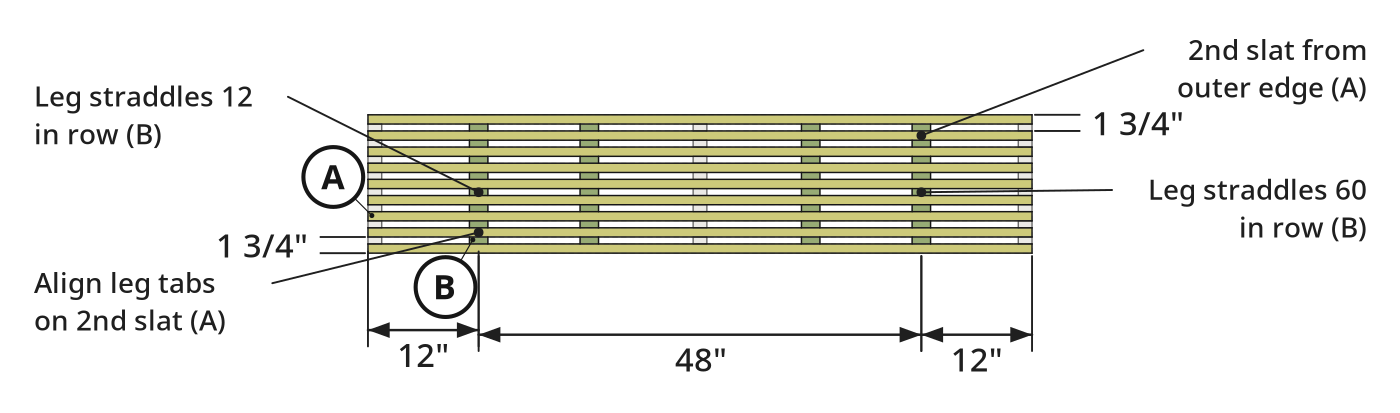
- Flip the bench top upside down; set each leg over the 12 in and 60 in intermediate spacer blocks (B) rows.
- Align leg mounting tabs along the second bench slat (A) from each outer edge with a combination square.
- Mark holes with a pencil and drill pilot holes into the bench slats (A) with a drill/driver.
- Drive the supplied mounting screws into the pilot holes to secure both metal bench legs.
Key measurements
- Leg lengthwise position: straddling 12 in and 60 in interior spacer rows (1 ft from each end)_
- Leg side inset: mounting tabs centered along the second slat from each outer edge
- Tip: Use a combination square from the bench side edge to keep both legs square and evenly inset.
- Heads up: Always drill pilot holes before driving leg screws so the narrow 1 in pine slats do not split.
Before you move on: Turn the bench upright and check it sits level on the floor without rocking.
Finishing
Sanding
- Sand each slat with 100-grit sandpaper right after ripping on the table saw.
- Flush uneven glue joints and end grain after assembly with a belt sander and detail sander.
Finish application
- Spray several light oil-based semi-gloss polyurethane coats on all faces and inside the 3/4 in slots.
Cure and care
- Let the polyurethane dry thoroughly before flipping the bench to install the metal legs.
Alternatives
- Apply wood stain before spraying clear polyurethane, or use satin aerosol polyurethane for lower sheen.
These Specs are built from EmyLuDesigns's video “Modern Slatted Wood Bench from a Single 2x12 Board”. Open the Modern Slatted Wood Bench from a Single 2x12 Board project page.
