Spetz Specs No. 2405: step-by-step assembly & installation guide
Assembling and Finishing Farmhouse Dining Chairs
The complete step-by-step guide made from Indy Farm Life's YouTube video, free on Spetz. For the video, a step-by-step player and answers to your questions, see the Assembling and Finishing Farmhouse Dining Chairs project page.
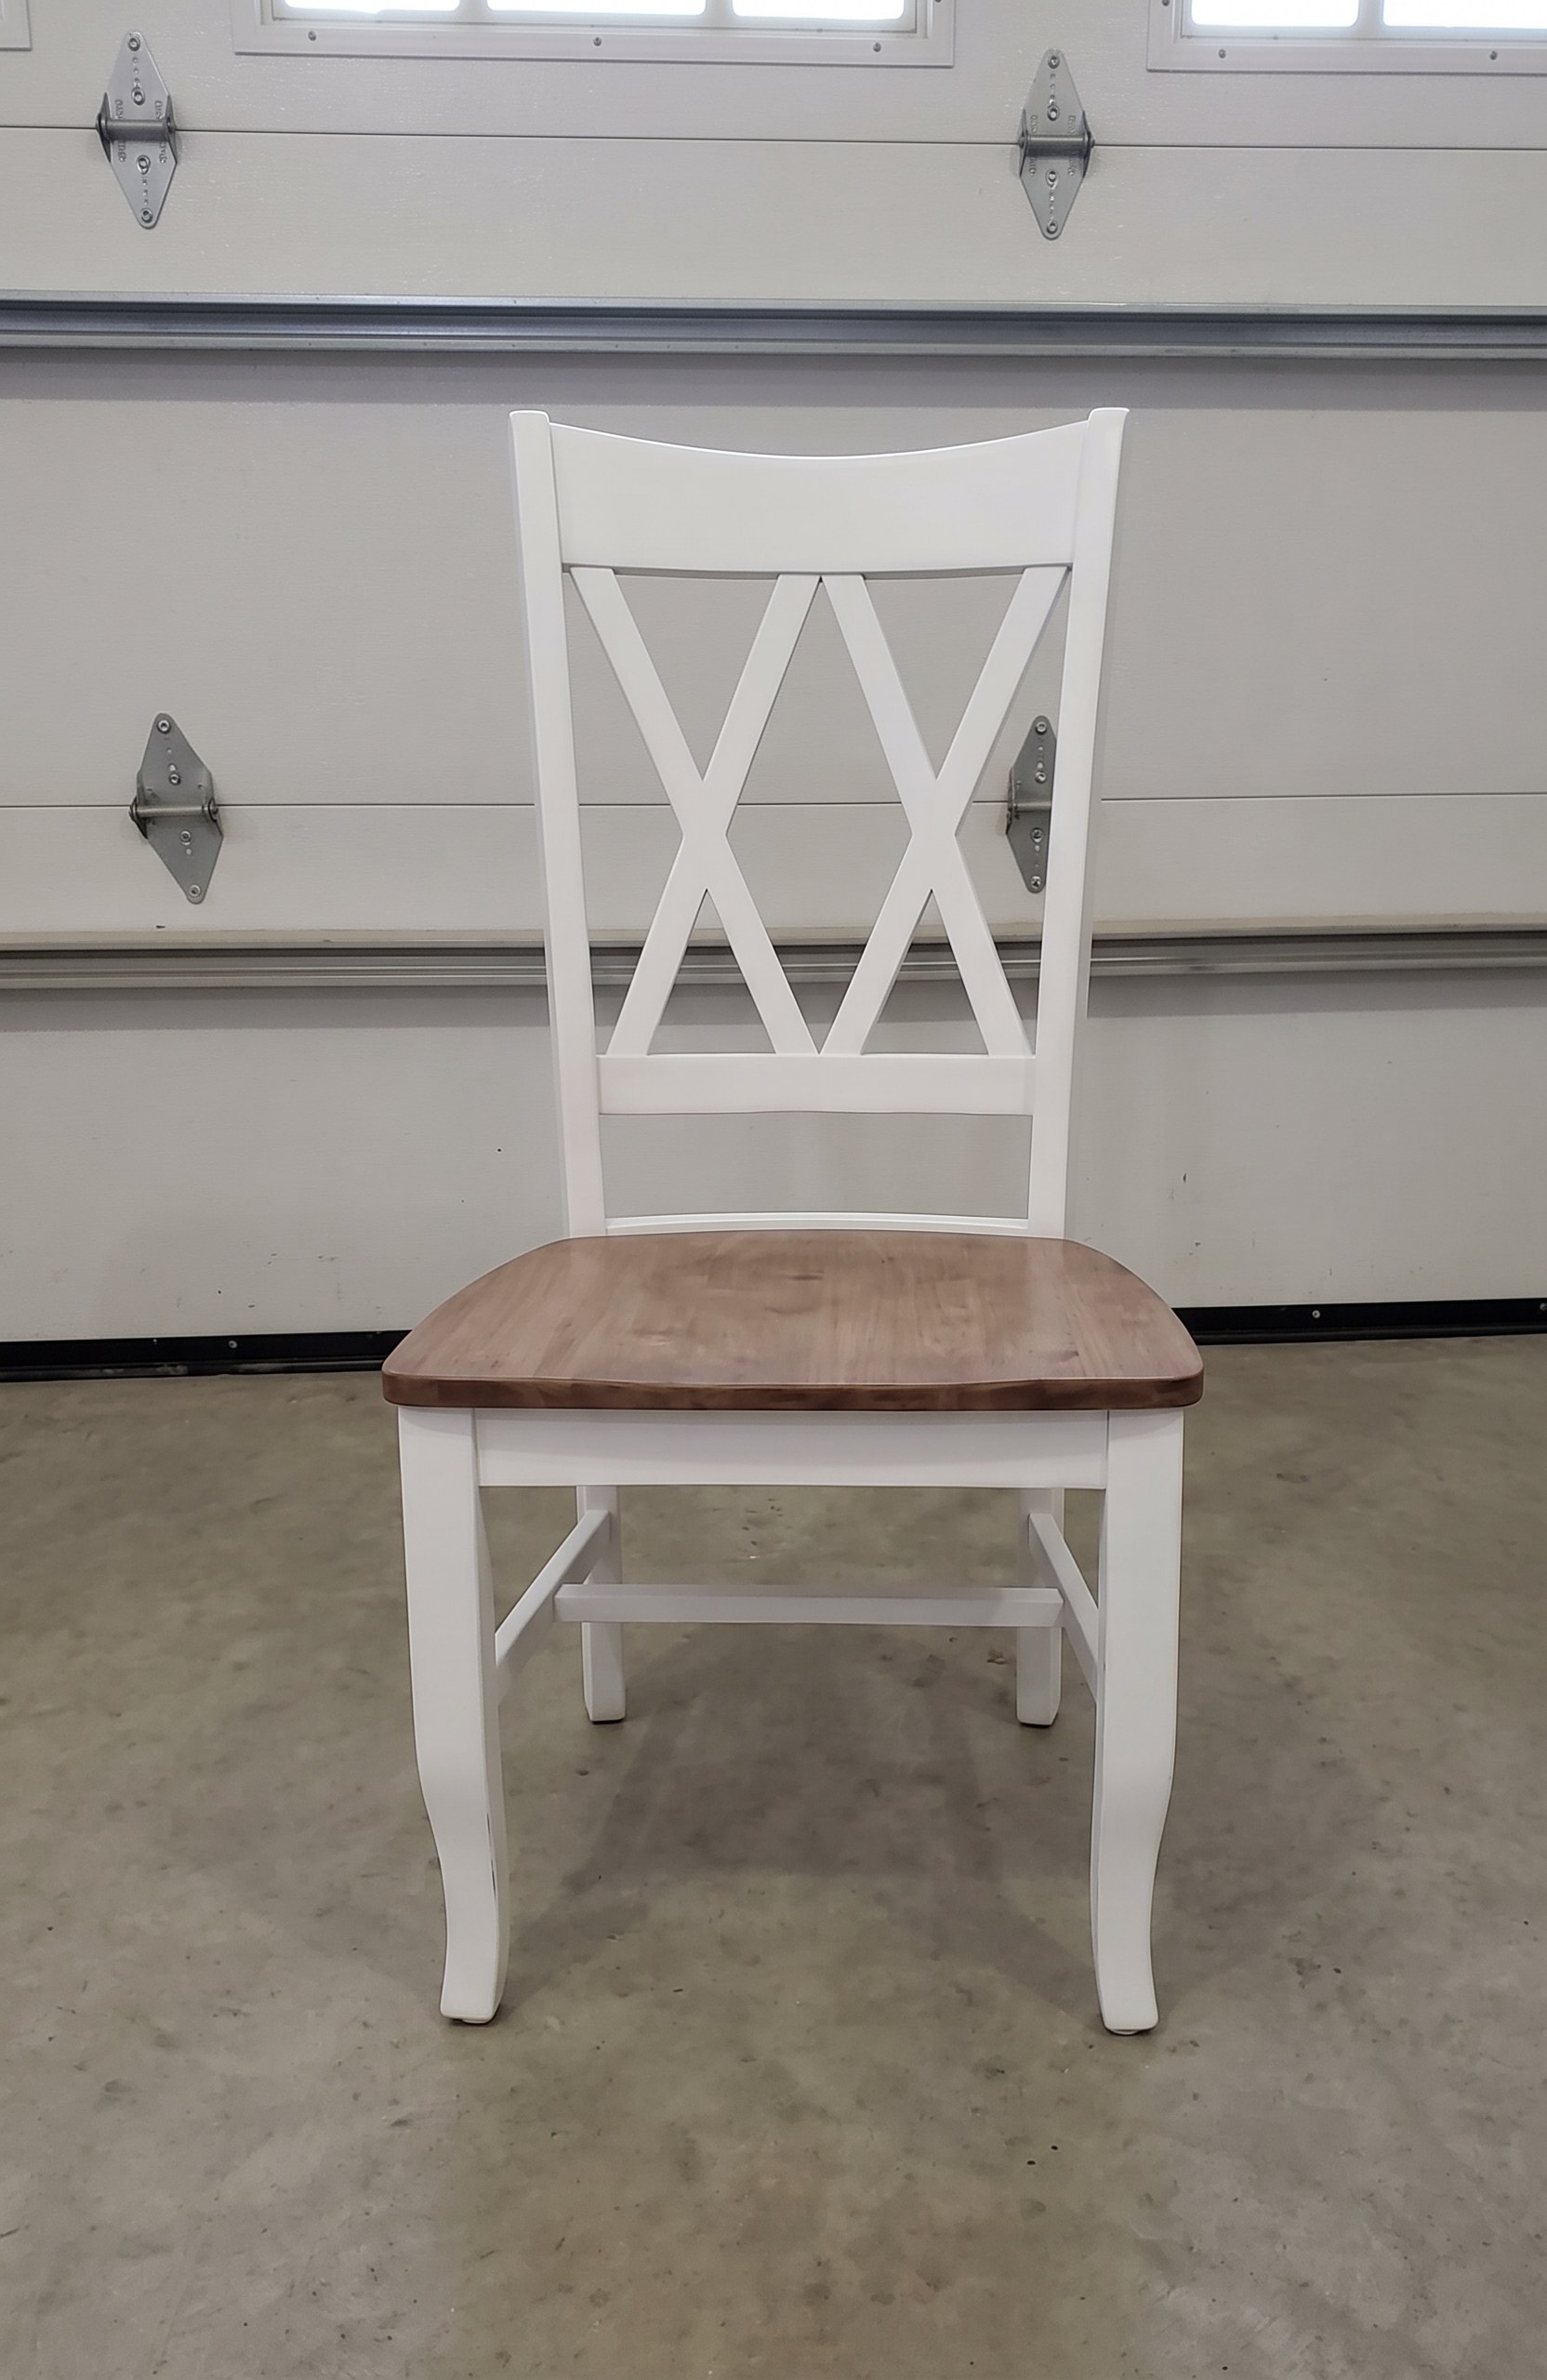
4 steps, 9 parts, 4 tools, 7 materials
Overview
The Unit
- International Concepts unfinished Parawood dining chairs: available armless or with arms.
- The wood is factory-sanded to at least 220 grit, ready to finish.
- Chairs are rated to hold 250 lb each.
Why Do It Yourself
- Six chairs delivered for about $625, a fraction of the $925+ quote.
- The kit instructions omit wood glue. Add glue at every cross-brace and dowel joint.
- Finish them yourself to match an existing table with a two-tone look.
What It Takes
- Allow 20 to 30 minutes of assembly per chair, plus several days to cure.
- No helper needed: each chair is light enough to handle solo.
What Decides Success
- Glue every cross-brace and dowel joint for long-term rigidity.
- Test your stain on the underside of a seat before the visible top.
Health and safety
Fumes and Flammables
- Work in a well-ventilated area when applying the spray primer, penetrating stain, and top coat.
- Wear a respirator mask rated for paint and organic vapors when operating the paint sprayer.
- Stain rags can self-ignite; lay them flat to dry outdoors or store them in a sealed water-filled metal can.
Assembly and Tool Safety
- Always use wood glue on the cross braces; chairs assembled without glue will loosen and collapse under weight.
- Keep your free hand clear of the driving line when using the cordless drill to prevent puncture injuries.
- Verify all bolts and screws are fully tightened with the Allen key or screwdriver before sitting on the chairs.
Safe Finishing Practices
- Protect your eyes with safety glasses when spraying primer and paint to prevent airborne particles from causing irritation.
- Allow the polycrylic top coat to cure completely according to the label before using the chairs.
Before you open the box
- Check parts against the included hardware sheet before starting: armless chairs ship in packs of two; armed chairs ship individually.
- Lay parts on the box's cardboard or a soft blanket to prevent scratches to the pre-sanded Parawood.
- Sort hardware by type: machine screws, wood screws, dowels, and the Allen key. Sizes are not printed on the bags, so keep them separated to avoid mix-ups.
- If finishing after assembly, plan your workspace: a spray booth or well-ventilated area for priming and painting, and a clean, dust-free surface for staining the seat tops.
- Have wood glue on hand: the kit does not include it, and the kit instructions do not call for it, but it is essential for long-term joint stability.
Tools
- Cordless Drill/Driver (DeWalt, 20V MAX)
- Allen Key (Hex key)
- Screwdriver (Manual)
- Paint Sprayer (optional)
Materials
- Dining Chair Kit (6, Parawood, International Concepts)
- Wood Glue (Titebond, Titebond III)
- Primer (Spray primer)
- Paint (Latex paint, White)
- Wood Stain (Penetrating Stain, Minwax, Special Walnut 224)
- Top Coat (Water-Based, Minwax, Polycrylic)
- Felt Pads
Hardware
| Hardware | Size | Count | Used in steps |
|---|---|---|---|
| machine screw | 1, 2, 3 | ||
| wood screw | 2, 3 | ||
| dowel | 3 | ||
| Allen key | 1 |
Finishes & supplies, in the order they go on
| Product | What it does | Mix & coats | Dry time | Applied with |
|---|---|---|---|---|
| Primer | Seal and prepare chair frames for paint adhesion. | Paint sprayer | ||
| Paint | Final colour coat on the chair frames | Paint sprayer | ||
| Minwax Special Walnut 224 penetrating stain | Colour seat tops to match the farmhouse table. | |||
| Minwax Polycrylic (water-based) | Protective topcoat over the stained seat tops | 4 coats |
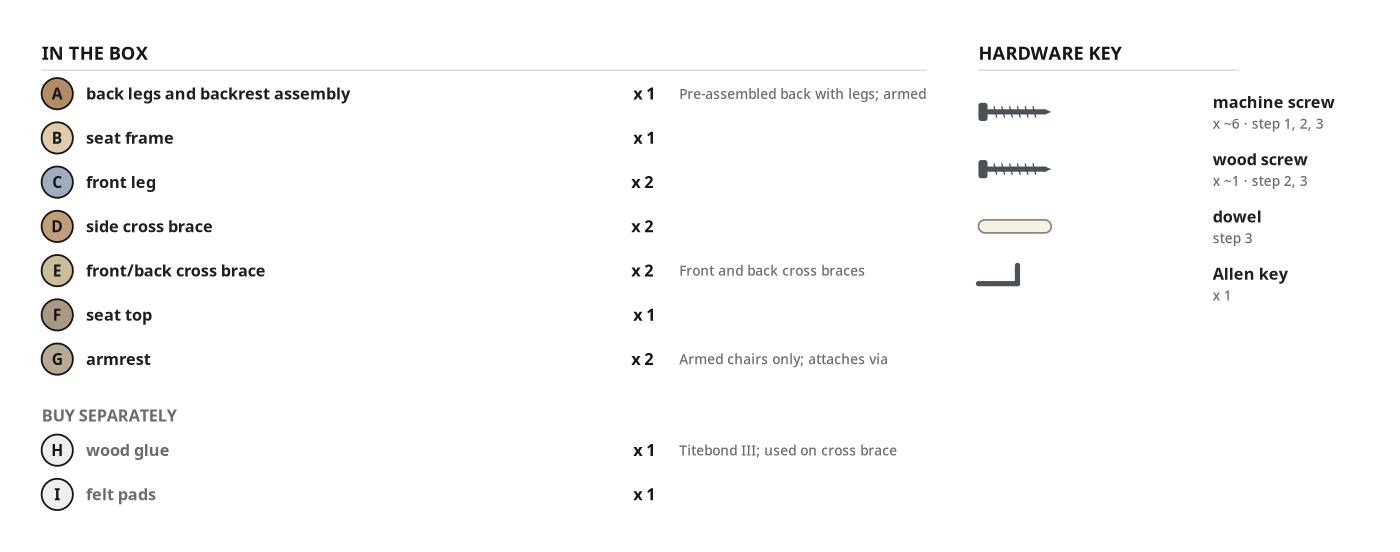
What's in the box
| Part | Name | Qty | Size | Notes |
|---|---|---|---|---|
| A | back legs and backrest assembly | x1 | Pre-assembled back with legs; armed version has pre-drilled holes for arms | |
| B | seat frame | x1 | ||
| C | front leg | x2 | ||
| D | side cross brace | x2 | ||
| E | front/back cross brace | x2 | Front and back cross braces installed between legs | |
| F | seat top | x1 | ||
| G | armrest | x2 | Armed chairs only; attaches via dowel and screws | |
| H | wood glue | x1 | Titebond III; used on cross brace joints and arm dowels | |
| I | felt pads | x1 |
Before you start
Unbox & Sort
- Lay parts on cardboard or a blanket to protect the factory sanding.
- Separate machine screws, wood screws, and dowels into labelled cups or bags.
- Identify armed chairs (pre-drilled holes for armrests on the back-leg assembly) and armless chairs.
Tool Set-Up
- Cut the 90-degree bend off the included Allen key with a hacksaw or bolt cutters; chuck the straight shaft into a cordless drill as a power-driver bit.
- Set a sturdy trash can or similar stand nearby to hold the chair frame at a comfortable height during assembly.
Step by step
Step 1: Assemble the Main Frame
The back-leg/backrest assembly bolts to the seat frame, forming the chair's main structure.
Parts in this step: (A) back legs and backrest assembly, (B) seat frame
You'll need: Cordless Drill/Driver, Allen Key, machine screw
- 1.1 Position the Frame
- Set a sturdy trash can or similar stand at your work surface to cradle the chair during assembly.
- Place the back legs and backrest assembly (A) upside-down or angled so the seat-frame mounting points are accessible.
- Rest the seat frame (B) against the assembly (A), aligning the pre-drilled bolt holes on both.
- 1.2 Attach Back to Seat Frame
- Insert four machine screws through the seat frame (B) into the threaded holes on the back legs and backrest assembly (A).
- Drive each machine screw with the modified Allen key bit in your drill; do not use glue on these machine-screw joints.
- Tighten all four screws snug; do not over-torque, as the Parawood can strip.
- Check the seat frame sits flush and square against the back assembly.
- Tip: Use the modified Allen key in a drill to save time, especially when assembling multiple chairs.
Before you move on: Check the seat frame is flush and square against the back assembly, leaving no gaps.
Step 2: Attach Front Legs and Cross Braces
Both front legs are attached and all four cross braces are glued and screwed for full rigidity.
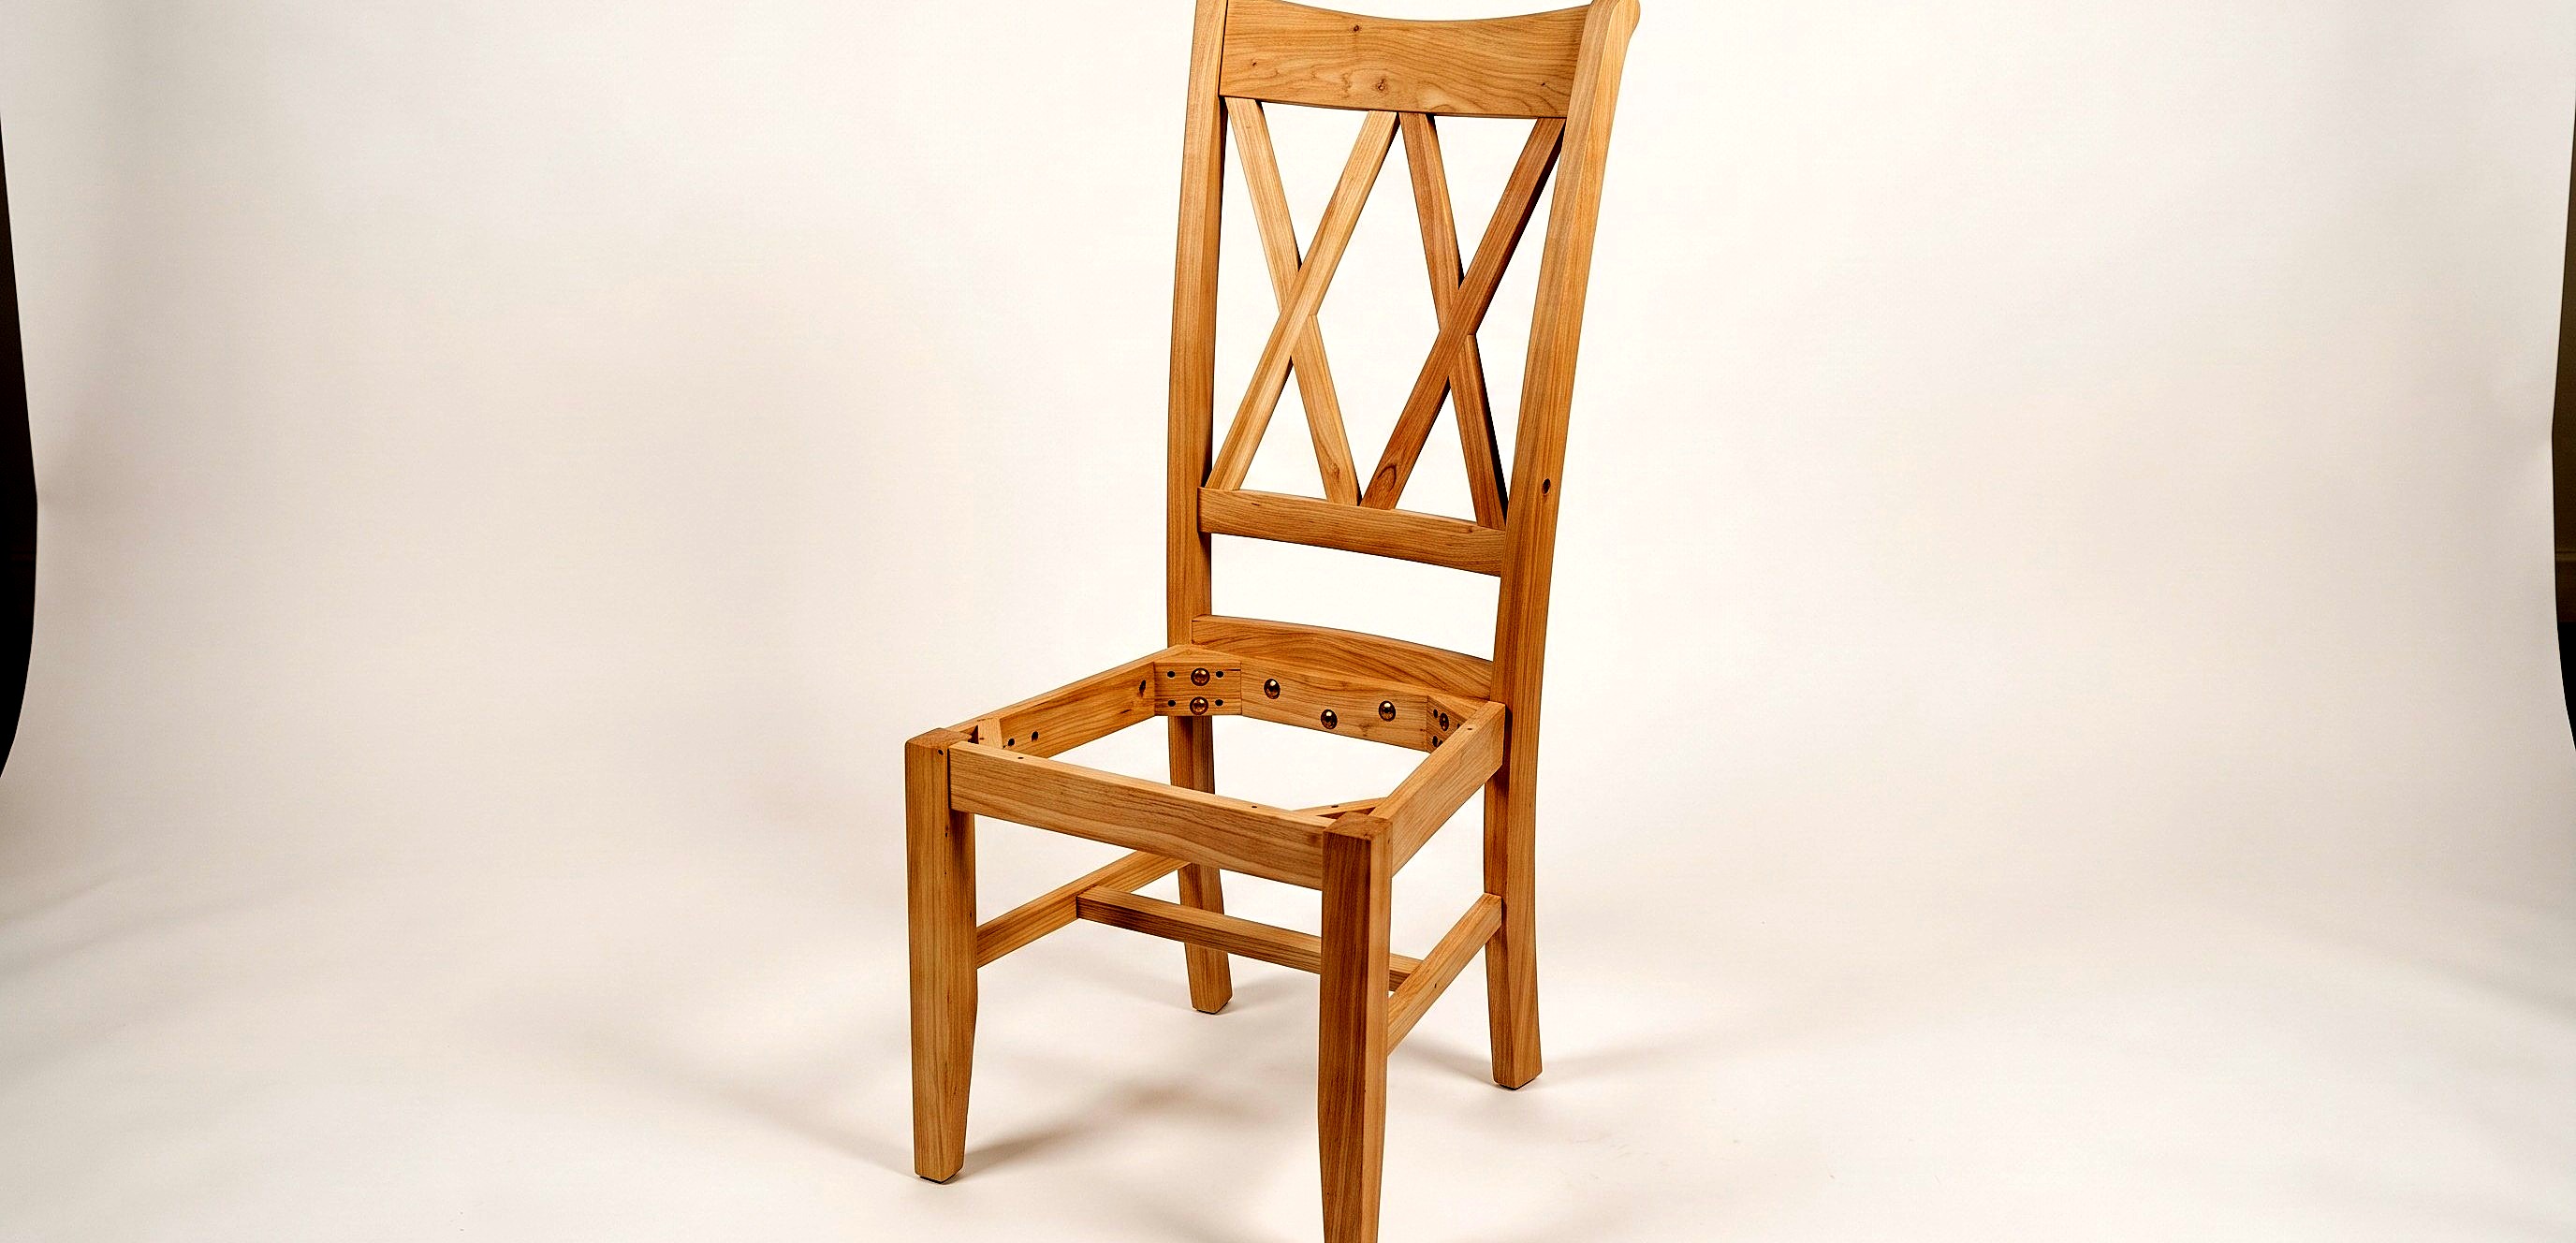
Parts in this step: (A) back legs and backrest assembly, (B) seat frame, (C) front leg, (D) side cross brace, (E) front/back cross brace
You'll need: Cordless Drill/Driver, Allen Key, Screwdriver, Wood Glue, machine screw, wood screw
- 2.1 Attach Front Legs
- Align a front leg (C) at each seat frame (B) front corner using the pre-drilled holes.
- Drive machine screws through the seat frame into each front leg with the Allen key bit.
- Repeat for the second front leg.
- 2.2 Install Side Cross Braces
- Apply generous wood glue (H) into each side cross brace (D) end pocket.
- Fit side cross brace (D) between front leg (C) and matching back leg on assembly (A).
- Secure each end with a wood screw through the pre-drilled hole.
- Wipe glue squeeze-out immediately with a damp rag; dried glue blocks stain.
- Repeat for the second side cross brace.
- 2.3 Install Front and Back Cross Braces
- Fill both front/back cross brace (E) end pockets with wood glue (H).
- Press the brace into the sockets between the two front legs (C) or two back legs on assembly (A).
- Drive a wood screw into each end to lock the brace.
- Repeat for the remaining front/back cross brace.
- Wipe all glue squeeze-out before it sets.
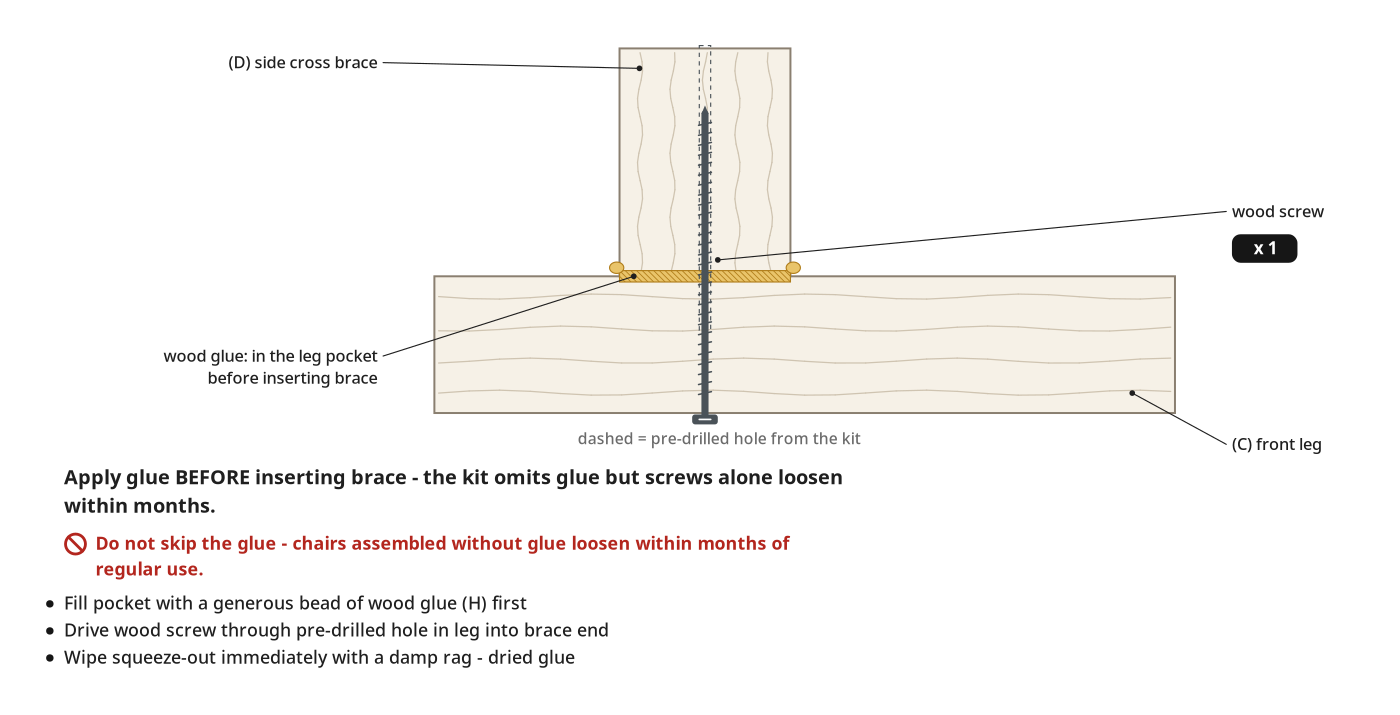
- Tip: Glue every cross-brace joint, the small wood screws alone will work loose over time, and the kit instructions do not call for glue.
- Tip: Install side cross braces (D) first, then front and back braces (E) for easy pocket access.
- Heads up: Never skip the glue; chairs assembled without it loosen within months of regular use.
Before you move on: Press the seat frame down on a flat surface; there should be zero wobble or racking.
Step 3: Attach the Arms
Both armrests are attached to the chair frame (armed chairs only); armless chairs skip this step.
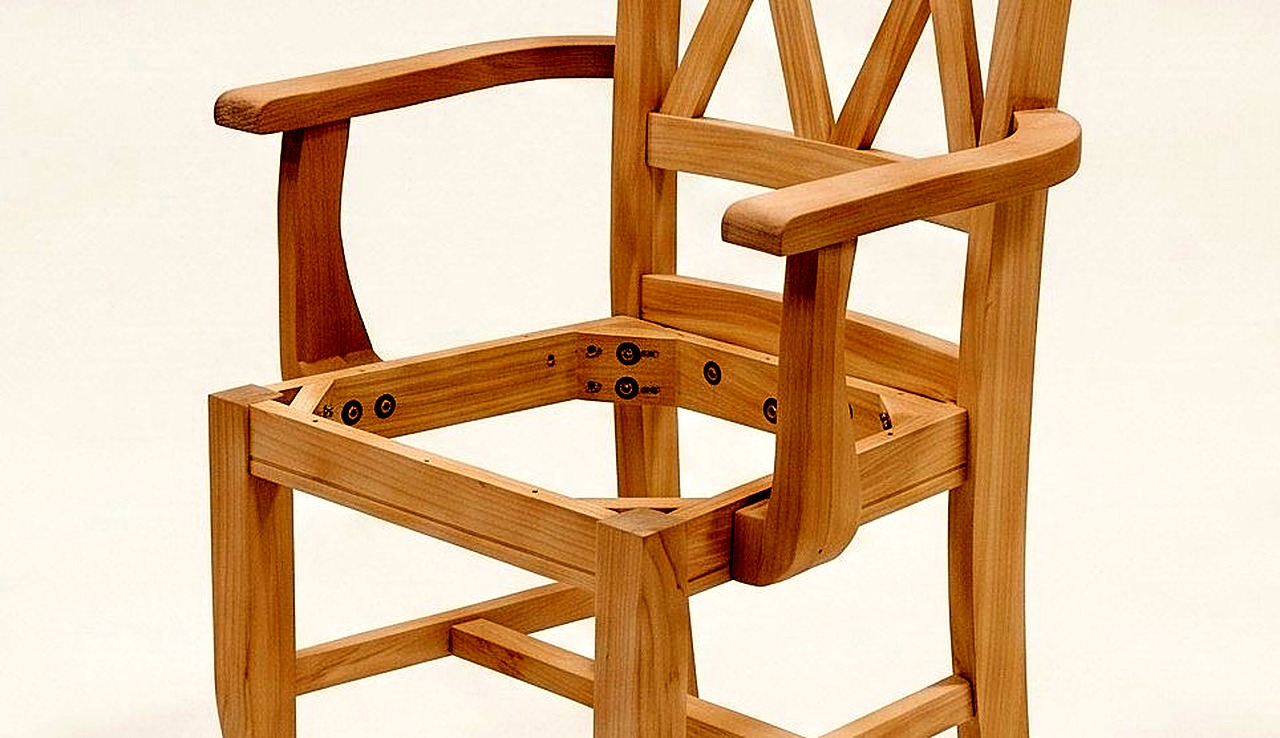
Parts in this step: (A) back legs and backrest assembly, (C) front leg, (G) armrest
You'll need: Cordless Drill/Driver, Allen Key, Screwdriver, Wood Glue, wood screw, machine screw, dowel
- 3.1 Attach Arm to Backrest
- Apply wood glue (H) to the armrest dowel hole on the assembly (A) back leg.
- Insert the armrest (G) rear dowel into the back leg hole for alignment.
- Drive a wood screw through the back leg into the armrest.
- Wipe any glue squeeze-out.
- 3.2 Attach Arm to Front Leg
- Apply wood glue (H) to the front leg (C) top dowel.
- Press the armrest (G) front onto the glued front leg dowel.
- Secure the armrest to the front leg with two machine screws from underneath or through the pre-drilled holes.
- Repeat Steps 3.1 and 3.2 for the second armrest.
- Tip: Glue the front-leg dowel as well as driving the two machine screws: the glue makes the joint last.
Before you move on: Press down and wiggle each armrest; it should feel solid with no play.
Step 4: Finishing Process Overview
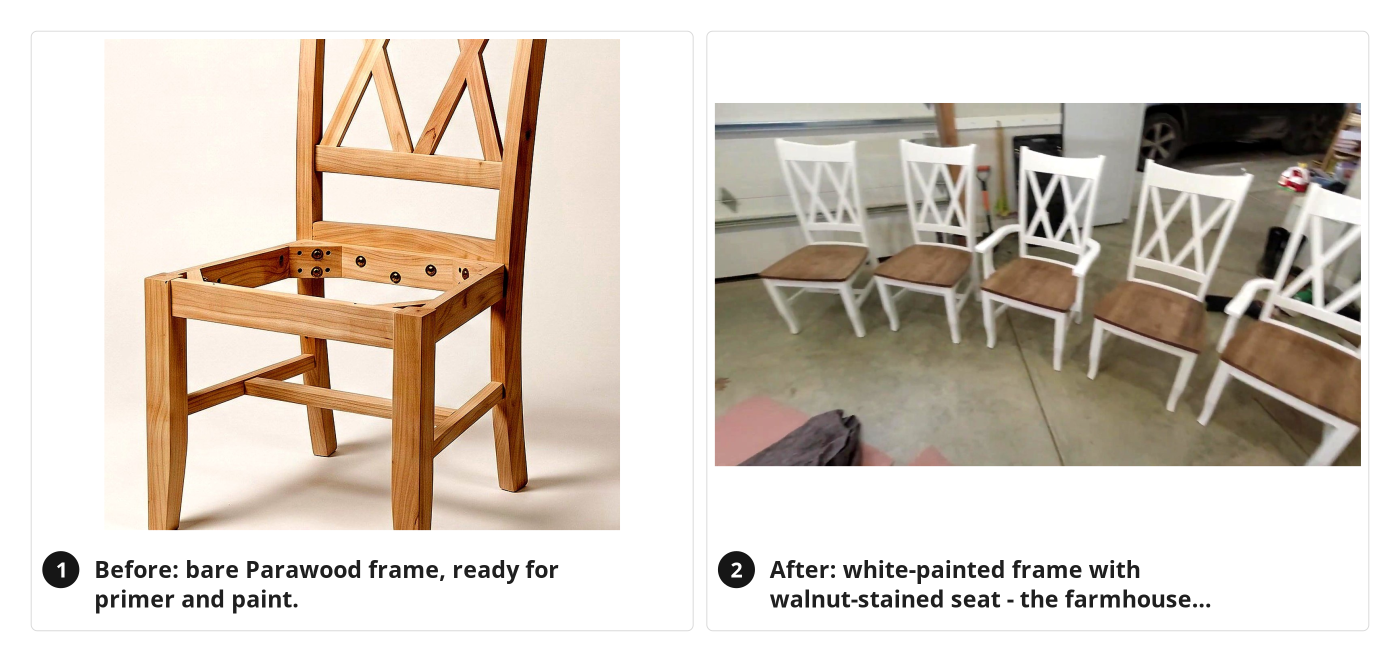
Chair frames are primed and painted white, seat tops stained to match the table, and a protective topcoat seals the stained surfaces.
Parts in this step: (F) seat top
You'll need: Paint Sprayer, Primer, Paint, Wood Stain, Top Coat
- 4.1 Finishing Process Overview
- Do not attach the seat top (F) to the frame yet; finish each piece separately for clean colour separation.
- In a well-ventilated area, spray one coat of primer on each chair frame and let dry per the primer's label.
- Apply white latex paint over the primed frames using a paint sprayer for the smoothest finish; apply additional coats as needed for full coverage.
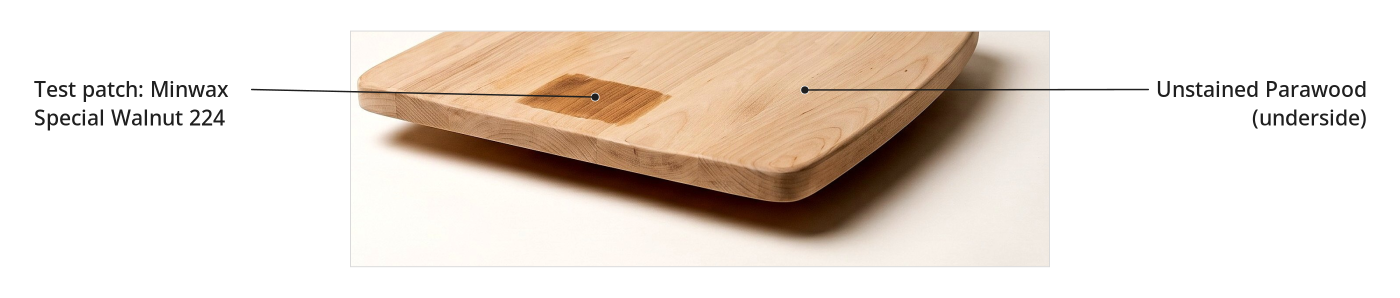
- Before staining the visible seat (F) top, test the stain colour (Minwax Special Walnut 224) on the underside; Parawood accepts stain differently than other species.
- Once satisfied, stain the top face of each seat (F), let dry, then brush on 3 to 4 thin coats of Minwax Polycrylic, drying each per the label.
Key measurements
- 3–4 coats of Polycrylic topcoat on seat tops
- Tip: Parawood is a different species than red oak or pine; the stain colour looks different, so always test first.
- Tip: Test on the six seat undersides to dial in the stain match before the visible tops.
- Heads up: Do not stain over dried glue squeeze-out; the stain will not penetrate and leaves a visible blotch.
Before you move on: Compare the stained seat to your existing table or reference piece under the same lighting before the topcoat.
Finishing
Last Touches
- Apply felt pads (I) to the bottom of all four legs to prevent scratching the floor.
- Attach each finished seat top (F) to its frame if not already done.
- Wipe down all surfaces with a dry cloth to remove finishing dust.
Cure & Settle
- Let the Polycrylic topcoat cure fully per the product label before placing hot dishes or heavy items on the seats.
- Let painted frames cure for at least a few days before stacking or heavy use to avoid paint scuffs.
Care
- Clean painted frames and stained seats with a damp cloth; avoid harsh chemical cleaners that can strip the topcoat.
- Re-tighten machine screws annually if any joint feels loose, though glued joints should remain solid.
Alternatives
- Stain the entire chair a single colour instead of the two-tone painted-frame-and-stained-seat look.
- Use Titebond II instead of Titebond III; both are suitable for interior furniture joints.
Test it before you call it done
| Check | What you should see | If not |
|---|---|---|
| Sit in each chair on a flat, hard floor. | No wobble, no racking, no creaking; the chair feels solid and stable. | Disassemble the loose joint, apply wood glue, reassemble, and let the glue cure before use. |
| Inspect every cross-brace and armrest joint for tightness. | No play or movement when you grip and twist each brace or armrest. | Tighten the wood or machine screw at the loose joint; add glue if omitted. |
| Check stained seat tops under final lighting. | Colour matches the existing table; finish is smooth without blotches or bare spots. | Lightly sand and apply more stain or topcoat as needed. |
| Check felt pads are on all four leg bottoms per chair. | Pads sit flat and fully cover each leg's floor contact point. | Remove and reapply any pad that is off-centre or not adhering fully. |
These Specs are built from Indy Farm Life's video “Assembling and Finishing Farmhouse Dining Chairs”. Open the Assembling and Finishing Farmhouse Dining Chairs project page.
