Spetz Specs No. 2611: step-by-step system install guide
Long-Range Outdoor Wi-Fi Access Point Installation
The complete step-by-step guide made from Indy Farm Life's YouTube video, free on Spetz. For the video, a step-by-step player and answers to your questions, see the Long-Range Outdoor Wi-Fi Access Point Installation project page.
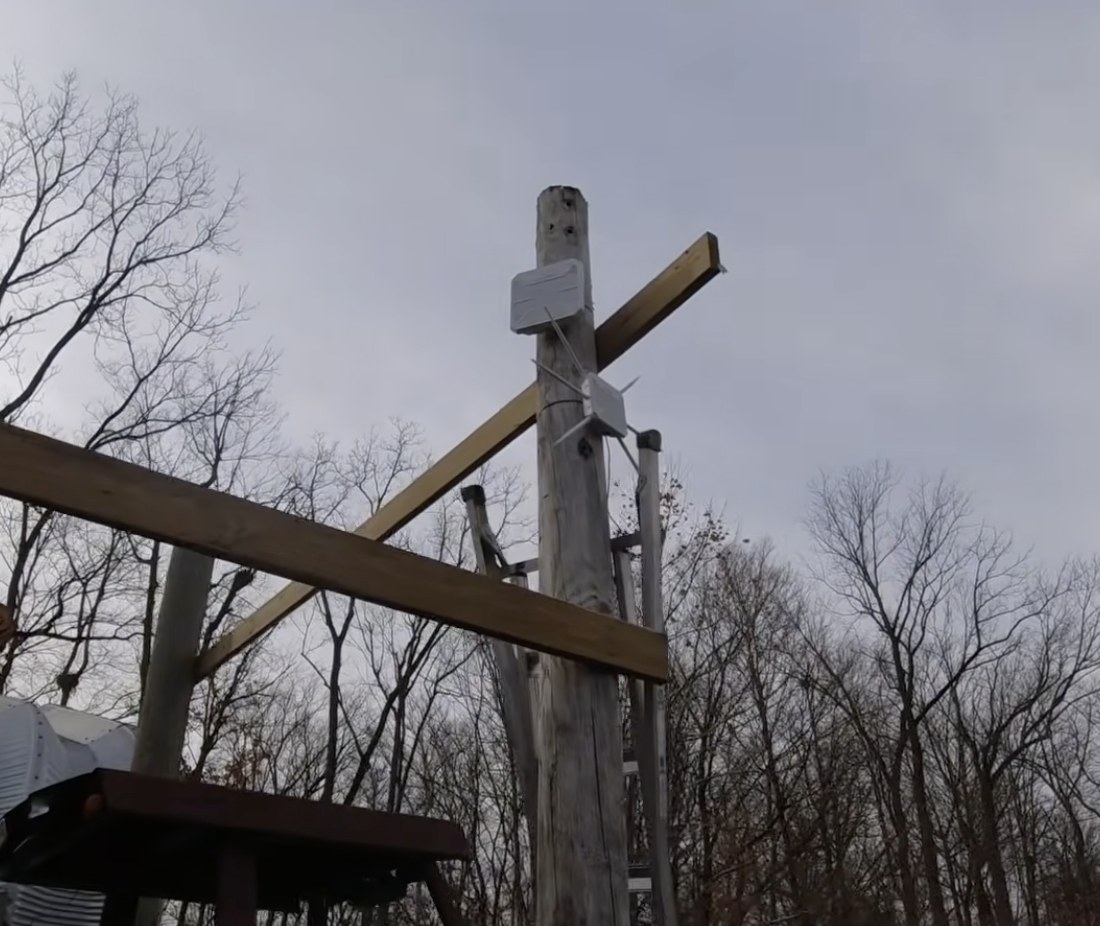
5 steps, 4 parts, 2 tools, 6 materials
Overview
The System
- Extend hardwired house internet to barn via TP-Link unmanaged network switch (A).
- Send power and data on one cable via Power over Ethernet injector (B).
- Broadcast outdoor Wi-Fi via Wavlink AX3000 directional (C) and omnidirectional (D) access points.
Why Do It Yourself
- End outbuilding, pond, and yard dead zones where cell data drops.
- Link remote security cameras, smart lights, and mobile devices across rural property.
- Specs omit how trees, berms, and aim angles cut real speeds.
What It Takes
- Needs basic networking, safe ladder work, extension ladder, and smartphone.
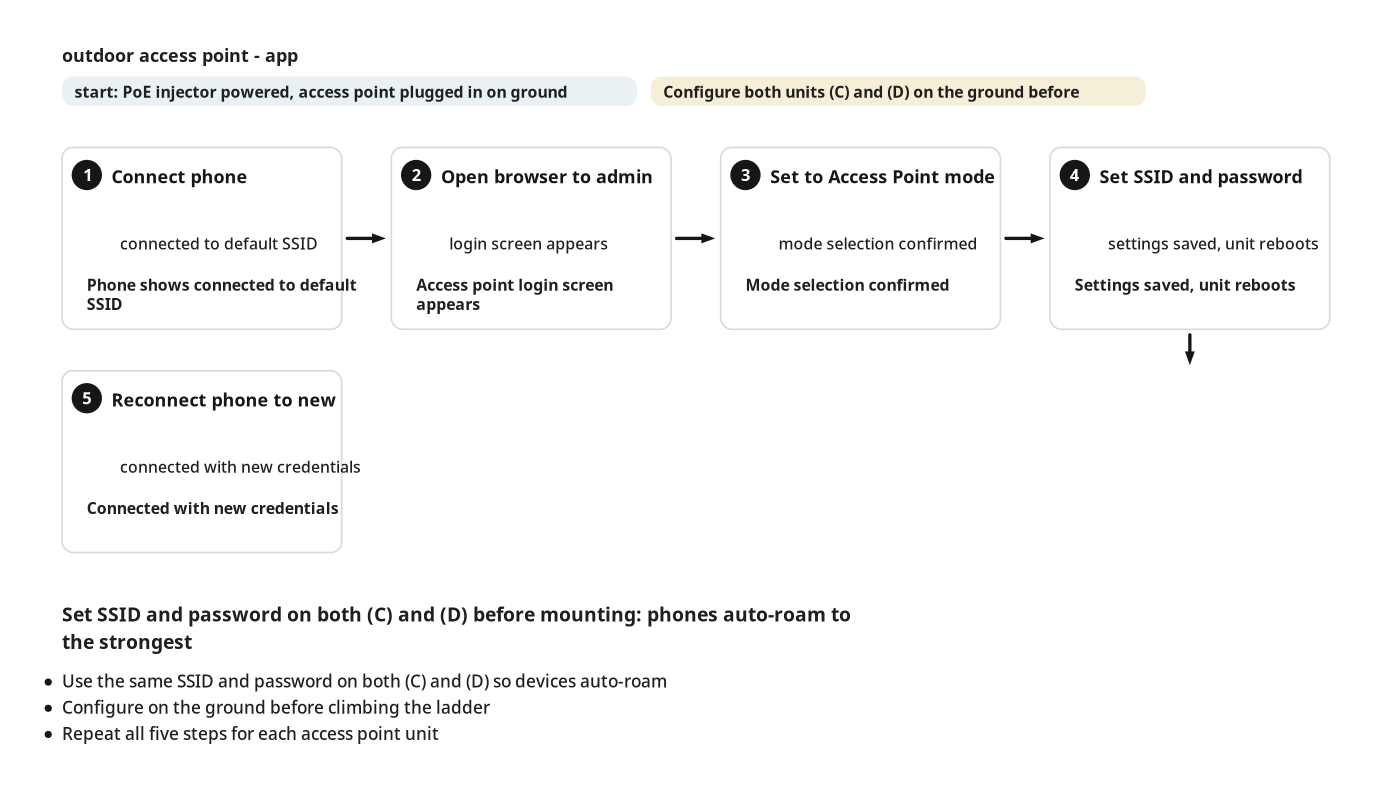
- Pre-set access point network names and passwords before climbing the ladder to mount.
What Decides Success
- Keep clear line of sight from access point to coverage areas.
- Match external antennas to labeled frequency ports and weatherproof outdoor connections.
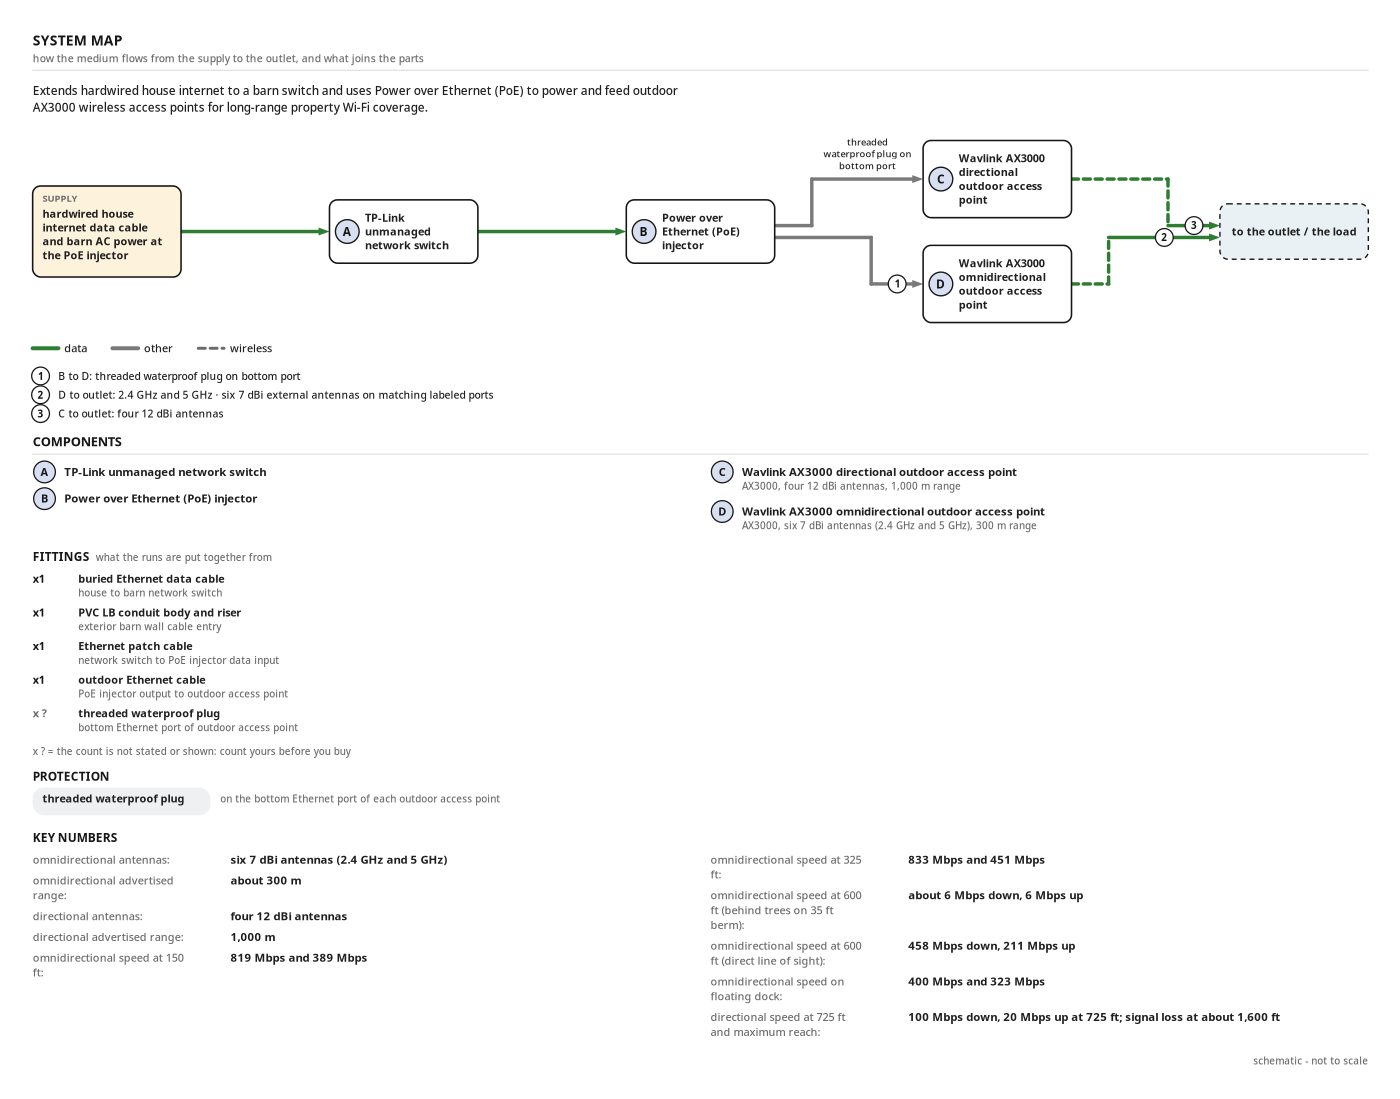
The system at a glance
- Extends hardwired house internet to a barn switch and uses Power over Ethernet (PoE) to power and feed outdoor AX3000 wireless access points for long-range property Wi-Fi coverage.
- Supply: hardwired house internet data cable and barn AC power at the PoE injector
- supply → TP-Link unmanaged network switch: data, cable
- TP-Link unmanaged network switch → Power over Ethernet (PoE) injector: data, cable
- Power over Ethernet (PoE) injector → Wavlink AX3000 omnidirectional outdoor access point: other, cable, threaded waterproof plug on bottom port
- Wavlink AX3000 omnidirectional outdoor access point → out: data, wireless, 2.4 GHz and 5 GHz, six 7 dBi external antennas on matching labeled ports
- Power over Ethernet (PoE) injector → Wavlink AX3000 directional outdoor access point: other, cable, threaded waterproof plug on bottom port
- Wavlink AX3000 directional outdoor access point → out: data, wireless, four 12 dBi antennas
- Protection: threaded waterproof plug, on the bottom Ethernet port of each outdoor access point
- omnidirectional antennas: six 7 dBi antennas (2.4 GHz and 5 GHz)
- omnidirectional advertised range: about 300 m
- directional antennas: four 12 dBi antennas
- directional advertised range: 1,000 m
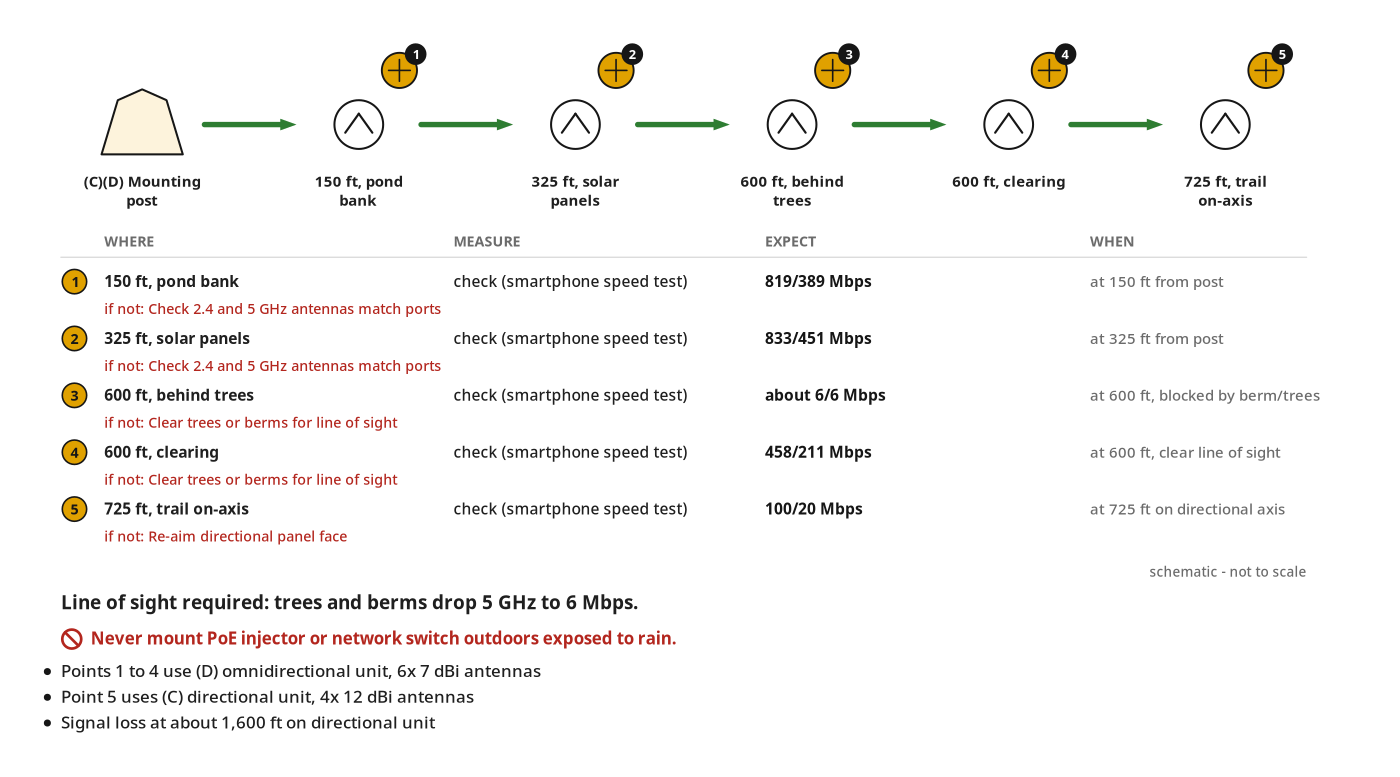
- omnidirectional speed at 150 ft: 819 Mbps and 389 Mbps
- omnidirectional speed at 325 ft: 833 Mbps and 451 Mbps
- omnidirectional speed at 600 ft (behind trees on 35 ft berm): about 6 Mbps down, 6 Mbps up
- omnidirectional speed at 600 ft (direct line of sight): 458 Mbps down, 211 Mbps up
- omnidirectional speed on floating dock: 400 Mbps and 323 Mbps
- directional speed at 725 ft and maximum reach: 100 Mbps down, 20 Mbps up at 725 ft; signal loss at about 1,600 ft
Health and safety
Aluminum Extension Ladder Safety
- Set the aluminum extension ladder on firm, level ground next to the wooden post before climbing.
- Check for overhead power lines before raising or moving the conductive aluminum ladder around the barn and yard.
- Maintain three points of contact on the ladder while climbing and strapping the access points to the post.
- Step only on rated rungs and never overreach while tightening zip ties or plugging in Ethernet cables.
Electrical and PoE Protection
- Keep the unmanaged network switch, PoE injector, and power adapters inside the dry, weather-protected barn away from moisture.
- Fit the threaded waterproof plug onto the outdoor access point Ethernet connection to prevent water entry and electrical faults.
- Disconnect the PoE injector from its power source before plugging or unplugging Ethernet data cables during setup.
Post Mounting and Cable Routing
- Pull zip ties tight around the wooden post and verify the access point is secure before letting go at height.
- Route Ethernet data cables between the house, barn switch, and post clear of walkways and ladder feet to prevent trips.
- Never mount outdoor access points or handle elevated antennas and cables during rain, high winds, or lightning.
Outdoor Range Testing Hazards
- Stop walking before looking at your smartphone to run speed tests or check GPS apps across the rural property.
- Watch your step and stay back from unguarded edges while testing Wi-Fi coverage on the pond dock.
Checks before you start
- Check a hardwired Ethernet data cable runs from house router to barn.
- Check the barn has an indoor AC outlet for the PoE injector.
- Set access points to access point mode with SSID and password before mounting.
- Check omnidirectional unit frequency labels and match 2.4 GHz and 5 GHz antennas.
- Pick a high post with clear line of sight to the coverage zone.
- Keep network switch and PoE injector indoors, away from rain and moisture.
Tools
- Extension Ladder (aluminum ladder)
- Smartphone (mobile phone with speed test and GPS apps)
Materials
- Omnidirectional Outdoor Wi-Fi Access Point (1, outdoor wireless access point, Wavlink, AX3000, six 7 dBi antennas (2.4 GHz and 5 GHz), 300m advertised range)
- Directional Outdoor Wi-Fi Access Point (1, point-to-point outdoor wireless access point, Wavlink, AX3000, four 12 dBi antennas, 1,000m advertised range)
- Unmanaged Network Switch (1, unmanaged Ethernet switch, TP-Link)
- Power over Ethernet (PoE) Injector (1, PoE power adapter)
- Ethernet Data Cables (Ethernet / LAN cable)
- Zip Ties (plastic cable ties, Harbor Freight)
Hardware
| Hardware | Size | Count | Used in steps |
|---|---|---|---|
| Zip Ties | 2 | ||
| threaded waterproof plug | 1 | 2 |
Components
| Part | Name | Qty | Size | Notes |
|---|---|---|---|---|
| A | TP-Link unmanaged network switch | x1 | installed inside the barn as the network hub receiving the incoming data cable from the house | |
| B | Power over Ethernet (PoE) injector | x1 | powered box inside the barn that adds electrical power to the outbound Ethernet data line | |
| C | Wavlink AX3000 directional outdoor access point | x1 | AX3000, four 12 dBi antennas, 1,000 m range | mounted high on the outdoor wooden post with zip ties and aimed down the trail for point-to-point coverage |
| D | Wavlink AX3000 omnidirectional outdoor access point | x1 | AX3000, six 7 dBi antennas (2.4 GHz and 5 GHz), 300 m range | mounted on the outdoor post below the directional unit with 2.4 GHz and 5 GHz antennas matched to labeled ports |
Before you start
Step by step
Step 1: Connect the Network Switch and PoE Injector
Barn network switch takes house data and feeds powered Ethernet to the outdoor post.
Parts in this step: (A) TP-Link unmanaged network switch, (B) Power over Ethernet (PoE) injector
You'll need: Unmanaged Network Switch, Power over Ethernet (PoE) Injector, Ethernet Data Cables
- 1.1 Connect the house data line to the barn switch
- Run buried house Ethernet data cable through exterior PVC conduit into the barn.
- Plug incoming house cable into TP-Link unmanaged network switch (A).
- Plug an Ethernet patch cable into an open switch (A) LAN port.
- 1.2 Wire the Power over Ethernet (PoE) injector
- Plug the patch cable into the Power over Ethernet (PoE) injector (B) data input.
- Plug the injector (B) AC power cord into an indoor barn outlet.
- Plug the long outdoor Ethernet cable into the injector (B) PoE output port.
- Run powered outdoor Ethernet cable from barn to wooden mounting post.
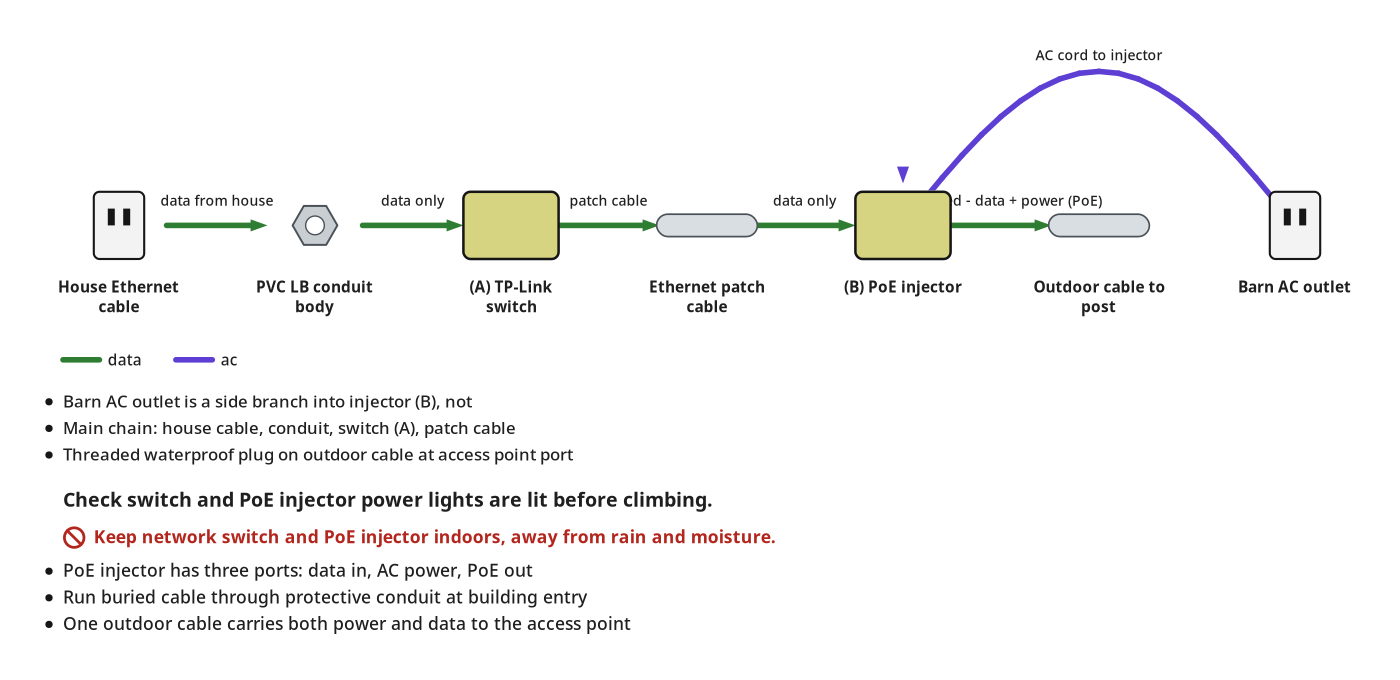
- Tip: Run buried outdoor data cable through protective conduit at the building entry.
- Tip: Use Power over Ethernet so one outdoor cable carries power and data.
- Heads up: Keep network switch and PoE injector in a dry, weather-protected building.
Before you move on: Check switch and PoE injector power lights are lit before climbing.
Step 2: Mount and Plug In the Outdoor Access Points
Both pre-configured access points strap high on the post; the omnidirectional unit powers on.
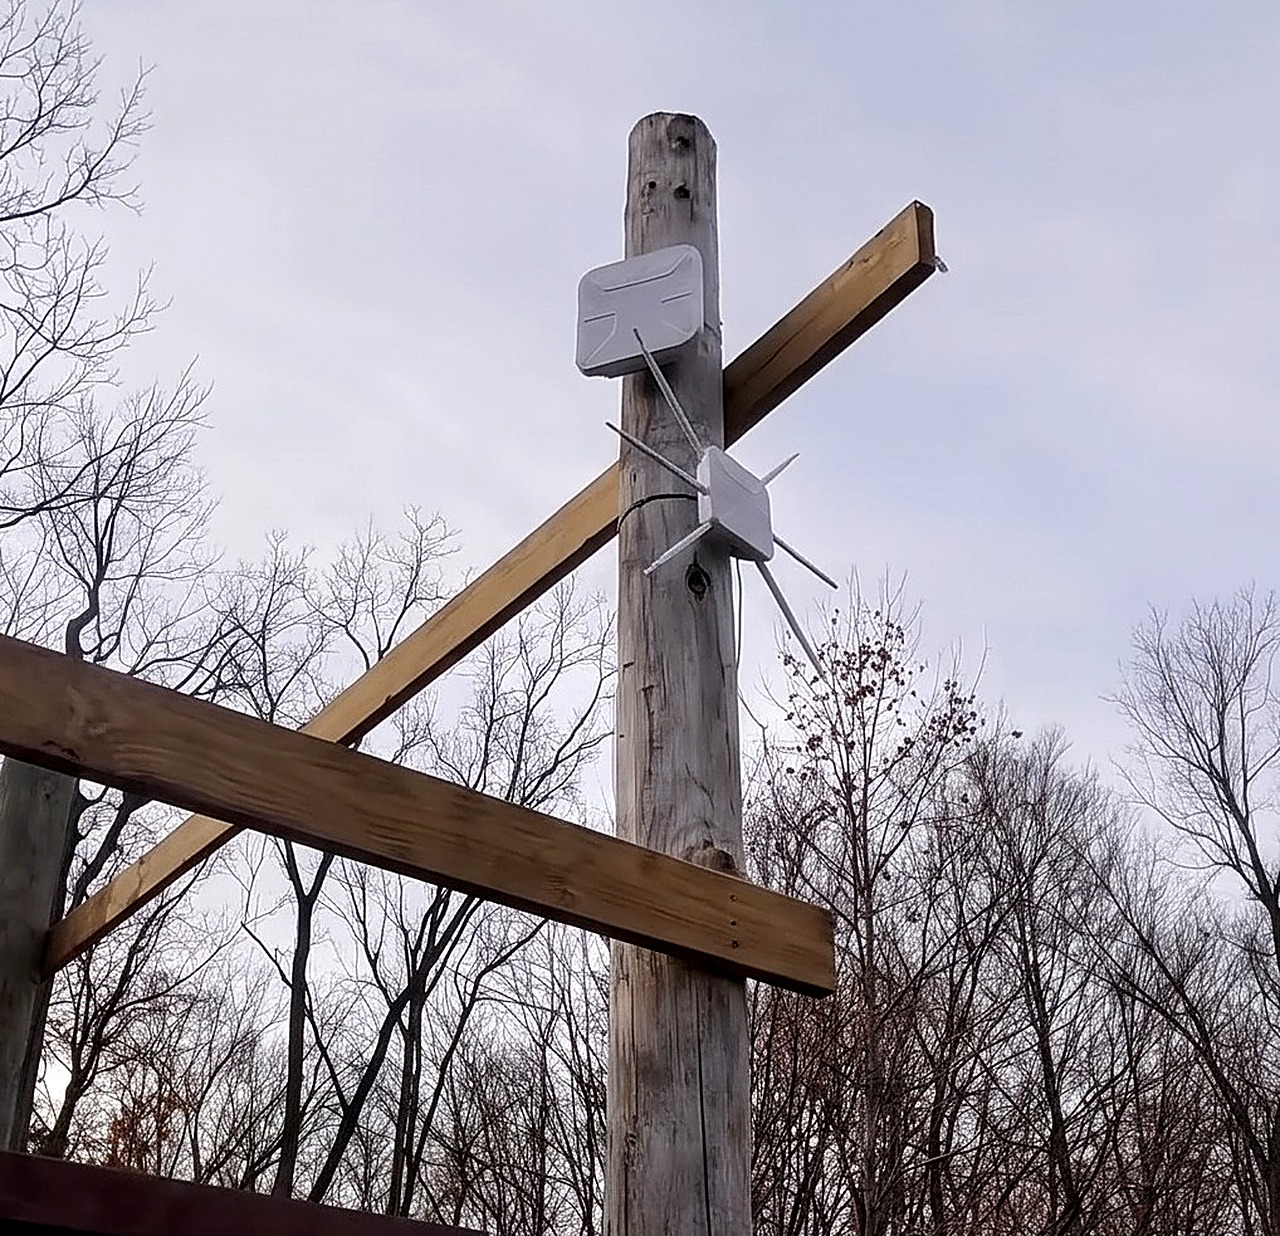
Parts in this step: (C) Wavlink AX3000 directional outdoor access point, (D) Wavlink AX3000 omnidirectional outdoor access point
You'll need: Extension Ladder, Directional Outdoor Wi-Fi Access Point, Omnidirectional Outdoor Wi-Fi Access Point, Ethernet Data Cables, Zip Ties, threaded waterproof plug
- 2.1 Strap the directional access point to the post
- Set the extension ladder on firm, level ground against the wooden post.
- Carry the Wavlink AX3000 directional outdoor access point (C) and zip ties up.
- Aim the directional unit (C) flat front face at the target trail.
- Wrap connected zip ties on the upper wooden post to hold directional unit (C).
- 2.2 Mount the omnidirectional access point
- Thread six 7 dBi antennas onto the Wavlink AX3000 omnidirectional outdoor access point (D).
- Match 2.4 GHz and 5 GHz antennas to their matching ports.
- Point external whip antennas straight up or down to work together.
- Pre-thread zip ties in the omnidirectional unit (D) back bracket before climbing.
- Strap omnidirectional unit (D) to the post below the crossbeam and directional unit (C).
- 2.3 Plug in the PoE Ethernet cable and verify status light
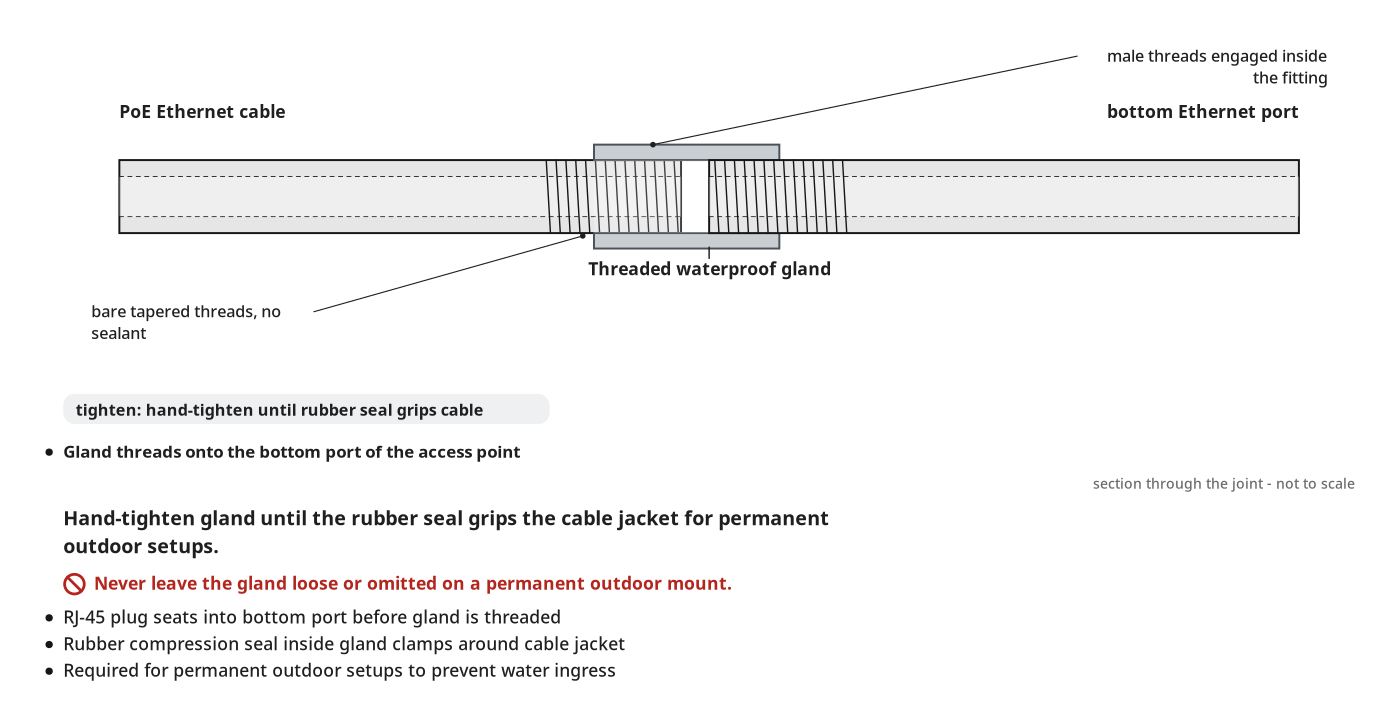
- Thread the waterproof cable gland on the outdoor Ethernet cable for permanent setups.
- Plug the live PoE Ethernet cable into the omnidirectional unit (D) bottom port.
- Check the omnidirectional unit (D) status LED lights up for power.
Key measurements
- Omnidirectional antennas: six 7 dBi external, on labeled 2.4 GHz and 5 GHz ports
- Omnidirectional advertised range: about 300 m (under 1,000 ft).
- Directional antennas: four 12 dBi internal antennas
- Directional advertised range: 1,000 m
- Tip: Set each unit's network name and password before climbing the ladder.
- Tip: Ground-thread zip ties into the mounting bracket for one-handed strapping.
- Heads up: Keep three points of contact on the extension ladder while strapping hardware to the post.
- Heads up: Use the threaded waterproof plug on permanent setups to keep water out.
Before you move on: Check 2.4 GHz and 5 GHz antennas match labeled ports and the status LED is lit.
Step 3: Test Omnidirectional Wi-Fi Speeds and Line of Sight
Check omnidirectional Wi-Fi speeds and video streaming up to 600 feet in line of sight.
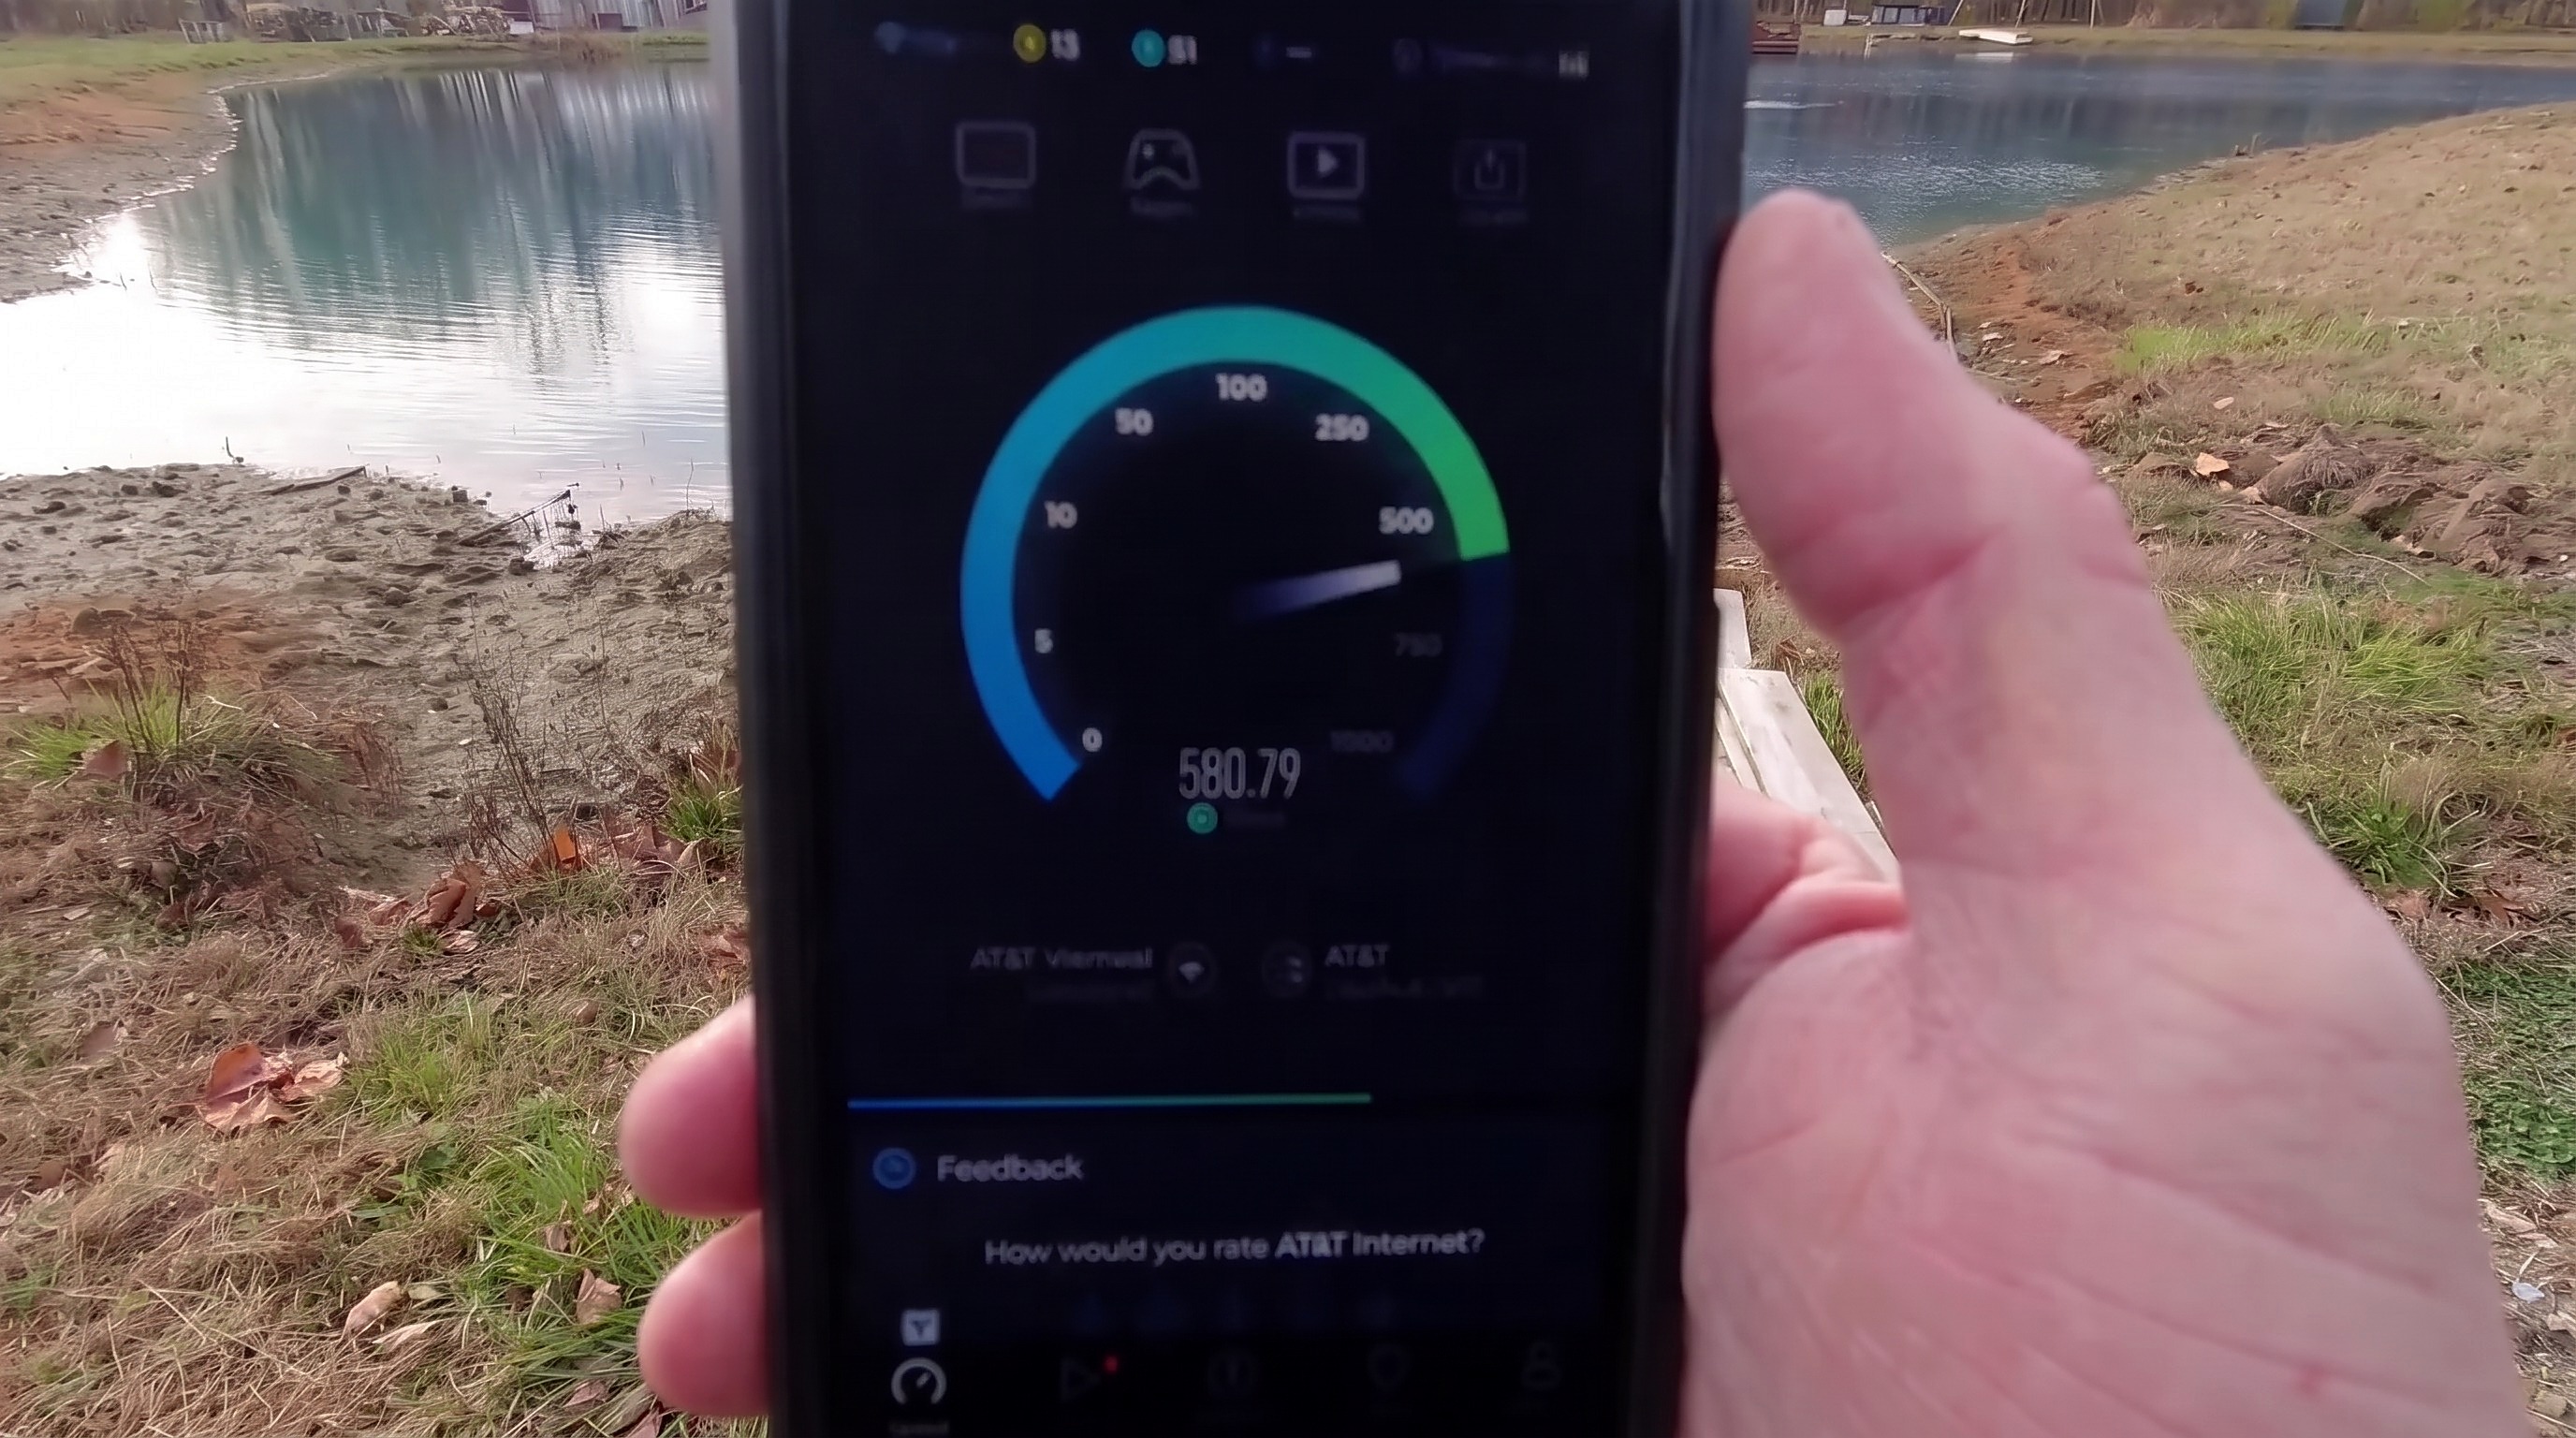
Parts in this step: (D) Wavlink AX3000 omnidirectional outdoor access point
You'll need: Smartphone, Omnidirectional Outdoor Wi-Fi Access Point
- 3.1 Run speed tests at 150 ft and 325 ft across the pond
- Connect the smartphone to the Wavlink AX3000 omnidirectional outdoor access point (D) network.
- Walk 150 feet from barn to pond bank and test speed.
- Check for high open-air throughput (389 Mbps and 819 Mbps at 150 feet).
- At the solar panels (325 feet), check for strong speeds (451 Mbps and 833 Mbps).
- 3.2 Test signal through trees at the top of the berm (600 ft)
- Climb the 35-foot berm at 600 feet, where trees block omnidirectional unit (D).
- Check distance on the smartphone GPS app and test speed behind the foliage.
- Note severe signal drop (about 6 Mbps down, 6 Mbps up) above unit height.
- 3.3 Retest with direct line of sight at 600 ft and stream video
- Step off the berm into the clearing at 600 feet with clear line of sight.
- Test speed in clear view of omnidirectional unit (D) (458 Mbps down, 211 Mbps up).
- Stream smartphone video at 600 feet to check smooth playback without cell data.
Key measurements
- Speed at 150 ft (pond bank): 819 Mbps, 389 Mbps
- Speed at 325 ft (solar panels): 833 Mbps, 451 Mbps
- Berm height at 600 ft: about 35 ft, above access point mounting height
- Speed at 600 ft behind berm trees: about 6 Mbps down, 6 Mbps up
- Speed at 600 ft in line of sight: 458 Mbps down, 211 Mbps up
- Tip: Mount the access point with clear line of sight to target areas.
- Heads up: Do not expect 5 GHz signals to pass dense trees or reach above mounting height.
Before you move on: Check video streams smoothly at 600 feet in the clearing before walking back.
Step 4: Test Wi-Fi Coverage on the Pond Dock
Confirm continuous 360-degree omnidirectional Wi-Fi coverage across the water and behind the post.
Parts in this step: (D) Wavlink AX3000 omnidirectional outdoor access point
You'll need: Smartphone, Omnidirectional Outdoor Wi-Fi Access Point
- 4.1 Run a live speed test on the floating dock
- Walk back to the barn, testing on the smartphone for dead zones.
- Walk onto the floating pond dock and test speed (400 Mbps and 323 Mbps).
- Check signal behind the Wavlink AX3000 omnidirectional outdoor access point (D) (150 Mbps at 200 feet).
Key measurements
- Floating pond dock speed: 400 Mbps and 323 Mbps
- House speed behind access point (200 ft): about 150 Mbps
- Tip: Test signal while walking across the property to verify there are no dead zones.
Before you move on: Check 360-degree coverage over water and behind the mounting post.
Step 5: Connect and Test the Directional Access Point
Power and test directional access point off-axis at 600 feet, on-axis to 1,600 feet.
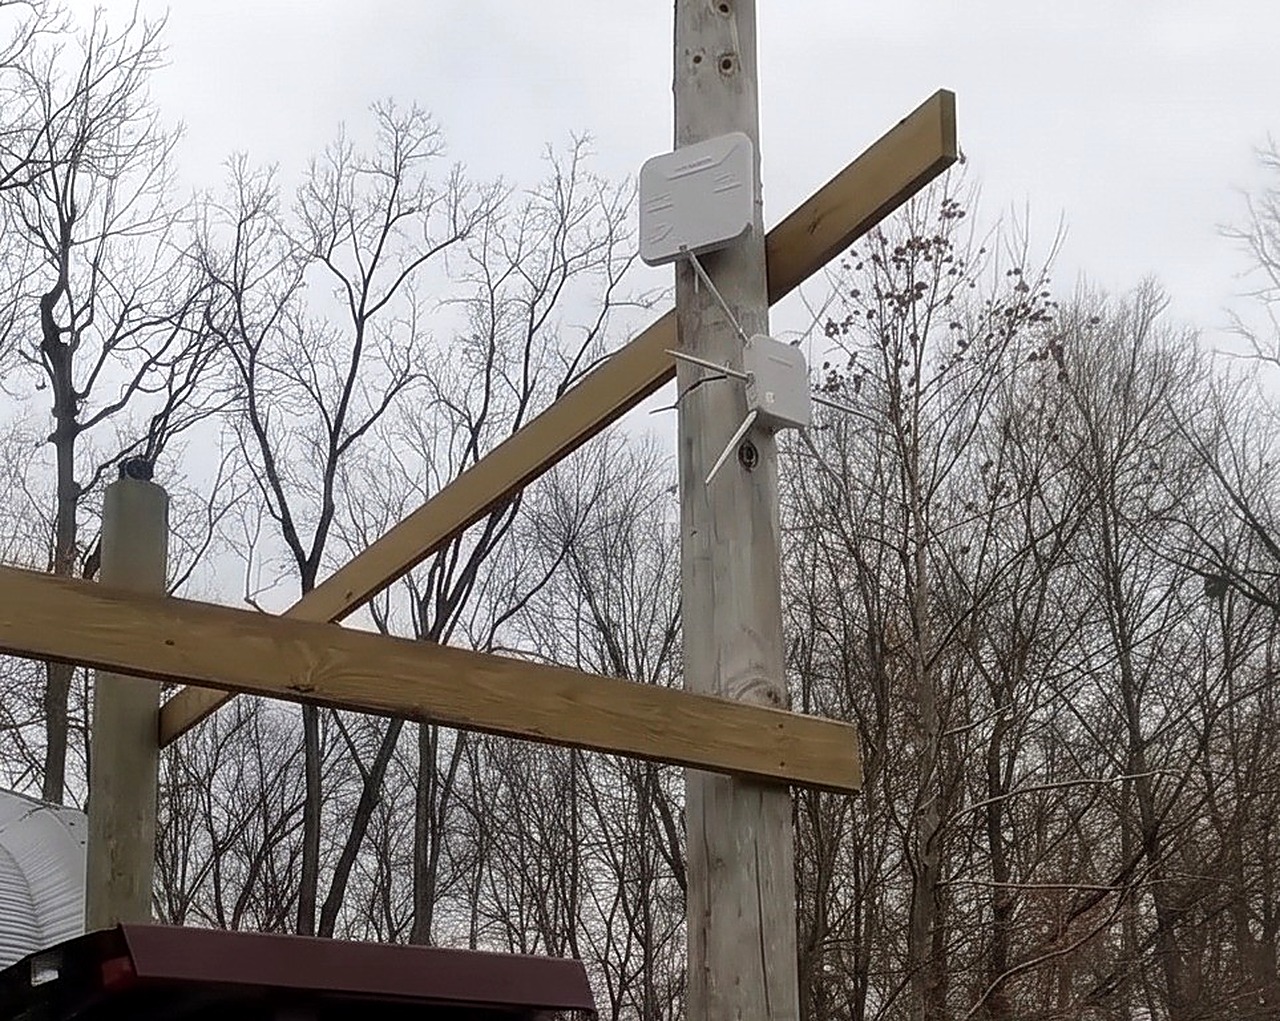
Parts in this step: (C) Wavlink AX3000 directional outdoor access point, (D) Wavlink AX3000 omnidirectional outdoor access point
You'll need: Extension Ladder, Smartphone, Directional Outdoor Wi-Fi Access Point, Omnidirectional Outdoor Wi-Fi Access Point, Ethernet Data Cables
- 5.1 Swap the PoE Ethernet cable to the directional unit
- Climb extension ladder and unplug PoE cable from Wavlink AX3000 omnidirectional outdoor access point (D).
- Plug live PoE cable into bottom port of Wavlink AX3000 directional outdoor access point (C).
- 5.2 Test off-axis signal at the 600-foot berm clearing
- Walk to 600-foot berm clearing, 200 to 300 feet left of beam.
- Test smartphone speed off-axis from directional unit (C) (10 Mbps down, 8 Mbps up).
- Directional unit (C) throws a narrow cone, not a wide sphere.
- 5.3 Test long-range directional signal at 725 ft and 1,600 ft
- Walk down the trail inside the directional unit (C) beam to 725 feet.
- Test speed at 725 feet; check throughput (100 Mbps down, 20 Mbps up).
- Continue down trail to 1,600 feet where smartphone signal drops.
- Test midrange speeds at well pump and solar panels (325 feet: 50 Mbps down, 60 Mbps up).
Key measurements
- Directional off-axis speed (600 ft clearing): about 10 Mbps down, 8 Mbps up
- Directional on-axis speed (725 ft): 100 Mbps down, 20 Mbps up
- Max directional phone reach: about 1,600 ft line of sight
- Directional well pump speed (325 ft): about 50 Mbps down, 60 Mbps up
- Tip: Use omnidirectional unit for broad coverage, directional unit for point-to-point links.
- Tip: Fine-tune aim and clear Fresnel zone for a distant outbuilding.
Before you move on: Reconnect PoE cable to the primary access point for permanent coverage.
Finishing
Last Touches
- Give all access points the same network name (SSID) and password.
- Phones and tablets auto-roam to the strongest access point signal.
- Tighten the waterproof cable gland on the bottom Ethernet port for permanent setups.
Care
- Swap temporary zip ties for permanent mounting brackets once the outbuilding is done.
- Trim growing tree branches entering the barn-to-pond line of sight.
Alternatives
- Use a PoE-enabled network switch to replace the unmanaged switch and PoE injector.
- Use wireless repeater or mesh node mode if hardwiring is impossible.
Commission & test
| Check | What you should see | If not |
|---|---|---|
| Plug live PoE Ethernet cable into the access point bottom port. | Access point housing status LED lights immediately. | Check PoE injector power cord and switch patch cable are seated. |
| Test smartphone speed at 150 ft and 325 ft on omnidirectional unit. | Speeds: 389 to 819 Mbps at 150 ft; 451 to 833 Mbps at 325 ft. | Check 2.4 GHz and 5 GHz antennas match their labeled ports. |
| Test speed and stream video at 600 ft in line of sight. | Omnidirectional unit gives 458 Mbps down, 211 Mbps up, and smooth video. | Clear trees or berms; 600 ft foliage drops speed to 6 Mbps. |
| Test speed along the directional beam at 725 ft. | Directional unit gives 100 Mbps down, 20 Mbps up, reaching 1,600 ft. | Re-aim the directional panel face; off-axis speed drops to 10 Mbps. |
These Specs are built from Indy Farm Life's video “Long-Range Outdoor Wi-Fi Access Point Installation”. Open the Long-Range Outdoor Wi-Fi Access Point Installation project page.
