Spetz Specs No. 1185: step-by-step build guide
DIY Wooden Farm & ATV Wagon
The complete step-by-step guide made from Indy Farm Life's YouTube video, free on Spetz. For the video, a step-by-step player and answers to your questions, see the DIY Wooden Farm & ATV Wagon project page.
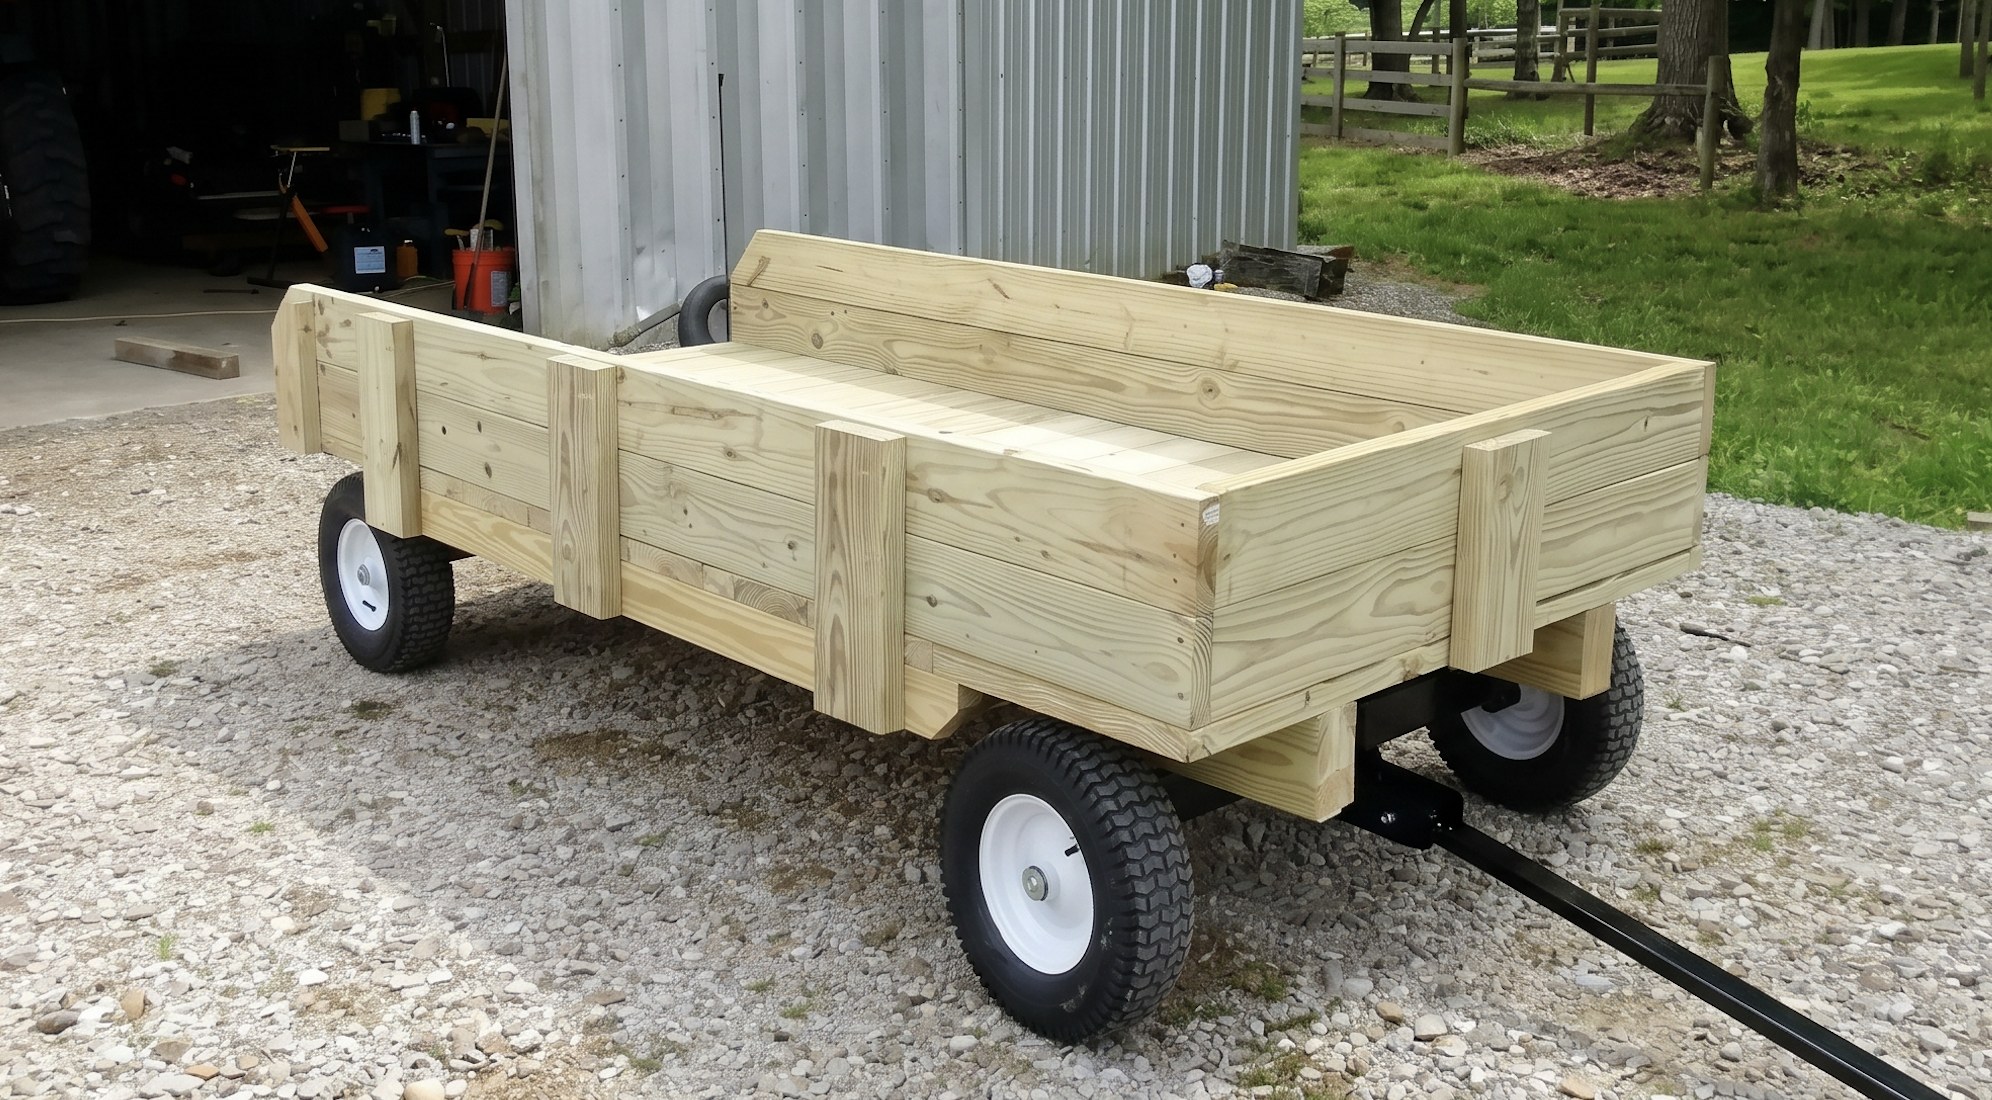
5 steps, 7 parts, 6 tools, 6 materials
Overview
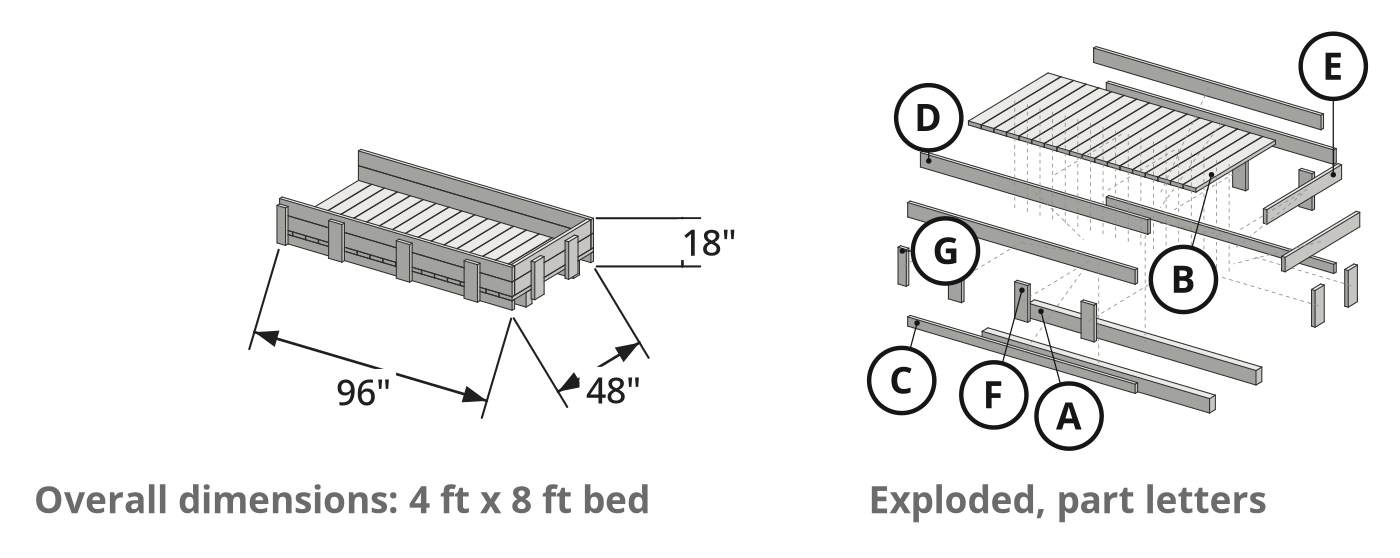
Finished size: 48 in W x 96 in D (bed)
What You're Building
- Build a 4x8 ft wooden utility wagon on a 2,200 lb steel running gear chassis.
- Tow with an ATV, UTV, or golf cart to haul firewood, mulch, tools, or passengers.
Why This Design Works
- Two 8 ft 4x6 beams carry the deck over a 6.5 ft steel chassis without cutting the beams.
- Under-deck 2x4 tie rails and exterior vertical risers lock 2x6 walls into a rigid box.
- An open rear speeds raking out mulch and climbing in.
What It Takes
- Wet pressure-treated 4x6 beams and 2x6 lumber lift heavy.
- Use a wrench set, carpenter square, miter saw, chalk line, and cordless drill/driver.
What Decides Success
- Square the front steering linkage before the wooden bed so tires track straight.
- Mount 4x6 beams inside axle bolster plates so front tires never rub on turns.
Health and safety
Pressure-Treated Lumber Hazards
- Wear a dust mask and eye protective equipment when cutting or drilling pressure-treated lumber to avoid inhaling chemical-treated sawdust.
- Wear heavy work gloves when handling rough pressure-treated boards to prevent chemical-treated splinters, and wash hands thoroughly after working.
- Cut lumber outdoors or in a well-ventilated space, and never burn pressure-treated wood scraps in a stove or fire pit.
Power Tools and Fastening
- Wear eye and hearing protective equipment when cutting lumber on the miter saw and driving lag and deck screws.
- Hold boards firmly against the miter saw fence, keep hands clear of the blade path, and let the blade stop before lifting.
- Brace the cordless drill firmly when driving 3-inch lag screws into the main support beams to control sudden torque reaction.
- Fit wrenches squarely onto running gear nuts and pull toward you rather than pushing to prevent injury if a wrench slips.
Running Gear and Heavy Lifting
- Clear a flat concrete floor to assemble the running gear, and chock the wheels so the steel chassis cannot roll during assembly.
- Keep fingers clear of pinch points around the steering linkage, axle pivots, and tongue while aligning and bolting the steel frame.
- Lift the steel running gear components and heavy pressure-treated support beams with a helper, bending at the knees to protect your back.
Safe Towing and Load Limits
- Never exceed the 2200 lb capacity of the running gear kit, and distribute heavy cargo evenly across the 4x8 foot wooden bed.
- Avoid tight turning loops when towing so the vehicle does not out-turn the wagon and pinch the tongue against the linkage.
- Avoid towing across deep cross-ruts, because the rigid lagged bed cannot flex and may lift a tire or pull lag screws loose.
- Inspect the steering linkage alignment and lag screws before towing, especially after pavement use that can work the steering linkage loose.
Tools
- Wrench Set (ratchet and open-end wrench set)
- Carpenter Square
- Cordless Drill/Driver (cordless drill driver, DEWALT)
- Tape Measure
- Chalk Line (marking tool)
- Miter Saw (power saw)
Materials
- Wagon Running Gear Kit (1, steel chassis kit, Northern Tool, 2200 lb capacity)
- Pressure-Treated Lumber (2, dimensional lumber, 4x6x8 ft)
- Pressure-Treated Lumber (dimensional lumber, 2x6)
- Pressure-Treated Lumber (dimensional lumber, 2x4)
- Lag Screws (3-inch x 5/16-inch)
- Deck Screws
Hardware
| Hardware | Size | Count | Used in steps |
|---|---|---|---|
| Chassis bolts, locknuts, and lug nuts | 1 | ||
| Bolster bracket bolts and nuts | 3 | ||
| 3 in x 5/16 in Lag Screws | 3 | ||
| Deck Screws | ~72 | 4, 5 |
Cut list
| Part | Name | Qty | Size | Notes |
|---|---|---|---|---|
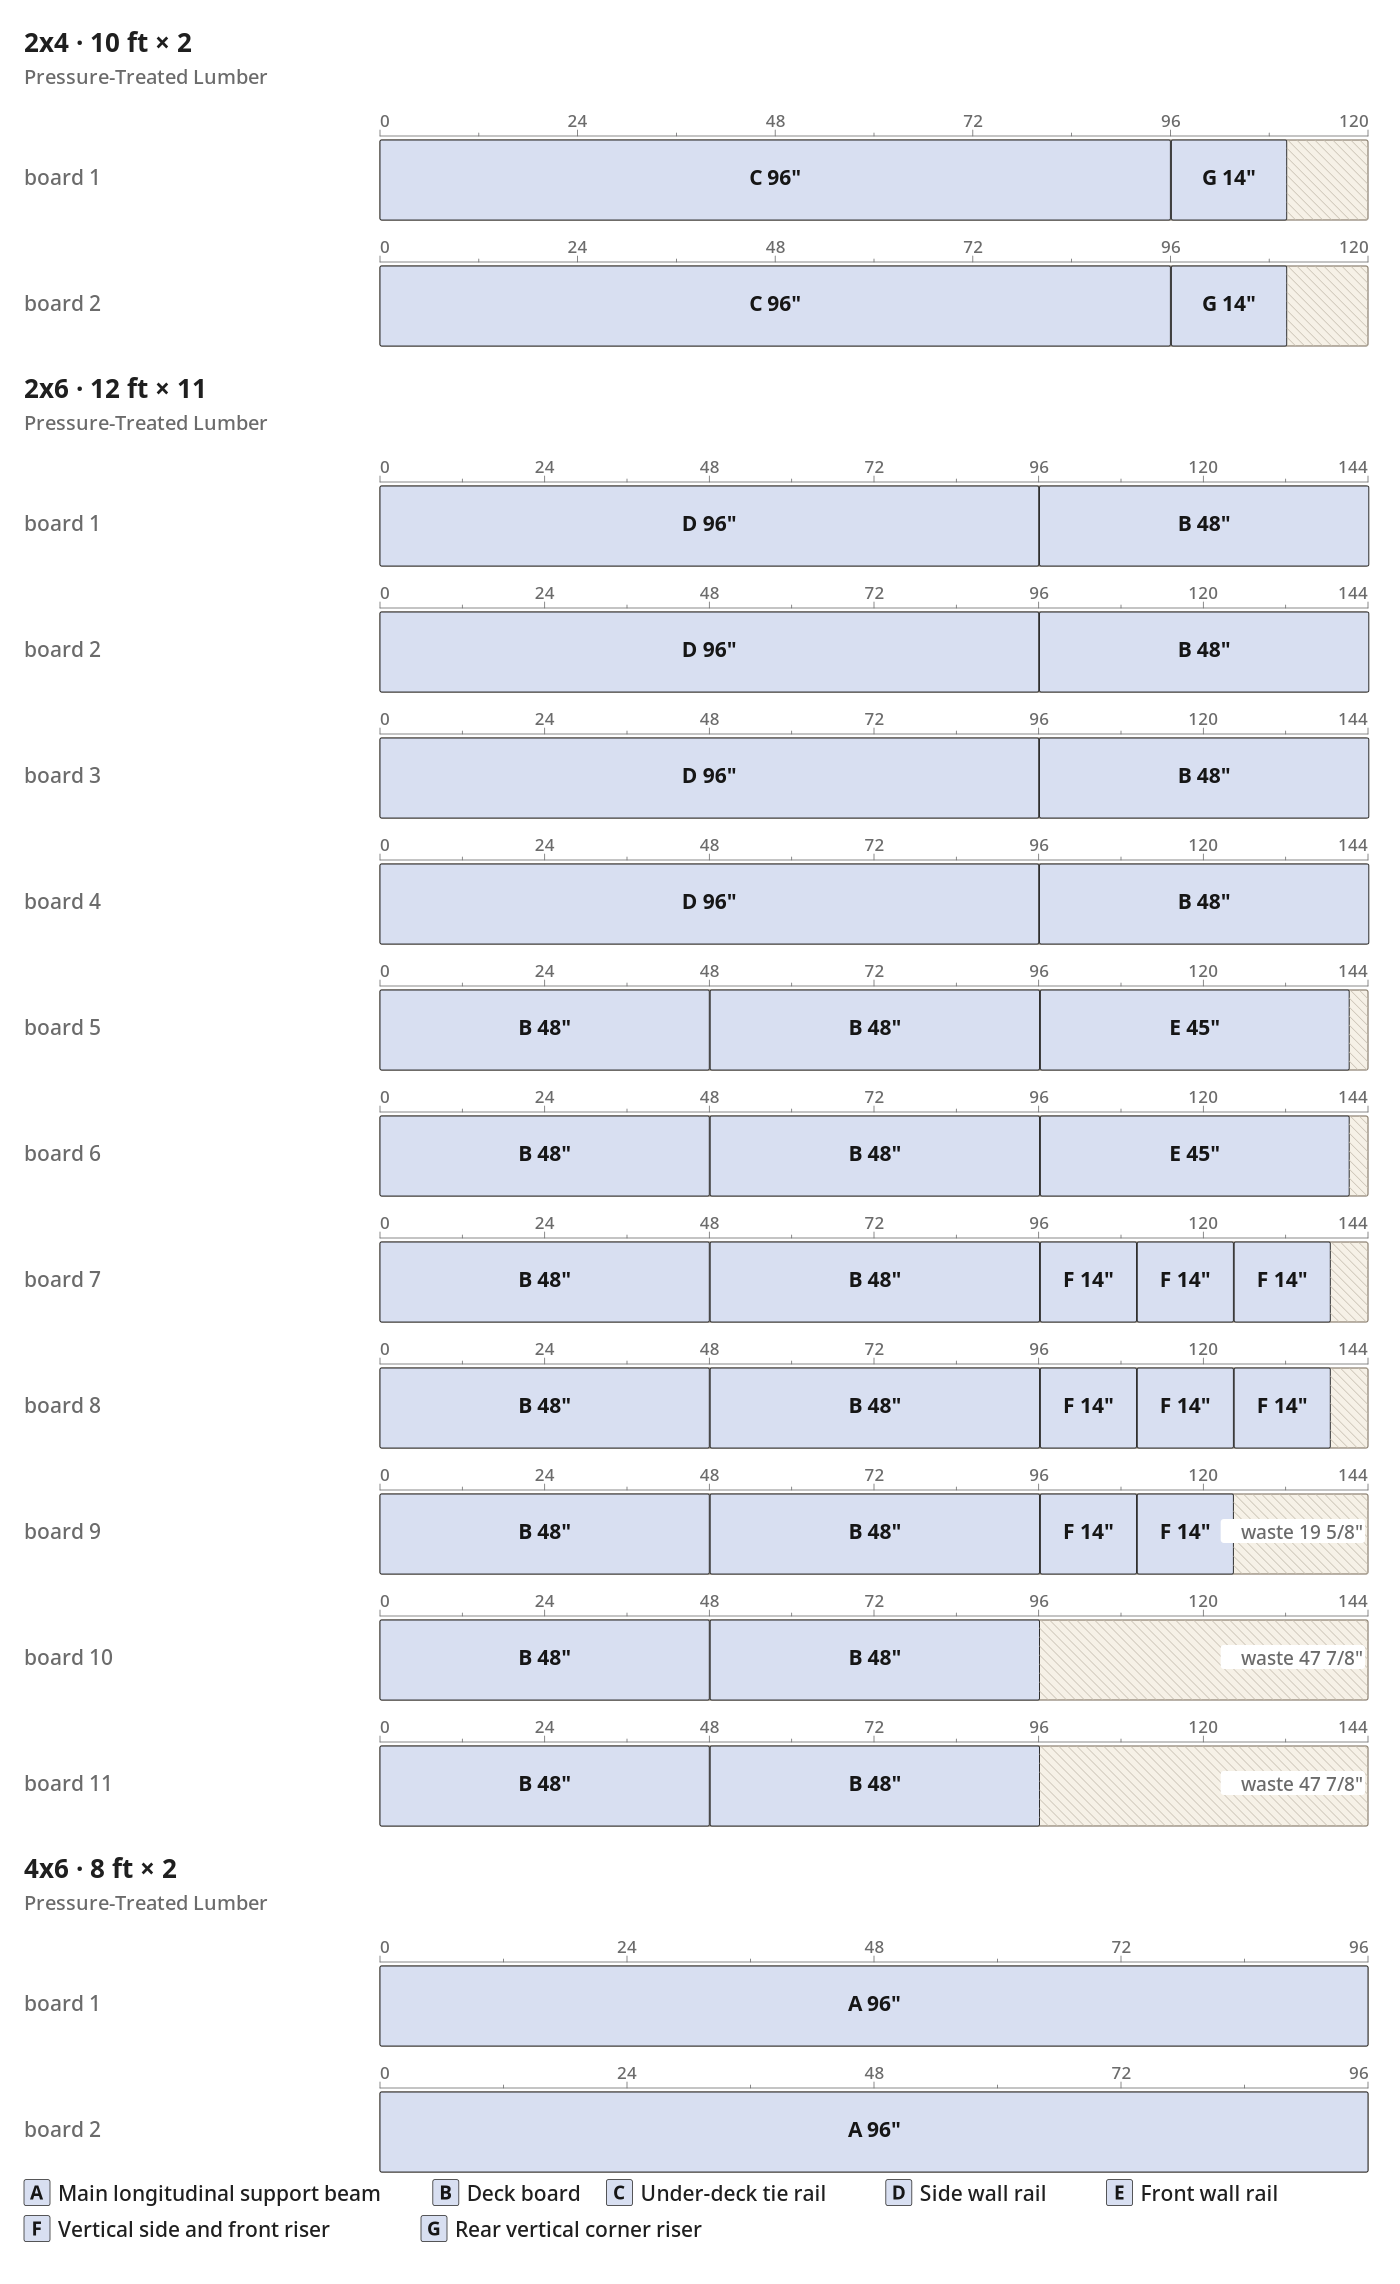
| A | Main longitudinal support beam | x2 | 3 1/2" (T) × 5 1/2" (W) × 96" (L) | No cuts required from standard 8 ft stock; mounted lengthwise on the running gear brackets. |
| B | Deck board | x18 | 1 1/2" (T) × 5 1/2" (W) × 48" (L) | Laid crosswise across the 4x6 beams with full unripped width, butted tightly together while green, and trimmed flush along the side edges with a saw. |
| C | Under-deck tie rail | x2 | 1 1/2" (T) × 3 1/2" (W) × 96" (L) | Fastened flat underneath the overhanging ends of the deck boards along both 8 ft sides; bevel the rear ends slightly. |
| D | Side wall rail | x4 | 1 1/2" (T) × 5 1/2" (W) × 96" (L) | Stacked two high along both 8 ft sides (bottom plank toe-screwed to the deck, top plank held by exterior vertical risers). Cut down/angle the rear end of the top rails and sand smooth. |
| E | Front wall rail | x2 | 1 1/2" (T) × 5 1/2" (W) × 45" (L) | Stacked two high across the front end of the bed, fitting between the two 1.5 in thick 2x6 side walls (or cut to 48 in if lapping the side walls). |
| F | Vertical side and front riser | x8 | 1 1/2" (T) × 5 1/2" (W) × 14" (H) | Screwed to the outside of the box to tie the under-deck rail, deck, and two stacked 2x6 wall rails together. |
| G | Rear vertical corner riser | x2 | 1 1/2" (T) × 3 1/2" (W) × 14" (H) | Mounted vertically on the outside at the rear end of each side wall. |
What to buy
- Buy 2 × 2x4 10 ft (Pressure-Treated Lumber)
- Buy 11 × 2x6 12 ft (Pressure-Treated Lumber)
- Buy 2 × 4x6 8 ft (Pressure-Treated Lumber)
Before you start
Lumber Selection
- Pick pressure-treated 2x6 boards with minimal knots for the deck.
- Green pressure-treated lumber starts heavy and shrinks as it dries.
Layout & Labeling
- Keep both 4x6 main beams (A) at full 96 in stock length.
- Sort and label cut parts (A through G) before fastening the bed.
Step by step
Step 1: Assemble the Running Gear
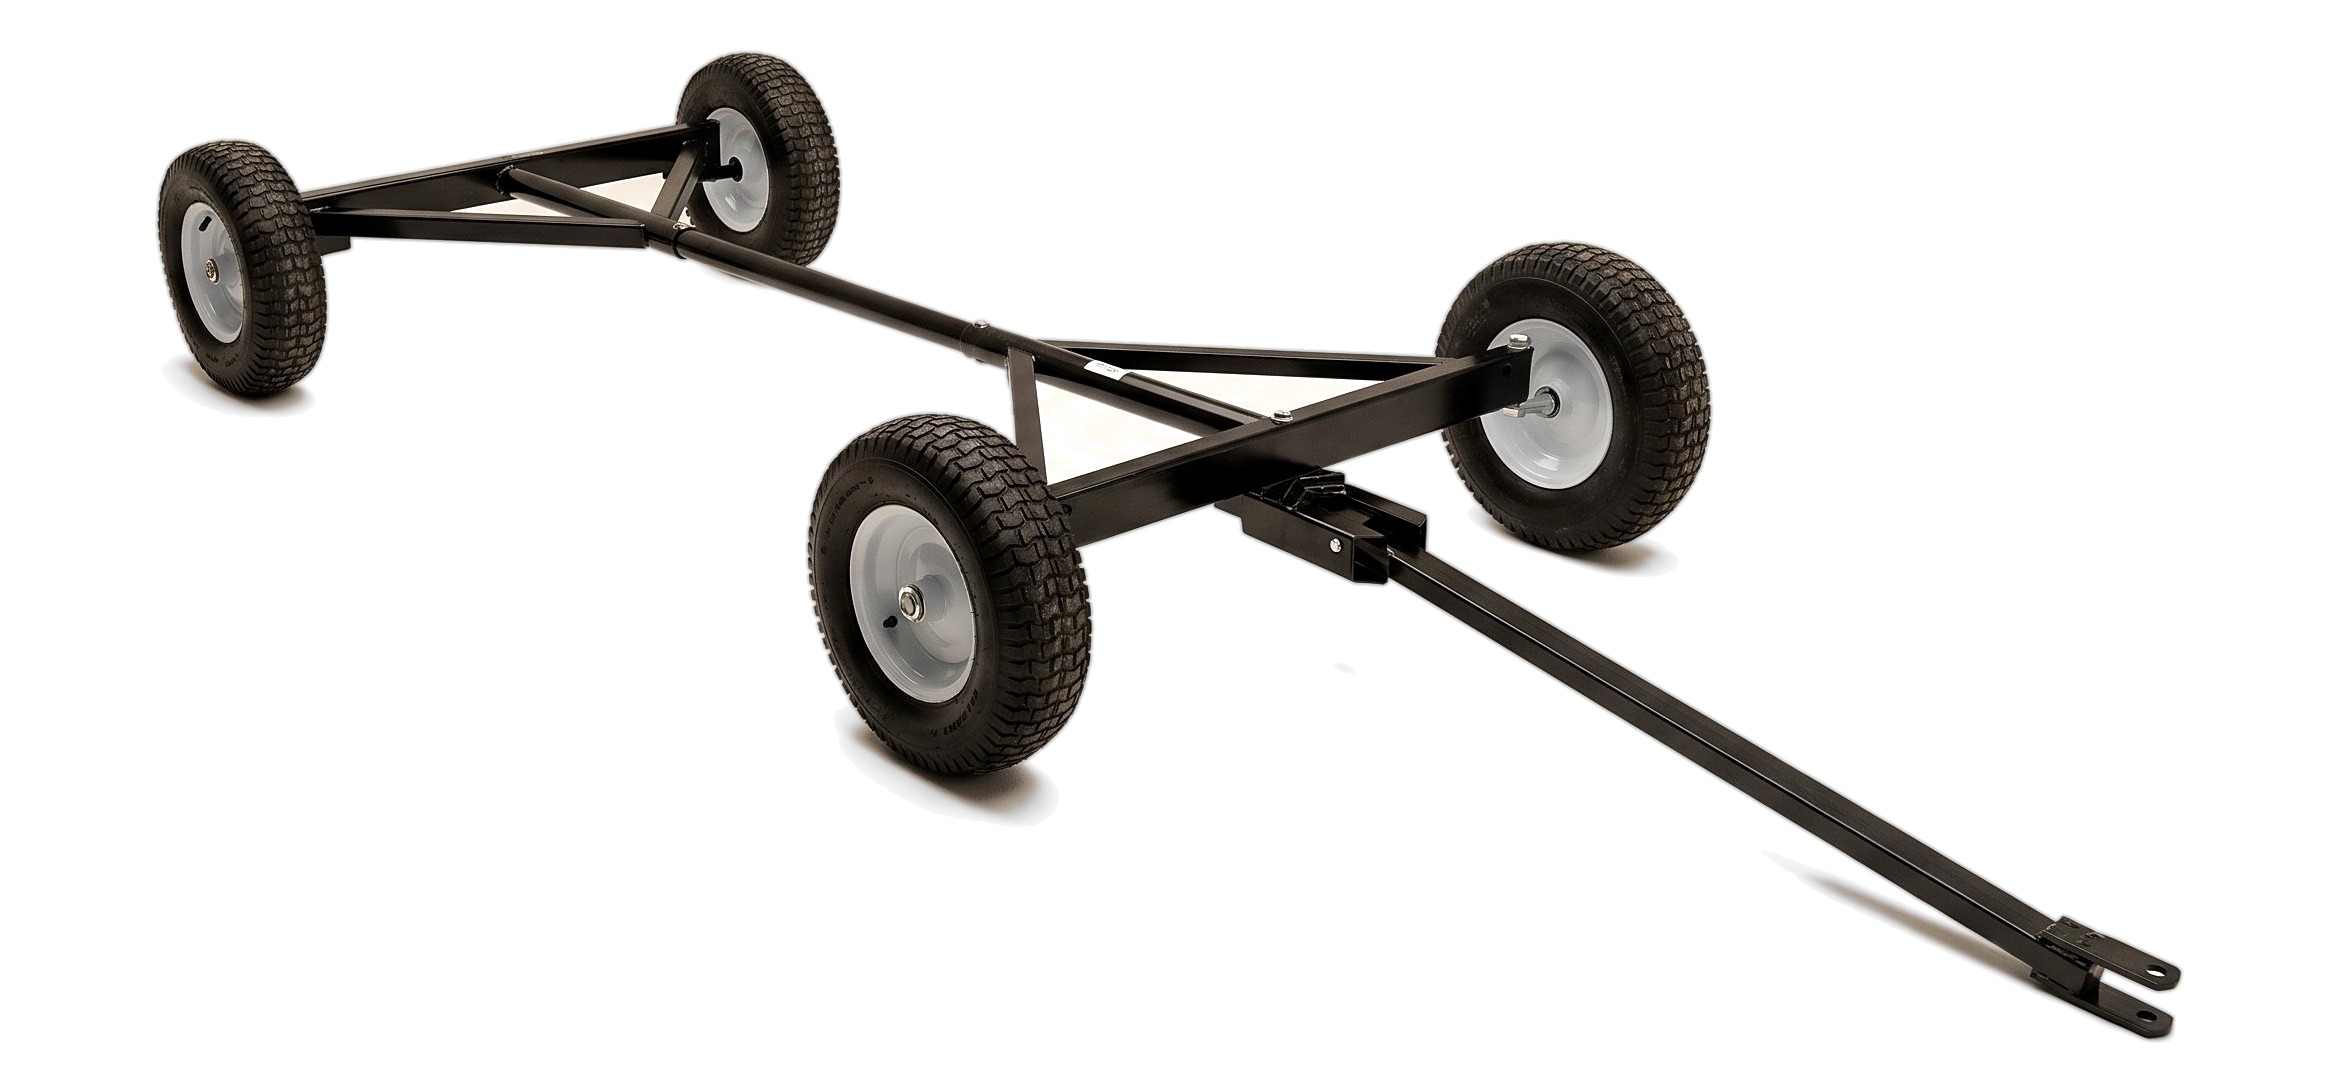
The steel running gear chassis stands on four wheels at its 6.5 ft frame length.
You'll need: Wrench Set, Wagon Running Gear Kit, Chassis bolts, locknuts, and lug nuts
- 1.1 Lay Out and Assemble Frame
- Unpack the Wagon Running Gear Kit on a flat floor and sort bolts.
- Assemble steel frame sections with kit hardware and a wrench set.
- Set the telescoping center pole to the full 6.5 ft frame length.
- 1.2 Attach Axles and Wheels
- Bolt front steering and rear axle assemblies to the main frame.
- Connect towing tongue and steering tie-rod linkage to the front axle.
- Mount all four wheels on the hubs and tighten lug nuts.
- Grease steering and axle fittings so the front turns smoothly.
Key measurements
- Chassis frame length: 6.5 ft extended to carry an 8 ft bed
- Outside tire width: 48 in across outer sidewalls
- Running gear capacity: 2,200 lb maximum load
- Tip: Keep the steering tie-rod adjuster reachable until Step 2 wheel alignment.
Before you move on: Frame and lug bolts are tight; the chassis rolls freely on all four tires.
Step 2: Align the Steering
Both front tires sit parallel to the frame with the tow tongue straight ahead.
You'll need: Carpenter Square, Wrench Set, Wagon Running Gear Kit
- 2.1 Check Wheel Alignment
- Align the front towing tongue straight with the center frame tube.
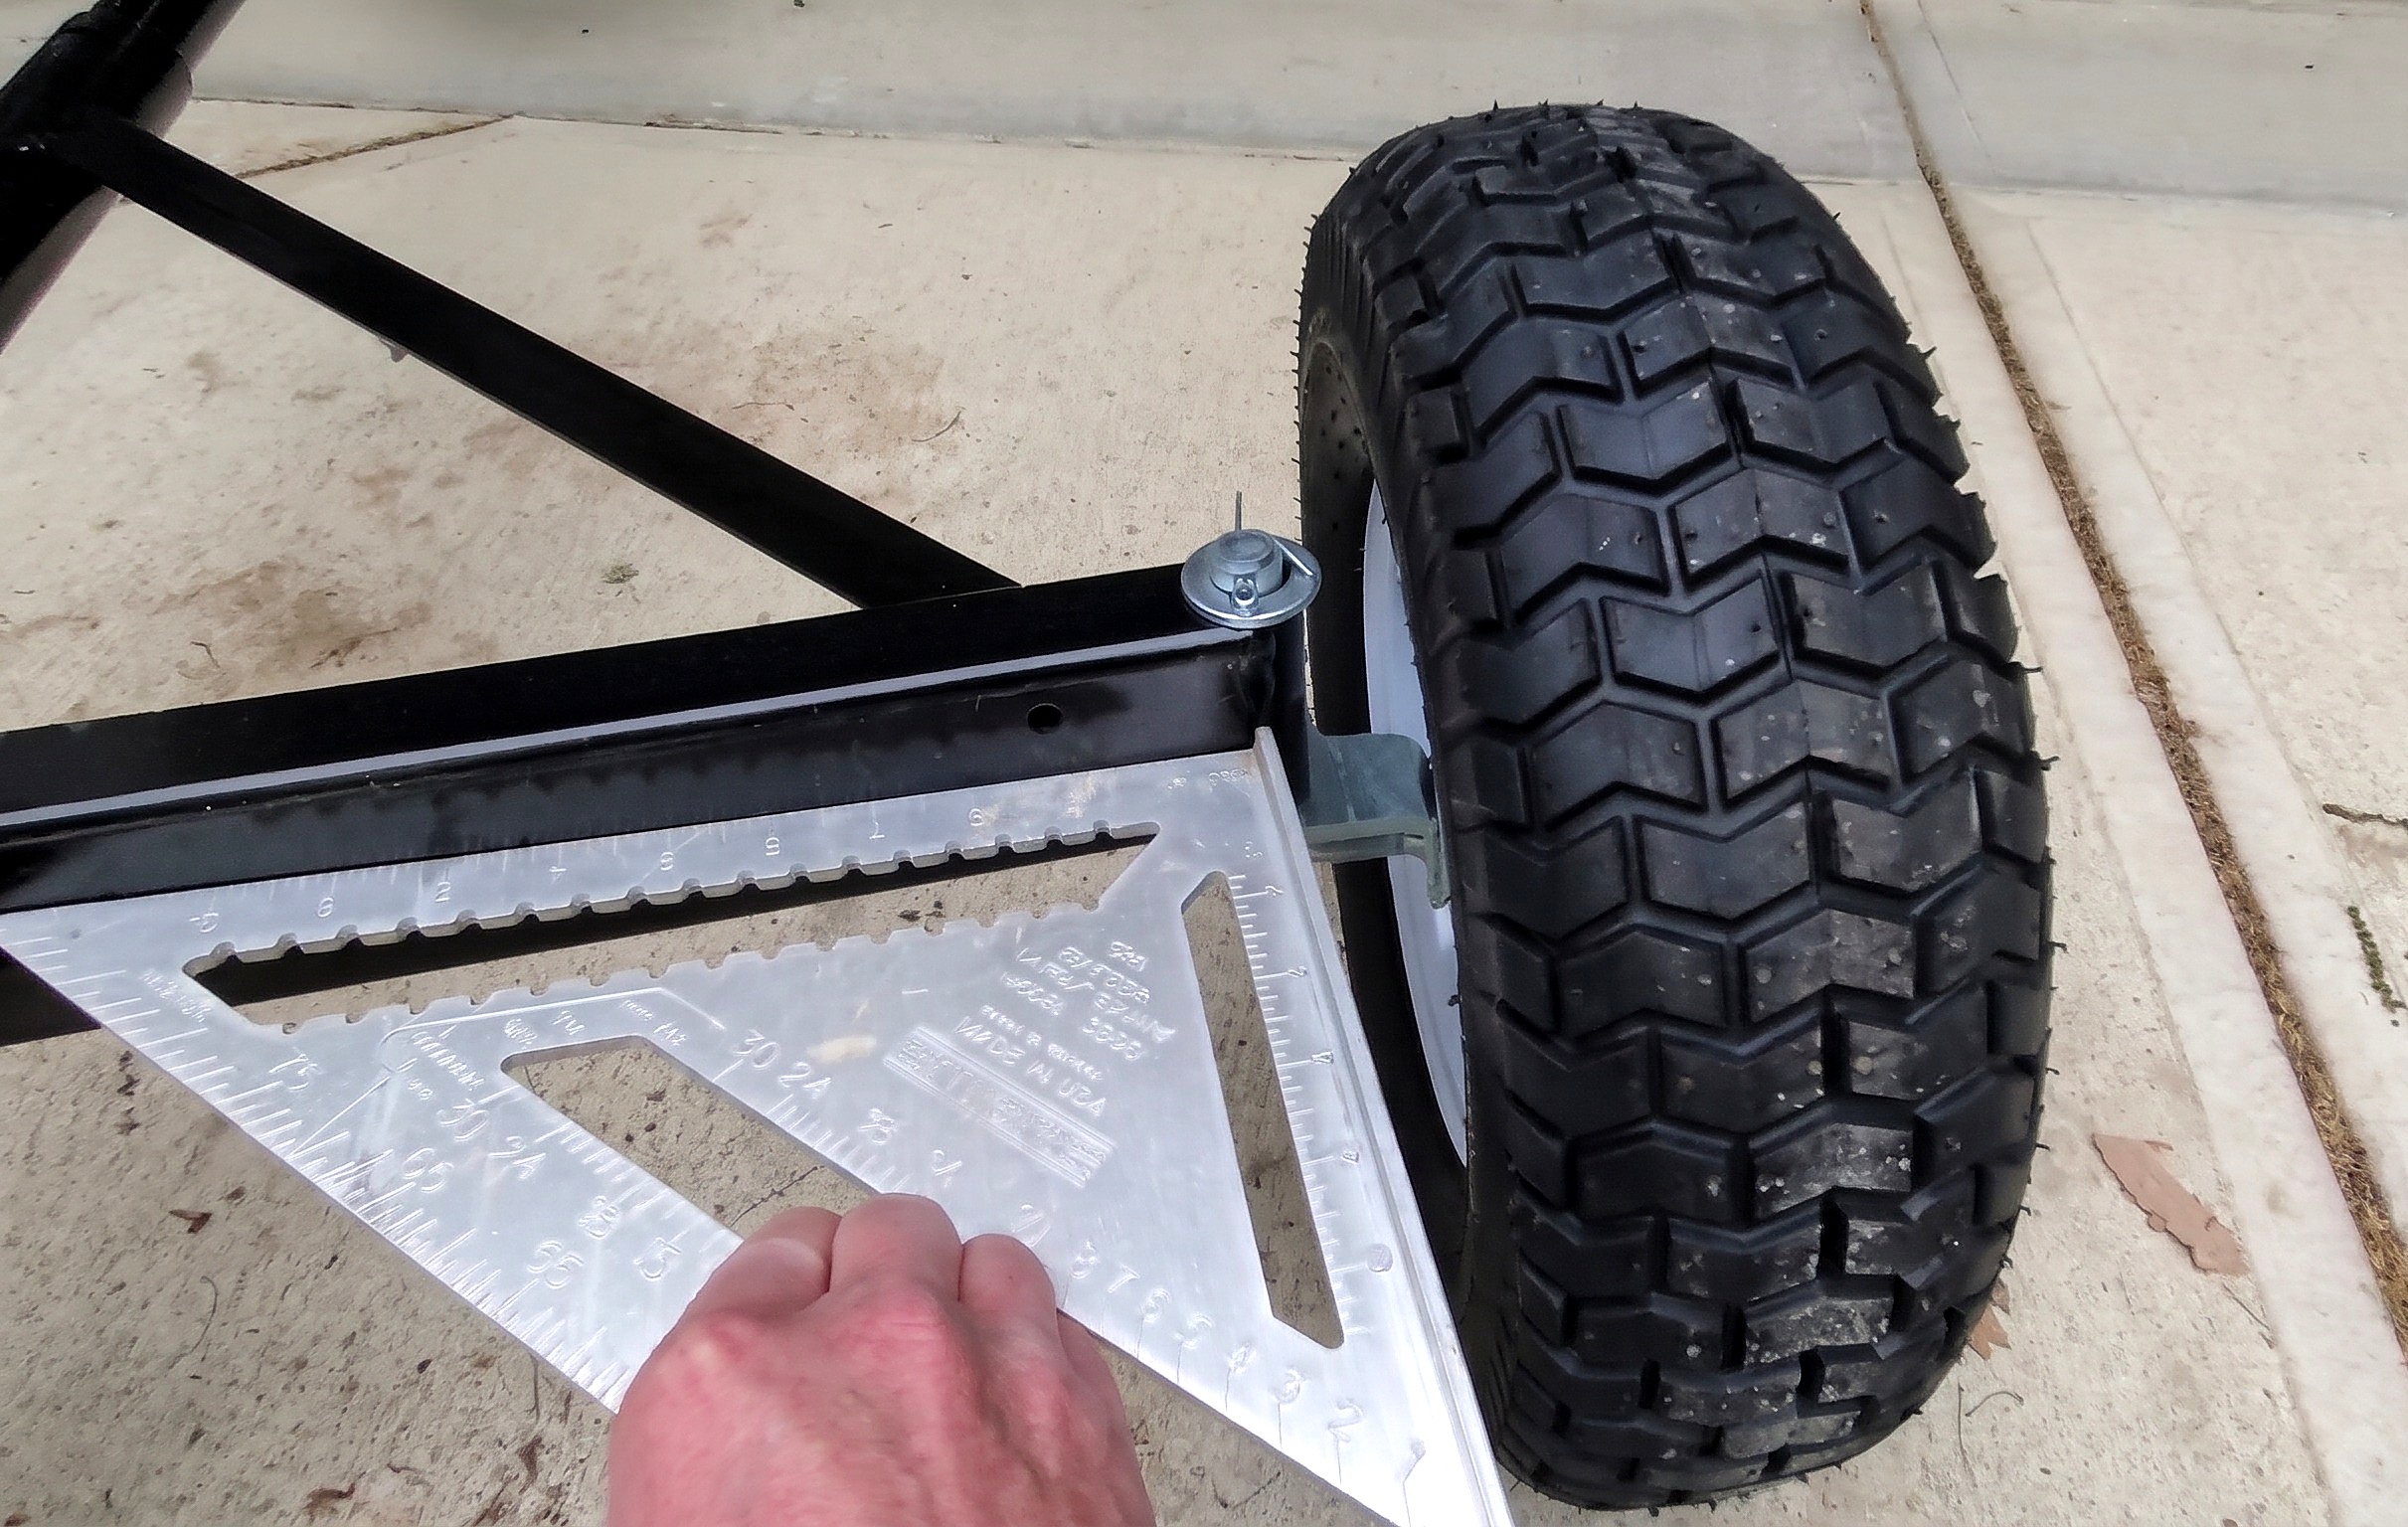
- Hold a carpenter square flat against the main frame tube behind the front axle.
- Check both front tires against the square for toe-in or toe-out.
- 2.2 Adjust the Steering Linkage
- Wrench-loosen the jam nuts on the rear steering tie-rod linkage.
- Turn the threaded tie-rod sleeve until both front tires sit parallel to the frame.
- Lock the jam nuts; test-tow the bare chassis for smooth tracking.
Key measurements
- Wheel alignment angle: 90 degrees to the axle reference so front tires sit parallel
- Tip: Align and test-tow the bare chassis now while the steering linkage is unobstructed.
- Heads up: Out-of-square front tires skip sideways on concrete and wear unevenly.
- Heads up: Frequent pavement towing can work the steering linkage out of alignment.
Before you move on: Both front tires roll straight on pavement without skipping or scrubbing when towed.
Step 3: Attach the Main Support Beams
Two 8 ft 4x6 support beams fastened lengthwise to the running gear axle bolsters.
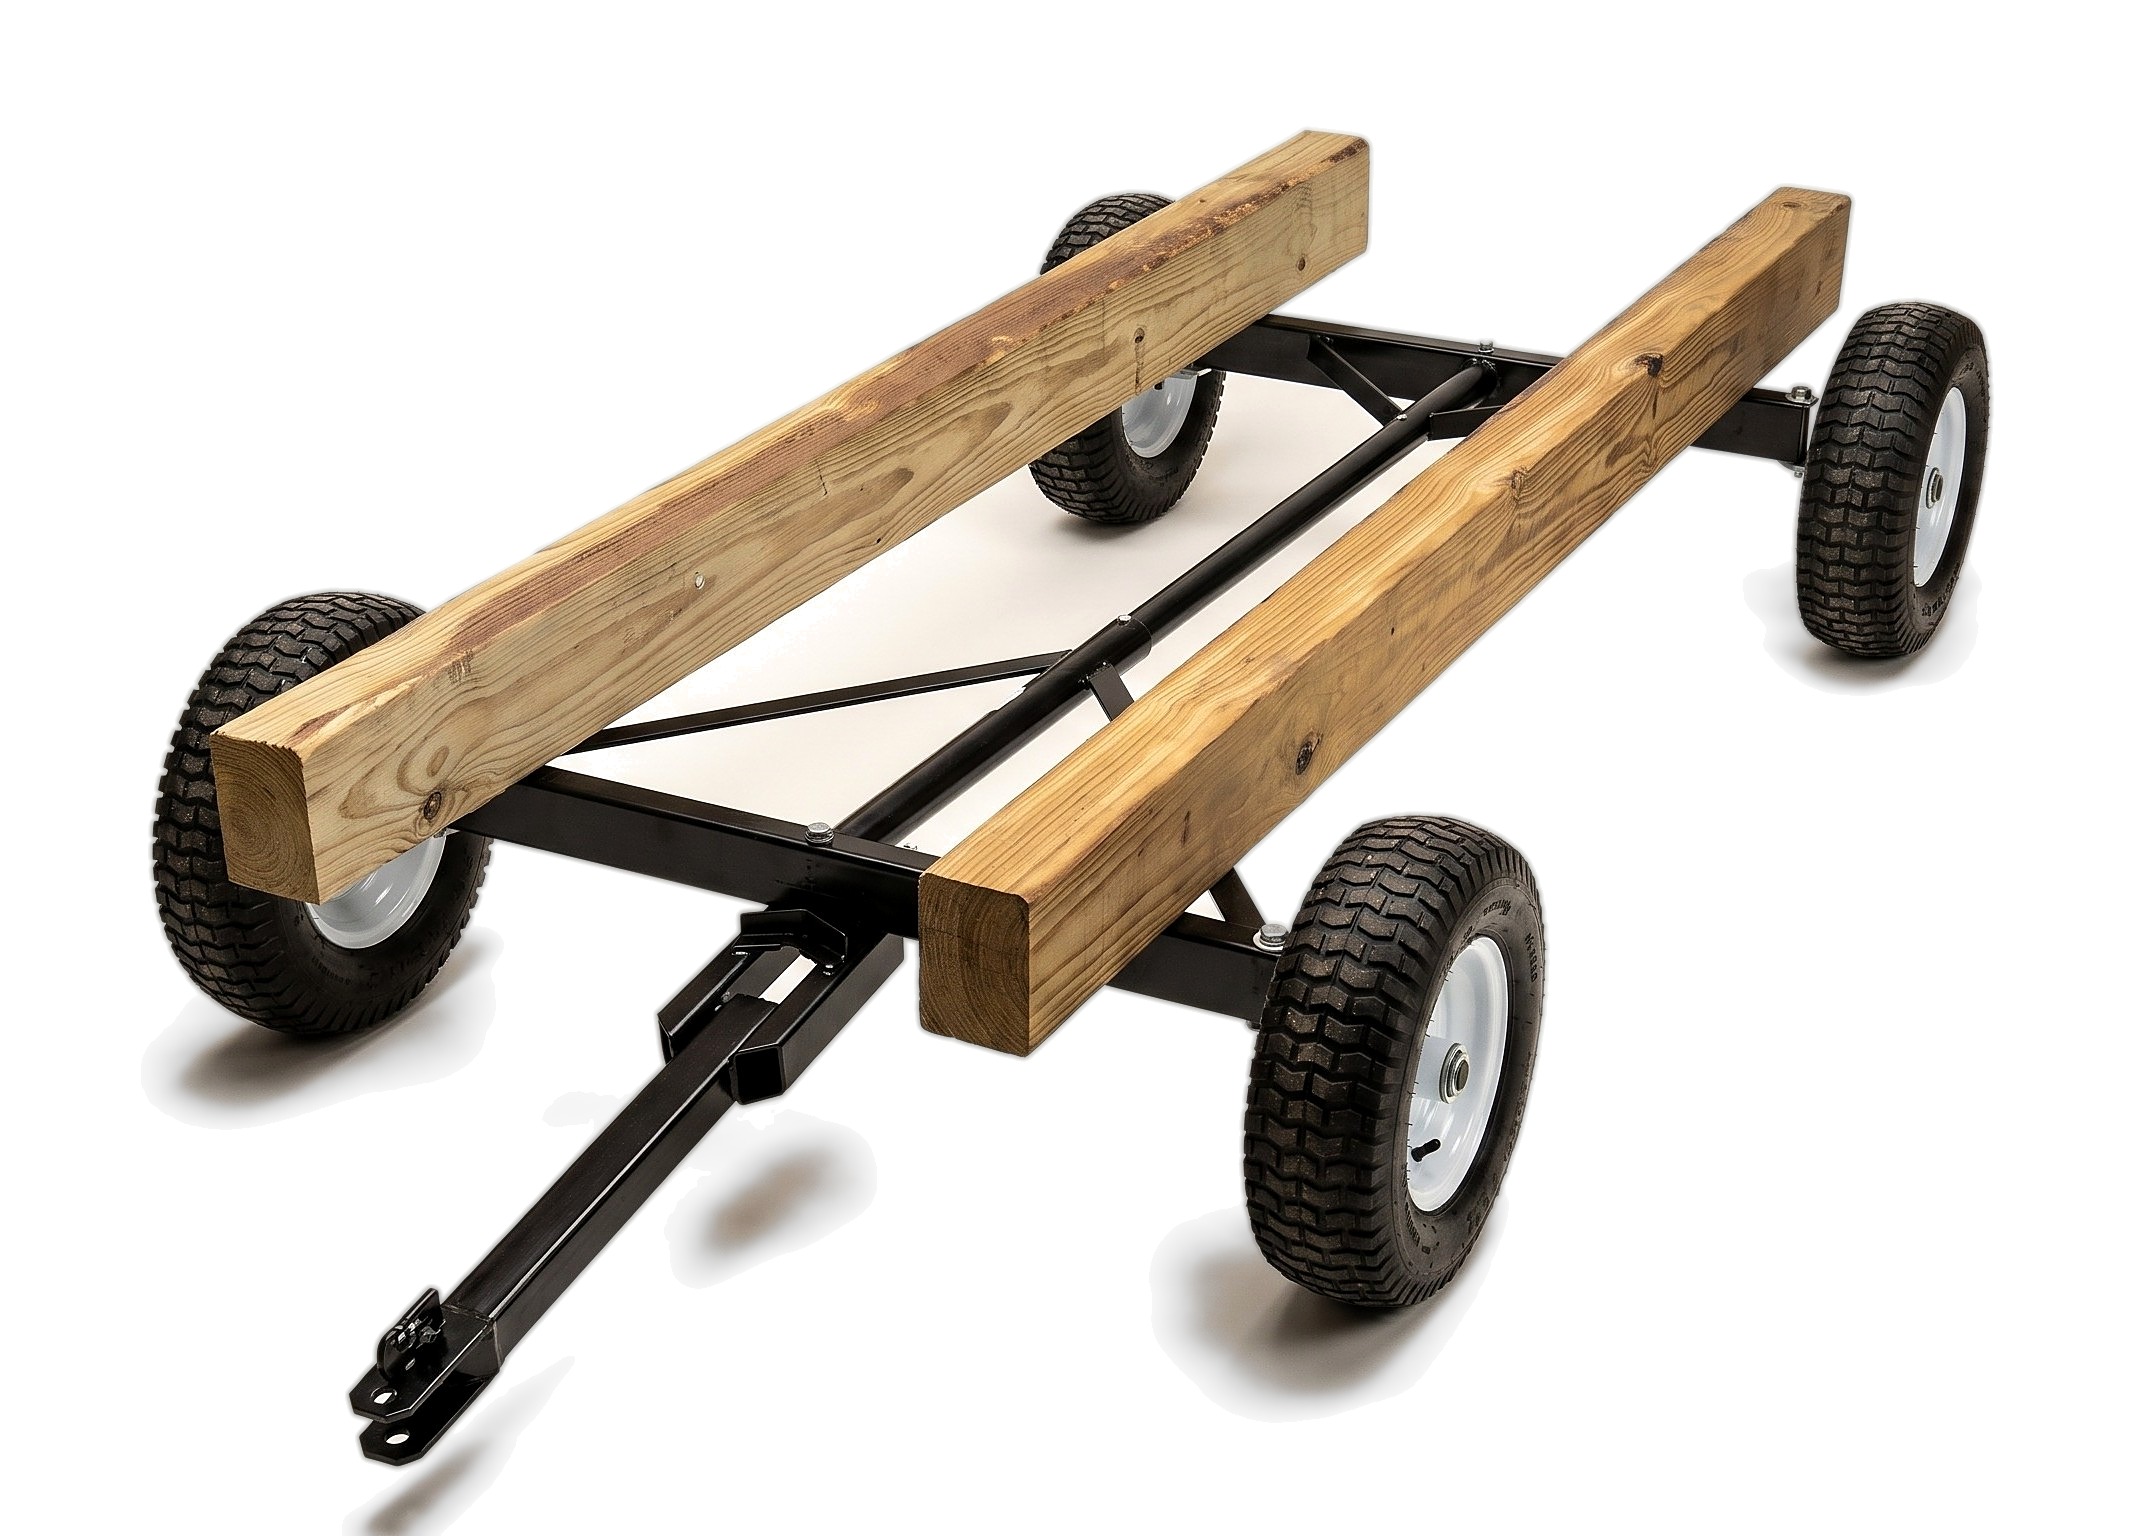
Parts in this step: (A) Main longitudinal support beam
You'll need: Wrench Set, Cordless Drill/Driver, Tape Measure, Wagon Running Gear Kit, Pressure-Treated Lumber, Lag Screws, Bolster bracket bolts and nuts
- 3.1 Position the Support Beams
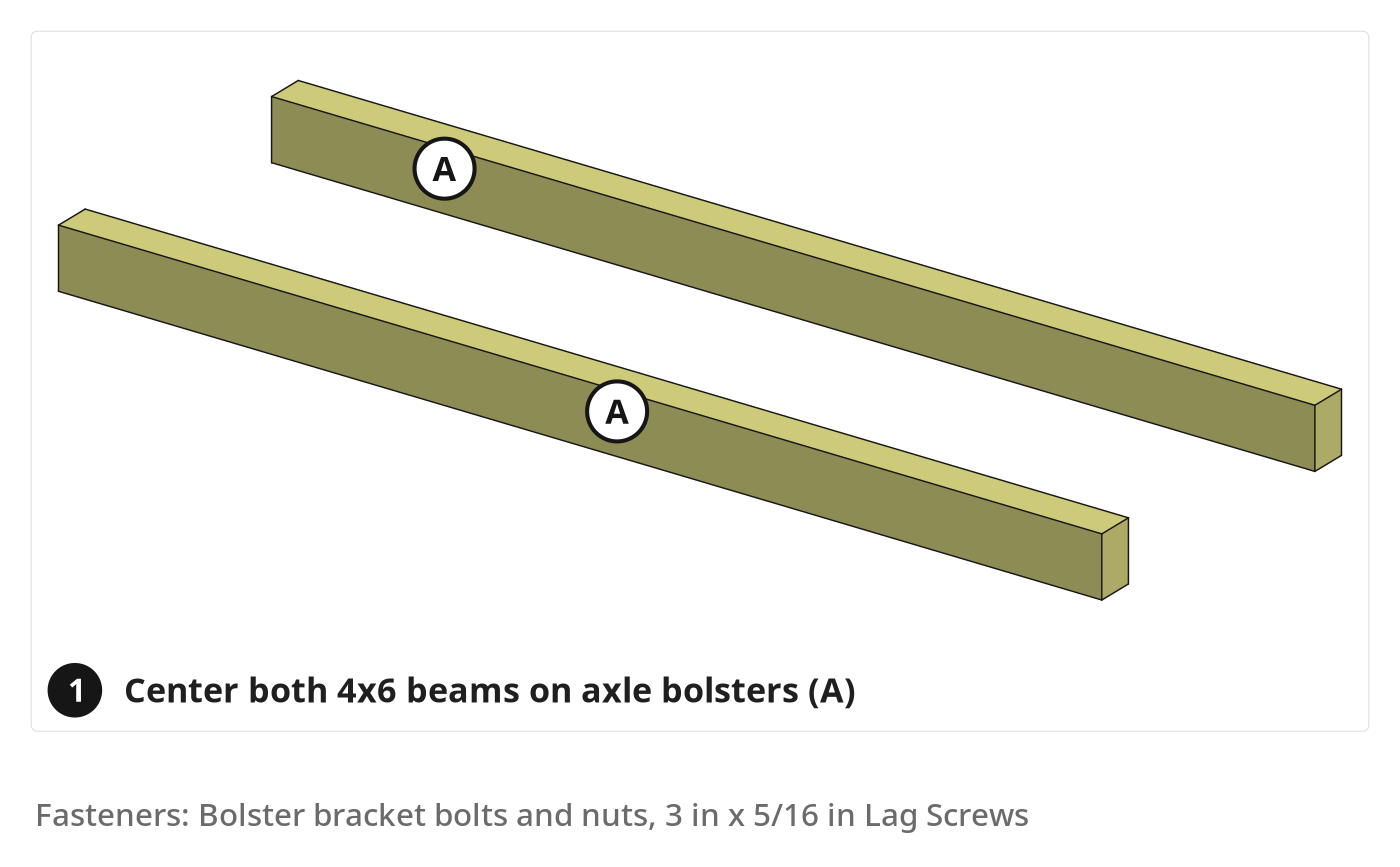
- Set both main support beams (A) lengthwise across the front and rear bolsters.
- Set each beam (A) atop the bolster plate, shifted slightly inward.
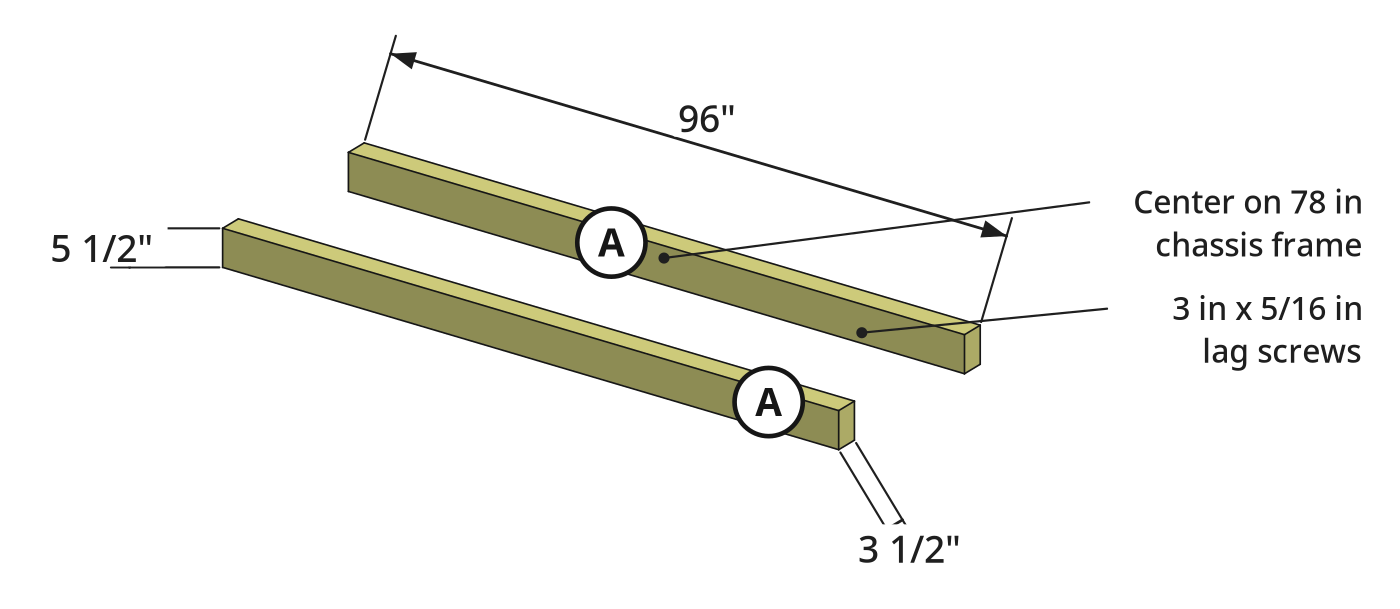
- Center the 96 in beams (A) front-to-back on the 6.5 ft chassis frame.
- 3.2 Secure Beams with Brackets
- Bolt kit L-brackets into the factory holes on the axle bolster plates.
- Drive 3 in x 5/16 in lag screws through the bracket side holes into each beam (A).
- Swing the tow tongue full left and right; check that tires clear both beams (A).
Key measurements
- Support beam length: full 96 in 4x6 stock for both beams (A)\
- Lag screw size: 3 in long, 5/16 in diameter
- Tip: Mount beams atop and inside the bolster plates; recessing plates into the wood sets beams too wide, causing tire rub.
- Heads up: A rigid wooden bed lagged to both axles cannot flex over deep cross-ruts, lifting a tire and pulling the lag screws.
Before you move on: Both 4x6 beams (A) sit parallel with equal front and rear overhang and clear the front tires at full turn.
Step 4: Install the Decking
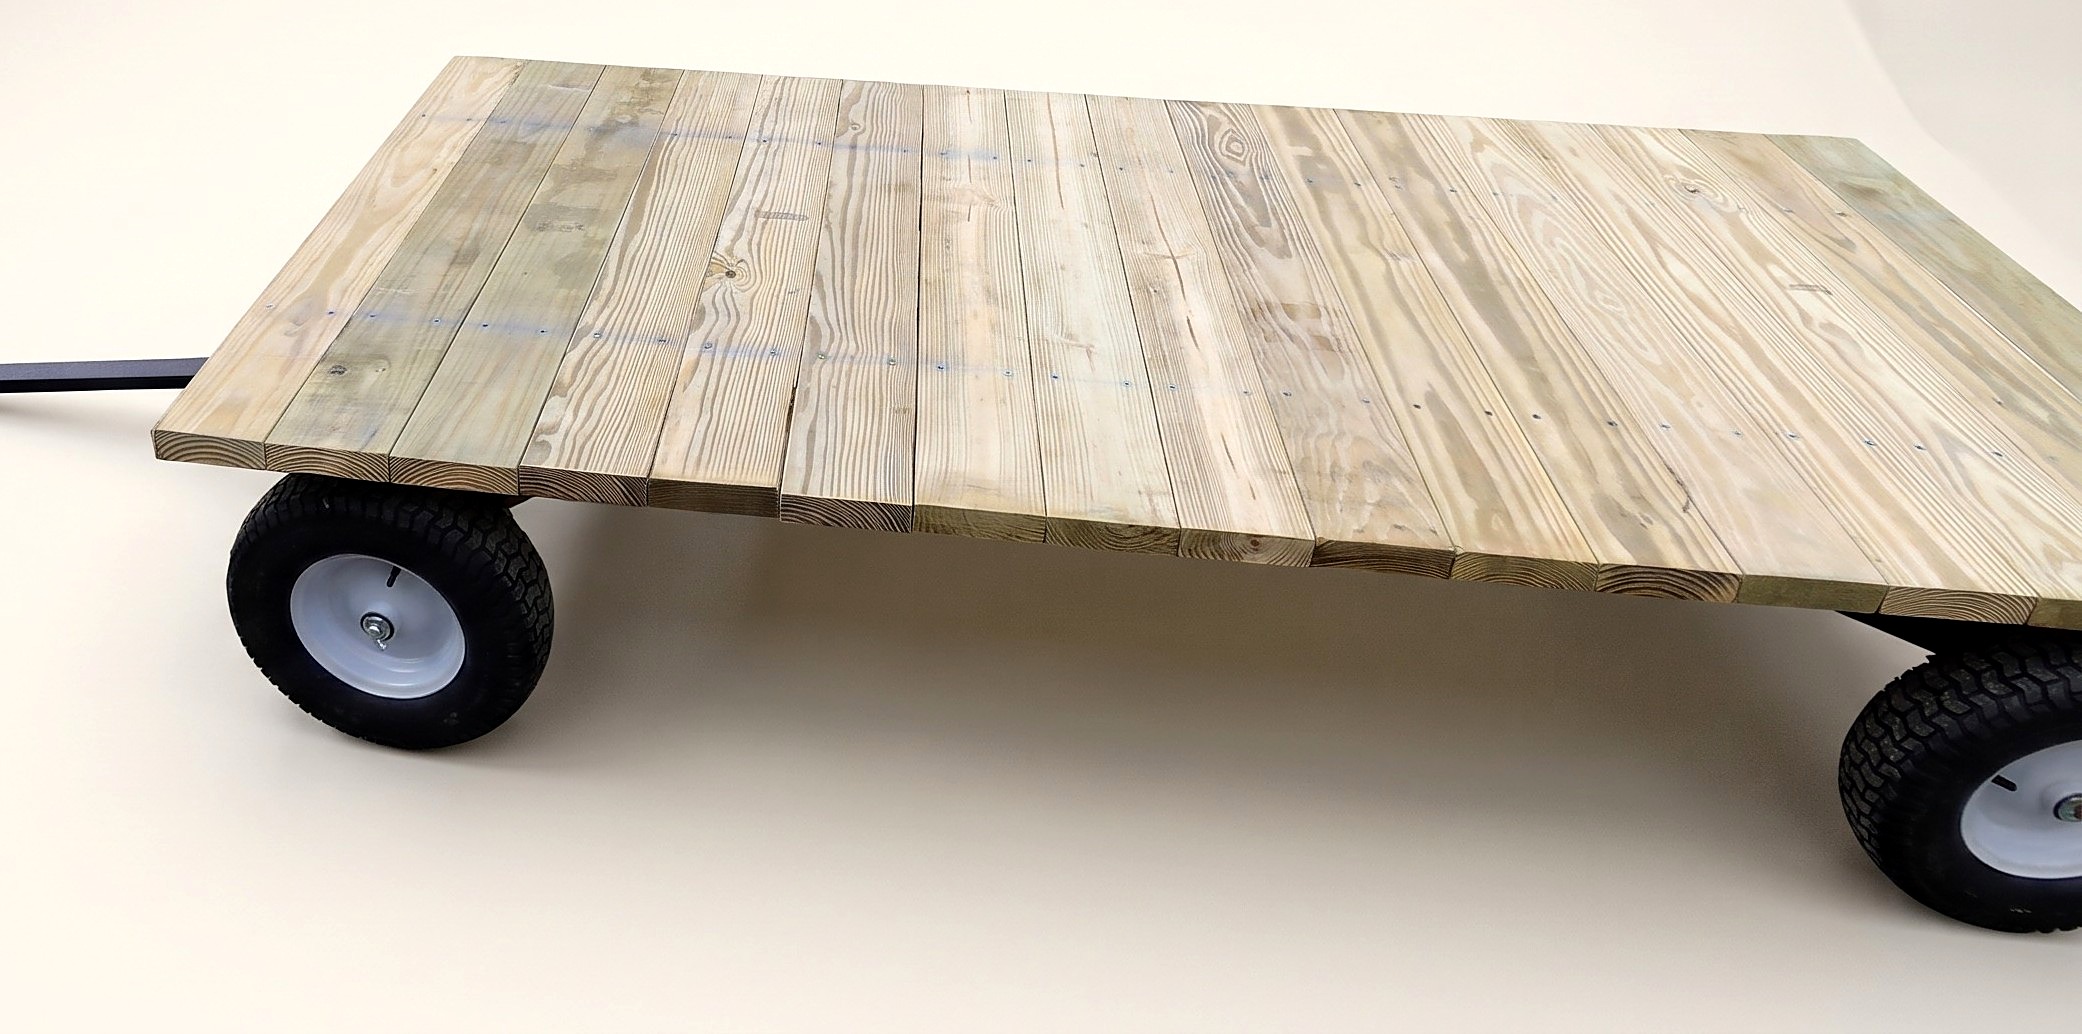
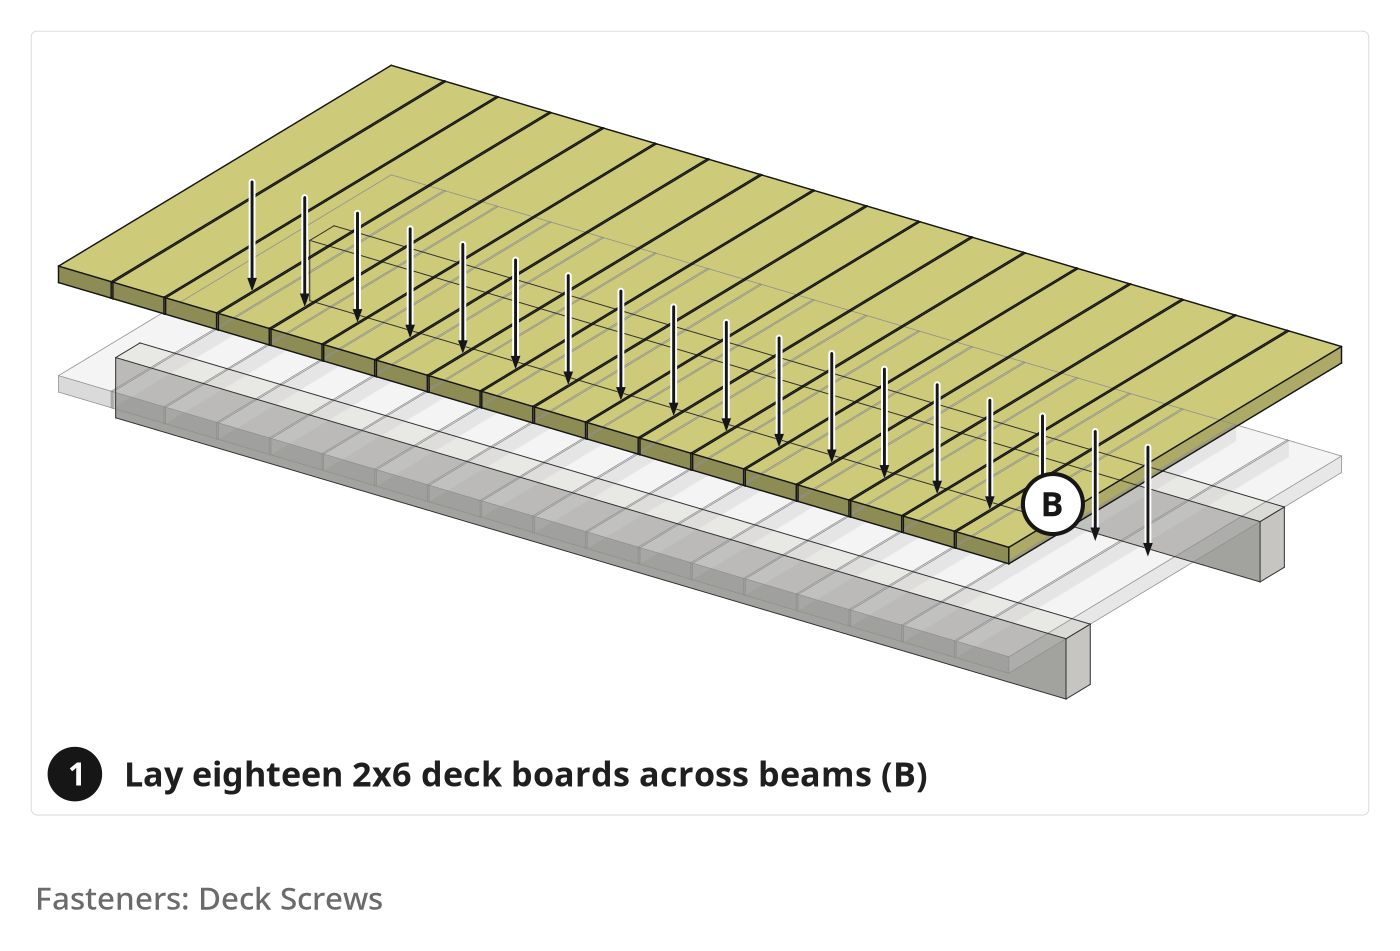
Eighteen 48 in 2x6 deck boards screwed crosswise to the 4x6 beams form a 4x8 ft floor.
Parts in this step: (B) Deck board
You'll need: Miter Saw, Tape Measure, Chalk Line, Cordless Drill/Driver, Pressure-Treated Lumber, Deck Screws
- 4.1 Cut and Dry-Fit Deck Boards
- Cut eighteen knot-free deck boards (B) to 48 in on the miter saw.
- Dry-fit the deck boards (B) crosswise across both beams (A); rip the last board to fit the 96 in bed.
- Set equal side overhang past beams (A); screw the first end board (B) down square.
- 4.2 Mark Screw Lines
- Butt remaining wet deck boards (B) tightly together down the 96 in bed.
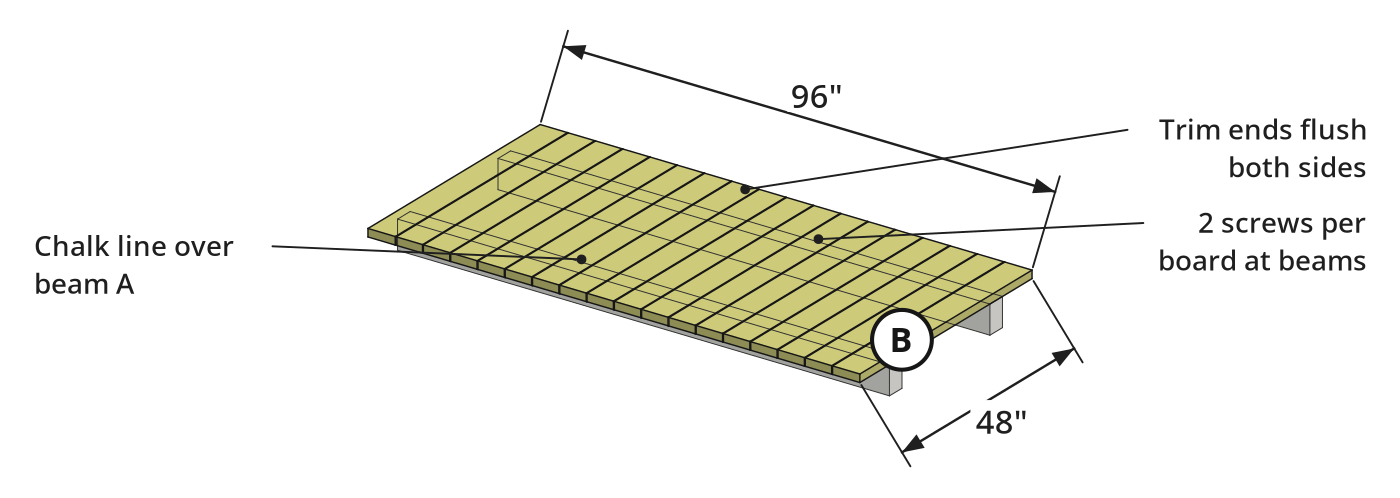
- Mark the center of both 4x6 beams (A) on the front and rear deck boards (B).
- Snap two chalk lines down the deck over the center of each beam (A).
- 4.3 Fasten the Deck Boards
- Drive one deck screw through each board (B) along both chalk lines into beams (A).
- Drive a second deck screw beside the first in a narrow centerline over each beam (A).
- Saw the overhanging deck board (B) ends flush along both 8 ft sides.
Key measurements
- Deck board length: 48 in across the bed width
- Deck board count: 17 full 2x6 boards plus 1 ripped to fit the 96 in bed
- Screw count: 2 deck screws per board at each 4x6 beam, near the centerline
- Tip: Butt wet pressure-treated boards tightly so shrinkage leaves only small gaps as they dry.
Before you move on: All eighteen deck boards (B) are fastened with two screws per beam and trimmed flush on both sides.
Step 5: Build and Attach the Sides
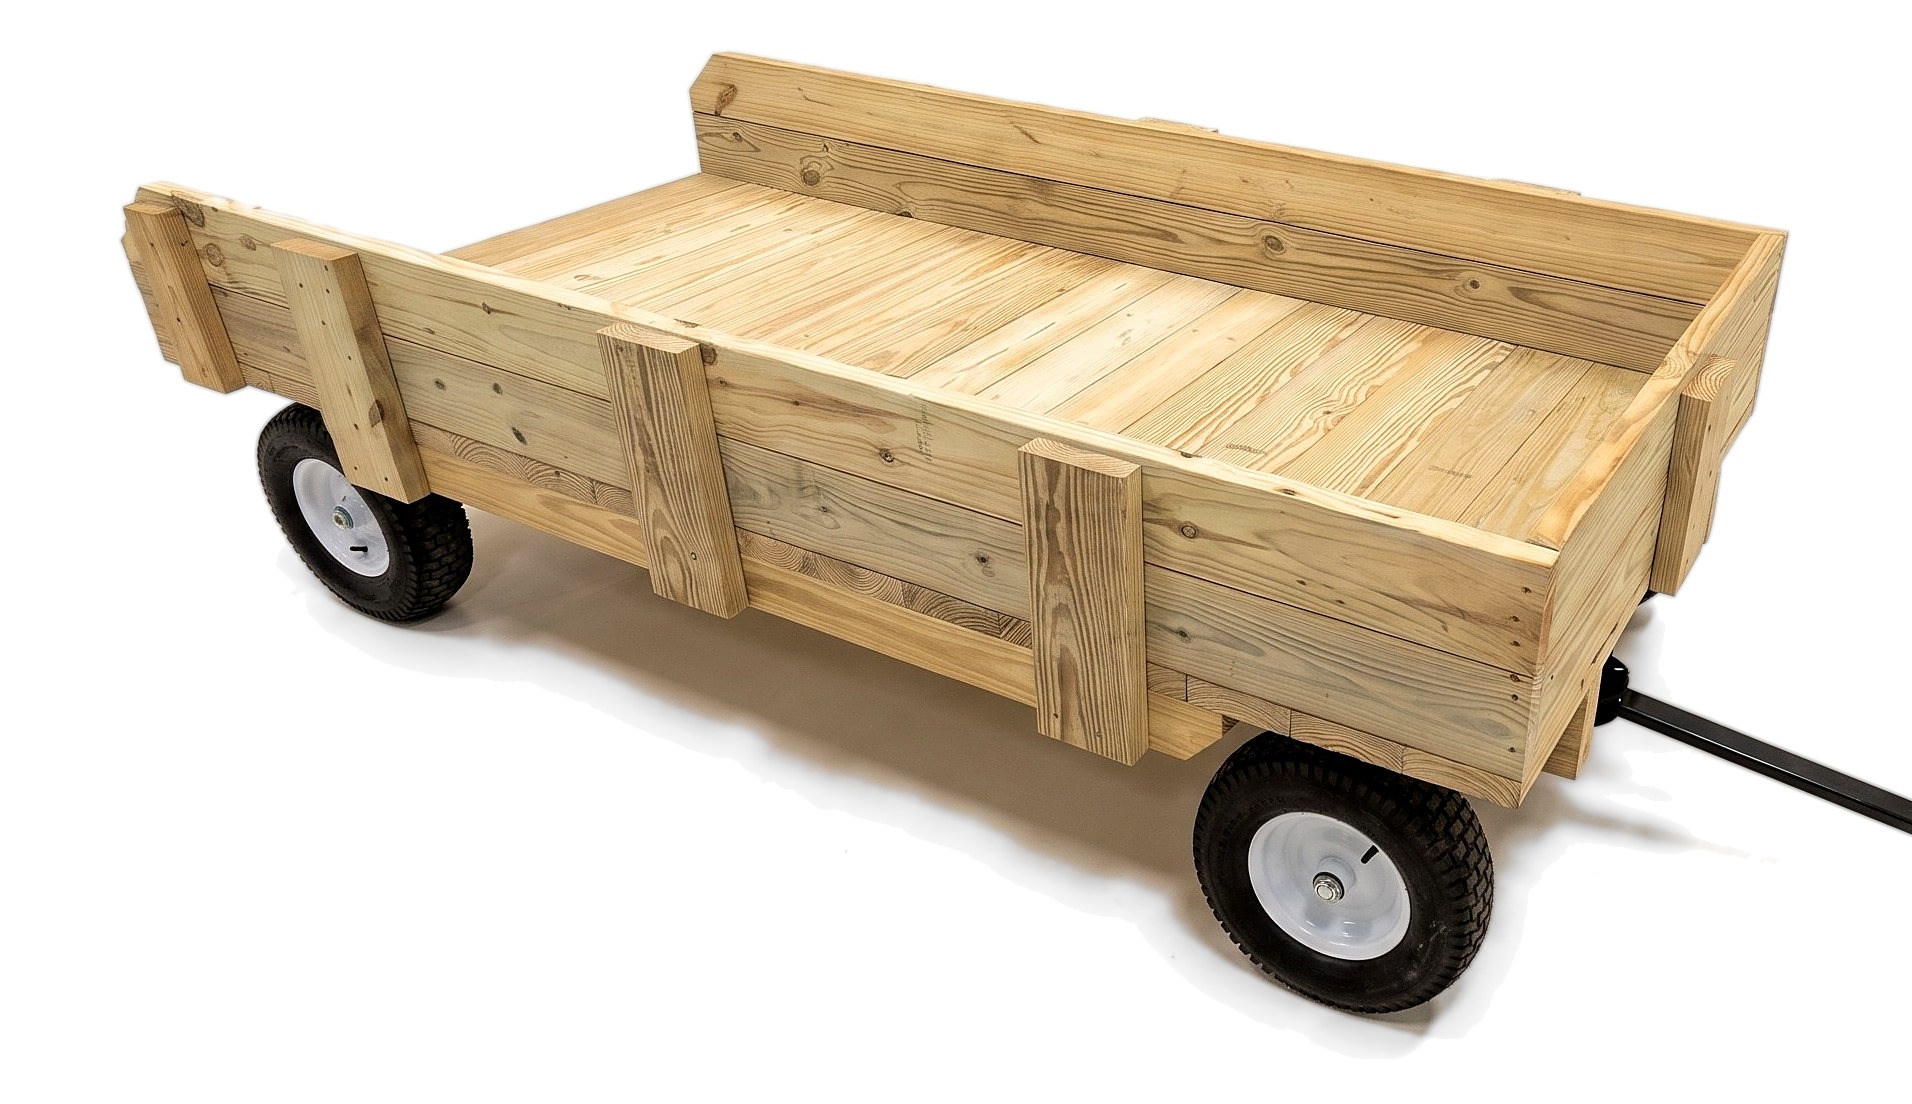
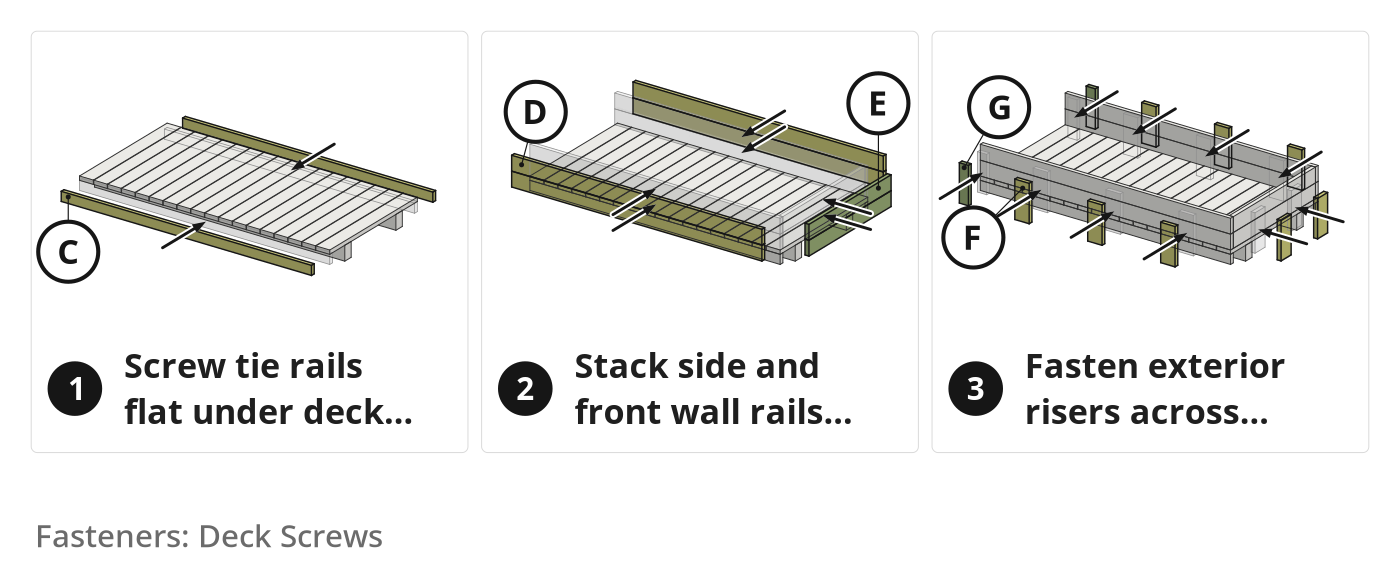
2x6 front and side walls locked to the deck with under-deck tie rails and exterior vertical risers.
Parts in this step: (C) Under-deck tie rail, (D) Side wall rail, (E) Front wall rail, (F) Vertical side and front riser, (G) Rear vertical corner riser
You'll need: Miter Saw, Tape Measure, Cordless Drill/Driver, Pressure-Treated Lumber, Deck Screws
- 5.1 Construct the Side Walls
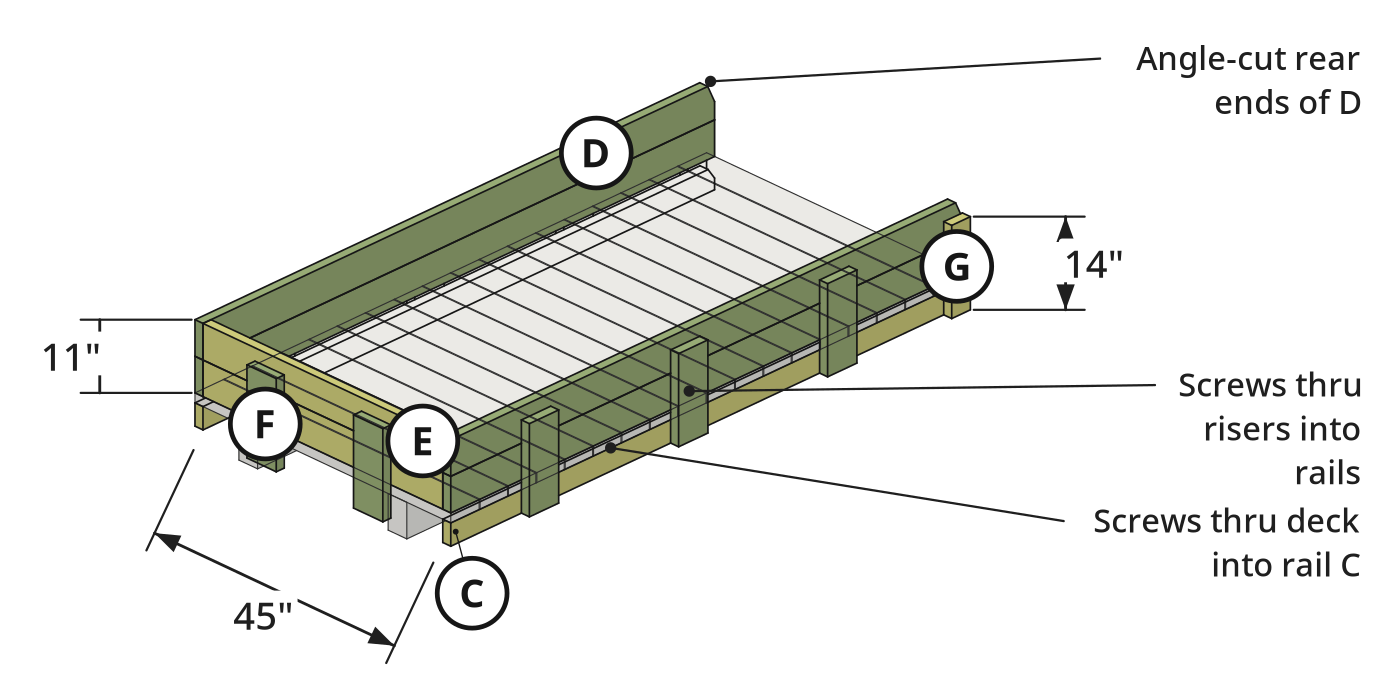
- Bevel the rear ends of the 96 in under-deck tie rails (C), hold flat under the overhangs, and screw down through deck boards (B).
- Set the lower 96 in side wall rails (D) and 45 in front wall rail (E) on the deck and toe-screw them down.
- Angle-cut the rear ends of upper side rails (D) and stack with upper front rail (E); do not screw rail-to-rail.
- Cut eight 2x6 vertical risers (F) and two 2x4 rear corner risers (G) to 14 in (estimated; cut to span full wall and under-deck rail height).
- Screw 2x6 risers (F) outside the sides and front and 2x4 risers (G) at the rear corners into rail (C), deck (B), and rails (D, E).
Key measurements
- Under-deck tie rail and side wall rail length: 96 in per side
- Front wall rail length: 45 in between the two 1 1/2 in thick side walls
- Side wall height: 11 in above deck (two stacked 2x6 planks)
- Vertical riser length: 14 in (estimated), tying the under-deck 2x4, 2x6 deck, and two 2x6 wall rails
- Tip: Fixed exterior risers make the sides rock-solid for leaning kids and eliminate storing loose stake-pocket rails.
- Heads up: Avoid tight turning loops when towing; the vehicle can out-turn the wagon, pinching the tongue against the frame or linkage.
Before you move on: Exterior risers (F, G) tie under-deck rails, deck, and upper and lower wall rails tightly with zero play.
Finishing
Sanding
- Sand angled rear ends of top side wall rails (D) and rear risers (G) smooth so passengers avoid splinters.
- Ease sharp sawn edges along the trimmed deck overhang.
Drying & Care
- Let green pressure-treated lumber air-dry several weeks; the wagon pulls lighter dry.
- Recheck lag screws and steering tie-rod locknuts after rough-ground hauling.
Optional Top Cover
- Lay a 4x8 ft plywood sheet across top rails for a mobile workbench.
- Or crosscut a 4x8 ft plywood sheet in half and center-hinge it for covered storage underneath.
These Specs are built from Indy Farm Life's video “DIY Wooden Farm & ATV Wagon”. Open the DIY Wooden Farm & ATV Wagon project page.
